

Page 1

1
ENGLISH
PRESTIGIO GEOVISION 450BT
USER MANUAL
Page 2
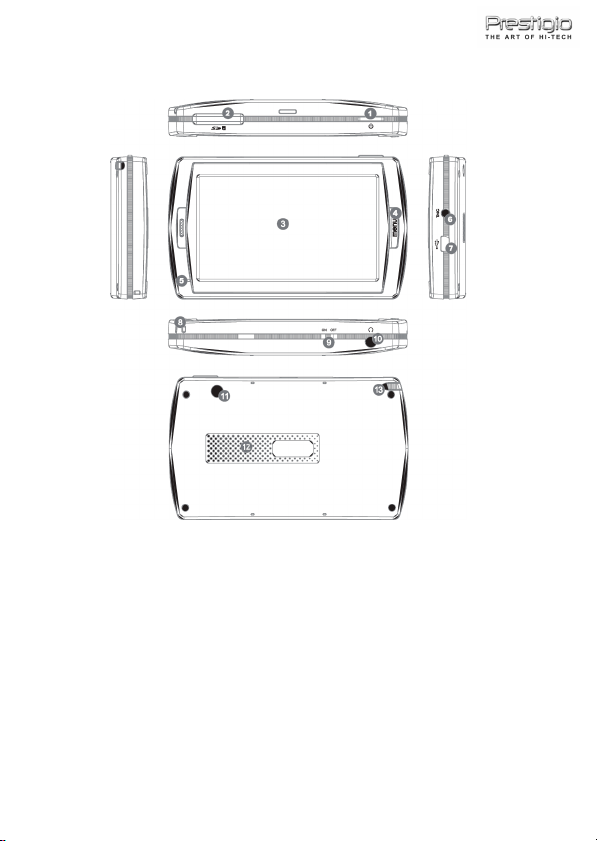
Prestigio GeoVision 450BT - Position of the controls
2
1. Power Button
2. SD Card Slot
3. Touch Panel
4. Menu Button
5. Indicator Light*
6. TMC Antenna Jack
7. USB Port
8. Strap Hole
9. Battery Switch
10. Headphone Jack
11. External GPS Antenna Port
12. Speaker
13. Stylus Pen/ Slot (Slide the stylus pen out of the slot when needed.)
Page 3
IMPORTANT:
3
Charging the Batterry
Before using your PND for the first time, we recommend you to charge the
unit for 5 hours via the USB cable or 2 hours via the car charger in order to
charge the battery.
Car charger
When using your PND in the car we recommend that you always use the
in-car charger to power the unit, especially on long journeys.
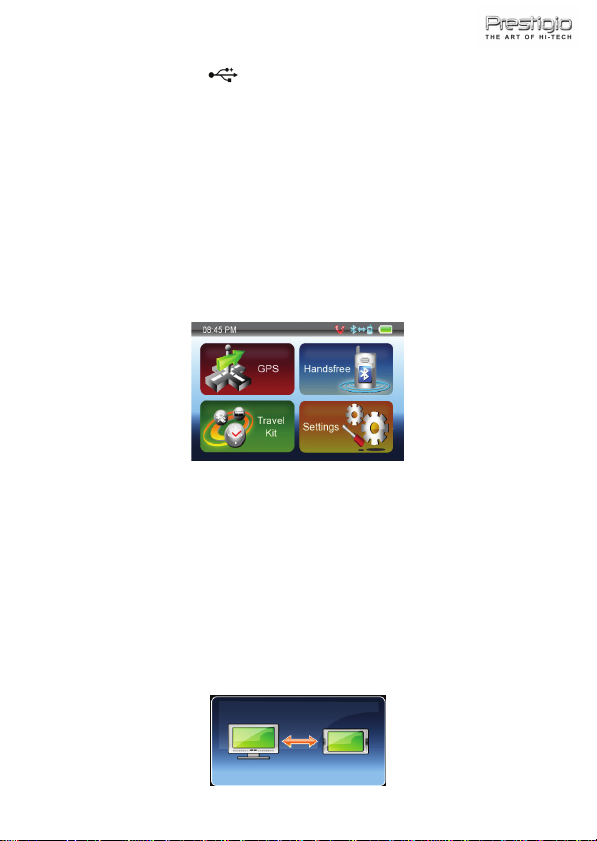
Main Menu
When the Hardware Reset Switch is at ON position, press the Power Button
for 3 seconds to turn the unit on. The following screens will be displayed,
and the unit is ready to be used. Tap on an icon to enter the function.
This device integrates several multimedia programs. You can use it for
navigation, to watch video clips, view photo, and also listen to music.
Connect to PC
You can connect the unit to PC for transferring data. Insert a SD/ MMC card
to the card slot, you can use the unit as a card reader.
1. Power on the unit.
2. Plug B-type end of the supplied USB cable to the mini USB port of the
unit, and plug the other end to your computer.
3. The system will try to recognize and connect the device; the display will
show as the figure below.
Page 4
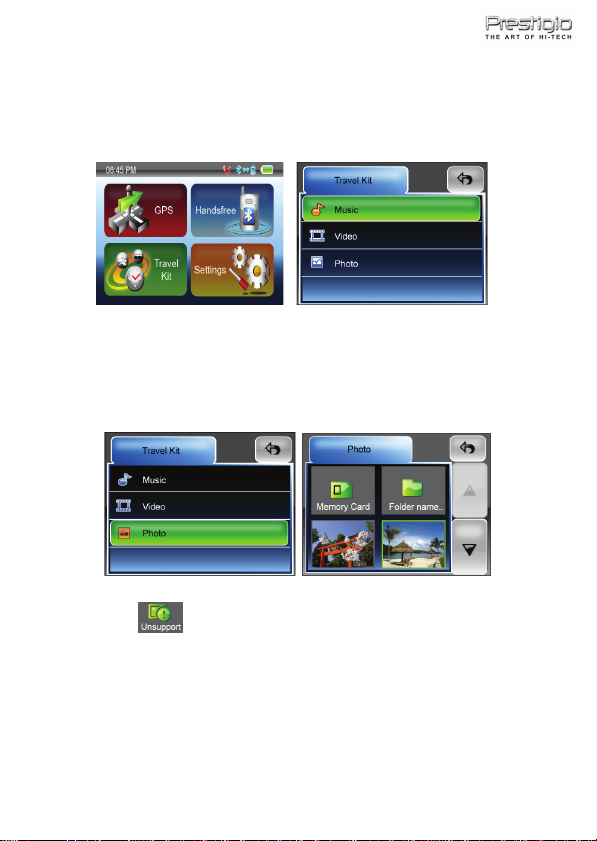
4
Travel Kit
Enter each function to enjoy your media files.
Photo
This device supports jpg, bmp, png, gif formats (up to 12MegaPixel file).
Enter "Photo" function to see thumbnails for all the photo files.
Note: press Menu button to go back main menu.
If you see an icon on the list, it means that photo is unsupported.
Page 5
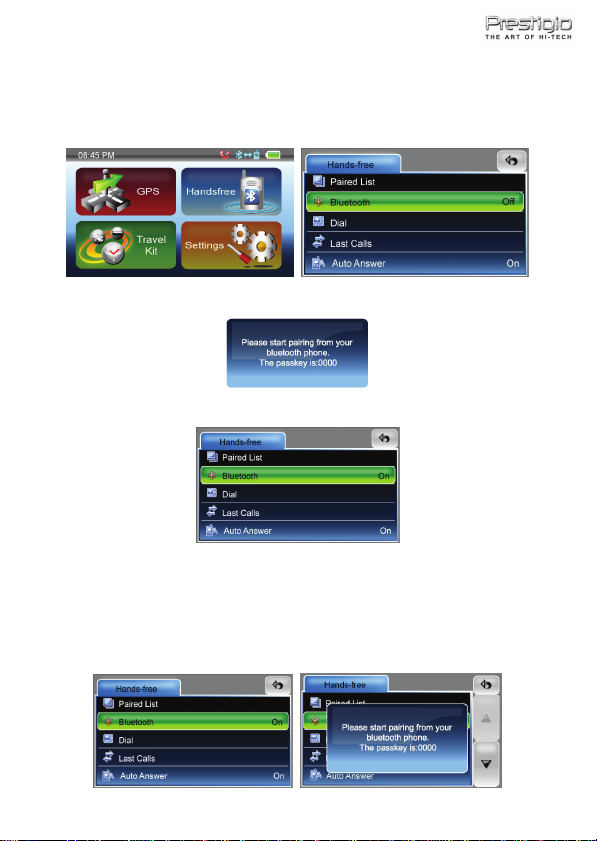
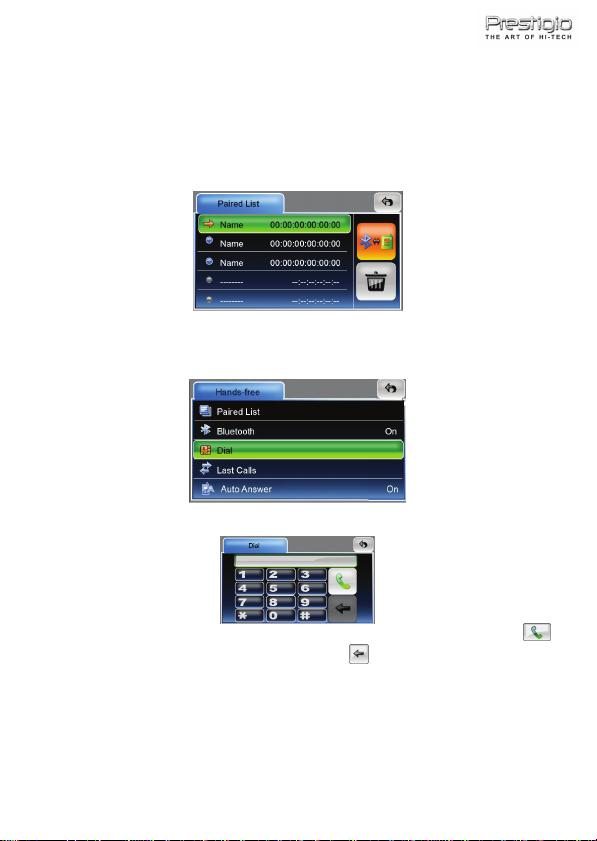
Handsfree
5
This device can be linked to a mobile phone as a Handsfree device. After
being linked to a mobile phone, you can use Prestigio GeoVision to call and
answer the phone without holding your mobile phone. Tap on the Handsfree
icon on the Main Menu to enter.
To operate the Handsfree function, tap on Bluetooth option to switch it on.
You will see a message as below. Remember the passkey for later usage.
Then you can see the menu as below.
Paired List
To use the Handsfree function, you have to pair the device with a mobile
phone first. Follow the procedure below to pair your phone with the device.
1. Switch on the Bluetooth feature on your mobile phone and on your
Prestigio GeoVision. A pop-up message will prompt to tell the passkey,
0000.
Page 6
2. Place the navigation device and your phone nearby, and press relative
6
keys on your phone to make it search for new devices.
3. When the searching is complete, you should see a new device on the list.
4. Select it from the list, and then your phone will ask you to enter a passkey.
Enter 0000 as the pop-up message prompts.
5. Select your device and press the required buttons to connect it. Now you
can see your phone on the paired list of Prestigio GeoVision.
Dial
Once a phone is paired and connected to your navigator, the Hands-free
features of Prestigio GeoVision are now enabled. You can dial from and
answer your phone.
Tap on Dial to begin entering a number to dial out, you will see the number
pad as below.
Tap to enter the phone number you want to call, and then tap on the
button. If a number is dialled wrong, tap on once to erase a digit at a
time.
Auto Answer
Prestigio GeoVision supports answering incoming calls automatically, tap on
Auto Answer to set it to On/Off. If it is set On, any received call will be
answered automatically after 3 seconds
Page 7
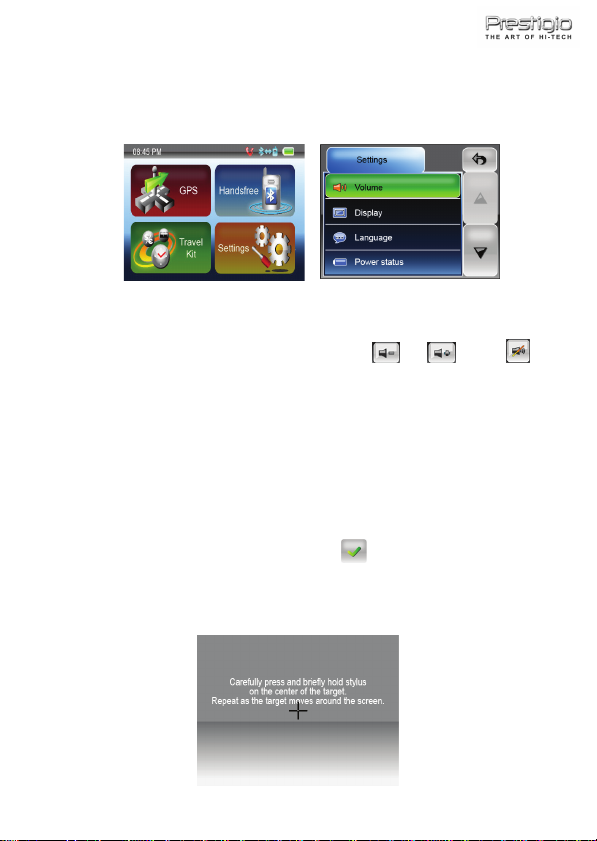
Settings
7
Tap on the Settings icon on the Main Menu, the following screen is
displayed.
Vol u me
Press 'Volume' you can modify the volume level of the voice prompts. You
can increase or decrease the level by clicking or . Click to
mute.
Display
Tap on the Display option to enter display submenu. There are 3 items to
adjust: Brightness, Backlight Timeout, and Screen Calibration.
Select Backlight Timeout to set idling time to shut down the display to
save battery consuming. Select “Never” to disable this option.
Select Screen Calibration to calibrate the unit to respond to your screen
taps. You will need to use this function only if the unit begins to respond
inconsistently to your screen taps. Tap on button to start. Follow the
on screen directions to tap on the center of the cross to calibrate. When the
steps are done, you will see the second figure, tap on screen to save and
apply the new calibration.
Page 8
Language
8
Tap to select a language from the list to suit your need.
Power Status
Enter this filed to know the battery status.
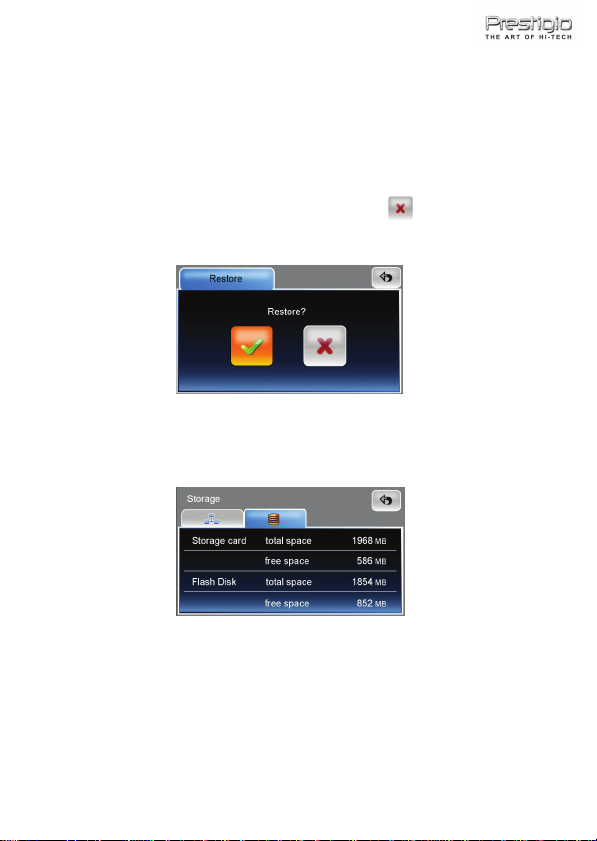
Restore
This field is for you to restore the settings to default values. When
necessary, tap on “Restore” item to enter or tap on to cancel and exit.
System Info
Tap on System Info to know the information of the unit and the inserted
memory card. There are 2 items to read: Device and Storage
Page 9
9
GPS
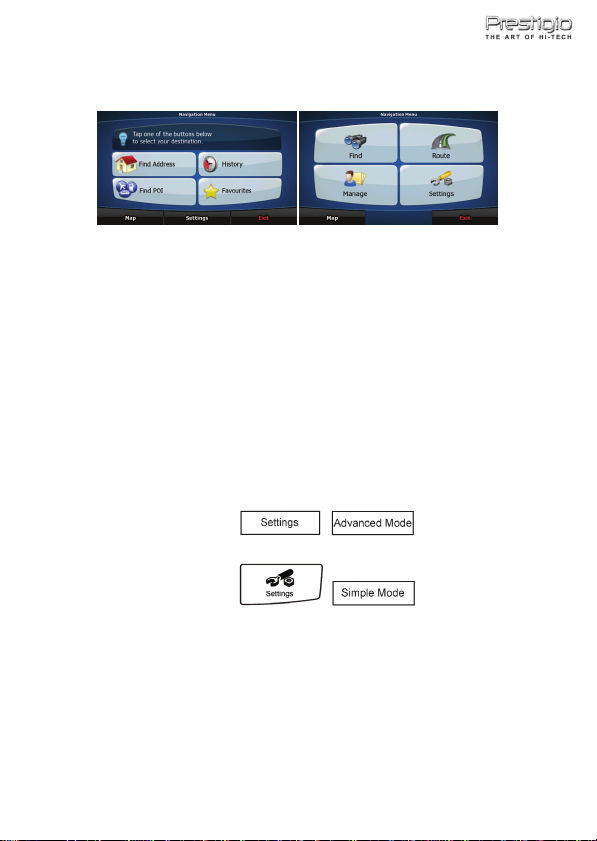
When Prestigio GeoVision is started the first time, you need to select
whether to start the program in Simple mode or in Advanced mode.
The two operating modes of Prestigio GeoVision mainly differ in the menu
structure and the number of available features. The controls and screen
layouts are the same.
• Simple mode: you have easy access to the most important navigation
functions and the basic settings only. The rest of the settings are set to
values that are optimal for typical use.
• Advanced mode: you have access to the full functionality of Prestigio
GeoVision.
This Guide covers actions in Simple mode. See the User Manual for
detailed instructions on both modes.
Later you can switch between the two operating modes:
• To switch from Simple mode to Advanced mode: on the startup screen
(Navigation Menu), tap
• To switch from Advanced mode to Simple mode: on the startup screen
(Navigation Menu), tap
, .
, .
Page 10

STARTUP SCREEN: THE NAVIGATION MENU
10
After selecting Simple mode, the Navigation menu appears. From here you
can reach all parts of Prestigio GeoVision.
The Navigation menu contains the following options:
• Tap to specify an address as your destination.
• Tap for the list of recent destinations.
• Tap to select one of the stored Points of Interest.
• Tap for the list of your favourite destinations.
• Tap to navigate or to browse the map.
• Tap to customise the way Prestigio GeoVision works.
• Tap to stop navigation, and exit Prestigio GeoVision.
Page 11

11
NAVIGATING TO AN ADDRESS
In the Navigation menu, tap
.
By default, Prestigio GeoVision proposes the country/state and settlement
where you are. If needed, tap the button with the name of the country/state,
and select a different one from the list.
If needed, change the settlement:
• To select the settlement from the list of recently used ones, tap the
button.
• To enter a new settlement:
1. Tap the button with the name of the settlement, or if you have
changed the country/state, tap
2. Start entering the settlement name on the keyboard.
3. Get to the list of search results:
• After entering a couple of characters, the names that match
the string appear in a list.
• Tap to open the list of results before it appears
.
automatically.
4. Pick the settlement from the list.
Page 12

NAVIGATING TO AN ADDRESS
12
Enter the street name:
1. Tap .
2. Start entering the street name on the keyboard.
3. Get to the list of results:
• After entering a couple of characters, the names that match the
string appear in a list.
• Tap to open the list of results before it appears
automatically.
4. Pick the street from the list.
Enter the house number:
1. Tap .
2. Enter the house number on the keyboard.
3. Tap to finish entering the address.
The map appears with the selected point in the middle. Tap
from the Cursor menu. The route is then automatically calculated, and you
can start navigating.
Page 13

13
NAVIGATING TO A PO I
On the Map screen, tap
In the Navigation menu, tap
to return to the Navigation menu.
.
Select the area around which the POI should be searched:
• : The POI will be searched around a given address.
• : The POI will be searched around the Cursor.
• : The POI will be searched around the current GPS
position.
• : The POI will be searched around the destination of the
active route.
• : The POI will be searched not around a given point but
by the size of the detour it means from the active route. This can be
useful if you search for a later stopover that causes only a minimal
detour. For example upcoming petrol stations or restaurants.
After this, the list of POI categories appear.
Page 14

NAVIGATING TO A PO I
14
You can narrow the search with the following:
• Select the POI group (e.g. Accomodation), and after that, if needed,
select the POI subgroup (e.g. Hotel or Motel).
• To find the POI by its name, tap , and use the keyboard
to enter a part of the name.
• To list all POIs in a given POI group, press , and then
without entering any letters of its name.
[optional] When finally the list of results appear, you can change the list
order with the
or button.
Tap the desired POI in the list.
The map appears with the selected point in the middle. Tap
from the Cursor menu. The route is then automatically calculated, and you
can start navigating.
Page 15
15
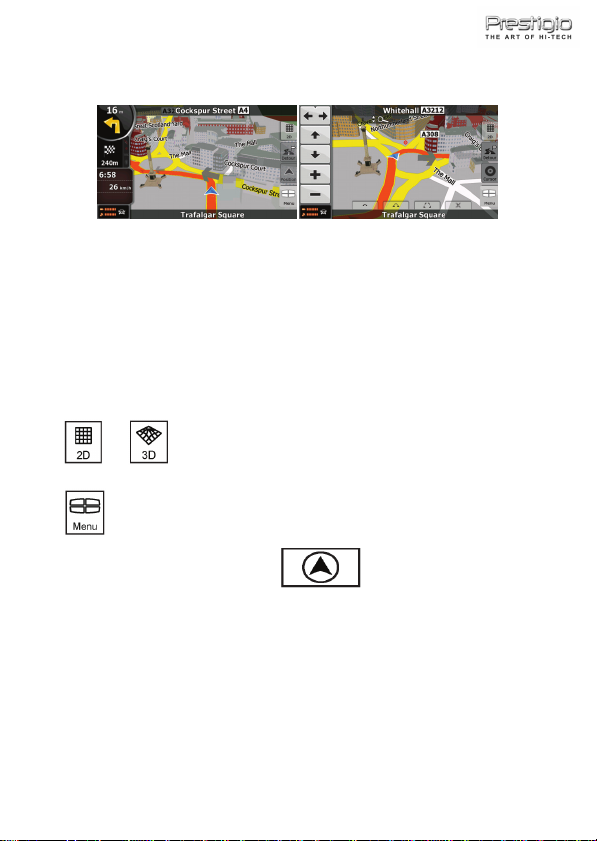
MAP SCREEN
The most important and most often used screen of Prestigio GeoVision is
the Map screen. The map looks similar to a conventional road-map. The
blue arrow represents your current position, and the green line shows the
recommended route.
There are several screen buttons and data fields on the screen to help you
navigate. Their functions are explained in detail in the User Manual.
During navigation, the screen shows route information and trip data (left
screenshot), but when you tap the map, additional buttons and controls
appear for a few seconds (right screenshot). Most parts of the screen
behave as buttons.
or : Switches between 2D (classic top-down view) and 3D
(perspective view for navigation) map modes.
: Opens the Navigation menu.
If you have moved the map, a
button appears. Tap this
button to move the map back to the current GPS position.
Page 16

16
РУССКИЙ
PRESTIGIO GEOVISION 450BT
РУКОВОДСТВО ПОЛЬЗОВАТЕЛЯ
Page 17

Prestigio GeoVision 450BT - Расположение органов управления
17
1. Кнопка питания
2. Разъем для SD-карт
3. Сенсорная панель
4. Кнопка меню
5. Индикатор *
6. Разъем антенны TMC
7. Порт USB
8. Крепление для ремешка
9. Переключатель батареи
10. Разъем для наушников
11. Разъем внешней GPS-антенны
12. Динамик
13. Крепление стилуса (Для работы со стилусом вытяните его из
крепления.)
Page 18

ОБРАТИТЕ ВНИМАНИЕ:
18
Зарядка батареи
При первом использовании устройства мы рекомендуем произвести
зарядку в течение 5 часов при помощи кабеля USB или 2 часов при
помощи автомобильного зарядного устройства, чтобы обеспечить
полную зарядку батареи устройства.
Автомобильное зарядное устройство
При использовании устройства в автомобиле, особенно во время
длительных поездок, рекомендуем постоянно подключать его к сети
питания автомобиля.
Главное меню (Main Menu)
Переведите переключатель устройства в положение ВКЛ. (ON) и
нажмите на кнопку включения питания в течение 3 сек. для включения
устройства. На экране появится приведенное ниже изображение.
Устройство готово к работе. Нажмите на соответствующей
пиктограмме для входа в тот или иной режим.
Устройство является многофункциональным и может быть
использовано для навигации, просмотра видео клипов, фотографий,
прослушивания музыкальных композиций.
Подключение к компьютеру
Вы можете подключить устройство к компьютеру для двусторонней
передачи данных. Вставьте карту памяти SD/ MMC в разъем, чтобы
использовать устройство в качестве устройства для чтения карт
памяти.
1. Включите питание устройства.
2. Подключите один конец (B) кабеля USB к порту mini-USB port на
устройстве, а второй конец – к компьютеру.
3. система произведет распознавание устройства. На экране появится
приведенное ниже изображение.
Page 19

19
Комплект путешественника (Travel Kit)
При помощи данного режима Вы можете получить доступ к файлам
мультимедиа различного типа.
Фотографии (Photo)
Устройство поддерживает форматы jpg, bmp, png, gif (до 12
мегапикселей). Войдите в режим "Photo" для просмотра файлов
изображений.
Внимание: для возврата в главное меню нажмите кнопку Menu.
Пиктограмма означает, что данный файл не поддерживается.
Page 20

Функция Handsfree
20
Данное устройство может быть подключено к мобильному телефону в
качестве устройства Handsfree. После соединения с мобильным
телефоном Вы можете использовать навигатор Prestigio GeoVision для
осуществления звонков, не прикасаясь к самому телефону. Для того
чтобы войти в систему, выберите значок Handsfree в Главном меню.
Чтобы активировать функцию Handsfree, выберите и включите опцию
Bluetooth. Вы увидите следующее сообщение. Запомните пароль для
дальнейшего использования.
После этого Вы увидите следующее меню.
Соединение телефона и Handsfree гарнитуры
Чтобы использовать функцию Handsfree, прежде необходимо создать соединение
с мобильным телефоном. Выполните следующую процедуру, чтобы создать
соединение телефона с устройством.
1. Активируйте функцию Bluetooth на мобильном телефоне и на навигаторе
Prestigio GeoVision. Всплывающее сообщение запросит код доступа, наберите
0000.
2. Разместите навигатор и телефон в непосредственной близости друг
Page 21

от друга, и активируйте на телефоне функцию поиска новых
21
устройств.
3. После завершения поиска Вы увидите в списке новое устройство.
4. Выберите его из списка, после чего телефон запросит код доступа.
Введите 0000 согласно всплывающему сообщению.
5. Выберите Ваше устройство и нажмите необходимые для его
соединения кнопки. Теперь Вы видите Ваш телефон в списке
спаренных устройств навигатора Prestigio GeoVision.
Набор номера
После создания соединения телефона с навигатором функции
Handsfree на Prestigio GeoVision будут доступны для пользования. Вы
можете осуществлять звонки или отвечать на них.
Выберите Dial, чтобы набрать номер. На экране появится виртуальная
клавиатура.
Введите номер телефона и выберите кнопку . Если номер набран
неверно, выберите . Каждое нажатие кнопки стирает один
символ.
Автоответ
Prestigio GeoVision поддерживает функцию автоматического ответа на
входящие звонки. Для этого необходимо выбрать кнопку Auto Answer в
положение On/Off. Если выбрано положение On, любой входящий
звонок будет автоматически принят через 3 секунды после
поступления.
Page 22

Настройки (Settings)
22
Нажмите на пиктограмму настроек (Settings) в главном меню. На
экране будет отображено приведенное ниже изображение.
Громкость (Volume)
При помощи пункта 'Volume' (Громкость) Вы можете настроить уровень
голосовых команд. Уменьшение и увеличение громкости
осуществляется при помощи пиктограмм и . Для отключения
звукового сопровождения нажмите на пиктограмму .
Дисплей (Display)
Нажмите на пиктограмму дисплея (Display) для входа в подменю
данного пункта. Вы можете настроить три различных параметра:
яркость (Brightness), время отключения подсветки (Backlight Timeout) и
калибровка экрана (Screen Calibration).
Выберите пункт Время отключения подсветки (Backlight Timeout) для
установки времени отключения подсветки дисплея после истечения
заданного промежутка времени бездействия для сохранения энергии
батареи. Для отключения функции выберите пункт “Never” (Никогда).
Выберите пункт Калибровка экрана (Screen Calibration) для настройки
работы сенсорного экрана. Данной функцией необходимо будет
воспользоваться только в случае, если устройство начнет неверно
реагировать при нажатии на сенсорный экран. Нажмите кнопку
для начала калибровки. Нажимайте в центре крестика, появляющегося
на экране. После прохождения процедуры калибровки нажмите на
экране для сохранения результатов.
Page 23

Язык (Language)
23
При помощи нажатия на экране выберите язык из списка.
Состояние питания (Power Status)
Войдите в данный пункт для получения информации о состоянии
заряда батареи.
Восстановление (Restore)
Данный пункт используется для восстановления изначальных настроек.
При необходимости восстановления нажмите на пиктограмму “Restore”
или на пиктограмму для отмены и выхода.
Информация о системе (System Info)
Воспользуйтесь данным пунктом для получения информации об
устройстве и установленной карте памяти. Данный пункт содержит два
раздела: Устройство (Device) и Хранение данных (Storage).
Page 24

24
GPS
При первом запуске Prestigio GeoVision требуется выбрать режим
запуска программы: Простой режим или Расширенный режим.
Эти два режима работы Prestigio GeoVision отличаются в основном
структурой меню и числом доступных функций. Элементы управления
и компоновка экранов не отличаются.
• Простой режим: доступны только наиболее важные
навигационные функции и базовые настройки. Для остальных
параметров выбираются оптимальные типовые значения.
• Расширенный режим: доступны все функциональные возможности
Prestigio GeoVision.
В настоящем руководстве описано использование Простого режима.
Подробные инструкции по обоим режимам см. в Руководстве
пользователя.
В последствии два рабочих режима можно переключать.
• Переключение из Простого режима в Расширенный режим: на
начальном экране (Меню навигации) нажмите
.
• Переключение из Расширенного режима в Простой режим: на
начальном экране (Меню навигации) нажмите
.
,
,
Page 25

НАЧАЛЬНЫЙ ЭКРАН: МЕНЮ НАВИГАЦИИ
25
После выбора Простого режима отображается Меню навигации. Из
этого экрана можно получить доступ ко всем частям Prestigio
GeoVision.
Ниже приведены пункты Меню навигации.
• Нажмите для указания адреса конечного пункта.
• Для просмотра списка последних конечных пунктов нажмите
.
• Для выбора одной из сохраненных важных точек нажмите
.
• Для просмотра списка избранных конечных пунктов нажмите
.
• Для навигации или просмотра карты нажмите .
• Для настройки работы Prestigio GeoVision нажмите .
• Для прекращения навигации и выхода из Prestigio GeoVision
нажмите
.
Page 26

26
НАВИГАЦИЯ К АДРЕСУ
В Меню навигации нажмите
По умол чанию Prestigio GeoVision предлагает страну (штат) и город
или населенный пункт текущего места пребывания. При
.
необходимости нажмите кнопку с названием страны (штата) и
выберите из списка другую страну (другой штат).
При необходимости смените населенный пункт.
• Для выбора населенного пункта из списка недавно
использованных пунктов нажмите кнопку
• Ввод нового населенного пункта.
1. Нажмите кнопку с названием населенного пункта, или при
смене страны (штата) нажмите
2. С помощью клавиатуры начните ввод названия населенного
.
.
пункта.
3. Перейдите к списку результатов поиска.
• После ввода нескольких символов в списке отобразятся
названия, соответствующие введенной строке.
• Чтобы открыть список результатов поиска до его
автоматического отображения, нажмите
4. Из списка выберите населенный пункт.
.
Page 27

НАВИГАЦИЯ К АДРЕСУ
27
Ввод названия улицы
1. Нажмите .
2. С помощью клавиатуры начните ввод названия улицы.
3. Перейдите к списку результатов поиска.
• После ввода нескольких символов в списке отобразятся
названия, соответствующие введенной строке.
• Чтобы открыть список результатов поиска до его
автоматического отображения, нажмите
4. Из списка выберите улицу.
.
Ввод номера дома
1. Нажмите .
2. С помощью клавиатуры введите номер дома.
3. Для завершения ввода адреса нажмите .
Отобразится карта с выбранным пунктом в центре. В меню курсора
нажмите
. Будет выполнен автоматический расчет
маршрута, и можно начинать навигацию.
Page 28

28
НАВИГАЦИЯ К POI
На Экране карты для возврата в Меню навигации нажмите
В Меню навигации нажмите
.
.
Выберите область, в которой необходимо выполнить поиск POI.
• : Поиск POI будет выполняться в районе указанного
адреса.
• : Поиск POI будет выполняться в районе курсора.
• : Поиск POI будет выполняться в районе текущего
GPS-положения.
• : Поиск POI будет выполняться в районе конечного
пункта активного маршрута.
• : Поиск POI будет выполняться не в районе данной
точки, а по протяженности отклонения от активного маршрута,
требующегося для ее достижения. Это может быть полезно при
поиске последующей остановки, которая приводит лишь к
минимальному объезду, например близлежащих АЗС или
ресторанов.
После этого отобразится список Категорий POI.
Page 29

НАВИГАЦИЯ К POI
29
Ниже приведены способы уточнения поиска.
• Выберите группу POI (например Проживание), а затем при
необходимости выберите подгруппу POI (например Отель,
мотель).
• Для поиска POI по названию нажмите и при помощи
клавиатуры введите часть названия.
• Для отображения списка всех POI в данной группе POI, нажмите
, а затем нажмите , не вводя буквы
названия.
[Дополнительно] Когда отобразится список результатов, можно
изменить порядок сортировки списка при помощи кнопки
или
.
В списке нажмите необходимую POI.
Отобразится карта с выбранным пунктом в центре. В меню курсора
нажмите
. Будет выполнен автоматический расчет
маршрута, и можно начинать навигацию.
Page 30

30
ЭКРАН КАРТЫ
Самым важным и наиболее часто используемым экраном Prestigio
GeoVision является Экран карты. Карта выглядит как обычная
дорожная карта. Стрелка (blue) указывает текущее положение, а линия
(green) указывает рекомендуемый маршрут.
Для облегчения навигации на экране отображается несколько значков
и полей данных. Их функции подробно поясняются в Руководстве
пользователя.
Во время навигации на экране от
ображаются информация маршру
та и
данные пути (снимок экрана слева), но при нажатии карты на
несколько секунд отображаются дополнительные кнопки и элементы
управления (снимок экрана справа). Большинство элементов на экране
действует как кнопки.
или : переключение между режимами карты 2D
(классический вид сверху вниз) и 3D (вид в перспективе для
навигации).
: Отображение меню навигации.
При перемещении карты отображается кнопка
данную кнопку для перемещения карты обратно к GPS-положению.
. Нажмите
 Loading...