

Page 1

Avanti 1592W
Page 2

Prestigio Avanti 1592W
User’s Manual
Notice
The information in this user’s manual is subject to change without notice.
THE MANUFACTURER OR RESELLER SHALL NOT BE LIABLE FOR ERRORS OR OMISSIONS CONTAINED IN THIS MANUAL AND
SHALL NOT BE LIABLE FOR ANY CONSEQUENTIAL DAMAGES, WHICH MAY RESULT FROM THE PERFORMANCE OR USE OF THIS
MANUAL.
ENG
The information in this user’s manual is protected by copyright laws. No part of this manual may be photocopied or
reproduced in any form without prior written authorization from the copyright owners.
Copyright July, 2006
All rights reserved.
Microsoft and Windows are registered trademarks of Microsoft Corporation. DOS, Windows 95/98/ME/2000/NT/XP are
trademarks of Microsoft Corporation.
Product names mentioned herein may be trademarks and/or registered trademarks of their respective owners/companies.
The software described in this manual is delivered under a license agreement. The software may be used or copied only
in accordance with the terms of the agreement.
This product incorporates copyright protection technology that is protected by U.S. patents and other intellectual property rights. Use of this copyright protection technology must be authorized by Macrovision, and is intended for home and
other limited viewing uses only unless otherwise authorized by Macrovision. Reverse engineering or disassembly is prohibited.
.
Rev 1.0
1PRESTIGIO AVANTI 1592W
Page 3

Preface
Using This Manual
This User’s Manual contains general information about the hardware and software setup, troubleshooting, and technical
ENG
specifications of the notebook computer.
Symbols and Conventions
The following conventions and symbols are used in this manual:
When keys are to be pressed at the same time, a plus (+) symbol is used. For instance, Fn+F7 means
holding Fn and F7 keys at the same time.
When a series of clicking actions is needed in Windows O/S, [ ] and > symbols are used. For instance,
[Start > Settings > Control Panel > Display] means clicking the Start icon first, then the Settings, then
the Control Panel, then the Display icon.
When you need to make a selection with the touch pad (or mouse), you will be asked to ‘select’ or ‘click’
or ‘double-click’, ‘right-click’ the item.
Note: Text in this format and symbol means specific instructions, commentary, sidelights, or any
additional information or notes that you should be aware of.
Warning: Text in this format and symbol means that failures to comply with the given instructions
or information could result in damage to your computer or could cause bodily harm or loss of
life.
Protecting Your Computer - Avoid Abusive Handling and Adverse
Environment
Follow the advice below will help ensure that you get the most out of your Investment.
Your computer will serve you well if you take good care of it.
Do not expose the computer to direct sunlight or place it near sources of heat.
Do not subject it to temperatures below 0oC (32oF) or above 35oC (95oF).
Do not expose the computer to magnetic fields.
Do not expose the computer to moisture or rain.
Do not spill water or liquid on the computer.
Do not subject the computer to adverse shock and vibration.
Do not expose the computer to dust and dirt.
Do not place objects on top of the computer to avoid damaging the computer.
Do not place the computer on rocky surfaces.
Here are some ways of taking care of your AC adapter.
Do not connect the adapter to any devices other than your computer.
Do not let water get into the adapter.
Do not block the ventilation airway of the adapter.
2 PRESTIGIO AVANTI 1592W
Page 4

Keep the adapter in a cool and ventilated place.
Do not step on the power cord or place heavy objects on top of it.
Carefully tuck away the power cord and any cables away from pedestrian traffic.
When unplugging the power cord, do not pull on the cord itself but pull on the plug.
Keep the adapter away from children.
The total ampere ratings of the equipment plugged in should not exceed the ampere rating of the cord if
you are using an extension cord.
The total current rating of all equipment plugged into a single wall outlet should not exceed the fuse
rating.
Do not connect other AC adapter to your notebook. This Notebook uses exclusively the AC adapter: Liteon
PA-1900-05 (90W), Liteon PA-1900-06 (90W), Lishin LSE0202D2090 (90W), Lishin LSE0202C2090(90W)
When cleaning the computer, observe these steps:
1. Power off the computer and remove the battery pack.
2. Disconnect the AC adapter.
3. Use a soft cloth dampened with water. Do not use liquid or aerosol cleaners.
Contact your dealer or see your service technician if any of the following occurs:
Computer has been dropped or the body has been damaged.
Liquid has been spilled into the product.
The computer does not operate normally.
ENG
Cleaning the Ventilation Grills:
It is suggested that you clean the ventilation grills regularly to maintain optimal thermal regulation of the notebook. To
do this, you may use a soft brush or a vacuum cleaner (with appropriate head adapter) to remove the dust buildup on the
ventilation grills.
3PRESTIGIO AVANTI 1592W
Page 5

GETTING TO KNOW THE BASICS
This chapter introduces the features and components of the computer.
ENG
Performance Features
High Performance Processor with Calistoga Chipset
The notebook PC is equipped with a powerful Mobile Intel Pentium M processor. Together with the latest Calistoga chipset
and technologies, the system offers advanced PC performances.
Advanced Graphic Engine
The system is built with ATI Mobility M54-P with 128MB DDR dedicated frame buffer. The PCI-Express high-end graphic
engine offers excellent graphic performance for the most demanding professionals or gamers. The advanced graphic chip
also incorporates a hardware-based motion-compensation engine, which gives you smooth MPEG video playback. DirectX
9 graphics capability also adds realism to PC games.
LCD Display
The computer is equipped with a non-wide (16:10) 15.4” TFT display panel for best cinematic viewing experience.
Serial ATA Hard Disk Drive Support (on certain models)
The serial ATA bus offers higher data throughput than the traditional parallel ATA bus. This gives you optimal hard drive
performance.
ExpressCard Technology
ExpressCard is the next-generation of the PC Card standard. The bus interface is based on the two standards: PCI Express
for high-performance I/O and USB2.0 for variety of devices.
Expandability
The system offers upgradeable hard disk drive and 2 DDR SDRAM sockets for expansion, allowing the user to easily increase
the storage and system capacities as the need arises.
Built-in Multiple Card Reader
The built-in 4-in-1 card reader lets you access many of the portable media formats (SD Card, MMC Card, MS Card, and MS
Pro Card).
Ethernet Port
The system provides built-in 10/100/1000Mbps Ethernet network adapter for high bandwidth network connection.
4 PRESTIGIO AVANTI 1592W
Page 6
Firewire (IEEE1394 / 1394a) and USB2.0 ports
In addition to a full array of built-in I/O ports, the computer offers IEEE1394 for ultra high-speed connection to high
bandwidth digital video devices and USB2.0 ports to connect to any USB-based peripheral devices.
Wireless LAN
The internal Wireless LAN module allows your notebook to connect wirelessly to other 802.11-enabled systems, devices,
or network.
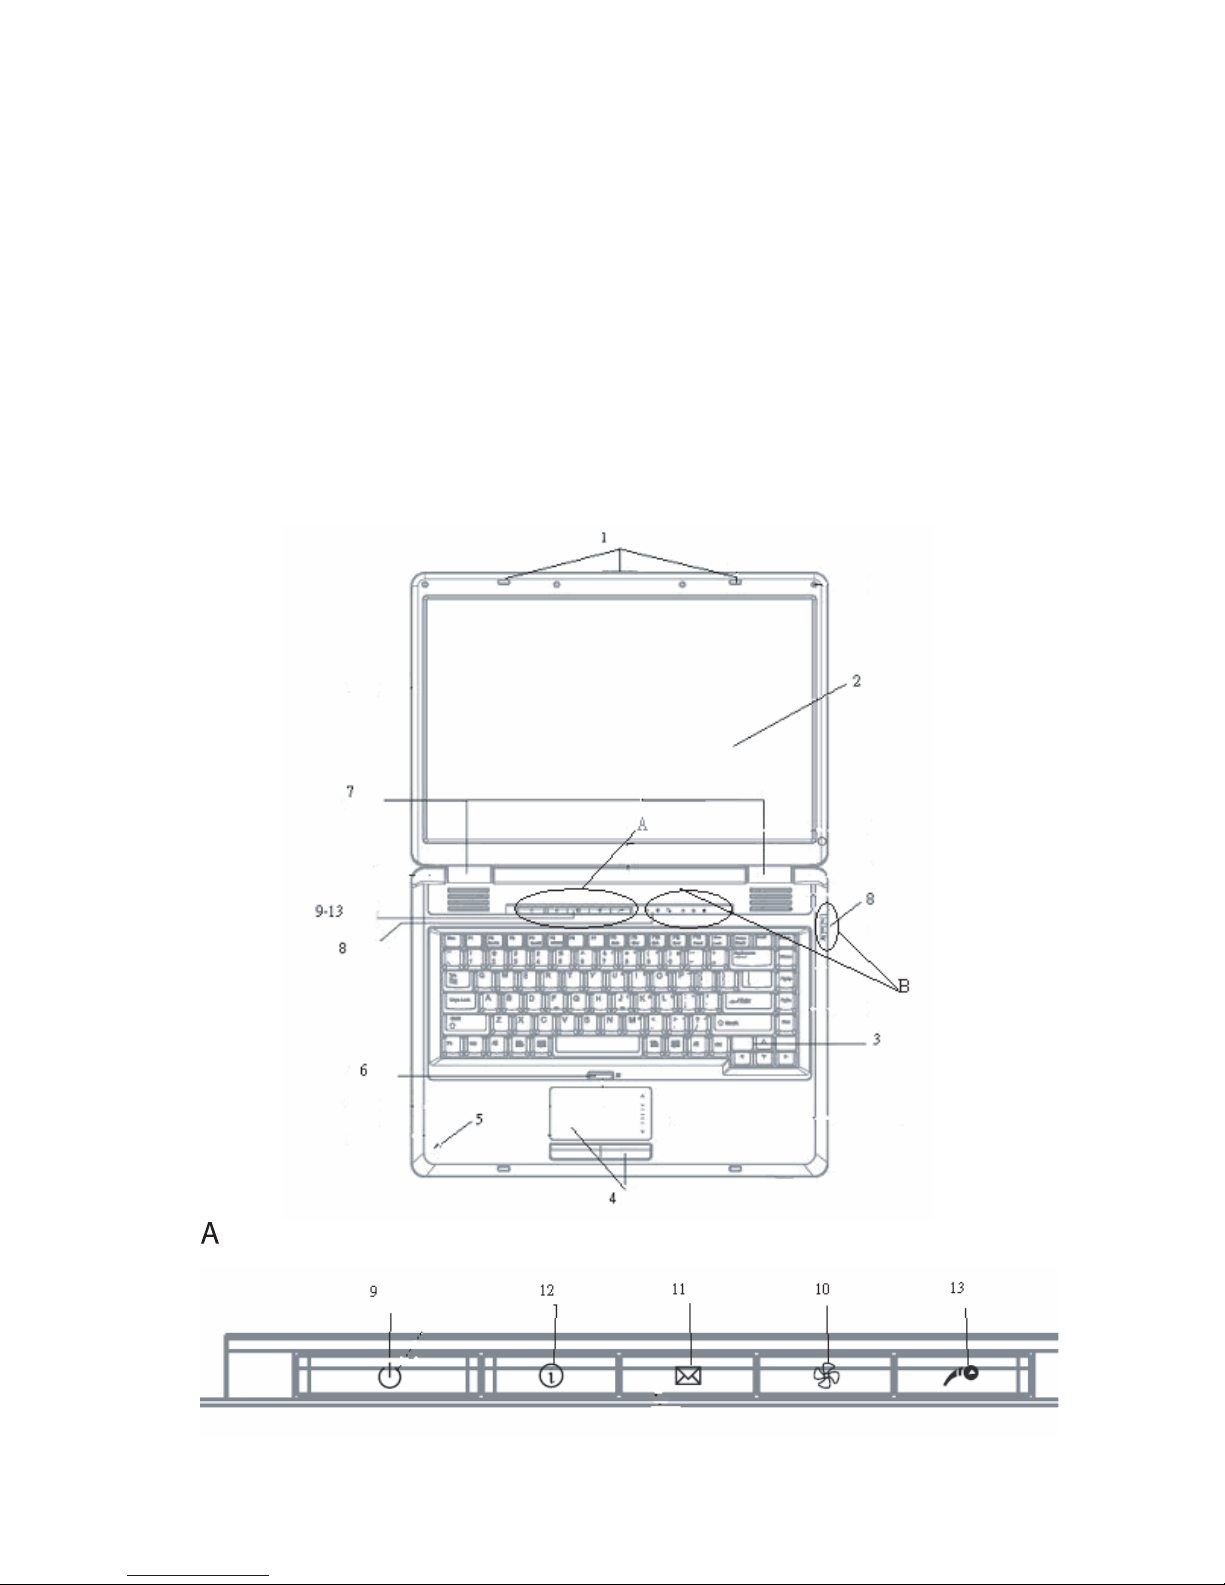
System At A Glance
Top View
ENG
5PRESTIGIO AVANTI 1592W
Page 7
ENG
1. LCD Latch
The LCD latches lock / unlock the LCD panel.
2. LCD Latch
The panel is where the system content is displayed.
3. Keyboard
The keyboard is used to enter data. It has an embedded numeric keypad and cursor control keys. (See Keyboard Section
for details.)
4. Touch Pad
The touch pad is a built-in pointing device with functions similar to a mouse.
5. Built-in Microphone
The built-in microphone records sound.
6. Touch Pad Disable / Enable Button
The button enables or disables Touch Pad function.
7. Built-in Stereo Speakers
The built-in speakers output the sound in stereo.
8. LED Status Indicator
The LED Status indicators reveal the status of these functions: Numeric keypad, cap lock, scroll lock, WLAN module enabling
and disabling and also the ODD, HDD activities. (See the LED Status Indicator Section for details.)
The LED Status indicators also reveal the status of the system power state and battery-charging state. (See the LED Status
Indicator Section for details.)
9. Power / Suspend Button
The power/suspend button turns the notebook on and off and it also ac ts as a system suspend key. Press momentarily to
turn on the system. Press and hold for at least 4 seconds to turn off the system. How this key behaves can be defined in
[Start > Settings > Control Panel > Power Options > Advanced] menu. Press the power / suspend button again to return
6 PRESTIGIO AVANTI 1592W
Page 8
from the suspend mode. (See Chapter 3 for more details on system suspend function.)
Note: When the system power is initially turned on, the Scroll-lock, Cap-lock, and Numeric keypad
LED indicators will light up momentarily to indicate the start of the Power-On sequence.
10. Silent Mode Button
Pressing the key enables the system to lower its power usage; therefore the fan speed is reduced to achieve lowest
operating noise.
You may need to go to BIOS Setup to enable Silent Mode for this button. (See Chapter 2 for details.)
11. Outlook Express Quick Key
Pressing the button launches Outlook Express in Windows.
12. Internet Explorer Quick Key
Pressing the button launches Internet Explorer in Windows.
13. Windows Media Player Quick Key
Pressing the button launches Media Player in Windows.
ENG
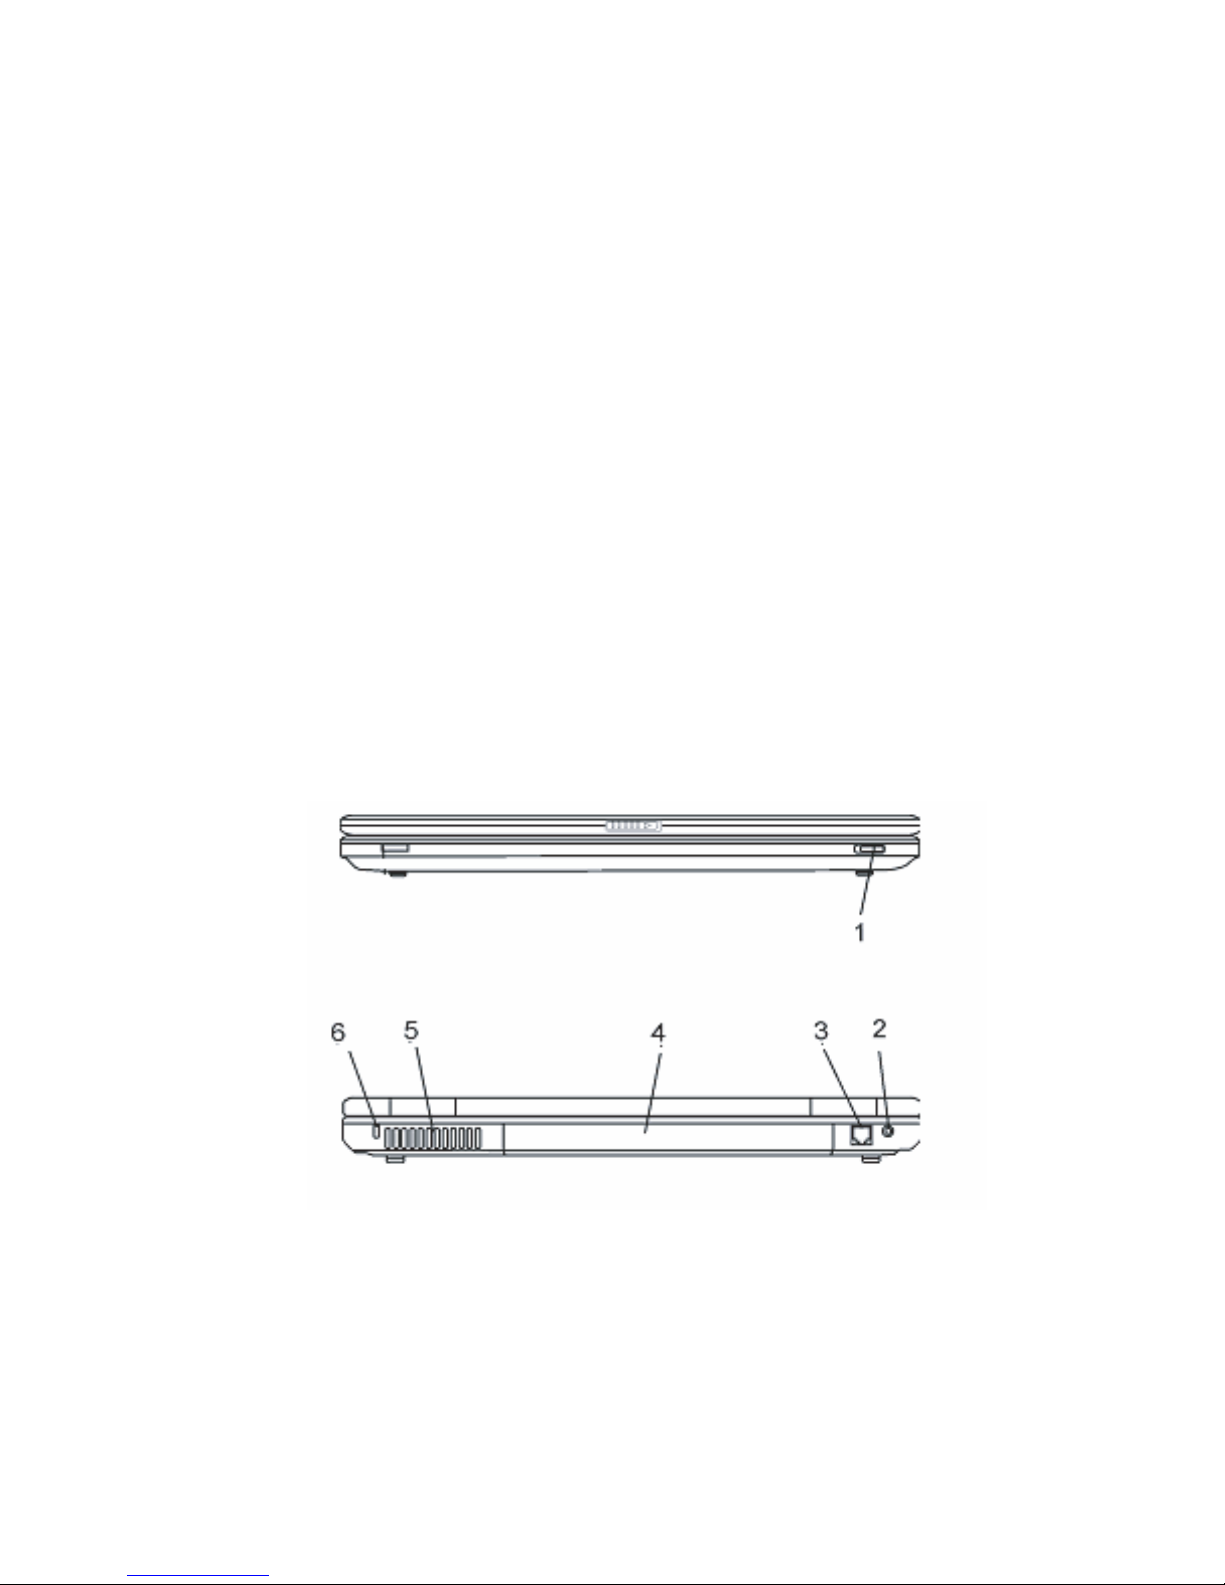
Front and Rear View
Warning: Do not place any heavy objects on the top of notebook. This may damage the display.
1. Wireless On/Off Switch
Use the Switch to disable or enable the Wireless function.
2. Power Jack (DC-in)
The DC-out jack of the AC Adapter connects here and powers the computer.
7PRESTIGIO AVANTI 1592W
Page 9
3. Modem Port
This is where you plug the phone jack (RJ-11) for fax/modem functions.
4. Battery Pack
The battery pack is a built-in power source for the notebook.
ENG
5. Ventilation Grill
The fan grill is where air is exchanged to dissipate the internal heat. Do not block this airway completely.
6. Kensington Lock Key Hole
A Kensington-type security lock latches to this keyhole for anti-theft purpose.
Side Views
Warning: Do not place any heavy objects on the top of notebook. This may damage the display.
1. Audio Volume Dial
Use the volume dial to control the loudness of the speakers.
2. Stereo Headphone / SPDIF-out Jack
The stereo headphone jack (3.5-mm diameter) is where you connec t the headphones or external speakers. Alternatively,
you may connect the SPDIF output to an external DTS, AC3, or PCM sound processor / decoder in your home stereo system.
3. Microphone Jack
The microphone jack (3.5-mm diameter) is where you connect a microphone.
8 PRESTIGIO AVANTI 1592W
Page 10

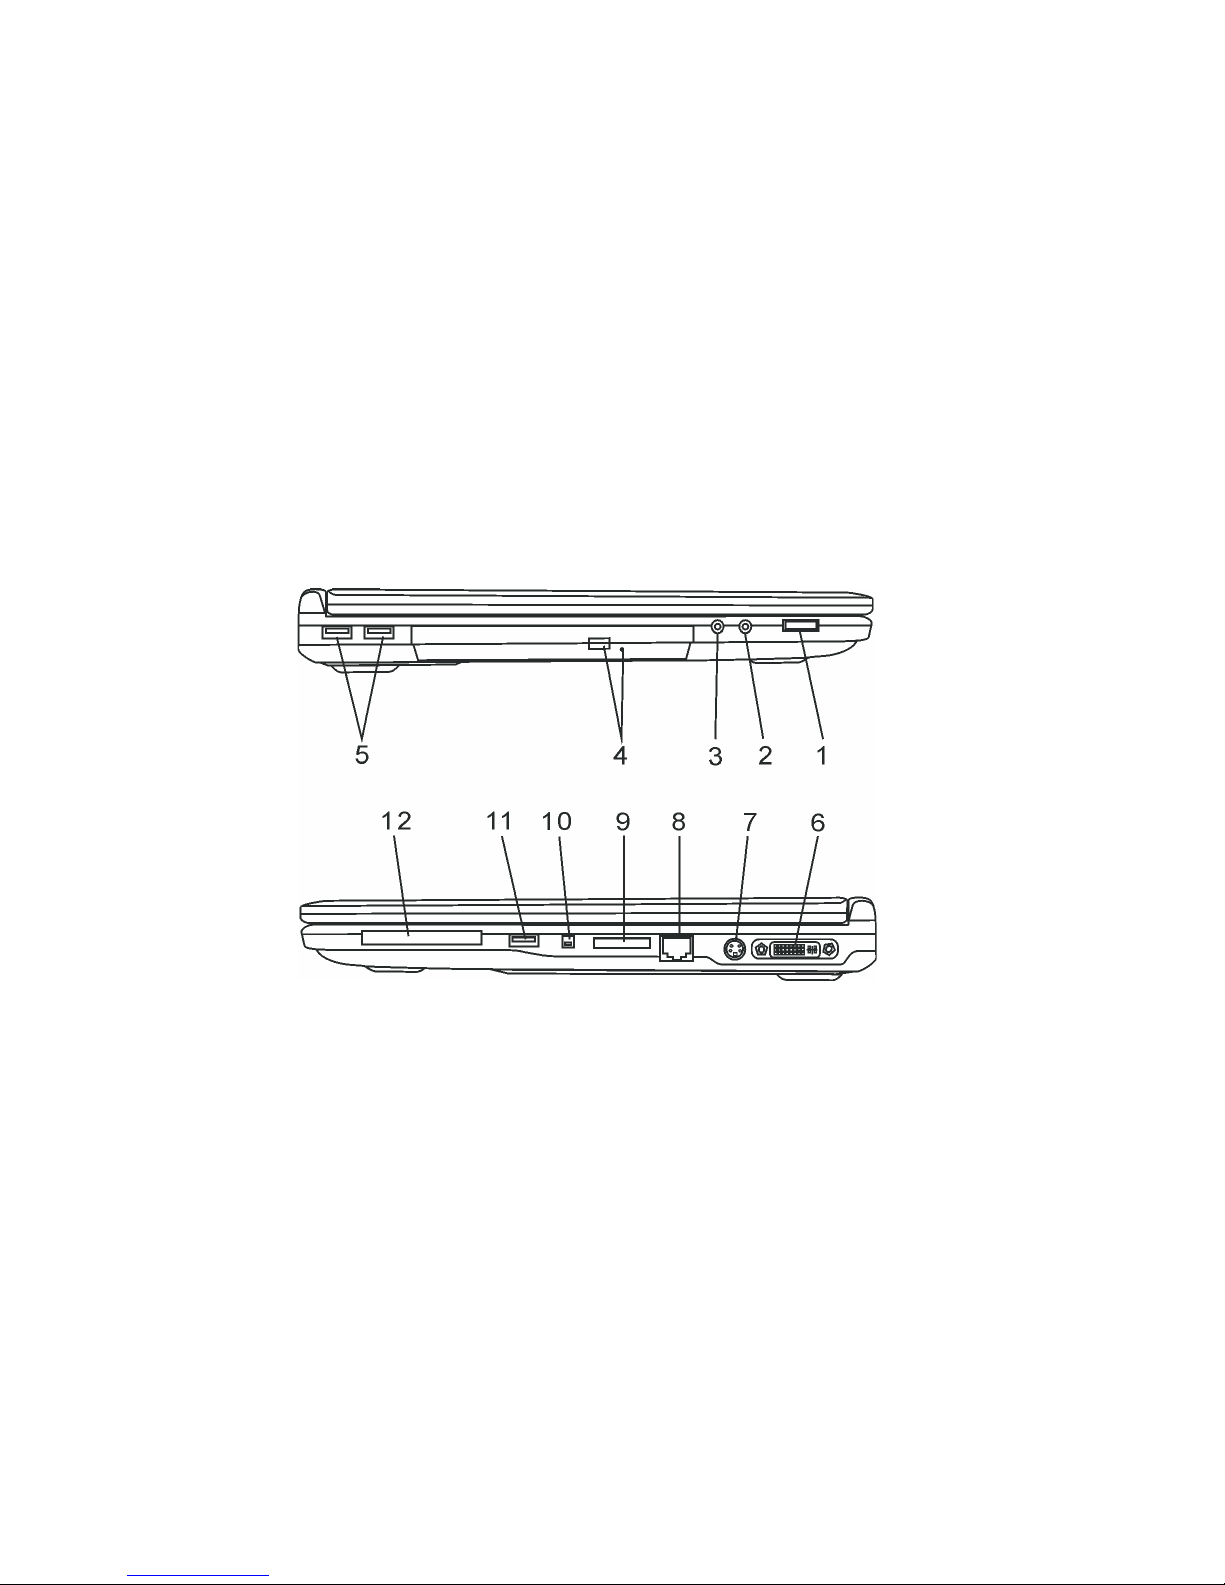
4. Optical Drive and Disk Eject Button and Manual Eject Key Hole
If your computer comes with the Combo drive, DVD-RW, DVD+RW, or DVD-Dual drive, you may save data onto a CD-R / CDRW or DVD RW disc. Press the eject button to eject the disk tray. The manual eject keyhole allows you to manually ejec t a
jammed disk.
5. USB2.0 Port (x2)
The Universal Serial Bus (USB2.0-compliant) port allows you to connect a wide variety of devices to your computer at a
rate of up to 480 Mbps. This port conforms to the latest USB2.0 plug-and-play standards.
6. DVI-I Port
The DVI-I video output port is for connecting the external LCD monitor or projector.
7. TV (S-Video) Port
The S-Video port permits you to redirect the screen output to a television set or any analog video playback device. This TV
Port is copyright protected; when DVD movie is played, the output is scrambled to prevent analog recording.
8. Ethernet / LAN Port
The port connects to a network hub via the RJ-45 cable and also conforms to 10/100/1000Base-TX transmission protocol.
ENG
9. 4-in-1 Card Reader
The 4-in-1 Card Reader supports SD Card, MS Card, MMC Card, and MS-Pro Card.
10. Firewire / IEEE1394 / 1394a Port
This is a high-speed serial data port. You may connect any Fire-wire-ready device to this port.
11. USB2.0 Port (x1)
The Universal Serial Bus (USB2.0-compliant) port allows you to connect a wide variety of devices to your computer at a
rate of up to 480 Mbps. This port conforms to the latest USB2.0 plug-and-play standards.
12. ExpressCard Slot
The slot is where Express Card (Type 54) is inserted. ExpressCard Type 54 allows insertion of either 54mm or 34mm cards.
ExpressCard integrates both the PCI-Express bus technology and USB2.0 interface.
9PRESTIGIO AVANTI 1592W
Page 11
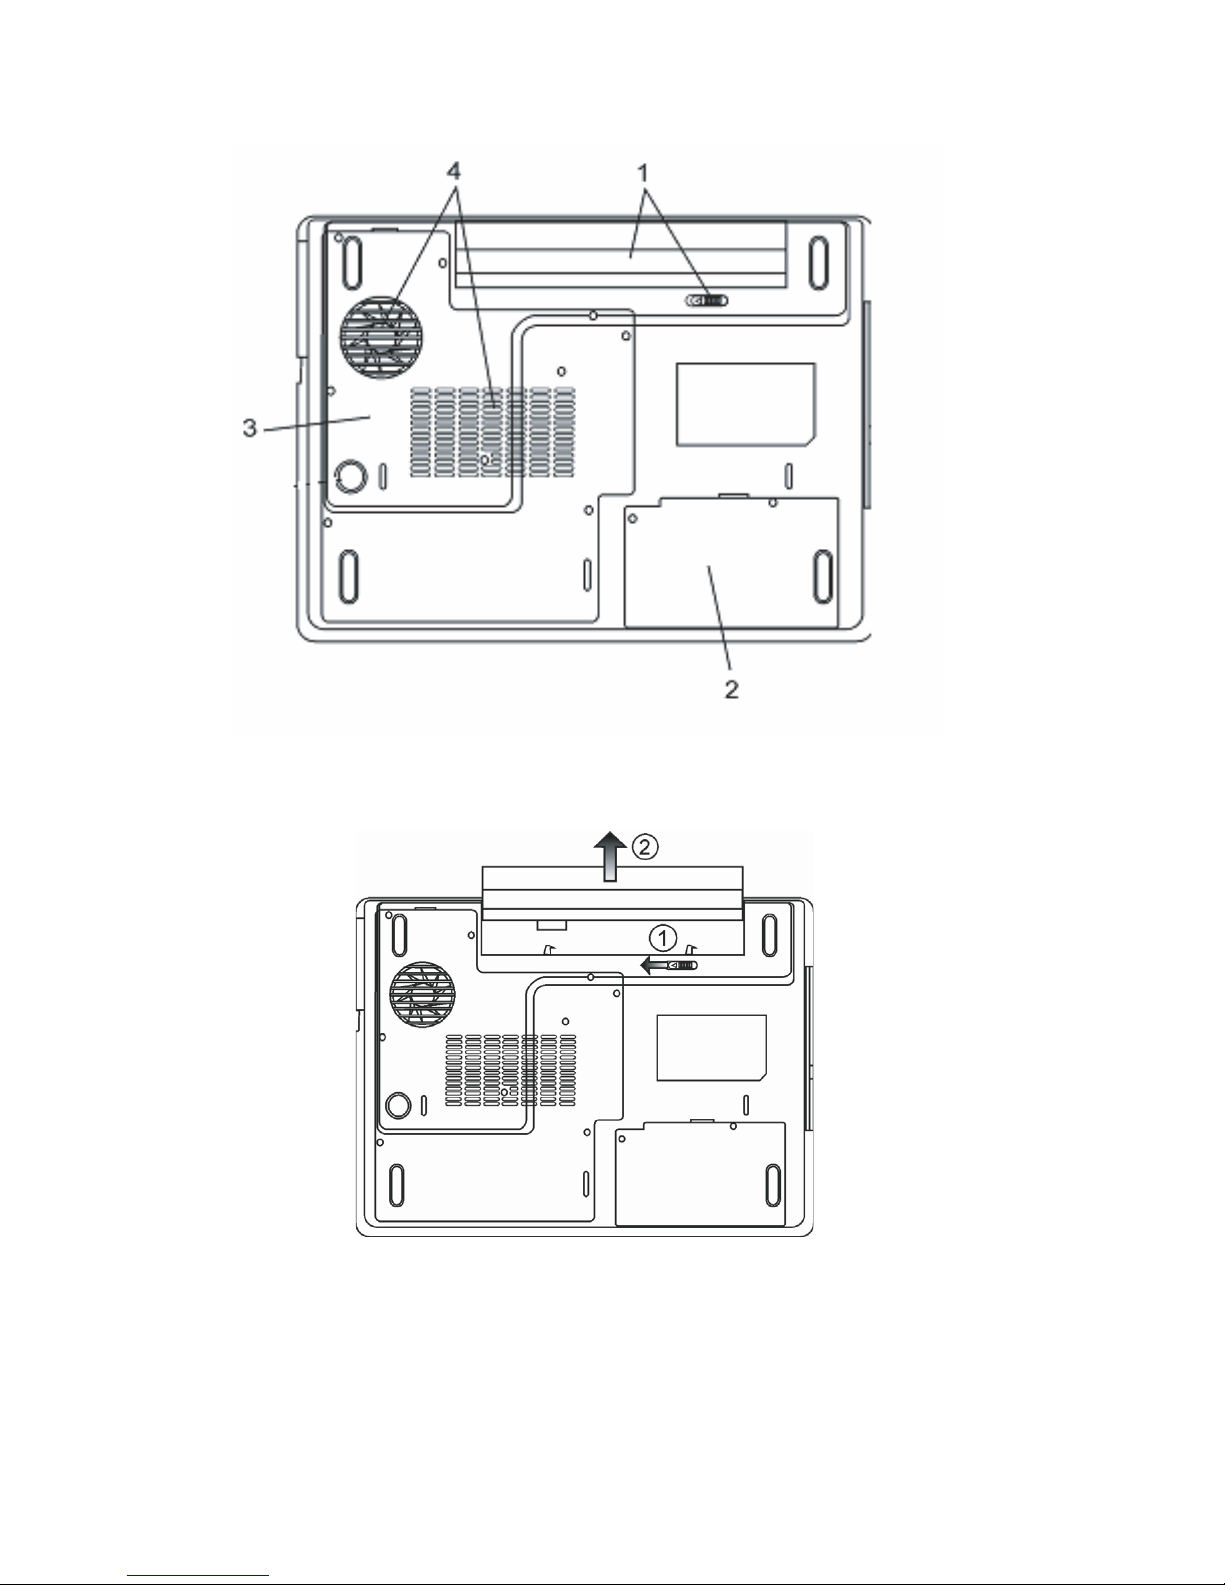
Bottom View
ENG
1. Battery Pack and Battery Latch
The battery pack is a built-in power source for the notebook. Slide the battery latch to release the battery pack.
2. Hard Disk Drive Cover
The system’s hard disk drive is located under the cover. The HDD can be upgraded to a larger capacity. (See Chapter 4 for
instructions on a HDD upgrade.)
10 PRESTIGIO AVANTI 1592W
Page 12
3. System Device Cover
The system’s processor with cooler assembly, Wireless LAN module, and DDR memory module are located under the case
cover. You may install the WLAN module and the system memor y can be upgraded to a larger capacity. (See Chapter 4 for
instructions on a memory upgrade.)
4. Ventilation Grill
The fan grill is where air is exchanged to dissipate the internal heat. Do not block this airway completely.
Warning: Do not block the Fan Grill outlet. Place the machine on hard surface only. The bottom
case may get very hot.
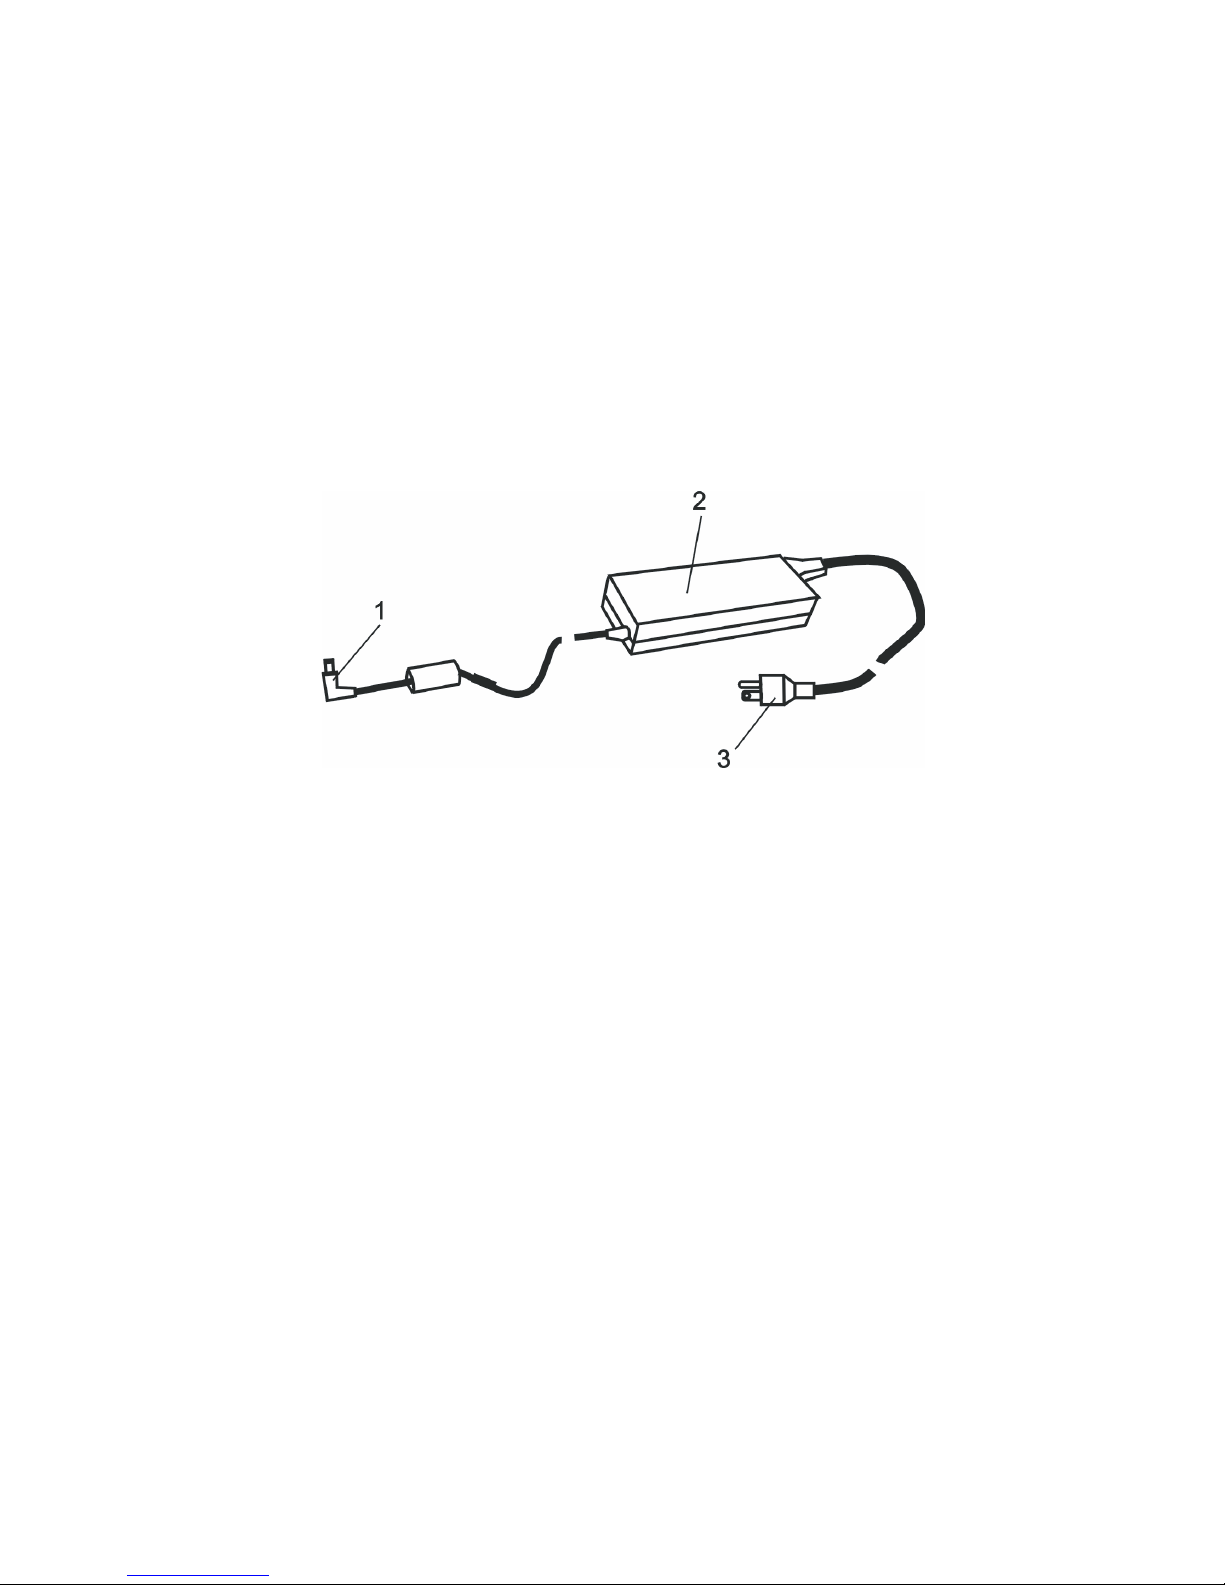
AC Adapter
ENG
1. DC-out Connector
The DC-out connector docks to the power jack (DC-in) on the computer.
2. Adapter
The adapter converts alternating current into constant DC voltage for the computer.
3. AC Plug
The AC plug plugs to the AC wall outlet.
Warning: Make sure that you are using a standard 3-prong AC wall socket with a ground pin. If
not, you may feel a slight tingling sensation when you touch any of the computer’s metal parts
such as the I/O ports. This is caused by leakage current when the AC adapter is not properly
grounded (via the ground pin). However, the amount of leakage current is within the safety
regulation and is not harmful to human body.
11PRESTIGIO AVANTI 1592W
Page 13
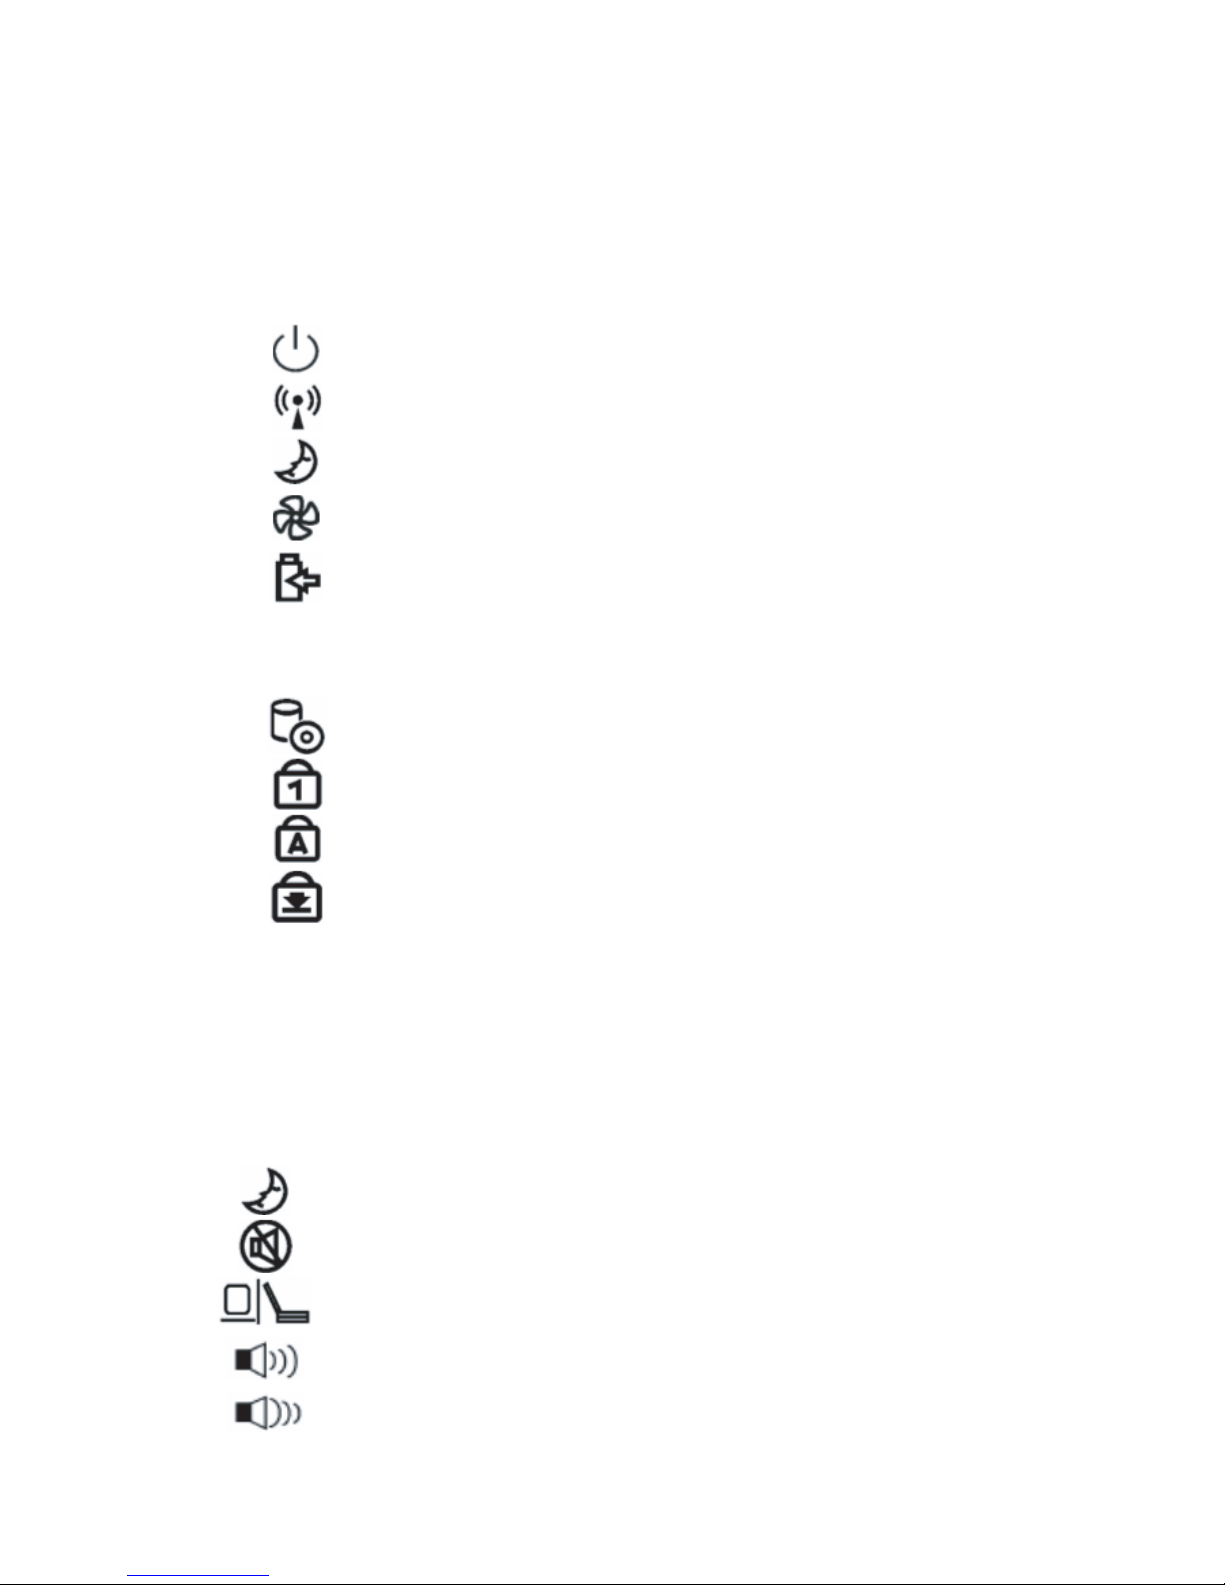
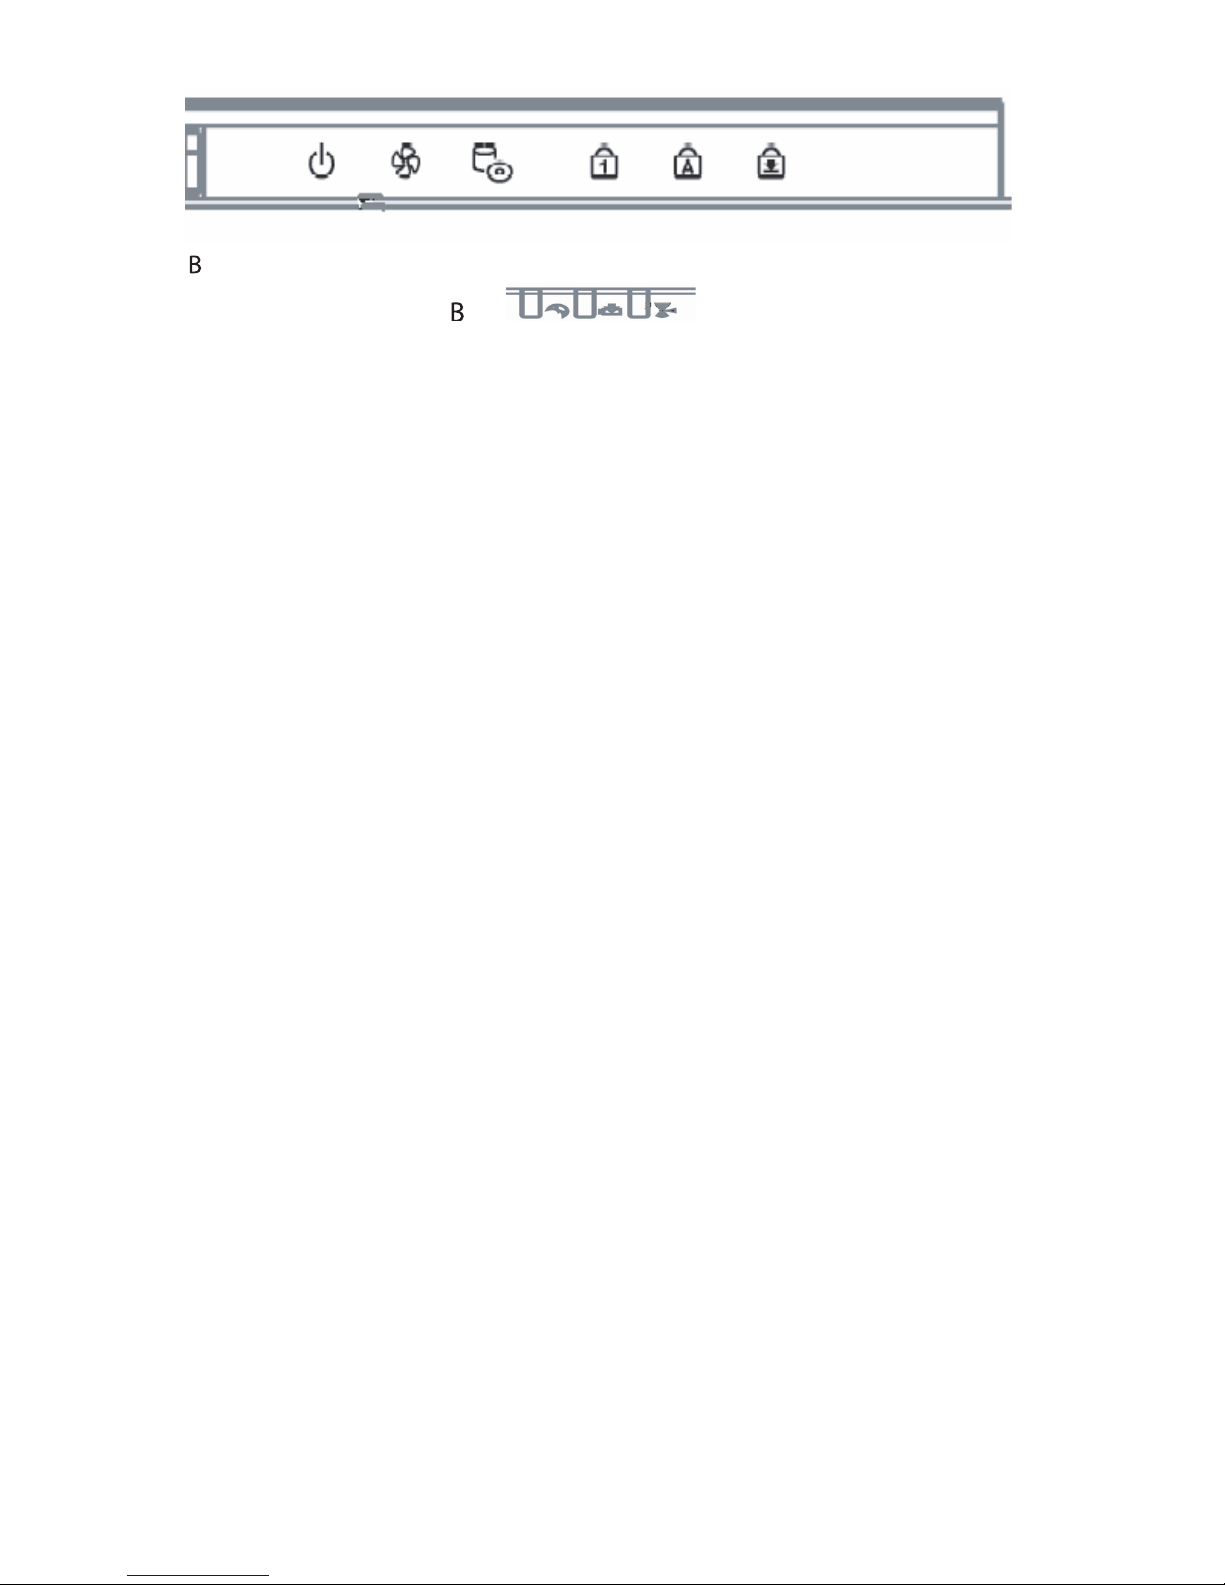
LED Status Indicator
The LED Status Indicator displays the operating status of your notebook. When a certain function is enabled, an LED will
light up. The following section describes its indication.
System & Power Status Indicators
ENG
LED Graphic Symbol Indication
Green light indicates the notebook is ON.
Green light indicates the WLAN module is active.
Blinking green light indicates the notebook is in suspend mode.
Green light indicates the Silent Mode is enabled.
Blinking orange light indicates the battery is being charged.
Blinking red light indicates the battery power is low when the system is
turned ON.
Persistent green light indicates the battery is Full.
LED-off (Dark) indicates the system is without battery.
Green light indicates the hard drive and/or optical drive is being
accessed.
Green light indicates the numeric keypad is activated.
Green light indicates the cap-lock is activated.
Green light indicates the scroll-lock is activated.
Keyboard Features
Function Keys (Quick Keys)
Graphic Symbol Action System Control
Fn + F1 Enters Suspend Mode.
Fn + F3 Audio Mute on or off.
Fn + F4 Changes Display Mode: LCD-only, CRT-only and LCD&CRT.
Fn + F5 Turns Speaker Volume up.
Fn + F6 Turns Speaker Volume down.
12 PRESTIGIO AVANTI 1592W
Page 14

Fn + F7 Increases Display Brightness.
Fn + F8 Decreases Display Brightness.
Fn+Num Lk Enables the embedded keypad to work in numeric mode. The keys act
like numeric keypads in a calculator. Use this mode when you need to do
a lot of numeric data entry. An alternative would be to connect an
external numeric keypad.
Fn + Scr Lk Press the Scroll Lock key and then press ‘!or “!to move one line up or
down.
For various system controls, press the Fn (Function) key and the Fx key simultaneously.
Windows Keys
Your keyboard also has two Windows keys:
1. Start Key
This key allows you to pull up the Windows Start Menu at the bottom of the taskbar.
2. Application Menu Key
This key brings up the popup menu for the application, similar to a click of the right
mouse button.
ENG
Embedded Numeric Keypad
Press Fn+NumLk to enable the embedded numeric keypad. The numbers are printed in upper right corner of a key, in a
color different from the alphabets. This key pad is complete with arithmetic operators (+, -, * , /).
Press Fn+NumLk to revert to normal character keys.
13PRESTIGIO AVANTI 1592W
Page 15

Touch Pad
The built-in touch pad, which is a PS/2-compatible pointing device, senses movement on its surface. As you move your
fingertip on the surface of the pad, the cursor responds accordingly.
The following items teach you how to use the touch pad:
ENG
1. Move your finger across the touch pad to move the cursor.
2. Press buttons to select or execute functions. These two buttons are similar to the left and right buttons on a mouse.
Tapping on the touch pad twice is similar to clicking the left button of a mouse.
Function Left Button Right Button Equivalent Tapping Action
Execution Click twice quickly Tap twice (at the same
speed as double-clicking
the mouse button)
Selection Click once Tap once
Drag Click and hold to drag the cursor Tap twice quickly and on
the second tap hold finger
to the touch pad to drag
the cursor
Access Context Menu Click once
Move One Page Up or Down
Tips on Using the Touch Pad:
1. The double-click speed is timed. If you double-click too slowly, your notebook responds as if you single-clicked twice.
2. Keep your fingers dry and clean when using the touch pad. Also keep the surface of touch pad clean and dry to prolong
its life.
3. The touch pad is sensitive to finger movements. Hence, the lighter the touch, the better the response. Heavy touch does
not produce better response.
Graphic Subsystem
Your computer uses a high performance 15.4-inch (non-wide) active matrix TFT panel with high resolution and multimillion colors for comfortable viewing. The ATI Mobility M54-P video graphics accelerator, which is Microsoft DirectX 9
compatible, performs graphic rendering at a lighting-fast speed.
Adjusting the Display Brightness
The notebook uses special key combinations, called hot keys, to control brightness.
Press Fn+F7 to increase the brightness.
Press Fn+F8 to decrease the brightness.
Note: To maximize your battery operating time, set the brightness to the lowest comfortable
setting, so that the internal backlight uses less power.
Extending the Life of the TFT Display Device
Observe the following guidelines to maximize the life of the backlight in the display.
1. Set the brightness to the lowest comfortable setting (Fn+F8).
14 PRESTIGIO AVANTI 1592W
Page 16

2. When working at your desk, connect your notebook to an external monitor and disable the internal display Fn+ F4.
3. Do not disable the suspend time-outs.
4. If you are using AC power and have no external monitor attached, change to suspend mode when not in use.
Opening and Closing the Display Panel
To open the display, push the LCD latch inwardly and lift up the lid. Then tilt it to a comfortable viewing position.
To close the display cover, fold it down gently until the LCD latches click into place.
Warning: To avoid damaging the display, do not slam it when closing. Do not place any object on
top of the computer when the display is closed.
Audio Subsystem
Your computer’s audio subsystem is Sound Blaster Pro-compatible.
Adjusting the Volume Manually
To increase the volume, press Fn+ F5.
To decrease the volume, press Fn+F6.
Adjusting the Audio Volume in Windows
1. Click the speaker symbol in the task tray in Windows.
2. Drag the volume control bar up or down to adjust the volume.
3. To temporarily silence the speaker without changing the volume setting, click Mute.
ENG
Voice Recording
A built-in microphone allows you to record sound. You will need to use audio processing software to enable the builtin microphone. For example, you may use Microsoft Sound Recorder.
Modem
Your computer comes with a 56K V.92 internal fax/modem and a phone jack (RJ-11), which is located on the left side of
your computer.
Use a telephone cable to connect the computer to the telephone wall outlet.
Connecting the Modem
1. Plug one end of the phone line into the modem port located on the rear side of the computer. (For EMI compliance,
you need to clip the included EMI CORE to the phone line.)
2. Plug the other end of the line into the analog phone wall outlet.
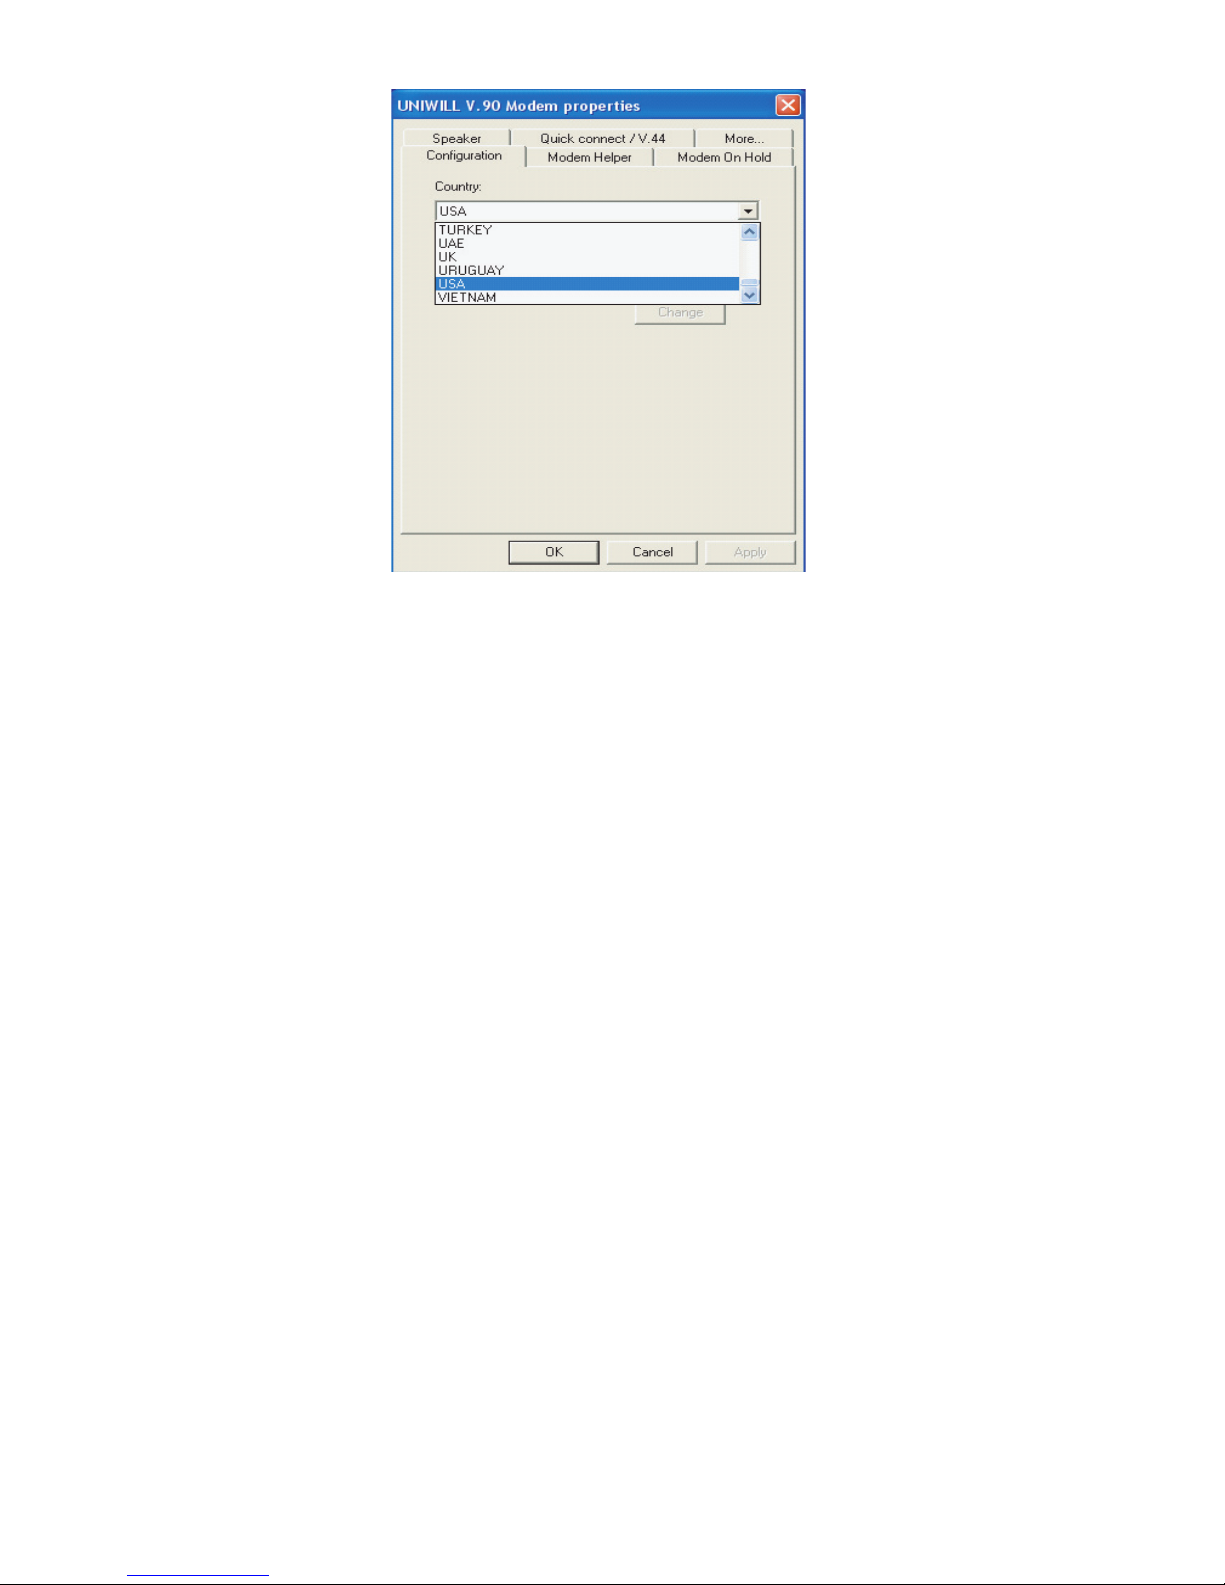
Depending on where your computer is used, you may need to change settings in the modem. Correct setting will allow
you to maintain a stable connection in a country where its telecommunication system may be different to others.
To change the modem setting, do the following:
1. Go to [Start > Settings > Control Panel] and double-click on Modem Settings icon. You will see a similar dialog box.
2. Click on the pull-down menu and select the country where it is applicable. Click on OK to exit.
15PRESTIGIO AVANTI 1592W
Page 17
ENG
Ethernet
Your computer is equipped with a 10/100/1000Base-TX Fast Ethernet network adapter. Connect the active LAN cable to
the RJ-45 LAN port located on the left side of the computer. This allows you to access and transmit data in the local area
network.
Connecting to the Network
Use Unshielded Twisted Pair (UTP) Ethernet cable only.
1. Insert one end of the UTP cable into the network connector until the connector snaps securely into the receptacle.
2. Either connect the other end of the cable to an RJ-45 jack wall outlet or to an RJ-45 port on a UTP concentrator or hub
in the network.
Cabling Restriction for Networks
The following restrictions should be observed for 10/100/1000BASE-TX networks:
The maximum cable run length is 100 meters (m) (328 feet [ft]).
For 100Mbps or 1000Mbps operations, use Category 5 wiring and connections.
Note: Consult Windows manual and / or Novell Netware user’s guide for the software installation,
configuration, operation of the network.
BIOS SETUP AND SECURITY FEATURE
In this chapter, you will learn how to enter the BIOS Setup Menu and manipulate various hardware control settings. You
will also learn how to use the built-in security features.
The Setup Utility is a hardware configuration program built into your computer’s BIOS (Basic Input/Output System). It runs
and maintains a variety of hardware functions. It is a menu-driven software, which allows you to easily configure and
change the settings.
16 PRESTIGIO AVANTI 1592W
Page 18

The BIOS contains manufacture’s default settings for the computer’s standard operations. However, there are occasions
when you may be required to modify the default settings in the BIOS. For example, you may need to configure the BIOS
power management (APM) settings if you are using DOS, or non-Windows operating system.
The BIOS allows you to set up passwords to limit access to users. This is an important feature because a great deal of vital
information is carried within the computer nowadays. Unauthorized access can be prevented. Later in this chapter, you
will learn how to use this security feature.
Entering the BIOS Setup Screen
First turn on the power. When the BIOS performs the POST (Power-On Self Test), press F2 key quickly to activate the Phoenix
BIOS Setup Utility.
Note: You may need to press F2 key fairly quickly. Once the system begins to load Windows, you
may have to retry by cycle-power on again
Leaving the BIOS Setup Screen
When you have finished modifying the BIOS settings, exit the BIOS. It takes a few seconds to record changes in the CMOS.
BIOS Action Keys
Function Key Command Description
ESC Exit Leaves a sub-menu to return to the previous menu OR exits the BIOS
setup while saving changes.
Enter Go to Sub Screen Shows the Sub Menu
F1 General Help Shows the Help Screen
F10 Save and Exit Saves changes and reboots the computer.
<Tab> Select a field Selects the next field.
/\ Select an item Selects the next upper item.
\/ Select an item Selects the next lower item.
- Lower value Selects the next value within a field.
+ Higher value Selects the next value within a field.
ENG
Modifying the BIOS Settings
The Phoenix BIOS setup main menu is subdivided into sub-menus. Each menu item is described in this section.
Main Setup
Under this menu, you may change time/date and view basic processor and system memory information.
Item Selections / Sub-menu Description
Date N/A Type in the current date, in MM/DD/YY format.
Time N/A Type in the current time, in HH:MM:SS format.
17PRESTIGIO AVANTI 1592W
Page 19

Boot Setup
Boot Settings Configuration
Item Selections / Sub-menu Description
Quick Boot Disabled / Enabled Certain tests are skipped during boot-up, therefore the system boots up faster.
ENG
Quiet Boot Disabled / Enabled When Enabled, the system will display OEM logo instead of the POST messages.
When Disabled, the system will display POST messages (i.e. devices information.)
Boot Device Priority
Item Selections / Sub-menu Description
1st Boot Device Removable Dev. CD/DVD Set the type of device for the 1st drive BIOS attempts to boot from.
Hard Drive If Realtek Boot Agent is selected, system will attempt to load boot sector
Network: Realtek Boot from the Ethernet port.
Agent Disabled
2nd Boot Device Set the type of device for the 2nd drive BIOS attempts to boot from.
3rd Boot Device Set the type of device for the 3rd drive BIOS attempts to boot from.
4th Boot Device Set the type of device for the 4th drive BIOS attempts to boot from.
Note: If you select Realtek Boot Agent, the system will attempt to boot from the network.
Note: When the BIOS performs POST, you may also press F12 Key to enable the Boot Device
selection menu. You may choose CD/DVD, Hard Drive, or Realtek Boot Agent as the first storage
device to boot from. If you have already connected a USB Floppy Disk Drive before powering up, it
will appear as a Removable Device in the Boot Device selection menu.
Security Setup
Boot Settings Configuration
Item Selections / Sub-menu Description
Change Supervisor Password N/A Install or Change the Password
Change User Password N/A Install or Change the Password
Using Password Protection
Two Levels of Password Protection are available. The BIOS provides both a Supervisor and a User password. If you try to
activate both passwords, the Supervisor password must be set first.
The passwords activate two different levels of protection:
1. System always asks for password every time it is powered on.
2. System asks for password only when you attempt to enter BIOS utility.
The passwords are encrypted and stored in NVRAM. Make sure you write them down or memorize them. If you lost the
passwords, the computer may need to be sent back to the factory or to an authorized service dealer to reset the passwords.
18 PRESTIGIO AVANTI 1592W
Page 20

Power Setup
Item Selections / Sub-menu Description
Long Battery Life Mode Enable / Disable When Enabled, maximum battery life can be achieved. The
processor performance is lowered.
Power Button Mode On/Off / Suspend [On/Off]: When the power button is pressed, the system is turned
off. [Suspend]: When the power button is pressed, the system
enters the suspend mode.
Note: The Suspend Mode selection in BIOS only applies to older Windows version (such as
Windows 3.1 or Windows 95 or NT4) or non-Windows operating system. In Windows ME / 98SE /
2000 / XP, suspend mode and settings are determined by settings in the Power Options Properties
(Start > Control Panel > Power Options).
Exit Setup
Item Selections / Sub-menu Description
Saves Changes and Exit N/A After you have completed the BIOS settings, select this item to
save all settings, exit BIOS Setup utility, and reboot. New system
settings will take effect on next power-up. F10 key can be used
for this operation.
Discard Changes N/A Discards changes done so far to any of the setup questions.
Load Optimal Defaults N/A Load Optimal Default value for all the setup questions. F9 key can
be used for this operation.
ENG
BATTERY POWER & POWER MANAGEMENT
In this chapter, you will learn the fundamentals of power management and how to use it to achieve longer battery life.
In this chapter, you will learn how to operate your notebook on battery power, how to handle and maintain the battery
pack, and learn about the system’s power saving features.
TFT display, central processor, hard disk drive are the major hardware subsystems that consume the most power. Power
management deals how these key components should behave to conserve power. For example, you can have the system
turn off its display after 2 minutes of inactivity to save power. Efficient power management can help you work longer
sessions before having to recharge the battery.
The Battery Pack
Lithium-Ion Battery
Your notebook uses a six-cell Lithium-Ion battery pack that provides power when you don’t have access to an AC outlet.
Note: It is necessary that you charge the battery pack for at least 6 hours before using it for the
first time.
19PRESTIGIO AVANTI 1592W
Page 21
Note: In the Standby Suspend mode, a fully charged battery loses its power in roughly 1/2 day or
less. When not being used, the battery’s power will deplete in 1-2 month.
Battery Low-Power Warning
1. Low Battery Warning
Low battery condition occurs when battery power is reduced to 6%. The red battery status LED indicator blinks and the
ENG
system beeps once every 16 seconds or so.
2. Very Low Battery Warning
Very Low battery condition occurs at 3 % power remaining. The red battery status LED indicator blinks and the system
beeps at 4-second interval.
When the notebook warns you of its low battery condition, you will have about 3-5 minutes to save your current work.
Warning: Do not expose battery packs to temperatures below 0 degree Celsius (32 degree F) or
above 60 degree C (140F). This may adversely affect the battery pack.
Note: Press Fn+F3 to turn off the battery warning beep.
Installing and Removing the Battery Pack
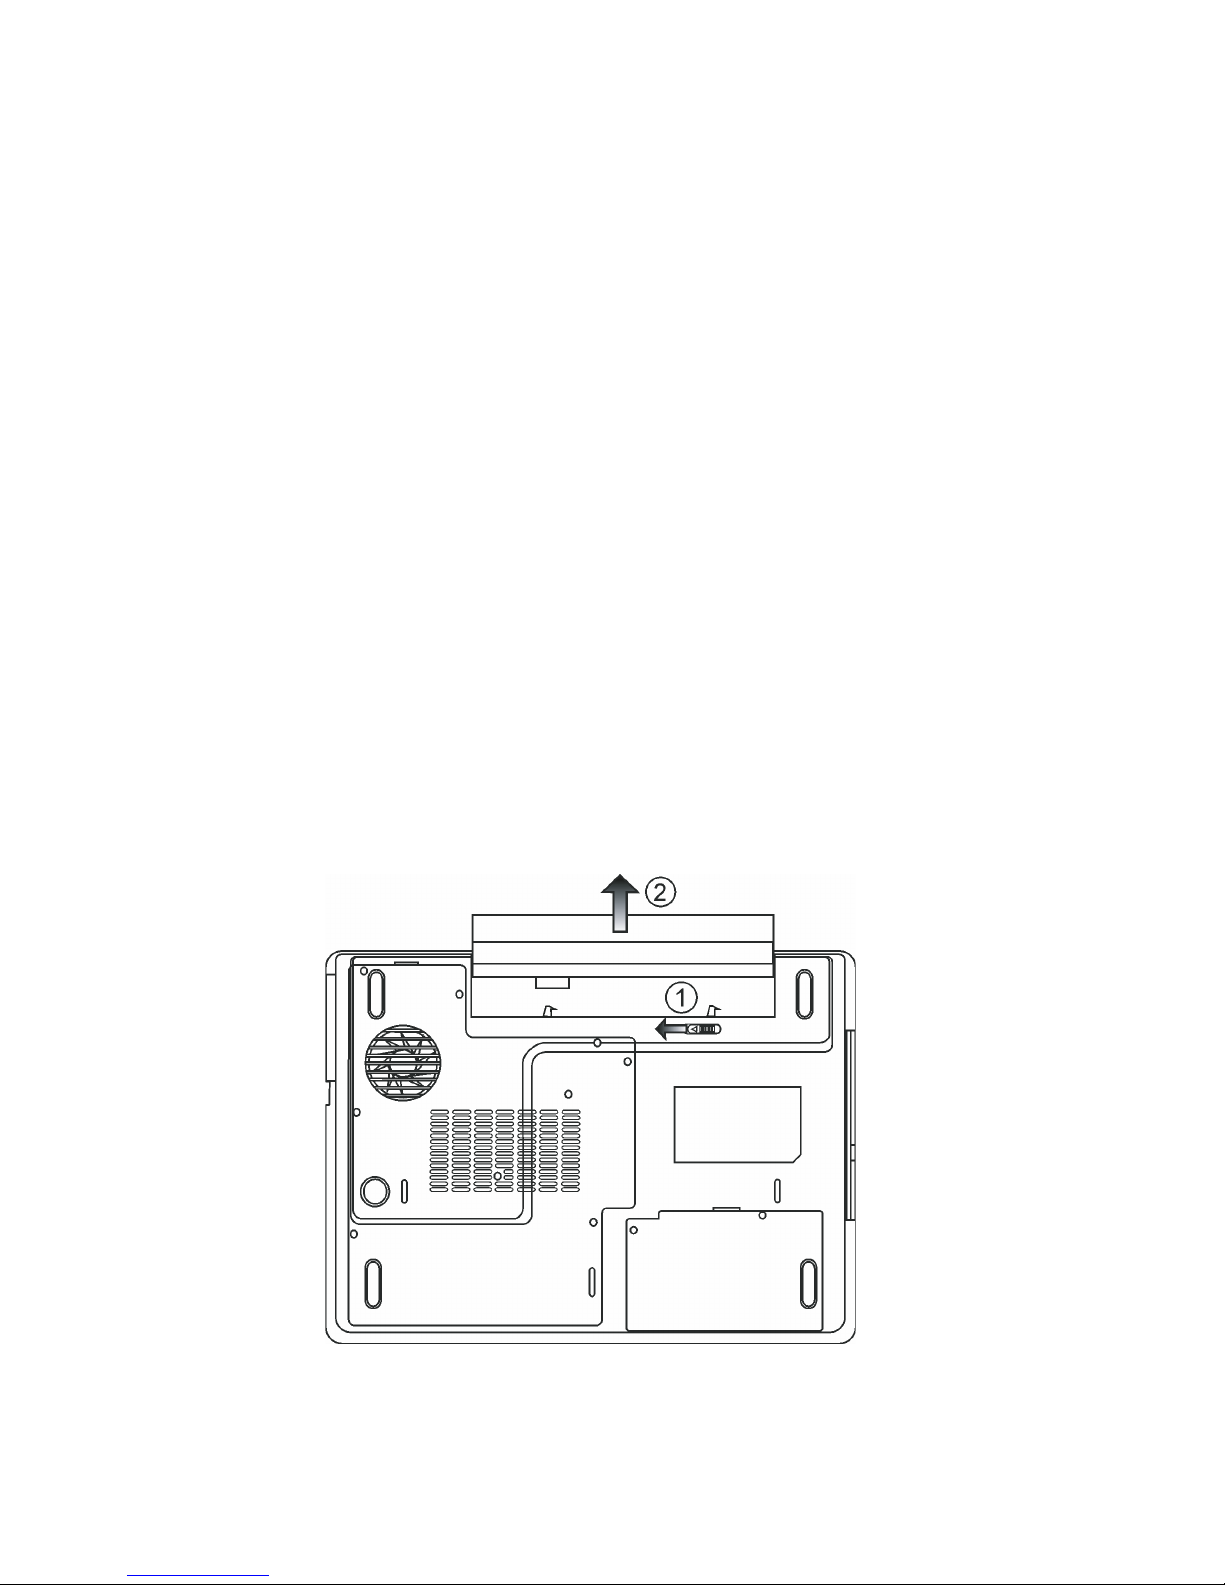
To Remove the Battery Pack:
1. Place the notebook bottom-side up on a flat and secured surface.
2. Push the latch and pull the battery’s hard case away from the notebook.
20 PRESTIGIO AVANTI 1592W
Page 22
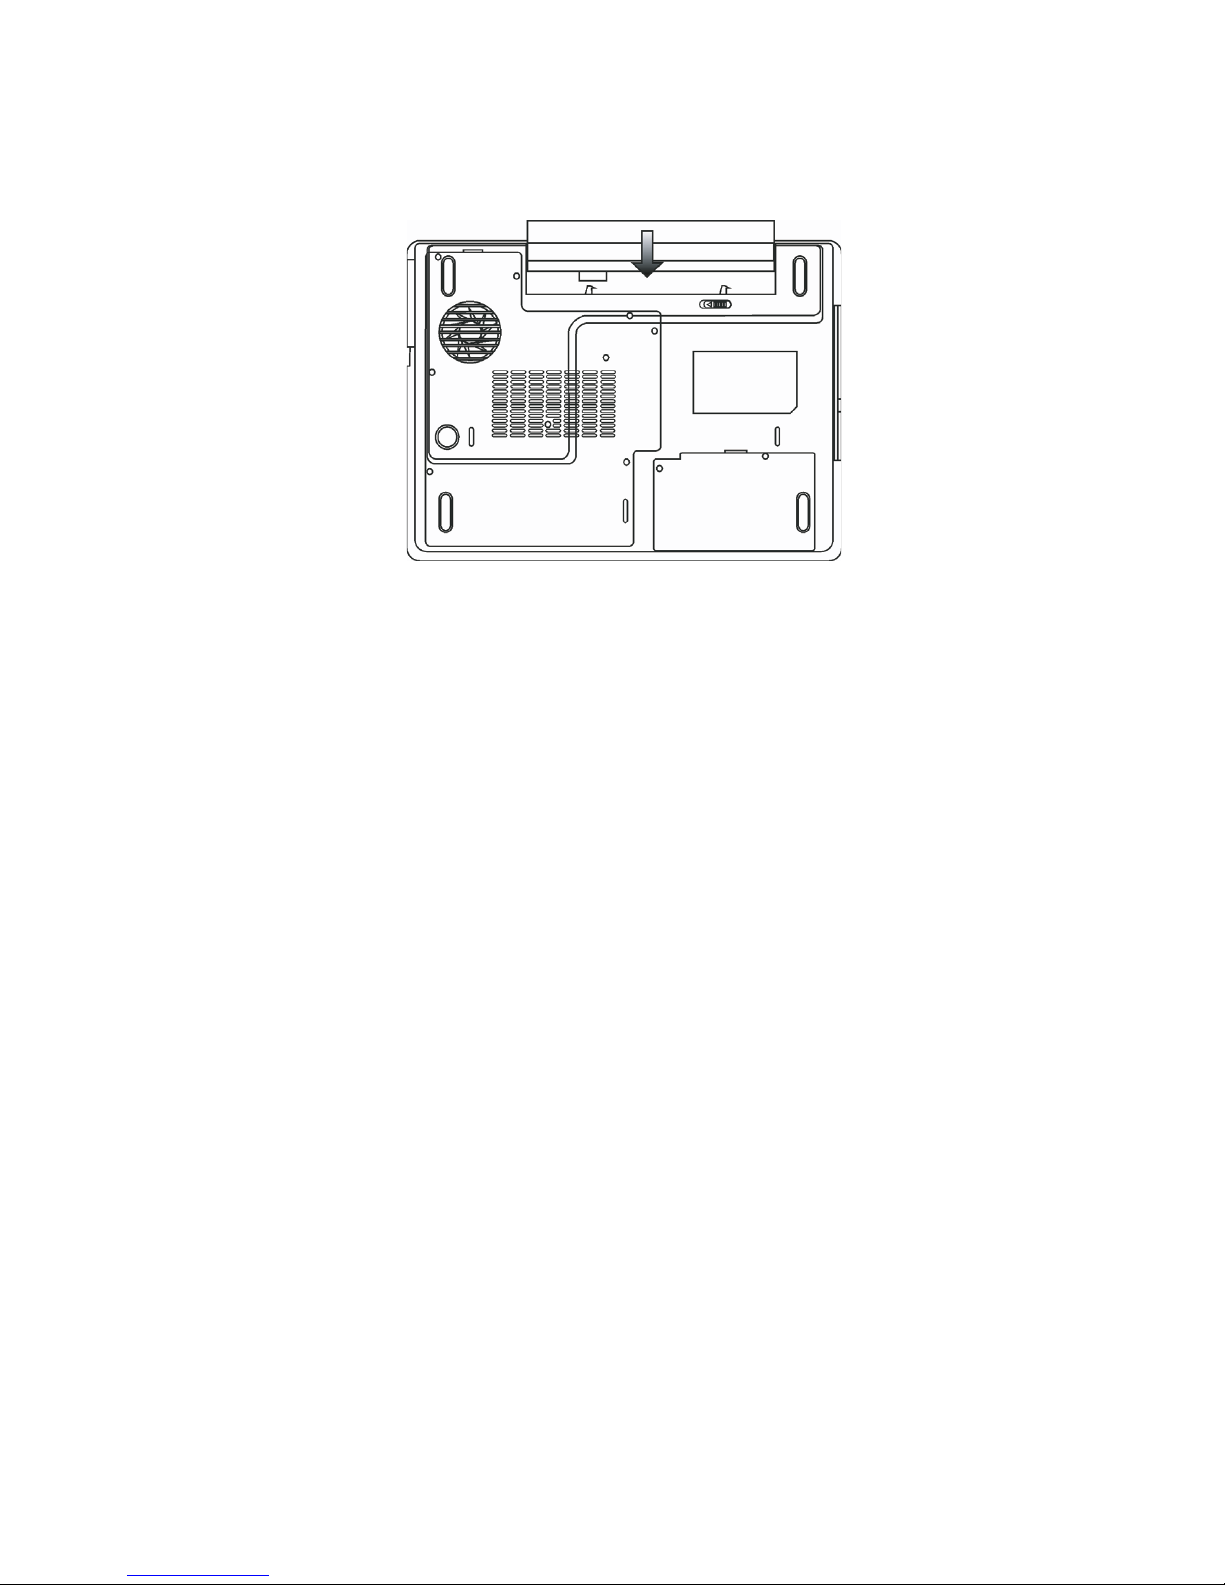
To Install the Battery Pack:
1. Place the notebook bottom-side up on a flat and secured surface.
2. Carefully insert the battery pack into the battery compartment of the notebook.
Charging the Battery and Charging Time
ENG
To charge the battery, while the battery pack is in the notebook, plug the AC adapter into the notebook and an electrical
outlet.
The charging time is approximately 4-6 hours when the notebook is turned off and approximately 6-10 hours when the
notebook is turned on.
When the battery is fully charged, the battery charge indicator becomes green.
Note: If system runs at heavy loading or in a high temperature environment, the battery may not
be fully charged. You need to continue to charge it with the AC adapter plugged in until the
charging LED turns green.
Checking the Battery Level
You can check the remaining battery power in the Windows battery status indicator, which is located at the lower righthand corner of the task bar. (If you do not see a battery or AC-in icon on the task tray, go to Power Options Properties box
and click on the Advanced tab. Check off “Always show icon on the task bar”.)
Alternatively, you can access the power meter by clicking the Power Options icon in the Windows Control Panel.
Prolonging the Battery’s Life and Usage Cycles
There are ways you can do to prolong the use of battery.
Use the AC adapter wherever AC wall outlet is available. This will ensure uninterrupted computing.
Purchase additional battery pack.
Store the battery pack in room temperature. Higher temperature tends to deplete the battery’s power faster.
Make good use of the power management function. Save To Disk (Hibernate) saves the most energy by storing current
21PRESTIGIO AVANTI 1592W
Page 23
system contents in a hard disk space reserved for this function.
The life expectancy of the battery is approximately 300 recharges.
See the notices section in the beginning of the user manual on how to care for the battery pack.
Note: Read Section Protecting Your Notebook in the beginning of this manual for tips about how
ENG
to maintain the battery pack.
Note: To achieve optimal battery performance, you may need to do a battery calibration at a 3month interval. To do this:
1. Fully charge the battery.
2. Then discharge the battery by entering the BIOS setup screen. (Press F2 key as soon as you
turn on the computer. And let it remain at the setup screen until the battery runs out.
3. Fully charge the battery again.
Using Windows Power Options
Windows Power Management provides basic power saving features. In the Windows Power Options Properties [Start >
Settings > Control Panel > Power Options] dialogue box, you may enter time-out values for display and hard disk drive.
Windows power manager saves power by turning off hard drive after 1 minute of inactivity, for example.
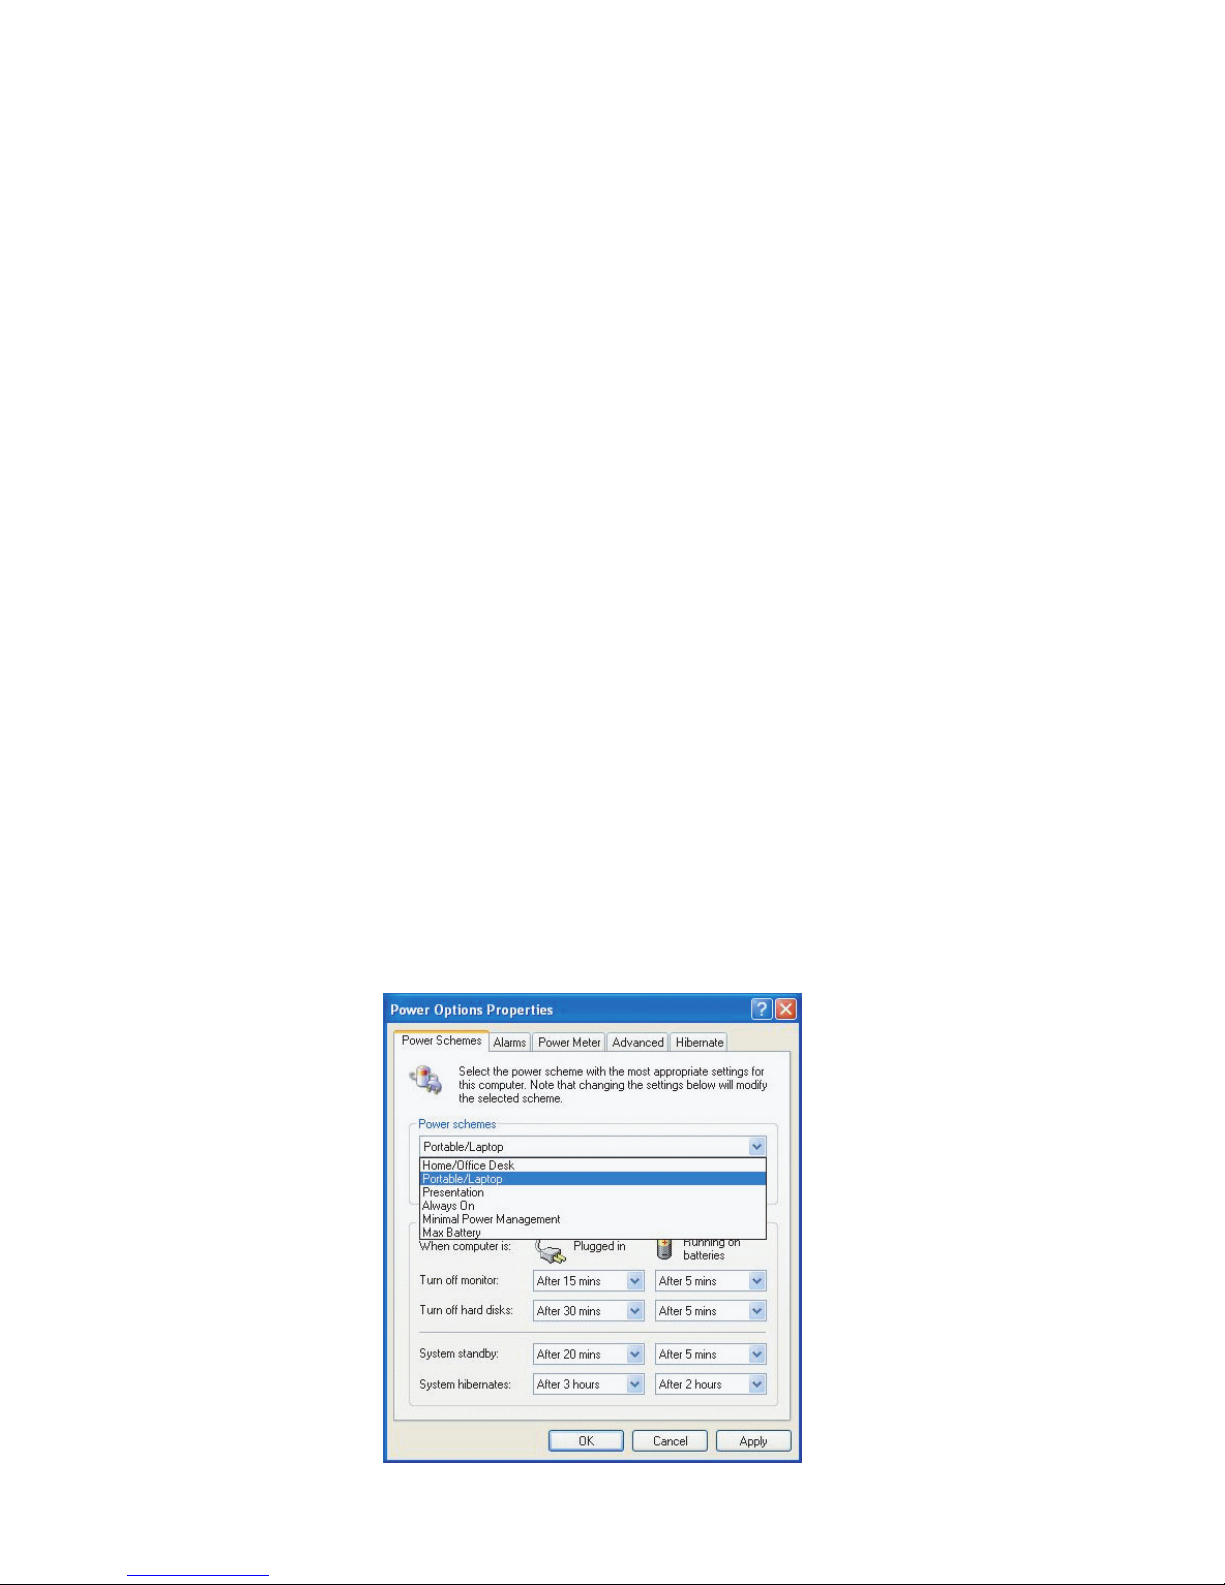
Windows’ Power Schemes
The power management control panel in Windows XP, known as Power Schemes, is designed to provide the user with an
easy-to-use interface. The Power Schemes tab can be found in the Power Options Properties panel that is accessible via
the control panel window.
Schemes are easy to understand, based on notebook usage scenarios, and control not only processor power usage but
other system peripherals as well.
Go to [Start > Settings > Control Panel] and double-click the Power Options icon.
Always on mode puts the processor into maximum performance mode, which provides no power saving. The other
schemes control processor performance based on demand. For example, Max Battery mode lowers the processor’s speed
and voltage to conserve power as much as possible.
22 PRESTIGIO AVANTI 1592W
Page 24

In this dialog box, you can manually set the LCD and hard drive’s time-out values in the Plugged in column and in the
Running on batteries column. Lower time-out values will save more battery power.
Note: Also consult Windows user guide for more information on how to use Windows power
management functions.
Note: Actual dialogue box shown above may appear slightly different
Suspend Mode
Standby Suspend
The system automatically enters this mode after a period of inactivity, which is set in the Power Schemes dialog box. In
Standby mode, hardware devices, such as display panel and hard disk, are turned off to conserve energy.
Hibernate Suspend
In this mode, all system data are saved in the hard disk before powering down. When this mode is activated, all system state
and contents are saved to the hard disk drive after a period of inactivity defined by the user. No power or very little power
is drawn from the battery module under this mode.
However, depending on how much RAM that have been installed on your computer, the amount of time the system
requires to restore all its previous contents can range from 5 to 20 seconds.
For Windows 2000 / XP users, hibernation is handled by the operating system; therefore, no special disk partition or disk
file is necessary.
If you wish to activate Hibernate mode, you need enable Hibernate Support in the Hibernate tab of the Power Options
menu.
ENG
Note: Do not install or remove the memory module when the system is in the suspend mode.
Note: Actual dialogue box shown above may appear slightly different.
23PRESTIGIO AVANTI 1592W
Page 25
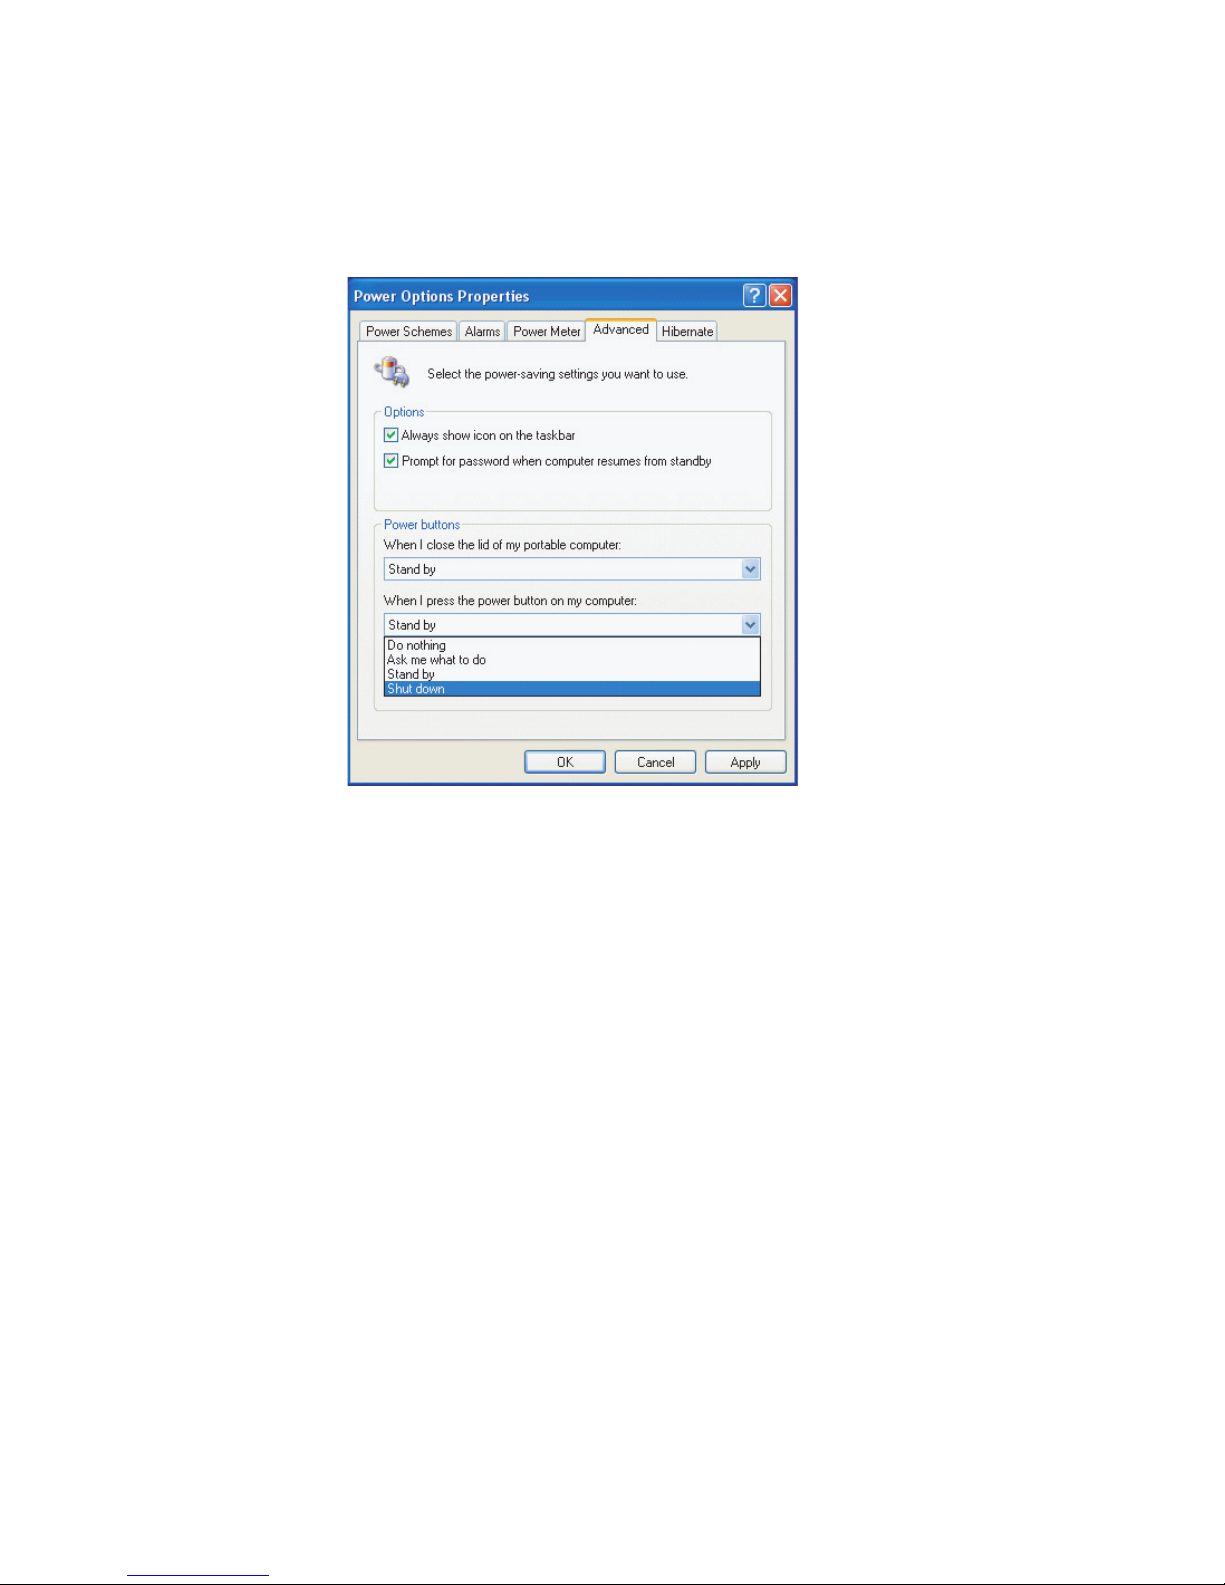
Power Button Action
The notebook PC’s power button can be set to turn off the system or activate the suspend mode.
Go to [Start > Settings > Control Panel > Power Options] and click on the Advanced tab. In the pull-down menu, select
how you wish the power button to work a
ENG
Note: Actual dialogue box shown above may appear slightly different
Warning: In the When I close the lid of my portable computer pull-down menu, DO NOT select Do
nothing – otherwise the system will still run at high speed while the processor’s fan grill is fully
blocked by the closed LCD panel. The heat will damage the LCD panel.
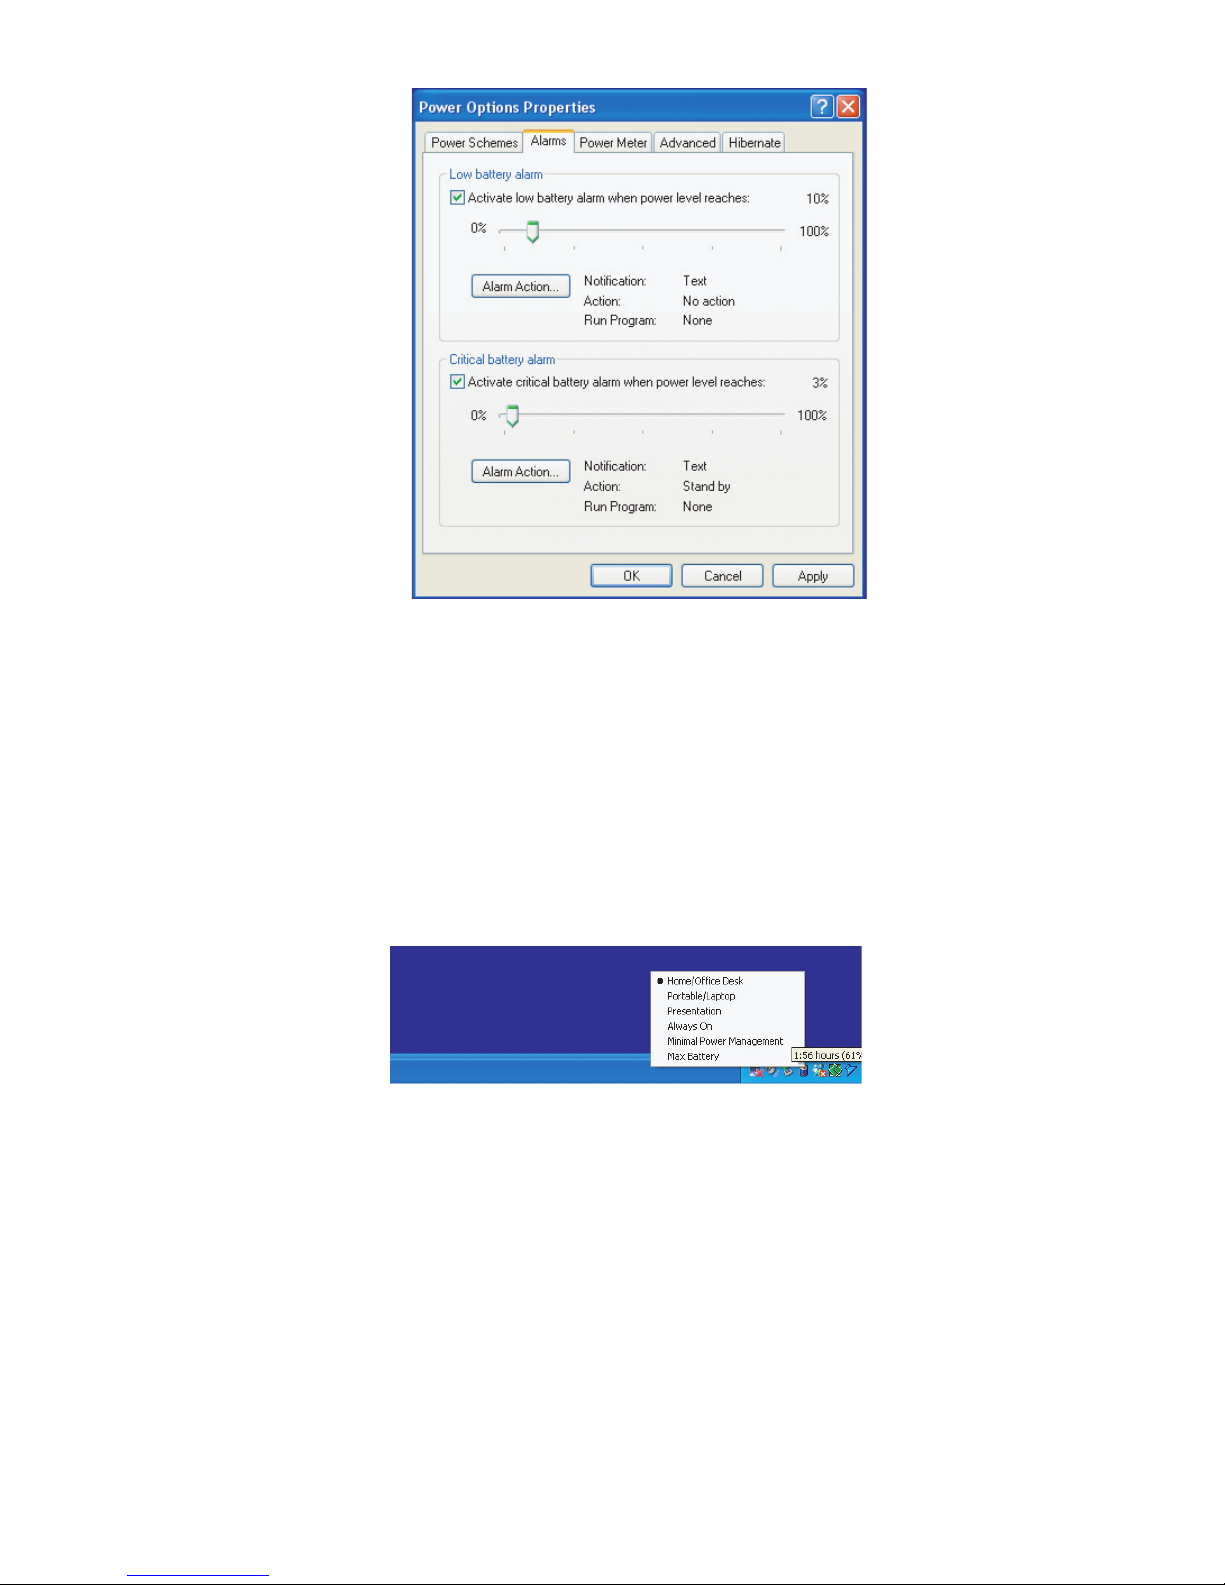
Low Battery Warning
You can define when and how the system warns you of its battery-low condition.
Go to the Alarms tab in the Power Options Properties box. If you wish to hear audible beeps, click on the Alarm Action
button and put a check on Sound Alarm.
24 PRESTIGIO AVANTI 1592W
Page 26
Note: Consult Windows user guide for more information on how to use Windows power
management functions.
Note: Actual dialogue box shown above may appear slightly different.
Power Manu Quick Access
ENG
Instead of making specific selections in the Power Options Properties box, you can quickly and easily specify which preset power saving function you desire by clicking on the Battery icon at the lower right-hand corner of the task bar. (If you
do not see a battery or AC-in icon, go to Power Options Properties box and click on the Advanced tab. Check off “Always
show icon on the task bar”.) S elect Max Battery if you want the system to enter suspend mode more often. Or, select Always
On if your notebook PC is plugged into an AC power source.
Note: Actual dialogue box shown above may appear slightly different
25PRESTIGIO AVANTI 1592W
Page 27
UPGRADING YOUR COMPUTER
In this chapter, you will learn how to upgrade the DRAM, hard disk drive, and to install the optional wireless LAN mini PCI.
Warning: We strongly recommend that you return the notebook to the dealer or the shop for
ENG
the hardware upgrade.
Before you perform the hardware upgrade, please turn off the system, unplug the AC adapter,
remove the battery pack and also disconnect the LAN and Modem cables first for your safety.
When the hardware upgrade is completed, please be sure to fasten all the screws before turning
on the notebook.
Upgrading the Hard Disk Drive
Replacing the original drive with one of larger capacity can increase the hard drive capacity of your computer. The
computer uses a 9.5 mm (height), 2.5-inch Serial ATA type hard disk.
Be sure to make a backup copy of all your data before attempting this operation.
Warning: Hard drive upgrade is a delicate process. Please observe the following instructions
carefully or have a qualified technician install it for you. Damages due to mishandling of this
procedure are NOT covered by the manufacture’s warranty.
Warning: Apply care when handling the hard disk.
Do not drop or apply any shock.
Do not press on the cover.
Do not touch the connector with your fingertips.
Mishandling of the hard drive can result in permanent loss of data. Make a backup copy of the
drive’s content before you remove it.
Note: Certain models that come with the IBM-brand hard drive emit a clattering sound when it is
being rattled. This is a normal condition.
Upgrading the Hard Disk Drive
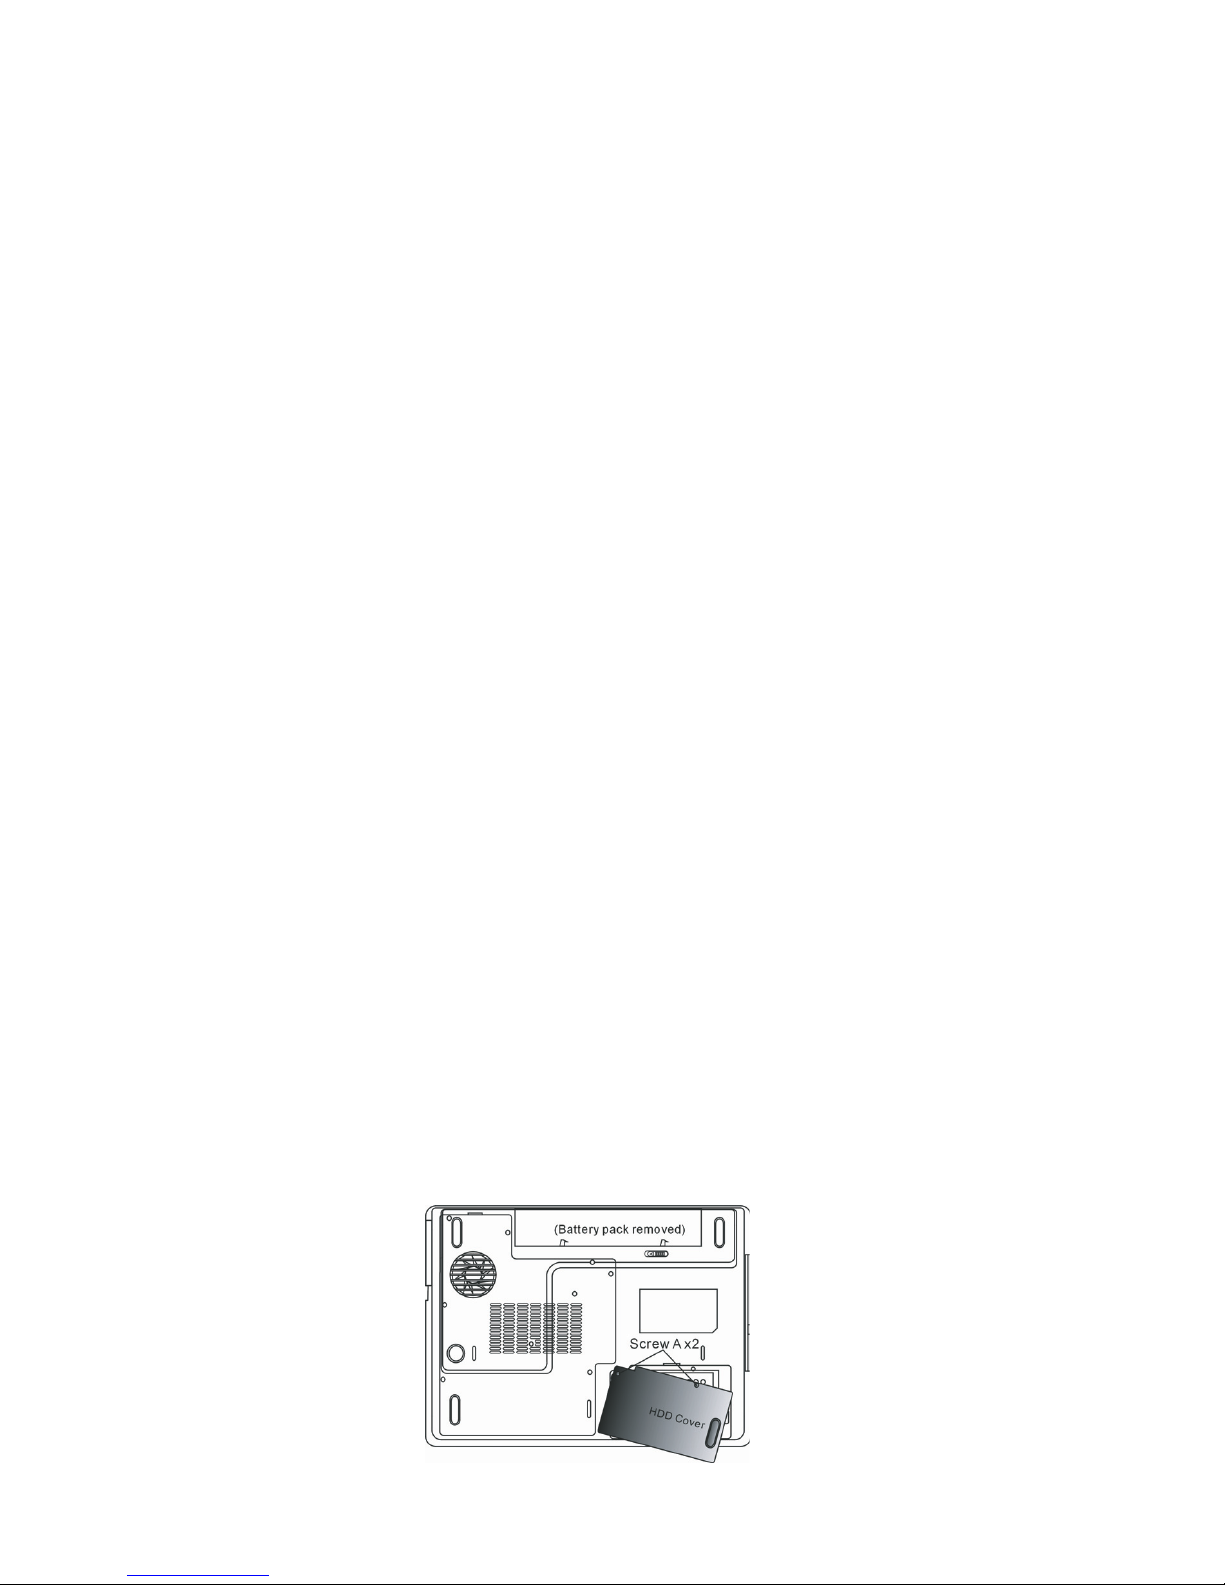
To replace the hard disk drive, do the following:
1. Turn OFF the computer. Unhook the AC cord and all cables/devices attached to the notebook. Remove the battery.
2. Place your hand on a large metal object momentarily to discharge any static electricity.
3. Locate and remove 2 Screw As.
4. Remove HDD Cover.
26 PRESTIGIO AVANTI 1592W
Page 28
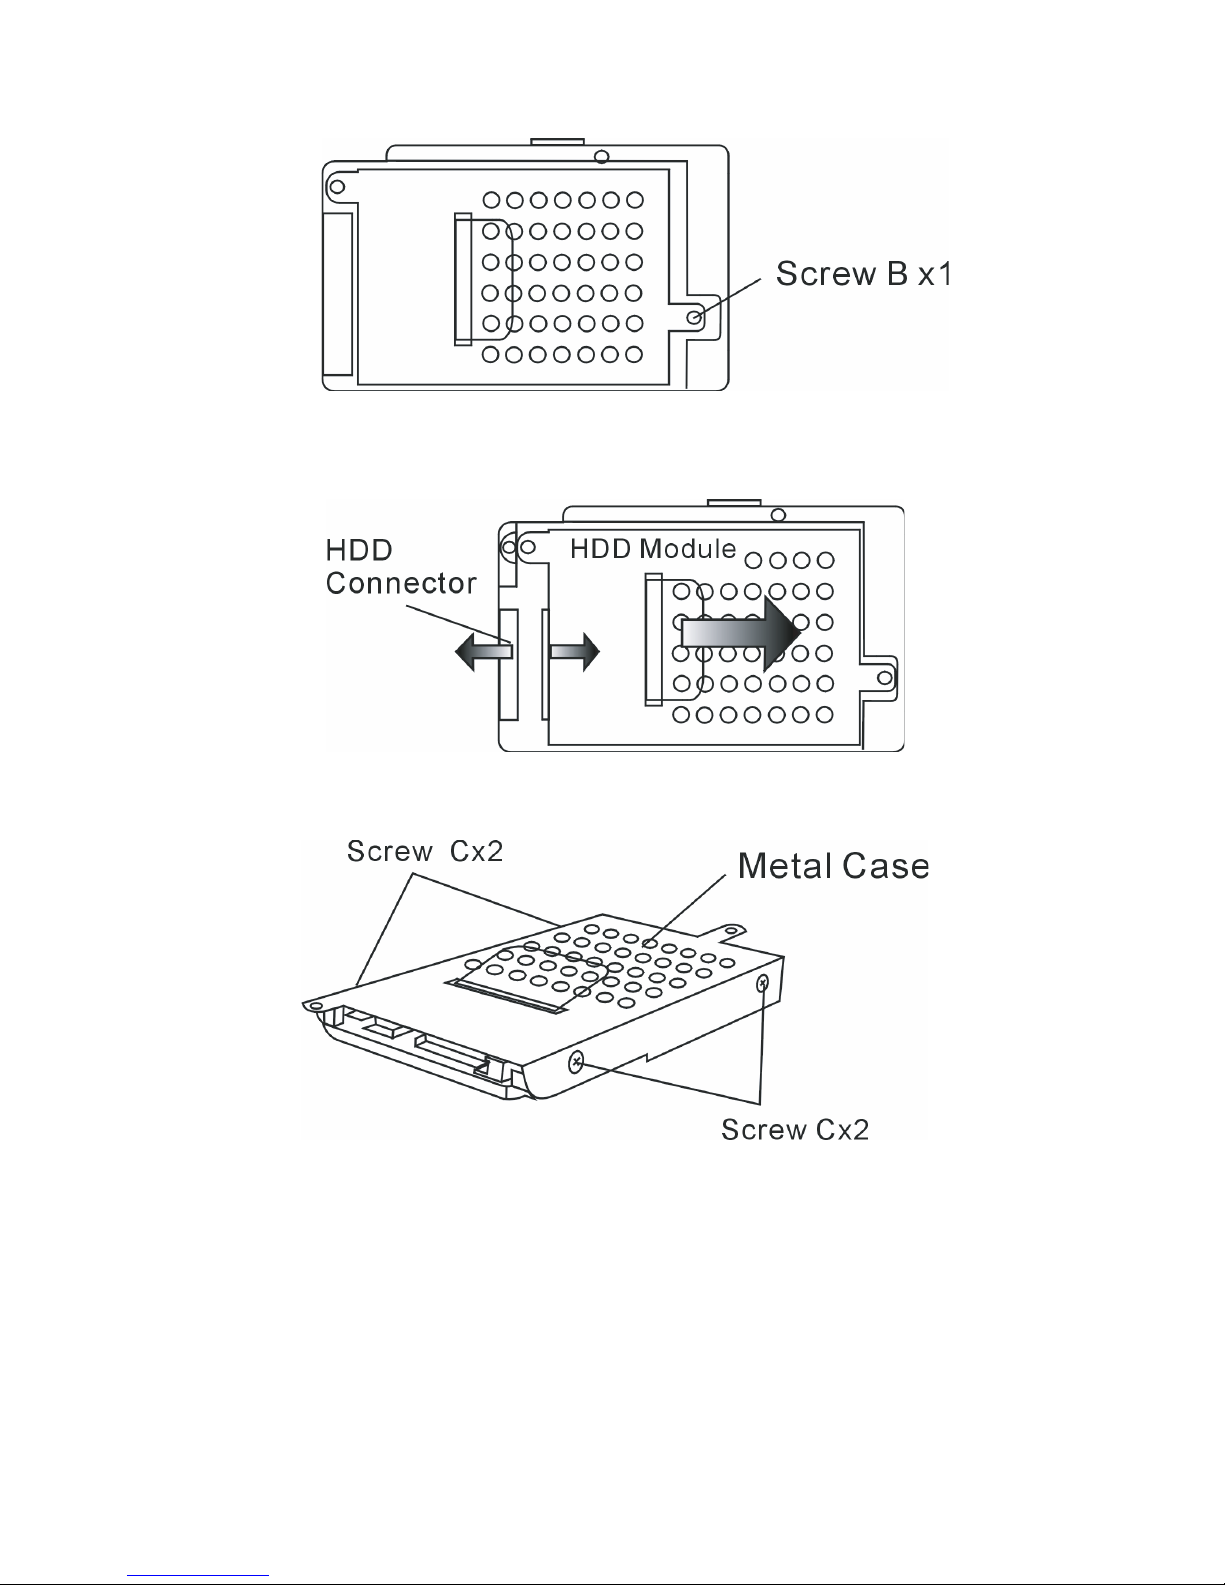
5. Locate and remove 1 Screw B.
6. Push the HDD module to the right and separate it from the connector. Lift the module away from the bay.
ENG
7. Locate and remove 4 Screw Cs from the HDD module. Remove the metal case.
8. Re-attach the metal cover to the new hard drive and tighten 4 Screw Cs. Note the green PC board of the hard disk drive
is facing against the metal case.
9. Re-attach the HDD module to the HDD connector. And re-attach 1 Screw B.
10. Put the HDD cover back and re-attach 2 Screw As.
Congratulations! You have now completed the hard drive upgrade. When you boot up the PC, you may need to create a
primary HDD partition and reformat the new drive and re-install O/S, drivers, and all the necessary applications.
27PRESTIGIO AVANTI 1592W
Page 29
Upgrading the System Memory
Many applications will generally run faster when the computer’s dynamic memory capacity is increased. The computer
provides two DDR2 memory sockets, located underneath the System Device Cover. You can increase the amount of memory
by replacing the existing one with a dual inline memory module (commonly known as SO-DIMM) of a higher capacity. The
ENG
SO-DIMM can be 128MB, 256MB, 512MB, or 1024MB in capacity. The SO-DIMM is of type DDR2 SDRAM, has 200 pins and
runs on 2.5V. The SO-DIMM should be PC2 3200 or PC2 4200 compliant.
Warning: Memory upgrade is a delicate process. Please observe the following instructions carefully
or have a qualified technician install it for you. Damages due to mishandling of this procedure are
NOT covered by the manufacture’s warranty.
Warning: Changing memory while your computer is in suspend or power-saving mode may cause
permanent damage to the hardware. Make sure you turn off the power and unplug the AC cord
before proceeding with a memory upgrade.
Warning: You should only use the DIMM module that is approved by the reseller or the
manufacturer; otherwise the system may become unstable.
Installing a memory module (DIMM) into the system
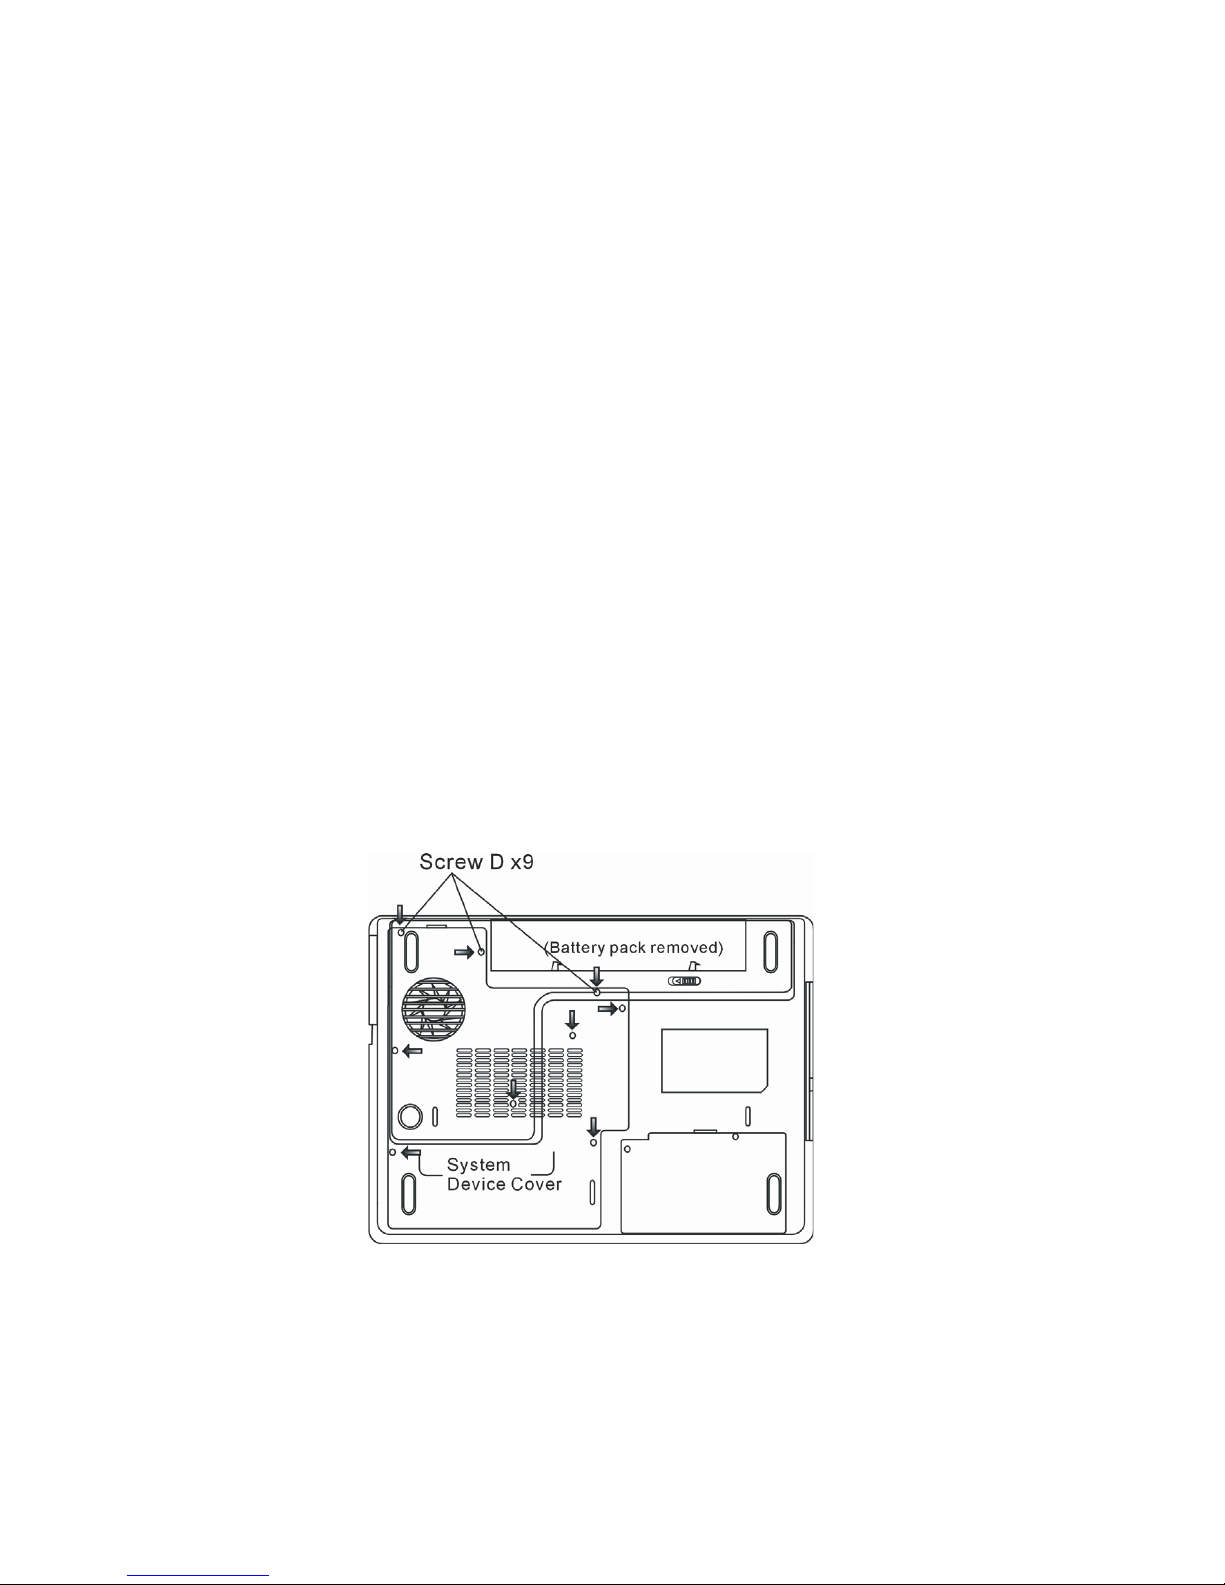
To install the DIMM under the System Device Cover, do the following:
1. Power OFF the notebook. Unplug the AC cord and all cables/devices attached to the notebook. Remove the battery.
2. Place your hand on a large metal object momentarily to discharge any static electricity. Place the notebook on a flat
surface and fully close the LCD lid.
3. Locate and remove 9 Screw Ds on the System Device Cover.
4. Remove the System Device Cover. The DIMM socket is now seen as shown below.
28 PRESTIGIO AVANTI 1592W
Page 30

5. If you need to remove an old DIMM from the socket, press out on the latches located on both edges of the socket at
the same time. The DIMM should pop up to an angle of 30 degree (see diagram below). Pull the DIMM module out of the
memory socket. Store away the DIMM for the future use.
ENG
6. Install the new DIMM module into the memory socket. The DIMM will only fit in one orientation. Insert the DIMM at an
angle of approximately 30 degrees into the empty memory socket. Then press it firmly so that the contact edge is driven
into the receiving socket.
7. Pivot the DIMM until the latches on both sides of the socket snap into place.
Note: Notice the notch on the DIMM. The notches should fit nicely with the socket.
8. Put the System Device Cover back and tighten 9 Screw Ds.
Congratulations! You have just completed the memory upgrade. When you boot up the computer, you should expect to
see an increase in DRAM capacity.
Note: Your computer has been tested with a wide range of DIMM on the market. However, not all
memory modules are compatible. Check with your system vendor for a list of compatible DIMM
for your computer.
29PRESTIGIO AVANTI 1592W
Page 31

Adding a Mini-PCI Type Wireless LAN Card (Optional Device)
Your computer comes with a unique Mini PCI Card socket, which is located next to the DRAM socket and underneath the
WLAN Module Cover. The socket allows the computer to add unique features such as wireless LAN (IEEE802.11x). Ask your
dealer on the availability of the mini PCI card.
ENG
Warning: Installing a mini PCI card is a delicate process. Please observe the following instructions
carefully or have a qualified technician install it for you. Damages due to mishandling of this
procedure are NOT covered by the manufacture’s warranty.
Warning: Installing the mini PCI card while your computer is in suspend or power-saving mode
may cause permanent damage to the hardware. Make sure you turn off the power and unplug
the AC cord before proceeding with a memory upgrade.
Installing a Mini PCI Card into the System
To install a new Mini PCI card, do the following:
1. Follow steps in the previous section, Installing a memory module (DIMM) into the system, to access the Mini PCI Socket.
2. The mini PCI card will only fit in one direction. Align the small notch in the module with the socket on the connector
and insert the card at an angle of approximately 30 degrees into the empty socket. Then press it firmly so that the contact
edge is driven into the receiving socket. Pivot the mini PCI card until the latches on both sides of the socket snap into place.
Note: If you want to remove a mini PCI card from the socket, press out on the latches located on
both edges of the socket at the same time. The card should pop up to an angle of 30 degree.
3. Locate 2 antenna cables with connectors. Snap the cable onto the golden connector on the Mini PCI Wireless LAN card.
30 PRESTIGIO AVANTI 1592W
Page 32

(Note: The connectors are fairly small! This may take some maneuvering. You may want to connect
the antenna cables before inserting the wireless card into the socket. )
4. Replace the System Device Cover and 9 Screw Ds.
Congratulations! You have now completed the mini PCI card installation. During the next time the system boots to
Windows, the system will prompt for driver location. Insert the Factory CD-ROM and point to the directory where the
Wireless LAN driver can be found. In addition to installing the driver, you may also need to run a Setup.exe program to install
the card’s utility applications before it is fully operational.
ENG
TROUBLE SHOOTING
In this chapter, you will learn how to solve common hardware and software problems.
Your computer has been fully tested and complies with the system specifications before shipping. However, incorrect
operations and/or mishandling may cause problems.
This chapter provides a reference for identifying and correcting common hardware and software problems that you may
encounter.
When you encounter a problem, you should first try to go through the recommendations in this chapter. Instead of
returning the computer and waiting for repair, you may easily solve the problems by considering the following scenarios
and possible solutions. If the error continues, contact your reseller for service information.
Before taking further actions, consider the following suggestions:
Check to see if the problem persists when all the external devices are removed.
Check to see that the green light indicator on the AC adapter is lit.
Check to see the power cord is properly plugged to the wall outlet and to the computer.
Check to see the power indicator of the computer is on.
Check to see if your keyboard is operational by pressing and holding any key.
Check for any incorrect or loose cable connections. Make sure the latches on the connectors latch
31PRESTIGIO AVANTI 1592W
Page 33

securely on to the receptor end.
Be sure you have not performed an incorrect setting on the hardware devices in the BIOS Setup utility. A
faulty setting may cause the system to misbehave. If you are not sure of the changes you made, try to
restore all the settings to factory defaults.
Be sure all the device drivers are installed properly. For example, without the audio driver properly
ENG
installed, the speakers and microphone will not work.
If external devices such as USB camera, scanner, printer do not function correctly when connected to the
system, it is usually the device’s own problem. Consult the device’s manufacturer first.
Some software programs, which have not gone through rigorous coding and testing, may cause
problems during your routine use. Consult the software vendor for problem solving.
Legacy peripheral are not plug-and-play capable. You need to restart the system with these devices
powered up and connected first.
Be sure to go to BIOS SETUP and load DEFAULT SETTING after BIOS re-flash.
Be sure the Quick Key Lockout Switch on the bottom of the computer is not engaged; otherwise the
quick keys will not work.
Audio Problems
No speaker output -
· Turn up the volume dial located at the left edge of the computer. See Chapter 1 for its location.
· Software volume control is turned down in Microsoft Sound System or is muted. Double-click the speaker icon
on the lower right corner of the taskbar to see if the speaker has been muted or turned down all the way.
· Most audio problems are software-related. If your computer worked before, chances are software may have
been set incorrectly.
· Go to [Start > Settings > Control Panel] and double-click the Sounds and Audio Devices icon. In the Audio page,
make sure that Realtek HD Audio is the default playback device.
Sound cannot be recorded -
· Double-click the speaker icon on the lower right corner of the taskbar to see if the microphone has been muted.
1. Click Options and select Properties.
2. Select Recording and click the OK button.
3. After Click OK button, the recording volume control panel will appear.
· Go to [Start > Settings > Control Panel] and double-click the Multimedia icon (or Sounds and Audio Devices
icon). In the Volume or Audio page, make sure that Realtek HD Audio is the default recording device.
Hard Disk Problems
The hard disk drive does not work or is not recognizable -
· If you had just performed a hard disk upgrade, make sure the hard drive connector is not loose and the hard
disk drive is also correctly seated. Remove it and reinsert it firmly, and restart your PC. (Refer to Chapter 4 for
details.)
· The new HDD may need to be partitioned and reformatted. O/S and drivers will need to be re-installed as well.
· Check the hard disk indicator LED. When you access a file, the LED lamp should light up momentarily.
· The new HDD may be defective or is not compatible.
· If your computer has been subjected to static electricity or physical shock, you may have damaged the disk drive.
32 PRESTIGIO AVANTI 1592W
Page 34

The hard drive is making abnormal whining noises -
· You should back up your files as soon as possible.
· Make sure the source of noise is indeed from the hard drive and not the fan or other devices.
The hard disk drive has reached its capacity -
· Run Disk Cleanup utility in Windows. [Start > All Programs > Accessories > System Tools > Disk Cleanup] The
system will prompt you for what to do.
· Archive files or programs that you had no longer used by moving them to an alternative storage medium
(floppy disk, optical record-able disk, etc.) or uninstall programs that no longer use.
· Many browsers store files in the hard drive as a cache to speed up the performance. Check the program’s Online
Help for instructions on decreasing the cache size or on removing temporary Internet files.
· Empty the Recycle Bin to create more disk space. When you delete files, Windows saves them to the Recycle Bin.
The hard disk takes longer to read a file -
· If you have been using the drive for a period, the files may be fragmented. Go to [Start > Programs >
Accessories > System Tools > Disk Defragmenter] to perform a disk defragmentation. This operation may take a
while.
· Interrupt requests or problems with other hardware devices may have occupied the CPU and therefore slows
down the system performance.
The files are corrupted -
· Run the Error-checking utility in Windows to check the HDD. Double-click My Computer. Right-click C: and select
Properties. Click Check Now in Error-checking in Tools.
ENG
Optical Drive Problems
The optical drive does not work -
· Try rebooting the system.
· The disk is damaged or files are not readable.
· After you have inserted a CD-ROM disk, it may take a moment before you can access its content.
The drive dose not read any disks -
· The CD may not be properly seated in the tray. Make sure the disk is firmly seated onto the spindle.
· The disk is damaged or not readable.
The disk cannot be ejected -
· Normally, it takes a few seconds to eject the disk.
· If the disk cannot be ejected, it may be mechanically jammed. Straighten out a paper clip and insert it to a tiny
hole next to the eject button. This should reject the disk tray. If not, return the unit for repair. Do not forcefully
pull on the disk tray.
The Combo or DVD RW drive (optional device) cannot record -
· You need to purchase and install a burner utility program to record files to a blank media.
33PRESTIGIO AVANTI 1592W
Page 35

Display Problems
The display panel is blank when the system is turned on -
· Make sure the computer is not in the Standby or Hibernate suspend modes. The display is turned off to conserve
energy in these modes.
ENG
The screen is difficult to read -
· The display resolution should be set to at least1024x768 for optimal viewing.
1. Go to [Start > Settings > Control Panel] and double-click the Display icon.
2. Under the Settings page, set screen resolution to at least 1024x768 and choose at least 256 colors.
The screen flickers -
· It is normal if the display flickers a few times during shutting down or powering up.
Keyboard and Mouse Problems
The built-in touch pad performs erratically -
· Make sure there is no excess perspiration or humidity on your hand when using the touch pad. Keep the surface
of the touch pad clean and dry.
· Do not rest your palm or wrist on the surface of the touch pad while typing or using the touch pad.
The built-in keyboard accepts no input -
· If you are connecting an external keyboard to the system, the built-in keyboard may not work.
· Try restarting the system.
The characters on the screen repeat while I type.
· You may be holding the keys down too long while you’re typing.
· Keep the keyboard clean. Dust and dirt under the keys could cause them to stick.
· Configure the keyboard to wait longer before the auto repeat feature starts. To adjust this feature, Go to [Start >
Settings > Control Panel], and double-click the Keyboard icon. A dialogue box shows up with the adjustable
settings for the keyboard.
CMOS Battery Problem
A message “CMOS Checksum Failure” displays during the booting process or the time (clock) resets when booting -
· Try to reboot the system.
· If the message “CMOS Checksum Failure” appears during the booting procedure even after rebooting, it may
indicate failure of the CMOS battery. If so, you need to replace the battery. This battery normally lasts two to five
years. The battery is of type CR2032 (3V). You may replace it by yourself. The battery is located under the System
Device Cover on the bottom of the notebook. See Chapter 4 for more details.
Memory Problems
The POST does not show an increased memory capacity when you have already installed additional memory -
· Certain brands of memory module may not be compatible with your system. You should ask your vendor for a
34 PRESTIGIO AVANTI 1592W
Page 36

list of compatible DIMM.
· The memory module may not be installed properly. Go back to Chapter 4 to review the details of this operation.
· The memory module may be defective.
The O/S issues an insufficient memory error message during operation -
· This is often a software or Windows-related problem. A program is draining the memory resources.
· Close the application programs you’re not using and restart the system.
· You need to install additional memory module. For instructions, go to Chapter 4 Upgrading Your Computer.
Modem Problems
The built-in modem does not respond -
· Make sure the modem driver is loaded properly.
· Go to [Start > Settings > Control Panel > Phone and Modem Options] and go to Modems tab. Make sure
SmartLink 56K Voice Modem or Uniwill V.92 Modem is listed. Otherwise, click the Add button to add the modem
drive, which is located in the factory CD-ROM (or floppy diskette).
· Go to [Start > Settings > Control Panel > System] and click Device Manager button in the Hardware page to
check for possible resource or driver conflict. See Windows on-line help or manual for how to handle such
problems.
· Make sure the phone line, which the computer is connected to, is working.
Connection difficulties -
· Be sure to disable Call Waiting on the phone line.
· Be sure to have the correct country setting where your computer is used. [Start > Settings > Control Panel >
Modem Settings > Configuration] In the Country/Area pull-down menu, select the appropriate country setting.
· Excessive line noise might cause the connection to be dropped. To check this, put the regular phone handset on
the line and placing a phone call. If you do hear abnormal noise, try to make the modem connection with a
different line or contact your local telephony company for service.
· Make sure the cable connection is firm.
· Try a different receiver number and see if the problem persists.
ENG
Network Adapter / Ethernet Problems
The Ethernet adapter does not work -
· Go to [Start > Settings > Control Panel > System > Hardware > Device Manager]. Double-click on Network
Adapters and check if Realtek RTL8510EX Family Fast Ethernet NIC appears as one of the adapters. If it does not
exist, Windows has not detected the Realtek RTL8510EX Family Fast Ethernet NIC or the device driver has not
been installed properly. If there is a yellow mark or red-cross on the network adapter, it may be a device or
resource conflict. Replace or update the device driver from the factory CD-ROM disk or consult Windows manual
on how to solve the resource conflict problem.
· Make sure the physical connections on both ends of the cable are good.
· The hub or concentrator may not be working properly. Check to see if other workstations connected to the
same hub or concentrator is working.
The Ethernet adapter does not appear to operate in the 100/1000Mbps transmission mode -
· Make sure the hub you are using supports 100/1000Mbps operation.
35PRESTIGIO AVANTI 1592W
Page 37

· Make sure that your RJ-45 cable meets the 100/1000Base-TX requirements.
· Make sure the Ethernet cable is connected to the hub? socket that supports 100/1000Base-TX mode. The hub
may have both 100Base-TX and 1000Base-T sockets.
PC Card / PCMCIA Problems
ENG
Note: Some system may not have the PC Card Slot option.
PC Cards do not function-
· Make sure you have properly installed the driver for the card.
· Consult the card’s manual or contact the vendor for trouble-shooting.
The PC card cannot be recognized -
· Windows NT4.0 does not support PCMCIA (PC Card) function. You may need an external program for this.
· Make sure the card is fully inserted; the outer end of the card should be even with the edge of the computer.
· Remove and insert the PC card again.
· Make sure there is no IRQ conflict with the card. See Windows on-line help for solving IRQ conflicts.
· Reboot the computer and see if the problem persists.
· The card may be defective. Try the card on another system, if possible.
Windows crashes or freezes when you remove the PC card-
· Make sure you have <Stop> the PC card before removing it. Double-click the Safely Remove Hardware icon at
the lower right corner of the task bar and select the card you wish to stop. When you click <Close>, in few
seconds Windows will prompt you to remove the card.
Performance Problems
The computer becomes hot -
· In a 35oC environment, the certain areas of the computer’s back case are expected to reach 50 degrees.
· Make sure the air vents are not blocked.
· If the fan does not seem to be working at high temperature (50 degrees Celsius and up), contact the service
center.
· Certain programs that are processor-intensive may increase the computer temperature to a degree where the
computer automatically slows down its CPU clock to protect itself from thermal damage.
The program appears stopped or runs very slowly -
· Press CTRL+ALT+DEL to see if an application is still responding.
· Restart the computer.
· This may be normal for Windows when it is processing other CPU-intensive programs in the background or
when the system is accessing slow-speed devices such the floppy disk drive.
· You may be running too many applications. Try to close some applications or increase system memory for higher
performance.
· The processor may have been overheated due to the system’s inability to regulate its internal heat. Make sure the
computer’s ventilation grills are not blocked.
36 PRESTIGIO AVANTI 1592W
Page 38

Firewire (IEEE1394) and USB2.0 Problems
The USB device does not work -
· Windows NT 4.0 does not support USB protocols
· Check the settings in the Windows Control Panel.
· Make sure you have installed the necessary device drivers.
· Contact the device vendor for additional support.
The IEEE1394 port does not work -
· Go to [Start > Settings > Control Panel > System > Hardware > Device Manager]. You should see an entry
which reads “Texas Instrument OHCI Compliant IEEE 1394 Host Controllers”. If it does not exist, Windows has not
detected the host controller or the device driver has not been installed properly. If there is a yellow mark or redcross on the 1394 host controller, it may be a device or resource conflict. Replace or update the device driver
from the factory CD-ROM disk or consult Windows manual on how to solve the resource conflict problem.
· Make sure the cable is fully connected.
· Make sure you have installed the necessary device drivers.
· Contact the device vendor for additional support.
PRODUCT SPECIFICATION
ENG
Processor and Core Logic
Processor
Mobile Intel Pentium M (Napa) Dual Core, up to 2.16GHz,
2 MB L2 cache, 667MHz FSB or
Mobile Intel Pentium M (Napa) Single Core, up to 1.83GHz,
2MB L2 cache, 667MHz FSB
Core Logic
Intel Calistoga 945PM + ICH7-M chipset with audio, modem, and USB2.0 controllers integrated
533/667 MHz DDR2 interface
System Memory
Memory Type
DDR2 SDRAM 533MHz, PC2 4200 compatible
Default
256 / 512 / 1024MB/ 2GB, 2.5-Volt 64-bit bus
Memory Expansion
Two 200-pin DIMM sockets, Max 2 GB
Display
LCD Panel
15.4-inch (1280x800) WXGA TFT display with 24-bit colors or
Graphic Accelerator
ATI Mobility M54-P (with 128MB frame buffer) or
PCI Express bus architecture graphics capability
Graphic Bus
Hardware Motion Compensation and IDCT Supported for
MPEG1/2 Playback
Motion Playback
DirectX compatible
(Integrated with graphic accelerator)
Audio
Chipset
Intel (ICH7M) integrated audio controller
Audio Codec
Realtek ALC880
Sound Capabilities
DirectSound 3D, EAX 1.0 & 2.0 compatible
A3D, I3DL2 compatible
AC97 V2.3 compatible
7.1 Multi-channel compatible (through S/PDIF)
Supports Azalia standard
2 Stereo Speakers with 1 Subwoofe
37PRESTIGIO AVANTI 1592W
Page 39

Modem
Chipset
Intel (ICH7M) integrated Modem Controller with MDC card,
AC97 V2.2 Modem support
Transmission Rate
ENG
V.92 / V.90 / K56flex for download data speed up to 56Kbps.
V.34, V.17, V.29 protocol supported
Wireless LAN
Module
Intel PRO/Wireless 3945ABG, MiniPCI Interface
Transmission Protocol
IEEE802.11 A&B&G
LAN / Ethernet
Chipset
Realtek 8110 Ethernet function for 10/100/1000Base-TX
network standards
PnP Function
Windows 2000 / XP Plug and Play compatible
Flow Control
Automatic Jam and auto-negotiation for flow control
Speed Selection
Auto Negotiation and Parallel detection for automatic
speed selection (IEEE 802.3u)
Other Features
High performance 32-bit PCI bus master architecture with
integrated DMA controller for low CPU and bus utilization
Remote Wake-up Scheme supported
Hot Insertion supported
Firewire IEEE1394(a)
Chipset
TI TSB43AB22A IEEE1394 OHCI Host Controller and
Capabilities
Up to 400 Mbps
Expandable up to 63 devices in chains
Storage
Hard Drive
2.5-inch format hard disk drive
Combo Drive
5.25-inch format (12.7mm height) fixed module (Optional
Purchase)
DVD±R/±RW or DVD-Dual or DVD-Multi
Standards
Keyboard & Touch pad
Keyboard
88-key QWERTY keyboard with embedded numeric keypad and Windows keys, 19.05mm Pitch
Touch pad
Built-in Touch Pad with Disable / Enable Touch Pad button
Express Card (New Card) &
Multiple Card Reader
Chipset
Genesys GL817E (Card Reader)
Express Card / New Card
Single Slot, 34mm and 54mm type supported
4-in-1 Card Reader Format Support
Multimedia Card (MMC), Secure Digital Card (SD), Memory
Stick (MS), and MS Pro Card
Ports and Connectors
Mic-In Port
One Microphone-in jack
Audio-Out / SPDIF
One Headphone / SPDIF jack
Firewire
One Firewire (IEEE1394) host connector
USB2.0 Port
Three USB2.0-compliant connectors
Ethernet
One standard network Ethernet connector (RJ-45)
Modem
One modem / phone connector (RJ11)
S-Video
One S-video (TV-out) output connector
Power-In
One DC-in connector
DVI-I Port
One DVI-I video connector
Card Reader
One 4-in-1 Card Reader slot
New Card Slot
One New Card Slot (type 54 / 34)
VR Dial
One VR Dial for audio/speaker volume
38 PRESTIGIO AVANTI 1592W
Page 40

Battery Pack / AC Adapter
Primary Battery Pack
Li-ion 6-Cell pack, 10.8V x 4400 mAH
Feature
Low battery state with low battery warning beep
Uniwill SmartPower II Power Management
Smart Battery Compliant; low battery warning beep
Long Battery Life Mode and Silent Mode
Adapter AC-Input /DC-Output
Autosensing AC-in 100~240V, DC-out 20V, 90W
BIOS
PnP Function
Phoenix PnP BIOS
Self Test
Power On Self Test
Auto Detection
DRAM auto-detection, auto-sizing
L2 Cache auto-detection
Hard disk type auto-detection
Power Management
APM 1.2 (Advanced Power Management) &
ACPI 2.0 (Advanced Configuration Power Interface)
Security
Two Level Password Protections
Other Features
32bit access, Ultra DMA, PIO5 Mode support
Multi-boot capability
O/S
Compatible with Microsoft Windows XP / MCE Home Edition
Physical Specification
Dimension
360 (W) x 269 (D) x 25-37.1 (H) mm
Weight
6.8 lbs / 3.1 KG (with 15.4”LCD, DVD-ROM Drive, and 6-cell
battery pack)
Environmental Limits
Operating Temperature: 5 to 35oC (41 to 95oF)
Operating Humidity: 20 to 80 percent RH (5 to 35oC)
Storage Temperature: -15 to 50oC (-5 to 122oF)
ENG
AGENCY REGULATORY NOTICES
Federal Communications Commission Notice
This equipment has been tested and found to comply with the limits for a Class B digital device, pursuant to Part 15 of the
FCC Rules. These limits are designed to provide reasonable protection against harmful interference in a residential installation. This equipment generates, uses, and can radiate radio frequency energy and, if not installed and used in accordance
with the instructions, may cause harmful interference to radio communications. However, there is no guarantee that
interference will not occur in a particular installation. If this equipment does cause harmful interference to radio or
television reception, which can be determined by turning the equipment off and on, the user is encouraged to try to
correct the interference by one or more of the following measures:
· Reorient or relocate the receiving antenna.
· Increase the separation between the equipment and the receiver.
· Connect the equipment into an outlet on a circuit different from that to which the receiver is connected.
· Consult the dealer or an experienced radio or television technician for help.
Modifications
The FCC requires the user to be notified that any changes or modifications made to this device that are not expressly
approved by the Manufacture may void the user’s authority to operate the equipment.
39PRESTIGIO AVANTI 1592W
Page 41

Connections to Peripheral Devices
Connections to this device must be made with shielded cables with metallic RFI/EMI connector hoods to maintain compliance with FCC Rules and Regulations.
Declaration of Conformity
ENG
This device complies with Part 15( CLASS B)/68 the FCC Rules. Operation is subject to the following two conditions: (1) this
device may not cause harmful interference, and (2) this device must accept any interference received, including interference that may cause undesired operation.
European Notice
Products with the CE Marking comply with both the EMC Directive (89/336/EEC) and the Low Voltage Directive (73/23/
EEC) and R&TTE Directive (1999/5/EC) issued by the Commission of the European Community.
Compliance with these directives implies conformity to the following European Norms:
· EN55022 : 1998+A1: 2000+A2: 2003, CLASS B
· EN61000-3-2 : 2000
· EN61000-3-3 : 1995+A1: 2001
· EN55024 : 1998+A1 : 2001+A1: 2003
· IEC61000-4-2: 2001
· IEC61000-4-3:2002+A1:2002
· IEC61000-4-4:1995+A1:2000+A2:2001
· IEC61000-4-5:2001
· IEC61000-4-6:2001
· IEC61000-4-8:2001
· IEC61000-4-11:2001
· EN50082 (IEC801-2, IEC801-3, IEC801-4) Electro-magnetic Immunity
· EN 300 328-2, EN 300 328-1, EN 301 489-1, EN 301 489-17 (ETSI 300 328, ETSI 301 489) Electro-magnetic
Compatibility and Radio Spectrum Matter.
· TBR21 ( ETSI TBR21) Terminal Equipment.
· EN60950 (IEC950) I.T.E. Product Safety
Power Cord Requirement
The power cord supplied with the AC adapter should match the plug and voltage requirements for your local area.
Regulatory approval for the AC adapter has been obtained using the power cord for the local area. However, if you travel
to a different area and need to connect to a different outlet or voltage, you should use one of the power cords listed below.
To purchase a power cord (including one for a country not listed below) or a replacement AC adapter, contact your local
dealer.
Other Countries
· The cord set fittings must bear the certification mark of the agency responsible for evaluation in a specific
country. Acceptable agencies are:
BSI (UK)
OVE (Australia)
CEBEC (Belgium)
SEMKO (Sweden)
40 PRESTIGIO AVANTI 1592W
Page 42

FIMKO (Finland)
DEMKO (Denmark)
NEMKO (Norway)
SETI (Finland)
EANSW (Australia)
SEV (Switzerland)
IMQ (Italy)
UTE (France)
CCC (China)
PSB (Singapore)
PSE (Japan)
BSMI (Taiwan)
B (Polish)
VDE (Germany)
SASO (Saudi Arabia)
· The flexible cord must be of a HAR (harmonized) type HO5VV-F 3-conductor cord with a minimum conductor
size of 0.03 square inches.
· The minimum specification for the flexible cord for Class II product are: (1) 2X0.75 mm2 conductors, (2) 2-
conductor cord.
· The cord set must have a current capacity of at least 10 A and a nominal voltage rating of 125 / 250 VAC.
ENG
CAUTION: MODEL P53IAx IS DESIGNED TO USE WITH THE FLLOWING AC ADAPTER MODEL ONLY
Manufacture: Li-Shin INC, LITE-ON ELECTRONICS, INC.
Model: LSE0202C2090 (90W), LSE0202D2090 (90W), PA-1900-05 (90W), PA-1900-06 (90W)
Telephone lines requirement
· The appropriate utilization of 26AWG telephone line cord on unit.
CAUTION: Always disconnect all telephone lines from the wall outlet before servicing or
disassembling this equipment.
CAUTION: To reduce the risk of fire, use only No. 26AWG or larger telecommunication line cord.
Battery Pack Safety
· The battery pack is intended to use only with this notebook.
· Do not disassemble the pack.
· Do not dispose of the battery pack in fire or water.
· To avoid risk of fire, burns, or damage to your battery pack, do not allow a metal object to touch the battery
contacts.
· Handle a damaged or leaking battery with extreme care. If you come in contact with the electrolyte, wash the
exposed area with soap and water. If it contacts the eye, flush the eye with water for 15 minutes and seek
medical attention.
· Do not charge the battery pack if the ambient temperature exceeds 45oC(113oF).
· To obtain a replacement battery, contact your local dealer.
· Do not expose the battery pack to high storage temperatures (above 60oC, 140oF).
· When discarding a battery pack, contact your local waste disposal provider regarding local restrictions on the
disposal or recycling of batteries.
41PRESTIGIO AVANTI 1592W
Page 43

· Use only supplied AC Adapter for charging.
CAUTION: Danger of explosion if battery is incorrectly replaced. Replace only with same or
equivalent type recommended by the manufacturer. Discard used batteries according to the
manufacturer’s instructions or local laws.
ENG
VORSICHT! Explisionsgefahr bei unsachgernazen Austausch der Batterie. Ersatz nur durch
denselben oder einem vom Hersteller empfohlenem ahnlichen Typ. Entsorgung gebrauchter
Batterien navh Angaben des Herstellers.
Laser Safety
The optical drive used with this computer is certified as a Class 1 laser device according to the U.S. Department of Health
and Human Services (DHHS) Radiation Performance Standard and International Standards IEC 825 / IEC 825-1 (EN60825
/ EN60825-1). The device is not considered harmful, but the following precautions are recommended:
· Do not open the unit.
· Avoid direct exposure to the laser beam.
· If the unit requires service, contact an authorized service center.
· Ensure proper use by reading and following the instructions carefully.
· Do not attempt to make any adjustment of the unit.
CLASS 1 LASER PRODUCT
APPAREIL A LASER DE CLASSE 1
LASERSCHUTZKLASSE 1 PRODUKT
Warning!
Do not attempt to disassemble the cabinet containing the laser. The laser beam used in this product is harmful to the eyes.
The use of optical instruments, such as magnifying lenses, with this product increase the potential hazard to your eyes. For
your safety, have this equipment serviced only by an authorized service provider.
Lithium battery warning / Bridge battery warning
This computer contains a lithium battery to power the clock and calendar circuitry.
CAUTION: Danger of explosion if battery is replaced incorrectly. Replace only with the same or
equivalent type recommended by the manufacturer. Discard used batteries according to the
manufacturer’s instructions.
When you see this symbol, be careful as this spot may be very hot.
42 PRESTIGIO AVANTI 1592W
Page 44

Prestigio Avanti 1592W
Ръководство на потребителя
Забележка
Информацията в настоящето ръководство може да бъде променена без уведомление на потребителя.
BG
ПРОИЗВОДИТЕЛЯТ ИЛИ ПРОДАВАЧЪТ НЕ МОГАТ ДА БЪДАТ ОТГОВОРНИ ЗА ГРЕШКИ ИЛИ ПРОПУСКИ В НАСТОЯЩЕТО
РЪКОВОДСТВО И НЯМА ДА ОТГОВАРЯТ ЗА ЕВЕНТУАЛНИ ЩЕТИ, ВЪЗНИКНАЛИ В РЕЗУЛТАТ ОТ ИЗПОЛЗВАНЕТО НА ТОВА
РЪКОВОДСТВО.
Информацията в това ръководство е защитена от закона за защита на авторските права. Забранено е възпроизвеждането/
копирането на цялото или части от ръководството без предварителното писмено съгласие на собствениците на правата.
Copyright Юли, 2006
Всички права запазени.
Microsoft и Windows са регисртирани търговски марки на Microsoft Corporation. DOS, Windows 95/98/ME/2000/NT/XP са
търговски марки на Microsoft Corporation.
Упоменатите в ръководството имена на продукти могат да бъдат търговски марки и/или регистрирани търговски марки
на техните собственици/компании.
Описаният в ръководството софтуер се доставя по лицензионно споразумение. Софтуерът може да се използва или
копира само съгласно това споразумение.
Този продукт използва технология за защита на авторските права, защитена от патетните закони на САЩ и други закони
за интелектуалната собственост. Използването на технологията за защита на авторските права трябва да бъде
оторизирано от Macrovision, и е предназначена за домашно разглеждане, освен ако от Macrovision не е дадена друга
оторизация. Забранено е разглобяването с цел проучване на използваната технология.
.
Rev 1.0
1PRESTIGIO AVANTI 1592W
Page 45

Предговор
Използване на ръководството
Настоящето ръководство съдържа обща информация за настройките на хардуера и софтуера, отстраняване на повреди
и технически спецификации на преносимия компютър.
BG
Символи и конвенции
В ръководството се използват следните символи и конвенции:
Когато трябва да се натиснат няколко клавиши едновременно, се използва символът плюс (+).
Например, Fn+F7 означава едновременно задържане натиснати на клавишите Fn и F7.
Когато в Windows OS е нужна серия от щраквания, се използват символите [ ] и > . Например,
[Start > Settings > Control Panel > Display] означава щракване първо на Start иконата, след това
на Settings, след това Control Panel, и след това Display.
Когато искате да изберете с тъчпада (или мишката), ще бъдете поканени да “изберете (‘select’)
или да “щракнете” (‘click’) или да “щракнете 2 пъти” (‘doubleclick’), или щракнете с десен
бутон (‘rightclick’) върху обекта.
Забележка: Текстът в този формат или символи означава специфични инструкции,
коментар, странични указания или някаква допълнителна информация, която
трябва да знаете.
Предупреждение: Текстът в този формат или символи означава, че
неизпълнението на дадени инструкции или информация може да доведе до
повреда във вашия компютър или опасност от нараняване за вас, или опасност за
живота.
Защита на вашия компютър Избягвайте грубо/невнимателно
третиране или неблагоприятна околна среда
Следвайте долните съвети, това ще гарантира, че ще използвате инвестицията си по найдобрия начин.
Вашият компютър ще ви служи добре, ако полагате правилните грижи за него.
Не излагайте компютъра на пряка слънчева светлина, нито го поставяйте близо до източници на
топлина.
Не го подлагайте на температури под 0oC (32oF) или над 35oC (95oF).
Не излагайте компютъра на въздйствието на силни магнитни полета.
Не излагайте компютъра на влага или дъжд.
Не разливайте върху компютъра вода или друга течност.
Не подлагайте компютъра на удар или силни вибрации.
Не излагайте компютъра на запрашеност и замърсеност.
Не поставяйте предмети върху компютъра, за да избегнете повреди.
Не поставяйте компютъра върху нестабилни повърхности.
Ето няколко начина как да се погрижите за вашия AC адаптер.
Не свързвайте адаптера към никакви други устройства, освен към компютъра, с който е
доставен.
Внимавайте да не попадне вода в адаптера.
Не закривайте вентилационните отвори на адаптера.
Дръжте адаптера на хладно и добре вентилирано място.
Не стъпвайте върху захранващия кабел, нито поставяйте тежки предмети върху него.
Аранжирайте кабела за захранване и останалите кабели така, че да не пресичат пътя за
минаване на вашите колеги.
2 PRESTIGIO AVANTI 1592W
Page 46

Когато откачате захранващия кабел, не дърпайте самата жица, а контакта му.
Дръжте далеч от деца.
Общият ампераж на включеното оборудване не трябва да надвишава спецификациите на
кабела, ако използвате разклонител/удължител.
Общият ампераж на оборудването свързано към един контакт на захранващата мрежа не
трябва да надвишава ампеража на бушона.
Не свързвайте към вашия ноутбук друг АС адаптер. Този мобилен компютър използва
изключително АС адаптер: Lishin 0335A2065 (65W), Lishin 0335C2065 (65W), Liteon PA165001
(65W), Liteon PA165002 (65W), EPS F10653A(65W)
При почистване на компютъра спазвайте следното:
1. Изключете компютъра и махнете батерията.
2. Откачете АС адаптера.
3. Използвайте меко парче плат, навлажнено с вода. Не използвайте течни или аерозолни
почистващи средства.
Обадете се на вашия дилър или сервизния техник, ако се случи следното:
Компютърът е паднал (бил е изпуснат), или корпусът му е повреден.
Върху компютъра е разлята течност.
Компютърът не работи нормално.
Почистване на вентилаторните отвори:
Предлагаме ви да почиствате редовно вентилаторните решетки (отвори), за да поддържате оптимално температурно
регулиране на ноутбука. За целта използвайте мека четка или прахосмукачка с накрайник четка, за да махнете
наслоения прах върху вентилаторните отвори.
BG
3PRESTIGIO AVANTI 1592W
Page 47

ПЪРВОНАЧАЛНО ЗАПОЗНАВАНЕ
Тази глава представя характеристиките и компонентите на вашия компютър.
Компоненти за висока производителност
BG
Високопроизводителен процесор с Calistoga чипсет.
Този ноутбук е снабден с мощен мобилен Intel Pentium M процесор. Заедно с последния чипсет Calistoga, системата
предлага висока производителност.
Мощна графична подсистема.
Чипсетът Intel 945GM Express има вграден графичен ускорител от следващо поколение Intel Graphics Media Accelerator
GMA950. Новият видеомодул предлага подсилена мултимедийна поддръжка MMX и подобра производителност от
предишната генерация чипсети.
LCD дисплей.
Компютърът е снабден с широкоекранен (16:10) 15.4” TFT дисплей за удобство при работа и гледане на филми.
Serial ATA харддиск (при някои модели)
Интерфейсът Serial ATA предлага повисока пропускателна способност от традиционния паралелен ATA интерфейс. Това
оптимизира производителността на твърдия диск.
ExpressCard технология
ExpressCard е следващото поколение стандарт за разширителни карти (PC Card). Интерфейсът е базиран на два стандарта:
PCI Express за високопроизводителни входоизходни операции и USB2.0 за свързване на голямо разнообразие от
периферни устройства.
Възможности за разширяване
Системата предлага възможност за ъпгрейд на твърдия диск, както и 2 слота за памет DDR SDRAM, с което дава
възможност на потребителя да увеличи капацитета на външната и системната памет съобразно своите нужди.
Вграден четец на флашкарти
Това устройство е 4в1, и може да чете дигитални медии от типа SD Card, MS Card, MMC Card, и MSPro Card).
Ethernet порт
Системата разполага с вграден 10/100/1000 Mbps Ethernet мрежов адаптер за високопропускателна връзка.
Firewire (IEEE1394 / 1394a) и USB2.0 портове
В допълнение към пълната гама вградени I/O портове, компютърът предлага IEEE1394 за ултрабърза връзка към дигитални
видеоустройства, както и USB2.0 портове за свързване на всякакъв вид USBбазирани цифрови периферни устройства.
Безжичен LAN
Вътрешният модул за безжичен LAN дава възможност на вашия ноутбук да се свързва към други системи, снабдени с
802.11 комуникация, или безжични мрежи.
4 PRESTIGIO AVANTI 1592W
Page 48

Системата с един поглед
Изглед отгоре
BG
5PRESTIGIO AVANTI 1592W
Page 49

BG
1. Ключалка за LCD екрана
Ключалката за LCD екрана заключва/освобождава горния капак с екрана.
2. LCD дисплей
Панелът е мястото, на което се показва съдържанието на системата.
3. Клавиатура
Клавиатурата се използва за въвеждане на информация. Тя има вградена цифрова клавиатура и клавиши за управление
на курсора. За подробности вижте раздел Клавиатура.
4. Тъч пад
Тъчпадът е вградено посочващо устройство с функции подобни на мишката.
5. Вграден микрофон
С вградения микрофон можете да записвате звук.
6. Бутон за активиране/отменяне на тъчпада
Този бутон активира или деактивира тъчпада.
7. Вградени стерео говорители
Вградените говорители извеждат стереозвук от звуковата подсистема.
8. Светодиоден индикатор
Светодиодните индикатори за статус показват статуса на различни активирани клавиши/функции: Цифрова
клавиатура, само главни, scroll lock, активиране на WLAN модула, както и активността наоптичното устройство и
твърдия диск. (Вижте раздела за Светодиоден Индикатор за повече подробности).
Светодиодните индикатори също показват дали системата е включена или изключена, както и заряда/зареждането на
батерията (Вижте раздел Светодиоден индикатор за повече подробности).
9. Бутон захранване/излизане от активен режим (Power / Suspend)
Бутонът захранване/бездействие (излизане от активен режим) включва и изключва ноутбука и също действа като
клавиш за изключване активното състояние на системата. Натиснете го кратко за включване на системата. Натиснете
и задръжте поне 4 секунди, за да изключите системата. Дефинирането на клавиша е в меню [Start > Settings > Control
Panel > Power Options > Advanced] . Натиснете бутона отново, за да се върнете от режим на бездействие. (Вижте Глава
3 за повече подробности по режима бездействие (suspend.)
6 PRESTIGIO AVANTI 1592W
Page 50

Забележка: Когато системата се включи, първоначално за момент светват
индикаторите за Scrolllock, Caplock, и цифрова клавиатура, за да покажат старта
на включване на различните компоненти.
10. Бутон за тих режим
С натискането на този бутон системата намапява потреблението на енергия, съответно се намалява и скоростта на
вентилатора за постигане на минимални нива на шум за поудобна работа.
Може да е необходимо да отидете в настройките на BIOS за да активирате тихия режим (Silent Mode) за този бутон (за
подробности вижте Глава 2.)
11. Бърз клавиш за Outlook Express
С натискането му се пуска Outlook Express в Windows.
12. Бърз клавиш за Internet Explorer
С натискането му се пуска Internet Explorer в Windows.
13. Бърз клавиш за Windows Media Player
С натискането му се пуска Media Player в Windows.
Изглед отпред и отзад
BG
Предупреждение: не поставяйте тежки предмети върху ноутбука. Това може да
повреди екрана.
1. Ключ за включване/изключване на безжичната комуникация.
Използвайте този ключ за включване/изключване на безжичната комуникация
2. Вход за захранване (DCin)
Тук се включва жакът на АС адаптера за (DCout) за захранване на компютъра.
7PRESTIGIO AVANTI 1592W
Page 51

3. Порт на модема
Тук се включва конекторът на телефонната линия (RJ11) за факс/модем комуникации.
4. Батерия
Батерията представлява вградения източник на захранване на ноутбука.
BG
5. Вентилационна решетка
Решетката (отворите) на вентилатора ся мястото, където става обмен на въздуха за разсейване на акумулираната
топлина в компютъра. Не запушвайте тези отвори.
6. Отвор за Kensington ключалка
Този отвор служи за закрепване към него на Kensington защитна ключалка, с цел предпазване от кражба.
Изгледи отстрани
Предупреждение: не поставяйте тежки предмети върху ноутбука. Това може да
повреди екрана.
1. Шайба за нивото на звука
Използвайте шайбата за да регулирате нивото на звука от говорителите.
2. Извод за стерео слушалки / SPDIFout
Изводът за стерео слушалки (3,5mm диаметър) е мястото за включване на слушалки или външни говорители.
Алтернативно, можете да свържете вашия S/PDIF изход към външен DTS, AC3, или PCM звуков процесор / декодер във
вашата домашна стерео уредба.
3. Вход за микрофон
Входът microphone (3,5mm диаметър) е мястото , където се включва микрофон.
8 PRESTIGIO AVANTI 1592W
Page 52

4. Оптично устройство, Бутон за изваждане на диска и Отвор за
ръчно изваждане
Ако вашият компютър е доставен с Комбо, DVDRW, DVD+RW, или DVDDual оптично устройство, вие можете да архивирате
данни върху CDR / CDRW или DVD RW оптичен диск. Натиснете бутона за изваждане на поставката (изваждане на
диска). Отворът за ръчно изваждане служи да извадите ръчно (или при изключено захранване) заклинил оптичен диск.
5. USB2.0 порт (х2)
Портът Universal Serial Bus (USB2.0съвместим) позволява да свързвате към компютъра широка гама периферни
устройства, със скорост на обмен на данните до 480 Mbps. Този порт съответства на последните USB2.0 plugandplay
спецификации.
6. DVII порт
Портът за DVII видео изход служи за свързване на външен LCD монитор или проектор.
7. TV (SVideo) порт
SVideo портът позволява да изведете видеосигнал към телевизор или друго аналогово устройство. TV портът е със
защита по отношение на авторските права, затова при възпроизвеждане на DVD филм изходният сигнал се следи и
смущава срещу аналогов презапис.
8. Ethernet / LAN порт
Този порт свързва машината към мрежа чрез RJ45 кабел, и също съответства на 10/100/1000BaseTX протокола за обмен
на данни.
BG
9. 4в1 Картов четец
Картовият четец 4в1 поддържа флаш памети с формат SD Card, MS Card, MMC Card, и MSPro Card.
10. Firewire / IEEE1394 / 1394a порт
Това е високоскоростен сериен порт. Към него можете да свържете всяко Firewireready устройство.
5. USB2.0 порт (х1)
Портът Universal Serial Bus (USB2.0съвместим) позволява да свързвате към компютъра широка гама периферни
устройства, със скорост на обмен на данните до 480 Mbps. Този порт съответства на последните USB2.0 plugandplay
спецификации.
12. ExpressCard слот
Това е слот, в който се поставя Express Card (Type 54). ExpressCard Type 54 означава приемане на карти с дебелина 54mm
или 34mm. ExpressCard интегрира PCIExpress и USB2.0 технологиите.
9PRESTIGIO AVANTI 1592W
Page 53

Изглед отдолу
BG
1. Батерия и заключалка за батерията
Батерията е вграденият източник на захранване на компютъра. Плъзнете заключалката на батерията, за да я освободите
и извадите при нужда.
2. Капак на твърдия диск
Под този капак е разположен твърдия диск на системата. Той може да бъде ъпгрейдван до поголям капацитет. (Вижте
Глава 4 за инструкции по обновяване на твърдия диск.)
10 PRESTIGIO AVANTI 1592W
Page 54

3. Капак за системно устройство
Под този капак са разположени процесорът на системата, модулът за безжичен LAN и DDR паметта. Вие можете да
инсталирате WLAN модул, ако такъв не е поставен в началната конфигурация, или да ъпгрейдвате паметта до поголям
капацитет. (Вижте Глава 4 за инструкции по ъпгрейд на паметта.)
4. Вентилационна решетка
Вентилационната решетка е мястото на въздухообмен за извеждане на топлината от вътрешността на компютъра. Не
закривайте решетката за да не блокирате въздушния поток.
Предупреждение: Не блокирайте изхода на въздух през вентилационната решетка.
Поставяйте машината само на твърда повърхност. Долната страна на компютъра
може силно да се нагорещи.
AC адаптер
BG
1. DCout конектор
Този конектор подава прав ток към извода за захранване на компютъра (DCin).
2. Адаптер
Адаптерът превръща променливия ток от захранващата мрежа в прав ток за компютъра.
3. AC контакт
Контактът служи за свързване на адаптера към розетка от захранващата мрежа.
Предупреждение: Уверете се, че използвате стандартен 3изводен контакт на
мрежата със занулен извод. Ако не, можете да усетите леко дразнене/гъделичкане
при докосване на някоя от металните части на компютъра, като I/O портове. Това е
от утечките на ток при неправилно зануляване на контакта на мрежата. Трябва да
знаете, че количеството ток на утечка е в безопасните граници предписвани от
инструкциите за безопасност и не е опасно за човешкото тяло.
11PRESTIGIO AVANTI 1592W
Page 55

Светодиоден индикатор на статуса
Светодиодният индикатор показва статуса на работа на ноутбука. Когато дадена функция е активирана, светодиодът
(LED) светва. Разделът подолу описва индикациите му.
Индикатори на статуса на системата и захранването
BG
LED графичен символ Индикация
Зелената светлина показва, че ноутбука е включен
Зелената светлина показва, че WLAN модулът е активен.
Мигащата зелена светлина показва, че ноутбукът е в изчакващ
(suspend) режим.
Зелената светлина показва, че е активиран тих режим (Silent
Mode).
Мигащата оранжева светлина показва, че батерията се зарежда.
Мигащата червена светлина показва, че нивото на батерията е
ниско, когато включите системата.
Постоянната зелена светлина показва, че батерията е напълно
заредена.
Изгасналият LED (тъмен) показва, че системата е без батерия.
Зелената светлина показва, че се извършва достъп до твърдия
диск или оптичното устройство.
Зелената светлина показва, че е активирана цифровата
клавиатура.
Зелената светлина показва, че е активиран клавишът Само главни
(caplock).
Зелената светлина показва, че е активиран (scrolllock).
Описание на клавиатурата
Функционни клавиши (Бързи клавиши)
Графичен символ Действие Управление на системата
Fn + F1 Влиза в режим изчакване (Suspend Mode).
Fn + F3 Включва/изключва заглушаването на звука.
Fn + F4 Сменя режима на дисплея: само LCD, само CRT, или LCD&CRT.
Fn + F5 Повишава звука от говорителите.
Fn + F6 Намалява звука от говорителите.
12 PRESTIGIO AVANTI 1592W
Page 56

Fn + F7 Увеличава яркостта на дисплея.
Fn + F8 Намалява яркостта на дисплея.
Fn+Num LkАктивира вградената цифрова клавиатура. Клавишите действат
като тези на калкулатор. Използвайте този режим, когато трябва да
въвеждате много цифрови данни. Алтернативата би било да
свържете външна цифрова клавиатура.
Fn + Scr Lk Натиснете Scroll Lock клавиша и след това с натискане на ‘! или “!
се придвижвате нагоре или надолу с един ред.
При различните клавишни комбинации за управление на системата, натискайте функционалния клавиш Fn и съответния
Fx клавиш едновременно.
Windows клавиши
Клавиатурата има и 2 Windows клавиша:
1. Start клавиш
С тови клавиш извеждате Windows Start Menu в дъното на лентата със задачи.
2. Клавиш за меню към приложенията
Този клавиш извежда контекстно меню за конкретното приложение, както
щракването на десен бутон на мишката.
BG
Вградена цифрова клавиатура
Натиснете Fn+Num Lk за да активирате вградената клавиатура. Цифрите са отпечатани в горния десен ъгъл на клавиша
в цвят различен от този на основните (буквени) означения. Тази клавиатура има съответно и знаци за аритметичните
операции (+, , * , /).
Натиснете Fn+Num Lk за да върнете към нормалната работа на клавишите.
13PRESTIGIO AVANTI 1592W
Page 57

Тъчпад
Вграденият тъчпад е PS/2съвместимо посочващо устройство, което регистрира движение по неговата повърхност. С
придвижване на върха на пръст по повърхността му, курсорът на екрана се движи по съответен начин.
Инструкциите подолу ви съветват как да използвате тъчпада:
1. Движете пръста си по тъчпада, за да движите курсора.
BG
2. Натиснете бутоните, за да изпълните определени функции. Двата бутона са подобни на левия и десен бутон на
мишката. Двойно потупване върху тъчпада съответства на щракване на левия бутон на мишката.
Функция Ляв бутон Десен бутон Еквивалентно потупване
Изпълнение Бързо двукрактно щракване Тупнете два пъти (със същата
скорост, както двойно щракване на
бутона на мишката)
Избиране Щракнете веднъж Тупнете веднъж
Провлачане Щракнете и задръжте, Тупнете бързо два пъти и на второто
за да провлечете курсора тупване задръжте пръста върху
тъчпада, за да провлачите кърсора.
Достъп до контекстно меню Щракнете веднъж
Придвижете една страница
нагоре или надолу
Съвети за използване на Тъчпада:
1. Скоростта на двойното щракване е определена ако щракнете твърде бавно, ноутбукът ще реагира като на единично
щракване два пъти.
2. Вашите пръсти трябва да са чисти и сухи когато използвате тъчпада. Също така, повърхността на тъчпада трябва да
е суха и чиста, за да удължите живота му.
3. Тъчпадът е чувствителен на движението на пръста. Колкото полеко е докосването, толкова подобра реакция (по
лесна работа) ще се получи. Силното натискане не означава подобра реакция.
Графична подсистема
Вашият компютър използва високопроизводителен 15,4инчов TFT екран (активна матрица) с висока разрешаваща
способност и изобразяване на милиони цветове за качествено гледане на изображения или филми. Графичният ускорител
ATI Mobility M54P е съвместим с Microsoft DirectX 9 и извършва рендериране на графика с висока скорост.
Настройка на яркостта на екрана
Ноутбукът използва специални клавишни комбинации, наречени “горещи клавиши”, за контрол на яркостта.
Натиснете Fn+F7 за повишаване на яркостта.
Натиснете Fn+F8 за да намалите яркостта
Забележка: За да удължите максимално времето за работа на батерия, настройте
яркостта до найниската стойност удобна за работа, така че подсветката на екрана
да черпи помалко енергия.
Удължаване на живота на TFT дисплея
Съблюдавайте следните мерки, за да удължите максимално живота на подсветката на екрана на дисплея.
1. Настройте яркостта на найниската стойност удобна за работа (Fn+F8).
2. Когато работите на бюрото в офиса, свържете ноутбука към външен монитор и отменете вътрешния дисплей Fn+ F4.
3. Не отменяйте времето за преминаване на машината към бездействие “suspend timeout”.
4. Ако използвате AC захранване и нямате външен монитор, сменете към режим на бездействие, когато не използвате
компютъра.
14 PRESTIGIO AVANTI 1592W
Page 58

Отваряне и затваряне на капака с дисплея
За да отворите дисплея, повдигнете капака. Настройте на удобен ъгъл за работа.
За да затворите капака с дисплея, внимателно го натиснете надолу, докато щракне на мястото си.
Предупреждение: За да избегнете повреда на дисплея, не го затръшвайте при
затваряне. Не поставяйте предмети върху компютъра при затворен капак.
Звукова подсистема
Звуковата подсистема на вашия ноутбук е съвместима със Sound Blaster Pro.
Ръчна настройка на силата на звука
За увеличаване на звука, натиснете Fn+F5.
За намаляване на звука, натиснете Fn+F6.
Настройка на нивото на звука в Windows
1. Щракнете върху иконкатаговорител в трея със задачи (долу дясно) в Windows.
2. Преместете управляващия бар на звука нагоре или надолу.
3. За временно заглушаване (отменяне) на говорителя, без промяна в нивото на звука, щракнете Mute.
Запис на глас
Вграденият микрофон позволява да записвате звук, Ще трябва да използвате софтуер за обработка на звук, например
Microsoft Sound Recorder.
BG
Модем
Вашият компютър идва с 56K V.92 вътрешен факс/модем и вход за телефонна линия (RJ11), който е разположен от
лявата страна на ноутбука.
Използвайте телефонен кабел, за да свържете компютъра към розетката на телефонната линия.
Свързване на модема
1. Поставете единия край на телефонния кабел в порта на модема (за EMI съвместимост, трябва да закрепите включения
в пакета EMI CORE към телефонната линия.)
2. Поставете другия край на кабела в розетката на телефонната линия на стената.
В зависимост от това къде се използва вашия компютър, може да е нужно да промените настройките на модема.
Правилната настройка ще позволи да поддържате стабилна връзка в страна, където телекомуникационната система
може да бъде различна от тази във вашата страна.
15PRESTIGIO AVANTI 1592W
Page 59

За промяна в настройките на модема направете следното:
1. Отидете на [Start > Settings > Control Panel] и щракнете 2 пъти въхру иконата Modem Settings (настройки на модема).
Ще видите следния диалогов прозорец.
2. Щракнете върху падащото меню и изберете страната, където настройките са приложими. Щракнете ОК за да
излезете.
BG
Ethernet
Вашият компютър е снабден с 10/100/1000BaseTX Fast Ethernet мрежов адаптер. Свържете LAN кабел към RJ45 LAN
порта отляво на компютъра. Така ще можете да обменяте данни с локалната мрежа.
Свързване към мрежата
Използвайте само UTP Ethernet кабел.
1. Поставете единия край на UTP кабела в мрежовия конектор докато конектора щракне здраво в мястото си.
2. Поставете другия край на кабела в RJ45 порт на розетка в стената или в UTP концентратор/суич на мрежата.
Ограничения за кабелите в мрежата
Следните ограничения трябва да се съблюдават за 10/100/1000BASETX мрежи:
. Максималната дължина за кабела е 100 метра (m) (328 фута[ft]).
. За работа със 100Mbps или 1000Mbps използвайте Category 5 окабеляване и конектори.
Заб.: Вижте в ръководството на Windows и/или Novell Netware за инсталиране на
софтуера, за конфигурация и работа на мрежата.
НАСТРОЙКИ НА BIOS И ФУНКЦИИ ЗА ЗАЩИТА
В тази глава ще научите как да влизате в менюто за настройка на BIOS и да променяте различните настройки за
управление на хардуера. Ще научите и как да използате вградените функции за защита.
Програмата Setup Utility служи за настройка на хардуера, вградена в BIOS (Basic Input/Output System) на вашия компютър.
Тя кара да работят и поддържа множество хардуерни функции. Това е софтуер управляван с менюта, които позволяват
лесно конфигуриране и промяна на настройките.
16 PRESTIGIO AVANTI 1592W
Page 60

BIOS съдържа настройките по подразбиране на производителя за стандарна работа на компютъра. Обаче, има случаи
когато може да е нужно да промените настройките по подразбиране в BIOS. Например, може да се наложи да конфигурирате
настройките за управление на захранването (APM), ако използате DOS или неWindows операционна система.
BIOS ви позволява да настроите пароли за да ограничите достъпа за други потребители. Това е важна функция, тъй като
днес с мобилните компютри пренасяте голямо количество важна ифнормация за вашия бизнес. Неоторизираният
достъп може да бъде предотвратен. Покъсно в тази глава ще научите как да използвате тази функция за защита.
Влизане в екрана за настройка на BIOS
Включете захранването. Когато BIOS извършва началния тест при включване (POST PowerOn Self Test), натиснете
бързо клавиша F2 за да активирате програмата Phoenix BIOS Setup Utility.
Забележка: Ще трябва бързо да реагирате с натискането на F2. След като
системата започне да зарежда Windows, ще трябва да изчакате пълно зареждане,
след което да загасите компютъра и почнете наново.
Излизане от екрана за настройка на BIOS
Когато сте завършили промените в настройките на BIOS, трябва да излезете от BIOS. Записът на промените в CMOS
ще отнеме няколко секунди.
Клавиши за работа в BIOS
Функционален клавиш Команда Описание
ESC Exit (излизане) Напускате подменю, за да се върнете в предишното меню ИЛИ да
излезете от BIOS със запомняне на промените.
Enter Преминаване в подекран Показва подменю
F1 Обща помощ (Help) Показва Help екран
F10 Save and Exit Запомня промените и рестартира компютъра.
<Tab> Избира поле Избира следващото поле.
/\ Избира обект Избира следващия обект погоре.
\/ Избира обект Избира следващия обект подолу.
Пониска стойност Избира следващата стойност в дадено поле.
+ Повисока стойност Избира следващата стойност в дадено поле.
BG
Променяне на настройките в BIOS
Главното меню за настройки на Phoenix BIOS е разделено на подменюта. Всеки обект в менюто е описан в този раздел.
Main Setup (главни настройки)
В това меню можете да променяте времето/датата и да разглеждате основна информация за процесора и системната
памет.
Обект Избор / Подменю Описание
Дата N/A (не е достъпно) Въведете текущата дата във формат месец/ден/година (MM/DD/YY).
Време N/A Въведете текущото време във формат HH:MM:SS.
17PRESTIGIO AVANTI 1592W
Page 61

Boot Setup (настройка на стартирането)
Конфигурация на настройките при стартиране
Обект Избор / Подменю Описание
Quick Boot (бързо стартиране)Disabled / Enabled (отменен/активиран) Тук някои тестове се пропускат пр стартиране,
BG
Quiet Boot (тихо стартиране) Disabled / Enabled (отменен/активиран) Когато е Активирано, системата ще покаже OEM
Приоритет на устройствата при стартиране
Обект Избор / Подменю Описание
1st Boot Device (първо Removable Dev. CD/DVD Настройте типа на първото устройство, от което да опита да стартира
устройство за Hard Drive BIOS. Ако изберетеRealtek Boot Agent, системата ще опита да зареди
стартиране) Network: Realtek Boot Agent стартиращ сектор от Ethernet порта.
Disabled
2nd Boot Device Настройте типа на второто устройство, от което BIOS да опита да
стартира.
3rd Boot Device Настройте типа на третото устройство, от което BIOS да опита да
стартира.
4th Boot Device Настройте типа на четвъртото устройство, от което BIOS да опита да
стартира.
затова системата стартира побързо.
лого вместо съобщенията от теста при стартиране
(POST).
Когато е Отменено (Disabled), системата ще
покаже POST съобщенията (т.е. Информация за
различните устройства)
Забележка: Ако изберете Realtek Boot Agent, системата ще опита да стартира от
мрежата.
Забележка: Когато BIOS извършва теста при начално включване (POST), може да
натиснете F12 за да задействате менюто за ибор на устройство за стартиране.
Можете да избирате между CD/DVD, Hard Drive, или Realtek Boot Agent като първо
устройство от което да стартира системата. Ако вече сте поставили USB флаш
памет преди да включите компютъра, то ще се появи като Removable Device в
менюто за избор Boot Device.
Security Setup (Настройки за защита)
Boot Settings Configuration (Конфигуриране на настройките при стартиране)
Обект Избор / Подменю Описание
Change Supervisor Password N/A Install or Change the Password (Инсталиране или смяна на
(Смяна на парола на Супервайзор) парола)
Change User Password N/A Install or Change the Password (Инсталиране или смяна на
(Промяна на потребителска парола) парола)
Използване на зщита с пароли
Достъпни са 2 нива на защита с пароли. BIOS предлага както парола за Супервайзор, така и за Потребител (Supervisor
и User). Ако опитате да активирате и двете пароли, паролата на Супервайзор трябва да се инсталира първа.
Паролите активират две различни нива на защита:
1. Системата винаги пита за парола всеки път, когато се стартира.
2. Системата пита за парола само когато опитате да влезете в BIOS.
Паролите се криптирани и съхраняват в NVRAM. Запишете си ги ли ги запомнете. Ако загубите паролите, компютърът
може да се наложи да бъде изпратен на производителя или оторизирания дилър за да ресетира паролите.
18 PRESTIGIO AVANTI 1592W
Page 62

Power Setup (Настройка на управление на захранването)
Обект Избор / Подменю Описание
Long Battery Life Mode Enable / Disable Когато е Активиран (Enabled), може да се постигне
(Режим Дълъг живот на максимално възможната продължителност на работа с
батерията) батерия. Производителността на процесора се понижава.
Power Button Mode (Режим On/Off / Suspend (Вкл/Изкл [On/Off]: При натискане на бутона за захранване
на бутона за захранване) /неактивен режим) системата се изключва. [Suspend]: При натискане на
бутона, системата влиза в неактивен режим (suspend).
Забележка: Изборът на Suspend режим в BIOS е приложим само за постари
версии на Windows (като Windows 3.1 или Windows 95 или NT4), или неWindows ОС.
При Windows ME / 98SE / 2000 / XP, неактивният режим (suspend mode) и
настройките се определят от настройките в Power Options Properties (Start > Control
Panel > Power Options).
Exit Setup (Излизане от настройките на BIOS)
Обект Избор / Подменю Описание
Saves Changes and Exit N/A След като сте завършили настройките на BIOS, изберете това, за да
(Запомня промените и излиза) запазите всички настройки, да излезете от BIOS Setup и да
рестартирате. При новото включване на компютъра новите
настройки ще влязат в действие. За тази операция можете да
използвате клавиш F10.
Discard Changes N/A Отменете промените извършени досега в някои от настройките.
(Откажете промените)
Load Optimal Defaults N/A Заредете оптималните настройки по подразбиране (Load Optimal
Default) за всички въпроси. За тази цел може да използвате F9.
BG
ЗАХРАНВАНЕ ОТ БАТЕРИЯ И УПРАВЛЕНИЕ НА
ЗАХРАНВАНЕТО
В тази глава ще научите найважното за управлението на захранването и как да го използвате за постигане подълъг живот
на батерията.
В тази глава ще научите как да работите с вашия ноутбук със захранване само от батерия, как да третирате и поддържате
батерията, и ще се запознаете с някои характеристики на вашата система за пестене на енергията.
TFT дисплеят, централният процесор и твърдият диск са хардуерните компоненти, които консумират наймного енергия.
Управлението на захранването се занимава с това, как тези компоненти трябва да се държат, за да съхраняват енергията.
Например, вие можете да настроите системата да изключва дисплея 2 минути след бездействие, за да пестите
енергия. Ефективното управление на захранването може да ви помогне да постигнете подълго време автономна работа
без да се наложи да презаредите батерията.
Батерията
Литиевойонна батерия
Вашият ноутбук използва 6клетъчна Литиевойонна батерия, която захранва системата когато нямате достъп до контакт
с променливотоково захранване.
Заб.: Необходимо е да зареждате батерията поне 6 часа преди да я използвате за
пръв път.
19PRESTIGIO AVANTI 1592W
Page 63

Заб.: В режим Standby Suspend, напълно заредена батерия се изчерпва за около 1/
2 ден или помалко. Когато не се използва, батерията ще се разреди за 12
месеца.
Предупреждение за ниско ниво на батерията
BG
1. Предупреждение за ниско ниво на батерията
Състояние на ниско ниво настъпва, когато зарядът на батерията се намали до 6%. Започва да мига зеленият индикатор
за статус на батерията и системата започва да издава кратък звук на всеки 16 секунди.
2. Предупреждение за много ниско ниво на батерията
Много ниско ниво означава, че остава 3 % от заряда. Зеленият индикатор за статус на батерията мига и системата
издава сигнал на всеки 4 секунди.
Когато ноутбукът предупреди за ниско ниво на батерията, имате 35 минути да запазите текущите файлове, с които
работите.
Предупреждение: Не излагайте батерията на температури под 0 градуса Целзий (32
F) или над 60 градуса C (140F). Това може да има негативно въздействие върху
батерията.
Заб.: Натиснете Fn+F3 за да изключите предупредителния звук на батерията.
Инсталиране и изваждане на батерията
Изваждане на батерията:
1. Поставете ноутбука с дъното нагоре на хорозонтална стабилна повърхност.
2. Натиснете заключалката и извадете батерията настрани от компютъра.
20 PRESTIGIO AVANTI 1592W
Page 64

Инсталиране на батерията:
1. Поставете ноутбука с дъното нагоре на хорозонтална стабилна повърхност.
2. Внимателно поставете батерията в отделението за батерията на ноутбука.
Зареждане на батерията и време за зареждане
За да заредите батерията, докато тя е в ноутбука, включете АС адаптера към ноутбука и го свържете към контакт на
захранващата мрежа.
Времето за зареждане в приблизително 46 часа, когато ноутбукът е изключен, и приблизително 610 часа, когато е
включен.
Когато батерията е напълно заредена, индикаторът за зареждане на батерията започва да свети в зелено..
BG
Заб.: Ако системата е сериозно натоварена или в среда с визока температура,
батерията може да не се зареди докрай. Вие трябва да продължите да я зареждате
с включен АС адаптер, докато светодиодът за зареждането започне да свети
зелено.
Проверка на нивото на заряд на батерията
Можете да проверите останалия заряд на батерията в статус индикатора за батерията на Windows, който се намира в
долния десен ъгъл на таскбара. (Ако не виждате иконка на батерия или ACin в лентата със задачи, отидете в прозореца
Power Options Properties и щракнете Advanced. Отметнете “Always show icon on the task bar“.)
По друг начин можете да видите заряда като щракнете върху иконката Power Options в Windows Control Panel.
Удължаване на живота на батерията и циклите на използване
Има различни начини, по които да удължите живота на батерията.
Винаги използвайте AC адаптер, когато наблизо има контакт на захранващата мрежа. Това ще осигури вашата работа
през прекъсване.
Закупете допълнителна батерия.
Съхранявайте батерията на стайна температура. Повисоката температура изтощава побързо батерията.
Възползвайте се по найдобрия начин от функциите за управление на захранването. Функцията Save To Disk (Hibernate)
пести наймного енергия чрез съхраняване на текущото състояние на системата върху твърдия диск.
Очаквания живот на батерията е приблизително 300 презареждания.
Вижте раздела със забележки в началото на ръководството за начини за грижа за батерията.
21PRESTIGIO AVANTI 1592W
Page 65

Заб.: Прочетете раздела Грижа за вашия ноутбук в началото на това ръководство
за съвети как да поддържате батерията.
Заб.: За да постигнете оптимална производителност на батерията, ще трябва да
извършвате калибриране на батерията всеки 3 месеца. За целта:
1. Заредете батерията напълно.
2. След това разредете батерията, като влезете в екрана за настройка на BIOS.
BG
(Натиснете F2 веднага щон включите компютъра. Оставете екрана за настройка на
BIOS докато батерията се изтощи докрай.
3. Отново заредете батерията напълно.
Използване възможностите за управление на
захранването в Windows
Windows Power Management предлага основни функции за пестене на енергията. диалоговия прозорец Windows Power
Options Properties [Start > Settings > Control Panel > Power Options] можете да въведете стойностите за спиране (заспиване)
на екрана и на твърдия диск. Windows power manager пести енергия като изключва твърдия диск след 1 минута
бездействие, например.
Windows Power Schemes
Контроният панел за управление на захранването в Windows XP, известен като Power Schemes, е проектиран да предложи
лесен интерфейс за потребителя. Табулаторът на Power Schemes може да бъде открит в панела Power Options Properties,
достъпен в прозореца на контрол панела.
Схемите са лесно разбираеми, базирани на възможните сценарии на използване на ноутбука, и управляват не само
енергията използвана от процесора, но и други периферни подсистеми.
Отидете на [Start > Settings > Control Panel] и щракнете два пъти иконката Power Options.
Режимът Always on (винаги включен) поставя процесора в режим на максимална производителност, което не предлага
никакво пестене на енергия. Другите схеми управляват производителността на процесора на базата на неговото
натоварване. Например, режимът Max Battery намалява скоростта и напрежението на процесора за съхранение на енергията
колкото може повече.
22 PRESTIGIO AVANTI 1592W
Page 66

В този диалогов прозорец можете ръчно да настроите стойностите на времето за изгасване на LCD екрана и на спиране
на диска при бездействие в колоната Plugged in и вколоната Running on batteries. Пониските времена на изгасване
пестят повече заряда на батерията.
Заб.: Вижте също ръководството на Windows за повече информация как да
използвате функциите за пестене на енергията на Windows.
Заб.: Действителният диалогов прозорец може да се различава леко от показания.
Режим бездействие (Suspend Mode)
Бездействие изчакване (Standby Suspend)
След период когато не е активна, системата автоматично влиза в този режим, което е настроено в диалоговия прозорец
Power Schemes. В режима Standby хардуерните устройства, като дисплей и твърд диск, се изключват за пестене на
енергията.
Бездействие сън (Hibernate Suspend)
В този режим цялата системна информация се записва на твърдия диск преди изключване. При активиране на този
режим, след зададен от потребителя период на неактивност състоянието на системата се запазва на твърдия диск. От
батерията се използва много малко или почти никакъв ток.
Обаче, в зависимост от това колко RAM сте инсталирали на компютъра, времето за възстановяване на системата до
предишното състояние може да трае от 5 до 20 секунди.
За потребители на Windows 2000 / XP хибернацията (заспиването) се управлява от Операционната система; следователно
не е необходим специален дял на диска или заделена директория.
Ако искате да активирате режима Hibernate, ще трябва да активирате Hibernate Support в Hibernate табулатора на менюто
Power Options.
BG
Заб.: Не инсталирайте нито махайте някой от модулите памет, когато системата е
в режим бездействие (suspend).
Заб.: Действителният диалогов прозорец може да се различава леко от показания.
23PRESTIGIO AVANTI 1592W
Page 67

Действие на бутона за включване на захранването
Бутонът за включване на мобилния компютър може да бъде настроен да изключи системата или да активира режим на
бездействие.
Отидете на [Start > Settings > Control Panel > Power Options] и щракнете табулатора Advanced. В падащото меню изберете
как бихте желали да работи бутона за включване на компютъра.
BG
Заб.: Действителният диалогов прозорец може да се различава леко от показания.
Предупреждение: В менюто “Когато затварям капака на моя портативен компютър
(When I close the lid of my portable computer) НЕ ИЗБИРАЙТЕ Do nothing (Не прави
нищо) – в противен случай системата ще върви на пълна скорост докато
решетката на вентилатора е напълно затворена от затворения капак с LCD екрана.
Топлината ще повреди LCD панела.
Предупреждение за ниско ниво на батерията
Можете да дефинирате кога и как системата да ви предупреди за ниско ниво на батерията.
Отидете в Alarms табулатора на прозореца Power Options Properties. Ако желаете да чувате звукови сигнали, щракнете
върху бутона Alarm Action и поставете отметка върху Sound Alarm.
24 PRESTIGIO AVANTI 1592W
Page 68

Заб.: Вижте ръководството на Windows за повече информация как да използвате
функциите за управление на захранването на Windows.
Заб.: Действителният диалогов прозорец може да се различава леко от показания.
Бърз достъп до менюто за управление на захранването
Вместо да извършвате определени избори в прозореца на Power Options Properties, можете бързо и лесно да зададете
кои предварително установени функции за пестене на енергията бихте желали да ползвате, като щракнете върху иконката
на Батерията в долния десен ъгъл на екрана. (Ако не виждате иконка на батерия или ACin, отидете в прозореца Power
Options Properties и щракнете табулатора Advanced. Отметнете “Always show icon on the task bar“.) Изберете Max Battery,
ако искате системата почесто да влиза в режим “бездействие”. Или пък, изберете Always On, ако вашият компютър
е свързан към източник на променливотоково захранване.
BG
Заб.: Действителният диалогов прозорец може да се различава леко от показания.
25PRESTIGIO AVANTI 1592W
Page 69

ЪПГРЕЙД НА КОМПЮТЪРА
В тази глава ще научите как да ъпгрейдвате DRAM, твърдия диск, и как да инсталирате опционалната mini PCI карта на
безжичната LAN връзка.
BG
Предупреждение: Сериозно препоръчваме да дадете обратно ноутбука на дилъра,
от когото сте го закупили, за извършване на хардуерен ъпгрейд.
Преди да извършите хардуерния ъпгрейд, моля предварително изключете
компютъра, откачете АС адаптера, извадете батерията и откачете LAN и модем
кабелите, за вашата безопасност.
Когато хардуерният ъпгрейд е завършен, моля убедете се че всички винтове са
затегнати, преди да включите компютъра.
Ъпгрейд на твърдия диск
Замяната на оригиналния диск с диск с поголям капацитет ще разшири възможностите на вашия компютър. Вашият
ноутбук използва 2,5инчов Serial ATA диск с 9,5 mm височина.
Направете бекъп на данните преди да започнете с тази операция.
Предупреждение: Ъпгрейдът на твърдия диск е деликатен процес. моля спазвайте
инструкциите подолу внимателно, или се обърнете към квалифициран техник,
който да извърши тази работа вместо вас. Повредите дължащи се на неправилно
третиране при тази процедура НЕ СЕ покриват от гаранцията на производителя.
Предупреждение: Третирайте твърдия диск много внимателно.
Не изпускайте нито подлагайте на удар.
Не натискайте върху капака.
Не докосвайте конектора с голи ръце.
Лошото третиране на твърдия диск ще доведе в резултат до перманентна загуба на
данни. Направете бекъп на съдържаниети на диска преди да отстраните това
съдържание.
Заб.: Някои модели бренд на IBM, издават тракане, когато се завъртат (направи
се достъп). Това е нормално състояние.
Ъпгрейд на твърдия диск
За замяна на твърдия диск, направете следното:
1. Изключете компютъра. Откачете захранващия кабел и останалите кабели и устройства свързани с компютъра.
Извадете батерията.
2. Поставете ръката си за момент върху голям метален предмет за отвеждане на статичното електричество.
3. Отвинтете двата винта “А” на капака.
4. Махнете капака на отделението за твърдия диск.
26 PRESTIGIO AVANTI 1592W
Page 70

5. Отвинтете един винт В.
6. Отделете внимателно модула на твърдия диск от конектора. Вдигнете го и го извадете от гнездото.
BG
7. Отвинтете 4 винта “С” от HDD модула. Махнете металната кутийка.
8. Закрепете металната кутийка върху новия твърд диск и я закрепете с 4те винта “С”. Отбележете, че зелената платка
контролер на твърдия диск е към металната кутийка.
9. Закрепете модула на харддиска към HDD конектора. Затегнете с винта “B”.
10. Поставете обратно капака на отделението на твърдия диск и завинтете 2та винта “А”.
Поздравления! Вие се справихте с ъпгрейда на твърдия диск. Когато стартирате ноутбука, може да е необходимо да
разделите новия диск на дялове и да го форматирате, да инсталирате ОС и всички нужни приложения за работа.
27PRESTIGIO AVANTI 1592W
Page 71

Ъпгрейд на системната памет
В найобщия случай повечето приложения ще вървят побързо с увеличаване капацитета на системната памет (RAM).
Мобилният компютър предлага две гнезда за DDR2 памет, разположени под капака на Системните устройства. Вие
можете да вдигнете капацитета на паметта, като замените съществуващия модул с такъв с повисок капацитет. SO
DIMM модулите могат да бъдат 256MB, 512MB, или 1024MB. Паметта е от типа DDR2 SDRAM, има 200 пина и работи
BG
на 2,5 V. Паметта SODIMM трябва да бъде PC2 3200 или PC2 4200 съвместима.
Предупреждение: Ъпгрейда на паметта е деликатен процес. Моля спазвайте
внимателно инструкциите подолу или се обърнете към квалифициран техник,
който да извърши операциите по ъпгрейда. Повредите поради некоректно
проведена процедура НЕ СЕ покриват от гаранцията на производителя.
Предупреждение: Смяната на модулите памет в момент, когато вашият компютър
е в режим suspend (бездействие) или друг режим на пестене на енергия може да
доведе до повреда в хардуера. Уверете се, че сте изключили компютъра и сте
откачили кабела за захранване преди да продължите с ъпгрейда на паметта.
Предупреждение: Трябва да използвате само DIMM модул, който е одобрен от
доставчика или производителя, в противен случай системата може да бъде
нестабилна.
Инсталиране на модул памет (DIMM) в системата
За инсталиране на DIMM под капака на Системните устройства, трябва да направите следното:
1. Изключете ноутбука. Откачете захранващия кабел и всички кабели и свързани към него допълнителни външни
устройства. Извадете батерията.
2. Поставете за момент ръката си върху голям метален предмет за отвеждане на статичното електричество. Поставете
ноутбука на плоска повърхност и напълно затворете горния капак с дисплея.
3. Отвинтете 9 винта “Д” на капака на Системните устройства.
4. Вдигнете капака на Системните устройства. Сега ще видите гнездото за DIMM памети, както е показано подолу.
28 PRESTIGIO AVANTI 1592W
Page 72

5. Ако трябва да се махне постар модул памет от гнездото, натиснете ключалките от двата края на гнездото едновременно.
Модулът трябва да изскочи под ъгъл 30 градуса (вижте фигурата подолу). Извадете напълно модула от гнездото.
Съхранете го за евентуална бъдеща употреба.
BG
6. Инсталирайте новия DIMM модул в гнездото. Модулът ще пасне само при определено ориентиране. Поставете модула
под ъгъл приблизително 30 градуса в гнездото. Натиснете плътно, така че ръбът с контактите да влезе в гнездото.
7. Поставете плътно в гнездото модула докрай така, че заключалките от двата му края да щракнат в своите места.
Заб.: Отбележете прореза в модула. Прорезите трябва добре да пасват с гнездото.
8. Поставете капака на Системните устройства обратно и за закрепете като завинтите 9те винта “Д”.
Поздравления! Вие се справихте с ъпгрейда на паметта. Когато стартирате компютъра, трябва да очаквате информацията
за системата да покаже повишен капацитет на паметта.
Заб.: Вашият компютър е тестван с широка гама SODIMM модули на пазара.
Обаче, не всички предлагани на пазара модули са съвместими. Проверете при
вашия доставчик за съвместимите модули памет за вашия компютър.
29PRESTIGIO AVANTI 1592W
Page 73

Добавяне на MiniPCI карта за безжичен LAN (опционално
устройство)
Вашият компютър е комплектован с уникален Mini PCI Card слот, разположен близо до гнездото на паметта под капака
за WLAN модул. Това позволява да се добави чудесната функция безжичен LAN (IEEE802.11x). Обърнете се към вашия
доставчик за наличието на безжични mini PCI карти.
BG
Предупреждение: Ъпгрейда на mini PCI карта е деликатен процес. Моля спазвайте
внимателно инструкциите подолу или се обърнете към квалифициран техник,
който да извърши операциите по ъпгрейда. Повредите поради некоректно
проведена процедура НЕ СЕ покриват от гаранцията на производителя.
Предупреждение: Инсталирането на mini PCI карта в момент, когато вашият
компютър е в режим suspend (бездействие) или друг режим на пестене на енергия
може да доведе до повреда в хардуера. Уверете се, че сте изключили компютъра и
сте откачили кабела за захранване преди да продължите с ъпгрейда на паметта.
Инсталиране на Mini PCI карта в системата
За да инсталирате нова Mini PCI карта в ноутбука, трябва да направите следното:
1. Следвайте стъпките в предишния раздел “Инсталиране на памет в системата” за да си осигурите достъп до Mini PCI
слота.
2. mini PCI картата ще пасне само при едно възможно правилно ориентиране. Съпоставете малкия прорез в модула с подобна
издатина в слота и поставете картата под ъгъл около 30 градуса в празния слот. След това притиснете плътно, така че ръбът
с контакти да влезе в слота. Натиснете картата така, че заключалките от двете страни да щракнат на мястото си.
Заб.: Ако искате да извадите mini PCI картата от гнездото, натиснете заключалките
на картата от двете страни едновременно. Картата трябва да изскочи под ъгъл
около 30 градуса.
3. Вижте 2та антенни кабела с конектори. Закрепете кабела върху позлатения конектор на Mini PCI картата.
30 PRESTIGIO AVANTI 1592W
Page 74

(Заб.: Конекторите са доста малки! това ще изисква известна сръчност. Може да
свържете антенните кабели преди дас поставите картата в слота.)
4. Поставете обратно капака на Системните устройства и завинтете 9те винтове “Д”.
Поздравления! Вие се справихте с инсталирането на mini PCI картата. Следващия път, когато системата стартира
отново в Windows, тя ще ви подкани за мястото където е записан драйвера. Поставете фабричния CDROM в оптичното
устройство и посочете директорията, където може да бъде открит драйвера. Освен инсталирането на драйвера може
да е нужно да стартирате Setup.exe за инсталиране на приложенията за картата, преди тя да стане напълно функционална.
BG
ОТСТРАНЯВАНЕ НА ПОВРЕДИ
В тази глава ще научите как да се справяте с често срещани хардуерни и софтуерни проблеми.
Вашият компютър е напълно тестван и съответства на системните спецификации преди неговата доставка. Независимо
от това, неправилни операции или третиране могат да доведат до проблеми.
В тази глава ще намерите справочник за идентифициране и поправяне на често срещани хардуерни и софтуерни проблеми,
които може да ви се случат.
Когато срещнете проблем, моля първо вижте препоръките в тази глава. Вместо да връщате компютъра и да чакате
ремонта, можете лесно да решите проблемите, като разгледате следните сценарии и възможни решения. Ако повредата
продължава, моля свържете се с вашия дилър за сервизна информация.
Преди да предприемате понататъшни действия, разгледайте следните предложения:
Проверете дали проблемът продължава след като всички периферни устройства са откачени.
Проверете дали свети зеления индикатор на АС адаптера.
Проверете дали захранващият кабел е правилно поставен в контакта на захранващата мрежа и
в компютъра.
Проверете дали свети индикаторът на захранването на компютъра .
Проверете дали клавиатурата работи като натиснете и задържите произволен клавиш.
Проверете за неправилни или разхлабени свързвания. Уверете се, че ключалките на
конекторите са здраво закрепени за приемния конектор.
Уверете се, че не сте извършили некоректна настройка на хардуерните устройства в BIOS.
Погрешна настройка може да доведе до неправилно действие на машината. Ако не сте сигурни в
настройките, кооито сте направили, опитайте да ги възстановите до фабричните (по
подразбиране).
31PRESTIGIO AVANTI 1592W
Page 75

Уверете се, че всички драйвери на устройствата са правилно инсталирани, Например, без
правилно инсталиран аудио драйвер, говорителите и микрофона няма да работят.
Ако външните устройства като USB камера, скенер, принтер, не функционират правилно, когато
са свързани към системата, обикновено това е проблем на самото устройство. Първо се
консултирайте с доставчика на устройството.
Някои програми, които не са преминали строги тестове, могат да причинят проблеми при
BG
използването им. Обадете се на софтуерния производител/доставчик за решаване на проблема.
Постарите периферни устройства не са plugandplay. Трябва да рестартирате системата, като
тези периферни устройства са включени преди това.
Уверете се, че сте отишли в BIOS SETUP и сте заредили DEFAULT SETTING след обновяване на
BIOS.
Уверете се, че не е задействан ключа за изключване на бързите клавиши (Quick Key Lockout
Switch) от долната страна на компютъра, в противен случай бързите клавиши няма да работят.
Проблеми със звука
Няма звук от говорителите
. Усилете звука с шайбата за регулиране отляво на компютъра. Вижте Глава 1 за нейното разположение.
. Софтуерното управление на звука е намалило силата на звука докрай, или го е заглушило. Щракнете 2 пъти иконката
на говорителя долу вдясно на екрана, за да коригирате проблема.
. Повечето проблеми със звука са софтуерни. Ако вашият компютър преди е работил нормално, твърде е възможно
някоя програма да не е настроена правилно.
. Отидете на [Start > Settings > Control Panel] и щракнете 2 пъти иконката Sounds and Audio Devices. В Audio страницата,
уверете се, че Realtek HD Audio е устройството по подразбиране за възпроизвеждане.
Не може да се узвърши звуков запис
. Ще трябва да поставите външен микрофон към конектора за външен микрофон за запис на звук.
1. Щракнете Options и изберете Properties.
2. Изберете Recording и щракнете бутона OK.
3. След щракване на OK, ще се появи контролен панел за силата на записвания звук.
. Отидете на [Start > Settings > Control Panel] и щракнете 2 пъти иконката Multimedia (или Sounds and Audio Devices).
В страницата Volume or Audio, уверете се, че Realtek HD Audio е устройството по подразбиране за възпроизвеждане.
Проблеми с твърдия диск
Твърдият диск не работи нито се разпознава
. Ако сте направили токущо ъпгрейд на твърдия диск, уверете се, че конектора на диска не е разхлабен и че самият
диск е добре монтиран. Ако не, извадете го и го поставете отново коректно, и рестартирайте системата. (Вижте
Глава 4 за подробности.)
. Новият диск по всяка вероятност трябва да бъде разделен на дялове и форматиран. Ще трябва да бъдат инсталирани
ОС и драйвери.
. Проверете LED индикатора на харддиска. Когато направите достъп до файл, светодиодът веднага трябва да
светне.
. Новият твърд диск може да е дефектен или да не е съвместим.
. Ако вашият компютър е бил подложен на въздействието на статично електричество или физически удар, това
може да е повредило твърдия диск.
Твърдият диск издава анормални виещи звуци
. Трябва да архивирате вашите файлове колкото може поскоро.
. Уверете се, че шумът идва от твърдия диск, а не от вентилатор или друго устройство.
Твърдият диск е запълнен докрая на своя капацитет
. Пуснете Disk Cleanup програмата в Windows. [Start > All Programs > Accessories > System Tools > Disk Cleanup]
Системата ще ви подскаже съответните стъпки.
32 PRESTIGIO AVANTI 1592W
Page 76

. Архивирайте файловете или програмите, които отдавна не сте използвали, като ги преместите на друга медия
(флопи дискета, оптичен диск и др.) или деинсталирайте програмите, които не използвате.
. Много браузъри сърханяват файлове върху твърдия диск като кешбуфер, откъдето се ускорява работата в интернет.
Проверете Online Help раздела на браузъра за инструкции как да намалите кеша или да премахнете временните
Интернет файлове.
. Изпразнете Кошчето (Recycle Bin) за да създадете повече дисково пространство. Когато триете файлове, Windows
ги спасява в Recycle Bin.
Твърдият диск чете файл за подълъг интервал от време от нормалното
. Ако сте използвали диска за подълъг период от време, файловете може да са фрагентирани. Идете на [Start >
Programs > Accessories > System Tools > Disk Defragmenter] за да направите дефрагментиране на диска. Операцията
ще отнеме известно време.
. Заявки за прекъсване или проблеми с други устройства могат да заемат ресурса на централния процесор и
следователно забавят производителността на системата.
Файловете са повредени
. Пуснете програмата в Windows за проверка за грешки, за да проверите твърдия диск. Щракнете 2 пъти My Com
puter. Щракнете десен бутон върху C: и изберете Properties. Щракнете Check Now в Errorchecking в Tools.
Проблеми с оптичното устройство
Оптичното устройство не работи
. Опитайте да рестартирате системата.
. Дискът е повреден или файловете не могат да се прочетат.
. След като сте поставили CDROM диск, може да отнеме време докато стане възможно да видите съдържанието
му.
BG
Устройството не чете никакви дискове
. Компактдискът може да не е правилно поставен в поставката. Уверете се, че е правилно сложен на шпиндела.
. Дискът е повреден или нечитаем.
Дискът не може да се извади
. В нормалния случай дискът излиза след няколко секунди (не веднага).
. Ако дискът не може да се извади, той може механично да е заседнал. Изправете един кламер и вкарайте края му
в малкия отвор до бутона за изваждане. Това трябва да извади поставката. Ако не успеете, върнете машината в
сервиза. Не изваждайте със сила поставката на компактдиска..
Комбинираното или DVD RW устройството не може да записва
. Трябва да закупите и инсталирате програма за прогаряне на дискове, за да можете да записвате файлове на празни
медии.
Проблеми с дисплея
Екранът е празен при включване на системата
. Уверете се, че компютърът не е в Standby или Hibernate режим. Дисплеят се изключва при нормални процедури за
пестене на енергия в тези режими.
Екранът трудно се чете
. Резолюцията на дисплея трябва да е поставена на 1024x768 за оптимална работа.
1 Отидете на [Start > Settings > Control Panel] и щракнете 2 пъти иконата Display.
2 В страницата Settings, поставете резолюция поне 1024x768 и изберете поне 256 цвята.
Екранът трепти
. Нормално е екранът да трепти понякога при изключване на системата или при стартирането й.
33PRESTIGIO AVANTI 1592W
Page 77

Проблеми с клавиатурата и мишката
Вграденият тъчпад не работи добре
. Уверете се, че ръката ви не е много потна или влажна, когато използвате тъчпада. Поддържайте повърхността на
тъчпада суха и чиста.
. Не поставяйте дланта или китката си върху тъчпада, когато пишете, или пък когато го използвате.
BG
Не можете да въвеждате от вградената клавиатура
. Ако сте свързали външна клавиатура, вградената може да не действа.
. Опитайте да рестартирате системата.
При въвеждане, знаците върху екрана се повтарят.
. Може би задържате клавишите твърде дълго натиснати, докато пишете.
. Поддържайте чиста клавиатурата. Прахът и мръсотията под клавишите може да причинят тяхното задържане.
. Конфигурирайте клавиатурата да изчаква подълъг интервал преди автоматичното повторение на знаците, които
въвеждате. За тази настройка, отидете на [Start > Settings > Control Panel], и кликнете 2 пъти върху иконата
Keyboard. Показва се диалогов прозорец с настройките за клавиатурата.
CMOS Battery Problem
По време на стартирането на системата се появява съобщение “CMOS Checksum Failure”, или
пък часовникът се ресетира при стартиране
. Опитайте да рестартирате системата.
. Ако съобщението “CMOS Checksum Failure” се появи по време на процедурата на стартиране дори след рестартиране,
това може да сочи отказ на CMOS батерията. Ако това е така, ще трябва да отстраните батерията. Тази батерия
трае обикновено 2 до 5 години. Батерията е от типа CR2032 (3V). Можете и сами да я замените. Батерията се
намира под капака на системните устройства откъм долната страна на ноутбука. За повече подробности вижте
Глава 4.
Проблеми с паметта
POST не показва повишен капацитет на паметта, когато вече сте инсталирали допълнителна
памет
. Някои видове памети може да не са съвместими с вашата система. Трябва да направите справка при вашия
доставчик за списък на съвместимите модули памет (DIMM).
. Модулът памет може да не е инсталиран правилно. Вижте Глава 4 за подробности по тази операция.
. Модулът памет може да е повреден/дефектен.
Операционната система дава съобщение за грешка от недостатъчно памет по време на
работа
. Често това е проблем свързан с конкретното приложение или с Windows. Някое приложение изчерпва ресурсите от
памет на системата.
. Затворете приложението, което използвате и рестартирайте системата.
. Трябва да инсталирате допълнително памет. За инструкции на тази тема, вижте Глава 4 Ъпгрейд на вашия
компютър.
Проблеми с модема
Вграденият модем не отговаря
. Make sure the modem driver is loaded properly.
. Отидете на [Start > Settings > Control Panel > Phone and Modem Options] и на таба Modems. Уверете се, че в списъка
има SmartLink 56K Voice Modem или Uniwill V.92. В противен случай, щракнете бутона Add за да добавите модемния
драйвер, който е разположен в CDROM в комплекта (или на дискетата).
. Отидете на [Start > Settings > Control Panel > System] и щракнете бутона Device Manager в Хардуерната страница,
за да проверите за възможен конфликт на ресурсите или драйвера. Вижте Помощните файлове на Windows, или
34 PRESTIGIO AVANTI 1592W
Page 78

ръководството за инструкции как да се справите с такива проблеми.
. Проверете дали телефонната линия, към която е свързан окмпютъра, работи.
Затруднения със свързването
. Трябва да отмените Очаква обаждане (Call Waiting) на телефонната линия.
. Проверете дали е поставена правилната страна в географските настройки, там където се използва компютъра.
[Start > Settings > Control Panel > Modem Settings > Configuration] В падащото меню на Country/Area изберете
подходящата страна.
. Твърде голям шум по линията може да причини пропадане на връзката. За да проверите това, поставете нормален
телефон на линията и проведете обаждане. Ако чуете шум извън нормалното, опитайте модемна връзка по друга
линия или се обадете на телефонната компания за съдействие.
. Проверете дали кабелната връзка е здрава.
. Опитайте с друг номер, на който да се обадите, и вижте дали проблема продължава.
Проблеми с мрежовия адаптер / Ethernet
Ethernet адаптерът не работи
. Отидете на [Start > Settings > Control Panel > System > Hardware > Device Manager]. Щракнете 2 пъти върху Network
Adapters и проверете дали Realtek RTL8510EX Family Fast Ethernet NIC се пявява като един от адаптерите. Ако не
съществува, Windows не е детектирал Realtek RTL8510EX Family Fast Ethernet NIC или драйверът на устройството
не е инсталиран коректно. Ако има отметка в жълто или червено зачеркване върху мрежовия адаптер, може да има
конфликт в устройствто или ресурсите. Заменете или обновете драйвера на устройството от фабричния CD или
вижте ръководството на Windows за възможностите да решите проблема с конфликта на ресурсите.
. Уверете се, че физическите връзки на двата края на кабела са добри.
. Концентраторът или суичът може да не работят коректно. Проверете дали другите свързани работни станции към
същия хъб работят нормално.
BG
Ethernet адаптерът изглежда не работи в режим 100/1000Mbps предаване на данни
. Уверете се, че хъбът, който използвате, поддържа работа със 100/1000Mbps
. Уверете се, че вашият RJ45 кабел покрива изискванията на 1000BaseTX стандарта.
. Уверете се, че Ethernet кабелът е свързан към порта на хъба, който поддържа режим 100/1000BaseTX. Хъбът може
да има едновременно 100BaseTX и 1000BaseT портове.
Проблеми с PC Card / PCMCIA
Забележка: Някои системи може да не разполагат с опцията за PC Card слот.
PC Card модулите не работят
. Проверете дали правилно сте инсталирали драйвера за картата.
. Вижте ръководството на картата или се обадете на производителя за отстраняване на повредата.
PC картата не може да се разпознае
. Windows NT4.0 не поддържа функцията PCMCIA (PC Card). Може да се наложи да потърсите допълнителен софтуер.
. Проверете дали картата е напълно вкарана в слота; външният ръб на картата трябва да се изравни с ръба на
компютъра.
. Извадете и поставете отново PC картата.
. Проверете дали няма IRQ конфликт с картата. Вижте помощните файлове на Windows за съвети как да решите IRQ
конфликти.
. Рестартирайте компютъра и вижте дали проблемът продължава.
. Картата може да е дефектна. Опитайте картата с друг компютър, ако е възможно.
Windows се срива или увисва, когато извадите PC картата
. Уверете се, че сте направили <Stop> на РСкартата преди да я извадите. Щракнете 2 пъти иконката Safely Remove
Hardware в долния десен ъгъл на лентата със задачи и изберете картата, кочто искате да спрете. Когато щракнете
<Close>, след няколко секунди Windows ще ви подскаже да извадите картата.
35PRESTIGIO AVANTI 1592W
Page 79

Проблеми с производителността
Компютърът загрява
. При околна температура 35oC, някои области отзад на компютъра може да достигнат 50 градуса.
. Уверете се, че вентилаторните отвори не са блокирани.
. Ако вентилаторът изглежда че не работи при високи температури (50 градуса по Целзий и нагоре), обадете се в
BG
сервизния център.
. Някои програми, които силно натоварват процесора, може да са причина за повишаване на температурата в компютъра
до момент, когато компютърът автоматично започне да забавя честотата на процесора, за да се предпази от
топлинна повреда.
Програмата изглежда спряла или върви много бавно
. Натиснете CTRL+ALT+DEL, за да видите дали приложението отговаря.
. Рестартирайте компютъра.
. Това може да е нормално в Windows, когато фоново вървят други програми заемащи сериозно ресурси на процесора,
или когато системата извършва достъп до побавни устройства като флопидисково устройство.
. Може би сте пуснали твърде много приложения. Опитайте да затворите някои приложения за да облекчите работата
на компютъра и да гарантирате побързата му работа.
. Процесорът може да е прегрял поради невъзможност на системата да регулира вътрешната си температура. Уверете
се че отворите за вентилация на системата не са блокирани.
Проблеми с Firewire (IEEE1394) и USB2.0
USB устройство не работи
. Windows NT 4.0 не поддържа USB протоколи
. Проверете настройките в Windows Control Panel.
. Уверете се, че сте инсталирали правилно нужните драйвери на устройствата.
. Обадете се на доставчика на устройството за допълнителна поддръжка.
IEEE1394 порта не работи
. Отидете на [Start > Settings > Control Panel > System > Hardware > Device Manager]. Трябва да видите “OHCI
Compliant IEEE 1394 Host Controllers”. Ако такова съобщение не съществува, значи Windows не е детектирал хост
контролера или драйверът на устройството не е инсталиран правилно. Ако има жълта марка или червено кръстче
върху 1394 хостконтролера, може да има конфликт на ресурсите. Заменете или обновете драйвера на устройството
от фабричния CD или вижте ръководството за Windows за начини да решите проблема с конфликт на ресурсите.
. Уверете се, че кабелът е добре свързан.
. Уверете се, че сте инсталирали необходимите драйвери на устройството.
. Обадете се на доставчика на устройството за допълнителна поддръжка.
36 PRESTIGIO AVANTI 1592W
Page 80

ТЕХНИЧЕСКИ СПЕЦИФИКАЦИИ
Процесор и чипсет
Процесор
Мобилен процесор Intel Pentium M (Napa) Dual Core, до
2.16GHz, 2 MB L2 кеш, 667MHz FSB илиr
Мобилен процесор Intel Pentium M (Napa) Single Core, до
1.83GHz, 2MB L2 кеш, 667MHz FSB
Чипсет
Intel Calistoga 945PM + ICH7M чипсет с интегрирани аудио,
модем и USB2.0 контролери
533/667 MHz DDR2 интерфейс
Системна памет
Тип памет
DDR2 SDRAM 533MHz, PC2 4200 съвместима
По подразбиране
256 / 512 / 1024MB/ 2GB, 2.5волтова 64битова шина
Разширителни слотове
Две 200пинови DIMM гнезда, до макс. 2 GB
Дисплей
LCD екран
15,4инчов (1280x800) WXGA TFT дисплей с 24битов цвят,
или
графичен ускорител
ATI Mobility M54P (със 128MB буфер за кадри) или
Графична шина
PCI Express архитектура на шината за графика
Възпроизвеждане на движение
Хардуерна компенсация на движението и IDCT поддръжка
за възпроизвеждане на MPEG1/2
Други характеристики
DirectX съвместимост
SVideo TVout енкодер
(Интегрирани с графичния ускорител)
Скорост на предаване на данни
V.92 / V.90 / K56flex за теглене със скорост до 56Kbps.
Поддръжка на протоколи V.34, V.17, V.29
Безжичен LAN
Модул
Intel PRO/Wireless 3945ABG, MiniPCI интерфейс
Протокол на предаване
IEEE802.11 A&B&G
LAN / Ethernet адаптер
Чипсет
Realtek 8110 Ethernet функция за мрежови стандарти 10/
100/1000BaseTX
PnP функционалност
Windows 2000 / XP Plug and Play съвместим
Flow Control
Автоматични Jam и autonegotiation за контрол на потока
данни (flow control)
Избор на скорост
Auto Negotiation и Parallel detection за автоматичен избор
на скорост (IEEE 802.3u)
Други функции
Високо производителна 32битова PCI bus master
архитектура с интегриран DMA контролер за разтоварване
заетостта на процесора и на шината.
Поддръжка на Remote Wakeup схема
Поддръжка на свързване под захранване
Firewire IEEE1394(a)
Чипсет
TI TSB43AB22A IEEE1394 OHCI хост контролер и
до 400 Mbps
Възможности
Възможност за свързване до 63 устройства
BG
Аудио
Чипсет
Intel (ICH7M) интегриран аудио контролер
Аудио кодек
Realtek ALC880
DirectSound 3D, EAX 1.0 & 2.0 съвместим
A3D, I3DL2 съвместим
AC97 V2.3 съвместим
7.1 Multichannel съвместим (чрез S/PDIF)
Поддържа Azalia стандарт
Звукови възможности
2 Стерео говорители с 2 субуфер
Модем
Чипсет
Intel (ICH7M) интегриран модем контролер с MDC карта,
поддръжка на AC97 V2.2 модем
Съхранение на данни
Твърд диск
2,5инчов твърд диск
Комбо устройство
5,25инчов (12.7mm височина) фиксиран модул
(Опционална поръчка)
DVD±R/±RW или DVDDual, или DVDMulti
Клавиатура и Тъчпад
Клавиатура
QWERTY клавиатура с 88клавиша, с вградена цифрова
клавиатура и Windows клавиши, 19.05mm разстояние
(ширина на клавиш + хлабина).
Тъчпад
Вграден тъчпад с бутон за активиране/деактивиране на
тъчпада
37PRESTIGIO AVANTI 1592W
Page 81

Express Card (New Card) & Четец
на флаш карти
Чипсет
Genesys GL817E (Четец на флаш карти)
Express Card / New Card
Един слот, поддръжка на , 34mm и 54mm дебелини
BG
4в1 Четец на флаш карти
Multimedia Card (MMC), Secure Digital Card (SD), Memory
Stick (MS), и MS Pro Card
Портове и конектори
Порт за микрофон
Вход за микрофон
AudioOut / SPDIF
Вход за слушалки / SPDIF
Firewire
Хост конектор Firewire (IEEE1394)
USB2.0 порт
Три USB2.0съвместими конектори
Ethernet
Един стандартен Ethernet мрежов конектор (RJ45)
Модем
Един модемен/телефонен конектор (RJ11)
SVideo
Един Svideo (TVout) изходен конектор
Вход за захранване
Един конектор за захранване (DCin)
DVII порт
Един DVII видео конектор
Картов четец
Един слот за Четец на карти 4в1
New Card слот
Един слот за New Card (тип 54 / 34)
VR шайба
Една шайба за регулиране на звука
Батерия / AC адаптер
Оригинална батерия
Liion 6клетъчен пакет, 10.8V x 4400 mAH
Функции
Следене за нисък заряд със звуков сигнал за нисък заряд
Uniwill SmartPower II управление на захранването
Smart Battery съвместима, звуков сигнал за нисък заряд
Дълъг живот на батерията, тих режим
Адаптер ACвход/ DCизход
Автодетектиране на входното напрежение: 100~240V, DC
out 20V, 90W
BIOS
PnP функция
Phoenix PnP BIOS
Самотестване
Power On Self Test
Автодетектиране
DRAM автодетектиране
L2 кеш автодетектиране
Автодетектиране на твърдия диск
Управление на захранването
APM 1.2 (Advanced Power Management) &
ACPI 2.0 (Advanced Configuration Power Interface)
Защита
Две нива на защита с пароли
32битов достъп, Ultra DMA, поддръжка на PIO5 Mode
Други функции
Възможност за стартиране от множество устройства
Операционна система
Съвместимост с Microsoft Windows XP / MCE Home Edition
Физически спецификации
Размери
360 x 269 x 2537.1 mm (ширина х дълбочина х височина)
Тегло
3,1 кг (с 15.4” екран, DVDROM и 6клетъчна батерия)
Ограничения за околната среда
Околна температура за работа: 5 до 35 град. Целзий(41
95oF)
Влажност при работа: 20 до 80 % относителна влажност (5
до 35oC)
Температура на съхранение: 15 до 50oC (5 до 122oF)
38 PRESTIGIO AVANTI 1592W
Page 82

СЪОТВЕТСТВИЕ С НАРЕДБИ
Съответствие с наредби на Федералната комисия по комуникации
(FCC)
Това устройство е тествано и е установено, че съответства на изискванията за дигитално устройство Class B, според
Част 15 на Правилата на FCC Rules. Тези изисквания са създадени за да предложат разумна защита срещу вредни
смущения в жилищни райони. Това устройство генерира, използва и може да излъчва енергия на радиочестоти и, ако
не се инсталира в съответствие с инструкциите, може да причини вредни смущения в радиокомуникациите. Обаче,
не съществува гаранция, че смущенията няма да се получат при конкретна инсталация. Ако това устройство причини
вредни смущения, което може да се установи чрез неговото включване или изключване, потребителят се съветва да
опита да коригира това с една или няколко от следните мерки:
. Преориентирайте или преместете приемащата антена.
. Увеличете разстоянието между устройството и приемника на смущения.
. Свържете устройството с контакт в захранващата мрежа различен от този на приемника.
. Консултирайте се с дилър или опитен радио или телевизионен техник за помощ.
Модификации
FCC Изисква от потребителя да знае, че всички промяни или модификации на това устройство, които не са ясно
одобрени от Производителя, могат да анулират правото на потребителя да използва устройството.
Свързване към периферни устройства
Свързването на устройството към периферията трябва да се извършва с екранирани кабели с метални RFI/EMI защитни
покрития на конекторите, в съответствие с Правилата и Наредбите на FCC.
Декларация за съответствие
Това устройство съответства на Част 15 ( CLASS B)/68 на Правилата на FCC. Работата му трябва да се подчинява на
следните условия:: (1) това устройство не е разрешено да причинява вредни смущения, и (2) това устройство трябва
да приема всякакви получени смущения, включително такива, които причиняват нежелана работа от него.
BG
Европейски директиви
Продуктите с маркировка CE съответстват както на EMC Директивата (89/336/EEC) и Директивата за Ниско Напрежение
(73/23/EEC), и R&TTE Директивата (1999/5/EC) Издадени от Комисията на Европейския Съюз.
Съблюдаването на изискванията на тези директиви означава съответвие със следните Европейски норми:
. EN55022 : 1998+A1: 2000+A2: 2003, CLASS B
. EN6100032 : 2000
. EN6100033 : 1995+A1: 2001
. EN55024 : 1998+A1 : 2001+A1: 2003
. IEC6100042: 2001
. IEC6100043:2002+A1:2002
. IEC6100044:1995+A1:2000+A2:2001
. IEC6100045:2001
. IEC6100046:2001
. IEC6100048:2001
. IEC61000411:2001
. EN50082 (IEC8012, IEC8013, IEC8014) Електромагнитна защитеност
. EN 300 3282, EN 300 3281, EN 301 4891, EN 301 48917 (ETSI 300 328, ETSI 301 489) Електромагнитна съвместимост
и радиочестоти
. TBR21 ( ETSI TBR21) Терминално оборудване.
. EN60950 (IEC950) I.T.E. Безопасност на продукта
39PRESTIGIO AVANTI 1592W
Page 83

Изисквания към захранващия кабел
Кабелът за захранване, доставен в комплект с АС адаптера трябва да съответства на изискванията за напрежение и
контакти във вашата страна. Получено е одобрение за използване на АС адаптер заедно съз захранващ кабел за вашия
регион. Обаче, ако пътувате в друг регион и трябва да се свържете към различен контакт или напрежение, трябва да
използвате един от кабелите в списъка подолу. За закупуване на захранващ кабел (включително за страна извън този
списък) или за замяна на АС адаптера, моля свържете се с вашия дилър.
BG
Други страни
. Захранващият кабел трябва да носи сертификационното маркиране на агенцията отговаряща за оценяването в
конкретната страна. Допустимите агенции са:
BSI (Великобритания)
OVE (Австралия)
CEBEC (Белгия)
SEMKO (Швеция)
FIMKO (Финландия)
DEMKO (Дания)
NEMKO (Норвегия)
SETI (Финландия)
EANSW (Австралия)
SEV (Швецария)
IMQ (Италия)
UTE (Франция)
CCC (Китай)
PSB (Сингапур)
PSE (Япония)
BSMI (Тайван)
B (Полша)
VDE (Германия)
SASO (Саудитска Арабия)
. Гъвкавият кабел трябва да бъде от HAR (хармонизиран) тип HO5VVF, 3проводен кабел с минимално сечение 0,03
кв.инча
. Минималната спецификация за гъвкавия кабел за продукт Клас II е: (1) 2X0.75 mm2 проводници, (2) 2проводен
кабел.
. Кабелът трябва да е оразмерен за ток поне 10 А и номинално напрежение 125 / 250 VAC.
ВНИМАНИЕ: МОДЕЛЪТ P53IAx ТРЯБВА ДА СЕ ИЗПОЛЗВА САМО СЪС СЛЕДНИЯ
АДАПТЕР ЗА ЗАХРАНВАНЕ
Производител LiShin INC, LITEON ELECTRONICS, INC.
Модел: LSE0202C2090 (90W), LSE0202D2090 (90W), PA190005 (90W), PA190006
(90W)
Изисквания за телефонната линия
. Подходящо е използването на 26AWG кабел за телефонна линия.
ВНИМАНИЕ: Винаги откачвайте всички телефонните кабели от розетката, преди да
извършвате сервизна дейност или разглобяване на компютъра.
ВНИМАНИЕ: За да намалите опасността от пожар, използвайте само No. 26AWG
или поголям кабел за телефонна линия.
40 PRESTIGIO AVANTI 1592W
Page 84

Безопасност на батерията
Батерията е предназначена за използване само с този ноутбук.
Не разглобявайте пакета на батерията.
Не изхвърляйте батерията в огън или вода.
За да избегнете опасността от пожар, изгаряне или повреда на батерията, особено внимавайте метален предмет да не
докосва контактите на батерията.
Третирайте повредените или изпускащи течност батерии с изключително внимание. Ако докоснете изтекъл електролит,
измийте тази област от кожата със сапун и вода. Ако електролит попадне в окото, обилно изплакнете с вода в продължение
на 15 минути и потърсете медицинска помощ.
Не зареждайте батерията, ако околната температура надвиши 45оС (113F)...
За да получите батерия за замяна, обадете се на вашия дилър.
Не излагайте батерията на високи температури на съхранение (над 60оС, или 149оF).
Когато трябва да изхвърлите батерия, обадете се на местна агенция упълномощена да извърши събиране и изхвърляне
на такива продукти, в съответствие със законите за изхвърляне или рециклиране на батерии.
За зареждане използвайте само доставения с продукта AC адаптер.
ВНИМАНИЕ: Ако батерията е некоректно заменена, съществува опасност от
експлозия. Заменяйте само със същия или еквивалентен тип, препоръчан от
производителя. Освобождавайте се от използваните батерии съгласно местните
закони или инструкция на доставчика.
Безопасност от лазерно излъчване
Оптичното устройство използвано с този компютър е сертифицирано като лазерно устройство Клас 1 според стандартите
за излъчване на Министерството на здравеопазването на САЩ и международните стандарти IEC 825 / IEC 8251 (EN60825
/ EN608251). Устройството не се счита вредно, но се препоръчват следните предпазни мерки:
. Не отваряйте устройството.
. Избягвайте директно излагане на лазерния лъч.
. Ако устройството изисква обслужване, обадете се в оторизиран сервизен център.
. Използвайте правилно устройството, като внимателно прочетете инструкциите към него.
. Не опитвайте да поправяте/променяте устройството.
BG
ЛАЗЕРЕН ПРОДУКТ КЛАС 1
CLASS 1 LASER PRODUCT
APPAREIL A LASER DE CLASSE 1
LASERSCHUTZKLASSE 1 PRODUKT
Предупреждение!
Не опитвайте да разглобите корпуса, съдържащ лазера. Лязерният лъч в този продукт е вреден за очите. За вашата
безопасност, това оборудване трябва да се сервизира само от оторизиран сервизен център.
41PRESTIGIO AVANTI 1592W
Page 85

Предупреждение за Литиева батерия
Този компютър съдържа литиева батерия за захранване на веригата на часовника и календара.
ВНИМАНИЕ: Ако батерията е некоректно заменена, съществува опасност от
експлозия. Заменяйте само със същия или еквивалентен тип, препоръчан от
BG
Внимавайте, когато видите този символ, защото мястото може да бъде много горещо.
производителя. Освобождавайте се от използваните батерии съгласно местните
закони или инструкция на доставчика.
42 PRESTIGIO AVANTI 1592W
Page 86

Prestigio Avanti 1592W
Návod k obsluze
Upozornění
Informace, které jsou obsažené v tomto návodu, jsou předmětem změn bez dalšího upozornění.
VÝROBCE ANI PRODEJCE NEJSOU ODPOVĚDNI ZA CHYBY A OPOMENUTÍ, KTERÁ MOHOU BÝT OBSAŽENA V TOMTO NÁVODU K OBSLUZE, A
NEJSOU ODPOVĚDNI ZA JAKÉKOLIV ŠKODY, KTERÉ MOHOU POUŽITÍM TOHOTO NÁVODU VZNIKNOUT.
CZ
Informace, obsažené v tomto návodu, jsou chráněny autorskými právy. Žádná část tohoto návodu nesmí být kopírována nebo reprodukována
bez písemného souhlasu majitele autorských práv.
Copyright červenec 2006
Všechna práva vyhrazena.
Microsoft a Windows jsou registrovanými ochrannými známkami společnosti Microsoft Corporation. DOS, Windows 95/98/ME/2000/
NT/XP jsou ochrannými známkami společnosti Microsoft Corporation.
Názvy výrobků, které jsou v návodu zmíněny, mohou být ochrannými známkami nebo registrovanými ochrannými známkami jejich
výhradních majitelů či společností.
Programy, které jsou popisovány v tomto návodu, jsou dodávány pod licenčním ujednáním. Tyto programy mohou být používány nebo
kopírovány pouze v souladu s licenčním ujednáním.
Tento výrobek v sobě zahrnuje technologii na ochranu autorských práv, která jsou chráněna U.S. patenty a dalšími právy na ochranu
intelektuálního vlastnictví, vlastněnými společností Macrovision Corporation a dalšími vlastnickými právy. Užití této technologie na
ochranu autorských práv musí být autorizováno společností Macrovision Corporation a je určeno pouze pro domácí a ostatní omezené
použití, pokud jiný způsob použití nestanoví společnost Macrovision Corporation. Zpětná demontáž výrobku a využití technologických
postupů, na kterých je založen, je zakázáno.
Rev 1.0
1PRESTIGIO AVANTI 1592W
Page 87

Úvod
Použití návodu k obsluze
CZ
Tento návod k obsluze obsahuje všeobecné informace o hardwarovém a softwarovém nastavení, řešení případných problémů s provozem
a technické specifikace tohoto notebooku.
Symboly a konvence
V tomto návodu k obsluze jsou použity následující symboly a konvence:
Pokud mají být klávesy stisknuty současně, je použit symbol “+”. Výraz Fn+F7 například znamená
současné stisknutí kláves Fn a F7 v jednom okamžiku.
Pokud je v OS Windows třeba několikanásobné akce kliknutí, jsou použity symboly [ ] a >, například
[Start > Nastavení > Ovládací panely > Zobrazení], což znamená nejprve kliknutí na tlačítko “Start”, poté
na “Nastavení”, dále na “Ovládací panely” a nakonec na ikonu “Zobrazení”.
Pokud je třeba provést výběr položky pomocí polohovacího zařízení /touchpadu/ nebo myši, budete
navigováni příkazy “vybrat”, “kliknout”, “dvojitě kliknout” nebo “kliknout pravým tlačítkem” na položku.
Poznámka: Text v tomto formátu a následující symboly upozorňují na specifické instrukce, komentáře,
poznámky na okraji nebo jakékoliv dodatkové informace nebo poznámky, kterými byste se měli řídit.
Varování: Text v tomto formátu a následující symboly znamenají, že pokud se nebudete danými
instrukcemi řídit, může dojít k poškození počítače, ke zranění nebo i ke smrtelnému úrazu.
Ochrana vašeho počítače - předcházení nesprávnému používání a provozu v
nepříznivých podmínkách
Řiďte se následujícími radami, abyste si zajistili maximální užitek ze svého počítače.
Váš počítač vám bude dobře sloužit, pokud mu věnujete odpovídající péči.
Nevystavujte počítač přímému slunečnímu záření a neumísťujte jej do blízkosti zdrojů tepla.
Nevystavujte jej teplotám pod 0°C nebo nad 35°C.
Počítač nevystavujte magnetickým polím.
Nevystavujte počítač dešti nebo vlhkosti.
Dbejte na to, aby se na počítač nerozlila žádná tekutina.
Dbejte na to, aby počítač nebyl vystaven nárazům nebo vibracím.
Neprovozujte počítač v prašném nebo znečistěném prostředí.
Na počítač nikdy nestavte žádné předměty, které by jej mohly poškodit.
Nepokládejte počítač na kamenité plochy.
Zde je několik rad, jak pečovat o síťový AC adaptér.
Nepřipojujte adaptér k jinému zařízení než k tomuto počítači.
Zabraňte, aby se do adaptéru dostala voda.
Neblokujte ventilační otvory adaptéru.
Používejte adaptér na chladném a větraném místě.
2 PRESTIGIO AVANTI 1592W
Page 88

Nepřecházejte po kabelu adaptéru a nestavte na něj těžké předměty.
Kabel umístěte tak, aby o něj nikdo nemohl zakopnout.
Když adaptér odpojujete, netahejte za jeho kabel, ale vždy za konektor adaptéru.
Udržujte adaptér z dosahu dětí.
Celkový příkon zařízení, připojených pomocí prodlužovacího kabelu, nesmí přesáhnout jmenovitý povolený
příkon tohoto prodlužovacího kabelu.
Celkový příkon zařízení připojených do jedné zásuvky nesmí přesáhnout příkon jejího jističe.
K vašemu počítači nepřipojujte jiný AC adaptér, nežli je dodaný s výrobkem nebo jeho schválenou náhradu.
Tento notebook využívá výhradně AC adaptéry: Liteon PA-1900-05 (90W), Liteon PA-1900-06 (90W),
Lishin LSE0202D2090 (90W), Lishin LSE0202C2090(90W)
Při čištění počítače postupujte podle těchto kroků:
1. Počítač vypněte a vyjměte baterie /battery pack/.
2. Odpojte AC adaptér.
3. Používejte pouze měkké utěrky mírně navlhčené vodou. Nepoužívejte tekuté nebo aerosolové čističe.
Pokud dojde k následujícím případům, kontaktujte svého prodejce nebo odborný servis:
Počítač vám spadl nebo je jeho tělo poškozeno.
Na počítač se rozlila jakákoliv tekutina.
Počítač nepracuje obvyklým způsobem.
CZ
Čištění ventilační mřížky:
Aby byla zajištěna optimální teplota v počítači a cirkulace vzduchu, je doporučeno pravidelné čištění ventilační mřížky. K tomuto úkonu
můžete použít měkký kartáč nebo vysavač s odpovídajícím nástavcem, kterým odstraníte nánosy prachu na ventilační mřížce.
3PRESTIGIO AVANTI 1592W
Page 89

ZÁKLADNÍ SEZNÁMENÍ SE S POČÍTAČEM
Tato kapitola vás seznámí s vlastnostmi a součástmi počítače.
Výkonové vlastnosti počítače
CZ
Vysoce výkonný procesor s chipsetem Calistoga
Tento počítač je vybaven vysoce výkonným procesorem Mobile Intel Pentium M. Spolu s nejnovějšími technologiemi a s chipsetem
Calistoga tento systém nabízí opravdu široké možnosti použití.
Rozšířený grafický nástroj
Systém je založen na ATI Mobility M54-P se 128 MB DDR vyhrazené paměti. High-end grafický nástroj PCI-Express nabízí excelentní
grafický výkon jak pro profesionální použití, tak i pro hraní her. Rozšířený grafický chip v sobě zahrnuje hardwarově založený
kompenzační nástroj pro pohybující se scény, který vyhlazuje přehrávání videa MPEG. Možnosti grafiky DirectX 9 zvyšují realistické
podání při hraní počítačových her.
LCD displej
Počítač je vybaven TFT 15,4" displejem o poměru stran 16:10 pro dokonalé zobrazení a vynikající kinematografický zážitek.
Podpora Serial ATA HDD (u některých modelů)
Sériová sběrnice ATA poskytuje vyšší průchodnost dat než tradiční paralelní ATA sběrnice. Zajišťuje optimální výkon pevného disku.
Technologie ExpressCard
Technologie ExpressCard je další generací standardu PC Card. Rozhraní je založeno na 2 standardech: PCI Express pro rychlé porty I/
O a USB 2.0 pro různá další přípojná zařízení.
Rozšiřitelnost systému počítače
Systém počítače nabízí možnosti použití pevného disku o větší kapacitě a 2 DDR SDRAM sockety pro rozšíření paměti, které dovolují
uživateli snadno zvětšit paměťovou kapacitu systému, pokud je požadována.
Vestavěná multi-čtečka karet
V tomto počítači je vestavěna multi-čtečka karet 4-in-1, dovolující použití 4 nejběžnějších typů těchto přenosných paměťových médií (SD
Card, MMC Card, MS Card a MS-Pro Card).
Ethernet port
Systém počítače zahrnuje vestavěný síťový Ethernet adaptér 10/100/1000Mbps pro vysokorychlostní připojení k počítačovým sítím.
4 PRESTIGIO AVANTI 1592W
Page 90

Firewire (IEEE1394 / 1394a) a porty USB2.0
Kromě vestavěných I/O portů je počítač vybaven možností ultra vysokorychlostního připojení standardu IEEE1394 k digitálním video
zařízením a porty USB 2.0 pro připojení k periferním zařízením, která podporují USB standard.
Bezdrátová síť Wireless LAN
Vestavěný modul Wireless LAN umožňuje bezdrátově připojit váš počítač k ostatním systémům, zařízením nebo sítím, podporujícím
standard 802.11.
Zběžný pohled na počítač
Pohled shora
CZ
5PRESTIGIO AVANTI 1592W
Page 91

CZ
1. Západka LCD panelu
Tyto západky uzamykají/odemykají LCD panel.
2. LCD displej
Umožňuje komunikaci s počítačem a zobrazuje obsah systému počítače.
3. Klávesnice
Klávesnice slouží k zadávání dat do počítače. Více informací naleznete v oddíle s popisem klávesnice.
4. Polohovací zařízení - touchpad
Touchpad je vestavěné dotykové polohovací zařízení a svojí funkcí nahrazuje počítačovou myš.
5. Vestavěný mikrofon
Vestavěný mikrofon slouží k nahrávání zvuků.
6. Tlačítko zapnutí/vypnutí touchpadu
Tímto tlačítkem je možno zapnout a vypnout funkce touchpadu.
7. Vestavěné stereo reproduktory
Vestavěné reproduktory produkují zvuk ve stereofonní kvalitě.
8. LED indikátory stavu systému
LED indikátory stavu počítače vám dávají informace o zařazení následujících funkcí: numerická klávesnice, CapsLock, ScrollLock,
zapnutí či vypnutí WLAN modulu a také o aktivitě optické mechaniky a pevného disku. (Více informací naleznete v odstavci o stavových
indikátorech).
LED indikátory stavu podávají také informace o režimu napájení a průběhu nabíjení baterie. (Více informací naleznete v odstavci o
stavových indikátorech).
9. Tlačítko napájení/pohotovostní režim
Tímto tlačítkem zapnete a vypnete počítač a slouží také jako tlačítko pro vstup systému do pohotovostního režimu nebo do režimu spánku.
Krátkodobým stisknutím počítač zapnete, stisknutím a podržením ve stisknutém stavu na alespoň 4 sekundy počítač vypnete. Chování
tohoto tlačítka může být definováno v menu: [Start > Nastavení > Ovládací panely > Možnosti napájení > Upřesnit]. Návrat z
pohotovostního režimu nebo z režimu spánku můžete provést také stisknutím tohoto tlačítka. (Více informací naleznete v kapitole 3).
6 PRESTIGIO AVANTI 1592W
Page 92

Poznámka: Při zapnutí napájení systému počítače LED indikátory ScrollLock, CapsLock a NumLock
probliknou, čímž indikují začátek náběhu systému a Power-On sekvence.
10. Tlačítko tichého režimu
Stisknutím tlačítka přejde systém do tichého režimu, ve kterém je nižší spotřeba energie, otáčky ventilátoru jsou také sníženy pro zajištění
co nejnižší provozní hlučnosti.
Je možné, že bude nutné zapnout tuto funkci tichého režimu v utilitě BIOS Setup. (Více naleznete v kapitole 2).
11. Tlačítko rychlého startu Outlook Explorer
Stisknutím tlačítka dojde k okamžitému otevření aplikace Outlook Express v OS Windows.
12. Tlačítko rychlého startu prohlížeče Internet Explorer
Stisknutím tlačítka dojde k okamžitému otevření aplikace Internet Explorer v OS Windows.
13. Tlačítko rychlého startu Windows Media Player
Stisknutím tlačítka dojde k okamžitému otevření aplikace Windows Media Player v OS Windows.
Pohled zepředu a zezadu
CZ
Varování: Nestavte nikdy na počítač těžké předměty, může tak dojít k poškození jeho displeje.
1. Tlačítko zapnutí a vypnutí bezdrátového modulu
Toto tlačítko můžete použít k zapnutí nebo k vypnutí funkce bezdrátového modulu.
2. Zdířka pro připojení AC adaptéru /DC-vstup/
Do této zdířky se připojuje výstupní konektor DC-out síťového AC adaptéru a slouží k připojení počítače ke zdroji el. proudu.
7PRESTIGIO AVANTI 1592W
Page 93

3. Port modemu
Tento port standardu RJ-11 slouží pro připojení telefonního kabelu pro využívání fax/modemových funkcí počítače.
4. Baterie
CZ
Baterie (battery pack) je zdrojem elektrické energie pro váš počítač.
5. Ventilační mřížka
Těmito otvory dochází pomocí ventilátoru k cirkulaci vzduchu uvnitř počítače a k jeho ochlazování. Nikdy tyto otvory neblokujte.
5. Otvor pojistného zámku Kensington
Pojistný zámek Kensington, který je možno vložit do tohoto otvoru, slouží k ochraně před zcizením počítače.
Pohled ze strany
Varování: Nestavte nikdy na počítač těžké předměty, může tak dojít k poškození jeho displeje.
1. Nastavovací kolečko hlasitosti
Kolečkem můžete nastavit požadovanou úroveň hlasitosti reprodukce.
2. Zdířka pro stereofonní sluchátka SPDIF-Out
Do stereofonního jacku o průměru 3,5 mm můžete připojit stereofonní sluchátka nebo externí reproduktory. Alternativně je možné do
tohoto výstupního konektoru SPDIF připojit zařízení DTS, AC3 nebo PCM zvukový procesor/dekodér vašeho domácího stereo systému.
3. Mikrofonní zdířka
Mikrofonní jack o průměru 3,5 mm slouží k připojení externího mikrofonu.
8 PRESTIGIO AVANTI 1592W
Page 94

4. Optická mechanika, tlačítko vysunutí disku a otvor pro manuální vysunutí disku
Pokud je váš počítač vybaven mechanikou Combo drive, DVD-RW, DVD+RW nebo DVD-Dual drive, můžete ukládat vaše data na CD-R/
CD-RW nebo na DVD RW disky. Stisknutím tlačítka pro vysunutí disku se disk vysune. Pokud je disk porušen a nejde tímto tlačítkem
vysunout, použijte manuální způsob vysunutí disku, ke kterému slouží otvor na straně této mechaniky.
5. Port USB 2.0 /x2/
Tento port nazývaný USB (Universal Serial Bus) a odpovídající standardu USB 2.0 dovoluje připojit k počítači široké spektrum různých
zařízení a periferií s přenosem do 480 MB za sekundu. Tento USB 2.0.port odpovídá nejnovějšímu standardu technologie Plug and Play
(připoj a pracuj).
6. Port DVI-I
Výstupní port DVI-I slouží pro připojení externího LCD monitoru nebo projektoru.
7. Port TV (S-Video)
Port S-Video vám dovoluje přesměrovat obrazovkový výstup na televizní přijímač nebo na jakékoliv analogové video přehrávací
zařízení. Tento TV port je vybaven ochranou proti kopírování. Pokud je přehráván DVD disk, výstupní signál na portu je rušen, aby bylo
zabráněno možnosti jej analogově nahrávat.
CZ
8. Ethernet/LAN port
Pomocí tohoto portu je možno počítač připojit kabelem s konektorem RJ-45 do zásuvky hubu a připojit tak počítač k LAN síti. Port odpovídá
přenosovému protokolu 10/100/1000 Base-TX.
9. Čtečka paměťových karet 4-in-1
Multi-čtečka karet 4-in-1 dovoluje použití 4 nejběžnějších typů přenosných paměťových médií (SD Card, MS Card, MMC Card a MS-Pro
Card).
10. Port Firewire /IEEE 1394/ 1394a
Do tohoto vysokorychlostního portu můžete připojit každé zařízení, které podporuje tento druh (Firewire) přenosu dat.
11. Port USB 2.0 /x1/
Tento port nazývaný USB (Universal Serial Bus) a odpovídající standardu USB 2.0 dovoluje připojit k počítači široké spektrum různých
zařízení a periferií s přenosem do 480 MB za sekundu. Tento USB 2.0.port odpovídá nejnovějšímu standardu technologie Plug and Play
(připoj a pracuj).
12. Slot pro kartu ExpressCard
Do tohoto slotu je možno zasunout kartu ExpressCard (Type 54). ExpressCard Type 54 dovoluje vložení jak karet 54 mm, tak i karet
34 mm. Tyto karty integrují jak technologii PCI-Express Bus, tak i rozhraní USB 2.0.
9PRESTIGIO AVANTI 1592W
Page 95

Pohled zespodu
CZ
1. Baterie a západka pro uvolnění baterie
Baterie /sada článků - battery pack/ je vestavěným zdrojem proudu pro váš počítač. Posunutím západky baterii uvolníte.
2. Kryt pevného disku
Pod tímto krytem je uložen pevný disk vašeho počítače. Pevný disk (HDD) může být vyměněn za disk s větší kapacitou (více v kapitole
4.).
10 PRESTIGIO AVANTI 1592W
Page 96

3. Kryt systémových zařízení
Pod tímto krytem jsou instalována systémová zařízení počítače, jako je procesor s ventilátorem, modul pro bezdrátovou komunikaci
Wireless LAN a DDR paměťové moduly. Systémová paměť může být rozšířena a může být také nainstalován WLAN modul (více naleznete
v kapitole 4).
4. Ventilační mřížka
Těmito otvory dochází pomocí ventilátoru k cirkulaci vzduchu uvnitř počítače a k jeho ochlazování. Nikdy tyto otvory neblokujte.
Varování: Ventilační otvory nikdy neblokujte. Počítač provozujte pouze na pevném povrchu, aby nemohlo
dojít k ucpání těchto otvorů. Spodní strana počítače může být při provozu velmi teplá.
AC adaptér
CZ
1. Výstupní /DC-out/ konektor
Tento výstupní konektor připojte do odpovídající zdířky (DC-in) na vašem počítači.
2. Adaptér
Adaptér převádí střídavé napětí z el. zásuvky na konstantní stejnosměrný proud pro napájení počítače.
3. Síťová zástrčka
Zasunutím síťové zástrčky do zásuvky s el. proudem připojíte adaptér k el. síti.
Varování: Ujistěte se, že vaše síťová zásuvka, do které připojujete adaptér, je vybavena zemnícím
středovým kolíkem. Pokud připojíte adaptér do neuzemněné zásuvky, můžete cítit lehké probíjení, pokud
se dotknete kovových částí počítače, např. konektorů I/O portů. Toto probíjení je zapříčiněno prostupem
proudu přes adaptér, který není správně uzemněn - připojen do zásuvky se středovým zemnícím kolíkem.
Tento slabý prostupující proud však splňuje bezpečnostní předpisy a není člověku nebezpečný.
11PRESTIGIO AVANTI 1592W
Page 97

LED indikátory stavu systému počítače
LED indikátory (svítivé diody) zobrazují provozní stav počítače. Pokud je určitá funkce zapnuta, LED indikátor svítí. Následuje popis
indikovaných stavů.
Indikátory stavu systému a indikátory napájení
CZ
Grafický symbol LED indikace Indikace
Zelená indikuje stav zapnutí notebooku.
Zelená indikuje aktivní stav WLAN modulu.
Blikající zelená indikuje pohotovostní režim.
Zelená indikuje, že se notebook nachází v tichém režimu.
Blikající oranžová indikuje nabíjení baterie.
Blikající červená indikuje, že baterie je téměř vybitá při zapnutém počítači.
Trvale svítící zelená indikuje plně nabitou baterii.
Nesvítící LED indikuje, že systém je bez baterie.
Zelená indikuje přístup k pevnému disku nebo k optické mechanice.
Zelená indikuje, že je funkce numerické klávesnice aktivována.
Zelená indikuje, je funkce CapsLock je aktivní.
Zelená indikuje, že je funkce ScrollLock aktivní.
Funkce klávesnice
Funkční klávesy (Klávesy rychlé volby)
Grafický symbol Akce Ovládání systému
Fn + F1 Vstup do úsporného režimu
Fn + F3 Vypnutí a zapnutí zvuku.
Fn + F4 Změna režimu zobrazení: pouze LCD, pouze CRT a LCD + CRT.
Fn + F5 Zvýšení hlasitosti reprodukce
Fn + F6 Snížení hlasitosti reprodukce
12 PRESTIGIO AVANTI 1592W
Page 98

Fn + F7 Zvýšení jasu zobrazení na displeji
Fn + F8 Snížení jasu zobrazení na displeji
Fn+Num Lk Aktivuje vloženou klávesnici do numerického režimu, která pak má stejné
funkce jako klávesnice na kapesní kalkulačce. Tento režim je užitečný při
vkládání velikého objemu numerických dat. Alternativně může být
připojena i externí numerická klávesnice.
Fn + Scr Lk Stiskněte klávesu ScrollLock a poté se můžete pomocí kláves ‘! nebo “!
pohybovat o jeden řádek nahoru nebo dolů.
Pro ovládání různých funkcí systému stiskněte nejprve funkční klávesu (Fn) a současně s ní klávesu Fx.
Funkční klávesy Windows
Vaše klávesnice také obsahuje 2 Windows klávesy:
1. Klávesa Start
Tato klávesa vám dovoluje rozvinout Windows menu Start z levého dolního rohu
Hlavního panelu.
2. Klávesa menu aplikace
Tato klávesa otevírá vyskakovací okno aplikačního menu podobně jako kliknutí pravým
tlačítkem myši.
Vložená numerická klávesnice
CZ
Stiskem kláves Fn+ NumLk aktivujete vloženou numerickou klávesnici. Čísla numerické klávesnice jsou na klávesách vytištěna v pravém
horním rohu, v barvě, která je odlišná od alfabetických znaků - písmen. Tato klávesnice obsahuje i aritmetické operátory (+,-,*,/).
Stisknutím kláves Fn+NumLk opět aktivujete obvyklou alfabetickou klávesnici.
13PRESTIGIO AVANTI 1592W
Page 99

Polohovací zařízení - touchpad
Touchpad je vestavěné dotykové polohovací zařízení, kompatibilní s PS/2, které snímá pohyby prstů na svém povrchu. Tyto pohyby
převádí na pohyb kurzoru na obrazovce. Svojí funkcí nahrazuje myš.
V následujících řádcích se dozvíte, jak používat touchpad:
CZ
1. Pohybem prstu po dotykové ploše touchpadu pohybujete kurzorem po obrazovce.
2. Stisknutím tlačítek provedete výběr nebo vyvoláte určitou funkci. Tato dvě tlačítka mají podobné funkce jako levé a pravé tlačítko myši.
Rychlé dvojité klepnutí prstem na dotykovou plochu touchpadu má stejnou funkci jako kliknutí levým tlačítkem myši.
Funkce Levé tlačítko Pravé tlačítko Ekvivalent akce poklepání
Vykonání funkce Dvojitě rychle klikněte Dvojitě poklepejte (stejnou rychlostí jako při
dvojitém kliknutí tlačítkem myši).
Výběr Jednou klikněte Jednou klepněte
Přetažení Klikněte a držte kurzor Dvakrát rychle poklepejte na dotykovou plochu
k přetažení touchpadu a držte po druhém poklepání prst na
povrchu touchpadu, kterým můžete pohybovat
kurzorem.
Přístup ke kontextovému menu Jednou klikněte
Posouvejte jednu stránku
nahoru nebo dolů.
Jak používat touchpad:
1. Rychlost dvojího kliknutí je měřena. Pokud kliknete dvakrát za sebou, ale příliš pomalu, počítač to bude považovat za jednoduché
kliknutí dvakrát po sobě.
2. Při práci s touchpadem udržujte své prsty suché a čisté, stejně tak jako samotný touchpad. Prodloužíte tím jeho životnost.
3. Touchpad je na pohyby prstů velmi citlivý, čím lehčí je dotyk, tím lepší je odezva. Silným a hrubým klepáním na touchpad jeho odezvu
nezrychlíte.
Grafický systém počítače
Tento počítač využívá vysoce výkonný 15.4" displej, který je založený na aktivní maticové technologii TFT s vysokým rozlišením a
několika miliony barev pro opravdu komfortní zobrazení obrazu. Grafický akcelerátor ATI Mobility M54-P, který je kompatibilní se
systémem Microsoft DirectX 9, poskytuje pohotovost grafického ztvárnění obrazu rychlostí světla.
Nastavení jasu displeje
Tento počítač využívá k nastavení jasu displeje speciální kombinaci kláves, které jsou nazývány “horké klávesy”.
Stisknutím Fn + F7 dojde ke zvýšení jasu.
Stisknutím Fn + F8 dojde ke snížení jasu.
Poznámka: Pro maximalizaci času, po který je možno s počítačem pracovat na baterie, nastavte jas na
nejnižší možnou přijatelnou úroveň, neboť se tak sníží odběr proudu z baterie.
Rady pro zvýšení životnosti TFT displeje
Dodržováním následujících rad si zajistíte maximální životnost podsvícení displeje.
1. Pomocí kláves Fn + F8 nastavte vždy jas displeje na nejnižší možnou úroveň, která vám ještě při práci vyhovuje.
14 PRESTIGIO AVANTI 1592W
Page 100

2. Pokud pracujete na vašem pracovním stole, připojte notebook k externímu monitoru a vypněte jeho interní displej pomocí kláves Fn + F4.
3. Nevypínejte funkci vstupu do úsporného režimu.
4. Pokud provozujete počítač přes síťový AC adaptér a nemáte připojen externí monitor, přepněte počítač do úsporného režimu vždy,
když na něm momentálně nepracujete.
Otevření a zavření panelu displeje
Pro otevření panelu displeje jej jednoduše zvedněte - odklopte. Pak jej nastavte do úhlu, který vám umožňuje pohodlné sledování
displeje.
Pro zavření panelu displeje jej opatrně a s citem sklopte dolů až západky, zajišťující displej, zapadnou.
Varování: Pro zamezení poškození displeje jej nikdy nezavírejte přibouchnutím k počítači! Na horní
stranu počítače neumisťujte žádné předměty, když je panel displeje uzavřen.
Audio systém počítače
Váš počítač využívá audio systém, který je kompatibilní se systémem Sound Blaster Pro.
Manuální nastavení hlasitosti
Pro zvýšení hlasitosti stiskněte klávesy Fn + F5.
Pro snížení hlasitosti stiskněte klávesy Fn + F6.
CZ
Nastavení hlasitosti zvuku v systému Windows
1. Klikněte na symbol reproduktoru na hlavním panelu Windows.
2. Pro nastavení hlasitosti přesuňte posuvný ovladač hlasitosti nahoru nebo dolů.
3. Pro dočasné vypnutí zvuku bez nutnosti měnit nastavení hlasitosti klikněte na MUTE (ztlumit).
Nahrávání zvuku
Vestavěný mikrofon vám dovoluje nahrávat do počítače různé zvuky. Pro využití funkce vestavěného mikrofonu budete potřebovat
aktivovat software pro zpracování zvuku, např. Microsoft Sound Recorder.
Modem
Váš počítač je vybaven interním fax/modemem 56 K V.92 s výstupem na telefonní konektor typu RJ-11, který je umístěn na levé straně
vašeho počítače.
Pro připojení počítače do vaší telefonní zásuvky použijte běžný telefonní propojovací kabel.
Připojení modemu
1. Zasuňte jeden konec telefonního kabelu do tel. konektoru na vašem počítači. (Pro soulad s EMI standardem musíte umístit na tel.
spojovací kabel přiložené EMI feritové jádro - odrušení kabelu.)
2. Druhý konec tel. kabelu zasuňte do telefonní analogové zásuvky na zdi.
V závislosti na místě použití počítače budete možná potřebovat změnit nastavení modemu. Pro navázání stabilního spojení je nutné
správné nastavení pro konkrétní zemi, neboť telekomunikační systémy se v různých zemích mohou navzájem lišit.
15PRESTIGIO AVANTI 1592W
 Loading...