

Page 1
Introduction
Thank you for purchasing Prestigio Portable DVD Player 590 , a mobile digital media center. You
have made an excellent choice and we hope you will enjoy all of its exciting features. Please read
through the user manual carefully before using the product, and follow all of the procedures in this
quick guide to fully enjoy all features of the product.
Package Content
1. Prestigio Portable DVD Player 590 X 1
2. Remote Control (battery included) X 1
3. Audio/Video Cable X 1
4. AC/DC Power Adapter X 1
5. Car Adapter X 1
6. Earphone X 1
7. Car Bag X 1
8. Quick Guide X 1
Product & Remote Control Overviews
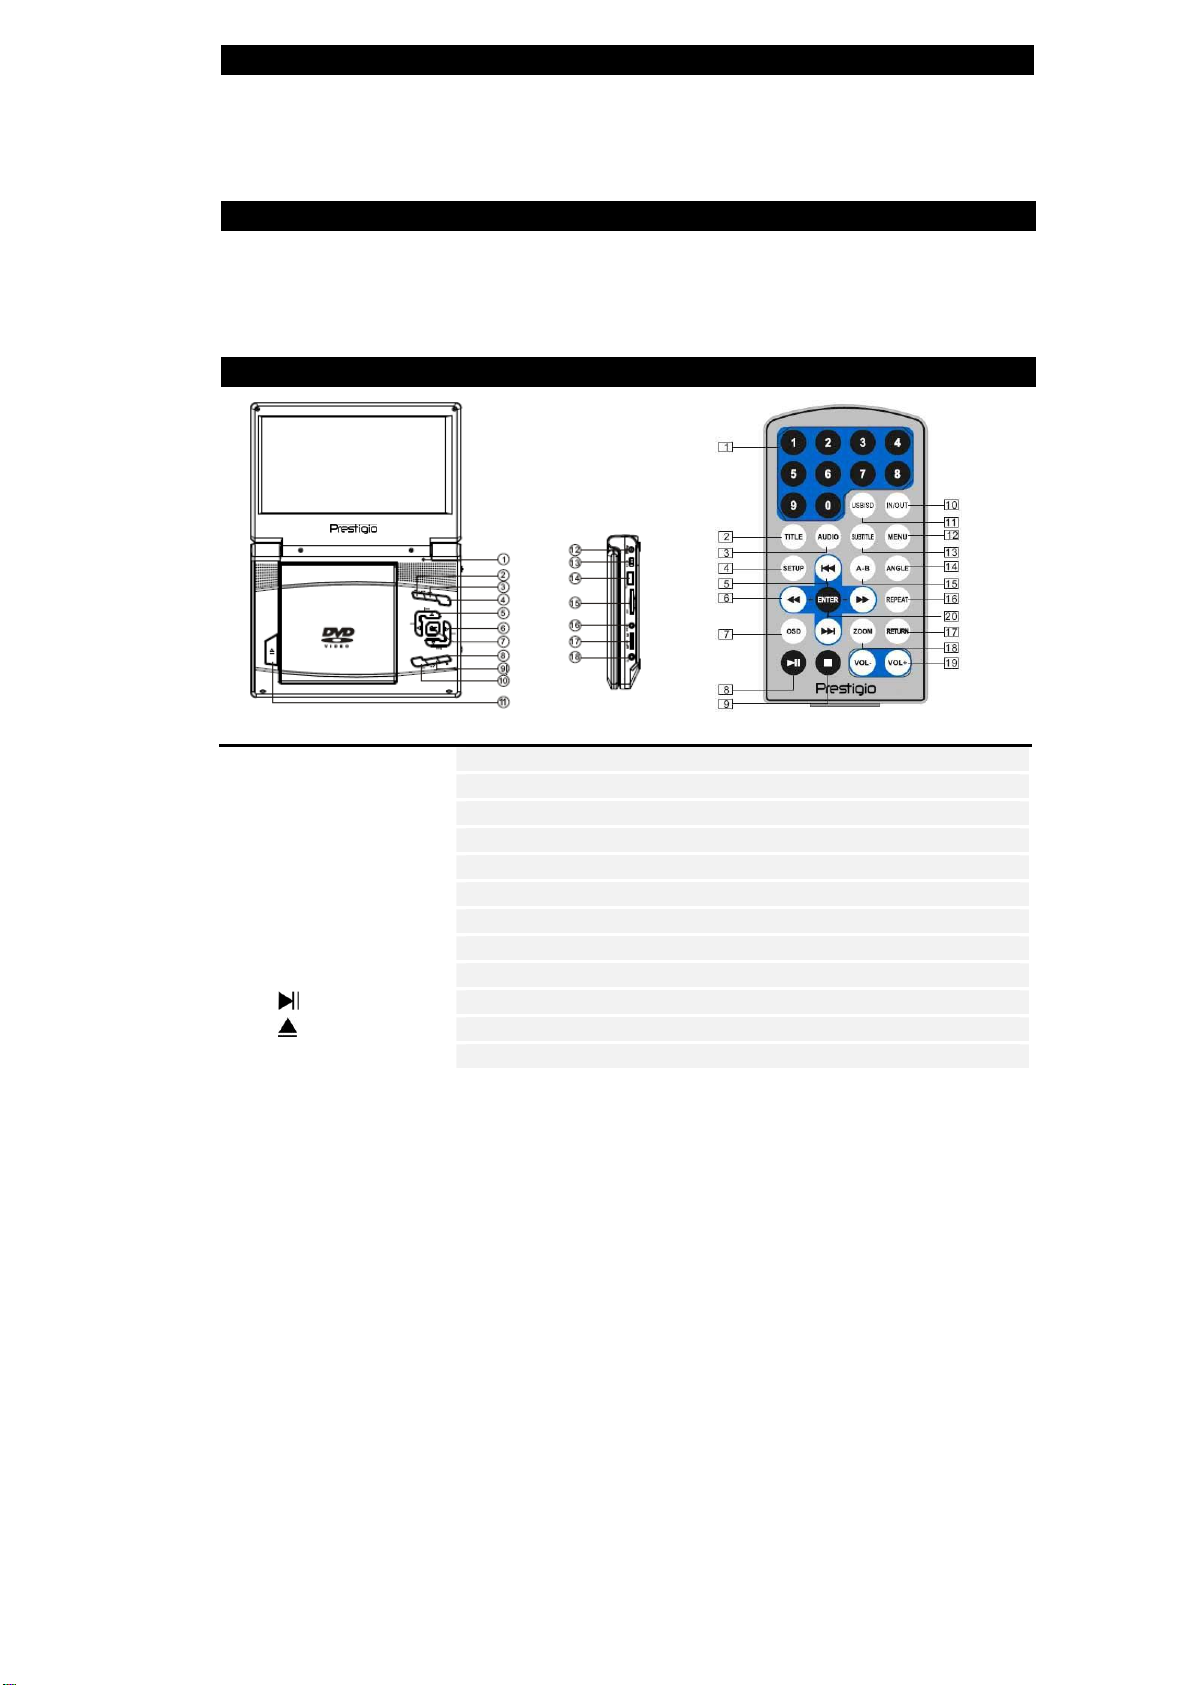
Main Unit
1 LCD Switch Turns ON/OFF LCD Screen.
2 MODE Button Press to select between DVD mode and Media Mode.
3 SETUP Button Press to enter or to exit from system setup menu.
4 FUNC. Button Press to toggle between AV/IN and AV/OUT function.
5 S/W Button Skips to previous track(UP direction) / Rewind(LEFT direction)
6 T/X Button Skips to next track(DOWN direction) / Fast Forward(RIGHT direction)
7 OK Button Press to confirm selection.
8 Button Press to stop playback. Press again to stop playback completely.
9 MENU Button Press to enter or to exit from root menu.
10 Button Press once to pause playback and press it again to resume playback.
11 Button Press to open tray cover.
12 DC IN 9V Connects to AC and car adapter.
EN-1
Page 2

13 ON/OFF Switch Slide to turn power ON/OFF.
14 USB Port Connects to USB device.
15 SD Card Slot Receives SD memory card.
16 AV IN/OUT Jack Connects to external display for audio/video input/output.
17 Volume Wheel Scroll to adjust volume of the headphone or speaker.
18 Earphone Jack Connects to headphone sets.
Remote Control
1 0-9 Number Button Press to select numbers.
2 TITLE Button Press to display title information.
3 AUDIO Button Press to select audio language.
4 SETUP Button Press to enter or to exit from system setup menu.
5 / Button Press to return/skip to the previous/next list, track, chapter, or scene.
Press to point/scroll UP/DOWN.
6 / Button Press to rewind/fast forward during playback at a speed of 2X, 4X, 8X,
16X, or 32X.
Press to point/scroll LEFT/RIGHT.
7 OSD Button Press to toggle between elapsed and remaining time during playback.
8 Button Press once to pause the playback and press it again to resume
playback.
9 Button Press to stop playback. Press button to resume playback at the
same point. Press button twice to stop playback completely.
10 IN/OUT Button Press to toggle between AV/IN and AV/OUT function.
11 USB/SD Button Press to select media source.
12 MENU Button Press to return to or exit from root menu during playback.
13 SUBTITLE Button Press to select a subtitle language (multi languages subtitle
required). Press again to cancel.
14 ANGLE Button Press to select camera angles (camera angle adjusting function
required).
15 A-B Button Press to play a certain selected segment repeatedly. Press again to
cancel.
16 REPEAT Button Press to select different repeat and shuffle patterns.
17 RETURN Button Press to return to the main menu.
18 ZOOM Button Press to cycle through zooming functions.
19 VOL-/VOL+ Button Press to turn volume down/up.
20 ENTER Button Press to start playback or to confirm selection.
EN-2
Page 3
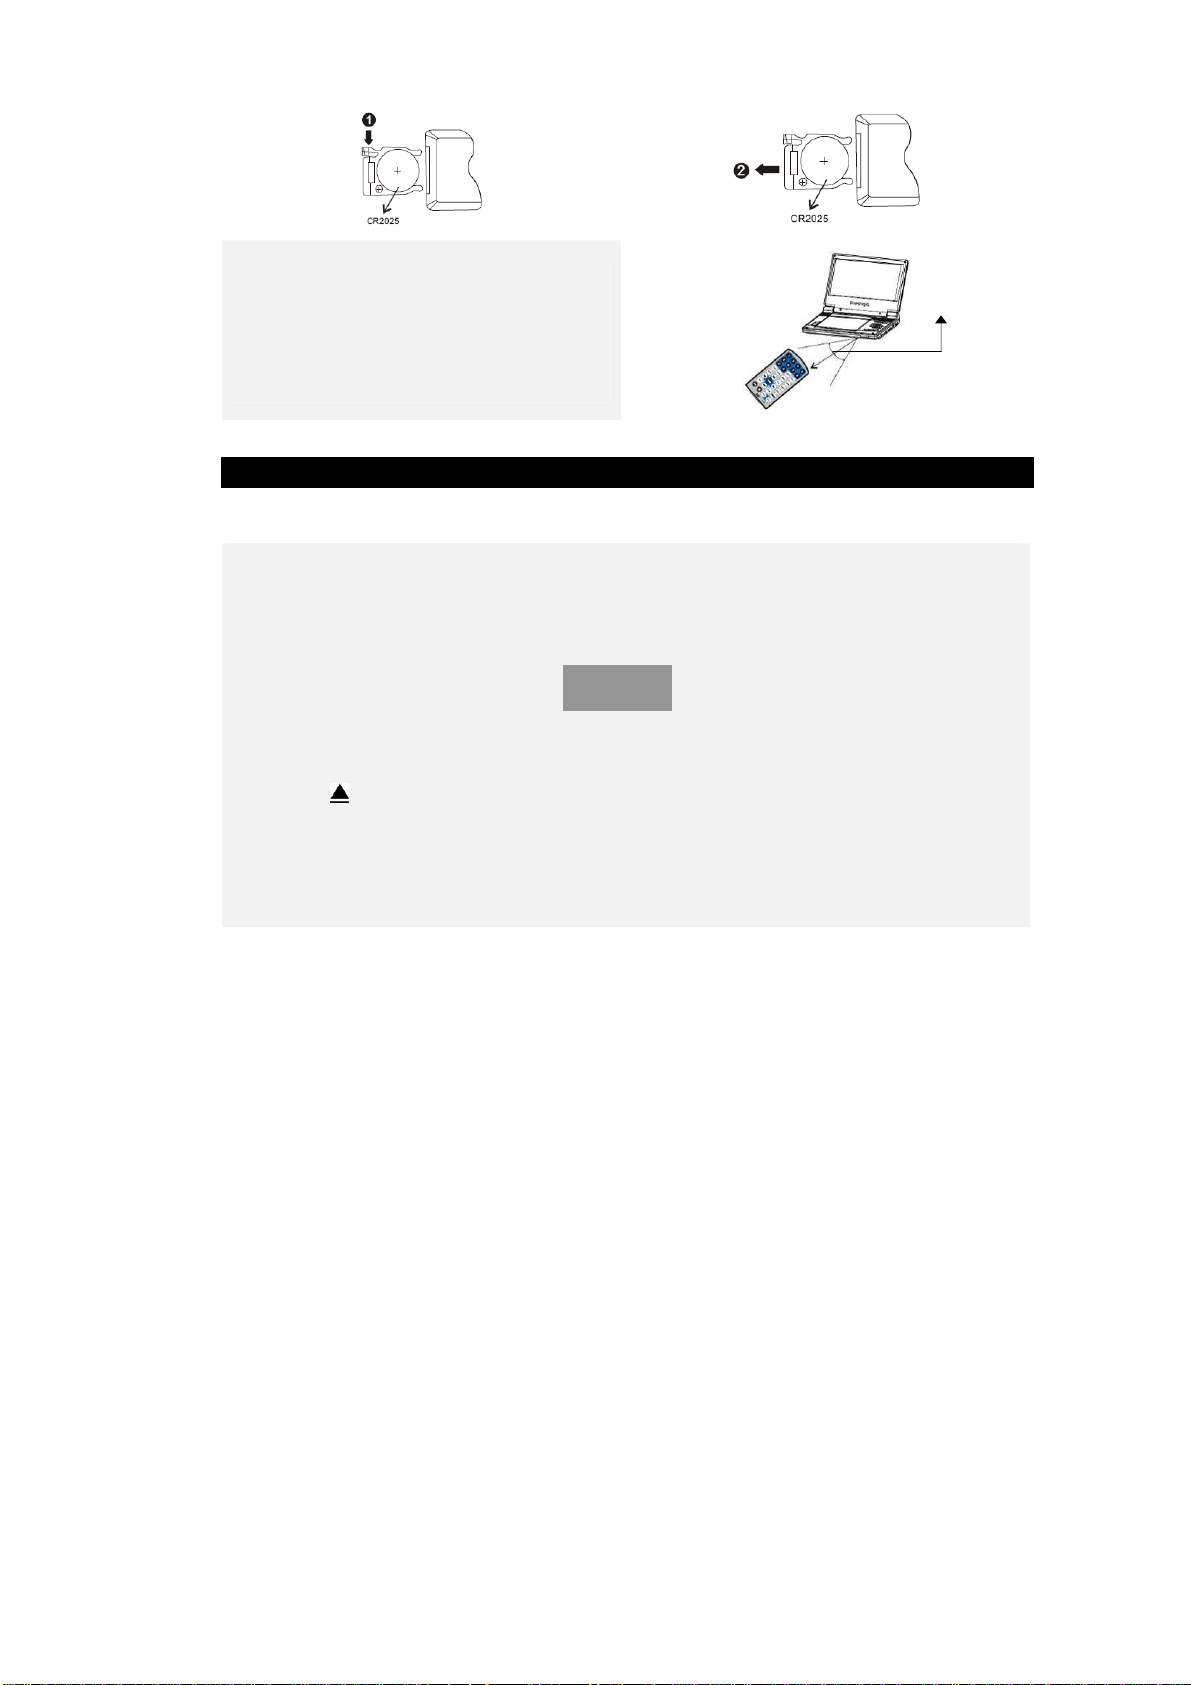
NOTE:
Please follow below diagrams to replace battery:
When using remote control, please make sure
the infrared window on remote control is
aligned with infrared receiving window of the
device. The distance must be within 3 meters.
Please refer to the diagram on the right for
illustration.
60°
Getting Started
Please read through the instructions below before operating Prestigio Portable DVD Player 590
for the first time.
To start disc/USB device/SD card media (DVD, MPEG4, SVCD, VCD, CD, MP3) playback:
1. Connect Prestigio Portable DVD Player 590 to power supply or wall plug via power
adapter provided.
2. Adjust the device to the best viewing position desired.
3. Turn on the device by sliding power switch at the left side of unit to ON position. The source
menu will be displayed on screen:
NOTE:
When selecting media mode, please make USB device or SD/MMC card is properly inserted.
4. Press / button to enter DVD Mode or Media Mode and press ENTER button to confirm
selection.
5. Press button to open disc tray cover. Place the disc with appropriate file formats in the disc
tray with printing side facing up. Close the disc tray cover.
6. The device will automatically begin media playback process upon closing of disc tray cover.
7. Adjust playback volume by scrolling VOLUME wheel at the left side of device to an
appropriate level before playback.
8. Turn off the device by sliding power switch at the left side of unit to OFF position.
DVD
MEDIA
EN-3
Page 4

General Video Playback Opeartions
Press once to stop playback; then press to resume playback from the point where you
stopped; press
z To pause playback DVD MPEG4 SVCD VCD CD MP3
z To start title/chapter playback DVD MPEG4 SVCD VCD CD MP3
z To fast forward/rewind DVD MPEG4 SVCD VCD CD MP3
twice to stop playback completely.
1. During playback, press to pause. Press it
again to resume playback.
NOTE:
When the device is at idle mode (paused, stopped, no
disc), the device will automatically enter screen
protection mode after 3 minutes. Press any button to
exit.
1. Press MENU button to enter disc main menu.
2. Press directional buttons to select user desired
title/chapter.
3. Press ENTER button to confirm.
NOTE:
This function is only available if the media disc supports
such feature.
1. Press to fast forward at speed of 2X, 4X, 8X,
16X, and 32X in cycle.
2. Press to rewind at speed of 2X, 4X, 8X, 16X,
and 32X in cycle.
z To repeat DVD MPEG4 SVCD VCD CD MP3
1. During DVD disc playback, Press REPEAT button to cycle through repeating patterns including
Chapter Repeat, Title Repeat, Disc Repeat, and Repeat Off.
EN-4
Page 5

2. During CD/VCD disc playback, Press REPEAT button to cycle through repeating patterns
including Track Repeat, Disc Repeat, and Repeat Off.
3. During MP3 disc playback, Press REPEAT button to cycle through repeating patterns including
File Repeat, Folder Repeat, and Repeat Off.
z To repeat a specific segment DVD MPEG4 SVCD VCD CD MP3
1. Press A-B button once to set the starting point A
2. Press it again to designate end point B.
3. The segment from A to B will be played repeatedly.
4. Press the button again to stop A-B repeat function.
z To adjust display angle DVD MPEG4 SVCD VCD CD MP3
1. Press ANGLE button to adjust display angle.
2. Press number buttons to select a display angle
desired.
3. Press ANGLE button again to resume default
angle playback.
NOTE:
z To zoom in/out DVD MPEG4 SVCD VCD CD MP3
This function is only available if the media disc supports
multi-angle feature.
1. Press ZOOM button to zoom in/out at factors of
2X, 3X, 4X, 1/2X, 1/3X, 1/4X in cycle.
2. Press / buttons to select a display angle
desired.
EN-5
Page 6

General Image Playback Operations
1. Press MENU button to browse *.jpg files. Press to display image files in thumbnail mode.
/ to move up/down the directory and / to select image files. To view desired
Press
image files for full screen display, press ENTER to confirm selection.
2. Press
3. Press
4. Press OSD button to cycle through various image transition modes:
A
B From bottom to top J From vertical center to both sides
C From left side to right side K From top and bottom to center
D From right side to left side L From right and left to center
E From left top to right bottom M From four window top side to bottom side
F From right top to left bottom N From four window left side to right side
G From left bottom to right top O From four edges to center
H From right bottom to left top
5. ∅ icon will be displayed when the options are not available at this mode.
/ to rotate the image file clockwise/counter-clockwise.
/ to reverse the image files vertically/horizontally.
From top to bottom I From horizontal center to both sides
General Music Playback Operations
1. Press / button to select desired MP3 file. Press
ENTER button to start playback.
2. Please refer to General Video Playback
Operations section for more detailed function
description.
System Setup
1. Press SETUP button to enter setup menu.
2. Press / button to highlight various categories.
Press / button to select options.
3. Press ENTER button to confirm selection. Press
button to exit.
EN-6
Page 7

General Setup Page
TV Display:
Adjusts screen display format between Normal/PS,
Normal/LB, and Wide.
Note:
z This option is determined by the screen ratio from
which DVD disc is recorded.
z Please select Wide when using a 16:9 TV display.
Angle Mark:
z Enables/Disables the multi-angle function.
z A camera icon will be displayed on the screen when
such function is supported by the media file.
TV Type:
z Adjusts TV type from PAL or NTSC.
z The default value is set on PAL TV type.
Screen Saver:
z Enables/Disables the screen saver function.
z The screen saver function will be activated when the
device is idle for more than 3 minutes.
z The default value is set to ON.
OSD Lang:
z Adjusts the OSD language.
z The default value is set on ENG.
EN-7
Page 8

Video Setup Page
Password Setup Page
Preference Page
Quality:
z Adjusts video output screen options including
Brightness, Contrast, Hue, and Saturation.
z The default values are 00.
Panel Quality:
z Adjusts device screen options including Brightness,
Contrast, Hue, and Saturation.
z The default values are 00.
Password:
z Defines/Modifies password.
z All parental control features are password protected.
z The default values are 8888.
Audio:
z Adjusts to desired audio language of DVD disc.
z The default language is ENG.
NOTE:
z The audio languages are provided by DVD disc.
Subtitle:
z Enables/Disables/Adjusts to desired subtitle
language of DVD disc.
z The default value if OFF.
NOTE:
z The subtitle languages are provided by DVD disc.
EN-8
Page 9

Disc Menu:
z Adjusts to desired menu language of DVD disc.
z The default language is ENG.
NOTE:
z This function is only available for DVD disc.
Parental:
z Locks up specific segments of DVD contents.
z Sets to various parental control levels of DVD disc.
z The default value is set to ADULT.
Default:
z Select the option and press ENTER button to restore
all settings to factory values.
Charging Device
z The device battery is made of Lithium Polymer rechargeable batteries. Please fully charge the
battery pack before using for the first time.
z Charging time under normal conditions is approximately 6 hours. A fully charged battery pack
delivers approximately 2 hours of main unit operation. However, operation time varies in
accordance with the files being played.
z A Low Battery sign will be displayed when battery is running low. The battery will be depleted
completely after 10 minutes.
z The battery can only be recharged when the device is in power off mode. Please turn off the
device before recharging battery. The battery status LED indicator will glow in red while
charging. It turns yellow when the device battery is fully charged.
EN-9
Page 10

Using Car Bag
Follow the steps below to attach the Prestigio Portable DVD Player 590 onto the car seat
headrests.
1. Open up the car bag included and detach hook-and-loop fasteners.
2. Place the device into the car bags with the base at the deeper side.
3. Put attached bands on left and right sides of the base and screen to fix its positions.
4. Re-attach hook-and-loop fasteners to desired positions.
5. Unbuckle and loosen up the strap on the back of car bag.
6. Insert the strap through the gap on the card seat headrest.
7. Adjust the length of the straps to fit the car seat headrest and buckle up.
Product Specifications
Compatible Disc Format DVD±RW/RW, VCD, CD-R/RW, CD-DA,MP3, MPEG4, JPEG
Signal System PAL/NTSC
TFT LCD screen size 9.0 inch
Frequency Response 20Hz~20kHz ±2.5dB
Video Output Output Level: 1.0V
Audio Output Output level: 1.4V
Audio Signal-to-Noise Rate ≥80dB
Dynamic Range ≥85dB
USB Data Transfer Speed USB1.1
Power Source DC 9~12V
Power Consumption 10W
Operating Temperature 5~40°C
Weight 0.79Kg
Dimensions (L * W * H) 233mm X 170mm X 36mm
Battery Type Lithium Polymer Rechargeable Battery
, Load: 75Ω, unbalanced
P-P
, Load: 10KΩ
rms
Technical Support and Warranty Information
Please refer to www.prestigio.com for technical support and included warranty card for warranty
information.
Disclaimer
We make every effort to ensure that the information and procedures in this user manual are accurate
and complete. No liability can and will be accepted for any erros or omissions. Prestigio reserves the
right to make any changes without further notice to any products herein.
EN-10
 Loading...