

Prestige UIB581200 Maintance Manual

Models covered by these instructions:
y
4
UIB, UIBTF, CMUIB, UIM
Ventilation Inserts & Liners
Intended for Domestic Cooking Onl
READ AND SAVE THESE INSTRUCTIONS
Installer: Leave this manual with homeowner.
Homeowner: Use and Care information inside.
Prestige America Ltd.
103 Fairfield Rd.
Fairfield, NJ 0700

-Table of Contents -
4
6
Important Safety Instructions…………………………………………………….1
Handling Precautions……………………………………………………………...2
Important Ventilation Information Before You Begin…………………………2
Parts Sold Separately…………………………………...…………………………3
Cleaning and Maintenance………………………………………………………..3
Packing List for your Inserts
a) UIB Inserts with Blowers...………………………………………………………..3-4
b) UIB Inserts without Blowers...………………………………………………………4
c) UIM Inserts………………...…………………………………………………………5
d) UIBTF & CMUIB Inserts without Blowers………………………………………….5
Wiring Diagram……………………………………………………………………….6
Installation Guide for your Insert…….…………………………………………….6
Hood Operating Instructions……………………………………………………….7
Rear ducting Instructions…………………………………………………...………7
Instructions for connection of Wall Switch Kit (UIBWSK)……………………..8
Warranty Information…………………………………………………………………8
Prestige Products Division
Signature Marketing Group Ltd.
103 Fairfield Rd.
Fairfield, NJ 0700
800.358.888

-Important Safety Instructions
-
T
.
E
.
PRESTIGE HOODS ARE FOR RESIDENTIAL USE ONLY!
CAUTION: FOR GENERAL VENTILATION USE ONLY. DO NOT USE TO EXHAUS
HAZARDOUS OR EXPLOSIVE MATERIALS OR VAPORS
1. Use this unit only in the manner intended by the manufacturer. (If you have questions, contact that
manufacturer at 800.358.8886.
2. Before servicing or cleaning this unit, switch power off at service panel and lock the panel to prevent
power from being switched on accident. When the service panel cannot be locked, securely fasten a
prominent warning device, such as a tag, to the service panel.
WARNING - TO REDUCE THE RISK OF RANGE TOP GREASE FIRE,
PLEASE OBSERVE THE FOLLOWING:
1. Never leave surface units unattended at high settings, boil overs can cause smoking and may ignite.
Heat oils slowly on low heat.
2. Always turn vent system ON 5 minutes before cooking to begin air flow.
3. Clean ventilation filters frequently. DO NOT ALLOW GREASE TO ACCUMULATE ON FAN OR FILTER.
4. Use proper pan size. Always use cookware appropriate for the size of the surface element.
WARNING - IN THE EVENT OF RANGE TOP GREASE FIRE, OBSERVE THE FOLLOWING:
1. Smother the flames with a close fitting lid, cooking sheet or other metal tray, then turn off the burner.
BE CAREFUL TO PREVENT BURNS. If the flames do not go out immediately, EVACUATE AND CALL TH
FIRE DEPARTMENT.
2. NEVER PICK UP A FLAMING PAN
3. MAKE SURE YOUR VENTILATION SYSTEM IS COMPLETELY TURNED OFF. DO NOT TURN HOOD
ON TO TRY AND EVACUATE SMOKE.
4. DO NOT USE WATER, including wet dishcloths or towels - a violent steam explosion may result.
5. Use an extinguisher only if:
a) You know you have a class ABC extinguisher and you already know how to operate it.
b) The fire is small and contained in the area where it started.
c) The fire department is being called.
d) You can fight the fire with your back to an exit.
1

-Handling Precautions-
s
2
t
a
1. Remove all rings, watches, belt buckles, jewelry and any clothing with metal buttons or snaps to prevent
damage to hood.
2. DO NOT REMOVE INSERT FROM ITS ORIGINAL CARTON UNTIL YOU ARE READY TO INSTALL IT.
3. When you are ready to begin the installation process, remove the insert from its carton and place it on a
clean soft blanket.
4. Inspect the insert carefully for any damage or imperfections before you begin to install the insert. If any
damage or imperfections exist, recarton the insert and call your dealer IMMEDIATELY, do not install a
damaged hood.
5. It is highly recommended that rubber gloves be used to prevent scratches on the insert and to provide
6. When removing the insert from the carton locate the filters. The filters are packed separately.
DO NOT DISCARD THE PACKAGING WITHOUT FIRST LOCATING THE FILTERS!
Important Ventilation Information Before You Begin
The desired installation height of the insert is at the discretion of the user, however, a height of 30" to 36" above
the cooking surface is recommended. Two persons are required to install insert.
Before Installing your insert, be sure to read the following!
Either an interior, in-line or remote blower may be used with Prestige hood liners and power pack inserts. Other
owers CANNOT be substituted. Select the series best suited for your application. Units labeled "LINERS" are for u
ith in-line blowers or remote blowers. Units labeled "POWER PACKS" come with pre-installed 600 (S1) or 1200 (S
CFM Blowers. Before installing ANY unit, inspect and test blowers to ensure there is no packing or obstructions
remaining in the unit and that blower(s) spin freely.
The custom hood frame must be sized to the shape and total weight of the insert assembly. (See hood liner/insert
dimension guide.) Run power cable to the installation location. Stub out a 4-foot length of electrical cable behind
he custom hood. DETERMINE WHETHER OR NOT THE USE OF WALL SWITCH IS NEEDED. A 3" to 4" recess
should be provided to allow for proper capture area. If the cooking product contains a grill (BBQ), a minimum of 6"
pture area should be provided. The custom hood depth should be at least 19" minimum for common gas or electri
cooktops. A 24" depth is to be provided for use with pro-style ranges, whether dual fuel or all gas. If the cooking
appliance contains a grill (BBQ) or a high output wok or griddle, the use of an in-line blower or remote blower is
highly recommended.
NOTE TO INSTALLER: Make sure blowers are free from obstructions (packing and debris). Test run
blowers before finalizing installation. Check with manufacturer before attempting to use other than
Prestige blower systems. (800.358.8886 for technical information)
2
Parts Sold Separately
)
T
In-line blowers IL600, IL1200 and IL1600
Remote blowers, RB1000, RB1200, RB1600, RB2000
ransitions TR6x15/8, TR6x15/10 (for use with S2 blower system), TRC8/6 transition collar (for use with S1 blower
Wall Caps, WC6HD, WC8HD, WC10HD.
The WC6x15/HD is for use with the S2 blower system when rear ducting.
Roof Caps RC6 and RC10 will accommodate 6" to 10" round duct sizes.
Backdraft damper BD8 or BD10 (in-line 8" or 10" section duct with backdraft damper installed.)
Wall switch kit UIBWSK controls both lights and fan(s) in lieu of unit switches.
NOTE: During installation, protect countertop and/or cooking appliances.
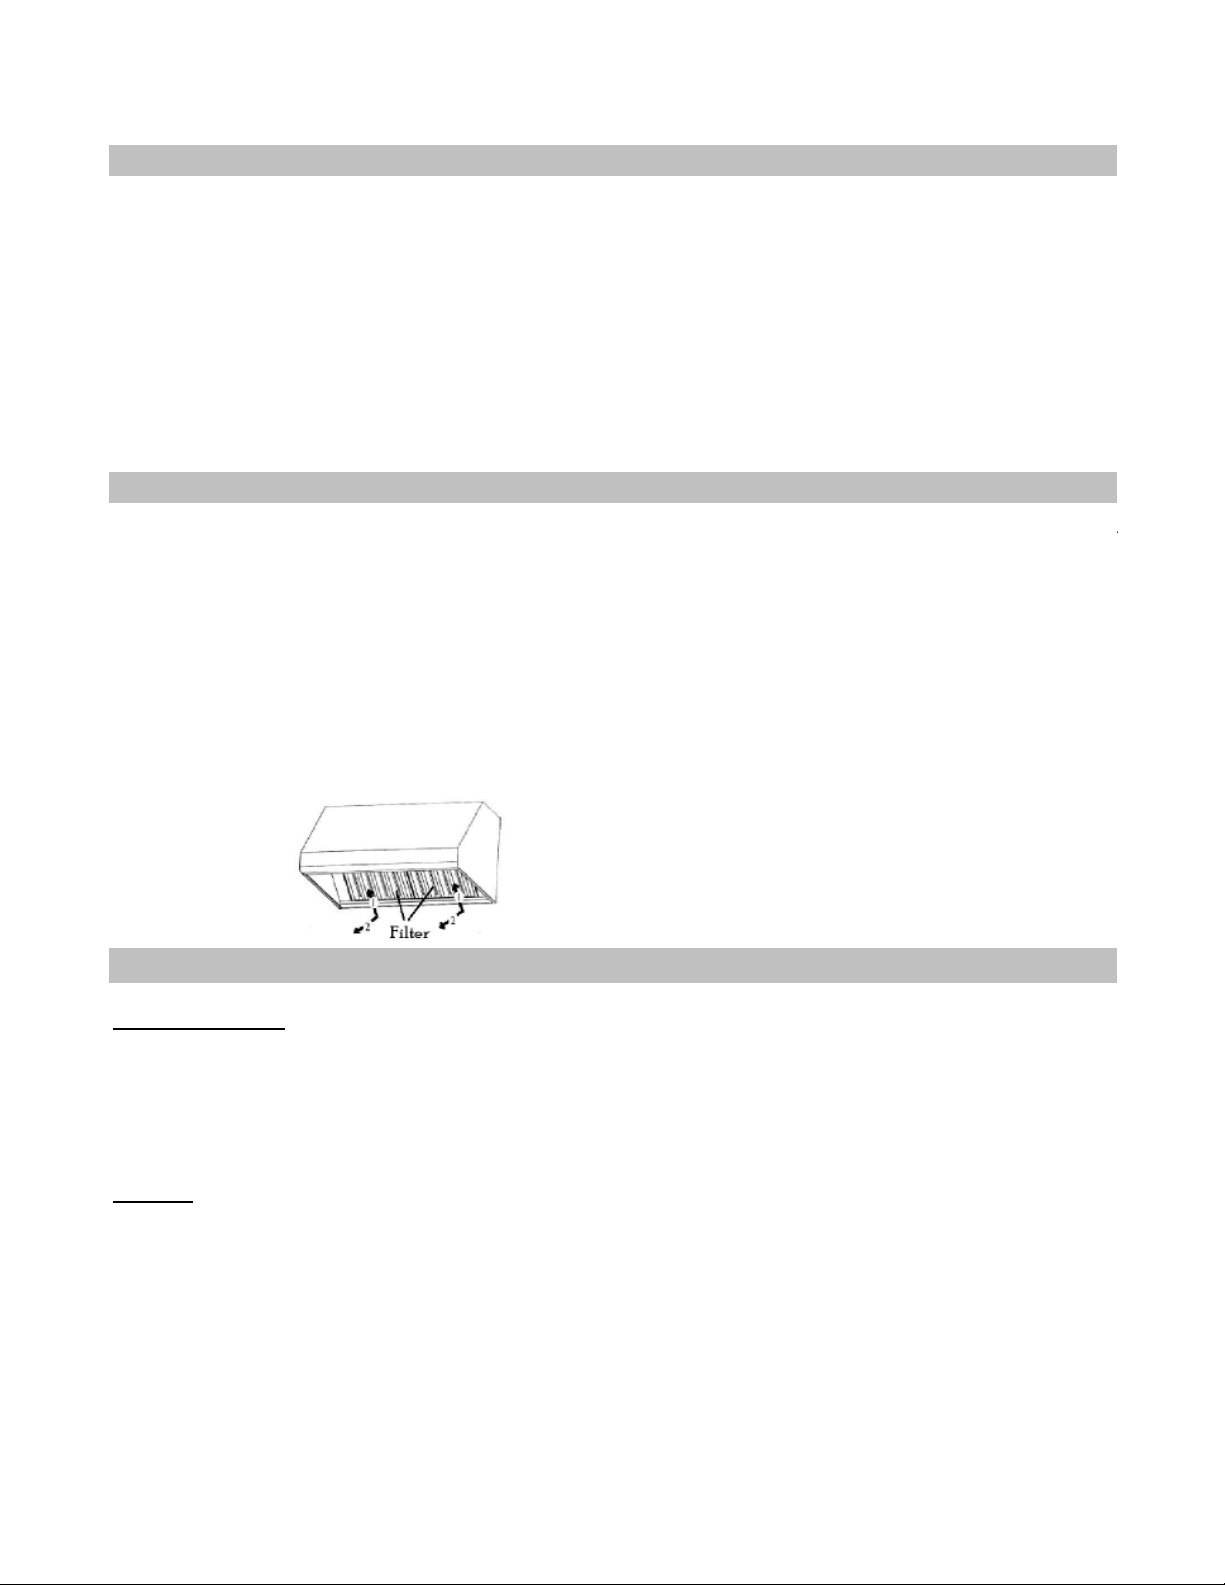
Cleaning and Maintenance
e sure lights are cool before cleaning your insert. Filters should be washed in the dishwasher or by hand AT LEAS
once every 24 hours of use or 2 weeks, whichever comes first.
1) Turn the fan and lights off.
2) Push the filters towards the top and extract downward.
3) When placing filters into the dishwasher be sure that the filters are angled.
4) Drain water and let each filter dry before replacing.
Packing List for your UIB Insert
UIB22S1, UIB28S1
Blower Pre-Installed in Unit
One (1) Stainless Steel Baffle Filter
Two (2) Pre-Installed Lights
Lid for Electrical Box
Use and Care Manual with Wiring Diagram
UIB34S1
Blower Pre-Installed in Unit
Two (2) Stainless Steel Baffle Filters
Two (2) Pre-Installed Lights
Lid for Electrical Box
Use and Care Manual with Wiring Diagram
Cleaning and Maintenance of your baffle filter
All Prestige stainless steel baffle filters
are dishwasher safe. You may also hand
wash the filters is warm soapy water.
3

Packing List for your UIB Insert (continued)
UIB34S2, UIB40S2
Two (2) Blowers Pre-Installed in Unit
Two (2) Stainless Steel Baffle Filters
Two (2) Pre-Installed Lights
Lid for Electrical Box
Use and Care Manual with Wiring Diagram
Transition Required and NOT supplied
UIB46S2, UIB52S2, UIB58S2
Two (2) Blowers Pre-Installed in Unit
Three (3) Stainless Steel Baffle Filters
Three (3) Pre-Installed Lights
Lid for Electrical Box
Use and Care Manual with Wiring Diagram
Transition Required and NOT supplied
UIB58S2 includes two (2) Filter Spacers
Packing List for your UIM Insert
UIM20S1
One (1) Blower Pre-Installed in Unit
One (1) Stainless Steel Baffle Filters
Two (2) Pre-Installed Lights
Lid for Electrical Box
Use and Care Manual with Wiring Diagram
UIM28S1
One (1) Blower Pre-Installed in Unit
Two (2) Stainless Steel Baffle Filters
Two (2) Pre-Installed Lights
Lid for Electrical Box
Use and Care Manual with Wiring Diagram
UIM28S2
One (1) Blower Pre-Installed in Unit
Two (2) Stainless Steel Baffle Filters
Two (2) Pre-Installed Lights
Lid for Electrical Box
Use and Care Manual with Wiring Diagram
Transition Required and NOT supplied
4
 Loading...