

Page 1
Split HD Video Conference Terminal User Guide
Split HD Video Conference Terminal
User Guide
English (V1.0)
Copyright Notice
All contents of this manual, whose copyright belongs to our Corporation cannot be cloned,
copied or translated without the permission of the company. Product specifications and
information which were referred to in this document are for reference only. We may change,
delete, or update any content at any time and without prior notice.
===================================================================================
This is class A production. Electromagnetic radiation at specific frequencies may affect the
image quality of TV in home environment.
Page 2

Split HD Video Conference Terminal User Guide
Catalog
1 Packing List....................................................................................................1
2 About Product................................................................................................ 2
2.1 Product Appearance
2.2 Product Specifications
3 Installation Connection.................................................................................5
3.1 Connection Cable
3.2 Turn On the Power
4 Remote Control............................................................................................. 7
5 GUI Main Interface........................................................................................8
6 Basic Settings................................................................................................ 9
6.1 Network Settings
6.2 H.323 Account Settings (optional)
6.3 SIP Account Settings (optional)
6.4 Display Name Settings
6.5 Date Settings
6.6 Reset Settings
............................................................................................
.........................................................................................
.................................................................................................
...............................................................................................
..................................................................................................
...................................................................
.......................................................................
......................................................................................
......................................................................................................
....................................................................................................
10
11
13
14
15
2
4
5
6
9
Page 3
Split HD Video Conference Terminal User Guide
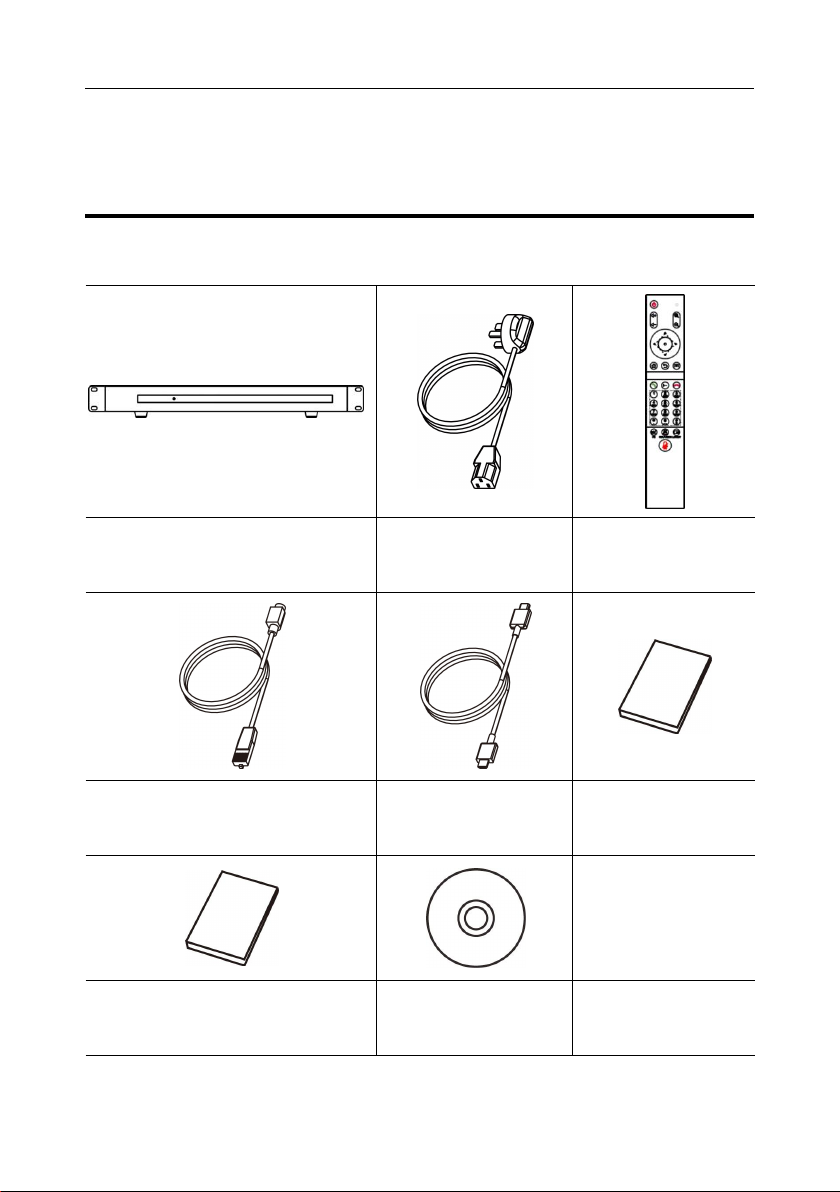
HD Video Conference Terminal x 1
Power Adapter x 1
Remote Control x 1
RJ45 to DIN8 Control Cable x 1
HDMI Cable x 2
Quick Start x 1
User Guide x 1
CD x 1
1 Packing List
When unpacking, please check and confirm all accessories that should be provided.
1
Page 4
Split HD Video Conference Terminal User Guide
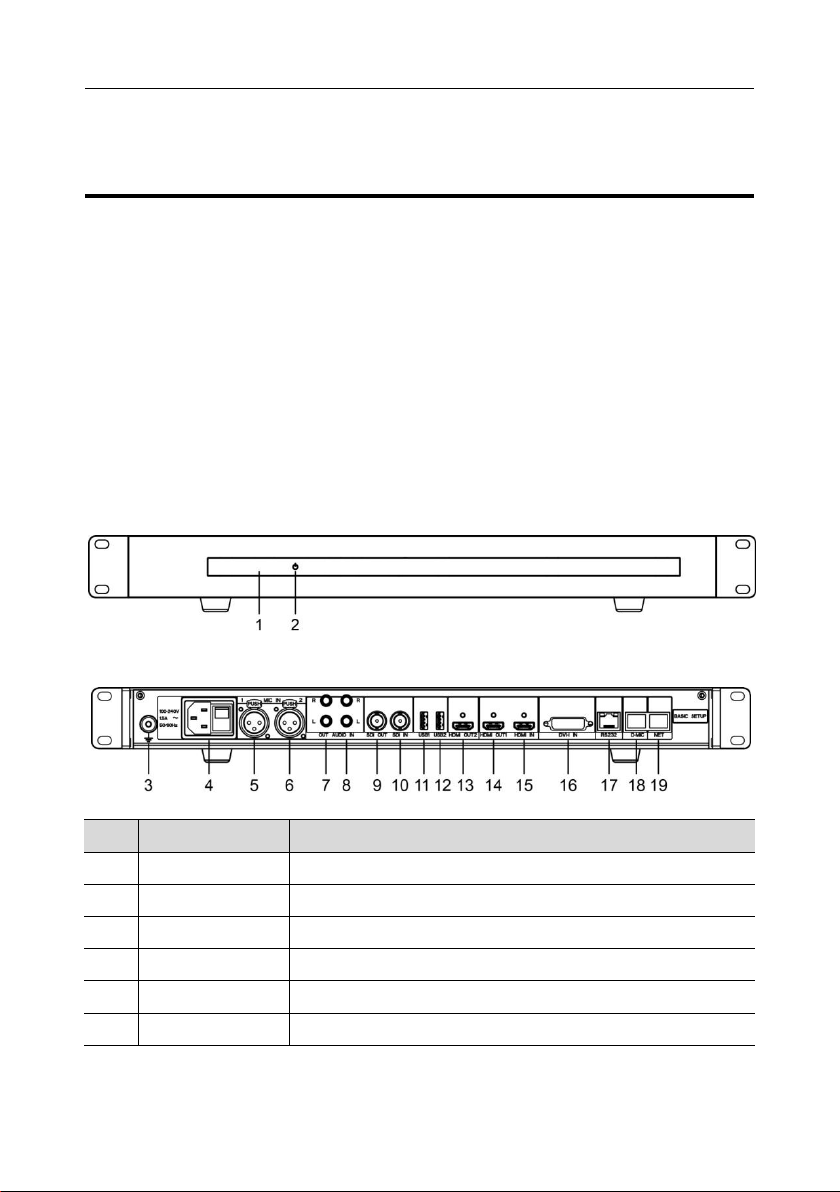
No.
Name
Function
1
Power Indicator
Power indicator.
2
Power Switch
Power switch.
3
Ground Interface
Ground interface for connecting ground cable.
4
Power Interface
100~240V power input interface.
5
MIC IN 1
Microphone audio input interface 1 for receiving voice.
6
MIC IN 2
Microphone audio input interface 2 for receiving voice.
2 About Product
The split HD video conference terminal adopts embedded system design and supports 1080P
HD codec and H.323 and SIP communication protocols. Split-type design, easy to install,
connect to the network, microphone, TV, plug in the power to communicate. The voice and
image information are transmitted to each other to complete various conference functions such
as document sharing. Save meeting time and funds, improve work efficiency, and create
convenient face-to-face video conference interaction and all-round communication and
communication.
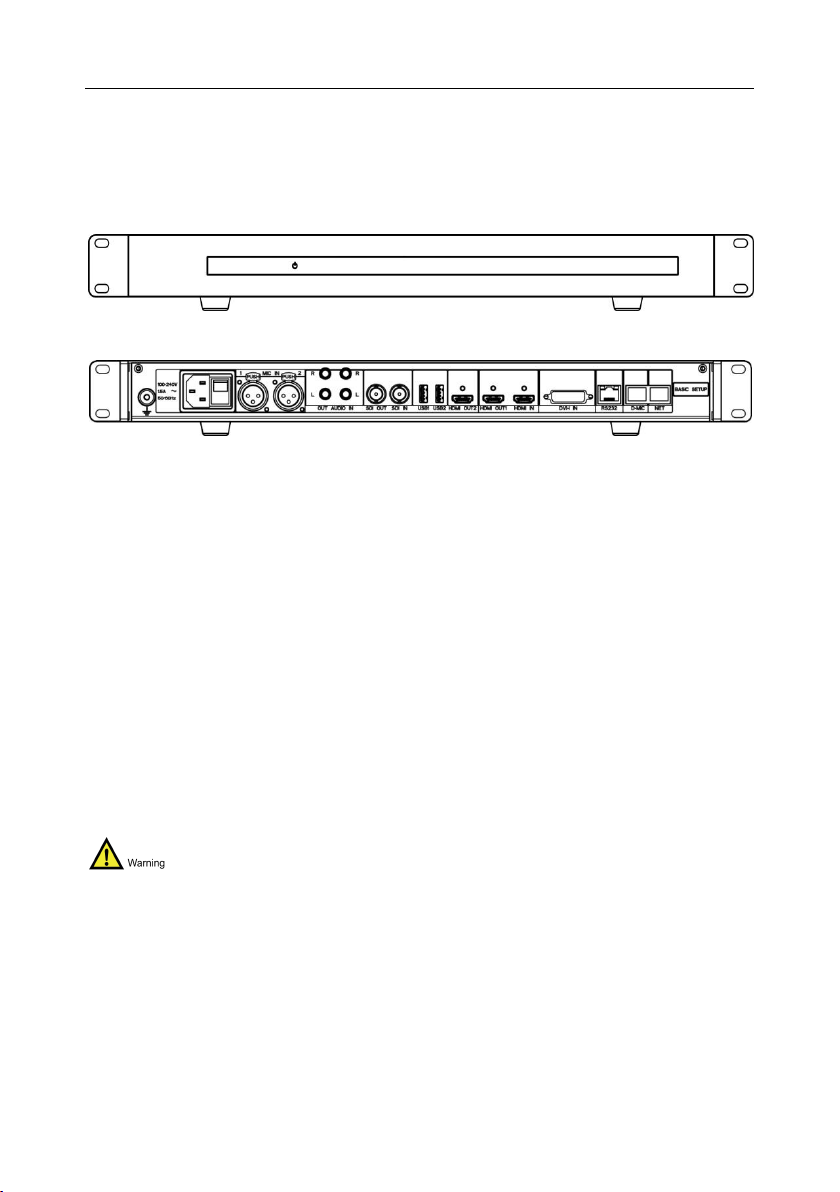
2.1 Product Appearance
Appearance
Interface
2
Page 5

Split HD Video Conference Terminal User Guide
No.
Name
Function
7
AUDIO OUT
The lotus head audio output interface connects the speaker
and terminal through the audio cable to output sound.
8
AUDIO IN
The lotus head audio input interface connects to the audio
input devices such as microphones, mixers, etc.
9
SDI OUT
SDI output interface for connecting a coaxial cable to the SDI
output interface.
10
SDI IN
SDI input connector for connecting a coaxial cable to the SDI
input interface.
11
USB1
USB interface 1, for USB devices such as an external USB
flash drive, mouse, keyboard, microphone or speaker.
12
USB2
USB interface 2, for USB devices such as an external USB
flash drive, mouse, keyboard, microphone or speaker.
13
HDMI OUT2
HDMI output interface 2, connected to the terminal and HDTV
via HDMI cable.
14
HDMI OUT1
HDMI output interface 1, connected to the terminal and HDTV
via HDMI cable.
15
HDMI-IN
HDMI input interface, connect the terminal and camera through
HDMI cable.
16
DVI-I IN
DVI-I IN input interface for connecting the second video input
device (DVI video source, such as computer) to connect the
computer or the second video source to the DVI-I IN input
interface using a DVI cable. Press the “ ” dual stream button
on the remote control and select “Open Dual Stream”, then
press the remote control “ ” confirm button to send the
second video to the conference terminal.
17
RS232
RS232 interface for external RS232 devices, such as
computers, cameras, etc.
18
D-MIC
Digital microphone input interface (not supported).
19
NET
Network interface, the terminal is connected to the network
through the network cable.
3
Page 6

Split HD Video Conference Terminal User Guide
Category
Item
Specifications
Electrical Feature
Operating Voltage
AC 100V ~ 240V
Power Consumption
20W (Max)
Environmental
Requirements
Working Status
Temperature
0°C ~ 40°C
Relative Humidity
10% ~ 80%
Ambient Noise
< 46dBA SPL
Non-working Status
Temperature
-40°C~70°C
Relative Humidity
0%~95%
Physical Feature
Dimension
200mm x 428mm x 44.5mm
Net Weight
3.2kg
2.2 Product Specifications
4
Page 7
Split HD Video Conference Terminal User Guide
3 Installation Connection
The terminal can be installed in the cabinet or placed directly on the horizontal desktop.
If you place the terminal directly on the desktop, keep the desktop steady and
pay attention to the anti-slip.
If you place the terminal in a rack, use screws to secure it to the rack.
Adjust the orientation of the terminal to avoid facing bright light sources (such as windows).
It is recommended that the terminal be facing the participant.
3.1 Connection Cable
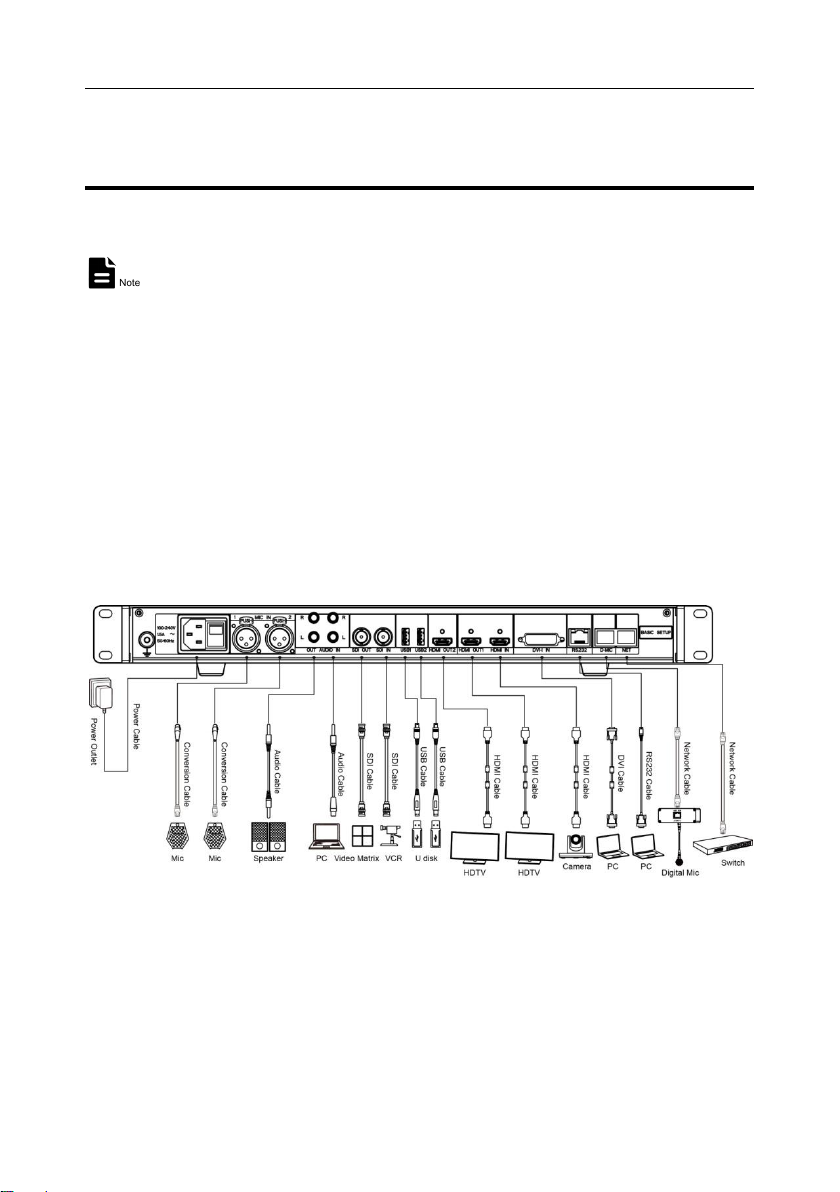
The cable connections shown in the following figure contain optional configurations. They are
for reference only. Please connect cables according to actual needs.
The connection configuration is as follows:
Enter the main video image: Connect an external camera to the HDMI IN interface on
the terminal.
Input the second video image: Connect the computer or the second video source to the
DVI-I IN input of the terminal via a DVI cable.
5
Page 8

Split HD Video Conference Terminal User Guide
Input microphone sound: Use the CANNON cable to connect the matching microphone to
the MIC IN interface of the terminal.
Input the player sound: Use the Lotus head audio cable to connect the computer or phone
audio to the AUDIO IN interface of the terminal.
Output sound: Connect the HDMI OUT1 of the terminal to the HDMI input of the display
device using the HDMI cable, or connect the audio (speaker) to the AUDIO OUT interface
of the terminal using the Lotus head audio cable.
Output the main video image: Connect the HDMI OUT1 interface of the terminal to the
HDMI input interface of the display device using the HDMI cable.
Output the second video image: Connect the HDMI OUT2 interface of the terminal to the
HDMI input interface of the display device using the HDMI cable.
Connect to the network: Connect the NET interface of the terminal with a network cable to
connect the terminal to the network.
Connect the power: Connect to the power outlet using 100~240V AC power cord.
3.2 Turn On the Power
After connecting all the devices used with the conference terminal, turn on the power.
When the terminal power is on, prevent the power cord from disconnecting from the
terminal and causing the terminal to lose power.
Please turn off the terminal, then turn off the external power supply, and finally pull out the
power cord. Please check that the power cord is properly and reliably connected to the
device as described below.
Please make sure that the AC power supply voltage ranges from 100V to 240V and the
frequency is 50Hz or 60Hz.
The sequence definition of the live (L), neutral (N) and protective ground (PE) and the
corresponding voltage difference must comply with international standards, and the
protective ground is reliably grounded.
With HDMI OUT1 as the output interface, connect the cable as shown above and press the
power button (green light is on) and boot to the main menu of the display screen.
After power is turned on, the indicators of the terminal are as shown in the following table.
6
Page 9
Split HD Video Conference Terminal User Guide
Indicator Status
Status Description
Power Indicator (green and bright)
Normal work
Power Indicator (off)
Power has been disconnected
Infrared receiving indicator (flashes green)
Received remote infrared signal
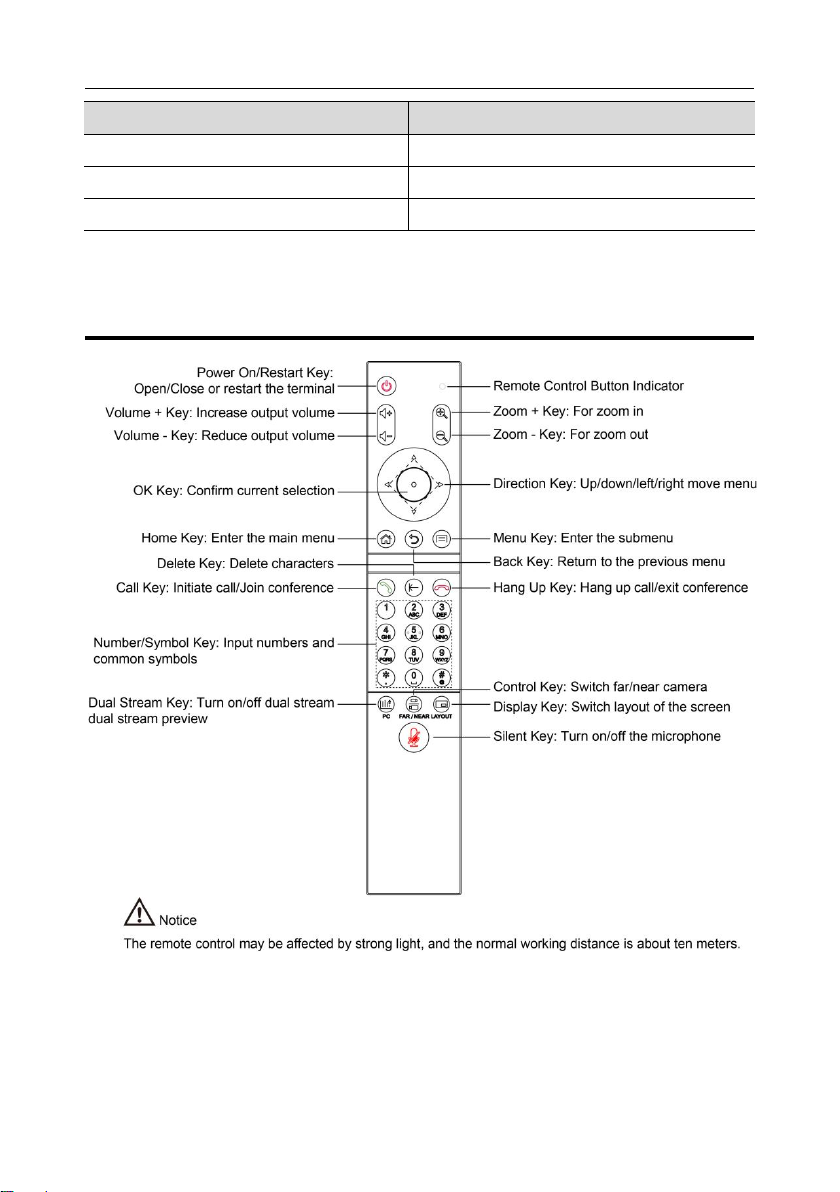
4 Remote Control
7
Page 10
Split HD Video Conference Terminal User Guide
No.
Description
No.
Description
No.
Description
1
IPv4 Address
2
IPv6 Address
3
Call Button
4
Remote IP or Number
Input Box
5
Contacts Menu
6
History Menu
7
Diagnostic Menu
8
Control Menu
9
Settings Menu
10
Display Call History
11
Select Call Protocol
12
Select Call Rate
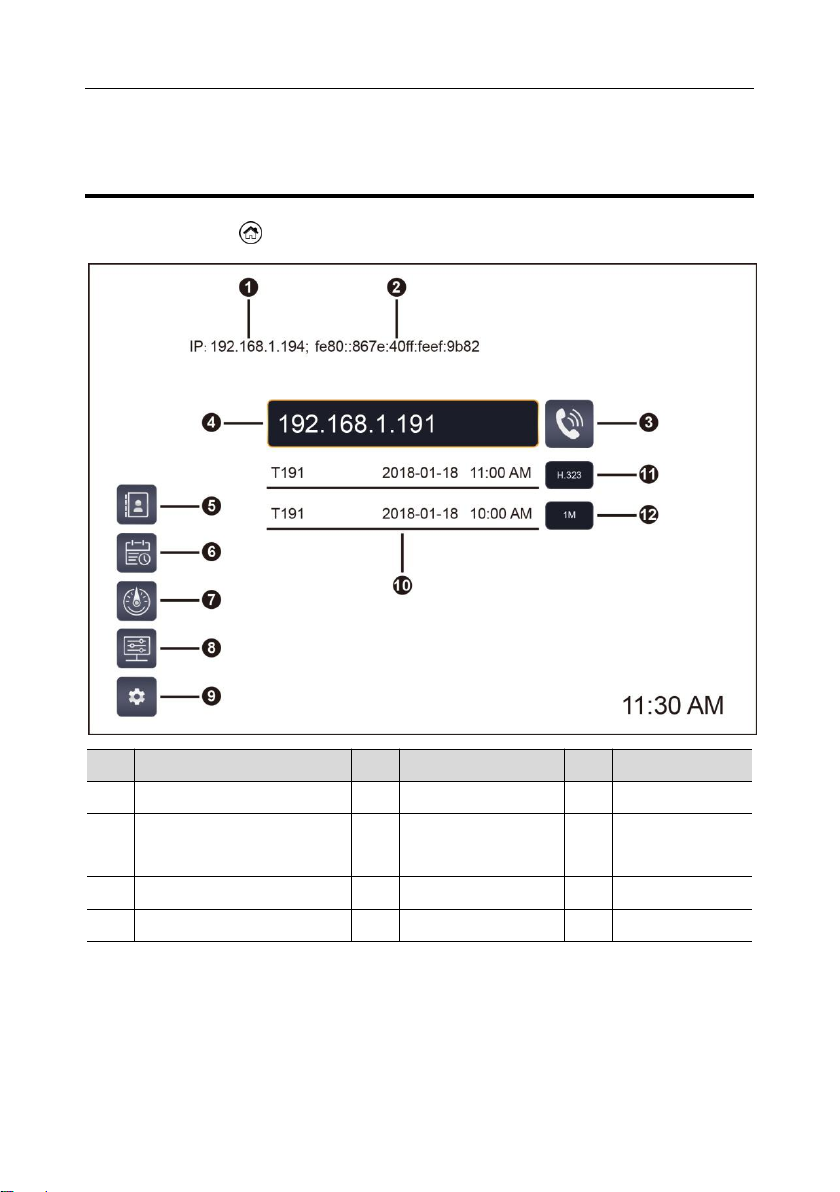
5 GUI Main Interface
Press the home key “ ” of the remote control to enter the GUI main interface.
When you move the cursor to the “Settings” menu, the “Contacts”, “History”, “Diagnostic” and
“Control” menus will pop up automatically; when you move the cursor to the “Call” button, the
system will automatically pop up “Call Protocol” and “Call Rate” options boxes.
8
Page 11

Split HD Video Conference Terminal User Guide
Parameter
Description
Work Mode
Configure the network working mode, the options are:
Auto
10M Full Duplex
10M Half Duplex
100M Full Duplex
100M Half Duplex
1000M Full Duplex
1000M Half Duplex
Connection
Type
DHCP: The terminal automatically obtains an IP address through a
DHCP server.
Static IP: The IP address of the terminal is assigned by the network
administrator. You need to set the IP address, netmask, gateway,
and DNS address.
IP address
Configure the IP address of the terminal.
Subnet mask
Configure the subnet mask of the terminal.
Gateway
Configure the default gateway address of the terminal.
DNS address
Configure the IP address of the DNS server.
Save
Select “Save”, save configuration information.
6 Basic Settings
6.1 Network Settings
Step 1 Enter the GUI main interface, select “Settings > Network > IPv4”.
Step 2 Set network parameters such as IP address, gateway and subnet mask etc.
Step 3 Select “Save”, save configuration information.
Step 4 End.
9
Page 12
Split HD Video Conference Terminal User Guide
Parameter
Description
Enable H.323
Enable or disable H.323 function.
Register Mode
Select the H.323 account register mode, you need to manually enter the
information required for H.323 registration.
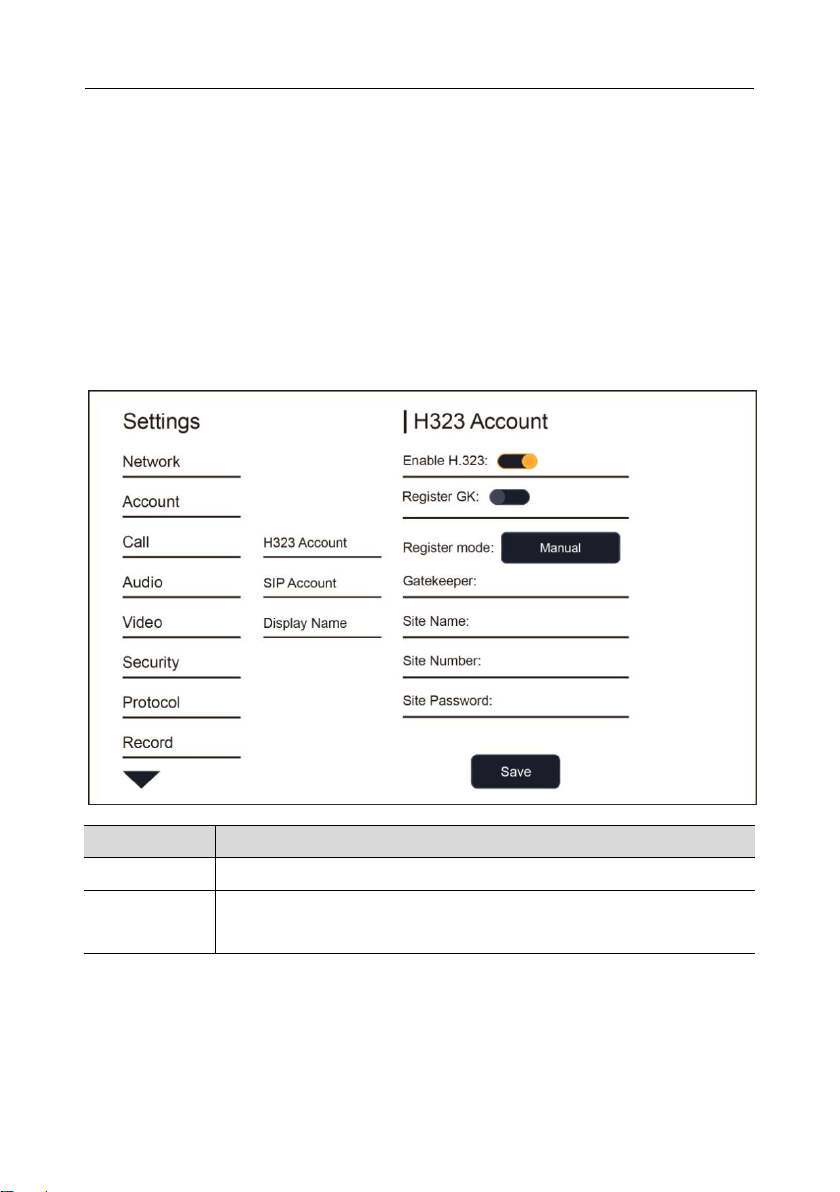
6.2 H.323 Account Settings (optional)
Set the H323 ID and number of the terminal, specify the GK address, and enable the terminal
to register with the GK, so that the conference or other terminal can be called by the number.
Step 1 Enter the GUI main interface, select “Settings > Account > H323 Account”.
Step 2 Configure H323 account parameter information. The parameters are described in the
following table.
Step 3 Select “Save”, save configuration information.
Step 4 End.
10
Page 13

Split HD Video Conference Terminal User Guide
Parameter
Description
Register GK
Enable or disable register GK function, the options are:
Enable: The terminal registers with the GK server. After the terminal
is successfully registered to the GK server, you can call other
terminals through the remote meeting number.
Disable: The terminal does not register with the GK server. When
calling with the H.323 protocol, only other terminals can be called by
IP address.
Gatekeeper
Set the IP address or domain name of the GK server.
When set to domain name, you need to enable the DNS server and set
the correct mapping on the DNS server.
Site Name
The name or alias of the terminal registered on the GK.
After the terminal registers with the GK server, the GK server identifies
the terminal with the name.
Site Number
Site number corresponding to the terminal.
After the terminal registers with the GK server, other terminals can use
the number to call the terminal.
Site Password
The password registered by the terminal to the GK server for the legality
of the GK server authentication terminal.
Save
Select “Save”, save configuration information.
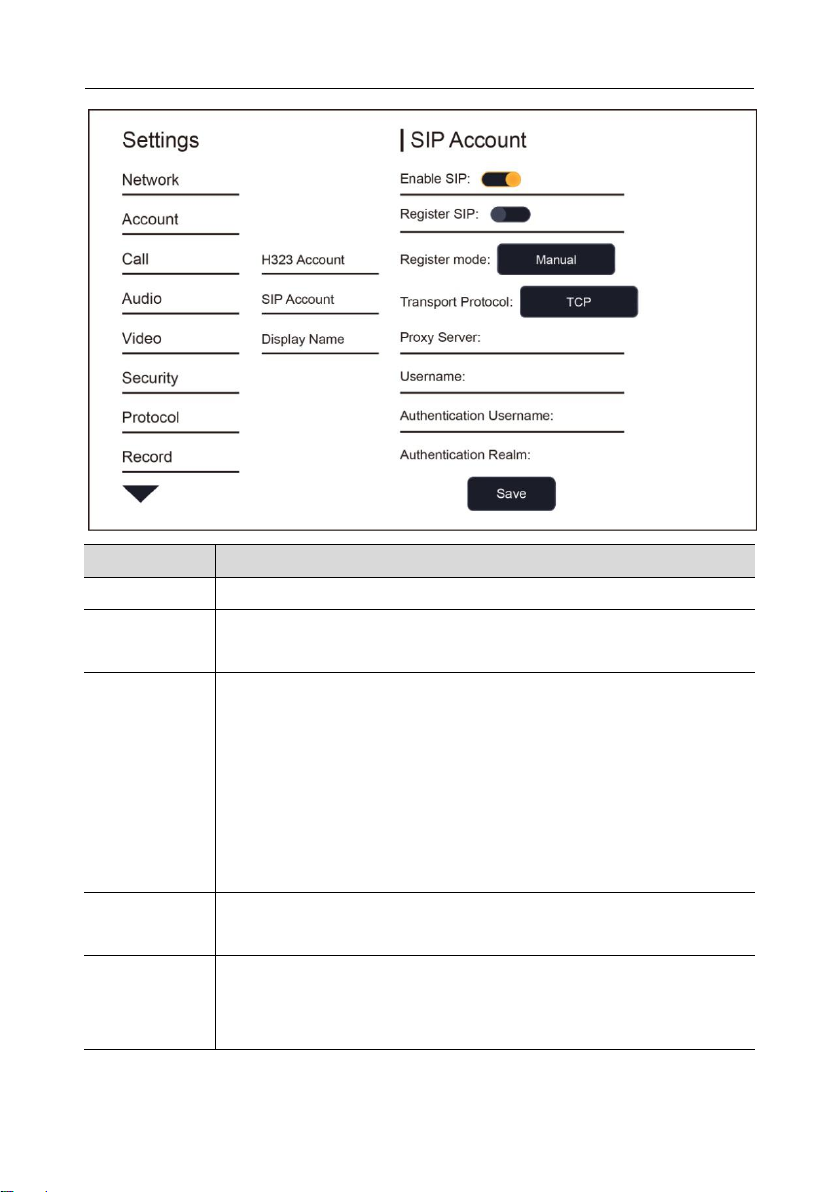
6.3 SIP Account Settings (optional)
Configure the SIP parameters, set the SIP address of the terminal, and communicate with the
remote server through the registration number.
Step 1 Enter the GUI main interface, select “Settings > Account > SIP Account”.
Step 2 Configure SIP parameters. The parameters are described in the following table.
Step 3 Select “Save”, save configuration information.
Step 4 End.
11
Page 14
Split HD Video Conference Terminal User Guide
Parameter
Description
Enable SIP
Enable or disable SIP function.
Register Mode
Select the SIP account register mode, you need to manually enter the
information required for SIP registration.
Register SIP
Enable or disable register SIP function, the options are:
Enable: The terminal registers with the SIP server. After the terminal
is successfully registered to the SIP server, you can call other
terminals through the remote meeting number.
Disable: The terminal does not register with the SIP server. When
calling with the SIP protocol, only other terminals can be called by IP
address.
Transport
Protocol
Select Transport Protocol, the options are TCP, UDP, TLS and Auto.
Proxy Server
Enter the IP address or domain name of the SIP proxy server.
This must be enabled when the user's network environment requires that
the proxy server be enabled.
12
Page 15
Split HD Video Conference Terminal User Guide
Parameter
Description
Username
Enter the username used to register the SIP server.
Authentication
Username
Enter the username used for authentication.
Authentication
Realm
Enter the domain name used by the SIP server to identify the
corresponding domain.
Authentication
Password
Enter the password of the SIP server to be used by the terminal to
authenticate the terminal of the SIP server. When the SIP server is
authenticated, the password set by the terminal must be the same as the
password set in advance on the SIP server.
Save
Select “Save”, save configuration information.
After you enable the terminal to register the SIP server, you need to configure the “Proxy
Server”, “Username” and “Authentication Realm”.
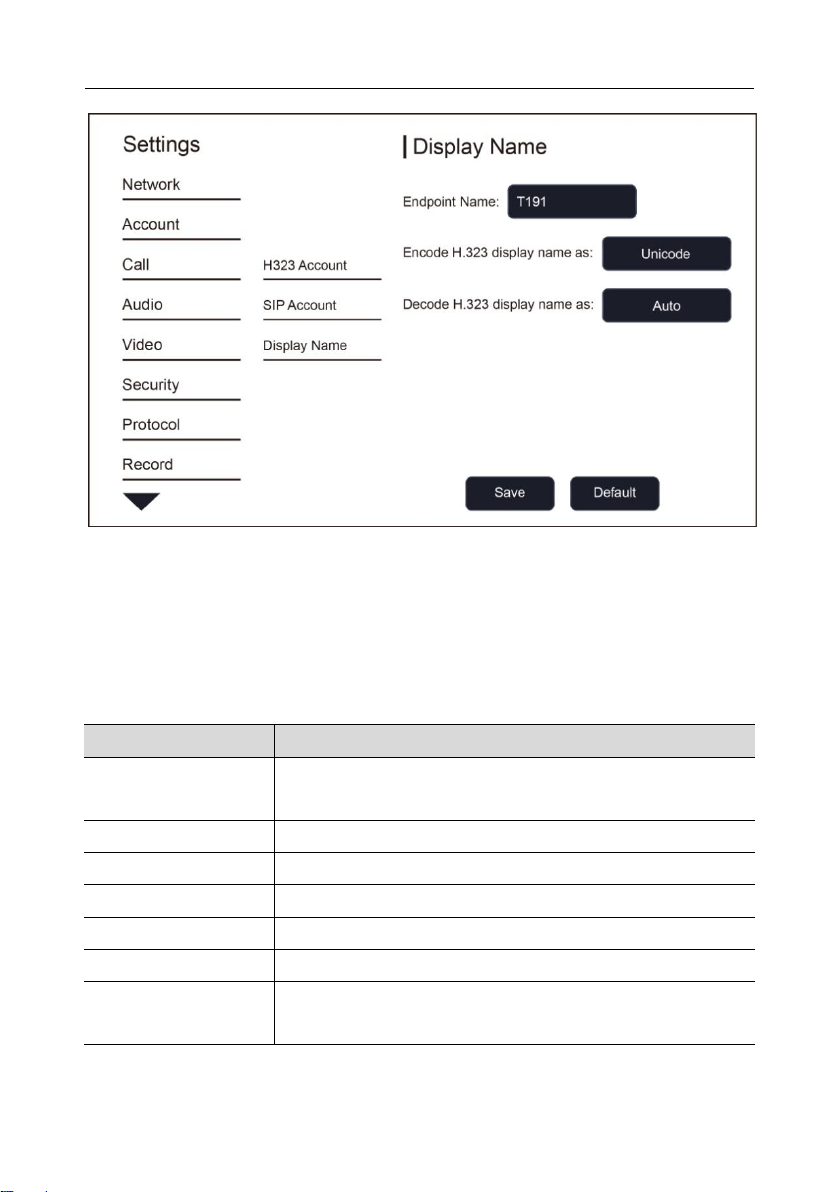
6.4 Display Name Settings
Step 1 Enter the GUI main interface, select “Settings > Account > Display Name”.
Step 2 Configure the “Display Name” of the terminal.
Step 3 Select “Save”, save configuration information.
Step 4 End.
13
Page 16
Split HD Video Conference Terminal User Guide
Parameter
Description
Automatic date time
Enable “Automatic date & time” to indicate the time provided by
the network.
Set date
Set the date to take effect when disable “Automatic date time”.
Set time
Set the time to take effect when disable “Automatic date time”.
NTP Server
Set the NTP time server.
Select time zone
Select the time zone of your region.
Enable 24-hour format
Enable or disable the 24-hour format.
Select date format
Select the order in which the date, month, and day formats are
displayed.
6.5 Date Settings
Step 1 Enter the GUI main interface, select “Settings > System > Date”.
Step 2 Set parameters such as date, time, and date format.
Step 3 Select “Save”, save configuration information.
Step 4 End.
14
Page 17

Split HD Video Conference Terminal User Guide
6.6 Reset Settings
Step 1 Enter the GUI main interface, select “Settings > System > Reset”.
Step 2 Select “Reset to factory settings”.
Step 3 Select “Save”, save configuration information.
Step 4 End.
After restoring the factory settings, all the terminal parameters you configured earlier will be lost,
please be careful settings!
15
079.79.1100XXX_V1.0
 Loading...