

Presonus Faderport Owner’s Manual
™
FaderPort
Production Controller
Owner’s Manual
®
www.presonus.com
English

Table of Contents
6 Live (MCU) — 23
1 Overview — 1
1.1 Introduction — 1
1.2 What’s in the Box — 2
1.3 What’s in your My PreSonus Account — 3
1.4 Firmware Updates — 3
2 Studio One — 5
2.1 Getting Started — 5
2.2 Channel Strip — 7
2.3 Transport Controls — 7
2.4 The Session Navigator — 8
2.4.1 F1-F4 Functions — 9
2.5 Automation Controls — 9
2.6 Control Link — 9
6.1 Getting Started — 23
6.2 Channel Strip — 24
6.3 Transport Controls — 24
6.4 The Session Navigator — 25
6.5 Automation Controls — 26
7 Studio One Artist Quick Start — 27
7.1 Installation and Authorization — 27
7.2 Setting Up Studio One — 28
7.2.1 Configuring Audio Devices — 29
7.2.2 Configuring MIDI Devices — 30
7.3 Creating a New Song — 35
7.3.1 Configuring Your Audio I/O — 36
7.3.2 Creating Audio and Instrument
Tracks — 37
3 Pro Tools (HUI) — 10
3.1 Getting Started — 10
3.2 Channel Strip — 11
3.3 Transport Controls — 11
3.4 The Session Navigator — 12
3.5 Automation Controls — 12
4 Logic (MCU) — 13
4.1 Getting Started — 13
4.2 Channel Strip — 15
4.3 Transport Controls — 15
4.4 The Session Navigator — 16
4.5 Automation Controls — 17
5 Cubase / Nuendo (MCU) — 18
7.3.3 Recording an Audio Track — 38
7.3.4 Adding Virtual Instruments and
Effects — 39
8 Appendix — 41
8.1 Operation Modes — 41
8.2 FaderPort Multichannel Controller MIDI
Protocol — 41
8.2.1 SysEx — 41
8.2.2 Fader — 42
8.2.3 Session Navigator Encoder — 42
8.2.4 Buttons and LEDs — 42
9 Warranty Information — 44
9.1 How Consumer Law Relates To This
Warranty — 44
5.1 Getting Started — 18
5.2 Channel Strip — 20
5.3 Transport Controls — 20
5.4 The Session Navigator — 21
5.5 Automation Controls — 22
1 Overview
1.1 Introduction
1 Overview
1.1 Introduction
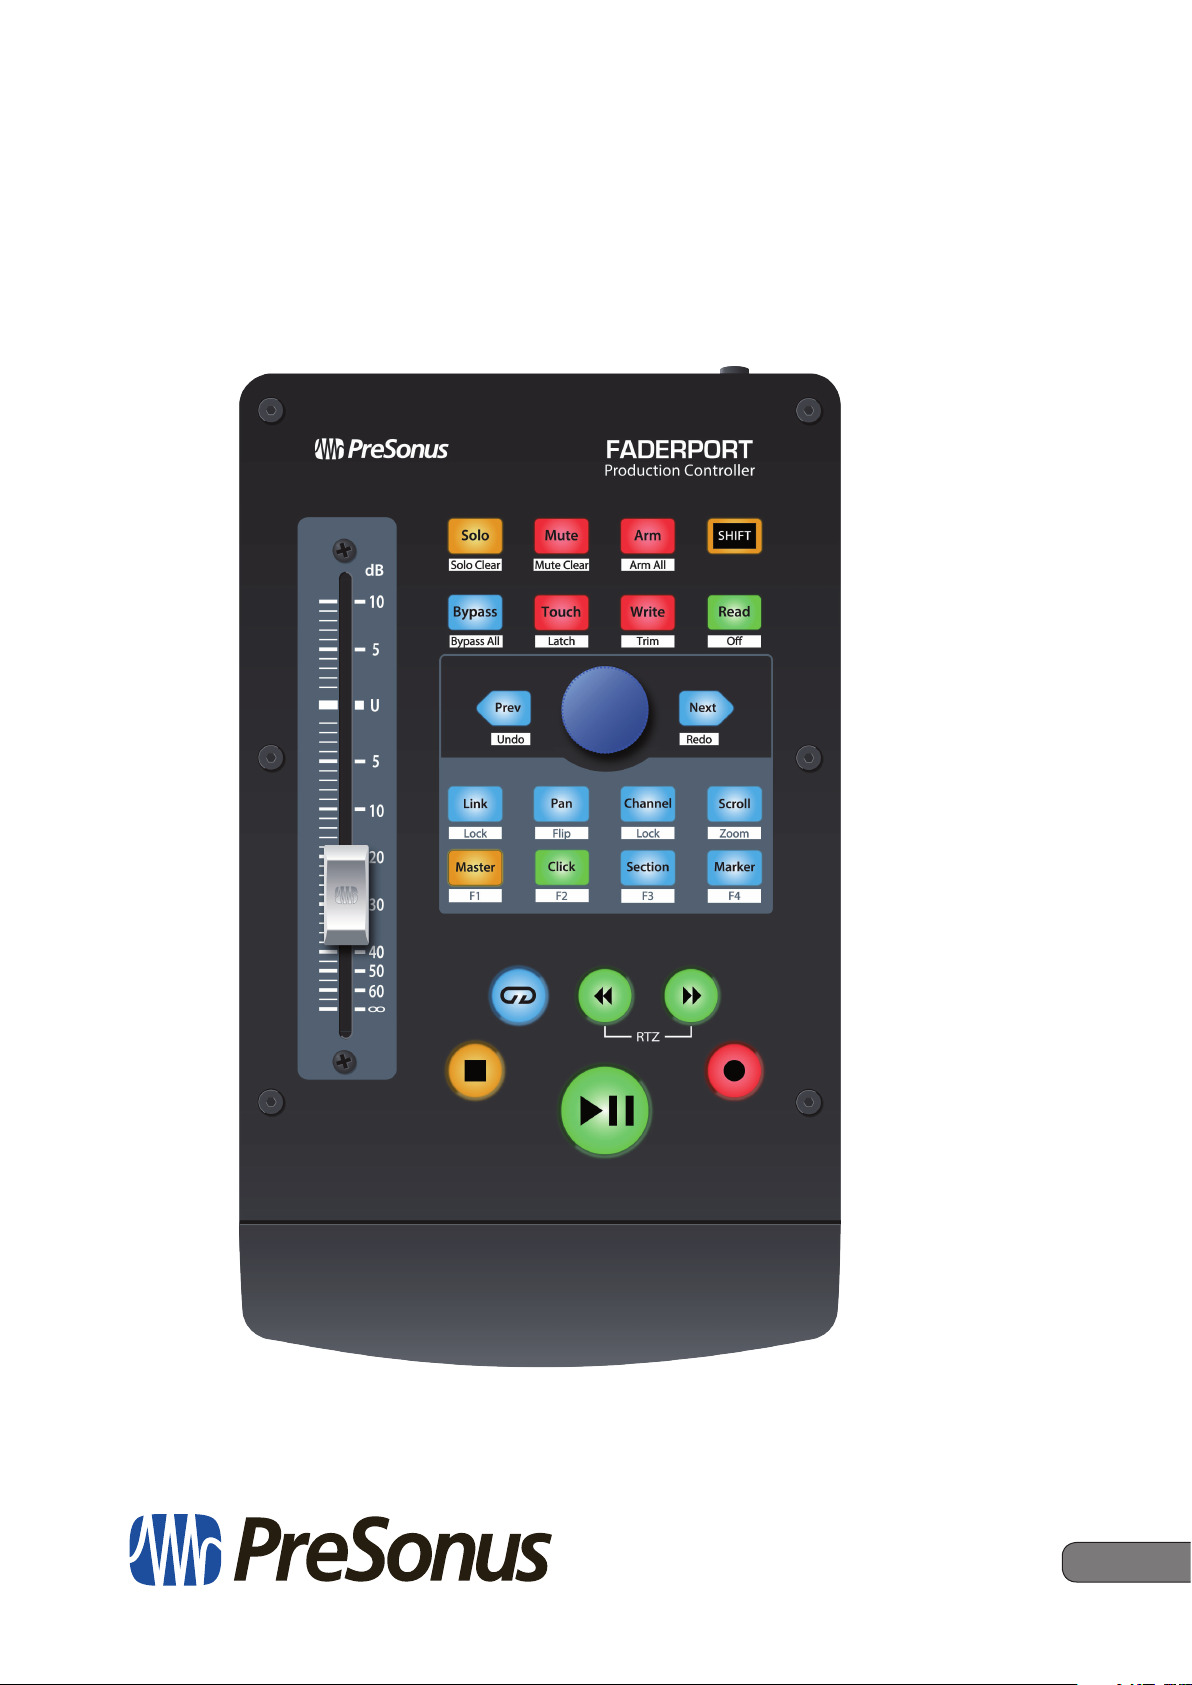
FaderPort™ Multichannel Production Controllers
Owner’s Manual
Thank you for purchasing the PreSonus® FaderPort™ production controller.
Featuring an ultra-smooth, touch-sensitive, motorized fader; complete
automation and transport controls; and the unique Session Navigator, FaderPort
controllers make mixing in your favorite DAW application quick and easy.
PreSonus Audio Electronics is committed to constant product improvement,
and we highly value your suggestions. We believe the best way to achieve our
goal of constant product improvement is by listening to the real experts: our
valued customers. We appreciate the support you have shown us through the
purchase of this product and are confident that you will enjoy your FaderPort!
About this manual: We suggest that you use this manual to familiarize
yourself with the features, applications, and correct connection procedures
for your FaderPort before trying to connect it to your computer. This
will help you avoid problems during installation and setup.
This manual describes the FaderPort behavior in the DAWs for
which each operation mode was designed. Please see Section
8.1 for applications not listed in the Table of Contents.
Throughout this manual, you will find Power User Tips that can quickly make
you a FaderPort expert and help you get the most out of your investment.
1
1 Overview
Go online to my.presonus.
com and register your serial
number.
The FaderPort offers customized operation modes for five
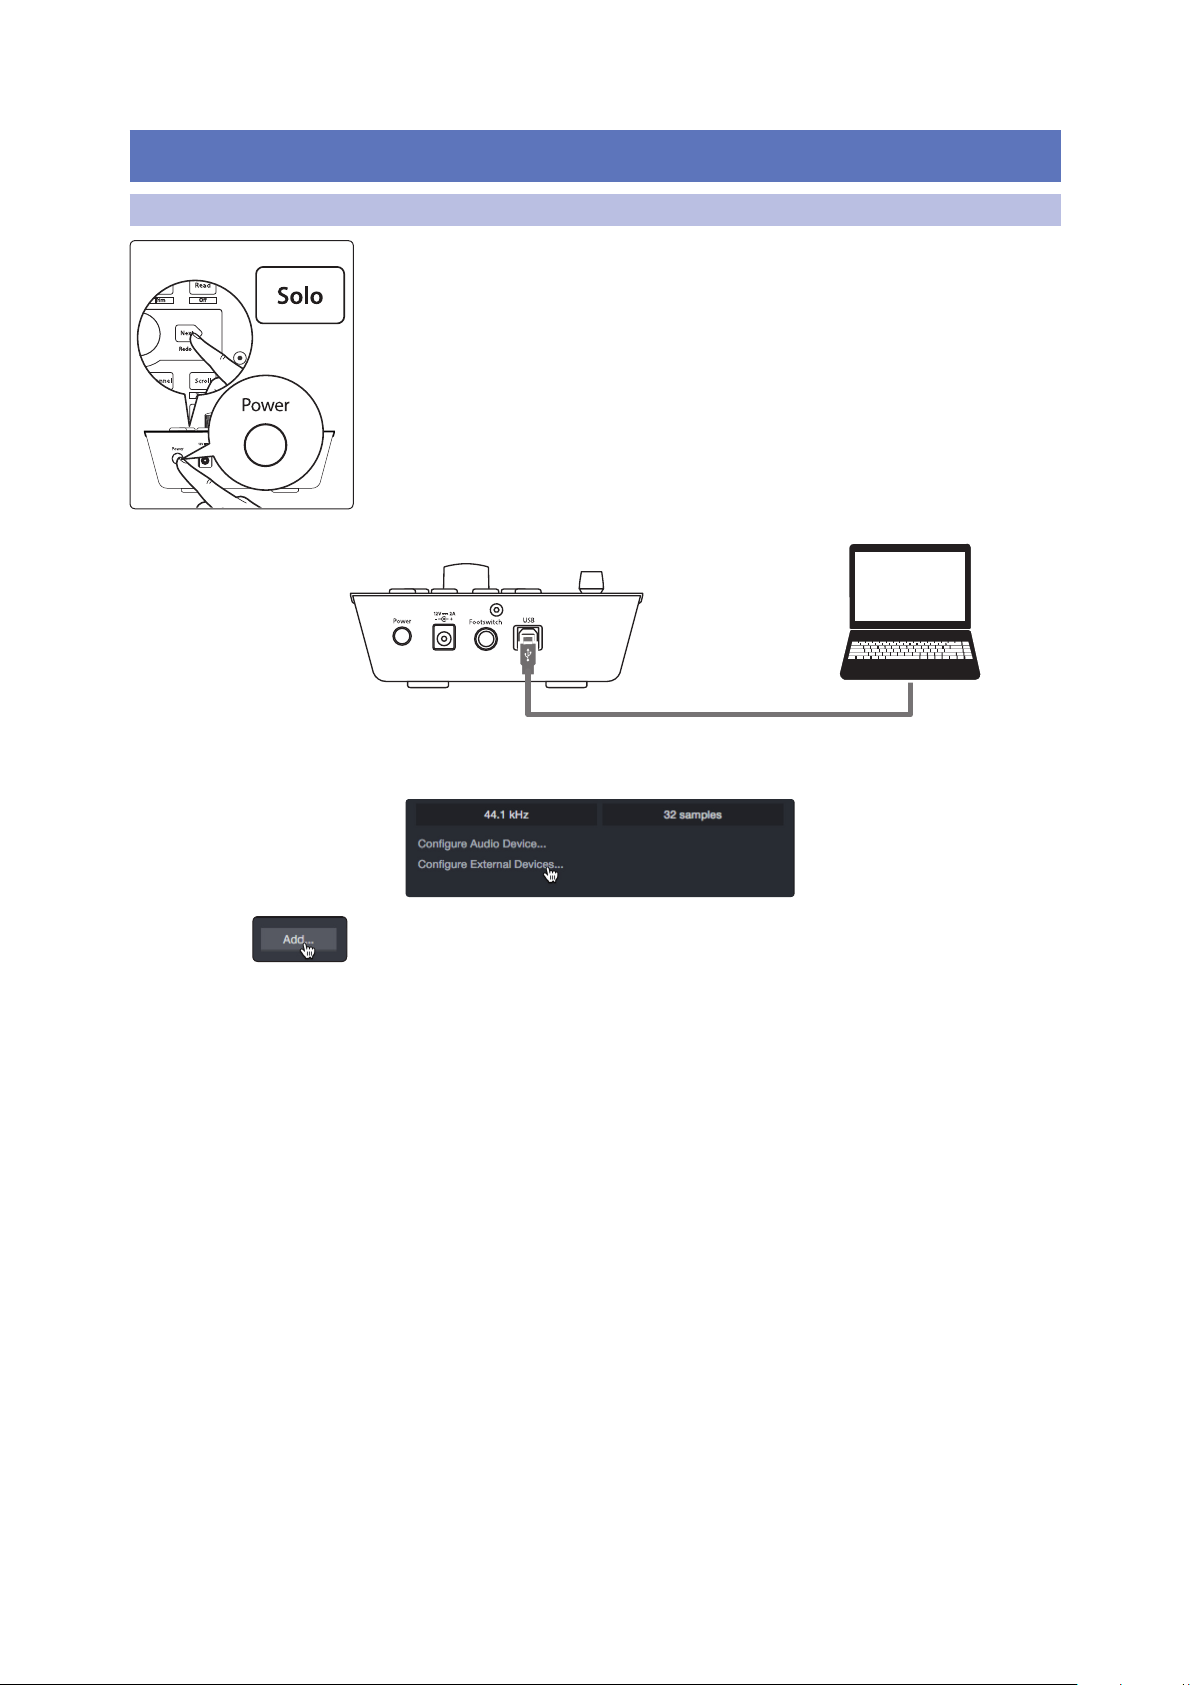
(5) major DAWs. To select your Operation Mode, press and
hold the NEXT button while powering on your F aderPort,
then press the button for the desired mode (see below).
Öffnen Sie die Webseite
My.PreSonus.com und
registrieren Sie Ihre
Seriennummer.
FaderPort bietet angepasste Betriebsmodi für fünf (5)
bekannte DAWs. Um einen Betriebsmodus auszuwählen,
halten Sie beim Einschalten Ihres FaderPort die NEXTTaste gedrückt und drücken dann die Taste des gewünschten Modus (siehe unten).
Allez sur my.presonus.com
et enregistrez votre numéro
de série.
Le FaderPort offre des modes de fonctionnement personnalisés pour cinq (5) grandes stations de travail
audio numériques. Pour sélectionner votre mode de
fonctionnement, pressez et maintenez la touche NEXT
pendant que vous mettez votre FaderPort sous tension,
puis pressez la touche correspondant au mode désiré
(voir ci-dessous).
Navegue online a
my.presonus.com y registre
su número de serie.
FaderPort ofrece modos de funcionamiento personalizados para cinco (5) grandes DAWs. Para seleccionar su
Modo de funcionamiento, mantenga pulsado el botón
NEXT mientras enciende su FaderPort, y luego pulse el
botón del modo deseado (vea más abajo).
MCU (Live)
HUI (ProT
ools)
Studio One
MCU (Logic)
MCU (Cubase)
www.presonus.com
FaderPort
™
Production Controller
Getting Started • Erste Schritte • Cómo empezar • Pour commencer
© 2018 PreSonus Audio Electronics, Inc. All Rights Reserved. FaderPort, PreSonus, and Universal Control are trademarks or registered trademarks of PreSonus Audio Electronics, Inc. Studio One is a
registered trademark of PreSonus Software Ltd. Mac and Mac OS are registered trademarks of Apple, Inc., in the U.S. and other countries. Windows is a registered trademark of Microsoft, Inc., in the U.S. and
other countries. Other product names and technologies mentioned herein may be trademarks of their respective companies. All specifications subject to change without notice.
1.2 What’s in the Box
1.2 What’s in the Box
FaderPort™ Multichannel Production Controllers
Owner’s Manual
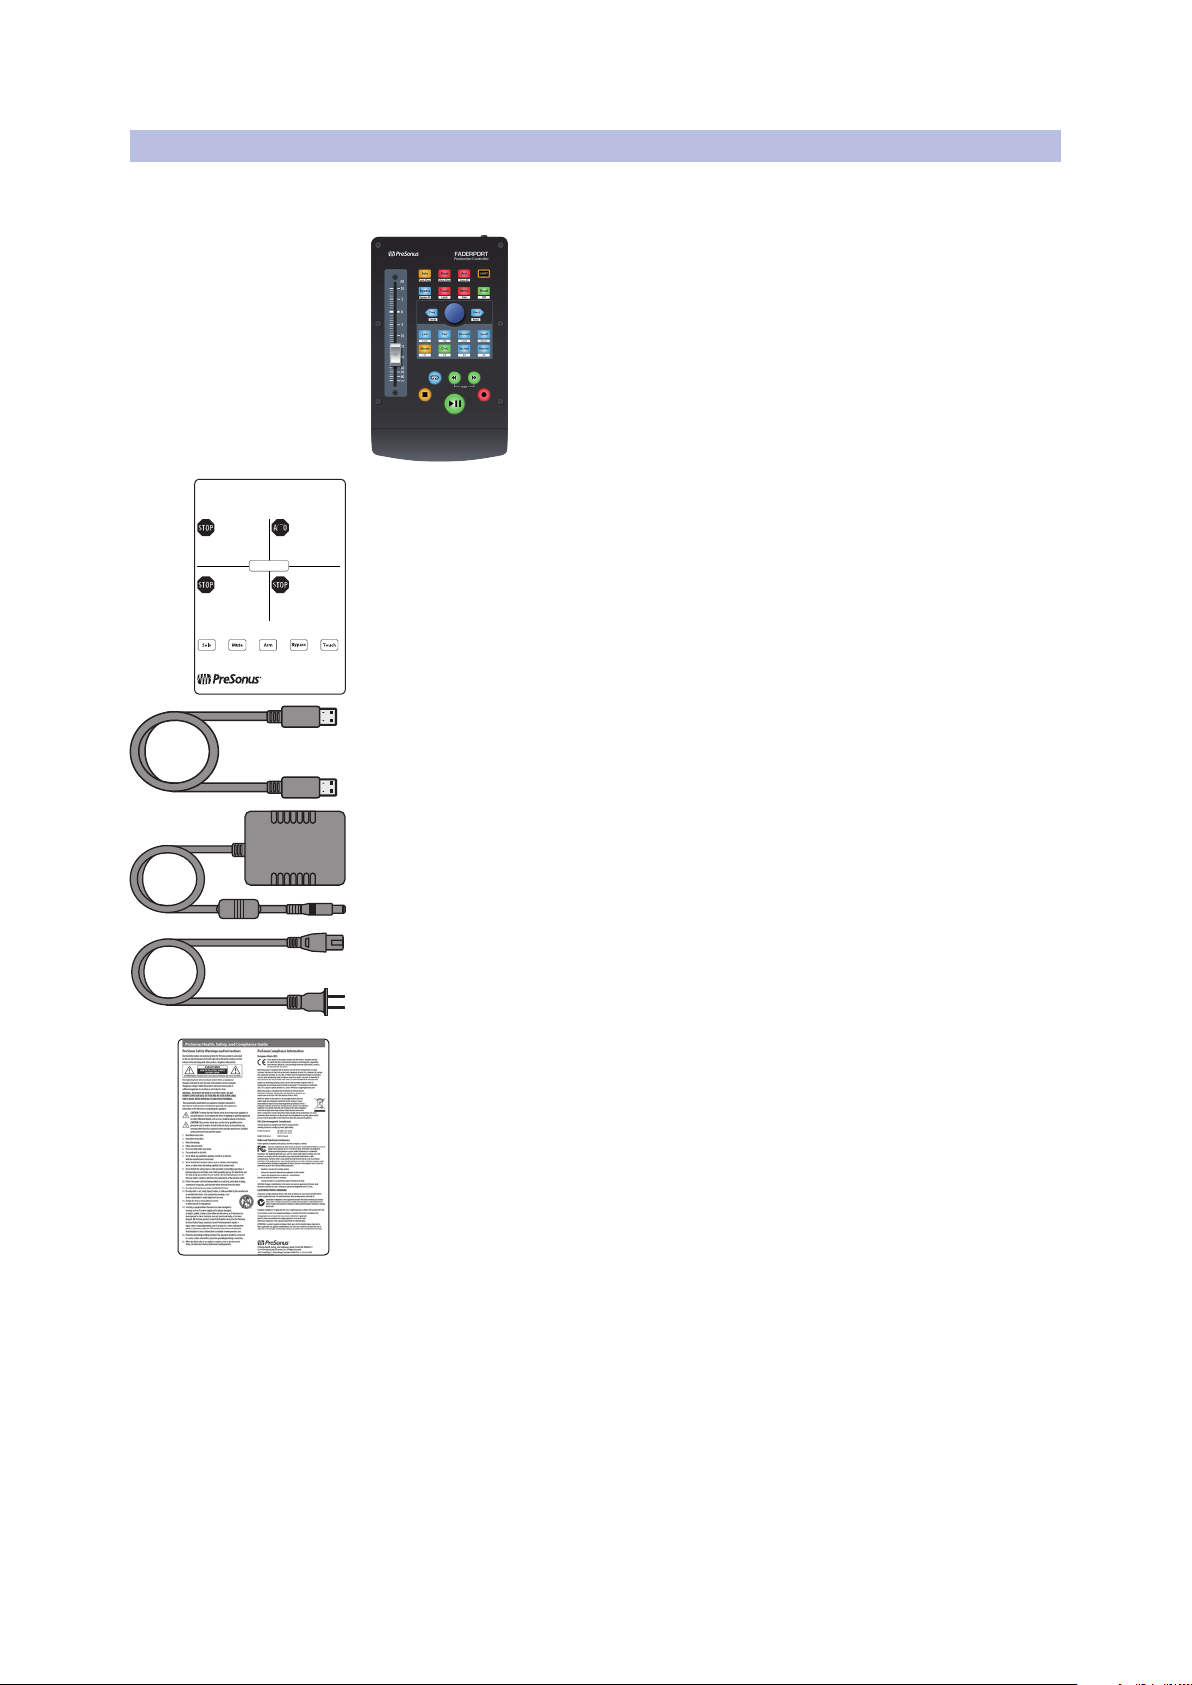
Your FaderPort package contains the following:
FaderPort production controller
Quick Start Guide
6’ (1.8m) USB cable
External Power Supply
PreSonus Health, Safety, and Compliance Guide
2
1 Overview
1.3 What’s in your My PreSonus Account
1.3 What’s in your My PreSonus Account
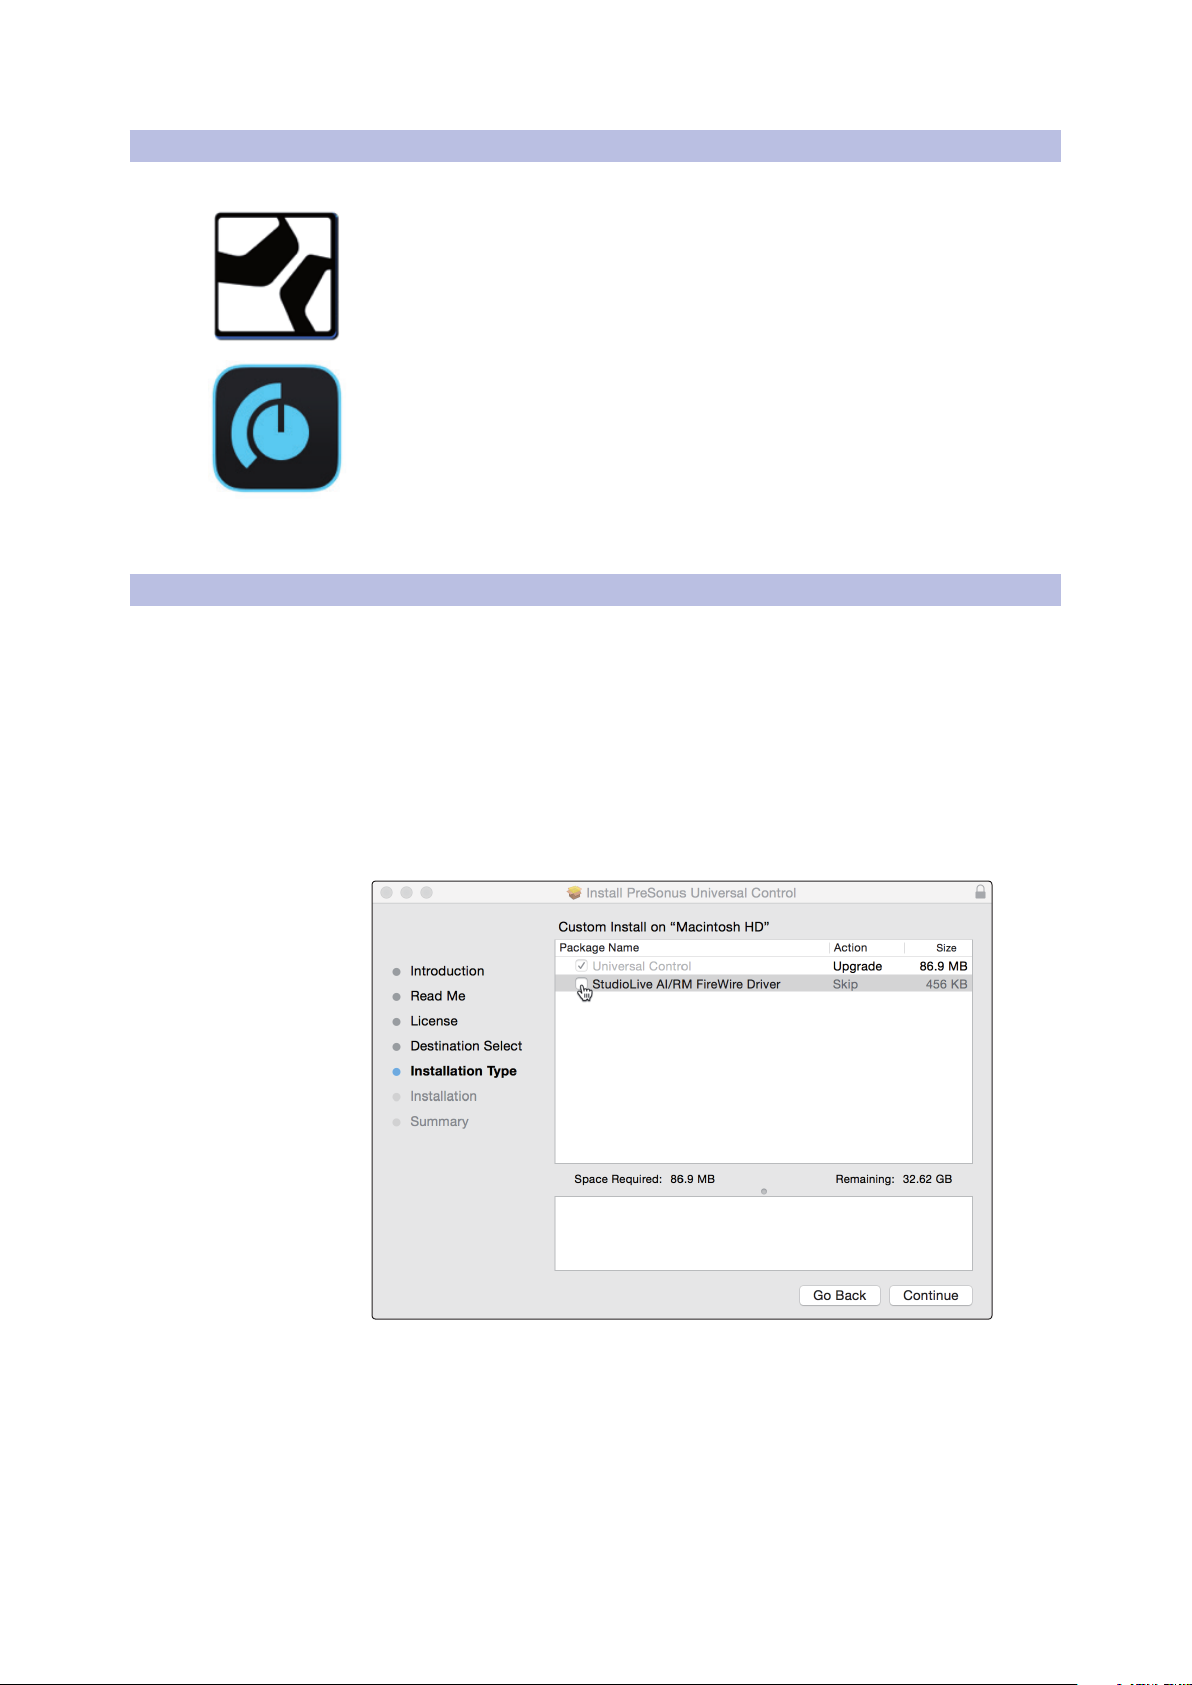
Once you register your FaderPort, you will be able to download the following:
Studio One Artist recording software and content
Universal Control (necessary for firmware updates)
Visit http://my.presonus.com to register your FaderPort
and download your software and license.
1.4 Firmware Updates
PreSonus is committed to constant product improvement. As part of this
commitment, we offer periodic firmware updates that add features, improve
functionality, and resolve issues that are discovered in the field. Because
of this, it is highly recommended that you download Universal Control
from your My PreSonus account after registering your FaderPort.
Note: At the time of this manual’s publication, a firmware update is required for full
functionality of your FaderPort. You must download and install Universal Control and run
the firmware update on your unit.
During installation, you will be given the option to install various PreSonus
audio drivers. No driver installation is required to use the FaderPort.
FaderPort™ Multichannel Production Controllers
Owner’s Manual
Once installed, connect your FaderPort to your computer.
3

1 Overview
1.4 Firmware Updates
FaderPort™ Multichannel Production Controllers
Owner’s Manual
Universal Control will alert you if there is new firmware available for
your FaderPort. Clicking on the Update Firmware button will begin the
update process. This process can take up to five minutes. At the end of
the firmware update, you will be prompted to reboot your FaderPort.
Once rebooted, your FaderPort fader may require recalibration. This is an automated
process. Do not interfere with or interrupt the fader calibration process.
Note: One of the Operating Modes must be selected to perform a firmware update.
4
2 Studio One
Studio One
2.1 Getting Started
2 Studio One
2.1 Getting Started
FaderPort™ Multichannel Production Controllers
Owner’s Manual
By default, your FaderPort is configured for Studio One. No further device setup
is required.
If you have changed the FaderPort’s Operation Mode and would like to return
to using it with Studio One, press and hold the NEXT button while powering
on your FaderPort, then press the Solo button to enable Studio One.
Note: In addition to Studio One, this operation mode should be used with
other DAWs that provide native FaderPort support. A complete list of nativesupport DAW applications is available at www.presonus.com.
The FaderPort is a class-compliant device in both macOS® and
Windows®. Simply connect your FaderPort to a free USB port
on your computer. No further installation is necessary.
To configure your FaderPort in Studio One:
1. From the Start page, click on the Configure External Devices link.
2. Click the Add button.
3. From the manufacturers list at the left, click on
PreSonus and then select FaderPort (2018).
Note: The original FaderPort uses a different mapping than its successor. You must select
FaderPort (2018) for proper functionality.
5

2 Studio One
2.1 Getting Started
FaderPort™ Multichannel Production Controllers
Owner’s Manual
4. Set the Send To and Receive From fields to “PreSonus FP2”
Your FaderPort is now ready for use.
6
2 Studio One
2 134
5
2.2 Channel Strip
2.2 Channel Strip
FaderPort™ Multichannel Production Controllers
Owner’s Manual
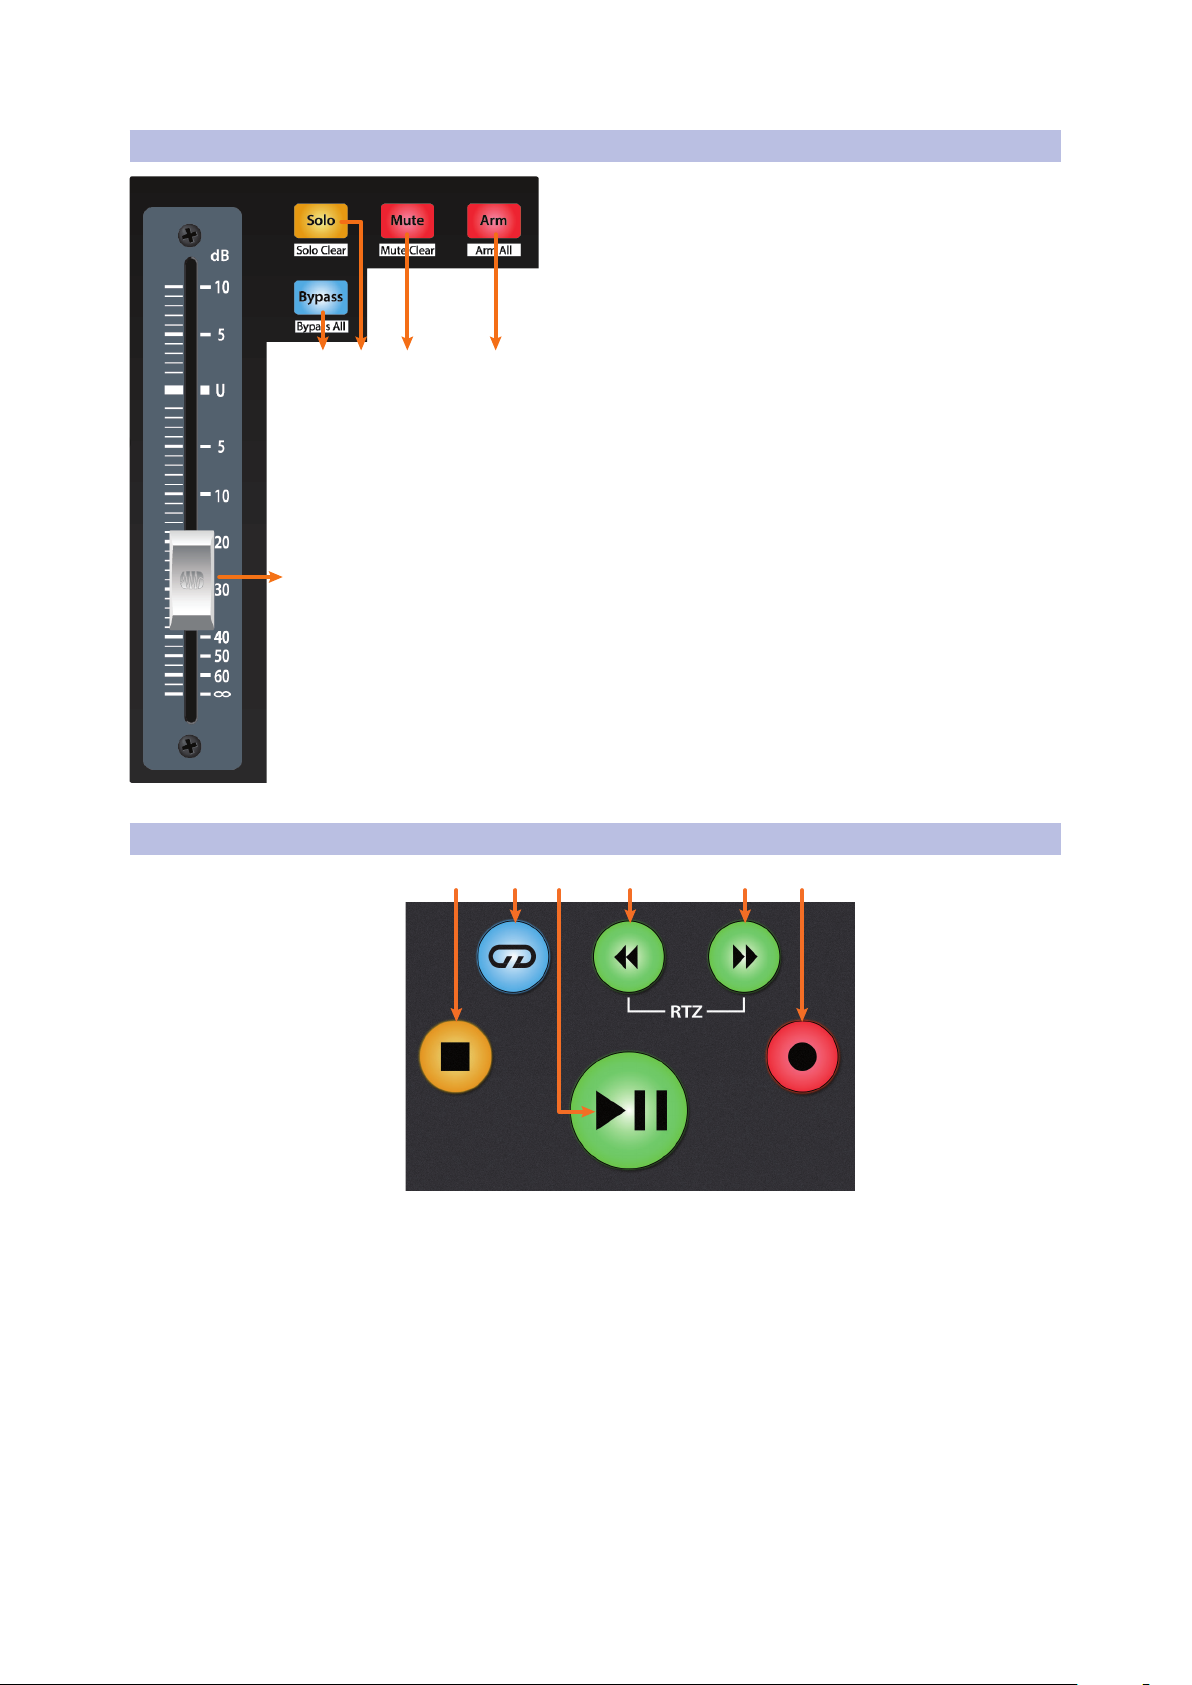
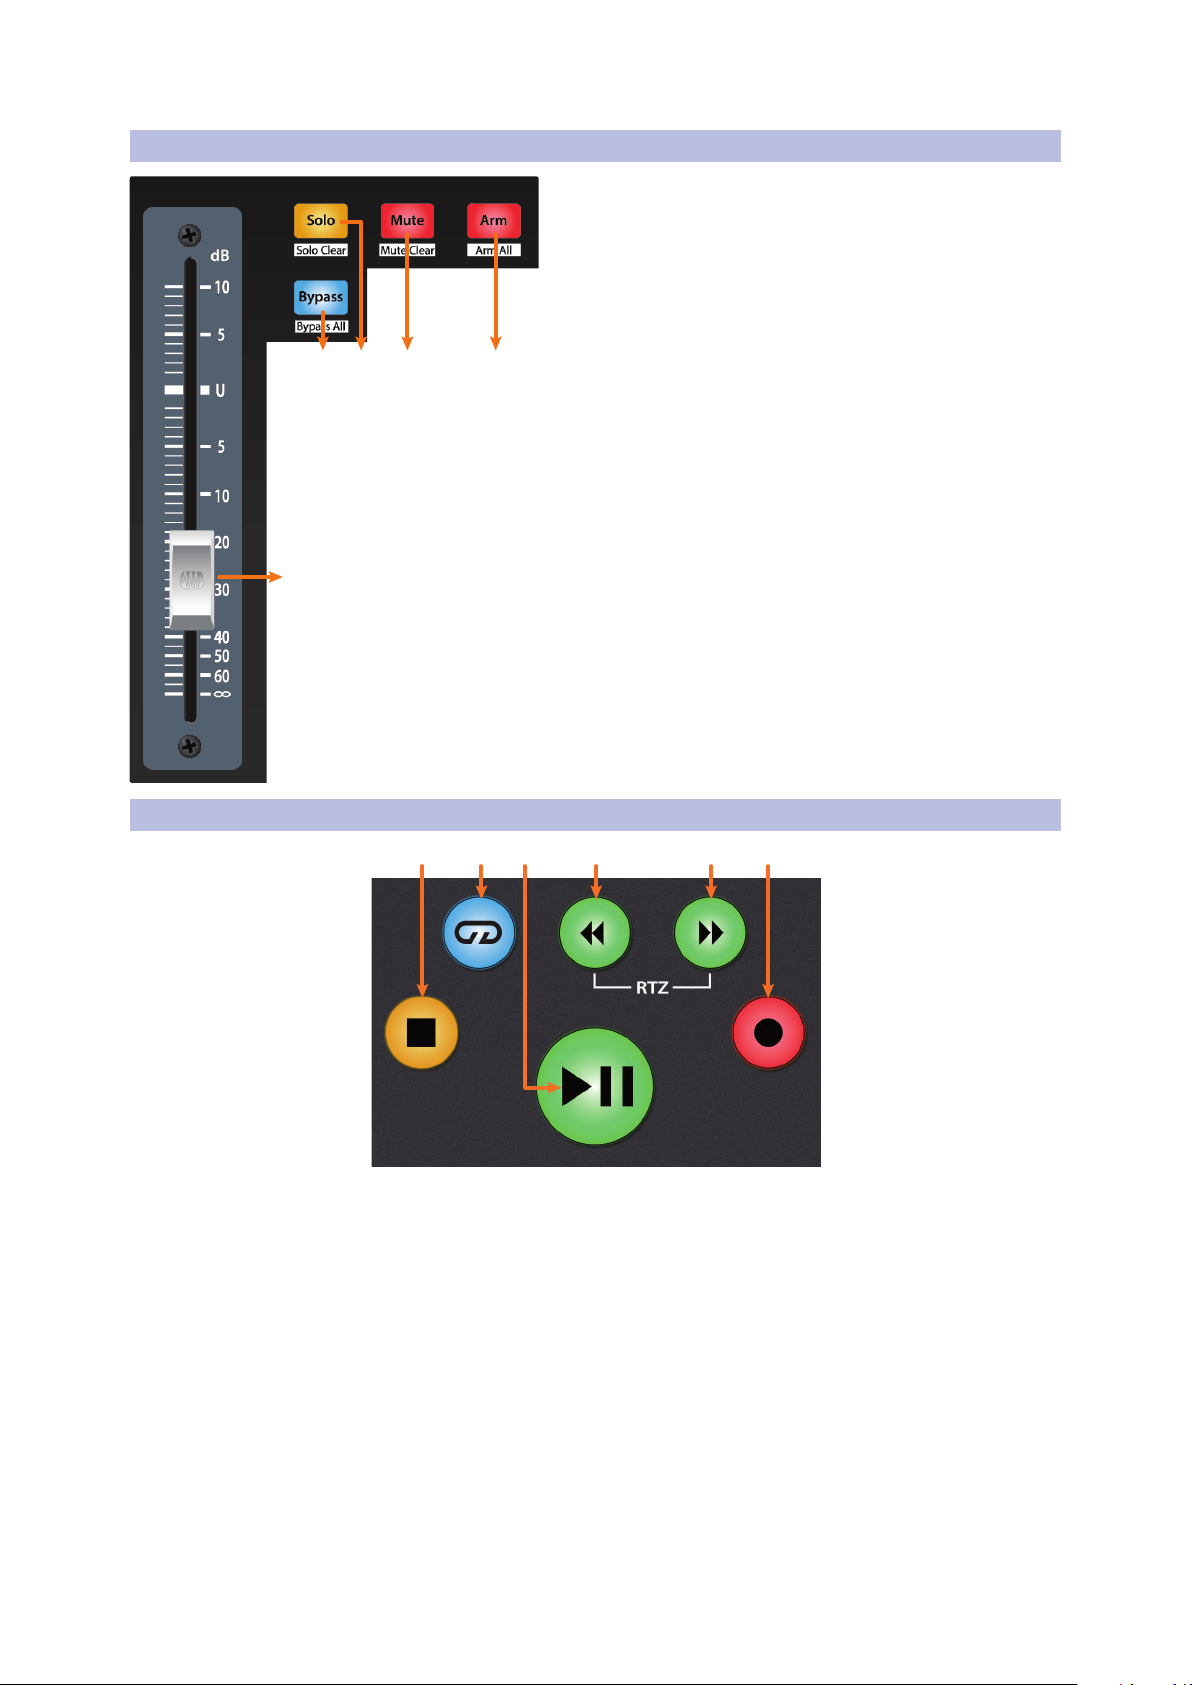
1. Arm. Pressing the Arm button will allow you to arm track
for recording by pressing the corresponding track’s Select
button. Press with SHIFT to arm all tracks for recording.
2. Mute. Mutes the corresponding channel’s output signal.
Press and hold to mute momentarily. Press with SHIFT for
Mute Clear.
3. Solo. Isolates the corresponding channel’s output signal
in the mix. Press and hold to solo momentarily. Press with
SHIFT for Solo Clear.
4. Bypass / Bypass All. Press the Bypass button to bypass
every plug-in on the selected channel. Press SHIFT +
Bypass to disable every plug-in in the Session.
5. Touch-Sensitive Fader. This 100 mm motorized fader can
be used to control volume levels and panning in Pan Flip
mode. See Section 2.4 for details.
2.3 Transport Controls
1. Stop. Stops playback. Press twice to return playback-cursor to zero.
2. Loop. Engages / disengages Looping.
3. Play / Pause. Starts playback at the current playback-
cursor position. Press again to pause playback.
4. Rewind. Press to rewind. Press and hold for continuous rewind. Press the
Rewind and Fast Forward buttons simultaneously to Return to Zero.
5. Fast Forward. Press to fast forward. Press and hold for continuous fast forward.
6. Record. Press to start recording at the current playbackcursor position for record-enabled tracks.
21 43 5 6
7
2 Studio One
21 43 65 87
2.4 The Session Navigator
2.4 The Session Navigator
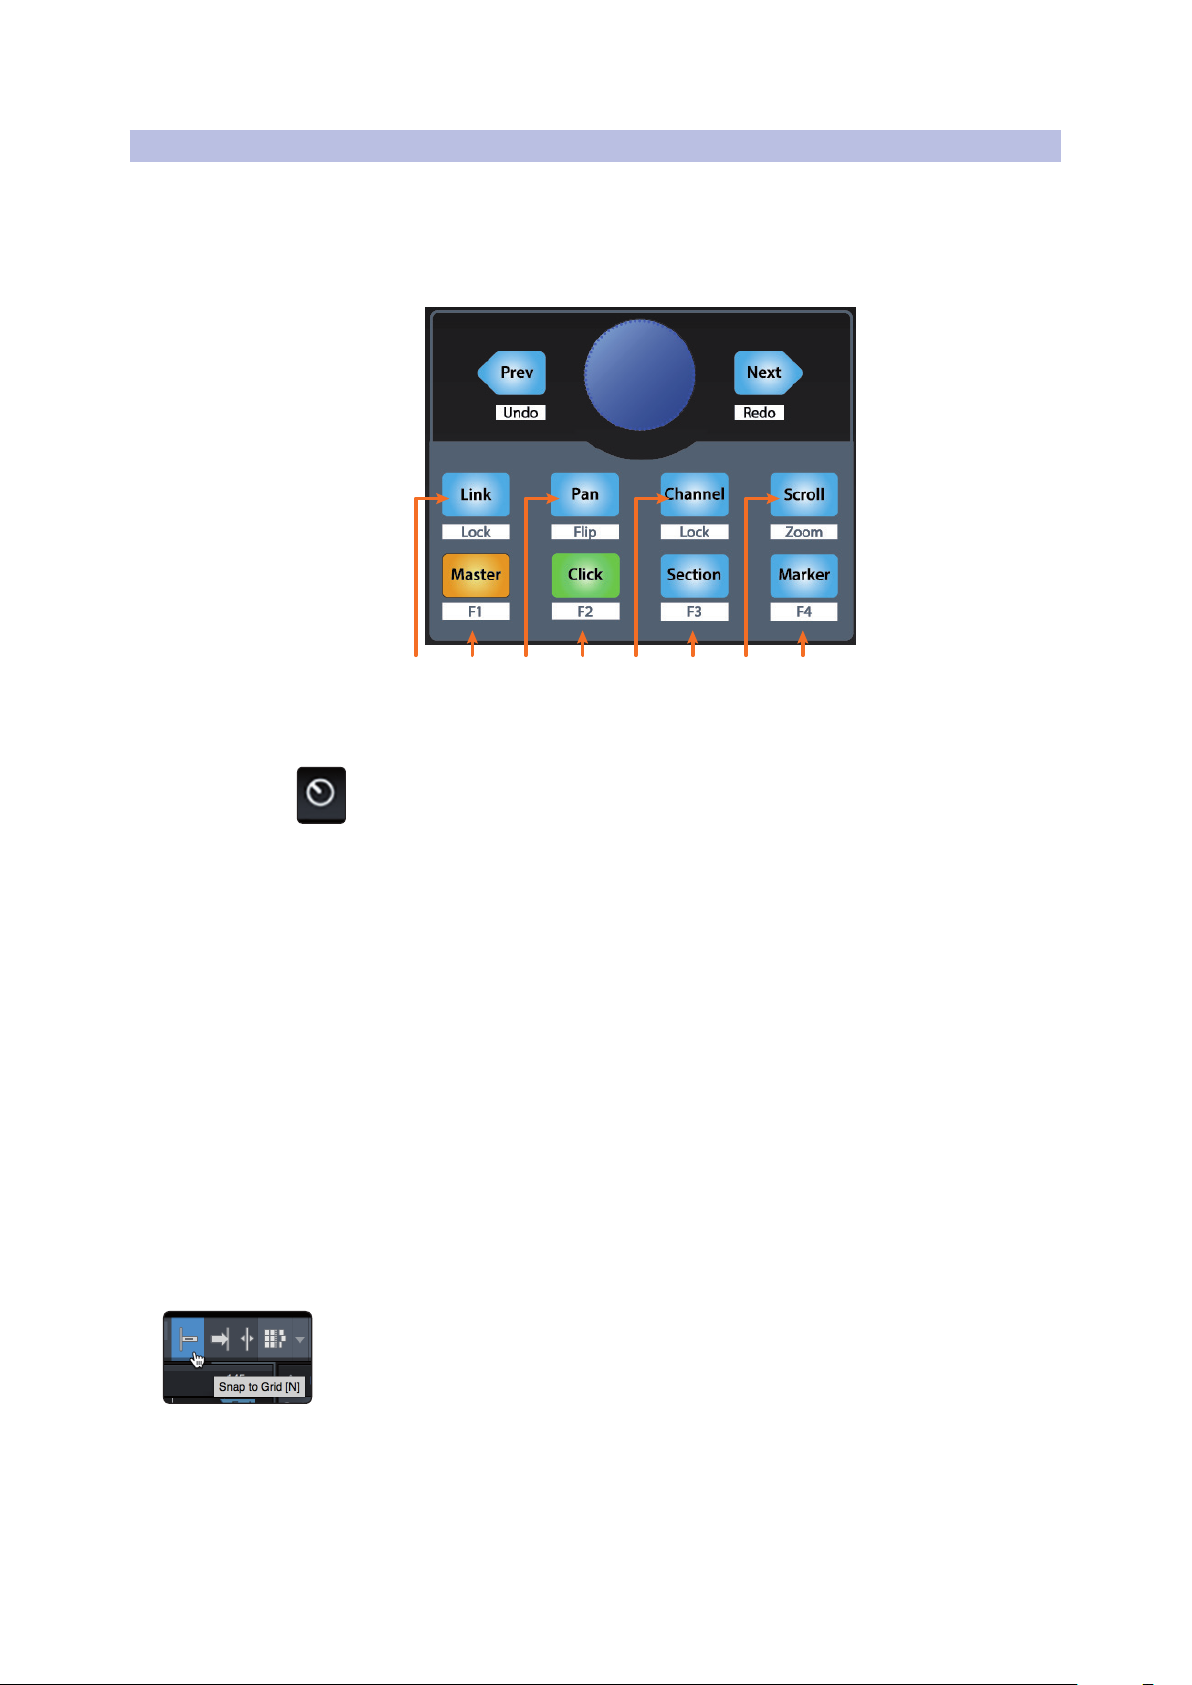
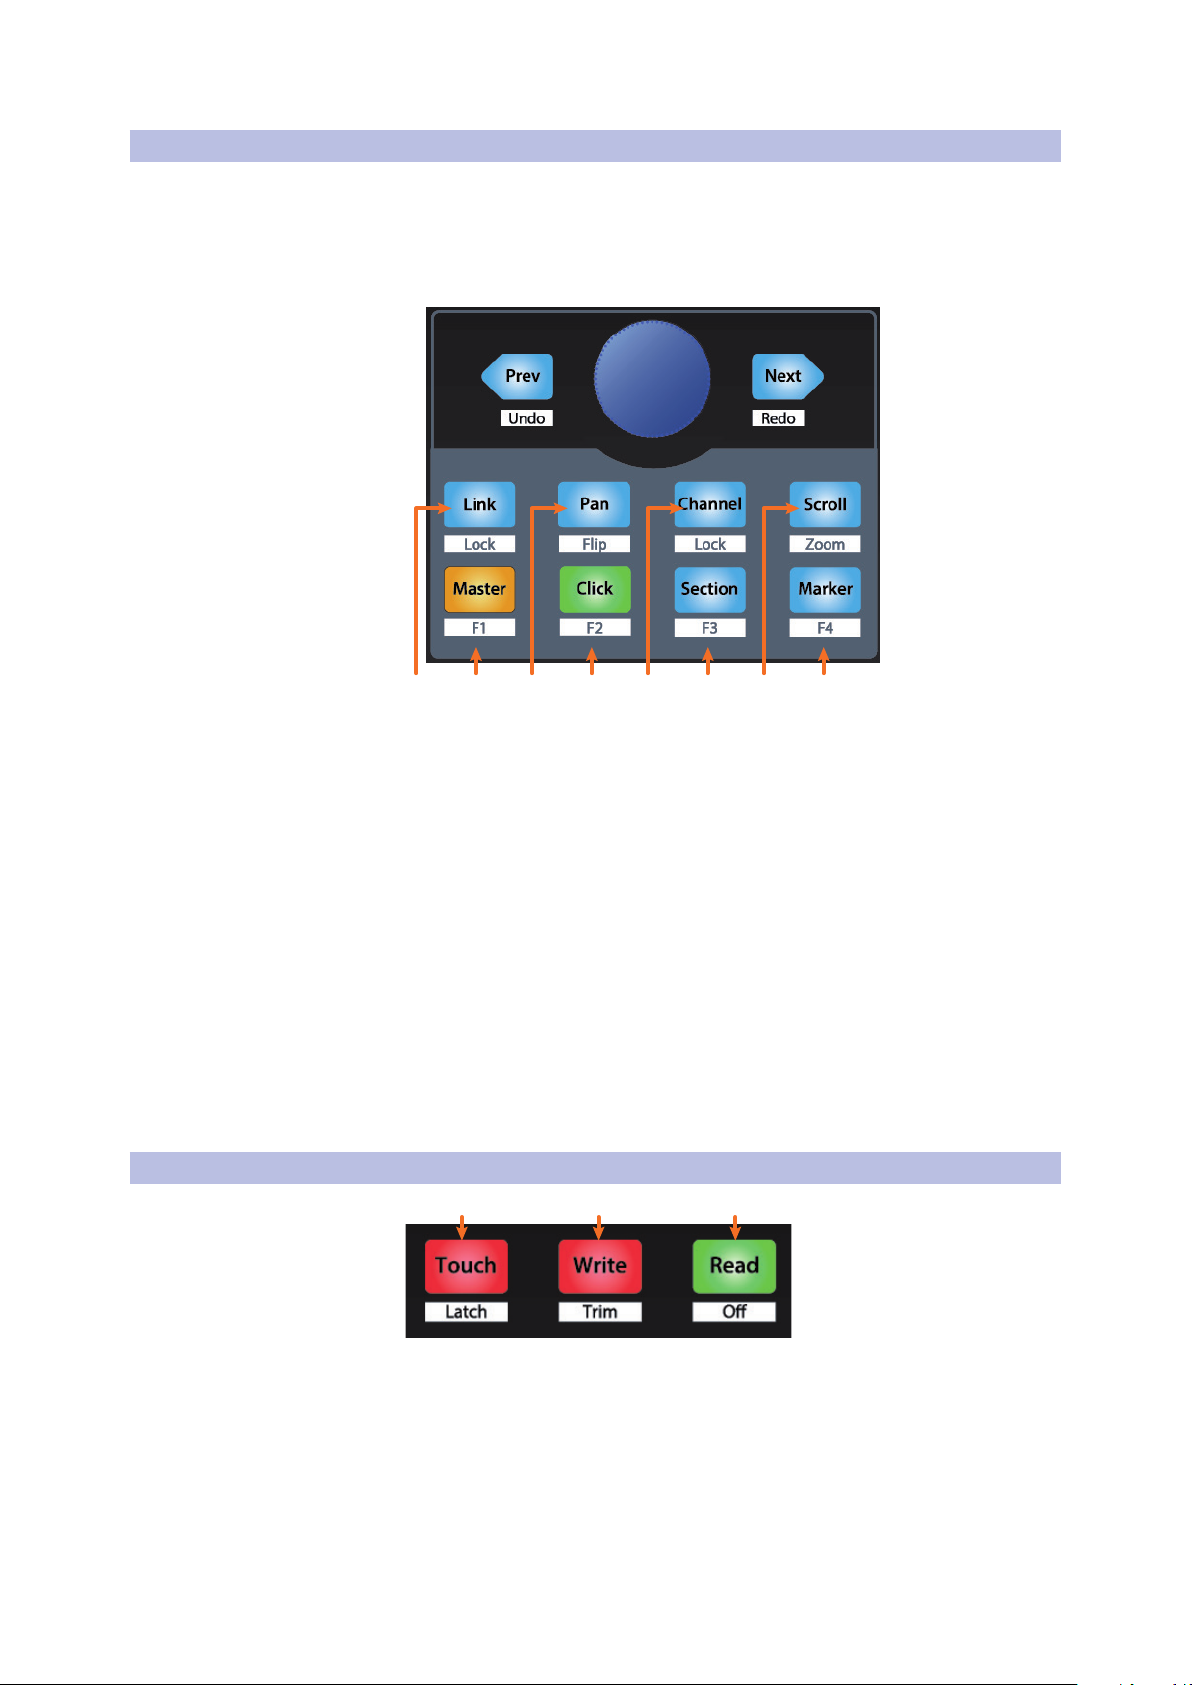
The Session Navigator provides quick navigation and session
controls. Each button alters the functions of the push-button
encoder and the Next and Prev buttons on either side.
Pressing SHIFT + Prev will Undo the last action. Pressing
SHIFT + Next will Redo the last action.
FaderPort™ Multichannel Production Controllers
Owner’s Manual
1. Link. Encoder controls any parameter beneath your mouse.
Navigation buttons select Next and Previous tracks respectively.
To lock a parameter to this encoder, press SHIFT + Link.
Power User Tip: The Channel Editor is a powerful feature in Studio One Pro that allows
you to map multiple parameters to the same control, with independent range/polarity/
curve controls. Additional XY vector pads can be assigned with individual parameters;
and much more.
2. Master. Encoder controls the Master level. Push the Encoder to reset the Master
level to 0 dB. While in this mode, the navigation buttons will control banking.
Press SHIFT + Master to enable F1 User function. See Section 2.4.1 for details.
3. Pan. Encoder controls panning. Navigation buttons scroll
through track list. Push the Encoder to reset the level to 0 dB.
Press SHIFT + Pan to use the fader to control panning.
4. Click. Turns the metronome on/off. The metronome can be
engaged or disengaged while any mode is active. Press SHIFT +
Click to enable F2 User function. See Section 2.4.1 for details.
5. Channel. Encoder controls individual channel scrolling. Navigation buttons
adjust the currently visible fader bank on the FaderPort by one channel. Press
SHIFT + Channel to lock the channel controls to the currently selected track.
Note: Channel Lock is only available in Studio One v4 and higher.
6. Section. Encoder nudges the selected event. Use the navigation buttons
to navigate through the events on the Arranger track. Press SHIFT +
Section to enable F3 User function. See Section 2.4.1 for details.
Power User Tip: Enable Snap to Grid for coarse nudging. Disable it for fine tuning.
7. Scroll / Zoom. Encoder controls timeline scrolling. Push the encoder to
fit the timeline to the window size. Use the navigation buttons to scroll
through the track list. Press SHIFT + Scroll to enable Zooming. While Zoom
is active, encoder controls horizontal zooming. Navigation buttons control
vertical zooming. Press the encoder to undo zooming in both directions.
8. Marker. Encoder moves the playback cursor in the Timeline. Use the navigation
buttons to scroll through markers. Press Encoder to drop a marker. Press
SHIFT + Marker to enable F4 User function. See Section 2.4.1 for details.
8
2 Studio One
3
2
1
2.5 Automation Controls
2.4.1 F1-F4 Functions
Using Shift plus the lower four Session Navigator button will access alternate
functions for your FaderPort. By default, these are assigned as follows:
• F1. Open Inspector
• F2. Open Editor
• F3. Open Mixer
• F4. Open Browser
Power User Tip: The default assignments for the Function buttons can be customized
using the FaderPort device editor. See Section 2.6 for more information.
2.5 Automation Controls
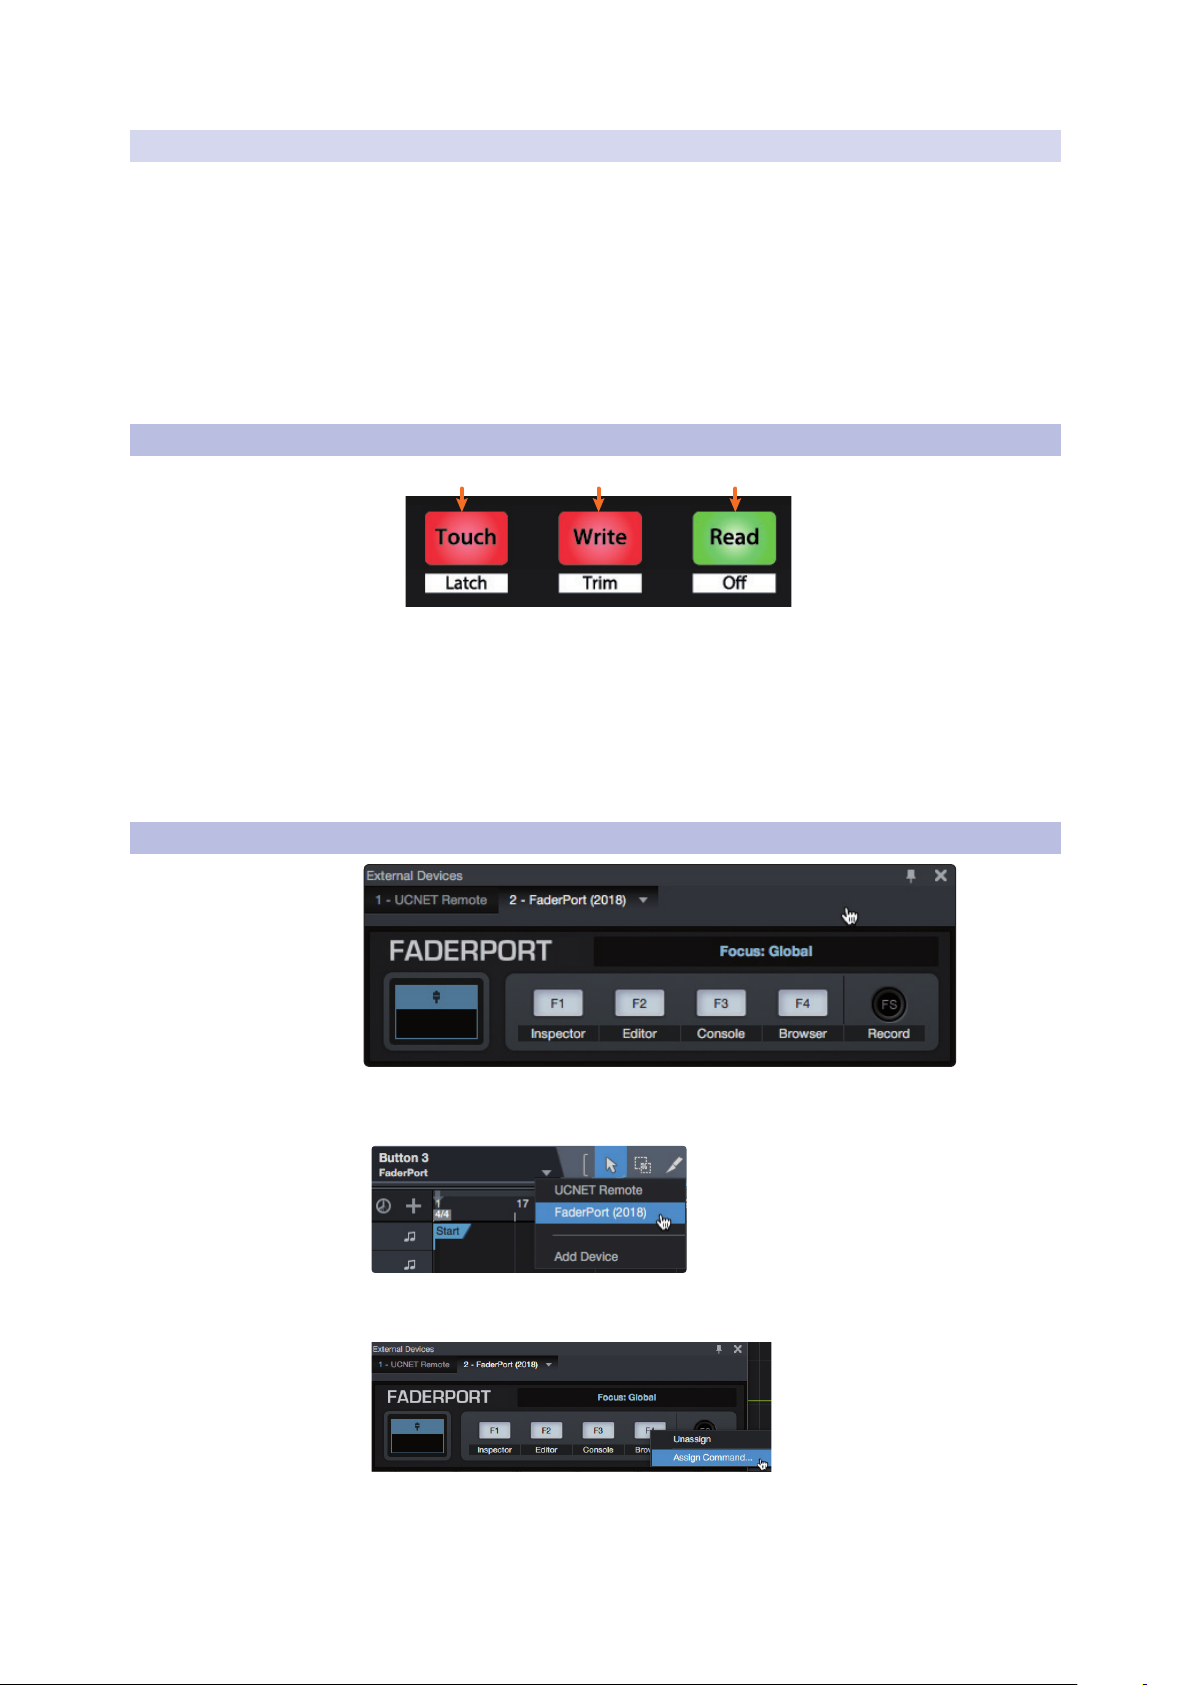
1. Touch / Latch. Engages Touch Automation on the currently
2. Write / Trim. Engages Write Automation on the currently selected track. At
3. Read / Off. Engages Read Automation on the currently selected track. Press
FaderPort™ Multichannel Production Controllers
Owner’s Manual
selected track. Press the SHIFT and Touch buttons simultaneously
to engage Latch Automation on the currently selected track.
the time of publication, Trim Automation is not available in Studio One.
the SHIFT and Read buttons simultaneously to undo the last action.
2.6 Control Link
Click on the pull-down menu in the Control Link display
to launch the FaderPort editor window.
Right-click on any FaderPort control and select “Assign
Command” to customize your FaderPort.
9
3 Pro Tools (HUI)
ProTools (HUI)
3.1 Getting Started
3 Pro Tools (HUI)
3.1 Getting Started
FaderPort™ Multichannel Production Controllers
Owner’s Manual
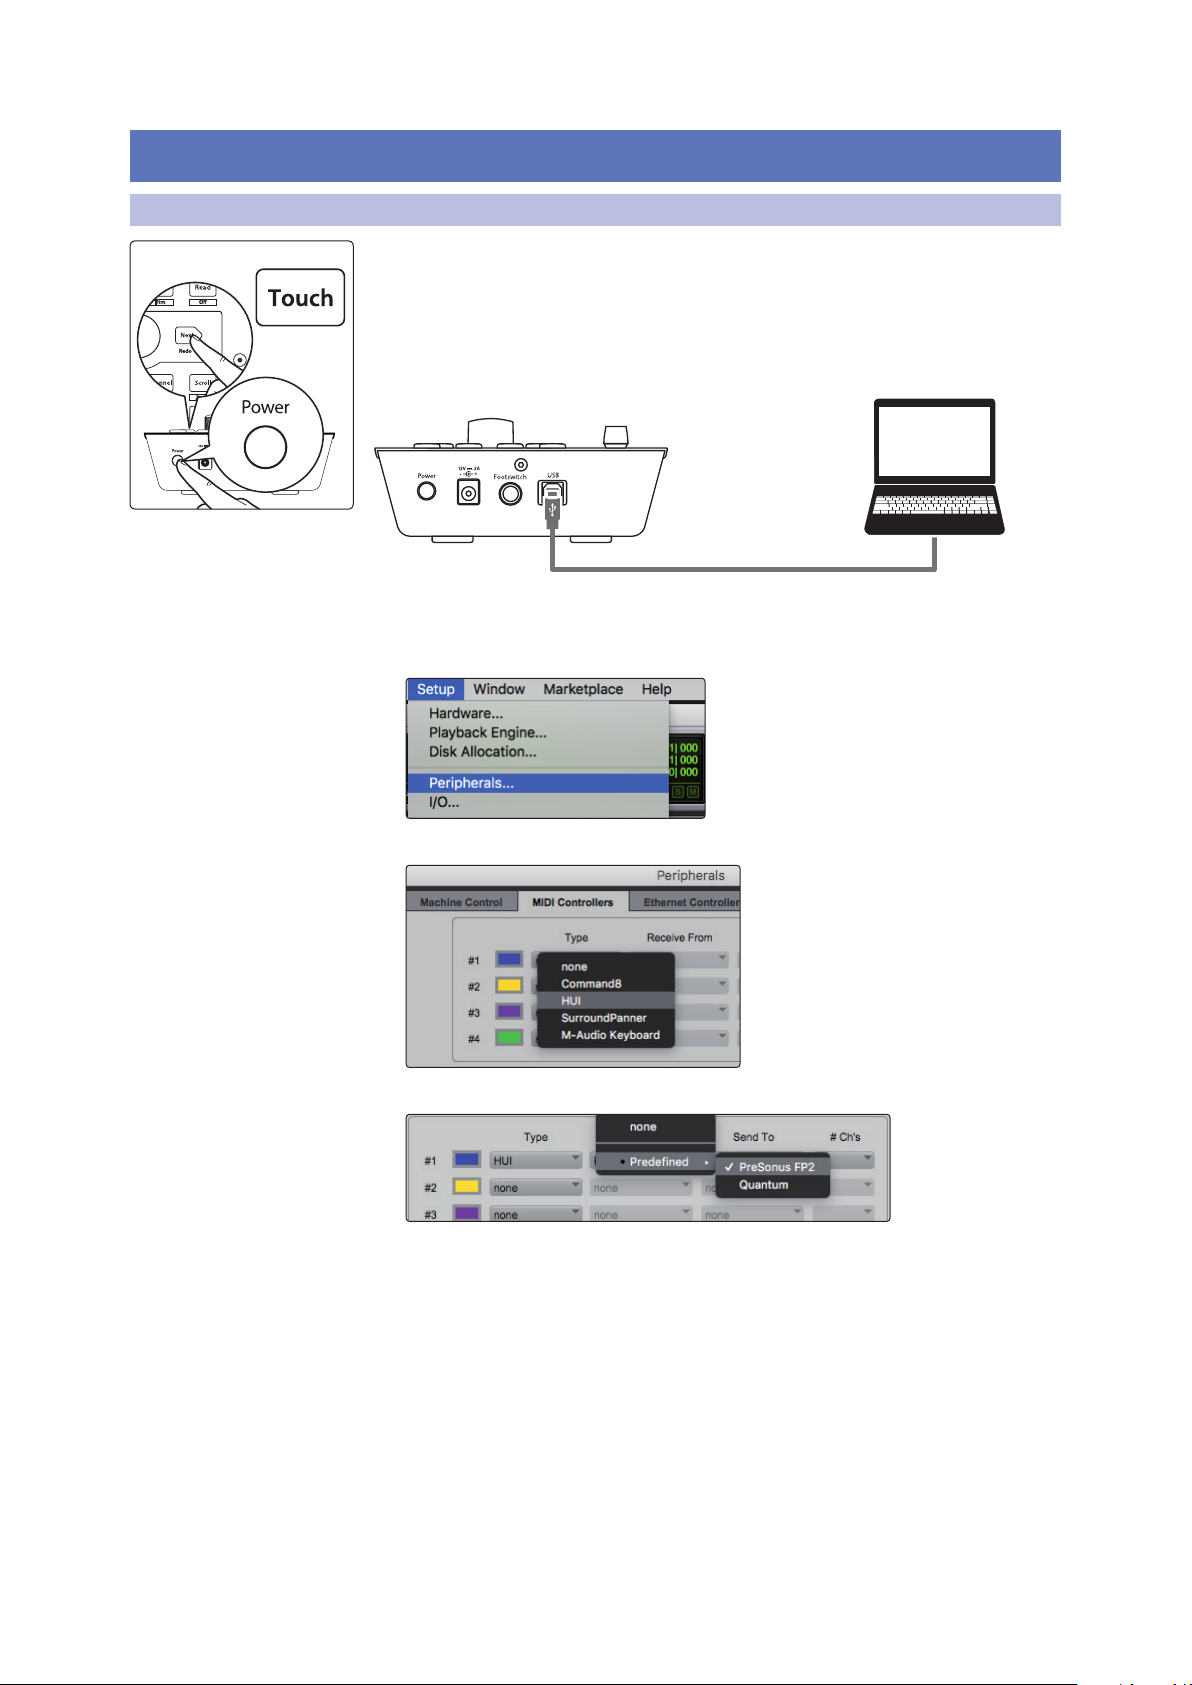
By default, the FaderPort is in Studio One operation mode. To switch to Pro Tools
operation, press and hold the NEXT button while powering on your FaderPort, then
press the Touch button to enable Pro Tools (HUI) operation.
The FaderPort is a class-compliant device in both macOS® and Windows®. Simply
connect your FaderPort to a free USB port on your computer. No further installation
is necessary.
Once you have connected your FaderPort to your computer, launch Pro Tools to set
up the FaderPort as a HUI device.
1. Go to Setups | Peripherals.
2. Create one HUI device under MIDI Controllers.
3. Set the Receive From and Send To menus to “PreSonus FP2” and #Ch’s to 8.
4. Click “OK.”
Your FaderPort is now ready to use. Enjoy!
10
3 Pro Tools (HUI)
2 134
5
3.2 Channel Strip
3.2 Channel Strip
FaderPort™ Multichannel Production Controllers
Owner’s Manual
1. Arm. Pressing the Arm button will allow you to arm track
for recording by pressing the corresponding track’s Select
button. Press with SHIFT to arm all tracks for recording.
2. Mute. Mutes the corresponding channel’s output signal.
Press and hold to mute momentarily. Press with SHIFT for
Mute Clear.
3. Solo. Isolates the corresponding channel’s output signal
in the mix. Press and hold to solo momentarily. Press with
SHIFT for Solo Clear.
4. Bypass / Bypass All. Press to turn Trim automation on
or off.
5. Touch-Sensitive Fader. This 100 mm motorized fader can
be used to control volume levels and panning in Pan Flip
mode. See Section 3.4 for details.
3.3 Transport Controls
1. Stop. Stops playback.
2. Loop. Engages / disengages Looping.
3. Play / Pause. Starts playback at the current playback-cursor position.
4. Rewind. Press once to regress playback by bar, second, frame, or base sample
rate depending on mode. Press and hold to regress in finer increments. Press
the Rewind and Fast Forward buttons simultaneously to Return to Zero.
5. Fast Forward. Press once to advance playback by bar, second, frame, or base
sample rate depending on mode. Press and hold to advance in finer increments.
6. Record. Press to enable record ready. Press with Play to start recording
at the current playback-cursor position for record-enabled tracks.
21 43 5 6
11
3 Pro Tools (HUI)
21 43 65 87
3
2
1
3.4 The Session Navigator
3.4 The Session Navigator
The Session Navigator provides quick navigation and session
controls. Each button alters the functions of the push-button
encoder and the Next and Prev buttons on either side.
Pressing SHIFT + Prev will Undo the last action. Pressing
SHIFT + Next will Redo the last action.
FaderPort™ Multichannel Production Controllers
Owner’s Manual
1. Link. At the time of publication, this button has no function in Pro Tools.
2. Master. This function is not available in HUI mode.
3. Pan. Encoder controls panning. Navigation buttons scroll through track
list. Press SHIFT + Pan to use the fader to control panning. Pressing the
encoder toggles pan control between Left and Right for stereo channels.
4. Click. Turns the metronome on/off. The metronome can be
engaged or disengaged while any mode is active.
5. Channel. Encoder and navigation buttons adjust the currently visible
fader bank on the FaderPort by one channel. Press SHIFT + Channel
to lock the channel controls to the currently selected track.
6. Section. This function is not available in HUI mode.
7. Scroll / Zoom. Press once to enable audio scrubbing. Press twice to enable
faster audio scrubbing. Press SHIFT + Scroll to enable Zooming. While Zoom
is active, encoder and navigation buttons control horizontal zooming.
8. Marker. Encoder and navigation buttons scroll through markers 1-9. Press
Encoder to drop a marker. Press Shift and Marker to cycle through the tools.
3.5 Automation Controls
1. Touch / Latch. Engages Touch Automation on the currently
selected track. Press the SHIFT and Touch buttons simultaneously
to engage Latch Automation on the currently selected track.
2. Write / Trim. Engages Write Automation on currently selected track.
Note: Trim automation is controlled by the Bypass button. See Section 3.2 for more
information.
3. Read / Off. Engages Read Automation on the currently selected track. Press
the SHIFT and Read buttons simultaneously to undo the last action.
12

4 Logic (MCU)
Logic (MCU)
4.1 Getting Started
4 Logic (MCU)
4.1 Getting Started
FaderPort™ Multichannel Production Controllers
Owner’s Manual
By default, the FaderPort is in Studio One operation mode. To switch to Logic
operation, press and hold the NEXT button while powering on your FaderPort, then
press the Mute button to enable Logic (MCU) operation.
The FaderPort is a class-compliant device in both macOS® and
Windows®. Simply connect your FaderPort to a free USB port
on your computer. No further installation is necessary.
Once you have connected your FaderPort to your computer, launch Logic.
The FaderPort will auto-configure as a Mackie Control Universal device. If for
some reason this does not happen, you will need to enable it manually.
1. If you do not have Advanced preferences enabled, go
to Logic Pro | Preferences | Advanced Tools…
2. Enable “Show Advanced Tools.”
3. Go to Logic Pro | Control Surfaces | Setup…
13
 Loading...