

Presonus EarMix 16M Owner’s Manual

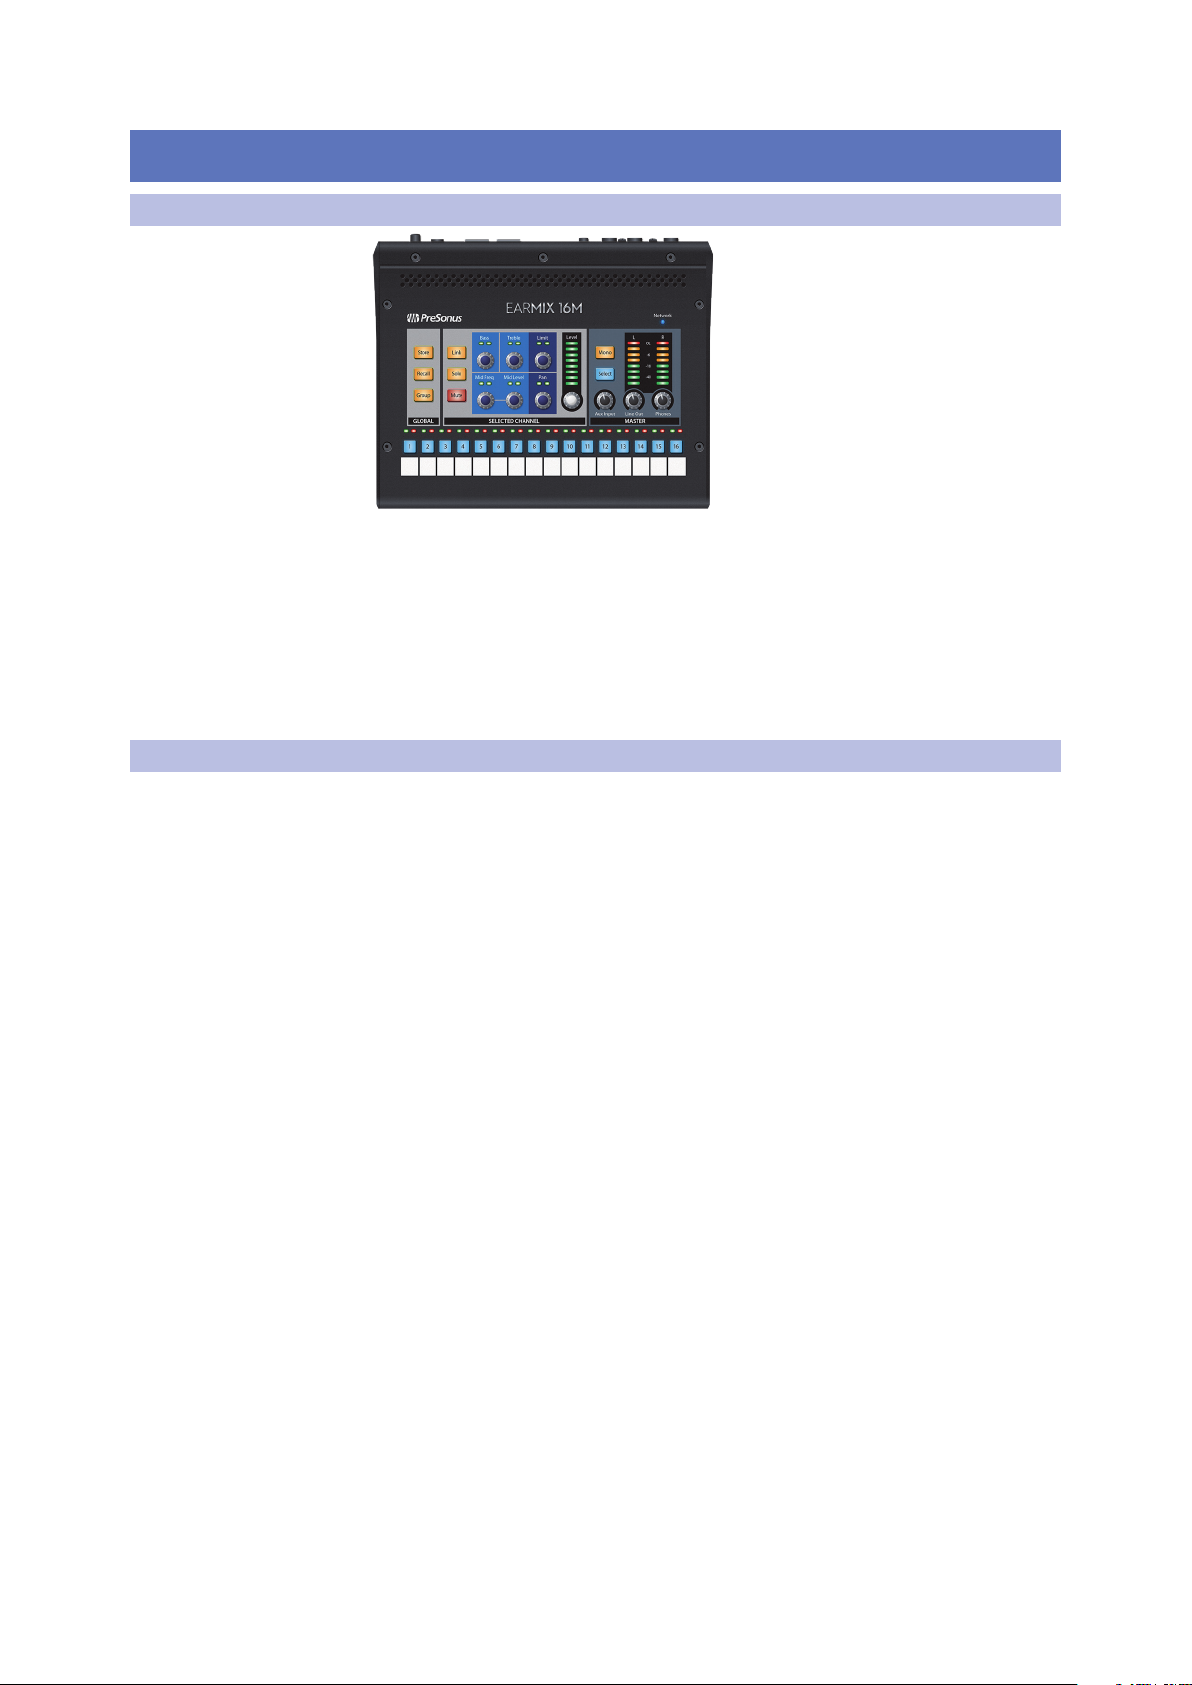
EarMix™ 16M
16x2 AVB-networked personal monitor mixer
Owner’s Manual
®
www.presonus.com
English

Table of Contents
1 Overview — 1
1.1 Introduction — 1
1.2 About This Manual — 1
1.3 What’s in the Box — 2
1.3.1 What Else You Need — 2
1.1 Companion PreSonus Products — 3
2 Getting Started — 4
2.1 Using a StudioLive Series III
Front-of-House mixer — 4
2.2 Using a StudioLive Classic- or AI-series
Front-of-House mixer — 12
3 Hookup — 23
3.1 Rear-Panel Connections — 23
3.2 Top Panel Controls — 24
3.2.1 Store and Recall — 24
3.2.2 Group — 25
3.2.3 Channel Controls — 26
3.2.4 Master Controls — 27
3.2.5 Resetting Your EarMix — 27
3.2.6 Adjust LED Brightness — 28
4 Technical Information — 29
4.1 Specifications — 29
5 Warranty — 30
5.1 Warranty Information — 30
1 Overview
1.1 Introduction
1 Overview
1.1 Introduction
EarMix 16M
Owner’s Manual
Thank you for purchasing an EarMix 16M Personal Monitor Mixer. Designed to
work seamlessly with the PreSonus StudioLive® Series III digital mixers, the EarMix
16M personal monitor mixer provides a high-quality, expandable, networked
monitoring solution for stage, installed sound systems, and studio recording.
PreSonus Audio Electronics is committed to constant product improvement,
and we highly value our customers and their creative endeavors. We appreciate
the support you have shown us by purchasing your EarMix 16M Personal
Monitor Mixer and are confident that you will enjoy for years to come!
1.2 About This Manual
We suggest you spend some time with this manual before beginning
to work with your EarMix 16M, to familiarize yourself with its features,
functions, and proper connection procedures. This will facilitate configuring
your AVB network and make the process go as smoothly as possible.
This manual describes the function of the EarMix 16M with the StudioLive
Series III digital mixers. More information about AVB Networking best
practices and configurations can be found in the PreSonus AVB Networking
Guide and we highly recommend that you review this document as
well to avoid any difficulty in creating your AVB network. This manual
only covers basic connection and use case configurations. For complex
routing, please review the PreSonus AVB Networking Guide.
Throughout this manual, you will find Power User Tips. These suggestions
provide useful information on getting the most out of your EarMix
as well as explanations of various useful audio terminology.
Thank you, once again, for purchasing our product. We are
confident that you will enjoy your new EarMix 16M.
Note: When using your EarMix 16M with a StudioLive Series III mixer, your mixer will
require the latest firmware and Universal Control version for proper functionality. Please
log into your My PreSonus user account and update all associated software for your
PreSonus AVB products before proceeding.
1
1 Overview
N
1
2
3
78
9
10
4
5
6
PowerAVB InAVB ThruAux InputLine Out
Link/ACT1G
LR
On
O
Link/ACT1G
Headphones
24V
-
+
Power
On
O
24V
-
+
EarMix 16M
Personal Monitor Controller
Quick Start Guide
EarMix 16M
Personal Monitor Controller
Guía Rápida
EarMix 16M
Personal Monitor Controller
Kurzanleitung
EarMix 16M
Personal Monitor Controller
Guide de prise en main
Page
(Insert)
Input
Mic/LineAssign
Channel
Stereo
Preset
CompGate
EQ / Dyn
FX CFX D
FX AFX B
-2
-12
-24
-36
-48
-65
EarMix 1
EarMix 2
EarMix 3
EarMix 4
EarMix 5
EarMix 6
EarMix Setup
1-8 Source Selection: FOH 1-8
Name: EarMix 1
9-16 Source Selection: FOH 9-16
Apply
Apply All
Paste
Cancel
i
EarMix 1
EarMix 2
EarMix 3
EarMix Setup
1-8 Source Selection: FOH 1-8
Name: EarMix 1
9-16 Source Selection: FOH 9-16
i
MonitorFX CFX D
FX AFX B
EarMix 1
EarMix 2
EarMix 3
EarMix 4
EarMix 5
EarMix 6
EarMix Setup
1-8 Source Selection: FOH 1-8
Name: EarMix 1
9-16 Source Selection: FOH 9-16
ApplyApply All
PasteCancel
i
FOH 1-8
FOH 9-16
FOH 17-24
FOH 25-32
FOH 1-8
FOH 9-16
FOH 17-24
FOH 25-32
MonitorFX CFX D
FX AFX B
EFFECTS MASTER MASTER CONTROL
EarMix 1
EarMix 2
EarMix 3
EarMix 4
EarMix 5
EarMix 6
EarMix Setup
1-8 Source Selection: FOH 1-8
Name: EarMix 1
9-16 Source Selection: FOH 9-16
ApplyApply All
PasteCancel
i
Apply
Create your network!
¡Cree su propia red!
Alles für Ihr Netzwerk!
Créez votre réseau!
Link PoE
Blue= PoE On
(Hold to toggle)
White= PoE O
1 2 3 4 5
SW5E
AVB SWITCH WITH PoE
SW5E
PoE
LinkPoE
1
2
3
4
5
NSB16-8
PowerAVB In AVB ThruAux InputLine Out
Link/ACT1G
L R
On
O
Link/ACT1G
Headphones
24V
-
+
EarMix 16M
5
4
3
A
AVB In
Watch the EarMix 16M Instruction video
and consult your Owner’s Manual for further
instructions.
Observe el video instructivo de EarMix 16M y
consulte el Manual de usuario para obtener más
instrucciones.
Sehen Sie sich das EarMix 16M Einführungs-Video
an und lesen Sie für weitere Informationen die
Bedienungsanleitung.
Regardez en vidéo les instructions concernant le
EarMix 16M et consultez votre mode d’emploi
pour des instructions supplémentaires.
CompGate
MonitorFX CFX D
FX AFX B
EFFECTS MASTER MASTER CONTROL
-2
-12
-24
-36
-48
-65
Audio Routing
System Global Lockout
Preamp
Gain
-18dB
Capture Utils
Ch. 1
Analog
PowerAVB InAVB ThruAux InputLine Out
Link/ACT1G
LR
On
O
Link/ACT1G
Headphones
24V
-
+
PowerAVB InAVB ThruAux InputLine Out
Link/ACT1G
LR
On
O
Link/ACT1G
Headphones
24V
-
+
CompGate
MonitorFX CFX D
FX AFX B
EFFECTS MASTER MASTER CONTROL
-2
-12
-24
-36
-48
-65
Audio Routing
Network Sends/Returns
SD Card / USB / AES
Stagebox Setup
EarMix Setup
AVB In
Link/ACT1G
Power
On
O
24V
-
+
Audio Routing
Preamp
Gain
-18dB
EarMix Setup
CompGate
MonitorFX CFX D
FX AFX B
EFFECTS MASTER MASTER CONTROL
-2
-12
-24
-36
-48
-65
Audio Routing
System Global Lockout
Preamp
Gain
-18dB
Capture Utils
Ch. 1
Analog
PowerAVB InAVB ThruAux InputLine Out
Link/ACT1G
LR
On
O
Link/ACT1G
Headphones
24V
-
+
PowerAVB InAVB ThruAux InputLine Out
Link/ACT1G
LR
On
O
Link/ACT1G
Headphones
24V
-
+
Page
(Insert)
Input Mic/LineAssign
Channel
Stereo
Preset
CompGate
Processor EQ / Dyn
FX CFX D
FX AFX B
EFFECTS MASTER
MASTER CONTROL
-2
-12
-24
-36
-48
-65
Ch 11Ch 22Ch 43Ch 44Ch 55Ch 66Ch 77Ch 88Ch 99Ch 1010Ch 1111Ch 1212Ch 13
13
Ch 14
14
Audio Routing
System Global Lockout
Preamp
Gain
-18dB
Capture Utils
Ch. 1
Analog
CompGate
MonitorFX CFX D
FX AFX B
EFFECTS MASTER MASTER CONTROL
-2
-12
-24
-36
-48
-65
Audio Routing
Network Sends/Returns
SD Card / USB / AES
Stagebox Setup
EarMix Setup
AVB In
Link/ACT1G
Power
On
O
24V
-
+
Audio Routing
Preamp
Gain
-18dB
EarMix Setup
PowerAVB InAVB ThruAux InputLine Out
Link/ACT1G
LR
On
O
Link/ACT1G
Headphones
24V
-
+
CompGate
MonitorFX CFX D
FX AFX B
EFFECTS MASTER MASTER CONTROL
-2
-12
-24
-36
-48
-65
Audio Routing
Network Sends/Returns
SD Card / USB / AES
Stagebox Setup
EarMix Setup
Power
On
O
24V
-
+
EarMix Setup
PowerAVB InAVB ThruAux InputLine Out
Link/ACT1G
LR
On
O
Link/ACT1G
Headphones
24V
-
+
PowerAVB InAVB ThruAux InputLine Out
Link/ACT1G
LR
On
O
Link/ACT1G
Headphones
24V
-
+
AVB In
Link/ACT1G
Power
On
O
24V
-
+
70-22000067-A
18011 Grand Bay Ct. • Baton Rouge,
Louisiana 70809 USA• 1-225-216-7887
www.presonus.com
© 2018 PreSonus Audio Electronics, Inc. All Rights Reserved. PreSonus, StudioLive, and EarMix are trademarks or registered trademarks of
PreSonus Audio Electronics, Inc. Other product names mentioned herein may be trademarks of their respective companies. All specications
subject to change without notice.
1.3 What’s in the Box
1.3 What’s in the Box
EarMix 16M
Owner’s Manual
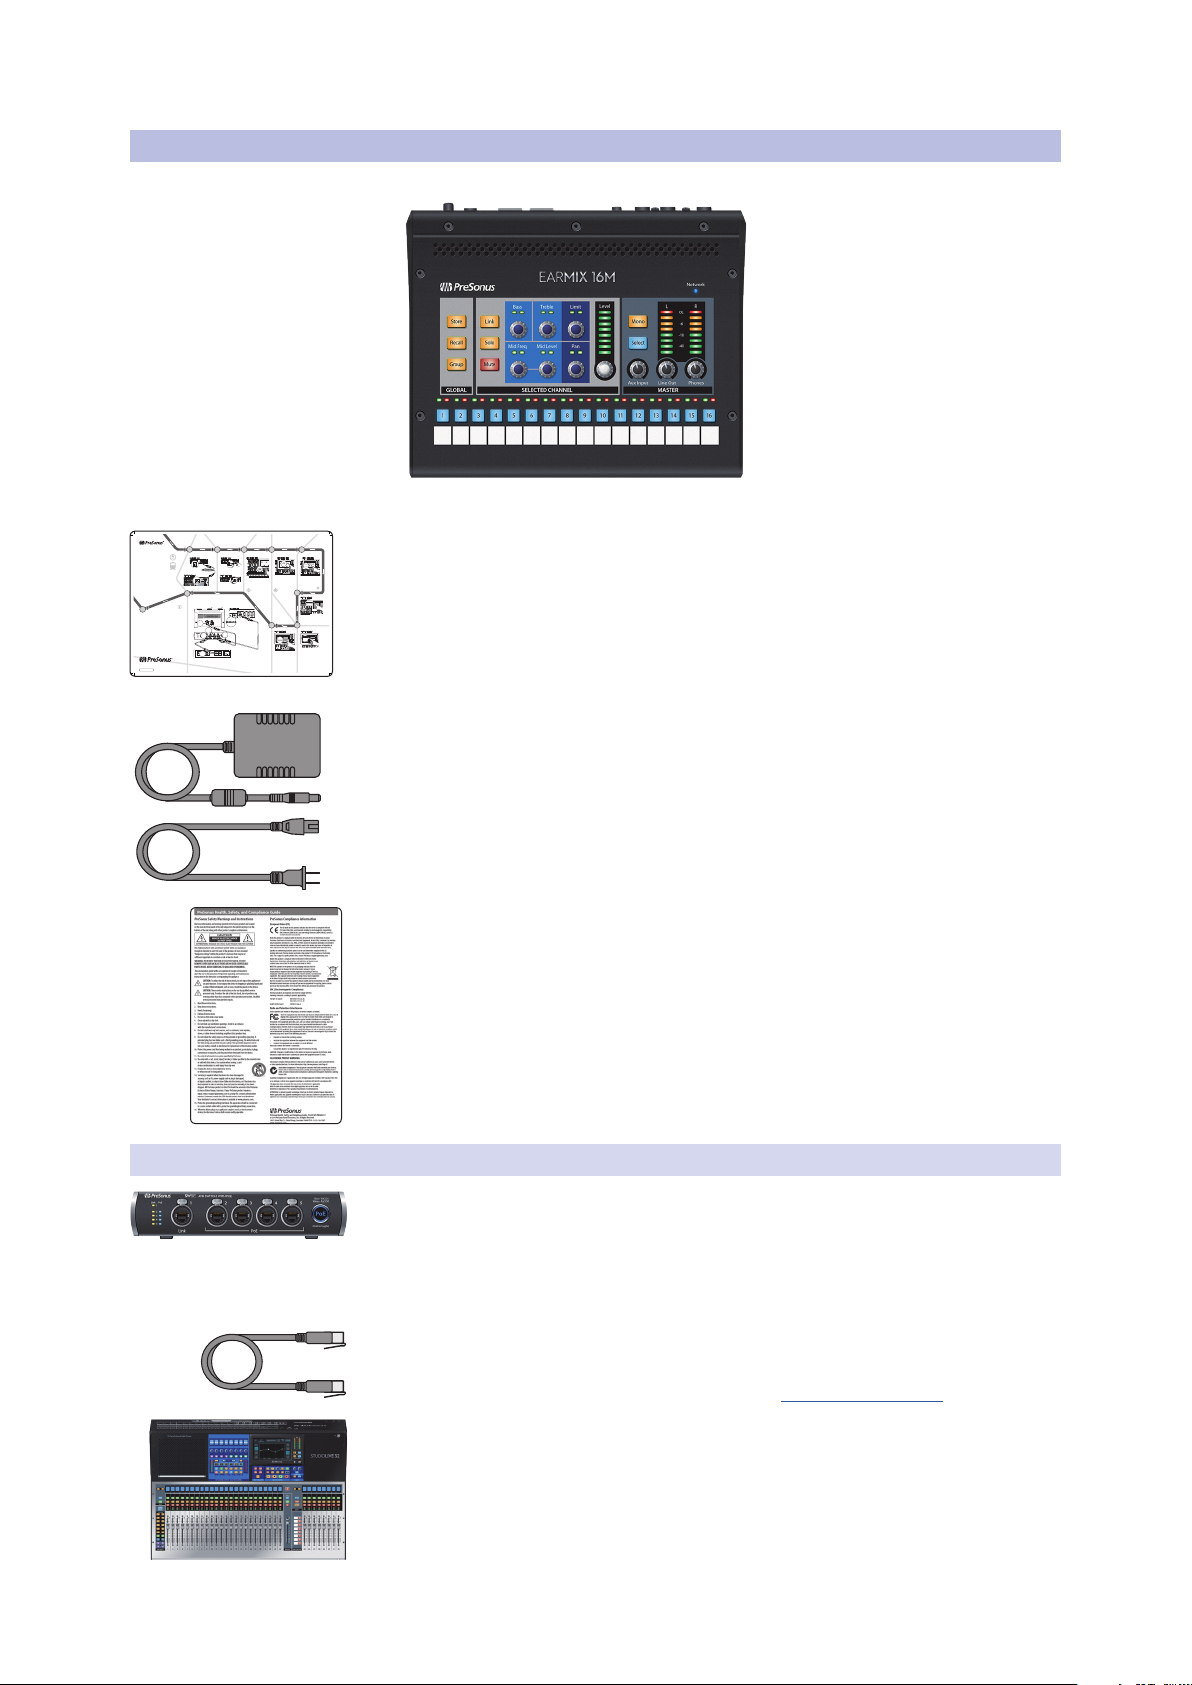
In addition to a Quick Start Guide, your EarMix 16M package contains the following:
• EarMix 16M Personal Monitor: 16x2 AVB-networked personal monitor mixer
• EarMix 16M Quick Start Guide
• 24V External Power Supply (for use with AVB switches that do not provide PoE)
• PreSonus Health Safety and Compliance Guide
1.3.1 What Else You Need
• AVB Switch
The PreSonus SW5E AVB PoE Switch is fully compatible with all
PreSonus AVB products and third-party AVB devices that adhere to the
1722.1 AVB standard. This switch also fully powers your EarMix 16M,
allowing you to use it without the included external power supply.
• Ethernet Cable
PreSonus requires a CAT5e or CAT6 Ethernet cable for all AVB devices. These
can be acquired at most electronics dealers or www.presonus.com
• 1722.1 AVB-Compatible Mixer
All PreSonus StudioLive Series III mixer models are fully compatible with the
1722.1 AVB standard and the EarMix 16M. If you are using a third-party AVB
mixer, please contact the manufacturer to verify compatibility with this standard.
2
1 Overview
1.1 Companion PreSonus Products
• Mic Stand Adapter (optional)
PreSonus has designed the EM-Mount to mount the EarMix 16M on a mic stand,
allowing you to put your mix at your fingertips. This accessory is sold separately
at your favorite PreSonus dealer or at www.presonus.com.
1.1 Companion PreSonus Products
Welcome to the PreSonus Ecosystem! As a solutions company, we believe
the best way to take care of our customers (that’s you) is to ensure that
you have the best possible experience from the beginning of your signal
chain to the end. In order to achieve this goal, we’ve prioritized seamless
integration throughout every design phase of these products from day
one. The result is systems that communicate with each other as intended—
straight out of the box—without excessive configuration hassle.
For more information on how our PreSonus AVB networking devices play so
well with one another, please review the PreSonus AVB Networking Guide.
EarMix 16M
Owner’s Manual
For more information on individual products, please visit www.presonus.com.
3

2 Getting Started
2.1 Using a StudioLive Series III Front-of-House mixer
2 Getting Started
A good monitor mix is critical for musicians to perform to the best of
their ability. Whether you’re on stage or in the studio, the EarMix 16M
can make getting the best mix in your ears quick and easy.
Before you begin, here are a few rules to get you started:
• If your mixer is not properly gain staged, none of your mixes will sound
their best, including your monitor mixes. If a source in your EarMix is too
quiet or if it’s distorting, chances are the problem lies closer to the input.
• Do not allow your inputs to clip. Watch the level meters; when the
signal nears clipping, the top LED will illuminate, indicating that the
digital-to-analog converters are in danger of being overdriven.
The tutorials in this section have been created for the following
application, but can be altered accordingly for your personal needs:
• Drum Kit with 10 microphones
• Bass (DI and Amp)
• Rhythm Guitar (Amp)
• Acoustic Guitar (DI)
• Lead Guitar (Amp)
• Background vocals (2)
• Keys (Stereo Left/Right)
• Lead vocals (1)
EarMix 16M
Owner’s Manual
2.1 Using a StudioLive Series III Front-of-House mixer
In most situations, the source audio for your EarMix 16M will come from
the same console that is running the front-of-house mix. This section
will guide you through this application. A tutorial for using a StudioLive
Classic- or AI-series mixer at Front-of-House can be found in Section 2.2.
Note: While this tutorial discusses using the EarMix 16M with the StudioLive 32, these
steps are applicable to using the StudioLive 16 and StudioLive 24 as well.
4

2 Getting Started
2.1 Using a StudioLive Series III Front-of-House mixer
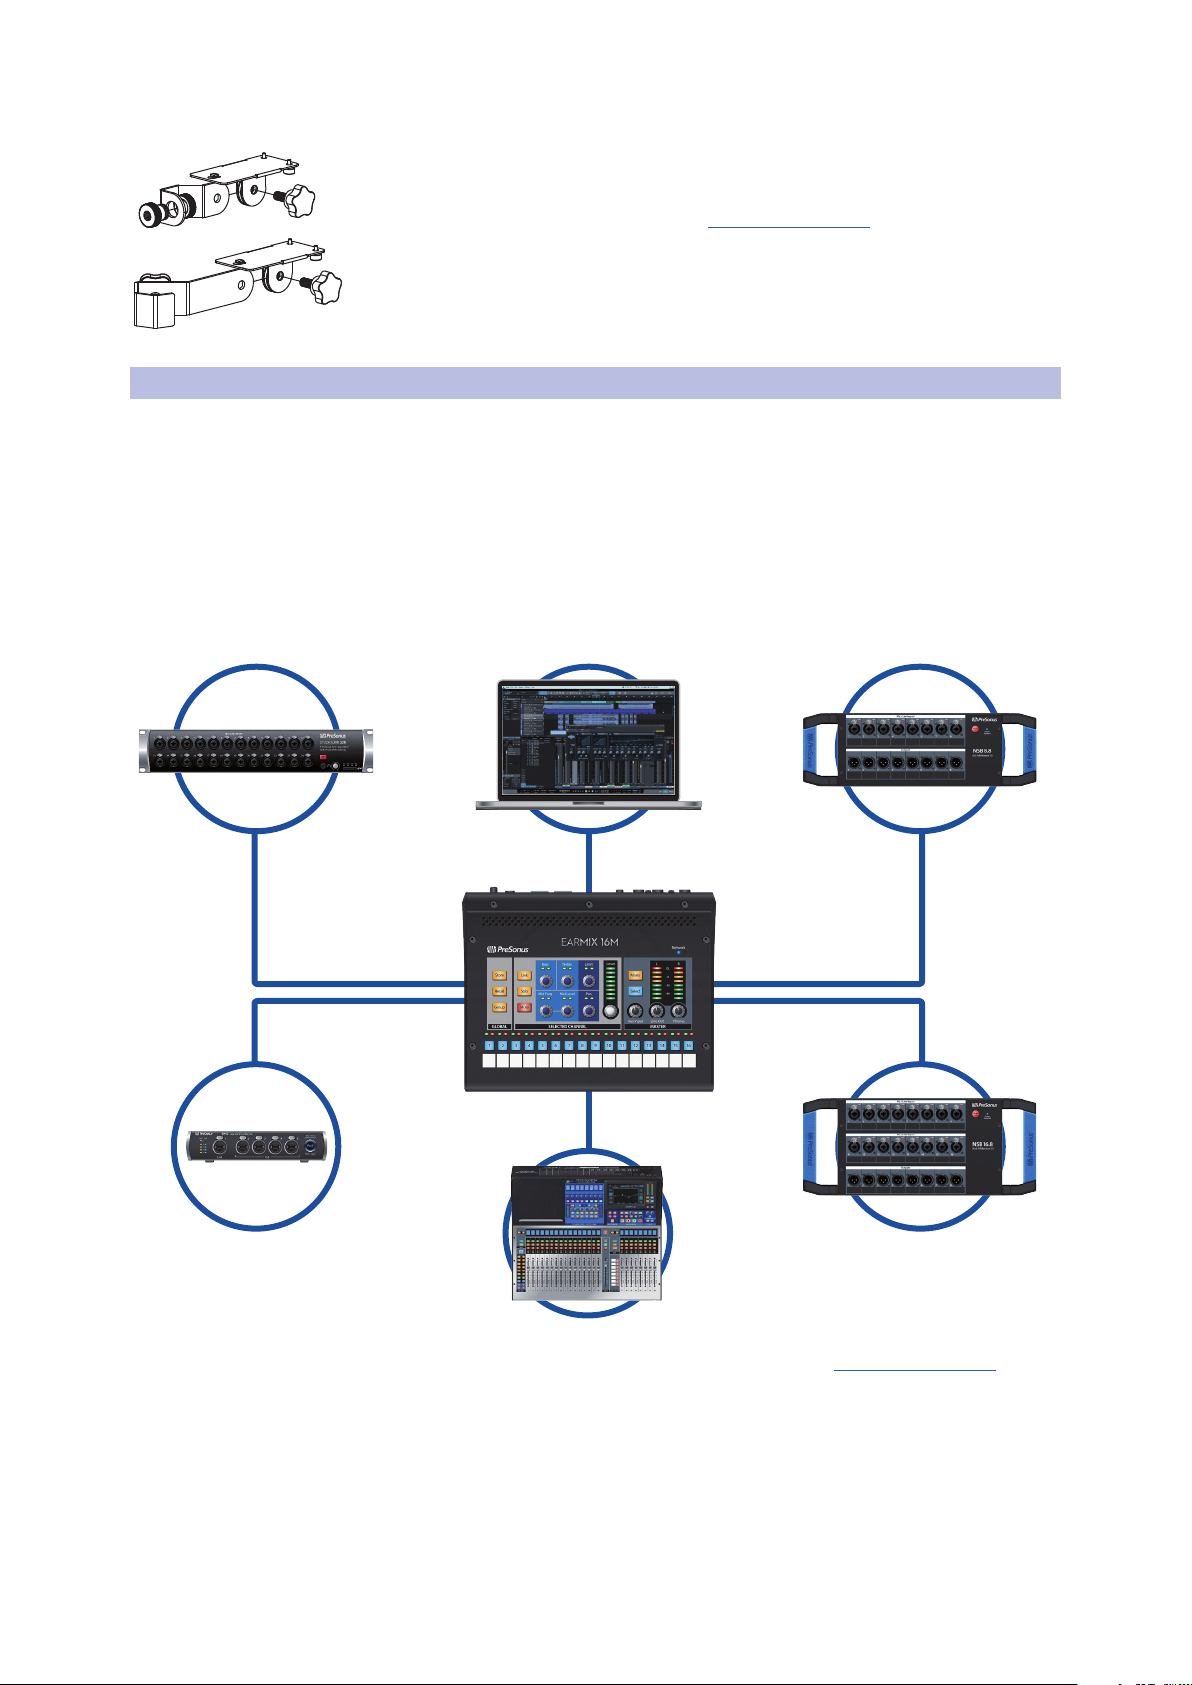
Connect you EarMix 16M units to your StudioLive Series III mixer as shown below and power on your equipment:
EarMix 16M
Owner’s Manual
backup vocal mics
Ch 15Ch 16
lead
guitar amp
acoustic
guitar/DI
Ch 14 Ch 13
rhythm
guitar amp
Ch 12
bass/DI
Ch 11
Ch 4
Ch 2
Ch 3
Ch 5
Ch 9
drum kit
Ch 1
Ch 10
Ch 6
Ch 8
Ch 7
StudioLive 32
Rear Panel
Mobile devices (iOS or Android)
running QMix-UC
EarMix 16M SW5E AVB switch
Tablet running
UC Surface
Power User Tip: The PreSonus SW5E AVB Switch provides PoE (Power over Ethernet) on ports 2-5. When connecting your EarMix 16M to these
ports, you do not need to connect the external power supply that came with your unit. Please Note: You must use the AVB In port to power your
EarMix 16M over Ethernet. The AVB Thru port does not accept input power.
front of house
speakers
Main Left/Right
lead vocal
Ch 17Ch 18Ch 19
keyboard/DI
5
2 Getting Started
MonitorFX C FX D
FX A FX B
EFFECTS MASTER MASTER CONTROL
FX C FX D
FX A FX B
EFFECTS MASTER MASTER CONTROL
TB
1
Ch. 1
PreampGa..
17 dB
System Global Lockout Audio Routing Talkback Edit
UtilsCapture
Audio Routing
MonitorFX C FX D
FX A FX B
AVB Input Streams
Audio Routing
Stagebox Setup Digital Patching
Earmix Setup
EarMix Setup
(Insert)
Stereo
Preset
Comp Gate
EQ / Dyn
FX C FX D
FX A FX B
-2
-12
-24
-36
-48
-65
EarMix 16
EarMix Setup
1-8 Source Selection: Sends 1-8
N
ame: EarMix 16M
9-16 Source Selection: Sends 9-16
EarMix 16
EarMix 16M
MonitorFX D
FX B
i
i
2.1 Using a StudioLive Series III Front-of-House mixer
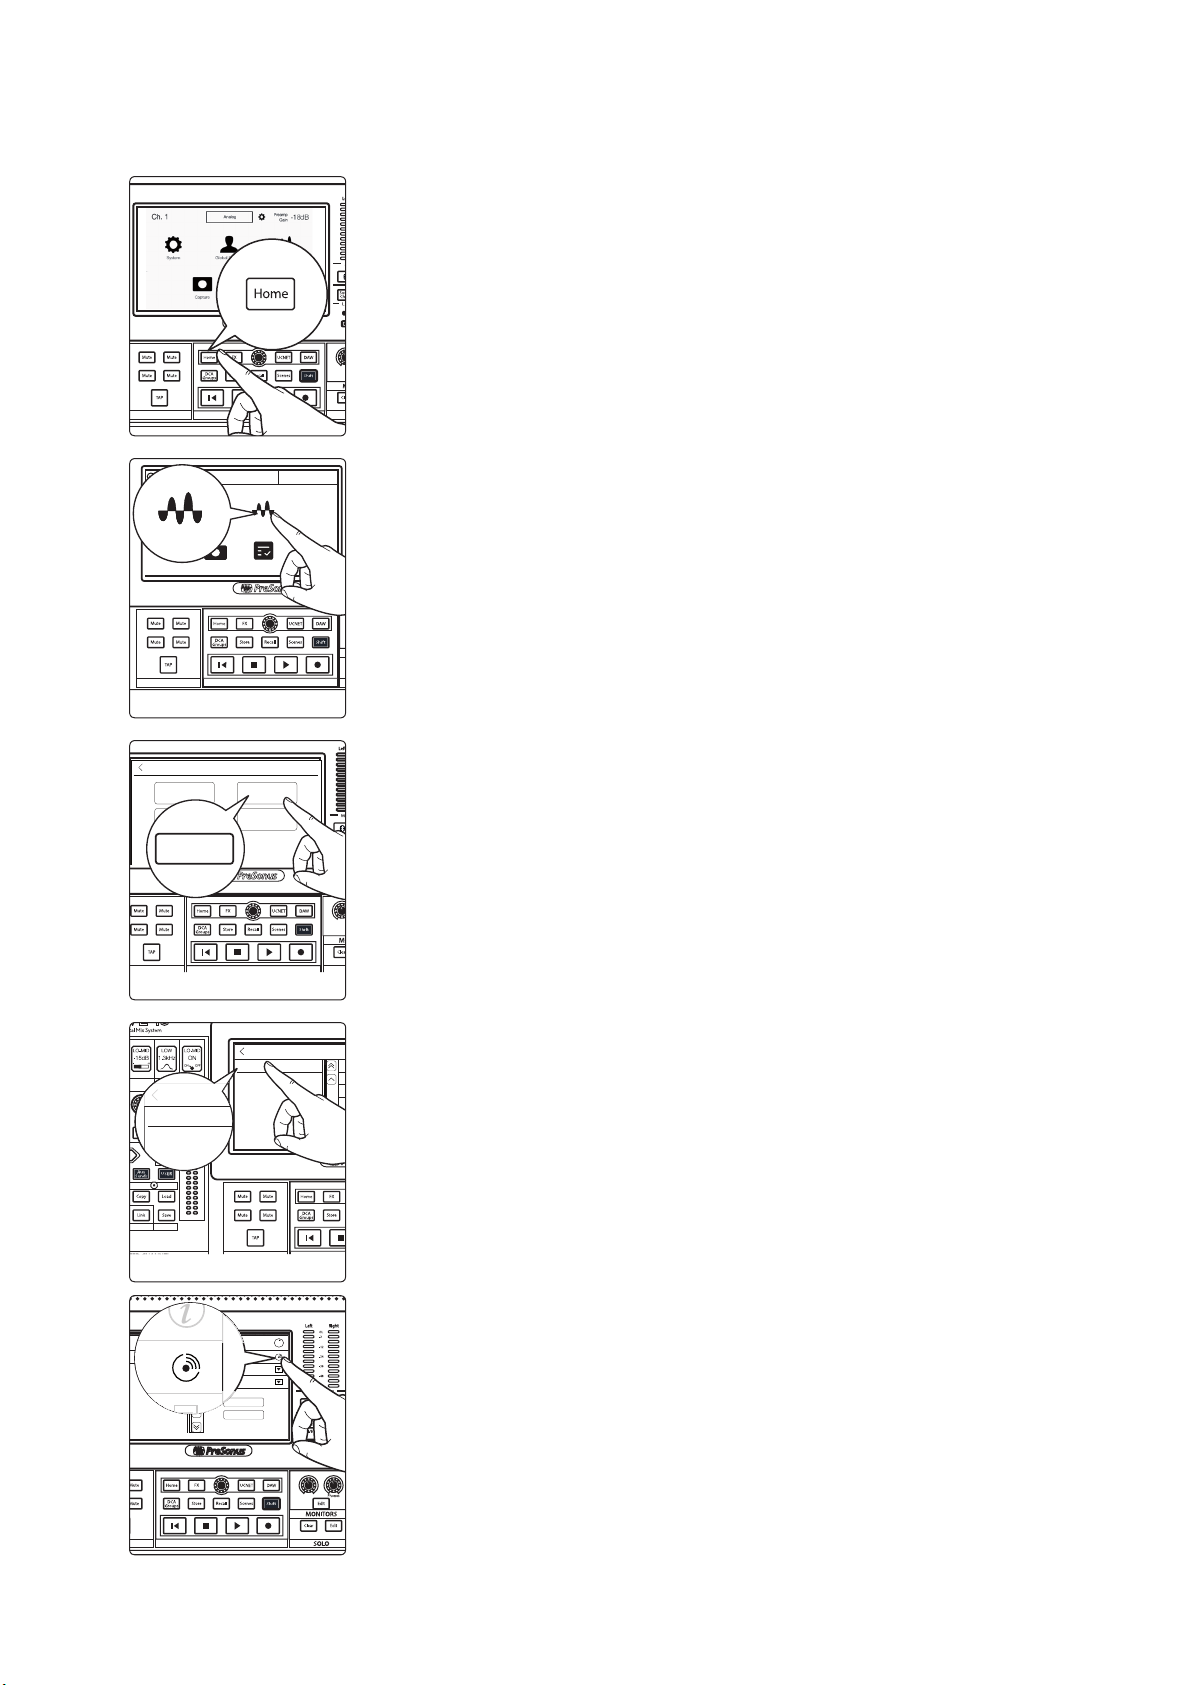
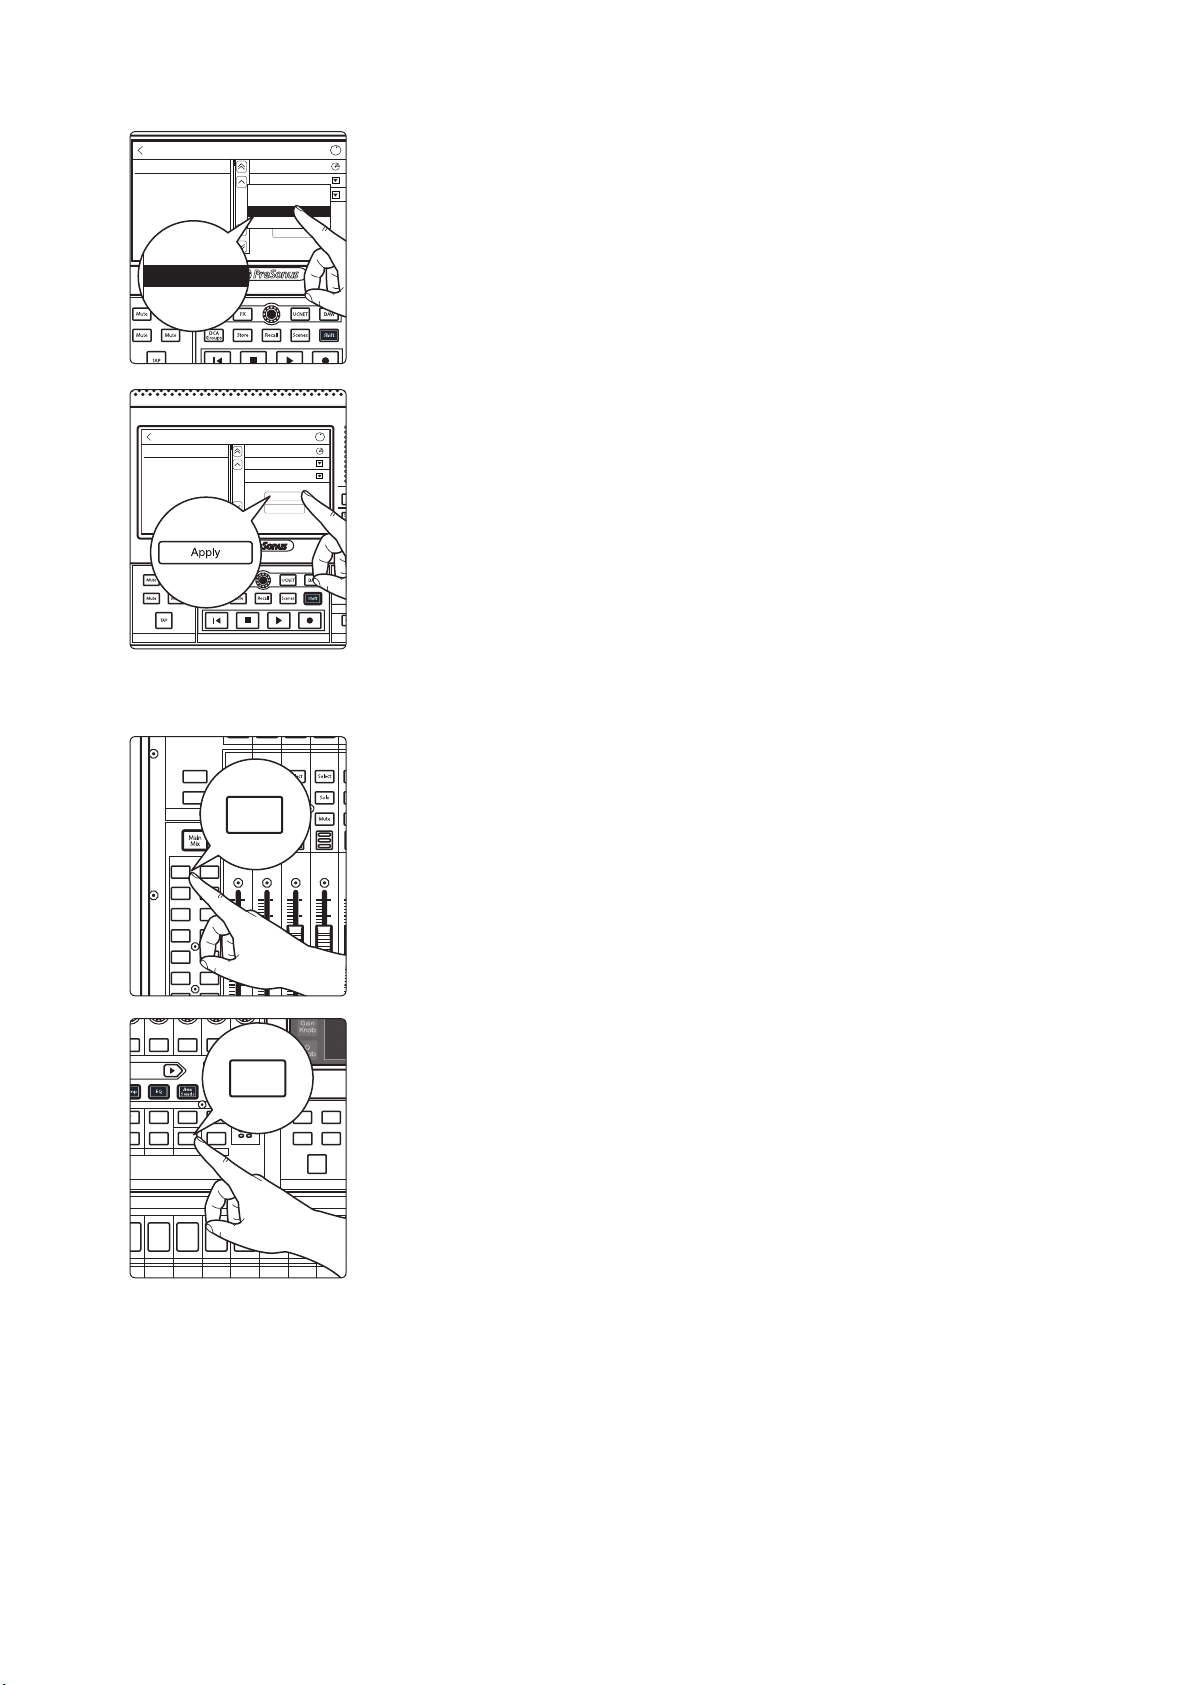
Step 1: Route Your Audio
1. Press the Home button on your StudioLive Series III mixer.
2. Press the Audio Routing icon on the Touchscreen.
EarMix 16M
Owner’s Manual
EarMix Setup
Name: EarMix 16M
1-8 Source Selection: Sends 1-8
9-16 Source Selection: Sends 9-16
3. Press the EarMix Setup button on the Touchscreen.
4. Select EarMix 16M from the list on the left.
If you are unsure which EarMix 16M is which, press the Identify button. This will
flash all the Select buttons on the currently selected EarMix 16M.
Apply All
Apply
6
2 Getting Started
FX C FX D
FX A FX B
EarMix 16
EarMix Setup
1-8 Source Selection: Inputs 1-8
Name: EarMix 16M
9-16 Source Selection: Inputs 9-16
Apply
Apply All
i
Sends 25-32
Sends 33-40
Sends 41-48
Sends 49-56
Sends 33-40
Sends 41-48
Sends 49-56
Sends 25-32
MonitorFX C FX D
FX A FX B
EFFECTS MASTER MASTER CONTROL
i
Mix 1
Mix 3
Mix 5
Mix 7
Mix 2
Mix 4
Mix 6
Mix 8
Mix 9
Mix 11
Mix 10
Mix 12
Inputs
User
Aux/Sub/Matrix
BANK
10U10
5
5
10
20
dB
U10U
10
5
5
10
20
dB
U10U
10
5
5
10
20
dB
U10U
10
5
5
10
20
dB
U
Mix 1
FX C FX D
FX A FX B
-2
-12
-24
-36
-48
-65
Page
(Insert)
EFFECTS MASTERFAT CHANNEL CONTROL - SELECTED CHANNEL
Assign
Channel
Stereo
Preset
Comp Gate
Link
Load
Save
Main
Copy
SubGrp
TAP
MuteMute
MuteMute
EQ / Dyn
A/B
Link
2.1 Using a StudioLive Series III Front-of-House mixer
5. Next you will need to select the AVB Sends from your mixer to which you route
to your EarMix. By default, the last 16 AVB Inputs are patched from Flex Mixes
1-16. In our example, let’s patch Inputs 41-48 to EarMix Sources 1-8 and Inputs
49-56 to EarMix Sources 9-16.
6. Press apply to finish.
EarMix 16
EarMix Setup
Name: EarMix 16M
1-8 Source Selection: Sends 1-8
9-16 Source Selection: Sends 9-16
Apply
Apply All
Power User Tip: If you are configuring multiple EarMix 16M Personal Monitor Mixers and
would like them to receive the same routing from the mixer, press the Apply All button.
This will apply the current AVB routings to every EarMix 16M currently on the AVB
network.
By default, every Flex Mix on your StudioLive mixer is configured as a pre-fader Aux
Mix. This tutorial will use this default setting.
EarMix 16M
Owner’s Manual
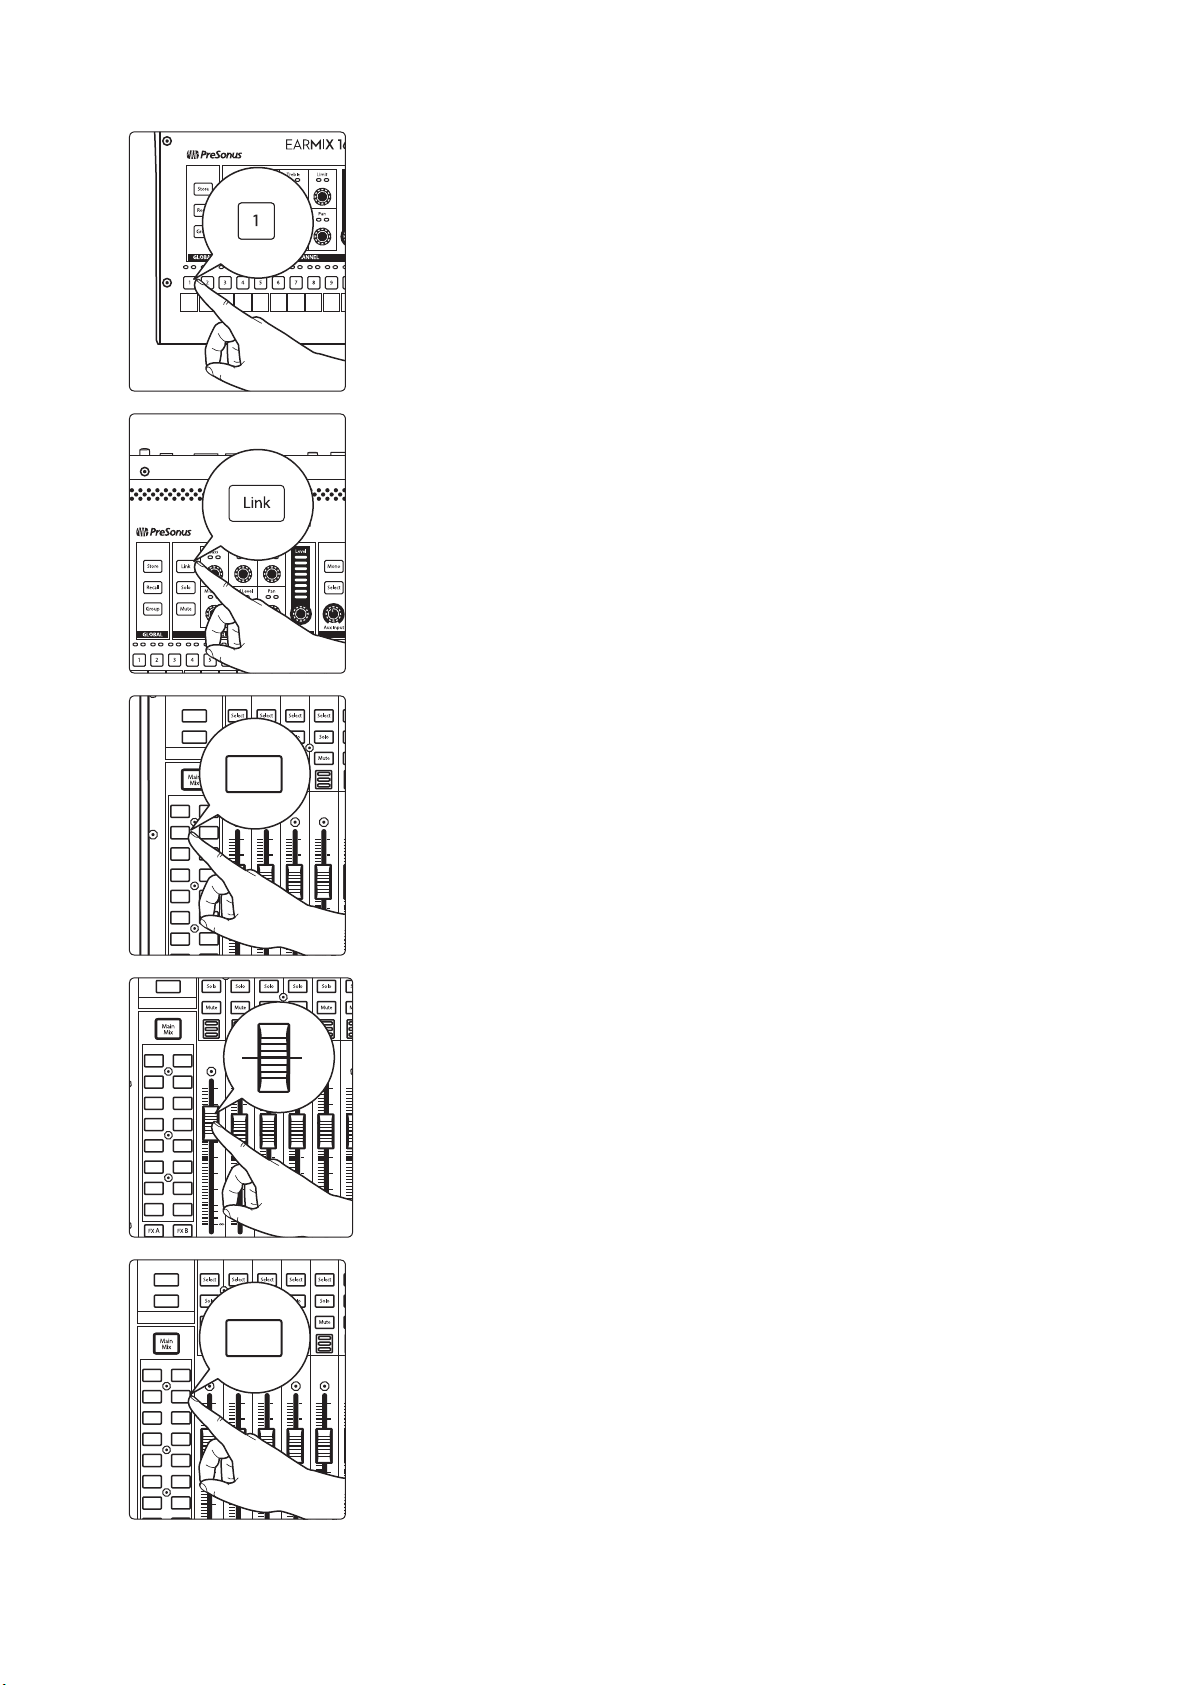
Step 2: Drums
1. Press Mix 1 on your StudioLive mixer, this will automatically select its output.
2. Press Link in the Fat Channel to create a stereo Aux mix.
3. Create a mix on Flex Mix 1-2 for your drum channels. Because this aux mix is
stereo, you can configure pans as well as levels. This will allow you to create a
more polished mix. If you would like to add Fat Channel compression and EQ,
do that as well. Creating the best stereo mix for your drums will provide your
musicians with the best foundation to create their own mixes locally on their
EarMix 16M.
7
2 Getting Started
Mix 1
Mix 3
Mix 5
Mix 7
Mix 2
Mix 4
Mix 6
Mix 8
Mix 9
Mix 11
Mix 13
Mix 10
Mix 12
Mix 14
Inputs
User
Aux/Sub/Matrix
BANK
10
U
10
5
5
10
20
30
dB
U10U
10
5
5
10
20
30
dB
U10U
10
5
5
10
20
30
dB
U10U
10
5
5
10
20
30
dB
U
Mix 3
Mix 1
Mix 3
Mix 5
Mix 7
Mix 2
Mix 4
Mix 6
Mix 8
Mix 9
Mix 11
Mix 13
Mix 15
Mix 10
Mix 12
Mix 14
Mix 16
User
Aux/Sub/Matrix
BANK
10
40
U
10
5
5
10
20
30
40
50
60
dB
U
10
40
U
10
5
5
10
20
30
40
50
60
dB
U
10
40
U
10
5
5
10
20
30
40
50
60
dB
U
10
40
U
10
5
5
10
20
30
40
50
60
dB
U
10
40
U
10
5
5
10
20
30
40
50
60
dB
U
U
Mix 1
Mix 3
Mix 5
Mix 7
Mix 2
Mix 4
Mix 6
Mix 8
Mix 9
Mix 11
Mix 13
Mix 10
Mix 12
Mix 14
Inputs
User
Aux/Sub/Matrix
BANK
10
U
10
5
5
10
20
30
dB
U10U
10
5
5
10
20
30
dB
U10U
10
5
5
10
20
30
dB
U10U
10
5
5
10
20
30
dB
U10U
10
5
5
10
20
30
dB
U
Mix 4
2.1 Using a StudioLive Series III Front-of-House mixer
4. On your EarMix, press the Channel 1 Select button.
5. Press Link in the Selected Channel section. This will create a stereo input on your
EarMix for your stereo drum mix.
EarMix 16M
Owner’s Manual
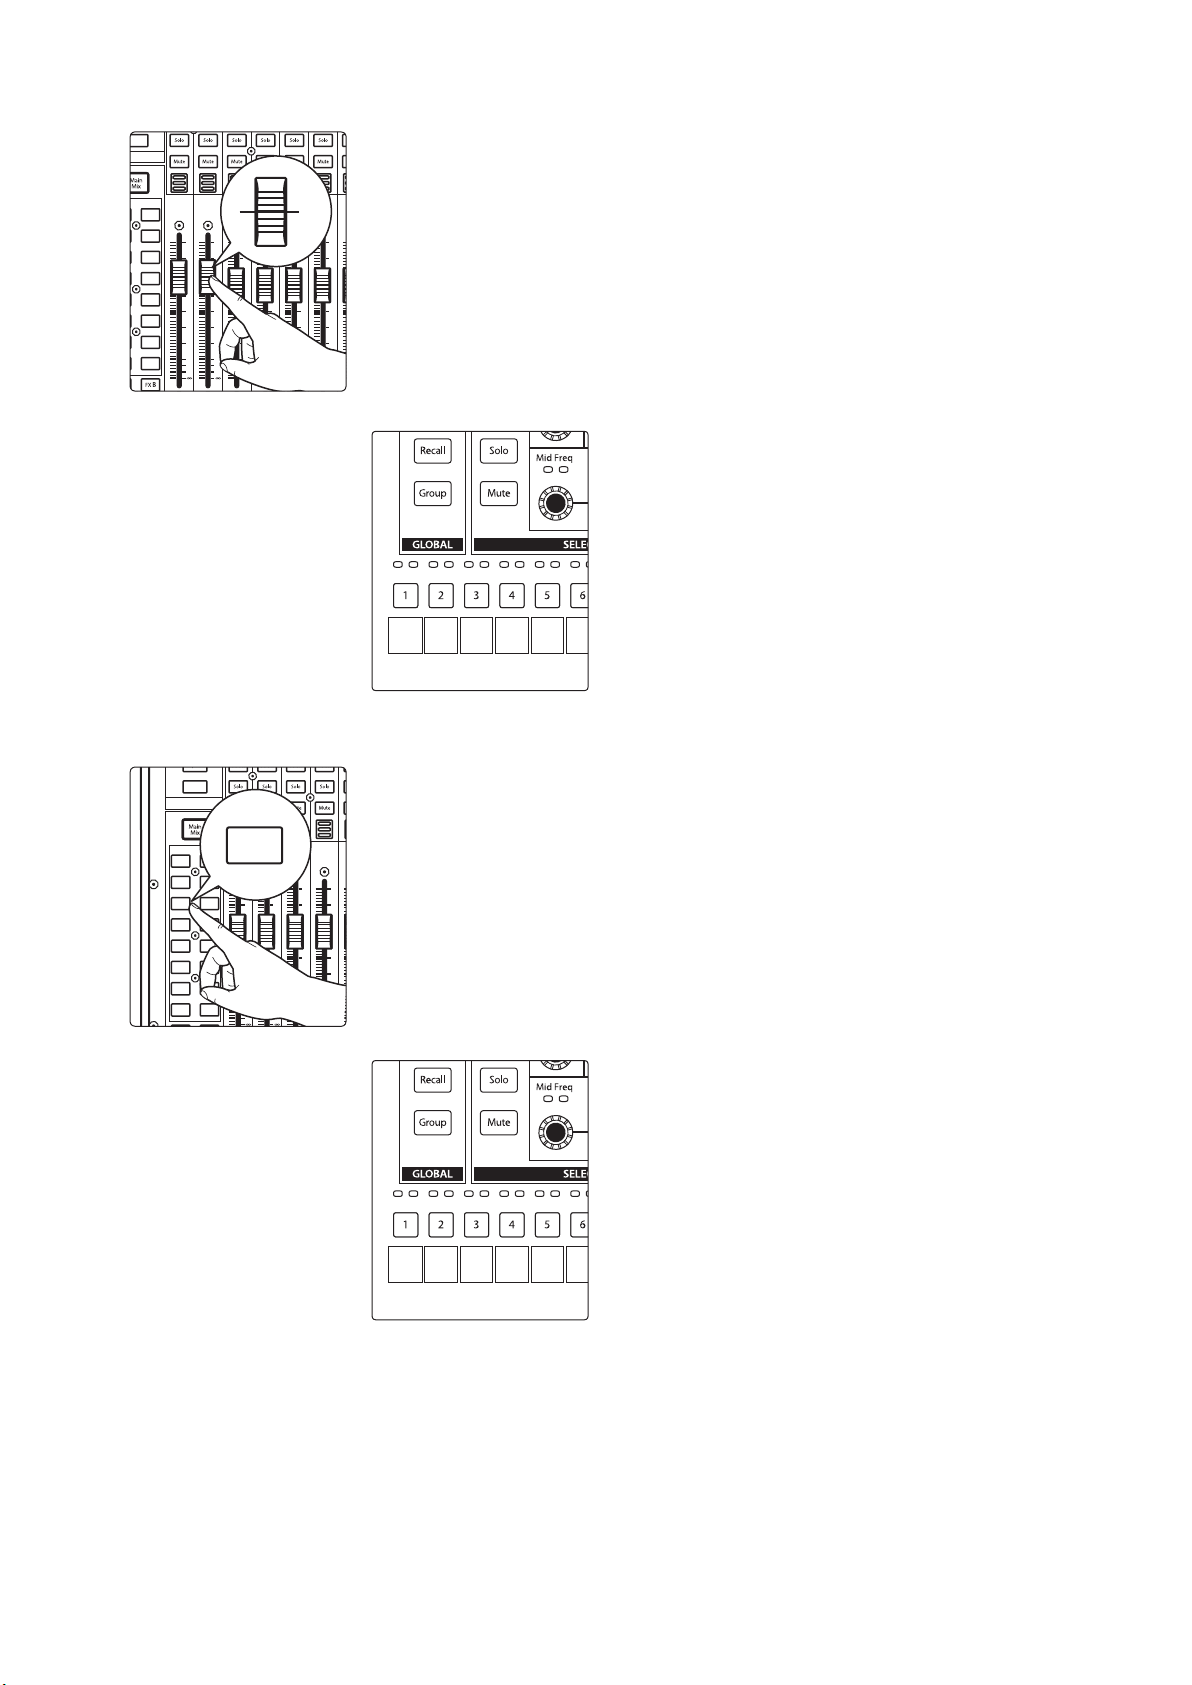
6. To provide your musicians with the most flexibility, it is recommended that you
provide unique control over the kick and snare in addition to the overall drum
mix. Press Mix 3 on your StudioLive.
7. Raise the level of the Kick channel to unity.
8. Select Mix 4 on your StudioLive.
8
2 Getting Started
Kick Snare
Drums
(L)
Drums
(R)
Kick Snare Bass
Drums
(L)
Drums
(R)
Mix 2
Mix 4
Mix 6
Mix 8
Mix 10
Mix 12
Mix 14
Mix 16
User
10
40
U
10
5
5
10
20
30
40
50
60
dB
U
10
40
U
10
5
5
10
20
30
40
50
60
dB
U
10
40
U
10
5
5
10
20
30
40
50
60
dB
U
10
40
U
10
5
5
10
20
30
40
50
60
dB
U
10
40
U
10
5
5
10
20
30
40
50
60
dB
U
10
40
U
10
5
5
10
20
30
40
50
60
dB
U
U
Mix 1
Mix 3
Mix 5
Mix 7
Mix 2
Mix 4
Mix 6
Mix 8
Mix 9
Mix 11
Mix 13
Mix 15
Mix 10
Mix 12
Mix 14
Mix 16
Inputs
User
Aux/Sub/Matrix
BANK
10
40
U
10
5
5
10
20
30
40
50
60
dB
U
10
40
U
10
5
5
10
20
30
40
50
60
dB
U
10
40
U
10
5
5
10
20
30
40
50
60
dB
U
10
40
U
10
5
5
10
20
30
40
50
60
dB
U
Mix 5
2.1 Using a StudioLive Series III Front-of-House mixer
9. Raise the level of the Snare channel to unity.
Your EarMix 16M is now setup as follows:
EarMix 16M
Owner’s Manual
Step 3: Bass
1. Press Mix 5 on your StudioLive mixer.
2. Create a blend between the DI channel and the amplifier channel. Add
compression and EQ to taste. Again, the more cohesive sound with which you
provide your musician, the easier it will be for them to create a good mix of their
own.
Your EarMix 16M is now setup as follows:
9
 Loading...