

Page 1
XP 400XP 400
XP 400
XP 400XP 400
(MINI 430 S)
MINI HAND HELD UHF TRANSCEIVER
0682
Manuel d'utilisation
Owner's manual
Page 2
Bienvenue dans le monde des émetteurs-récepteurs de la
dernière génération. Cette nouvelle gamme vous fait accéder à la communication électronique la plus performante.
Grâce à lutilisation de technologies de pointe garantissant
des qualités sans précédent, votre appareil est un nouveau
jalon dans la convivialité et la solution par excellence pour
le pro le plus exigeant. Pour tirer le meilleur parti de toutes
ses possibilités, nous vous conseillons de lire attentivement
ce mode demploi avant de lutiliser.
SOMMAIRE
Mise en place des piles 3
Mise en route 3
Utilisation de la touche "F" (FUNC) 3
Afficher et choisir une fréquence ou un canal 4
Emission et réception d'un message 4
Réglage des options 5
Améliorer la réception d'un signal faible 7
Eclairage de l'afficheur 7
Activer un signal sonore de confirmation 7
Activer un signal d'appel 7
Visualiser le réglage de la fonction Scan Skip 8
Mémoriser un canal 8
Utiliser la fonction scanner 9
Utiliser la fonction double veille 10
Utiliser le canal d'appel 11
Verrouiller le clavier 11
Réinitialiser l'appareil 11
Mélodie d'appel 12
Fonction surveillance 12
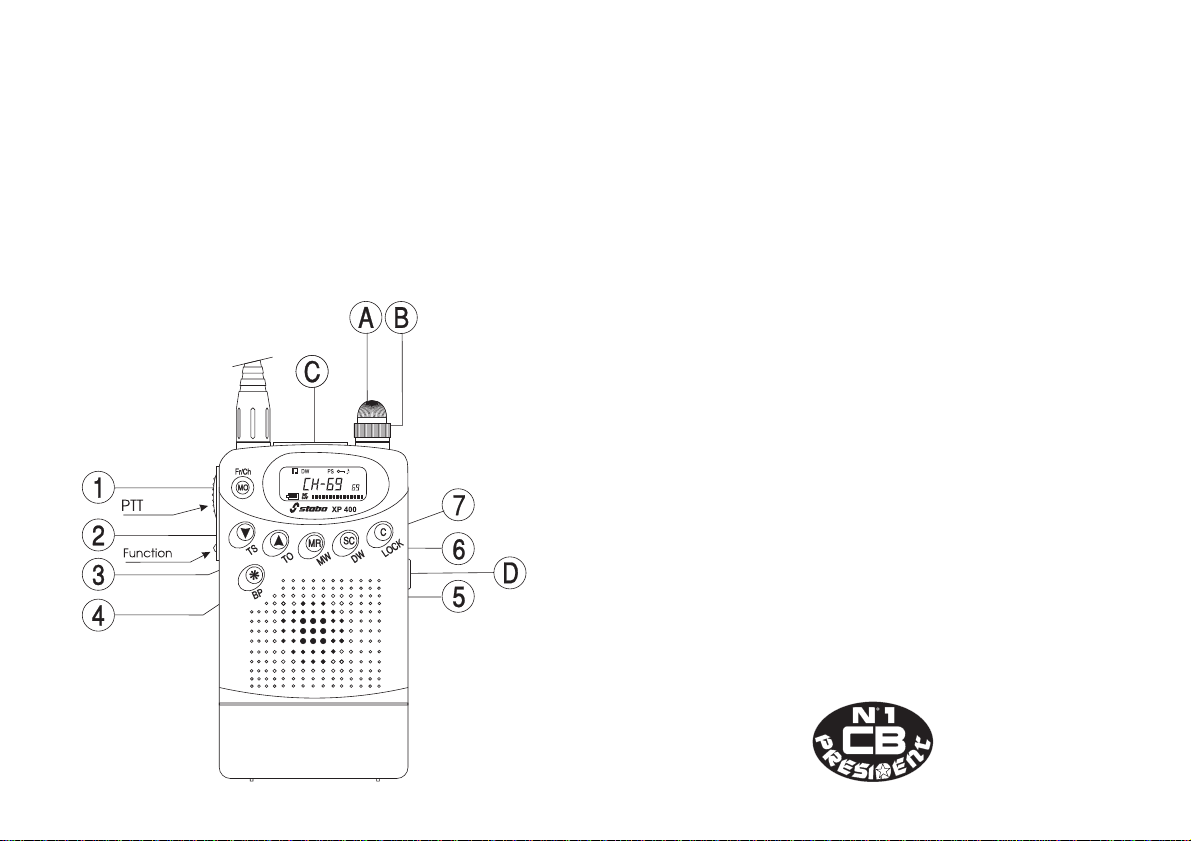
Connecteurs 15
Afficheur 15
Spécifications 16
Declaration of Conformity 35
2
Page 3
Mise en place des piles
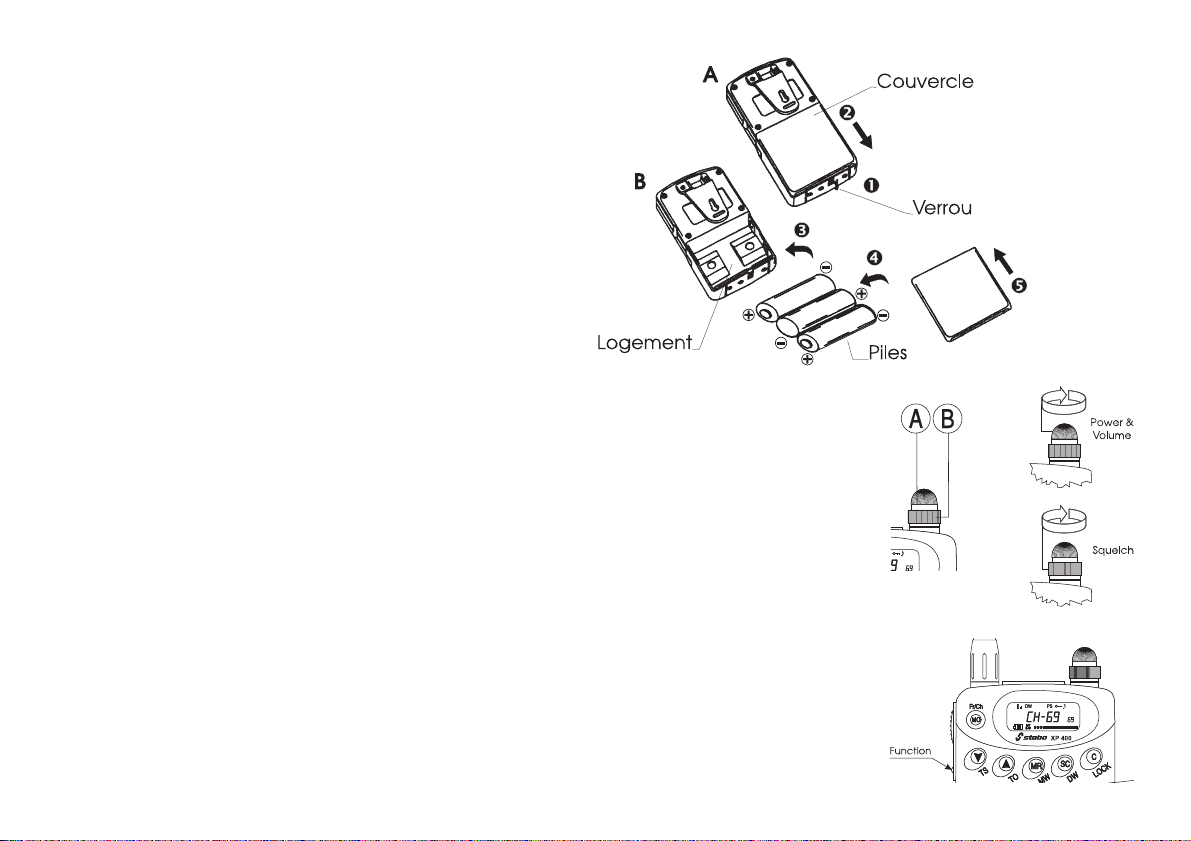
A) 1- Poussez vers le bas le verrou (1)
2- Enlevez le couvercle (2)
B) 3- Installez les batteries, étapes (3) et (4)
4- Remettez le couvercle (5)
5- Poussez le verrou vers le haut.
Mise en route
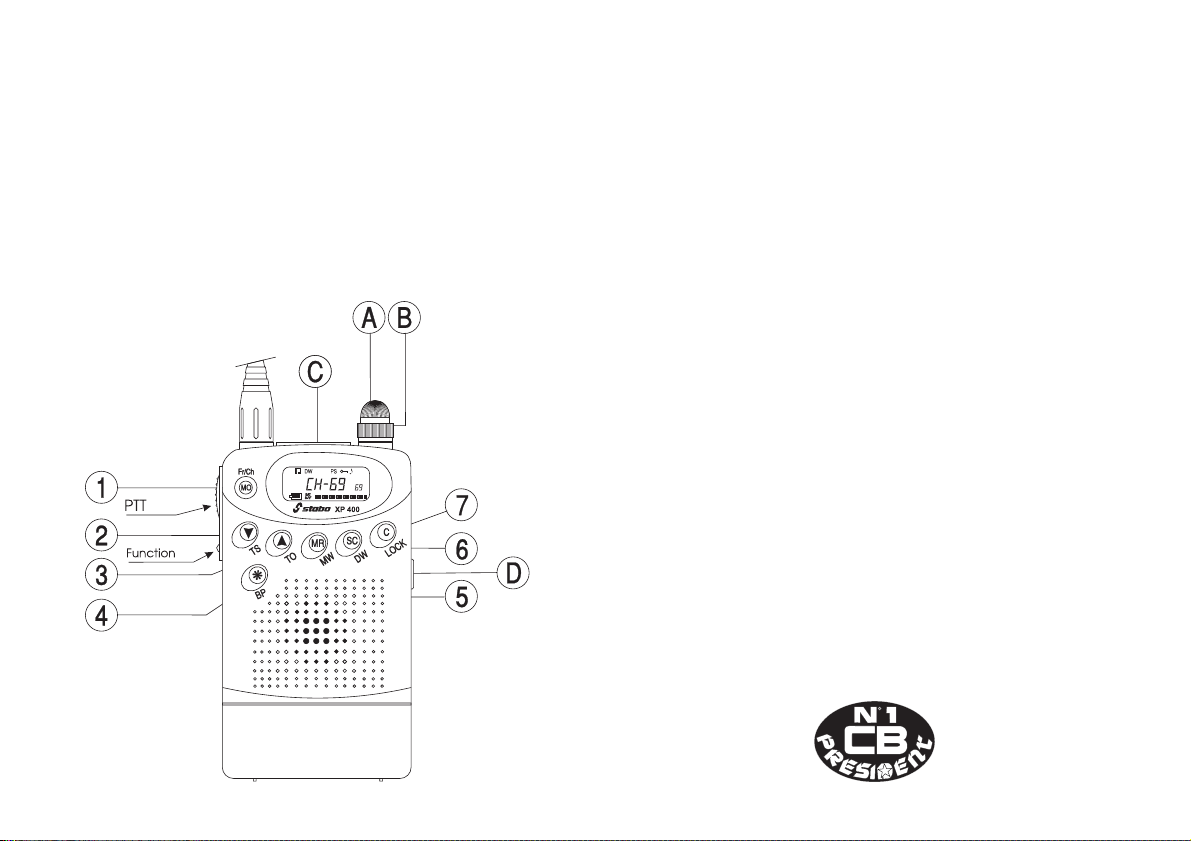
Tournez le bouton [A] dans le sens des aiguilles dune montre pour allumer l'appareil et régler
le volume. Tournez le bouton de volume en sens inverse des aiguilles dune montre pour
réduire le volume ou éteindre.
Le squelch ou "silencieux" permet de supprimer les bruits de fond indésirables en labsence
de communication. Tournez le bouton du squelch [B] dans le sens des aiguilles dune montre
jusquau point exact où tout bruit de fond disparaît. Cest un réglage à effectuer avec précision,
car mis en position maximum dans le sens des aiguilles dune montre, seuls les signaux les
plus forts peuvent être perçus.
Utilisation de la touche "F" (FUNC)
Ce bouton, lorsquon lutilise avec les autres touches du panneau avant, permet daccéder
ème
au 2
Si vous appuyez et maintenez la touche "F" en mode normal (sauf en mode mémorisation
d'un canal et canal d'appel) : les deux derniers digits indiquent le numéro du dernier canal
mémorisé utilisé. Mais si vous nappuyez pas sur le bouton "F", ces digits indiquent le numéro du canal d'émission /réception en cours.
niveau de chaque fonction.
3
Page 4
Afficher et choisir une fréquence ou un canal
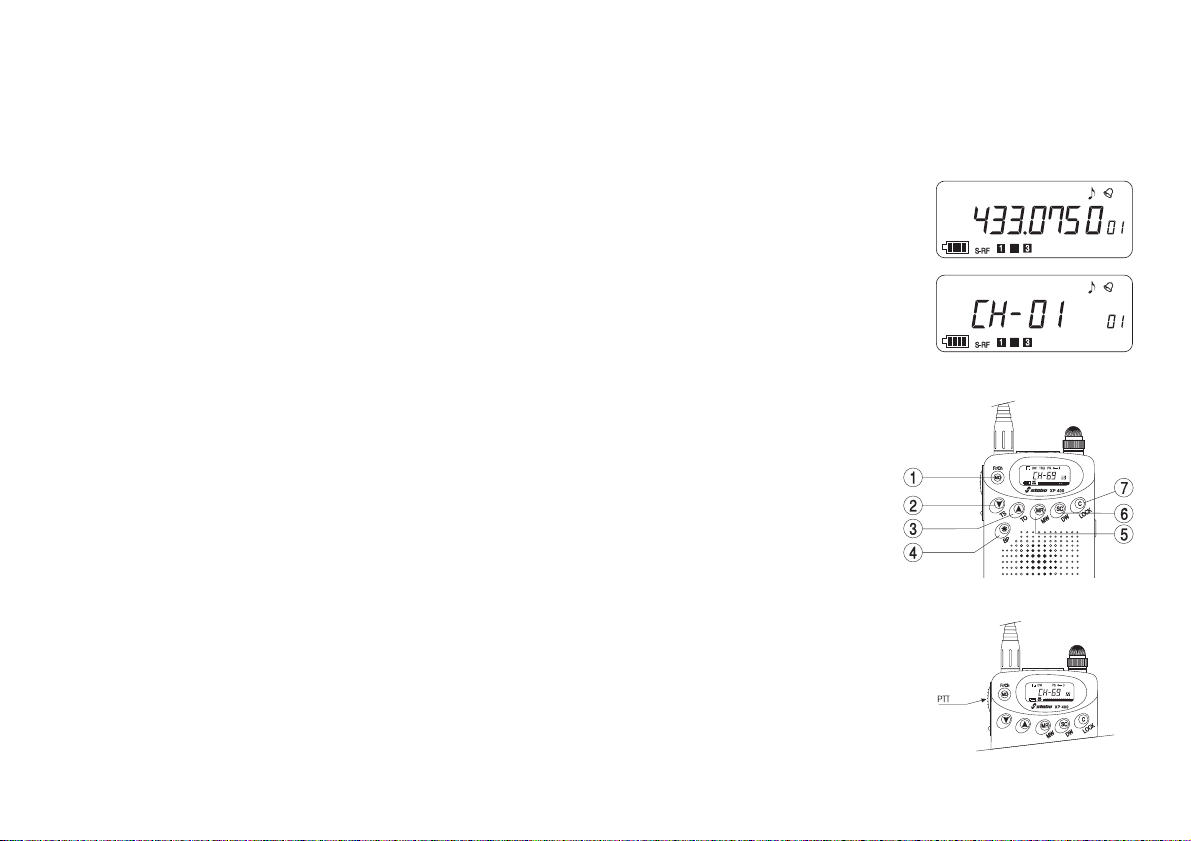
Si vous appuyez simultanément sur les touche "F" (FUNC) + "MO(Fr/Ch)" [1] lorsque la fréquence est affichée, le numéro
de canal apparaît sur lafficheur. Appuyez sur les touches "F" (FUNC) + "MO(Fr/Ch)" [1] une nouvelle fois et la fréquence
apparaît sur lafficheur.
- Affichage de la fréquence du canal d'émission (TX) ou de réception (RX)
Les deux derniers digits, à droite de l'afficheur, indiquent le numéro du canal utilisé, mais les sept
grands digits indiquent la fréquence RX/TX
- Affichage du canal d'émission (TX) ou de réception (RX).
69 canaux sont disponibles sur cet appareil
Touche de descente des canaux/fréquence t [2]
Cette touche permet deffectuer une descente par rapport au canal/fréquence en cours.
Touche de montée des canaux/fréquence s [3]
Cette touche permet deffectuer une montée par rapport au canal/fréquence en cours.
Une pression continue sur l'une de ces touches permet d'obtenir un défilement continu
des canaux/fréquences.
Emission et réception d'un message
Après avoir ajusté le réglage du volume ainsi que celui du squelch et vérifié que vous êtes bien sur
le même canal/fréquence que votre correspondant, vous pouvez maintenant émettre et recevoir.
Appuyer et maintenir la pédale d'émission "PTT", parler distinctement à quelques centimètres de
la face avant de l'appareil et relâcher la touche "PTT" pour attendre la réponse de votre
correspondant.
4
Page 5

Réglages des options
Pour entrer dans ce mode de réglage, appareil éteint, appuyer et maintenir la touche "F" (FUNC) tout en allumant la radio.
Note :
A- Si vous appuyez conjointement sur la touche "F" et les touches s ou t, l'option suivante (ou la précédente) apparaît sur
lafficheur.
B- Si vous appuyez sur le bouton "PTT", toutes les modifications seront enregistrées et l'appareil se remettra en fonctionne-
ment normal
C- Dans ce mode, les autres touches sont désactivées. Si vous y appuyez, vous entendrez un Beep derreur .
1- Option minuterie (timer)
Il est possible de fixer la durée maxi de l'émission. Celle-ci sera coupée automatiquement lorsque le temps sera écoulé.
- Affichage du mode de réglage de la minuterie
Pour changer le temps de réglage (off, de 10 à 990 secondes), appuyer sur les boutons s ou t.
2- Option blocage de l'émission pendant la réception (Busy Channel Lock Out) - BCLO
Cette fonction est utilisée pour interdire la transmission lorsque la radio reçoit un signal.
- Affichage du réglage de BCLO
Si vous appuyez sur le bouton s ou t, le réglage alterne (on/off), et le mode choisi apparaît sur
lafficheur LCD.
Note :
Si vous appuyez sur le bouton "PTT" lorsque la fonction BCLO est activée, un message derreur
apparaît sur lafficheur et votre radio reste en mode de réception.
5
Page 6

3- Option délai TX
Cette fonction permet d'éviter les parasites dus à une coupure franche de l'émission lorsque le bouton "PTT" est relâché.
- Affichage du réglage du mode délai TX
Si vous appuyez sur le bouton s ou t, le réglage alterne (on/off), et le mode choisi apparaît sur
lafficheur LCD.
4- Option délai de balayage (SCAN)
Cette fonction permet darrêter le balayage pour une durée donnée lorsquun signal est reçu pendant le scanning. Le
balayage reprend une fois le délai écoulé
- Affichage du réglage du délai de balayage
Si vous appuyez sur le bouton s ou t, le réglage permet d'augmenter ou de diminuer (de 1 à 30
secondes) le délai de balayage de 1 seconde par pression. Les modifications apparaissent sur
lafficheur LCD.
5- Option mode de fonctionnement économique (Power Save mode)
Ce système permet daccroître la durée de vos batteries.
- Affichage du réglage Power Save mode
Si vous appuyez sur le bouton s ou t, le réglage alterne (on/off), et le mode choisi apparaît sur
lafficheur LCD.
6
Page 7
Améliorer la réception d'un signal faible
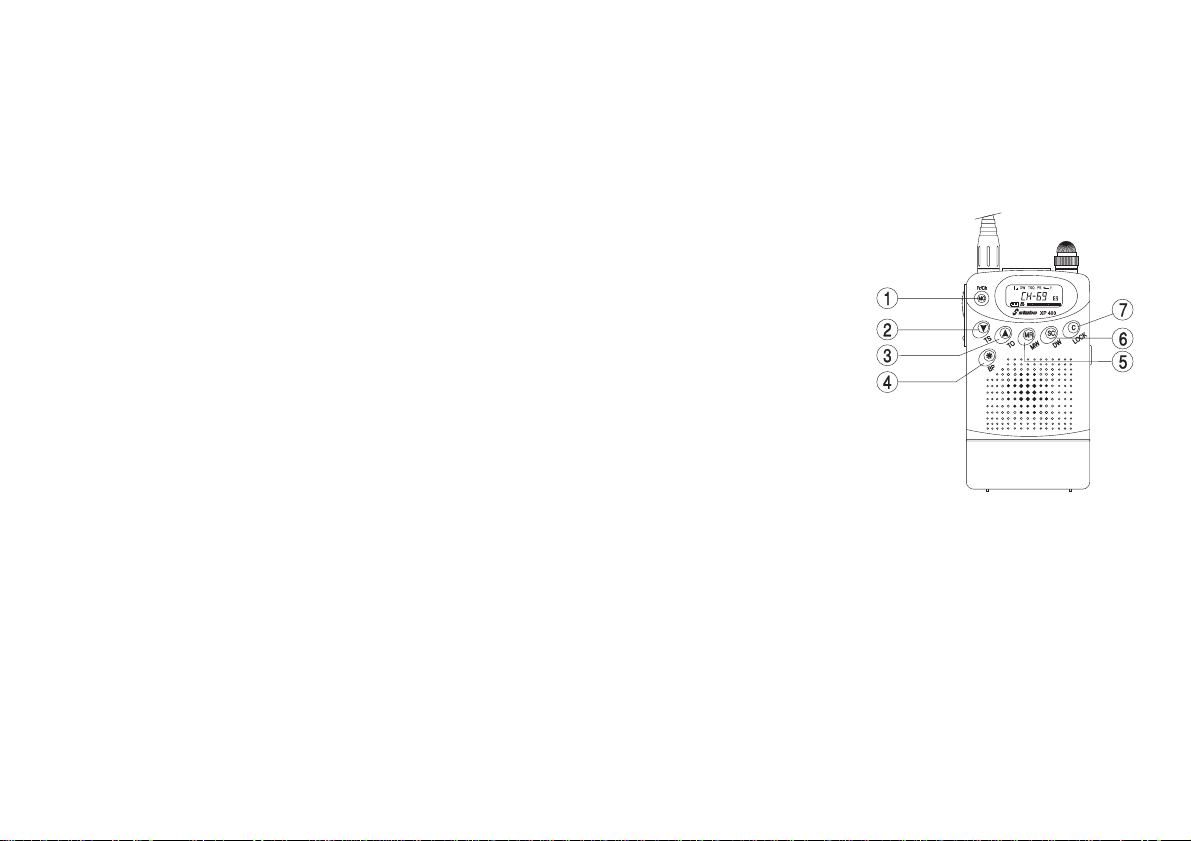
Touche MO "monitor" [1]
En mode réception, cette fonction est utilisée pour écouter un signal faible, qui ouvre et ferme le squelch à répétition, sans
modifier le réglage initial du squelch. Appuyer et maintenir la touche "MO" pour ouvrir le squelch. Si vous appuyez sur cette
touche pendant plus dune seconde, le réglage de la fonction Scan Skip (voir page 8) apparaît sur lafficheur pendant 1
seconde.
Eclairage de l'afficheur "
Touche éclairage "
Quand vous appuyez sur le bouton
dre automatiquement. Si vous appuyez sur une autre touche de la face avant pendant que la
lampe est allumée, elle reste allumée pour 4 secondes supplémentaires. Si vous appuyez
sur la touche
appuyez à nouveau sur la touche.
"R"
✲✲
✲" [4]
✲✲
plus dune seconde, la lampe reste allumée jusquau moment où vous
✲✲
✲"
✲✲
, la lampe reste allumée 4 secondes. Elle va sétein-
"R"
Activer un signal sonore de confirmation
Touche "BP" [4]
Cette caractéristique donne à lusager une confirmation sonore de la mise en route et de la manipulation de l'appareil . Cette
fonction est active d'origine. Si vous voulez la désactiver, appuyez sur "F" + "R(BP)". Pour la réactiver répétez l'opération ci-
dessus. Quand la fonction "Beep" est désactivée, le beep de verrouillage et derreur ne sont plus audibles.
Activer un signal d'appel
%%
Bell
% "cloche" [4]
%%
Pour activer ce signal d'appel : appuyer simultanément les boutons
La cloche se déclenche dès qu'un signal ouvre le squelch (pour un bon fonctionnement, il est impératif que le squelch soit
parfaitement réglé). Pour annuler, appuyer sur "PTT".
"Func"
et
"PTT"
. Le symbole
7
%%
% apparaît sur lafficheur.
%%
Page 8

Visualiser le réglage de la fonction Scan Skip
Touche MO "monitor" [1]
Si vous appuyez sur cette touche pendant plus dune seconde, le réglage de la fonction Scan Skip
apparaît sur lafficheur pendant 1 seconde pour le canal sélectionné.
- Affichage de Scan skip condition
Permet de visualiser, si la fonction est active, le canal(aux)/ fréquence(s) qui sera(ont) évité(s) lors du scan (voir p.10)
Mémoriser un canal
Touche MR "memory" [5]
Il est possible de stocker en mémoire 10 canaux/fréquences. Par défaut, lorsque vous allumez votre appareil pour la première
fois, seul le canal/fréquence 01 est stocké à l'emplacement 01, les emplacements de 02 à 10 étant libres.
Visualiser les canaux mémorisés et leurs emplacements
Appuyez sur "MR" puis sur s ou t, les canaux/fréquences mémorisés ainsi que leur numéro d'emplacement mémoire
apparaissent sur l'afficheur. Les emplacements mémoires libres sont signalés par une série de tirets (Par défaut le canal/
fréquence 01 est stocké l'emplacement mémoire 01).
Mémoriser un canal
Appuyez sur "MR", choisissez un emplacement mémoire (libre ou non, exemple 01) où vous sou-
haitez mémoriser un canal/fréquence à l'aide des touches s ou t.
Appuyez sur à nouveau sur "MR" pour revenir en mode normal, sélectionnez le canal/fréquence
que vous souhaitez mémoriser (exemple 67) avec s ou t.
Appuyez maintenant sur "F"+"MR (MW)", vous entendez un BIP à double ton et le canal/fréquence est enregistré à l'emplacement mémoire choisi.
Affichage du dernier canal mémorisé
En mode normal une pression sur "MR" vous permet d'afficher le dernier canal/fréquence mémorisé ou le dernier emplacement mémoire utilisé.
8
Page 9

Modifier et effacer des canaux mémorisés
Appuyez sur "MR" et choisissez l'emplacement mémoire que vous souhaitez modifier avec s ou t, appuyez maintenant
sur "F"+"MR (MW)", "MR" et le numéro d'emplacement choisi clignote.
- Utilisez les touches s ou t pour modifier le canal/fréquence et validez votre modification en appuyant sur "MR" ou "PTT".
- Si vous désirez effacer le canal/fréquence mémorisé, appuyez et maintenez "F" pendant plus de 2 secondes.
Utiliser la fonction Scanner
Touche SC [6]
Pour lactiver : régler parfaitement le squelch puis appuyez sur le bouton "SC" (sauf en double veille) la radio commence à
balayer en sarrêtant sur les canaux occupés par des signaux. Il reste sur ce canal pendant le délai de balayage (défini par
l'option réglage du délai de balayage, voir page 6) et redémarre une fois le temps écoulé.
- Si vous désirez arrêter le processus de balayage, appuyez simplement sur la touche "PTT".
- Pendant le processus de balayage, le canal évité (skip) ne sera pas balayé
- Pendant le balayage, appuyez sur s ou t pour changer la direction du balayage.
- Si vous appuyez sur la touche "F" lors de larrêt sur un canal pendant le processus de balayage, "dELEtE" apparaît sur
l'afficheur et ce canal sera effacé dans le prochain processus de balayage.
- Affichage du message de suppression
Note : Le canal supprimé est récupéré quand la radio sera à nouveau mise en marche.
S'il ne reste qu'un seul canal (suppression de tous les autres), la procédure de balayage sarrête et "EMPtY" (vide) apparaît
sur laffichage.
- Affichage du message "EMPTY"
Note : Les autres touches de la face avant de la radio sont inactives. Si vous y appuyez, vous
entendrez un beep d'erreur.
9
Page 10

Eviter des canaux mémorisés lors de l'utilisation de la fonction Scanner (Scan Skip Condition)
Pour initialiser la fonction scan skip (saut d'un ou plusieurs canaux mémorisés pendant le scan) : appuyez sur "MR" et
choisir le canal que vous souhaitez éviter avec s ou t, appuyez maintenant sur "F"+"MR", licône "MR" sur lafficheur
clignote. Appuyez sur "F" + s ou t, "SCSP" on/off apparaît sur l'afficheur, appuyez sur s ou t pour activer (on) ou
désactiver (off) la fonction scan skip pour ce canal mémorisé.
- Affichage du réglage des canaux mémorisés évités par la fonction scan-skip
- Appuyez sur "PTT" ou "MR" pour mémoriser les changements.
Note :
- Si vous appuyez sur "F" plus de 2 secondes, un double BIP est émis et le canal mémorisé s'efface, il est alors possible de
choisir un nouveau canal.
Utiliser la fonction Double Veille
Touche DW "Dual Watch" [6]
Pour lactiver :
1- Régler parfaitement le squelch, puis sélectionnez le premier canal que vous voulez surveiller (sauf en mode scan), auquel
nous nous référerons comme étant le canal A.
2- Appuyez sur "F" + "SC (DW)" : "DW" apparaît sur lafficheur.
3- Sélectionnez le deuxième canal que vous voulez surveiller. Dès que le canal B est sélectionné,
la radio commence sa double surveillance.
- Affichage des caractéristiques de la double veille
Pour désactiver la double veille, appuyez simplement sur "F" + "SC/DW" ou appuyez sur la touche "PTT". Notez que la
radio retournera automatiquement sur le canal A en mode normal.
Si vous appuyez sur le bouton "F" + "SC/DW" ou appuyez sur "PTT". Quand un signal est reçu sur le canal A (B), la fonction
double veille séteint sur le canal A (B).
10
Page 11

Si un signal est reçu sur le canal A, il sera conservé jusqu'à sa disparition. Par contre, si un signal est reçu sur le canal B, le
canal A continuera à être surveillé toutes les 3 secondes.
Même en cas de disparition du signal sur le canal A (B), la double veille restera en surveillance sur ce canal pendant le délai
du balayage. Une fois que le délai sera écoulé la surveillance sera déplacée vers l'autre canal.
Si en mode double veille, vous appuyez sur le bouton s ou t quand le canal A est en train de recevoir un signal vous
entendez un beep d'erreur. Mais si vous appuyez sur s ou t quand il ny a pas de signal reçu ou sil y a un signal reçu sur
le canal B, le canal B se déplace à un autre canal (plus haut / plus bas). En position double veille, la fonction économie
d'énergie "PS" ne fonctionne pas.
Utiliser le canal d'appel
Touche "C" [7]
a) Touche d'appel C
Pour lactiver, appuyez sur la touche "C" en mode de réception soit en mode canal mémoire, balayage ou double veille. Le
numéro de canal d'appel (Call) est fixé à CH 38 (fréquence 434.000 MHz) qui nest pas modifiable.
- Affichage du No. de canal d'appel
Pour désactiver, appuyez à nouveau sur la touche "C"
- Si vous appuyez sur le bouton "C" en mode scan ou Dual Watch, l'appareil bascule en mode canal d'appel Call.
Verrouiller le clavier
Touche "Lock" [7]
Cette fonction permet d'éviter toute mauvaise manipulation. Pour lactiver, appuyez sur les touches "F" + "C(Lock)" la clé
va apparaître sur lafficheur pour indiquer que la fonction est active
Pour désactiver, répétez le processus décrit ci-dessus. La clé va disparaître sur lafficheur et le clavier redevient actif.
Réinitialiser l'appareil
Si vous souhaitez effacer tous les canaux mémorisés et rétablir les options par défaut, appuyez et maintenez les touches
"F" + "MO" tout en allumant l'appareil. "InItIaL" apparaît sur l'afficheur, relâchez les touches "F" + "MO". Votre appareil a
retrouvé sa configuration d'origine.
11
Page 12

Mélodie d'appel
Cette fonction permet d'envoyer à votre correspondant la mélodie de votre choix afin de vous identifier.
Après être passé en émission en appuyant et en maintenant "PTT", appuyer sur une des touches suivantes : "▼", "▲",
"MR", "SC", "C" ou
Votre correspondant entend alors la mélodie tant que vous maintenez la pression sur la touche choisie.
✲✲
"
✲"
✲✲
Fonction surveillance (Baby/mother monitor)
Cette fonction qui nécessite 2 appareils, permet d'établir une surveillance sonore entre 2 points. Les deux émetteurs ainsi
programmés vont établir une liaison radio, avec contrôle par l'appareil "MothEr" (mére) toutes les minutes, de l'émission de
l'appareil "bAby" (enfant).
Pour activer (Appareil bAby) :
- Choisir un canal (identique pour les 2 apppareils).
- Eteindre l'appareil
- Appuyer et maintenir la touche
l'afficheur.
- Affichage du mode de réglage "bAby"
- Choisir pour l'appareil "bAby" à l'aide des touches "▼ ou ▲" la durée de transmission automatique désirée vers l'appareil
"MothEr". Cette durée correspond au temps pendant lequel il sera possible d'écouter l'activité sonore autour de l'appareil
"bAby" en appuyant sur la pédale d'émission de l'appareil "MothEr" pendant plus de 2 s.
tout en allumant l'appareil. L'initialisation du mode de surveillance "bAby" apparaît sur
"✲"
bAby - 00 Pas de transmission automatique (Transmission par "PTT")
bAby - 05 Transmission automatique pendant 5 s
bAby - 10 Transmission automatique pendant 10 s
bAby - 15 Transmission automatique pendant 15 s
bAby - 20 Transmission automatique pendant 20 s
12
Page 13

bAby - 30 Transmission automatique pendant 30 s
bAby - 40 Transmission automatique pendant 40 s
bAby - 50 Transmission automatique pendant 50 s
bAby - 60 Transmission automatique pendant 60 s
- Choisir le degré de sensibilité du micro vox (H : élevée, M : moyenne, L ; faible) par pressions successives sur la touche
"MR". Lorsque le micro vox est activé " " clignote sur l'afficheur
- Appuyer sur "PTT" pour valider les modifications et activer le mode "bAby".
- Affichage du mode de surveillance"bAby"
Pour activer (Appareil MothEr) :
- Choisir un canal (identique pour les 2 apppareils).
- Eteindre l'appareil
- Appuyer et maintenir la touche
- Appuyer sur "F" + "▼ ou ▲". L'initialisation du mode de surveillance mother apparaît sur l'afficheur.
- Affichage du mode de réglage "MothEr"
- Appuyer sur "PTT" pour valider et activer le mode "MothEr".
, allumer l'appareil. L'initialisation du mode de surveillance bAby apparaît sur l'afficheur.
"✲"
- Affichage du mode de surveillance "MothEr"
13
Page 14
Utilisation :
Les deux appareils sont réglés sur leur mode de fonctionnement respectifs :
- Il est alors possible d'écouter l'activité sonore autour de l'appareil "bAby" pendant la durée de transmission automatique
programmée sur l'appareil "bAby" en appuyant sur la pédale d'émission de l'appareil "MothEr" pendant plus de 2 s.
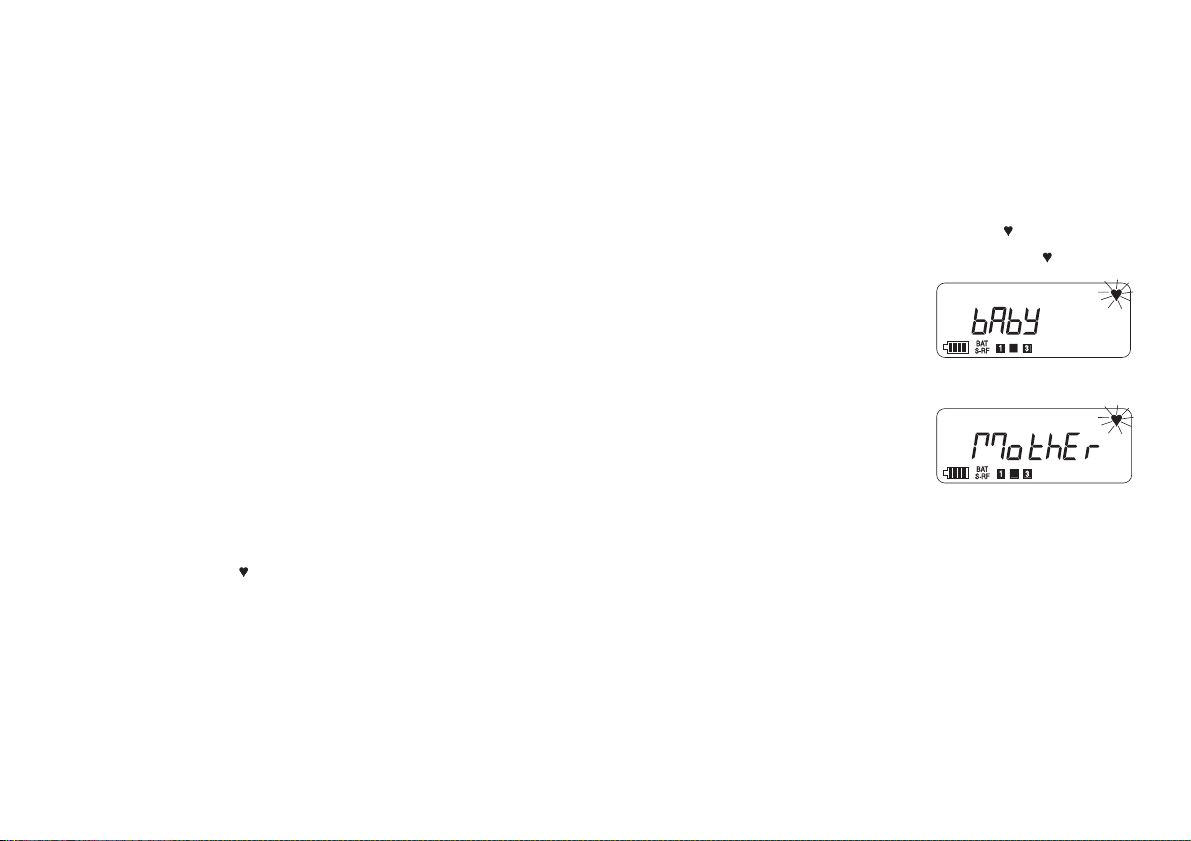
- Après vingt secondes d'initialisation, l'appareil "bAby" passe en mode alerte vocale "Voice alert" (" "clignote sur
l'afficheur), s'il y a une élévation du niveau sonore autour de l'appareil "bAby", l'alarme sonore se déclenche et " "clignote
sur l'afficheur de l'appareil "MothEr"
- Affichage du mode "Voice Alert" (appareil bAby)
- Affichage du mode "Voice Alert" (appareil MothEr)
- En cas de besoin, il est posssible d'utiliser la fonction alarme d'urgence à partir de l'appareil "bAby" : quand celui-ci est en
mode alerte vocale (" "clignote sur l'afficheur), il suffit d'appuyer pendant plus d'1,5 secondes sur la touche "C" pour déclencher
une alarme pendant 14 secondes sur l'appareil "MothEr". Après émission de l'alarme, il est possible d'envoyer un message
en parlant simplement dans le microphone ("HELP" s'affiche sur l'appareil "bAby").
- En mode alerte vocale, le micro vox est actif (une pression pendant plus d'1,5 seconde sur la touche "C" le désactive), la
pédale d'émission "PTT" quant à elle est inactive.
- Si l'appareil "MothEr" ne reçoit pas de réponse de l'appareil "bAby". Emission d'une alarme sonore et le message
"Out of range" apparaît sur l'afficheur :
14
Page 15
- Affichage du message "Out of range"
- Ce message peut aussi apparaître si l'appareil "bAby" est éteint, ou bien si sa durée de transmission automatique est
réglée sur 00.
Connecteurs
C- Jack microphone
Cette prise Jack est prévue pour la connection dun microphone extérieur. Ne pas utiliser un autre
modèle que celui prévu pour cet appareil. Un modèle non adapté peut causer des dégâts importants.
En cas de doute demander conseil à votre revendeur.
Protège poussière : Quand le jack n'est pas utilisé, installez le protège-poussière afin d'éviter toute
infiltration.
D- DC Jack
Il permet le branchement d'une alimentation externe (4,5 V maxi).
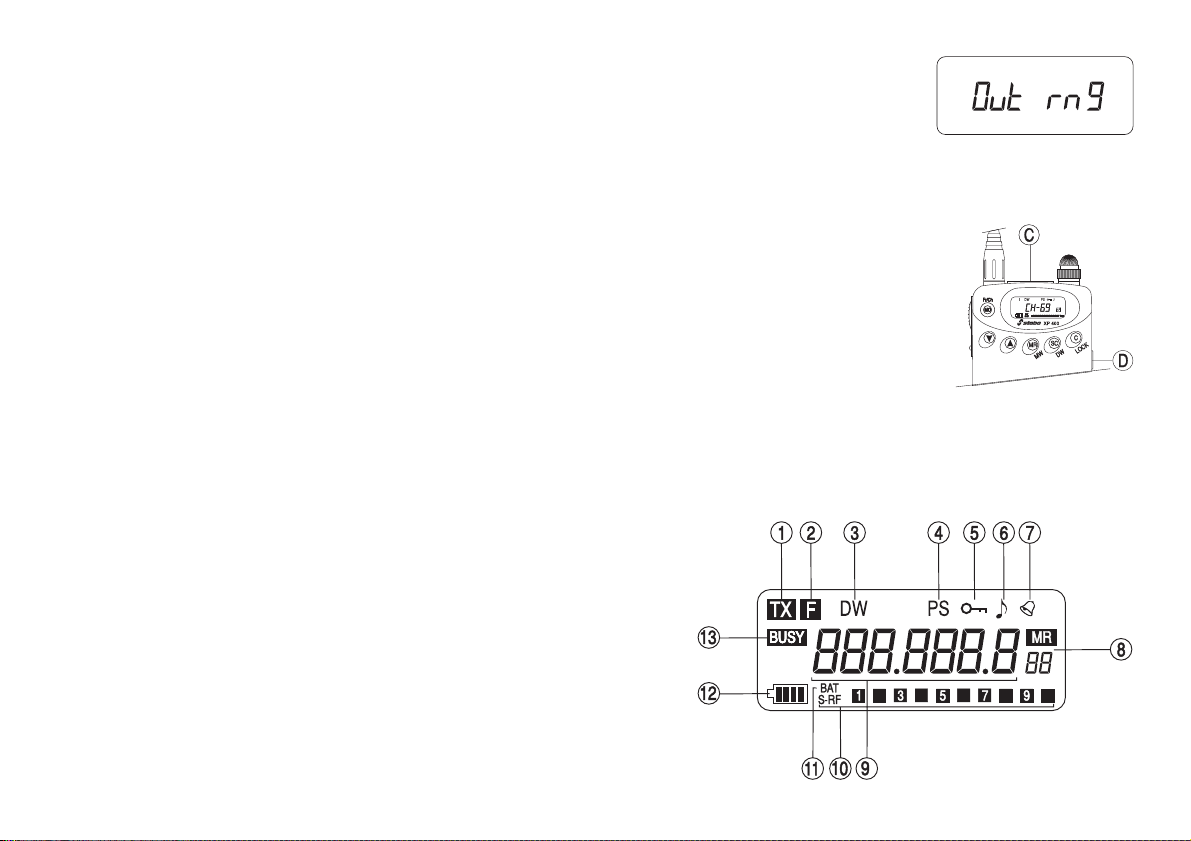
Afficheur
1- TX Indique que la radio est en mode émission.
2- Fonction Mode Indique que le bouton "F" est activé.
3- DW Indique que le "Dual Watch" est actif
4- PS Indique que la radio est dans le mode économie d'énergie
5- Lock Indique le verrouillage du clavier
6- Beep Indique que le beep est activé
7- Bell (Cloche) Indique que la cloche est activée
8- Memory Channel Indicator
Affichage du numéro de canal mémorisé.
15
Page 16

9- Indicateur de fréquence ou de canal
Affiche le numéro de canal ou le numéro de fréquence.
10- Indicateur de puissance du signal)
La radio intègre un compteur à dix segments pour mesurer
la puissance du signal reçu et émis. Lorsquon reçoit un
signal, le compteur indique la puissance de ce signal. Un
signal faible sera indiqué par un ou deux segments. Par
contre un signal très fort sera indiqué par huit à dix segments.
11- Indicateur de charge de la batterie)
Si vous voulez vérifier la puissance de la batterie, appuyez
simultanément sur la touche "PTT" et "MO" (monitor).
12- Batterie
Indique que les batteries sont faibles. Si le niveau de la
batterie est inférieur au point standard, lindicateur de niveau clignote.
13- Busy Indique la réception du signal RF.
Spécifications
1- Générales
Canaux 69
Gamme de fréquence 433.075 MHz à 434.775 MHz
Génération de fréquence PLL SYNTHETISEUR
Température opérationnelle - 10° C à + 55° C
Tension d'alimentation D.C 3 V
Modulation F3E
Impédance dantenne 50 ohm
Dimensions 58(L) x 105(H) x 26.5(P) mm
Poids 190 g avec batterie
2- Réception
Type de circuit DUAL CONVERSION
SUPERHETERODYNE
Fréquence IF 1er IF 21,4 MHz
Sensibilité 0.22 µV pour 20 dB SND
Sélectivité 60db Min
Taux de réjection dimage 60db Min
Distorsion de modulation inter 60db Min
Puissance Audio 10% THD 300 mW 16 Ohm
3- Emission
ème
2
IF 455 kHz
Puissance d'émission 10mW
Distorsion 5%
Deviation +/- 5 kHz
Consommation TX 300 mA
RX + squelch 30 mA
16
Page 17

NOTES
17
Page 18
Welcome to the world of the new generation of transceivers. This new range gives you access to top performance
equipment. With the use of up-to-date technology, which
guarantees unprecedented quality, your transceiver is a new
step in personal communication and is the surest choice
for the most demanding of professional radio users. To ensure that you make the most of all its capacities, we advise
you to read this manual carefully before using it.
CONTENTS
Battery installation 19
Getting started 19
"F" (FUNCTION) button 19
Display and selection of a frequency or channel 20
Transmitting and receiving 20
Option setting mode 21
Improving the reception of a weak signal 23
Lamp 23
Activating the BP (Beep) button 23
Activating the calling signal 23
Display of the Scan skip feature 24
Memorizing a channel 24
Using the Scan feature 25
Using the Dual Watch feature 26
Using the call channel 27
Keypad lock 27
Resetting the device 27
Melody call feature 28
Baby monitor function 28
Connectors 33
Display Panel Features 33
Specification 34
Declaration of Conformity 35
18
Page 19
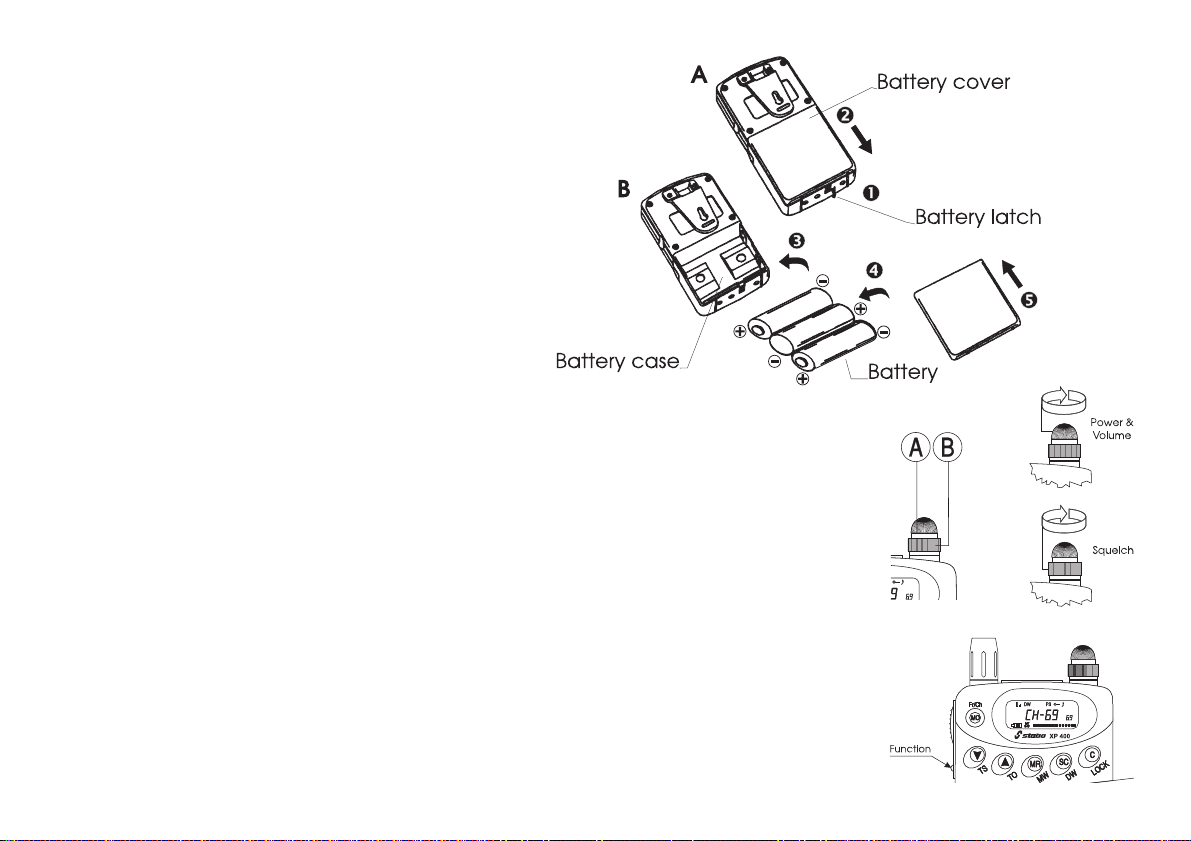
Battery installation
A) 1. Press down the battery latch on the bottom of the radio (1)
2. Open the battery cover on the back of the radio (2)
B) 3. Install the battery as shown by (3) and (4)
4. Put on the battery cover (5)
5. Press the battery latch upward to lock the battery case.
Getting started
Turn the Volume switch [A] clockwise to turn power on and set desired volume. Turn the
Volume button counterclockwise to turn power off.
The squelch [B] is used to eliminate received background noise in the absence of an incoming signal. For maximum receiver sensitivity, the control should be adjusted only to the point
where the receiver background on ambient background noise is eliminated. The incoming
signals that are then received will be stronger than the background noise.
"F" (FUNCTION) button
This button, when used in conjunction with the buttons on the front panel, allows access to
each 2 nd level function. Press and hold the "F" button in normal mode (not memory channel
mode and Call channel mode), then the two last digits indicate stored memory channel number.
However, if you do not press the "F" button, these digits indicate current transmitting/receiving channel number.
19
Page 20
Display and selection of a frequency or channel
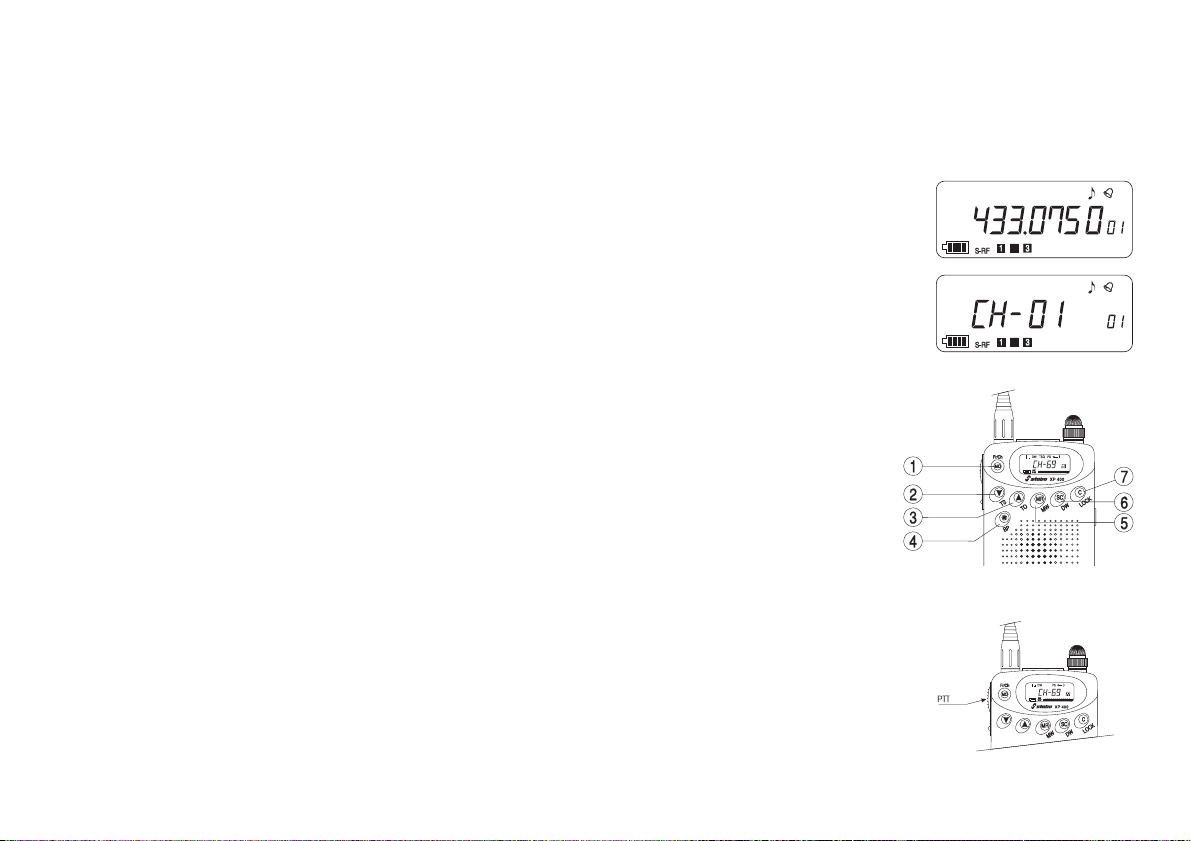
If you press the "F" + "MO(Fr/Ch)" [1] button when frequency is displayed on the LCD, channel number appears on the LCD. Press the
"F" + "MO(Fr/Ch)" [1] button and once again, frequency appears on the LCD.
- Display of frequency RX/TX channel
The 2 small digits on the right will show channel number, and the 7 large digits will show RX/TX frequency.
- Display of channel RX/TX
69 channels are available on this device.
Channel/Frecuency down t button
Press this button to move to a lower channel than the one currently shown on the LCD.
Channel/Frecuency up s button
Press this button to move to a higher channel than the one currently shown on the LCD.
If one of these buttons is pressed and held, the channels/frequencies change continuously.
Transmitting and receiving
Adjust the volume and the squelch and make sure you are on the same channel/frequency as the
person to whom you wish to speak. You can now transmit and receive.
Press and hold the PTT (push-to-talk) button, speak clearly a few centimeters from the front
panel of the device and release the PTT button to hear the reply of your correspondent.
20
Page 21

Option setting mode
To enter the option setting mode, press the "F" (function) button when the power is off, while turning on the radio.
Note:
A- If you hold the "F" button and then press the s or t button, the next (or previous) setting mode will appear on the LCD.
B- If you press the "PTT" button, all modifications will be stored and the radio will return to normal operation.
C- Other buttons located on the front of the radio will not operate. If you press these buttons, an error beep tone will sound
1- Setting of timer
This feature allows the transmission to be cut off automatically when time is out
- Display of timer setting mode
To change the setting time (off, from 10 to 990 seconds), press the s or t button.
2- Setting of Busy Channel Lock Out (BCLO)
When the radio receives a signal, this function is used to prohibit transmission.
- Display of BCLO setting mode
If you press the s or t button in this setting mode, Busy Channel Lock Out will alternate (on/off)
and the contents will appear on the LCD.
Note:
If you press the "PTT" button while using the Busy Channel Lock Out, an error message will appear
on the LCD and your radio will stay in the receiving mode.
21
Page 22

3- Setting the TX delay option
This feature is used to prevent interference due to a cutting off of emission when the "PTT" button is released.
- Display of TX delay option setting mode.
If you press the s or t button in this setting mode, the TX delay option will alternate (ON/OFF) and
the chosen mode will appear on the LCD.
4- SCAN delay time
This feature stops scanning for a fixed time when a signal is received during the scanning process.
The scanning process continues once time is out.
- Display of operating scan delay time mode
If you press the s or t button in this setting mode, this feature (from 1 to 30 seconds) increases or
shortens the scan time of 1 second per impulsion. Modifications appear on the LCD.
5- Setting of power save mode
This feature is used to increase the life of your battery significantly.
- Display of operating power save On/Off setting mode
If you press the s or t button in this setting mode, power save will alternate (ON/OFF) on the LCD.
22
Page 23
Improving the reception of a weak signal
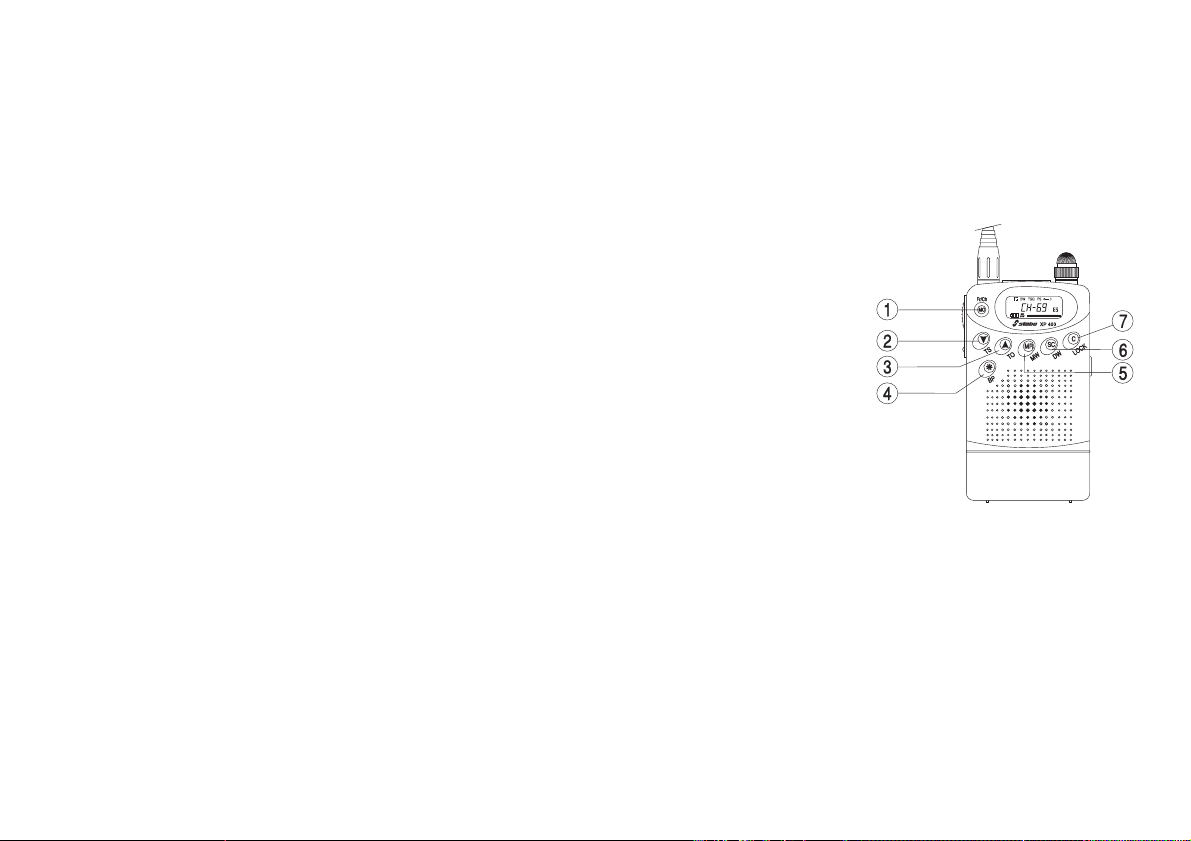
MO "monitor" [1]
Press and hold the "MO" (Monitor) button in the receiving mode, the audio signal will be heard until the "MO" button is
released.
If the "MO" button is pressed for more than one second, RX/TX Condition and Scan Skip Condition will appear on the LCD
(see page 20) for one second. However, they will not appear on the LCD in the setting mode.
Lamp "R"
Lamp button [4]
Press the
matically. If you press another button on the front cabinet when the lamp is on, the lamp will
stay on for four seconds from that time. If you press the
the lamp will stay on until you press the button once again.
button, the lamp will stay on for four seconds, after which it will turn off auto-
"R"
button more than one second,
"R"
Activating the BP (Beep) button
"BP" (Beep) button [4]
This feature gives the user an audible confirmation through a short beep tone that the radio
has been turned on. The transceiver comes with this feature already activated. If you would like to disable this feature, press
"F" + "R(BP)" button. To reactivate the Beep feature, repeat the above process. When the "beep" feature is off, the key beep
tone and the error beep tone will not sound.
Activating the calling signal
Bell % [4]
To activate: Press together "Func" and "PTT" switches. The
disappear on the LCD). To disable: Press the "PTT" button. The bell rings whenever a signal opens the squelch (the squelch
must be perfectly adjusted in order for the bell to work well).
%%
% will appear on the LCD. A bell melody will sound (
%%
%%
% will
%%
23
Page 24

Display of the SCAN skip feature
MO "monitor" [1]
If the "MO" button is pressed more than one second, SCAN Skip Condition will appear on the LCD
for one second.
- Display of the Scan skip feature
Allows one to visualize one or more channels that will be avoided during the scanning process (see page 22).
Memorizing a channel
MR Button "memory" [5]
Ten channels/frequencies can be stored in the memory. Automatically, when you turn your transceiver on for the first time,
only the channel/frequency 01 is stored at the location 01, locations 02 to 10 are free.
To see the channels in the memory and their locations
Press "MR" and then s and t, the channels/frequencies which are in the memory as well as their location number appear on the display. Free locations are indicated by a series of dashes.
Storing a channel in the memory
Press "MR", choose a location in the memory (free or not, 01 for example) where you wish to
store a channel/frequency with the s or t buttons.
Press "MR" again to go back to the normal mode, select the channel/frequency you want to store
(67, for example) with s or t.
Press "F" + "MR (MW)". You will hear a two-toned beep and the channel/frequency is saved at
the chosen memory location.
Display of the last channel stored
If you press "MR" while in the normal mode, the last channel/frequency stored or the last memory location used is
displayed.
24
Page 25

Modifying and erasing stored channels
Press "MR" and choose the memory location you wish to modify with s or t. Press "F" + "MR (MW)" and the location
number will blink.
- Use the s or t buttons to modify the channel/frequency and confirm your modification by pressing "MR" or "PTT".
- If you want to delete the stored channel/frequency, press the "F" button for more than two seconds.
Using the scan feature
The SC "SCAN" button [6]
To activate : adjust the squelch perfectly, press the "SC" button (not in the Dual Watch Mode), the radio will start the
scanning process and stop at any channel that is busy with signals received. It will remain on that channel during scan
delay time (defined by the option which allows you to adjust the scanning time, see page 18) and reactivate scanning.
If you want to stop scanning process, simply press the "PTT" button.
During the scanning process, the skipped channel will not be scanned.
During the Down (Up) scanning process, press the s or t button, then scanning direction will be changed to Down (Up)
scanning process.
If you press the "F" button at stopped channel during the scanning process, this channel will be deleted during the next
scanning process, "dELEtE" appears on the display.
- Display of delete message
Note: The deleted channel will be recovered when the radio is On/Off.
If only one channel remains because of the deletion of channel in the scanning process, the scanning process will stop and
"EMPtY" will appear on the LCD.
- Display of EMPTY message
Note: Other buttons located on the front of the radio will not operate. If you press these buttons,
an error beep tone will sound.
25
Page 26

Avoiding stored channels when using the scan feature (Scan Skip condition)
To Reset the Memory channel scan skip on/off condition: press the "F" + s or t button, the "MR" icon on the LCD will blink.
Press the s or t button, the memory channel scan skip (on/off) will alternate.
- Display of memory channel scan skip On/Off condition
- Press the "PTT" or "MR" button to store modifications.
Note:
- If you press the "F" button for over two seconds, the stored channel will delete and the radio will return to normal operation.
Using the Dual Watch feature
The DW "Dual Watch" button [6]
To operate dual watch:
1- Adjust the squelch perfectly, select the channel in which you want to monitor, which we will refer to as your A channel
2- Press the "F" + "SC(DW)" button, then "DW" will appear on the LCD.
3- Select the channel B in which you want to monitor. Once channel B has been selected, the radio will begin its dual watch
monitoring.
- Display of dual watch feature.
To turn off the dual watch, simply press the "F" + ""SC(DW)"button or press the "PTT" button.
Note that the radio will return to the A channel for normal operation.
If you press the "F" + "SC(DW)" button or press the "PTT" button when a signal is received on the channel A (B), the Dual
Watch feature will be turn off on the A (B).
If a signal is received on channel A, it will be kept until it disappears. But, if a signal is received on channel B, channel A will
still be checked every 3 seconds.
26
Page 27

Even if the signal on channel A (B) disappears, Dual Watch remains to check this channel during scan delay time. Once scan
delay time is out, the other channel will be checked.
If you press the s or t button when a signal is received at A channel in the Dual Watch feature, an error tone will sound.
However, if you press the s or t button when there is no received signal or there is a receiving signal at B channel, B
channel will move to higher (lower) channel. In the Dual Watch feature, the Power Save "PS" feature does not operate.
Using the call channel
C "Call" button [7]
To activate, press the "C" button in the receiving mode including Memory channel mode, Scan Mode and Dual Watch. Call
channel number is fixed as CH 38 (Frequency 434.000 MHz), cannot be modified.
- Display of call channel No.
To disable, press the "C" button once again.
If you press "C" button in Scan/Dual Watch mode Scanning/Dual Watch process will stop and
change to Call mode.
Keypad lock
Lock button [7]
To Activate - Press the "F" + "C(Lock)" button. The key will appear on the LCD to indicate that this feature is currently
activated. To disable: Repeat process described in "To Activate". The key will disappear from the LCD.
Resetting the device
If you wish to erase all of the stored channels and reestablish the automatic options, press and hold the "F" + "MO" buttons while turning on the device. "InItIaL" appears on the display. Release the "F" + "MO" buttons. Your transceiver is
now set as it was originally.
27
Page 28

Melody call feature
▼▼
This feature is used to identify the caller by using the specified melody. At TX mode, press
the specified melody per each button will sound.
▲▲
▼,
▲, MR, SC, ✲ button. Then
▼▼
▲▲
Baby monitor function
This function is used to check the babys situation by monitoring babys crying, surrounding big noise and limited communication
distance.
In this operation, the users are linked together by an invisible radio connection. One radio shall be programmed as MothEr
Unit and one or more radios shall be programmed as bAby units.
The user could also initiate a polling call by pushing the PTT any time. Upon receiving the polling call, the bAby units will
respond with a transponding call for selected respond time if the MothEr unit does not receive any transponding call 4
seconds after polling, an out-of-range indication will appear on the LCD of the MothEr unit with an alert tone.
The MothEr unit will continue to poll every minute to search for bAby unit response. The out-of-range status will be removed
if a valid transponding call is received from a bAby unit.
The transmission will be conducted on the channel with or without CTCSS tone squelch, which the user last selected before
changing the radio from normal operation into bAby monitor function.
To Activate :
1- Turn the power off
2- Press "✲" button and then turn on the power
The initial bAby mode will be displayed on the LCD.
28
Page 29

- Display of bAby Mode
3- Press the "FUNC + ▼ (▲)" button, then "Monitor (or bAby)" unit will be selected
- Display of MothEr Unit
- Display of bAby Unit
4- At the baby Unit, set up automatic responding time by pressing ▼ (▲) button
bAby 00 : Transmitting by PTT
bAby 05 : Automatic transmitting for 5 seconds
bAby 10 : Automatic transmitting for 10 seconds
bAby 15 : Automatic transmitting for 15 seconds
bAby 20 : Automatic transmitting for 20 seconds
bAby 30 : Automatic transmitting for 30 seconds
bAby 45 : Automatic transmitting for 45 seconds
bAby 60 : Automatic transmitting for 60 seconds
5- Select the Microphone Sensitivity
There are 3 sensitivity levels (H: High, n: Normal and L: Low Sensitivity). Pressing the MR button cycles the selection of
different sensitivity level.
29
Page 30
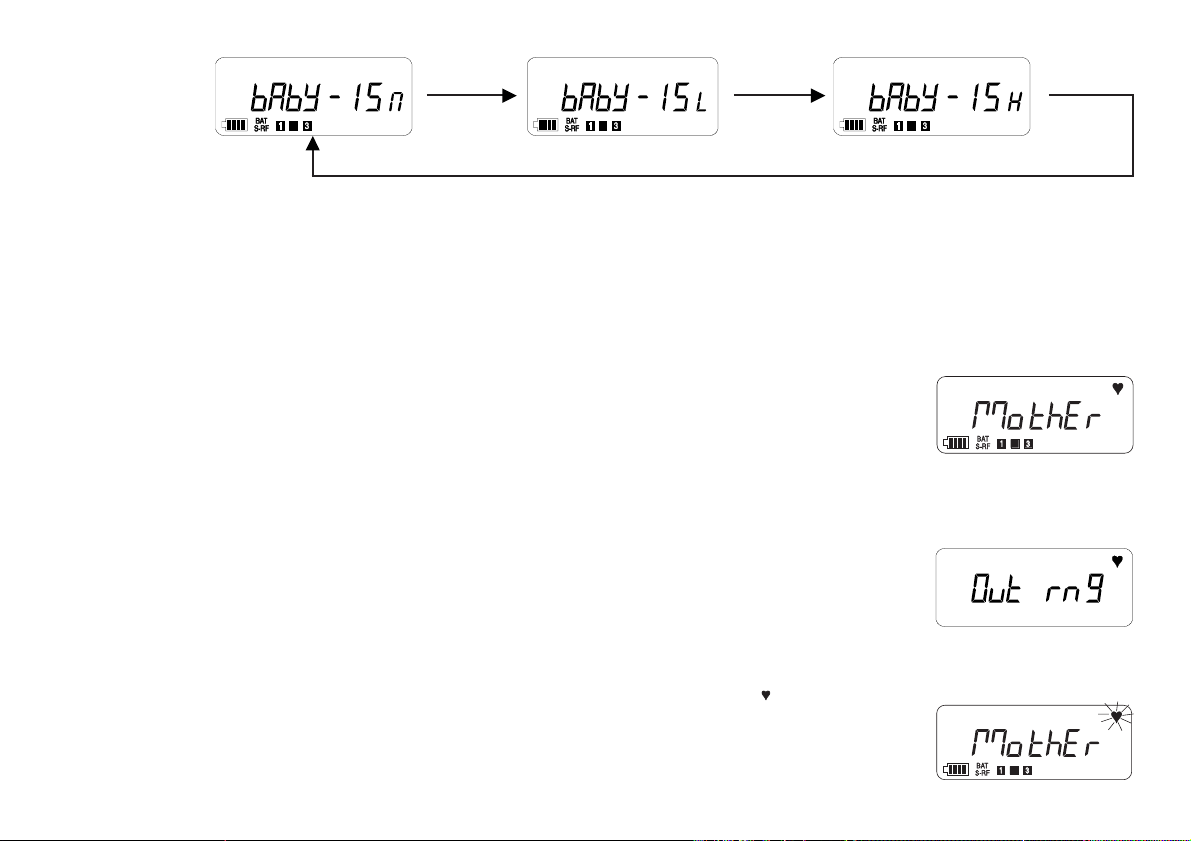
"MR" "MR"
"MR"
6- Press the PTT button to fix bAby Monitor.
1. operation of Mother unit
MothEr Unit will send out a 1 second polling transmission to check the bAby Unit every one minute. The user could also
trigger polling by pressing PTT.
- Display of MothEr Unit operation
If there is no answer (Transponding transmission) from bAby Unit, the MothEr Unit will give out an alert tone and display an
out-of-range Message on the LCD display.
- Display of no answer from bAby Unit
Note : If the automatic transmit time of bAby Unit is selected as 00, the MothEr Unit gives the alarm.
If something happened to the bAby, the MothEr Unit will receive the alarm and " " will blink at the
MothEr Unit.
30
Page 31

If MothEr wants to monitor bAbys situation, press the PTT button over 2 seconds, and then the
bAby Unit will transmit the signal for fixed time. If there is no signal from the bAby Unit the alarm
is given.
2. operation of bAby Unit
1- Voice alert function
- Display of bAby Unit operation
The bAby Unit will respond to the MothEr Units polling by giving out a fixed time transponding transmission immediately
after polling.
When the bAby Unit is set for Voice Alert, the radio will standby for 20 seconds and the microphone sensor will operate. The
icon on the LCD will blink indicating the unit is ready to pick up any voice or noise around it.
The PTT circuit will be disabled during the Voice Alert Operation.
When a voice or noise with acoustic level higher than the preset sensitivity level (H-N-L), the bAby Unit will transmit an alert
tone for 8 seconds. The microphone will be active during the whole period plus the fixed time PTT delay time such as the
voice or noise could be heard by the MothEr Unit.
Upon completion of the alert transmission, the bAby Unit will be dekeyed and become idle for 20 seconds. The radio will not
respond to surrounding noise during the idle period and the icon stop blinking.
When the idle time expires, the radio will return to monitoring the surrounding acoustic activities and the icon blinks again.
31
Page 32

The will blink on the LCD when microphones sensor operate. The microphone sensor will perceive babys crying,
surrounding big noise and so on and transmit the alarm to the MothEr Unit (in this case, bAby Unit can not notice the alarm
sound).
In case of emergency, transmit the panic alarm by pressing C button over 1.5 second.
A panic alarm tone will then be transmitted and the unit will revert to VOX operation. The user could then transmit and receive
without pressing any button on the radio.
2- Panic Alarm Function
When a bAby Unit is set to operate baby by monitoring, the user could activate the Panic Alarm by pressing the C button
over 1.5 second. The radio will transmit a Panic Alarm tone for 14 Seconds and then revert to Voice Activated Transmit. The
word HELP will appear on the LCD during the whole operation.
The user could transmit by just speaking into the internal microphone of the bAby Unit. There is 5 seconds transmission
delay time to ensure that there is no breaking of transmission during short pauses within the call. When the transmission
ends, the radio will revert to receive mode for listening to the MotheE Unit, or to wait for another voice activated transmission
from the user.
The icon on the LCD will blink when the unit is VOX operation. The VOX sensitivity can be adjusted between H-N-L by
pressing the MR button. VOX will be temporarily disabled when the radio is receiving transmission from others.
The PTT button will be disabled during VOX operation. Pressing the C button over 1.5 second will stop the VOX operation
and the radio will then revert to baby monitoring mode.
32
Page 33
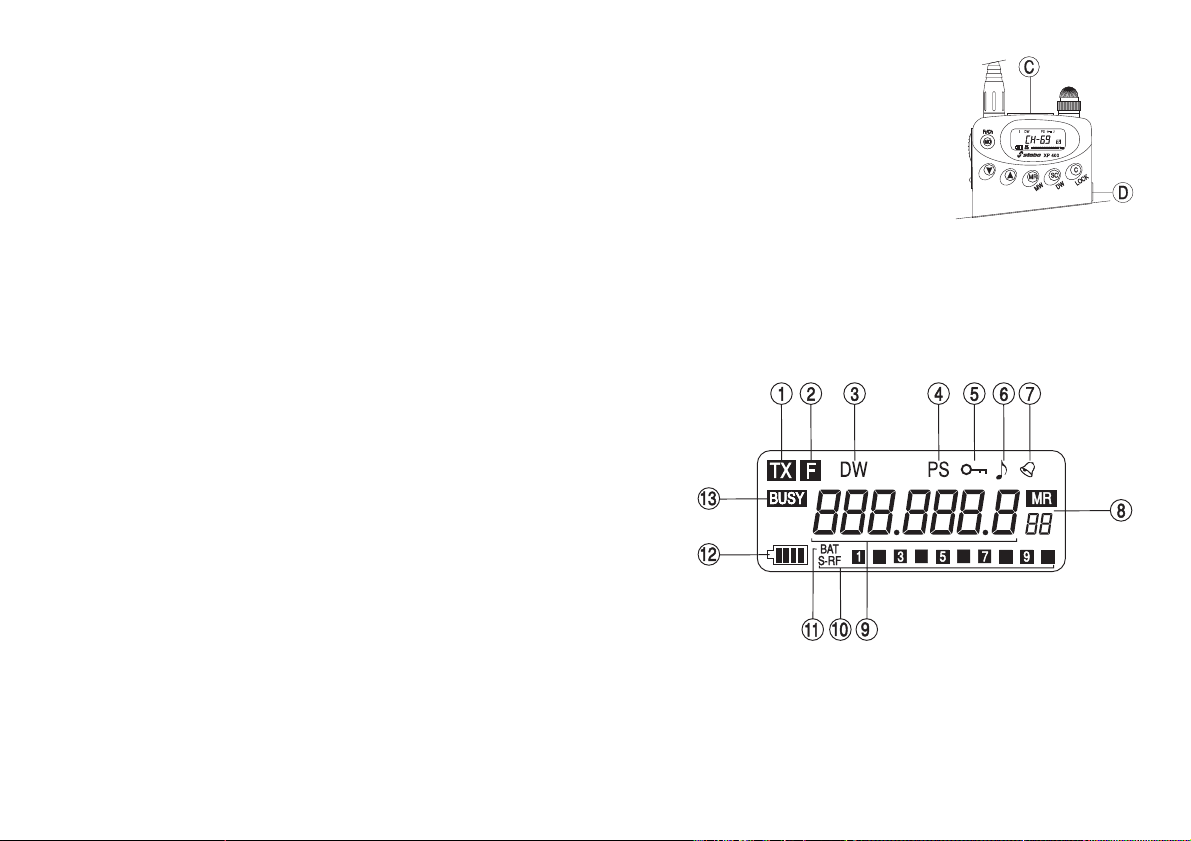
Connectors
C- Microphone and speaker jack
Jack for connection of optional speaker microphone
accessory. We recommend that you use our own external speaker/MIC for this radio. If you want to
use another makers external speaker/MIC. for this radio, please ask the shop if you may use your
external speaker/MIC or not.
Dust Cover: When speaker/microphone are not being used, this prevents dirt and moisture from
getting inside the radio.
D- DC jack
Allows one to use external supply
(4,5 V max)
.
Display Panel Features
1- TX Indicates that radio is in the "transmit" mode.
2- Function Mode Indicates the "F" button has been selected.
3- DW Indicates that the "Dual Watch" feature is activated
4- PS Indicates that the radio is in the "Battery Save" mode.
5- Lock Indicates the "Key Lock" feature has been activated.
6- Beep Indicates that "Beep" tone confirmation is on.
7- Bell Indicates that the "Bell" feature has been activated
8- Memory channel Indicator
Display the memorized channel number.
9- Channel (Frequency) Indicator
Display the channel number or Frequency
10- Signal strength indicator
The radio incorporates a tenth segment to measure incoming
signal and power output meter in the LCD. When receiving a
33
Page 34

signal, the meter will indicate how strong the signal is. A
weak signal will be indicated by one or two segments, while
a very strong signal will have 8 to 10 segments. When
transmitting, the letter "TX" will appear on the LCD and 10
segments will appear on the LCD.
11- Battery remainder level
If you want to see the battery level when you press the
"PTT" button, press the "MO" (monitor) button with "PTT"
button.
12- Battery
Indicates batteries are getting low. If the battery level is lower
than the standard point, Battery Level Indicator will blink
13- Busy Indicates that RF signal is received.
Specification
1- General
Channels 69
Frequency 433.075 MHz TO 434.775 MHz
Frequency generation PLL SYNTHESIZER
Operating temperature -10o C to +55o C
Power source D.C 3 V
Modulation F3E
Impedance 50 ohm
Dimensions 58(W) x 105(H) x 26.5(D)mm
Weight 190g with battery
2- Receiver section
Circuit type DUAL CONVERSION
SUPERHETERODYNE
IF frequency 1st IF 21,4 MHz
2nd IF 455 kHz
Sensitivity 0.22 µV FOR 20dB SND
Selectivity 60dB Min
Spurious & image rejection 60 dB Min
Inter modulation distorsion 60dB Min
Audio output @10%THD 300 mW 16 Ohm
3- Transmitter section
Power output 10mW
Distorsion 5%
Deviation +/- 5 kHz
Current drain TX 300 mA
RX + squelch 30 mA
34
Page 35

Ein Unternehmen der Groupe
FÜR GUTE VERBINDUNG
Declaration of Conformity
Herewith declare that our product :
LPD transceiver “stabo XP 400”
corresponds to our Technical Construction Files and Test reports and is conform to all relevant essential requirement s of
the R&TTE-Directive 1999/5/EC, issued March 9th, 1999. According to Annex II (receiving part of the product) and Annex
IV (transmitting part of the product) of the R&TTE-Directive we have involved the Notified Body 0682 ans mutually agreed
to use of following European standards do demonstrate the conformity of the product :
Radio and Spectrum engineering parameters : ETS 300 200
Electromagnetic Compatibility EMC : ETS 300683
Electrical safety (without application of voltage limits according to Art. 3 (1) (a) of R&TTE Directive) :
IEC 60950 / EN 60950 (1997-11 with A 11) (1998-08)
The authorities of following EU countries have received notifications : Austria, Belgium, France, Germany, Netherlands,
Portugal, Spain.
Name : stabo Elektronik GmbH
Address : Münchewiese 14-16
31 137 Hildesheim / Germany
Contact person : Helmuth Bormann Helmuth BORMANN
Place and date of issue : Hildesheim, 01.02.2001
35
Page 36
SIEGE SOCIAL/HEAD OFFICE - FRANCE - Route de Sète -BP 100 - 34540 BALARUC
Site internet : http//www.president-electronics.com E-mail : [email protected]
0430/09-02
0682
 Loading...