

Page 1

InstructionSheet
IMPORTANT SAFETY INFORMATION. READ AND FOLLOW ALL SAFETY INSTRUCTIONS. Follow label information and instructions
concerning Wet or Damp Locations, installation near combustible materials, insulation, building materials, and proper lamping. Do
not install in areas subject to combustible vapors or gases. Before wiring to power supply and during servicing or relamping, turn
off power at fuse or circuit breaker. All servicing or relamping must be performed by qualified service personnel.
Product must be grounded to avoid potential electric shock or other potential hazard. Product must be
mounted in locations and at heights and in a manner consistent with its intended use, and in compliance
with the National Electrical Code and local building codes. The use of accessory equipment not recommended by the
manufacturer or installed contrary to instructions may cause an unsafe condition. Do not block light emanating from product in
whole or part, as this may cause an unsafe condition. Do not allow items such as drapes, curtains, screens or the like to come into
contact with the product or to block light from the product, as this may cause an unsafe condition.
WARNING - This product contains chemicals known to the State of California to cause cancer, birth defects and/or other
reproductive harm. Thoroughly wash hands after installing, handling, cleaning, or otherwise touching this product.
INSTALLATION INSTRUCTIONS
PREPARATION: Current reflector and lamp must be removed. Supply line must be disconnected to current socket. The current
socket can be set aside above the ceiling or removed completely. Power must be turned off and the supply line must be
brought to the opening in ceiling as shown below.
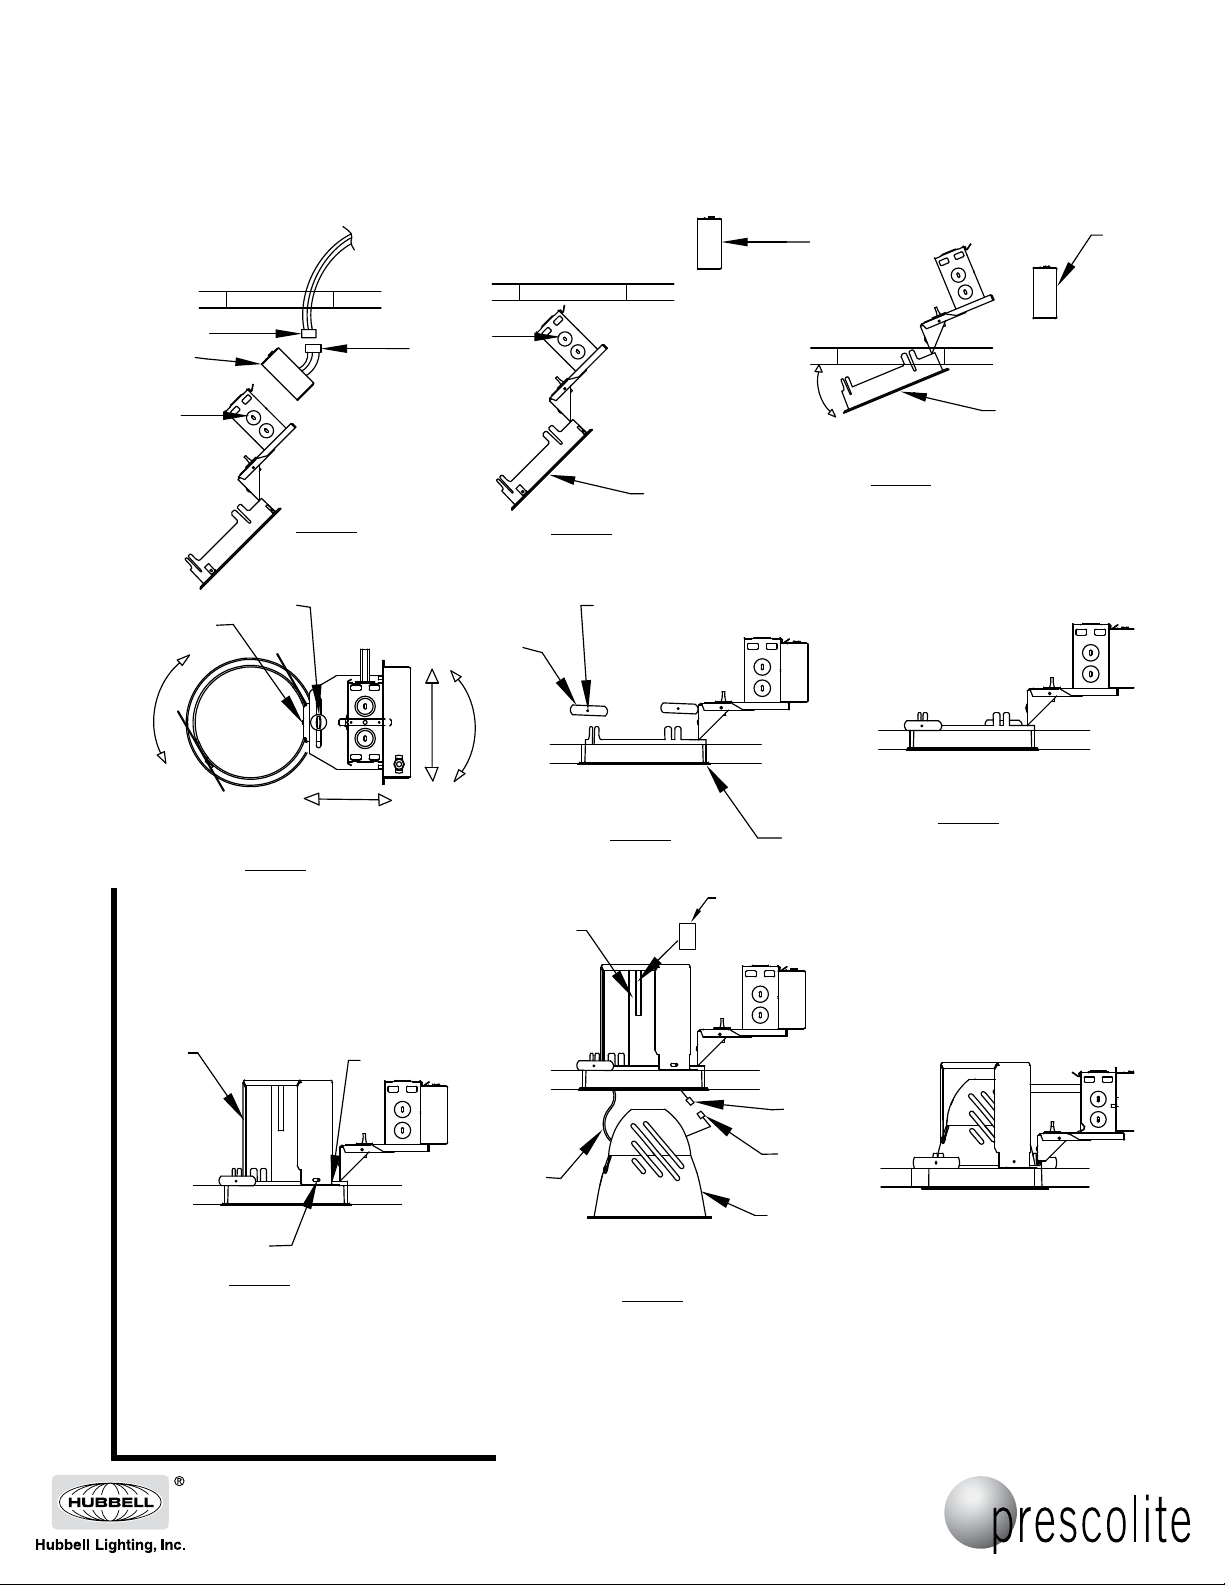
A. Attach quick connect (1) to supply line. Attach supply line to junction box (2) through one of the knock outs provided in
junction box (2). Remove junction box cover (3) with driver from junction box (2). Attach quick connect (1) to quick connect
(4). Push junction box cover with driver (3) through opening in ceiling and lay to the side. (SEE FIG. 1 and 2). Slip
junction box assembly and flange ring (5) through hole in ceiling. (SEE FIG. 2 and 3)
Part No ....................................................... 93026631
Sheet 1 of 2
www.prescolite.com Prescolite TollFree Technical Support 1.888.PRS.4TEC Hours: 8am - 5pm ET
RD6LED
B. With housing (5) in ceiling, the housing (5) can be rotated as needed to clear existing fixture obstacles and/or to be
positioned best for the flexible conduit, etc. If additional adjustment is needed, screw (6) and/or screw (7) can be loosened
and junction box (2) can be further moved. Ensure that screw (6) and (7) are retightened after this step. (SEE FIG. 4))
C. While pressing the bottom flange (8) tight against the bottom of the ceiling insert one support (9) into slot as shown. Press
support (9) down against the top of the ceiling and tighten screw (10). Repeat this step for other support (9). (SEE FIG.5
AND 6)
D. Put all wires inside of junction box (2) and install junction box cover with driver (3). NOTE: Tab on bottom of cover goes
into slot in plate and spring clip attaches to top of cover.
WARNING: DO NOT pinch wires between J-Box/driver cover and J-Box. Consult a qualified electrician for all other
options that require other wiring configurations. Make sure all connections are tight and secure.
E. Insert light engine bracket (11) into ceiling. Align two holes in bracket (11) with slots in housing (5). Push bracket (11)
down firmly until flange (12) makes firm contact with top of ceiling. While holding bracket (11) against top of ceiling
tighten two screws (13) down firmly. (SEE FIG 7)
F. After all ceiling installation and finishing work is complete, attach the safety cable (14) to the light engine/reflector
assembly (15) by unscrewing the wing nut (SEE FIG. 8).
G. Connect the wires (16) coming from the light engine to the wires (17) coming from the driver conduit by snapping the two
connectors together (SEE FIG. 8)
H. Install driver conduit connector into 7/8” hole inlight engine reflector on splice box. CAUTION: Do not pinch wires.
I. Insert the light engine/reflector assembly into the opening of the housing. Pay attention to the hexagonal rod (18) that
needs to slide into the heat sink hole. Tighten the captive tamper proof screw using the insert bit provided. Make sure the
reflector is flush against the ceiling. If needed light engine bracket (11) can be raised.
NOTE: If screw in center of light engine assembly (15) does not engage in hexagonal rod (18) then remove hexagonal rod
and reinstall using the appropriate spacer (19) provided by placing spacer (19) between hexagonal rod (18) and
bracket (11)
NOTE: During step I use gloves to prevent fingerprints on the reflector and trim.
SEE PAGE 2 FOR ILLUSTRATIONS
701 Millennium Blvd, Greenville, SC 29607
With representatives offices in principal cities throughout North America.
Copyright 2010,
6/4/10
, All Rights Reserved - Printed in U.S.A.
Page 2
InstructionSheet
INSTALLATION INSTRUCTIONS
RD6LED
2
FIG. 7
93026631
FIG. 2
FIG. 3
FIG. 6
FIG. 8
5
7
6
11
13
12
14
15
16
17
18
19
1
4
FIG. 5
9
10
8
3
2
FIG. 1
5
3
3
FIG. 4
Part No ....................................................... 93026631
Sheet 2 of 2
www.prescolite.com Prescolite TollFree Technical Support 1.888.PRS.4TEC Hours: 8am - 5pm ET
FIG. 3
FIG. 1
FIG. 4
FIG. 2
FIG. 5
FIG. 6
FIG. 7
701 Millennium Blvd, Greenville, SC 29607
With representatives offices in principal cities throughout North America.
Copyright 2010,
6/4/10
, All Rights Reserved - Printed in U.S.A.
FIG. 8
 Loading...