

Page 1
INSTRUCTION MANUAL
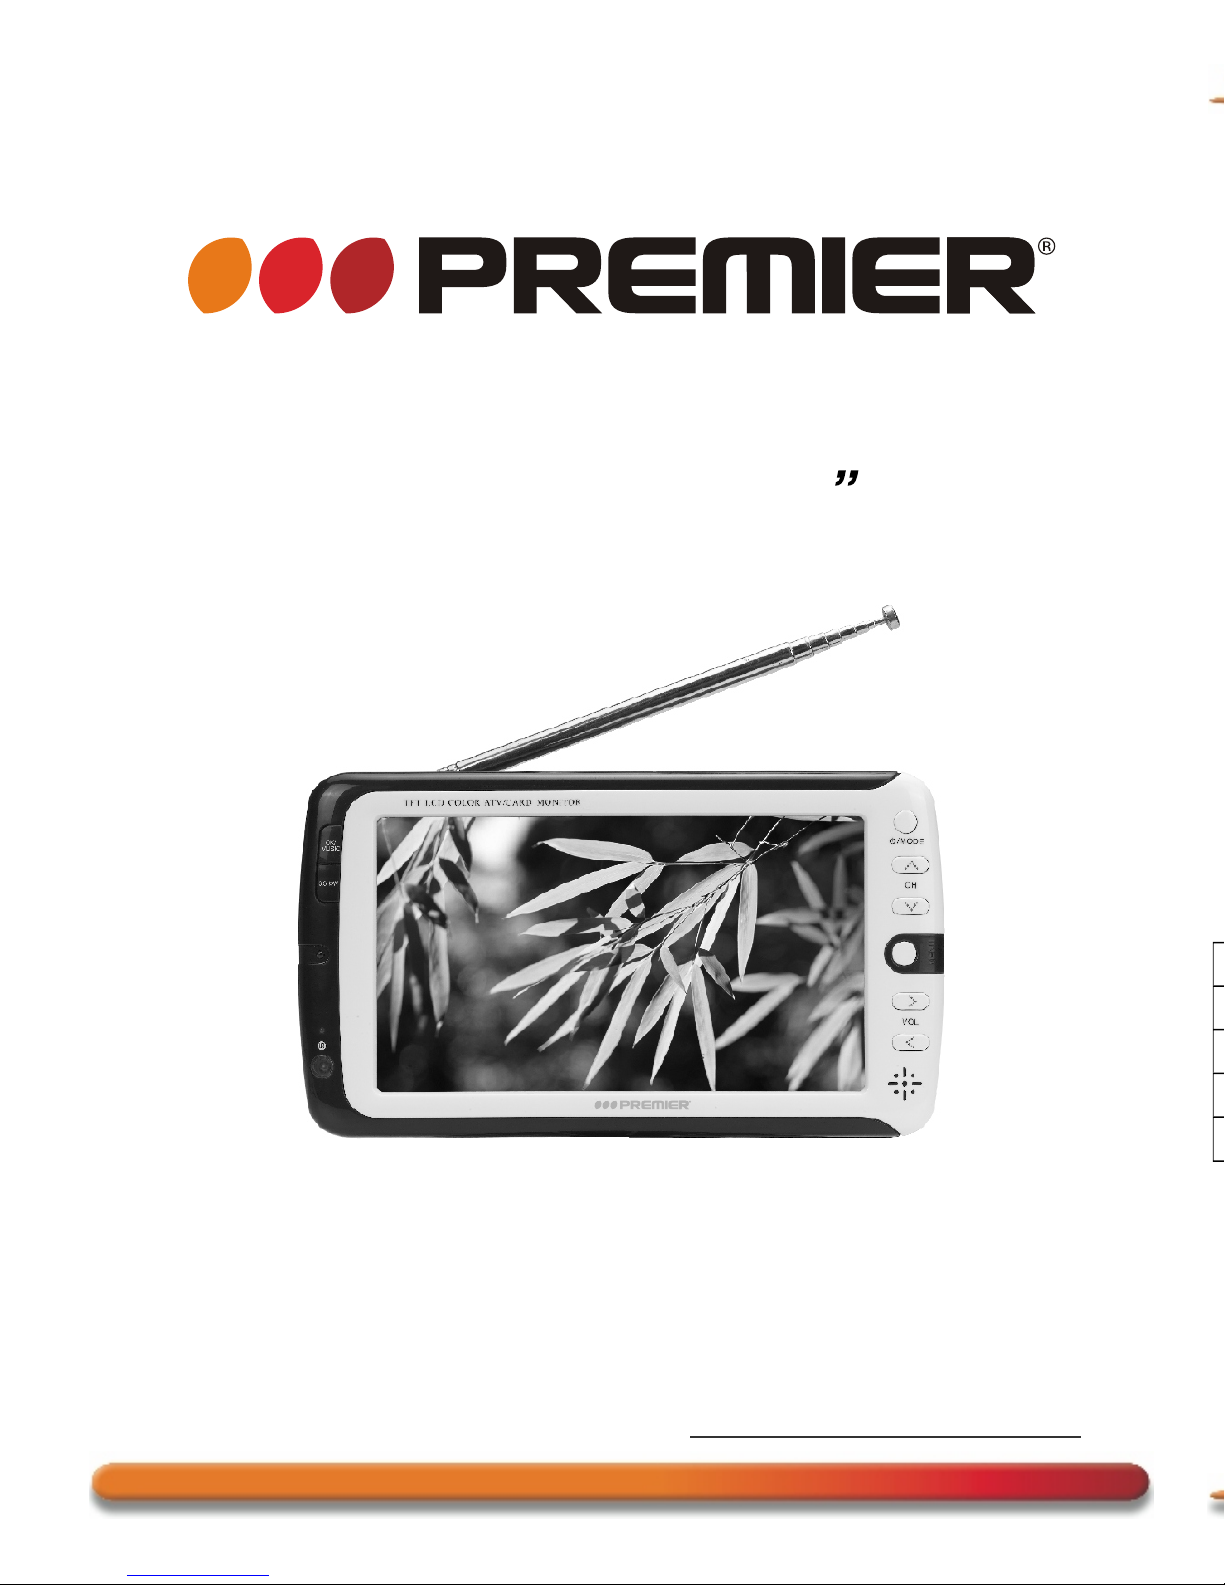
TV-4454TFT
DEAR CUSTOMER
In order to achieve the best performance of your product, please read this
instruction manual carefully before using, and keep it for future reference.
If you need extra support, please write to [email protected]
NOTE
This unit may be submitted to changes in specifications, characteristics and/or
operation without prior notice to the user, in order to continue improving and
developing its technology.
PREMIER CUSTOMER SERVICE
Venezuela:
Colombia:
Panama:
Website
E-mail:
Portable LCD TV(7 )
Page 2
1. Storage
temperature ranges from -20 to 60 and the working temperature from
-5 to 40 .
kitchens, washtubs, as well as basements, swimming pools or similar places.
strong collision.
2. Maintenance
on.
detergents like alcohol and benzene to clean your device.
Warning!
safety.
driving.
Special Notice
Bright spots or dark spots may appear on the screen. This is a normal phenomenon
associated with the active matrix display technology and is not a sign of malfunction.
Do not attempt to maintain. For any failures, please turn off your TV set immediately
and contact us or your dealer. This device integrates a great deal of fine electronic
components. Disassembly or alternation may result in damages or breaks.
3. Battery Recharging Ways
tools, internal battery is also available for power supply once built-in battery is
full charged.
down to specific one, and then the unit will shut down automatically. Please
connect adapter for recharging.
1. Precautions
P-1 P-2 P-3
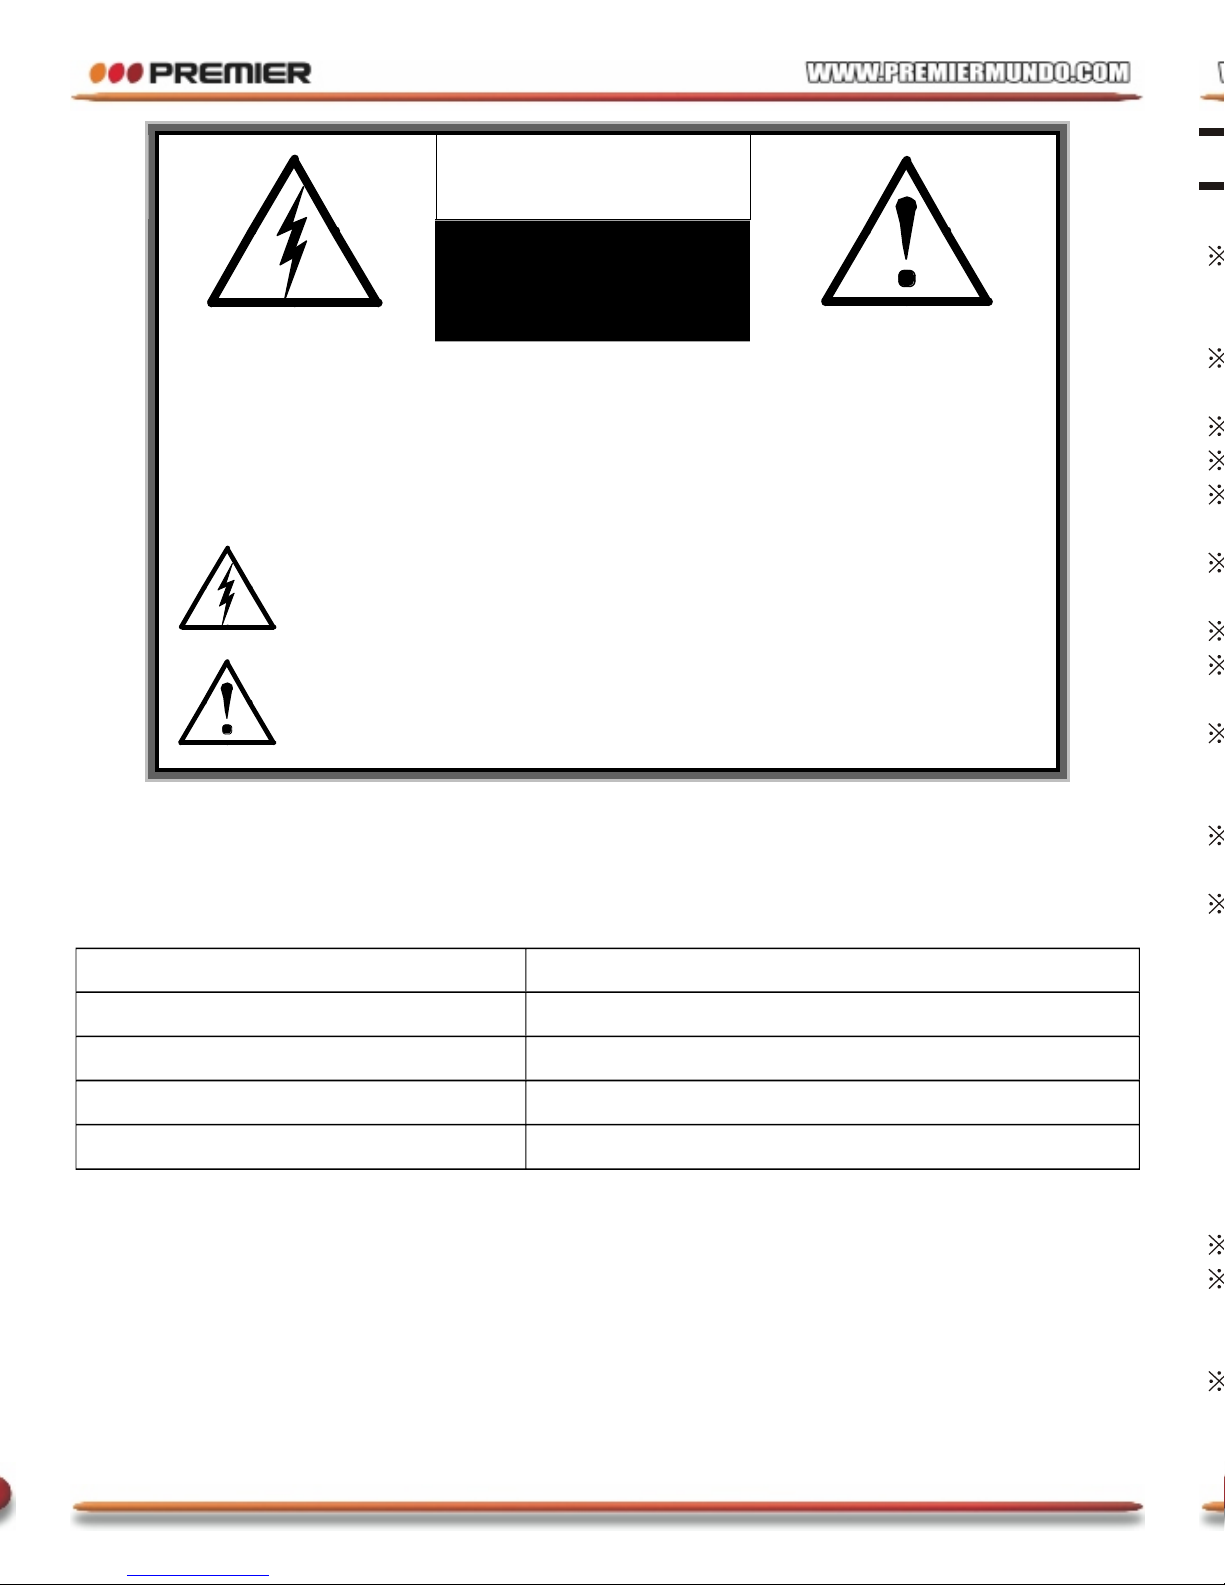
Caution: To reduce the risk of electric shock do not open
this device, there are not serviceable parts for customers.
Please refer any maintenance or repair to qualified
personnel.
CAUTION
RISK OF ELECTRIC
SHOCK, DO NOT
OPEN
This sign means the existence of dangerous voltage at
the inside of the unit, which states a risk of electric shock.
This sign means that there are important instructions of
operation and handling in the manual that comes with this
Device.
NOTE
This unit may be submitted to changes in specifications, characteristics and/or
operation without prior notice to the user, in order to continue improving and
developing its technology.
PREMIER CUSTOMER SERVICE
www.premiermundo.com
300-5185
01-900-331-PEJC (7352)
0800 ELECTRIC (353-2874)
Venezuela:
Colombia:
Panama:
Website
E-mail:
Page 3
1. Precautions
4. Notes about battery usage
1. Storage
Keep this product away from extremely hot or cold places. The storage
temperature ranges from -20 to 60 and the working temperature from
-5 to 40 .
Do not use this product at damp environment like bathtubs, wash basins,
kitchens, washtubs, as well as basements, swimming pools or similar places.
Do not expose your TV set to high humidity, dust or oil smoke.
Do not throw or drop this product.
Do not subject this device to the inside of a case or strong vibrations, avoiding
strong collision.
Do not push on or scrub this product with sharp objects.
2. Maintenance
Disconnect all cables of this device at first before cleaning.
Wipe the enclosure, screen and keys using soft cloth with a little soft detergent
on.
Do not use polishing cloth, abstergent, and all types of propellants or chemical
detergents like alcohol and benzene to clean your device.
Warning!
damages caused by overcharge.
temperature is over 60 while charging, it means abnormality happened.
Please plug off the power cord and take to professional for check.
(depending on different screen brightness).
Tip: The above is the approximate time; actual time depends on working
conditions.
least 3 times for full capacity and normal life reserved.
Notes: Internal battery is an optional function, the above description is only
for products with internal battery function.
2. Accessories
Do not watch television programs or turn your TV set on for your own and others'
safety.
It is very dangerous to watch television programs or operate the TV set while
driving.
Special Notice
Bright spots or dark spots may appear on the screen. This is a normal phenomenon
associated with the active matrix display technology and is not a sign of malfunction.
Do not attempt to maintain. For any failures, please turn off your TV set immediately
and contact us or your dealer. This device integrates a great deal of fine electronic
components. Disassembly or alternation may result in damages or breaks.
3. Battery Recharging Ways
The unit is available for battery recharging on standby mode or power on mode.
Please use AC adapter or car adapter to recharge battery. Disconnect those
tools, internal battery is also available for power supply once built-in battery is
full charged.
When internal battery suffers from a power shortage, the battery voltage will get
down to specific one, and then the unit will shut down automatically. Please
1. Car adapter
2. AC adapter
3. 75 ohm antenna conversion cable
Open the package and make sure all the items are included.
connect adapter for recharging.
Page 4
4. Notes about battery usage
To protect battery, please never charge any full charged battery against any
damages caused by overcharge.
Battery will get hot after charged, which is a normal phenomenon. But if the
temperature is over 60 while charging, it means abnormality happened.
Please plug off the power cord and take to professional for check.
If the battery is charged under high temperature, it will not be charged fully.
Suggest to charge under 15 -25 for the best effect.
Charge: Charging for 4-6 hours can play more than 60 minutes
(depending on different screen brightness).
Tip: The above is the approximate time; actual time depends on working
conditions.
For long period in storage (over 3-6 month), please charge and discharge at
least 3 times for full capacity and normal life reserved.
Notes: Internal battery is an optional function, the above description is only
for products with internal battery function.
Open the package and make sure all the items are included.
2. Accessories
1. Car adapter
2. AC adapter
3. 75 ohm antenna conversion cable
4. AV conversion cable
5. Remote control
6.Telescopic antenna
Page 5
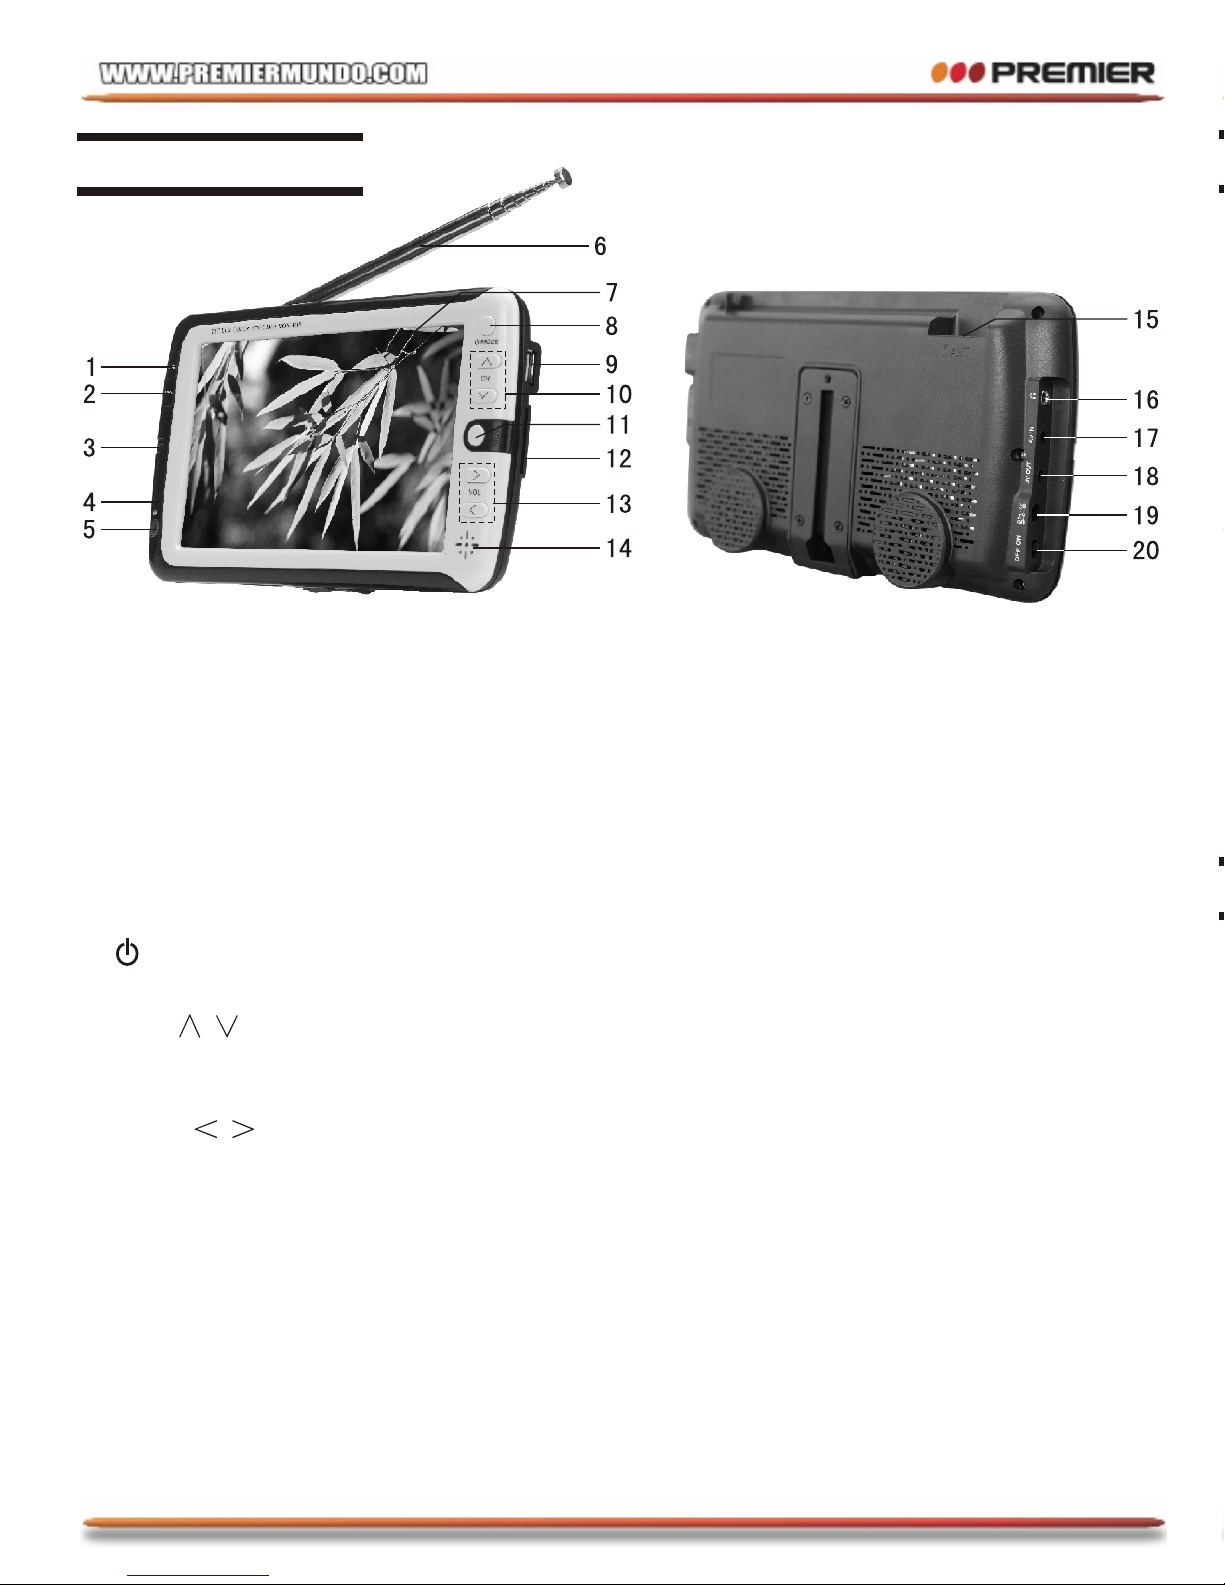
P-4
1. OK/MUSIC: Confirm button/Music Background button
2. EXIT:Return button
3. Power indicator/ Red:standby / Green:Power-on
4. Power indicator
5. Remote-control receive window
6. Telescopic antenna
8. /MODE: Standby/Operation mode shift button
10. CH / :Channel Select(Downward/Upwand)button
11. MENU: Menu button
13. VOL / : Volume(down/Left up/Right)ward button
14. Loudspeaker
15. Antenna input Jack
16. Headphone jack
17. AV Input
18. AV Output
19. DC Input
20. Power on/off
7. TFT-LCD screen
12.
9. USB connect Jack
SD/MMC/MS type CARD input port
3. Appearance
1
2
. OK/MUSIC: Under TV mode, keep pressing for 3 seconds
for Auto-search; Under CARD mode, press to confirm,
whenplaying slide show, press to turn ON/OFF the backg
round music.
.EXIT:Under CARD mode,press toreturn step by step;Under
TV/AV mode,press to EXIT.
3. /MODE: Under standby mode, short press to turn ON; When
the device is ON,short press to switch between TV/CARD/AV
mode; keep pressing 3 seconds for standby.
4. CH / : Under TV mode, press as Channels increases/decreases; under AV/
TV mode, press as upward/downward key; under OSD MENU or CARD mode,
press as upward/downward key.
5. MENU: Menu button; under AV/TV mode, press for Menu button; under CARD
mode, press to switch USB/CARD, keep pressing for 3 seconds as picture
adjust key.
6. VOL / : Under TV mode, press as Volume down/up; under AV/TV mode,
press as analog adjust; under CARD mode, short press as leftward/rightward
selection key, keep press(3 seconds) as Volume down/up key.
5. Description of Buttons on Remote Control
: the number of TV channel increases.
: the number of TV channel decreases.
press as ON/OFF for the background music.
main interface.
4. Description of Panel Buttons
Page 6
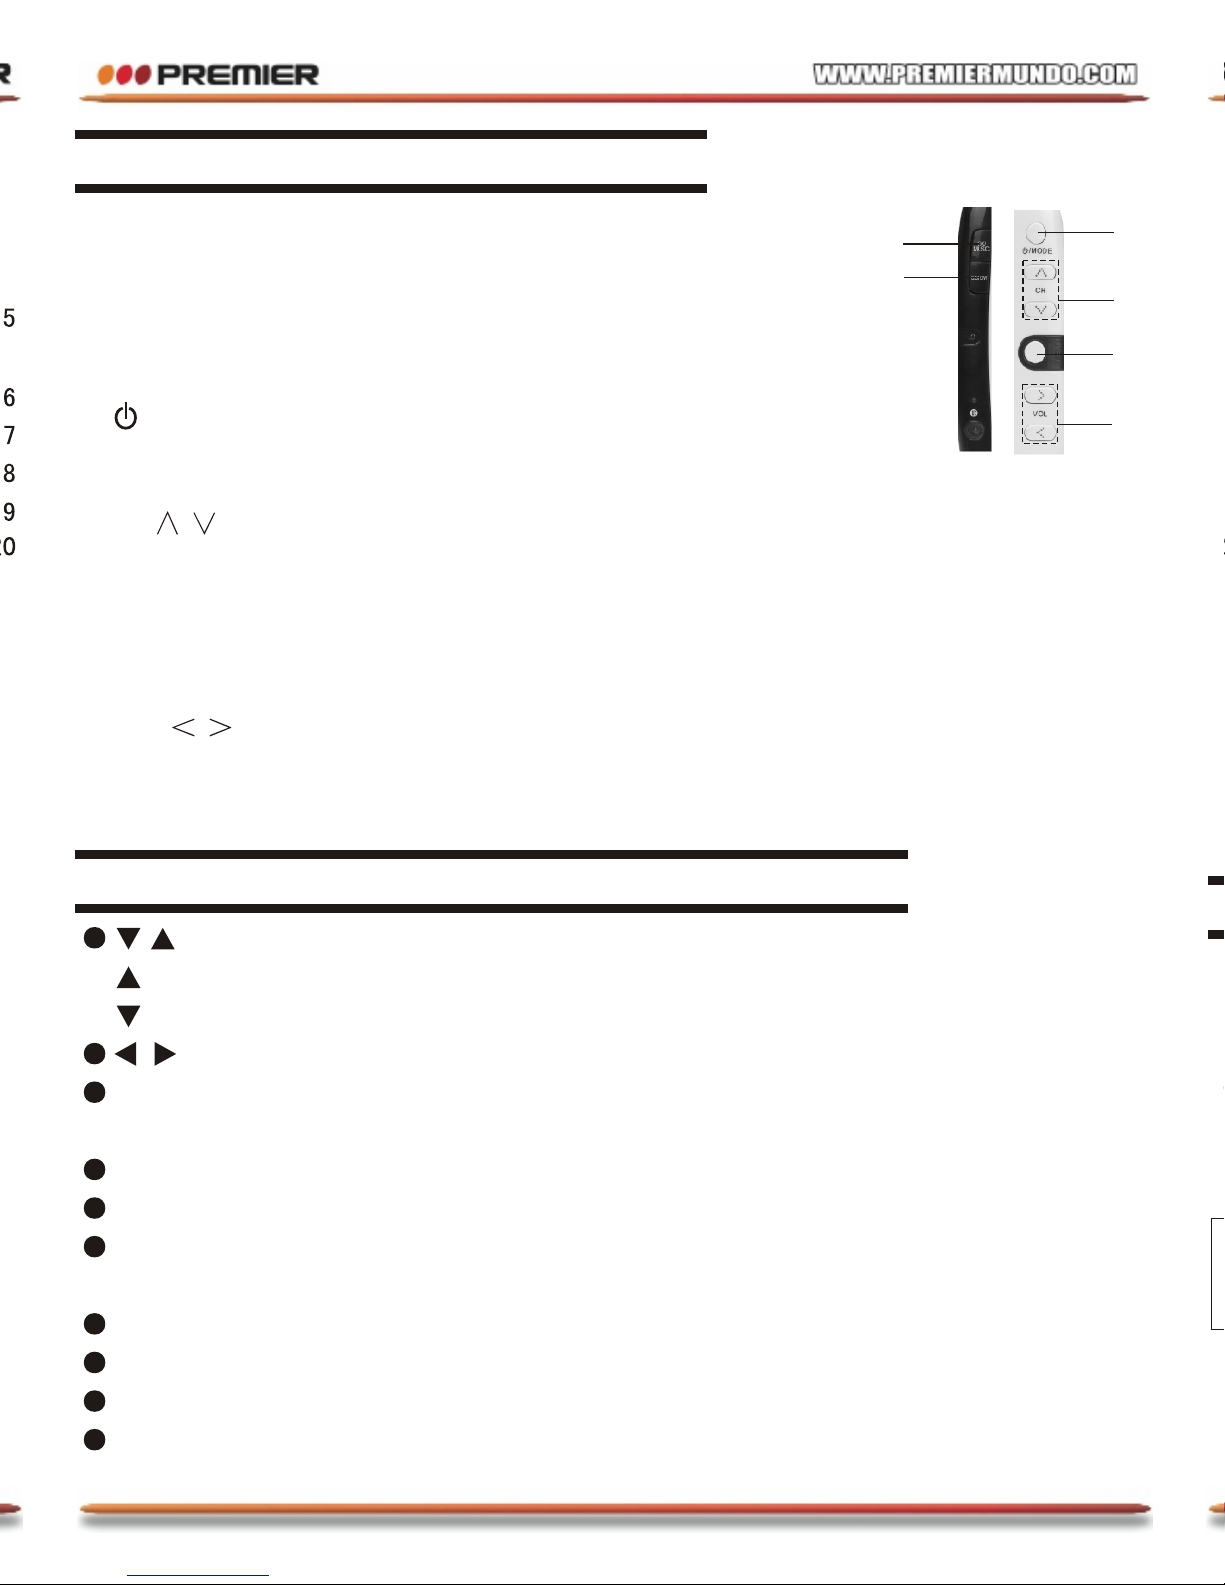
4. Description of Panel Buttons
1
. OK/MUSIC: Under TV mode, keep pressing for 3 seconds
for Auto-search; Under CARD mode, press to confirm,
whenplaying slide show, press to turn ON/OFF the backg
round music.
2
.EXIT:Under CARD mode,press toreturn step by step;Under
TV/AV mode,press to EXIT.
1
2
3
4
5
3. /MODE: Under standby mode, short press to turn ON; When
6
the device is ON,short press to switch between TV/CARD/AV
mode; keep pressing 3 seconds for standby.
4. CH / : Under TV mode, press as Channels increases/decreases; under AV/
TV mode, press as upward/downward key; under OSD MENU or CARD mode,
press as upward/downward key.
5. MENU: Menu button; under AV/TV mode, press for Menu button; under CARD
mode, press to switch USB/CARD, keep pressing for 3 seconds as picture
adjust key.
6. VOL / : Under TV mode, press as Volume down/up; under AV/TV mode,
press as analog adjust; under CARD mode, short press as leftward/rightward
selection key, keep press(3 seconds) as Volume down/up key.
5. Description of Buttons on Remote Control
/
: the number of TV channel increases.
: the number of TV channel decreases.
/ : To select program and adjust for selected program.
OK/MUSIC: Under CARD mode, press to confirm, when playing slide show,
6. Basic Operation Methods
1. Connection of Power Supply:
Align the power supply plug on AC
adapter with the jack on the machine
rear cover marked with DC.
press as ON/OFF for the background music.
PICT: Picture mode shift.
POWER: Power on/off.
MENU: Under MENU/CARD mode, press to switch between USB and CARD in
main interface.
MUTE: Mute button.
INFO: Press this button to display the character of program currently watching.
SLEEP: Selecting the switch off time within 120 minutes.
MODE: Press this button to switch between TV/CARD/ AV mode.
2. Connection of Antenna Cable:
Align one end of the attached antenna cable
plug in the antenna jack on TV set and the
other end plug in the external antenna jack.
P-5 P-6
Page 7
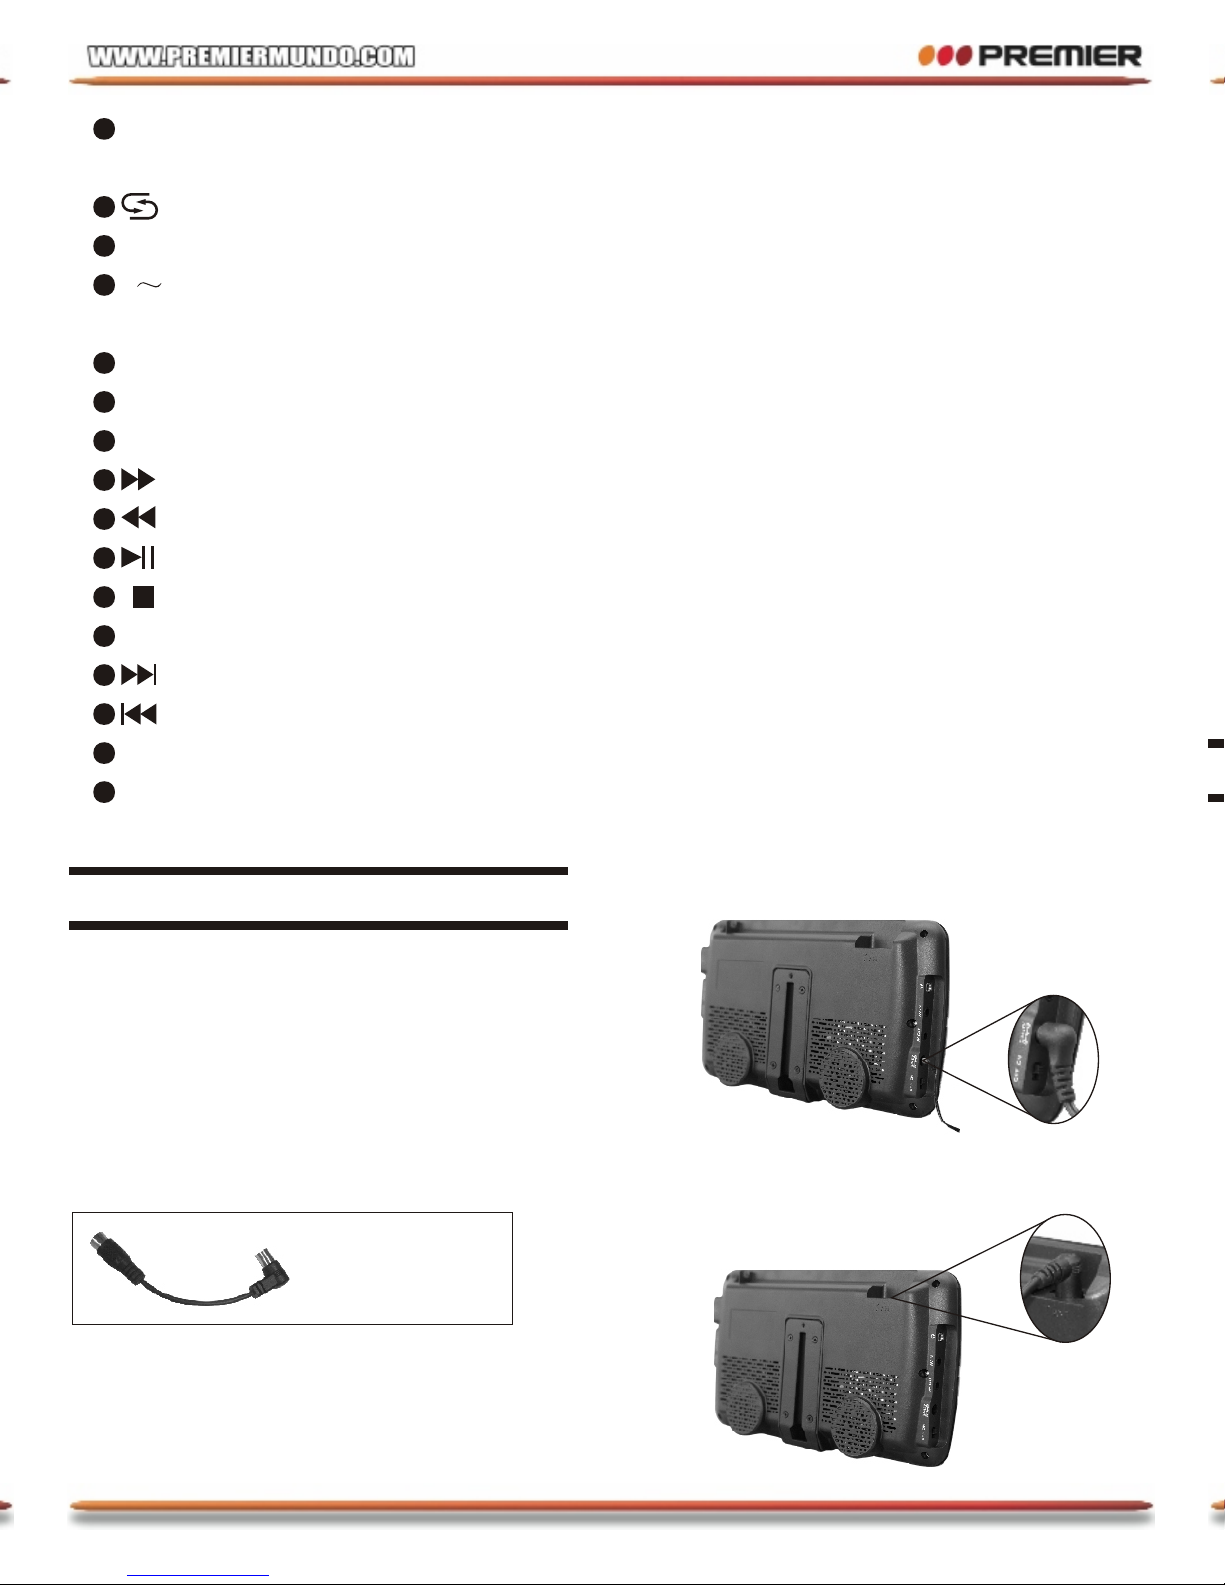
SEARCH: Under TV mode, keep pressing (3 seconds) to Auto search. Under
CARD mode, the movie playing can realize time selected function.
: Return button.
S.SHOW: Scan button (only available under CARD mode).
0 9 (Digital key), -/--(Channel shift):
On TV mode, use to choose the TV channel (TV mode only).
P. ADJ: Picture adjust.
VOL+: Volume +.
VOL-: Volume -.
: Fast forward(only available under CARD mode).
: Fast backward(only available under CARD mode).
: Play/pause(only available under CARD mode).
: Stop (only available under CARD mode).
ZOOM: Press to zoom in/out the image(only available under CARD mode).
: Next track(only available under CARD mode).
: Previous track(only available under CARD mode).
SOUND: Audio system/sound tracks switch.
REP: Repeat(only available under CARD mode).
6. Basic Operation Methods
1. Connection of Power Supply:
Align the power supply plug on AC
adapter with the jack on the machine
rear cover marked with DC.
2. Connection of Antenna Cable:
75ohm antenna
conversion line
Align one end of the attached antenna cable
plug in the antenna jack on TV set and the
other end plug in the external antenna jack.
7. Menu Operation
Press MENU to display options as follows:
PICTURE OPTION CLOCK SYSTEM PRESET
1. PICTURE
CONTRAST, BRIGHT, COLOR, SHARP and TINT displays on the screen as below
description: Press or to select the item, Press or to adjust.
Notice: Only when displaying the picture of NTSC system, it will show the character
of TINT in the Picture menu.
2. OPTION
LANGUAGE displays on the screen as below description:
Press or to select multi language of OSD.
3. CLOCK
TIME, ON-TIME, OFF-TIME, ATTENTION, BESPOKE TIME and POSITION will
display on the screen as below description:
Press or to select item, Press or to setup.
Notice: If you wish to setup other item, TIME must be setup. All items is 24 hours
the most.
Page 8
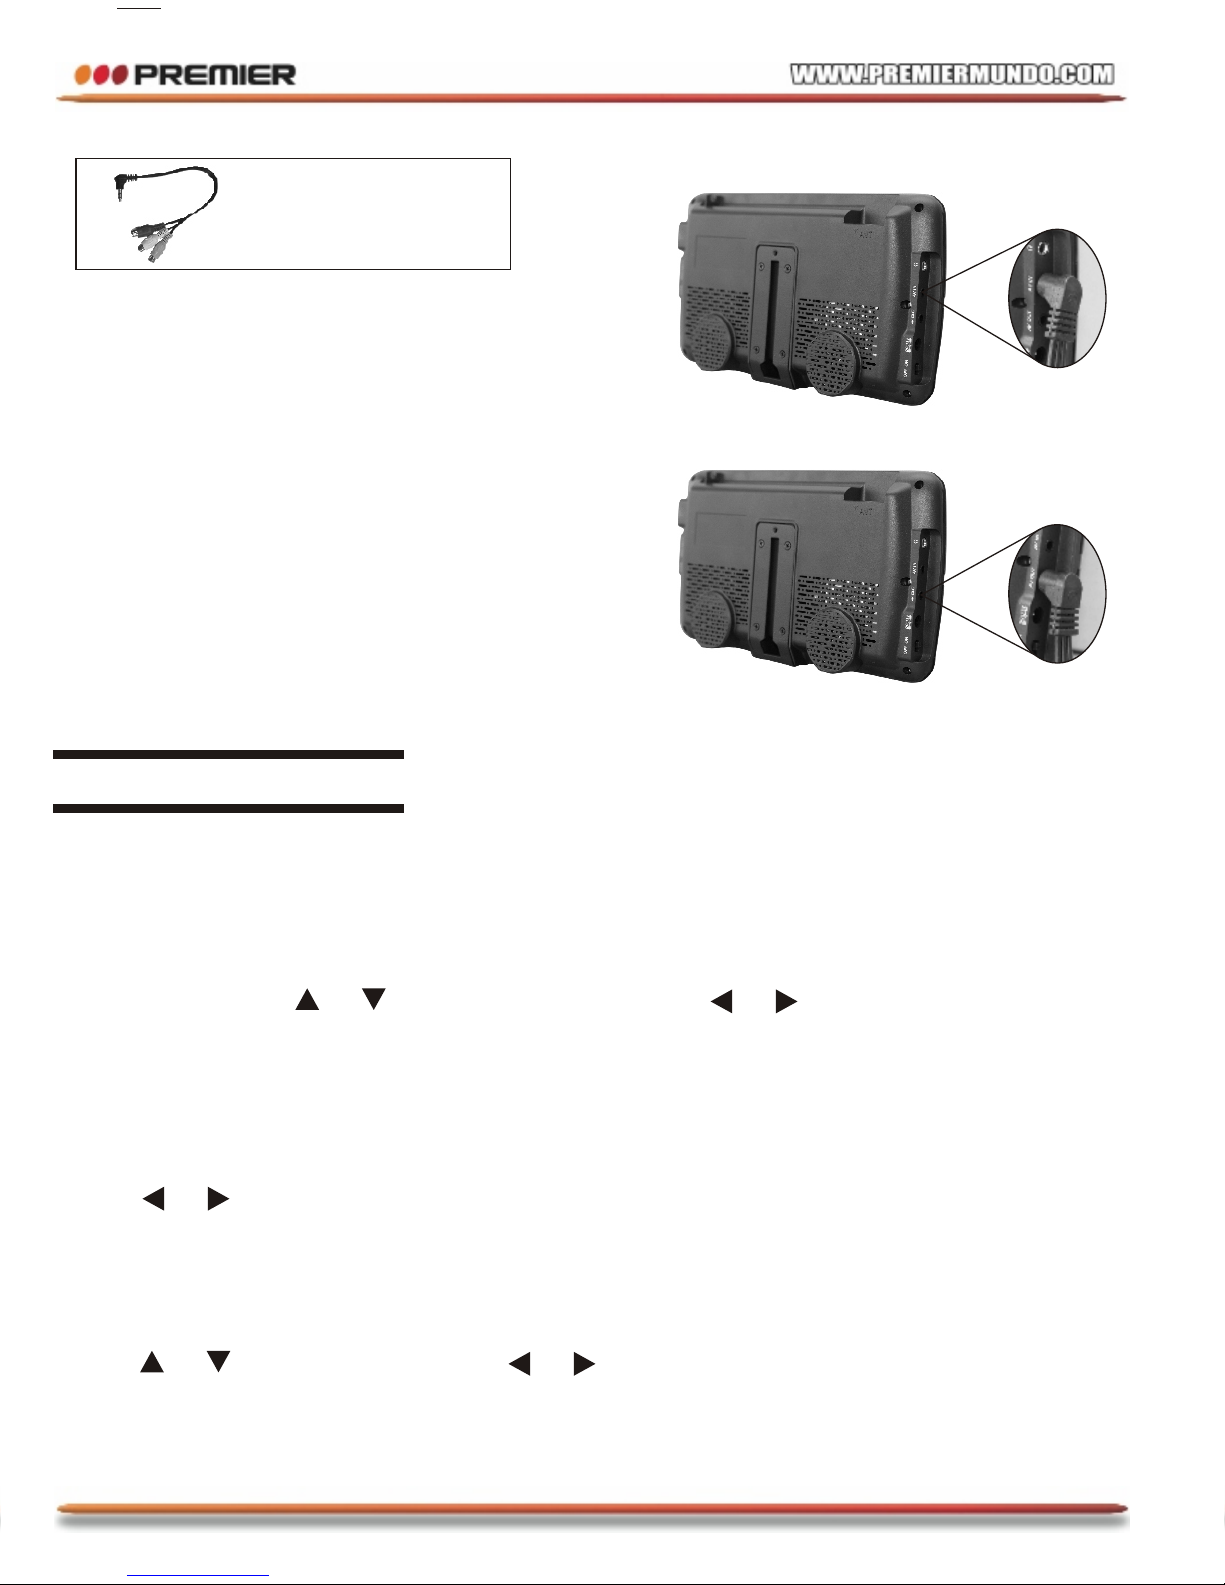
AV conversion cable
3. Connection of AV convert Cable:
3.1.AV input: Insert the external video
cord into the yellow port of the AV convert
cable, the left sound track into the white
port and the right sound track into the red
port. Then plug the AV convert cord in
AV IN jack.
3.2.AV output: Insert the external video
cord into the yellow port of the AV convert
cable, the left sound track into the white
port and the right sound track into the red
port. Then plug the AV convert cord in
AV OUT jack(AV OUT only in CARD mode) .
P-7
Press MENU to display options as follows:
PICTURE OPTION CLOCK SYSTEM PRESET
1. PICTURE
CONTRAST, BRIGHT, COLOR, SHARP and TINT displays on the screen as below
description: Press or to select the item, Press or to adjust.
LANGUAGE displays on the screen as below description:
Press or to select multi language of OSD.
Notice: Only when displaying the picture of NTSC system, it will show the character
of TINT in the Picture menu.
2. OPTION
3. CLOCK
TIME, ON-TIME, OFF-TIME, ATTENTION, BESPOKE TIME and POSITION will
display on the screen as below description:
Press or to select item, Press or to setup.
Notice: If you wish to setup other item, TIME must be setup. All items is 24 hours
the most.
7. Menu Operation
Page 9
P-8
4.2.Press or to select the item SOUND-SYS:
Then press , the SOUND-SYS displays in the order of BG5.5M, I6.0M, DK6.5M,
L6.5M and M4.5M.
4. SYSTEM
COLOR-SYS, SOUND-SYS, BLUE BACK, HORIZONTAL, VERTICAL and ZOOM
displays on the screen as below description:
4.1.Press or to select the item COLOR-SYS:
Then press to revolve the screen in the order of AUTO, PAL, SECAM, NTSC,
PAL N and PAL M. Please choose carefully this system correctly. Otherwise, it may
cause achromatic or inferior color. It is recommended to select on AUTO position.
Notes:
1)Please set the SOUND-SYS at local one.
2)In case with picture while without sound or with noise, please check the
SOUND-SYS for correct setup first.
4.3.Press or to select the item BLUE BACK:
Press or can realize the ON/OFF of BLUE BACK under no signal.
4.4.Press or to select the item HORIZONTAL:
Press or can realize HORIZONTAL, press again to resume the picture.
4.5.Press or to select the item VERTICAL:
Press or can realize VERTICAL flip, press again to resume the picture.
4.6.Press or to select the item ZOOM:
Press or can realize the selection of picture modes:4:3 mode, and 16:9 mode.
5. PRESET (When TV function moves to full frequency search, operate as the
below instruction.)
POSITION, REMEMBER, BAND, SWAP, FINE, SEARCH and AUTO-SEARCH will
display on the screen as below description:
5.1.Press or to select POSITION, and press or to set.
5.2.Press or to select REMEMBER, and press or to select ON, this
channel will be displayed when selected. When REMEMBER is OFF, this channel
will not be displayed.
5.3.Press or to select BAND ,and then press or to switch of V-L,V-H
and U.
5.4.Press or to select SWAP, then press or to select the channel No.
Press MENU to confirm SWAP.
5.5.Press or to select FINE. Then press or to adjust channel frenquency
by little.
5.6.Press or to select SEARCH. Then press or to start searching
forthward or backward. TV searching indicater bar will turn to green from red after
search TV signal. TV storage system will identify as no signal if TV channel are on
too weak signal.
5.7.Press or to select AUTO-SEARCH. Press or to start auto searching
from channel 0 in turns of V-L , V-H and UHF. Station of sufficient strength will be
memorized and searching stops.
6. PRESET (When TV function moves to fixed channel search, operate as the
below instruction.)
POSITION, REMEMBER, ANTENNA and AUTO-SEARCH will display on the screen
as below description:
6.1.Press or to select POSITION, and press or to set.
6.2.Press or to select REMEMBER, and press or to select ON, this
channel will be displayed when selected. When REMEMBER is OFF, this channel
will not be displayed.
6.3.Press or to select "ANTENNA" item, Press or to select AIR,
CATV-STD, CATV-HRC, CATV-IRC.
6.4.Press or to select "AUTO-SEARCH" item: press or to auto search.
In order to watch TV properly
1. Set the desired OSD language by pressing LANG.
2. Ensure the COLOR-SYS, SOUND-SYS is correct by checking from SYSTEM
menu.
3. Select AUTO-SEARCH in PRESET menu, and start auto search TV signal.
4. Adjust the length, angle and direction of the telescopic antenna to obtain optimum
image.
Page 10
P-9 P-10 P-11
whatever you adjust the antenna, and cause loud noise wave, shaking image and
inferior sound, etc., which is not TV fault. If the image remains inferior when using
telescopic antenna, please try to use the external antenna or CATV.
Notice:
5.3.Press or to select BAND ,and then press or to switch of V-L,V-H
and U.
5.4.Press or to select SWAP, then press or to select the channel No.
Press MENU to confirm SWAP.
5.5.Press or to select FINE. Then press or to adjust channel frenquency
by little.
5.6.Press or to select SEARCH. Then press or to start searching
forthward or backward. TV searching indicater bar will turn to green from red after
search TV signal. TV storage system will identify as no signal if TV channel are on
too weak signal.
5.7.Press or to select AUTO-SEARCH. Press or to start auto searching
from channel 0 in turns of V-L , V-H and UHF. Station of sufficient strength will be
memorized and searching stops.
6. PRESET (When TV function moves to fixed channel search, operate as the
below instruction.)
POSITION, REMEMBER, ANTENNA and AUTO-SEARCH will display on the screen
as below description:
6.1.Press or to select POSITION, and press or to set.
6.2.Press or to select REMEMBER, and press or to select ON, this
channel will be displayed when selected. When REMEMBER is OFF, this channel
will not be displayed.
6.3.Press or to select "ANTENNA" item, Press or to select AIR,
CATV-STD, CATV-HRC, CATV-IRC.
6.4.Press or to select "AUTO-SEARCH" item: press or to auto search.
In order to watch TV properly
1. Set the desired OSD language by pressing LANG.
2. Ensure the COLOR-SYS, SOUND-SYS is correct by checking from SYSTEM
menu.
3. Select AUTO-SEARCH in PRESET menu, and start auto search TV signal.
4. Adjust the length, angle and direction of the telescopic antenna to obtain optimum
image.
1. Usage of memory facility (USB&CARD)
This product supports almost all types of USB, Multi Media Card (MMC), SD,
Memory Stick (MS) in the market.
1)This product supports various USB & CARD within 4G (beyond the capacity, some
abnormal phenomenon may occur. )
2)This product supports JPEG, MP3, WMA, VCD, AVI ect. (some substandard files,
like DIVX3 and compress formats, are not available and Black screen may occur.)
Notice:
pause when the data stream is above 2000KBP/S.
pictures too big. It is suggested within 12M.
9. CARD mode operation
1 .Set the desired OSD language by pressing LANG.
2 .Ensure the COLOR-SYS, SOUND-SYS is correct by cheching
from SYSTEM menu.
3 .Select AUTO-SEARCH in PREST menu, and start auto search
TV signal.
4 .Adjust the length, angle and direction of the telescopic antenna
toobtain optimum image.
Notice
ln case the signal intensity is too weak, the imag will remain inferior
whatever you adjust the antenna, and cause loud noise wave,
shaking image and inferior sound, etc.,which is not TV fault. Lf the
image remains inferior when using telescopic antenna, please try to
use the external antenna or catv.
8. ln order to receive clearer picture
Page 11
In case the signal intensity is too weak, the image will remain inferior
whatever you adjust the antenna, and cause loud noise wave, shaking image and
inferior sound, etc., which is not TV fault. If the image remains inferior when using
telescopic antenna, please try to use the external antenna or CATV.
Notice:
1. Usage of memory facility (USB&CARD)
This product supports almost all types of USB, Multi Media Card (MMC), SD,
Memory Stick (MS) in the market.
1)This product supports various USB & CARD within 4G (beyond the capacity, some
abnormal phenomenon may occur. )
2)This product supports JPEG, MP3, WMA, VCD, AVI ect. (some substandard files,
like DIVX3 and compress formats, are not available and Black screen may occur.)
Notice:
Able to play very smoothly when data stream is below 2000KBP/S, it might
pause when the data stream is above 2000KBP/S.
The product may be not available to play or may need to restart once browsing
pictures too big. It is suggested within 12M.
9. CARD mode operation
1 .Set the desired OSD language by pressing LANG.
2 .Ensure the COLOR-SYS, SOUND-SYS is correct by cheching
from SYSTEM menu.
3 .Select AUTO-SEARCH in PREST menu, and start auto search
TV signal.
4 .Adjust the length, angle and direction of the telescopic antenna
toobtain optimum image.
Notice
ln case the signal intensity is too weak, the imag will remain inferior
whatever you adjust the antenna, and cause loud noise wave,
shaking image and inferior sound, etc.,which is not TV fault. Lf the
image remains inferior when using telescopic antenna, please try to
use the external antenna or catv.
8. ln order to receive clearer picture
reader, portable hard drive, MP3, Mp4.
then re-start (reset).
2. Playing multi-media files
Press 'MODE', switch to CARD mode, in the interface five functions ('PHOTO',
'MUSIC', 'VIDEO', 'SLIDE SHOW' and 'SETUP') are available. Insert USB or CARD
(Once occur at the same time, press MENU to switch between USB or CARD in the
interface).
2.1. Browse Picture
Press direction key to select 'PHOTO', then click 'OK' to open file; press
upward/downward key to select picture, click 'OK' to read. When browsing pictures,
press 'S.SHOW' once to switch a mode of pictures displaying.
When reading picture files, press direction key for fast operation of the
following functions:
Left direction key: anticlockwise 90
Right direction key: clockwise 90
Up direction key: up/down/left/right mirror
Down direction key: up/down/left/right mirror
After the operation of rotation or mirroring, press " " key to continue playing.
Notice: Background music can not be open while reading picture, other function
will not work when using zoom function.
2.2 Play music
Press direction key to select 'MUSIC' item, press 'OK' to open file from storage;
press direction key to select the file, and then press 'OK' to play music.
2.3 Play movie
Press direction key to select 'VIDEO' item, press 'OK' to open the file from storage,
press direction key to select file, then press 'OK' to play movie.
2.4 Slide show
Press direction key to select 'SLIDE SHOW' item, press 'OK' to open file from
storage; press direction key to select file, press 'OK' to play. While playing,
press 'OK' to turn ON/OFF background music.
Note: The display languages of file or movie named are to be simplified Chinese
and international standard character. If languages displayed are not the above
character or character over 8 digits, disorder characters may occur.
Page 12
The USB plug of this device do not support Multi-media devices such as Card
reader, portable hard drive, MP3, Mp4.
When facing problems from the device, please unplug the device for 5 seconds
then re-start (reset).
2. Playing multi-media files
Press 'MODE', switch to CARD mode, in the interface five functions ('PHOTO',
'MUSIC', 'VIDEO', 'SLIDE SHOW' and 'SETUP') are available. Insert USB or CARD
(Once occur at the same time, press MENU to switch between USB or CARD in the
interface).
2.1. Browse Picture
Press direction key to select 'PHOTO', then click 'OK' to open file; press
upward/downward key to select picture, click 'OK' to read. When browsing pictures,
press 'S.SHOW' once to switch a mode of pictures displaying.
When reading picture files, press direction key for fast operation of the
following functions:
Left direction key: anticlockwise 90
Right direction key: clockwise 90
Up direction key: up/down/left/right mirror
Down direction key: up/down/left/right mirror
After the operation of rotation or mirroring, press " " key to continue playing.
Notice: Background music can not be open while reading picture, other function
will not work when using zoom function.
2.2 Play music
Press direction key to select 'MUSIC' item, press 'OK' to open file from storage;
press direction key to select the file, and then press 'OK' to play music.
2.3 Play movie
Press direction key to select 'VIDEO' item, press 'OK' to open the file from storage,
press direction key to select file, then press 'OK' to play movie.
2.4 Slide show
Press direction key to select 'SLIDE SHOW' item, press 'OK' to open file from
storage; press direction key to select file, press 'OK' to play. While playing,
press 'OK' to turn ON/OFF background music.
Note: The display languages of file or movie named are to be simplified Chinese
and international standard character. If languages displayed are not the above
character or character over 8 digits, disorder characters may occur.
Page 13
P-12
Phenomena below does not necessarily mean failure with TV set. Please check
following before you request for repair. No repairable components exist in the
machine. Don't try to dismantle and improve the monitor, and the high voltage in the
machine may cause danger. Maintenance and adjustment of the monitor is subject
to professionals.
Whether the correct Channel selected;
Automatically set up the Receiving Channel again;
Any new place is subject to re-setup of channels.
Whether the volume is turned to the end or the Sound System is incorrect;
Whether earphone plugged in;
Whether ERASE functions under too weak signal.
Whether brightness and contrast adjusted correctly;
Whether environment temperature is too low.
Whether antenna adjusted correctly;
Maybe too weak signal received at the receiving place.
Whether color adjusted well, whether the decoloration actions under the Color
system with too weak proper signal.
Improper connection with AC adapter or Care adapter;
Use of unauthorized power supply;
TV set is on standby status.
Improperly adjusted Horizontal or Vertical in the remote control.
10. Troubleshooting methods
2.6.2 Video Setting Page
TV systems: when connecting video output, the output system of the product and the
system of TV should corresponding match, otherwise no color shows.
Abnormal, "NTSC" and "PAL" are available to choose; the default value
is "NTSC".
Home Page: return functions setting page
2.5 Common functions' operation instruction
: Play/pause : Fast forward : Forward file
: Stop : Fast backward : Backward file
ZOOM: When playing, press "ZOOM" to zoom out the picture to browse.
REP: When playing, press repeat key to realize the following functions:
"single repeat", "all repeat," "cancel".
SOUND: Track switch (excluded unsupported file).
EXIT: When playing, press " " to stop, then repress " " to return main interface,
or press the " " to return main interface directly.
2.6 Setting
Press direction key to select 'SETUP' item, press / to select upward/downward
file, then press 'OK' to confirm.
2.6.1 Common Setting
Languages: Chinese, English and other multi-languages are available.
Sound: Select your favor language to play when various sound languages are
supported for some videos.
Subtitle: Select your favor language to play when multiple subtitles languages are
supported for some videos.
Default Value: factory reset
Home Page: return functions setting page
Page 14

10. Troubleshooting methods
11. Technical Parameters
Phenomena below does not necessarily mean failure with TV set. Please check
following before you request for repair. No repairable components exist in the
machine. Don't try to dismantle and improve the monitor, and the high voltage in the
machine may cause danger. Maintenance and adjustment of the monitor is subject
to professionals.
No picture, no sound:
Improper connection with AC adapter or Care adapter;
Use of unauthorized power supply;
TV set is on standby status.
No image:
Whether the correct Channel selected;
Automatically set up the Receiving Channel again;
Any new place is subject to re-setup of channels.
No sound:
Whether the volume is turned to the end or the Sound System is incorrect;
Product Name: LCD Color TV Receiver
Display Device: Color TFT-LCD
Receiving frequency range: Full frequency search: 48.25MHz-863.25MHz
Fixed channel search: AIR: 55.25MHz-801.25MHz
CATV: 55.25MHz-799.25MHz
Screen Size: 7 inches
Resolution: 480(H) RGB 234(V)
Audio Output: 0.5W 2
Loudspeaker: 2 27mm
Connecting Terminal: External antenna input jack, Audio / Video (AV) input/output
jack, earphone jack, External power supply jack.
Applicable Power Supply: Three options:
1. AC Power supply AC adapter
2. Car adapter 12V 12-24V
3. Build-in battery 7.4V/1700mAh(optional)
Whether earphone plugged in;
Whether ERASE functions under too weak signal.
Dark picture:
Whether brightness and contrast adjusted correctly;
Whether environment temperature is too low.
Unclear or unstable image:
Whether antenna adjusted correctly;
Maybe too weak signal received at the receiving place.
Achromatic or flashing color:
Whether color adjusted well, whether the decoloration actions under the Color
system with too weak proper signal.
Upside down or lateral inverted picture:
Improperly adjusted Horizontal or Vertical in the remote control.
Power Consumption: No built-in battery: 8W
With built-in battery: 10W
Outer Dimension: 205mm 117mm 36mm
Weight: about 600g
P-13 P-14
Page 15
11. Technical Parameters
WARNING:
Product Name: LCD Color TV Receiver
Display Device: Color TFT-LCD
Receiving frequency range: Full frequency search: 48.25MHz-863.25MHz
Fixed channel search: AIR: 55.25MHz-801.25MHz
CATV: 55.25MHz-799.25MHz
Screen Size: 7 inches
Resolution: 480(H) RGB 234(V)
Audio Output: 0.5W 2
Loudspeaker: 2 27mm
Connecting Terminal: External antenna input jack, Audio / Video (AV) input/output
jack, earphone jack, External power supply jack.
Applicable Power Supply: Three options:
1. AC Power supply AC adapter
2. Car adapter 12V 12-24V
3. Build-in battery 7.4V/1700mAh(optional)
Power Consumption: No built-in battery: 8W
available to any modification of all information contained therein. Due to
continuing improvements, the features and design are subject to change without
notice.
improve the monitor, and the high voltage in the machine may cause danger.
Maintenance and adjustment of the monitor is subject to professionals.
WARNING:
accordance with the installation instructions.
remain readily operable, and it shall be disconnected from the mains completely.
remain readily operable.
filled with liquids, such as vases, shall be placed on the apparatus.
With built-in battery: 10W
Outer Dimension: 205mm 117mm 36mm
Weight: about 600g
apparatus.
after some items in this manual means it is available with this function.
Page 16
P-15
after some items in this manual means it is available with this function.
WARNING:
This operation instruction is only intended for reference. No further notice is
available to any modification of all information contained therein. Due to
continuing improvements, the features and design are subject to change without
notice.
No repairable components exist in the machine. Don't try to dismantle and
improve the monitor, and the high voltage in the machine may cause danger.
Maintenance and adjustment of the monitor is subject to professionals.
WARNING:
To prevent injury, this apparatus must be securely attached to the floor/wall in
accordance with the installation instructions.
The mains plug is used as the disconnect device, the disconnect device shall
remain readily operable, and it shall be disconnected from the mains completely.
The plug is used as disconnect device form the mains supply, the plug shall
remain readily operable.
The apparatus should not be exposed to dripping or splashing and that no objects
filled with liquids, such as vases, shall be placed on the apparatus.
No naked flame sources, such as lighted candles, should be placed on the
apparatus.
Batteries (battery pack or batteries installed) shall not be exposed to excessive
heat such as sunshine, fire or the like.
Danger of explosion if battery is incorrectly replaced. Replaced only with the
same or equivalent type.
 Loading...