

Page 1
Trouble Shooting Manual
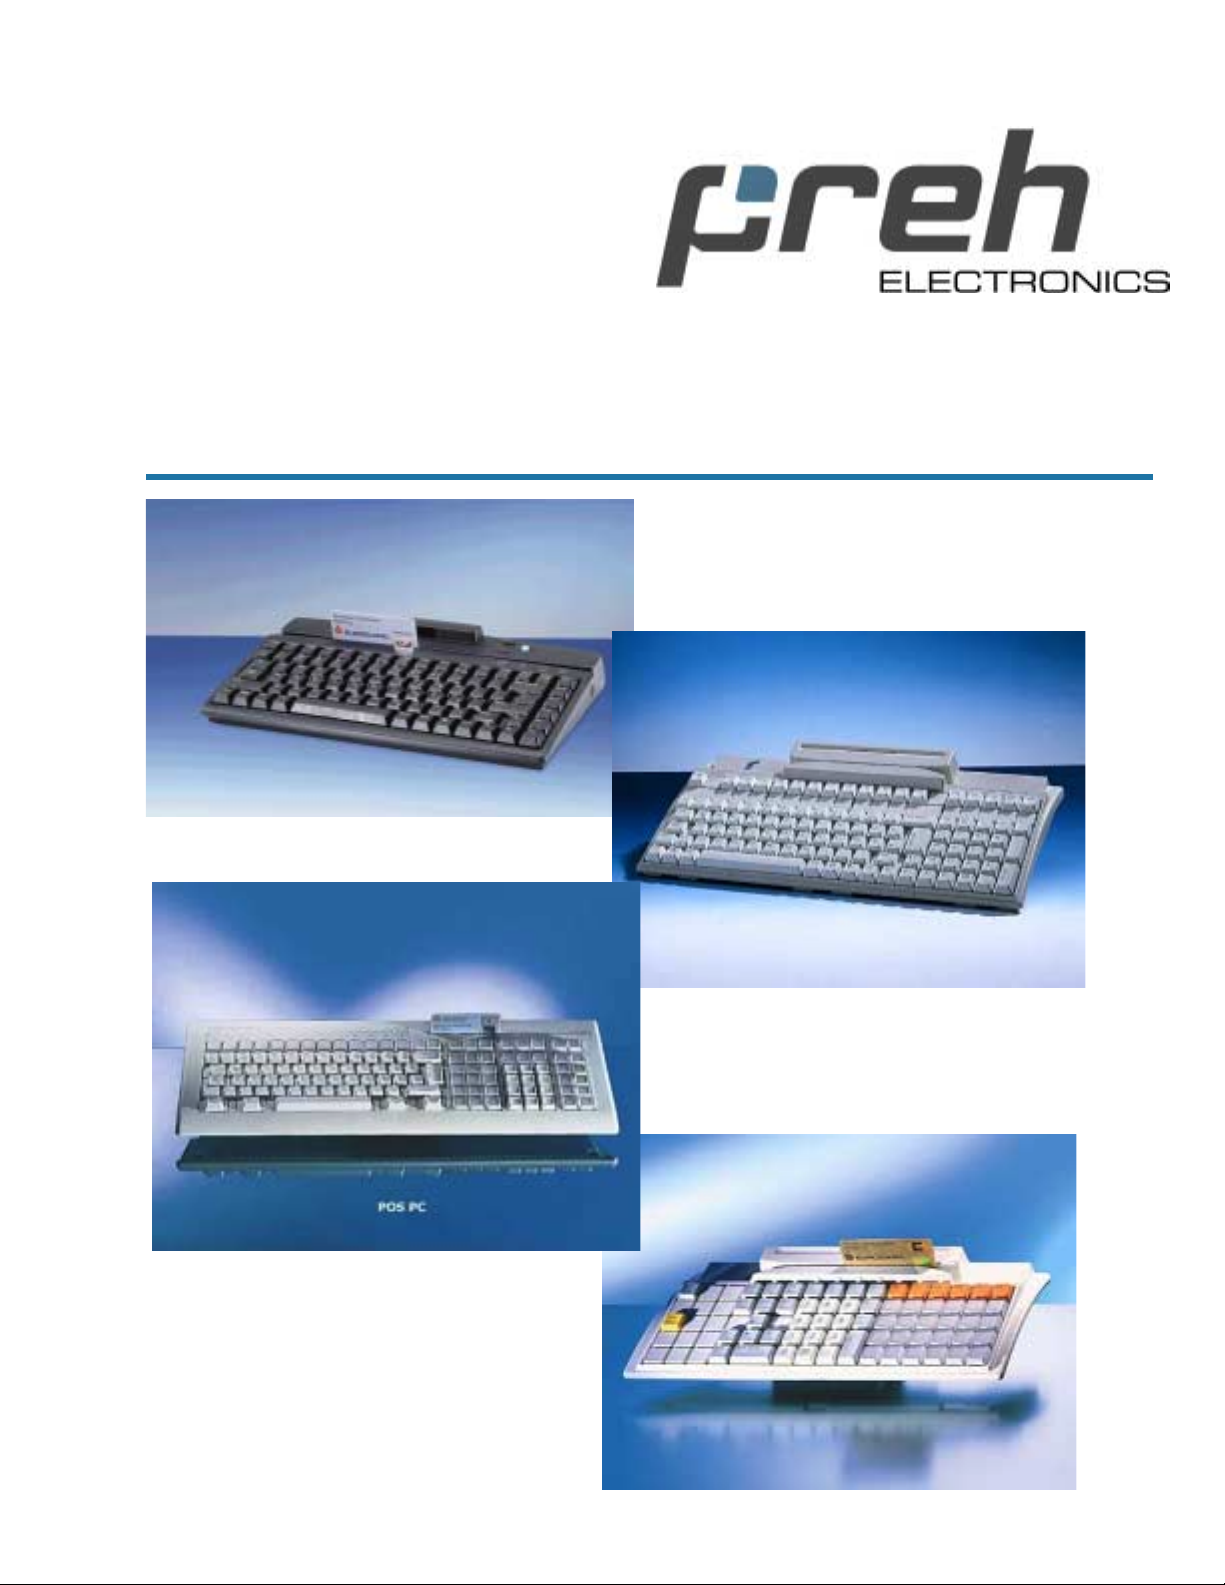
Preh Keyboards
MC25-35 Speciality Series
Classic Series
Advantage Series
Prestige Series
Page 2

INDEX
1. The computer indicates “Keyboard error” during start-up or Booting.….3
2. The keyboard beeps when any key is pressed and sends no data to the
computer…………………………………………………………………………………….…3
3. The keyboard is connected to a Scanner but it is not detected by the
computer during start-up……………………………..…………………………………..4
4. The keyboard does not respond, and there is no output….……………….....5
5. The keyboard output is very slow or some characters are lost when
typing…………………………………………………………………………………………...5
6. The MSR cannot be read with my software……………………………………....6
7. The keyboard does not respond and Scroll lock LED is flashing……….….6
8. How to reset the keyboard…………….………………………………………………7
9. How to change the output speed of the keyboard……………………………...9
10. How to change the settings of the MSR………………………………………...13
11. How to remove online programming……………………………………………16
12. How to deactivate the Bios keyboard initialization during POST……..19
13. How to turn off the unnecessary modules……..…………..……..…………...20
Warning: Preh Keyboards do not contain any electronic components that can be replaced, adjusted or serviced by the user. You should not therefore try to carry out repairs yourself.
2
Page 3

1. The computer indicates “Keyboard error” during start-up or booting
Possible Causes and Solutions:
1.1 The keyboard is not plugged properly.
Check if the keyboard cable is securely plugged into the keyboard PS/2 port
(USB or RS232 if applicable). If you have another device connected on the PS/2
port, shut down your computer, replace it for the preh keyboard and retest.
1.2 The Keyboard interface is incorrect.
The keyboard can have the wrong interface as a setting, please reset the
keyboard by following the instructions at “How to reset preh keyboards” page 7.
1.3 Timing problems between the computer an d the keyboard.
When the computer boots up, it checks up the keyboard and tries to initialize it.
If the keyboard is not detected, then an error is generated. There might be more
than one solution for this problem.
Solution 1: Please see “How to turn off the unnecessary modules” on page 18 and
follow the instructions. Restart the computer and test.
Solution 2: Please see “How to deactivate the Bios keyboard initialization” on
page 17 and follow the instructions. Restart the computer and test.
Solution 3: There might be an incompatibility between your computer and the
keyboard, or you might have an old firmware version that is not compatible with
your computer. Please contact Preh technical support for information. If you
have a scanner or any other device connected to the keyboa rd, please read point
3.
2. The keyboard beeps when any key is pressed and sends no data to
the computer.
Possible Causes and Solutions:
2.1 A fault has occurred during the transmission of the keyboard
assignment table.
Please see “How to reset the preh keyboards” on page 7 and test.
2.2 The contents of the EEPROM have been modified.
Please see “How to reset the preh keyboards” on page 7 and test.
3
Page 4
2.3 There was an error in the checksum.
Please see “How to reset the preh keyboards” on page 7 and test.
3.
The keyboard is connected to a Scanner but it is not detected by
the computer during start-up
Possible Causes and Solutions:
3.1 Data transmission conflict between keyboard and Scanner.
There might be more than one solution for this problem.
Solution1: The keyboard output speed and the scanner output speed is causing
conflicts when transmitting the data. Please change the output speed of the
keyboard by following “How to change the output speed of the keyboard” on page
9. After, please re-test.
Solution 2: The keyboard-scanner configuration might be causing a problem.
There is no standard on the output speed for scanners, so if you connect the
keyboard and the scanner through a “Y” cable to the computer, the keyboard
output will appear to be slowed down or the computer might not detect it. Please
connect the keyboard directly to the computer. Then connect the scanner
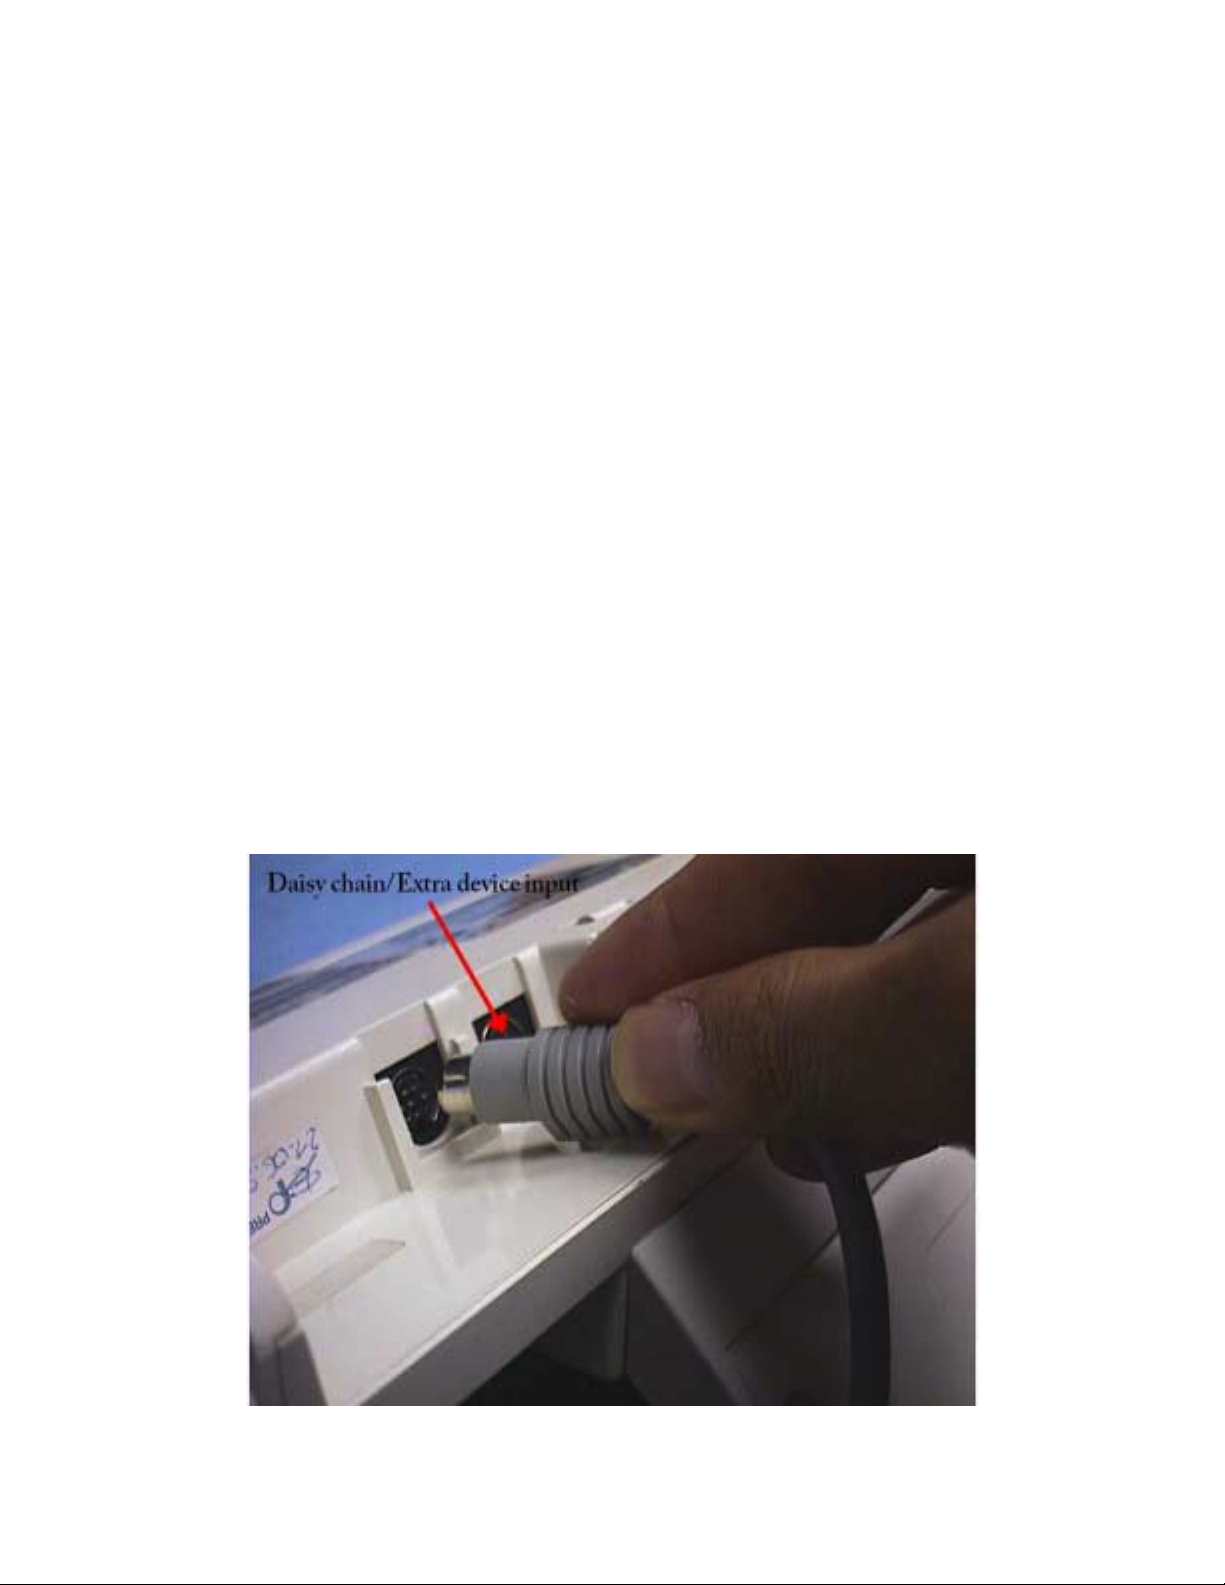
through the daisy chain port of the keyboard. The da isy chain port might be
located on the side or the back of the keyboard.
Figure 1
4
Page 5

Solution 3: Please see “How to turn off the unnecessary modules” on page 18 and
follow the instructions. Restart the computer and test.
4. The keyboard does not respond, and there is no output.
Possible Causes and Solutions:
4.1 Keyboard pad is not responding.
Lets make sure that the keyboard does not have an output. Open notepad or
any other word processing program and verify that all the keys have an
output into Notepad.
4.2 The Keyboard has an error on the checksum.
The keyboard needs to be reset. Please see “How to reset the preh keyboards”
on page 7 and test.
4.3 The keyboard is not plugged properly.
Check that the keyboard cable is securely plugged into the keyboard PS/2
port (USB or RS232 if applicable). If you have another PS/2 cable, shut down,
replace the cable, restart and retest.
4.4 The keyboard has not been programmed
You need to create a file on the Winprogrammer or the DOS programmer to
assign values to each key of your keyboard. Please read “QuickStart Manual
for the Winprogrammer” or the “Winprogrammer User’s Guide” for
information about how to program the keyboard
5. The keyboard output is very slow or some characters are lost
when typing
Possible Causes and Solutions:
5.1 Wrong configuration.
If you have a scanner connected to the computer through the keyboard daisy
chained, scanner daisy chained or a “Y” cable, then please read point 3.
Following point 3 solutions can solve this problem.
5.2 Change the output speed of the keyboard.
Please change the speed output of the keyboard by following “How to change
the output speed of the keyboard” on page 12. After following this procedure,
please re-test.
5
Page 6

6. The MSR cannot be read with my software
Possible causes and solutions:
6.1 MSR head is not working properly.
Open NotePad; Use a card with a magnetic stripe on the back such as credit
card or debit card. Swipe the card and see on Notepad if there is an output. If
no data is displayed, please contact Preh customer service to repair your
keyboard.
6.2 The keyboard MSR does not have the correct settings that are
required by your software.
Please contact your software provider to learn the requirements of your
software to read the MSR. Ask them about headers, terminator, sentinels and
checksum output requirements. After that please refer to “How to change the
MSR settings” on page 12 to change the settings.
6.3 Your software might require OPOS settings.
OPOS is a standard for Point of Sale systems and equipment. It is probable
that your software will require these settings . Pleas e f o llow the ins tr u c tion on
“How to change the MSR settings” on page 12 to change the settings
7. The keyboard does not respond and Scroll lock LED is flashing
Possible causes and solutions:
7.1 Online programming was activated.
Please see “How to remove Online programming” on page 15.
6
Page 7
8. HOW TO RESET PREH KEYBOARDS
Simply resetting the keyboard may solve the majority of the most common problems
that a user can have. If a fault has occurred during the transmission of the
keyboard assignment table or the contents of the EEPROM has been modified,
there will be an error in the checksum.
Please Follow the instructions:
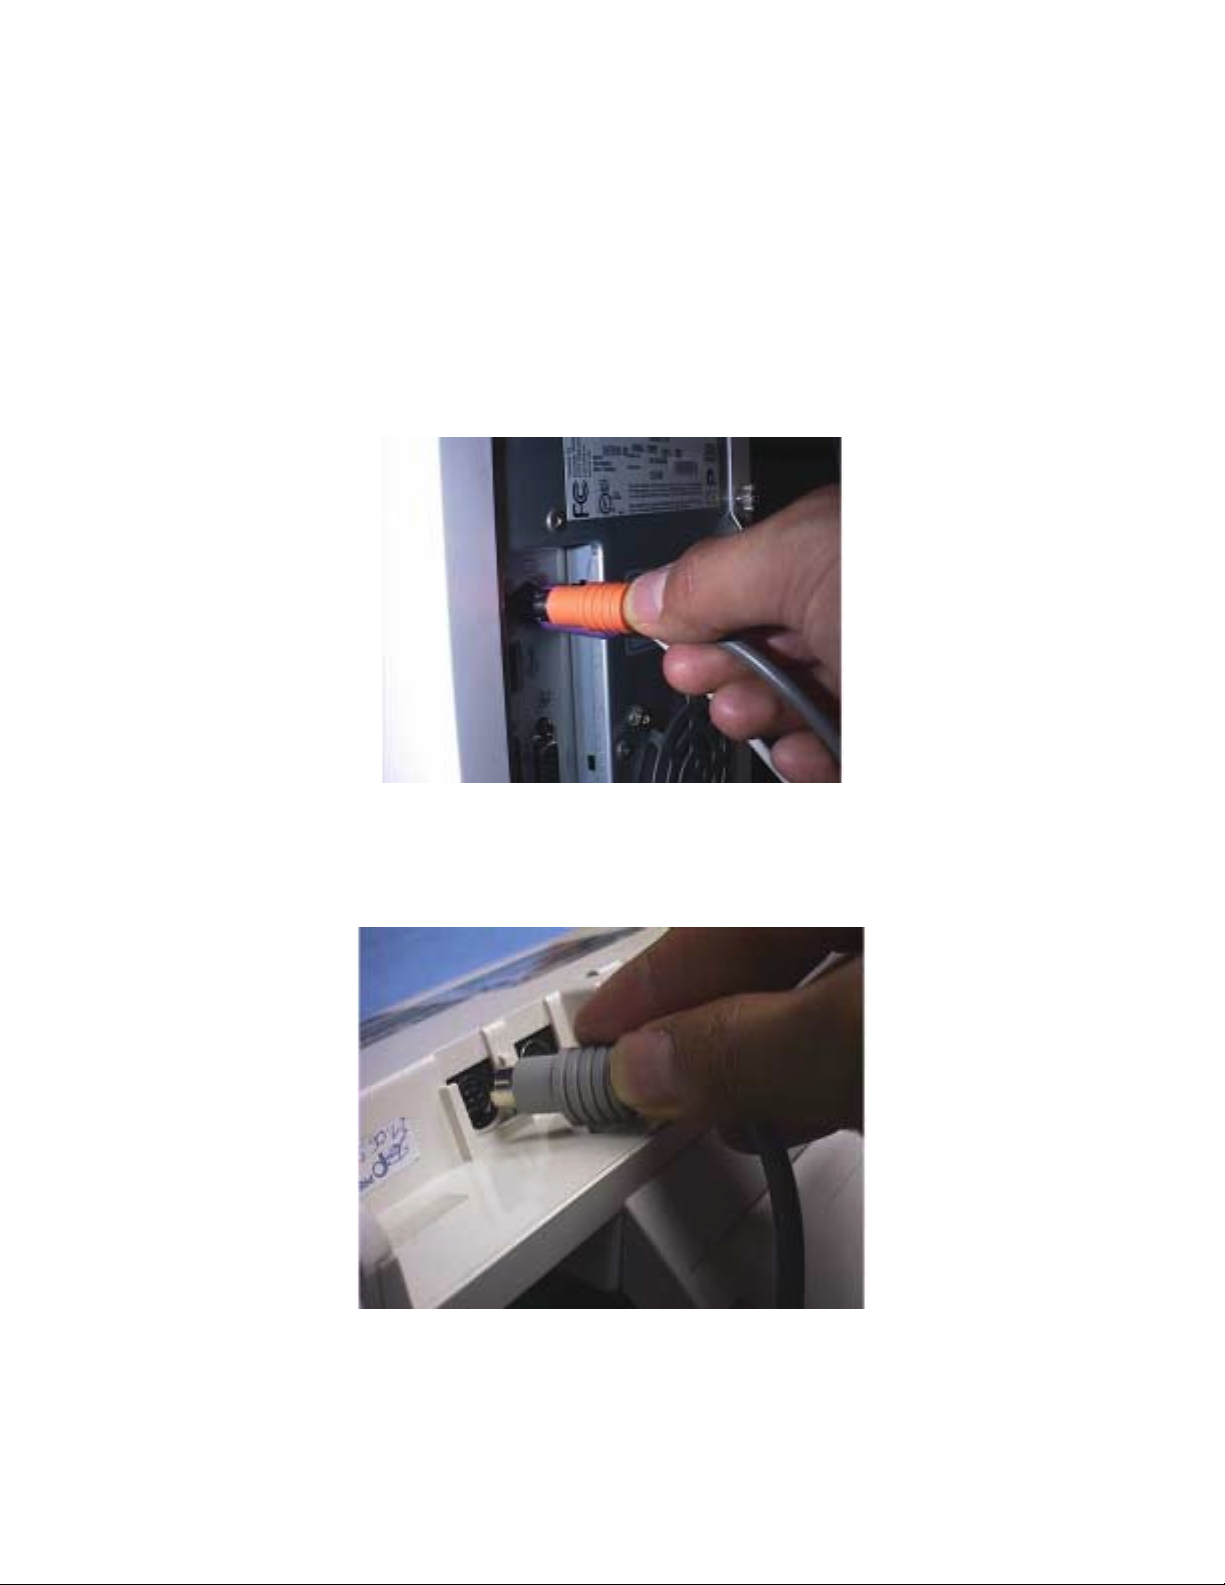
1. Unplug your keyboard from the Computer
Figure 2. Unplugging the keyboard from the computer
Some preh keyboards have a detachable cable on the back. The keyboard can
be unplugged by either from the back of the computer or from the back of the
keyboard
Figure 3. Unplugging the keyboard from the computer
2. Hold down keys A01 and B01. The term A corresponds to the first row on the
bottom and 01 is the column. Please see figure 4 to identify the keys on a row
and column keyboard.
7
Page 8
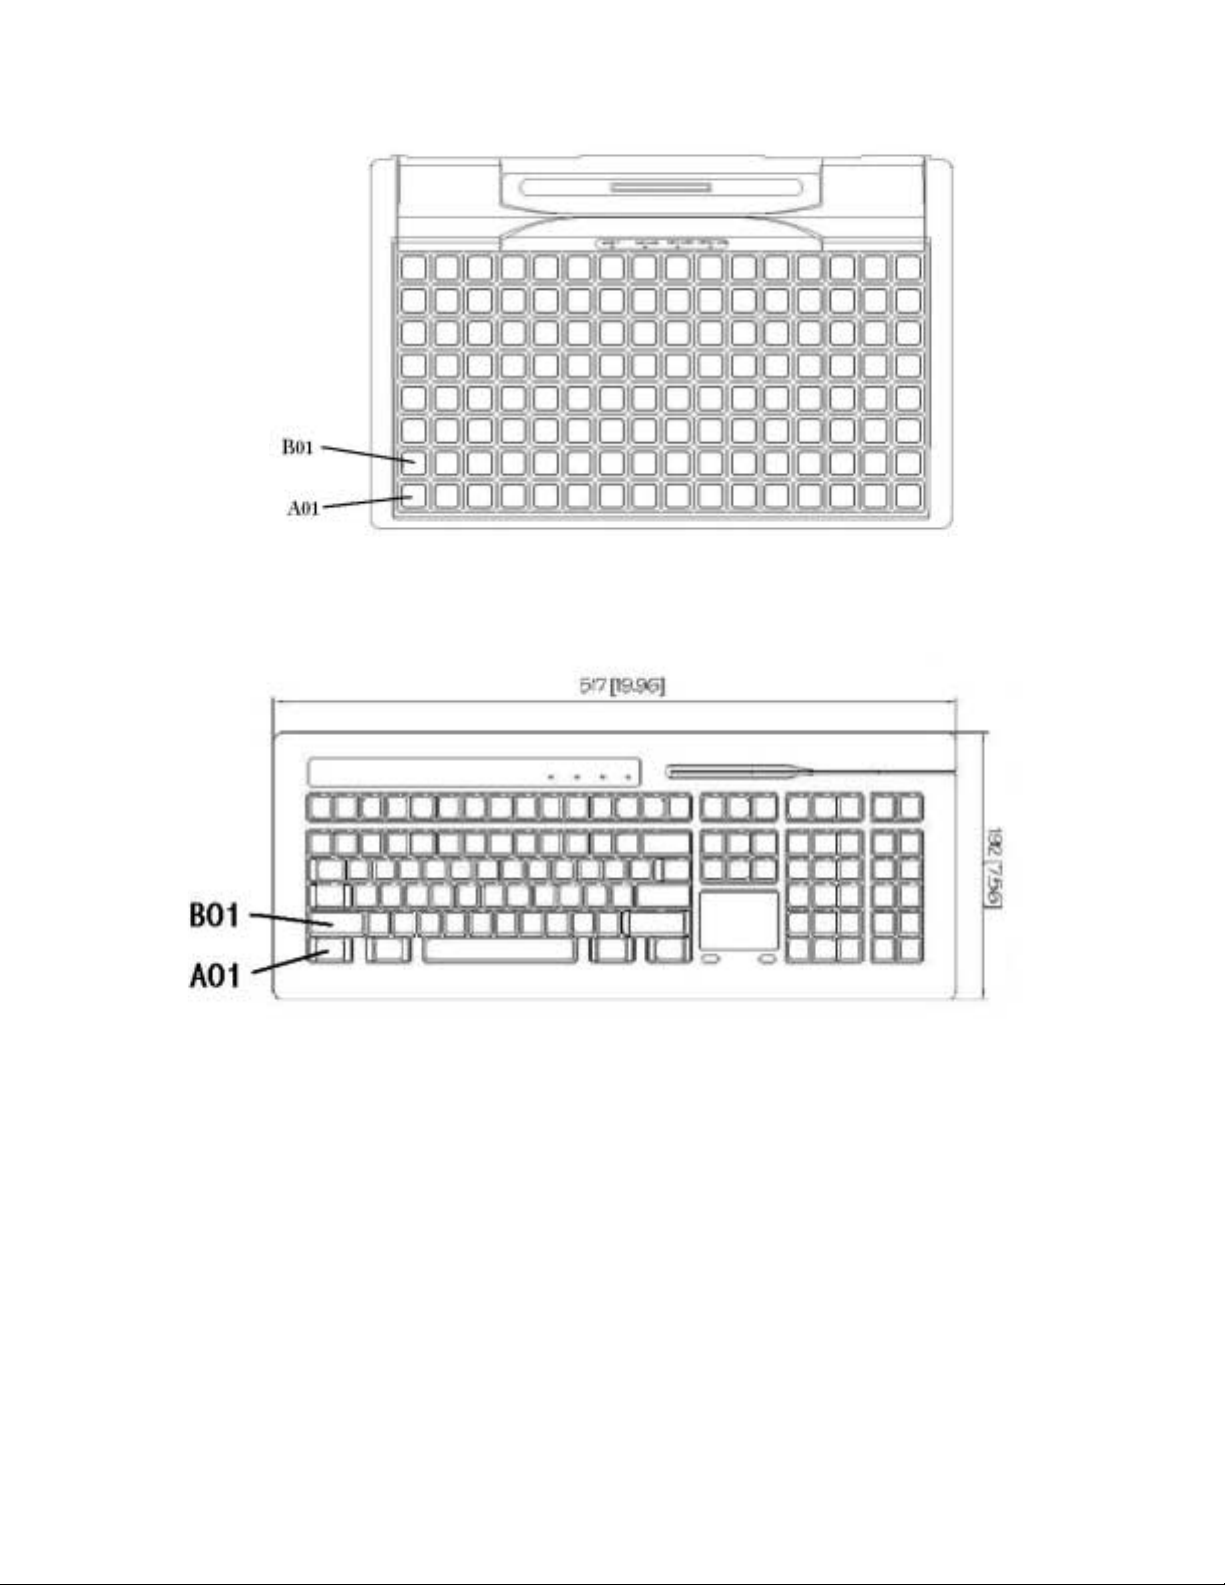
Figure 4. Row and Column keyboard
In an alphanumeric keyboard, A01 and B01 can be identified as SHIFT and
CONTROL on the right side of the keyboard as shown in figure 5.
Figure 5. Alphanumeric keyboard layout
3. Plug the keyboard back into the computer while you keep holding down A01
and B01.
4. All the lights on the keyboard (if available) will turn on and the keyboard
acknowledges you that a reset has been performed by producing a single bip
sound. After that, Accept light will turn on and off.
5. Now, you can release keys A01 and B01 and start using the keyboard normally.
Important: If you have an RS232 interface keyboard, then you will need to press
A01+D01 instead of A01+B01. D is the fourth row up from the bottom of the
keyboard and 01 the first column
8
Page 9
9. HOW TO CHANGE THE OUTPUT SPEED OF THE KEYBOARD
For changing the output speed of the keyboard it will be necessary to use one of our
programming tools: The winprogrammer or the DOS programmer.
WINPROGRAMMER
1. In order to change the output speed with the winprogrammer you need to have
an MWF file or create a new file since the Winprogrammer cannot read the
program from the keyboard. To create a new file, please refer to the
Winprogrammer User’s manual or the Quick reference for the
winprogrammer. If you do not have any of these documents, please contact
Preh Electronics Technical support.
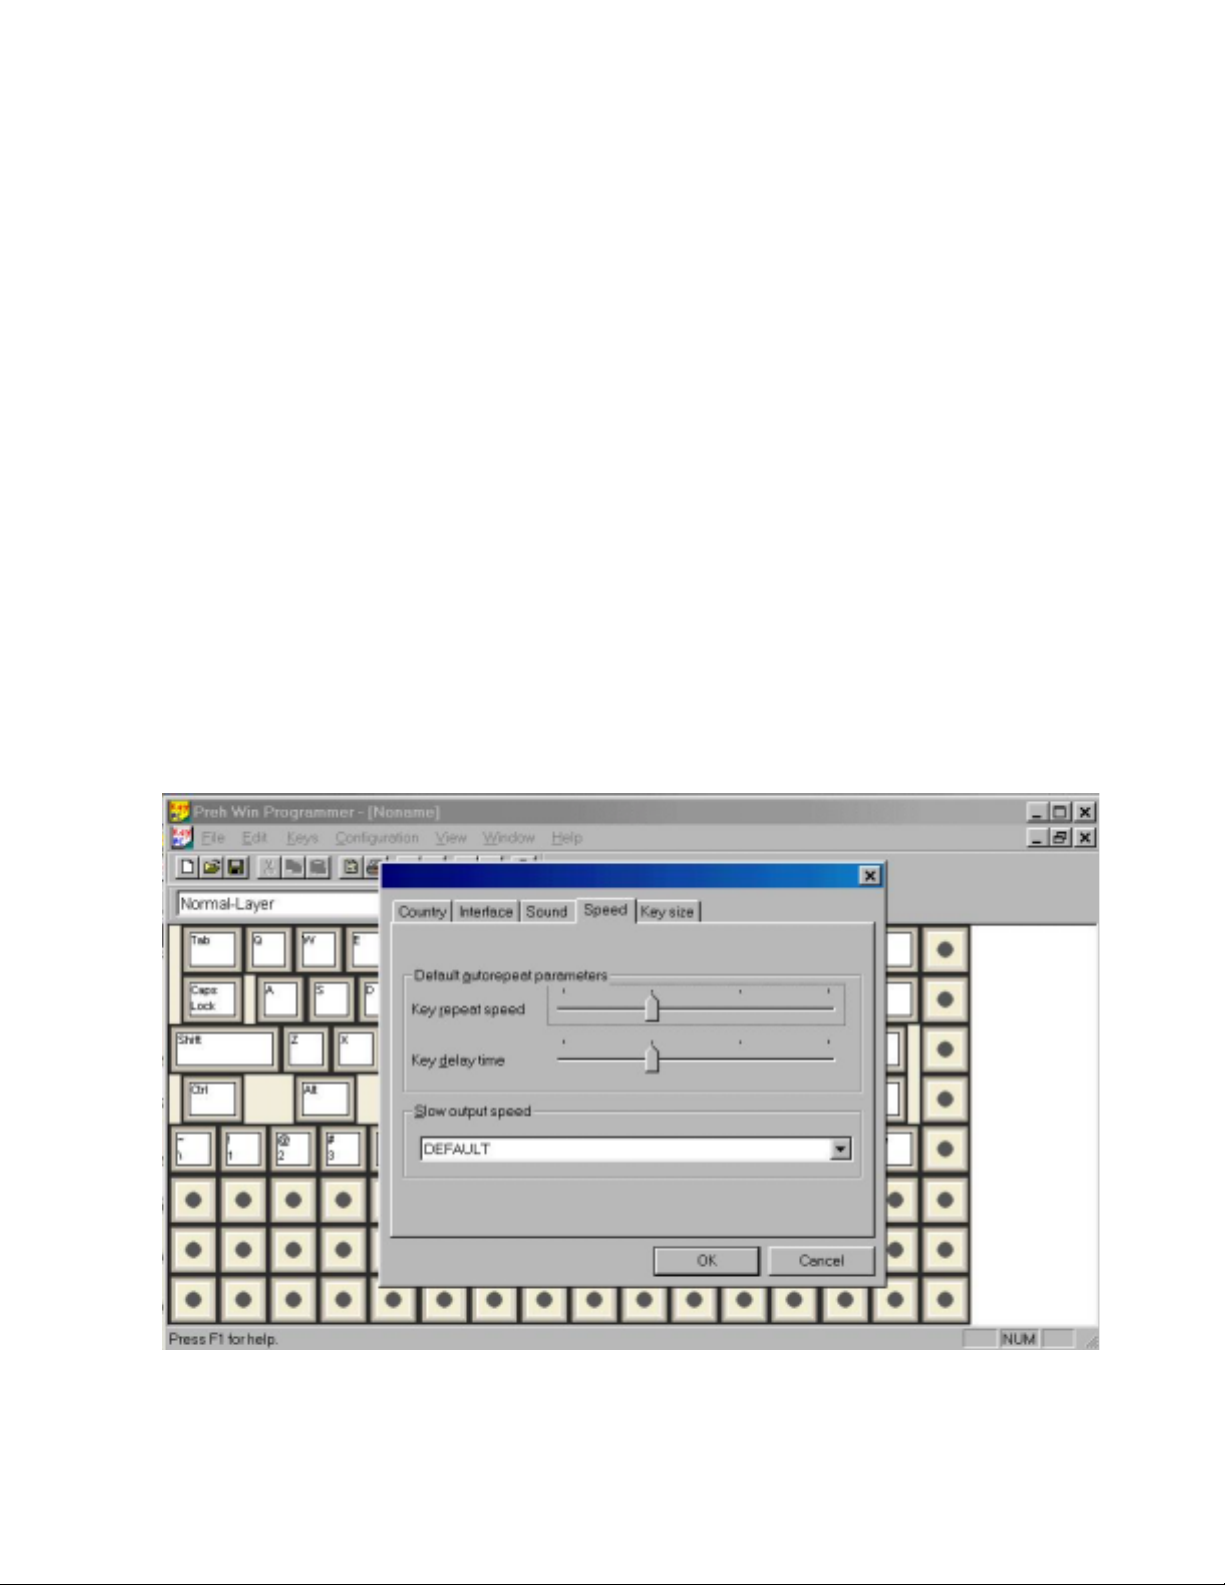
2. Open your mwf file and click on Configuration>keyboard setup. Another
window will pop up
3. Click on Speed. At the bottom of the window, you will see a select box named
“Slow output speed”.
4. Select a different output speed.
Figure 6.
9
Page 10
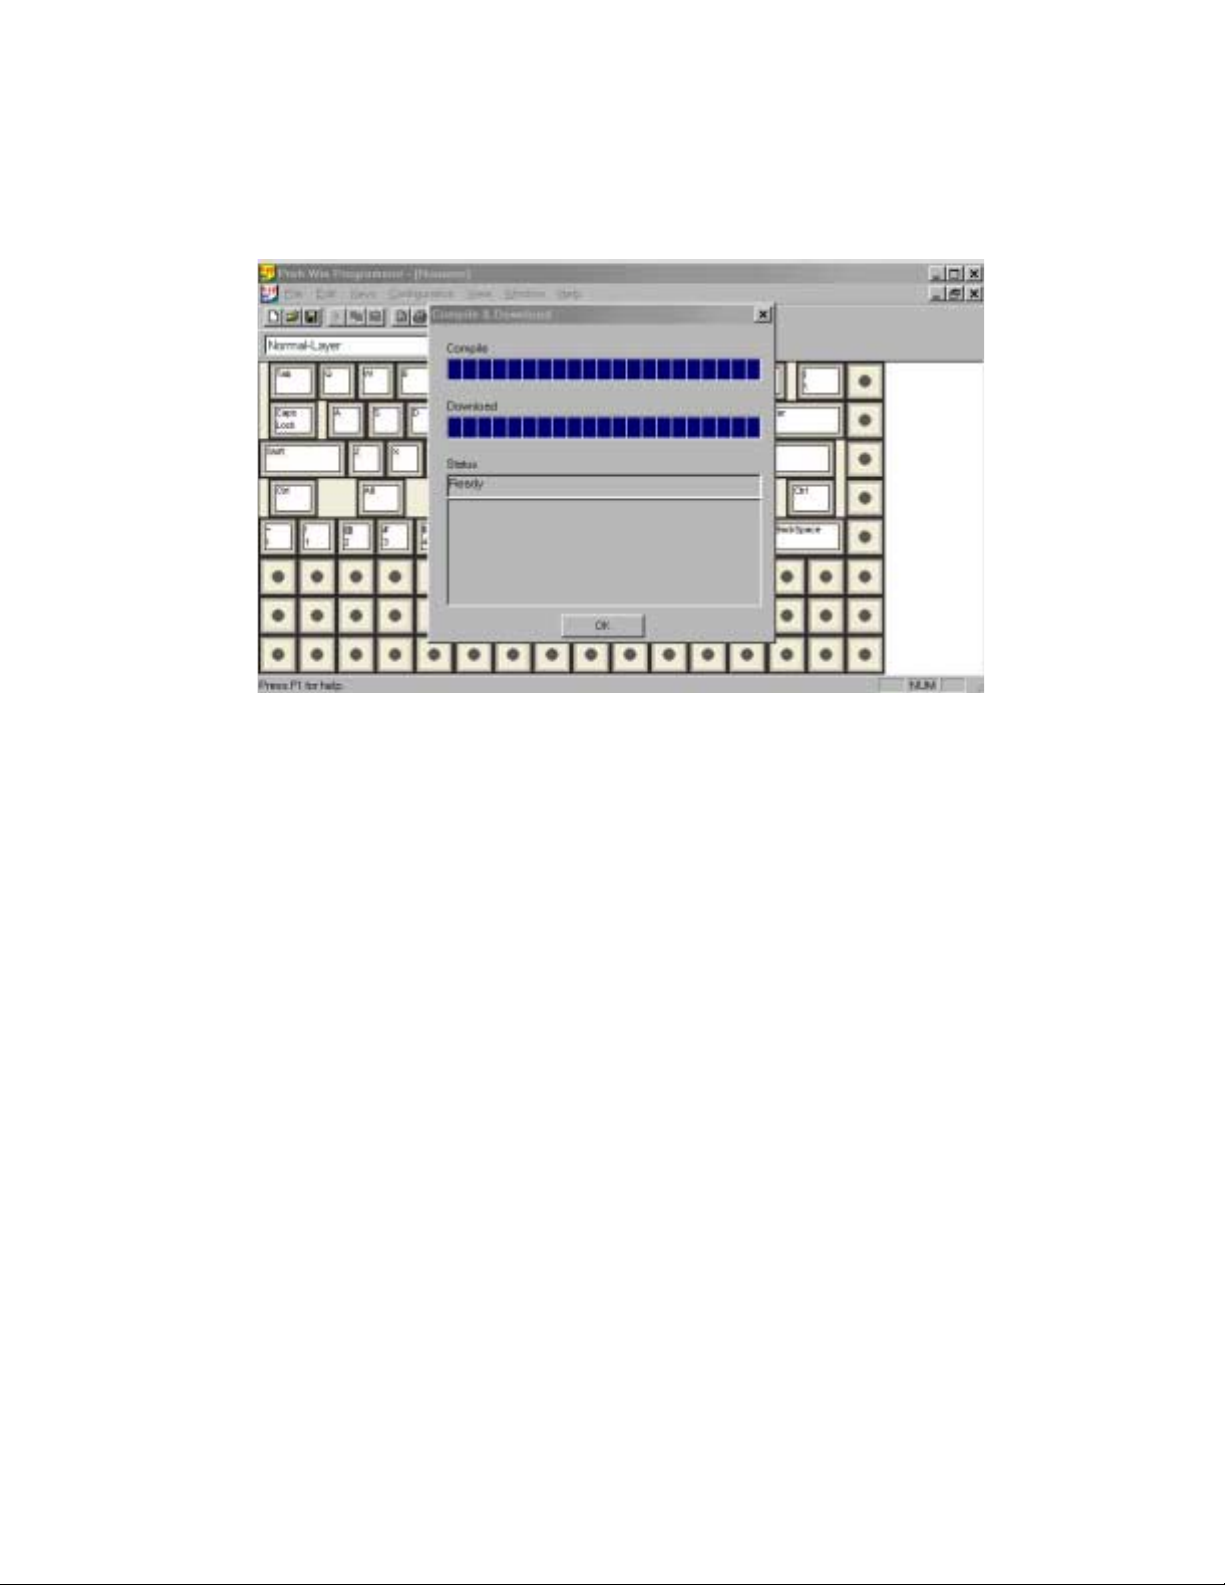
5. Go to File>UpdateKeyboard, Select your interface (USB, AT for PS/2 or Serial
RS232) and click ok to download the file into the keyboard. Wait until the
process is completed.
Figure 7.
6. If the keyboard does not respond to y our configuration correctly, change the
speed output by following steps 1 through 5 and select a different speed on
point 4.
DOS PROGRAMMER
1. Connect your keyboa rd and start DOS programmer
2. Go to the File menu and select “Read keytable”. This command will read all
data and settings that are inside the keyboard. Please, make sure that the
keyboard is connected. A status bar will show you when the reading of the
keyboard has been completed as shown in figure 8.
10
Page 11
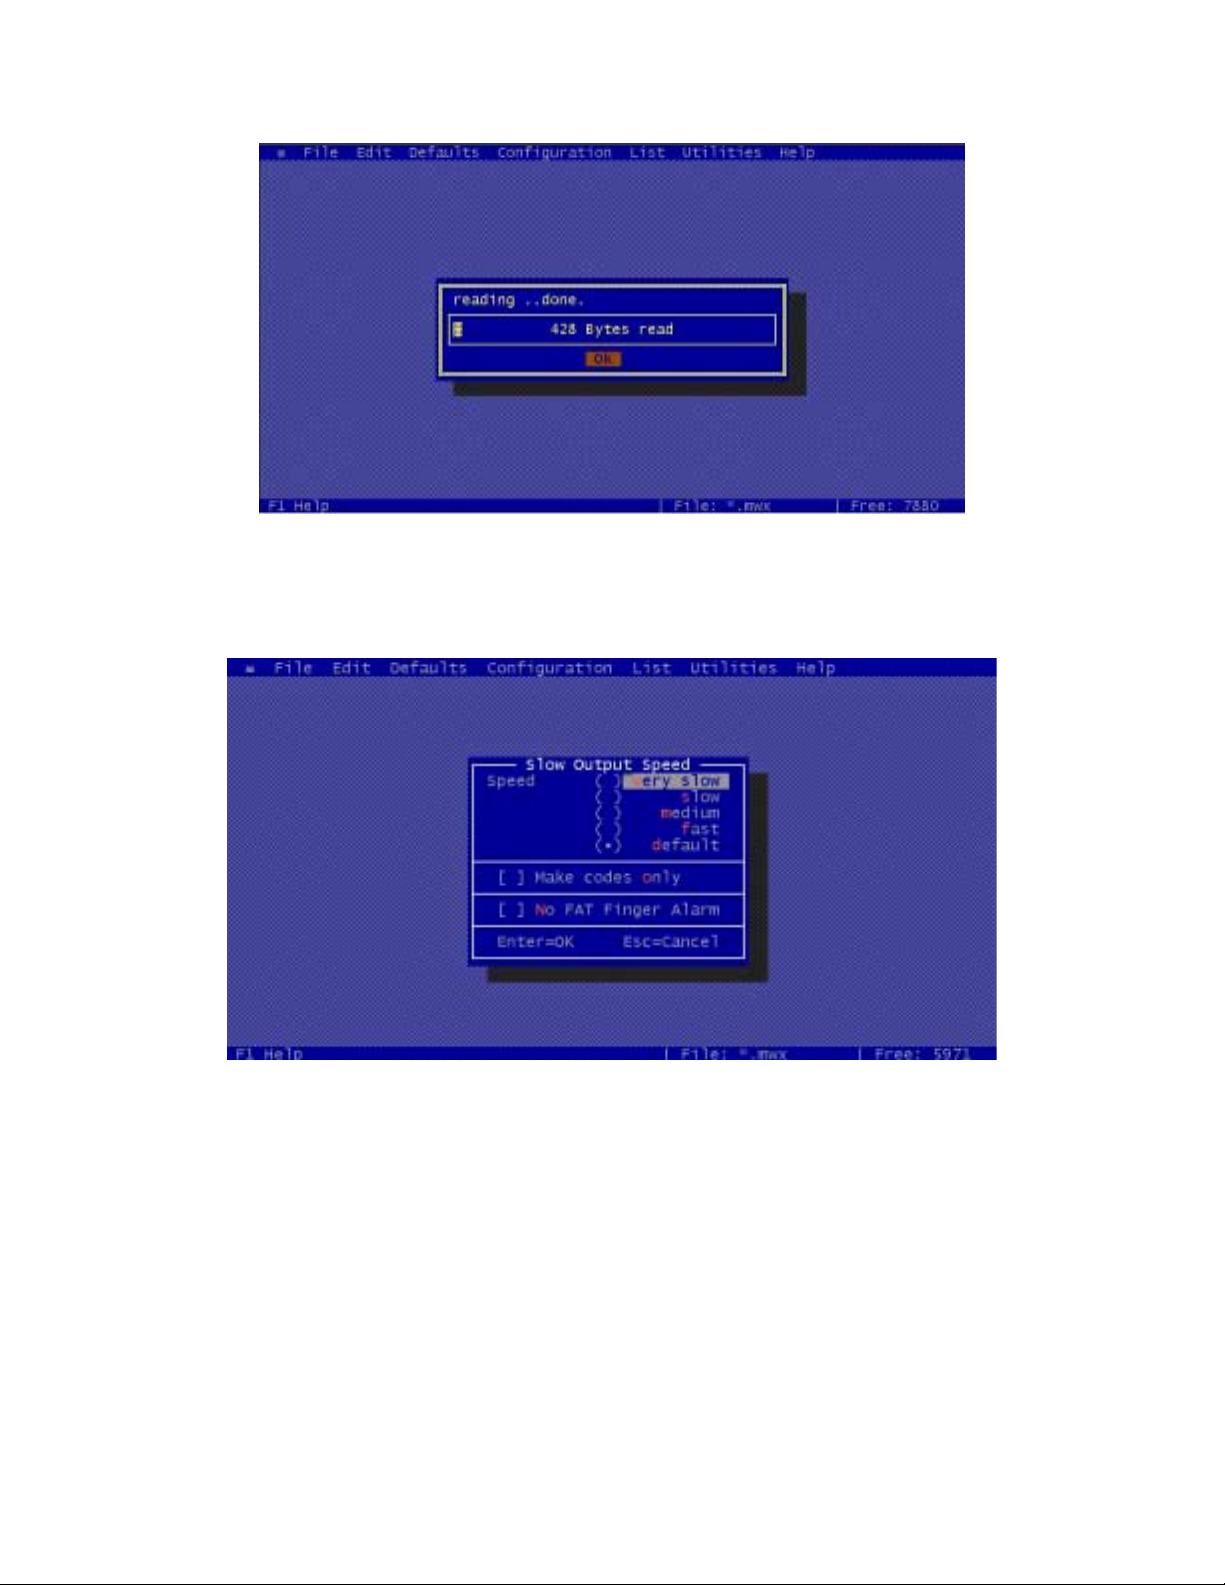
Figure 8
3. Click on Edit>SlowOutputSpeed. A new window will pop up as the one in
figure 9.
Figure 9
4. Select a different output speed.
5. Go to File>WriteKeyboard, then a status bar will indicate you the progress of
the file downloaded into the keyboard as shown in figure 10. After download is
completed, the keyboard is ready to be tested.
11
Page 12
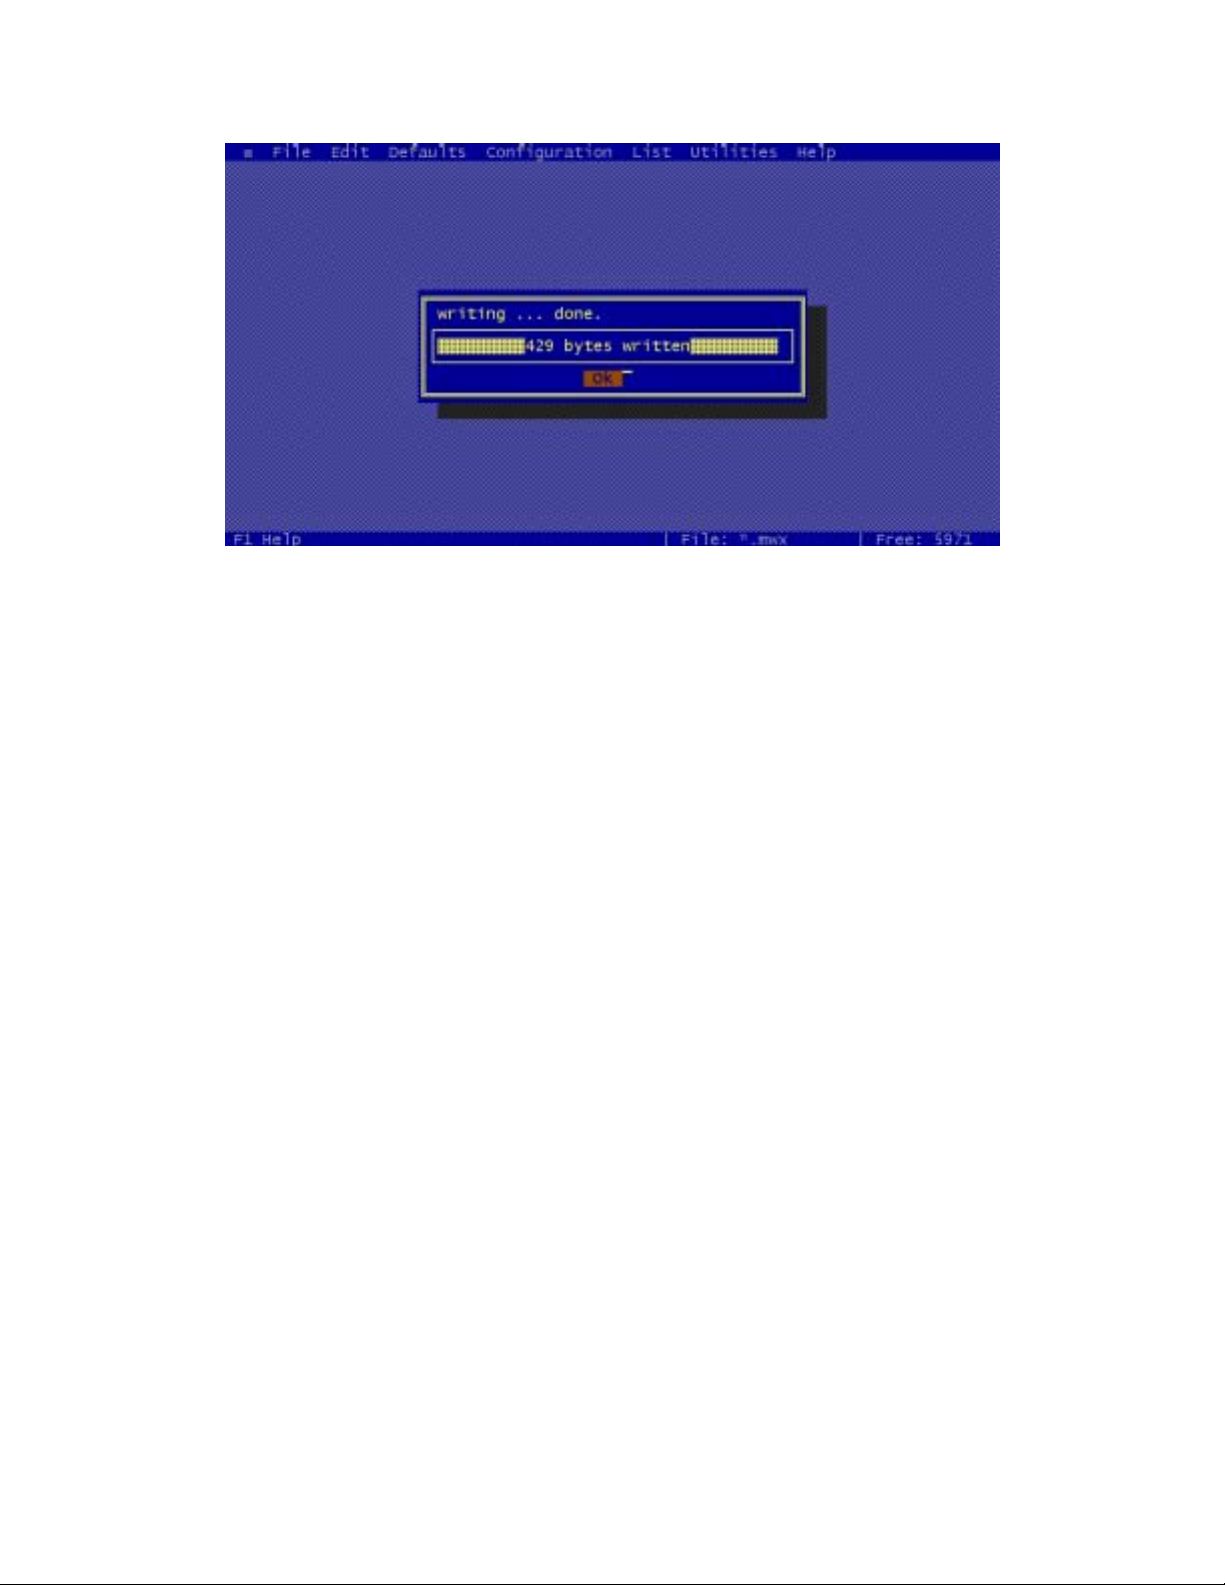
Figure 10
6. If the keyboard does not respond to y our configuration correctly, change the
follow steps 1 through 5 but selecting a different speed on point 4.
12
Page 13
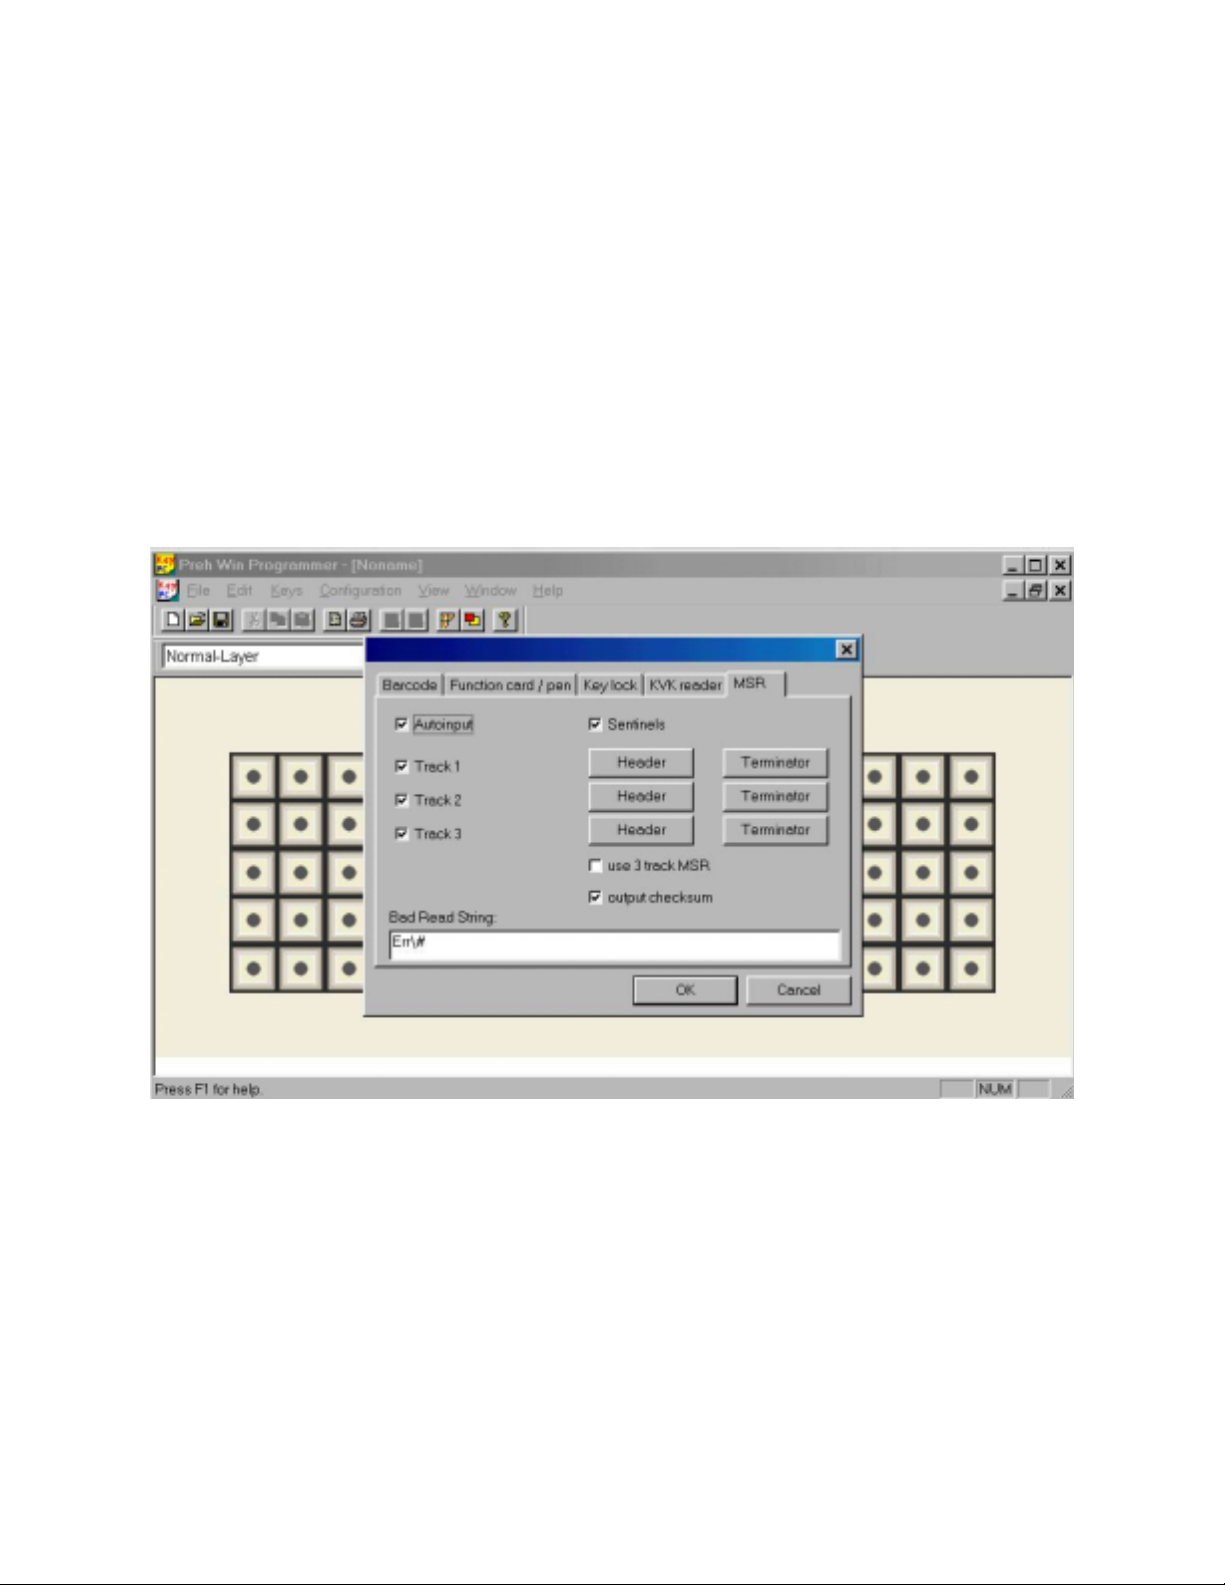
10. HOW TO CHANGE THE SETTINGS OF THE MSR
For changing the MSR settings, it will be necessary to use one of our programming
tools: The winprogrammer or the DOS programmer. OPOS is a standard in the
point of sale industry. It is required that your MSR have these settings if you are
using software that uses the OPOS standard. This section will show you how to
program the MSR under this standard just as an example how to modify the MSR
settings.
WINPROGRAMMER
1. Open your MWF file. Go to Configuration>Module Setup and a new window
will pop up. Select MSR on this new window.
Figure 11
2. Check the boxes that are needed according to figure 11. Click on Header
button, and then a new window will pop up.
3. Select StdKey-Layer. Note: you can input any data into the Headers and
terminators boxes, the values below are just an example. If you want to input
an hex number just follow the format {\xXX}.
Enter {POSMSR1} for Track 1
Enter {POSMSR2} for Track 2
Enter {POSMSR3} for Track 3
13
Page 14
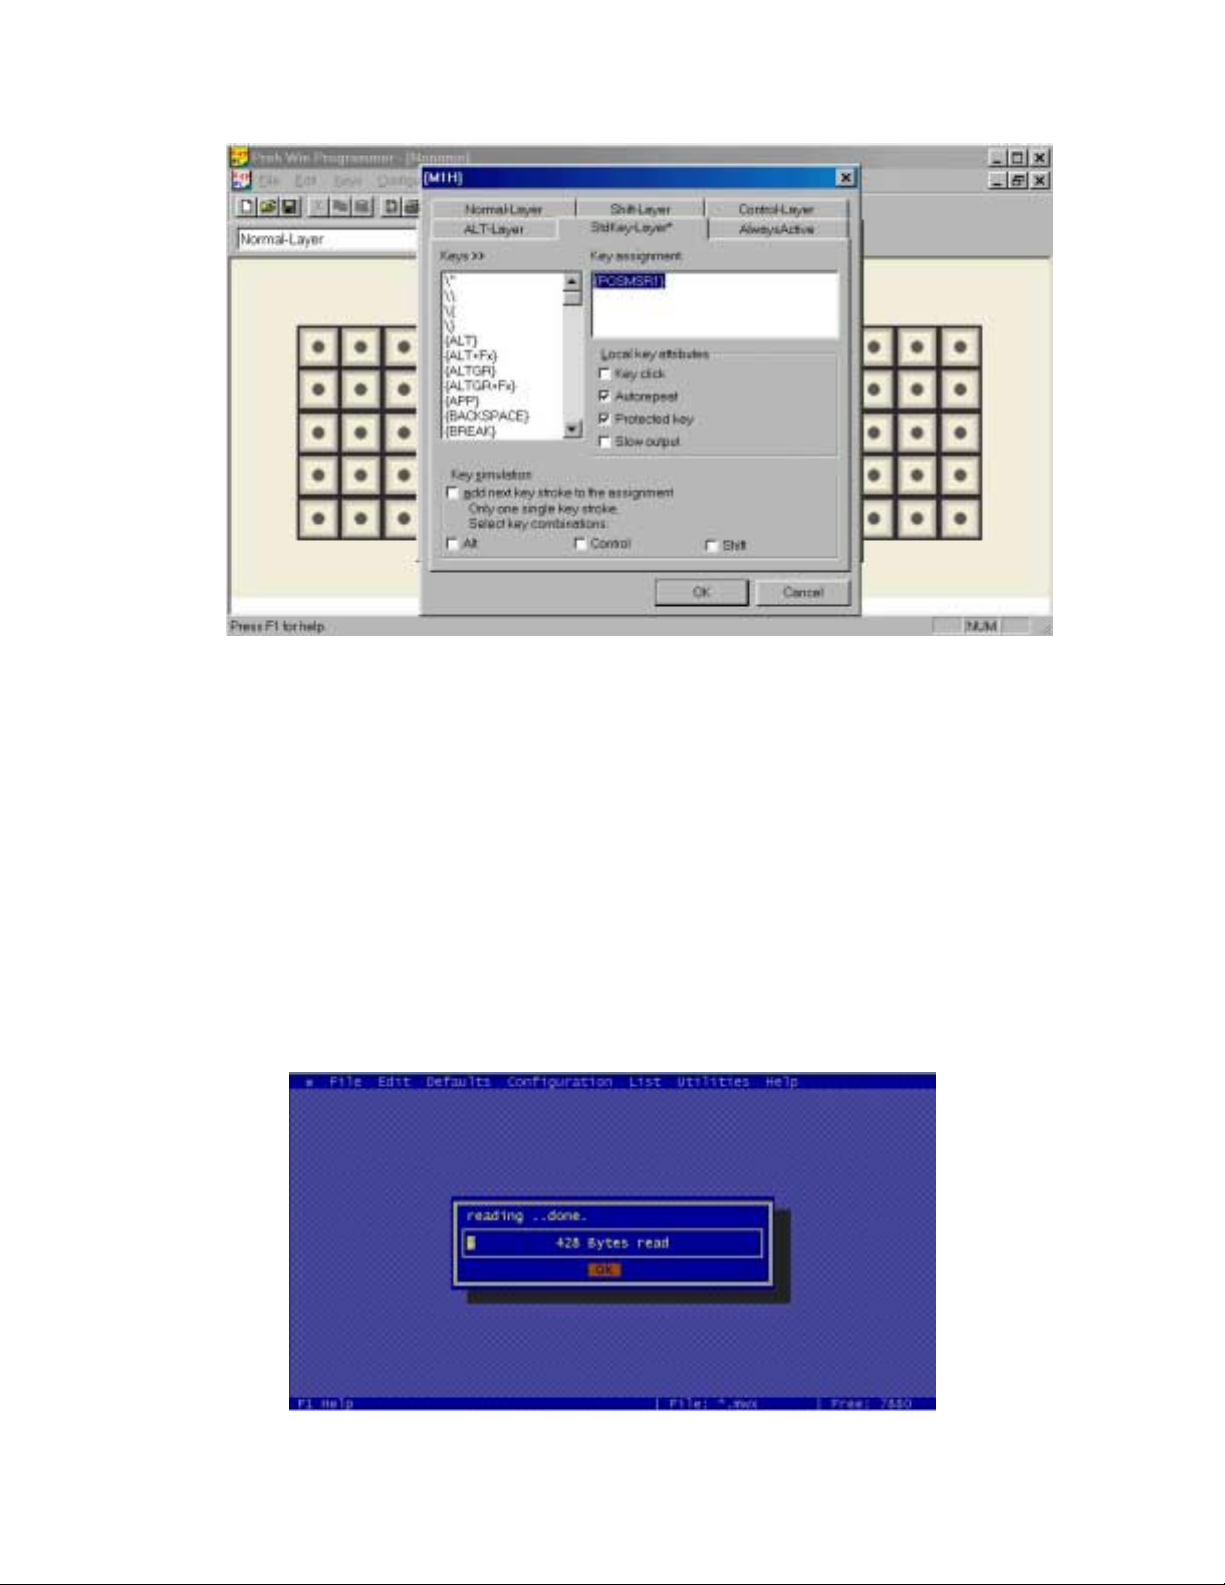
Figure 12
4. Repeat the same process as in point 3 for “Terminator”.
5. Click OK, and then go to File>UpdateKeyboard. Wait until programming is
completed.
DOS PROGRAMMER
1. Connect your keyboa rd and start DOS programmer.
2. Go to the File menu and select “Read keytable”. This command will read all
data and settings that are inside the keyboard. Please, make sure that the
keyboard is connected. A status bar will show you when the reading of the
keyboard has been completed as shown in figure 13
Figure 13
14
Page 15
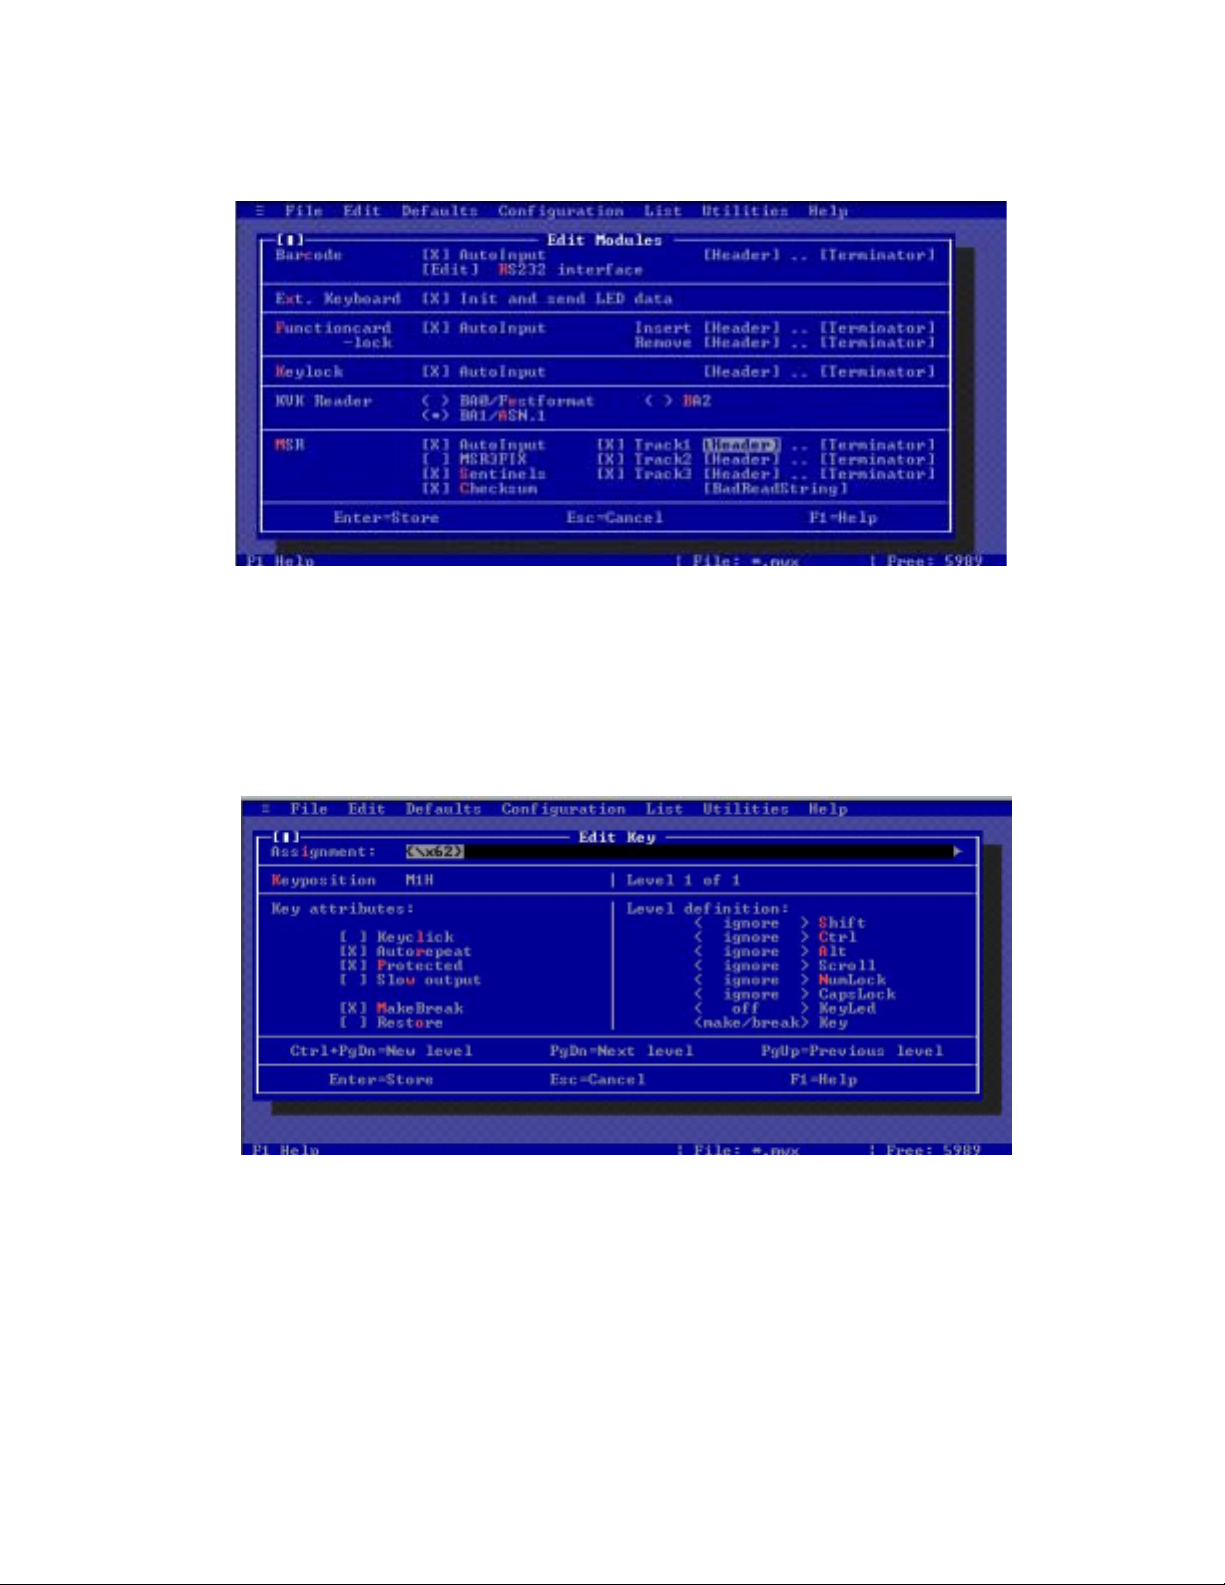
3. Click on Edit>Modules, and then a new window will pop up.
Figure 14
4. Click on Header and then input at “Assigment” box.
Enter {\x62} for Track 1
Enter {\x63} for Track 2
Enter {\x64} for Track 3
Figure 15
5. Repeat the same procedure for “Terminator” as in point 3.
6. Click OK, and then go to File>WriteKeytable. Wait until programming is
completed.
15
Page 16
11. HOW TO REMOVE ONLINE PROGRAMMING
Online programming is an alternative method to program a Preh Keyboard. It is
recommended not to have access to online programming unless is necessary and
intended to be.
WINPROGRAMMER
1. In order to deactivate the online programming option with the winprogrammer
you need to have an MWF file or create a new one since the winprogrammer
cannot read the program from the keyboard. To create a new one, please refer
to the Winprogrammer User’s manual or the Quick reference for the
winprogrammer. If you do not have any of these documents, please contact
Preh Electronics Technical support.
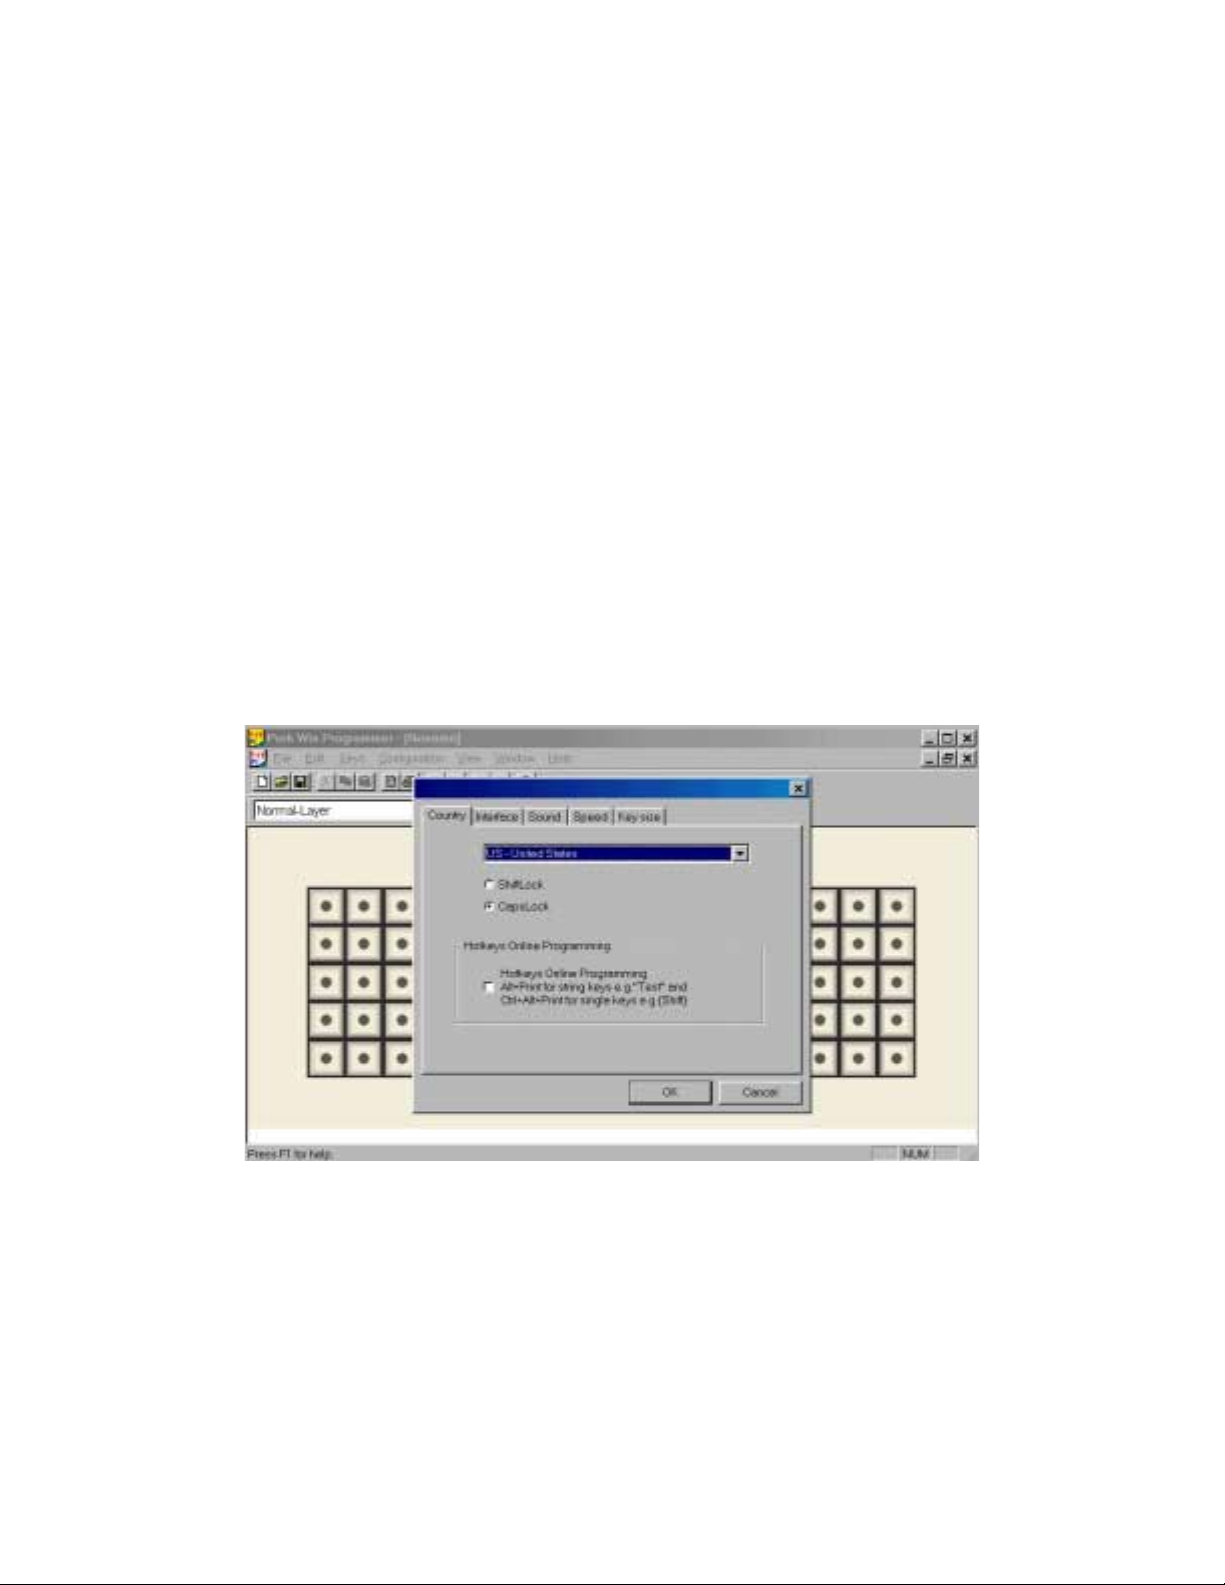
2. Open your MWF file, Go to Configuration>keyboard setup, then a new window
will pop up.
3. On “Country”, check out Hotkeys online programming as shown in figure 16.
Figure 16
4. Go to file>update keyboard. Wait until programming is completed.
5. Reset the keyboard.
DOS PROGRAMMER
1. Connect your keyboa rd and start DOS programmer.
16
Page 17
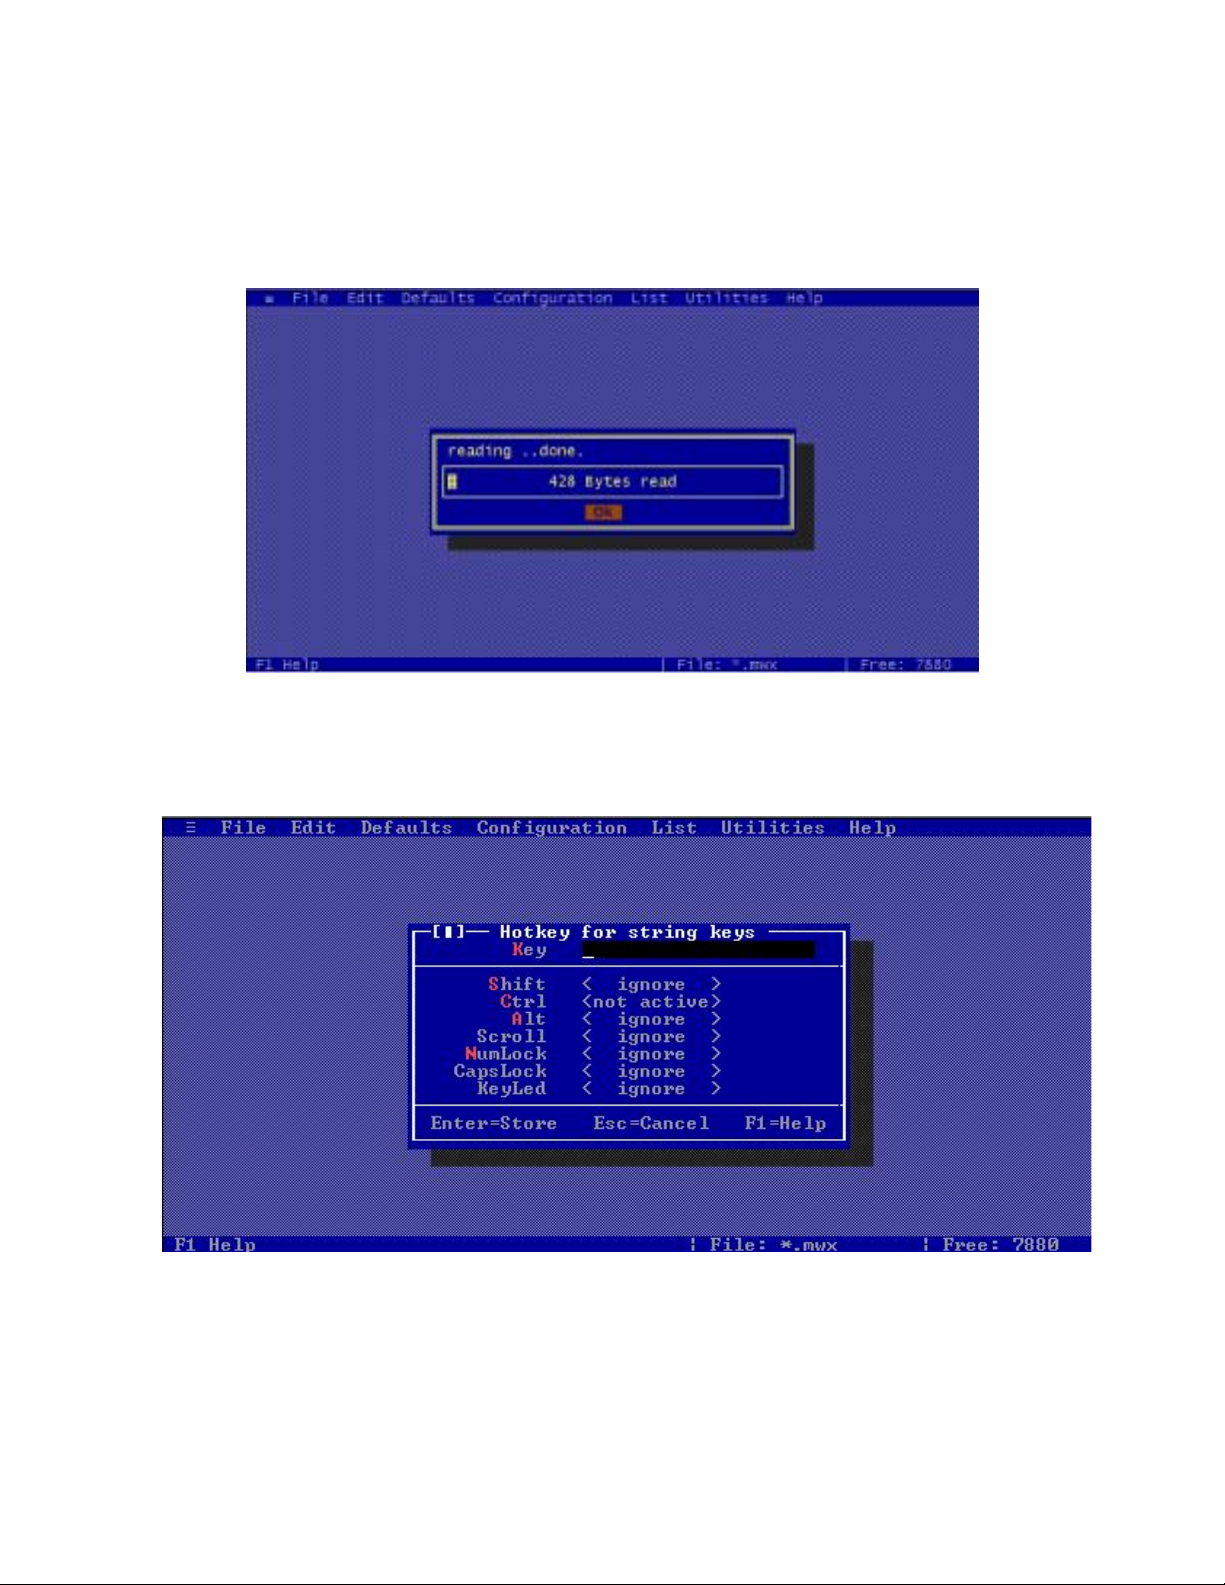
2. Go to the File menu and select “Read keytable”. This command will read all
data and settings that are inside the keyboard. Please, make sure that the
keyboard is connected. A status bar will show you when the reading of the
keyboard has been completed as shown in figure 17.
Figure 17
3. Go to Edit>Hotkey 0.
Figure 18
4. Clear out all information data contained on the input box as shown in figure
18.
17
Page 18

5. Click OK, and then go to File>WriteKeytable. Wait until programming is
completed.
6. Reset the keyboard.
18
Page 19

12. HOW TO DEACTIVATE THE BIOS KEYBOARD
INITIALIZATION DURING POST
There are 2 options:
1. Using the BIOS deactivate the option for checking keyboard duri ng
initialization.
2. Another option is for users of Win2000 and WinXP. It is possible to deactivate
this option by creating 2 registers. Open Notepad and input the following
text, then save the file as Keyboard_chk_on.reg. The following text is needed
to create a register update to activate the keyboard initialization.
[ H K E Y _ L O C A L _ M A C H I N E \ S Y S T E M \ C u r r e n t C o n t r o
l S e t \ S e r v i c e s \ i 8 0 4 2 p r t \ P a r a m e t e r s ]
" H e a d l e s s " = d w o r d : 0 0 0 0 0 0 0 1
You will also need to create a register file to deactivate the registers. Open
Notepad and input the following text, then save the file as
Keyboard_chk_off.reg. The following text is needed to create a register update
to deactivate the keyboard initialization.
[ H K E Y _ L O C A L _ M A C H I N E \ S Y S T E M \ C u r r e n t C o n t r o
l S e t \ S e r v i c e s \ i 8 0 4 2 p r t \ P a r a m e t e r s ]
" H e a d l e s s " = d w o r d : 0 0 0 0 0 0 0 0
Once you have created these files, double click on “Keyboard_chk_off.reg” to
deactivate the keyboard initializations and double click on
“Keyboard_chk_on.reg” to activate it.
If you have problems creating this file, please contact our technical support.
19
Page 20
13. HOW TO TURN OFF THE UNNECESSARY MODULE S
The keyboard has extra options that might not be used by the user, or
initializations.
WINPROGRAMMER
1. In order to deactivate or activate modules with the winprogrammer you need
to have an MWF file or create a new fi le since the winprogrammer cannot read
the program from the keyboard. To create a new file, please refer to the
Winprogrammer User’s manual or the Quick reference for the
winprogrammer. If you do not have any of these documents, please contact
Preh Electronics Technical support.
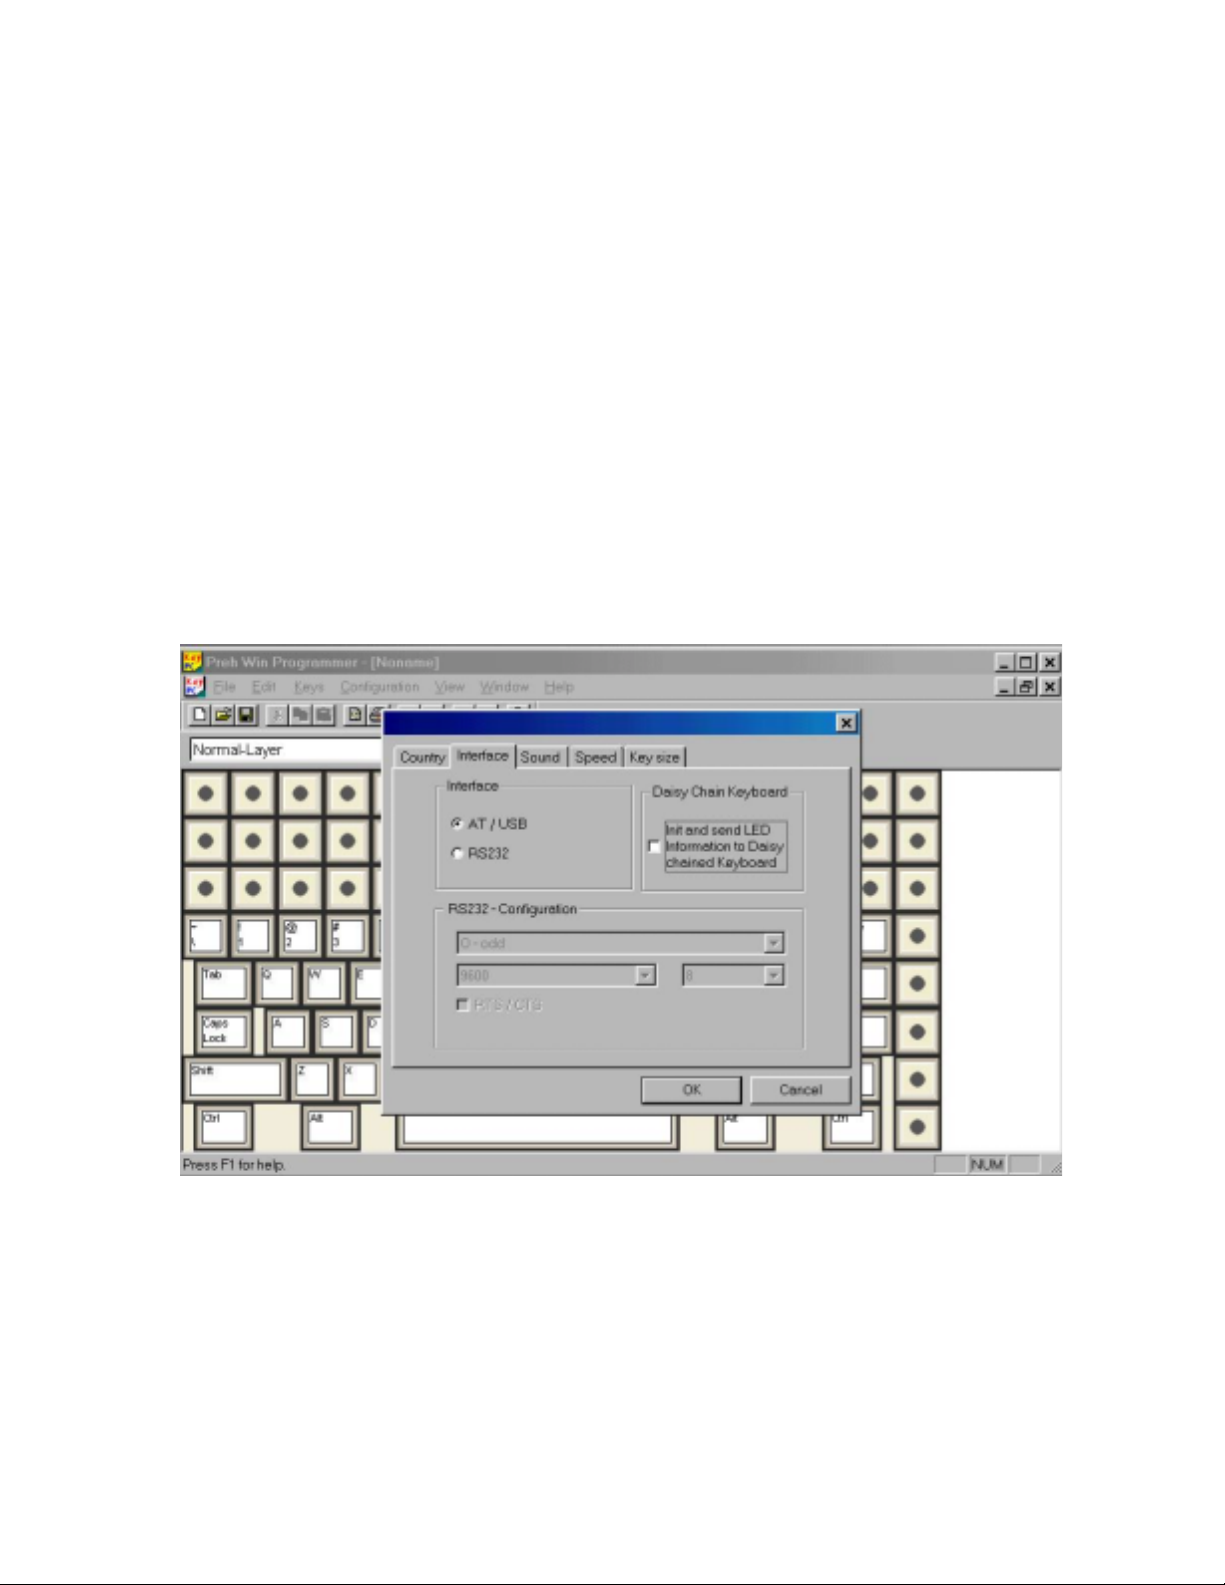
2. Open your MWF file. Go to Configuration>Keyboard Setup. A new window will
pop up. Then click on Interface.
Figure 19
3. Uncheck “Init and Send LED information to Daisy chained keyboard”. Click OK
4. Go to Configuration>Modules Setup. A new window will pop up.
20
Page 21
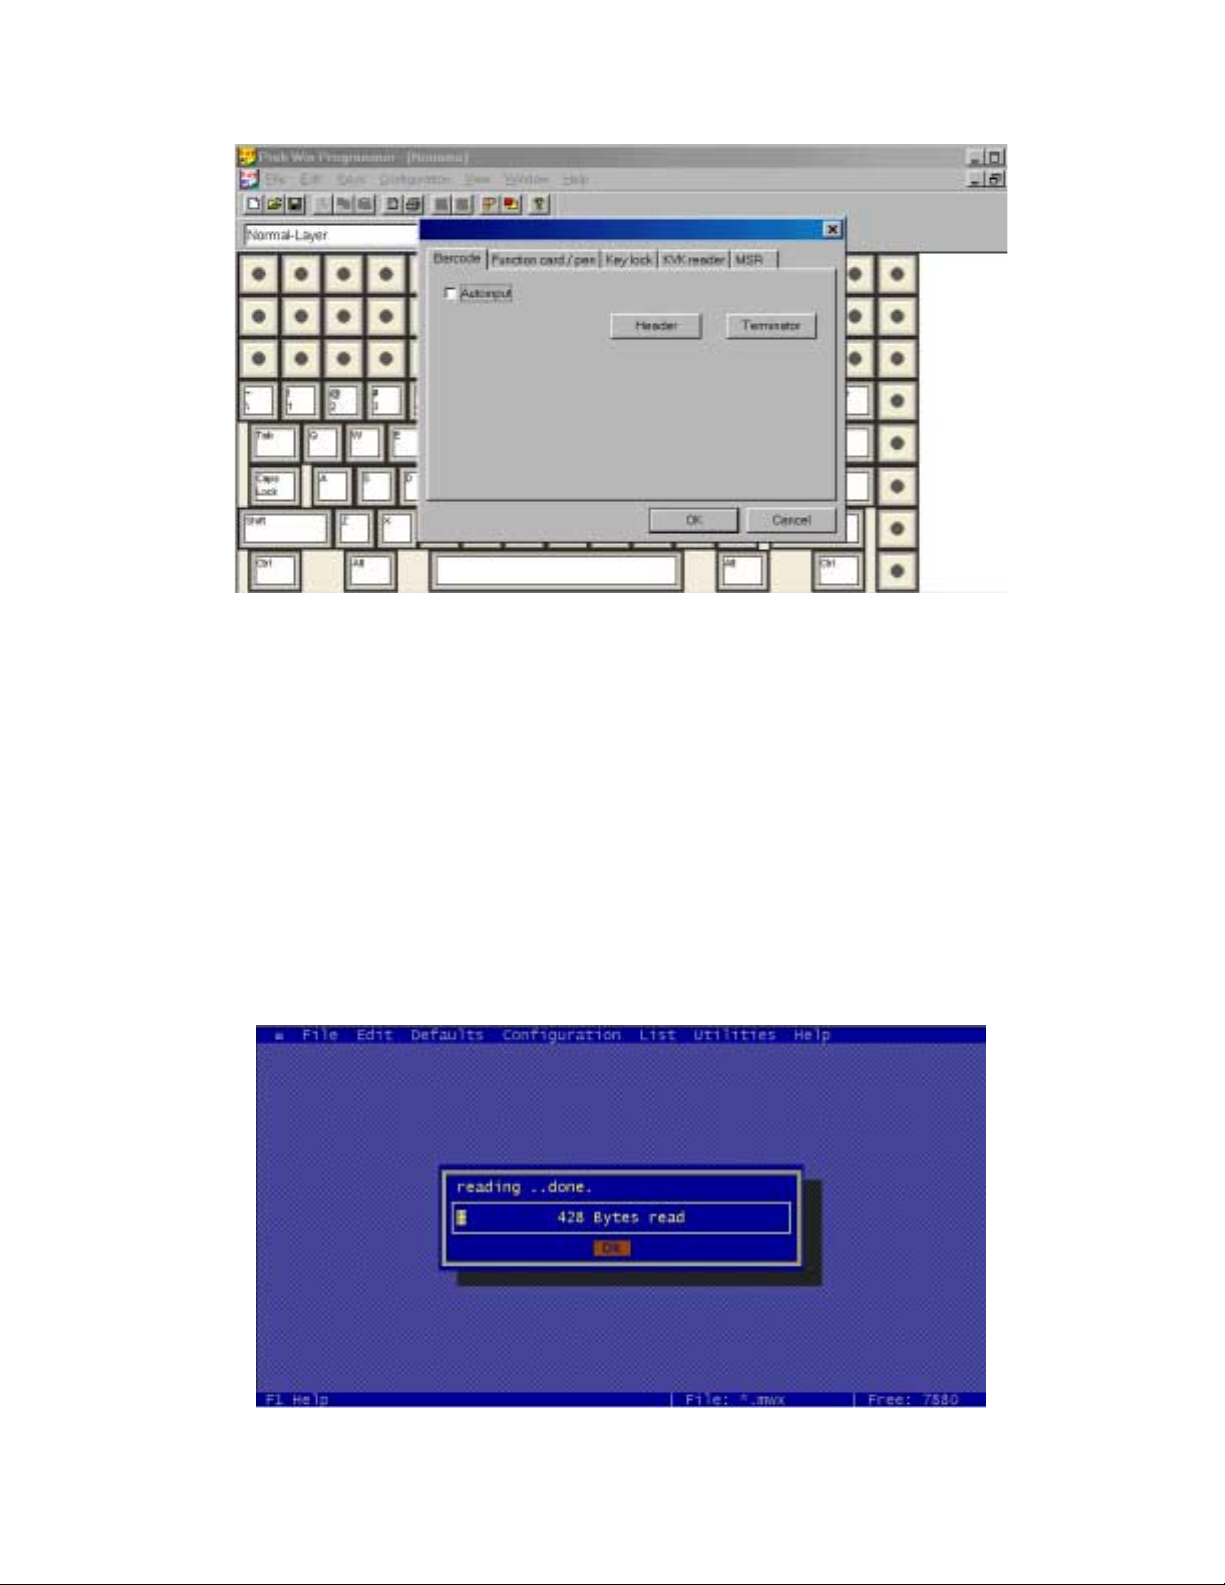
Figure 20
5. Uncheck all “Autoinput” from the modules that are not being used or are not
available on your keyboard. Click OK
6. Go to File>Update Keyboard and click OK.
DOS PROGRAMMER
1. Connect your keyboa rd and start DOS programmer.
2. Go to the File menu and select “Read keytable”. This command will read all
data and settings that are inside the keyboard. Please, make sure that the
keyboard is connected. A status bar will show you when the reading of the
keyboard has been completed as shown in figure 21.
Figure 21
21
Page 22
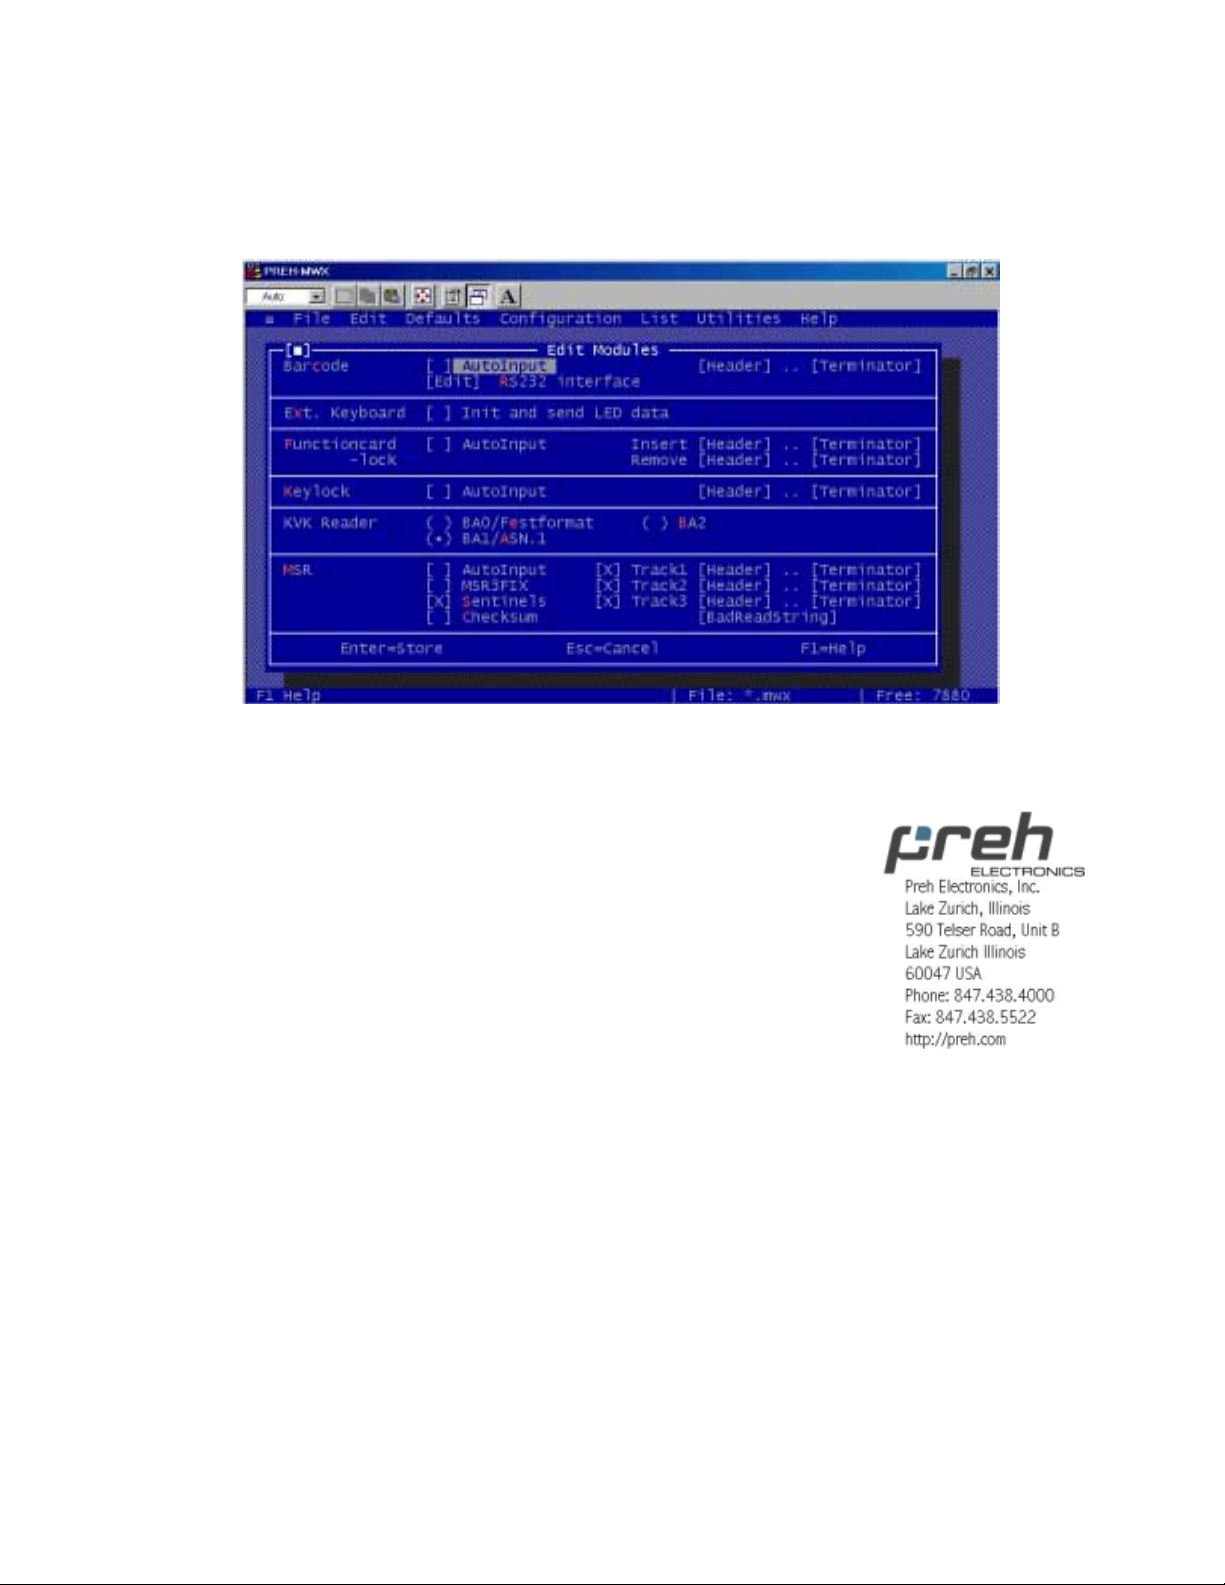
3. Go to File>Edit>Modules. Uncheck Init and send LED data, and all the
modules (Autoinput) that are not used, such as MSR, Keylock etc.
figure 22
4. Click Enter and go to File>Write Keyboard.
TRM Ver 1.1
Nov 2003
22
 Loading...