

Page 1
Commercial StretchTrainer
Assembly Guide
C240
Page 2

Page 3

®
Thank you for purchasing the Precor StretchTrainer™. You have made an excellent choice in reducing
your daily stress, enhancing muscle elasticity and flexibility, diminishing the risk of injury, and increasing
body awareness and relaxation. The StretchTrainer puts the emphasis on flexibility, and like all Precor
products, it is manufactured to the highest quality standards.
The StretchTrainer makes it easy to incorporate stretching into your daily routine. There is no getting
up and down off the floor or dealing with awkward balancing rituals. The StretchTrainer uses alignment,
traction, and precisely engineered angles to place your body in its most advantageous position for
stretching and flexibility training. The patented StretchTrainer design locks in your legs and pelvis as the
seat pivots back. This stabilizes your back so that the weight of your body helps achieve an optimal
stretch. No other stretching device puts your body in such an ideal position.
This guide provides important safety and assembly instructions. An instructional placard, attached to the
StretchTrainer, illustrates several stretching techniques.
Important Safety Instructions
When using exercise equipment, basic precautions
should always be taken, including the following:
z Read all instructions before using the
StretchTrainer. These instructions are written to
educate club personnel, patrons, and other users
in the proper use of the equipment.
z Do not allow children or those unfamiliar with its
operation on or near the StretchTrainer. Do not
leave children unsupervised around the unit.
z Do not use the StretchTrainer outdoors.
z Do not modify the StretchTrainer or any of its
parts. Do not use accessory attachments that are
not recommended by Precor, as such
attachments may cause injuries. You should not
attempt to service the StretchTrainer yourself.
z Assemble and operate the StretchTrainer on a solid,
level surface. Make sure that the unit is installed with
enough free space for safe operation. As a general
rule, allow about a 4-foot (1 meter) circle of space
from the user’s center.
z Make sure that users, trainers, club personnel,
and maintenance technicians understand how to
use the StretchTrainer, comply with the important
safety instructions, read the safety information for
users, and can recognize potential problems, such
as a cracked weld or worn wrist strap.
z Before using the StretchTrainer, examine it
thoroughly. Make sure that all fasteners are
securely tightened and the instructional placard
is attached to the unit. Inspect the wrist straps for
wear. Replace them if they are frayed, worn, or
missing.
z If you determine that the StretchTrainer needs
service, move the equipment away from the
exercising area. Place an OUT OF SERVICE sign
on it and make sure all patrons and users know
that they must not use the StretchTrainer.
z The StretchTrainer is accompanied by a Precor
Limited Warranty. To retain this limited warranty,
keep your receipt, mail the warranty registration
card, and follow the assembly and usage
instructions. To review the limited warranty, refer
to the back cover.
page 3
Page 4
Safety Information for Users
®
To familiarize yourself with the StretchTrainer and
basic stretching techniques, review the instructional
placard and the following safety information.
z Before beginning any fitness program, see your
physician for a complete physical examination.
z If you do not understand how to operate the
equipment, ask someone from the club such as
a trainer to demonstrate how to use it and explain
the safety information.
z Before using the StretchTrainer, always check for
loose, worn, or frayed parts. If you spot a potential
problem, do not use the StretchTrainer. If it is a
club unit, inform the club immediately.
z Wear comfortable exercise clothing and soft-soled
shoes for your workout and avoid loose clothing.
Tie long hair back.
z Always hold the handlebars while stretching. Do
not attempt a stretch using only the wrist straps.
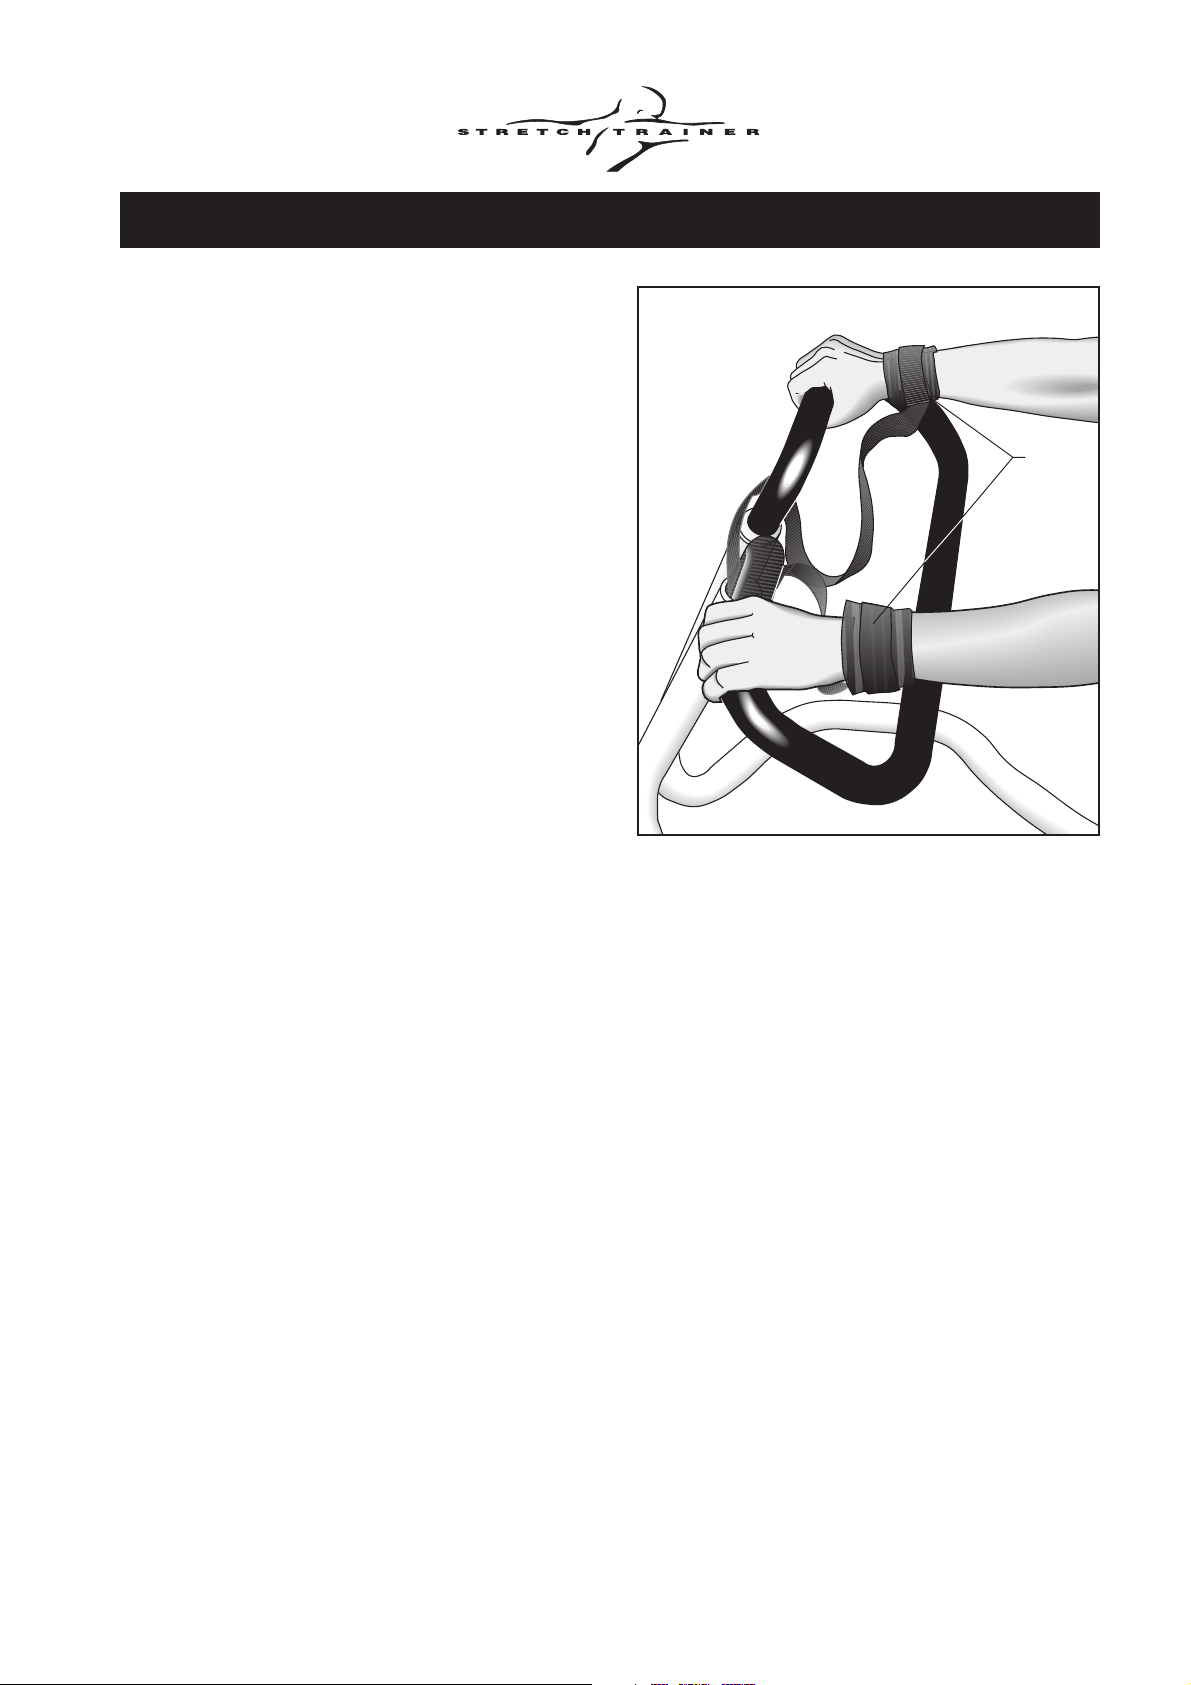
z Use the wrist straps at all times while on the
StretchTrainer. The wrist straps may help reduce
the risk of injury by decreasing the chance of over
stretching or falling should you lose your grip on
the handlebar. Refer to Diagram 1.
z Do not over stretch, force a stretch, or bounce
during a stretch.
z Do not overexert yourself or try to do all the
stretches shown on the instructional placard the
first time you use the StretchTrainer. Start your
stretching routine slowly and conservatively. With
practice and increased flexibility, you can add
more stretches and repetitions to your routine.
Diagram 1
Wrist
straps
Obtaining Service
A club owner, facility manager, or trainer can help
you with most questions regarding the
StretchTrainer. For information about product
operation or service, see the Precor web site at
www.precor.com. Should you need more information regarding customer support numbers or a list
of Precor authorized service centers, visit the
Precor web site at www.precor.com/corp/contact.
z When you have completed your stretching routine,
verify that the seat is returned to the forward
position.
z Do not rock the equipment. Do not stand on the
handlebars, instructional placard, or the padded
seat.
z Do not overexert yourself or work to exhaustion.
If you feel any pain or abnormal symptoms, stop
your workout immediately and consult your
physician.
page 4
Page 5
®
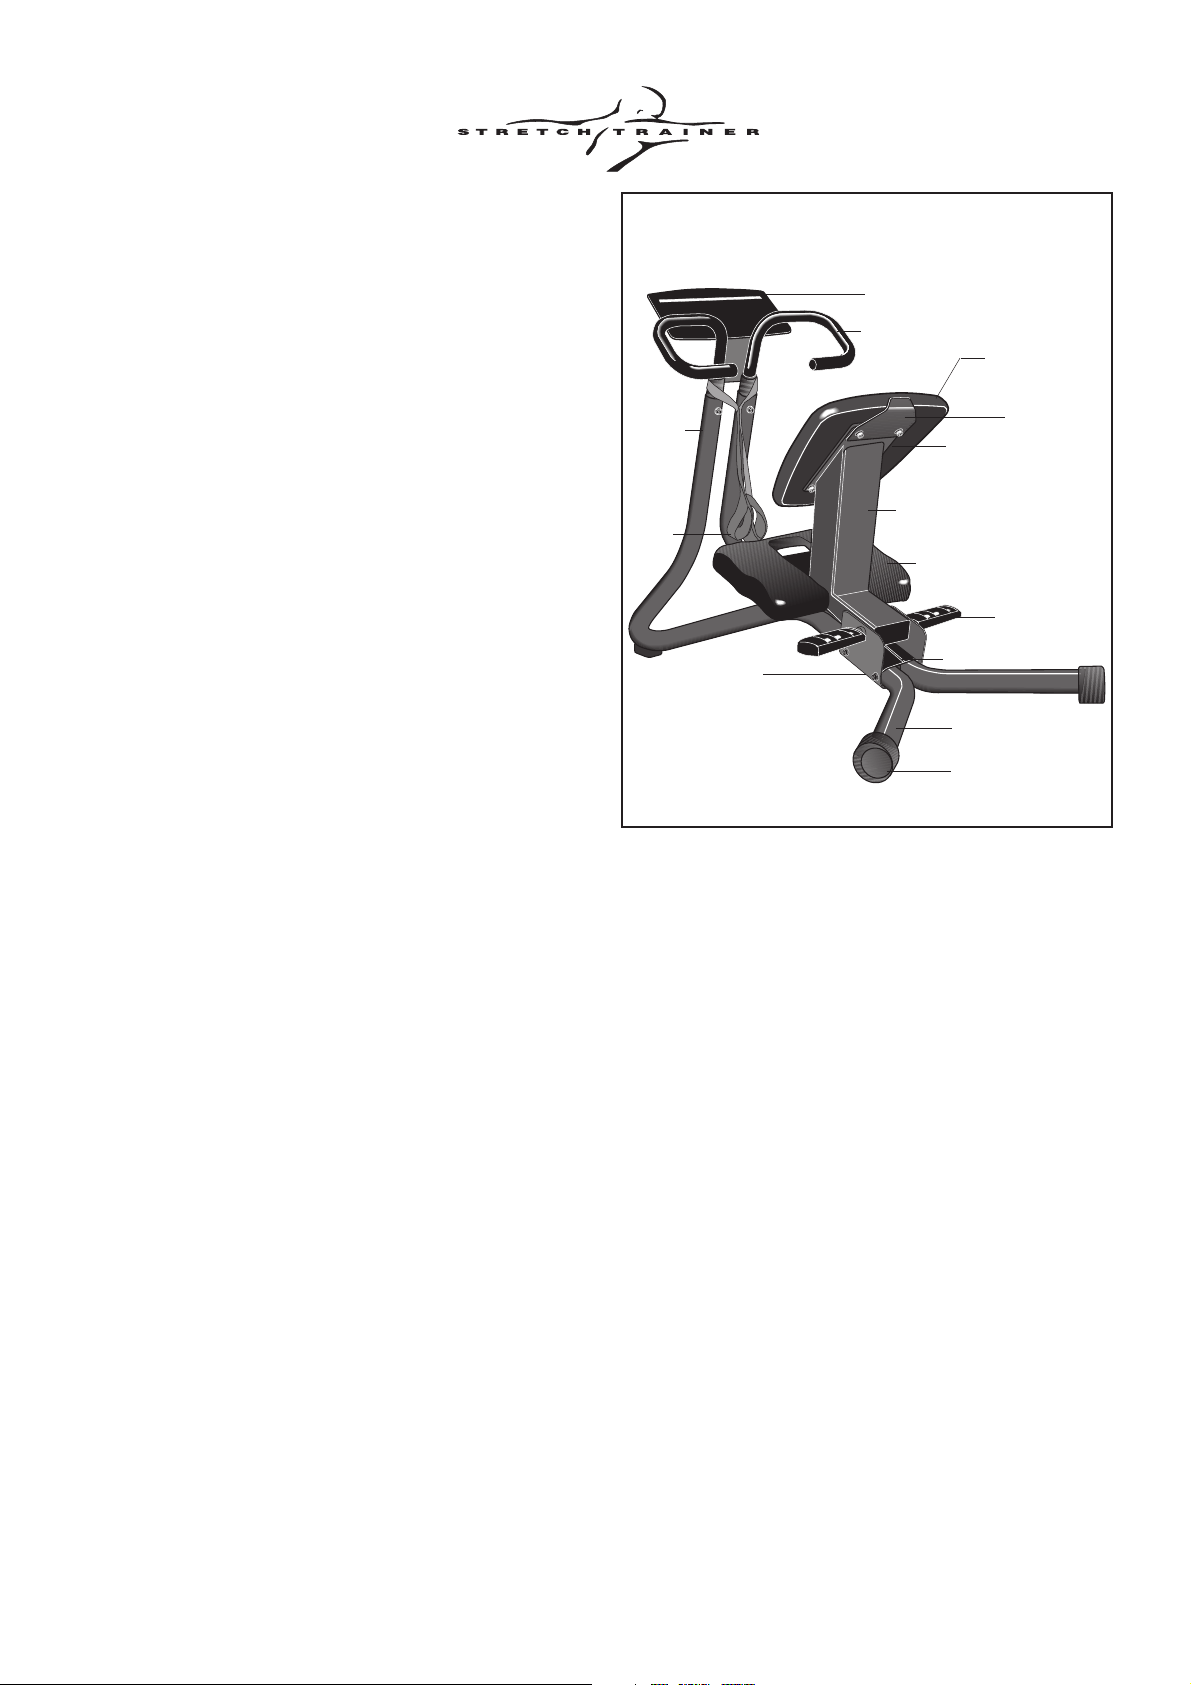
Unpacking the StretchTrainer
The StretchTrainer comes equipped with everything
you need to assemble it. Refer to Diagram 2. It is
shipped in the following pieces:
z Seat assembly (padded seat, knee pad,
bolts and washers)
z base rails (2)
z handlebar (includes wrist straps)
z instructional placard
• assembly kit
3mm and 6mm hex keys
Two E-rings
Two foot rests
Two rear level adjustors (for the base rails)
Seat bumper
Axle
Alignment bracket
Several fasteners (bolts, washers, and nuts)
z literature kit - not shown in Diagram 2 (includes
the assembly instructions and warranty card)
Carefully unpack the pieces and lay them on the
floor near the location where you plan to use it. If
any items are missing, contact the dealer from whom
you purchased the StretchTrainer or use the Precor
web site at www.precor.com to find the dealer
nearest you.
Diagram 2
StretchTrainer parts.
Upright
support
Wrist
straps
Seat bracket
Instructional placard
Handlebar
Padded seat
Seat bumper
Seat plate
Seat frame
Knee pad
Foot rest
Alignment bracket
Base rails
Rear level adjustor
Assembly Instructions
To assist you in the assembly of the StretchTrainer,
refer to Diagram 2 while performing the following
steps.
Important: Assemble and operate the StretchTrainer
on a solid, level surface. Also, have rags or paper
towels available to set the fasteners on during
assembly. Be aware that the lubrication on the
fasteners can stain carpeting and clothing.
Extra tools needed: A small crescent (or open-end)
wrench and needle-nose pliers.
1. Ask for assistance in assembling the
StretchTrainer. Putting the seat assembly
together and positioning it and the handlebars
over the base rails is a difficult procedure for
one person. Fully assembled, the StretchTrainer
weighs over 60 pounds.
2. Set the base rails on the floor. Ask for an
assistant to hold the upright supports together
while you align and secure the base rails.
page 5
Page 6
®
3. Assemble the base rails. Diagram 3. While
your assistant holds the upright supports, slide
the seat bracket under the base rails and align
the mounting holes. Place the alignment bracket
into position between the base rails and align
the holes.
4. Secure the base rails. Four fasteners secure
the seat bracket. A pair of fasteners with long
bolts is inserted through the side (horizontally)
and another pair of fasteners are inserted
(vertically) through the base of the seat bracket
and into the base rails. (
fasteners are not shown in Diagram 3.
Note that the vertical
) To
secure the base rails, take the following steps:
a. Insert the long bolts and washers
(horizontally) through the seat bracket, base
rails, and alignment bracket. Diagram 3.
b. Place a washer and locknut onto the ends
of the bolts and finger tighten.
c. Place a lock washer and washer on each
of the two shorter bolts. The lock washer
should be placed against the head of the
bolt.
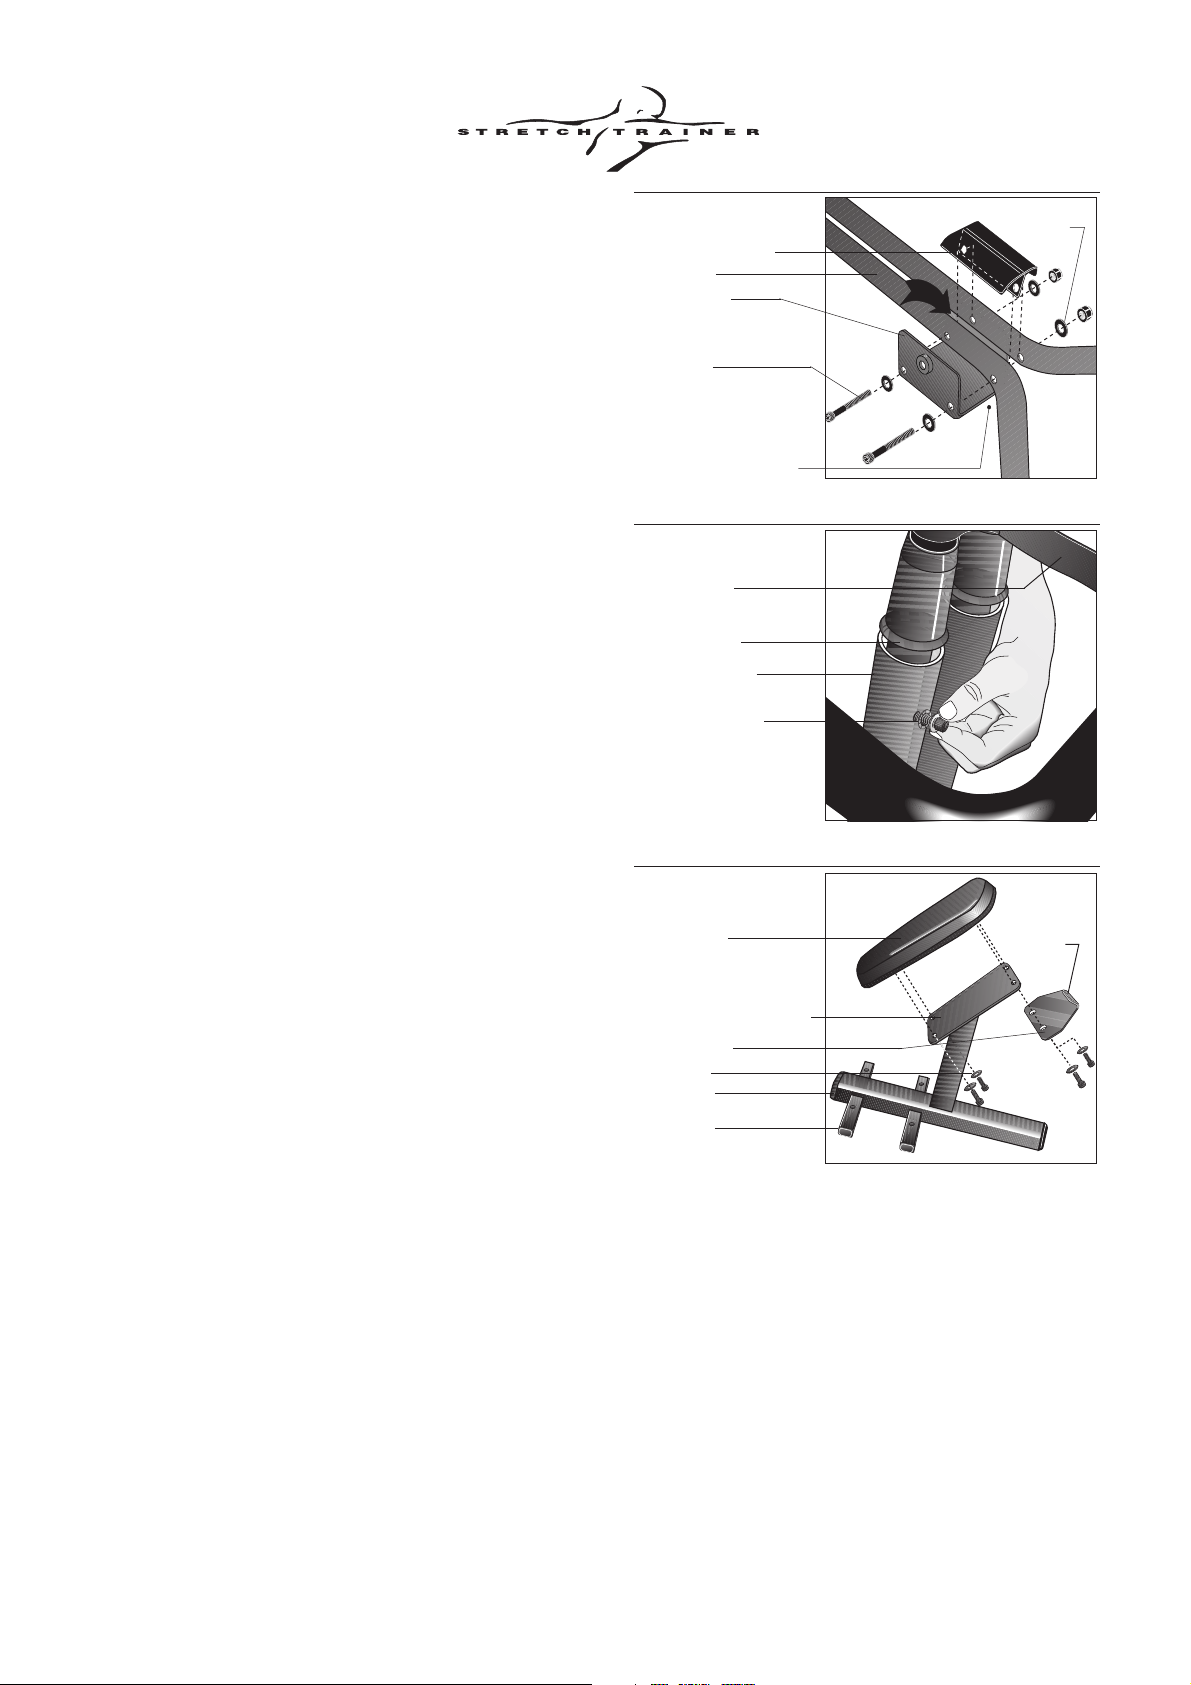
Diagram 3
Positioning the base rails.
Alignment bracket
Base rails
Seat bracket
2 long bolts,
4 flat washers, and
2 locknuts
2 shorter bolts, 2 lock
washers, and 2 flat
washers are inserted
through the base of the
seat bracket.
Diagram 4
Positioning the handlebar.
Wrist straps
Handlebar cap
Upright support
Bolt, lock washer,
and flat washer
Washer
d. Align the bolt holes and insert the bolts
(vertically) through the seat bracket and base
rails. Finger tighten the bolts.
5. Position the handlebar over the upright supports.
Diagram 4. Slide the handlebar into place and align
the bolt holes. Be sure that the wrist straps, on the
handlebars, face toward the rear (seat assembly
location).
6. Insert the bolts (with washers) through the
upright supports and into the handlebars.
Diagram 4. Notice that there are two bolt holes
in front and two in back. Finger tighten each
bolt. Do not use the hex key at this time. Loose
bolts make it easier to install the seat frame.
7. Put the seat assembly together. Diagrams 5
and 6. The seat assembly (seat frame, padded
seat, seat bumper, and knee pad) is put
together before it is attached to the base rails.
8. Start with the padded seat. Diagram 5.
Position the padded seat as shown and take
the following steps:
Diagram 5
Installing the padded seat.
Padded seat
Narrow end of seat plate
Seat bumper
Fasteners
Seat frame
Crossbars
Seat
bumper
a. Align the bolt holes and make sure that the
narrow end of the seat faces the crossbars.
b. Place a washer on each of four 1-inch bolts.
page 6
Page 7

®
c. Align the seat bumper as shown in Diagram 5.
Insert the four bolts and washers through the
seat bumper, seat plate, and into the underside of the padded seat. A small space (about
¹⁄₈-inch) will exist between the seat bumper
and the padded seat. To keep the padded
seat aligned properly, alternately finger tighten
each bolt.
d. After making sure that the padded seat is
aligned properly, securely tighten each bolt
with the 6mm hex key.
9. Properly position the knee pad. Diagrams 6
and 7. Align the bolt holes in the knee pad with
the mounting holes in the crossbars.
10. Attach the knee pad to the crossbars.
Diagram 7. Slide a washer onto each of the four
bolts. Then, place a bolt and washer on the end
of the 6mm hex key and insert it through the
crossbars. Thread the bolt into the underside of
the knee pad. To keep the pad properly aligned,
thread all four bolts and then, alternately tighten
each bolt securely.
Note: It is easy to lose a bolt in the crossbars.
To retrieve it, tip the seat assembly on its side
and jiggle it until the bolt drops out of the hole.
Diagram 6
Installing the knee pad.
Padded seat
Knee pad
Seat bumper
Crossbars
Diagram 7
Securing the knee pad.
6mm hex key
Bolt and washer
Place a bolt with
washer on the hex
key before inserting it
through the crossbar.
Crossbars
11. Install the axle. Diagram 8. Place the seat
frame into position between the seat bracket.
Align the axle mounting hole. Slide the axle
(located in hardware kit) through the bracket
and seat frame. When the axle is halfway
through, stop and place a foot rest on one end
of the axle.
12. Secure the foot rests. Diagram 9. Take an E-
ring (found in the hardware kit) and push it into
position as shown in Diagram 9. Do the same
for the foot rest on the other side. A notch has
been cut into the axle for the E-ring to rest in.
Note: You may need to use a pliers to help
push the E-ring into position.
Diagram 8
Installing the axle.
Seat frame
Axle
Seat bracket
Base rails
Diagram 9
Securing the foot pedals.
Axle
Foot rest
E-ring
page 7
Page 8

®
13. Secure the axle. Diagram 10. Make sure that
the foot rests are securely fastened to the axle
and the axle is centered through the seat frame.
Use the 3mm hex key to tighten the two small
set screws that hold the axle in position. Do not
overtighten the screws.
14. Secure the handlebar. Diagram 11. Prior
to tightening the handlebar bolts, slide the
handlebar caps into the upright supports.
Then, securely tighten the bolts using the
6mm hex key.
15. Return to the seat bracket bolts. Use the hex
key to securely tighten the 4 seat bracket bolts.
Do not tighten the bolts so severely that you
compress or crack the plastic alignment bracket.
16. Position the instructional placard onto the
handlebar bracket. Diagram 12. Remove the
paper backing from the double-sided tape.
17. Center the placard on the handlebar bracket
and press firmly into place. Diagram 13. Be
sure that the placard is positioned in the center
of the handlebar bracket before you press it
firmly onto the double-sided tape.
Diagram 10
Securing the axle.
Tighten screw with
3mm hex key
Axle
Foot rest
Diagram 11
Sliding the handlebar
caps into place.
Wrist strap
Handlebar cap
Upright support
18. Install the rear level adjustors. Diagram 14.
Raise the rear end of the equipment slightly off
the floor and slide a rubber level adjustor onto
one side of the rear base rail. Slide the other
level adjustor onto the opposite base rail.
Carefully lower the equipment onto the floor.
Avoid pinching your fingers.
Important: If the equipment is placed on a
slightly, uneven surface, rotating the rear level
adjustors can help, but will not compensate for
extremely uneven surfaces. The maximum
height that you can compensate for using the
rear level adjustors is about one quarter inch
(6 mm).
Diagram 12
Exposing the adhesive
tape.
Paper backing
Handlebar
Handlebar Bracket
Diagram 13
Attaching the placard.
®
Instructional placard
Adhesive doublesided tape
Handlebar
page 8
Page 9

®
19. Level the equipment. Diagram 14. Sit on the
StretchTrainer as it rests on the floor. If it wobbles
slightly, rotate the rear level adjustors until the
equipment is stable.
20. You have completed the assembly process.
Use a cloth dampened with a non-abrasive
degreaser to clean any parts of the equipment
that may have been blackened by grease from
the bolts.
21. Review the stretching techniques. Prior to
working out, refer to the stretching guidelines on
the next page and techniques highlighted on the
instructional placard.
Important: Do not discard the hex keys
supplied with the equipment. Maintain the
integrity of the StretchTrainer by occasionally
checking and tightening the fasteners. Use the
hex keys to tighten any bolts that become loose.
Diagram 14
Installing the rear level
adjustors.
Rear level adjustor
page 9
Page 10

To get the most our of each stretching routine, a
general understanding of the muscle groups being
used during your stretching routine is invaluable.
This section provides information about the different
muscle groups and also discusses general guidelines on "how to use" the StretchTrainer.
®
Before your begin your stretching routine, review the
following guidelines.
z Always use the wrist straps during your stretching
routine.
z For most stretching positions, make sure that your
knees rest on the knee pads, your lower legs are
parallel to the knee pads, and your feet are
properly positioned in the foot pedals.
z Warm up and start slowly. Warm muscles are
easier to stretch and are less prone to injury. Do
three to five warm-up stretches using the
techniques shown in stretch #1.
z Do not over stretch. Do not hold stretches for
longer than 3 to 5 seconds. Pay attention to
exactly how your body feels. The amount of
movement should be determined by your comfort
level. Stop when you feel tension in the muscle.
z Never bounce while stretching. The stretching
routines should always be done in a controlled
manner, slow and smooth movements.
z Use your abdominal and gluteal muscles to move
in to and out of each stretch. Do not use your
arms to pull you up.
z Do not hold your breath. Remember to relax and
breathe normally while stretching. Exhale on the
stretch and inhale on the return. Holding your
breath increases the tension in your body which
makes stretching less effective and can be
harmful to your health.
z Learn how to perform each stretch correctly.
Always keep your arms straight. Pay close
attention to the position of each body part.
The numerical callouts on the illustration, correspond to the eight stretches on the instructional
placard.
For example, the callout 1 shows the general area
(just above the tailbone) which is targeted in the first
stretch titled 1 Lower Back.
page 10
Page 11

Commercial Equipment Limited Warranty
PLEASE READ THESE WARRANTY TERMS AND CONDITIONS CAREFULLY BEFORE USING YOUR PRECOR INCORPORATED PRODUCT.
BY USING THE EQUIPMENT, YOU ARE CONSENTING TO BE BOUND BY THE FOLLOWING WARRANTY TERMS AND CONDITIONS.
Limited Warranty.
Precor Incorporated warrants all new Precor products to be free from defects in materials and
manufacture for the warranty periods set forth below. The warranty periods commence on the
invoice date of the original purchase. This warranty applies only against defects discovered
within the warranty period and extends only to the original purchaser of the product. Parts
repaired or replaced under the terms of this warranty will be warranted for the remainder of the
original warranty period only. To claim under this warranty, the buyer must notify Precor or
your authorized Precor dealer within 30 days after the date of discovery of any nonconformity
and make the affected product available for inspection by Precor or its service representative.
Precor’s obligations under this warranty are limited as set forth below.
Warranty Periods and Coverage.
Commercial Cardiovascular Products, also known as C-Series Products,
(excluding StretchTrainer, Strength Products).
• Seven years frame, five years display face assembly, three years motor controller, one
year durable wear parts, two years parts, one year labor.
• For treadmills, five years drive motor.
• For self-powered ellipticals and bikes, one year battery.
• For InSite, one year parts and labor.
• Labor coverage for options as defined below.
StretchTrainer
Five years frame, two years parts, 90 days upholstery, no labor.
Strength Products (S3.45 and S3.25 only)
Ten years frame; three years bearings, guide rods, cams, pulleys; one year belts, cables,
hand grips, miscellaneous parts; 90 days upholstery; no labor.
Options / Accessories / Battery-powered or Self-Operated Devices
Many options or accessories have components that are connected internally or mounted
inside the electronic console. The following guidelines determine the warranty for these
components. If the internal components are installed by the factory or by an authorized dealer
as part of the original sale and delivery, they have a warranty that is identical to the warranty of
the equipment in which they are connected or mounted. If the internal components are not
installed by the factory or by an authorized dealer as part of the original sale and delivery, they
have a 90 days parts and labor limited warranty. All components that are not internally
connected have a 90 days parts only limited warranty. Satisfactory proof of purchase is
required in all cases.
Conditions and Restrictions.
This warranty is valid only in accordance with the conditions set
forth below:
1. The warranty applies to the Precor product only while
a. it remains in the possession of the original purchaser and proof of purchase is
demonstrated,
b. it has not been subjected to accident, misuse, abuse, improper service, or non-Precor
modification.
c. claims are made within the warranty period.
2. Certain products are warranted for standard commercial use only (defined as use in nonfee paying clubs or facilities and less than 6 hours daily use. Unapproved use voids the
warranty. Current standard commercial products include C936i, C932i, EFX524i,
EFX534i.).
3. This warranty does not cover damage or equipment failure caused by electrical wiring
not in compliance with electrical codes or Precor owner’s manual specifications, or
failure to provide reasonable and necessary maintenance as outlined in the owner’s
manual.
4. Except in Canada, Precor does not pay labor outside the United States.
5. Warranties outside the United States and Canada may vary. Please contact your local
Dealer for details.
This Limited Warranty shall not apply to:
1. Software (PROM) version upgrades.
2. Normal wear and tear, consumables and cosmetic items, including, but not limited to
the following: grips, seats, and labels.
3. Repairs performed on Precor equipment missing a serial number or with a serial tag
that has been altered or defaced.
4. Service calls to correct installation of the equipment or instruct owners on how to use
the equipment.
Complete this portion and keep for your records.
Purchased From: _________________________________ Example: Dealer or store name.
Phone Number: ___________________________________ Example: Dealer or store telephone
number.
Product/model: ___________________________________ Example: EFX534i or C966i
Serial number: ____________________________________
The serial number is found on the shipping container.
5. Pickup and delivery involved with repairs.
6. Any labor costs incurred beyond the
applicable labor warranty period.
Disclaimer and Release.
The warranties provided herein are the exclusive
warranties given by Precor and supersede any prior,
contrary or additional representations, whether oral or
written. ANY IMPLIED WARRANTIES, INCLUDING
THE WARRANTY OF MERCHANTABILITY OR
FITNESS FOR A PARTICULAR PURPOSE THAT
APPLY TO ANY PARTS DESCRIBED ABOVE ARE
LIMITED IN DURATION TO THE PERIODS OF
EXPRESS WARRANTIES GIVEN ABOVE FOR
THOSE SAME PARTS. PRECOR HEREBY
DISCLAIMS AND EXCLUDES THOSE WARRANTIES
THEREAFTER. Some States do not allow limitations
on how long an implied warranty lasts, so the above
limitation may not apply to you. PRECOR ALSO
HEREBY DISCLAIMS AND EXCLUDES ALL OTHER
OBLIGATIONS OR LIABILITIES, EXPRESS OR
IMPLIED, ARISING BY LAW OR OTHERWISE, WITH
RESPECT TO ANY NONCONFORMANCE OR
DEFECT IN ANY PRODUCT, INCLUDING BUT NOT
LIMITED TO: (A) ANY OBLIGATION, LIABILITY,
RIGHT, CLAIM OR REMEDY IN TORT, WHETHER
OR NOT ARISING FROM THE NEGLIGENCE OF
PRECOR OR ITS SUPPLIERS (WHETHER ACTIVE,
PASSIVE OR IMPUTED); AND (B) ANY OBLIGATION, LIABILITY, RIGHT, CLAIM OR REMEDY FOR
LOSS OF OR DAMAGE TO ANY EQUIPMENT. This
disclaimer and release shall apply even if the express
warranty set forth above fails of its essential purpose.
Exclusive Remedies.
For any product described above that fails to conform
to its warranty, Precor will provide, at their option, one
of the following: (1) repair; (2) replacement; or (3)
refund of the purchase price. Precor Limited Warranty
service may be obtained by contacting the authorized
dealer from whom you purchased the item. Precor
compensates Servicers for warranty trips within their
normal service area to repair commercial equipment
at the customer’s location. You may be charged a trip
charge outside the service area. THESE SHALL BE
THE SOLE AND EXCLUSIVE REMEDIES OF THE
BUYER FOR ANY BREACH OF WARRANTY.
EXCLUSION OF CONSEQUENTIAL AND INCIDENTAL DAM-
AGES.
PRECOR AND/OR ITS SUPPLIERS SHALL HAVE
NO OBLIGATION OR LIABILITY, WHETHER
ARISING IN CONTRACT (INCLUDING WARRANTY),
TORT (INCLUDING ACTIVE, PASSIVE, OR
IMPUTED NEGLIGENCE AND STRICT LIABILITY),
OR OTHERWISE, FOR DAMAGE TO THE
EQUIPMENT, PROPERTY DAMAGE, LOSS OF USE,
REVENUE OR PROFIT, COST OF CAPITAL, COST
OF SUBSTITUTE EQUIPMENT, ADDITIONAL
COSTS INCURRED BY BUYER (BY WAY OF
CORRECTION OR OTHERWISE) OR ANY OTHER
INCIDENTAL, SPECIAL, INDIRECT, OR CONSEQUENTIAL DAMAGES, WHETHER RESULTING
FROM NONDELIVERY OR FROM THE USE,
MISUSE OR INABILITY TO USE THE PRODUCT.
This exclusion applies even if the above warranty fails
of its essential purposes and regardless of whether
such damages are sought for breach of warranty,
breach of contract, negligence, or strict liability in tort or
under any other legal theory. Some states do not allow
the exclusion or limitation of incidental or consequential
damages, so the above limitation may not apply to you.
This warranty gives you specific legal rights, and you
may also have other rights, which vary from state to
state.
Effective 27 March, 2006
P/N 36286-112
Page 12

Page 13

Thank You and Welcome to Precor
To allow us to serve you better, please take a few moments to
complete and return your warranty registration.
YOU MAY ALSO REGISTER ONLINE AT
www.precor.com/warranty
If you have questions or need additional information, contact your
local dealer or call Precor Customer Support at 800-347-4404.
RET.
Woodinville, WA 98072-4002
PO Box 7202
20031 142nd Avenue NE
Precor Incorporated
HERE
STAMP
PLACE
Page 14

TELL US ABOUT YOUR NEW PRECOR PRODUCT
Date of
Purchase:
Month
Day
Year
Purchased
from:
Please indicate the type of product purchased:
❑ Elliptical Fitness CrossTrainer (EFX
®
)
❑ Treadmill
❑ Strength Training System
TELL US ABOUT YOU
❑ Mr.
❑ Mrs.
❑ Ms.
First Name
Street Address
Product
Serial
Number:
The serial number is located on the shipping box and on the product.
Dealer Name
❑ StretchTrainer
TM
❑ Cycle
❑ Stair Climber
Middle Initial Last Name
Zip CodeCity State
Apt./Suite:
Area Code
Your Email Address
Telephone
Gender: Marital status: Age: Annual household income: What are your fitness goals?
❑ Male ❑ Married ❑ Under 18 ❑ Under $50,000 ❑ Weight loss/management
❑ Female ❑ Divorced ❑ 18-24 ❑ $51,000-75,000 ❑ Muscle tone enhancement
❑ Widowed ❑ 25-34 ❑ $76,000-100,000 ❑ Cardiovascular improvement
❑ Never been married ❑ 35-44 ❑ $101,000-150,000 ❑ Overall health
❑ 45-54 ❑ $151,000+ ❑ Increase energy and flexibility
❑ 55-64 ❑ Stress reduction
❑ 65+ ❑ Rehabilitation
❑ Other
TELL US ABOUT YOUR PURCHASE
Purchase (check all that apply): How did you FIRST become aware of Precor
❑ First Precor product products (choose only one):
❑ Replaces a Precor product of the same type ❑ A gift
❑ Replaces same type of product – different brand ❑ Friend/relative
❑ Addition to equipment currently owned ❑ Physician
❑ Fitness club
❑ Internet
What factors MOST influenced your decision to ❑ News report or product review
purchase your Precor product (choose up to three): ❑ Magazine advertisement or article
❑ Precor reputation ❑ Print advertisement
❑ Prior use of Precor product(s) ❑ In-store display or demonstration
❑ Design/appearance ❑ Other
❑ Value for the price
❑ Special product features
❑ Rebate or sale price
❑ Quality/durability
❑ Warranty
❑ Physician recommendation
Effective 01 July 2004
P/N 45623-102
Please detach and mail in the warranty registration within ten days of purchase.
Page 15

Page 16

C240 StretchTrainer
Product Specifications
Length: 52 inches (132 cm)
Width: 28 inches (71 cm)
Height: 36 inches (91 cm)
Weight: 75 lbs (34 kg)
Shipping weight: 90 lbs (41 kg)
Precor Incorporated
20031 142nd Avenue NE
P.O. Box 7202
Woodinville, WA USA 98072-4002
1-800-347-4404
Precor, C, StretchTrainer, CrossRamp, EFX, M, Move
Beyond, and SmartRate are registered trademarks of
Precor Incorporated.
CrossTrainer and QuickStart are trademarks of Precor
Incorporated.
Copyright 2007 Precor Incorporated.
Specifications subject to change without notice.
www.precor.com
NOTICE:
Precor is widely recognized for its innovative, award winning designs of
exercise equipment. Precor aggressively seeks U.S. and foreign patents
for both the mechanical construction and the visual aspects of its product
design. Any party contemplating the use of Precor’s product designs is
hereby forewarned that Precor considers the unauthorized appropriation
of its proprietary rights to be a very serious matter. Precor will vigorously
pursue all unauthorized appropriation of its proprietary rights.
C240 Lit Kit# 38866-111
OM# 38875-109
Warranty Registration Card # 45622-101
Commercial Warranty Statement # 36286-112
15 April 2007
 Loading...