

Page 1

R
Programmable
Treadmill Ergometer
Owner’s Manual
R
USA
page 1
Page 2

Safety Information
Before beginning any fitness program, you should have a complete physical
examination by your physician.
Read and observe the following guidelines when using the M9.5sp
Programmable Treadmill Ergometer:
• Read the Owner’s Manual and follow all instructions. These instructions
were written to ensure your safety and to protect the treadmill.
Note for Club Owners: To ensure the proper use and safety of the M9.5sp
treadmill, make sure that all users review this manual. Please make this
manual a part of your training program.
• Assemble and operate the M9.5sp treadmill on a solid, level surface.
Locate the treadmill at least 4 feet from walls or furniture. Keep the area
behind the treadmill clear.
• Never allow children on or near the M9.5sp treadmill. Never leave children
unsupervised around the treadmill.
• Check the M9.5sp treadmill before each use. Do not use the treadmill if it is
not completely assembled or is damaged in any way.
• Keep hands away from moving parts.
• Wear proper exercise clothing and shoes for your workout—no loose
clothing. Do not wear shoes with heels or leather soles. Check the soles of
your shoes and remove any dirt and embedded stones. Tie long hair back.
• Keep all loose clothing and towels away from the treadmill running surface.
A treadmill running belt will not stop immediately if an object becomes
caught in the belt or rollers.
• Use care when getting on or off the M9.5sp treadmill. Use the handrails
whenever possible. Do not get on or off the treadmill when the running belt
is moving.
• Before starting the running belt, straddle the belt by placing your feet firmly
on the right and left staging platforms. You should also step onto the
staging platforms after turning off the running belt.
• Never turn ON the treadmill when someone is standing on the machine.
• Keep your body and head facing forward. Never attempt to turn around on
the treadmill when the running belt is moving.
page 2
• Do not rock the unit. Do not stand or climb on the handrails, electronic
console, or hood.
• Do not set anything on the handrail, electronic console, or hood. Never
place liquids on any part of the treadmill.
Page 3

• Keep all electrical components, such as the motor, power cord, and
ON/OFF switch, away from water or other liquids to prevent shock.
• Do not use accessory attachments that are not recommended by the
manufacturer—such attachments might cause injuries.
• Do not attempt to service the M9.5sp treadmill yourself. This treadmill does
not have any user-serviceable parts. See
Getting Service
later in this
manual for service information.
• Turn OFF the treadmill when adjusting or working near the rear roller. Do
not make any adjustments to the running belt when someone is standing
on the machine.
• This treadmill is manufactured with six safe “fail-off” systems. If the treadmill encounters a problem, it will trigger a “fail-off” system, allowing the
running belt to come to a gradual stop. Continued use of the treadmill after
a fail-off system occurs is not recommended. Instead, have your treadmill
serviced as described in
Getting Service
later in this manual.
• Do not overexert yourself or work to exhaustion.
• Stop your workout immediately if you feel any pain or abnormal symptoms,
and consult your physician.
Precor treadmills are designed for the enjoyment of the serious runner as well
as the dedicated walker. By following the above precautions and using good
common sense, you will have many safe and pleasurable hours of healthful
exercise with your Precor treadmill.
page 3
Page 4

Table of Contents
Before You Begin ................................................. 5
1
2
3
About this Manual............................................................. 5
Unpacking the M9.5sp Treadmill ...................................... 6
Setting Up the M9.5sp Treadmill......................... 7
Installation Requirements ................................................. 7
Assembly Instructions....................................................... 7
Checking the Alignment of the Running Belt.................... 11
Using the M9.5sp Treadmill................................. 12
Understanding the Electronic Console ............................. 12
How to Use the M9.5sp Treadmill .................................... 14
Creating Custom Courses ................................................ 16
Configuring the M9.5sp Default Settings .......................... 20
4
5
6
Getting the Most Out of Your Workout............... 22
How Hard Should I Exercise?........................................... 23
How Long Should I Exercise? .......................................... 24
How Often Should I Exercise?.......................................... 24
Maintaining the M9.5sp Treadmill....................... 25
Cleaning the Treadmill...................................................... 25
Aligning the Running Belt ................................................. 25
Adjusting the Tension of the Running Belt ....................... 27
Getting Service ................................................................. 27
Marathon Courses and Custom Graphs ............ 28
Marathon Courses........................................................... 28
Custom Course Graphs.................................................... 30
page 4
Page 5

Before You Begin
1
Congratulations on purchasing one of the newest, most technologically advanced electronic treadmills available, the M9.5sp Programmable Treadmill
Ergometer. This treadmill belongs to Precor’s exciting “M” series of exercise
equipment, which represents a superior combination of high technology and
ergonomics.
The M9.5sp treadmill offers 105 professionally-designed exercise programs.
Incorporating the latest in exercise science, these programs are designed to
maximize cardiorespiratory benefits, while providing challenge and motivation.
You can also custom design up to nineteen courses for even more challenge
and variety.
The easy-to-understand electronic console displays the speed and percent
incline of your chosen course. After an optional 3-minute warm-up, an electronic pacer motivates you to maintain your pace uphill or downhill, or around a
quarter-mile or 400-meter track. Other displays include time, distance, speed,
and calories burned. If you ever have a question about a prompt, the “Help”
feature can give clarification.
The M9.5sp Programmable Treadmill Ergometer has unique features which set
it apart from conventional treadmills. To maximize your use of the M9.5sp
treadmill, please study this guide thoroughly.
About this Manual
This Owner’s Manual explains how to assemble and use the M9.5sp Programmable Treadmill Ergometer. This manual also provides a basic explanation of
aerobic conditioning, and describes how to tailor a M9.5sp fitness program to
your needs. If you encounter problems while installing or using the M9.5sp
treadmill, refer to this manual for troubleshooting information.
This manual uses the following conventions:
Note: Contains additional information that applies to the preceding text.
Important: Indicates information to which you should pay special attention.
CAUTION: Indicates steps or information necessary to prevent harm to
yourself or damage to the equipment.
page 5
Page 6

Unpacking the M9.5sp Treadmill
Your M9.5sp treadmill is carefully inspected before shipment, so it should arrive
in good operating condition. Precor ships the unit in five pieces as listed below:
• running bed assembly
• handrail/display assembly
• lift motor
• lift motor cover
• hardware kit (contents described below)
Carefully unpack the parts from the original shipping container.
CAUTION: This unit weighs over 150 pounds. To avoid back strain and to
ensure the safety of the unit and yourself, we suggest that you drop the
sidewalls of the box and slide the running bed assembly from the box,
rather than lifting the running bed assembly from the box.
After unpacking the treadmill, open the hardware kit and make sure that you
have the following items:
two hex-head shoulder bolts
one long shoulder bolt
four 3/8" screws
one 7/8" washer
one 3/8" locknut
two plastic plug caps
three cable ties
one 1/4" hex key
one 5/16" hex key
If any items are missing, contact your authorized Precor dealer. For the dealer
nearest you, call 1-800-4-PRECOR.
Important: The packaging for this equipment was designed to protect it during
shipment. Please store the original packaging in a safe place in case you need
to ship the M9.5sp treadmill in the future.
page 6
Page 7

Setting Up the M9.5sp Treadmill
2
Installation Requirements
You do not need special knowledge or experience is required to set up an
M9.5sp treadmill. However, you must carefully review and follow the instructions in this manual. If you do not assemble and use this treadmill according to
following guidelines, you could void the Precor warranty.
CAUTION: Precor recommends that two people move the treadmill to its
proper location. A fully assembled M9.5sp treadmill is very heavy, and
may cause back strain if one person tries to move it.
Follow these installation requirements when installing the treadmill:
• Set up the M9.5sp treadmill on a solid, level surface. Do not install the
treadmill on deeply padded, plush, or shag carpeting due to possible
damage to the carpet and the machine. If the treadmill is placed on a
carpeted surface, place a piece of heavy cardboard, plywood, or other
smooth, flat surface under the unit to protect the carpet and treadmill.
• Locate the treadmill at least 4 feet from walls and furniture. Be sure to
provide ample space in front of the machine to allow easy access to the
ON/OFF switch. Open space to the sides and back of the unit makes for a
safer mount and dismount and easier belt adjustment.
• Use a 220-volt outlet. Precor recommends that you plug the treadmill into
an outlet with a dedicated 20 amp circuit breaker. The treadmill comes
equipped with a 20 amp circuit breaker to protect the electrical and electronic components from sustained overloads, and an integral 3-prong plug
grounded to protect the machine and provide for your safety.
CAUTION: Do not remove or otherwise bypass the plug with an
adapter in order to use a non-grounded outlet.
• Supply the appropriate tools. To properly assemble the 9.5sp treadmill,
you need to supply two box end wrenches. A 1/2" box end wrench is
needed to complete the handrail assembly installation while a 9/16" box
end wrench is required to secure the lift platform and lift tube.
Assembly Instructions
Take the following steps to assemble the M9.5sp treadmill. We recommend
that two people assemble the treadmill.
1. Make sure that the treadmill is unplugged and turned OFF. Do not
assemble the M9.5sp treadmill if it is plugged in and turned ON.
2. Remove the black hood by unscrewing the eight phillips-head screws.
3. Remove the four 5/16" locknuts and washers (two on each side) from the
handrail/display assembly mounts near the front of the treadmill as shown
in Photo 1.
page 7
Page 8
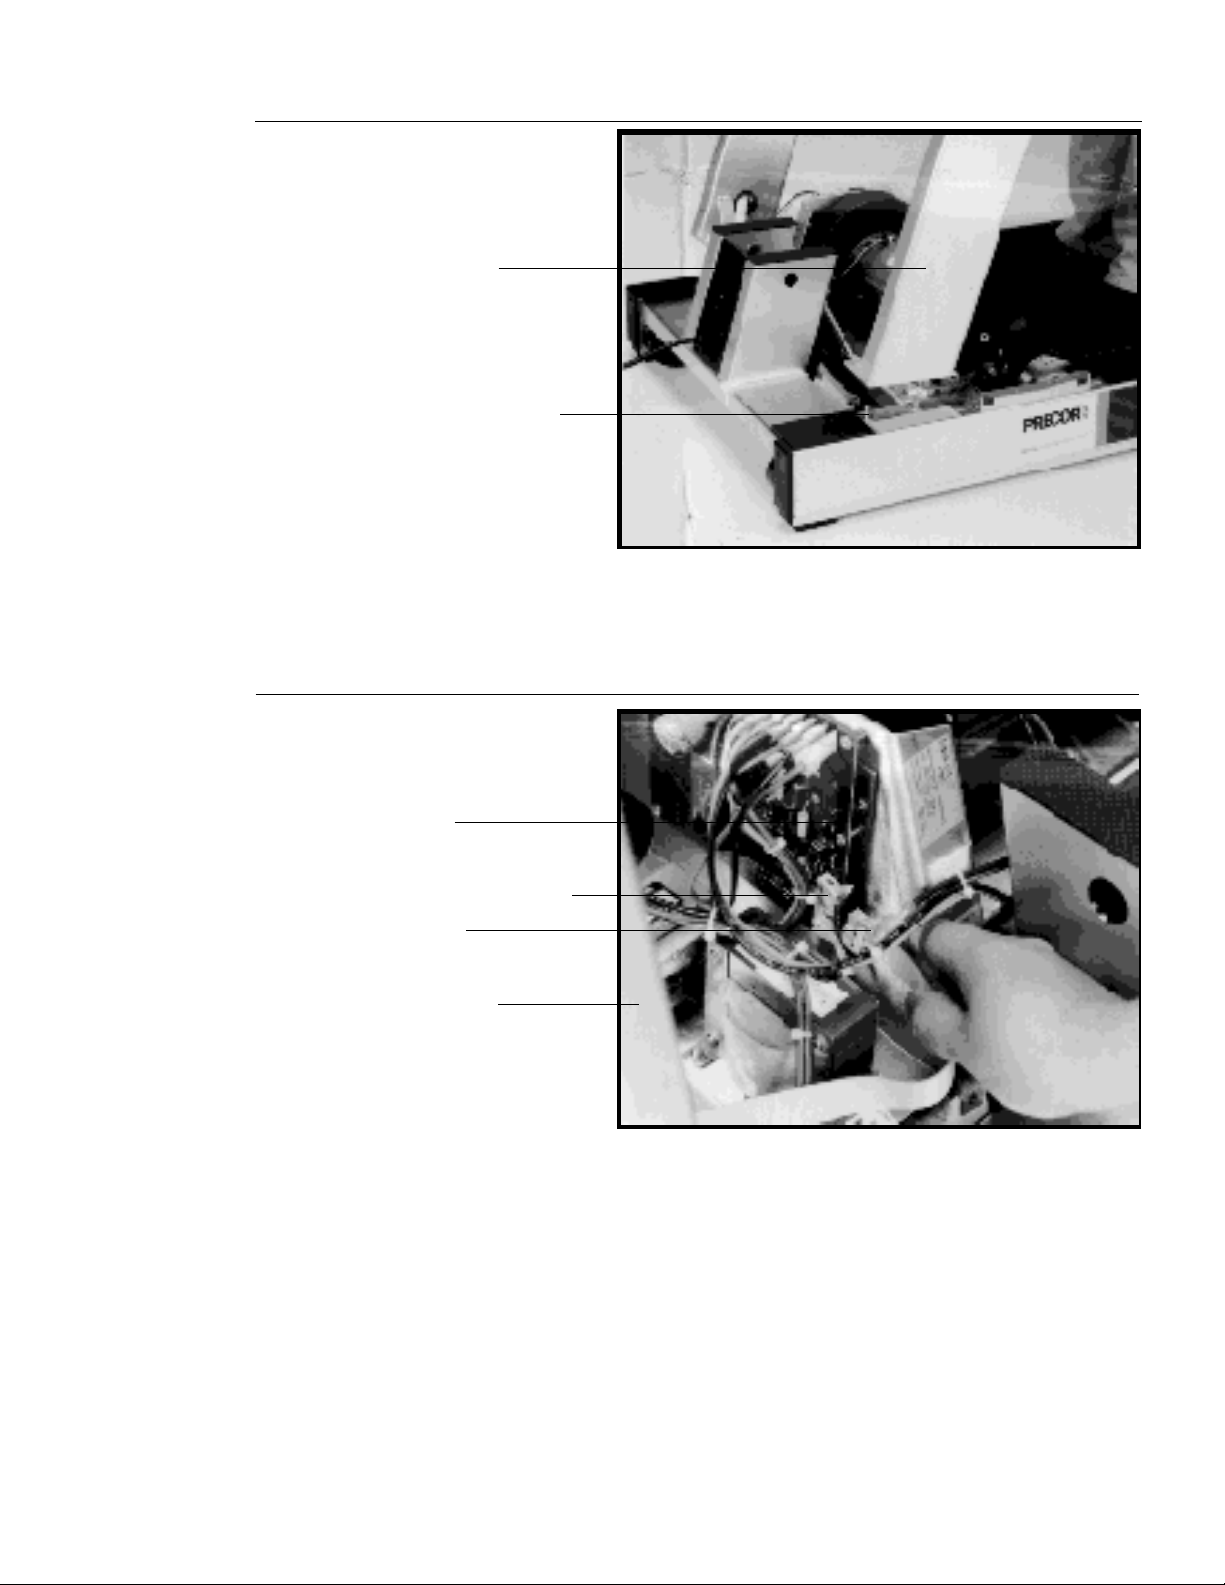
Photo 1
Install handrail/
display assembly.
Handrail/display assembly
Handrail/display assembly mount
4. Position the handrail assembly so both the right and left handrail columns
align over the mounts. (See Photo 1.) Replace the washers and locknuts.
Using the 1/2" box end wrench, begin to tighten each locknut. Alternate
between each one until all four locknuts are snug up against the handrail
columns.
Photo 2
Install ribbon
cable connector.
Printed circuit board
Ribbon cable connector receptacle
Ribbon cable connector
Handrail/display assembly
5. Locate the ribbon cable connector that protrudes from the handrail/display
assembly.
6. Align the tab on the side of the ribbon cable connector with its corresponding receptacle on the printed circuit board located near the motor. (See
Photo 2.) Make sure that all pins are aligned and fully engaged. The
connector is designed to engage in one direction only. Do not force the
connector into the receptacle.
page 8
Page 9
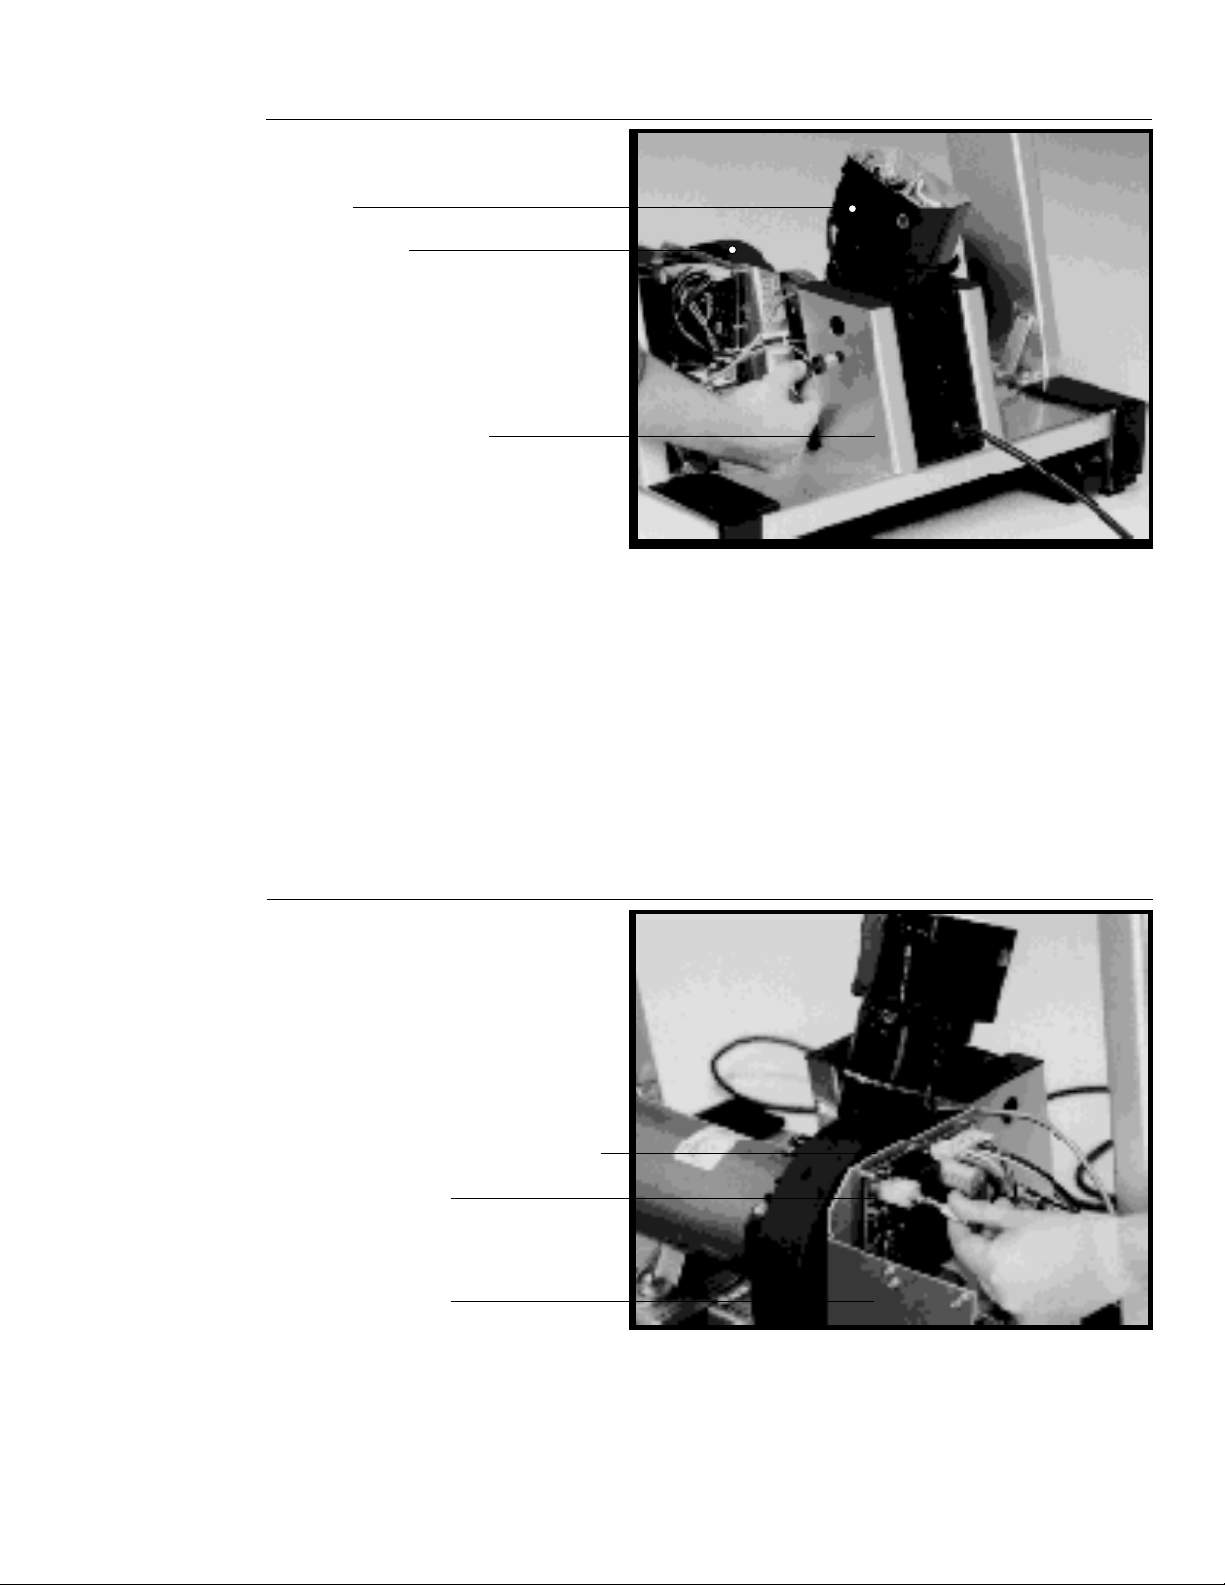
Photo 3
Secure top two
bolts.
Lift motor
Treadmill motor
Lift motor support mount
7. Slide the lift motor into position, shaft side down, with the long tube toward
8. Secure the lift motor by placing one of the two hex-head shoulder bolts on
the front of the treadmill and the short tube facing the treadmill motor. (See
Photo 3.)
the 5/16" hex wrench (both are found in the hardware kit). Insert the bolt
through the lift motor mount and into the lift motor. Follow the same procedure for the second shoulder bolt. (See Photo 3.) Align the motor and
securely tighten the shoulder bolts.
9. Locate the two plastic plug caps in the hardware kit. Insert the plastic plug
caps over the two shoulder bolts on the lift motor support mount.
Photo 4
Plug lift-motor
wiring harness
into printed circuit
board.
Lift-motor wiring harness receptacle
Printed circuit board
Lower board chassis
10. Plug the lift-motor wiring harness into the receptacle on the printed circuit
board. (See Photo 4.)
11. Using the cable ties supplied in the hardware kit, secure the lift-motor
wiring to the lower board chassis. Cut the ends of the cable ties so the
excess plastic does not interfere with the motor or circuit board.
page 9
Page 10
12. Place the lift motor cover over the lift motor. Locate the four 3/8" screws
and appropriate hex key in the hardware kit. Use the screws to securely
attach the cover to the lift motor. Do not overtighten the screws. Overtightening can cause damage to the plastic cover.
Photo 5
Lift platform
Lift tube
Long shoulder bolt
Secure lift
platform and lift
tube.
13. Lay the treadmill on its right-hand side with the help of another person.
Note: Right and left are determined while standing behind the treadmill,
facing towards the front of the machine.
14. Locate the long shoulder bolt, 7/8" washer and 3/8" locknut in the hardware
kit. Insert the long shoulder bolt through the center of the lift platform and
the lift tube. Secure the lift platform and tube together by sliding the washer
and fastening the 3/8" locknut onto the end of the shoulder bolt. Hold the
locknut in place using your 9/16" box end wrench while fully tightening the
bolt with the hex key provided. (See Photo 5.)
page 10
15. Return the treadmill to an upright position, so it rests flat on the floor.
16. Replace the black hood that you removed in Step 2 and tighten the eight
phillips-head screws.
CAUTION: Precor recommends that two people move the treadmill to
its final location. A fully-assembled M9.5sp treadmill is very heavy,
and might cause back strain if one person tries to move it.
17. If you need to move the treadmill, ask for assistance from another person.
Roll the treadmill on its front wheels to the new location by lifting the rear
end of the unit.
CAUTION: Do not remove or otherwise bypass the 3-prong plug with
an adapter in order to use a non-grounded outlet.
18. Plug the treadmill into a 220v outlet. Make sure that no other major appliances use the same circuit as the treadmill.
19. Continue to
Checking the Alignment of the Running Belt
to complete the
installation of the M9.5sp treadmill.
Page 11

Checking the Alignment of the Running Belt
The belt is aligned at the factory before shipment. However, during shipment or
by using the treadmill on an uneven surface, the belt might move off center.
Proper belt alignment is important because it allows the belt to remain centered
and assures smooth operation.
Follow these steps to check the alignment:
CAUTION: Do not walk on the running belt during this procedure.
1. Locate the ON/OFF power switch at the front of the black hood and turn
ON the treadmill.
2. Stand next to the treadmill. and answer the startup questions. Select
“Manual” mode.
3. Continue to stand next to the treadmill and increase the running belt speed
to 6 miles per hour using the SPEED arrow key.
4. Walk to the back of the treadmill and observe the belt as it runs (watch for
about one minute).
If the running belt Then...
tracks centered on the treadmill the belt is functioning correctly and
no adjustment is necessary
runs or drifts off center you need to adjust the belt; see
Aligning the Running Belt
at the
end of this manual for instructions
Important: If you notice that the belt needs alignment, make the adjustments at once. Failure to do so might cause the belt to tear or fray which is
not covered by warranty.
5. Press and hold STOP to stop the running belt. Using the ON/OFF switch,
turn OFF the treadmill.
If the belt is functioning correctly, the M9.5sp Programmable Treadmill Ergometer is assembled and ready to use. If the belt needs alignment, refer to
the Running Belt
for instructions
before
using the treadmill.
Aligning
page 11
Page 12

Using the M9.5sp Treadmill
3
Photo 6
As simple as using the M9.5sp treadmill might seem, you should read this
section so that you can use it safely and easily. This section provides the basic
information you need to exercise on your treadmill, including the following:
• a brief description of the electronic console
• instructions explaining how to exercise on the treadmill
• instructions for creating custom courses and marathon races
• instructions for changing the preconfigured default settings for the startup
questions
Understanding the Electronic Console
The electronic console lets you control your M9.5sp treadmill session. As you
workout, the electronic LED display provides constant feedback about your
progress. Information about elapsed time, speed, distance covered, degree of
incline, and total calories burned is available at any time. Photo 6 shows the
electronic console. An explanation of the keypads and displays follows the
photograph.
M9.5sp electronic console
page 12
Left Keypad
The left keypad is used to program the desired course or track. Each key
provides a separate function. The following information describes each key on
the left keypad.
HELP: Press this key when you want an explanation of any selection. The
information will scroll across the top of the display.
Right arrow: Use this multi-function key to select a position on a custom
course. Press the key if the arrow corresponds to your desired choice on the
display.
Left arrow: Use this multi-function key to select a position on a custom
course. Press the key if the arrow corresponds to your desired choice on the
display.
Page 13

Up arrow: Use this multi-function key to increase body weight and belt speed
in program mode only. Also, push if the arrow corresponds to the desired
choice on screen.
Down arrow: Use this multi-function key to decrease body weight and belt
speed in program mode only. Also, press this key if the arrow corresponds to
your desired choice on the display.
ENTER: Use this key to enter your selection into the program.
CANCEL: Press this key to cancel your selection and return to a previous
question.
Right Keypad
The right keypad facilitates manual control of treadmill. The following information describes each key on the right keypad.
START: Press this key to start the running belt and begin a programmed
course.
RESET: This key has two uses.
a. Use this key to select a new program. When using the treadmill in course
or track mode, first press STOP. Then, press RESET to select a new
program.
b. While using the treadmill in track mode, press RESET to return to the
beginning of the lap. The pacer is also returned to the beginning of the lap.
Green arrow: Press this key to increase belt speed (this does not affect the
pacer speed).
Yellow arrow: Press this key to decrease belt speed (this does not affect the
pacer speed).
Black up arrow: Press and hold this key until the desired incline is displayed;
you can choose an incline up to 12% percent (cannot use key during programmed course).
Upper Display
Window
(Red LED's)
Center Display
Window
(Green LED's)
Black down arrow: Press and hold this key to lower the incline; you can lower
to a -3% incline (cannot use key during programmed course).
STOP: Press this key to stop the running belt; it immediately shuts off power to
the motor, and begins to slow the running belt to 0 mph.
TIME: Displays the elapsed time up to 59 minutes and 59 seconds.
SCAN: Alternately displays (every five seconds) belt speed in mph/kph and
total calories burned.
DISTANCE: Displays cumulative distance travelled during workout.
Course mode: Displays a comparison profile of the selected course along with
your progress. Your position on the course is indicated by the flashing segment. A programmed pacer also appears across the bottom of the display.
Track mode: Depending on your selection, this window displays either a 440yard or 400-meter oval track with lap counter. Your position on the track is
indicated by the flashing segment. The pacer appears on the outside of the
track.
page 13
Page 14

How to Use the M9.5sp Treadmill
Before using the M9.5sp treadmill, we recommend that you follow these
instructions and go through a preliminary demonstration of the treadmill. Then,
you will be familiar with the treadmill when you begin your workout.
When using the treadmill, follow these general guidelines:
• At the beginning of a workout, take several minutes to bring your heart rate
into your training zone, which is shown in Diagram 2 later in this manual.
• After your workout, walk slowly for several minutes to cool down your body
and lower your pulse rate.
• Gently stretch your lower body and back after a workout to help prevent
stiffness or soreness.
The M9.5sp treadmill has a series of standard startup prompts that you must
answer before each workout. For example, these startup prompts let you
specify whether you want to use the 440-yard (400 meter) track or one of the
programmed courses. Many of the answers to the startup prompts can be
preset which lets you quickly begin your workout. Instructions for pre-setting
the answers to the standard prompts are provided in
Default Settings
.
Configuring the M9.5sp
To use the treadmill, take the following steps. While following these steps, you
can press the HELP key at anytime and an explanation of your selection will
scroll across the top of the display. We recommend that you start at a gentle
pace before attempting the more advanced courses and higher speeds.
Note: A few steps show the word (Preconfigured) prior to the step’s instructions. This means that a particular mode has been previously set. The prompt
in these steps will not appear on the electronic console display unless you
change the configuration. Skip these preconfigured steps unless the prompt
appears.
1. Locate the ON/OFF switch at the front of the black hood and turn ON the
treadmill. The electronic console display shows “Press Enter to Begin.”
2. Straddle the running belt with your feet firmly planted on the right and left
staging platforms. (Stand close enough to the electronic console so you
can extend your arms and touch the keys.)
3. Press ENTER to begin setting up the treadmill for your workout session.
4. At the “Weight?” prompt, specify your weight using the black and
arrows. Press ENTER when your weight is displayed.
This information allows the M9.5sp treadmill to accurately calculate how
many calories you burn during your workout. The display always automatically shows the last weight entered, so you will not have to re-enter your
weight next time unless someone else has used the treadmill.
page 14
Page 15

5. At the "Select Mode" prompt, choose how you want to program your
session (Manual or Program) by using the appropriate black arrow.
Select Manual if you want to start using the treadmill quickly, using the
440-yard (400-meter) track. Select Program if you want to specify a course
and distance.
6. (Preconfigured; miles) At the “Select Mode” prompt, specify whether you
want distance measured in miles or kilometers using the appropriate black
arrow.
7. (Preconfigured; mph) At the “Speed Display Mode?” prompt, specify miles
per hour (mph) or kilometers per hour (kph) using the appropriate black
arrow.
This lets you to use a different speed display than chosen in distance
mode. For example, you can choose a kilometer course and have your
speed displayed in mph and minutes per mile.
If you selected in Step 5... Then...
Manual Continue to Step 8
Program Skip to Step 11
Program Mode Steps
8. At the “Course” prompt, select the course you want to use. Use the black
and arrows to move through the available courses. When the course
you want is shown, press ENTER. You can choose from six standard types
of courses: Easy-Walk, Moderate-Walk, Advanced-Walk, Easy-Run,
Moderate-Run, and Advanced-Run.
9. At the “Distance” prompt, specify the distance you want to travel by using
the black arrows to increase or decrease the distance displayed. Press
ENTER.
If a walking course was selected, you can choose from .5 to 3.0 miles
(kilometers) in .5 mile increments. If a running course is selected, you can
choose from 1.0 to 6.0 miles (kilometers) in .5 mile increments.
10. (Preconfigured; constant) At the “Select Speed Mode” prompt, specify
whether you want the speed to be maintained at a Constant or Average
speed by pressing the appropriate black arrow. Choose Constant if you
want the M9.5sp treadmill to maintain a selected speed throughout the
course. Choose Average if you want the treadmill to slow down on inclines
to maintain a constant calorie burn.
Note: The pacer always runs at a constant speed.
page 15
Page 16

Steps for Both Modes
11. (Preconfigured; no pacer) At the “Pacer Speed” prompt, specify how fast
you want the pacer to move using the appropriate black arrow. Press
ENTER.
12. Stand on the running belt with one hand on the handrail for balance,
prepared to start walking.
13. (Preconfigured; no warmup) At the “Warm-up” prompt, specify whether you
want a warmup period.
If “Warm-up” is chosen, you may exit the 3-minute warmup session by
pressing CANCEL. If "Warm-up" is not chosen, the treadmill will automatically increase speed to the desired pacer speed.
14. At the “Press Start to Begin” prompt, press START when you are ready to
begin your session.
In Manual mode, as soon as you press START, the display shows a 440yard (400-meter) track. In Program mode, your chosen course appears on
the display after your selected warm-up period. During your session, you
can control your speed by using the two SPEED arrows.
15. When you feel comfortable with the motion of the treadmill, let go of the
handrail and continue your workout. Remember to hold onto the handrail
when using the electronic console and when slowing down or stopping the
running belt.
16. When you are finished exercising, hold onto the handrail and either press
STOP or use the SPEED key to come to a safe stop.
Note: Always allow yourself a cool-down period of a few minutes before
bringing the machine to a complete stop.
Creating Custom Courses
You can program your M9.5sp treadmill with a maximum of nineteen custom
designed courses. Since each course has been pre-programmed at the factory,
all you need to do is modify the factory-programmed segments with your own
custom course changes. If you plan to design your own course, we suggest
that you plot your custom course on one of the graphs found at the end of this
manual before programming the M9.5sp treadmill.
An example of a custom designed course (the Boston Marathon) is shown on
the graph in Diagram 1. The M9.5sp treadmill provides 20 sections (miles or
kilometers) in which you can plot a custom course. Each section is composed
of 10 segments. The 10 segments within each section let you plot out the
degree of incline and the distance you want to travel.
page 16
Page 17

Diagram 1
Boston Marathon custom designed course
Miles
Segment
+12%
0%
-3%
+12%
0%
-3%
246810
20
22
24
26
Finish
12 14 16
18
The programmable courses are packaged by segment length. For example, the
segment length in Courses 1 through 10 is .05 miles (0.5 mile incremental
sections let you design up to a ten mile course). For courses 11 through 15, the
segments are 0.1 miles. For courses 16 through 19, the segments are 0.2 miles
which lets you design a course up to 40 miles in length.
The location of each segment is displayed on the electronic console in the
upper right-hand corner beneath DISTANCE. The flashing segment indicates
the position of the segment you are currently working on. By pressing the
arrows on the left key, you indicate the distance and incline for each segment
on the course.
You can program the percent of incline or decline between +12% and -3% for
each segment. As you create your custom course, this information is displayed
in the middle display window under SCAN.
20
To create your own custom course, take the following steps.
1. If the treadmill is OFF, locate the ON/OFF switch at the front of the unit
above the power cord and turn ON the treadmill. If the treadmill is already
ON, press and hold the RESET key for three seconds. The prompt, “Press
Enter to Begin” appears on the electronic console display.
2. Straddle the running belt with your feet firmly planted on the right and left
staging platforms. (Stand close enough to the electronic console so you
can extend your arms and touch the keypads.)
3. Locate the hidden key directly below the STOP key and to the right of the
INCLINE key. Press the hidden key to access the Configuration and
Custom Course modes. You can press this key only when “Press Enter to
Begin” appears on the display.
Note: The console briefly displays the odometer reading for your treadmill.
Initially, it will display the distance as XX.XX, allowing you to see increments of less than a mile. However, once the treadmill has gone over 99.99
miles, the odometer will drop the decimal point and change to XXXX. The
odometer will then increase in 1 mile increments.
page 17
Page 18

4. To enter custom course mode, at the “Set Configuration?” prompt, press
one of the arrows on the left keypad to answer NO .
5. Nineteen different course plans are available and can be customized to
your particular needs. The following table shows the segment length and
the associated course length. For example, if you want to design a ten mile
course, at the “Course #XX” prompt, select a course numbered 1 through
10.
To select a particular course plan, use the keys on the left keypad
when the “Course #XX” prompt appears. Once the course number you
want appears on the display, press ENTER.
Course Maximum Segment
Number Course Length Length
1 through 10 10 miles 0.05 miles
11 through 15 20 miles 0.1 miles
16 through 19 40 miles 0.2 miles
6. To customize a course, at the “Modify Course” prompt, use the arrow
to answer YES and press ENTER.
Note: If you wish to cancel or select a course that is already programmed
in, use the arrow to select NO. Press ENTER.
If you selected Then...
Yes Continue to Step 7
No At the “Weight” prompt, either continue
answering the startup prompts or press
CANCEL to exit the custom course mode.
7. Use the left keypad to modify the selected course plan and design your
own custom course. To modify any part of the custom course, locate the
segments you wish to modify and change them to the desired incline or
decline.
The following information appears on your display:
INCLINE DISTANCE
FWD UP xx% xx.xx
BK DN COURSE PROFILE
page 18
Page 19

8. The flashing segment indicates your current position on the course. Use
the black directional arrows on the left keypad to change the position of the
flashing segment and to design specific portions of the course:
FWD press to move the flashing segment from left to right
BK press to move flashing segment from right to left
UP press to increase incline
DN press to decrease incline
9. Change the segment to reflect the desired incline or decline. The length of
the course may also be increased or decreased using the FWD or
BK arrows as previously described. When modification is complete,
move to the final segment of the programmed course.
CAUTION: If CANCEL is pressed during modification, all course
segments following the flashing course segment will be erased. Use
CANCEL to eliminate any unwanted course segments prior to reprogramming. This feature may only be used in Course mode and
only affects the course displayed.
10. If your completed course design is shorter than either the 20 segments preprogrammed at the factory or an existing course, you may cancel all
remaining segments by pressing CANCEL. Then, press ENTER to save
your custom course design in the treadmill's memory.
Note: If CANCEL is pressed in error, press RESET to restore your course
design. Only ENTER stores data in the treadmill's memory.
page 19
Page 20

Configuring the M9.5sp Treadmill Default Settings
The M9.5sp treadmill lets you preset many of the answers to the standard
startup prompts. Configuring the default settings eliminates the time it takes to
answer all the startup prompts, letting you begin your workout sooner.
Precor has preset several of the default answers at the factory, as shown
below:
M9.5sp Configuration
Distance Mode? Miles
Speed Mode? Miles per hour
Program Speed? Constant
Use Pacer? No pacer
Use Warmup? No warmup
To preset answers to many of the prompts, take the following steps. While
following these steps, you can press the HELP key at anytime and an explanation of your selection will scroll across the top of the display.
1. Locate the ON/OFF switch located at the front of the black hood. Turn ON
the treadmill. The prompt, “Press Enter to Begin” appears on the electronic console display.
2. Straddle the running belt with your feet firmly planted on the right and left
staging platforms. (Stand close enough to the electronic console so you
can extend your arms and touch the keys.)
3. Press the hidden key to access the Configuration and Custom Course
modes. The display briefly shows the odometer on your treadmill.
Note: The hidden key is located directly below the STOP key and to the
right of the INCLINE key. You can press this key only when the “Press
Enter to Begin” prompt appears.
4. At the “Set Configuration?” prompt, use arrows on the left key to
answer YES and configure the M9.5sp treadmill default settings.
5. At the “Distance Mode” prompt, select one of the following:
If you want... Then...
To be asked this prompt at the Press ENTER
beginning of each session
Distance measured in Miles Press
Distance measured in Kilometers Press
6. At the “Speed Mode” prompt, select one:
If you want... Then...
To be asked this prompt at the Press ENTER
beginning of each session
Speed measured in MPH Press
Speed measured in KPH Press
page 20
Page 21

7. At the “Program Speed” prompt, select one:
If you want... Then...
To be asked this prompt at the Press ENTER
beginning of each session
Constant speed Press
Average speed Press
8. At the “Use Pacer” prompt, select one:
If you want... Then...
To be asked this prompt at the Press ENTER
beginning of each session
To use a pacer Press
To not use a pacer Press
9. At the “Use Warmup” prompt, select one:
If you want... Then...
To be asked this prompt at the Press ENTER
beginning of each session
To use a 3-minute warmup Press
To not use a 3-minute warmup Press
You have now configured the default settings.
page 21
Page 22

Getting the Most Out of Your Workout
4
A workout on the M9.5sp Programmable Treadmill Ergometer provides excellent and efficient cardiovascular conditioning, while strengthening and toning all
the major muscle groups in the lower body. The darkened areas in Diagram 2
indicate the muscles worked.
To get the most out of each workout, a general understanding of the principles
behind aerobic training is invaluable. The best source of fitness information is
your specialty fitness dealer. In addition to providing information on which
exercise equipment is the best for your individual needs, your specialty fitness
retailer can provide useful advice on training, technique, and exercise physiology. Your retailer can also recommend good books on these subjects.
Diagram 2
1. Trapezius
2. Deltoid
3. Pectorals
4. Rhomboids
5. Triceps
6. Biceps
7. Latissimus Dorsi
8. Forearm Flexors/Extensors
9. Abdominals
10. Erector Spinae
11. Gluteals
12. Hip Flexors
13. Quadriceps
14. Hamstrings
15. Gastrocnemius/Soleus
16. Peroneus Longus/Brevis
Muscles in the
body.
12
1
2
3
6
9
8
13
16
14
15
16
1
2
4
5
8
7
10
11
page 22
To help you get started in planning and carrying out your fitness program, this
section provides some basic information on aerobic exercise—such as how
hard you should work out, how long each session should be, and how often you
need to exercise to benefit from a regular program.
Page 23

Diagram 3
Your heart rate.
200
190
180
170
160
150
140
130
YOUR HEART RATE
120
110
100
90
80
HEART RATE TRAINING ZONES
200
195
190
180
170
140
185
175
171
166
136
133
180
175
170
Advanced
166
162
162
157
130
Intermediate
153
Beginner
126
YOUR AGE
165
157
153
148
149
145
140
123
119
115
MAXIMUM ATTTAINABLE HEART RATE
160
155
150
144
136
112
145
139
135
132
128
108
105
100%
131
90%
123
85%
102
70%
757065605550454035302520
How Hard Should I Exercise?
Studies show that to achieve the benefits of aerobic exercise, it is necessary to
work out hard enough raise your heart rate to a certain minimum level, called a
“training zone.” Your training zone depends on your age and level of fitness.
Refer to Diagram 3 to determine your training zone. Keep in mind that this zone
is an approximation, to be used as a guideline—individual heart rates vary
according to several physiological factors. To determine your training zone, or
target heart rate, find your age and fitness level on the chart, and then find the
line where they intersect. For example, if you are 35 years old, your training
heart rate at the intermediate fitness level is 157 beats per minute. Remember
this number—this is the pulse rate you should try to maintain as you work out.
To determine your heart rate, take your pulse at a place that you can reach
easily and comfortably while you exercise. Typical locations for measuring
heart rate are directly over the heart on the left side of the chest, on either side
of the neck, over the temple, or on the thumb side of either wrist. Wherever you
measure your pulse, make sure that you use your index and middle fingers—
not your thumb
. Your thumb has a strong pulse which can affect your heart rate
reading.
Once you locate your pulse, look at a clock with a second hand and count the
beats for six seconds. Multiply that number by 10 to determine the total number
of beats per minute. For example, if you count 14 beats over six seconds, the
total number of beats per minute is 140. Compare the total number of beats
with your training zone as identified in Diagram 4. If necessary, increase or
decrease your activity level to bring your heart rate into your training zone. You
can increase your activity level by decreasing the resistance and stepping at a
higher cadence. Similarly, raising the resistance and decreasing your steps per
minute will lower your heart rate.
Remember—your heart rate is the definitive
measure of how hard you are working.
Regardless of your fitness level, avoid doing too much too soon. Setting the
resistance cylinders too far forward, stepping too deeply (taking large steps) or
stepping too quickly for too long are common errors. Give yourself time to
become familiar with your climber and improve your fitness level. Then you can
gradually decrease your resistance level and increase your stepping cadence
to make your workouts more challenging.
page 23
Page 24

How Long Should I Exercise?
The length of each exercise session depends on your fitness level. Exercise
physiologists have determined that, to attain cardiovascular benefits from
exercise, you should maintain your heart rate in the training zone for at least 15
minutes. This is in addition to your warmup time, and does not include cooldown. You should always allow several minutes to bring your heart rate into the
training zone, by starting out slowly and gradually increasing the work level.
Similarly, use several minutes of light exercise after the workout to bring your
heart rate down to near resting level.
The higher your fitness level, the longer you should maintain your heart rate in
the training zone (between 20 and 30 minutes). Beginners should always start
slowly, and gradually get their sessions up to 20 minutes or more.
Walking and running are excellent aerobic exercises that condition the heart
and lungs while improving strength and tone in the thighs, calves, and hips.
The best aerobic exercises involve the continuous, rhythmic, repetitive movement of large muscle groups. When you exercise, you need to work out hard
enough, long enough, and often enough to achieve your desired results.
How Often Should I Exercise?
Research indicates that aerobic sessions of 20 minutes or more should be
done at least three to five times a week to obtain significant cardiovascular
benefits. Most experts agree that sensible eating habits and regular aerobic
exercise are the keys to weight control and fitness. A recent study, which
tracked several subjects over a period of years, conclusively shows that
exercise, not dieting, is the key factor to successful long-term weight loss.
To help you get the most out of your workout, this section provides suggestions
about aerobic exercise. Following these suggestions will help you reach your
fitness goals.
page 24
Page 25

Maintaining the M9.5sp Treadmill
5
Cleaning the Treadmill
The M9.5sp Programmable Treadmill Ergometer requires little maintenance to
keep it running smoothly and efficiently. Typical maintenance tasks include
cleaning the treadmill and aligning the running belt. Instructions for both
procedures are provided in this section.
Cleaning the Treadmill
Your Precor treadmill relies on low friction for efficient operation. To keep the
friction low, the treadmill must be as clean as possible.
CAUTION: Turn OFF the treadmill and disconnect the power cord before
cleaning.
Before a workout, use a damp, soft cloth to clean the staging platform, running
bed, and between the belt and running bed surface as far as you can easily
reach. This removes any dirt or dust which might affect the smooth operation of
the treadmill.
Vacuum underneath the unit every week to prevent the accumulation of dust
and dirt on the running belt.
Periodically, clean the treadmill’s frame, control panel assembly, and running
belt. Use mild soap and water for this. To clean the running belt, use a soft
nylon scrub brush. Never pour water or spray liquids on the control panel. Allow
the treadmill to dry completely before using.
Aligning the Running Belt
The correct alignment of the running belt is critical to the smooth operation of
the treadmill. The belt is properly aligned at the factory. However, during
shipping and handling or by use on an uneven surface, the belt may move off
center and require a few simple adjustments.
Before adjusting the running belt, check its operation by following the steps in
Checking the Alignment of the Running Belt
determine that the belt needs adjustment, follow the instructions here.
CAUTION: To avoid injury, special care must be taken when adjusting the
running belt. Turn OFF the treadmill and wait for the running belt to come
to a complete stop before adjusting or working near the rear roller.
Remove any loose clothing and tie back your hair. Be very careful to keep
your fingers or any other object clear of the belt and rollers. The treadmill
will not stop immediately if any object becomes caught in the belt or
rollers.
earlier in this manual. If you
page 25
Page 26

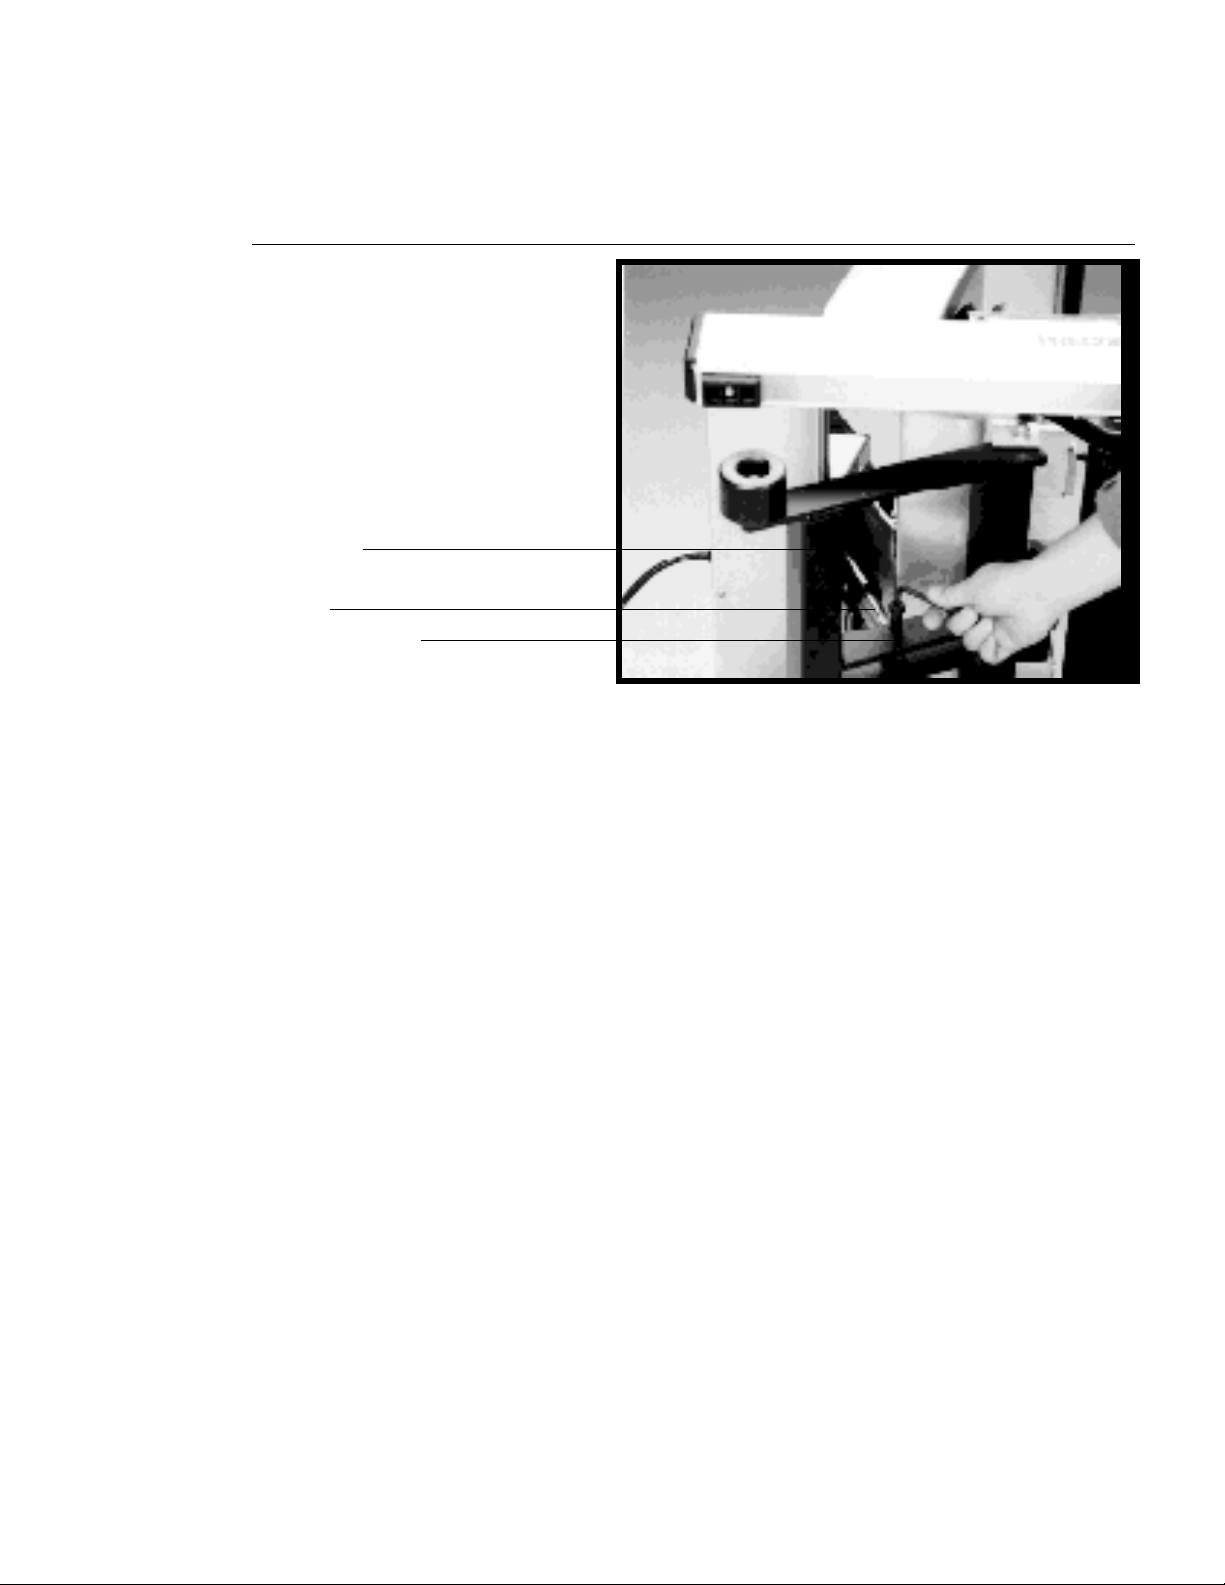
Photo 7
Belt adjustment bolt
Adjusting the
running belt
Take the following steps to adjust the running belt on the M9.5sp treadmill (see
Photo 7 for clarification). To ensure proper safety while aligning the running
belt, all adjustments must be made when the treadmill is OFF.
CAUTION: Do not walk on the running belt during this procedure.
1. Make sure the treadmill is OFF and the running belt is completely stopped.
2. Locate the belt adjustment bolt at the rear of the treadmill (see Photo 7).
The direction you turn the bolt depends on how the belt is tracking. Make all
belt adjustments on the left rear corner bolt using the hex key provided.
• If the belt is off center to the LEFT, turn the adjusting
bolt 1/4 turn
clockwise
, which moves the running belt to the right.
• If the belt tracks off center to the RIGHT, turn the
bolt 1/4 turn
counterclockwise
; this moves the belt to the left.
Important: Do not turn the adjusting bolt more than 1/4 turn at a time.
Overtightening the bolt can damage the treadmill.
3. Turn ON the treadmill, then increase the speed of the running belt to 6
miles per hour. (You can follow Steps 1 through 3 of the procedure,
ing the Alignment of the Running Belt
, if you need instructions about how to
Check-
increase speed and check alignment.)
4. Observe the running belt for 30 seconds or more. The belt should track
centered on the running bed.
5. Press STOP to stop the running belt.
page 26
6. If the belt needs additional alignment, repeat Steps 1 through 5 of this
procedure until the belt is properly aligned.
Page 27

Adjusting the Tension of the Running Belt
Proper belt adjustment is important for a smooth, steady run. If your physical
condition permits, test the belt tension by jogging at 6 mph. If the belt tension is
too loose, you will feel a pause in the belt with each footplant (step).
Important: For your safety, turn OFF the treadmill when adjusting the running
belt or working near the rear roller.
To adjust belt tension, use the rear belt adjustment bolts (see Photo 7). Simply
alternate turning each (left and right) bolt clockwise in 1/4 turn increments until
there is no slippage in the belt when you are jogging.
Important: Do not turn the adjusting bolts more than 1/4 turn at a time.
Overtightening the bolts can damage or cause premature failure of the precision
bearings in the front and rear rollers
.
Getting Service
Do not attempt to service the M9.5sp Programmable Treadmill Ergometer
yourself except for minor belt adjustments and maintenance as described in
this manual.
For information about product operation or service, contact an authorized
Precor dealer (or a Precor Factory Authorized Service Company). To locate the
dealer nearest you, call 1-800-4-PRECOR.
page 27
Page 28

6
Marathon Courses and Custom Course Grids
The following four marathon courses are available for your use. Each course
can be programmed into the M9.5sp treadmill by following the instructions
found in
Note: After you program the marathons into the treadmill’s memory, it might be
helpful to write the actual course number you used in the “Notes” section above
each graph.
Use the blank custom course graph to design your own custom courses. To
maintain the original blank graph, be sure to make a working copy.
Creating Custom Courses
.
Diagram 4
+12%
0%
-3%
20
+12%
0%
-3%
Diagram 5
+12%
Boston Marathon custom designed course
Course Number: #16-20 Course Description: Boston Marathon
Segment Length: .20 miles Overall Distance: 26 miles
Notes______________________________________________
__________________________________________________
246810
22
.5 1.5 2.5
24
Bay to Breakers custom designed course
Course Number: #1-10 Course Description: Bay to Breakers
Segment Length: 0.5 miles Overall Distance: 7.5 miles
Notes______________________________________________
__________________________________________________
__________________________________________________
123
26
Finish
12 14 16
3.5
18
45
4.5
20
page 28
0%
-3%
+12%
0%
-3%
5.5
6
6.5
75
7.5
Finish
Page 29

Diagram 6
Bloomsday Run custom designed course
Course Number: #1-10 Course Description: Bloomsday Run - Spokane
Segment Length: .05 miles Overall Distance: 7.4 miles/12 kilometers
Notes______________________________________________
__________________________________________________
__________________________________________________
+12%
0%
-3%
+12%
0%
-3%
Diagram 7
123
6
75
Finish
45
New York City Marathon custom designed course
Course Number: #16-20 Course Description: NY City Marathon
Segment Length: .20 Overall Distance: 26.2 miles
Notes______________________________________________
__________________________________________________
__________________________________________________
+12%
0%
-3%
+12%
0%
-3%
2610 14 18
22 26
48121620
2420
Finish
page 29
Page 30

page 30
Diagram 8
+12%
0%
-3%
+12%
0%
-3%
+12%
Custom Course Grid Sheet
0%
-3%
+12%
0%
-3%
Page 31

R
USA
Precor Incorporated
P.O. Box 3004
Bothell, WA USA 98041-3004
Precor and “M” are registered trademarks of Precor Incorporated.
© 1987 Precor Incorporated
Specifications subject to change without notice.
1-800-4-PRECOR
P/N 31130-103
6/92
page 31
 Loading...