

Page 1
9.35
Page 2

Page 3

Important Safety Instructions
DANGER
WARN ING
When using the treadmill, always take basic precautions,
including the following:
• Read all instructions before using the treadmill. These
instructions are written for your safety and to protect the
unit.
• Before beginning any fitness program, see your
physician for a complete physical examination.
Il est conseillé de subir un examen médical complet
avant d’entreprendre tout programme d’exercise. Si
vous avez des étourdissements ou des faiblesses,
arrêtez les exercices immédiatement.
To reduce the risk of electrical shock
always unplug the treadmill from the
electrical outlet immediately after
using and before cleaning.
To reduce the risk of burns, fire,
electric shock, or injury, take the
following precautions:
• Do not allow children or those unfamiliar with its
operation on or near the treadmill. Do not leave children
unsupervised around the unit.
• Never leave the treadmill unattended when it is plugged
in. Unplug the treadmill from the power source when it is
not in use, before cleaning it, and before acquiring
authorized service.
• Assemble and operate the treadmill on a solid, level
surface. Locate the treadmill a few feet from walls or
furniture. Keep the area behind the treadmill clear.
• Maintain the treadmill in good working condition. Refer
to the Maintenance section. Make sure that all fasteners
are secure and the running belt is clean and running
smoothly.
• Use the treadmill only for its intended purpose as
described in this manual. Do not use accessory
attachments that are not recommended by the
manufacturer, as such attachments may cause injuries.
• Never operate the unit if it is damaged, not working
properly, when it has been dropped, or has been
dropped in water. Return the treadmill to a service
center for examination and repair.
• Keep the power cord and plug away from heated
surfaces.
• Do not operate the treadmill where aerosol (spray)
products are being used or where oxygen is being
administered.
IMPORTANT SAFETY INSTRUCTIONS
Owner’s Manual: Important Safety Instructions 1
Page 4

• Do not use outdoors.
DANGER
• Do not attempt to service the treadmill yourself except to
follow the maintenance instructions found in this manual.
• Never drop or insert objects into any opening. Keep
hands away from moving parts.
• Keep all electrical components, such as the power
cord and I/O switch, away from liquids to prevent shock.
• Do not set anything on the handrails, display console,
or hood. Place liquids, magazines, and books in the
appropriate receptacles.
• Do not rock the unit. Do not stand on the handrail(s),
display console, or hood.
The treadmill must be connected to a
dedicated, grounded circuit. See
Grounding Instructions.
• Wear proper exercise clothing and shoes for your
workout and avoid loose clothing. Do not wear shoes
with heels or leather soles. Check the soles of your
shoes and remove any dirt and embedded stones. Tie
long hair back.
• Use care when getting on or off the treadmill. Always
grasp the handrail when stepping on the running belt
and keep the initial speed at or below 1 mile per hour
(mph) or 1 kilometer per hour (kph). Never step off the
treadmill while the running belt is moving.
• Before the running belt begins moving (before your
workout), and after it stops (at the end of your workout),
straddle the belt by placing your feet firmly on the right
and left staging platforms.
• Keep your body and head facing forward. Never attempt
to turn around on the treadmill.
• The safety clip must be attached at waist level before
your workout. A lanyard connects to the magnetic safety
key near the red STOP button. If you encounter
difficulties, a strong tug on the lanyard disengages the
magnetic safety key and stops the running belt.
• Do not overexert yourself or work to exhaustion. If you
feel any pain or abnormal symptoms, stop your workout
immediately and consult your physician.
• When the treadmill is not in use, disconnect the unit by
turning the power switch to the Off position, and then
remove the power plug from the power outlet.
IMPORTANT SAFETY INSTRUCTIONS
Owner’s Manual: Important Safety Instructions 2
Page 5

Safety Code
DANGER
To help prevent unauthorized use, the treadmill is equipped
with a safety code. The safety code involves entering four
keys in sequence. If a key is not pressed within 30 seconds
or the correct safety code is not entered within two minutes,
further access is denied and the running belt will not move.
For more information, refer to Entering the Safety Code.
Safety Approval
When identified with the ETL-c logo, the unit has
been tested and conforms to the requirements of
CAN/CSA-E-335-1/3-04, EN 60335-1: 2002 Safety
of Household and Similar Electrical Appliances.
Grounding Instructions
The treadmill must be grounded. If the unit malfunctions or
breaks down, grounding provides a path of least resistance
for electric current, which reduces the risk of electrical
shock. The unit is equipped with a power cord having an
equipment-grounding conductor and a grounding plug.
The plug must be inserted into an outlet that is properly
installed and grounded in accordance with all local codes
and ordinances. Failure to properly ground the treadmill
could void the Precor Limited Warranty.
Improper connection of the
equipment-grounding conductor can
result in a risk of electric shock. Check
with a qualified electrician or service
person if you are in doubt as to
whether the unit is properly
grounded. Do not modify the plug
provided with the treadmill. If it does
not fit the outlet, get a proper outlet
installed by a qualified electrician.
IMPORTANT SAFETY INSTRUCTIONS
Owner’s Manual: Important Safety Instructions 3
Page 6

120 V and 240 V Units Designated for U.S.
Markets
The treadmill must be connected to a dedicated, grounded
circuit. A 15 amp dedicated circuit is required, but a 20
amp dedicated circuit is recommended. The unit’s
grounding plug looks like the plug shown in Diagram 1 or
Diagram 2. The power outlet must have the same
configuration as the plug. No adapter should be used with
this product.
Diagram 1: 120-volt power plug
Radio Frequency Interference (RFI)
Federal Communications Commission, Part 15
The treadmill has been tested and found to comply with
• the limits for a Class B digital device, pursuant to Part
15 of the FCC Rules. These limits are designed to
provide reasonable protection against harmful
interference in a residential installation. The treadmill
generates, uses, and can radiate radio frequency energy
and, if not installed and used in accordance with the
owner’s manual instructions, may cause harmful
interference to radio communications.
If the treadmill does cause harmful interference to radio or
television reception, which can be determined by turning
the unit Off and On, you are encouraged to try to correct
the interference using one or more of the following
measures:
• Reorient or relocate the receiving antenna for your TV,
radio, VCR, etc.
• Increase separation between the unit and the receiver
(TV, radio, etc.).
IMPORTANT SAFETY INSTRUCTIONS
Diagram 2: 240-volt power plug
Owner’s Manual: Important Safety Instructions 4
Page 7
• Connect the treadmill into a different power outlet on a
WARN ING
Serial number
label
dedicated circuit different from the one used by the
receiver (TV, radio, etc.). No other appliance should be
plugged into the same power outlet as the treadmill.
• Consult an experienced radio/TV technician for help.
Per FCC rules, changes or
modifications not expressly
approved by Precor could void the
user’s authority to operate the
equipment.
Canadian Department of Communications
This digital apparatus does not exceed the Class B limits for
radio noise emissions from digital apparatus set out in the
Radio Interference Regulations of the Canadian
Department of Communications.
Le présent appareil numérique n’émet pas de bruits
radioéélectriques dépassant les limites applicables aux
appareils numériques de la class B prescrites dans le
Règlement sur le brouillage radioélectrique édicté par le
ministére des Communications du Canada.
ATTENTION: Haute Tension
Obtaining Service
You should not attempt to service the treadmill except for
maintenance tasks as described in this manual. The
treadmill does not contain any user-serviceable parts that
require lubrication. For information about product operation
or service, see the Precor web site at www.precor.com.
Should you need more information regarding customer
support numbers or a list of Precor authorized service centers,
visit the Precor web site at www.precor.com/corp/contact.
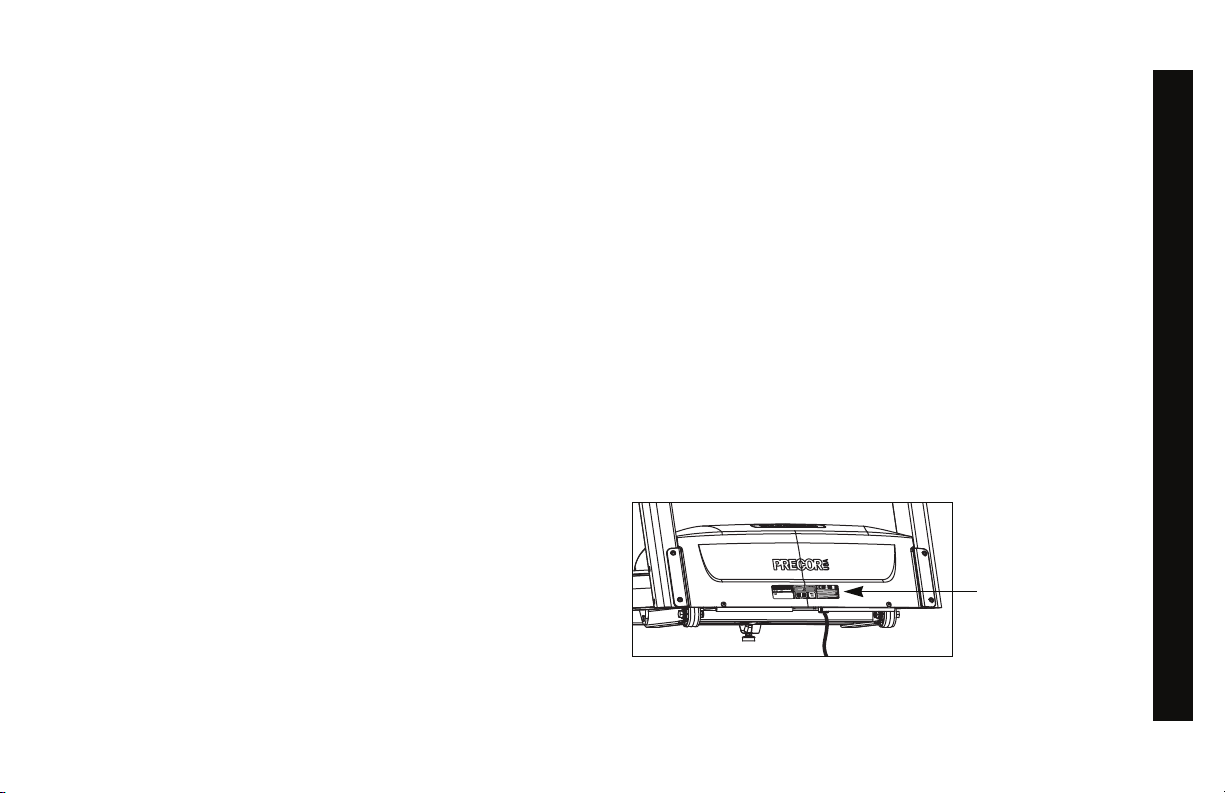
For future reference, write the model, serial number, and
date of purchase for your unit in the space provided. The
serial number is printed on a label located on the front
panel, near the power cord (Diagram 3).
Model #: _______ Serial #: _______________________
Date purchased: _________________________
IMPORTANT SAFETY INSTRUCTIONS
Débranchez avant de réparer
Owner’s Manual: Important Safety Instructions 5
Diagram 3: Location of serial number
Page 8

Notes:
Owner’s Manual: Important Safety Instructions 6
Page 9

Table of Contents
Important Safety Instructions .............................1
Safety Code ........................................................................... 3
Safety Approval ..................................................................... 3
Grounding Instructions ........................................................ 3
Radio Frequency Interference (RFI) .................................4
Obtaining Service ................................................................. 5
Treadmill Safety Features ..............................................9
Using the Safety Clip ........................................................... 9
Entering the Safety Code ................................................ 10
Using the Handrails ........................................................... 10
Turning the Unit On and Off ............................................ 10
Location ............................................................................... 11
Heart Rate Features ...................................................... 12
Important Use and Safety Information .......................... 12
Using the Heart Rate
Touch-Sensitive Handrail Grips ..................................... 15
Using SmartRate ................................................................ 15
Exercise to Your Target Heart Rate ............................... 17
Heart Rate Analysis ........................................................... 17
Display Console ..............................................................18
More Information about the Upper Display .................. 19
More Information about the Center Display ................. 19
More Information about the Lower Display .................. 19
Keypads ............................................................................... 21
User Identification ..........................................................28
Adding a User ..................................................................... 29
Updating User Information ............................................... 30
Changing the User Name and
Clearing Workout Statistics ............................................ 31
Workout Options ............................................................32
Choosing QUICKSTART .................................................33
Selecting a Program .......................................................... 34
Selecting a USER key ....................................................... 35
Setting Display Preferences Before Exercising .......... 36
Cooling Down After a Workout ...................................... 36
Pausing During a Workout or the
Cool-Down Period ............................................................. 37
Ending a Workout .............................................................. 38
Owner’s Manual: Table of Contents 7
Page 10

Programs .......................................................................... 39
Choosing a Program ......................................................... 39
Program Tips ...................................................................... 39
Manual Program ................................................................. 40
Interval Programs ............................................................... 41
Random Program ............................................................... 42
Walk in the Park Program ................................................ 42
Distance Goal Program .................................................... 43
Custom Programs .............................................................. 43
Heart Rate Programs ........................................................ 45
Weight Loss Programs ..................................................... 48
Track Program .................................................................... 49
5K Program ......................................................................... 49
10K Program ...................................................................... 50
One Mile Program ............................................................. 50
Two Mile Program .............................................................. 51
Fitness Test Program ........................................................ 51
Exercise Session ............................................................ 54
Exercise Session Tips ....................................................... 54
Changing Programs in Mid-session .............................. 54
Recording Your Personal Best Time ............................. 55
Changing the Workout Time ........................................... 56
Adjusting Program Goals ................................................. 57
Changing Your Workout Display Options ................... 57
Changing the Units of Measure Display ....................... 59
Adjusting Your Target Heart Rate .................................. 59
Changing Safety Code Protection ................................. 60
Setting Your Pace .............................................................. 61
Using the Pacer Feature with Your Personal
Best Record ........................................................................ 61
Advanced Programming and Troubleshooting ......62
Advanced Programming Tips .......................................... 62
Changing Treadmill Settings ........................................... 63
Informational Displays ....................................................... 65
Troubleshooting Error Codes .......................................... 69
Troubleshooting Heart Rate ............................................ 69
Maintenance ....................................................................70
Inspection ............................................................................ 70
Cleaning the Equipment ................................................... 70
Storing the Chest Strap ................................................... 71
Checking the Alignment of the
Running Belt ........................................................................ 71
Adjusting the Running Belt .............................................. 72
Long-Term Storage ............................................................ 73
Precor Residential Equipment
Limited Warranty.................................................. 74
Owner’s Manual: Table of Contents 8
Page 11
Treadmill Safety Features
The treadmill is equipped with certain items that, when used
properly, help sustain an enjoyable workout. These items
include:
• Safety clip and magnetic safety key
• Safety code
•Handrails
• Power switch
Important: Before exercising, review the Important Safety
Instructions found at the beginning of this manual.
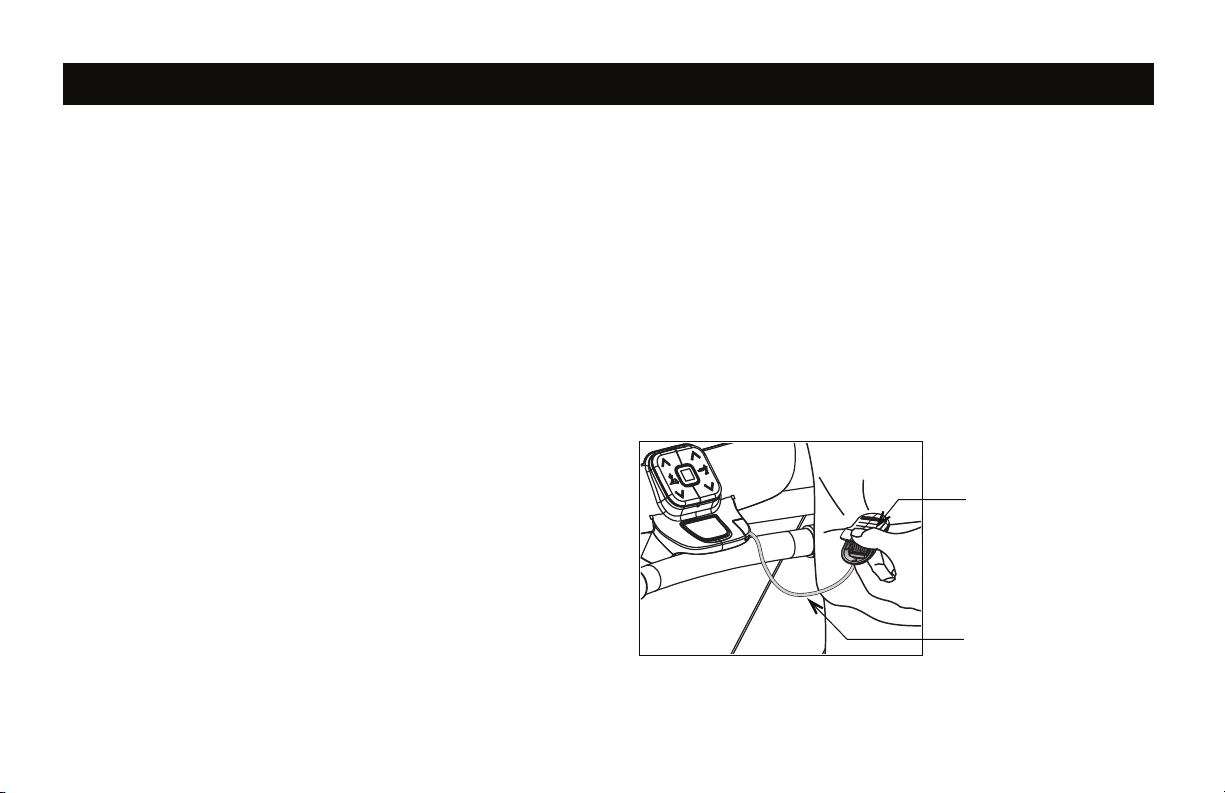
Using the Safety Clip
Attach the safety clip to your clothing before each workout.
Refer to Diagram 4. A tug on the lanyard disengages the
magnetic safety key and trips the safety switch inside the
display console which stops the running belt.
If the safety switch trips while you are exercising, the running
belt stops and the treadmill enters pause mode. A ten-minute
shutdown appears in the upper display.
Note: If the safety switch trips while the banner is scrolling,
STOP KEY appears.
To resume exercising, take the following steps:
1. If needed, reattach the safety clip to your clothing and the
magnetic safety key onto the display console.
2. Straddle the running belt.
3. Press QUICKSTART.
4. If needed, enter the safety code.
5. Hold onto a handrail while you step on to the running belt
with the speed at or below 1 mph or 1 kph.
Note: The treadmill retains your workout statistics if you
resume exercising within 10 minutes.
Safety clip
Lanyard
Diagram 4: Attach the safety clip to your clothing
Owner’s Manual: Treadmill Safety Features 9
Page 12
Entering the Safety Code
Power switch
The treadmill provides a safety code to help prevent
unauthorized use. You have the option to enable or disable
the feature using the OPTIONS key. Refer to Setting Display
Preferences Before Exercising.
At the safety code prompt, press the following number
sequence: 1, 2, 3, 4.
An asterisk appears on the display with each key press. If a
key is not pressed within 30 seconds or the correct safety
code is not entered within two minutes, the Precor banner
appears on the display and the running belt does not move.
Important: Do not assume the treadmill is safe because of
safety code protection. Never leave children unsupervised
around the treadmill. Always turn Off and unplug the
treadmill when it is not in use.
Using the Handrails
To maintain your balance, always grasp a handrail extension
when you step on or off the treadmill, and when you use the
keypad.
To learn more about the touch-sensitive handrail grips, refer
to Heart Rate Features.
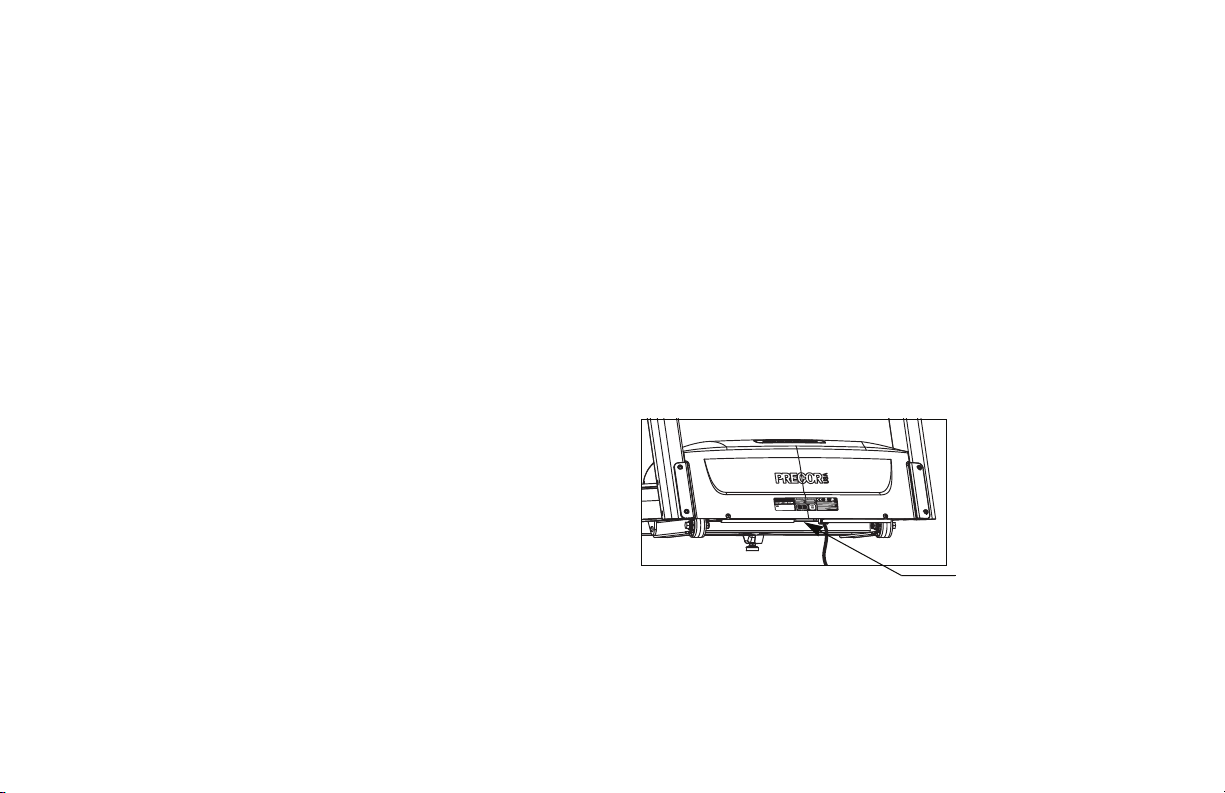
Turning the Unit On and Off
To turn the unit On and Off, use the power switch located at
the front of the unit, near the power cord connection. Refer
to Diagram 5.
Important: When it is not being used, turn the unit Off.
Diagram 5: Power switch
Owner’s Manual: Treadmill Safety Features 10
Page 13

Location
It is important to keep the area around the treadmill open and
free from encumbrances such as other equipment. The
minimum space requirement needed for user safety and
proper maintenance is three feet wide by six feet deep
(one meter wide by two meters deep), directly behind the
running belt.
Owner’s Manual: Treadmill Safety Features 11
Page 14

Heart Rate Features
CALORIES
9.35
HEART RATE
109
SmartRate
WARMUP FATBURN CARDIO PEAK HIGH
Heart rate and SmartRate
you wear the chest strap or grasp both touch-sensitive
handrail grips. When a heartbeat is detected, the HEART
RATE display shows your heart rate and, if your age has
been entered, the SmartRate LED pulses and indicates your
target zone.
®
features are available when
Important Use and Safety Information
Read the following before using the heart rate or SmartRate
features.
• Consult your physician before engaging in any vigorous
exercise. Do not use the heart rate programs until
authorized by your physician.
• Know your heart rate and your physician-recommended
heart rate target zone. Individual heart rates vary
according to several physiological factors and may not
correspond directly with Diagram 6.
Owner’s Manual: Heart Rate Features 12
Page 15
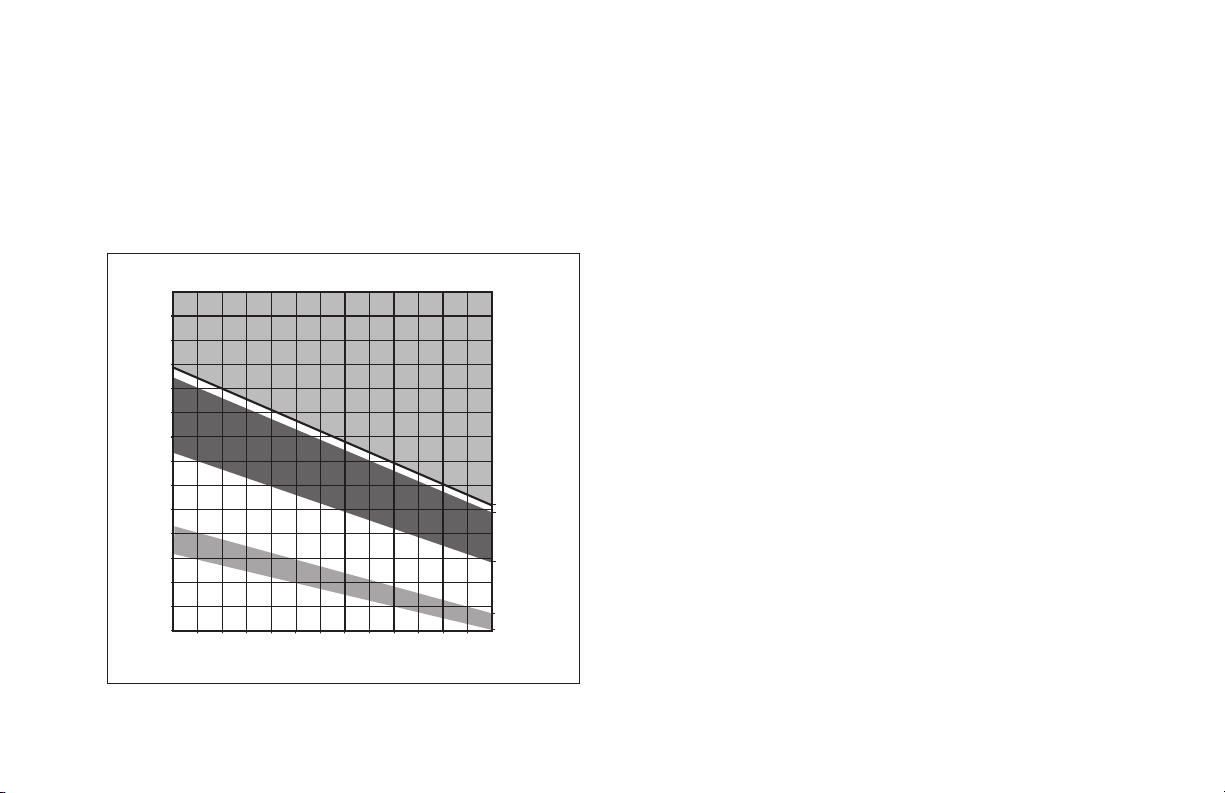
• The calculation used for the heart rate target zone is:
Heart Rate Target Zones
Yo u r Ag e
Your Heart Rate
High
Cardio
Warmup
R
e
c
o
m
m
e
n
d
e
d
C
a
r
d
i
o
v
a
s
c
u
l
a
r
Z
o
n
e
R
e
c
o
m
m
e
n
d
e
d
W
e
i
g
h
t
L
o
s
s
Z
o
n
e
Peak
Fat Burn
(220 minus your age) multiplied by a percent.
For example:
Low range: (220 minus your age) multiplied by 55%
High range: (220 minus your age) multiplied by 85%
Refer to Table 1 in Using SmartRate.
• After you put on the chest strap, face the display console
for a few seconds. This allows the receiver in the console
to recognize the signal from the chest strap.
•If Hr appears on the display, the treadmill is detecting a
signal, but has not yet determined your heart rate. Make
sure the chest strap is positioned properly around your
chest and against your skin.
• If you prefer to use the touch-sensitive handrail grips,
grasp both touch-sensitive handrail grips and wait five to
200
190
180
170
160
150
140
130
120
110
100
20 25 30 35 40 45 50 55 60 65 70 75
Diagram 6: Heart rate target zones
90
80
70
Owner’s Manual: Heart Rate Features 13
ten seconds. Make sure both hands are moist.
Note: When a signal is detected, a number flashes in the
HEART RATE display and indicates your heart rate.
• Always face forward on the treadmill and use the handrail
for balance. Keep upper body movement to a minimum.
Page 16
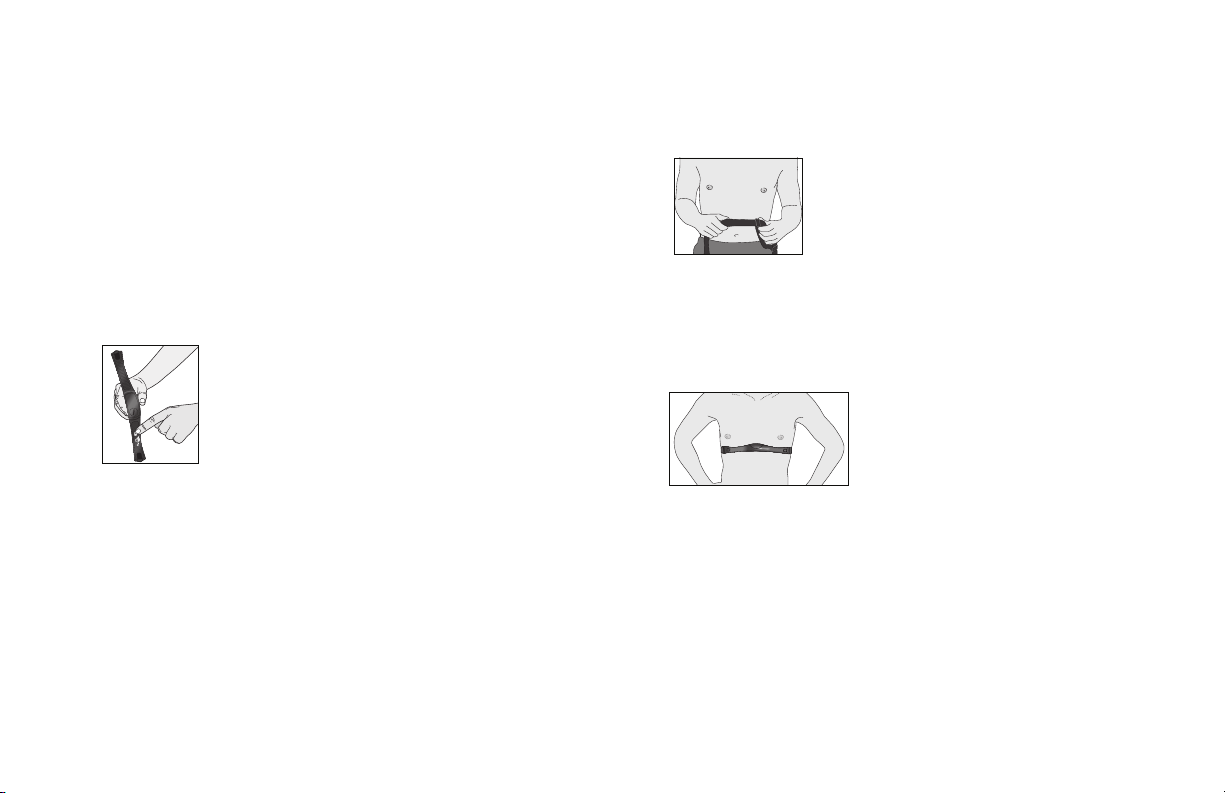
Wearing a Chest Strap
During a workout, the heart rate features appear on the
display when you wear a chest strap. To receive an accurate
reading, the chest strap needs to be in direct contact with
your skin.
1. Carefully dampen the back of the strap with tap water
Refer to Diagram 7.
Important: Do not use deionized water. It does not have
the proper minerals and salts to conduct electrical
impulses.
Diagram 7: Moisten chest strap
2. Adjust the strap and fasten it around your chest. The
strap should feel snug, not restrictive. Refer to
Diagram 8.
.
Diagram 8: Adjust chest strap
3. Make sure that the chest strap is right side up, lies
horizontally across your chest, and is centered in the
middle of your chest. Refer to Diagram 9.
Diagram 9: Fasten chest strap
After you put on the chest strap, face the display console for
a minimum of 15 seconds. This allows the receiver in the
console to recognize the signal from the chest strap.
Owner’s Manual: Heart Rate Features 14
Page 17

Using the Heart Rate
Touch-sensitive
handrail grips
Touch-Sensitive Handrail Grips
While exercising, you must grasp both touch-sensitive
handrail grips for a minimum of five to ten seconds to
transmit your heart rate to the display. Refer to Diagram 10.
Diagram 10: Touch-sensitive handrail grips
Usually, the concentration of salts in a person’s perspiration
provides enough conductivity to transmit a signal to the
receiver inside the display console. However, some people,
because of body chemistry or erratic heart beats cannot use
the touch-sensitive heart rate feature on the treadmill. A
chest strap may provide better results.
Important: While exercising, do not grasp the touchsensitive handrail grips and wear the chest strap at the
same time. The touch-sensitive handrail grips override the
signals from the chest strap transmitter. If used together,
inconsistent readings may occur.
Using SmartRate
The SmartRate feature helps you monitor and maintain your
heart rate in the target zone best suited to your specific
needs. All 10 LEDs may light during a workout. When the
treadmill detects a heart rate, a single LED blinks and
indicates the zone that your heart rate is in.
Important: To use the SmartRate feature, you must choose
a program and enter your age during the setup phase of
your exercise session.
The 10 LEDs in the SmartRate display are color-coded. A
pulsating orange LED indicates you are outside the
recommended heart rate target zone. Green LEDs indicate
when you are exercising within the recommended fat burn or
cardio fitness zones.
Owner’s Manual: Heart Rate Features 15
Page 18

Table 1 shows the percents used in calculating the heart rate
target zones. While your heart rate remains within these
zones, the corresponding lights blink and provide a visual cue.
The calculation used to determine your maximum aerobic heart
rate is (220 minus your age). When you multiply it by the
percent indicated in Table 1, you can understand the relationship between the pulsating LED and your target heart rate.
CAUTION: Your heart rate should never exceed 85% of
your maximum aerobic heart rate or go above PEAK. If it
does, immediately reduce your pace or adjust the incline
to return your heart rate to your physician-recommended
target zone.
Table 1. Heart rate target zones and SmartRate LEDs
Heart Rate Zone
Percent LED Lit LED Blinking
Below 50 First Orange
50 to 54 Second Orange
55 to 59 Third Green
60 to 64 Fourth Green
65 to 69 Fifth Green
70 to 74 Sixth Green
75 to 79 Seventh Green
80 to 84 Eight Green
85 to 87 Ninth Orange
Above 87 Tenth Orange
The SmartRate indicator lights do not appear when:
• You press QUICKSTART at the banner.
• You do not enter your age before starting a program.
• You do not wear or improperly position the chest strap.
• You fail to grasp both touch-sensitive handrail grips for
five to ten seconds.
Owner’s Manual: Heart Rate Features 16
Page 19

Exercise to Your Target Heart Rate
A heart rate receiver is an integral part of the display so you
can monitor your heart rate while exercising. If you wear a
chest strap or grasp both touch-sensitive handrail grips, your
heart rate (beats per minute) appears on the display.
The Precor web site (www.precor.com) has several
suggestions for workouts with varying levels of intensity. It
provides many workout details that include the appropriate
target heart rate.
Heart Rate Analysis
Every time you complete a program using the chest strap or
touch-sensitive handrail grips, the treadmill provides a heart
rate analysis after the workout summary.
Your average heart rate appears followed by the maximum
heart rate achieved during your workout. A third display
appears, if you entered your age, and indicates the amount of
time your heart rate remained between the target zones
shown.
The treadmill includes several programs that let you exercise
based on a specified target heart rate. As you exercise, the
heart rate programs monitor your heart rate and
automatically maintain it within a few beats per minute (bpm)
The heart rate analysis is based on how often your heart rate
signal is received while exercising. If you use the chest strap,
the average heart rate will be more accurate than if you
occasionally grasp the touch-sensitive handrail grips.
of your selected target. Refer to Table 2.
To use these programs, press the PROGRAMS - HEART
RATE key. For more information, refer to Programs.
Table 2. Heart rate programs
PROGRAMS - HEART RATE
Basic HRC
Weight Loss HRC
Heart Health HRC
Endurance HRC
Speed HRC
Owner’s Manual: Heart Rate Features 17
Page 20
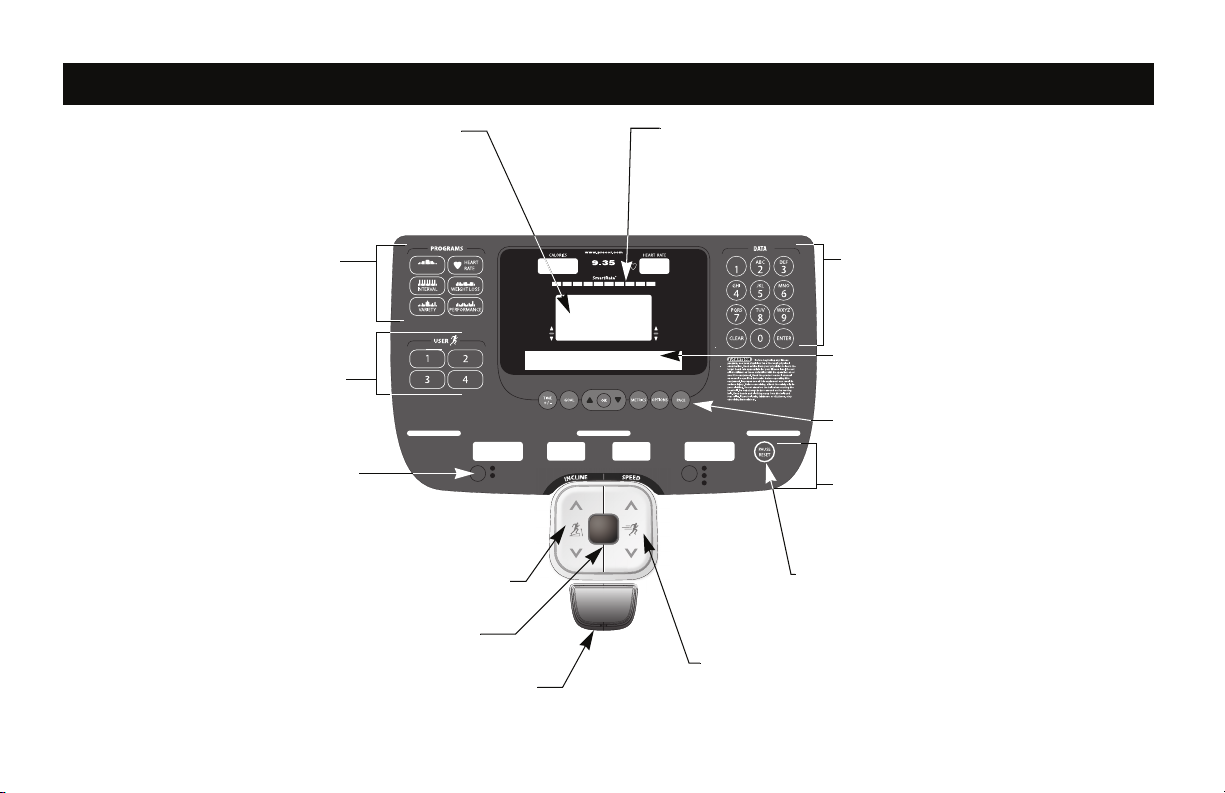
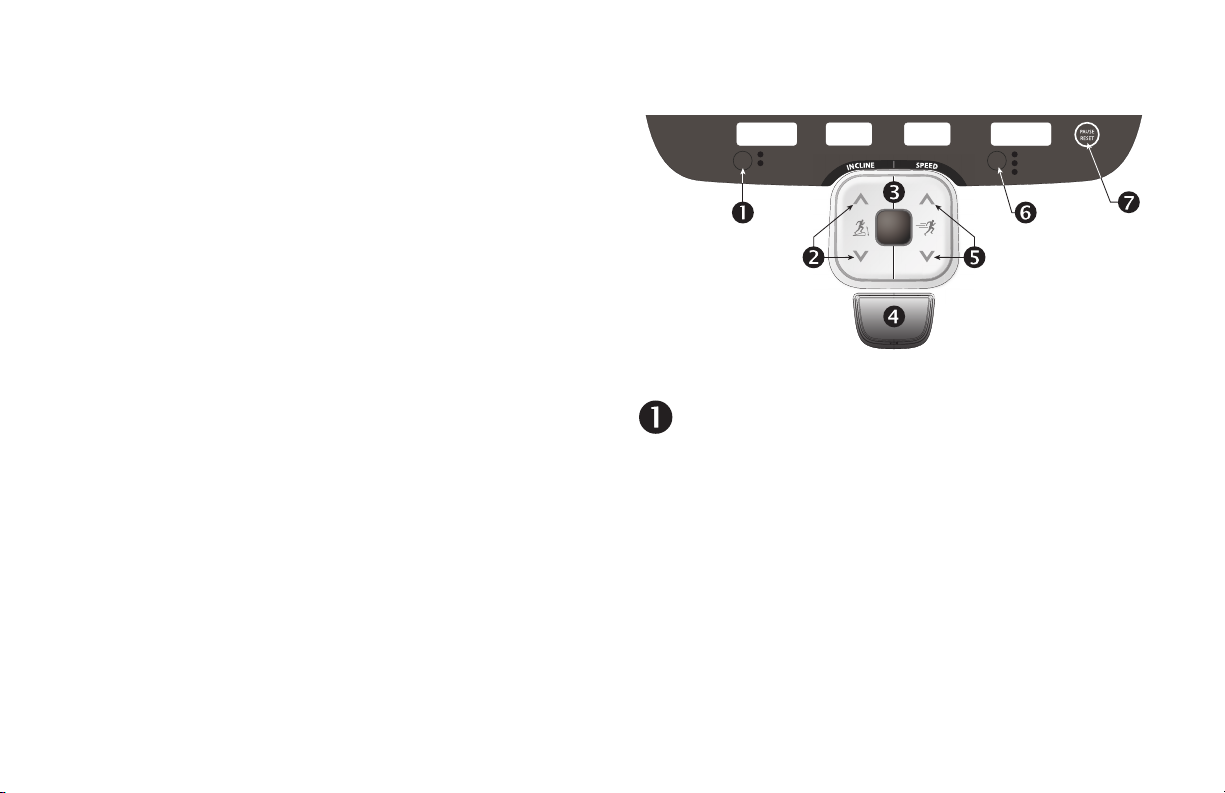
Display Console
Copyright 2006 Precor Incorporated en
MANUAL
WARMUP FATBURN CARDIO PEAK HIGH
INCLINE
0% INCLINE
DECLINE
DISTANCE
PACE
AVERAGE SPEED
TIME ELAPSED
TIME REMAINING
I
N
C
L
I
N
E
S
PE
E
D
QUICK
START
Upper display: Initially shows the Precor banner. It
changes to the program profile when you select a
program or press QUICKSTART. A blinking column in
the profile indicates your position. The smaller
CALORIES and HEART RATE displays show your
calorie expenditure and pulse.
SmartRate display: LEDs light in this column when the
SmartRate feature is activated. Follow the LEDs to monitor your
heart rate and maintain it in your target zone.
PROGRAMS keypad: To b eg in an
exercise session, press a PROGRAMS
key to view a menu of programs within
each category. For program
descriptions, refer to Programs.
QUICKSTART: Press QUICKSTART to
begin your workout immediately.
Selection key: Press the key to move
through the information in the column, so
you can choose what you want to display
during your session. Indicator lights
appear next to the item that is displayed.
Red STOP button: Press to pause or end a workout
and stop the running belt.
User 1—4: Press a USER key at the
Precor banner to personalize your
exercise experience. The information is
stored for future exercise sessions.
Number keys: During an exercise
session, use the number keys to answer
prompts and update information.
Lower display: While you exercise, four
sets of numbers show information about
your session.
SPEED arrow keys: Use the arrow keys to
adjust the speed.
PAUS E / R E SE T key : Press it once to enter
pause mode. Press it again to display a
workout summary. Press it once more to end
your exercise session.
Center display
INCLINE arrow keys: Use the
arrow keys to adjust the incline.
OK and Navigational arrow keys: Use the
OK key to confirm responses to specific
prompts. The up and down arrow keys
present the available selection and affect
what appears on the display.
Owner’s Manual: Display Console 18
Page 21
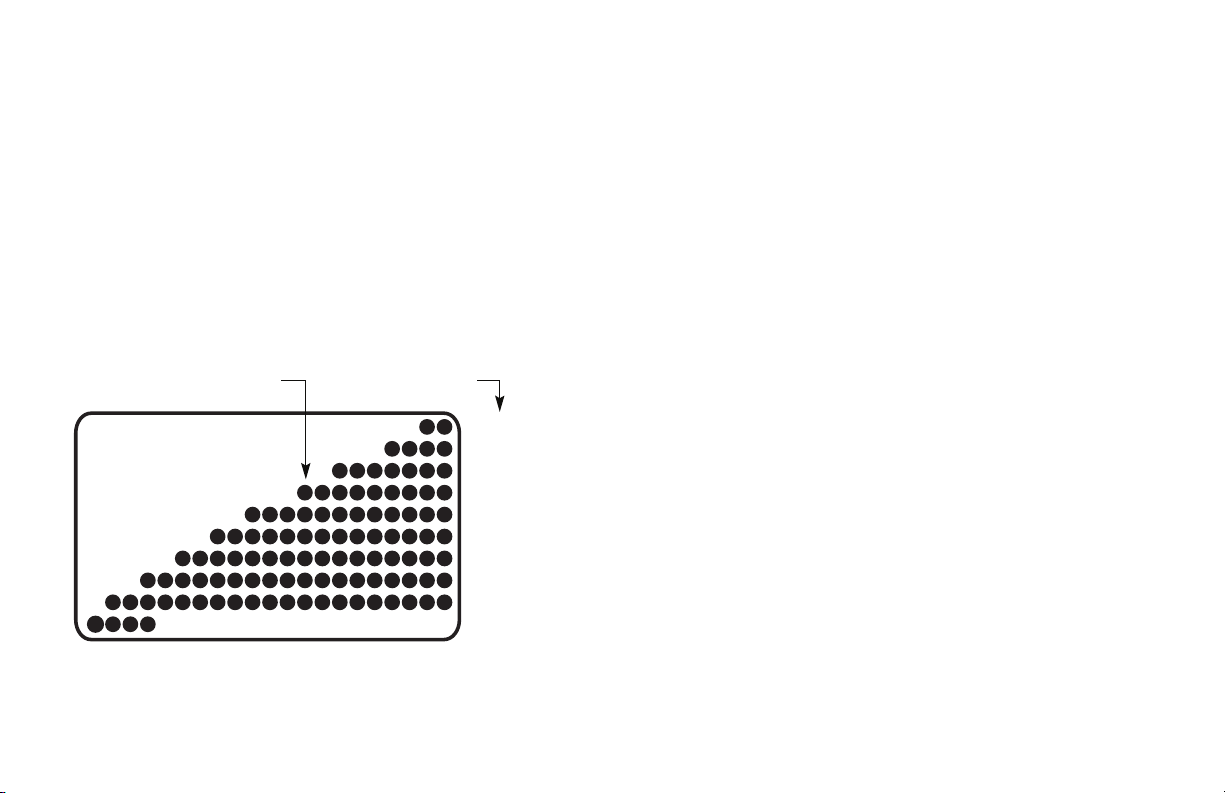
More Information about the Upper
Column height Incline settings
Display
The estimated cumulative number of calories burned and the
program profile appear during an exercise session in the
upper portion of the display. Your heart rate appears if you
are using the chest strap or touch-sensitive handrail grips.
Refer to Heart Rate Features.
In most programs, the incline setting affects the column
height in the program profile as shown in Diagram 11. The
profile raises or lowers according to which arrow key is
pressed.
13 — 15
10 — 12.5
8 — 9.5
6 — 7.5
4 — 5.5
3 — 3.5
2 — 2.5
1 — 1.5
0.0 — 0.5
-2 — -0.5
More Information about the Center Display
The center display presents the program name when you
select a program. During an exercise session, the center
display becomes a message bar showing additional
information depending on user selections and program
interludes. For more information about the selections that
can appear in the center display, refer to Changing Your
Workout Display Options.
More Information about the Lower Display
The lower display consists of four windows which provide
information about your exercise session. The two center
windows automatically provide information about your incline
and speed. To choose the type of information displayed in
the left and right windows, press the adjacent Selection key.
The numbers that appear relate to your workout statistics
and are described below.
Note: If you choose to rest a book or magazine on the
display, you can still view these workout statistics.
Diagram 11: Column height in the program profile
Owner’s Manual: Display Console 19
Page 22

Column 1: TIME ELAPSED and TIME
REMAINING
TIME ELAPSED—displays workout time in minutes and
seconds and indicates the amount of time you have been
exercising. When you exceed 60 minutes during a single
workout, the TIME ELAPSED display converts to hours and
minutes.
TIME REMAINING—shows the amount of time remaining in
a workout. If the selected workout time is less than 60
minutes, the display shows time in minutes and seconds. If
you select a workout time greater than 60 minutes, the
display reflects hours and minutes until the countdown
reaches 60 minutes, at which time the display reverts to
minutes and seconds.
Column 2: INCLINE
INCLINE—displays the percentage of incline or decline
during your workout. The INCLINE arrow keys affect the lift
and let you set an incline between -2% and 15%. The values
displayed can change in 0.5% increments.
Column 3: SPEED
SPEED—displays the running belt speed in miles per hour
(mph) or kilometers per hour (kph). The running belt speed
ranges from 0.5 and 12 mph (0.8 to 20 kph) and can be
changed in 0.1 increments using the SPEED arrow keys.
Column 4: DISTANCE, PACE and AVERAGE
SPEED
DISTANCE—shows linear distance in either miles or
kilometers. The distance is calculated based on your speed.
PACE—displays your target speed in minutes and seconds
per mile (or kilometer). For example, the number 4:23
indicates that the pace (speed at which you are moving) is
4 minutes and 23 seconds per mile. When you press the
SPEED arrow keys, the pace display changes accordingly
(0.1 mile per key press). To designate a specific pace, use
the PACE key. Refer to Navigational Keypad.
Note: If you are taking longer than an hour to complete a
mile, the display shows hours and minutes.
AVERAGE SPEED—indicates the average speed associated
with your workout.
Owner’s Manual: Display Console 20
Page 23
Keypads
DISTANCE
PACE
AVERAGE SPEED
TIME ELAPSED
TIME REMAINING
I
N
C
L
I
N
E
S
PE
E
D
QUICK
START
Use the keypads to enter your workout session selections, to
affect what appears on the display, and to establish your
incline and speed preferences.
Five distinct keypads exist on the display and are discussed
in this section:
• Lower Display keypad and the Selection keys
• User identification keys
• Navigational keypad in the center of the display
• PROGRAMS keypad
• Data keypad
Lower Display Keypad and the Selection Keys
Diagram 12: Lower Display keypad and the Selection keys
Left Selection Key: Every time you press this key the
the display reflects either the amount of time elapsed
since you began your exercise session, or it shows the
time remaining. An LED lights and indications which
information is being displayed. The TIME REMAINING
display is lit when you begin a program.
Owner’s Manual: Display Console 21
Page 24

INCLINE: Press and hold the INCLINE arrow keys to
increase or decrease the incline from -2% to 15% in
0.5% increments.
SPEED: Press and hold the SPEED arrow keys to
increase or decrease the running belt speed in 0.1
increments from 0.5 to 12 mph (0.8 to 20 kph).
Changes to the incline are not immediate. It takes time
for the lift to reach the target incline shown on the
display.
To change the incline in larger increments, use the
number keys. Refer to Data Keypad.
The incline setting affects the column height in the
program profile. The incline display shows the new
setting.
QUICKSTART: Press QUICKSTART to start your
workout immediately using the Manual Program. Refer
to Choosing QUICKSTART.
STOP: A firm tap on the red STOP button slows the
running belt to a stop and the treadmill enters pause
mode. To resume, press QUICKSTART or the SPEED
up arrow key and enter the safety code, if necessary.
Refer to Pausing During a Workout or the Cool-Down
Period.
To change the speed in larger increments, use the
number keys. Refer to Data Keypad.
When you press the arrow keys, a target speed
appears in the display. The running belt speed changes
to meet the target, but the change occurs gradually so
the transition is smooth.
PAUSE/RESET: This key has several functions during
an exercise session. You press it once to enter pause
mode. You press it again to display a workout summary.
And, you press it a third time, to end your session and
return to the Precor banner. Refer to Pausing During a
Workout or the Cool-Down Period.
Right Selection Key: Every time you press this key the
display reflects either the distance travelled since you
began your exercise session, your current pace, or your
average speed. An LED lights and indicates which
information is being displayed.
Owner’s Manual: Display Console 22
Page 25
USER Keys
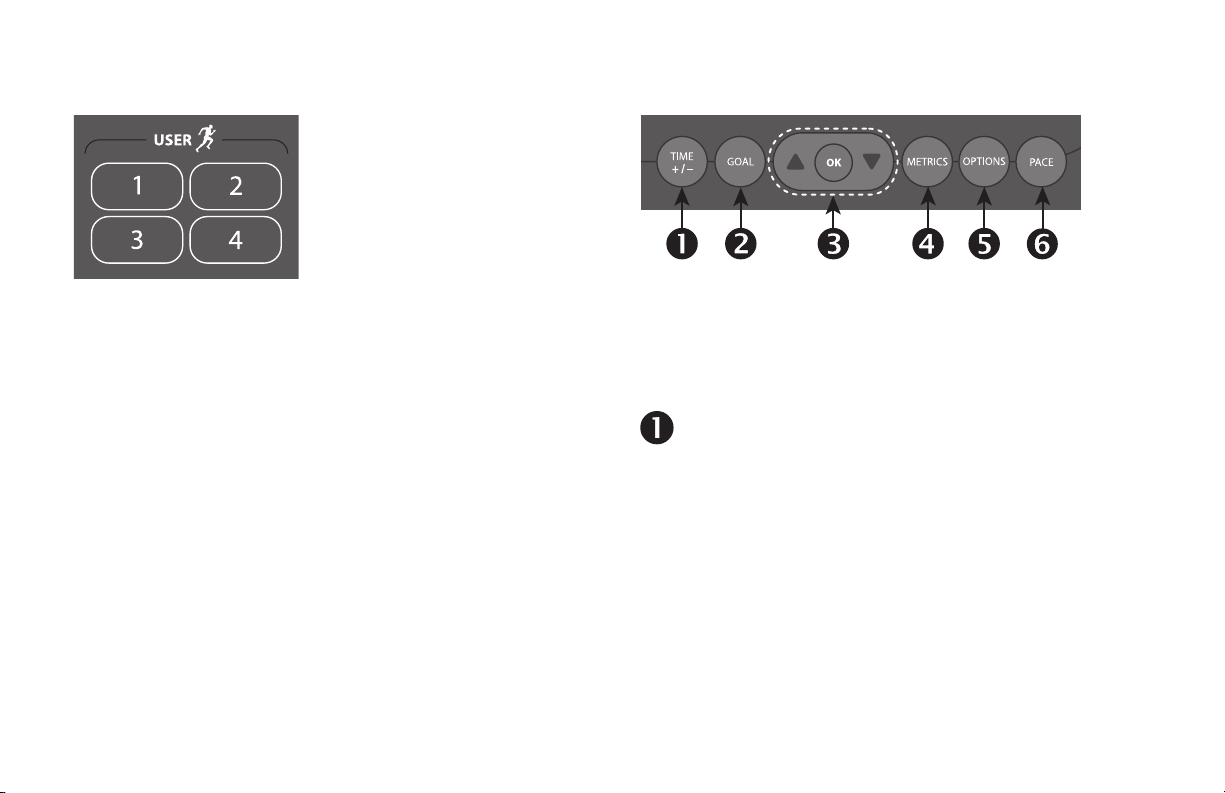
Navigational Keypad
Diagram 13: USER keys
User Keys: To personalize your exercise session, press a
USER key (1 through 4) at the Precor banner. Selecting a
USER key lets you track your workout statistics from session
Diagram 14: Navigational keypad
The navigational keypad provides several ways to change
your exercise session and to display various workout
statistics. The OK key, which allows you to confirm display
selections, is also part of the navigational keypad.
to session. When you choose a USER key, personal
information such as age, weight, gender, and preferred
program are reinstated as your exercise session begins. If
you haven’t already done so, you’ll need to select a user
number and enter a user name. For more information, refer to
Adding a User or Selecting a USER key.
TIME +/-: You can change the workout time while you
are exercising, by pressing the TIME +/– key. A blinking
number appears in the center display. You can change
the number using the navigational arrow keys or enter a
different time using the number keys. Refer to
Changing the Workout Time.
Owner’s Manual: Display Console 23
Page 26

GOAL: Press the GOAL key to set exercise session
goals: time, calories, or distance. You can set your
preferences once you are already engaged in an
exercise program. Refer to Adjusting Program Goals.
Up and Down Arrows: These up and down arrows
present the available selections and affect what
appears on the display.
OK: Use the OK key to confirm responses to specific
prompts.
METRICS: The METRICS key is a multi-functional key.
It lets you customize the center display while exercising.
You select one item from the list or choose ALL
METRICS, which causes a variety of scrolling statistics
to appear in the center display. To review the list, refer
to Changing Your Workout Display Options.
OPTIONS: The OPTIONS key is a multi-functional key.
You can set your preferences for units of measure and
for the safety code prior to selecting a program. When
you are using a program, the display also lets you set
your target heart rate. Refer to Setting Display
Preferences Before Exercising or Adjusting Your Target
Heart Rate.
PACE: The PACE key lets you view your pace or
change it using the SPEED arrow keys, number
keypad, or the arrow keys on the navigational keypad.
For more information, refer to Setting Your Pace.
Owner’s Manual: Display Console 24
Page 27
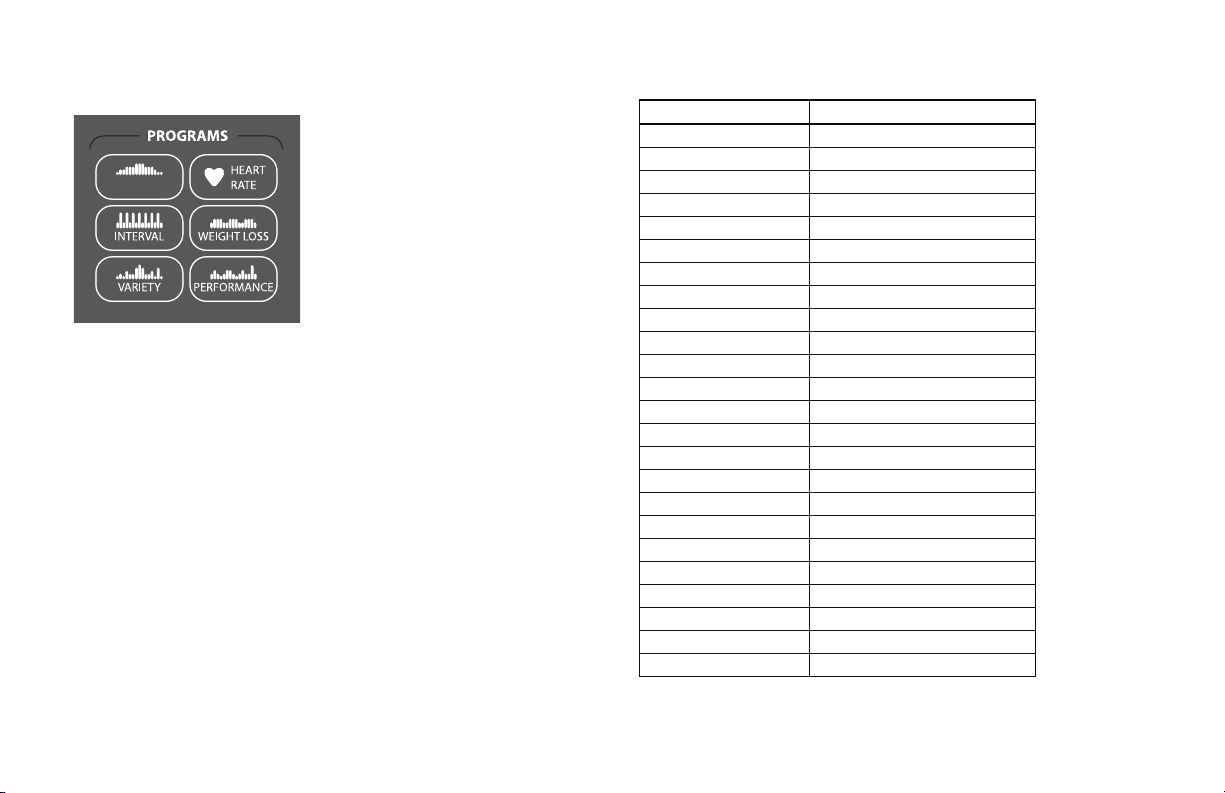
PROGRAMS Keypad
Table 3. Available programs
PROGRAMS key Menu Selections
MANUAL Manual
INTERVAL 1—1 Interval
MANUAL
Diagram 15: PROGRAMS keypad
The PROGRAMS keypad provides access to all the exercise
programs. Choosing a category and continually pressing the
associated PROGRAMS key, cycles you through the menu
selections. Refer to Table 3. For a description of each
program, refer to Programs.
Note: Use the OK key to confirm your selection. For more
information, refer to Workout Options.
VAR I ETY Random
HEART RATE Basic HRC*
WEIGHT LOSS Weight Los s
PERFORMANCE Track
* Use of chest strap or the touch-sensitive handrail grips is required.
†
Appears when you select a USER key.
1—2 Interval
1—3 Interval
Custom Interval
Walk in the Park
Distance Goal
1 Custom
2 Custom
Weight Loss HRC*
Heart Health HRC*
Endurance HRC*
Speed HRC*
Weight Loss HRC*
Calorie Goal
5 K
10 K
1 Mile
2 Mile
Fitness Test*
†
†
Owner’s Manual: Display Console 25
Page 28

Data Keypad
Diagram 16: Data keypad
During an exercise session, you can use the number keys to
answer prompts and update information or adjust the incline
and speed.
The CLEAR and ENTER keys provide the following
functions:
CLEAR: Use the CLEAR key to remove the last number
being displayed.
ENTER: Use the ENTER key to accept the number being
displayed.
Note: The OK and ENTER keys are interchangeable and
provide the same function when no peripheral devices are
attached to the treadmill.
When you press the INCLINE or SPEED arrow keys, the lift
or running belt changes incrementally.
To adjust the incline in larger increments, take the
following steps.
1. To establish the direction of the lift, press the appropriate
INCLINE arrow key.
2. Within three seconds, press a number (0 – 15) followed
by a zero, and then press ENTER.
For example, to adjust the lift incline to 8% when the
display shows 2.0, you need to press the INCLINE up
arrow, press the number 8 and 0, and then press ENTER
or the INCLINE up arrow key.
If you wish to halt the lift’s movement, press either
INCLINE arrow key. The lift stops moving and the display
indicates the current incline level.
Owner’s Manual: Display Console 26
Page 29

To adjust the speed of the running belt in larger
increments, take the following steps.
1. To adjust the speed, press the appropriate SPEED up or
down arrow key.
2. Within three seconds, press a number 0–12 for miles
(0–20 for kilometers) followed by a zero, and then press
ENTER.
If you wish to cancel the speed adjustment, press either
SPEED arrow key. The display indicates the current
speed of the running belt.
Owner’s Manual: Display Console 27
Page 30

User Identification
Choosing a user identification (USER key) enables the
treadmill to identify you and track your cumulative workout
statistics. Once you configure your USER key, you can
personalize your workout session and store information
about your preferred program, workout time, weight, age,
and gender.
The USER keys allow four people to customize, store, and
retrieve workout selections. Two custom programs are also
available when you choose a USER key. The custom
programs record your speed and incline settings as you
exercise.
Initially, you must “add a user” so the treadmill can store
exercise session information associated with the specific
USER key. Once you enter the requested information, it is
stored until you opt to change it. You can select the same
USER key time and time again, and your user preferences
will automatically be re-instated. Refer to Adding a User.
When you choose a USER key and a distance-based
program, you can also access the PACER feature through
the METRICS key. For more information, refer to Setting
Your Pace.
This section explains how to:
• Add a user.
• Update your personal information.
• Change the user name and clear your workout statistics.
Owner’s Manual: User Identification 28
Page 31

Adding a User
4. When you are satisfied with your name or user
identification, press OK.
5. The display then prompts you to enter your weight, age,
and gender.
Use the navigational arrow keys or number keys to
answer each prompt, and then press OK. With each
successful entry, you move onto the next prompt. After
the gender type prompt, the display indicates that the
user setup is complete and resets to the Precor banner.
To add a user, select a user number by taking the following
steps:
1. At the Precor banner, press a USER key. A blinking line
prompts you to enter the first letter in your name.
2. Use the alphabet, on the number keypad, to enter your
name. To enter a letter, press the appropriate number key
repeatedly until the desired letter appears. To erase a
letter, press the CLEAR key.
3. Wait until the next cell blinks and continue the process
until your name or identification is complete.
Note: Blank spaces between letters are not allowed.
Owner’s Manual: User Identification 29
Note: The treadmill retains entries even if you exit the
user setup process prior to answering all the prompts.
When you press the same USER key, the setup process
is initiated and the prompts display your existing entries.
Press OK to accept each entry and move on to the next
prompt.
To begin an exercise session using your USER key, refer to
Selecting a USER key.
Page 32

Updating User Information
To update user information such as weight and age without
clearing the workout statistics associated with a USER key,
take the following steps:
1. At the Precor banner, press and hold the USER key. A
welcome greeting scrolls across the display.
Continue holding the USER key until CHANGE USER
[user number]? USER [x] SETUP scrolls across the
display. Release the USER key, and then press OK.
2. When your user name appears, do not change it. Accept
it as is by pressing OK.
Important: If you change your user name, you also
delete all cumulative workout statistics associated with
the user name. Refer to Changing the User Name and
Clearing Workout Statistics.
3. Answer the prompts for weight, age, and gender.
Use the navigational arrow keys or number keys to
answer each prompt, and then press OK. With each
successful entry, you move onto the next prompt.
4. At the CLEAR [user name] STATISTICS? prompt,
choose one of the following options:
1 = No Pressing USER key 1 updates user
information only. The program
preferences and cumulative workout
statistics remain intact.
2 = Yes Pressing USER key 2 updates user
information, but deletes program
preferences and cumulative workout
statistics. Refer to Changing the User
Name and Clearing Workout Statistics.
Owner’s Manual: User Identification 30
Page 33

Changing the User Name and Clearing Workout Statistics
You can clear the stored workout statistics for any USER key
by changing the name associated with a USER key.
Changing the user name resets workout goal, weight, age,
and gender preferences to the original factory defaults. The
cumulative goal statistics and personal best records are
reset to zero. The metrics displayed are reset to factory
defaults.
1. At the Precor banner, press and hold the USER key while
the welcome greeting scrolls across the display.
Continue holding the USER key until CHANGE USER
[user number]? scrolls across the display. Release the
USER key, and then press OK.
2. When your user name appears, a blinking line prompts
you to change the first letter.
3. Use the alphabet, on the number keypad, to enter a new
name. To enter a letter, press the appropriate number key
repeatedly until the desired letter appears. To erase a
letter, press the CLEAR key.
4. A blinking space or letter indicates it is ready to receive a
new letter. Wait until the next cell blinks and continue the
process until your name or user identification is complete.
Note: Blank spaces between letters are not allowed.
5. When you are satisfied with your name or user
identification, press OK.
6. The display then prompts you to enter your weight, age,
and gender.
Use the navigational arrow keys or number keys to
answer each prompt, and then press OK. With each
successful entry, you move onto the next prompt. After
the gender type prompt, the display indicates that the
user setup is complete and resets to the Precor banner.
Note: Preferences and workout statistics are cleared and
all programs are restored to original default settings.
Owner’s Manual: User Identification 31
Page 34

Workout Options
CAUTION: Before beginning any fitness program, see your
physician for a complete physical examination. Know your
physician-recommended heart rate target zone.
1. Turn the unit On. The Precor banner scrolls across the
display.
2. Hold on to a handrail while stepping on to the treadmill.
3. Face the display and then straddle the running belt by
placing your feet on the trim strips provided.
4. Attach the safety clip to your clothing.
5. Grip a handrail with one hand to steady yourself.
6. Select one of the following options:
Option... Steps...
To start exercising
immediately
To view a list of
programs
To begin exercising
using personal
preferences
Use the QUICKSTART key.
Refer to Choosing
QUICKSTART.
Press a PROGRAMS key.
Refer to Selecting a Program.
Press your USER key.
Refer to Selecting a USER key.
Owner’s Manual: Workout Options 32
Page 35

Choosing QUICKSTART
QUICK
START
2. If needed, enter the safety code by pressing: 1, 2, 3, 4.
An asterisk appears on the display with each entry.
3. Hold onto a handrail and straddle the running belt.
BELT STARTING flashes in the center display. A
3-second countdown appears in the upper display,
and then the running belt starts moving.
4. Step on to the running belt with the speed at or below
1 mph or 1 kph and begin exercising. Use the SPEED
arrow keys to increase or decrease the speed of the
running belt.
1. While the Precor banner scrolls, press QUICKSTART to
begin the Manual Program.
To use the SmartRate feature, you need to specify your
age. In this case, review the steps found in Adding a User
or Selecting a Program.
QUICKSTART applies the following defaults:
When you use the QUICKSTART key, you enter the
Prompts Default Value
Program Manual
Time 30 minutes
MANUAL program as a guest user. Features in the
METRICS menu, such as PACER which appear when
you press a USER key and select a distance-based
program, will not appear with a guest user.
Weight 150 lb (68 kg)
Age 0
Owner’s Manual: Workout Options 33
Page 36

Selecting a Program
MANUAL
If you choose a distance- or calorie-goal program, you will
prompted for a goal, not a workout time. You can enter a
goal using the number keypad.
3. Enter your weight (1—999) and then your age (1—99).
Note: To change a value (program, weight, or age) that
you have already entered press PAUSE/RESET to return
to the Precor banner. Select a program and reenter the
appropriate values.
4. Hold onto a handrail and straddle the running belt.
1. While the Precor banner scrolls, continually press one of
the PROGRAMS keys to review its list of programs.
Choose the program you want, and then press OK. For a
description of each program, refer to Programs or review
Table 3 with the PROGRAMS Keypad.
Note: After pressing a PROGRAMS key, you can also
scroll through the list of programs by pressing the
navigational arrow keys.
2. A workout time blinks in the center display if you choose
a time-based program. Enter a number between 1—240
minutes or zero (NO LIMIT) by using the navigational
arrow keys or the number keys, and then press OK.
Note: To review the NO LIMIT option or to adjust your
workout time using the TIME+/- key while exercising,
5. If needed, enter the safety code by pressing: 1, 2, 3, 4.
An asterisk appears on the display with each entry.
BELT STARTING flashes in the center display.
A 3-second countdown appears in the upper display, and
then the running belt starts moving.
6. Step on to the running belt with the speed at or below
1 mph or 1 kph and begin exercising. Use the SPEED
arrow keys to increase or decrease the speed of the
running belt.
Note: When you select a program without an identifying
USER key, you enter the program as a guest user.
Features, such as your personal best record which are
stored with a USER key, will not appear with a guest
user.
refer to Changing the Workout Time.
Owner’s Manual: Workout Options 34
Page 37

Selecting a USER key
2. Press OK to select the program being displayed or
choose another program using the navigational arrow
keys or the PROGRAMS keypad. Refer to Selecting a
Program for information about how to choose a program.
Important: If you make an entry error, press PAUSE/
RESET to return to the Precor banner.
3. If needed, enter the safety code by pressing: 1, 2, 3, 4.
An asterisk appears on the display with each entry.
To start your exercise session using personal identification
and preferences set up in Adding a User, take the following
steps:
1. At the Precor banner, press the same USER key you
designated in step 1, Adding a User.
Note: Refer to User Identification if you have not
previously chosen a USER key.
A welcome greeting scrolls across the display and the
last program associated with the USER key appears.
User preferences such as weight, age, and goal type are
re-instated.
The time, distance or calories goal associated with the
displayed program also applies.
Owner’s Manual: Workout Options 35
BELT STARTING flashes in the center display. A
3-second countdown appears in the upper display,
and then the running belt starts moving.
4. Step on to the running belt with the speed at or below
1 mph or 1 kph and begin exercising. Use the SPEED
arrow keys to increase or decrease the speed of the
running belt.
Page 38

Setting Display Preferences Before Exercising
While the Precor banner scrolls, you have the opportunity to
change what units of measure appear on the display and
designate safety code preferences.
1. As the Precor banner scrolls, press OPTIONS.
2. Use the arrow keys on the navigational keypad to display
each option and press OK to select it.
Table 4. Display preferences before an exercise session
Menu
Option Preferences Effect
UNITS U.S. or METRIC Determines which
units of measure
appear on the
display.
SAFETY
CODE
3. Follow the prompts on the display and return to the
Precor banner.
4. Review cautionary information, found in Changing the
Units of Measure Display and Changing Safety Code
Protection.
ENABLED or DISABLED Sets safety code
protection.
Cooling Down After a Workout
Incorporate a cool-down period into your workout to help
lower your heart rate and minimize muscle stiffness or
soreness.
Note: You cannot switch to a different program, goal type or
goal value, or change display options during the cool-down
period. To alter the cool-down period time limit, refer to
Setting a Cool-Down Time Limit.
When you complete a program with a time limit or specified
goal, you automatically enter a cool-down period. The
running belt slows by about 20% and the incline returns to
0% grade. To readjust the incline or speed, press the
INCLINE or SPEED arrow keys.
A workout summary appears at the end of the cool-down
period. Refer to Ending a Workout.
Important: If you exit a program before completing it, the
cool-down period is bypassed.
Owner’s Manual: Workout Options 36
Page 39

Note: The red STOP button and the PAUSE/RESET key can
be used interchangeably. So, for the following steps, you
may use the red STOP button instead of the PAUSE/RESET
key.
To prematurely end the cool-down period, do the following:
1. Grasp a handrail with one hand.
2. Press the PAUSE/RESET key with your other hand. The
treadmill enters pause mode.
3. Press PAUSE/RESET to view the workout summary.
4. Press PAUSE/RESET again to return to the Precor
banner.
Important: Hold on to a handrail extension. Step off the
treadmill when the lift has stopped moving.
Pausing During a Workout or the Cool-Down Period
Press the red STOP button or the PAUSE/RESET key to
pause anytime during a workout or during a cool-down
period. The pause mode has a time limit. If you do not
resume exercising during that time, the display returns to
the banner.
1. To pause, press the PAUSE/RESET key.
The center display indicates the amount of time remaining
in pause mode.
2. To resume exercising from pause mode, press
QUICKSTART or the SPEED up arrow key.
3. If needed, enter the safety code by pressing: 1, 2, 3, 4.
An asterisk appears on the display with each entry.
4. Adjust the running belt speed using the SPEED arrow
keys.
When you pause a program, you can change your program
selection or display options. Refer to Changing Programs in
Mid-session and Changing Your Workout Display Options.
You cannot change your program or display options while
paused during the cool-down period.
Note: The red STOP button and the PAUSE/RESET key can
be used interchangeably.
Owner’s Manual: Workout Options 37
Page 40

Ending a Workout
CAUTION: Hold on to a handrail when you near the end of
your exercise session. The incline automatically
recalibrates to a 0% grade. If the lift is moving, wait until it
stops before stepping off the treadmill.
The running belt stops when you complete the automatic
cool-down period. After the running belt stops, time stops
accruing.
The workout summary shows your cumulative workout
statistics including warm-up and cool-down periods. You can
review your workout statistics for two minutes before the
display automatically resets to the Precor banner.
Grand totals (cumulative statistics) in calories, distance and
time appear if you have been accessing programs through a
USER key.
A fitness score, associated with your fitness category,
appears when you take the Fitness Test.
A heart rate analysis also appears, if you held onto the touchsensitive handrail grips or wore a chest strap while
exercising. Refer to Heart Rate Analysis.
If you choose to exercise with no set time limit, you must
manually end a program by pressing the red STOP button or
the PAUSE/RESET key. You can also press the SPEED
down arrow until the speed is reduced to zero and the
running belt stops.
Note: The red STOP button and the PAUSE/RESET key can
be used interchangeably.
To stop the running belt or end an exercise session at any
time, do the following:
1. Grasp a handrail with one hand.
2. Press the PAUSE/RESET key with your other hand. The
treadmill enters pause mode.
3. Press PAUSE/RESET to view the workout summary.
4. Press PAUSE/RESET again to return to the Precor
banner.
Important: Do not assume the treadmill is safe because of
safety code protection. Never leave children unsupervised
around the treadmill. Always turn Off and unplug the
treadmill when it is not in use.
Owner’s Manual: Workout Options 38
Page 41

Programs
This section describes the programs available on the
treadmill. Use this section as a reference tool to better
understand each program’s purpose. For more information,
refer to Selecting a Program.
The program descriptions are presented in menu selection
order. To see a list of programs, refer to PROGRAMS
Keypad and Table 3.
Choosing a Program
Choosing a program depends on your goals. If you are a
beginner or returning to regular exercise, you can start a
cardio-conditioning program to slowly return your body to a
comfortable level of exercise. If you have been exercising and
feel that you have an intermediate or advanced fitness level,
you probably have established goals. The Precor web site
(www.precor.com) can give you many ideas about fitness
workouts and advice from the experts.
Several exercise choices on the treadmill are preprogrammed with recommendations for incline levels, pace,
and alternating intervals. You always have the option to
override the suggested levels with the exception of the
Fitness Test.
Program Tips
• Begin at the Precor banner. Refer to Workout Options.
• A blinking column indicates your position as you progress
through a program.
• Prior to choosing a program, you may press the
OPTIONS key to access units of measure and safety
code settings. Refer to Setting Display Preferences
Before Exercising.
• To use the SmartRate feature, you need to specify your
age and wear a chest strap or hold on to the touchsensitive handrail grips. Refer to Using SmartRate.
• To exercise indefinitely in any program (except preset
distance or calorie goal programs and the Fitness Test),
an unlimited exercise time setting may be an available
option. Refer to Selecting a Program.
• If your level of exertion becomes too great, reduce your
pace or change the incline using the SPEED or INCLINE
arrow keys to override each upcoming column in the
program profile.
Owner’s Manual: Programs 39
Page 42

• To pause during a program, press PAUSE/RESET or the
MANUAL
red STOP button. Refer to Pausing During a Workout or
the Cool-Down Period.
• When you complete a program that contains a time,
distance or calorie goal, the automatic cool-down period
begins. Refer to Cooling Down After a Workout.
• Cumulative workout statistics appear when you end your
exercise session. Refer to Ending a Workout.
Manual Program
The Manual Program profile, available by pressing the
MANUAL key, begins as a flat line. You control incline and
speed settings using the INCLINE or SPEED arrow keys.
The program profile reflects changes in all subsequent
columns. The blinking column indicates your position in the
program. A cool-down period occurs automatically when you
end your workout.
Note: An exception to the cool-down period exists. Refer to
Advanced Programming and Troubleshooting for more
information.
To use the SmartRate feature, you need to specify your age
by pressing the OPTIONS key and following the display
prompts. To change the workout time, press the TIME +/–
key. Refer to Changing the Workout Time.
Owner’s Manual: Programs 40
Page 43

Interval Programs
INTERVAL
While exercising, you can vary the speed and change the
preset incline using the SPEED or INCLINE arrow keys. The
settings are repeated throughout the remainder of the
program.
The Interval Programs, available by pressing the INTERVAL
key, are among the best for conditioning your cardiovascular
system. Each program raises and lowers your level of
exertion repeatedly for the specified period of time.
The display lets you know when the speed setting is about to
change, and indicates the levels of the next interval.
Note: Incline changes are limited to +/–5% grade variance
from the previous incline level.
Four programs let you choose the rest and work intervals
according to your training regimen. In the Custom Interval
Program, you specify the duration of the rest and work
intervals.
Interval Program Rest Duration Work Duration
1-1 Interval 2 minutes 2 minutes
1-2 Interval 2 minutes 4 minutes
1-3 Interval 2 minutes 6 minutes
Custom Interval user specified user specified
Initially, the rest interval is set to 0% grade and 1 mph
(1 kph). The work interval is set at a 3% grade and the speed
remains at 1 mph (1 kph).
Owner’s Manual: Programs 41
Page 44

Random Program
VARIETY
VARIETY
Walk in the Park Program
The Random Program can be accessed by pressing the
VARIETY key. Every time the Random program is selected, a
different program profile appears. The columns that appear
in the program profile show the preprogrammed incline. You
can override the preprogrammed incline at any time using
the INCLINE arrow keys.
The incline is preset to zero for the first column. The
maximum change allowed between columns is +/–4%.
The running belt speed is completely under your control. You
can adjust the pace by pressing the SPEED arrow keys.
Owner’s Manual: Programs 42
The Walk in the Park Program, available by pressing the
VARIETY key, has preprogrammed inclines in a fixed pattern.
You determine whether the program uses a time, distance, or
calorie goal. During your exercise session, you can change
the speed and override the preprogrammed incline using the
arrow keys.
Walk in the Park is a relatively easy walk, designed to
increase muscle tone, cardio-conditioning, and endurance
over several weeks.
Page 45

Distance Goal Program
VARIETY
Custom Programs
VARIETY
The Distance Goal Program, available by pressing the
VARIETY key, lets you designate a fixed distance. When you
reach your goal, the program ends and the automatic cooldown period begins.
After selecting the Distance Goal Program, specify your
distance goal at the blinking prompt. Acceptable entries are
from 0.1 to 50 (miles or kilometers). Use the navigational
arrow keys or number keypad to change the value, and then
press OK to begin.
Note: To change the units of measure settings from miles to
kilometers, follow the instructions in Changing Your Workout
Display Options.
Owner’s Manual: Programs 43
Two Custom Programs are available if you select a USER
key, and then press the VARIETY key. As you exercise, you
customize the program by determining the speed or incline
settings for each 1-minute column along the length of the
profile. As each column elapses, the speed and incline for
that column are stored in memory.
The subsequent columns repeat the last programmed speed
or incline and are reflected in the program profile. Adjust the
speed or incline using the INCLINE and SPEED arrow keys.
When you complete the program, the settings are
automatically recalled using the same USER key and
program number.
Important: The starting speed may be greater than 1 mph
(1 kph). Do not use the custom programs if you are
unfamiliar with the settings.
Page 46

Custom Program Tips
• The custom programs are time-based, you cannot select
a distance or calorie goal.
• The duration of the custom program and the number of
speed and incline settings is limited to available memory
in the treadmill. The program does not end if the available
memory is exhausted, but the display notifies you and
further changes to speed or incline are not saved.
Approximately, 1¹⁄₂ hours of recording time are available.
• You need to incorporate a cooling down period into your
exercise session. The cool-down period is not
automatically appended to the end of the custom
programs.
• The program profile reflects changes to incline.
Clearing the Settings in a Custom Program
Perform the following steps to clear (delete) any speed and
incline settings stored in a custom program.
1. At the Precor banner, select a USER key, and then press
OK.
2. Display the custom program that you wish to clear.
Important: Clearing the speed and incline settings from
a custom program permanently deletes them from
memory.
3. While the custom program name appears on the display,
hold the red STOP button for about fourteen seconds.
After a message appears on the display indicating that the
settings have been cleared, you can release the key.
Speed and incline information are reset to zero.
During the 14-second delay and before CLEARING appears
on the display, you can release the red STOP button and no
change will occur to the custom program settings.
Owner’s Manual: Programs 44
Page 47

Heart Rate Programs
HEART
RATE
These programs (except Speed HRC) adjust the incline to
maintain your heart rate within two beats per minute of the
target heart rate while you exercise. To use these programs,
you must enter your age and wear a chest strap or grasp the
touch-sensitive handrail grips so your heart rate can be
monitored throughout the session. Refer to Table 5 for more
information about the heart rate programs.
Important: Consult your physician to determine the
appropriate target heart rate for your age and fitness level.
If your physician recommends a different target heart rate
than the one that appears on the display, use the OPTIONS
key to change your target heart rate while exercising. Do not
exercise over the recommended range of 85% of your
maximum aerobic heart rate.
Heart Rate Program Tips
The Heart Rate programs enhance your overall
cardiovascular fitness levels to help you achieve your weight
loss and fitness goals. Read through the following tips
before selecting a program. These tips provide general
information regarding how the programs function. For more
information and exercise suggestions, refer to the Precor
web site at www.precor.com.
• Each program provides a 3-minute warm-up period.
During this time, you may change the incline or speed,
but you cannot change to a distance or calorie goal. At
the end of the warm-up period, the program automatically
controls the incline. Pressing the INCLINE arrow keys
has no affect.
Note: When your target heart rate is achieved or the
3-minute period elapses, the warm-up period ends and
the program begins.
Owner’s Manual: Programs 45
Page 48

• The program sets the target heart rate as a percentage of
220 minus your age. Changing the target heart rate or
speed affects the unit’s ability to maintain your target
heart rate in the preferred zone. It takes time for the
treadmill to readjust the incline so that your heart rate
remains on target. Check the SmartRate and the HEART
RATE displays to see if you are maintaining your preferred
zone and to determine your actual heart rate. For
information about understanding your target heart rate,
refer to Heart Rate Features.
• To change your target heart rate, refer to Adjusting Your
Target Heart Rate.
• To view a variety of workout statistics, press the
METRICS key. Refer to Changing Your Workout Display
Options.
• To adjust the time, press the TIME +/– key and use the
navigational arrow keys or number keypad followed by
OK to change the workout time.
• To change to a distance- or calorie-based goal, press the
GOAL key after the warm-up period elapses. Refer to
Adjusting Program Goals.
• To change to a different program, select a PROGRAMS
key and press OK.
• Cool down periods are incorporated into each program.
The table below briefly explains the purpose of each
program.
Owner’s Manual: Programs 46
Page 49

Table 5. Heart Rate Programs
Program Description
Basic HRC Start with the Basic HRC Program if this is the
first time you have used a heart rate program or
you are returning to an exercise fitness routine.
Weight Loss
HRC
Heart Health
HRC
Improve fat-burning results and increase
endurance every time you exercise. This
program helps you achieve weight loss and
increase your aerobic capacity. Refer to Heart
Rate Features.
Add variety and increase your endurance. The
Heart Health HRC Program is a good choice if
you have been using the Weight Loss HRC
Program for several weeks and wish to try
something different. The Heart Health HRC
Program splits the exercise session time equally
between the weight loss and cardioconditioning zones.
Program Description
Endurance HRC Increase your aerobic activity and improve heart
muscle strength and power. The Endurance
HRC Program also provides a high intensity
workout that enhances your fat-burning
capability and increases your endurance. If you
are beginning or returning to regular exercise,
start with the Basic HRC Program or the
Weight Loss HRC Program before moving on
to the Endurance HRC Program.
Speed HRC Intensify your workout with intervals that
consistently increase incline and speed. Be
aware the Speed HRC Program is an intense
program designed to increase your anaerobic
threshold and improve your percentage of
aerobic capacity. Best results occur if you are
already in good physical shape and
conditioning.
Visit our web site www.precor.com for more information and
to supplement your workout with additional plans.
Owner’s Manual: Programs 47
Page 50

Weight Loss Programs
WEIGHT LOSS
The Weight Loss Programs are available by pressing the
WEIGHT LOSS key. During your workout, set a comfortable
pace. The display lets you know when the incline levels are
about to change. You have the option to leave the setting
alone or override it by pressing the arrow keys. When you
make changes, the software repeats the changes in the
remaining intervals.
For ideal weight loss, your heart rate should remain between
55% and 70% of your maximum aerobic heart rate. Refer to
Heart Rate Features.
The chart below briefly explains the purpose of each
program.
Program Description
Weight Loss Use this program if you are beginning or
returning to a regular fitness routine. The
workout time is fixed at 28 minutes and consists
of seven 4-minute intervals. You are not
prompted for a workout time. Use the
SmartRate display and maintain your heart rate
within the FAT BURN zone.
Program Description
Weight Loss
HRC
Calorie Goal Attain your designated calorie expenditure as
Improve fat-burning results and increase
endurance every time you exercise. This
program helps you achieve weight loss and
increase your aerobic capacity. You should
wear the chest strap and use SmartRate to
monitor your heart rate throughout the session.
Refer to Heart Rate Features.
you promote aerobic activity and improve your
cardio-vascular conditioning. When you select
this program, specify your calorie goal at the
blinking calorie prompt. Acceptable entries
range from 1 to 5000 calories. Use the
navigational arrow keys or number keys to
change the value, and then press OK to begin.
Owner’s Manual: Programs 48
Page 51

Track Program
PERFORMANCE
PERFORMANCE
5K Program
An oval track appears on the display; one lap around the
track represents 440 yards (400 meters). A blinking LED
(moving counterclockwise) indicates your position on the
track. You control speed and incline.
If you wish to know the remaining time required to complete
the current lap based on your current speed, select the
SEGMENT TIME REMAINING display using the METRICS
key. For more information, refer to Changing Your Workout
Display Options.
Owner’s Manual: Programs 49
The 5K Program, available by pressing the PERFORMANCE
key, provides a favorable distance to run or walk depending
on your level of fitness. The distance is fixed at five kilometers
(3.1 miles) and cannot be changed. The incline is
preprogrammed. You can change the speed and override the
preprogrammed incline using the arrow keys.
This program records your personal best time when you
select a USER key and complete the program. If you have a
previous record, it scrolls across the display when the
program begins.
When you complete the program, a message appears
indicating whether you exceeded, maintained, or missed your
personal best record. Refer to Recording Your Personal
Best Time.
To view the time it will take you to complete the program at
your current speed, press the METRICS key until FINISH
TIME appears, and then press OK. Refer to Changing Your
Workout Display Options. To use the pacer icon to help you
maintain or exceed your personal best, press the METRICS
key until PACER appears and then press OK. Refer to Using
the Pacer Feature with Your Personal Best Record.
Page 52

10K Program
PERFORMANCE
PERFORMANCE
One Mile Program
The distance for the 10K course is fixed at ten kilometers
(6.2 miles) and the incline is preprogrammed. You can
change the speed and override the preprogrammed incline
using the arrow keys.
This program records your personal best time when you
select a USER key and complete the program. If you have a
previous record, it scrolls across the display when the
program begins.
When you complete the program, a message appears
indicating whether you exceeded, maintained, or missed your
personal best record. Refer to Recording Your Personal
Best Time.
To view the time it will take you to complete the program at
your current speed, press the METRICS key until FINISH
TIME appears, and then press OK. Refer to Changing Your
Workout Display Options. To use the pacer icon to help you
maintain or exceed your personal best, press the METRICS
key until PACER appears and then press OK. Refer to Using
the Pacer Feature with Your Personal Best Record.
Owner’s Manual: Programs 50
The distance is fixed at one mile and the incline is
preprogrammed. You can change the speed and override the
preprogrammed incline using the arrow keys.
This program records your personal best time when you
select a USER key and complete the program. If you have a
previous record, it scrolls across the display when the
program begins.
When you complete the program, a message appears
indicating whether you exceeded, maintained, or missed your
personal best record. Refer to Recording Your Personal
Best Time.
To view the time it will take you to complete the program at
your current speed, press the METRICS key until FINISH
TIME appears, and then press OK. Refer to Changing Your
Workout Display Options. To use the pacer icon to help you
maintain or exceed your personal best, press the METRICS
key until PACER appears and then press OK. Refer to Using
the Pacer Feature with Your Personal Best Record.
Page 53

Two Mile Program
PERFORMANCE
PERFORMANCE
Fitness Test Program
The distance is fixed at two miles and the incline is
preprogrammed. You can change the speed and override the
preprogrammed incline using the arrow keys.
This program records your personal best time when you
select a USER key and complete the program. If you have a
previous record, it scrolls across the display when the
program begins.
When you complete the program, a message appears
indicating whether you exceeded, maintained, or missed your
personal best record. Refer to Recording Your Personal
Best Time.
To view the time it will take you to complete the program at
your current speed, press the METRICS key until FINISH
TIME appears, and then press OK. Refer to Changing Your
Workout Display Options. To use the pacer icon to help you
maintain or exceed your personal best, press the METRICS
key until PACER appears and then press OK. Refer to Using
the Pacer Feature with Your Personal Best Record.
Owner’s Manual: Programs 51
The Fitness Test provides a 15-minute test consisting of five
3-minute stages. You cannot adjust the speed or incline
levels. When you complete the test, the display provides a
fitness level.
The Fitness Test measures the maximum amount of oxygen
max) the body can use for energy production during
(V0
2
exercise. The higher the amount of oxygen that your body
can use enhances your ability to exercise for prolonged
periods of time. The test results can help you gauge the
effectiveness of your current exercise routine and tailor it to
meet your fitness goals.
Important: You must wear the chest strap throughout the
Fitness Test. If the heart rate reception is erratic, incorrect
readings can occur and the test will automatically end. If
you have completed at least two stages of the test, you will
receive a score.
Page 54

During the test, the treadmill gradually increases the incline
Column height Incline settings
and speed in specific stages. The keypads are disabled. The
test ends if,
• You press STOP.
• After the first stage elapses, no heart rate signal is
detected for one minute.
• You surpass your target heart rate (85% of your maximum
aerobic heart rate) at the first stage or 80% of your
maximum aerobic heart rate after any subsequent stages.
• You complete the 15-minute time limit.
You must complete at least three stages of the test for it to
determine your aerobic capacity and establish your VO
max.
2
Once you complete the test, a fitness score and fitness level
appear as part of the workout summary. Use it to compare to
Tab l e 6 o r Tab le 7.
Fitness Test Tips
Read through the following tips before selecting the Fitness
Te st .
• If you press the red STOP button during the test, the test
ends and the display indicates whether the test was
completed.
• The program profile appears slightly different in the
Fitness Test than in the other programs. The profile
combines both speed and incline in five stages. The
relationship between column height and incline settings
is shown in Diagram 17.
13 — 15
10 — 12.5
8 — 9.5
6 — 7.5
4 — 5.5
3 — 3.5
2 — 2.5
1 — 1.5
0.0 — 0.5
-2 — -0.5
• Sit and rest for at least five minutes prior to taking the
test.
• You must enter your weight, age, and gender.
• You can change to another program while in the midst of
Diagram 17: Column height in the Fitness Test
Important: If you need to stop the running belt to regain
control or reduce your heart rate, please do so. You can
retake the fitness test later.
taking the Fitness Test, but you will not receive a fitness
score.
Owner’s Manual: Programs 52
Page 55

Fitness Test Scores
When you finish the Fitness Test, the program stops the
running belt and returns the incline to a 0% grade. No
automatic cool-down period is provided after the test. A
fitness score and a fitness level appear on the display as part
of the workout summary and relate to the tables shown
below.
Note: A fitness score appears only if you complete at least
three stages of the test.
This test provides a means of comparing your fitness level
with the official fitness test of the IAFF. It is written using the
Gerkin Protocol, which is the basis for the official IAFF
fitness test and part of their Wellness and Fitness Initiative.
Table 6. Cardio respiratory Fitness Score Category—Females*
Fitness Category
Low
Age in Years
20–39 28 (or below) 28–34 34 (or above)
40–49 26 (or below) 26–32 32 (or above)
50–59 24 (or below) 24–29 29 (or above)
60 and over 22 (or below) 22–27 27 (or above)
Fitness
Medium
Fitness
High
Fitness
Table 7. Cardio respiratory Fitness Score Category—Males*
Fitness Category
Low
Age in Years
20–39 35 (or below) 35–43 43 (or above)
40–49 32 (or below) 32–40 40 (or above)
50–59 29 (or below) 29–37 37 (or above)
60 and over 24 (or below) 24–32 32 (or above)
* The test and analysis algorithm were developed by Dr. Neil Gordon of
Cooper Clinic.
Fitness
Medium
Fitness
High
Fitness
* The test and analysis algorithm were developed by Dr. Neil Gordon of
Cooper Clinic.
Owner’s Manual: Programs 53
Page 56

Exercise Session
This section describes how to use the navigational keys to
affect changes to your exercise session. While exercising,
you can:
• Change the program you are using
• Record your personal best time
• Change the workout time
• Choose between time-, distance-, or calorie-type goals
• Change the display to U.S. Standard or Metric
• Reset your target heart rate
• Change the safety code protection
• Display more workout statistics
Note: Prior to selecting a program, you can select
preferences for units of measure and safety code protection.
Refer to Setting Display Preferences Before Exercising.
Exercise Session Tips
• When you press one of the navigational keys (TIME +/-,
GOAL, METRICS, OPTIONS, or PACE) you have 30
seconds to make a selection. Prompts scroll across the
display and indicate what to do. If no key press occurs
within 30 seconds, the center display reverts to its
previous state.
• When you press a navigational key, you enter its menu.
As you continue to press the key, you cycle through all
the menu selections. When a blank display appears, it
signifies you are no longer in the menu selection process.
Changing Programs in Mid-session
You can change programs in the middle of a session by
selecting a new program from the PROGRAMS key menu.
All accumulated workout statistics are transferred to the new
program as you continue exercising.
Certain programs, such as the Fitness Test and heart rate
programs, are not available for mid-session transfers due to
set goals and program preferences. If this occurs, a
message scrolls across the center display.
Owner’s Manual: Exercise Session 54
Page 57

Recording Your Personal Best Time
The distance programs (5K, 10K, One Mile, Two Mile) record
your personal best time when you select a USER key and
complete the program. The next time you select the same
USER key and its settings, your personal best record
appears when you press OK.
During your exercise session, the distance traveled is being
recorded whether or not the program goal is time, distance,
or calories. If you transfer to a distance program and
complete it, your personal best time indicates the cumulative
workout time regardless of how many mid-session transfers
may have occurred. Upon program completion, one of the
following messages scrolls across the display as you begin
the cool-down period.
NEW PERSONAL BEST displays your best time.
MISSED PERSONAL BEST displays the amount of time
required to meet or surpass your
personal best time.
SAME PERSONAL BEST indicates that you met and
maintained your personal best
record.
Note: Your personal best time appears in minutes and
seconds unless you surpass 60 minutes. Then, the display
presents your workout time in hours and minutes.
A pacer icon is available when you have recorded a personal
best record. For more information, refer to Using the Pacer
Feature with Your Personal Best Record.
Owner’s Manual: Exercise Session 55
Page 58

Changing the Workout Time
Some programs allow you to exercise indefinitely.
1. Once you begin a program, press the TIME +/– key.
A workout time blinks in the center display.
To change the duration of your exercise session, take the
following steps:
1. Press TIME +/–.
2. A workout time blinks in the center display. Use the
navigational arrow keys or the number keys to adjust the
time.
3. Press OK.
A message scrolls across the display indicating that the
new workout time has been accepted. If your attempt to
change the workout time is not accepted, display
messages scroll and indicate the reasons.
Owner’s Manual: Exercise Session 56
2. Press the number 0 (NO LIMIT) and then press OK to
accept this value.
Important: If you choose this option, the automatic cooldown period is eliminated. You will need to incorporate a
cool-down period at the end of your exercise session by
accessing the Manual Program.
Page 59

Adjusting Program Goals
Changing Your Workout Display Options
To designate a distance, calories, or time goal while
exercising take the following steps:
1. Press the GOAL key until the goal you wish to use
appears on the display: TIME, DISTANCE, or
CALORIES.
2. When you are ready, press OK to select the displayed
goal.
3. A blinking number appears indicating that the system is
ready for adjustments to the goal. Use the number keys
or navigational arrow keys to change the setting.
4. When you are ready, press OK. If the program you are
using allows changes to goal settings, a message scrolls
across the display indicating that your selection has been
accepted.
Note: Several programs on the treadmill are preset with
time, distance or calorie goals and cannot be changed. If
a program has a preset goal such as distance in the 5K
Program or 28 minutes in the Weight Loss Program, you
cannot change it. A message scrolls across the display
indicating that changing the goal is not an available
option.
Owner’s Manual: Exercise Session 57
During an exercise session, the center display becomes a
message bar. It can show additional workout statistics
depending on user selections accessed through the
METRICS menu.
To display more workout statistics or choose one among
them, take the following steps:
1. Press METRICS.
2. % COMPLETE appears.
3. Continue to press the METRICS key or use the
navigational arrow keys to scroll through all the available
displays. Refer to Table 8.
4. When you are ready, press OK to select a displayed
metric or display the entire menu consecutively by
selecting SHOW ALL.
Note: To remove a scrolling statistic from the message
bar, you need to reenter the METRICS menu and select a
different workout statistic display or select METRICS
OFF.
Page 60

Table 8. Workout statistics available in the METRICS menu
METRICS Menu Description
PACER This metric only appears as an option when
you’ve chosen a fixed distance course and
started a program by choosing a USER key.
For more information, refer to Using the Pacer
Feature with Your Personal Best Record.
% COMPLETE Shows how much of the program goal you
have completed.
TIME IN ZONE Displays the total time that your heart rate is
within the range of 55% to 84% of your target
heart rate.
SEGMENT TIME
REMAINING
FINISH TIME This metric only appears as an option when
AVERAGE SPEED Displays the average miles or kilometers per
CALS/MIN Displays the approximate number of calories
Indicates the amount of time, in minutes and
seconds, that remains in the highlighted
column of the profile before the next column
begins blinking.
you’ve chosen a fixed distance course. It
shows the time required to finish the program
at the speed you have set.
hour. The number that appears is determined
by dividing the total distance travelled by the
total accumulated workout time.
burned per minute.
METRICS Menu Description
CALS/HR Displays the approximate number of calories
burned per hour.
WATTS Shows your current energy expenditure level.
METS Shows the metabolic units associated with
your current energy expenditure level, derived
from the calories per minute value and
adjusted for your weight.
TAR G ET H EA R T
RATE
AVG HEART RATE Displays your average heart rate. The number
ELEVATION GAIN Presents the cumulative incline converted into
SHOW ALL Presents all the workout statistics in this
METRICS OFF Stops scrolling the workout statistics, found
Shows the current target heart rate setting.
is based on systematic sampling taken while
you are exercising. A chest strap will give you
a more accurate heart rate average than if you
occasionally use the touch-sensitive handrail
grips. If no heart rate reading occurred during
your exercise session, three dashes appear
when you change to this display.
elevation gained over the course of the
program.
menu in consecutive order.
in this table, across the message bar.
Owner’s Manual: Exercise Session 58
Page 61

Changing the Units of Measure Display
Adjusting Your Target Heart Rate
Display measurements can appear in either Metric or U.S.
Standard. To change this setting while exercising, perform
the following steps:
1. Press the OPTIONS key until UNITS appears.
2. Press OK.
3. The current setting appears in the display. Use the
navigational arrow keys to toggle between the two
options: U.S. or METRIC.
4. When you are ready, press OK to select the displayed
unit of measure. A message scrolls across the display
indicating that the unit of measure has changed as you
continue your exercise session.
CAUTION: If you change the units of measure, be sure to
check the speed settings on the treadmill to verify that it
is correct. Refer to Setting the Speed Limit.
Note: You can change the units of measure prior to
exercising. For more information, refer to Setting Display
Preferences Before Exercising.
Owner’s Manual: Exercise Session 59
Your target heart rate can be adjusted anytime during your
exercise session by taking the following steps:
1. Press the OPTIONS key until TARGET HR appears.
2. Press OK.
3. A blinking number appears indicating the suggested
target heart rate based on your age. Use the number keys
or navigational arrow keys to change the setting.
4. When you are ready, press OK. A message scrolls across
the display indicating your target heart rate zone as you
continue your exercise session.
Important: Consult your physician to determine the
appropriate target heart rate for your age and fitness
level. If your physician recommends a different target
heart rate than the one that appears on the display,
change the target heart rate to match your physician’s
recommendation. Do not exercise over the
recommended range.
Page 62

Changing Safety Code Protection
You can change the safety code setting while exercising, by
taking the following steps:
1. Press the OPTIONS key until SAFETY CODE appears.
2. Press OK.
3. The current setting appears in the display. Use the
navigational arrow keys to toggle between the two
options.
Setting Description
ENABLED Causes the safety code prompt to appear
prior to a workout and when returning from
pause mode.
DISABLED Does not require a safety code to operate.
CAUTION: Precor recommends that you leave the safety
code ENABLED. It is your responsibility to make sure
that no children or persons unfamiliar with its operation
are allowed on or near the treadmill. Do not assume the
unit is safe because of safety code protection.
4. When you are ready, press OK to accept the displayed
setting. A message scrolls across the display indicating
the condition of safety code protection as you continue
your exercise session.
Note: If you are moving from an ENABLED to a
DISABLED state, the display prompts you for the safety
code after you press OK. If you receive this prompt, press
the following numbers in sequence: 1, 2, 3, 4.
Owner’s Manual: Exercise Session 60
Page 63

Setting Your Pace
Using the Pacer Feature with Your Personal Best Record
When you exercise in a program, you can adjust your pace to
meet your fitness goals.
To set your pace, take the following steps:
1. Press PACE. A time display appears in the center display.
2. You can make pace entries using three different formats:
The pacer icon provides a visual cue to help you maintain
your personal best record. Your personal best is recorded
when you select a USER key and complete a distancebased program.
To use the pacer feature, take the following steps:
1. Select a USER key and the distance-based program
where your personal best is recorded.
Format What to do
Number
keypad
Navigational
arrow keys
SPEED arrow
keys
Press the appropriate numbers to enter the
new pace time, and then press OK.
Press the up or down arrow key to adjust the
pace in 100ths of a second.
Press the up or down SPEED arrow key to
adjust the pace in 10ths of a mile or
kilometer.
2. Press the METRICS key until PACER appears.
3. Press OK.
The pacer icon appears. A dot blinks in the center of the
icon. As you continue through the program, the pacing
dot indicates where the pacer icon should be to maintain
your personal best record.
4. If the pacing dot is ahead of the pacer icon, you need to
increase your speed. If the pacing dot is falling behind the
pacer icon, you are creating a new personal best record.
Important: When you make adjustments to the pace
display, the speed of the running belt and the SPEED
display change accordingly.
Note: If you have fallen far behind the pacing dot, to
where it cycles along the center display, it may look as if
the pacer icon is ahead of the pacing dot. Allow some
time for both pacing features to accurately appear on the
display.
Owner’s Manual: Exercise Session 61
Page 64

Advanced Programming and Troubleshooting
Certain features remain hidden and can only be accessed
using special key presses. Read this section if you want to:
• Set the pause or cool-down times
• Set the maximum speed limit
• View the odometer
• Display the number of hours you have used your treadmill
• View the software versions and part numbers
• Display the serial number
• Check the usage log
• Check the error log
Advanced Programming Tips
• Always start at the Precor banner.
• The advanced programming and diagnostic mode is
accessed by pressing the red STOP button at the Precor
banner. Any remaining key presses must occur quickly
and without pause.
• The QUICKSTART key is disabled while in programming
mode.
• The number keypad is disabled once you enter advanced
programming mode. You need to use the navigational
arrow keys to change the blinking prompts.
• Some keys provide the same functionality and can be
used interchangeably while in advanced programming
mode. These keys are:
OK and ENTER
PAUSE/RESET and the red STOP button
• The advanced programming prompts appear sequentially
and in a menu format. Pressing the arrow keys in the
navigational keypad moves you through the programs.
Press OK to choose or accept the displayed selection. To
return to the Precor banner without saving any changes,
press PAUSE/RESET or the red STOP button.
Owner’s Manual: Advanced Programming and Troubleshooting 62
Page 65

Changing Treadmill Settings
Through a specific set of number key presses, you can
customize the pause or cool down times and adjust the
maximum limit for the running belt speed.
To access the menu and change the settings, perform the
following steps:
1. At the Precor banner, press the following keys in
sequence without pausing between selections:
PAUSE/RESET, 5, 6, 7, 1
Numbers appear on the display as you press the
associated key.
Setting a Pause Time Limit
You can limit how long a user can pause while exercising on
the unit by entering a time between 1 and 10 minutes. For
example, if you set the pause time limit to 60 seconds, the
display automatically resets to the Precor banner if no key
press occurs within one minute.
2. At the SET MAX PAUSE TIME prompt, press OK. Use
the navigational arrow keys to change the time limit.
Choose between 1 and 10 minutes.
3. When you are ready, press OK to accept the displayed
setting and move to the next program. Or, press PAUSE/
RESET to return to the Precor banner.
Owner’s Manual: Advanced Programming and Troubleshooting 63
Page 66

Setting a Cool-Down Time Limit
You can limit how long a user cools down after exercising on
the unit by entering a time between 0 and 5 minutes.
Important: It is highly recommended that you set the cooldown period at or above three minutes. It takes time for a
user’s heart rate to return to a resting state after vigorous
exercise. An effective cool-down period also reduces the
amount of lactic acid in muscle tissue.
4. At the SET COOL DOWN TIME prompt, press OK. Use
the navigational arrow keys to display the available time
limits. The default setting is 5 minutes.
5. When you are ready, press OK to accept the displayed
setting and move to the next program. Or, press PAUSE/
RESET to return to the Precor banner.
Setting the Speed Limit
You can set a maximum speed for the treadmill in miles per
hour. This limits how fast the running belt moves and,
consequently, the number of speed settings that are
available to the user. The range of speeds available are 0.5 to
12 mph.
Note: The treadmill automatically converts the speed setting
to kilometers per hour if you change the UNITS to metric. To
change the units of measure, press the OPTIONS key. Refer
to Setting Display Preferences Before Exercising.
6. At the SET SPEED LIMIT prompt, press OK. Use the
navigational arrow keys to select the desired running belt
speed limit.
7. When you are ready, press OK to accept the displayed
setting and return to the SET MAX PAUSE TIME prompt.
Or, press PAUSE/RESET to return to the Precor banner.
Owner’s Manual: Advanced Programming and Troubleshooting 64
Page 67

Informational Displays
The treadmill provides information about its use (odometer
and hour meter), as well as software version, serial number,
usage log, and error codes. In general, you would only
access this information if directed to do so by Precor
Customer Support.
These instructions guide you through all eight informational
displays. Pressing the OK key moves you through the
displays. Pressing the navigational arrow keys cycles you
through the menu selection. To exit, press PAUSE/RESET at
any time.
Important: Quick access to the informational displays is
available if error messages have appeared on the display
and have been recorded in the error log. This feature is
usually reserved for service personnel. At the Precor
banner, press and hold PAUSE/RESET for 4 seconds. If
DIAGS - INFORMATION DISPLAY appears continue with
step 2 in Viewing the Odometer. If no errors are logged, you
return to the Precor banner when you release the key.
Viewing the Odometer
1. At the Precor banner, press the following keys in
sequence and without pause:
PAUSE/RESET, 6, 5
The numbers 6, 5 appear on the display as you press the
associated key.
Then DIAGS - INFORMATION DISPLAY scrolls across
the display followed by ODOMETER.
2. Press OK to view the odometer value (cumulative miles
traveled) or press the ▼ arrow key to move to the next
informational display.
Note: If the unit of measure is set to metric, then
kilometers appears instead of miles.
3. When you are ready, press OK to move to the next
display (hour meter).
Owner’s Manual: Advanced Programming and Troubleshooting 65
Page 68

Viewing the Hour Meter
HOUR METER scrolls across on the display.
4. Press OK to view the number of hours that the unit has
been in use or press the ▼ arrow key to move to the next
informational display.
The treadmill tracks the elapsed minutes, but the value
that appears is truncated to the nearest full hour.
5. When you are ready, press OK to move to the next
display (software version).
Viewing the Software Part Numbers
U-BOOT SW scrolls across the display.
6. Press OK to view the upper board boot software part
number (for example, 48996-100) or press the ▼ arrow
key to move to the next informational display.
7. When you are ready, press OK to move to the next
display (upper base application software part number).
U-BASE SW scrolls across the display.
8. Press OK to view the upper base application software
part number or press the ▼ arrow key to move to the next
informational display.
9. When you are ready, press OK to move to the next
display (lower board’s serial number).
LOWER SW scrolls across the display.
10.Press OK to view the lower board software version and
part number.
11.Write the numbers below. You will need these numbers
if you call Customer Support with questions. This
information will help rule out any software-related
problems:
UPPER BOOT SW: ___________________
UPPER BASE SW: ___________________
LOWER SW: ___________________
12.When you are ready, press OK to move to the next
display (serial number).
Owner’s Manual: Advanced Programming and Troubleshooting 66
Page 69

Viewing the Serial Number
SER. NUMBER scrolls across the display.
Viewing the Usage Log
USAGE LOG scrolls across the display.
13.When you are ready, press OK to view the serial number
or press the ▼ arrow key to move to the next
informational display. The serial number is helpful when
you contact Customer Support.
Note: If no serial number has been entered, then SER.
NUMBER NONE appears. Use the serial number found
on the front panel, near the power cord.
14.If you have not already done so, write the serial number
onto the Warranty Registration card. You can also
register online at www.precor.com.
15.When you are ready, press OK to move to the next
display (usage log).
16.When you are ready, press OK to view each program, the
number of times it has been used, and the associated
cumulative minutes. The usage log is helpful in
determining user preferences in program selection.
17. Use the navigational arrow keys to select and view usage
information about each specific program.
Note: For a list of programs, refer to PROGRAMS
Keypad and Table 3.
18.When you are ready, press OK to move to the next
display (error log).
Owner’s Manual: Advanced Programming and Troubleshooting 67
Page 70

Viewing the Error Log
ERROR LOG scrolls across the display.
19.When you are ready, press OK to determine how many
errors exist in the error log or press the ▼ arrow key to
cycle back to the ODOMETER display.
Note: If there are no errors in the log, you will see NO
ERRORS displayed. When you press OK, you return to
the ODOMETER display.
20.Press OK again to view the first entry in the error log.
21.To move through the error log, continue to press the ▼
arrow key. Each error code specifies when it occurred,
listing the error code, odometer, hour meter and current
(amps) values.
Note: Use the ▲ arrow key to review prior error log
entries. To exit the error log, press OK while the code
scrolls across the display.
22.Copy the error code information to paper so you can
provide it to Customer Support if needed. Be sure to
copy it exactly as shown.
23.When you no longer need the information in the error log,
press QUICKSTART for at least four seconds to erase it.
The message, NO ERRORS, appears on the display and
remains static to let you know when the error log has
been cleared.
Important: You cannot retrieve the error log once you
have cleared it. You may want to resolve any issues you
are experiencing with the treadmill before clearing the
error log.
24.When you are ready, press OK to cycle back to the
ODOMETER, or press PAUSE/RESET to return to the
Precor banner.
Owner’s Manual: Advanced Programming and Troubleshooting 68
Page 71

Troubleshooting Error Codes
If any error codes appear in the center display, turn the unit
Off and On. If the error continues to occur, call an authorized
service person for assistance. Refer to Obtaining Service.
Troubleshooting Heart Rate
Table 9 may help you understand and troubleshoot erratic
heart rate readings.
Important: A heart rate can only be detected when the
Precor heart rate receiver is properly installed in the display
and the treadmill is turned On. You must also wear the chest
strap or hold on to both touch-sensitive handrail grips.
To conduct electrical impulses from a user’s heart, both
touch-sensitive handrail grips must be grasped firmly for five
to ten seconds. Usually, the concentration of salts in a
person’s perspiration provides enough conductivity to
transmit a signal to the receiver in the display console.
However, because of body chemistry or erratic heartbeats,
some people cannot use the heart rate feature. A chest strap
may provide better results. Refer to the QuickStart Card for
proper placement of the chest strap.
Table 9. Erratic heart rate readings
What appears on
the display Cause What to Do
Nothing The heart rate
receiver is not
installed or it has
been disconnected.
— — — A signal is being
detected, but the
transmission requires
more time to establish
a heart rate.
Hr A signal is being
detected, but the
transmission requires
more
time to establish a
heart rate.
Pulsing HEART The LED heart blinks
when a heart beat is
detected.
To receive Customer
Support, refer to
Obtaining Service.
Be sure the chest strap
is in direct contact with
your skin.
If using the touchsensitive handrail grips,
use both hands and
make sure your hands
are moist, not dry.
If the LED is pulsating,
it indicates that the
heart rate equipment is
working properly.
Owner’s Manual: Advanced Programming and Troubleshooting 69
Page 72

Maintenance
DANGER
It is important to perform the minor maintenance tasks
described in this section. Failure to maintain the treadmill as
described here could void the Precor Limited Warranty.
To reduce the risk of electrical shock,
always unplug the unit from its power
source before cleaning it or
performing any maintenance tasks.
Inspection
Inspect the treadmill daily.
1. Look and listen for slipping belts, loose fasteners,
unusual noises, worn or frayed power cords, and any
other indications that the equipment may be in need of
service. If you notice any of these, obtain service.
Important: If you determine that the treadmill needs
service, make sure that the treadmill cannot be used
inadvertently. Turn the unit Off, and then unplug the
power cord from its power source. Make sure other
users know that the treadmill needs service.
2. Check for worn, frayed or missing safety lanyards.
Replace missing or worn safety lanyards immediately.
Do not exercise on the treadmill without attaching the
safety clip to your clothing.
To order parts or to contact a Precor authorized service
provider in your area, refer to Obtaining Service.
Cleaning the Equipment
Most of the working mechanisms are protected inside the
hood and base of the treadmill. However, for efficient
operation, the treadmill relies on low friction. To keep the
friction low, the unit’s running belt, staging platforms, and
internal mechanisms must be as clean as possible.
Precor recommends the treadmill be cleaned before and
after each workout. Use mild soap and water to dampen a
soft cloth and wipe all exposed surfaces. This helps remove
any dust or dirt.
CAUTION: Do not use any acidic cleaners. Doing so will
weaken the paint or powder coatings and void the Precor
Limited Warranty. Never pour water or spray liquids on any
part of the treadmill. Allow the treadmill to dry completely
before using.
Owner’s Manual: Maintenance 70
Page 73

Frequently vacuum the floor underneath the unit to prevent
the accumulation of dust and dirt, which can affect the
smooth operation of the unit. Use a soft nylon scrub brush to
clean the running belt.
Storing the Chest Strap
Store the chest strap in a place where it remains free of dust
and dirt such as, in a closet or drawer. Be sure to protect
the chest strap from extremes in temperature. Do not store it
in a place that may be exposed to temperatures below 32° F
(0° C).
To clean the chest strap, use a sponge or soft cloth
dampened in mild soap and water. Dry the surface
thoroughly with a clean towel.
Checking the Alignment of the Running Belt
Proper belt alignment allows the belt to remain centered and
ensures smooth operation. Realigning the belt takes a few
simple adjustments. If you are unsure about this procedure,
call Precor Customer Support. Refer to Obtaining Service.
CAUTION: Special care must be taken when aligning the
running belt. Turn Off the treadmill while adjusting or
working near the rear roller. Remove any loose clothing
and tie back your hair. Be very careful to keep your fingers
and any other object clear of the belt and rollers,
especially in front of the roller and behind the deck. The
treadmill will not stop immediately if an object becomes
caught in the belt or rollers.
1. The treadmill has adjustable rear feet. Make sure that the
running surface is level. If the treadmill is placed on an
uneven surface, adjusting the rear feet can help, but will
not compensate for extremely uneven surfaces.
2. Turn the unit On.
3. Stand beside the treadmill and press QUICKSTART.
Owner’s Manual: Maintenance 71
Page 74

4. If needed, enter the safety code by pressing the following
number keys in sequence: 1, 2, 3, 4.
The running belt starts automatically after a 3-second
countdown appears on the display.
5. Press the SPEED up arrow key until the display shows a
speed of 3 mph (5 kph).
CAUTION: If you hear any chafing or the running belt
appears to be getting damaged, stop the running belt
immediately by pressing the red STOP button.
Contact Precor Customer Support.
6. Walk around to the rear of the unit and observe the belt
for a few minutes. The belt should be centered on the
running belt. If the belt drifts off center, you must make
adjustments. Refer to Adjusting the Running Belt.
Important: Failure to align the belt may cause the belt to
tear or fray, which is not covered by the Precor Limited
Warranty.
7. To stop the running belt, press the red STOP button.
8. Turn the treadmill Off.
Adjusting the Running Belt
If you are unsure about adjusting the running belt, call Precor
Customer Support. Refer to Obtaining Service.
CAUTION: For your safety, use the power switch to turn Off
the treadmill before making any adjustments. Do not
adjust the running belt when someone is standing on the
unit.
1. Locate the right belt adjustment bolt in the rear end
cap of the treadmill. Refer to Diagram 18.
Diagram 18: Location of the adjustment bolt
To determine left and right, stand at the rear of the
treadmill and face the display. Make all belt adjustments
on the right rear corner bolt using the hex key provided.
Owner’s Manual: Maintenance 72
Page 75

• If the belt is off center to the LEFT, turn the adjusting
bolt ¼ turn counterclockwise, which moves the
running belt to the right.
• If the belt tracks off center to the RIGHT, turn the bolt
¼ turn clockwise; this moves the belt to the left.
Important: Do not turn the adjusting bolt more than ¼
turn at a time. Overtightening the bolt can damage the
treadmill.
2. Recheck the alignment of the running belt by repeating
the steps found in Checking the Alignment of the
Running Belt.
Long-Term Storage
When the treadmill is not in use for any length of time, turn it
Off. Make sure that the power cord is unplugged from its
power source and is positioned so that it will not become
damaged or interfere with people or other equipment.
Owner’s Manual: Maintenance 73
Page 76

Precor Residential Equipment Limited Warranty
PLEASE READ THESE WARRANTY TERMS AND CONDITIONS
CAREFULLY BEFORE USING YOUR PRECOR INCORPORATED
PRODUCT. BY USING THE EQUIPMENT, YOU ARE
CONSENTING TO BE BOUND BY THE FOLLOWING
WARRANTY TERMS AND CONDITIONS.
Limited Warranty
Precor Incorporated warrants all new Precor products to be free
from defects in materials and manufacture for the warranty period
set forth below. The warranty period commences on the invoice
date of original purchase. This warranty applies only against defects
discovered within the warranty period and extends only to the
original purchaser of the product. Parts repaired or replaced under
the terms of this warranty will be warranted for the remainder of the
original warranty period only. To make claim under warranty, the
buyer must notify Precor or their authorized Precor dealer within 30
days after the date of discovery of any nonconformity and make the
affected product available for inspection by Precor or its service
representative. Precor’s obligations under this warranty are limited
and set forth below.
Warranty Periods and Coverage
All residential products and commercial products used in the home
are warranted for the following periods:
• Lifetime frame and welds
• 10 years parts and wear items
• 1 year labor
• Coverage for options and accessories defined below.
Options / Accessories
Many options or accessories have components that are connected
internally or mounted inside the electronic console. The following
guidelines determine the warranty for these components. If the
internal components are installed by the factory or by an authorized
dealer as part of the original sale and delivery, they have a warranty
that is identical to the warranty of the equipment in which they are
connected or mounted. If the internal components are not installed
by the factory or by an authorized dealer as part of the original sale
and delivery, they have a 90-day parts and labor limited warranty. All
components that are not internally connected have 90-day parts
only limited warranty. Satisfactory proof of purchase is required in
all cases.
Conditions and Restrictions
This warranty is valid only in accordance with the conditions set
forth below:
1. The warranty applies to the Precor product only while:
a. It remains in the possession of the original purchaser and
proof of purchase is demonstrated
b. It has not been subjected to accident, misuse, abuse,
improper service, or non-Precor modifications
c. Claims are made within the warranty period
2. This warranty does not cover damage or equipment failure
caused by electrical wiring not in compliance with electrical
codes or Precor owner’s manual specifications, or failure to
provide reasonable and necessary maintenance as outlined in
the owner’s manual.
Owner’s Manual: Precor Residential Equipment Limited Warranty 74
Page 77

3. Warranty of all Precor products applies to residential use only
and is void when products are used in a nonresidential
environment or installed in a country other than where sold.
4. Except in Canada, Precor does not pay labor outside the United
States.
5. Warranties outside the United States and Canada may vary.
Please contact your local Dealer for details.
This limited warranty shall not apply to:
1. Software version upgrades
2. Cosmetic items, including, but not limited to the following: grips,
seats, and labels.
3. Repairs performed on Precor equipment missing a serial number
or with a serial tag that has been altered or defaced.
4. Service calls to correct installation of the equipment or instruct
owners on how to use the equipment.
5. Pickup, delivery, or freight charges involved with repairs.
6. Any labor costs incurred beyond the applicable labor warranty
period.
Disclaimer and Release
The warranties provided herein are the exclusive warranties given
by Precor and supersede any prior, contrary or additional
representations, whether oral or written. ANY IMPLIED WARRANTIES,
INCLUDING THE WARRANTY OF MERCHANTABILITY OR FITNESS
FOR A PARTICULAR PURPOSE THAT APPLY TO ANY PARTS
DESCRIBED ABOVE ARE LIMITED IN DURATION TO THE PERIODS OF
EXPRESS WARRANTIES GIVEN ABOVE FOR THOSE SAME PARTS.
PRECOR HEREBY DISCLAIMS AND EXCLUDES THOSE WARRANTIES
THEREAFTER
implied warranty lasts, so the above limitation may not apply to you.
. Some states do not allow limitation on how long an
PRECOR ALSO HEREBY DISCLAIMS AND EXCLUDES ALL OTHER
OBLIGATIONS OR LIABILITIES, EXPRESS OR IMPLIED, ARISING BY
LAW OR OTHERWISE, WITH RESPECT TO ANY NONCONFORMANCE
OR DEFECT IN ANY PRODUCT, INCLUDING BUT NOT LIMITED TO: (A)
ANY OBLIGATION, LIABILITY, RIGHT, CLAIM OR REMEDY IN TORT,
WHETHER OR NOT ARISING FROM THE NEGLIGENCE OF PRECOR
OR ITS SUPPLIERS (WHETHER ACTIVE, PASSIVE OR IMPUTED); AND
(B) ANY OBLIGATION, LIABILITY, RIGHT, CLAIM, OR REMEDY FOR
LOSS OF OR DAMAGE TO ANY EQUIPMENT.
This disclaimer and
release shall apply even if the express warranty set forth above fails
of its essential purpose.
Exclusive Remedies
For any product described above that fails to conform to its
warranty, Precor will provide, at their option, one of the following:
(1) repair; (2) replacement; or (3) refund of the purchase price.
Precor Limited Warranty service may be obtained by contacting the
authorized dealer from whom you purchased the item. Precor
compensates Servicers for warranty trips within their normal service
area to repair equipment at the owner’s location. You may be
charged a trip charge outside the service area.
THE SOLE AND EXCLUSIVE REMEDIES OF THE BUYER FOR ANY
BREACH OF WARRANTY.
THESE SHALL BE
Owner’s Manual: Precor Residential Equipment Limited Warranty 75
Page 78

Exclusion of Consequential and Incidental
Damages
PRECOR AND/OR ITS SUPPLIERS SHALL HAVE NO OBLIGATION OR
LIABILITY, WHETHER ARISING IN CONTRACT (INCLUDING
WARRANTY), TORT (INCLUDING ACTIVE, PASSIVE, OR IMPUTED
NEGLIGENCE AND STRICT LIABILITY), OR OTHERWISE, FOR
DAMAGE TO THE EQUIPMENT, PROPERTY DAMAGE, LOSS OF USE,
REVENUE OR PROFIT, COST OF CAPITAL, COST OF SUBSTITUTE
EQUIPMENT, ADDITIONAL COST INCURRED BY BUYER (BY WAY OF
CORRECTION OR OTHERWISE) OR ANY OTHER INCIDENTAL,
SPECIAL, INDIRECT, OR CONSEQUENTIAL DAMAGES, WHETHER
RESULTING FROM NONDELIVERY OR FROM THE USE, MISUSE OR
INABILITY TO USE THE PRODUCT.
above warranty fails of its essential purpose and regardless of
whether such damages are sought for breach of warranty, breach of
contract, negligence, or strict liability in tort or under any other legal
theory. Some states do not allow the exclusion or limitation of
incidental or consequential damages, so the above limitation might
not apply.
This warranty gives you specific legal rights, and you may also have
other rights, which vary state to state.
This exclusion applies even if the
Effective 01 January, 2003
P/N 36287-110
Owner’s Manual: Precor Residential Equipment Limited Warranty 76
Page 79

Notes:
Owner’s Manual 77
Page 80

Notes:
Owner’s Manual 78
Page 81

9.35 Low Impact Treadmill
Product Specifications
Length: 79 in (204 cm)
Width: 34 in (86 cm)
Height: 56 in (142 cm)
Weight: 335 lb (152 kg)
Shipping weight: 400 lb (182 kb)
Running surface: 22 in x 56 in
Motor: 3.0 hp continuous duty
Power: 120 VAC, 50/60Hz
Speed: 0.5–12 mph
Incline: -2%–15% grade
Frame: Powder-coated steel
Regulatory Approvals: FCC, ETL, E N957
Product Features
CSAFE Compatible
QUICKSTART™
SmartRate
®
Heart Rate Telemetry
(chest strap included)
Touch Heart Rate
User IDs (4)
Safety Code
(56 cm x 142 cm)
240 VAC, 50/60 Hz
(0.8–20 kph)
Programs
Manual Weight Loss
Interval Weight Loss
1-1 Interval Weight Loss HRC*
1-2 Interval Calorie Goal
1-3 Interval Performance
Custom Interval Track
Variety 5K
Random 10K
Walk in the Park 1 Mile
Distance Goal 2 Mile
1 Custom
2 Custom
✝
✝
Fitness Test*
Heart Rate
Basic HRC*
Weight Loss HRC*
Heart Health HRC*
Endurance HRC*
Speed HRC*
✝ Appears when you select a USER key.
Electronic Readouts
% Complete Personal Best Record*
Age Profile
Average Heart Rate* Program Name
Average Speed Segment Time Remaining
Calories SmartRate*
Calories per Hour Speed
Calories per Minute Target Heart Rate
Distance Time
Fitness Test Score Time Elapsed
Finish Time Time in Zone*
Goal Time Remaining
Heart Rate* Units
Incline User Name
Language Watts
Maximum Heart Rate* Weight
METS Workout Summary
Pace
* Use of chest strap or touch-sensitive handrail
grips is required.
Page 82

Precor Incorporated
20031 142nd Ave NE
P.O. Box 7202
Woodinville, WA USA 98072-4002
1-800-347-0404
Precor, C, CrossRamp, EFX, M, Move Beyond, and SmartRate are registered trademarks of Precor
Incorporated. Crosstrainer, QuickStart, and StretchTrainer are trademarks of Precor Incorporated.
Copyright 2007 Precor Incorporated.
Specifications subject to change without notice.
www.precor.com
NOTICE:
Precor is widely recognized for its innovative, award winning designs of exercise equipment.
Precor aggressively seeks U.S. and foreign patents for both the mechanical construction and the
visual aspects of its product design. Any party contemplating the use of Precor’s product designs
is hereby forewarned that Precor considers the unauthorized appropriation of its proprietary rights
to be a very serious matter. Precor will vigorously pursue all unauthorized appropriation of its
proprietary rights.
9.35 OM 49758-101, en
Warranty # 36287-110, en
Registration Card# 45623-102, en
09 April 2007
Page 83

QUICKSTART™
9.35
CAUTION: Before using the treadmill, read all these
instructions. Failure to do so may result in serious injury.
• Do not allow children or those unfamiliar with its
operation, on or near this equipment.
• Before beginning any fitness program, see
your physician for a thorough physical
examination. Seek advice from your physician
to learn the target heart rate appropriate for
your fitness level.
• At the beginning of a workout, straddle
the belt by placing your feet firmly on
the right and left staging platforms.
• Always face the display and use
the handrail for balance. Never
attempt to turn around on the
treadmill while the running belt
is moving.
• If you feel pain, faintness, or
dizziness, stop exercising
immediately.
Workout Tips
Use the Safety Clip
Always attach the safety clip
to your clothing before each
workout. A tug on the lanyard
trips the safety switch inside
the display and stops the
running belt. If the safety
switch trips while you are
exercising, the treadmill retains
your workout statistics and
enters pause mode. To resume
your workout, reattach the
magnetic safety key to the
console and attach the clip to
your clothing. Enter the
password, and then
press QUICKSTART.
• Before and after a workout, gently stretch
your lower body and back to help prevent
stiffness or soreness.
• At the beginning of a workout, take several
minutes to bring your heart rate into your
target zone (shown in Diagram D on the
other side of this card).
• To display your heart rate, wear a chest
strap or use both hands to grasp the touchsensitive handrail grips.
• Incorporate a cool-down period into your
workout to help lower your heart rate and
minimize muscle stiffness and soreness.
Begin Your Workout with QUICKSTART
To begin exercising immediately without personalizing your exercise
session, take the following steps.
1. Turn On the treadmill, using the power switch located beneath the
front of the unit, near the power cord.
2. Step on the treadmill. Face the display and straddle the running belt.
3. Attach the safety clip to your clothing. Make sure the magnetic
safety key is in position next to the red STOP button.
4.
Hold on to the handrail with one hand and press QUICKSTART with
the other.
manual.
A 3-second countdown appears, and then the running belt starts
moving. The Manual Program begins.
5. Step on to the running belt with the speed at 1 mph (1 kph), and
begin exercising.
• To increase or decrease the incline or speed, use the INCLINE or
SPEED arrow keys.
• To pause, hold onto a handrail with one hand while you press the
PAUSE/RESET key with the other.
6. To adjust the time goal, use the TIME +/- key. When the blinking
time prompt appears, use the number keypad to adjust the time.
Press OK.
Note: When you reach your time goal, you automatically enter a
cool-down period.
7. Complete the cool-down period and a workout summary, which
presents your exercise session statistics, appears. To review your
cumulative distance and average speed, press the right selection
key. The cumulative number of calories burned appears in an upper
display.
8. Remove the safety clip from your clothing and hold on to a handrail
as you step off the treadmill.
9. To prevent unauthorized use, turn the treadmill Off.
Note: To personalize your exercise experience, refer to Workout
Options in the owner’s manual.
If needed, enter the password. Refer to your owner’s
9.35 QSC 49761-101, 09 April 2007, en
Page 84

Choose a Program
• Determine your level of fitness: beginner,
intermediate, or advanced.
• Determine your immediate goal: endurance
training, cardio-conditioning, or weight loss.
If you are a beginner, start a cardio-conditioning
program to slowly adjust your body to a comfortable
level of exercise. Over a recommended 8-week
period, you will increase your endurance and strength
while improving flexibility.
If you have been exercising and feel that you have
reached an intermediate or advanced fitness level, you
probably have established goals for yourself.
For all fitness levels, plan to exercise at a comfortable
pace for 20 to 30 minutes a day. Wear a chest strap
to monitor your heart rate. Supplement your plans
with fitness workouts from the Precor web site
(www.precor.com). The Precor web site also provides
expert advice to help you reach your fitness goals.
Monitor Your Heart Rate
The SmartRate and heart rate displays provide visual
cues that help you adjust your fitness routine to reach
your goals. Use these features to keep your heart rate
within the target zones.
Wear a Chest Strap
During a workout, the heart rate features appear on
the display when you wear a chest strap. To receive
an accurate reading, the chest strap needs to be in
direct contact with your skin. After you put on the
chest strap, face the display console for a minimum of
15 seconds. This allows the receiver in the console to
recognize the signal from the chest strap.
1. Carefully dampen the back of the strap with tap
water (Diagram A).
Important: Do not use deionized water. It does
not have the proper minerals and salts to conduct
electrical impulses.
2. Adjust the strap and fasten it around your chest.
The strap should feel snug, not restrictive
(Diagram B).
3. Make sure that the chest strap is right side up, lies
horizontally across your chest, and is centered in
the middle of your chest (Diagram C).
Diagram A Diagram B Diagram C
When these steps are complete, you are ready to view
your heart rate!
Touch-Sensitive Handrail Grips
Several Precor products incorporate touch-sensitive
heart rate grips on the handrails. If you prefer to use
the touch-sensitive handrail grips, use both hands.
Make sure both hands are moist (not dry) when you
grasp the touch-sensitive handrail grips.
SmartRate® Features
When you begin an exercise session, a blinking
segment in the SmartRate display appears if you
entered your age during the setup phase. The blinking
segment indicates the current zone of your heart rate.
The calculation used for the heart rate target zone is
your maximum aerobic heart rate:
(220 minus your age) multiplied by a percent.
For the ideal weight loss range, your heart rate should
remain between 55% and 70% of your maximum
aerobic heart rate. To improve your overall
cardiovascular and respiratory fitness level, maintain
your heart rate between 70% and 85% of your
maximum aerobic heart rate.
For the greatest benefits, maintain your heart rate in
either zone for 30 minutes or more at least three times
a week.
CAUTION: Your heart rate should never exceed
85% of your maximum aerobic heart rate or go
above your target zone (Diagram D).
Heart Rate Target Zones
200
190
180
170
160
R
150
140
130
120
Your Heart Rate
110
100
e
R
e
c
90
80
70
20 25 30 35 40 45 50 55 60 65 70 75
c
o
m
m
e
n
d
e
d
C
a
r
d
i
o
v
a
s
c
u
l
a
r
Z
o
n
o
m
m
e
n
d
e
d
W
e
i
g
h
t
e
L
o
s
s
Z
o
n
e
High
Peak
Cardio
Fatburn
Warmup
Yo u r Ag e
Diagram D
Cool Down After Your Workout
Cooling down is an important aspect of your workout
because it helps reduce muscle stiffness and
soreness by transporting excess lactic acid out of the
working muscles. Cooling down for at least three
minutes helps provide a smooth transition that allows
your heart rate to return to its normal, non-exercising
state.
Precor Incorporated
20031 142nd Avenue NE
Woodinville, WA USA 98072-4002
©2007 Precor Incorporated
P.O. B o x 72 0 2
www.precor.com
HR INFO 48140-104
Page 85

9.3x
Assembly Guide
Low-Impact Treadmills
Page 86

Page 87

Thank you for choosing Precor. For proper installation, please read this guide
thoroughly and follow the assembly instructions. If you do not assemble the
treadmill according to these guidelines, you could void the Precor Limited
Warranty.
Obtaining Service
You should not attempt to service the treadmill except for minor belt adjustments
and maintenance as described in the owner’s manual. Should you need more
information regarding customer support numbers or a list of Precor authorized
service centers, visit the Precor website at www.precor.com/cons.
Unpacking the Equipment
The treadmill is carefully tested and inspected before shipment. The unit is shipped
in one box. Ask for help from two or more people to unpack and assemble the
treadmill. If any items are missing, contact your dealer.
Required Tools
• Phillips-head screwdriver
• Crescent wrench
• Bubble level
• Wire cutter
Installation Requirements
Follow these installation requirements when assembling the unit:
• Assemble the unit near the location where you plan to use it.
• Provide ample space around the unit.
Open space around the unit allows for easier access.
• Set up the unit on a solid, flat surface.
A smooth, flat surface under the unit helps keep it level. A level unit has fewer
malfunctions.
• Open the box and assemble the components in the sequence presented
in this guide.
• Obtain assistance.
Ask another capable adult for assistance during the assembly process.
• Use your fingers or the appropriate tools to insert fasteners.
Proper alignment helps alleviate crossthreading. Do not fully wrench tighten
fasteners until instructed to do so.
Important: When wrench tightening, the head of the fastener should be flush
with the product. If it is not, cross-threading has occurred. Do not attempt to
rework the assembly as more damage to the unit will occur. Contact
Customer Support. Refer to Obtaining Service.
• If you plan to move the unit, obtain help and use proper lifting techniques.
Grasp the one-piece plastic end cap to lift the treadmill and roll it on its front
wheels. Do not grasp any other plastic part while lifting or moving the unit. The
other plastic pasts are not reinforced and they may break.
9.3x Low-Impact Treadmills Assembly Guide 1
Page 88

Hardware Kit (not to scale)
Fasteners Quantity
(A) Socket head screw (¾-inch) 8
(B) Buttonhead screw (¾-inch) 6
(C) Socket head screw (⁷⁄₈-inch) 1
(D) Washer (¼-inch) 1
(E) Socket head screw (2-inch) 2
1 – Magnetic safety key and safety clip (H)
2 – Water bottle holder (J)
(F) Phillips-head screw (³⁄₈-inch) 2
1 – Console cover (G)
Hex key
1 – ³⁄₁₆
1 – ¼ Hex key
9.3x Low-Impact Treadmills Assembly Guide 2
Page 89

Assembly Steps
Left Upright
Support
CAUTION: The location of the On/Off switch is beneath the
cutout on the base frame. Make sure the power switch is in the
Off position. Make sure the power cord is disconnected from its
power source.
Loosen, but do not remove, the two front fasteners and two side
fasteners on the hood using the ³⁄₁₆-inch hex key. Remove the hood
and set it aside.
Place the left upright support into the base frame side bracket. Ask
your assistant to insert a socket head screw (A) into the top
mounting hole on the front panel. Thread the screw so the other
mounting holes line up. Then, secure the upright support to the side
bracket using three socket head screws (A). Finger tighten.
Attach the right upright support by following the same procedure as
step 2 using four socket head screws (A). Finger tighten.
Right Upright
Support
9.3x Low-Impact Treadmills Assembly Guide 3
Page 90

Interior rail
Unwrap the cable and remove the kinks. Ask your assistant to hold
the handrail extensions while you feed the cable inside the right
upright support. Make sure the cable connector rests on the floor at
the base of the upright support.
CAUTION: Be aware of the handrail extensions when you are
working around the front of the unit. It is easy to bump your
head or sustain other injuries if you ignore the location of the
handrail extensions.
Have your assistant hold the handrail assembly above the upright
supports. Tip the assembly forward so the mounting brackets slide
along the interior rails inside the upright supports. Align the
mounting holes and insert six buttonhead screws (B). For easier
assembly, insert the top rear fasteners first. Then, lift the handrail
extensions and insert the bottom front fasteners. Align the top front
mounting holes and thread the two remaining fasteners. Finger
tighten.
Important: Make sure the fasteners do not pinch the cable. Cables
damaged by improper installation will not be covered by the Precor
Limited Warranty.
Pull the cable connector through the hole in the right upright
support.
Connect the display cable to its receptacle on the electronics
board. The tab on the cable connector faces the front of the
treadmill. An audible click is heard when the cable is properly
attached.
Note: Place the excess cable inside the upright support.
Tighten all mounting screws.
a. Start at the base and use the ¼-inch hex key to alternately tighten
the eight fasteners that secure the upright supports to the base
assembly. Refer to steps 2 and 3.
b. Use the ³⁄₁₆-inch hex key to wrench tighten the six screws that
secure the handrail extensions to the upright supports. Refer to
step 5.
9.3x Low-Impact Treadmills Assembly Guide 4
Page 91

Display support bar
Center
handrail
Position the hood over the running belt so you can slide it through
the upright supports from the rear. Align the hood with its four
fasteners. Use the ³⁄₁₆-inch hex key to wrench tighten the two side
fasteners before wrench tightening the two fasteners that secure the
front of the hood.
Install the display console.
a. Cut the wire ties that secure the cables to the center handrail and
display support bar.
b. Ask your assistant to stand on the running belt and hold the
display console. The display label must face the rear of the
treadmill. Tilt the display console so the cables are easily
accessible.
c. Stand to the side of the treadmill and connect each cable to its
appropriate receptacle.
Note: The 9.31 has one cable connection. The 9.33 and 9.35
have two cable connections.
9.3x Low-Impact Treadmills Assembly Guide 5
Page 92

Position the display console so the half-round cutout rests on the
display support bar. Place any excess cables inside the display
console. Tip the display console up so its base aligns with the
mounting bracket on the center handrail.
CAUTION: Have your assistant hold the display console until it
is fastened to the center handrail and display support bar. If it
drops, cables will stretch or break and damage will occur to the
electronic boards. The Precor Limited Warranty does not cover
damage caused during installation.
Secure the display console to the display support bar with two
socket head screws (E). Wrench tighten using a ³⁄₁₆-inch hex key.
Once the display console is secure, your assistant can stop
supporting it.
Secure the display console to the center handrail with one socket
head screw (C) and washer (D). Wrench tighten using the ³⁄₁₆-inch
hex key.
Attach the console cover (G) by inserting the bottom two tabs.
Rotate the cover up and apply pressure so the top tab snaps into
place.
Note: If you need to remove the cover, apply pressure to the thumb
tab and rotate the cover out.
Place the two water bottle holders (J) onto their brackets and secure
each with a buttonhead screw (F). Tighten each screw with a
Phillips-head screwdriver.
Place the magnetic safety key (H) into the cutout on the display
console.
9.3x Low-Impact Treadmills Assembly Guide 6
Page 93

Before using the unit, make sure it is level. If adjustments are needed,
Adjustable
rear foot
adjust one rear foot at a time. Do not raise the unit more than ¾ inch
(2 cm) from the floor.
a. Ask a capable assistant to lift the rear portion of the treadmill (using
proper lifting techniques).
b. Loosen the upper lock nut with a crescent wrench and rotate the rear
feet as needed.
c. Retighten the lock nut and lower the treadmill to the floor.
Check the alignment and adjust the running belt. For instructions, refer to
Checking the Alignment and Adjusting the Running Belt. If you wish to
test the heart rate feature, refer to the owner’s manual.
9.3x Low-Impact Treadmills Assembly Guide 7
Page 94

Checking the Alignment and Adjusting the Running Belt
Adjustment bolt location
Proper belt alignment allows the belt to remain centered and ensures smooth
operation. Realigning the belt takes a few simple adjustments. If you are unsure
about this procedure, call Precor Customer Support. Refer to Obtaining Service.
To check the alignment:
CAUTION: Special care must be taken when aligning the running belt. Turn Off
the treadmill while adjusting or working near the rear roller. Remove any
loose clothing and tie back your hair. Be very careful to keep your fingers and
any other object clear of the belt and rollers, especially in front of the roller
and behind the deck. The treadmill will not stop immediately if an object
becomes caught in the belt or rollers.
1. The treadmill has adjustable rear feet. Make sure that the running surface is
level before aligning or adjusting the running belt. Refer to step 18.
2. Connect the power plug to a dedicated, 15-amp power source and turn
the unit On.
3. Stand beside the treadmill and press QUICKSTART.
4. If needed, enter the password. Refer to your owner’s manual. The running belt
starts automatically after a 3-second countdown appears on the display.
5. Press the SPEED up arrow key until the display shows a speed of 3 mph
(5 kph).
CAUTION: If you hear any chafing or see that the running belt appears to
be getting damaged, stop the running belt immediately by pressing the
red STOP button. Contact Precor Customer Support.
6. Walk around to the rear of the unit and observe the belt for a few minutes. The
belt should run centered along the running bed. If the belt drifts off center, you
will need to make adjustments. Refer to the next section.
Important: If the belt needs alignment, make the adjustments at once. Failure
to align the belt may cause the belt to tear or fray, which is not covered by the
Precor Limited Warranty.
To adjust the running belt:
If you are unsure about adjusting the running belt, contact Precor Customer
Support. Refer to Obtaining Service.
CAUTION: For your safety, use the power switch to turn Off the treadmill
before making any adjustments. Do not adjust the running belt when
someone is standing on the unit.
1. Locate the right belt adjustment bolt in the rear end cap of the treadmill.
To determine left and right, stand at the rear of the treadmill and face the
display. Make all belt adjustments on the right rear corner bolt using the
¼-inch hex key.
• If the belt is off center to the LEFT, turn the adjusting bolt ¼ turn
counterclockwise, which moves the running belt to the right.
• If the belt is off center to the RIGHT, turn the bolt ¼ turn clockwise, which
moves the belt to the left.
Important: Do not turn the adjusting bolt more than ¼ turn at a time.
Overtightening the bolt can damage the treadmill.
2. Recheck the alignment of the running belt.
7. To stop the running belt, press the red STOP button.
8. Turn the treadmill Off.
9.3x Low-Impact Treadmills Assembly Guide 8
Page 95

Page 96

Precor Incorporated
20031 142nd Avenue NE
P.O. Box 7202
Woodinville, WA USA 98072-4002
©2007 Precor Incorporated
www.precor.com
9.3x Online AG 49760-403
23 July 2007
 Loading...