

Page 1

Manual
Treadmill
R
USA
Owner’s Manual
Assembly and Operation
Page 2

R
USA
Manual
Treadmill
CAUTION: Before beginning
any fitness program, you
should have a complete
physical examination by your
physician.
Thank you for purchasing one of the innovative additions to the famous Precor
treadmill line. The 903 Manual Treadmill provides you with a safe and effective
workout.
Before using the 903 Manual Treadmill, we urge you to familiarize yourself with
the entire Owner’s Manual. Whether you are a beginner or exercise on
treadmills regularly, understanding this manual will help you use the 903
treadmill safely and successfully.
Safety Information
Please review and observe the following safety guidelines:
• Read the Owner’s Manual and follow all instructions.
• Assemble and operate the 903 treadmill on a solid, level surface. Locate
the treadmill a few feet from walls or furniture. Keep the area behind the
treadmill clear.
• Do not allow children on or near the 903 treadmill. Do not leave children
unsupervised around the treadmill.
• Check the 903 treadmill before each use. Be sure all assembly bolts and
T-knobs are tightened and secure. Do not use the treadmill if it is not
completely assembled or is damaged in any way.
• Keep hands away from the flywheel and other moving parts.
• Wear proper exercise clothing and shoes for your workout—no loose
clothing. Do not wear shoes with heels or leather soles. Check the soles of
your shoes and remove any embedded stones. Tie long hair back.
• Use care and hold onto the handrail when getting on or off the 903
treadmill.
• Keep your body and head facing forward. Do not attempt to turn around
on the treadmill when the belt is moving.
• Do not rock the unit. Do not stand or climb on the handrail. Never place
liquids on any part of the treadmill.
• Do not overexert yourself or work to exhaustion.
• Stop your workout immediately if you feel any pain or abnormal
symptoms, and consult your physician.
Precor treadmills are designed for the enjoyment of the serious runner as well
as the dedicated walker. By following the above precautions and using good
common sense, you will have many safe and pleasurable hours of healthful
exercise with your Precor treadmill.
page 2
Page 3

Table of Contents
Unpacking the 903 Manual Treadmill......................................................... 4
Assembling the 903 Manual Treadmill ..................................................... 5
Installation Requirements.................................................................... 5
Assembly Instructions......................................................................... 5
Adjusting the Elevation Tube ............................................................... 7
Checking the Alignment of the Running Belt ....................................... 9
Using the Precor 903 Manual Treadmill. ................................................... 10
Beginning Your Workout ..................................................................... 10
Ending Your Workout .......................................................................... 10
Working Out on the 903 Treadmill....................................................... 10
Adjusting the Resistance Level ............................................................ 12
General Aerobic Training Information ....................................................... 13
How Hard Should I Exercise? .............................................................. 14
How Long Should I Exercise?.............................................................. 15
How Often Should I Exercise? ............................................................. 15
Maintaining the 903 Manual Treadmill ..................................................... 16
Cleaning the Treadmill ......................................................................... 16
Storing the Treadmill ........................................................................... 16
Aligning the Running Belt .................................................................... 17
Lubricating the Running Belt ............................................................... 19
Obtaining Service ................................................................................ 19
page 3
Page 4
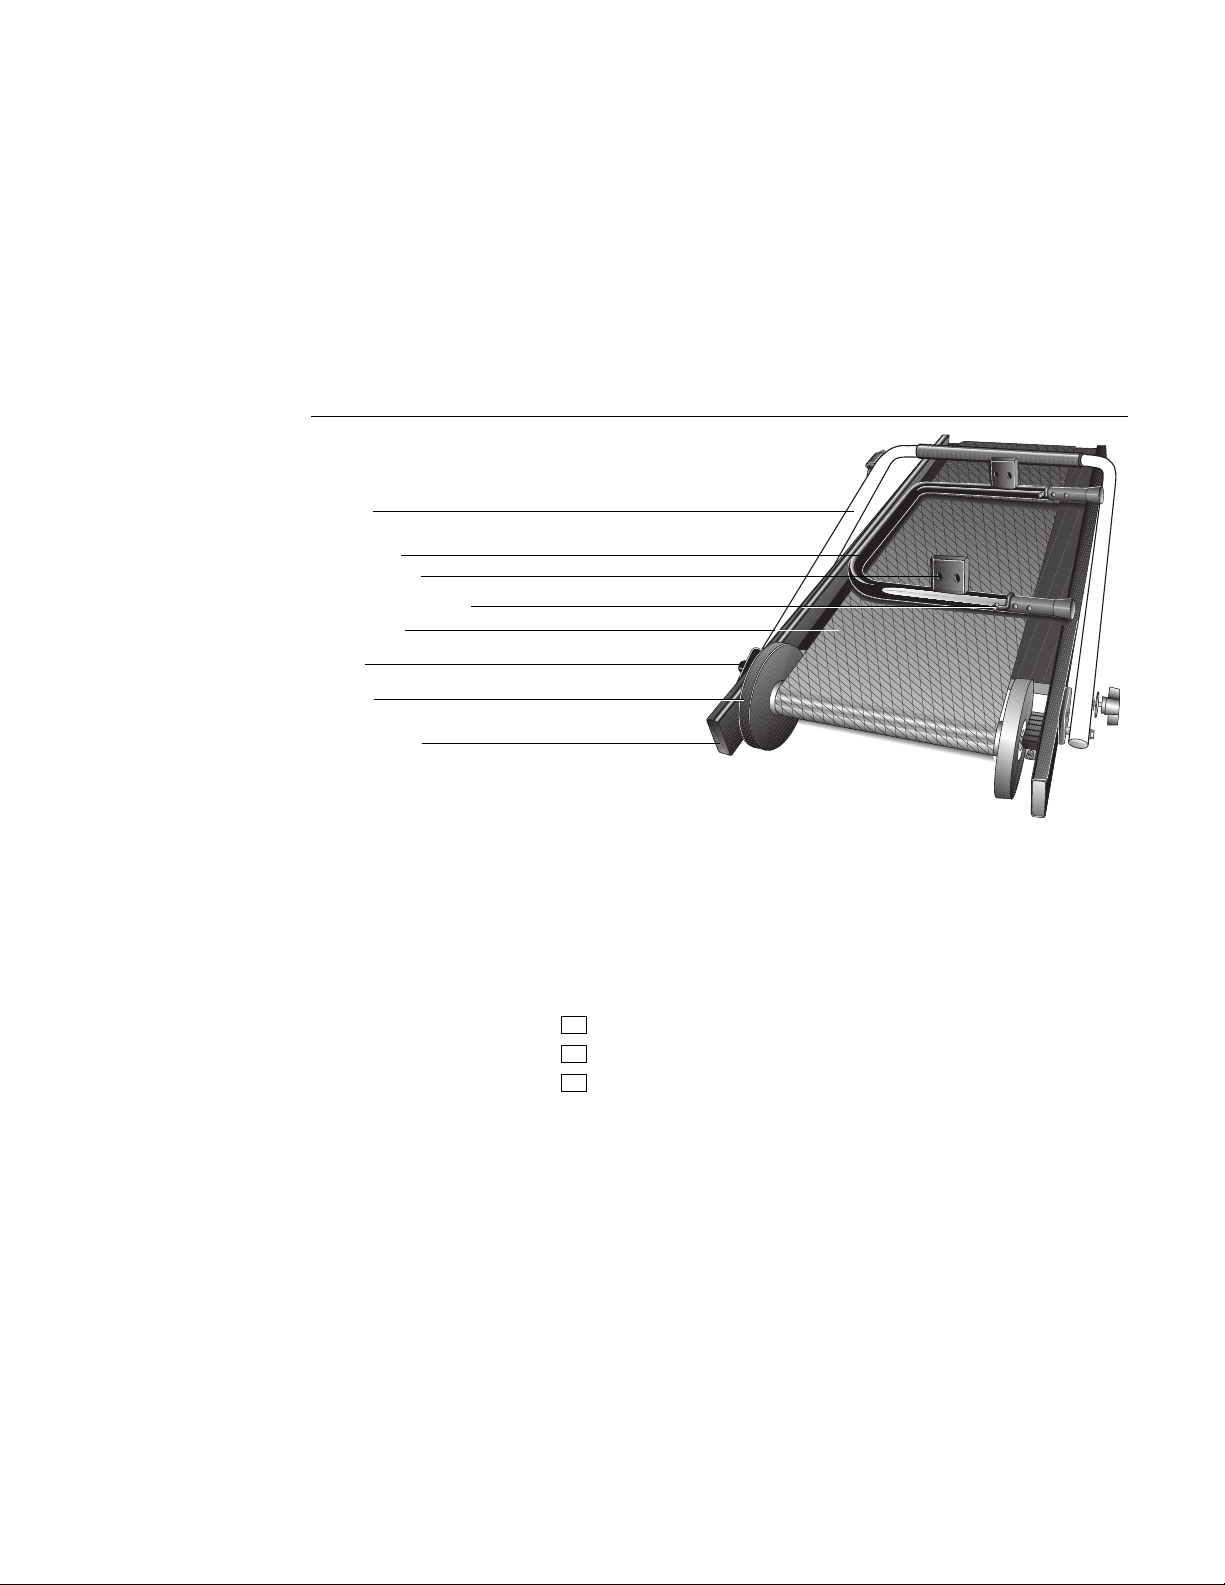
Diagram 1
Unassembled 903 treadmill.
Handrail
Front lift bar
Lift bar bracket
Height adjustment pin
Running belt
T-knob
Flywheel
Unpacking the 903 Manual Treadmill
All Precor products are thoroughly tested and inspected before shipment.
Precor ships the 903 treadmill in three pieces:
• deck assembly
• front lift bar
• hardware kit (contents described below) and literature kit
Side rail mount
CAUTION: Place the hex key
in a safe and secure place. If
the running belt should move
off-center, you can use the
1/4" hex key to align it.
Diagram 1 shows the treadmill parts after the carton has been removed.
Callouts point to the different parts of the treadmill that are discussed in the
assembly instructions. Unpack the treadmill close to the location where you
plan to use it. Save the triangular end blocks for use in the assembly.
Open the hardware kit and make sure that you have the following items. As you
identify the contents of the kit, check them off below.
2 T-knobs—handrail installation
2 washers—handrail installation
1/4" hex key
If any items are missing, contact your authorized Precor dealer. For the dealer
nearest you, call 1-800-4-PRECOR.
Important: The packaging for this equipment was designed to protect it during
shipment. Please store the original packaging in a safe place in case you need
to ship the 903 treadmill in the future.
page 4
Page 5

Assembling the 903 Manual Treadmill
Follow the instructions in this section to assemble the 903 Manual Treadmill. It
is important to read through the entire procedure before assembling your
treadmill. If you do not assemble and use this treadmill according to the
following guidelines, you could void the Precor limited warranty.
Installation Requirements
Follow these installation requirements when installing the treadmill:
• Fill out and mail the limited warranty registration card. The serial
number is written on a label underneath the treadmill on the center
crossbeam. During the assembly process, write the serial number on the
limited warranty card and in this Owner’s Manual (see
If you want a 903 Service Manual, write to:
ATTN: 903 Service Manual
Precor Customer Service Department
P.O. Box 3004
Bothell, WA 98041-3004
• Set up the 903 treadmill on a solid, flat surface. Do not install the
treadmill on hardwood floors because the wheels might scratch or damage
the surface. If the treadmill is placed on a hardwood floor or a carpeted,
deep-pile surface, place a piece of heavy cardboard, plywood, or other
smooth, flat surface under the unit to protect the floor and treadmill. If the
floor is not flat and even, the running belt may not track properly.
Obtaining Service
).
• Locate the treadmill at least 4 feet from walls and furniture. Open space
to the front, sides, and back of the machine make for a safer mount and
dismount and easier belt adjustment.
Assembly Instructions
To assemble the 903 treadmill, review the callouts in Diagram 1 before you take
the following steps:
1. Install the Front Lift Bar assembly. (Diagram 2) With the treadmill base
flat on the floor near the location where you plan to use it, take the
following steps to install the front lift bar:
a. Place the triangular, cardboard end blocks, set aside when you
unpacked the treadmill, under the front of the unit to lift the flywheel
off of the floor.
b. Remove the four bolts and washers from the front lift bar and set
them aside.
c. Slide the front lift bar brackets into the side rail mounts.
Note: You may need to ask for assistance to help you lift the front of
the treadmill to align the front lift bar brackets into the side rail
mounts.
page 5
Page 6
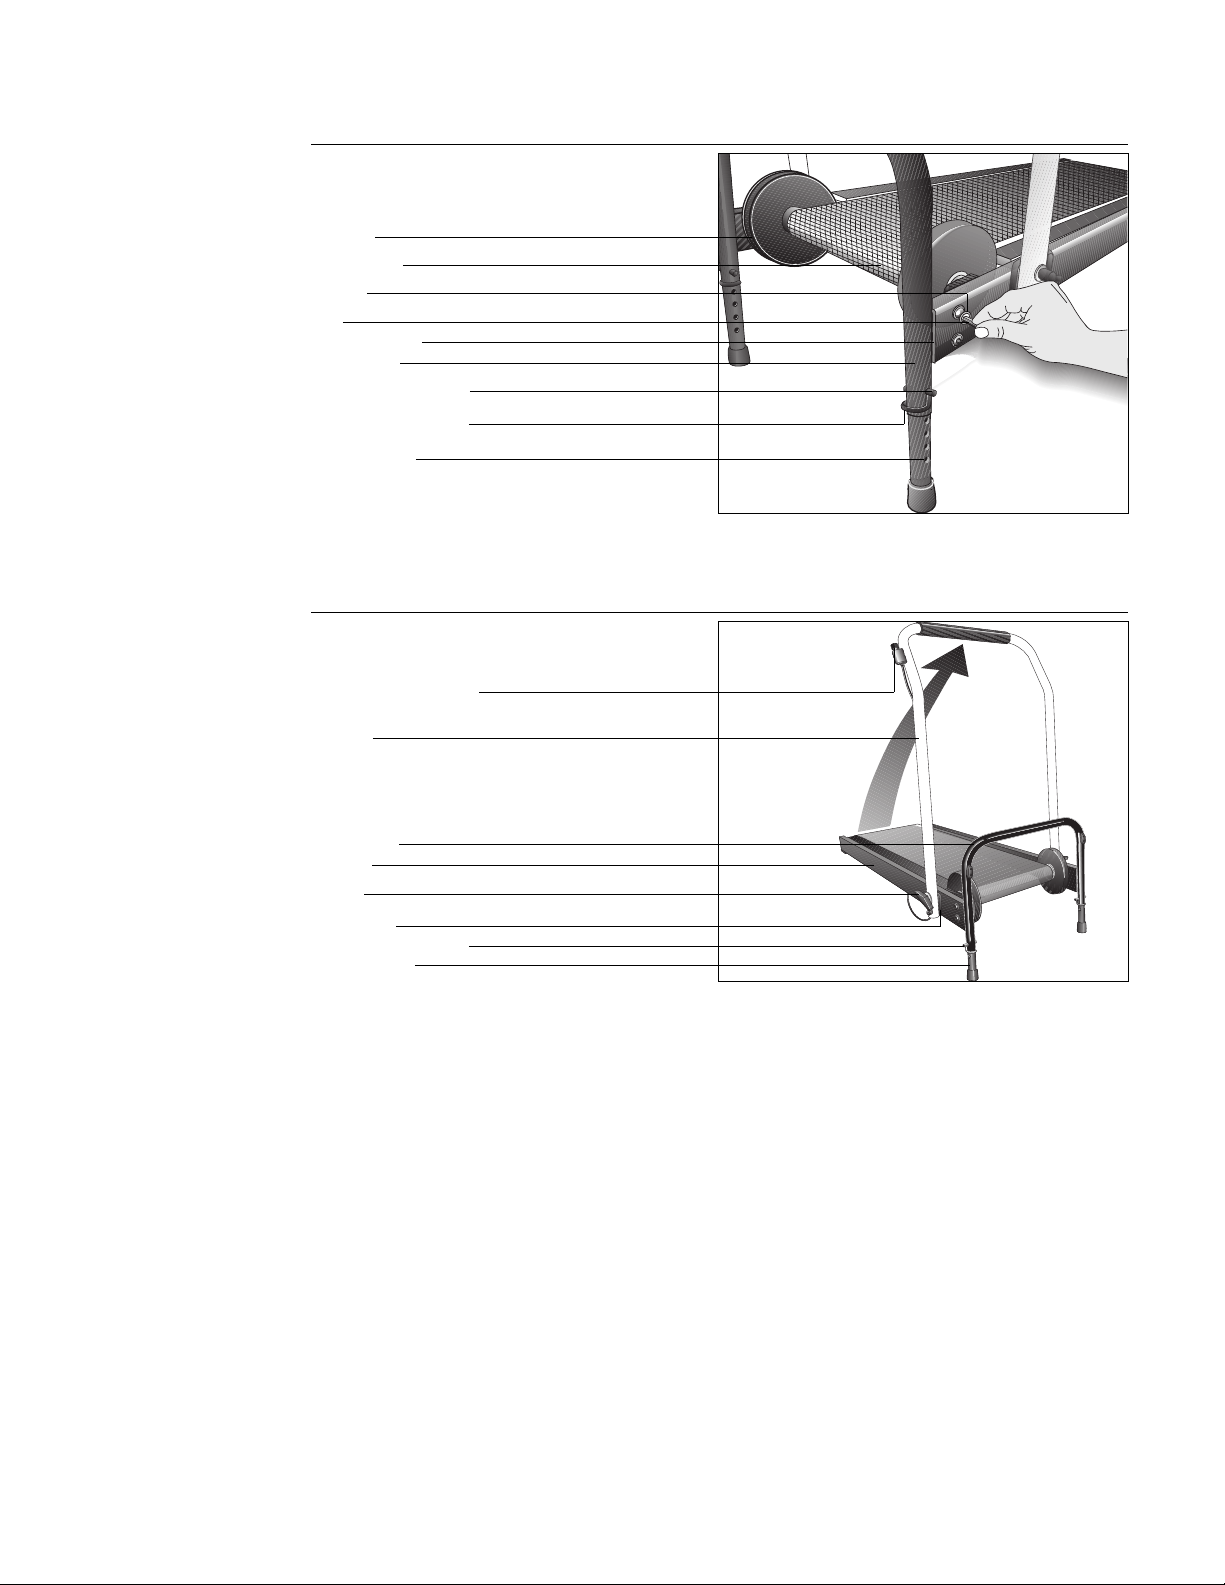
Diagram 2
Installing the Front Lift Bar assembly.
Flywheel
Running belt
Washer
Bolt
Side rail mount
Front lift bar
Height adjustment pin
Locking portion of pin
Elevation tube
Diagram 3
Locking handrail into upright position.
Micro adjustment knob
Handrail
d. Re-insert the bolts and washers as shown in Diagram 2. Tighten the
bolts securely using the hex key provided.
Front lift bar
Side rail
T-knob
Frame plate
Height adjustment pin
Elevation tube
2. Position the Handrail. (Diagram 3) Remove the T-knobs and washers
from the hardware kit and take the following steps to secure the handrail:
a. Pull the handrail into an upright position. See Diagram 3.
Important: Perform the remaining steps on one side of the treadmill
at a time.
b. Hold onto the handrail while you insert a T-knob and washer through
the handrail mount (one on each side of the treadmill). Repeat this
step for the opposite side.
c. Align the T-knob with the hole in the side rail and tighten the T-knob
by turning it clockwise. Alternately tighten the T-knobs until both
washers are tight against the side rails.
3. Adjust the incline of the treadmill and set the running belt to the proper
resistance level, by following the steps in
Adjusting the Elevation Tube
.
page 6
Page 7

Adjusting the Elevation Tube
The elevation tube is set at the factory at the lowest setting. To receive optimal
performance, reposition the height adjustment pin by taking the following steps:
1. Determine the proper Elevation Tube setting. (Table 1) The elevation tube
provides six different settings. Each setting provides a different level of
resistance needed (dependent on your weight) to maintain an efficient
workout. To get optimal performance from your treadmill, refer to settings
shown in Table 1.
To determine if you have set the proper elevation for your height, stand on
the running belt with your hands on the handrail for balance. Your feet
should slide slowly and easily away toward the rear of the treadmill.
Continue walking and when you are comfortable and well-balanced on the
treadmill, release your grip on the handrail. The running belt should
continue to move freely while you maintain your momentum. If the running
belt slows, stops, or becomes more difficult to walk on, consider moving
the elevation tube up one more setting.
Table 1
Elevation tube settings
according to user’s weight.
Setting #6
Setting #3
Setting #1
Height adjustment pin
Locking portion of pin
Elevation tube
Elevation Tube Settings Dependent on Weight
#6
below 80 lbs
#5
80 lbs and below
#4
80 to 100 pounds
100 through 140 pounds
#3
#2
140 through 200 pounds
#1
200 pounds (lbs) and above
Note: Table 1 is an approximation and elevation tube settings may vary
slightly depending on differences in weight and the amount of lubrication
between the running belt and deck. Over time and extended use, you may
need to readjust the elevation tube setting. Remember that you want to be
able to maintain your momentum on the running belt without having to
push off from the handrail. A lubrication kit, available from your local
dealer, can be used as the equipment ages or friction (between the running
belt and deck) increases. If you do lubricate the deck, you may need to
change the elevation setting. See
Obtaining Service
for more information.
page 7
Page 8

Diagram 4
Placing treadmill onto front lift bar.
Micro-adjustment knob
Front lift bar
Running belt
Handrail
CAUTION: Be sure that the
T-knobs are secure and locked
into position on both sides of
the handrail before performing
this step.
Diagram 5
Moving the elevation settings
and height adjustment pins.
Height adjustment pin
Locking portion of pin
Elevation tube
2. Position the Treadmill on Its Side. (Diagram 4) Place your hands on
either side of the handrail and gently tip the treadmill onto its side opposite
the micro-adjustment knob. See Diagram 4. Be sure the treadmill is
balanced and secure on its side and the micro-adjustment knob is
resting on the floor, before you let go of the handrail.
3. Adjust the Elevation Tube. (Diagram 5) The elevation tube has six settings
(refer to Table 1). To move the height adjustment pin to another setting,
take the following steps.
not
page 8
CAUTION: To avoid injury, do
not place your fingers
between the locking portion of
the height adjustment pin and
the elevation tube.
Important: Due to the weight of the treadmill, always adjust the elevation
tube while the treadmill is resting on its side. Making adjustments in this
manner also alleviates the possibility of injury.
a. Remove the height adjustment pin by pushing up on the locking
portion that wraps around the tube. Use your fingers to pull the pin
out of the elevation tube hole. Repeat this step on the opposite side.
See Diagram 5. Set the height adjustment pins aside.
b. Slide the elevation tube so that the elevation tube and front lift bar
holes align at the proper setting.
Make sure that the settings are the
same for both sides of the elevation tube.
c. Re-insert the height adjustment pins and push down on the portion
that wraps around the tube to secure the pin into position.
d. Return the treadmill to an upright position, so that the base is flat on
the floor.
Page 9

Checking the Alignment of the Running Belt
Before working out on your treadmill, you need to check the alignment of the
running belt. The running belt on the 903 treadmill has been fully adjusted at
the factory and should track straight on the deck. However, if the running belt
seems to track off center of the deck or you hear a chafing noise, check the belt
alignment by taking the following steps:
1. Walk on the treadmill while holding onto the handrail for balance.
2. Observe the running belt for a couple minutes.
3. If the running belt tracks off center or the belt moves toward either
flywheel, you need to align the belt.
4. If you determine that the belt needs alignment, follow the steps in
the Running Belt
Once the treadmill is assembled, be sure to check the alignment of the belt
periodically. Adjust the running belt as soon as it needs alignment to prevent
tearing or fraying of the belt. Any damage due to improper maintenance of the
running belt is not covered by the limited warranty.
found in the maintenance section of this manual.
Aligning
page 9
Page 10

Using the Precor 903 Manual Treadmill
In addition to providing an excellent cardiovascular workout, one of the
advantages of the 903 Manual Treadmill is that it is simple to use. With very
little time or practice, you can learn how to use it effectively. This section
provides information about the following areas:
• beginning and ending your workout
• working out on the treadmill
• adjusting the resistance level
Beginning Your Workout
Prior to beginning a workout, make sure that you have completed the following:
• assembled your 903 treadmill—
• adjusted the elevation tube settings—
• checked the running belt alignment—
• stretched your lower body and back—
If a procedure has not been fully completed, refer to that section and complete
the tasks involved before beginning your workout.
To begin a workout, hold onto the handrail as you step onto the running belt.
Slowly, turn the micro-adjustment knob to adjust the resistance of the running
belt. You should adjust the resistance so that you can walk comfortably, but
maintain momentum without holding onto the handrail. For more information
about working out, refer to
the Resistance Level
Ending Your Workout
To end your workout, hold onto the handrail as you gradually reduce the speed
of the running belt till it comes to a complete stop. Step off the running belt
onto the floor. If you wish to store the treadmill, refer to the instructions found
in
Storing the Treadmill
Remember to incorporate a cool-down period into your workout. A cool-down
period helps you to gradually lower your heart rate and lessen excessive muscle
soreness or stiffness.
Working Out on Your 903 Treadmill
.
.
Assembly Instructions
Adjusting the Elevation Tube
Aligning the Running Belt
Working Out on Your 903 Treadmill
and
Adjusting
page 10
CAUTION: Before beginning
any fitness program, you
should have a complete
physical examination by your
physician.
Working Out on the 903 Treadmill
Before using your treadmill, we recommend that you follow these instructions
and go through a preliminary demonstration of the treadmill. Then, you will be
more familiar with the treadmill when you begin your workout.
When using the treadmill, follow these general guidelines:
• At the beginning of a workout, take several minutes to bring your heart
rate into your training zone, as shown in Diagram 8 later in this manual.
• After your workout, walk slowly for several minutes to cool down your
body and lower your pulse rate.
• Gently stretch your lower body and back before and after a workout to help
prevent stiffness or soreness.
Page 11

Photo 1
Working out on the 903.
CAUTION: Before beginning
any fitness program, you
should have a complete
physical examination by your
physician.
To use the 903 treadmill, follow these steps:
1. Hold onto the handrail and step onto the running belt.
2. Begin walking as shown in Photo 1. You should start your workout at a
pace that will allow your heart rate to reach your training zone within
5 minutes. Adjust the resistance of the running belt by slowly turning the
micro-adjustment knob. Turn the knob counterclockwise to increase
resistance (clockwise to reduce resistance).
3. When you feel comfortable with the motion of the treadmill, let go of the
handrail and continue your workout. After your initial warm-up period,
maintain your heart rate in your training zone during your aerobic session.
Refer to Diagram 8 later in this manual.
Note: Remember to hold on to the handrail when slowing down or
stopping.
4. When you are through exercising, cool down for 3 to 5 minutes by
gradually reducing your belt speed. A proper cool-down helps to transport
excess lactic acid out of the working muscles, allowing them to recover
faster.
5. To end your workout, hold onto the handrail and stop walking or running.
Let the running belt come to a complete stop before stepping onto the
floor.
For best results, vary your workouts by changing duration, intensity, and type
of work (such as interval training). We recommend that you keep track of your
workouts by writing them down; this way you can monitor your progress
toward your fitness goals and also use the information as a reference in
planning interesting, challenging workouts.
page 11
Page 12

Adjusting the Resistance Level
The micro-adjustment knob on the 903 treadmill, allows adjustments that affect
the movement of the running belt. Adjust the resistance while you are walking
or running on the treadmill. Before using the micro-adjustment knob, make
sure that you have completed the following procedures:
Diagram 6
Set the resistance using the
micro-adjustment knob.
Micro-adjustment knob
Front lift bar
T-knob
• assembled your 903 treadmill—
• adjusted the elevation tube settings—
• checked the running belt alignment—
Diagram 6 shows the location of the micro-adjustment knobs on the 903
treadmill.
Assembly Instructions
Adjusting the Elevation Tube
Aligning the Running Belt
CAUTION: Avoid excessive
wear to the running belt by
setting the proper elevation
for your weight. Refer to
Table 1 on page 7.
Note: Remember that the running belt should move freely while you maintain a
comfortable momentum (without holding onto the handrail).
If more than one person in your household uses the treadmill, be sure to
release the belt resistance at the end of your workout by turning the microadjustment knob clockwise till it stops. This allows the next person on the
treadmill to properly re-adjust the elevation and resistance according to his or
her needs. Refer to Table 1 on page 7 to set the treadmill to the proper elevation
before beginning a workout.
• To increase the resistance of the running belt and decrease speed, slowly
turn the knob counterclockwise.
• To reduce the resistance of the running belt and increase speed, slowly
turn the knob clockwise.
Important: If the micro-adjustment knob is turned clockwise as far as it can go
and you need to continually hold onto the handrail to push against the running
belt to keep it moving, you will need to adjust the elevation tube setting up to
the next hole. Refer to
Adjusting the Elevation Tube
.
page 12
Page 13

Diagram 7
Muscles exercised during a
cycle workout.
1. Trapezius
2. Deltoid
3. Pectorals
4. Rhomboids
5. Triceps
6. Biceps
7. Latissimus Dorsi
8. Forearm Flexors/Extensors
9. Abdominals
10. Erector Spinae
11. Gluteals
12. Hip Flexors
13. Quadriceps
14. Hamstrings
15. Gastrocnemius/Soleus
16. Peroneus Longus/Brevis
General Aerobic Training Information
A workout on the Precor 903 Manual Treadmill provides excellent and efficient
cardiovascular conditioning, while strengthening and toning the thighs, calves,
and hips. Darkened areas in Diagram 7 indicate the muscles that can be improved.
To get the most out of each workout, a general understanding of the principles
behind aerobic training is invaluable. The best source of fitness information is
your specialty fitness dealer. In addition to providing information on which
exercise equipment is the best for your individual needs, your specialty fitness
retailer can provide useful advice on training, technique, and exercise physiology. Your retailer can also recommend good books on these subjects.
To help you get started in planning and carrying out your fitness program, this
section provides some basic information on aerobic exercise—such as how
hard you should work out, how long each session should be, and how often you
need to exercise to benefit from a regular program.
page 13
Page 14

Diagram 8
Training zones
HEART RATE TRAINING ZONE
190
185
180
175
170
165
160
128
104
155
124
101
150
120
98
152
148
144
140
136
132
RECOMMENDED TRAINING ZONE
124
120
117
114
110
107
20
25 30 35 40 45 50 55 60 65 70 75
YOUR AGE
YOUR HEART RATE
190
180
170
160
150
140
130
120
110
100
90
80
70
145
116
94
140
112
91
135
108
88
MAX.
HEART
RATE
80% OF
MAX.
HEART
RATE
65% OF
MAX.
HEART
RATE
How Hard Should I Exercise?
Studies show that to achieve the benefits of aerobic exercise, it is necessary to
work out hard enough raise your heart rate to a certain minimum level, called
the “training zone.” Your training zone depends on your age and level of fitness.
Diagram 8 shows your recommended heart rate training zone which is
calculated using your age and your maximum attainable heart rate. The chart is
based on a resting heart rate of about 72 for males and 80 for females. Your
optimum training zone is between 65% and 80% of your maximum heart rate.
For efficient aerobic exercise, work only hard enough to keep your heart rate in
this zone. You will obtain the greatest fat-burning benefits when you exercise
within the optimum training zone.
Pushing yourself beyond the recommended range, (that is, exercising so hard
that your heart rate rises above 80% of maximum) can overstress your
muscles. To increase cardiovascular improvement, exercise longer, not harder.
Keep in mind that this zone is an approximation, to be used as a guideline—
individual heart rates vary according to several physiological factors. To
determine your training zone, find your age on the diagram, and then find the
line where they intersect. For example, if you are 35 years old, your training
zone is between 114 and 140 beats per minute. Remember this zone—this is
the heart rate zone you should try to maintain as you work out.
If you do not have an accurate heart rate monitor, you can determine your heart
rate by taking your pulse at a place that you can reach easily and comfortably
while you exercise. Typical locations for measuring heart rate are directly over
the heart on the left side of the chest, on either side of the neck, over the
temple, or on the thumb side of either wrist. Wherever you measure your pulse,
make sure that you use your index and middle fingers—
not your thumb
. Your
thumb has a strong pulse which can affect your heart rate reading.
page 14
Page 15

Once you locate your pulse, look at the time and count the beats for six
seconds. Multiply that number by 10 to determine the total number of beats per
minute. For example, if you count 14 beats over six seconds, the total number of
beats per minute is 140. Compare the total number of beats with your training
zone as identified in Diagram 8. If necessary, increase or decrease your activity
level to bring your heart rate into your training zone. You can regulate your work
level (and heart rate) by the changing belt’s speed.
Remember—your heart rate
is the definitive measure of how hard you are working.
Regardless of your fitness level, avoid doing too much too soon. Running or
walking too fast or choosing too high of an incline are common errors. Give
yourself time to become familiar with your treadmill and improve your fitness
level. Then you can gradually increase your speed and incline to make your
workouts more challenging.
How Long Should I Exercise?
The length of each exercise session depends on your fitness level. Exercise
physiologists have determined that, to attain cardiovascular benefits from
exercise, you should maintain your heart rate in the training zone for at least 15
minutes. This is in addition to your warm-up time, and does not include cooldown. You should always allow several minutes to bring your heart rate into the
training zone, by starting out slowly and gradually increasing the work level.
Similarly, use several minutes of light exercise after the workout to bring your
heart rate down to near resting level.
The higher your fitness level, the longer you should maintain your heart rate in
the training zone (between 20 and 30 minutes). Beginners should always start
slowly and gradually increase their sessions up to 20 minutes or more.
How Often Should I Exercise?
Research indicates that aerobic sessions of 20 minutes or more should be done
at least 3 to 5 times a week to obtain significant cardiovascular benefits. Most
experts agree that sensible eating habits and regular aerobic exercise are the
keys to weight control and fitness. A recent study, which tracked several
subjects over a period of years, conclusively shows that exercise, not dieting, is
the key factor to successful long-term weight loss.
page 15
Page 16

Maintaining the 903 Manual Treadmill
The 903 treadmill requires little maintenance. Periodically, you need to clean the
treadmill and possibly realign the running belt. Instructions for these procedures are provided in this section. At the end of this section, you will find
information about how to receive additional service.
Cleaning the Treadmill
CAUTION: A special lubricant
exists between the treadmill’s
running belt and deck. Do not
clean between the deck and
running belt because you will
remove the lubricant.
CAUTION: Use proper lifting
techniques to avoid injury
when lifting the front of the
treadmill off the floor. The
903 treadmill weighs
approximately 60 pounds.
Before a workout, use a damp, soft cloth to clean the side rails and handrail.
This removes any dirt or dust that might affect the smooth operation of the
treadmill.
Do not pour water or spray liquids on the treadmill. Allow the treadmill to dry
completely before using.
Storing the Treadmill
The 903 treadmill has wheels at the rear of the treadmill for moving and storage
purposes and provides locking mechanisms for the handrail. To store the
treadmill in a horizontal (base on floor) position, keep in mind that you need a
vertical clearance of 14 to 20 inches if you plan to store it underneath something. You can also position the treadmill in a vertical position on its front lift
bar to open up floor space when the treadmill is not is use.
To store the treadmill in a horizontal position, take the following steps:
1. Hold onto the handrail with one hand and with the other hand, loosen the
T-knobs from their upright locked position until the T-knob screw
disengages from the frame plate.
2. Lower the handrail onto the surface of the deck.
3. Align the T-knob screws with the lower hole in the side rail. Lock the
handrail into position by tightening both T-knobs securely.
4. Move to the front of the treadmill. Place both hands on the front lift bar.
5. Lift the front of the treadmill off the floor and on its wheels roll it to the
storage location. Note that the treadmill weighs approximately 60 pounds.
To avoid injury, ask for assistance before lifting the treadmill.
page 16
Page 17

Diagram 9
Storing the treadmill.
Deck
Side rail
Running belt
Handrail
T-knob
Front lift bar
CAUTION: Do not try to lift the
rear of the treadmill by
holding onto the rear roller as
you may cause injury to
yourself.
To store the treadmill in a vertical position as shown in Diagram 9 and free up
floor space when the treadmill is not in use, take the following steps:
1. Follow steps 1 through 3 above to lock the handrail into its lower position
and then, move to the rear of the treadmill.
Note: If you need to roll the treadmill to a specific location before setting it
into a vertical position, lift the treadmill up using the front lift bar and roll it
to its storage location.
2. Place your hands on opposite sides of the side rails. Lift the treadmill onto
its front lift bar. Be sure that the treadmill is secure in a vertical position
before taking your hands off of the side rails.
Aligning the Running Belt
Correct alignment of the running belt is critical to the smooth operation of the
treadmill. The belt is aligned at the factory before shipment. However, during
shipment or by using the treadmill on an uneven surface, the belt might move
off center.
Once the treadmill is assembled, be sure to check the alignment of the belt
periodically. Adjust the running belt as soon as it needs alignment to prevent
tearing or fraying of the belt. Any damage due to improper maintenance of the
running belt is not covered by the limited warranty.
page 17
Page 18

Diagram 10
Turning the adjustment bolt to
align the running belt.
Deck
Running belt
Rear roller
Belt adjustment bolt
Side rail
To check the alignment of the running belt, take the following steps:
1. Walk on the treadmill while holding onto the handrail for balance.
2. Observe the running belt for a couple minutes.
3. If the running belt tracks off center or the belt moves toward either
flywheel, you need to align the belt.
Caution: Be sure to grasp the
handrail while performing this
step.
CAUTION: Do not turn the
adjustment bolt more than 1/2
turn at a time. Overtightening
the bolt can damage the
treadmill.
4. If you see that the running belt is noticeable off center, adjust the
alignment of the belt using the supplied hex key on the adjustment bolts
(located at the rear of the treadmill). See Diagram 10.
5. If you haven’t already done so, set the incline of the treadmill and adjust
the micro-adjustment knob so that you can keep your momentum while
walking on the treadmill without using the handrail. Refer to the sections,
Adjusting the Elevation Tube
Adjusting the Resistance Level
Important: If you notice that the belt needs alignment, make the adjustments at once. Failure to do so might cause the belt to tear or fray which is
not covered by the limited warranty.
6. While walking on the running belt, observe (for a few minutes) how it
tracks along the deck. If the running belt tracks off center or the belt
moves toward the flywheel, you need to align the belt.
7. Step off the treadmill and tighten the rear adjustment bolt on the side of
the treadmill that the belt tends to move toward. Turn the bolt clockwise
1/2 turn at a time.
Important: Do not stand on or move the running belt while you are turning
the adjustment bolt.
8. Walk on the treadmill for a few minutes to see if the belt is tracking
properly. If necessary, step off the treadmill and turn the appropriate
adjustment bolt clockwise another 1/2 turn.
9. Again, walk on the treadmill for a few minutes to see if the belt is tracking
properly. If it is still not tracking properly, loosen the rear adjustment bolt
on the opposite side 1/2 turn counterclockwise. Do not overtighten the
belt.
to change the height adjustment pins and
to use the micro-adjustment knob.
page 18
Page 19

Lubricating the Running Belt
Over an extended period of time, you may notice that the running belt does not
slide as easily as it did when you first purchased the treadmill and adjusted the
elevation tubes according to Table 1 on page 7. Make sure that the microadjustment knob is turned clockwise as far as it will go to release all tension
from the flywheel resistance belt. If you still need to raise the incline of the
treadmill up to the next setting on the elevation tube to maintain your exercise
intensity and running belt momentum, you may want to consider lubricating the
deck and running belt. Lubrication kits can be obtained through your local
dealer.
Obtaining Service
While servicing the 903 treadmill is possible, do not attempt to service the 903
Manual Treadmill yourself unless you have purchased the 903 Service Manual
and carefully read through the servicing instructions.
For information about product operation or service, contact an authorized
Precor dealer (or a Precor Factory Authorized Service Company). To locate the
Precor dealer or servicer nearest you, call 1-800-4-PRECOR.
To help the customer service representative expedite your call, have your serial
number available. The serial number on the 903 treadmill is written on a label
located underneath the treadmill on the center beam. The best time to write the
serial number in the space provided below is during the assembly process or
when you store the treadmill in an upright position on its front lift bar.
Model number: ________ Serial number: __________________________
If you have any questions regarding the treadmill, use the model and serial
numbers whenever you call your Precor dealer or servicer. To purchase a 903
Service Manual , write to:
ATTN: 903 Service Manual
Precor Customer Service Department
P.O. Box 3004
Bothell, WA 98041-3004
903
page 19
Page 20

Precor Incorporated
20001 North Creek Parkway
Bothell, WA USA 98041-3004
Precor is a registered trademark of Precor Incorporated.
© 1994 Precor Incorporated.
Specifications subject to change without notice.
1-800-4-PRECOR
NOTICE:
Precor is widely recognized for its innovative, award winning designs of exercise equipment. Precor
aggressively seeks U.S. and foreign patents for both the mechanical construction and the visual
aspects of its product design. Any party contemplating the use of Precor’s product designs is
hereby forewarned that Precor considers the unauthorized appropriation of its proprietary rights to
be a very serious matter. Precor will vigorously pursue all unauthorized appropriation including
through legal actions.
P/N36502-102
Web Version 9/98
 Loading...