

Page 1
I&M008-10135-9/05
Precision Digital
Test Gauge
Model PD233, PD243,PD253
Operating
Instructions
I&M008-10135-9/05 dwg. 83B234-01 Rev.A
GAUGE INSTALLATION
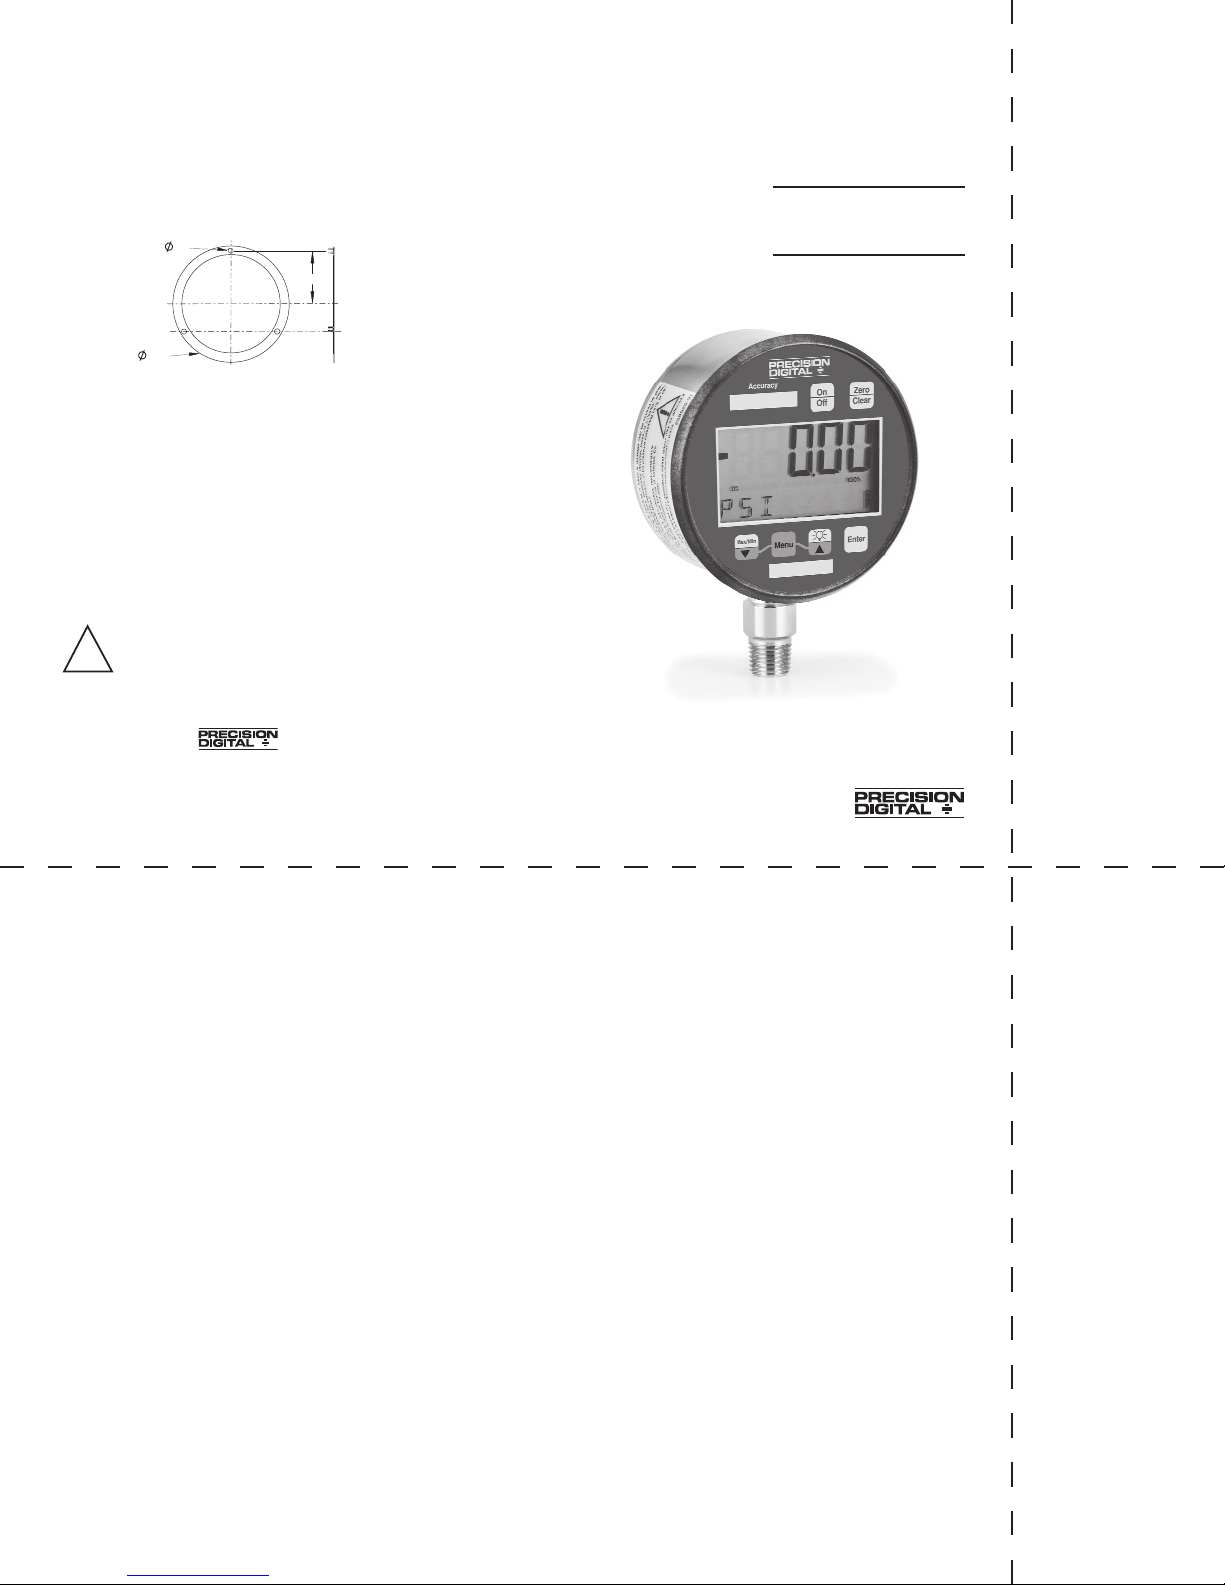
Pipe Mount – The digital test gauge comes standard with a1⁄4NPT connec-
tion. Good piping practices recommend using teflon tape or a pipe sealant
on the gauge threads. Utilize a 7⁄
16
˝ wrench on the wrench flat of the gauge
to tighten the gauge to the process.
NEVER TIGHTEN GAUGE THREADS BY HOLDING THE BODY OF THE GAUGE.
DOING SO MAY DAMAGE THE GAUGE AND MAKE THE GAUGE INOPERABLE.
Panel Mount – The lower connected digital test gauge is available with an
optional flange for panel mounting. Please refer to illustration and dimensions below.
!
Pipe to which gauge is attached must be properly grounded.
4.00
1.860
.17
Battery Installation and Replacement:
The gauge comes standard with a quantity of three AAA alkaline batteries
(installed). Use either Duracell MN2400, MX2400 or Energizer E92BP,
X92RP AAA alkaline, non-rechargeable batteries.
Batteries have a life of approximately 1000 hours. Battery life is dependent
on gauge usage, backlite settings and power off settings. When the display
flashes LOW BAT, batteries should be replaced.
To replace the batteries:
1) Remove the single screw on the back of the gauge case.
2) Hold the keypad in the palm of hand.
3) Carefully remove the three batteries from the holder and replace the batteries. Use only AAA alkaline non-rechargeable batteries.
HOLE
CUTOUT
DIAMETER
3.406
(3
13
⁄
32
±
1
⁄
32
)
Precision Digital Corporation
19 Strathmore Road
Natick, MA 01760-2418
Tel: 800-343-1001
Fax: 508-655-8990
Page 2
– 15 –
Config Mode
Allows Scrolling Through CONFIG Menus
Engineering Units
Psi, ˝Hg, ˝H2O (with three temperature options, 60°F, 4°C
and 20°C), ft.SW, bar, mbar, kPa, MPa, mmHg, cmH
2
O,
mmH2O, kg/cm
2
Update Rate
4 Options: 10x/sec, 5x/sec, 2x/sec, 1x/sec
Auto Off 6 Options: Never, 2 Min., 5 Min., 15 Min., 30 Min.,
Dampening 6 Options: None, Average 2, 4, 6, 8 x update rate
Languages 7 Languages: English, Spanish, French, Italian, German,
Portuguese, Dutch
Backlite 5 Options: On/Off, 10 Sec., 30 Sec., 5 Min., 15 Min.
Field Recalibration
Zero & Span (password protected)
Contrast 7 Available Options
Disable Config Options
Allows disabling of Config Options (password protected)
Calibration Chart
10 Point Individual NIST Traceable Calibration Chart,
Standard
Standard Accessories
300 Series SS Protective Cover
Nylon Protective Carrying Pouch
Display Description
Flashing Gauge over/underpressured
0% or 100% beyond 105% of range
LOW BAT Low battery, replace
ERROR
Internal error, call customer
service (203) 378-8281
Pressure unit conversion exceeds
RES ERROR display resolution or gauge
pressured beyond resolution
SPECIFICATIONS
WARNING AND ERROR MESSAGES
– 2 –
Congratulations on your purchase of the
Precision Digital Test Gauge with total error band
full-scale accuracy and the largest display readout
in the industry of .66˝ high. Other industry-lead-
ing features include twelve selectable engineering
units, seven languages, and password-protected
disable and calibration functions. With the range
printed on the keypad, this digital gauge meets
the ASME B40.7 digital gauge specification. See a
complete listing of product features and specifi-
cations on pages 14 & 15.
Precision Digital Corporation
19 Strathmore Road
Natick, MA 01760-2418
Tel: 800-343-1001
Fax: 508-655-8990
Page 3

– 3 –
TABLE OF CONTENTS
Page
Quick Reference Guide 4-5
Keypad Functions 6-7
• ON/OFF KEY
• BACKLITE KEY
• MIN/MAX KEY
• ZERO/CLEAR KEY
• ENTER KEY
• CONFIG KEY
Configurable Functions (CONFIG Mode) 7-12
• Units (Engineering) 7
• Update Rate 7-8
• Auto Off 8
• Backlite 8-9
• Languages 9
• Damping 9-10
• Contrast 10
• Calibrate (Gauge Calibration) 10-11
• Disable 12
Available Ranges
13
Specifications 14-15
Installation & Battery Replacement
16
• Mounting
• Battery Replacement & Installation
– 14 –
Model PD233, PD243, PD253
Accuracy 0.05%, (PD253), 0.10% (PD243), 0.25% (PD233) Full
Scale Terminal Point Total Error Band (TEB) Accuracy
Including Hysteresis, Linearity, Repeatablilty &
Temperature (–18/65°C) (0/150°F)
Dial Size 3"
Case Material
300 Series SS
Case Finish Electropolished
Case Enclosure Rating
Weatherproof, IP65
Socket Material
316 SS
Socket Size1⁄
4 NPT Male (others on application)
Socket Location
Lower connection, 6:00 o’clock
Ranges Vac thru 7000 psi (see other engineering units below for
other units of measurement)
Operating Temperature
0/150°F
Storage Temperature
–40/180°F
DISPLAY:
Type LCD
Display Digits 5
Character Height .66˝
Backlit Off By Default
Bargraph Yes
Battery Life 1000 Hrs.
Agency Approvals
CE, FM & CSA (Intrinsically Safe Class I, Div 1)
KEYPAD FUNCTIONS:
On/Off Manually Turns Unit On & Off
(auto off options in config menu)
Backlit Manually Turns Backlit On & Off
(auto off options in config menu)
Min/Max Stores Min & Max Values
Zero/Clear Zeros Display or Clears Min/Max Values When
Displayed
Enter Selects Items In CONFIG Menu
SPECIFICATIONS
Page 4
– 13 –
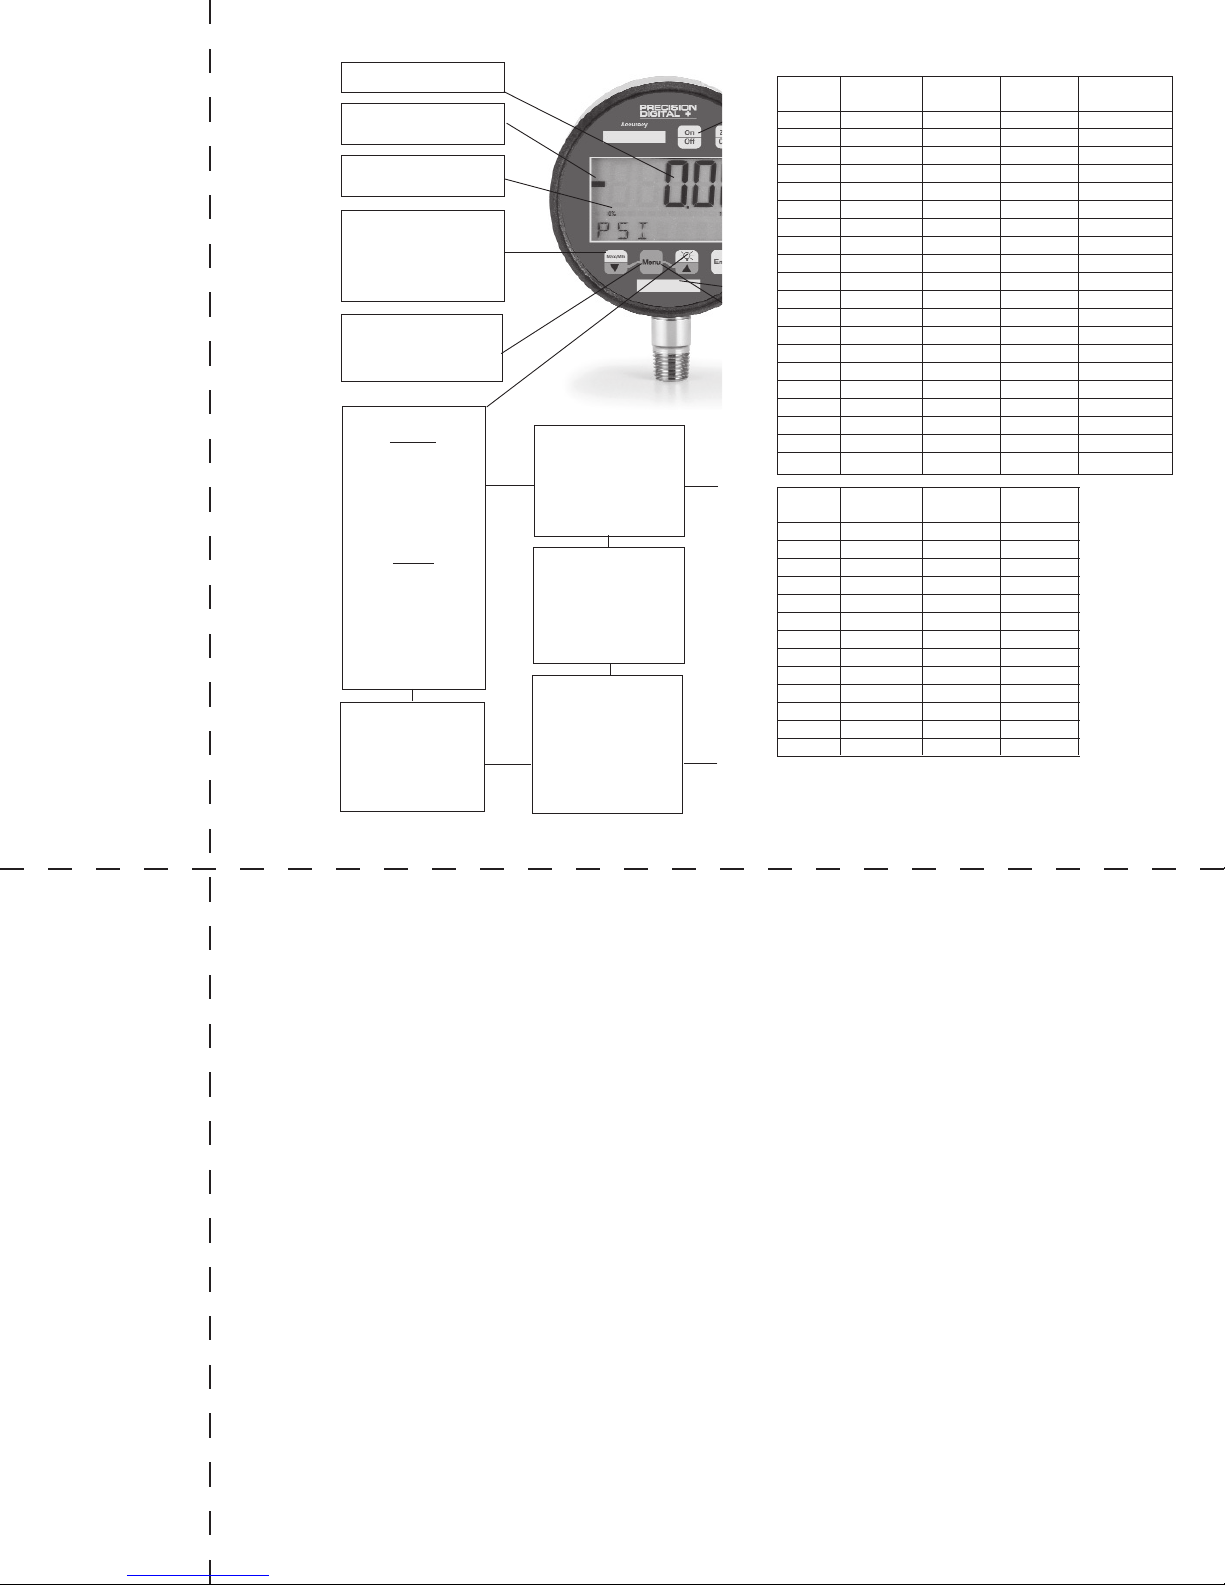
PRESURE RANGES:
Compound Bar/ Compound
psi (psi) kPa KSC (bar)
vac.
15# & vac. –100/0
1 –1 to 0
5
30# & vac.
25 1.6 –1 to 1
10
60# & vac.
40 2.5 –1 to 2
15
100# & vac.6
60 4 –1 to 3
30 100 6 –1 to 30
60 160 10
100 250 16
160 400 25
200 600 40
300 1000 60
500 100
600 160
800 250
1000 400
1500 500
2000
2500
3000
5000
7000
mBar/ Absolute Temp.
mmH2O MPa cmH2O (psia) Options
3000 1 250 15 4°C
5000 1.6 300 25 20°C
10,000 2.5 400 50 60°F
6 500
10 600
40 1000
1600
2000
(2)
2500
(1)
4000
5000
6000
10,000
– 4 –
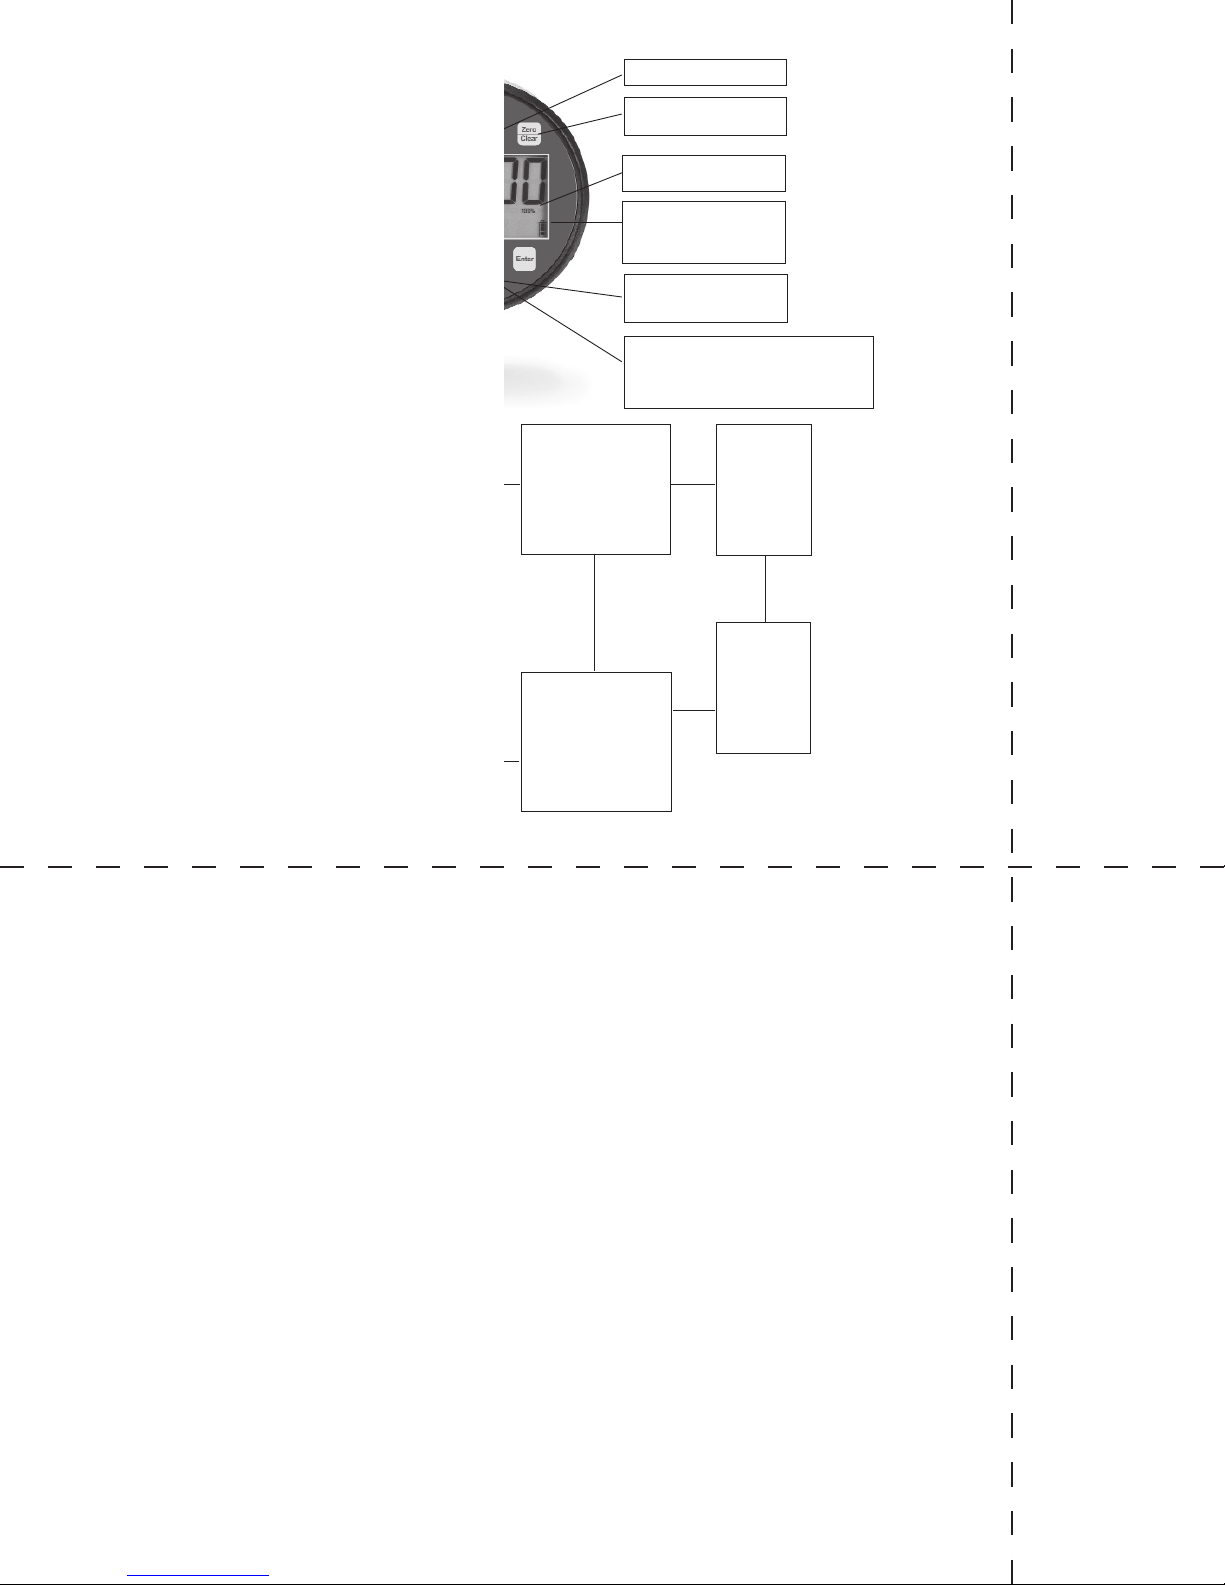
Bargraph
% of full scale
Flashing display when unit
pressured below zero
Press to indicate minimum
or maximum pressure
gauge has measured
Press again to return to
pressure units
While in max or min mode,
press to clear minimum or
maximum displayed values
UNITS (Pressure)
ENGLISH
PSI
INHG
INH2O
with Temperature
(Options: 60°F,
4°C, 20°C)
FTSW
METRIC
BAR
MBAR
KPA
MPA
mmHG
CMH2O
mmH2O
KG/CM2
UPDATE RATE
(Pressure measurement
per second)
10x*
5x
2x
1x
BACKLIGHT
(Off options)
ON/OFF*
10 SEC
30 SEC
1 MIN
5 MIN
LANGUAGE(s)
English*
French
Spanish
German
Italian
Portuguese
Dutch
DAMPING
(averages gauge reading
None*
AVG 2
AVG 4
AVG 6
AVG 8
.66˝ high display, 5 digit
QUICK REFERENCE
Page 5
– 5 –
While in unit of measurement mode (eg: psi),
press the ZERO CLEAR button to rezero the
gauge. This feature functions when displayed
pressure is within ±5% of zero value
This bargraph indicates
battery level; the more
segments, the closer the
battery is to full charge
Flashing display when unit
pressured beyond full-scale
Press to turn backlite
on or off
Range on keypad;
complies with ASME B40.7
Press to turn unit on or off
AUTO OFF
(Turns unit off after
option selected)
Never*
2 minutes
5 minutes
15 minutes
30 minutes
CALIBRATE
Zero and span
adjustments,
password
protected
DISABLE
Allows for
“lockout” of
CONFIG
options
CONTRAST
(Customizes
display
readout)
7 available
Selection 4 is
Default*
*Indicates Default
– 12 –
Step 3: Enter user five digit password (PW). This
is the same password established to access the
CONFIG mode in the menu.
Step 4: Press the CONFIG key to select the desired
option.
Step 5: Press ENTER to finalize the selection.
Notes:
Selecting the DISAB feature does not disable the
CLEAR button on the keypad for the MAX/MIN feature. If the DISAB feature is selected, pressing the
ZERO button on the keypad will cause the display to
read DISAB for two seconds. The gauge will then
revert back to the unit of measure of the gauge. The
DISAB feature disables the zero feature of the gauge.
Zero Disable Feature
:
This feature allows disabling the Zero/Clear button
on the keypad. It also allows for a zero tolerance of
either 5% (default) or 10% of the gauge range.
Step 1: Press the CONFIG key until the word ZERO
SP appears.
Step 2: Press ENTER.
Step 3: A prompt appears to enter PW (enter
password). The ZERO SP password is the same
password as discussed on page 10 and the heading CALIBRAT:, Gauge Calibration. Follow the
instructions on page 10 to enter a password.
Step 4: Press the CONFIG key to select the zero
tolerance, either 5% or 10% of range, or press the
CONFIG key again and the word DISAB appears.
Press ENTER to select the new default setting.
Page 6
– 11 –
Zero Calibration:
Step 14: Press the CONFIG key once and the word
CALIBRA appears. Press ENTER. (This mode
allows for 0 and full- scale adjustment of span.)
The gauge will now display 0.00. Ensure the gauge
is not pressurized,
1
then press ENTER to zero the
gauge. Zero calibration is now complete.
Full Scale Calibration
Step 15: The gauge will now display full-scale
range (e.g. 100.00 psi). Pressurize the gauge to
100% of the range (which is equal to the displayed
value) utilizing a pressure standard with accuracy
four times greater than the unit being calibrated.
2
Press ENTER. Full-scale calibration is now complete.
Notes:
1. If the digital gauge under test is not pressurized
while in span adjustment of full-scale range, an
ERROR message will be displayed when the
ENTER button is pressed. If this occurs, press
the ZERO CLEAR button on the keypad to return
to the previous screen.
2. ASME B40.7-1998, section 6.1.1.1 recommends
the working standard for the gauge being tested
is 4X better than the digital gauge under test.
This means the pressure standard measuring
the full-scale pressure being applied to the
gauge should have an accuracy four times
greater than the unit being spanned.
Zero SP (span):
This feature allows setting the % of span in which
the zero button will operate. Span is limited to prevent accidental tare of process pressures. Options
are 5%, 10% or DISAB (5% is the factory default
and means the unit can be rezeroed between ±5%
of span). If DISAB is selected, the zero button is
deactivated and no display change will occur when
the zero button is pushed.
Step 1: Press the CONFIG key until the word ZERO
SP appears.
Step 2: Press ENTER.
– 6 –
Turns the gauge on and off. When pressing the
ON/OFF key while in the off position, gauge startup display first indicates the software version
followed by the gauge pressure range. The gauge
will then display indicated pressure and be ready
for use.
Manually turns backlite on and off. (See CONFIG
mode for options).
Press this key prior to gauge usage to rezero any
initial offset less than ±5% of the rated gauge
range. If indicated pressure is greater than 5% of
range, the rezero feature becomes inoperable. This
prevents accidental tare of a pressurized gauge.
To clear minimum and maximum values, press
ZERO/CLR button (when min/max values are indicated.
This key allows for customization of the gauge.
Pressing the CONFIG key allows cycling through
the main menu items; UNITS, UPDATE, AUTO OFF,
BACKLITE, LANGUAGE, DAMPING, CONTRAST &
CALIBRAT.
KEYPAD FUNCTIONS
ON/OFF
BACK
LITE
MAX
MIN
ZERO
CLR
CONFIG
ENTER
Allows review of minimum and maximum pressure values since unit start-up or last push of the
clear button. Press key to:
1) Indicate maximum pressure.
2) Indicate minimum pressure.
3) Exit MAX/MIN mode and return to unit of pressure measurement mode. To clear minimum
and maximum values press ZERO/CLR button.
Must be in MAX/MIN mode.
Note: MIN/MAX data is lost when unit is turned
off.
Used in conjunction with CONFIG key, see
next page.
Page 7

– 7 –
KEYPAD FUNCTIONS
UNITS: 12 units of measurement are available,
both English and metric, by cycling through the
UNITS key; psi, ˝Hg, ˝H
2
O (with three temperature
options, 60°F, 4°C and 20°C), ftSw, Bar, mBar,
kPa, MPa, mmHg, cmH
2
O, mmH2O, kg/cm2.
Step 1: Press the CONFIG key until the word
UNITS appears.
Step 2: Press the ENTER key.
Step 3: Press the CONFIG key once to select
ENGLISH or again to select METRIC.
Step 4: Press the ENTER key with selection of
ENGLISH or METRIC.
Step 5: Press CONFIG key to select unit of
measurement.
Step 6: Press ENTER key to finalize unit of
measurement.
UPDATE: this option allows for changing the rate
at which pressure is updated on the display
screen. The default rate measures pressure at the
maximum rate of 10* updates per second or 100
milli-seconds. Optional rates of measurement are
measured in updates per second. The options are
10
*, 5, 2 or 1 update of pressure measurement
per second.
Since customer processes vary, update rates
should be selected based on the application.
To use the UPDATE option:
Step 1: Press the CONFIG key until the word
UPDATE appears.
Step 2: Press the ENTER key.
Step 3: Press the CONFIG key to select the
desired update rate.
Step 4: Press ENTER key to finalize UPDATE rate.
AUTO OFF: this option sets the amount of time
before the gauge will turn itself off after no activity.
*Indicates default.
– 10 –
Step 1: Press the CONFIG key until the word CALIBRAT appears.
Step 2: Press the ENTER key.
Step 3: The letters/asterisks… PW***** appear.
Step 4: Press the CONFIG key. An Ø appears in
the first position.
Step 5: Press the ENTER key once.
Step 6: Press the CONFIG key until Ø appears. Ø
will appear in the second position.
Step 7: Press ENTER.
Step 8: Use this format until all the asterisks are
replaced with Ø.
There now should be a total of five Ø’s on the
keyboard display. The zero in the fifth position
should be blinking.
Step 9: Press the ENTER key. You are now
prompted to SET PW (or set password).
Step 10: Press the ENTER key.
Step 11: Decide on a five number user password,
then follow the procedure above inserting a number in the flashing display until all five numbers
are inserted.
Step 12: A SAVE prompt will then appear. If the
selected user password is acceptable, press
ENTER. If the selected user password is not
acceptable press ZERO CLEAR to refigure the user
password.
After the password is configured, the default factory password will be replaced with the user password. Once configured, the factory password is no
longer accessible.
If an incorrect password is entered, the system
will display WRONG. Press the CONFIG key to
reenter the correct password.
Step 13: Press ENTER again to begin calibration.
Note: Calibration feature allows recalibration of
zero and span.
KEYPAD FUNCTIONS
*Indicates default.
Page 8

– 9 –
available LANGUAGE options.
Step 4: Press the ENTER key to finalize your
LANGUAGE option.
DAMPING: with six different options, this mode
allows for taking process pressure readings and
averaging them. This option is particularly useful
when there is pulsation in the process. The
options are NONE*, AVG 2, 4, 6 or 8.
Step 1: Press the CONFIG key until the word
DAMPING appears.
Step 2: Press the ENTER key.
Step 3: Press the CONFIG key to select one of the
available DAMPING options.
Step 4: Press the ENTER key to finalize your
DAMPING option.
CONTRAST: this mode allows for BACKLITE con-
trast level. Seven options are available, 1, 2, 3, 4*,
5, 6 and 7.
Step 1: Press the CONFIG key until the word CONTRAST appears.
Step 2: Press the ENTER key.
Step 3: Press the CONFIG key to select one of the
available CONTRAST options.
Step 4: Press the ENTER key to finalize your CON-
TRAST selection.
Note: setting high contrast levels will decrease
battery life.
CALIBRAT.:
Gauge Calibration: Both zero and span adjust-
ments are available. This gauge has been configured with a default password of ШШШШШ. This factory password does not allow access to calibration. To access the calibration mode, it is necessary to configure a user password. Once the user
password is configured, it will become the default
password that allows access to gauge calibration
.
To access the factory default password:
KEYPAD FUNCTIONS
– 8 –
Offerings are Never*, 2, 5, 15, or 30 minutes.
To use the AUTO OFF option:
Step 1: Press the CONFIG key until the word
AUTO OFF appears.
Step 2: Press the ENTER key.
Step 3: Press the CONFIG key to select the
desired AUTO OFF rate.
Step 4 Press the ENTER key to finalize the AUTO
OFF rate.
BACKLITE: 5 options are available. They include
ON/OFF*, 10 seconds, 30 seconds 1 or 5 min-
utes. With the ON option pressed, the gauge backlite will remain lit whenever the gauge is in the ON
mode or until the backlite button is pushed again.
Options allow the backlite to automatically turn-off
after a selected period of time. Note: leaving backlite button on will decrease battery life.
To use the BACKLITE option:
Step 1: Press the CONFIG key until the word
BACKLITE appears.
Step 2: Press the ENTER key.
Step 3: Press the CONFIG key to select one of the
available time options.
Step 4: Press the ENTER key to finalize your
choice of BACKLITE options.
LANGUAGE: available in seven different languages,
this option allows the user to change the default
language in the CONFIG mode. The languages
include English*, French, Spanish, German,
Italian, Portuguese and Dutch.
Step 1: Press the CONFIG key until the word LANGUAGE appears.
Step 2: Press the Enter key.
Step 3: Press the CONFIG key to select one of the
KEYPAD FUNCTIONS
*Indicates default. *Indicates default.
 Loading...