

Prastel M2000PE User Manual
M2000PE
Alimentazione
Ingressi
Capacità memoria
Modalità relè
Portata con
tatti relè
Programmazioni
M/KEYB
Dimensioni/Peso
ITALIANO
ISM2000PEEU_06_12.doc
1. DESCRIZIONE GENERALE
M2000PE è la centrale di controllo accessi per la gestione di due porte.
Essa è dotata di ricevitore radio a 433MHz integrato, di due ingressi per lettori esterni, di due relè di uscita, con portata dei contatti di 5A in modo da
permettere il collegamento diretto alle elettroserrature, e di una memoria interna per la gestione di 2000 diversi codici utente.
Per la programmazione dei codici e dei vari parametri di funzionamento, M2000PE è dotata di 4 tasti e un display a 4 cifre, tramite i quali è possibile:
• programmare nuovi codici in memoria (per autoapprendimento via radio o tramite i lettori collegati agli ingressi)
• cancellare un singolo codice dalla memoria
• selezionare per ogni relè, in modo indipendente, il funzionamento bistabile o temporizzato
• impostare per ogni relè il tempo di attivazione (nel funzionamento temporizzato)
• associare ad ogni relè uno dei quattro canali disponibili nei trasmettitori radio
• attivare il trasferimento dei dati programmati verso un'altra centrale M2000PE collegata tramite linea seriale RS485
Tutte le operazioni possono essere compiute anche tramite la Tastiera/Display remota M/KEYB, collegata all’unità tramite RS/485.
I circuiti ed i componenti della centrale M2000PE sono alloggiati in un contenitore plastico, per uso interno, adatto allo standard per il montaggio su
barre a norme DIN. La tastiera M/KEYB è alloggiata in un contenitore per fissaggio a parete o per il posizionamento su di un tavolo.
2. CARATTERISTICHE TECNICHE
N. relè di uscita
Altre funzioni
3. ELENCO FUNZIONI
Programmazione nuovi codici
1. Premere contemporaneamente i tasti INC e DEC
2. Selezionare con i tasti INC e DEC una locazione di memoria libera (i punti decimali spenti indicano che la locazione è libera)
3. Effettuare una trasmissione o far leggere il badge al lettore il badge da memorizzare: i punti decimali si accendono
4. Confermare la memorizzazione col tasto VAL: i punti decimali lampeggiano brevemente.
5. Ripetere la procedura dal punto 2 per programmare altri codici o premere contemporaneamente i tasti INC e DEC per uscire dalla
programmazione
Cancellazione codici
1. Premere contemporaneamente i tasti INC e DEC
2. Selezionare con i tasti INC e DEC una locazione di memoria da cancellare (i punti decimali accesi indicano che la locazione è occupata)
3. Premere il tasto VAL. Sul display compare la lettera “C” a sinistra.
4. Confermare la cancellazione con il tasto VAL; i punti decimali si spengono e la locazione di memoria è cancellata.
5. Ripetere la procedura dal punto 2 per cancellare altri codici o premere contemporaneamente i tasti INC e DEC per uscire dalla programmazione
Impostazione della modalità di funzionamento e della temporizzazione dei relè
1. Premere contemporaneamente i tasti INC e DEC
2. Premere il tasto FUN per accedere al menu di scelta delle funzioni
3. Selezionare con i tasti INC e DEC la funzione F1 (relè 1) o F2 (relè 2)
4. Confermare la selezione con VAL: sul display appare il valore corrente del parametro
5. Selezionare con i tasti INC e DEC il valore da assegnare al parametro. Se si imposta il valore 0000 il relè funzionerà in modalità bistabile. Se si
imposta un valore compreso tra 1 e 180 il relè funzionerà in modalità monostabile, con tempo di attivazione corrispondente al valore impostato,
espresso in secondi.
6. Confermare con il tasto VAL: il display torna alla selezione funzioni e il nuovo parametro è memorizzato.
7. Premere contemporaneamente i tasti INC e DEC per uscire dalla programmazione
Assegnazione del canale radio al relè
1. Premere contemporaneamente i tasti INC e DEC
2. Premere il tasto FUN per accedere al menu di scelta delle funzioni
3. Selezionare con i tasti INC e DEC la funzione F3 (relè 1) o F4 (relè 2)
4. Confermare la selezione con VAL: sul display appare il valore corrente del parametro
5. Selezionare con i tasti INC e DEC il canale del trasmettitore radio (1, 2, 3 o 4) da assegnare al relè
6. Confermare con il tasto VAL: il display torna alla selezione funzioni e il nuovo parametro è memorizzato.
7. Premere contemporaneamente i tasti INC e DEC per uscire dalla programmazione
Inserimento della password
1. Entrare in modo programmazione con INC+DEC
2. Premere il tasto FUN per accedere al menu di scelta delle funzioni
3. Selezionare con i tasti INC e DEC la funzione F5 e confermare con VAL
4. Sul display appare, a sinistra, la lettera P. Digitare una sequenza di 6 tasti entro 10 secondi. Ogni volta che si preme un tasto la lettera P
lampeggia
5. Al completamento della sequenza di 6 tasti, si torna al menu di scelta delle funzioni.
12 -24 Vac/dc
1 Ricevitore radio 433.92MHz integrato 4 CANALI + 2 ingressi con protocollo Wiegand
2000 utenti
2, comandati dai due ingressi Wiegand e/o dall’ingresso radio, con la possibilità di selezionare l’indirizzo canale per ogni
relè. Es. canale 4 trasmettitore su relè 2.
Contatto di abilitazione alla lettura sulla porta. Uno per ogni relè.
Ingressi per forzare l’attivazione della singola porta (pulsante “apriporta”)
temporizzato da 1s a 180s
5 A
4 pulsanti, FUN – INC – DEC – VAL, e 4 display + Tastiera/Display remota opzionale mod.
Porta seriale RS/485 di comunicazione per il trasferimento dei dati ad una centrale “slave” e per il collegamento della
tastiera remota con 4 pulsanti e 4 display mod. M/KEYB
105 x 90 x 60 320g
1

M2000PE
ITALIANO
ISM2000PEEU_06_12.doc
Se non si completa la sequenza entro 10 secondi, la password non è inserita. Questo serve anche per evitare di inserire password errate, nel caso
che si abbiano dei dubbi sulla sequenza inserita o si premano dei tasti involontariamente.
La password è memorizzata in EEPROM è richiesta ogni volta che si accede alla programmazione premendo INC+DEC a partire dalla situazione di
standby (display spenti). In questo caso:
1. Sul display appare, a sinistra, la lettera P. Digitare la sequenza di 6 tasti che corrisponde alla password. Ad ogni pressione la lettera P lampeggia
2. Al completamento della sequenza di 6 tasti, si entra in programmazione. Se la sequenza è sbagliata, i display si spengono.
Entrati in programmazione, è sempre possibile cancellare la password esistente e sostituirla con una nuova password.
N.B. Per rimuovere una password dimenticata rivolgersi al fornitore del sistema.
Cancellazione della password esistente
1. Premere INC+DEC per entrare in modo programmazione: è richiesta la password
2. Digitare la password
3. Premere il tasto FUN per accedere al menu di scelta delle funzioni
4. Selezionare con i tasti INC e DEC la funzione di inserimento password F5 e confermare con VAL
5. Lasciare scadere il timeout di 10 secondi: la password è azzerata e non sarà più richiesta ai successivi accessi alla programmazione.
Inserimento di un blocco di codici
Con l’inserimento a blocchi si evita di effettuare l’apprendimento di tutti i trasmettitori o di tutte le carte se si hanno confezioni da 10, da 50 o da 100
pezzi con codici consecutivi.
1. Entrare in modo programmazione con INC+DEC
2. Premere il tasto FUN per accedere al menu di scelta delle funzioni
3. Selezionare con i tasti INC e DEC la funzione F6
4. Confermare con VAL: appare la richiesta della prima locazione da programmare, di default, 0001. E’ illuminato solo il primo punto decimale a
sinistra, per indicare che si sta selezionando la locazione di partenza.
5. Selezionare la locazione con INC e DEC e confermarla con VAL.
6. Appare ora la richiesta dell’ultima locazione da programmare: il valore mostrato è quello prima selezionato come locazione di partenza, e con i
tasti INC e DEC è possibile solo selezionare un valore superiore a questo. E’ illuminato l’ultimo punto decimale a destra, per indicare che si sta
selezionando la locazione di fine.
7. Dopo aver selezionato la locazione di fine, confermare con VAL: l’M2000PE si predispone ad accettare la trasmissione di un codice. Una volta
ricevuto il codice (via radio o tramite uno dei lettori collegati), questo è inserito nella locazione di partenza. Le locazioni successive, fino alla
locazione di stop, sono riempite con i codici ottenuti incrementando di un’unità il codice di partenza.
Ad esempio: start=120, stop=127, codice ricevuto=112233
Ad inserimento avvenuto si torna al menu di scelta delle funzioni.
Cancellazione di un blocco di codici
1. Entrare in modo programmazione con INC+DEC
2. Premere il tasto FUN per accedere al menu di scelta delle funzioni
3. Selezionare con i tasti INC e DEC la funzione F7
4. Confermare con VAL: appare la richiesta della prima locazione da cancellare,
Locazione Codice
120
121
122
123
124
125
126
127
⇒
⇒
⇒
⇒
⇒
⇒
⇒
⇒
112233
112234
112235
112236
112237
112238
112239
112240
cioè, di default, 0001. E’ illuminato solo il primo punto decimale a sinistra, per indicare che si sta selezionando la locazione di partenza.
5. Selezionare la locazione con INC e DEC e confermarla con VAL.
6. Appare ora la richiesta dell’ultima locazione da cancellare: il valore mostrato è quello prima selezionato come locazione di start e con i tasti INC
e DEC è possibile solo selezionare un valore superiore a questo. E’ illuminato l’ultimo punto decimale a destra, per indicare che si sta
selezionando la locazione di fine.
7. Dopo aver selezionato la locazione di fine, confermare con VAL; sul display compare la lettera “C” a sinistra.
8. Confermare con il tasto VAL. L’ M2000PE esegue la cancellazione dei codici contenuti nel blocco di locazioni impostato.
Al termine della cancellazione si torna al menu di scelta delle funzioni.
Cancellazione totale dei codici
Con la cancellazione totale si evita di dover scorrere tutte le locazioni e di cancellarle ad una ad una, nel caso si voglia ripulire la memoria.
1. Entrare in modo programmazione con INC+DEC
2. Premere il tasto FUN per accedere al menu di scelta delle funzioni
3. Selezionare con i tasti INC e DEC la funzione F8
4. Confermare con VAL: sul display appare, a sinistra, la lettera C
5. Confermare ancora con VAL: l’M2000PE esegue la cancellazione totale della sola area codici. Tutte le altre programmazioni (tempi relè, canali,
etc…) restano inalterate.
Al termine della cancellazione si torna al menu di scelta delle funzioni.
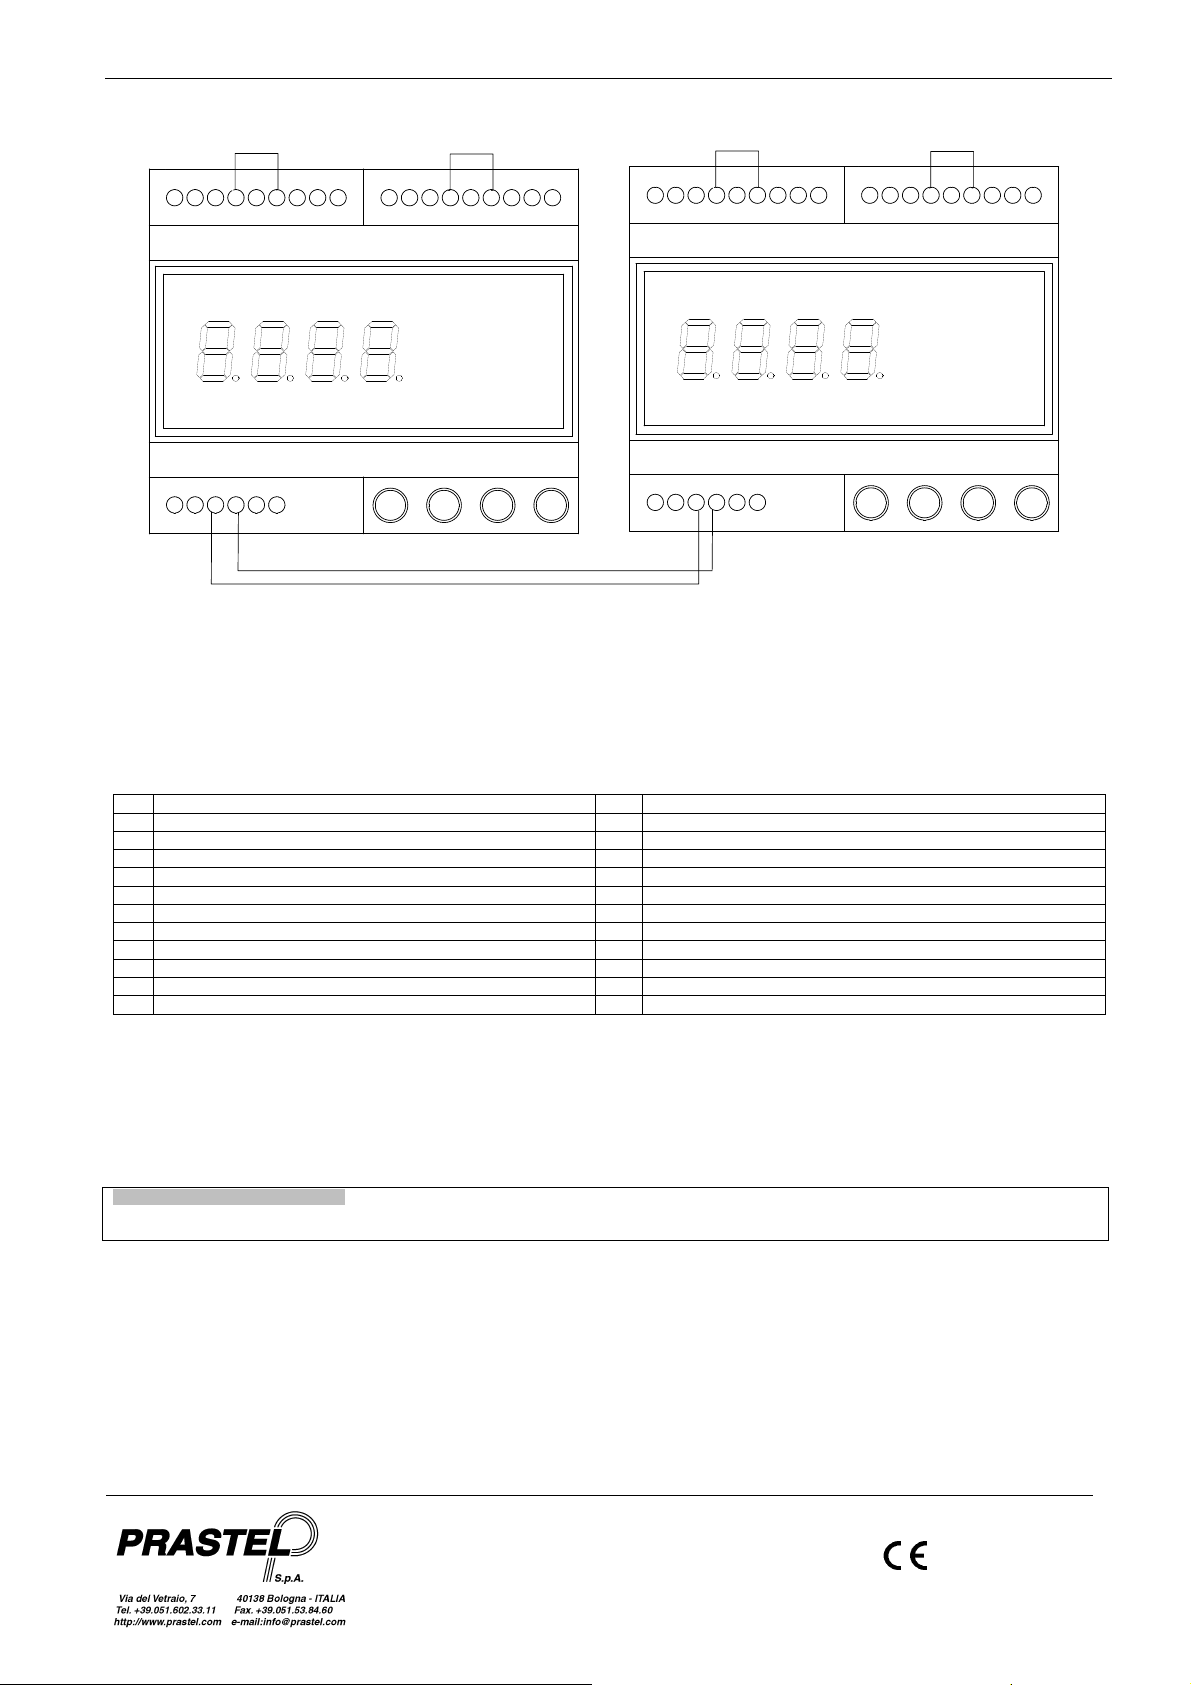
Trasferimento seriale dei dati
1. Collegare le centrali come indicato in figura (massima distanza di collegamento di 500 m).
2. Entrare in modo programmazione con INC+DEC
3. Premere il tasto FUN per accedere al menu di scelta delle funzioni
4. Selezionare con i tasti INC e DEC la funzione F9
5. Confermare con VAL: appare la richiesta della prima locazione da trasferire, cioè, di default, 0001. E’ illuminato solo il primo punto decimale a
sinistra, per indicare che si sta selezionando la locazione di partenza.
6. Selezionare la locazione con INC e DEC e confermarla con VAL.
7. Appare ora la richiesta della locazione di stop: il valore mostrato è quello prima selezionato come locazione di start e con i tasti INC e DEC è
possibile solo selezionare un valore superiore a questo. E’ illuminato l’ultimo punto decimale a destra, per indicare che si sta selezionando la
locazione di fine.
8. Dopo aver selezionato la locazione di fine, confermare con VAL; i quattro segmenti inferiori del display si accendono
9. Confermare con il tasto VAL; parte il trasferimento, durante il quale lampeggiano i quattro segmenti inferiori del display.
ATTENZIONE : effettuare questa manipolazione sulla M2000PE con informazioni già registrate in memoria, non sulla M2000PE di cui
memoria è vuota (altrimenti tutte le informazioni vennero cancellate).
2
M2000PE
Tipo di evento
Esempio di stampa
ITALIANO
ISM2000PEEU_06_12.doc
N.B. Collegare le centrali come indicato in figura 1 utilizzando possibilmente un cavo schermato (massima distanza di collegamento 500 m).
In qualsiasi momento, premendo il tasto FUN si annulla la procedura e si torna al menu di scelta delle funzioni.
Nel caso si prema tasto FUN durante il trasferimento è in corso, il sistema completa comunque il trasferimento del codice che si sta in quel momento
trasferendo, poi la procedura si ferma e si torna al menu di scelta delle funzioni.
Selezione della modalità di utilizzo della memoria
E’ possibile selezionare tre diverse modalità di utilizzo della memoria codici:
F: I codici inseriti via radio possono attivare indifferentemente i due relè, a seconda dell’assegnazione fatta con le funzioni F3 e F4.
H: La memoria viene suddivisa a metà: la parte bassa da locazione 1 a locazione 1000 (associata alla PORTA 1) mentre quella alta da 1001 a 2000
(associata al PORTA 2). Questa funzione è adatta per la gestione di 2 gruppi di utenze diverse sulla stessa centrale, per discriminare l’attivazione del
relè 1 o del relè 2 con lo stesso codice utente (badge, radio, tag). E’ quindi possibile memorizzare un codice (a prescindere dalla tecnologia) in
entrambe le porzioni di memoria e ad es., nel caso di un trasmettitore radio, la ricerca viene fatta a seconda del tasto premuto.
P: Attiva la funzione di anti-passback: ogni codice, una volta attivato uno dei due relè (entrata), non può riattivarlo se prima non ha attivato l’altro
(uscita).
Per selezionare la modalità:
1. Premere contemporaneamente i tasti INC e DEC
2. Premere il tasto FUN per accedere al menu di scelta delle funzioni
3. Selezionare con i tasti INC e DEC la funzione F10
4. Confermare la selezione con VAL: sul display appare il valore corrente della modalità
5. Selezionare con i tasti INC e DEC la modalità F, H o P.
6. Confermare con il tasto VAL: il display torna alla selezione funzioni e la nuova modalità è attiva
7. Premere contemporaneamente i tasti INC e DEC per uscire dalla programmazione
Es: Nella modalità H, per assegnare un telecomando al relè 1, memorizzarlo premendo il canale 1 o il canale 3, Per assegnarlo al relè 2,
memorizzarlo premendo il canale 2 o il canale 4.
Selezione del protocollo di comunicazione
La centrale può colloquiare attraverso la porta seriale utilizzando due diversi protocolli di comunicazione:
0: Comunicazione con GTSYSTEM, M2000PE o MKEYB.
1: Comunicazione con stampante PRINT2000
Per selezionare il protocollo:
1. Premere contemporaneamente i tasti INC e DEC
2. Premere il tasto FUN per accedere al menu di scelta delle funzioni
3. Selezionare con i tasti INC e DEC la funzione F11
4. Confermare la selezione con VAL: sul display appare il valore corrente del protocollo
5. Selezionare con i tasti INC e DEC il protocollo 0 o 1
6. Confermare con il tasto VAL: il display torna alla selezione funzioni e il nuovo protocollo è attivo
7. Premere contemporaneamente i tasti INC e DEC per uscire dalla programmazione
Stampa dell’elenco dei codici
Per eseguire la stampa dell’elenco di tutti i codici presenti in memoria:
1. Impostare il protocollo 1 tramite la funzione F11 (v. Selezione del protocollo di comunicazione)
2. Collegare alla porta seriale la stampante PRINT2000
3. Selezionare la funzione F12
4. Premere il tasto VAL
Al termine della stampa la centrale torna al menu di scelta delle funzioni.
Stampa degli eventi
Se tramite la funzione F11 è stato selezionato il protocollo 1 (v. Selezione del protocollo di comunicazione), e la stampante PRINT2000 è collegata
alla porta seriale, ad ogni ricezione di un codice verrà stampata una stringa contenente la locazione, lo stato dell’utente, il codice utente, la data, l’ora
e il varco, nel formato:
LOCAZIONE STATO CODICE UTENTE
DATA ORA VARCO
Codice Valido
Codice non in memoria
Anti-passback (con modalità di utilizzo della memoria P)
La stampante PRINT2000 deve essere preventivamente programmata con la data e l’ora corrette.
Operazioni tramite tastiera remota
E’ possibile collegare all’M2000PE, un terminale dotato di 4 tasti e 4 display che consente di eseguire le operazioni di programmazione, inserimento
e cancellazione codici da una postazione remota”. La comunicazione avviene tramite una linea seriale RS485 La distanza massima del collegamento
tra l’M2000PE e la tastiera/display (M/KEYB) è 500 metri.
I tasti e i display del terminale remoto corrispondono esattamente a quelli presenti nell’unità base sia come disposizione sia come funzioni.
L’M2000PE rileva automaticamente la presenza del terminale remoto permettendo immediatamente il suo controllo anche dalla tastiera remota.
Non è possibile la programmazione concomitante in centrale e su tastiera. Nel caso si inizi la programmazione da tastiera, i display in centrale
resteranno spenti e viceversa. Non è quindi possibile interrompere da terminale un’operazione di programmazione avviata dall’unità base, e
viceversa.
Dal terminale è possibile compiere tutte le operazioni di programmazione dell’M2000PE, escluso il trasferimento seriale dei dati tra le centrali.
POS.0001 VALID 00524602
01/12/00 04:59 DOOR1
POS.0000 INVALID 00524999
POS.0001 APB 00524602
03/12/00 11:04 DOOR1
3
M2000PE
ITALIANO
Disposizione morsettiere e pulsanti
Porta 1 :contatto di abilitazione relè Porta 2 :contatto di abilitazione relè Porta 1 :contatto di abilitazione relè Porta 2 :contatto di abilitazione relè
ISM2000PEEU_06_12.doc
18 17 16 15 14 13 12 11 10 9 8 7 6 5 4 3 2 1
M/2000E
M/2000PE
19 20 21 22 23 24
F1 : Relay 1 setup
F2 : Relay 2 setup
F3 : Radio channel → Relay 1
F4 : Radio channel → Relay 2
F5 : Password
F6 : Block program
F7 : Block erase
F8 : Erase all
F9 : Data copy
F10 : Memory mode
F11 : Serial port mode
F12 : Print
FUN DEC INC VAL
GIALLO BLU ROSSO VERDE
Se si utilizza la linea seriale RS485 per collegare MKEYB o GTSYSTEM è necessario disconnettere altre M2000PE eventualmente collegate
tramite i morsetti 21 e 22.
Morsettiera
1 Porta 2: contatto relè N.C 13 Porta 1: contatto di abilitazione del relè
2 Porta 2: comune relè 14 Porta 1: pulsante per attivazione del relè
3 Porta 2: contatto relè N.O. 15 GROUND
4 Porta 2: contatto di abilitazione del relè 16 Porta 1: ingresso dati (DATA1)
5 Porta 2: pulsante per attivazione relè 17 Porta 1: ingresso dati (DATA0)
6 GROUND 18 Porta 1: uscita per alimentazione lettore (9 Vdc)
7 Porta 2: ingresso dati (DATA1) 19 Antenna
8 Porta 2: ingresso dati (DATA0) 20 Calza antenna
9 Porta 2: uscita per alimentazione lettore (9 Vdc) 21 Linea seriale (RS485) : B
10 Porta 1: contatto relè N.C 22 Linea seriale (RS485) : A
11 Porta 1: comune relè 23 Alimentazione +12-24 Vac/dc
12 Porta 1: contatto relè N.O. 24 Alimentazione –12-24 Vac/dc
N.B. Assicurarsi che i morsetti 4 e 13 siano collegati a rispettivamente ai morsetti 6 e15 (vedi figura) per abilitare rispettivamente le uscite a relè 1 e
2. Questo contatto risulta particolarmente utile per abilitare, ad esempio,le uscite a relè dell’M2000PE tramite apparecchiature esterne quali spire
magnetiche interrate (l’M2000PE fornisce il comando d’apertura solo in presenza di un veicolo sulla spira evitando aperture indesiderate causate da
una trasmissione via radio involontaria), o tramite relè temporizzati (l’M2000PE è abilitato in un determinato lasso di tempo), chiusura di un contatto
N.A. di un semplice interuttore, etc…
N.B. L’ingresso per forzare l’apertura della singola porta (rispettivamente il morsetto 5 e il 14) è attivo se riferito a GND.
DICHIARAZIONE DI CONFORMITA’
Con la presente PRASTEL S.p.A. dichiara che M2000PE è conforme ai requisiti essenziali ed alle altre disposizioni pertinenti stabilite dalla direttiva 1999/5/CE.
La dichiarazione di conformità completa è disponibile presso Prastel.
4
M2000PE
Power supply
Inputs
M
emory capacity
No. of output relays
Relay operating mode
Relay contact capacity
Programming
M/KEYB
Other functions
M/KEYB
Dimensions and weight
ENGLISH
ISM2000PEEU_06_12.doc
1. GENERAL DESCRIPTION
M2000PE is an access control unit for the operation of two doors.
It is equipped with an integrated 433MHz radio receiver, two inputs for external readers, two output relays with 5A-capacity contacts for direct
connection to the electric locks, and an internal memory with a storage capacity of 2000 user codes.
It is also fitted with 4 keys and a 4-digit display for code and functional parameter setting, and more precisely for
• programming new codes into the memory (through self-learning via the radio or the readers connected to the inputs);
• deleting single codes from the memory;
• selecting either bistable or timed operation mode independently for each relay;
• setting activation time for each relay (in the timed operation mode);
• associating any of the four channels of the radio transmitters to each relay;
• activating transfer of set data to another M2000PE unit connected via the RS485 serial line.
All operations can also be performed through the remote M/KEYB keyboard/display connected to the unit via RS/485.
All M2000PE circuits and components are housed in a plastic enclosure suitable for indoor installation and for mounting on bars according to DIN
standards. The M/KEYB keyboard is housed in an enclosure for wall-mounting or for countertop use.
2. TECHNICAL FEATURES
3. FUNCTIONS
Programming new codes
1. Simultaneously press keys INC and DEC.
2. Select a free storage location via keys INC and DEC (free location is indicated by decimal points being off).
3. Perform transmission or have the badge to be stored read by the badge reader (decimal points will go on).
4. Confirm by pressing key VAL (decimal points will briefly flash).
5. Repeat procedure from step 2 to enter other codes or simultaneously press keys INC and DEC to exit from programming mode.
Deleting codes
1. Simultaneously press keys INC and DEC.
2. Select the storage location to be deleted via keys INC and DEC (decimal points on indicate that the location is engaged)
3. Press the VAL key. The letter -C- will now appear on the left-hand side of the display.
4. Press the VAL key again to confirm deletion. The decimal points will go off and the storage location ‘h’ will be deleted.
5. Repeat procedure from step 2 to delete other codes and simultaneously press keys INC and DEC to exit from the programming mode.
Selecting operation mode and relay timing
1. Simultaneously press keys INC and DEC.
2. Press key FUN to access the function selection menu.
3. Select function F1 (relay 1) or F2 (relay 2) by pressing keys INC and DEC.
4. Confirm selection by pressing the VAL key; current parameter value will appear on the display.
5. Select the value to be assigned to the parameter by pressing keys INC and DEC. If value 0000 is set, the relay will operate in the bistable mode.
If a value between 1 and 180 is selected, the relay will operate in the monostable mode with activation time corresponding to the set value
(expressed in seconds).
6. Confirm by pressing key VAL; display will return to function selection and the new parameter will be stored.
7. Simultaneously press keys INC and DEC to exit from programming mode.
Assigning radio channel to the relay
1. Simultaneously press keys INC and DEC.
2. Press the FUN key to access the function selection menu.
3. Select function F3 (relay 1) or F4 (relay 2) by pressing keys INC and DEC.
4. Confirm selection by pressing the VAL key; current parameter value will appear on the display.
5. Select the desired radio transmitter channel (1, 2, 3 or 4) to be assigned to the relay by pressing keys INC and DEC.
6. Confirm by pressing key VAL; display will return to function selection and the new parameter will be stored.
7. Simultaneously press keys INC and DEC to exit from programming mode.
Entering the password
1. Access programming mode by pressing keys INC + DEC.
2. Press the FUN key to access the function selection menu.
3. Select function F5 by pressing keys INC and DEC and confirm by pressing the VAL key.
4. The letter P will appear on the left side of the display. Digit a sequence of six keys within 10 seconds. Each time a key is pressed, the letter P will
flash.
5. Upon the full sequence of six keys having been completed, the function selection menu will reappear on the display.
Failure to complete sequence within 10 seconds will abort password entry. This also avoids entry of incorrect passwords in case of any doubts as to
the sequence to be entered or erroneous pressing of any key.
12-24Vac/dc
integrated 433.92MHz radio receiver, 4 channels + 2 inputs with Wiegand protocol
2,000 users
2, controlled by two Wiegand inputs and/or by radio input, with the possibility of selecting channel address for each
relay. Example: channel 4 transmitter on relay 2.
Contact for enabling reading function on the door (one for each relay).
Inputs for forcing activation of the single door (“door opener” push-button)
timed from 1 to 180 seconds
5 A
4 keys (FUN, INC, DEC, VAL) and 4 displays plus
RS/485 serial communication port for transferring data to a slave unit and for connection of the
keyboard with 4 keys and 4 displays
105x90x60, 320 grams
remote optional keyboard/display
remote
5

M2000PE
ENGLISH
ISM2000PEEU_06_12.doc
The password is stored in EEPROM and is requested whenever INC+DEC are pressed to access programming mode starting from the stand-by
status (displays being off). In this case:
1. The letter P appears on the left side of the display. Digit the sequence of six keys corresponding to the password. Each time a key is pressed, the
letter P will flash.
2. Upon the 6-key sequence being completed, programming mode is accessed. If sequence is erroneous, the displays will go off.
Upon programming mode being accessed, any resident password may be deleted or replaced with a new one.
Note: To remove a password which has been forgotten, contact system supplier.
Deleting a resident password
1. Press INC+DEC to access programming mode: the password will be requested.
2. Digit in the password.
3. Press the FUN key to access the function selection menu.
4. Select the password entry function F5 by pressing keys INC and DEC and confirm by pressing key VAL.
5. Allow time-out (10 seconds) to elapse; password is deleted and will not be requested upon any subsequent accessing of programming mode.
Entering a set of codes
Entry of a set of codes avoids having to perform learning of all the transmitters or of all the badges in case of packages of 10, 50 or 100 pieces with
consecutive codes.
1. Access programming mode by pressing keys INC+DEC.
2. Press the FUN key to access the function selection menu.
3. Select function F6 by pressing keys INC and DEC.
4. Confirm by pressing the VAL key. Request of the first location to be programmed will now appear, default value being 0001. Only the first
decimal point to the left will appear indicating that the initial location is being selected.
5. Select location by pressing keys INC and DEC, and confirm by pressing the VAL key.
6. Request of final location to be programmed will now appear. The value shown is the one which has been previously selected as the initial
location so that only a value greater than this can be selected by pressing keys INC and DEC. The last decimal point to the right will now appear
indicating that the final location is being selected.
7. After selection of the final location, confirm by pressing the VAL key. The M2000PE will now set itself up to accept transmission of a code. Once
code has been received (via radio or any of the connected readers), it is entered in the initial location. All subsequent locations up to the final
one may be entered with codes obtained by increasing the initial code by one unit.
Example: initial location = 120, final location = 127, received code = 112233
Upon all locations having been entered with the code, system will return to the function selection menu.
Deleting a set of codes
1. Access programming mode by pressing keys INC+DEC.
2. Press the FUN key to access the function selection menu.
3. Select function F7 by pressing keys INC and DEC.
4. Confirm by pressing the VAL key. Request of the first location to be deleted
Location Code
120
121
122
123
124
125
126
127
⇒
⇒
⇒
⇒
⇒
⇒
⇒
⇒
112233
112234
112235
112236
112237
112238
112239
112240
(that is, the default value 0001) will now appear. Only the first decimal point to the left will appear indicating that the initial location is being
selected.
5. Select location by pressing keys INC and DEC, and confirm by pressing the VAL key.
6. Request of final location to be deleted will now appear. The value shown is the one which has been previously selected as the initial location so
that only a value greater than this can be selected by pressing keys INC and DEC. The last decimal point to the right will now appear indicating
that the final location is being selected.
7. After having selected the final location, confirm by pressing the VAL key; the letter -C- will now appear on the left-hand side of the display.
8. Press the VAL key again to confirm. The M2000PE will now automatically delete all the codes stored in the set of programmed locations.
Upon deletion being completed, system will return to the function selection menu.
Deleting all codes
Deletion of all codes avoids having to scroll all locations and having to delete one code at a time in case of memory having to be fully cleared.
1. Access programming mode by pressing keys INC+DEC.
2. Press the FUN key to access the function selection menu.
3. Select function F8 by pressing keys INC and DEC.
4. Confirm by pressing the VAL key. The letter C will appear on the left side of the display.
5. Confirm again by pressing the VAL key. The M2000PE will fully delete the code area only. All other stored parameters (relay times, channels,
etc.) will remain unaltered.
Upon deletion being completed, system will return to the function selection menu.
Serial transferring of data
1. Access programming mode by pressing keys INC+DEC.
2. Press the FUN key to access the function selection menu.
3. Select function F9 by pressing keys INC and DEC.
4. Confirm by pressing the VAL key. Request of the first location to be transferred (that is, the default value 0001) will now appear. Only the first
decimal point to the left will appear indicating that the initial location is being selected.
5. Select location by pressing keys INC and DEC, and confirm by pressing the VAL key.
6. Request of final location will now appear. The value shown is the one which has been previously selected as the initial location so that only a
value greater than this can be selected by pressing keys INC and DEC. The last decimal point to the right will now appear indicating that the
final location is being selected.
7. After having selected the final location, press the VAL key to confirm; the four lower segments in the display will now come on.
8. Press the VAL key again to confirm; this will initiate data transfer which while in progress will be signalled by the four segments in the lower part
of the display flashing.
WARNING : this manipulation has to be done on the M2000PE with data registered in its memory, not on the M2000PE whose memory is
empty (otherwise all data will be deleted)
Pressing of the FUN key at any time causes system to exit from data transfer mode and to return to the function selection menu.
If the FUN key is pressed while data is being transferred, the system in any case completes transfer of the code being processed, after which it exits
from this mode and returns to the function selection menu.
6
M2000PE
Type of event
Print example
ENGLISH
ISM2000PEEU_06_12.doc
Selecting the modalities for using the memory
It is possible to select three different modalities for using the code memory:
F: The codes entered via radio can activate either of the two relays, according to the assignment made with functions F3 and F4.
H: The memory is divided into two parts: lower part from location 1 to location 1000 (associated to PORT 1), upper part from location 1001 to location
2000 (associated to PORT 2).
This function is useful to manage two groups of different users in the same unit, to discriminate the activation of relay 1 or relay 2 with the same user
code (badge, radio, tag).
P: The anti-passback function is active: each code, once one of the two relays is activated (input), cannot be reactivated unless the other one is
activated first (output).
In order to select the modality:
1. Press keys INC and DEC at the same time
2. Press key FUN to access the select functions menu
3. Using keys INC and DEC select function F10
4. Confirm the selection with VAL: the display shows the current value of the modality
5. Using keys INC and DEC select modality F, H or P.
6. Confirm with key VAL: the display returns to selecting functions and the new modality is active
7. Press keys INC and DEC at the same time to exit programming
WARNING: By modifying the modalities for using the memory all previously stored codes are deleted.
In order to assign a remote control to relay 1 in modality H, store it by pressing channel 1 or channel 3. To assign it to relay 2, store it by pressing
channel 2 or channel 4.
Selecting the communication protocol
The control unit can dialog via the serial port by using two different communication protocols:
0: Communication with GTSYSTEM, M2000 or MKEYB.
1: Communication with printer PRINT2000
In order to select the protocol:
1. Press keys INC and DEC at the same time
2. Press key FUN to access the select functions menu
3. Using keys INC and DEC select function F11
4. Confirm the selection with VAL: the display shows the current value of the protocol
5. Using keys INC and DEC select protocol 0 or 1
6. Confirm with key VAL: the display returns to selecting functions and the new protocol is active
7. Press keys INC and DEC at the same time to exit programming
Printing the list of codes
In order to print the list of all the codes in the memory:
1. Set protocol 1 via function F11 (see Selecting the communication protocol)
2. Connect the printer PRINT2000 to the serial port
3. Select function F12
4. Press key VAL
When the printing is finished the control unit returns to the select functions menu.
Printing the events
If protocol 1 has been selected via function F11 (see Selecting the communication protocol), and the printer PRINT2000 is connected to the serial
port, each time a code is received a string will be printed containing the location, user status, user code, date, time and door, in the following format:
LOCATION STATUS USER CODE
DATE TIME DOOR
Valid Code
Code not stored
Anti-passback (with modality P for using the memory)
The printer PRINT200 must have been previously programmed with the correct date and time.
Operating the system via the remote keyboard
The M2000PE may be connected to a terminal equipped with 4 keys and 4 displays for the remote programming, entering and deleting of codes.
Communication is made via an RS485 serial line.
Maximum link-up distance between the M2000PE and the M/KEYB keyboard/display is 500 metres.
The keys and displays of the remote terminal are exactly the same as those on the base unit both in terms of configuration and functions.
The M2000PE automatically detects the presence of the remote terminal, so that the same can be immediately controlled from the remote keyboard.
Programming cannot be made simultaneously on the central unit and the remote keyboard. In case of programming having been initiated from the
remote keyboard, the displays of the central unit will stay off and vice versa. This means that a programming operation initiated from the central unit
cannot be aborted from the remote keyboard and vice versa.
The terminal permits all M2000PE programming operations except the serial transfer of data from one central unit to another.
Note: Connect the central units as shown in the figure (maximum connection distance is 500 meters).
POS.0001 VALID 00524602
01/12/00 04:59 DOOR1
POS.0000 INVALID 00524999
POS.0001 APB 00524602
03/12/00 11:04 DOOR1
7
 Loading...