

Page 1
On-Line UPS
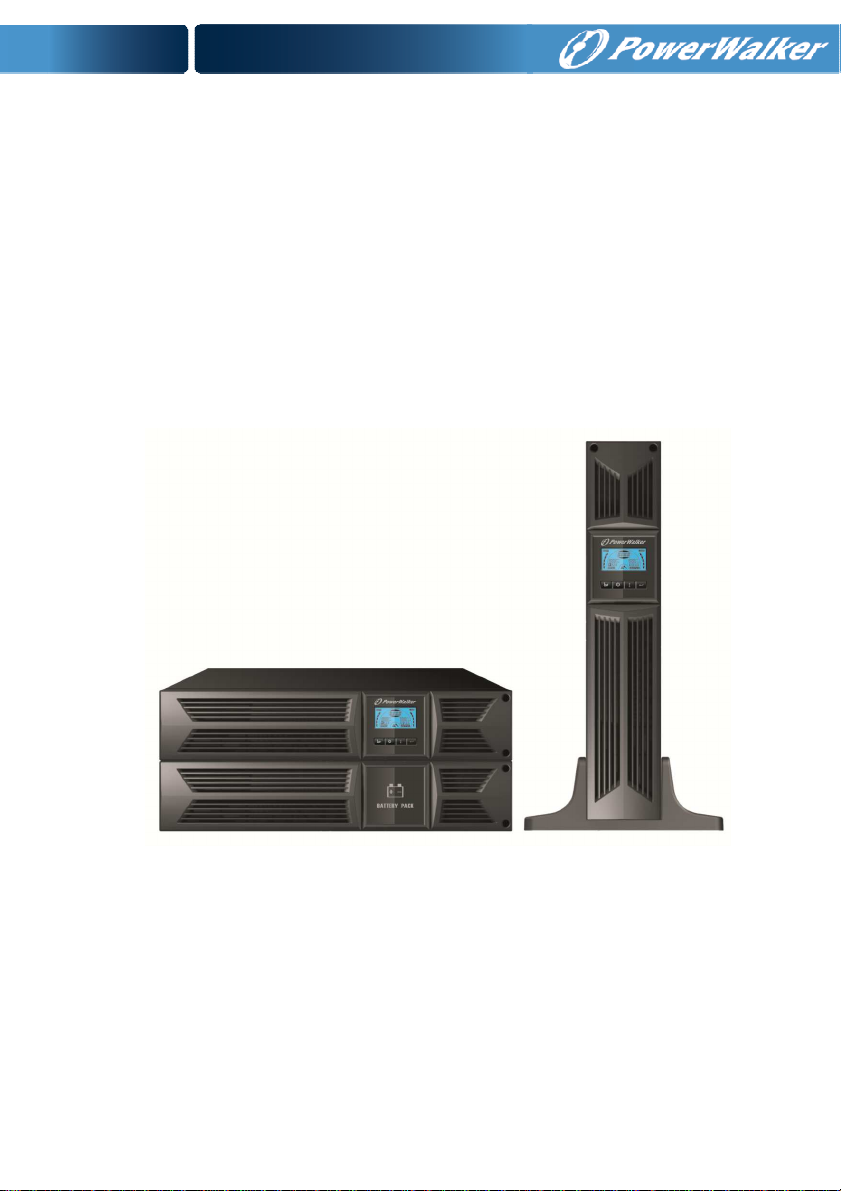
PowerWalker VFI 1000RT LCD
PowerWalker VFI 1500RT LCD
PowerWalker VFI 2000RT LCD
PowerWalker VFI 3000RT LCD
Manual
EN, DE, FR
Page 2

2
EN
CONTENT
USER MANUAL .................................... Fehler! Textmarke nicht definiert.
1. Safety and EMC Instructions ............................................................ 1
1.1 Installation .......................................................................................... 1
1.2 Operation ............................................................................................ 9
1.3 Maintenance, servicing and faults .................................................... 10
1.4 Transport .......................................................................................... 13
1.5 Storage ............................................................................................. 13
1.6 Standards ......................................................................................... 14
2. Description of Commonly Used Symbols ..................................... 15
3. Introduction ...................................................................................... 16
4. Panel Description ............................................................................. 17
5. Connection and Operation .............................................................. 19
5.1 Inspection ......................................................................................... 19
5.2 Connection ....................................................................................... 19
5.3 Battery charge .................................................................................. 21
5.4 Turn on the UPS ............................................................................... 21
5.5 Test function ..................................................................................... 21
5.6 Turn off the UPS ............................................................................... 22
5.7 Audible alarm mute function ............................................................. 22
5.8 Operation procedure of external battery for long backup time model
(“S” model) ............................................................................................. 22
6. Operating Mode for All Models ....................................................... 24
6.1 Line mode ......................................................................................... 24
6.2 Battery mode .................................................................................... 25
6.3 Bypass mode .................................................................................... 25
6.4 NO output mode ............................................................................... 26
6.5 EPO (Emergency Power Off) ........................................................... 26
6.6 ECO mode (Economy mode) ........................................................... 26
6.7 Converter mode ................................................................................ 27
6.8 Abnormal mode ................................................................................ 27
7. Setting by LCD Module .................................................................... 28
8. Trouble Shooting .............................................................................. 30
9. Maintenance ...................................................................................... 32
Page 3

EN
9.1 Operation .......................................................................................... 32
9.2 Storage ............................................................................................. 32
9.3 Battery Replace ................................................................................ 32
10. Technical Data ................................................................................ 33
10.1 Electrical specifications .................................................................. 33
10.2 Operating Environment .................................................................. 33
10.3 Typical backup time (Typical values at 25°C in minutes:) ................. 33
10.4 Dimensions and weights .................................................................. 34
11. Communication Port ...................................................................... 35
11.1 RS-232 and USB communication ports ......................................... 35
11.2 RS-232 port .................................................................................... 35
11.3 USB port ......................................................................................... 36
11.4 Installing a Serial Network Management Card (optional) .............. 36
11.5 Dry Contact port ........................................................................... 36
12. Software Installation ...................................................................... 38
Appendix: Rear panel .......................................................................... 39
Page 4

Page 5

EN
1. Safety and EMC Instructions
SAVE THESE INSTRUCTIONS – This manual contains important instructions for
models PowerWalker VFI 1000/1500/2000/3000RT LCD that should be followed
during installation and maintenance of the UPS and batteries.
Please read carefully the following user manual and the safety
instructions before installing the unit or using the unit!
1.1 Installation
• This product is specially designed for PCs and it is not recommended for use
in any life-supporting system and other specific important equipment.
• Do not connect household or other appliances or items of equipment which
would overload the UPS (e.g. laser printers, hair dryers, etc) to the UPS
output.
• This unit intended for installation in a controlled environment (temperature
controlled, indoor area free of conductive contaminants).
• Condensation may occur if the UPS is moved directly from a cold to a warm
environment. The UPS must be absolutely dry before being installed. Please
allow an acclimatization time of at least two hours.
• Risk of electric shock, do not remove cover. No user serviceable parts inside.
Refer servicing to qualified service personnel.
• The utility power outlet shall be near the equipment and easily accessible. To
isolate UPS from AC input, remove the plug from the utility power outlet.
• If UPS is to be stored for a long time, it is recommended to recharge the
batteries (by connecting the utility power to UPS, switch “ON”), once a month
for 24 hours to avoid a full battery discharge.
• Please do not use the UPS in excess of the rated load capacity.
• The UPS contains large-capacity batteries. So the shell shall not be opened,
otherwise such dangers as electric shock will be caused. If any internal
overhaul or replacement of the battery is required, please contact the
distributor.
• The internal short circuiting of the UPS will lead to dangers such as electric
shock or fire, therefore, no water containers (such as a water glass) shall be
placed on the top of the UPS so as to avoid such dangers as electric shock.
• Do not dispose of battery or batteries in a fire. The battery may explode.
1
Page 6

2
EN
• Do not open or mutilate the battery or batteries. Released electrolyte is
harmful to the skin and eyes. It may be toxic.
• Icon Φ on the rating label stands for phase symbol.
• A battery can present a risk of electrical shock and high short circuit current.
The following precautions should be observed when working on batteries :
• Remove watches, rings, or other metal objects from the hand.
• Use tools with insulated handles.
• Servicing of batteries should be performed or supervised by personnel
knowledgeable of batteries and the required precautions. Keep
unauthorized personnel away from batteries.
• When replacing batteries, replace with the same type and number of the
sealed lead-acid batteries.
• This pluggable type A equipment with battery already installed by the supplier
is operator installable and may be operated by laymen.
• During the installation of this equipment it should be assured that the sum of
the leakage currents of the UPS and the connected loads does not exceed
3.5mA.
• Attention, hazardous through electric shock. Also with disconnection of this
unit from the mains, hazardous voltage still may be accessible through supply
from battery. The battery supply should be therefore disconnected in the plus
and minus pole of the battery when maintenance or service work inside the
UPS is necessary.
• The mains socket outlet that supplies the UPS shall be installed near the UPS
and shall be easily accessible.
• Place cables in such a way that no one can step on or trip over them.
• Assure to connect the UPS and external battery pack with the earth reliably
• Do not block ventilation openings in the UPS´s housing. Ensure the air vents
on the front and rear of the UPS are not blocked. Allow at least 25cm of space
on each side.
• In case smoke is found coming out from the device, please cut off the power
supply quickly and contact the distributor.
• An appropriate disconnect device as short-circuit backup protection should be
provided in the building wiring installation. Please see the disconnect device
specification in chapter 5.2
• Do not keep or use this product in any of the following environments:
o Any area with combustible gas, corrosive substance, heavy dust,
Page 7

EN
standing water or running water.
o Any area with extraordinarily high or low temperature (above 40˚C or
below 0˚C) and humidity of more than 90%.
o Any area exposed to direct sunshine or near any heating apparatus.
(Maximum ambient temperature rating is 40°C.)
o Any area with serious vibrations.
o Outdoor.
• In the event that there is fire occurring in the vicinity, please use dry-power
extinguishers. The use of liquid extinguishers may give rise to the danger of
electric shock.
★
1.1.1 Inspection of Unit
Inspect the UPS upon receiving. If the UPS is apparently damaged during the
shipment, please keep the box and packing material in original form for the
carrier and notify the carrier and dealer immediately.
1.1.2 Unpacking the Cabinet
To unpack the system:
1. Open the outer carton and remove the accessories packaged with the
cabinet.
2. Carefully lift the cabinet out of the outer carton and set it on a flat, stable
surface.
3. Discard or recycle the packaging in a responsible manner, or store it for
future use.
1.1.3 UPS Setup
All model series are designed for tower and rack purpose. They can be
installed into a 19 inches equipment rack. Please follow the instruction for
Tower Setup and Rack-Mount Setup.
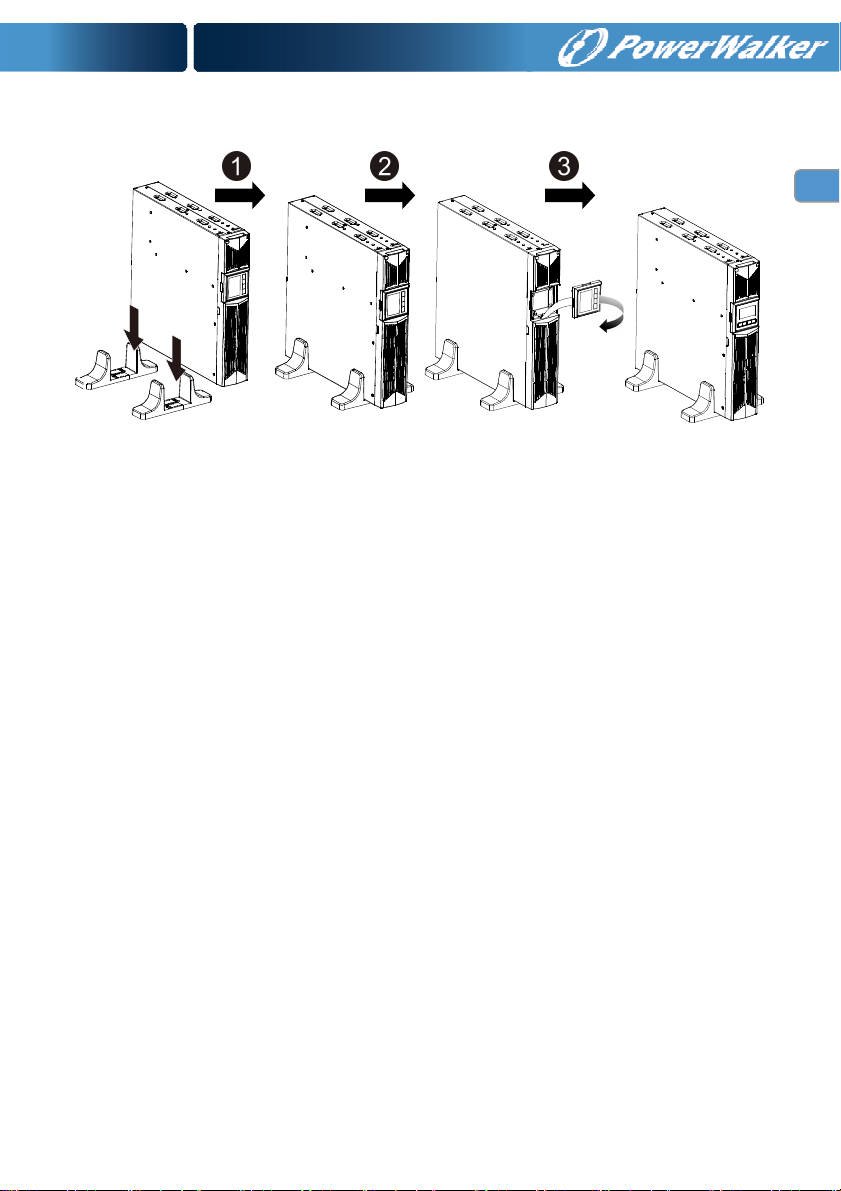
Tower setup
This series of UPS can be placed horizontally and vertically. As a tower
configuration, it is provided with the optional UPS stands to stabilize the UPS
when the UPS is positioned in vertical. The UPS stand must be attached to the
bottom of the tower. Use the following procedure to install UPS in UPS stands.
1. Slide down the UPS vertically and put two UPS stands at the end of the tower.
2. Place down the UPS into two stands carefully.
3
Page 8
4
EN
3. Pull out the LCD box and rotate it in a clockwise direction to 90 degree and then
push it back in the front panel.
Page 9
EN
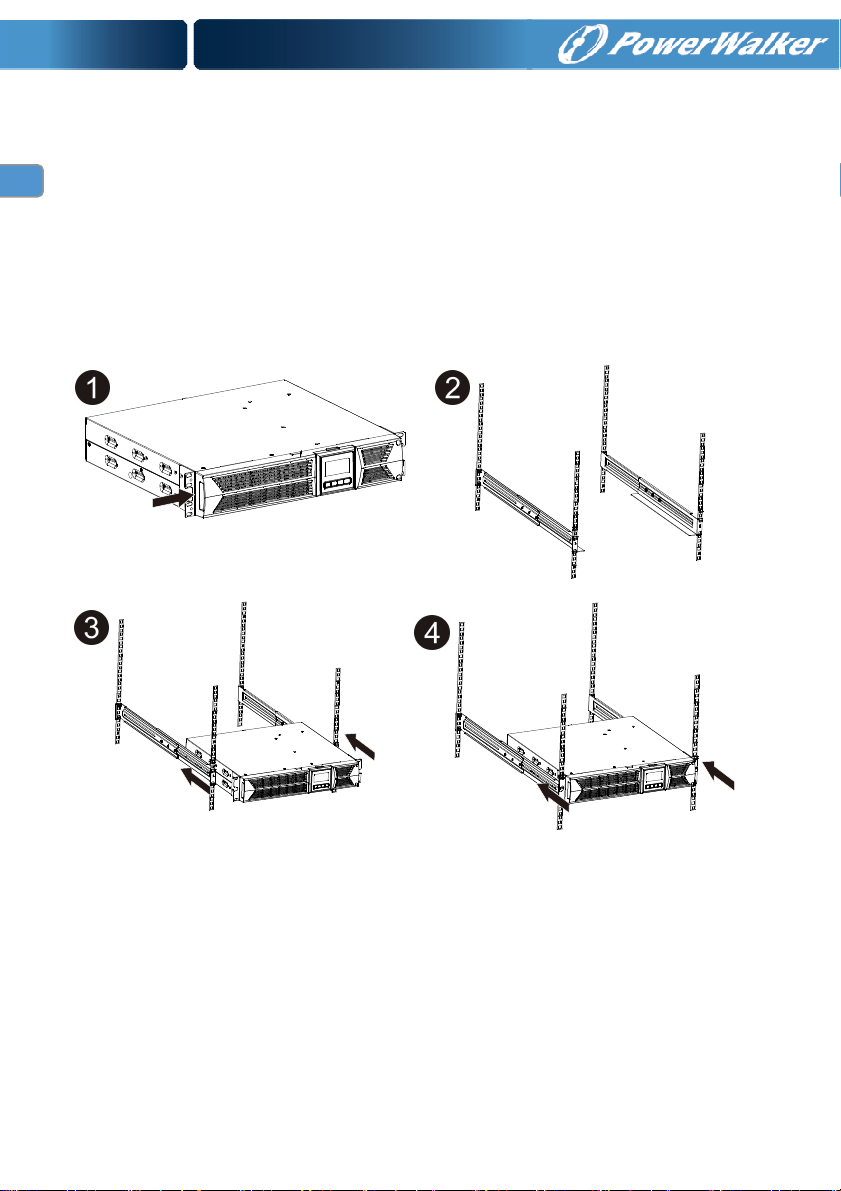
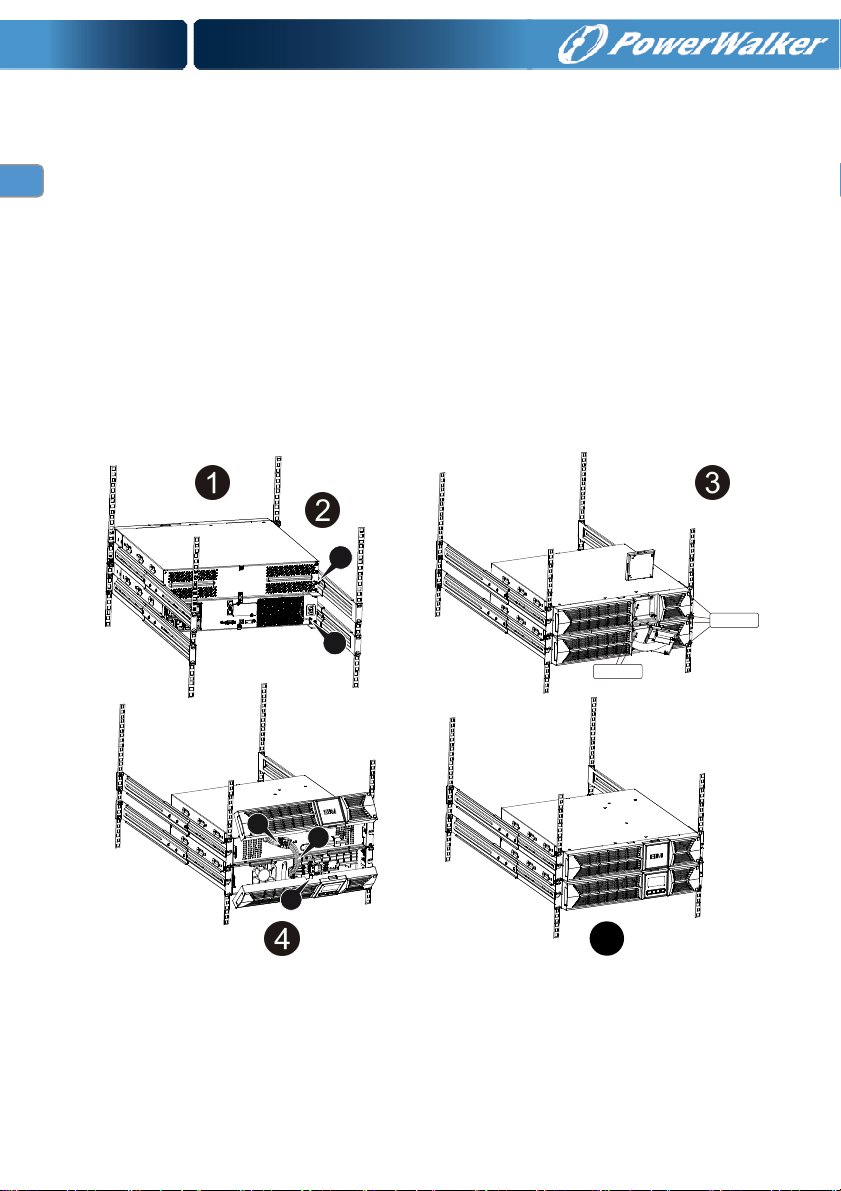
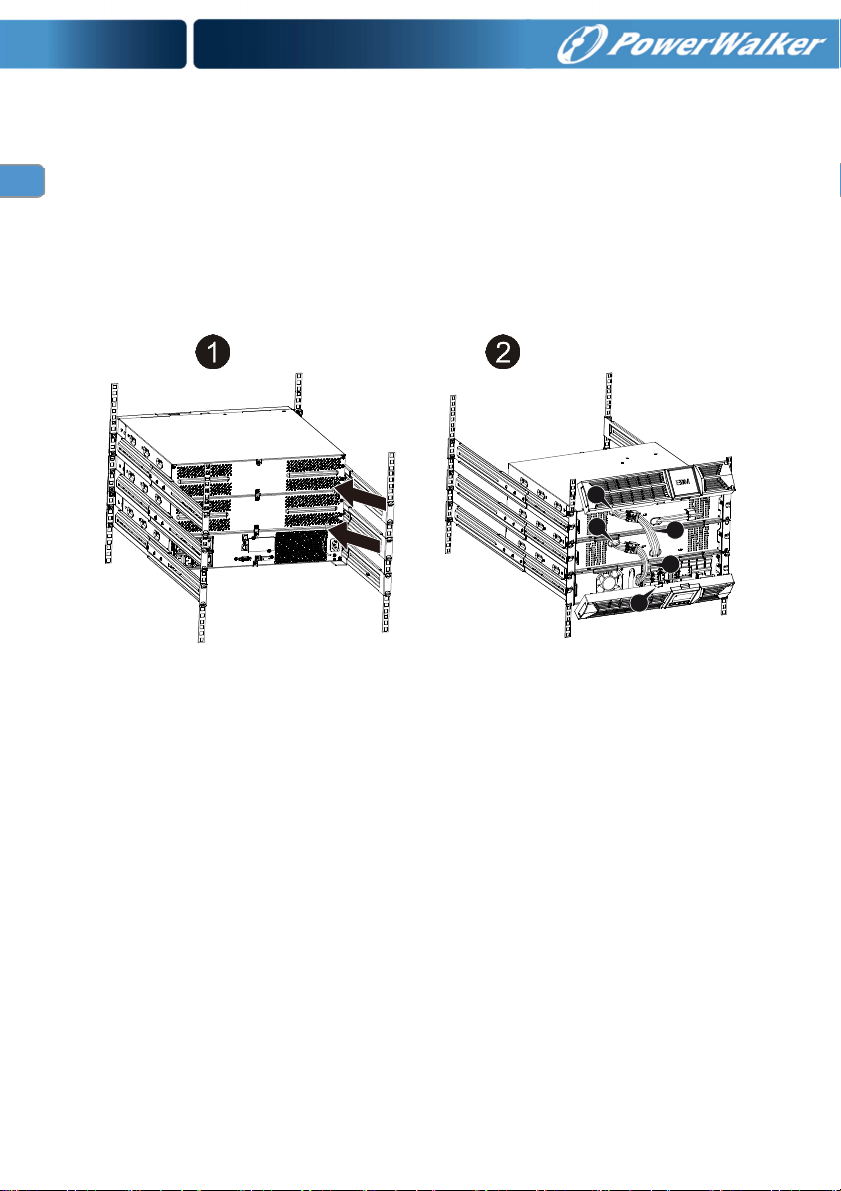
Rack-mount setup
The series can be installed in 19 inches racks. Both the UPS and external battery
enclosure need 2U of rack space.
Use the following procedure to install UPS in a rack.
1. Align the mounting ears with screw holes on the side of the UPS, and tighten
the screw.
2. Assemble the rack rails with the rack-mounting.
3. Slide in the UPS into the rack rail and lock it in the Rack-mounting.
4. Tighten the screw, and then the load can be connected.
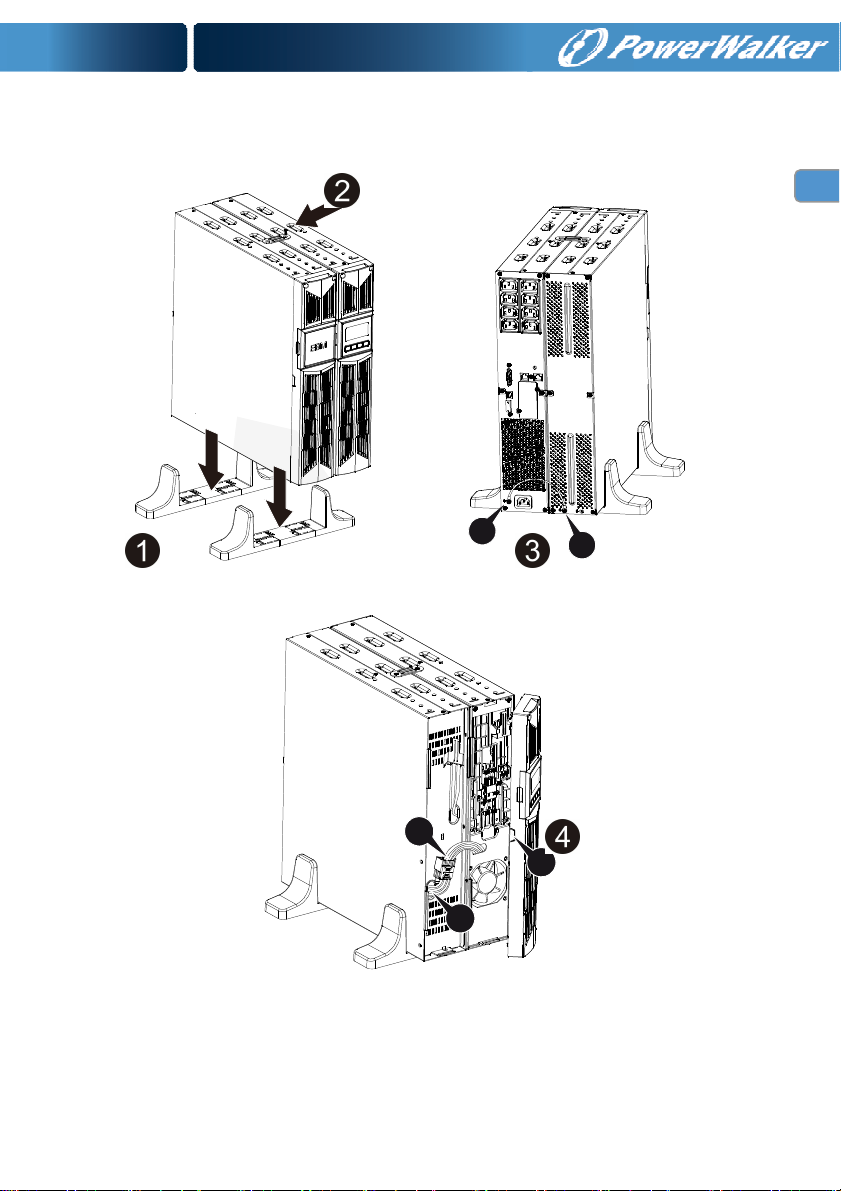
1.1.4 EBM Installation (Optional)
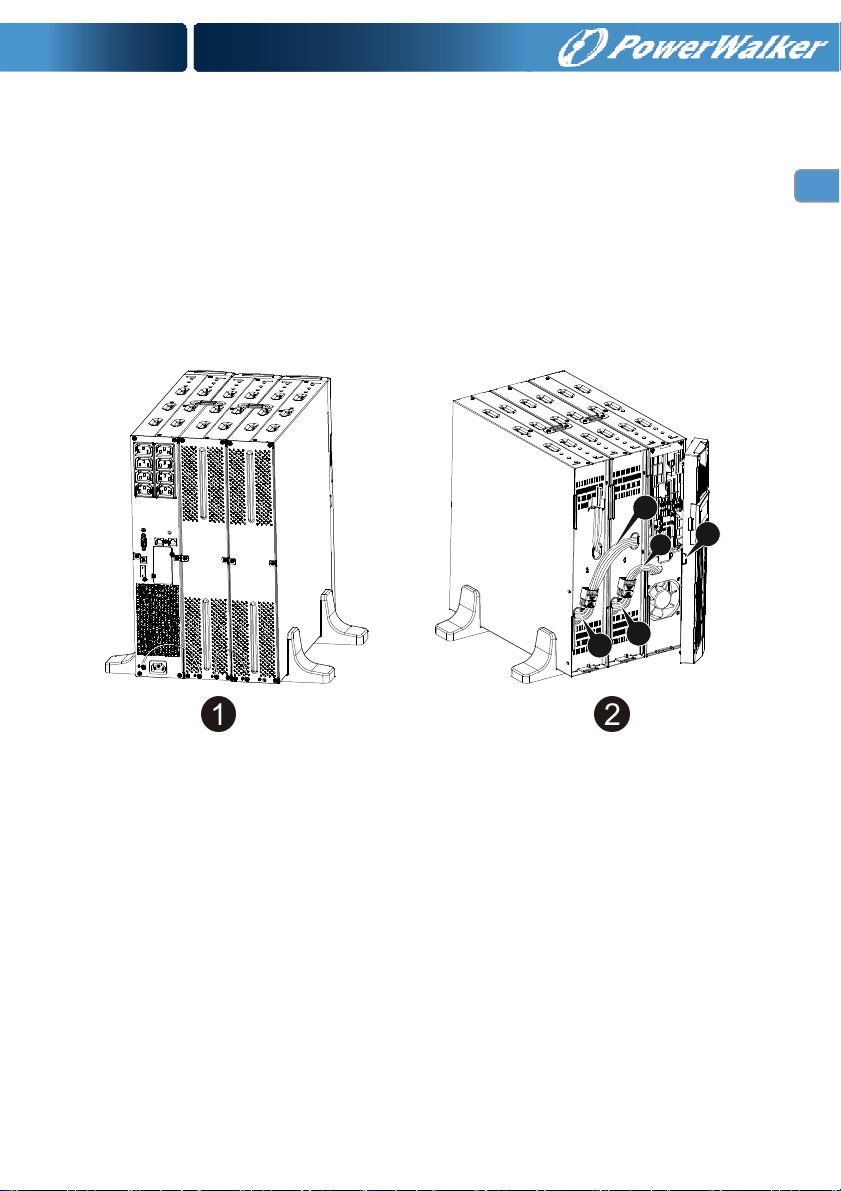
Connecting the EBM in Tower form:
1. Slide down the UPS and EBM vertically and place two UPS stands with the
extend part at the end of the tower.
2. Tighten the screw on the metal sheet for stabilization
3. Connect the Earth line from UPS (port A ) to EBM (port B)
4. Take off the front panel, and connect the battery terminal (A) from UPS to
EBM terminal (B) shown as below. Users need to remove the small gate(C)
5
Page 10
6
EN
on side of the front panel to allow the outlet wire of the EBM to pass through
the gate and then reassemble front panel.
A
A
B
C
B
Page 11
EN
5
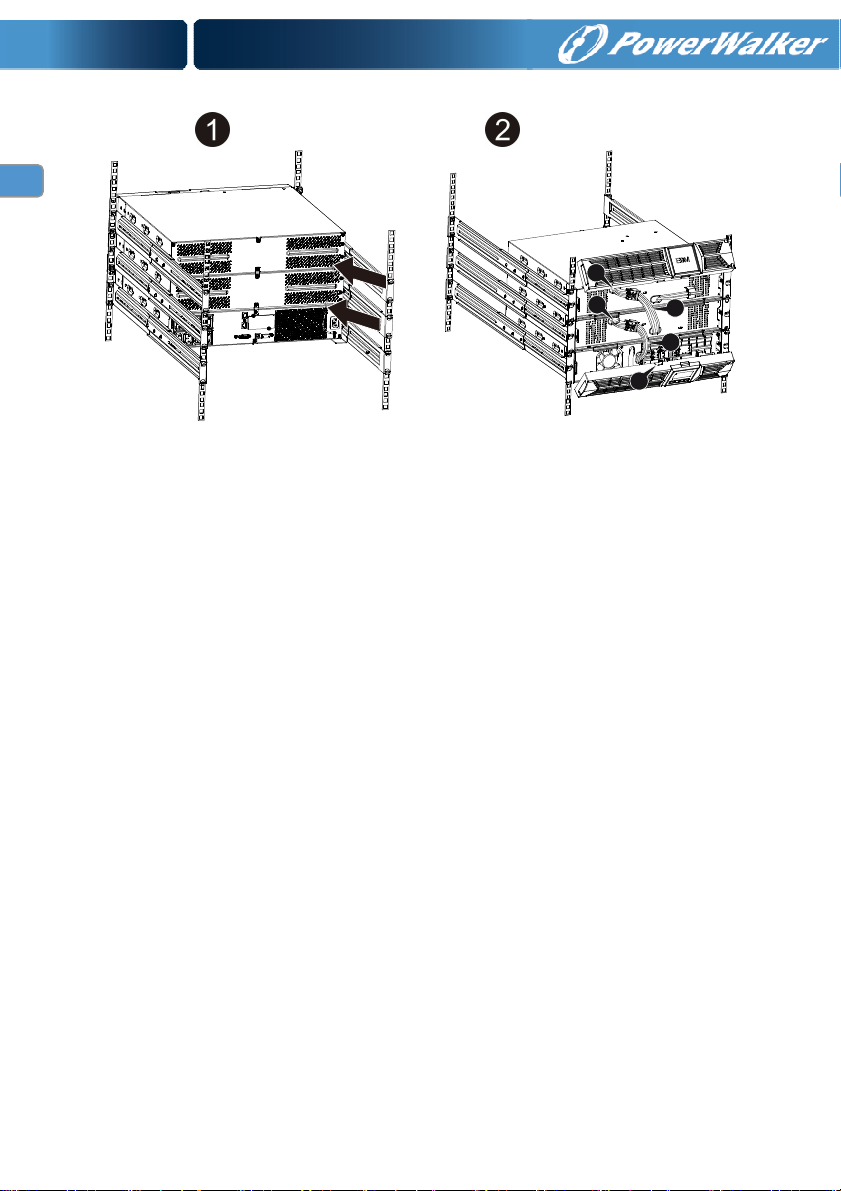
Connecting the EBM in a rack form
1. Using the same method as assembling UPS in a rack form, assemble EBM
into the rack-mounting on the top or bottom of the UPS.
2. Connect the earth line from UPS (port A ) to EBM (port B )
3. Take off the LCD box, and unscrew the internal screws.
4. Take off the front panel, and connect the battery terminal (A) from UPS to
EBM terminal (B) shown as below. Users need to remove the small gate(C)
on side of the front panel to allow the outlet wire of the EBM to pass through
the gate and then reassemble front panel.
5. After installing the UPS into rack, the load can then be connected to UPS.
Please make sure the load equipment is turned off before plugging all loads
into the output receptacle
B
A
Unscrew
Unscrew
B
A
C
Connecting the Multiple EBMs
1000VA/1500VA/2000VA and 3000VA UPS include external battery port that
allows users to connect multiple EBM in order to provide additional backup
time. Follow the procedure to install multiple EBM as below.
7
Page 12
8
EN
Connecting multiple EBMs in Tower form
1. Connect Earth line between UPS and the first EBM, and then connect Earth
Line between the first EBM and the second EBM.
2. Take off the front panel, and connect the battery terminal (A) from UPS to
EBM terminal (B) shown as below. And then connect the battery terminal
(D) from the first EBM to the battery terminal (E) from the second EBM.
Users need to remove the small gate(C) on side of the front panel to allow
the outlet wire of the EBM to pass through the gate and then reassemble
front panel.
D
C
A
B
E
Connecting the Multiple EBMs in rack form
1. Connect Earth line between UPS and the first EBM, and then connect
Earth Line between the first EBM and the second EBM.
2. Take off the front panel, and connect the battery terminal (A) from UPS to
EBM terminal (B) shown as below. And then connect the battery terminal
(D) from the first EBM to the battery terminal (E) from the second EBM.
Users need to remove the small gate(C) on side of the front panel to allow
the outlet wire of the EBM to pass through the gate and then reassemble
front panel.
Page 13
EN
E
B
D
A
C
Note: Three or more EBMs can be connected to the UPS in the same way as
shown above.
Note: After connect the EBMs, please do not forget to set the number of
EBMs on LCD, please refer to chapter 7 “Setting by LCD module” for setting
method. If use the nonstandard EBMs,
setting method.
please call local dealer or distributor for
1.2 Operation
★ Do not disconnect the mains cable on the UPS or the building wiring
socket (grounded shockproof socket) during operation as this would
remove the ground to the UPS and of all connected loads.
★ The UPS features its own, internal current source (batteries). You may be
electric shock when you touch the UPS output sockets or output terminal
block even if the UPS is not connected to the building wiring socket.
★ In order to fully disconnect the UPS, first press the OFF button to turn off
the UPS, then disconnect the mains lead.
★ Ensure that no liquid or other foreign objects can enter the UPS.
★ Do not remove the enclosure. This system is to be serviced by qualified
service personnel only.
★ Remove the protective panel only after disconnecting the terminal
connections.
9
Page 14

EN
★ Use No. 12 AWG (for 3KS input wire), 90°C copper wire and 4.4 lb-in
Torque force when connecting to terminal block.
★ Use No. 10AWG (for all models battery wire), 90°C copper wire and
Anderson PP45 connectors for user’s external battery cabinet.
1.3 Maintenance, servicing and faults
★ The UPS operates with hazardous voltages. Repairs may be carried out
only by qualified maintenance personnel.
★ Caution - risk of electric shock. Even after the unit is disconnected from
the mains power supply (building wiring socket), components inside the
UPS are still connected to the battery which are potentially dangerous.
★ Before carrying out any kind of service and/or maintenance, disconnect
the batteries. Verify that no current is present and no hazardous voltage
exists in the capacitor or BUS capacitor terminals.
★ Batteries must be replaced only by qualified personnel.
★ Caution - risk of electric shock. The battery circuit is not isolated from the
input voltage. Hazardous voltages may occur between the battery
terminals and the ground. Verify that no voltage is present before
servicing!
★ Batteries have a high short-circuit current and pose a risk of shock. Take
all precautionary measures specified below and any other measures
necessary when working with batteries:
- remove all jewellery, wristwatches, rings and other metal objects
- use only tools with insulated grips and handles.
★ When changing batteries, replace with the same quantity and the same
type of batteries.
★ Do not attempt to dispose of batteries by burning them. It could cause
explosion.
★ Do not open or destroy batteries. Effluent electrolyte can cause injury to
the skin and eyes. It may be toxic.
★ Please replace the fuse only by a fuse of the same type and of the same
amperage in order to avoid fire hazards.
★ Do not dismantle the UPS, except the qualified maintenance personnel.
10
Page 15

EN
1.3.1 UPS and Battery Care
For the best preventive maintenance, keep the area around the UPS clean
and dust-free. If the atmosphere is very dusty, clean the outside of the system
with a vacuum cleaner. For long battery life, keep the UPS at an ambient
temperature of 25°C (77°F)
1.3.2 Storing the UPS and Batteries
When the UPS is intended to store for a long period, recharge the battery
every 6 months by connecting the UPS to utility power. The batteries charge
to 90% capacity in approximately 4 hours. However, it is recommended that
the batteries charge for 48 hours after long-term storage.
1.3.3 Time to Replace Batteries
When the discharging time is less than 50% of specified after full charged, the
battery may need to be replaced. Please check the battery connection or
contact your local dealer to order new battery.
WARNING:
Turn off the UPS and disconnect the utility power cord from the wall outlet.
Servicing should be performed by qualified service personnel
knowledgeable of batteries and required precautions. Keep unauthorized
personnel away from batteries
Batteries can present a risk of electrical shock or burn from high short
circuit current. The following precautions should be observed:
1. Remove watches, rings, or other metal objects.
2. Use tools with insulated handles.
3. Do not lay tools or metal parts on top of batteries.
4. Wear rubber gloves and boots.
5. Disconnect the charging source prior to connecting or disconnecting
battery terminal.
When replacing batteries, replace with the same type and number of
batteries or battery packs. Contact your service representative to order new
batteries.
Do not dispose of battery in a fire. Batteries may explode when exposed to
flame.
Proper disposal of batteries is required. Refer to your local codes for
disposal requirements.
Do not open or mutilate the battery. Released toxic electrolyte is harmful to
skin and eyes.
11
Page 16
EN
immediately.
5
7
Note: If you are not qualified service personnel to replace the battery, do not
attempt to open the battery cabin. Please call local dealer or distributor
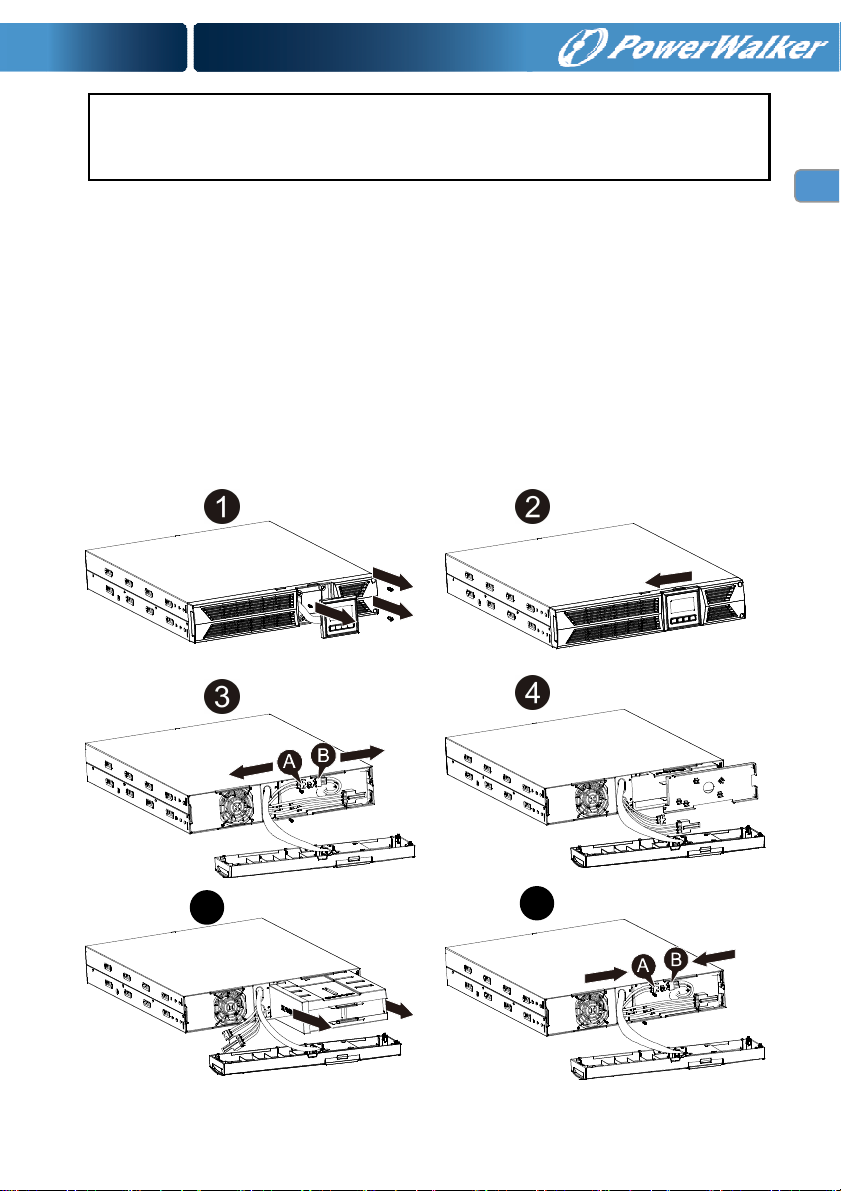
1.3.4 Replacing UPS Internal Batteries
Follow the steps and Charts as below to replace batteries:
1. Take off the LCD box, and remove the screws.
2. Slide and Pull the front panel leftward and then take it off.
3. Disconnect the cable from the UPS and battery pack.
4. Remove the right inner battery bracket.
5. Pull the battery pack out onto flat area.
6. Install new battery pack into UPS.
7. Screw up the battery bracket and reconnect the battery cable A and B
8. Re-install the front panel back to UPS.
12
Page 17
EN
electrical shock and high short circuit curre
nt.
1.3.5 Testing New Batteries
For a battery test, please check:
The batteries must be fully charged.
The UPS must be in Normal mode with no active alarms.
Don’t take on/off the load.
To test batteries:
1. Connect the UPS to utility power for at least 48 hours to charge the
batteries.
2. Press and hold the “I” button 1 second to start the battery test on line mode
or HE mode. The status display string shows “TEST”
1.3.6 Recycling the Used Battery:
Warning:
Never dispose the batteries in a fire. It may explode.
Do not open or mutilate the batteries. Released electrolyte is harmful to
the skins and eyes. It may be toxic. A battery can present a risk of
To recycle properly the used battery, please do not discard the UPS, battery
pack and batteries into the trash bin. Please follow your local laws and
regulations; you may contact your local recycling waste management center
for further information to dispose properly of the used UPS, battery pack, and
batteries.
1.4 Transport
★ Please transport the UPS only in the original packaging (to protect against
shock and impact).
1.5 Storage
★ The UPS must be stockpiled in the room where it is ventilated and dry.
13
Page 18

EN
1.6 Standards
* Safety
IEC/EN 62040-1
* EMI
Conducted Emission..........................:IEC/EN 62040-2 Category C1
Radiated Emission.............................:IEC/EN 62040-2 Category C1
Harmonic Current...............................:IEC/EN 61000-3-2
Voltage Fluctuation and Flicker..........:IEC/EN 61000-3-3
*EMS
ESD...................................................:IEC/EN 61000-4-2 Level 3
RS.....................................................:IEC/EN 61000-4-3 Level 3
EFT....................................................:IEC/EN 61000-4-4 Level 4
SURGE.............................................:IEC/EN 61000-4-5 Level 4
CS……………………………………...:IEC/EN 61000-4-6 Level 3
MS……………………………………..: IEC/EN 61000-4-8 Level 3
Voltage Dips………………………….: IEC/EN 61000-4-11
Low Frequency Signals.....................:IEC/EN 61000-2-2
14
Page 19
EN
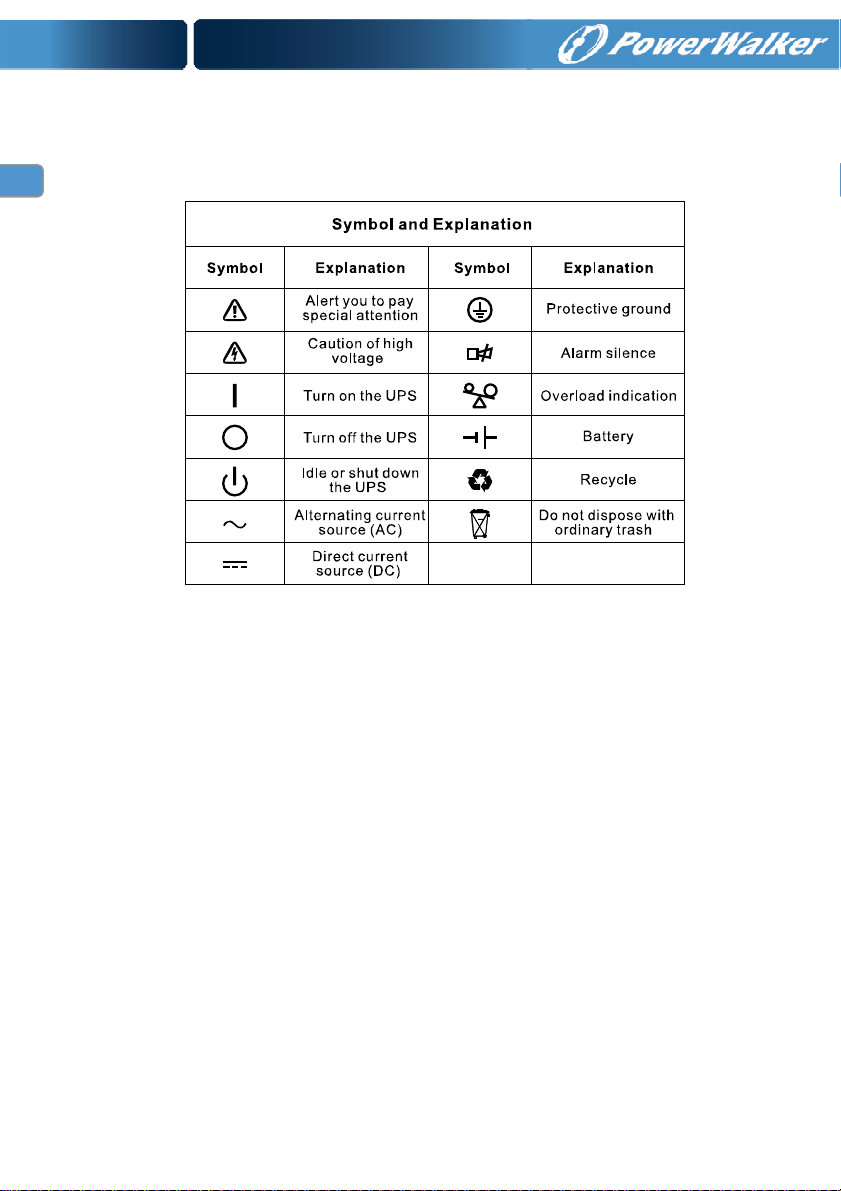
2. Description of Commonly Used Symbols
Some or all of the following symbols may be used in this manual. It is advisable to
familiarize yourself with them and understand their meaning:
15
Page 20
EN
3. Introduction
This On-Line-Series is an uninterruptible power supply incorporating
double-converter technology. It provides perfect protection specifically for
Novell, Windows NT and UNIX servers.
The double-converter principle eliminates all mains power disturbances. A
rectifier converts the alternating current from the socket outlet to direct
current. This direct current charges the batteries and powers the inverter. On
the basis of this DC voltage, the inverter generates a sinusoidal AC voltage,
which permanently supplies the loads.
Computers and periphery are thus powered entirely by the mains voltage. In
the event of power failure, the maintenance-free batteries power the
inverter.
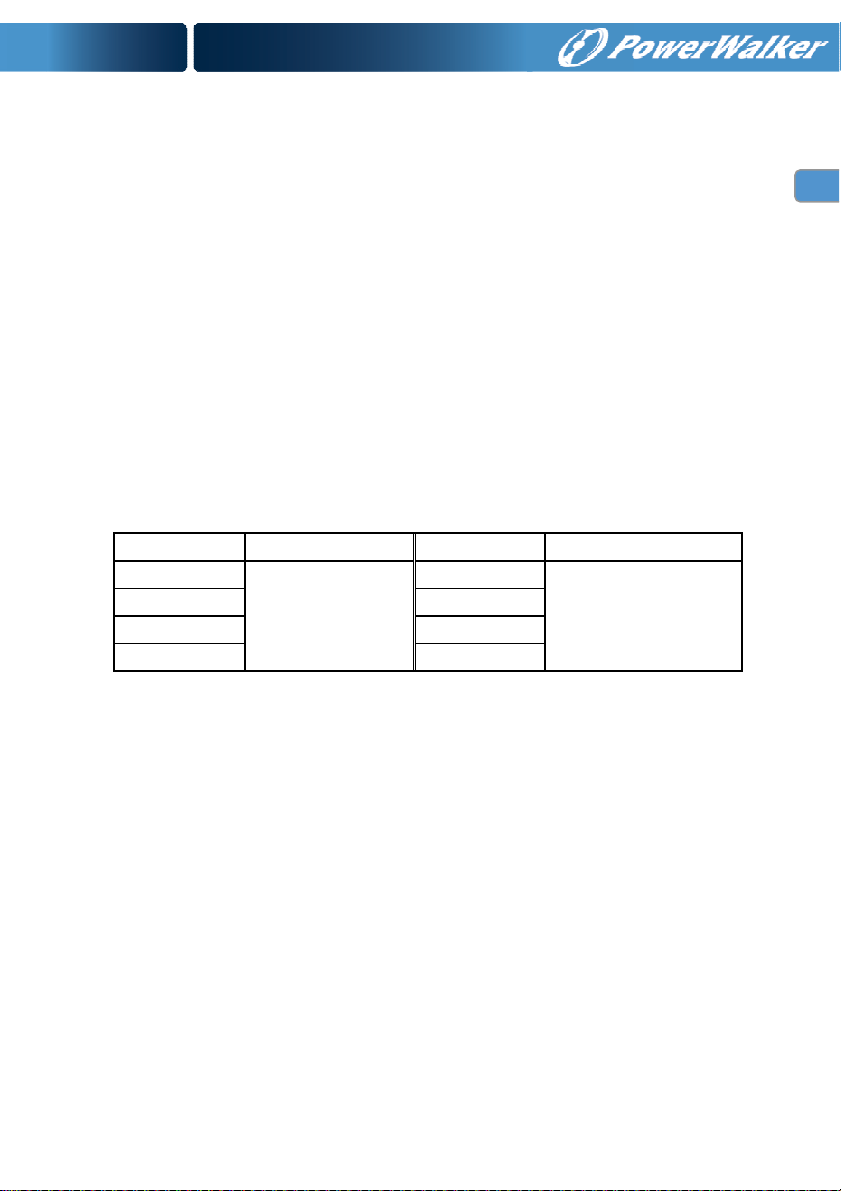
This manual covers the UPS listed as follows. Please confirm whether it is
the model you intend to purchase by performing a visual inspection of the
Model No. on the rear panel of the UPS.
Model No. Type Model No. Type
1K
1.5K 1.5KS
2K 2KS
3K 3KS
Standard
1KS
Extended backup
time
“S” Model: Extended backup time
16
Page 21
EN
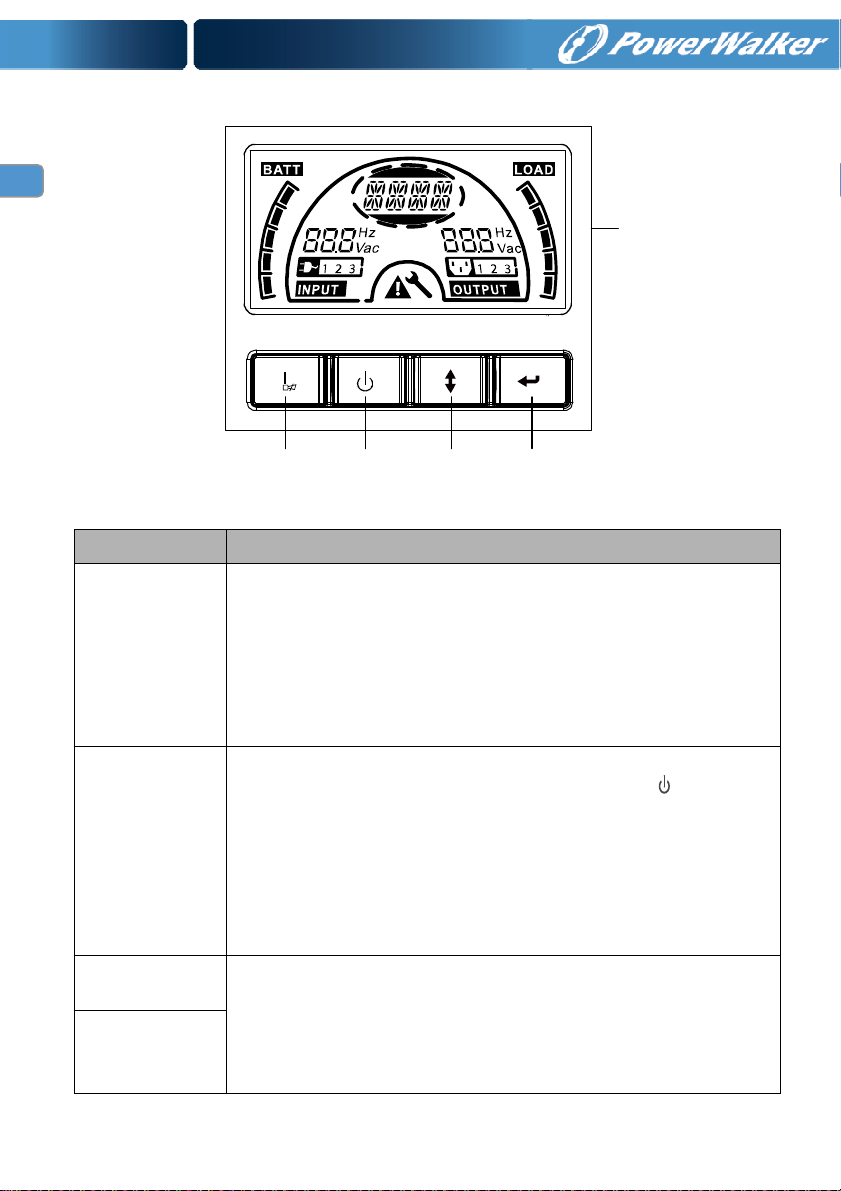
4. Panel Description
Switch Function
ON-Button
OFF-Button
ON Button/
Alarm Silence
OFF-Button Select-Button Enter-Button
The Display Panel
Turn on UPS system: By pressing the ON-Button “I” the UPS
system is turned on.
Deactivate acoustic alarm: By pressing this Button an acoustic
alarm can be deactivated in the battery mode. By short touch this
Button all acoustic alarms can be deactivated in all mode.
Do the battery test: By pressing this Button the UPS can do the
battery test in the Line mode or ECO mode or Converter mode.
When mains power is normal, the UPS system switches to No
output or Bypass mode by pressing OFF-Button “ “, and the
inverter is off. At this moment, if Bypass is enabled, then the
output sockets are supplied with voltage via the bypass if the
mains power is available.
Deactivate acoustic alarm: By pressing this Button an acoustic
alarm can be deactivated in the bypass mode.
Release the UPS from fault mode and EPO status.
LCD Screen
Select-Button The output voltage, frequency, Bypass disable/enable and
operating mode in No output or Bypass mode, Two Load
Enter-Button
segments in output mode, The number of EBM in all mode, could
be selected by pressing Select-Button, and confirmed by
pressing Enter-Button.
17
Page 22
EN
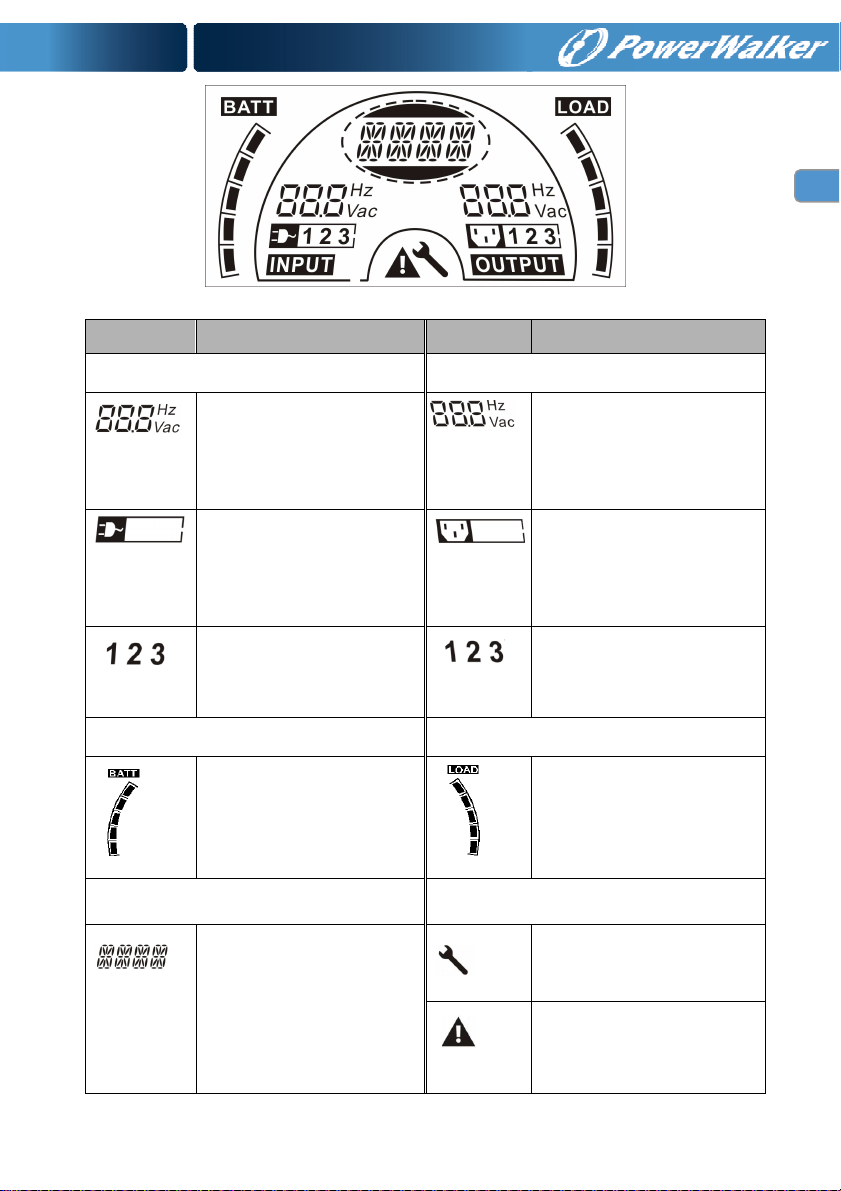
The LCD Display
Display Function Display Function
Input Information Output Information
It indicates input
voltage/frequency value,
which are displayed
alternately.
It indicates the input is
connected with mains,
and the input power is
supplied from the mains.
It indicates the Number of
the input supplied from
the mains.
Battery Information Load Information
Mode/Fault/Warning Information Else
It indicates the battery
capacity. Every grid
represents the capacity of
20%.
It Indicates the operating
mode or Fault kind or
Warning kind, several
warning kinds at the same
time could be displayed
alternately.
It indicates output
voltage/frequency value,
which are displayed
alternately.
It indicates the Number of
It indicates the Output
plug.
the output connected with
load.
It indicates the load level.
Every grid represents the
level of 20%.
It indicates the UPS is in
setting mode.
It indicates the UPS is in
Fault mode or has some
warnings.
18
Page 23

EN
in accordance with applicable safety regulations!
amperage of your incoming feeder
.
5. Connection and Operation
The system may be installed and wired only by qualified electricians
When installing the electrical wiring, please note the nominal
5.1 Inspection
Inspect the packaging carton and its contents for damage. Please inform the
transport agency immediately should you find signs of damage.
Please keep the packaging in a safe place for future use.
Note: Please ensure that the incoming feeder is isolated and secured to
prevent it from being switched back on again.
5.2 Connection
(1) UPS Input Connection
If the UPS is connected via the power cord, please use a proper socket with
protection against electric current, the user can refer to below table. If the
UPS is connected via wires, it is recommended to select the 2.5mm2 wire,
and the “GND” terminal should be grounded first.
The UPS System has no input breaker on the standard cabinet. When
installing the UPS, the user needs to connect the external breakers and
protective components in the input terminals. It is recommended to select
the NFB(Non-Fuse Breaker) instead of the traditional combination kit
including breaker and fuse.
When selecting the NFB, the user can refer to below table.
Model No.
UPS INPUT NFB & Power Cord & Socket
VOLTAGE CURRENT
1K(S) 300Vac 10A
1.5K(S) 300Vac 12A
2K(S) 300Vac 16A
3K(S) 300Vac 20A
19
Page 24
EN
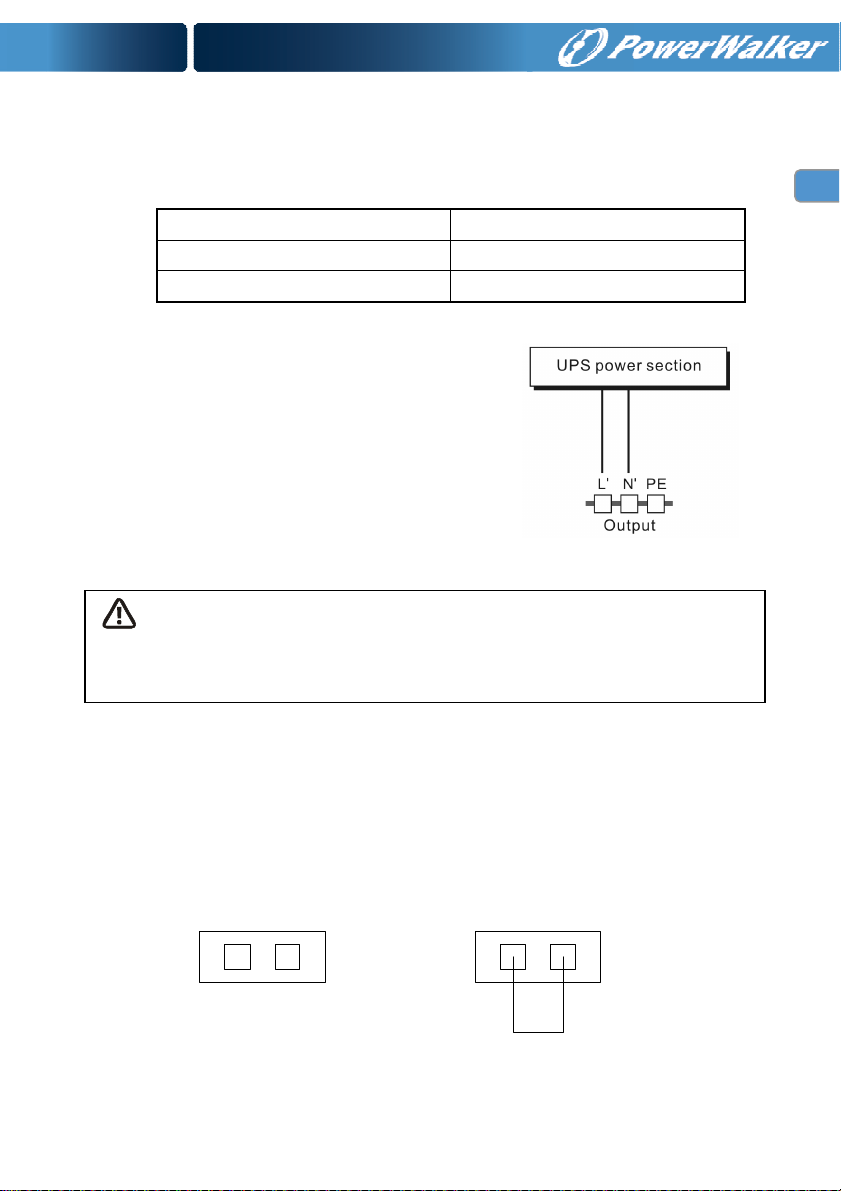
(2) UPS Output Connection
The output of the UPS is IEC socket-types. Simply plug the load power cord
to the output sockets to complete connection. Use one cord for every 5A
load.
Model No. Output Socket (pcs)
1K(S)/1.5K(S)/ 2K(S) 8 * IEC320 C13
3K(S) 8 * IEC320 C13 + 1 * C19
The wiring configuration is shown as the
following procedure:
a) Remove the small cover of the terminal block
b) Use 2.5mm2 wires for wiring configuration
c) Upon completion of the wiring configuration,
please check whether the wires are securely
affixed
d) Put the small cover back to the rear panel
Caution:
Do not connect equipment which would overload the UPS system (e.g. laser
printers)
Connection diagram
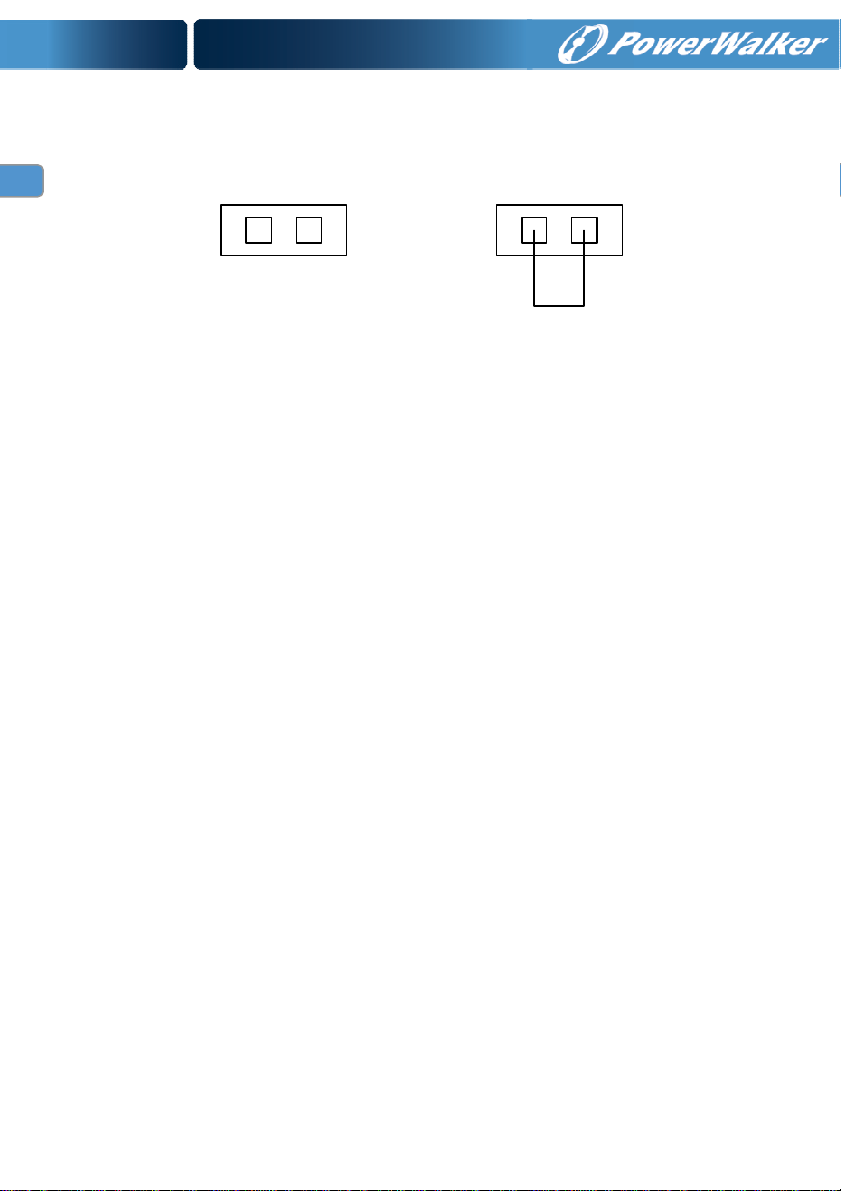
(3) EPO Connection:
User can select the polarity of EPO, EPO is Normally open as default setting.
NO
Normally the EPO connector is open on the rear panel. Once the connector is
closed with a wire, the UPS would stop the output until the EPO status is disabled.
Disable the EPO status Enable the EPO status
20
Page 25
EN
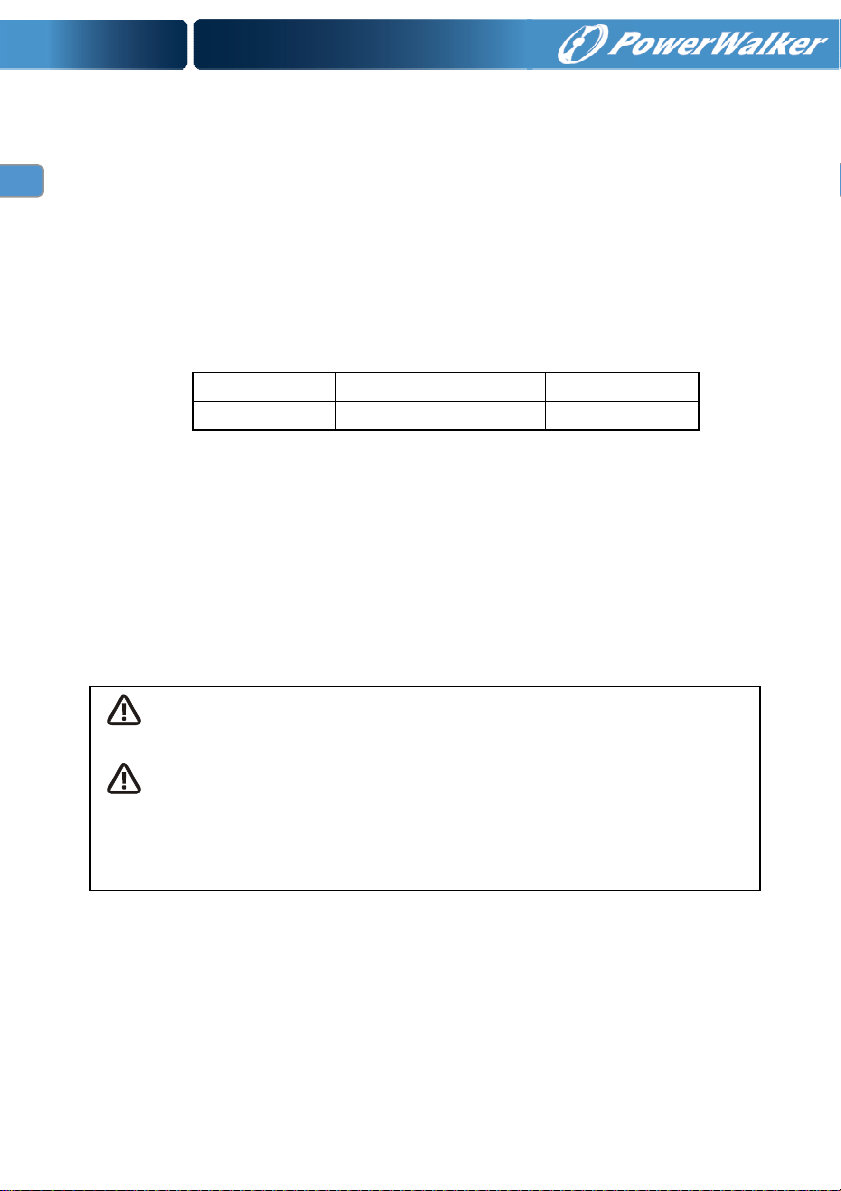
NC
Normally the EPO connector is closed with a wire on the rear panel. Once
the connector is open, the UPS would stop the output until the EPO status is
disabled.
Enable the EPO status Disable the EPO status
5.3 Battery charge
Fully charge the batteries of the UPS system by leaving the UPS system
connected to the mains for 1-2 hours. You may use the UPS system directly
without charging it but the stored energy time may be shorter than the
nominal value specified.
5.4 Turn on the UPS
(1) With utility power connecting:
Press “I” button continuously for more than 1 second to turn on the UPS, the
UPS will get into the inverter mode, the LCD screen will indicate the state of
the UPS.
(2) Without utility power connecting:
If UPS is cold start without utility power connecting, user need to push “I”
button twice, first pushing “I” button is for UPS to get power, LCD screen
show ‘INIT’. And second pushing “I” button continuously for more than 1
second is for UPS to turns on, the UPS will get into the inverter mode. In fact,
the two pushing “I” button is to make further sure user operation for turning
on UPS, the LCD screen will indicate the state of the UPS.
Note: The default setting for bypass mode is no output after UPS is
connecting utility power and breaker is turned on. This can be configured by
monitoring the LCD panel or firmware.
5.5 Test function
(1) Real time detection
UPS could do real-time detection when battery connected or disconnected. If
the battery connection status is changed, in floating mode, UPS will detect the
21
Page 26

EN
change within 30 seconds; in resting mode, UPS will detect the change within
3 minutes;
(2) Manual test
Test the function of the UPS system by pressing the On-Switch “I” for more
than 1 second, the UPS would detect whether the battery is connected or the
battery is low immediately. Also the UPS could do the test automatically and
periodically, the period time could be set by user, the default value is 7 days.
5.6 Turn off the UPS
(1) In Inverter Mode:
Press “ ” button continuously for more than 1 second to turn off the UPS, the
UPS will get into no output or bypass mode. At this time, the UPS might has
output if bypass is enabled. Disconnect the utility power to turn off the output.
(2) In Battery Mode:
Press “ ” button continuously for more than 1 second to turn off the UPS, the
UPS will be turned off completely.
5.7 Audible alarm mute function
If the alarm is too annoying in battery mode, you may press “I” button
continuously for more than 1 second to clear it. Moreover, the alarm will be
enabled when the battery is low to remind you to shutdown the load soon.
If the alarm is too annoying in bypass mode, you may press “ “button
continuously for more than 1 second to clear it. The action doesn’t affect the
warning and fault alarm.
If all alarm is too annoying, you can short touch “I” button, all alarms are
disable, if alarms need to be resumed, short touch “I” button again.
5.8 Operation procedure of external battery for long backup
time model (“S” model)
(1) Use the battery pack with voltage: 36VDC for 1KS (12V×3 batteries),
48VDC for 1.5KS/ 2KS (12V×4 batteries), 72VDC for 3KS (12V×6
batteries). Connection of batteries more than or less than required
will cause abnormality or permanent damage.
(2) One hard wiring type battery terminal on the rear panel is used for
connecting the battery pack.
22
Page 27
EN
(3) The battery connection procedure is very important. Any
incompliance may result in the risk of electric shock. Therefore, the
following steps must be strictly complied with.
(4) Make sure the mains input is cut off, if there is a battery breaker then
turn it off first.
(5) Remove front panel, connect the battery via Anderson PP45
connectors. Prepare the battery cable which should be able to carry
the current of >50A for all models, the cross section area should be
great than 4 mm2 for all model. And battery wire color is
recommended as following:
+
+ GND ----
++
Red wire Green/Yellow wire Black wire
(6) The red wire is connected to the "+" terminal of the battery. The black
wire is connected to the "-" terminal of the battery. (Note: the
green/yellow wire is grounded for protection purpose.)
(7) Make sure the wires are fasten, install the terminal block cover on the
rear panel of the UPS.
(8) Connect the UPS to the load. Then, turn on the mains switch or
connect the power cord of the UPS to utility power supply, the battery
would start to be charged.
Caution:
A DC breaker must be connected between the UPS and external battery.
Caution:
The output sockets of the UPS system may still be electrically live even if the
power supply system has been disconnected or the Bypass switch is on
“OFF” position.
23
Page 28

EN
6. Operating Mode for All Models
The different string could be displayed on the LCD screen corresponding to
their own operating modes, and they are illustrated as the following table. At
any time, only one normal operating string or fault string is presented. But the
warning, even several warnings could appear in a certain normal operating
mode at one time. And the normal operating mode string and the warning
string would be shown circularly. Once one fault is come forth, then all
previous warnings would not be shown again but only the fault string is
presented.
Normal operating mode Code
No output mode STbY
Bypass mode bYPA
Line mode LINE
Battery mode bATT
Battery test mode TEST
ECO mode ECO
Converter mode CVCF
6.1 Line mode
The LCD display in Line mode is shown in the following diagram. The
information about the utility power, the battery level, the UPS output and the
load level could be displayed. The “LINE” string indicates the UPS is working
in Line mode.
■
■ The Line mode
■■
If output overloaded, alarm will keep twice every second. You should get rid of
some unnecessary loads one by one to decrease the loads connected to the
UPS less than 90% of its nominal power capacity.
24
Page 29

EN
Note: Please follow the following steps to connect the generator:
● Activate the generator and wait until the operation is stable before supplying
power of the generator to the UPS (be sure that the UPS is in idle mode).
Then turn on the UPS according to the start-up procedure. After the UPS is
turned on, then the loads can be connected to the UPS one by one.
● The power capacity of the AC generator should be at least twice of the UPS
capacity.
6.2 Battery mode
The LCD display in battery mode is shown in the following diagram. The
information about the utility power, the battery level, the UPS output and the
load level could be displayed. The “bATT” string indicates the UPS is working
in the battery mode.
When the UPS is running in battery mode, the buzzer beeps once every 4
seconds. If the “ON” button on the front panel is pressed for more than 1
second again, the buzzer will stop beeping (in silence mode). Press the “ON”
button once again for more than 1 second to resume the alarm function.
■■■■
The Battery mode
6.3 Bypass mode
The LCD display in bypass mode is shown in the following diagram. The
information about the utility power, the battery level, the UPS output and the
load level could be displayed. The UPS will beep once every 2 minutes in
bypass mode. The “bYPA” string indicate the UPS is working in the bypass
mode.
■■■■
The Bypass mode
25
Page 30
EN
The UPS does not have the backup function when it is in bypass mode.
The power used by the load is supplied from the utility power via internal
filter.
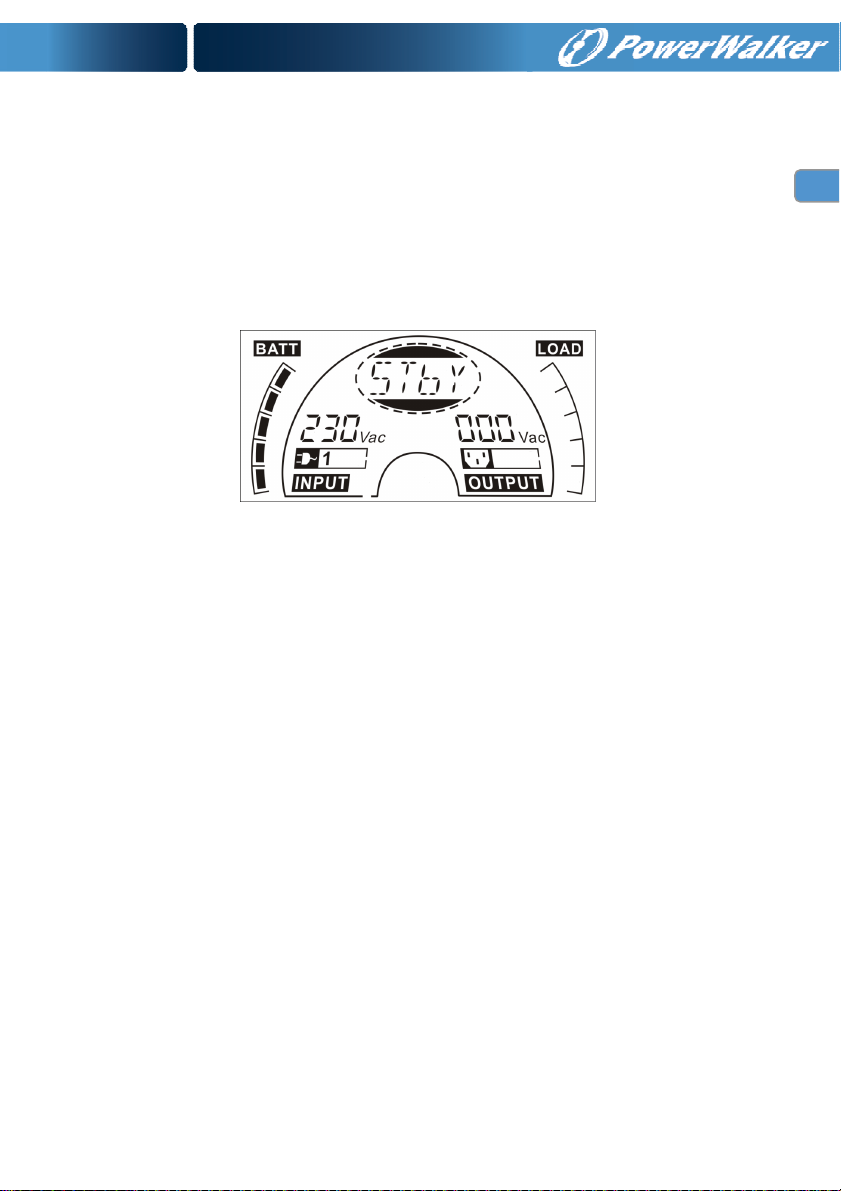
6.4 NO output mode
The LCD display in No output mode is shown in the following diagram.
The information about the utility power, the battery level, the UPS output
and the load level could be displayed. The “STbY” string indicates the
UPS is working in the No output mode.
■■■■
The No output mode
6.5 EPO (Emergency Power Off)
It is also called RPO (Remote Power Off). On LCD display, the mode
string is “EPO”.
It is a special status in which the UPS would shut the output off and alarm.
The UPS could not be turned off by pressing “OFF” button on the panel,
only after releasing EPO status by turning off the EPO switch.
6.6 ECO mode (Economy mode)
It is also called high efficiency mode. In ECO mode, on LCD display, the
mode sting is “ECO”.
After the UPS is turned on, the power used by the load is supplied from
the utility power via internal filter while the utility power is in normal range,
so the high efficiency could be gained in the ECO mode. Once the mains
is loss or abnormal, the UPS would transfer to battery mode and the load
is supplied continuously by the battery.
1) It could be enabled through the LCD setting or the software (Winpower,
etc.).
2) It is attention that the transfer time of UPS output from ECO mode to
battery mode is less than 10ms. But it is still too long for some sensitive
load.
26
Page 31

EN
6.7 Converter mode
In converter mode, on LCD display, the mode string is “CVCF”.
The UPS would free run with fixed output frequency (50Hz or 60Hz) in
converter mode. Once the mains is loss or abnormal, the UPS would transfer
to battery mode and the load is supplied continuously by the battery.
1) It could be enabled through the LCD setting or the software (Winpower,
etc.).
2) The load should be derating to 70% in converter mode.
6.8 Abnormal mode
In abnormal mode such as Bus fault etc., the corresponding fault string would
be shown to indicate the operating mode of the UPS, and the background light
become red. For example “SHOR” would be shown when the load or the UPS
output is short. The LCD display is shown in the following diagram.
27
Page 32

EN
7. Setting by LCD Module
The output voltage, frequency, Bypass status and operating mode in No
output mode or Bypass mode, Two Load segments in output mode, The
number of EBM in all mode could be set directly through LCD module. The
output voltage could be set to 208V, 220V, 230V and 240V. The output
frequency could be set to 50Hz and 60Hz. The bypass state could be set to
enable and disable. The operating mode of UPS could be set between the
Line mode, ECO mode and Converter mode. The number of EBM could be
set to 0 to 9. Two Load segments could be set to on and off.
In bypass or no output mode, pressing the “Enter” button on the LCD panel for
more than one second to enter setting mode. The LCD display is shown in the
following diagram. The string “OPV” indicates that the current setting is output
voltage. “230Vac” indicates the current default output voltage is 230Vac. if you
want to set output voltage, press the “Enter” button for more than one second,
a flickering string “208” would be shown, if the “Enter” button is pressed again,
the string “208” turn to flickerless, the output volt is changed to 208V; if the
“Select” button is pressed for more than one second, the next flickering string
“220” appear, the order of flickering string is 208 – 220 – 230 – 240 – 208,
Press “Enter” button to confirm the output volt what you want.
Exit the setting mode to short touch the “Enter” button; continue setting to
press “Select” button. if no any pressing on the “Select” or “Enter” button
lasting for more than 10 seconds, the setting mode exit automatically.
The output frequency string “OPF”, Bypass status string ” bYPA”, operating
mode string “MOdE”, EBM string EbM, Load segment string “LS1” and “LS2”
would be presented circularly. The only one voltage value could be selected in
“208V”, “220V”, “230V”, “240V” at any time; The only one frequency value
could be selected in “50Hz”, “60Hz” at any time; Bypass status could be
selected in “000” or “001”(Here 000 means Bypass Disable,001 means
Bypass Enable),The UPS would turn to bypass mode in several seconds after
28
Page 33

EN
“
Enter”
button to exit setting mode.
“Bypass Enable” is selected, and turn to no output mode in several seconds
after “Bypass Disable” is selected; Operating mode could be selected in
“UPS”, “ECO”, “CVF”(Here “UPS” means the normal inverter mode, “ECO”
means the high efficiency mode, and “CVF” means the converter mode), The
mode change would be active only after the UPS is turned on; The number of
EBM could be selected in “000” to “009”(Here “000” means no EBM
connected). Load segment 1 could be selected in “000” or “001”(Here 000
means load segment 1 off, 001 means load segment 1 on); Load segment 2 is
the same as Load segment 1.
■
■ Here is a example for changing the Operating mode from normal mode to
■■
converter mode through the LCD panel.
Step 1: “OPV” after pressing the “Enter” button; Step 2: “OPF” after pressing the “Select” button.
Step 3: “bYPA” after pressing the “Select” button; Step 4: “MOdE” after pressing the “Select” button,
press the “Enter” button to set mode, then “UPS”
flickering;
Step 5: “ECO” flickering after pressing
button the “Select” button;
Step 6: “CVF” flickering after pressing the
“Select” again. Press the “Enter” button to
make sure to change the mode. Short touch
29
Page 34

EN
8. Trouble Shooting
If the UPS system does not operate correctly, check the operating status on the LCD
display.
Warning String Fault String
Site fail SITE Inverter short SHOR
Fan fail FANF Overload fault OVLD
Battery over voltage (over charged) HIGH Inverter soft start fail ISFT
Battery low bLOW Bus soft start fail bSFT
Charge fail CHGF Over temperature fault OVTP
Inverter temperature high TEPH Inverter voltage low INVL
Ambient temperature high AMbH Inverter voltage high INVH
Battery open bOPN Bus voltage over bUSH
Overload OVLD Bus voltage Low bUSL
EPO EPO Bus voltage unbalance bUSE
Battery fault bATF Bus short bUSS
NTC open NTCO
If the UPS system does not operate correctly, please attempt to solve the problem
using the table below.
Problem Pzle cause Remedy
No indication, no
warning tone even
though system is
connected to mains
power supply
Display Mode
string ”STbY” in LCD,
even though the power
supply is available
Display Mode
string ”bATT” in LCD,
and audible alarm
sounding every 1 beep
in every 4 seconds
Emergency supply
period shorter than
nominal value
Fan fail Fan abnormal Check if the fan is running
Battery over voltage Battery is over charged Stop charging to battery
No input voltage Check building wiring socket outlet
Inverter not switched on Press On-Switch “I”.
Mains power supply has
failed, or Input power
and/or frequency are out
of tolerance
Batteries not fully charged
/ batteries defect
and input cable.
Switching to battery mode
automatically.
Check input power source and inform
dealer if necessary.
Charge the batteries for at least
5 - 8 hours and then check capacity.
If the problem still persists, consult
your dealer.
automatically, and after the battery
voltage is normal and the mains is
normal, charge automatically again.
30
Page 35

EN
Battery low Battery voltage is low When audible alarm sounding every
Charge fail The charge is broken Notify dealer.
Inverter temperature
high
Ambient temperature
high
Battery open Battery pack is not
Battery fault Battery may need to be
Overload Overload Check the loads and remove some
Site fail Phase and neutral
EPO active EPO function is enabled Turn off the EPO switch.
Bus fault(Low/high/
Unbalance/soft start)
Inverter
fault(Low/high/soft
start)
Over temperature fault Over temperature Check the ventilation of the UPS,
NTC open UPS internal fault Notify dealer
Inverter short Output short circuit Remove all the loads. Turn off the
Bus short UPS internal fault Notify dealer
Inside temperature of the
UPS is too high
The ambient temperature
is too high
connected correctly
replaced
conductor at input of UPS
system are reversed
UPS internal fault Notify dealer
UPS internal fault Notify dealer
second, battery is almost empty.
Check the ventilation of the UPS,
check the ambient temperature.
Check the environment ventilation.
Check the battery bank is connected
to the UPS.
Check the battery breaker is turn on.
Notify dealer
non-critical loads.
Check whether some loads are failed.
Rotate mains power socket by 180°
or connect UPS system.
check the ambient temperature and
ventilation.
UPS. Check whether the output of
UPS and loads is short circuit. Make
sure the short circuit is removed, and
the UPS has no internal faults before
turning on again.
Please have the following information at hand before calling the After-Sales
Service Department:
1. Model number, serial number
2. Date on which the problem occurred
3. LCD display status, Buzzer alarm status
4. Utility power condition, load type and capacity, environment temperature,
ventilation condition
5. The information (battery capacity, quantity) of external battery pack if the UPS
is “S” model
6. Other information for complete description of the problem
31
Page 36

EN
9. Maintenance
9.1 Operation
The UPS system contains no user-serviceable parts. If the battery service life
(3~5 years at 25°C ambient temperature) has been exceeded, the batteries
must be replaced. In this case please contact your dealer.
9.2 Storage
If the batteries are stored in temperate climatic zones, they should be charged
every three months for 1~2 hours. You should shorten the charging intervals
to two months at locations subject to high temperatures.
9.3 Battery Replace
If the battery service life has been exceeded, the batteries must be replaced.
Battery replacement should be performed only by qualified personnel.
It recommends to shut off the UPS completely before the replacement. If there
is a battery breaker then turn it off first. Disconnect the battery cable carefully
and make sure no any exposed wires can be touched. Reconnect the new
batteries to the UPS by following section 5.8. Then turn on the battery breaker
and start the UPS.
If it needs to replace the batteries while the UPS is running, make sure the
UPS would not shut down during the replacement. If there is a battery breaker
then turn it off first. Disconnect the battery cable carefully and make sure no
any exposed wires can be touched. Reconnect the new batteries to the UPS
by following section 5.8. Then turn on the battery breaker and press the ON
switch to make the UPS do the battery test, check whether the battery
information is normal.
32
Page 37

EN
10. Technical Data
10.1 Electrical specifications
INPUT
Model No. 1K(S) 1.5K(S) 2K(S) 3K(S)
Phase 1
Frequency (45~55)/(54~66) Hz
Max Current(A) 7.5 10.5 13.5 20
OUTPUT
Model No. 1K(S) 1.5K(S) 2K(S) 3K(S)
Power rating 1kVA/0.9kW 1.5k/1.35kW 2kVA/1.8kW 3kVA/2.7kW
Voltage 208/220/230/240×(1 士 1%)VAC
Frequency 50/60(±0.2)Hz (Battery mode)
Wave form sinusoidal
BATTERIES
Model No. 1K 1.5K 2K 3K
Number and type 3×12V 7Ah 4×12V 7Ah 4×12V 9Ah 6×12V 9Ah
10.2 Operating Environment
Ambient Temperature 0°C to 40°C
Operating humidity < 95%
Altitude < 1000m
Storage temperature 0°C to 45°C
10.3 Typical backup time (Typical values at 25°C in minutes:)
Model No. 100 % Load 50 % Load
1K 5 15
1.5K 4 12
2K 3 10
3K 3 10
33
Page 38

EN
10.4 Dimensions and weights
Model 1000 1000S 1500 1500S 2000 2000S 3000 3000S
UPS
Case
EBM
Case
Net weight (kg) 16.2 8.4 19.7 9.3 19.7 9.3 28.6 13.2
Dimension (mm)
(W x H x D)
Dimension (mm)
(W x H x D)
Net weight (kg) 22.2 27.5 40.5
Type 36V 48V 72V
438X86.5x436 438X86.5x608
34
Page 39

EN
11. Communication Port
11.1 RS-232 and USB communication ports
To establish communication between the UPS and a computer, connect a
computer to one of the UPS communication ports by using an applicable
communication cable.
NOTE:
Only one of the communication ports can be active at one time. The USB port has
priority over the RS-232 port.
When a communication cable is installed, the power management software can
exchange data with the UPS. The software polls the UPS for detailed information
on the status of the power environment. If a power emergency occurs, the
software initiates the saving of all data and an orderly shutdown of the equipment
11.2 RS-232 port
The RS-232 port is available for UPS monitoring, control, and firmware
updates. To establish communication between the UPS and a computer,
connect one end of the serial communication cable that comes with the UPS
to the RS-232 port on the UPS. Connect the other end of the serial cable to
the RS-232 port on a computer.
The cable pins for the RS-232 communication port are identified in the
following illustration.
RS-232 communication port pin assignments
Pin Signal name Function
1 Unused Not applicable
2 Tx Transmit to external device Out
3 Rx Receive from external device In
4 Unused Not applicable
5 GND
Signal common
(tied to chassis)
6 Unused Not applicable
7 Unused Not applicable
8 Unused Not applicable
9 Unused Not applicable
Direction from
the UPS
Not applicable
35
Page 40

EN
11.3 USB port
The UPS can communicate with a USB-compliant computer by using
HID-compatible power management software. To establish communication
between the UPS and a computer, connect the USB cable that comes with the
UPS to the USB port on the UPS. Connect the other end of the USB cable to
the USB port on a computer.
11.4 Installing a Serial Network Management Card (optional)
Each UPS has one available communication bay, which supports the optional
Serial Network Management Card. After you install a Serial Network
Management Card, you can connect an environmental monitoring probe to
the UPS.
Note: You do not have to shut down the UPS before you install a
communication card.
To install the Network Management Card, complete the following steps:
1. Locate the UPS communication bay.
2. Remove the two screws that secure the communication bay cover to the
UPS and save the screws.
3. Insert the Serial Network Management Card into the slot on the UPS.
4. Secure the Serial Network Management Card to the UPS with both
screws.
For more information about the Serial Network Management Card, see the
Serial Network Management Card User's Guide.
11.5 Dry Contact port
The UPS incorporates build-in single programmable relay output with
potential free contact for remote alarm indication: Dry out port; And
incorporates single signal input: Dry in port. See figure in the UPS rear
panel for the locations of the ports.
The relay output can be configured by protocol command setting, the
default output contact is “Summary Alarm”; The signal input to control UPS
On/Off status does not need to be configured, its function is the same as
one button to control UPS On/Off status.
Note:
connected circuits. Reinforced insulation to the utility is required. The relay
output contact has a maximum rating of 30Vac/1A and 60Vdc/2A normal
values.
The relay output contact must not be connected to any utility
36
Page 41

EN
The following figures show schematic of the dry out/in contacts.
Dry out contact schematic
Dry in contact schematic
The following table shows the options for the dry out/in contacts
Dry out signal Description
Summary Alarm Activated when any warning happens
On Battery Activated when the UPS operates on battery
Battery Low Activated with the “bLOW” alarm
UPS ok Activated when the UPS has no alarms and no
fault.
On Bypass Activated when the UPS has bypass output.
Dry in signal Description
UPS On/Off One second pulse activate, if active, the UPS
turns off when UPS is on inverter; the UPS turns
on when UPS is not on inverter. It is the same as
a remote button to control UPS On/Off status.
37
Page 42

EN
12. Software Installation
WinPower is UPS monitoring software, featuring user-friendly interface to
monitor and control your UPS. This unique software provides complete
power protection for computer system while power failure. With the
software users can monitor any UPS status on the same LAN.
Furthermore, a UPS can provide security protection for more than one
computer on the same LAN at the same time, such as shutting down
system in security, saving application data and shutting down the UPS
when power fails.
Software Installation on your PC:
Connected by USB to a PC or notebook, the Software enables communication
between the UPS and the computer. The UPS software monitors the status of the
UPS, shuts down the system before the UPS is exhausted and can remotely observe
the UPS via the Network (enabling users to manage their system more effectively).
Upon AC failure or UPS battery low, UPS takes all necessary actions without
intervention from the system administrator. In addition to automatic file saving and
system shut-down functions, it can also send warning messages via pager, e-mail
etc.
• Use the bundled CD and follow the on-screen instructions to install the software
WinPower.
• Enter the following serial No. to install software: 511C1-01220-0100-478DF2A
• After the software is successfully installed, the communication with UPS has
been established and an green icon will appear in the system tray.
• Double-click the icon to use the monitor software (as above).
• You can schedule UPS shutdown/start-up and monitor UPS status through PC.
• Detail instructions please refer to the e-manual in the software.
Check www.powerwalker.com/winpower.html from time to time to get the latest
version of monitoring software.
38
Page 43

EN
Appendix: Rear panel
The UPS rear panel description table and pictures are shown as below:
No. Function(1000VA &1500VA&2000VA&3000VA)
1 AC Output
2 EPO / Dry in Communication Port
3 USB Port
4 AC Input
5 Dry out
6 SNMP slot
7 RS232
8 Modem/Network Surge Protection
9 Earth Line Port
1000VA /1500VA/2000VA Standard
& 1000VA /1500VA Super charger model rear panel
2000VA Super charger model rear panel
39
Page 44

EN
~
250V 16A
DRYIN
~
EPO
DRYOUT
RS232
INTELLIGENT SLOT
USB
250V 10A
LS2AC OUTPUT
~
250V 1 0A
LS1AC OUTPUT
3000VA Standard model rear panel
~
250V 1 6A
DRYIN
EPO
DRYOUT
RS232
INTELLIGENTS LOT
USB
250V 10A~
LS2AC OUTPUT
~
250V 10A
LS1AC OUTPUT
3000VA Supper charger model rear panel
The EBM rear panel description table and picture are shown as below:
AC INPUT
USECOPPERCONDUCTORONLY.FORSUPPLYCONNECTIONS,
USEWIRESSUITABLEFORATLEAST75℃.REFERTO
THEINSTRUCTIONMANUALFORTIGHTMENINGTORQUE
NL
No. Function(36V &48V & 72V EBM)
1 Earth Line Port
36V &48V&72V EBM rear panel
40
Page 45

On-Line USV
PowerWalker VFI 1000RT LCD
PowerWalker VFI 1500RT LCD
PowerWalker VFI 2000RT LCD
PowerWalker VFI 3000RT LCD
Bedienungsanleitung
DE, EN, FR
Page 46

2
DE
INHALT
1. Sicherheits- und EMC-Anweisungen ........................................ 1
1.1 Installation .......................................................................................... 1
1.2 Betrieb ................................................................................................ 9
1.3 Wartung, Instandhaltung und Fehler ................................................ 10
1.4 Transport .......................................................................................... 14
1.5 Lagerung .......................................................................................... 14
1.6 Normen ............................................................................................. 15
2. Beschreibung der häufig verwendeten Symbole ................... 16
3. Einführung ................................................................................ 17
4. Platten beschreibung ............................................................... 18
5. Verbindung und Betrieb ........................................................... 20
5.1 Inspektion ......................................................................................... 20
5.2 Anschluss ......................................................................................... 20
5.3 Batterie ladung ................................................................................. 22
5.4 Einschalten derUSV ......................................................................... 22
5.5 Test funktion ..................................................................................... 23
5.6 Ausschalten derUSV ........................................................................ 23
5.7 Akustik alarm Stumm funktion .......................................................... 24
5.8 Betriebs vverfahren der externen Batterie für ein langes
Sicherungszeit modells (“S” Model) ....................................................... 24
6. Betriebs modus für alle Modelle .............................................. 26
6.1 Leitungs modus ................................................................................ 26
6.2 Batterie-Modus ................................................................................. 27
6.3 Bypass-Modus .................................................................................. 27
6.4 KEIN Ausgangs modus .................................................................... 28
6.5 EPO (Emergency Power Off) [Notabschaltungsfunktion] ................ 28
6.6 ÖKO-Modus (Sparmodus) ............................................................... 28
6.7 Konvertermodus ............................................................................... 29
6.8 Abnormaler Modus ........................................................................... 29
7. Einstellung durch LCD-Modul ................................................. 30
8. Problembehebung .................................................................... 32
9. Wartung ..................................................................................... 34
9.1 Betrieb .............................................................................................. 34
Page 47

DE
9.2 Lagerung .......................................................................................... 34
9.3 Batterieaustausch ............................................................................. 35
10. Technische Daten ................................................................... 36
10.1 Elektrische Spezifikationen ............................................................ 36
10.2 Betriebskonfiguration ..................................................................... 36
10.3 Typische Sicherungs zeit (Typische Werte bei 25°C in Minuten:) ..... 36
10.4 Maße und Gewichte ......................................................................... 37
11. Kommunikationsanschluss ................................................... 38
11.1 RS-232 and USB-Kommunikationsanschlüsse ............................. 38
11.2 RS-232 Port .................................................................................... 38
11.3 USB-Anschluss .............................................................................. 39
11.4 Installation einer Seriennetzwerk-Managementkarte (optional) .... 39
11.5 Potenzialfreier Kontaktport ......................................................... 39
12. Softwareinstallation ............................................................... 42
Anhang: Rückwand ...................................................................... 43
Page 48

Page 49

DE
1. Sicherheits- und EMC-Anweisungen
BEWAHREN SIE DIESE ANLEITUNG GUT AUF – Dieses Handbuch enthält wichtige
Anweisungen für die Modelle PowerWalker VFI 1000/1500/2000/3000 RT LCD, die
während Installation und Wartung der USV-Geräte und Akkus eingehalten werden
müssen.
Bitte lesen Sie das folgende Benutzerhandbuch und die
Sicherheitsanweisungen vor Installation oder Gebrauch des Geräts
1.1 Installation
• Dieses Produkt wurde speziell für PC’s entwickelt und wird nicht für den
Einsatz wie etwa für Lebenserhaltungssysteme und andere wichtige Geräte
empfohlen.
• Schließen Sie keine Haushalts- oder sonstigen Geräte oder
Sachgegenstände, die die USV überlasten würden (z.B. Laserdrucker,
Haartrockner usw.) zur USV-Ausgabe.
• Dieses Gerät ist für die Installation in einer kontrollierten Umgebung
ausgelegt (d.h. geregelte Temperatur, Innenbereich, der frei von schädlichen
Substanzen ist).
• Die Kondensation kann auftreten, wenn die USV direkt von einer kalten in
eine warme Umgebung bewegt wird. Die USV muss vor ihrer Installation
absolut trocken sein. Bitte ermöglichen Sie eine Akklimatisierung von
mindestens zwei Stunden.
• Decken Sie das Gerät nicht ab, da dadurch Gefahr eines elektrischen
Schlages besteht. Es befinden sich im Inneren des Geräts keine zu
wartenden Teile. Lassen Sie das Gerät nur von qualifiziertem Fachpersonal
warten oder reparieren.
• Die Steckdose, in der das USV eingesteckt wird, sollte gut zugänglich sein
und sich in der Nähe des Geräts befinden. Um die USV von der
Wechselspannung zu trennen, ziehen Sie bitte den Stecker aus der
Steckdose.
• Wenn das USV-Gerät längere Zeit nicht benutzt wird, sollten die Akkus
einmal pro Monat für 24 Stunden aufgeladen werden, (den Stromanschluss
mit dem USV-Gerät verbinden und den “ON”-Schalter betätigen).
• Überlasten Sie die USV bitte nicht, beachten Sie die zulässige Nennlast des
Geräts.
1
Page 50

2
DE
• Die USV enthält Batterien mit großer Kapazität. Deshalb sollte das Gehäuse
der USV nicht geöffnet werden, um Gefahren von elektrischen Schlägen zu
vermeiden. Wenn die Batterie repariert oder ersetzt werden muss,
kontaktieren Sie bitte den Händler.
• Ein interner Kurzschluss in dem USV-Gerät führt zu Gefahren wie z.B.
Stromschlag oder Feuer. Um die Gefahr eines Stromschlages zu vermeiden,
bitte niemals Flüssigkeitsbehälter (z.B. ein Wasserglas) auf dem USV-Gerät
abstellen.
• Werfen Sie die Batterie(n) nicht in offenes Feuer. Der Akku könnte
explodieren.
• Öffnen oder zerstören Sie die Batterie(n) nicht. Freigesetzter Elektrolyt kann
Haut und Augen schädigen. Es kann giftig sein.
• Das Symbol Φ auf dem Typenschild steht für das Phasensymbol.
• Eine Batterie kann einen elektrischen Schlag oder einen hohen
Kurzschlussstrom verursachen. Die folgenden Vorsichtsmaßnahmen sollten
getroffen werden, wenn mit Batterien gearbeitet wird:
• Entfernen Sie Uhren, Ringe oder andere Metallgegenstände von Ihrer Hand.
• Verwenden Sie Werkzeuge mit isolierten Griffen.
• Wartung und Reparatur der Batterien sollte nur von Fachpersonal
durchgeführt oder überwacht werden, das Wissen über Batterien hat und die
notwendigen Vorsichtsmaßnahmen kennt. Halten Sie unqualifizierte
Personen von den Batterien fern.
• Wenn die Akkus ersetzt werden, ersetzen Sie diese mit dem gleichen Typ
und der gleichen Anzahl versiegelter Blei-Säure-Akkumulatoren.
• Dieses steckerfertige Typ A-Gerät mit schon installierten Akkumulatoren ist
betriebsbereit und kann von Laien betrieben werden.
• Bei der Installation des Gerätes muss darauf geachtet werden, dass die
Summe des Verluststroms der USV und der angeschlossenen Last 3,5mA
nicht übersteigt.
• Achtung: Gefahr durch elektrischen Schlag. Nach Ziehen des Steckers aus
der Steckdose kann noch eine gefährliche Spannung von dem Akku
vorhanden sein. Die Akkumulator Versorgung sollte deshalb am Plus- und
Minuspol des Akkumulators abgeklemmt werden, wenn Wartung und
Reparatur im Inneren der USV notwendig werden.
• Die Steckdose, die die USV versorgt, sollte in der Nähe der USV installiert
und leicht zugänglich sein.
Page 51

DE
• Kabel so platzieren, dass keiner darauf treten oder darüber stolpern kann.
• Stellen Sie sicher, die USV und den externen Batteriesatz sicher mit der Erde
zu verbinden
• Blockieren Sie nicht die Lüftungsöffnungen im USV-Gehäuse. Stellen Sie
sicher, dass die Lüftungsschlitze vorne und hinten an der USV nicht blockiert
sind. Sorgen Sie dafür, dass mindestens 25 cm Platz an jeder Seite sind.
• Im Falle von Rauch aus dem Gerät ziehen Sie bitte sofort den Netzstecker
und kontaktieren Sie Ihren Händler.
• Es muss eine angemessene Unterbrechungsvorrichtung als Kurzschlussschutz
in der Gebäudeverdrahtungsinstallation eingebaut werden. Siehe bitte
die Unterbrechungsvorrichtungsspezifikation in Kapitel 5.2
• Verwenden Sie das Gerät nicht in einer der folgenden Umgebungen:
o Jeder Bereich mit Brenngas, ätzenden Stoffen, Starkstaub,
stehendem Wasser oder fließendem Wasser.
o Jegliche Bereiche, in denen ungewöhnlich hohe oder niedrige
Temperaturen vorherrschen (über 40 °C oder unter 0 °C) und mit
einer Feuchtigkeit von mehr als 90%.
o Jegliche Bereiche mit direkter Sonneneinstrahlung oder in der Nähe von
Heizgeräten/Heizungen. (Maximale Umgebungstemperaturzuordnung
beträgt 40 °C.
o Jegliche Bereiche mit starken Vibrationen.
o Außenbereiche.
• Falls ein Feuer in der Umgebung ausbricht, verwenden Sie bitte
Trockenfeuerlöscher. Die Verwendung von Feuerlöschern mit flüssigen
Mitteln, kann zu elektrischen Schlägen führen.
.
★
1.1.1 Überprüfung des Geräts
Überprüfen Sie die USV bei Empfang. Wenn die USV während des
Transports offensichtlich beschädigt wurde, bewahren Sie den Karton und das
Verpackungsmaterial in Original form für den Spediteur auf und setzen Sie
den Spediteur und Händler direkt in Kenntnis.
3
Page 52

4
DE
1.1.2 Auspacken des Schranks
Auspacken des Systems:
1. Öffnen Sie den äußeren Karton und entfernen Sie das Zubehör, das
zusammen mit dem Schrank eingepackt ist.
2. Heben Sie den Schrank aus dem äußeren Karton und stellen Sie ihn auf
eine ebenen, stabile Fläche.
3. Entsorgen oder recyceln Sie die Verpackung wie vorgeschrieben oder
bewahren Sie sie zum späteren Gebrauch auf.
1.1.3 USV-Einrichtung
Alle Baureihen sind für Turm- und Rack-Einbau geeignet. Sie lassen sich in
einem Rack für 19-ZollGeräte installieren. Bitte befolgen Sie die Anweisungen
für Turm- und Rack-Montage.
Turm-Montage
Diese USV-Serie kann horizontal und vertikal aufgestellt werden. Als Turm
-Konfiguration wird sie mit den optionalen USV-Ständern geliefert, um die USV bei
vertikaler Aufstellung zu stabilisieren. Der USV-Ständer muss am Boden des
Turms befestigt werden. Gehen Sie folgendermaßen vor, um die USV in den
USV-Ständern zu installieren.
1. Schieben Sie die USV senkrecht nach unten und stellen Sie zwei USV-Ständer
am Ende des Turms auf.
2. Setzen Sie die USV vorsichtig in die zwei Ständer.
3. Ziehen Sie das LCD-Feld heraus, drehen Sie es im Uhrzeigersinn um 90 Grad
und schieben Sie es in die Frontplatte zurück.
Page 53

DE
Rack-Montage
Die Serie kann in Racks von 19 Zoll installiert werden. Sowohl die USV als auch
externe Batteriegehäuse benötigen 2U Platz im Rack.
Gehen Sie folgendermaßen vor, um die USV in einem Rack zu installieren.
1. Richten Sie die Montageösen an den Bohrungen an der Seite der USV aus und
ziehen Sie die Schraube an.
2. Bauen Sie die Rack-Schienen mit der Rack-Halterung zusammen.
3. Schieben Sie die USV in die Rack-Schiene und lassen Sie sie im
Rack-Gehäuse einrasten.
4. Ziehen Sie die Schraube fest und dann kann die Last angeschlossen werden.
1.1.4 EBM-Installation (Optional)
Anschließen des EBM bei Turm-Montage:
1. Schieben Sie die USV und EBM senkrecht nach unten und setzen Sie zwei
USV-Ständer mit dem verlängerten Teil auf das Ende des Turms.
2. Ziehen Sie zur Stabilisierung die Schraube auf dem Blech an
3. Verbinden Sie die Erdungsleitung von der USV (Anschluss A) mit dem
EBM (Anschluss B)
5
Page 54

6
DE
4. Nehmen Sie die Frontplatte ab und schließen Sie die Batterieklemme (A)
von der USV wie unten dargestellt am EBM-Terminal (B) an. Benutzer
müssen die kleine Tür (C) an der Seite der Frontplatte entfernen, damit der
Ausgangsdraht des EMB durch die Tür verlegt werden kann, dann
muss die Frontplatte wieder angebracht werden.
A
A
B
C
B
Page 55

DE
5
Anschließen des EBM bei Rack-Montage
1. Verwenden Sie die gleiche Methode wie bei der Montage der USV in einem
Rack und montieren Sie das EBM in der Rack-Halterung an der Ober- und
Unterseite der USV.
2. Verbinden Sie die Erdungsleitung von der USV (Anschluss A) mit dem
EBM (Anschluss B)
3. Nehmen Sie das LCD-Feld und lösen Sie die inneren Schrauben.
4. Nehmen Sie die Frontplatte ab und schließen Sie die Batterieklemme (A)
von der USV wie unten dargestellt am EBM-Terminal (B) an. Benutzer
müssen die kleine Tür (C) an der Seite der Frontplatte entfernen, damit der
Ausgangsdraht des EMB durch die Tür verlegt werden kann, dann muss
die Frontplatte wieder angebracht werden.
5. Nach der Installation der USV im Rack kann die Last an der USV
angeschlossen werden. Bitte stellen Sie sicher, dass die angeschlossenen
Geräte ausgeschaltet sind, bevor Sie die Lasten mit der Ausgangsbuchse
verbinden
B
A
Unscrew
Unscrew
B
A
C
7
Page 56

8
DE
Anschließen mehrerer EBMs
Die USV mit 1000VA/1500VA/2000VA und 3000VA verfügen über einen
externen Batterieanschluss, mit dem die Benutzer mehrere EBM anschließen
kann, um zusätzliche Notstrom Versorgungszeit bieten zu können. Befolgen
Sie die Anweisungen unten für den Anschluss mehrerer EBM .
Anschließen mehrerer EBM bei Turm-Montage
1. Verbinden Sie die Erdungsleitung zwischen USV und dem ersten EBM und
dann die Erdungsleitung zwischen dem ersten und dem zweiten EBM.
2. Nehmen Sie die Frontplatte ab und schließen Sie die Batterieklemme (A)
von der USV wie unten dargestellt am EBM-Terminal (B) an. Und
verbinden Sie dann die Batterie klemme (D) vom ersten EBM mit der
Batterieklemme (E) vom zweiten EBM. Benutzer müssen die kleine Tür (C)
an der Seite der Frontplatte entfernen, damit der Ausgangsdraht des EMB
durch die Tür verlegt werden kann, dann muss die Frontplatte wieder
angebracht werden.
D
C
A
B
E
Anschließen mehrerer EBMs bei Rack-Montage
1. Verbinden Sie die Erdungsleitung zwischen USV und dem ersten EBM und
dann die Erdungsleitung zwischen dem ersten und dem zweiten EBM.
Page 57
DE
2. Nehmen Sie die Frontplatte ab und schließen Sie die Batterieklemme (A)
von der USV wie unten dargestellt am EBM-Terminal (B) an. Und
verbinden Sie dann die Batterie klemme (D) vom ersten EBM mit der
Batterieklemme (E) vom zweiten EBM. Benutzer müssen die kleine Tür
(C) an der Seite der Frontplatte entfernen, damit der Ausgangsdraht des
EMB durch die Tür verlegt werden kann, dann muss die Frontplatte
wieder angebracht werden.
E
B
D
A
C
Hinweis: Es können in der gleichen Weise wie oben drei oder mehr EBMs an
die USV angeschlossen werden.
Hinweis: Nach dem Anschließen der EBMs nicht vergessen, die Anzahl an
EBMs auf LCD zu setzen, bitte beziehen Sie sich für das
Einstellungsverfahren auf Kapitel 7, "Einstellung durch LCD-Modul". Bei
Anwendung der Nichtstandard-EBMS bitte den lokalen Händler für das
Einstellungsverfahren kontaktieren.
1.2 Betrieb
★ Trennen Sie das Netzkabel an der USV oder der
Gebäudeverkabelungssteckdose (geerdete, stoßfeste Steckdose)
während des Betriebs, da dies die Erdung zur USV und aller
angeschlossenen Lasten entfernt.
9
Page 58

DE
★ Die USV verfügt über ihre eigene interne Stromquelle (Batterien). Sie
können einen Stromschlag bekommen, wenn Sie die
USV-Ausgangssteckdosen oder den Ausgangsklemmenblock berühren,
selbst wenn die USV nicht an die Gebäudeverkabelungssteckdose
angeschlossen ist.
★ Um die USV vollständig zu trennen, drücken Sie die AUS Taste, um die
USV abzuschalten, trennen Sie dann das Anschlusskabel.
★ Stellen Sie sicher, dass keine Flüssigkeit oder sonstige Fremdkörper in
die USV eindringen können.
★ Das Gehäuse nicht entfernen. Das System darf nur von qualifiziertem
Servicepersonal gewartet werden.
★ Entfernen Sie die Schutztafel nur, nachdem Sie die Terminalverbindungen
getrennt haben.
★ Verwenden Sie Nr. 12 AWG (für den 3KS Eingangsdraht), 90°C
Kupferdraht und 4.4 lb-in Drehmoment beim Anschluss an den
Klemmenblock.
★ Verwenden Sie Nr. 10AWG (für alle Modelle Batteriedraht), 90°C
Kupferdraht und Anderson PP45 Stecker für den externen
Batterieschrank des Nutzers.
1.3 Wartung, Instandhaltung und Fehler
★ Die USV wird mit gefährlichen Spannungen betrieben. Reparaturen
dürfen nur von qualifiziertem Wartungspersonal durchgeführt werden.
★ Vorsicht - Stromschlagrisiko. Selbst nachdem das Gerät vom Netzstrom
(Gebäudeverkabelungssteckdose) getrennt ist, werden die Komponenten
in der USV immer noch an die Batterie angeschlossen, was potenziell
gefährlich sein kann.
★ Vor Ausführung jeglicher Art von Instandhaltung und/oder Wartung
müssen Die Batterien abgeklemmt werden. Prüfen Sie das vorab kein
Strom gesendet wird und dass keine gefährliche Spannung im
Kondensator oder in den BUS-Kondensator klemmen vorhanden ist.
★ Batterien dürfen nur von qualifiziertem Personal ausgetauscht werden.
★ Vorsicht - Stromschlagrisiko. Der Batteriekreis wird nicht von der
Eingangsspannung isoliert. Gefährliche Spannungen können zwischen
den Batterieterminals und dem Boden auftreten. Prüfen Sie, dass vor der
Wartung keine Spannung vorhanden ist!
10
Page 59

DE
★ Batterien haben einen hohen Kurzschlussstrom und stellen ein
Stromschlagrisiko dar. Ergreifen Sie alle nachstehend spezifizierten
Vorsichtsmaßnahmen und alle anderen notwendigen Maßnahmen, wenn
Sie mit Batterien arbeiten.
- Entfernen Sie Schmuck, Armbanduhren, Ringe und sonstige
Metallgegenstände
- Verwenden Sie nur Werkzeug mit isolierten Griffen.
★ Wenn Sie Batterien austauschen, die gleiche Menge und die gleiche Art
von Batterien verwenden.
★ Versuchen Sie nicht, Batterien durch Verbrennen zu entsorgen. Dies
könnte zu einer Explosion führen.
★ Öffnen oder zerstören Sie die Batterien nicht. Ausströmende Elektrolyte
können Verletzungen an Haut und Augen verursachen. Es kann giftig
sein.
★ Bitte tauschen Sie die Sicherung nur mit einer Sicherung des gleichen
Typs und mit der gleichen Amperezahl aus, um Brandgefahr zu
vermeiden.
★ Bauen Sie die USV nicht auseinander, außer das qualifizierte
Wartungspersonal.
1.3.1 Pflege von USV und Batterie
Die beste vorbeugende Wartung ist, den Bereich um die USV sauber und
staubfrei zu halten. Wenn die Atmosphäre sehr staubig ist, reinigen Sie die
Außenseite der Anlage mit einem Staubsauger. Für eine lange Lebensdauer
der Batterie stellen Sie die USV bei einer Umgebungstemperatur von 25°C
(77°Fauf)
1.3.2 Aufbewahrung von USV und Batterien
Wenn die USV soll über einen längeren Zeitraum aufbewahrt wird, laden Sie
die Batterie alle 6 Monate auf, indem Sie die USV an das Stromnetz
anschließen. Die Batterien werden in etwa 4 Stunden auf 90% Kapazität
aufgeladen. Es wird jedoch empfohlen, die Batterien nach der
Langzeitlagerung für 48 Stunden aufzuladen.
11
Page 60

DE
rufen Sie sofort Ihren lokalen Händler an.
1.3.3 Zeitpunkt zum Austauschen der Batterien
Wenn die Entladezeit weniger als 50% der spezifizierten vollen Ladung
beträgt, muss die Batterie ausgetauscht werden. Bitte überprüfen Sie den
Batterieanschluss oder kontaktieren Sie Ihren Händler vor Ort, um neue
zu Batterie bestellen.
WARNUNG:
Schalten Sie die USV aus und ziehen Sie das Netzkabel aus der Steckdose.
Wartung der Batterien sollte nur von Fachpersonal durchgeführt werden,
das Wissen über Batterien hat und die notwendigen Vorsichtsmaßnahmen
kennt. Halten Sie unqualifizierte Personen von den Batterien fern.
Batterien können einen elektrischen Schlag oder Verbrennungen durch
einen hohen Kurzschlussstrom verursachen. Folgende Vorsichtsmaßnahmen
sind einzuhalten:
1. Legen Sie Uhren, Ringe und ähnliche metallische Gegenstände ab.
2. Verwenden Sie Werkzeuge mit isolierten Griffen.
3. Legen Sie keine Werkzeuge oder Metallteile auf die Batterien.
4. Tragen Sie Gummihandschube und Stiefel.
5. Trennen Sie die Aufladequelle ab, bevor Sie die Batterieklemme
anschließen oder entfernen.
Wenn die Akkus ersetzt werden, ersetzen Sie diese mit dem gleichen Typ
und der gleichen Anzahl Batterien oder Akkumulatoren. Wenden Sie sich an
den Kundendienst, um neue Batterien zu bestellen.
Werfen Sie die Batterien nicht ins Feuer. Batterien können explodieren,
wenn sie Flammen ausgesetzt werden.
Batterien müssen fachgerecht entsorgt werden. Folgen Sie Ihren örtlichen
Entsorgungsvorschriften.
Öffnen oder zerstören Sie die Batterie nicht. Freigesetzter toxischer
Elektrolyt kann Haut und Augen schädigen.
Anmerkung: Wenn Sie kein qualifiziertes Wartungspersonal sind, um die
Batterie zu ersetzen, versuchen Sie nicht, das Batterie Fach zu öffnen. Bitte
1.3.4 Austauschen der Batterien im Inneren der USV
Folgen Sie beim Ersetzen von Batterien den Schritten und Diagramme unten:
1. Nehmen Sie das LCD-Feld ab und entfernen Sie die Schrauben.
2. Schieben und ziehen Sie die Frontplatte nach links und nehmen Sie sie
dann ab.
12
Page 61

DE
5
7
3. Trennen Sie das Kabel von der USV und der Batterie.
4. Entfernen Sie die Halterung der rechten inneren Batterie.
5. Ziehen Sie die Batterie auf eine ebene Fläche heraus.
6. Setzen Sie die neue Batterie in die USV ein.
7. Schrauben Sie die Batteriehalterung an und schließen Sie die
Batteriekabel A und B wieder an.
8. Setzen Sie die Frontplatte wieder auf die USV.
1.3.5 Testen neuer Batterien
Für einen Batterietest überprüfen Sie bitte Folgendes:
Die Batterien müssen vollständig aufgeladen sein.
Die USV muss sich im Normal-Modus ohne aktive Alarme befinden.
Schalten Sie keine Last zu/ab.
13
Page 62

DE
Testen der Batterien:
1. Schließen Sie die USV für mindestens 48 Stunden an das Stromnetz an,
um die Batterien aufzuladen.
2. Drücken und halten Sie die “I” Taste 1 Sekunde, um den Batterietest im
Leitungsmodus oder HE-Modus zu starten. Die Statusanzeige zeigt die
Zeichenfolge “TEST”
1.3.6 Recycling gebrauchter Batterien:
Warnung:
Werfen Sie die Batterien keinesfalls ins Feuer. Sie können explodieren.
Öffnen oder zerstören Sie die Batterien nicht. Freigesetzter Elektrolyt
kann Haut und Augen schädigen. Es kann giftig sein. Eine Batterie kann
einen elektrischen Schlag oder einen hohen Kurzschlussstrom
verursachen.
Für ein ordnungsgemäßes Recycling der verbrauchten Batterie entsorgen
Sie die USV, Batteriepaket und Batterien im Abfalleimer. Bitte befolgen Sie
Ihre lokalen Gesetze und Vorschriften, bei Ihrem lokalen Abfall
Entsorgungszentrum erhalten Sie weitere Informationen zur
ordnungsgemäßen Entsorgung der gebrauchten USV, Akkus und Batterien.
1.4 Transport
★ Bitte transportieren Sie die USV nur in der Originalverpackung (zum Schutz
gegen Stöße und Schläge).
1.5 Lagerung
★ Die USV muss in dem Raum gehortet werden, der belüftet wird und trocken
ist.
14
Page 63

DE
1.6 Normen
* Sicherheit
IEC/EN 62040-1
* EMI
Durchgeführte Emission..........................:IEC/EN 62040-2 Kategorie C1
Ausgestrahlte Emission.............................:IEC/EN 62040-2 Kategorie C1
Harmonischer Strom...............................:IEC/EN 61000-3-2
Spannungsschwankung und Flicker..........:IEC/EN 61000-3-3
*EMS
ESD.....................................................:IEC/EN 61000-4-2 Stufe 3
RS.....................................................:IEC/EN 61000-4-3 Stufe 3
EFT.....................................................:IEC/EN 61000-4-4 Stufe 4
ÜBERSPANNUNG.....................................................:IEC/E
N 61000-4-5
CS……………………………………...:IEC/EN 61000-4-6 Stufe 3
MS……………………………………..: IEC/EN 61000-4-8 Stufe 3
Spannungseinbrüche………………………….: IEC/EN 61000-4-11
Niederfrequenzsignale...............................:IEC/EN 61000-2-2
Stufe 4
15
Page 64

DE
2. Beschreibung der häufig verwendeten
Symbole
Einige oder alle der folgenden Symbole können in diesem Handbuch verwendet
werden. Es wird empfohlen, dass Sie sich mit den Symbolen vertraut machen und
ihre Bedeutung verstehen:
16
Page 65

DE
3. Einführung
Diese On-Line-Serie ist eine unterbrechungsfreie Stromversorgung, die die
Doppelkonvertertechnologie integriert. Sie bietet perfekten Schutz speziell
für Novell-, Windows-, NT- und UNIX-Server.
Der Doppel-Konverter eliminiert im Prinzip alle Stromstörungen. Ein
Gleichrichter konvertiert den Wechselstrom von der Steckdose in
Gleichstrom. Dieser Gleichstrom lädt die Batterien und versorgt den Inverter
mit Strom. Auf Basis dieser DC-Spannung erzeugt der Inverter eine
sinusförmige AC-Spannung, die die Ladungen dauerhaft versorgt.
Computer und Peripherie werden somit komplett durch Netzspannung
betrieben. Im Falle eines Stromausfalls, wird der Inverter von wartungsfreien
Batterien betrieben.
Dieses Handbuch deckt die wie folgt aufgeführten USV ab. Bitte bestätigen
Sie, ob dies das Modell ist, das Sie beabsichtigen zu kaufen, indem Sie eine
Sichtprüfung der Modell-Nr. auf der Rückenplatte der USV durchführen.
Modell Nr.
1K
1,5K 1,5KS
2K 2KS
3K 3KS
"S"-Modell: Verlängerte Sicherungszeit
Typ Modell Nr. Typ
Standard
1KS
Verlängerte
Sicherungszeit
17
Page 66

DE
4. Display Beschreibung
Schalter Funktion
EIN-Taste
AUS-Taste
Auswahl-Taste
Eingabe-Taste
ON Button/
Alarm Silence
OFF-Button Select-Button Enter-Button
Die Display-Platte
Schalten Sie das USV-Sytem ein: Durch Drücken der EIN-Taste "I"
wird das USV-System eingeschaltet.
Deaktivieren Sie den akustischen Alarm: Durch Drücken dieser Taste
kann ein akustischer Alarm im Batteriemodus deaktiviert werden.
Durch kurzes Berühren dieser Taste können alle akustischen Alarme
in allen Modi deaktiviert werden.
Führen Sie den Batterietest durch. Durch Drücken dieser Taste kann
die USV den Batterietest im Leitungsmodus oder ÖKO-Modus oder
Converter-Modus durchführen.
Wenn der Netzstrom normal ist, schaltet das USV-System durch
Drücken der AUS-Taste in den Keine-Ausgabe oder Bypass-Modus “
“, und der Inverter ist ausgeschaltet. In diesem Moment , wenn
der Bypass aktiviert ist, werden die Ausgangssteckdosen über den
Bypass mit Spannung versorgt, wenn Netzstrom verfügbar ist.
Deaktivieren Sie den akustischen Alarm: Durch Drücken dieser Taste
kann ein akustischer Alarm im Bypass-Modus deaktiviert werden.
Nehmen Sie die USV aus dem Fehlermodus und EPO-Status.
Die Ausgangsspannung, Frequenz,
Bypass-Aktivierung/Deaktivierung und Betriebsmodus im Kein
Ausgabe- oder Bypass-Modus, Zwei Lastsegmente im
Ausgangsmodus, die Anzahl an EBM in allen Modi können direkt
durch Drücken der Auswahl-Taste ausgewählt und durch Drücken
der Eingabe-Taste bestätigt werden.
LCD Screen
18
Page 67
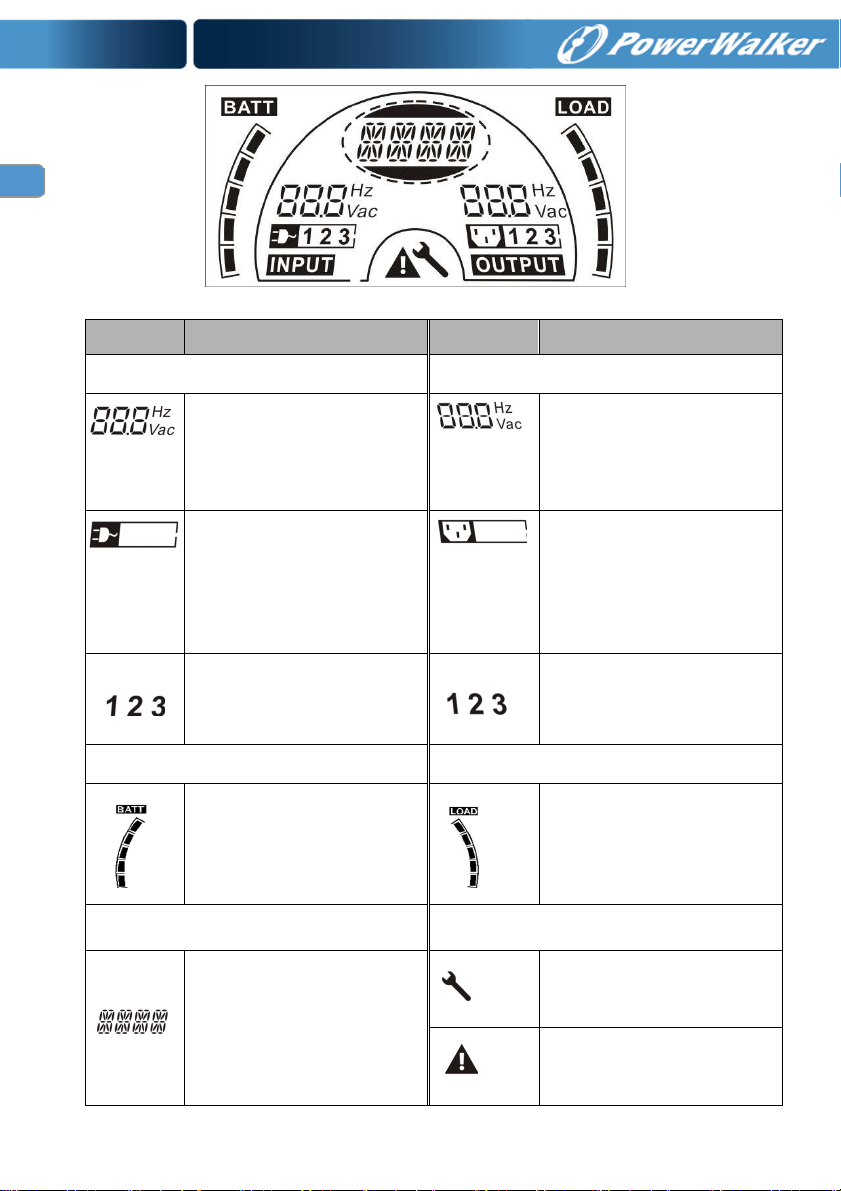
DE
Der LCD Display
Display Funktion Display Funktion
Eingabeinformationen Ausgabeinformationen
Er zeigt die
Batterieinformationen Lastinformation
Modus/Fehler/Warninformationen Sonstiges
Eingangsspannung/Freque
nzwert an, die im Wechsel
angezeigt werden.
Er zeigt an, dass der
Eingang an das Stromnetz
angeschlossen ist und die
Eingangsspannung wird
vom Stromnetz geliefert.
Er zeigtdie Anzahl der
Eingänge an, die vom
Stromnetz geliefert werden.
Er zeigt die
Batteriekapazität an. Jedes
Netz stellt die Kapazität von
20% dar.
Er zeigt den Betriebsmodus
oder die Fehlerart oder die
Art der Warnung an,
verschiedene Warnarten
gleichzeitig können alternativ
angezeigt werden.
Er zeigt die
Ausgangsspannung/Freque
nzwert an, die im Wechsel
angezeigt werden.
Er zeigtden
Ausgangsstecker an.
Er zeigtdie Anzahl an
Ausgängen an, die mit der
Last verbunden sind.
Er zeigt das Last niveau
an. Jedes Netz stellt das
Niveau von 20% dar.
Er zeigt andass die USV im
Einstellungsmodus ist.
Er zeigtan, dass die USV im
Fehlermodus ist oder ein
paar Warnungen vorliegen.
19
Page 68

DE
Nennamperezahl Ihrer Einspeisung beachten
.
5. Verbindung und Betrieb
Das System darf nur von qualifizierten Elektrikern in
Übereinstimmung mit den geltenden Sicherheitsbestimmungen
installiert und verdrahtet werden!
Beim Installieren der elektrischen Verdrahtung bitte die
5.1 Inspektion
Prüfen Sie den Verpackungskarton und dessen Inhalt auf Schäden. Bitte
informieren Sie die Transportagentur sofort, wenn Sie Anzeichen von
Schäden vorfinden.
Bewahren Sie die Verpackung zur späteren Nutzung an einem sicheren Ort
auf.
Hinweis: Bitte stellen Sie sicher, dass die Einspeisung isoliert und gesichert
ist, um zu verhindern, dass sie nicht wieder eingeschaltet werden kann.
5.2 Anschluss
(1) USV-Anschluss
Wenn die USV über die Elektrozuleitung angeschlossen wird, bitte eine
ordnungsgemäße Steckdose mit Schutz gegen Strom, kann sich der
Benutzer auf die nachstehende Tabelle beziehen. Wenn die USV über
Drähte angeschlossen wird, wird empfohlen, den 2,5mm2 Draht zu
verwenden und die “GND” Klemme sollte zunächst geerdet werden.
Das USV System hat keinen Eingangstrennschalter am Standard Schrank.
Beim Installieren der USV muss der Benutzer die externen Schalter und
Schutzkomponenten in den Eingangsklemmen anschließen. Es wird
empfohlen den NFB(Non-Fuse Breaker) zu wählen anstatt das traditionelle
Kombinations-Kid, einschließlich Trennschalter und Sicherung.
20
Page 69

Bei der Auswahl des NFB kann der Benutzer sich auf die nachstehende
Tabelle beziehen.
DE
Modell Nr.
UPS EINGANG NFB & Elektrozuleitung & Steckdose
SPANNUNG STROM
1K(S) 300Vac 10A
1,5K(S) 300Vac 12A
2K(S) 300Vac 16A
3K(S) 300Vac 20A
(2) USV-Ausgangsanschluss
Der Ausgang der USV ist vom Steckdosentyp IEC . Stecken Sie die
Lastverbindungsschnur in die Ausgangssteckdose, um den Anschluss zu
komplettieren. Verwenden Sie eine Schnur für jeweils 5A Last.
Modell Nr. Ausgangssteckdose (Stk)
1K(S)/1.5K(S)/ 2K(S) 8 * IEC320 C13
3K(S) 8 * IEC320 C13 + 1 * C19
Die Verdrahtungskonfiguration wird als
folgendes Verfahren dargestellt:
a) Entfernen Sie die kleine Abdeckung des
Klemmenblocks
b) Verwenden Sie 2.5mm2 Drähte für die
Verdrahtungskonfiguration
c) Mit Abschluss der Verdrahtungskonfiguration
bitte prüfen, ob die Drähte sicher befestigt
sind
d) Legen Sie die kleine Abdeckung zurück auf
die Rückenplatte
Anschlussdiagramm
Vorsicht:
Schließen Sie keine Geräte an, die das USV-System überlasten würden
(z.B. Laserdrucker)
21
Page 70

DE
(3) EPO Anschluss:
Benutzer können die Polarität von EPO auswählen, EPO offen ist im
Auslieferzustand als Standardeinstellung gewählt.
NEIN
Normalerweise ist der EPO-Stecker auf der Rückenplatte offen. Sobald der
Stecker mit einem Draht geschlossen wird, stoppt die USV die Ausgabe, bis der
EPO-Status deaktiviert ist.
Deaktivieren Sie den EPO-Status Aktivieren Sie den EPO-Status
NC
Normalerweise ist der EPO-Stecker auf der Rückenplatte mit einem Draht
geschlossen. Sobald der Anschlussstecker offen ist, stoppt die USV die
Ausgabe, bis der EPO-Status deaktiviert ist.
Aktivieren Sie den EPO-Status Deaktivieren Sie den EPO-Status
5.3 Batterie Ladung
Laden Sie die Batterien des UVS-Systems vollständig, indem Sie das
USV-System für 1-2 Stunden am Netz lassen. Sie können das USV-System
direkt verwenden ohne es zu laden, aber die Überbrückungszeit kann kürzer
sein als der angegebene Nennwert.
5.4 Einschalten der USV
(1) Mit angeschlossenem Netzstrom:
Drücken Sie die “I” Taste kontinuierlich für länger als 1 Sekunde, um die
USV einzuschalten, die USV wechselt in den Inverter-Modus, der
LCD-Bildschirm zeigt den Status der USV an.
22
Page 71

DE
(2) Ohne angeschlossenen Netzstrom:
Wird die USV ohne Netzstrom kaltgestartet, muss der Benutzer die “I” Taste
zweimal drücken, das erste Mal Drücken der “I” Taste dient dazu, dass die
USV am Stromnetz angeschlossen wird, der LCD-Bildschirm zeigt ‘INIT’an.
Ein zweites Mal dauerhaftes Drücken der “I”-Taste für länger als eine
Sekunde dient dazu, dass die USV eingeschaltet wird, die USV schaltet in
den Inverter-Modus. Tatsächlich dient das zweimalige Drücken der “I”
-Taste dazu, den weiteren Benutzerbetrieb zum Einschalten der USV
sicherzustellen, der LCD-Bildschirm zeigt den Status der USV an.
Hinweis: Die Standardeinstellung für den Bypass-Modus ist, dass kein
Ausgang nach USV den Netzstrom anschließt und der Trennschalter ist
eingeschaltet. Dies kann durch Überwachung der LCD-Platte oder Firmware
konfiguriert werden.
5.5 Test Funktion
(1) Echtzeiterkennung
Die USV kann eine Echtzeiterkennung vornehmen, wenn die Batterie
angeschlossen oder getrennt ist. Wenn der Batterieanschlussstatus in den
Floating-Modus geändert wird, erkennt die USV den Wechsel innerhalb von 30
Sekunden: im Ruhemodus erkennt die USV den Wechsel innerhalb von 3 Minuten;
(2) Manueller Test
Prüfen Sie die Funktion des USV-Systems, indem Sie den Ein-Switch “I” länger
als eine Sekunde lang drücken, die USV erkennt, ob die Batterie
angeschlossen ist oder ob die Batterie sofort einen Niedrigstandaufweist. Auch
die USV kann den Test automatisch und periodisch durchführen, die
Abstandszeit kann vom Benutzer festgelegt werden, der Standardwert ist 7
Tage.
5.6 Ausschalten der USV
(1) Im Inverter-Modus:
Drücken Sie die “ ” Taste dauerhaft für länger als eine Sekunde, um die USV
auszuschalten, die USV wechselt in den kein Ausgabe oder Bypass-Modus.
Zu diesem Zeitpunkt könnte die USV Ausgang haben, wenn der Bypass
aktiviert ist. Trennen Sie den Netzstrom, um den Ausgang abzuschalten.
(2) Im Batterie-Modus:
Drücken Sie die “ ” Taste dauerhaft für länger als eine Sekunde, um die USV
23
Page 72

DE
auszuschalten, die USV wird komplett ausgeschaltet.
5.7 Akustik Alarm Stumm Funktion
Wenn der Alarm im Batteriemodus zu störend ist, können Sie die "I"-Taste
dauerhaft für mehr als 1 Sekunde drücken, um ihn zu löschen. Zudem wird
der Alarm aktiviert, wenn der Batteriestand niedrig ist, um Sie daran zu
erinnern, dass die Last bald abzuschalten.
Wenn der Alarm im Bypass Modus zu störend ist, können Sie die“ “Taste
dauerhaft für mehr als 1 Sekunde drücken, um ihn zu löschen. Die Aktion
betrifft nicht die Warnung und den Fehleralarm.
Wenn der Alarm zu störend ist, können Sie kurz die “I” Taste berühren, alle
Alarme werden deaktiviert, wenn die Alarme wieder aufgenommen werden
sollen, kurz erneut auf die “I” Taste drücken.
5.8 Betriebs verfahren der externen Batterie für ein langes
Sicherungszeit Modells (“S” Model)
(1) Verwenden Sie die Batterie mit der Spannung: 36VDC für 1KS
(12V×3 Batterien), 48VDC für 1,5KS/ 2KS (12V×4 Batterien),
72VDC für 3KS (12V×6 Batterien). Der Anschluss von mehr oder
weniger Batterien als erforderlich verursacht Abnormalitäten oder
permanenten Schaden.
(2) Eine Batterie vom Typ Festverdrahtung an der Rückenplatte wird
zum Anschluss des Batteriepakets verwendet.
(3) Das Batterieanschlussverfahren ist sehr wichtig. Jede
Nichteinhaltung kann in einem Stromschlag resultieren. Deshalb
müssen die folgenden Schritte streng eingehalten werden.
(4) Stellen Sie sicher, dass der Netzeingang abgeschaltet ist, wenn ein
Batterietrennschalter vorhanden ist, dann schalten Sie diesen
zunächst ab.
(5) Entfernen Sie die Frontplatte und schließen Sie die Batterie über
Anderson PP45 Stecker an. Bereiten Sie das Batteriekabel vor, das
den Strom von >50A für alle Modelle durchführen kann, die
Querschnittsfläche muss für alle Modelle größer als 4 mm² sein. Und
die Batteriedrahtfarbe wird wie folgt empfohlen:
24
+
+ GND ----
++
Roter Draht Grüner/gelber Draht Schwarzer
Page 73

DE
Draht
(6) Der schwarze Draht wird an die "+"-Klemme der Batterie
angeschlossen. Der schwarze Draht wird an die "-"-Klemme der
Batterie angeschlossen. (Hinweis: der grüne/gelbe Draht wird aus
Schutzzwecken geerdet.)
(7) Stellen Sie sicher, dass die Drähte befestigt werden, installieren Sie
die Klemmenblockplatte der USV.
(8) Schließen Sie die USV an die Last an. Schalten Sie dann den
Netzschalter ein oder schließen Sie die Verbindungsschnur der USV
an die Netzstromversorgung an, die Batterie beginnt zu laden.
Vorsicht:
Ein DC-Trennschalter muss zwischen der USV und der externen Batterie
angeschlossen werden.
Vorsicht:
Die Ausgangssteckdosen des USV-Systems können immer noch
spannungsführend sein, selbst wenn das Stromversorgungssystem getrennt
25
Page 74

DE
6. Betriebs Modus für alle Modelle
Die verschiedenen Strings können auf dem LCD-Display angezeigt werden
entsprechend ihrer eigenen Betriebsmodi und sie werden als die folgende
Tabelle dargestellt. Es kann immer nur ein normaler Betriebsstring oder
Fehlerstring dargestellt werden. Aber die Warnung, selbst verschiedene
Warnungen könnten in bestimmten Betriebsmodi gleichzeitig erscheinen. Und
der normale Betriebsmodusstring und der Warnungsstring werden kreisförmig
angezeigt. Sobald ein Fehler aufgetreten ist, werden alle vorherigen
Warnungen nicht mehr angezeigt, sondern nur der Fehlerstring wird dargestellt.
Normaler Betriebmodus Code
Kein Ausgangsmodus STbY
Bypass-Modus bYPA
Leitungsmodus LEITUNG
Batteriemodus bATT
Batterietestmodus TEST
ÖKO-Modus ÖKO
Konverter-Modus DVCF
6.1 Leitungs modus
Das LCD Display im Leitungs Modus wird im folgenden Diagramm dargestellt.
Die Informationen über den Netzstrom, den Batteriestand, die USV-Ausgabe
und die Last können angezeigt werden. Der “LINE” String weist daraufhin,
dass die USV im Leitungs-Modus betrieben wird.
■
■ Der Leitungs modus
■■
Ist der Ausgang überladen, ertönt der Alarm zweimal pro Sekunde. Sie sollten sich
nach und nach ein paar unnötiger Lasten entledigen, um die Lasten, die an die
USV angeschlossen sind, um weniger als 90% ihrer Nennleistung zu reduzieren.
26
Page 75

DE
Hinweis: Bitte befolgen Sie die folgenden Schritte, um den Generator
anzuschließen:
● Aktivieren Sie den Generator und warten Sie, bis der Betrieb stabil ist, bevor
die Leistung des Generators der USV zugeführt wird (stellen Sie sicher,
dass die USV im Ruhemodus ist). Schalten Sie dann die USV entsprechend
dem Startverfahren an. Nachdem die USV eingeschaltet ist, können die
Lasten nacheinander an die USV angeschlossen werden.
● Die Leistungsfähigkeit des AC-Generators muss doppelt so hoch sein wie
die USV-Kapazität.
6.2 Batterie-Modus
Das LCD Display im Batteriemodus wird im folgenden Diagramm dargestellt.
Die Informationen über den Netzstrom, den Batteriestand, die USV-Ausgabe
und die Last können angezeigt werden. Der “bATT” String weist daraufhin,
dass die USV im Batterie-Modus betrieben wird.
Wenn die USV im Batteriemodus läuft, piept der Buzzer einmal alle 4
Sekunden. Wenn die "EIN"-Taste auf der Frontplatte erneut länger als eine
Sekunde gedrückt wird, hört der Buzzer auf zu piepen (im stillen Modus).
Drücken Sie die "EIN"-Taste länger als eine Sekunde, um die Alarmfunktion
wieder aufzunehmen.
■■■■
Der Batteriemodus
6.3 Bypass-Modus
Das LCD Display im Bypass-Modus wird im folgenden Diagramm dargestellt.
Die Informationen über den Netzstrom, den Batteriestand, die USV-Ausgabe
und die Last können angezeigt werden. Die USV piept im Bypass-Modus
einmal alle zwei Minuten. Der “bYPA” String weist daraufhin, dass die USV im
Bypass-Modus betrieben wird.
■■■■
Der Bypass-Modus
27
Page 76

DE
Die USV hat keine Sicherungsfunktion, wenn sie im Bypass-Modus ist.
Der von der Last verwendete Strom wird über einen internen Filter vom
Elektrizitätswerk geliefert.
6.4 KEIN Ausgangs Modus
Das LCD Display im Nicht-Ausgabe Modus wird im folgenden Diagramm
dargestellt. Die Informationen über den Netzstrom, den Batteriestand, die
USV-Ausgabe und die Last können angezeigt werden. Der “STbY” String
weist daraufhin, dass die USV im Kein-Ausgabemodus betrieben wird.
■■■■
Der Kein-Ausgabe modus
6.5 EPO (Emergency Power Off) [Notabschaltungsfunktion]
Sie wird auch RPO (Remote Power Off) [Fernabschaltung] genannt. Auf
dem LCD-Display, ist der Modus-String “EPO”.
In einem speziellen Status, in dem die USV die Ausgabe und den Alarm
ausschaltet. Die USV kann nicht durch Drücken der “OFF” Taste auf der
Platte ausgeschaltet werden, nur nachdem der EPO-Status durch
Ausschalten des EPO-Schalters aufgehoben wird.
6.6 ÖKO-Modus (Sparmodus)
Er wird auch Hocheffizienzmodus genannt. Im ECO-Modus ist der
Modus-String auf dem LCD-Display “ECO”.
Nachdem die USV eingeschaltet ist the UPS is turned on, the power used
by the load is supplied from the utility power via internal filter while the utility
power is in normal range, so the high efficiency could be gained in the ECO
mode. Sobald das Netz verloren oder abnormal ist, schaltet die USV in den
Batteriemodus um und die Last wird dauerhaft von der Batterie betrieben.
1) Sie könnte durch die LCD-Einstellung oder die Software (Winpower
etc.) aktiviert werden.
2) Es muss darauf geachtet werden, dass die Übertragungszeit des USV
Ausgangs vom ÖKO-Modus in den Batteriemodus kürzer als 10
Sekunden ist. Aber es ist immer noch zu lang für die gleiche
empfindliche Last.
28
Page 77

DE
6.7 Konvertermodus
Im Konverter-Modus ist der Modus-String auf dem LCD-Display “CVCF”.
Die USV würde mit einer festgelegten Ausgangsfrequenz (50Hz oder 60Hz)
im Konvertermodus frei laufen. Sobald das Netz verloren oder abnormal ist,
schaltet die USV in den Batteriemodus um und die Last wird dauerhaft von
der Batterie betrieben.
1) Sie könnte durch die LCD-Einstellung oder die Software (Winpower etc.)
aktiviert werden.
2) Die Last wird im Konvertermodus auf 70% gedrosselt.
6.8 Abnormaler Modus
Im abnormalen Modus, wie ein Bus-Fehler usw., wird der entsprechende
Fehlerstring angezeigt, um auf den Betriebsmodus der USV hinzuweisen und
das Hintergrundlicht wird rot. Zum Beispiel wird “SHOR” angezeigt, wenn die
Last oder die USV-Ausgabe knapp ist. Das LCD Display wird im folgenden
Diagramm dargestellt.
29
Page 78

DE
7. Einstellung durch LCD-Modul
Die Ausgangsspannung, Frequenz, Bypass Status und Betriebsmodus im Kein
Ausgabe Modus oder Bypass-Modus, Zwei Lastsegmente im Ausgangsmodus, die
Anzahl an EBM in allen Modi können direkt über das LCD-Modus eingestellt werden.
Die Ausgangsspannung könnte auf 208V, 220V, 230V und 240V eingestellt werden.
Die Ausgangsfrequenz könnte auf 50Hz und 60Hz eingestellt werden. Die
Bypass-Status könnte auf aktivieren und deaktivieren eingestellt werden. Der
Betriebsmodus der USV kann zwischen Leitungsmodus, ÖKO-Modus und
Konvertermodus eingestellt werden. Die Anzahl an EBm könnte auf 0 bis 9
eingestellt werden. Zwei Lastsegmente könnten auf ein und aus gestellt werden.
Im Bypass- oder Kein-Ausgangs-Modus muss die “Enter” Taste auf der LCD-Platte
länger als eine Sekunde gedrückt werden, um in den Einstellungsmodus zu
gelangen. Das LCD Display wird im folgenden Diagramm dargestellt. Der String
“OPV” weist daraufhin, dass die aktuelle Einstellung Ausgangsspannung ist.
“230Vac” weist daraufhin, dass die aktuelle Standardausgangsspannung 230VAC
beträgt. Wenn Sie die Ausgangsspannung festlegen wollen, drücken Sie die “Enter”
Taste länger als eine Sekunde, ein flackernder String “208” würde angezeigt, wenn
die “Enter” Taste erneut gedrückt wird, der String “208” wechselt in flimmerfrei, die
Ausgangsspannung wird auf 208V geändert; wenn die “Select” Taste länger als eine
Sekunde gedrückt wird, erscheint der nächste Flacker-String“220”, die Reihenfolge
des Flacker-Strings ist 208 – 220 – 230 – 240 – 208, Drücken Sie die “Enter” Taste,
um die Ausgangsspannung zu bestätigen, die Sie wünschen.
Verlassen Sie den Einstellungs-Modus, indem Sie die “Enter” Taste kurz berühren;
setzen Sie die Einstellung fort, indem Sie die “Select” Taste drücken. Wird die
“Select” oder “Enter” Taste länger als 10 Sekunden nicht mehr gedrückt, wird der
Einstellungs-Modus automatischverlassen.
Die Ausgangsfrequenz String “OPF”, Bypass status string ” bYPA”, Betriebmodus
String “MOdE”, EBM String EbM, Lastsegment String “LS1” und “LS2” würden
kreisförmig dargestellt. Der einzige Spannungswert könnte zu jeder Zeit in “208V”,
30
Page 79
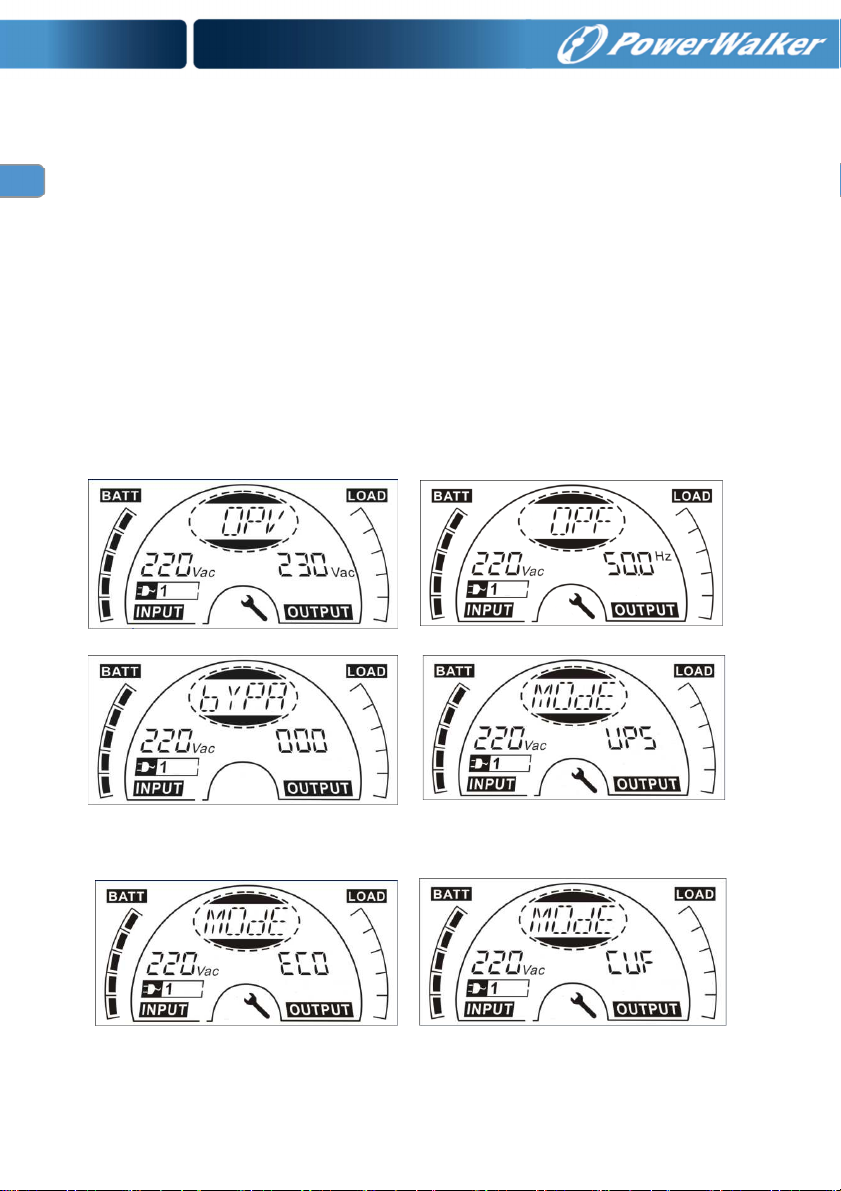
DE
“220V”, “230V”, “240V” ausgewählt werden; Der einzige Frequenzwert könnte zu
jeder Zeit in “50Hz”, “60Hz” ausgewählt werden; Bypass Status könnte in “000” oder
“001”ausgewählt werden (Hier bedeutet 000 Bypass Deaktivierung,001 bedeutet
Bypass Aktivierung),Die USV würde in ein paar Sekunden in den Bypass-Modus
umschalten, nachdem “Bypass Enable” ausgewählt wird und Wechsel in kein
Ausgangsmodus in ein paar Sekunden, nachdem “Bypass Disable” ausgewählt wird;
Betriebsmodus könnte in “USV”, “ECO”, “CVF”ausgewählt werden (Hier bedeutet
“USV” der normale Inverter-Modus, “ECO” bedeutet Hocheffizienzmodus und “CVF”
bedeutet Konvertermodus), Der Moduswechsel wäre nur aktiv, nachdem die USV
eingeschaltet ist; Die Anzahl an EBM könnte in “000” bis “009”ausgewählt werden
(Hier bedeutet “000”, dass kein EBM angeschlossen ist). Lastsegment 1 könnte in
“000” oder “001”ausgewählt werden (Hier bedeutet 000 Lastsegment 1 aus, 001
heißt Lastsegment 1 ein); Lastsegment 2 ist das gleiche wie Lastsegment 1.
■■■■
Hier ist ein Beispiel für den Wechsel des Betriebs modus vom normalen Modus in den
Konvertermodus über die LCD-Platte.
Schritt 1: “OPV” nach Drücken der “Eingabe” Taste; Schritt 2: “OPF” nach Drücken der “Auswahl” Taste.
Schritt 3: “bYPA” nach Drücken der “Auswahl”
Schritt 5: “ECO” Flackern nach Drücken
Drücken Sie die“Auswahl” taste;
Schritt 4: “MOdE” nach Drücken der “Auswahl” Taste, die
“Eingabe” Taste in den Einstellungsmodus drücken, dann “USV”
Flackern;
Schritt 6: “CVF” Flackern nach erneutem Drücken der
“Auswahl” Taste. Drücken Sie die “Eingabe” taste, um den
Moduswechsel sicherzustellen Berühren Sie die “Enter”
Taste kurz, um den Einstellungsmodus zu verlassen.
31
Page 80

DE
8. Problembehebung
Wenn das USV-System nicht korrekt funktioniert, prüfen Sie den Betriebsstatus auf
dem LCD-Display.
Warnung String Fehler String
Standort fehlgeschlagen SITE Inverterkurzschluss SHOR
Lüfterausfall FANF Überlastfehler OVLD
Batterie über Spannung
(überladen)
Batteriestand niedrig bLOW Sanftanlauf des Bus
Laden fehlgeschlagen CHGF Übertemperaturfehler OVTP
Invertertemperatur hoch TEPH Inverterspannung niedrig INVL
Umgebungstemperatur hoch AMbH Inverterspannung hoch INVH
Batterie offen bOPN Bus-Überspannung bUSH
Überlast OVLD Bus-Niederspannung bUSL
EPO EPO Spannungsungleichgewicht bUSE
Batteriefehler bATF Bus-Kurzschluss bUSS
NTC offen NTCO
Wenn das USV-System nicht korrekt funktioniert, bitte versuchen, das Problem
anhand der nachstehenden Tabelle zu lösen.
Problem Pzle Ursache Lösung
Keine Anzeige, kein
Warnton, obwohl das
System an die
Netzstromversorgung
angeschlossen ist
Display Mode string
”STbY” in LCD, even
though the power supply is
available
Der Display-Modus-String
"bATT" im LCD und der
Akustikalarm ertönen
einmal alle 4 Sekunden.
Keine Eingangsspannung: Prüfen Sie das Ausgangs- und
Inverter nicht eingeschaltet Drücken Sie den Ein-Schalter "I".
Netzstromausfall oder
Eingangstrom und/oder
Frequenz liegen außerhalb
der Toleranz
HOCH Sanftanlauf des Inverters
fehlgeschlagen
fehlgeschlagen
Eingangskabel der
Gebäude-Steckdosenverkabelun
g.
Schaltet automatisch in den
Batteriemodus
Prüfen Sie die
Eingangsstromversorgung und
informen Sie bei Bedarf den
Händler.
ISFT
bSFT
32
Page 81

DE
Notstromzeitraum kürzer
als der Nennwert
Lüfterausfall Lüfter abnormal Prüfen Sie, ob der Lüfer läuft
Batterieüberspannung Batterie ist überladen Stoppen Sie das automatische
Niedriger Batteriestand Batteriespannung ist niedrig Wenn der Akustikalarm jede
Laden fehlgeschlagen Laden wurde abgebrochen Händler benachrichtigen.
Invertertemperatur hoch Innentemperatur des USV ist
Umgebungstemperatur
hoch
Batterie offen Batteriepaket nicht richtig
Batteriefehler Batterie muss ersetzt
Überlast Überlast Prüfen Sie die Lasten und
Standort fehlgeschlagen Phasenleiter und
EPO aktiv EPO-Funktion ist aktiviert Schalten Sie den EPO-Schalter
Bus-Fehler
(Niedrig/hoch/Ungleichge
wicht/Sanftanlauf)
Inverterfehler
(Niedrig/hoch/Sanftanlauf)
Batterien nicht voll geladen/
Batterien defekt
zu hoch
Die Umgebungstemperatur
ist zu hoch
angeschlossen
werden
Neutralleiter am Eingang des
USV-Systems sind
umgekehrt
Interner USV-Fehler Händler benachrichtigen
Interner USV-Fehler Händler benachrichtigen
Laden Sie die Batterien
mindestens
5 - 8 Stunden und prüfen Sie
dann die Kapazität. Hält das
Problem an, wenden Sie sich an
Ihren Händler.
Laden der Batterie und nachdem
die Batteriespannung und das
Netz wieder normal sind, erneut
automatisch laden.
Sekunde ertönt, ist die Batterie
fast leer.
Prüfen Sie die Lüftung der USV,
prüfen Sie die
Umgebungstemperatur.
Prüfen Sie die
Umgebungsbelüftung,
Prüfen Sie, ob die Batteriebank
an die USV angeschlossen ist
Prüfen Sie, ob der
Batterietrennschalter
eingeschaltet ist.
Händler benachrichtigen
entfernen Sie einige
nichtkritische Lasten.
Prüfen Sie, ob ein paar Lasten
fehlgeschlagen sind.
Drehen Sie die Netzsteckdose
um 180° oder schließen Sie das
USV-System an.
ab.
33
Page 82

DE
Übertemperaturfehler Übertemperatur Prüfen Sie die Lüftung der USV,
NTC offen Interner UPS-Fehler Händler benachrichtigen
Inverterkurzschluss Ausgangskurzschluss Alle Lasten entfernen. UPS
Bus-Kurzschluss Interner USV-Fehler Händler benachrichtigen
Bitte halten Sie die folgenden Informationen bereit, bevor Sie die
Kundendienst-Serviceabteilung kontaktieren.
1. Modellnummer, Seriennummer
2. Datum, an dem das Problem auftrat
3. LCD-Displaystatus, Buzzer-Alarmstatus
4. Netzstromzustand, Lasttyp und Kapazität, Umgebungstemperatur,
Belüftungszustand
5. Die Informationen (Batteriekapazität, Menge) des externen Batteriepakets,
wenn es sich bei der USV umd das “S” Modell handelt
6. Sonstige Informationen für eine komplette Beschreibung des Problems
prüfen Sie die
Umgebungstemperatur und
Belüftung.
unterbrechen. Prüfen Sie, ob der
Ausgang der USV und die Lasten
einen Kurzschluss haben. Stellen
Sie sicher, dass der Kurzschluss
beseitigt wird und die USV keine
internen Fehler hat, bevor sie
wieder eingeschaltet wird.
9. Wartung
9.1
Betrieb
Das USV-System enthält keine Teile, die der Benutzer warten kann. Wenn die
Batterielebensdauer (3~5 Jahre bei 25°C Umgebungstemperatur)
überschritten ist, müssen die Batterien ausgetauscht werden. Kontaktieren
Sie in diesem Fall Ihren Händler.
9.2 Lagerung
Wenn die Batterien in gemäßigten Klimazonen aufbewahrt werden, sollten
Sie alle drei Monate für 1~2 Stundengeladen werden. An Orten, die hohen
Temperaturen ausgesetzt sind, müssen die Ladeabstände auf zwei Monate
gekürzt werden.
34
Page 83

DE
9.3 Batterieaustausch
Wenn die Batterielebensdauer überschritten wird, müssen die Batterien
ausgetauscht werden.
Der Batterieaustausch darf nur von qualifiziertem Personal durchgeführt
werden.
Es empfiehlt sich, die USV vor dem Austausch komplett auszuschalten. Falls
ein Batterietrennschalter vorhanden ist, dann zunächst diesen ausschalten.
Trennen Sie das Batteriekabel vorsichtig und stellen Sie sicher, dass keine
freigelegten Drähte berührt werden können. Schließen Sie die Batterien
wieder an die USV an und folgen Sie dabei Abschnitt 5.8. Schalten Sie dann
den Batterietrennschalter ein und starten Sie die USV.
Wird ein Batterieaustausch erforderlich, während die USV in Betrieb ist, muss
sichergestellt werden, dass die USV nicht während des Austauschs
abgeschaltet wird. Falls ein Batterietrennschalter vorhanden ist, dann
zunächst diesen ausschalten. Trennen Sie das Batteriekabel vorsichtig und
stellen Sie sicher, dass keine freigelegten Drähte berührt werden können.
Schließen Sie die Batterien wieder an die USV an und folgen Sie dabei
Abschnitt 5.8. Schalten Sie dann den Batterietrennschalter ein und drücken
Sie den EIN-Schalter, damit die USV den Batterietest durchführt, prüfen Sie,
ob die Batterieinformationen normal sind.
35
Page 84

DE
10. Technische Daten
10.1 Elektrische Spezifikationen
EINGANG
Modell-Nr. 1K(S) 1,5K(S) 2K(S) 3K(S)
Phase 1
Frequenz (45~55)/(54~66) Hz
Max Strom(A) 7,5 10,5 13,5 20
AUSGANG
Modell-Nr. 1K(S) 1,5K(S) 2K(S) 3K(S)
Nennleistung 1kVA/0,9kW 1,5k/1,35kW 2kVA/1,8kW 3kVA/2,7kW
Spannung 208/220/230/240×(1士 1%)VAC
Frequenz 50/60(±0.2)Hz (Batteriemodus)
Wellenform sinusförmig
BATTERIEN
Modell-Nr. 1K 1,5K 2K 3K
Anzahl und Art 3×12V 7Ah 4×12V 7Ah 4×12V 9Ah 6×12V 9Ah
10.2 Betriebskonfiguration
Umgebungstemperatur 0°C to 40°C
Betriebsfeuchte < 95%
Höhe < 1000m
Lagertemperatur 0°C to 45°C
10.3 Typische Sicherungs zeit (Typische Werte bei 25°C in
Minuten:)
Modell-Nr. 100 % Last 50 % Last
1K 5 15
1,5K 4 12
2K 3 10
3K 3 10
36
Page 85

DE
10.4 Maße und Gewichte
Modell 1000 1000S 1500 1500S 2000 2000S 3000 3000S
Nettogewicht (kg) 16,2 8,4 19,7 9,3 19,7 9,3 28,6 13,2
USVGehä
Maß (mm) (W x H
use
EBM
Gehä
use
x D)
Maß (mm) (W x H
x D)
Nettogewicht (kg)
Typ 36V 48V 72V
22,2 27,5 40,5
438X86.5x436 438X86.5x608
37
Page 86

DE
11. Kommunikationsanschluss
11.1 RS-232 und USB-Kommunikationsanschlüsse
Um die Kommunikation zwischen der USV und einem Computer herzustellen,
verbinden Sie einen Computer über ein geeignetes Kommunikationskabel mit
einem Kommunikationsanschluss der USV.
HINWEIS:
Nur einer der Kommunikationsanschlüsse kann gleichzeitig aktiv sein. Der USB-Port hat
Priorität über den RS-232 Port.
Wenn ein Kommunikationskabel installiert ist, kann die Leistungsverwaltungs-Software
mit der USV Daten austauschen. Die Software ruft von der USV detaillierte Informationen
über den Status der Stromversorgungsumgebung ab. Wenn ein Stromversorgungsnotfall
eintritt, leitet die Software das Speichern aller Daten und ein ordnungsgemäßes
Herunterfahren des Geräts ein.
11.2 RS-232 Port
Der RS-232 Port ist zur USV Überwachung, Kontrolle und für Firmware-Updates
verfügbar. Um eine Kommunikation zwischen der USV und einem Computer
herzustellen, schließen Sie ein Ende des Kommunikationsserienkabels an, das mit
der USV an den RS-232 Port auf der USV angeschlossen wird. Schließen Sie das
andere Ende des Serienkabels an den RS-232 Port an einem Computer an.
Die Kabelpins für die RS-232 Kommunikationsschnittstelle werden in der folgenden
Abbildung identifiziert.
RS-232 Kommunikationsschnittstelle Pin-Belegungen
Pin Signalname Funktion
1 Frei keine Angabe
2 Tx Übertragung an externes Gerät Aus
3 Rx Erhalt von externem Gerät In
4 Frei keine Angabe
5 GND
Gemeinsames Signal
(am Gehäuse befestigt)
6 Frei keine Angabe
7 Frei keine Angabe
8 Frei keine Angabe
9 Frei keine Angabe
Richtung von der
USV
keine Angabe
38
Page 87

DE
11.3 USB-Anschluss
Die USV kann mit einem USB-konformen Computer kommunizieren, indem
eine HID-kompatible Energieverwaltungssoftware verwendet wird. Um eine
Kommunikation zwischen der USV und einem Computer herzustellen,
schließen Sie das USB-Kabel an, das mit der USV an den USB-Port auf der
USV angeschlossen wird. Schließen Sie das andere Ende des USB-Kabels
an den USB-Port an einem Computer an.
11.4 Installation einer Seriennetzwerk-Managementkarte
(optional)
Jede USV hat eine verfügbare Kommunikationsbucht, die die optionale
Seriennetzwerk-Managementkarte unterstützt. Nachdem Sie eine
Seriennetzwerk-Managementkarte installiert haben, können sie eine
Umgebungsüberwachungssonde an die USV anschließen.
Hinweis: Sie müssen die USV abschalten, bevor Sie eine
Kommunikationskarte installieren.
Um die Netzwerkmanagementkarte zu installieren, müssen die folgenden
Schritte unternommen werden:
1. Lokalisieren Sie die USV-Kommunikationsbucht.
2. Entfernen Sie die zwei Schrauben, die die Kommunikationsbuchtabdeckung zur
USV sichern und sichern Sie die Schrauben.
3. Setzen Sie die Seriennetzwerk-Managementkarte in den Steckplatz auf der USV.
4. Befestigen Sie die Seriennetzwerk-Managementkarte mit beiden
Schrauben an der USV.
Für weitere Informationen über die Seriennetzwerk-Managementkarte siehe
das Benutzerhandbuch für Seriennetzwerk-Managementkarten.
11.5 Potenzialfreier Kontaktport
Die USV integriert einen eingebauten einzeln programmierbaren
Relais-Ausgang mit potenzialfreiem Kontakt für eine Fernalarmanzeige.
Potenzialfreier Ausgangsport; Und beinhaltet einen Einzelsignaleingang:
Potenzialfreier Eingangsport. Siehe Abbildung in der USV-Rückenplatte
für die Lagen der Ports.
The relay output can be configured by protocol command setting, the
default output contact is “Summary Alarm”; The signal input to control
UPS On/Off status does not need to be configured, its function is the same
as one button to control UPS On/Off status.
39
Page 88

DE
Hinweis:
Der Relais-Ausgangskontakt darf nicht an Netzstromkreise
angeschlossen werden. Es ist eine verstärkte Isolierung zum Netz
erforderlich. Der Relais-Ausgangskontakt hat ein maximales Rating von
30Vac/1A und 60Vdc/2A Normalwerte.
Die folgenden Abbildungen stellen das Schaltbild der potenzialfreien
Eingangs-/Ausgangskontakte dar.
Schaltbild zum potenzialfreien Ausgangskontakt
Schaltbild zum potenzialfreien Eingangskontakt
40
Page 89

DE
Die folgenden Abbildungen stellen das Schaltbild der potenzialfreien
Eingangs-/Ausgangskontakte dar.
Dry out Signal Beschreibung
Summenalarm Aktiviert, wenn eine Warnung auftritt
Auf Batterie Aktiviert, wenn die USV auf Batterie betrieben
wird
Niedriger
Batteriestand
USV ok Aktiviert, wenn die USV keine Alarme und keinen
Auf Bypass Aktiviert, wenn die USV auf Bypass-Ausgang hat
Potenzialfreies
Signal
UPS Ein-/ Aus One second pulse activate, if active, the UPS
Mit dem "bLOW"-Alarm aktiviert
Fehler aufweist
Beschreibung
turns off when UPS is on inverter; the UPS turns
on when UPS is not on inverter. Es ist das
gleiche wie ein Ferntastensteuerung, um den
Ein-/Aus-Status der USV zu kontrollieren.
41
Page 90

DE
12. Softwareinstallation
WinPower ist die Überwachungssoftware der USV, mit benutzerfreundlicher
Schnittstelle zur Überwachung und Steuerung Ihrer USV. Diese einzigartige
Software bietet kompletten Leistungsschutz für Ihr Computer-System bei
Stromausfall. Mit der Software können Benutzer jeden USV-Status auf dem
gleichen LAN überwachen. Darüber hinaus kann eine USV Sicherheit für mehr
als einen Computer auf dem gleichen LAN gleichzeitig liefern, zum Beispiel
das sichere Herunterfahren des Systems, das Speichern von
Anwendungsdaten und Abschalten der USV bei Stromausfall.
Software Einstellung auf Ihrem PC:
Angeschlossen über USB an einen PC oder Notebook ermöglicht die Software die
Kommunikation zwischen der USV und dem Computer. Die USV-Software
überwacht den Zustand der USV, schaltet das System ab, bevor der USV-Strom
verbraucht ist, und ermöglicht eine Fernüberwachung der USV über ein Netzwerk
(dadurch können Sie Ihr System effizienter verwalten). Bei einem Stromausfall oder
bei niedrigem Batteriestand der USV führt die USV alle notwendigen Schritte, ohne
Eingreifen des Systemadministrators, durch. Zusätzlich zur automatischen
Dateisicherungs- und Abschaltfunktion können auch Warnmeldungen per Pager,
E-Mail usw. versendet werden.
• Verwenden Sie die beiliegende CD und folgen Sie den Anweisungen auf dem
Bildschirm, um die WinPower-Software zu installieren.
• Geben Sie bei der Installation der Software folgende Seriennummer ein:
511C1-01220-0100-478DF2A
• Nachdem die Software erfolgreich installiert wurde und die Kommunikation mit
der USV hergestellt wurde, erscheint ein grünes Symbol im Infobereich.
• Doppelklicken Sie auf das Symbol, um die Überwachungssoftware zu
verwenden (siehe oben).
• Sie können Abschaltung und Hochfahren der USV festlegen und den
USV-Status per PC überwachen.
• Genaue Informationen dazu finden Sie im E-Benutzerhandbuch der Software.
42
Page 91

DE
Auf www.powerwalker.com/winpower.html regelmäßig prüfen, um auf dem neuesten Stand zu sein
Version der Überwachungssoftware.
Anhang: Rückwand
Die USV Rückenplatten beschreibungs tabelle und Bilder werden wie folgt dargestellt:
Nr. Funktion(1000VA &1500VA&2000VA&3000VA)
1 AC-Ausgang
2 EPO / Potenzialfrei im Kommunikationsanschluss
3 USB Schnittstelle
4 AC-Eingang
5 Potenzialfrei aus
6 SNMP Steckplatz
7 RS232
8 Überspannungsschutz Modem/Network
9 Schutzleiteranschluss
1000VA /1500VA/2000VA Standard
& 1000VA / 1500VA Supercharger-Modell, Rückseite
2000VA Supercharger-Modell, Rückseite
43
Page 92

DE
~
250V 16A
DRYIN
~
EPO
DRYOUT
RS232
INTELLIGENT SLOT
USB
AC INPUT
250V 10A
LS2AC OUTPUT
~
250V 1 0A
LS1AC OUTPUT
3000VA Standard-Modell, Rückseite
~
250V 1 6A
DRYIN
~
EPO
DRYOUT
RS232
INTELLIGENTS LOT
USB
250V 10A
LS2AC OUTPUT
~
250V 10A
LS1AC OUTPUT
USECOPPERCONDUCTORONLY.FORSUPPLYCONNECTIONS,
USEWIRESSUITABLEFORATLEAST75℃.REFERTO
THEINSTRUCTIONMANUALFORTIGHTMENINGTORQUE
NL
3000VA Supercharger-Modell, Rückseite
Die Tabelle mit der Beschreibung der EBM Rückseite und Abbildungen werden
wie unten dargestellt:
Nr. Funktion(36V &48V & 72V EBM)
1 Schutzleiteranschluss
36V &48V&72V EBM Rückwand
44
Page 93

Onduleur en ligne
PowerWalker VFI 1000RT LCD
PowerWalker VFI 1500RT LCD
PowerWalker VFI 2000RT LCD
PowerWalker VFI 3000RT LCD
Manuel
FR, EN, DE
1
Page 94

2
FR
TABLE DES MATIÈRES
1. CONSIGNES DE SECURITE ET CEM ................................ 4
1.1 Installation .......................................................................................... 4
1.2 Utilisation .......................................................................................... 13
1.3 Maintenance, révision et pannes ..................................................... 13
1.4 Transport .......................................................................................... 17
1.5 Stockage ........................................................................................... 17
1.6 Normes ............................................................................................. 18
2. DESCRIPTION DES SYMBOLES D'USAGE COURANT . 19
3. INTRODUCTION ............................................................... 20
4. DESCRIPTION DU PANNEAU .......................................... 21
5. CONNEXION ET UTILISATION ......................................... 23
5.1 Inspection ......................................................................................... 23
5.2 Connexion ........................................................................................ 23
5.3 Recharge de la batterie .................................................................... 25
5.4 Mettre l'onduleur en marche ............................................................ 25
5.5 Fonction de test ................................................................................ 26
5.6 Arrêter l'onduleur .............................................................................. 26
5.7 Fonction de désactivation de l'alarme sonore.................................. 26
5.8 Procédure d'utilisation de la batterie externe pour le modèle
à autonomie prolongée (modèle « S ») ................................................. 27
6. MODE DE FONCTIONNEMENT POUR TOUS LES
MODELES ............................................................................. 29
6.1 Mode Ligne ....................................................................................... 30
6.2 Mode Batterie ................................................................................... 31
6.3 Mode Dérivation ............................................................................... 31
6.4 Mode Aucune sortie ......................................................................... 32
6.5 EPO (arrêt d'urgence) ...................................................................... 32
6.6 Mode ECO (mode économie) .......................................................... 32
6.7 Mode Convertisseur ......................................................................... 33
6.8 Mode Anormal .................................................................................. 33
7. PARAMETRAGE AVEC LE MODULE LCD ...................... 34
8. DEPANNAGE .................................................................... 37
Page 95

9. ENTRETIEN ....................................................................... 41
9.1 Utilisation .......................................................................................... 41
9.2 Stockage ........................................................................................... 41
9.3 Remplacement de la batterie ........................................................... 41
10. CARACTERISTIQUES TECHNIQUES ............................ 42
10.1 Spécifications électriques ............................................................... 42
10.2 Environnement d'utilisation ............................................................ 42
10.3 Autonomie typique (valeur typiques à 25 °C en minutes) : ................ 43
10.4 Dimensions et poids ......................................................................... 43
11. PORT DE COMMUNICATION ......................................... 44
11.1 Ports de communication RS-232 et USB ....................................... 44
11.2 Port RS-232 .................................................................................... 44
11.3 Port USB ......................................................................................... 45
11.4 Installation d'une carte de gestion de réseau série (en option) ..... 45
11.5 Port à contact sec ........................................................................... 45
12. INSTALLATION DU LOGICIEL ....................................... 48
ANNEXE : PANNEAU ARRIERE .......................................... 49
3
Page 96

4
FR
1. Consignes de sécurité et CEM
CONSERVEZ CES INSTRUCTIONS – Ce manuel contient des instructions
importantes pour les modèles PowerWalker VFI 1000/1500/2000/3000RT LCD qui
doivent être respectée durant l'installation et l'entretien de l'onduleur et des batteries.
Veuillez lire attentivement le manuel utilisateur suivant et les
consignes de sécurité avant d'installation ou d'utiliser l'appareil !
1.1 Installation
• Ce produit a été conçu spécialement pour être utilisé avec des ordinateurs et,
par conséquent, n'est pas recommandé pour une utilisation avec un
équipement de survie quel qu'il soit ni avec tout autre équipement spécifique
important.
• Ne pas brancher d'appareils domestiques ou d'autres appareils qui pourraient
surcharger l'onduleur (par ex. imprimantes laser, sèche-cheveux, etc.) sur la
sortie de l'onduleur.
• Cet appareil est prévu pour être installé dans un environnement contrôlé
(température contrôlée, dans une pièce exempte de contaminants
conducteurs).
• De la condensation peut se former si l'onduleur est transporté directement
d'un lieu froid à un lieu chaud. L'onduleur doit être absolument sec avant
l'installation. Veuillez prévoir une période d'acclimatation d'au moins deux
heures.
• Risque d´électrocution, Ne pas démonter le capot. L'intérieur ne contient
aucune pièce réparable. Faites appel à un technicien qualifié pour toute
réparation.
• La prise de courant doit être près de l'équipement et facilement accessible.
Pour isoler l'onduleur de l'alimentation secteur, débranchez la fiche de la
prise de courant.
• Si l'onduleur doit être stocké pendant une période prolongée, il est
recommandé de recharger les batteries une fois par mois (en raccordant
l'onduleur à une prise de courant, interrupteur sur « ON ») pendant 24 heures
afin d'éviter une décharge totale de la batterie.
• N'utilisez pas l'onduleur au-dessus de la capacité de charge nominale.
Page 97

FR
• L'onduleur contient des batteries de grande capacité. Il ne faut donc pas
ouvrir le coffret, sachant que l'on risque sinon d'être exposé à des dangers
tels qu'une électrocution. Si une révision ou un remplacement de la batterie
sont nécessaires, veuillez contacter le distributeur
• Un court-circuit interne de l'onduleur entraîne des dangers comme une
électrocution ou un incendie ; par conséquent, aucun récipient d'eau (verre
d'eau, par exemple) ne doit être placé au-dessus de l'onduleur afin d'éviter
ces dangers.
• Ne jetez pas les batteries au feu. Elles pourraient exploser.
• Ne pas ouvrir ni démanteler les batteries. L'électrolyte qui s'écoule des
batteries est dangereux pour la peau et les yeux. Il peut être toxique.
• Le symbole Φ sur l'étiquette signalétique représente la phase.
• Une batterie peut présenter un risque d'électrocution et de courant de
court-circuit élevé. Les précautions suivantes doivent être respectées en cas
d'intervention sur des batteries :
• Retirez les montres, bagues ou autres objets métalliques de vos mains.
• Utilisez des outils munis de poignées isolantes.
• La révision des batteries doit être assurée ou dirigée uniquement par le
personnel bien informé sur les batteries et les précautions requises.
Maintenez les personnes non autorisées éloignées des batteries.
• Lors du remplacement des batteries, les remplacer par le même type et
nombre de batteries d'acide au plomb scellées.
• Cet équipement électrique de type A, doté d'une batterie déjà installée par le
fournisseur, peut être installé et manipulé par un personnel non spécialisé.
• Au cours de l'installation de cet équipement il faudra vérifier que la somme
des courants de fuite de l'onduleur et des charges connectées ne dépasse
pas 3,5 mA.
• Attention, danger d'électrocution. Une tension dangereuse demeure
accessible en raison de l'alimentation de la batterie, même lorsque l'appareil
est débranché du secteur. L'alimentation de la batterie doit par conséquent
être débranchée des pôles positif et négatif de la batterie lorsque l'entretien
ou une intervention de révision à l'intérieur de l'onduleur sont nécessaires.
• La prise de courant qui alimente l'onduleur doit être installée à proximité de
l'onduleur et doit être facilement accessible.
• Placez les câbles de sorte que personne ne puisse marcher ou trébucher
dessus.
5
Page 98

6
FR
• Assurez-vous de raccorder de manière fiable l'onduleur et le bloc batterie
externe à la terre
• N'obstruez pas les orifices de ventilation du boîtier de l'onduleur.
Assurez-vous que les orifices de ventilation à l'avant et à l'arrière de
l'onduleur ne sont pas obstrués. Laissez au moins 25 cm d'espace libre de
chaque côté.
• En cas de fumée sortant de l'appareil, coupez rapidement l'alimentation
secteur et prenez contact avec le distributeur.
• Un dispositif de déconnexion approprié, comme une protection contre les
courts-circuits, doit être prévu dans le bâtiment d'installation. Veuillez
consulter les spécifications de l'appareil pour la déconnexion au chapitre 5.2
• Ne pas conserver ni n'utiliser ce produit dans l'un des environnements
suivants :
o Toute zone avec du gaz combustible, des substances corrosives, de
la poussière abondante, de l'eau stagnante ou de l'eau courante.
o Toute zone se trouvant à une température extrêmement élevée ou
basse (supérieure à 40 °C ou inférieure à 0 °C) et où le degré
d'humidité dépasse 90 %.
o Tout endroit exposé directement au soleil ou se trouvant à proximité
d'appareils de chauffage. (La température ambiante maximale
nominale est de 40 °C).
o Toute zone sujette à de fortes vibrations.
o En plein air.
• Si un incendie se produit à proximité, utilisez les extincteurs à poudre.
L'utilisation des extincteurs liquides peut entraîner un risque d'électrocution.
★
1.1.1 Inspection de l'appareil
Inspectez l'onduleur dès sa réception. Si l'onduleur est visiblement
endommagé durant l'expédition, veuillez conserver la boîte et le matériau
d'emballage original pour le transporteur et avertir immédiatement le
transporteur et le vendeur.
Page 99

FR
1.1.2 Déballage du module
Pour déballer le système :
1. Ouvrez le carton extérieur et retirez les accessoires emballés avec le
module.
2. Soulevez soigneusement le module hors du carton extérieur et placez-le
sur une surface plane et stable.
3. Mettez au rebut ou recyclez l'emballage de manière responsable ou
conservez-le pour une utilisation ultérieure.
1.1.3 Installation de l'onduleur
Tous les modèles sont conçus pour une installation en mode tour ou dans une
baie. Ils peuvent être installés dans une baie de 19 pouces. Veuillez suivre les
instructions pour l'installation en mode tour et dans une baie.
Installation en mode tour
Cette série d'onduleurs peut être placée à l'horizontale ou à la verticale. En
configuration tour, des supports en option sont prévus pour stabiliser l'onduleur
lorsqu'il est placé à la verticale. Le support de l'onduleur doit être raccordé au bas
de la tour. Utilisez la procédure suivante pour installer l'onduleur dans les
supports.
1. Faites glisser l'onduleur vers le bas à la verticale et placez deux supports au
bas de la tour.
2. Enfoncez l'onduleur soigneusement dans les deux supports.
3. Sortez le boîtier LCD et faites-le tourner de 90 degrés vers la droite puis
remettez-le dans la façade.
7
Page 100

8
FR
Installation dans une baie
La série peut être installée dans une baie de 19 pouces. L'onduleur et le boîtier de
la batterie externe ont besoin de 2U d'espace.
Utilisez la procédure suivante pour installer l'onduleur dans une baie.
1. Alignez les oreilles de montage avec les trous de vis sur le côté de l'onduleur et
serrez les vis.
2. Assemblez les rails pour baie avec le support de la baie.
3. Enfoncez l'onduleur dans le rail pour baie et verrouillez-le dans le support de la
baie.
4. Serrez la vis avant de brancher la charge.
1.1.4 Installation de l'EBM (module batterie externe en option)
Raccordement de l'EBM en mode tour :
1. Faites glisser l'onduleur et l'EBM vers le bas à la verticale et placez deux
supports sur la partie allongée au bas de la tour.
2. Serrez la vis sur la tôle métallique pour la stabilisation
3. Raccordez la ligne de terre provenant de l'onduleur (port A ) à l'EBM (port
B)
 Loading...