

S P E C I F I C AT I O NS:
SPÉCIFICATIONS | ESPECIFICACIÓNES | SPECIFICAS
SPEZIFIKATIONEN | BIJZONDERHEDEN
• 10W multi-voltage, clamshell solar
charger
• 1x USB output: 5V /2A
• 1x DC output: 20V /0.5A
• Size: 264mm x 200mm x 19mm
(folded)
• Weight: 700g
For full details of our CE declaration –
please go to www.powertraveller.com/support
KIT INCLUDES:
INCLUS DANS LE KIT | EL KIT INCLUYE
IL KIT INCLUDE | KIT BEINHALTET | KIT OMVAT
• Solargorilla
• 1x DC extension cable (2m)
• 1x USB extension cable (2m)
• 1x Female 12V socket
• 1x Laptop tips set (15 pieces)
• Neoprene case
• Velcro strap
PART CODE: PTL-SG002
EAN CODE: 5060 1769 8032 7
UPC CODE: 648499643935
PART CODE: PTL-SG002 TAC
EAN CODE: 5060 1769 8455 4
UPC CODE: 648499643980
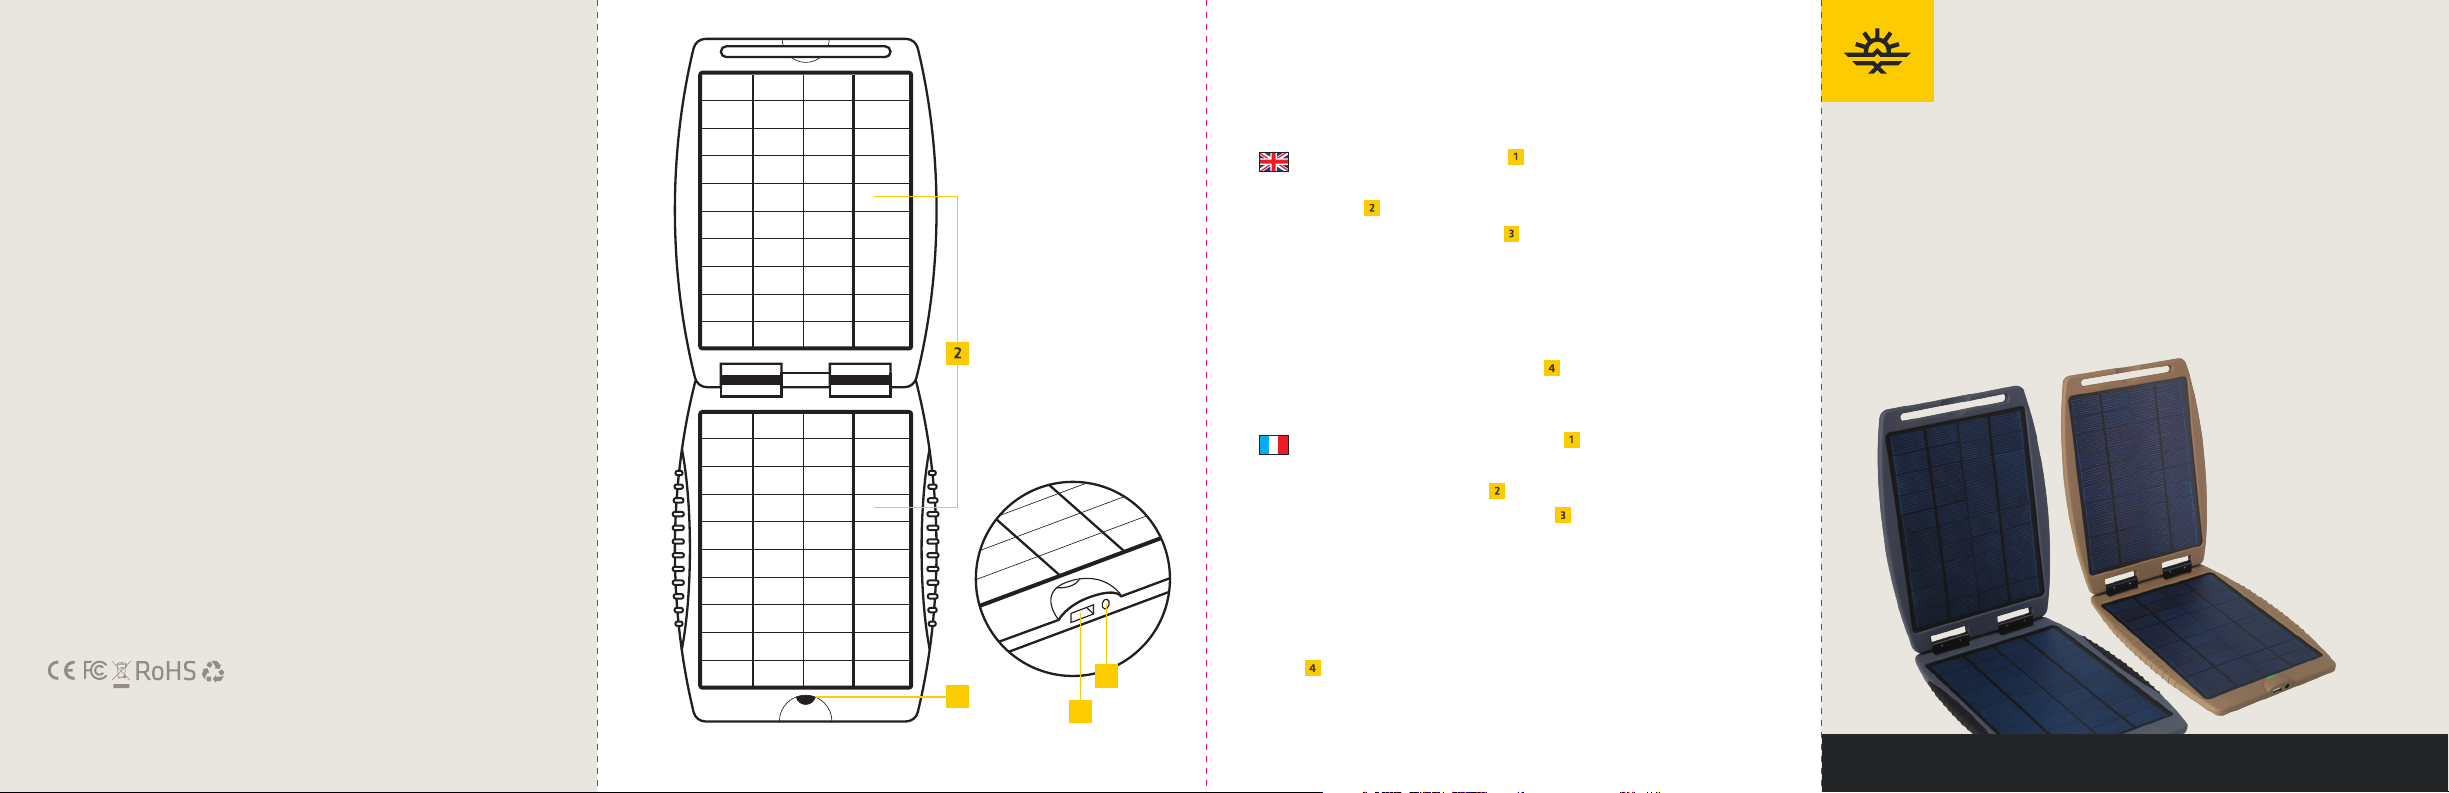
QUICK START GUIDE:
To charge devices using the DC output (1) , select the appropriate tip from the
supplied pack (other tips available at www.powertraveller.com) and connect to your
device, then connect the supplied DC cable to the tip and the DC output and expose
the panels (2) to sunlight.
To charge devices using the USB port (3) , connect the supplied USB cable or your
device’s own to the USB output, then connect your device.
To charge the Powergorilla or Mini-G (available separately), use the Solargorilla’s
supplied DC cable and the L52D tip to connect the Solargorilla’s DC output to the
Powergorilla / Mini-G’s DC input and expose the panels to sunlight.
For optimum charging, ensure the panels directly face the Sun at all times, with no
obstructions such as shadows or glass in front of the panels. If there is enough
sunlight to generate a charge, the green LED (5) will light up.
Pour charger les appareils à l'aide de la sortie DC (1) , sélectionnez l'embout approprié
dans le pack fourni (autres astuces disponibles sur www.powertraveller.com) et
connectez-le à votre appareil, puis connectez le câble DC fourni à l'embout et à la
sortie DC et exposez les panneaux (2) à la lumière du soleil.
Pour charger des appareils à l'aide du port USB (3) , connectez le câble USB fourni ou
celui de votre appareil à la sortie USB, puis connectez votre appareil.
Pour charger le Powergorilla ou le Mini-G (disponible séparément), utilisez le câble DC
fourni avec Solargorilla et l'embout L52D pour connecter la sortie DC du Solargorilla à
l'entrée DC du Powergorilla / Mini-G et exposez les panneaux au soleil.
Pour une charge optimale, veillez à ce que les panneaux soient face au soleil en
permanence, sans obstructions telles que des ombres ou du verre devant les
panneaux. Si la lumière du soleil est susante pour générer une charge, la LED verte
1
4
3
(5) s'allume.
AND SOLARGORILLA
CHARGEUR SOLAIRE MULTI TENSION | CARGADOR SOLAR DE MULTIPLE VOLTAJE
CARICABATTERIE SOLARE VOLTAGGIO MULTIPLO | SOLAR LADEGERÄT MIT MEHRFACHSPANNUNG
SOLARGORILLA
TACTICAL
MULTI-VOLTAGE SOLAR CHARGER
MULTI-VOLTAGE ZONNELADER
QUICK START GUIDE

Para cargar dispositivos usando la salida DC (1) , seleccione la conexión adecuada del
paquete suministrado (puede encontrar otras conexiones disponibles en
www.powertraveller.com) y conéctela a su dispositivo, a continuación conecte el cable
DC proporcionado a la conexión y la salida DC y exponga los paneles (2) a la luz solar.
Para recargar dispositivos utilizando el puerto USB (3) , conecte el cable USB
proporcionado o el de su dispositivo a la salida USB, a continuación conecte
su dispositivo.
Para cargar el Powergorilla o Mini-G (disponibles de forma separada), use el cable DC
proporcionado del Solargorilla y la conexión L52D para conectar la salida DC del
Solargorilla a la entrada DC del Powergorilla / Mini-G y exponga los paneles a la luz solar.
Para obtener una carga óptima, asegúrese de que los paneles están orientados
directamente hacia el sol todo el tiempo, sin obstrucciones como sombras o cristales en
frente de los paneles. Si no hay luz solar suficiente para generar carga, la LED (4)
verde se iluminará.
Um Geräte am DC-Ausgang (1) zu laden, wählen Sie den entsprechenden Stecker aus
dem gelieferten Set (andere Stecker finden Sie unterwww.powertraveller.com) und
schließen ihn an Ihr Gerät an, dann schließen Sie das mitgelieferte DC-Kabel an den
Stecker und den DC-Ausgang an und richten die Panele (2) auf das Sonnenlicht aus.
Um Geräte mithilfe des USB-Ausgangs (3) zu laden, schließen Sie das mitgelieferte
USB-Kabel oder das Ihres Geräts an den USB-Ausgang an und dann Ihr Gerät.
Zum Laden des Powergorilla oder Mini-G (separat erhältlich) verwenden Sie das
mitgelieferte DC-Kabel des Solargorilla und den L52D-Stecker, um den DC-Ausgang des
Solargorilla mit dem DC-Eingang des Powergorilla/Mini-G zu verbinden und richten dann
die Panele auf das Sonnenlicht aus.
Um optimal zu laden, stellen Sie sicher, dass die Panele immer direkt auf das
Sonnenlicht ausgerichtet sind und sich keine Gegenstände (z. B. Schatten oder
Scheiben) vor den Panelen befinden. Wenn genügend Sonnenlicht vorhanden ist,
um zu laden, leuchtet die grüne LED (4) .
För att ladda enheter med DC-utgången (1) , ska du välja en lämplig spets från det
medföljande paketet.( andra spetsar finns på www.powertraveller.com) och ansluta den
till din enhet. Anslut därefter den medföljande DC-kabeln till spetsen och DC-utgången
och utsätt panelerna för (2) solljus.
För att ladda enheterna via USB-porten (3) anslut den medföljande kabeln eller din
enhets egen kabel till USB-utgången. Anslut sedan till din enhet.
För att ladda Powergorilla eller Mini-G (tillgänglig separat), använd DC-kabeln som
medföljande din Solargorilla och L52D-spetsen för att ansluta Solargorillans DC-utgång
till Powergorilla/Mini-GsDC-ingång och utsätt panelerna för solljus.
För optimal laddning, se till att panelerna hela tiden är riktade mot solen utan några
hinder såsom skuggor eller glas framför panelerna. Om det finns tillräckligt med solljus
för att uppnå en laddning kommer den gröna LED -lampan (4) att tändas.
DC出力(1) を使用してデバイスを充電する場合には、付属パック(他のチップは
www.powertraveller.comで別売り)から適切なチップを選択してデバイスに接続
し付属のDCケーブル をチップ、DC出力に接続しパネル(2) を太陽光に当てます。
USBポ ート (3) を使用してデバイスを充電する場合、付属のUSBケ ーブ ル もしく
はデバイス付属ケーブルをUSBアウトプットに接 続し、デ バイス に接続します。
PowergorillaかMini-G (別売り)を充電する場合、Solargorilla’sの付属DCケーブル、
L52Dチップを使用しSolargorillaのDC出力をPowergorilla / Mini-GのDC入力に接
続しパネルを日光に当ててください。
最適な充電のため、常時パネルが正面を向いていることを確認し、パネルの前
に影やガラスなど障害物がないようにしてください。充電に十分な日光がある
場合には緑色のLED (4) が点灯します。
Per caricare dispositivo utilizzando l’uscita CC (1) , selezionare la punta necessaria dal
pack fornito (per le altre punte disponibili, cercare sul sito web al seguente indirizzo
www.powertraveller.com) e collegare il dispositivo, poi collegare il cavo CC in dotazione
alla punta e l’uscita CC ed alla fine esporre i pannelli (2) alla luce diretta del sole.
Per caricare i dispositivi attraverso l’uscita USB (3) collegare uno dei cavi USB in
dotazione o il proprio dispositivo all’uscita USB e poi collegare il dispositivo.
Per caricare Powergorilla o Mini-G (disponibili separatamente), utilizzare il cavo CC
fornito con Solargorilla e la punta L52D per collegare l’uscita CC di Solargorilla all’uscita
di CC di Powergorilla / Mini-G ed esporre ai pannelli solari.
Per una carica ottimale, controllare che i pannelli siano rivolti verso il sole sempre, senza
alcuna ostruzione quali ombre o vetro che possano bloccare la luce. Se la luce del sole
fosse suciente per generare una carica, il LED (4) verde si accenderà.
Om toestellen te laden met de DC output (1) , selecteer de passende tip uit het
bijgeleverde pack (meer tips verkrijgbaar op www.powertraveller.com) en koppel het aan
uw toestel, verbind dan de bijgeleverde DC-kabel met het tipje en de DC output en
plaats de panelen (2) in het zonlicht.
Om toestellen te laden met de USB-poort (3) , verbind de bijgeleverde USB-kabel of de
kabel van uw toestel met de USB-output, verbind dan uw toestel.
Om de Powergorilla of de Mini-G (afzonderlijk verkrijgbaar) te laden, gebruik de
bijgeleverde DC-kabel van de Solargorilla en het L52D-tipje om de DC-output van de
Solargorilla te verbinden met de DC-input van de Powergorilla/Mini-G en plaats de
panelen in het zonlicht.
Om optimaal te laden, zorg ervoor dat de panelen steeds rechtstreeks gericht zijn naar
de zon, zonder hindernissen zoals schaduwen of glas voor de panelen. Indien er
voldoende zonlicht is om een lading te genereren, zal het groene LED (4) oplichten.
如果需要使用DC输出 1 为您的设备充电,从配备的电池组中选择适当的充电
头(其他充电头可在www.powertraveller.com上查询)并且与您的设备相连接
,之后将配备的DC线与充电头和DC输出相连接,使太阳能板 2 面对阳光。
如果需要使用USB接口 3 为设备充电,将配备的USB线或您自己设备的线与
USB输出相连接,然后与您的设备相连接。
如果需要为Powergorilla或Mini-G(另售)充电,使用Solargorilla配备的DC线和
L52D充电头将Solargorilla的DC输出与Powergorilla / Mini-G的DC输入相连接,
使太阳能板面对阳光。
为了实现充电效果最佳,时刻保证电池板面向太阳,并且在电池板前面不存
在影子或玻璃等障碍物。如果阳光足够用于充电,则绿LED 4 会亮。
 Loading...