

SOLAR ADVENTURER
USER GUIDE
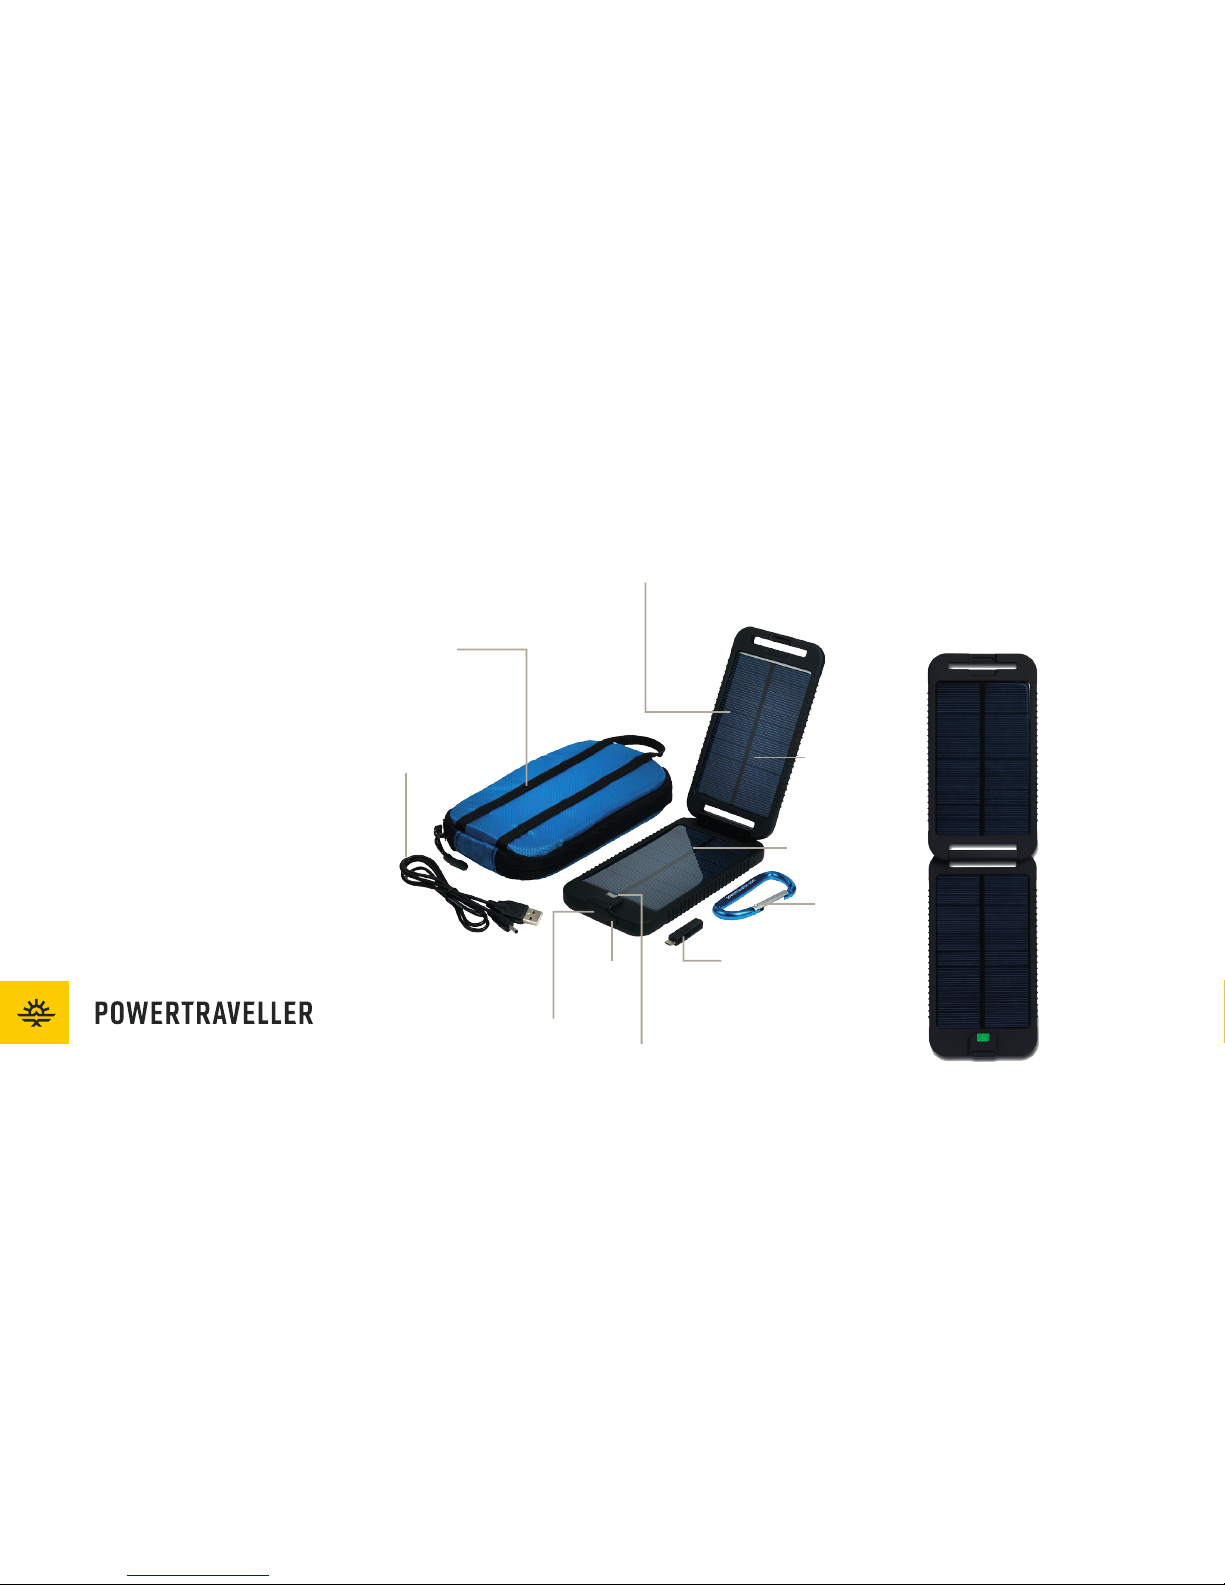
IN THE BOX:
PROTECTIVE
STORAGE CASE
USB TO
DC CABLE
SOLAR PANELS WITH
MPPT TECHNOLOGY
HOT/COLD
BATTERY
INSULATION
-10°C TO 90°C
3500MAH SOLAR
COMPATIBLE
INTERNAL
BATTERY
CARABINER
MICRO USB
TO DC TIP
4 COLOUR LED
LIGHT INDICATOR
DC INPUT
USB OUT
SOLAR CHARGER WITH
INTEGRATED BATTERY PACK
POWERT RAVELLER INTERNATIONAL LTD.
United Kingdom
Unit 4, Delta Park
Wilsom Road, Alton
Hampshire GU34 2RQ
T: +44 1420 542 980
United States
1651 E. St Andrew Place
Santa Ana, CA 92705-4932
T: +1 (888) 422 6726
Canada
2321 Cohen Street
Montreal, Quebec
H4R 2N7
T: +1 (514) 333 5010
Asia Pacific
8/F Admiralty Centre
Tower 2, 18 Harcourt Road
Admiralty, Hong Kong
T: +852 2147 5880
sales@powertraveller.com
support@powertraveller.com
Unplug as we plug in.
powertraveller.com

QUICK START
CHARGE DEVICE
RECHARGING
SOLAR
RECHARGING
USB
Connect the included USB cable to the solar adventurer
attach the correct tip and connect to a device.
If the connector for your device is not included,use the
device’s own USB charging/sync cable to connect to the
solar adventurer. The unit will automatically detect
the device and start charging. The unit can charge a
device open whilst being charged by the sun or closed
not in sunlight from the internal battery.
LED LIGHT INDICATORS
Open up the solar adventurer and place in direct sunlight.
The unit features low voltage battery protection
meaning it will charge devices whilst being charged,
providing there is adequate sunlight and internal battery
reserve. If the unit doesn’t charge your device, leave it
connected as the solar adventurer will automatically
start charging your device when sunlight and internal
battery reserve improves. Alternatively, leave
just the adventurer unit out to solar charge and collect
power in the internal battery which you can then use to
charge your devices when you need it.
Attach the USB charging cable into any 5V USB
output device (e.g. smartphone AC mains with USB,
in-car USB or laptop USB). Connect the other end of the
USB cable into the solar adventurer (see image below).
You can charge your devices from the solar adventurer
while the unit is being recharged from the USB.
The solar adventurer features a 4-colour LED
light to show the level of charge left in the internal battery.
0-25%
25-50% 50-75% 75-100%
When solar charging, the LED will scroll through all 4
colours in succession. The light will then flash in the
colour indicating the level of power stored in the battery
reserve.
When charging from the solar adventurer to a
device, all 4 colours will show in succession. The light
will then become static and stay on the colour to show
how much power is held in the internal battery.
TECHNICAL
SPECIFICATIONS
“Made for iPod,” “Made for iPhone,” and
“Made for iPad” mean that an electronic
accessory has been designed to connect
specifically to iPod, iPhone and iPad,
respectively, and has been certified by
the developer to meet Apple performance
standards. Apple is not responsible for the
operation of this device or its compliance with
safety and regulatory standards. Please note
that the use of this accessory with iPod or
iPhone may aect wireless performance.
iPad, iPhone, iPod, iPod nano and iPod touch
are trademarks of Apple Inc., registered in the
U.S. and other countries.
• 3500mAh internal battery (12.95Wh)
• Internal battery output: 5V/2A
• Solar panel output: USB port: 5V 600mA
• Solar/DC input: 5V
• Weight: 265g (unit only)
Other tips are available to buy at:
powertraveller.com
• Size: 170mm x 96mm x 22.75mm (folded)
with 2mm safety gap between solar panels
 Loading...