

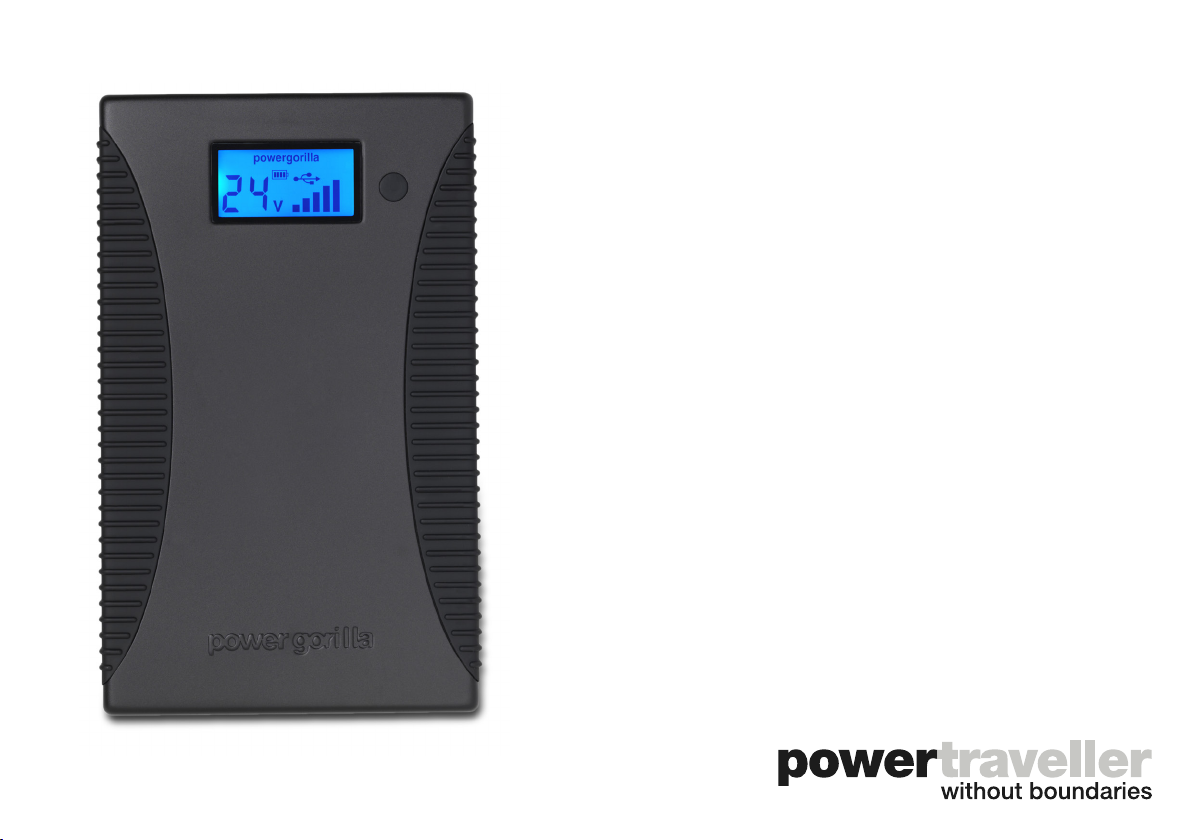
POWERGORILLA
POWERGORILLA TACTICAL
5V TO 24V
RUGGED
HIGH TECH
CHARGER
USER GUIDE
YOU CAN: CHARGE LAPTOPS
NETBOOKS TABLETS SMARTPHONES
SAT PHONES SLR CAMERAS GPS
SMART WATCHES & MORE

INDEX
What’s in the box
Technical specications
Dimensions, capacity and output currents
powergorilla diagram
LCD screen
Diagram descriptions
Using the powergorilla
1. Turning on the powergorilla
2. Recharging the powergorilla
3. Charging devices via DC
4. Charging devices via USB
5. Permanent USB on mode
6. Permanent DC on mode
7. UPS feature
8. Daisy chain feature
9. Safety lock on feature
10. Recharging via solar
Frequently asked questions
Product disposal instructions
Safety features
3
4
5
6
7
8
10
10
10
11
11
11
12
12
12
13
14
15
15
2

IN THE BOX
• powergorilla portable charger
• 19V universal AC mains charger
• 80cm DC out cable
• USB to USB-C cable
• Female USB-C to male micro USB adaptor
• Connector tips pack
• Female 12V socket
• Neoprene case
ADDITIONAL EXTRAS AVAILABLE
• solargorilla 10 Watt solar powered charger
• Y cable
• In-car charger
* If you require a tip that is not included, please
email support@powertraveller.com for help.
3

TECHNICAL SPECIFICATIONS
Parameters Description
Weight
Capacity
Cells
Dimensions
Battery type
Input
Output
Material
Working temperature
Storage temperature
700g
24,000mAh (88Wh)
4 x 6000mAh
(L*W*H*) 215 x 130 x 17mm
Lithium Polymer rechargeable
powergorilla: 15-25V / powergorilla tactical: 15-30V
5V USB, DC: 12V, 16V, 19V, 24V
Aluminium housing with shock resistant rubber protection strips
-20° to 60°C
-20 to 60°C
4
DIMENSIONS
215mm
130mm
130mm
CAPACITY & DC OUTPUT CURRENTS
Voltage
5V USB
12V
16V
19V
24V
mAh
17,700
7,400
5,500
4,600
3,700
Amp
2.4A Max
4A Max
4A Max
4A Max
3A Max
17mm
215mm
17mm
5

POWERGORILLA DIAGRAM
2
1 3
10
6
7
8
11
9
5
3
4
12
6
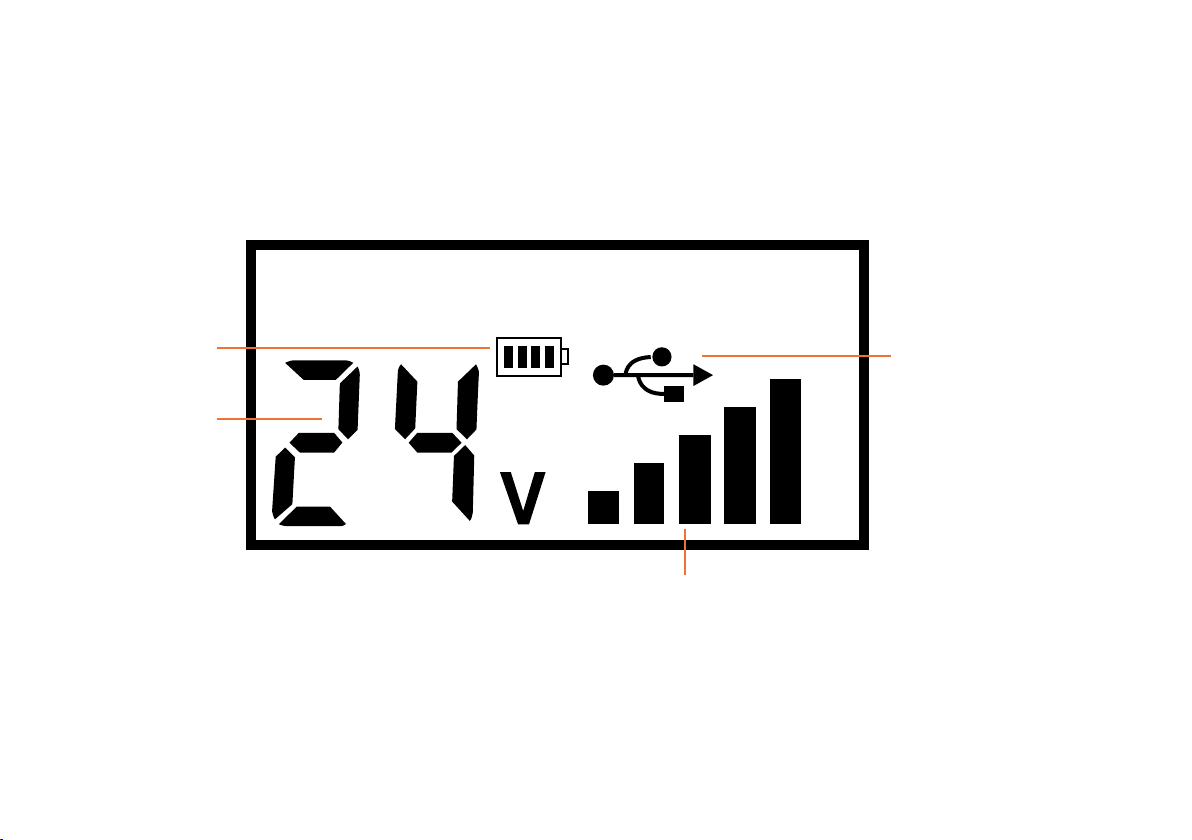
LCD SCREEN DIAGRAM
powergorilla
13
14
16
15
7

DIAGRAM DESCRIPTIONS
1. DC IN (DC 5.5 x 2.1mm)
powergorilla input from: 15-25V Max
powergorilla tactical from: 15-30V Max
2. USB SOCKET
5V 2.4A Max
3. DC OUT
Output from: 8.4V, 9.5V, 12V, 16V, 19V, 24V
DC 4.7 x 1.7mm
4. ON/OFF BUTTON
To turn the unit on or o, hold down the button for 3 seconds. The on/o button also enables the user to
select the correct output voltage to charge their device.
5. LCD SCREEN
powergorilla - Blue LCD screen / powergorilla tactical - Red LCD screen
The LCD screen shows the status of USB and DC output voltage settings and the battery level.
6. AC MAINS CHARGER
19V mains charger with 4 interchangeable heads for UK, Europe, US/China and Australia.
7. DC CABLE
4.7 x 1.75 to female 4.7 x 1.75mm
8. USB TO USB-C CABLE
USB to USB-C cable
8

9. LAPTOP TIP PACK
Selection of laptop tips.
10. NEOPRENE CASE
Protective storage case for the powergorilla unit.
11. FEMALE 12V SOCKET
In-car charger socket for SLR cameras or any other 12V electronic device.
12. FEMALE USB-C TO MICRO USB ADAPTOR
This adaptor converts the USB-C end of the USB to USB-C cable (8) to micro USB.
13. BATTERY ICON
When the battery icon ashes, this indicates that there is less than 10% power left in the powergorilla.
The battery icon does not represent the amount of power left.
14. VOLTAGE SETTING
The dierent settings can be seen from this section of the screen. By tapping the on/o button (4), you can
scroll through the voltage settings.
15. LEVEL OF CHARGE
The level of charge remaining in your powergorilla is shown by the vertical bars. A fully charged powergorilla
will be denoted by six solid vertical bars. As the six bars decrease, available power decreases.
16. USB SYMBOL
The USB symbol is permanently shown allowing simultaneous charging of USB and DC devices.
9

USING THE POWERGORILLA
This user guide covers both the powergorilla and the powergorilla tactical as they are identical in functionality and power
capability. The dierences between the two are the colour of the unit and the colour of the LCD screen.
1. Turning on the powergorilla
• To turn on the powergorilla, hold down the on/o button (4) for 3 seconds. Repeat to turn the unit o.
2. Recharging the powergorilla
• Recharge powergorilla via the universal AC mains charger supplied (6) with the appropriate plug head
into an electrical wall socket. Connect the DC end of the cable into the DC in port (1) of powergorilla.
• The LCD screen (5) will illuminate and the vertical bars will increase as it is being charged.
• When the sixth vertical bar is no longer ashing, this means the powergorilla is fully charged.
• Always disconnect the AC mains charger (6) when the powergorilla is fully charged or not in use.
NOTE: Please only use the AC mains charger provided to charge the powergorilla or ocial Powertraveller in-car charger
(available separately) Using a 3rd party AC mains charger may invalidate your warranty.
3. Charging devices via DC out port
• When connecting a device to the powergorilla, e.g. a laptop, please check the laptop’s input voltage.
This can be found on the laptop’s AC/mains adaptor or the user guide supplied with your laptop.
• Connect the DC cable (7) to the DC out port (3). Select the correct tip required from the tip pack (9).
• Select the required output voltage on the LCD screen (5). Do this by tapping the on/o button (4) until
the desired voltage is displayed on the LCD screen (5).
• When nished charging/powering, turn o powergorilla by holding down the on/o button (4) for
3 seconds and disconnect the cable. powergorilla will turn itself o when device connected is fully
charged.
10

4. Charging devices from powergorilla via USB out port
• Turn the powergorilla on by holding down the on/o button (4) for 3 seconds.
• For 5V USB-C devices, use the USB to USB-C cable (8) or your devices’ own USB-C sync/charging
cable.
• For 5V USB devices, use the USB to USB-C cable (8) along with the female USB-C to micro USB
adaptor (12) or your devices’ own USB-C sync/charging cable.
• The powergorilla will stop charging once the device is fully charged.
5. Permanent USB on mode (‘88’ setting)
• This feature is used if the USB device draws only a small amount of power.
• Disconnect all cables from the USB and DC out sockets.
• Turn the powergorilla on by holding down the on/o button (4) for 3 seconds.
• Tap on/o button (4) until the ‘88’ function is shown on the LCD screen (5).
• The back light will remain on while this feature is enabled.
• You may now connect your device to the USB port (2).
• While this feature is in use, the DC out will output at 12V.
• You can simply press the on/o button (4) again to disable this feature.
6. Permanent DC on mode
• This feature is used if the DC device draws only a small amount of power.
• Turn the powergorilla on by holding down the on/o button (4) for 3 seconds.
• Select the correct DC voltage for your device by tapping the on/o button (4) until desired voltage is
shown.
• Press the on/o button (4) twice in quick succession.
• The LCD screen will illuminate and on until the powergorilla is manually turned o.
11

7. UPS feature
• Turn on the powergorilla by holding down the on/o button (4) for 3 seconds.
• Tap the on/o button (4) until the 19V setting is show on the LCD screen (5).
• Connect the universal AC mains charger (6) to the powergorilla and connect it to the electrical socket.
• If the power supply is interrupted, the powergorilla will stay permanently on when on the 19V setting.
8. Daisy chain feature
• When using the 19V AC mains charger (6) to charge the powergorilla, the DC out port (3) will be set at
19V. This will enable you to charge your laptop for example and powergorilla at the same time.
• While charging with the 19V AC mains charger (6), you are also able to charge USB devices
simultaneously.
9. Safety lock on feature
• When a device is connected and drawing enough power to be detected by the powergorilla, the LCD
screen (5) will ash 3 times. The voltage setting will be locked on to avoid accidental voltage change
when charging a device. To change the voltage when the safety lock on feature is enabled, hold down
the on/o button (4) for 3 seconds and scroll through.
12

10. Recharging via solar
• The powergorilla can be charged via the sun using the solargorilla solar panel (not included).
• The solargorilla (our recommended solar panel for use with the powergorilla) is equipped with Max-
imum Power Point Tracking (MPPT) technology. This maximises the solar panel’s eciency for any
given weather condition and protects the battery from over-charging or excessive discharging. In low
light conditions, this technology improves eciency by up to 60%.
• The powergorilla will automatically detect when the solargorilla solar charger is connected and
the symbol below will be displayed. This will disable the DC OUT port (3) and USB (2) on the
powergorilla. The internal circuits will also turn o to improve charging eciency and reduce charge
times from solar.
v
• Select the L52D tip and connect it to the 2m charging cable both supplied with the solargorilla and
insert the tip into the DC IN (1) of the powergorilla. Place the solargorilla panel in the sun.
• For further information on the solargorilla, please visit www.powertraveller.com
13

FREQUENTLY ASKED QUESTIONS
• Can I use the powergorilla straight away without charging?
Yes, the powergorilla only comes 30% pre-charged. This limit is
set according to airline regulations and is ready to use straight
out of the box. However, we do recommend fully charging the
powergorilla within 7 days of receiving it, and at least once
every 4 months thereafter.
• What are connector tips?
Connector tips are attachments to make the powergorilla
compatible with various devices.
• What if I can’t nd the right tip?
Please refer to www.powertraveller.com - tips/adaptors. These are
updated on a regular basis.
• Why does the powergorilla auto shut down?
This can be for various reasons:
1. Device is fully charged.
2. The powergorilla has run out of power and needs recharging.
3. A safety feature has been activated.
4. Your device is not drawing enough power from the powergorilla.
• My powergorilla shuts down when charging my USB device.
This may happen when your device is only drawing a very small
amount of power and is not being detected by the powergorilla.
Select the ‘88’ setting on the LCD screen to lock the USB on. Refer
to page 12.
• Can I charge the powergorilla via solar?
Yes, it is compatible with the 20V solargorilla (sold separately).
Refer to recharging via solar on page 13.
• If I accidentally left my powergorilla turned on with no device
attached, how long would it stay on for?
It will automatically turn o after 1 minute.
• My powergorilla will not turn on. It shuts down when it still has
power left in it.
A safety feature may have been triggered. Connect the powergorilla
to the AC electrical wall socket with the included AC mains charger
(6) for at least 10 seconds. This will reset the powergorilla.
• I’ve attached a device and the LCD screen is ashing and the
powergorilla shuts down.
This happens when the device attached is drawing too much
power from the powergorilla. Try using a lower power consumption
setting on your device or charging with the device turned o.
• Can I use 2 or more powergorilla’s to speed up the powering
time of my device?
Yes, from DC out (3) you can power from multiple powergorilla
chargers with our Y or 4 way cable (available separately).
• The DC out port turns o when my device is not fully charged.
This may happen when your device is only drawing a very small
amount of power and is not being recognised by powergorilla.
Select the correct DC voltage for your device. Press the on/o
button (4) twice in quick succession. The LCD screen will
illuminate and stay on until the powergorilla is manually turned
o. Refer to Permanent DC on mode on page 11.
• Which voltage should I use to charge my smartphone?
14
The USB port can charge your smartphone.

• There’s a strange symbol on my screen.
PRODUCT DISPOSAL CERTIFICATIONS
When connected to solar, you will see this symbol on
the LCD screen (5). While in this mode the DC out will
not function. This is so the powergorilla collects as much power as
possible from the solar panel. Please refer to page 13.
• Can I simultaneously charge from the DC out?
Yes, you can simultaneously charge and use a device at the same
time as long as the charging voltage in is the same as the charging
voltage out. The AC mains charger is 19V therefore the DC out will
be at 19V.
• Can I charge my 5V device and DC device at the same time?
Yes, you can simultaneously charge 5V devices when charging DC
devices as well.
• How long does it take to charge the powergorilla?
Approximately 3-5 hours.
• Can I charge the powergorilla from a USB port?
No, the powergorilla cannot be charged via USB.
• Does the powergorilla automatically recognise the voltage my
device requires?
No, you have to select the correct voltage before connecting and
turning your device on.
v
The symbol shown here and on the product means that the product is
classed as Electrical or Electronic Equipment and should not be disposed
with other household or commercial waste at the end of its working life.
The Waste of Electrical and Electronic Equipment (WEEE) Directive
(2002/96/EC) has been put in place to recycle products using best available
recovery and recycling techniques to minimise the impact on the
environment, treat any hazardous substances and avoid the increasing
landll.
Product disposal instructions for residential users
When you have no further use for it, please remove any batteries and
dispose of them and the product as per your local authority’s recycling
processes. For more information, please contact your local authority or the
retailer where the product was purchased.
Product disposal instructions for business users
Business users should contact their suppliers and check the terms and
conditions of the purchase contract and ensure that this product is not
mixed with other commercial waste for disposal.
SAFETY FEATURES
• Voltage limitation protection
• Current limitation protection
• Short circuit limitation protection
• Anti-discharge limitation protection
• Over-charging limitation protection
• Overheating protection
• Power surge protection
• Drop tested: UN 38.3
POWERGORLLA AC TRANSFORMER
15

POWERGORILLA
POWERGORILLA TACTICAL
POWERTRAVELLER INTERNATIONAL LIMITED
4 Delta Park, Wilsom Road,
Alton, Hampshire
GU34 2RQ, UK
t: +44 (0) 1420 542980
info@powertraveller.com
www.powertraveller.com
16
 Loading...