


CycleOps Joule™ 3.0
User Guide
Guide page 1
© 2009 Saris Cycling Group, Inc. 5253 Verona Road
Madison WI 53711 USA
Telephone: 800.783.7257 or 608.274.6550 Fax: 608.274.1702
All rights reserved. No part of this publication may be copied, photographed, reproduced, translated, transmitted electronically or placed on digital media without the prior written consent of Saris Cycling Group, Inc.
Trademarks
Saris Cycling Group, Inc , Joule 2.0, Joule 3.0, CycleOps, CycleOps logo, PowerTap and the PowerTap logo, are all registered trademarks of Saris Cycling Group, Inc. All other product, brand, or trade names used in this manual may be trademarks or registered trademarks of their respective owners.
Modif ications
Saris Cycling Group, Inc reserves the right to make improvements and/or updates to the products described herein at any time without notice.
Joule 3.0 User Guide page 2

Table of Contents: Chapters
1. Starting Out.................................................................................................................................... |
5 |
Compatibility................................................................................................................ |
6 |
Installing CycleOps Joule 3.0 ™ On Indoor Cycle............................................ |
8 |
Installing CycleOps Joule 3.0 ™ Using Standard Mount............................... |
9 |
CycleOps (ANT+) Heart Rate Strap...................................................................... |
11 |
Charging Battery....................................................................................................... |
12 |
Installing MicroSD Card.......................................................................................... |
13 |
2. Navigation.................................................................................................................................... |
14 |
Overview of CycleOps Joule 3.0......................................................................... |
15 |
3.Data File Management............................................................................................................. |
16 |
Pausing, Saving and/or Deleting a Ride........................................................... |
17 |
3. Dashboard Mode....................................................................................................................... |
20 |
Alerts............................................................................................................................. |
20 |
Using Dashboard...................................................................................................... |
21 |
Dashboard Categories............................................................................................ |
23 |
4. Intervals......................................................................................................................................... |
24 |
5. Reports Mode.............................................................................................................................. |
25 |
Using Reports............................................................................................................ |
25 |
Report Details............................................................................................................ |
27 |
Report Def initions.................................................................................................... |
31 |
Joule 3.0 User Guide page 3

Table of Contents: Chapters...continued |
|
6.Workouts....................................................................................................................................... |
37 |
Using Workouts......................................................................................................... |
37 |
Using Manual Workouts on CycleOps 400 Pro Indoor Cycle..................... |
39 |
Using Manual Workouts on CycleOps PowerBeam Pro Trainer................ |
41 |
Using Saved Workouts on CycleOps 400 Pro Indoor Cycle........................ |
43 |
Using Saved Workouts on CycleOps 400 Pro Indoor Cycle........................ |
45 |
Pausing, Saving and/or Deleting a Workout.................................................... |
47 |
7. Sensors........................................................................................................................................... |
48 |
Setting Up.................................................................................................................... |
49 |
Calibrating Devices.................................................................................................. |
55 |
8. Setup CycleOs Joule ™ 3.0...................................................................................................... |
59 |
9. Setup User..................................................................................................................................... |
66 |
10. History.......................................................................................................................................... |
68 |
Previous Rides............................................................................................................ |
68 |
Maximum History..................................................................................................... |
69 |
Total History................................................................................................................ |
70 |
11.Troubleshooting CycleOps Joule 3.0................................................................................. |
71 |
12. Important Precautions........................................................................................................... |
73 |
13.Technical Specif ications for CycleOps Joule ™ 3.0....................................................... |
75 |
14. CycleOps Joule 3.0 Warranty................................................................................................ |
76 |
14. Def inition of Common Training Terms............................................................................. |
77 |
Joule 3.0 User Guide page 4

Chapter 1: Starting Out
Thank you for purchasing CycleOps Joule 3.0, the f irst cycling computer designed for cyclists who train with power.
This user guide is just one of the resources to help you understand all the features Joule 3.0 has to offer.
Please visit www.cycleops.com to:
•Learn more about Joule 3.0 and the CycleOps system of products including stationary trainers, indoor cycles, software and power meters
•Register all CycleOps products and activate warranty
•View instructional videos
•Sign up for the CycleOps Power newsletteryour source for the latest news and technical updates from CycleOps Power
WARNING: Always consult a physician before beginning or modifying any exercise program.
Unpacking Joule 3.0
Remove all parts from the box to ensure the following contents are included: PACKAGE CONTENTS:
Item |
Part Description |
Qty |
• |
Joule 3.0 computer |
1 |
• |
Heart rate strap |
1 |
• |
Standard mount |
1 |
• |
Indoor cycle mount |
1 |
• |
Mount bolts |
2 |
• |
Mount knobs |
2 |
• |
Training with Power DVD |
1 |
• |
PowerAgent CD |
1 |
• |
USB cable |
1 |
Please contact your local dealer or Saris Cycling Group with any questions at 1-800-783-7257.
Joule 3.0 User Guide page 5

Chapter 1: Starting Out
Compatibility
Joule 3.0 is compatible with any ANT+ compatible power meter, speed sensor, cadence sensor or heart rate strap. For more information on ANT+ compatible devices, please visit www.thisisant. com. Note: Joule 3.0 is not compatible with combination speed/cadence sensors, wired version of PowerTap and non-ANT+ PowerTap models such as the SL 2.4.
In addition, Joule 3.0 is compatible with the following CycleOps products:
1.PowerTap 2.4+ Power Meter
2.PowerTap Elite+ Power Meter
3.PowerTap Pro+ Power Meter
4.PowerTap SL+ Power Meter
5.PowerTap SLC+ Power Meter
6.PowerBeam Pro Trainer*
7.200 Pro Indoor Cycle
8.300 Pro Indoor Cycle
9.400 Pro Indoor Cycle*
10.CycleOps PowerAgent Software
*Important: Unit must be plugged in to work with Joule.
Joule 3.0 User Guide page 6
Chapter 1: Starting Out
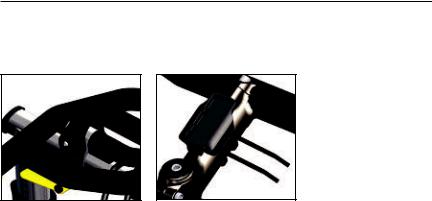
Installing CycleOps Joule 3.0
Joule 3.0 comes with two different mounts.The indoor cycle mount is designed specif ically for use on the CycleOps indoor cycles while the standard mount may be used on any handlebar or stem.
Indoor cycle mount |
Standard mount |
Joule 3.0 User Guide page 7
Chapter 1: Starting Out
Installing CycleOps Joule 3.0 on Indoor Cycle
Joule 3.0 should be installed with the indoor cycle mount if it is being used on an indoor cycle. The indoor cycle mount allows Joule 3.0 to be tilted for optimum viewing angles.
1. Place mount onto the handlebars as shown. Note: release lever should be closest to seat.
2. Insert two screws and two knobs through mount and handlebar. Tighten securely.
3. Slide Joule 3.0 forward into mount until it snaps into place.
Joule 3.0 User Guide page 8
Chapter 1: Starting Out
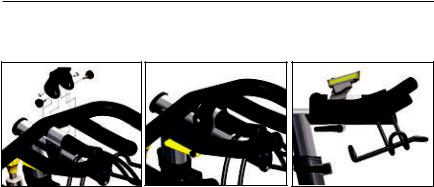
Installing CycleOps Joule 3.0 Using Standard Mount
The standard mount can be installed in either stem or handlebar orientations for use on any handlebar or stem. The mount is preassembled for the stem orientation.
1. For stem orientation insert two zip ties through bottom of mount and attach sticky pad. Secure to stem.
2. Position Joule 3.0 slightly behind mount.
3. Slide Joule 3.0 forward into mount until it snaps into place.
Press to
release
4. Be sure to check Joule 3.0 is secure in mount before riding.
5.To remove Joule 3.0 , press down on the release lever and slide Joule 3.0 back. Note: additional sticky pads may be used if release lever is not acces-
sible due to stem length or angle.
Joule 3.0 User Guide page 9

Chapter 1: Starting Out
Installing CycleOps Joule 3.0 Using Standard Mount
For handlebar orientation, change the standard mount from the preassembled stem orientation.
1. Remove screw that holds bottom of mount and rotate 90 degrees.
2. Insert screw through bottom of mount.
3. Insert two zip ties through bottom of mount. Apply sticky pad and tighten zip ties to secure mount.
4. Be sure to check Joule 3.0 is secure in mount before riding.
Joule 3.0 User Guide page 10
Chapter 1: Starting Out
CycleOps (ANT+) Heart Rate Strap
Wearing the heart rate strap, position it above torso as pictured. The strap should rest just beneath the pectoralis muscles of the chest. For best results slightly moisten the electrodes where contact is made with skin. The heart rate strap must be worn to enable the heart rate function. It should be snug enough to stay in place during the ride.
NOTE: Joule 3.0 is compatible with any ANT+ compatible heart rate strap. The CycleOps heart rate strap contains a user replaceable CR2032 battery; with an expected life of three years, assuming one hour of use per day. After replacing sensor battery, Joule must be repaired to heart rate sensor. See Sensor section on page 48.
Band
Front of Heart Rate Strap
Electrodes |
Battery Door |
Electrodes |
|||
|
|
||||
|
|
|
|
|
|
|
|
|
|
|
|
Back of Heart Rate Strap
Joule 3.0 User Guide page 11
Chapter 1: Starting Out
Charging Battery
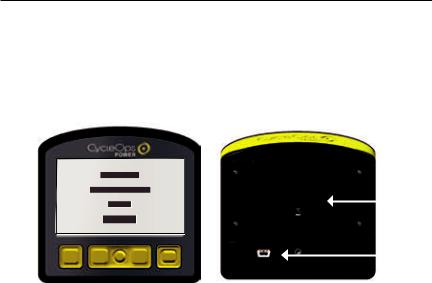
The Joule 3.0 is powered by a user replaceable lithium-ion battery that can be recharged using the included USB cable and a computer. A 5VDC 400mA charger can also be used (not included). A fully charged battery can run for approximately 60 hours before it must be recharged. Recharging completely, via USB cable or AC adapter will take approximately six hours. The battery level is indicated in the title bar. The Joule 3.0 is fully charged at the factory, but shipping and handling may inadvertently consume charge. For more information see Important Precautions section on page 38.
|
|
|
Battery |
|
|
|
cover |
HOME |
MODE |
INTERVAL |
RESISTANCE |
|
|
|
Mini- |
|
|
|
USB |
|
|
|
port |
|
Front of Joule |
Back of Joule |
|
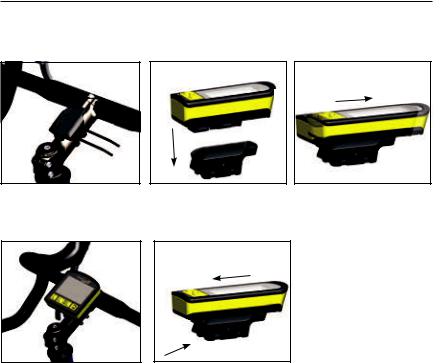
1.Press in release [HOME] , [MODE] or [INTERVAL] to turn on Joule 3.0. Note: Pressing either [JOYSTICK] will not turn Joule 3.0 on.
2.Plug the mini-USB cable into the mini-USB port on the back of Joule 3.0 and plug the other end into an available USB port on a computer.
3.A standard AC adapter to wall outlet is available separately.
4.Once connected to a computer or AC adapter, Joule 3.0 displays the connection and charge screen (charging or charge complete). No data will be displayed.
Joule 3.0 User Guide page 12
Chapter 1: Starting Out
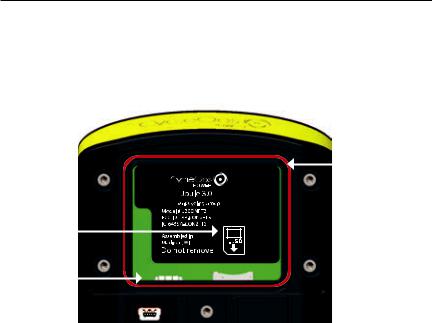
Installing MicroSD Card
Joule 3.0 provides 4 MB of onboard memory for storing activities, history and workouts. Activity f ile size increases with ride time but a one hour ride is approximately 150 KB, history f iles are always 1 KB (1,000 history f iles = 1 MB) and workout f iles also increase with workout size but a workout containing 500 segments will be approximately 50 KB. A microSD card slot is available under the battery for additional memory. Once a microSD card is installed, all f iles are stored on the card. For more information see Data Management section on page 16.
Red O-ring
MicroSD card holder
Mini-USB port
1.Remove the four screws attaching battery cover to Joule 3.0.
2.Remove battery cover. Remove battery. Note: disconnecting the battery is not necessary. Be careful not to damage the o-ring
3.Slide microSD card into microSD card holder, behind battery.
4.Insert battery. Attach battery cover and four bolts, using screwdriver. Make sure red O-ring is in place before
attaching battery cover. O-rings should be inspected and replaced if necessary whenever the battery cover is Joule 3.0 User Guide page 13
removed. Use a light coating of grease when re-installing the battery cover on the O-rings.

Chapter 1: Starting Out
Navigation Overview CycleOps Joule 3.0
There are three buttons and two [JOYSTICK] to navigate Joule 3.0. To help navigate Joule 3.0 display and this user guide note; bold letters will bring special attention to Menu items as they appear on the screen. Letters appearing in all [CAPs] denote an actual button.
|
HOME |
MODE |
INTERVAL RESISTANCE |
|||
[HOME] |
|
|
|
[RESISTANCE |
||
button |
|
|
|
|
|
JOYSTICK] |
|
|
|
|
|
||
|
|
|
|
|
|
|
[MODE] button |
[JOYSTICK] [INTERVAL] button |
Joule 3.0 User Guide page 14
Chapter 1: Starting Out
Navigation Overview CycleOps Joule 3.0
Display Actions
|
Button |
|
|
|
Function |
|
|
|
[JOYSTICK] |
|
Press left/right |
|
Move within a screen or change screens |
||
|
|
|
|||||
|
|
|
Press up/down |
|
Move within a screen or scroll up/down screen |
||
|
|
|
|
||||
|
|
|
Press in and release |
|
Change metrics in dashboard, change date |
||
|
|
|
|
||||
|
|
|
|
|
ranges in reports or select settings in menu |
||
|
|
|
|
|
|||
|
|
|
Press and hold for 2 seconds |
|
Initate list for changing dashboard categorysettings |
||
|
|
|
|
||||
|
|
|
|
|
|
|
|
|
[MODE] |
|
Press and release |
|
Change between dashboard, reports, activities, |
|
|
|
|
|
|
|
|||
|
|
|
|
|
menu |
|
|
|
|
|
Press and release |
|
Navigate “back” in menu mode |
|
|
|
|
|
|
|
|
||
|
|
|
Press and hold for 2 seconds |
|
Display “Ride Paused” screen |
|
|
|
|
|
|
|
|
||
|
[INTERVAL] |
|
Press and release |
|
Stop current interval and start next interval |
||
|
|
|
|||||
|
|
|
Press and hold for 2 seconds |
|
Change dashboard to and from “Interval Mode” |
||
|
|
|
|
||||
|
|
|
|
|
|
|
|
|
[MODE] |
|
Press and hold for 2 seconds |
|
Initiates f inding previously paired sensors |
|
|
|
+ |
|
|
|
|
|
|
|
[INTERVAL] |
|
|
|
|
|
|
|
|
|
|
|
|
|
|
|
[RESISTANCE |
|
Press up/down |
|
Change resistance setting |
||
|
JOYSTICK] |
|
Press in and release |
|
Change resistance type |
||
|
|
|
|||||
|
|
|
|
|
|
|
|
|
[HOME] |
|
Press in and release |
|
Return to dashboard mode |
||
|
|
|
|
|
|
|
|
Joule 3.0 User Guide page 15

Chapter 1: Starting Out
Data File Management
Joule 3.0 saves three types of f iles into memory, activities, workouts and history. Activities f iles contain second by second ride data for analysis by PC or Mac on software such as CycleOps PowerAgent. History f iles contain summary data only and are used by Joule 3.0 for calculating averages, maximums and totals for Reports. Workout f iles are created in PowerAgent and sent to Joule 3.0.
Whenever ride time is accumulated, an activities f ile is created and saved automatically. A history f ile is generated anytime a ride is stopped and saved. Note: because history f iles are used by Reports for calculating averages, maximums and totals it is important to manage them carefully, only saving rides that you want to contribute to these calculations. Because Joule 3.0 acts as a mass storage device, activities and history f iles may also be viewed from a PC or Mac when connected via USB cable.
File Type |
Description |
Size |
Activtiies |
Second by second complete ride storage |
1hr=150K |
|
|
|
Workouts |
Summarized ride data for reports and history |
1 ride=1KB |
|
|
|
History |
Created by PowerAgent for training a precise power |
500 segments=5KB |
|
output, powerzone or terrain (slope). |
|
|
|
|
Joule 3.0 User Guide page 16
Chapter 1: Starting Out
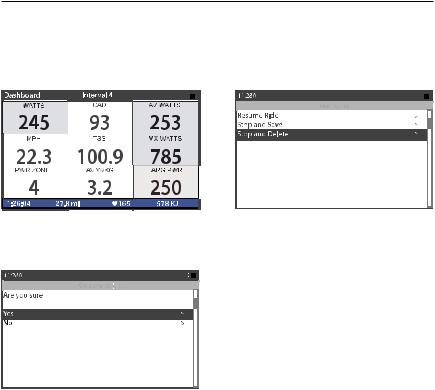
Pausing, Saving and/or Deleting a Ride
A ride may be paused at any time. Joule 3.0 will turn off automatically if paused for longer than the designated sleep time. For more information on how to change sleep time see page 64.
1. Press and hold [MODE] for two seconds to access ride paused screen from any mode.
2. Press [JOYSTICK] in and release to resume ride.
Joule 3.0 User Guide page 17

Chapter 1: Starting Out
Pausing, Saving and/or Deleting a Ride
Stopping and saving a ride creates a history f ile for that ride. History f iles are used for calculating averages, maximums and totals for Reports. Stop and save resets all data in the dashboard.
1. Hold [MODE] for two seconds to access ride paused screen from any mode.
2. Press [JOYSTICK] up/down to highlight stop and save. Press [JOYSTICK] in and release to select.
Joule 3.0 User Guide page 18
Chapter 1: Starting Out
Pausing, Saving and/or Deleting a Ride
A ride may be deleted at any time. If a ride is deleted no history f ile is created.
1. Press and hold [MODE] to access ride paused screen from any mode.
2. Press [JOYSTICK] up/down to highlight stop and delete. Press [JOYSTICK] in and release to select stop and delete.
3. Press [JOYSTICK] in and release to conf irm deletion.
Joule 3.0 User Guide page 19

Chapter 1: Starting Out
Alerts
Notif ications indicated in the title bar alerting users to prepare to action step to optimize Joule 3.0 functionality. Alerts are located in the title bar.
Battery Low: indicating Joule 3.0 battery is low. Need to plug in and charge to computer or AC adapter. If one bar remains on the battery icon, there is approximately a half an hour of use left before Joule 3.0 battery shuts down.
Connected: indicating Joule 3.0 is connected to a computer or AC adapter and is receiving a charge. Charging may take three hours to complete.
Hub Battery Low: indicating the CycleOps PowerTap hub battery is low. Reference CycleOps PowerTap User Guide to change battery in hub.
Finding: indicating Joule 3.0 is attempting to f ind activated sensors.
RU Lost: indicating the signal from the resistance unit that was activated and paired to Joule 3.0 has been lost.
Hub Lost: indicating the signal from the power meter that was activated and paired to Joule 3.0 has been lost.
Memory Full: indicating the memory on the Joule 3.0 has reached its limit. Insert new microSD card or delete activity f iles to create more memory.
Joule 3.0 User Guide page 20
Chapter 2: Dashboard Mode
Using Dashboard Mode
Joule 3.0 has four display modes of operation: dashboard, reports, activities and menu indicated by the title bar. Note: after the mode is displayed in the title bar for f ive seconds, the time of day will appear. Press and release [MODE] to change to dashboard mode. Note: Press in and release [HOME] at any time to return to the dashboard mode.
Selected metric
Dashboard
Information bar
Mode level indicator/ |
|
|
Alerts notif ications |
Interval on/off |
Battery indicator |


 Title bar
Detailed view
Resistance control type/ setting
Ride time |
Total ride |
Average heart Total ride KJ |
|
distance |
rate for total |
|
|
ride |
Joule 3.0 User Guide page 21

Chapter 2: Dashboard Mode
Using Dashboard Mode
Dashboard mode shows current ride data. It displays six metrics, out of a choice of eighteen metrics that can be easily customized.The detailed view shows additional metrics related to the
selected metric in the dashboard.
Selected metric
Detailed view
1. Press [JOYSTICK] left/right or up/down to highlight a metric. Note: when a new metric is highlighted, the detailed view changes to show related metrics.
2.Press in and release [JOYSTICK] to rotate metrics from detailed view to dashboard. (Example: watts, av watts, mx watts).
Joule 3.0 User Guide page 22
3. Press in and hold [JOYSTICK] to change the metric category displayed in the dashboard.

Chapter 2: Dashboard Mode
Dashboard Categories
Each dashboard category is made up of three metrics.There are twelve available dashboard categories. Press and hold [JOYSTICK] to change the metric category displayed in the dashboard.
|
Category Metric 1 |
|
Metric 2 |
Metric 3 |
|
|||||||
|
Watts |
|
|
watts |
average watts |
maximum watts |
|
|||||
|
|
|
WATTS |
|
|
AV WATTS |
|
|
MX WATTS |
|
|
|
|
|
|
|
2999 |
|
|
2999 |
|
|
2999 |
|
|
|
Watts/kg |
|
|
watts/kg |
average watts/kg |
maximum watts/kg |
|
|||||
|
|
|
|
W/KG |
|
|
AV W/KG |
|
|
MX W/KG |
|
|
|
|
|
|
20.0 |
|
|
20.0 |
|
|
20.0 |
|
|
|
Zones |
|
current power zone average power zone |
heart rate zone |
|
|||||||
|
|
|
|
PWR ZONE |
|
|
AV PWR ZN |
|
|
HR ZONE |
|
|
|
|
|
|
6 |
|
|
4.2 |
|
|
3 |
|
|
|
Peak Power |
|
5sec Peak Power |
5min Peak Power |
20 min Peak Power |
|
||||||
|
|
|
|
5 SEC |
|
|
5 MIN |
|
|
20 MIN |
|
|
|
|
|
|
2999 |
|
|
2999 |
|
|
2999 |
|
|
|
Scores |
|
training stress score normalized power |
intensity factor |
|
|||||||
|
|
|
|
TSS |
|
|
NORM PWR |
|
|
IF |
|
|
|
|
|
|
500.1 |
|
|
2999 |
|
|
2.000 |
|
|
|
Work |
|
|
kilojoules |
kilojoules / hour |
training stress score |
|
|||||
|
|
|
|
KJ |
|
|
KJ/HR |
|
|
TSS |
|
|
|
|
|
|
9999 |
|
|
9999 |
|
|
9999 |
|
|
|
RPM |
|
|
rpm |
average rpm |
maximum rpm |
|
|||||
|
|
|
|
CAD |
|
|
AV CAD |
|
|
MX CAD |
|
|
|
|
|
|
250 |
|
|
250 |
|
|
250 |
|
|
|
Heart Rate |
|
|
heart rate |
average heart rate |
maximum heart rate |
|
|||||
|
|
|
|
HR |
|
|
AV HR |
|
|
MX HR |
|
|
|
|
|
|
250 |
|
|
250 |
|
|
250 |
|
|
|
Speed |
|
current speed |
average speed |
maximum speed |
|
||||||
|
|
|
|
|||||||||
|
|
|
|
MPH |
|
|
AV MPH |
|
|
MX MPH |
|
|
|
% Grade |
|
|
99.9 |
|
|
99.9 |
|
|
99.9 |
|
|
|
|
current grade |
current altitude ft or m |
total ascent ft or m |
|
|||||||
|
|
|
|
|||||||||
|
|
|
|
% GRADE |
|
|
ALT FT |
|
|
FT GAIN |
|
|
|
|
|
|
45.0 |
|
|
29999 |
|
|
9999 |
|
|
|
VAM |
|
vertical ascent |
current altitude ft or m |
total ascent ft or m |
|
||||||
|
|
|
|
VAM |
|
|
ALT FT |
|
|
FT GAIN |
|
|
|
|
|
|
45.0 |
|
|
29999 |
|
|
9999 |
|
|
|
|
|
|
|
|
|
|
|
|
|
|
|
|
Ride |
|
|
ride time |
ride distance |
|
kilojoules |
|
||||
|
|
|
|
|
|
|
MILE |
|
|
KJ |
|
|
|
|
|
|
99:59:59 |
|
|
99.99 |
|
|
9999 |
|
|
|
|
|
|
RIDE TIME HR |
|
|
|
|
|
|
|
|
Joule 3.0 User Guide page 23
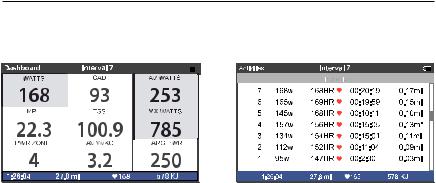
Chapter 3: Intervals
Intervals
Intervals may be viewed from activities mode or dashboard mode. Intervals are useful for viewing ride data specif ic to a section of your ride such as a hill or other period of high intensity riding.
1.Intervals can be started at any point during the ride and from any mode. Press and release [INTERVAL].To stop the existing interval and start the next one, press and release [INTERVAL] again.
2.To view intervals from the dashboard press and hold [INTERVAL] until “INT” is displayed in the title bar. Note: All dashboard data now pertains to the active interval only.
3.To exit interval mode, press and hold [INTERVAL] again. Note: all dashboard data will now pertain to the entire ride.
4.To view all interval data press and release [MODE] to navigate to activities mode.
Note: Activities mode shows all intervals completed with the current interval at the top of the list. Average power, heart rate, interval time and distance are displayed for each interval.
Intervals are disabled during saved workouts.
Joule 3.0 User Guide page 24

Chapter 4: Reports Mode
Using Reports Mode
Joule 3.0 has four display modes of operation: dashboard, reports, activities and menu indicated in the title bar. Note: after the mode is displayed in the title bar for f ive seconds, the time of day will appear Press and release [MODE] button to change from dashboard mode to report mode. Note: Press in and release [HOME] at any time to return to the dashboard mode.
|
|
Mode level indicator |
Battery indicator |
|||||||||||||
|
|
|
|
|
|
|
|
|
|
|
|
|
|
|
|
|
Report |
|
|
|
|
|
|
|
|
|
|
|
|
|
|
|
|
Type |
|
|
|
|
|
|
|
|
|
|
|
|
|
|
|
Title bar |
|
|
|
|
|
|
|
|
|
|
|
|
|
|
|
||
|
|
|
|
|
|
|
|
|
|
|
|
|
|
|
|
|
Todays |
|
|
|
|
|
|
|
|
Report Name |
|||||||
|
|
|
|
|
||||||||||||
|
|
|
|
|
|
|
Comparable |
|||||||||
Ride |
|
|
|
|
|
|
|
|||||||||
|
|
|
|
|
|
|
Timeframe |
|||||||||
|
|
|
|
|
|
|
|
|
|
|
|
|
|
|
||
|
|
|
|
|
|
|
|
|
|
|
|
|
|
|
|
|
Report Metrics |
|
|
|
|
|
|
|
|
|
|
|
|||||
|
|
|
|
|
|
|
|
|
|
|||||||
Information |
|
|
|
|
|
|
|
|
|
|
|
|
|
|
|
|
|
|
|
|
|
|
|
Green box |
|
bar |
|
|
|
|
|
|
|
|
|
|||
|
|
|
|
|
|
|
|
|
highlights |
|||
|
|
|
|
|
||||||||
|
|
|
|
|
|
|
|
|
|
|
|
larger volume |
|
|
|
|
|
|
|
|
|
|
|
|
|
|
Ride time |
Total ride |
Average heart Total ride KJ |
|||||||||
|
|
|
|
|
distance |
rate for total |
||||||
|
|
|
|
|
|
|
ride |
|||||
Joule 3.0 User Guide page 25

Chapter 4: Reports Mode
Using Reports Mode
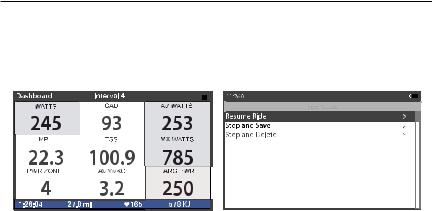
Joule 3.0 provides eight reports for an easy comparison of the current ride and historical averages so information can be seen in context. Each report contains three columns; the f irst column is the metric label, the second column is the data for a given metric on the current ride, the
third column is the average of all rides completed over the selected date range. Note: the green highlighted metrics represents the larger of the two metrics. For more information see Report Def initions for an explanation of each metric in reports from pages 31-36.
1.From dashboard mode, press and release [MODE]. Press [JOYSTICK] left/right to change reports.
2.Press [JOYSTICK] up/down to scroll screen within a particular report. For past ride historical reports, see pages 31-36.
3.Press in and release [JOYSTICK] to change date ranges from two weeks, four weeks, eight weeks, six months and twelve months.
4.Move [JOYSTICK] left and right to show the other reports.There are eight available reports.
Joule 3.0 User Guide page 26
 Loading...