

Page 1
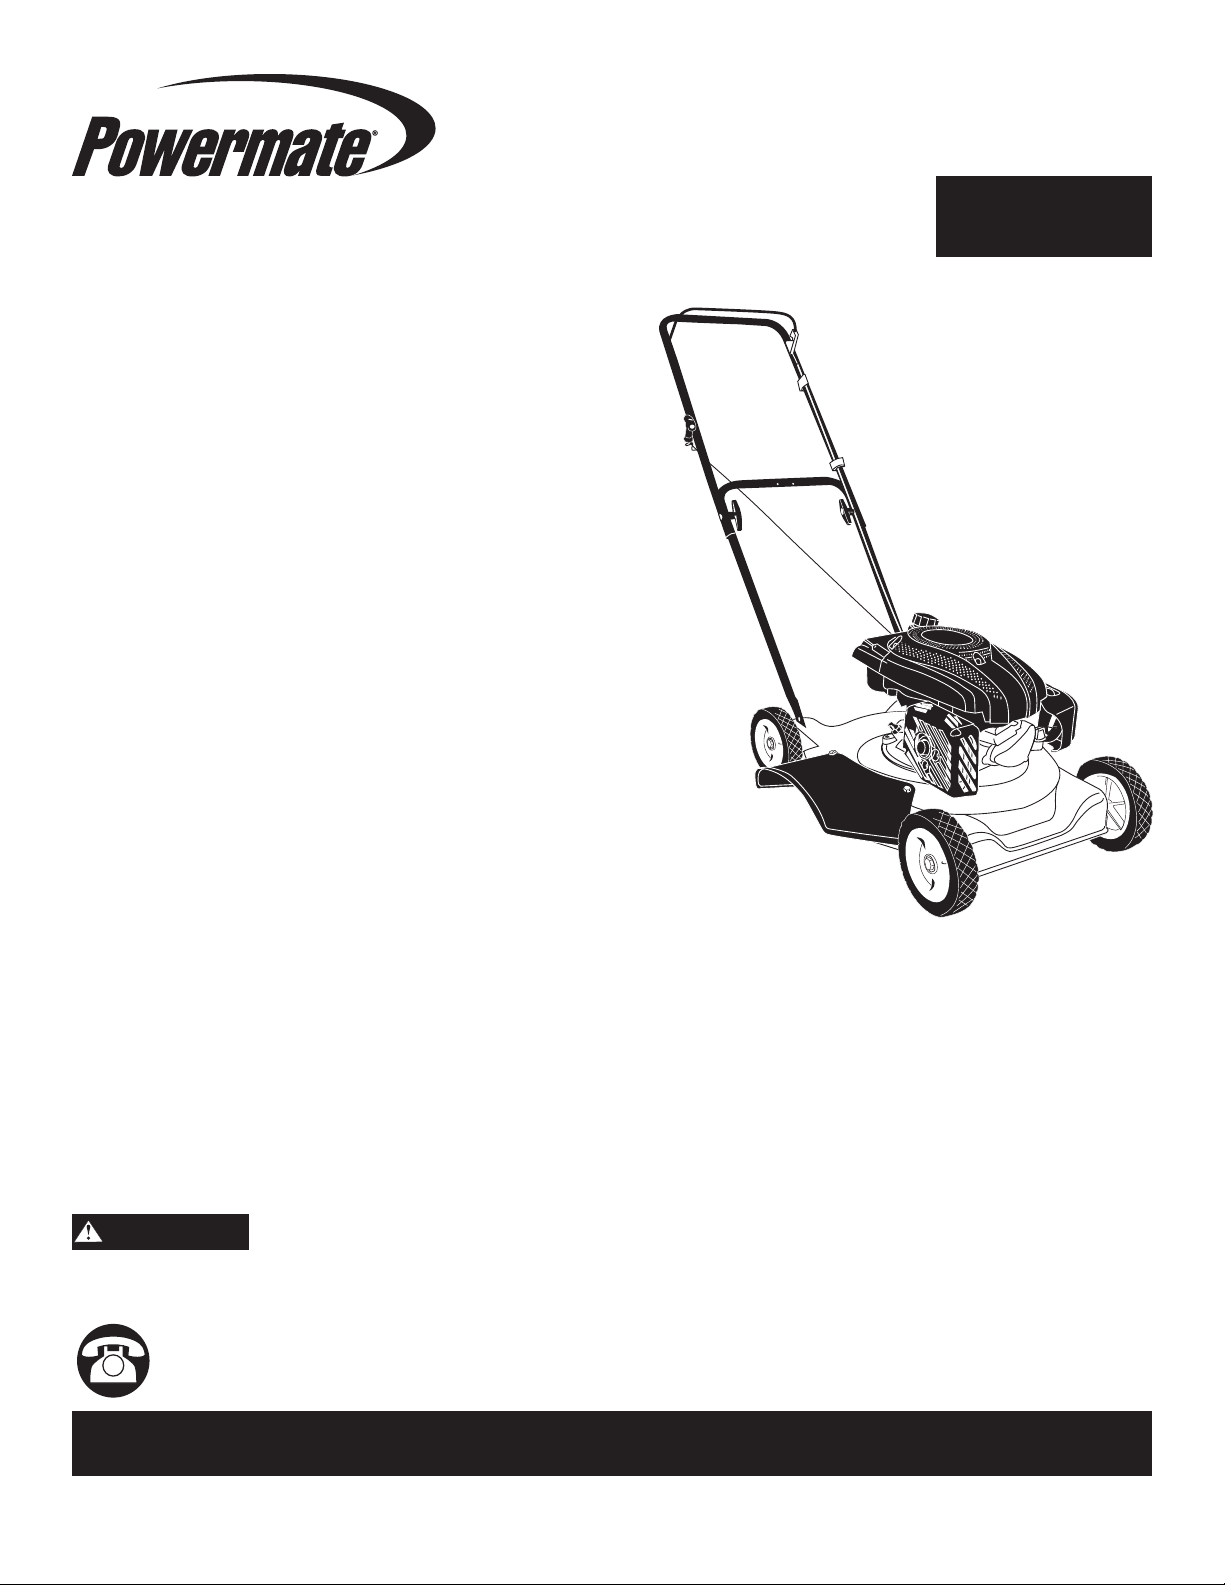
Operator’s Manual
WALK-BEHIND
LAWN MOWER
Look Inside for:
Page
Safety Definitions 2
Important Safety Information 3-6
Product Specifications 7
Parts & Features 7
Safety Decals 8
Assembly 9-12
Operation 13-15
Routine Maintenance 16-19
Common Repair Parts 19
Storage 19
Troubleshooting 20
Technical Service 21
Warranty 21-24
MODEL NO.
PM2015
IMPORTANT:
This manual provides complete instructions for safely operating and
maintaining your mower. Read and save these instructions. Refer to
this manual each time before using your mower.
Record the following for future reference:
Model No: ___________________
Mfg. Date Code: ______________________
Date of Purchase: Attach a copy of your sales receipt.
Consumer Toll Free Number: 1-800-737-2112
Refer to the website for electronic manual and parts book.
www.powermateoutdoor.com
WARNING
Engine exhaust, some of its constituents, and certain product components contain or emit chemicals known to the State
of California to cause cancer and birth defects or other reproductive harm.
If you have a question or problem...
CALIFORNIA PROPOSITION 65 WARNING
CALL TOLL FREE: 1-800-737-2112
KEEP THIS MANUAL FOR FUTURE REFERENCE
07/14/2016 Printed in China A203240
Page 2
PUSH TO PRIME
Safety Definitions
• Save all instructions
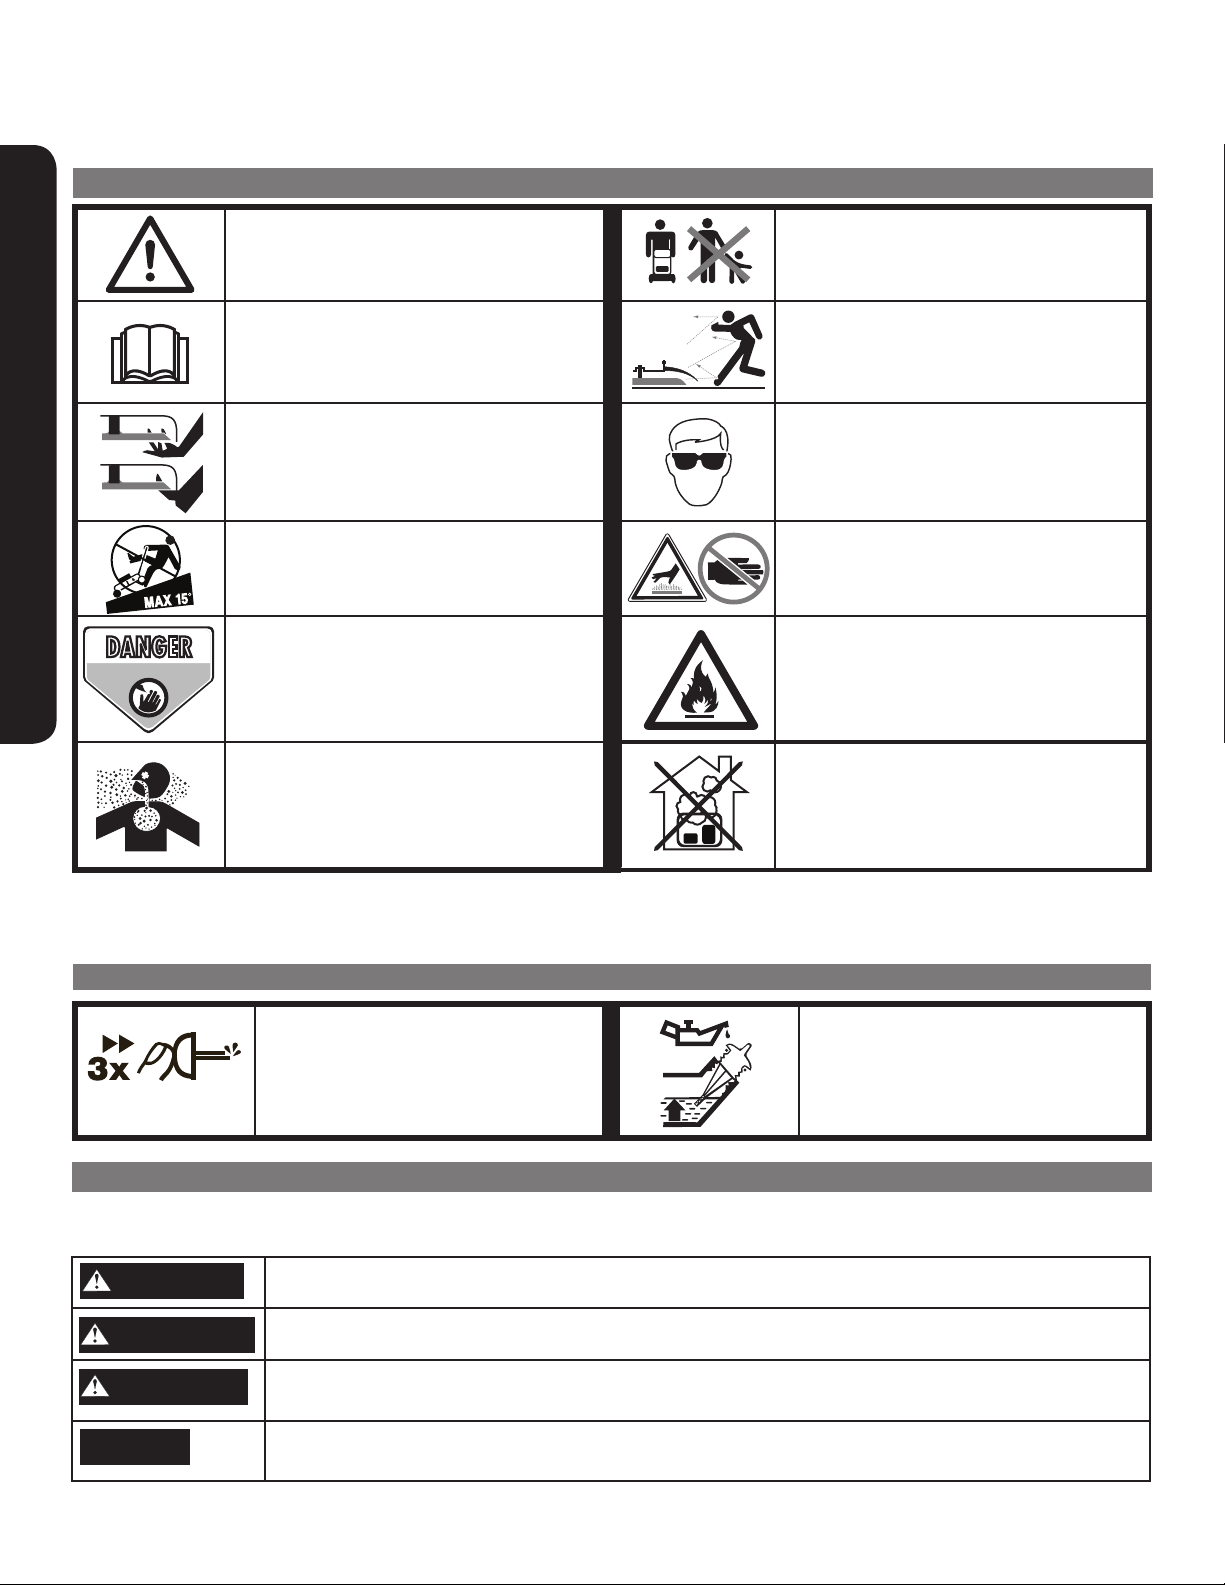
Become familiar with and understand the meaning of the warning symbols found on your mower.
Important Safety Information
SAFETY WARNING SYMBOLS
DANGER
DANGER
KEEP HANDS and FEET AWAY
Indicates WARNING, DANGER,
or CAUTION. It means: Attention! Become
Alert! Your Safety Is Involved.
Read operator’s manual before operating
this machine. Failure to follow directions
could result in serious injury.
Keep hands and feet away from rotating
parts.
Do not mow slopes greater than 15°. Mow
across slopes, never up and down.
The mower is capable of amputating
hands and feet. To avoid risk or serious injury, do not put hands or feet near
or under the mower. Keep clear of the
discharge opening at all times.
Engine exhaust contains large amounts
of poisonous carbon monoxide (CO)
gas.
Do not mow when children or others
are around.
This mower can throw small objects at
high speed causing personal injury or
property damage. Remove objects that
could be thrown by the blade.
Wear eye protection that meets or
exceeds the requirements of ANSI
Z87.1.
Hot surface. The muffler and engine
become hot and can burn you. Do not
touch.
Gasoline is flammable. Handle with care.
Engine exhaust contains carbon monoxide, an odorless and deadly gas. NEVER
run unit indoors or in a poorly ventilated
area.
CONTROL AND OPERATING SYMBOLS
Push primer 3 times before starting a
cold engine . Important: Do not prime
to restart a warm engine.
SAFETY ALERT SYMBOLS
The symbols below identify important safety information in this manual. Become familiar with these symbols and the
warnings associated with these symbols.
DANGER
WARNING
CAUTION
NOTICE
Indicates an imminently hazardous situation which, if not avoided, will result in death or serious injury.
Indicates a potentially hazardous situation which, if not avoided, could result in death or serious injury.
Indicates a potentially hazardous situation which, if not avoided, may result in minor/moderate injury.
Indicates a situation which may result in equipment / property damage or may relate to
general safety messages.
Oil Fill Location
Do Not Overfill
Questions? Call Toll Free at 1-800-737-2112 Copyright © 2016 MAT Engine Technologies, LLC
ENG - 2
Page 3

Important Safety Information
• Save all instructions
BEFORE OPERATING THE MOWER
1. READ AND UNDERSTAND ALL INSTRUCTIONS BEFORE OPERATING THE MOWER.
DANGER
The mower is capable of amputating hands and feet and throwing objects. Read and follow all warnings and safety instructions
on the mower and in this manual. Failure to do so can result in serious injury or death to you or bystanders.
2. Avoid Dangerous Environments
a. Do not operate the mower while under the influence of alcohol, medications, or drugs.
b. Do not operate the mower when you are tired.
c. Do not use this mower if you are mentally or physically unable to operate safely.
3. Make sure all fasteners are tight and safety devices (guards, shields, blade control, etc.) are in place and working
correctly. Inspect mower for damaged parts. Replace any damaged parts.
4. Dress properly when operating the mower.
a. Always wear substantial footwear that provides protection and reliable footing. Never operate the mower in
bare feet or sandals.
b. Heavy long pants, steel-toed boots, gloves, and a long-sleeve shirt are recommended.
c. Do not wear loose clothing or jewelry that can get caught in the moving parts of the mower.
5. Always wear eye protection that meets or exceeds the requirements of ANSI Z87.1.
6. Operate the mower only in daylight or good lighting conditions.
7. Thoroughly inspect the area where the mower is to be used and remove all foreign objects such as rocks, wire,
toys, etc., which could be thrown by the blade.
WARNING
Important Safety Information
This mower can throw small objects at high speed causing personal injury or property damage.
WHILE OPERATING THE MOWER
1. Stay alert. Watch what you are doing.
2. Do not operate the mower if it is damaged or not securely and fully assembled.
DANGER
Never start or run the mower inside a closed room or building; breathing exhaust fumes can kill.
WARNING
Tragic accidents can occur if you are not alert to the presence of children. Children are often attracted to the mower and mowing activity. Never assume that children will remain where you last saw them.
3. Only well instructed and responsible adults should operate the mower. Never allow children to operate the mower.
4. Keep children and bystanders out of the mowing area. Keep children under the watchful care of a responsible adult
other than the operator.
5. Be alert and turn the mower engine off if anyone enters the mowing area.
6. Use extreme care when approaching blind corners, shrubs, trees or other objects that may block your view of a
child.
7. Never leave a running mower unattended.
8. Do not pull the mower backwards unless absolutely necessary. When moving the mower backwards, look down
and behind for small children and foreign objects. Take extreme care when moving the mower backwards to keep
your feet clear of the mower and to maintain your footing and balance.
DANGER
Do not put hands or feet near or under the mower. Keep clear of the discharge opening at all times.
9. Do not operate mower without the entire discharge guard, trailing rear shield, blade control or other safety
protective devices in place and working.
Questions? Call Toll Free at 1-800-737-2112 Copyright © 2016 MAT Engine Technologies, LLC
ENG - 3
Page 4

Important Safety Information (Continued)
• Save all instructions
Important Safety Information
WARNING
Disconnect spark plug wire before servicing blade or cleaning underneath mower deck. Failure to disconnect spark plug wire
could lead to incidental engine starting resulting in serious injury or death.
10. Stop the engine (motor) and wait for the blade to completely stop before cleaning the mower or unclogging the
discharge guard.
11. Maintain your balance and proper footing at all times. Always be sure of your footing; walk; never run.
12. The blade control lever is a safety device. Do not attempt to bypass or override the blade control lever. Doing so
may cause severe personal injury from contact with a rotating blade. Stay behind the handle when the engine is
running.
13. Never direct the mower’s discharge toward anyone. Avoid discharging the mower against a wall or other
obstruction. Objects may ricochet back toward the operator or bystanders. Stop the engine when crossing gravel
drives and walkways.
14. Do not force mower. It will do the job better, last longer and with less likelihood of a risk of injury at the rate for
which it was designed.
15. If the mowers starts to vibrate abnormally, stop the engine and check for the cause immediately. Vibration is
generally a warning of trouble.
16. The muffler and engine become hot and can burn you. Do not touch.
WHILE OPERATING THE MOWER ON SLOPES
WARNING
Slopes are a major factor related to slip and fall accidents, which can result in severe injury. Operation on all slopes requires
extra caution. If you feel uneasy on a slope, do not mow it.
1. If a slope is greater than 15 degrees, do not mow. Use the slope gauge inside this manual (see pg. 6) to measure
slopes before operating this mower on a slope or hilly area.
2. Mow across the face of slopes; never up and down. Exercise extreme caution when changing direction on slopes.
3. Watch for holes, ruts, bumps, rocks, or other hidden objects. Uneven terrain could cause a slip and fall accident.
Tall grass can hide obstacles.
4. Do not mow on wet grass or excessively steep slopes. Poor footing could cause a slip and fall accident.
5. Do not mow near drop-offs, ditches, or embankments. You could lose your footing or balance.
6. If you do lose your balance, release the handle and blade control lever immediately.
FUEL SAFETY
WARNING
To avoid personal injury or property damage, use extreme care when handling gasoline. Gasoline is extremely flammable and
the vapors are explosive.
1. Do not smoke or allow smoking near fuel or the mower. Extinguish all cigarettes, cigars, pipes and other sources
of ignition.
2. Never refuel the mower indoors. Refuel outdoors WHERE THERE ARE NO SPARKS OR FLAMES.
3. Use a container approved for gasoline.
4. Never fill containers inside a vehicle or on a truck or trailer bed with a plastic liner. Always place containers on the
ground away from your vehicle before filling.
5. Do not lock the fuel dispensing nozzle in the open position.
6. Remove gas-powered equipment from the truck or trailer and refuel it on the ground. Always refuel the mower using
a portable container. Never refuel mower from a fuel dispensing nozzle.
7. Never remove the fuel cap or add fuel with the engine running. Always stop engine and allow to cool before
removing fuel cap. Remove fuel cap slowly.
8. Never overfill fuel tank. Avoid spilling fuel or oil. Wipe up all fuel spills.
9. After refueling, replace fuel cap and tighten securely.
10. If fuel is spilled on clothing, change clothing immediately.
11. Move at least 10 feet (3 meters) away from fueling site before starting engine.
Questions? Call Toll Free at 1-800-737-2112 Copyright © 2016 MAT Engine Technologies, LLC
ENG - 4
Page 5

Important Safety Information (Continued)
• Save all instructions
MAINTENANCE AND STORAGE OF THE MOWER
1. Disconnect the spark plug before performing maintenance.
2. Maintain the mower with care. Inspect the mower periodically. If the mower is not working properly or damaged,
have it repaired by a qualified service center.
3. Check for misalignment of moving parts, binding of moving parts, broken parts, mounting, and any other condition
that may affect its operation.
4. Check guards frequently and keep guards in place and in working order.
5. A guard or other part that is damaged should be properly repaired or replaced by a qualified service center.
6. Use only genuine Powermate
accessories could lead to injury, damage to the unit, and void your warranty.
7. Maintain or replace safety and instruction labels as necessary. Do not remove safety or any labels from the mower
for any reason.
8. Do not change engine governor setting or overspeed the engine.
9. Do not remove or modify any parts. Removing or modifying parts could lead to injury, damage the mower and will
void the warranty.
10. Keep machine free of grass, leaves or other debris build-up. Clean up oil or fuel spills and remove any fuel-soaked
debris.
11. Allow engine to cool and empty the fuel tank before storing or transporting in vehicle. Use up remaining fuel in the
carburetor by starting the engine and letting it run until it stops.
12. Use extra caution when servicing mower blades. Disconnect spark plug wire before servicing blade or cleaning
underneath mower deck. Blades are sharp. To protect your hands, wrap the blade or wear gloves when handling.
13. Store unit and fuel in area where fuel vapors cannot reach sparks or open flames from water heaters, electric
motors or switches, furnaces, or where power tools are operated.
14. When not in use, store the mower in a clean, dry and well ventilated area.
®
replacement parts and accessories. Use of any non-Powermate® parts or
Important Safety Information
Questions? Call Toll Free at 1-800-737-2112 Copyright © 2016 MAT Engine Technologies, LLC
ENG - 5
Page 6
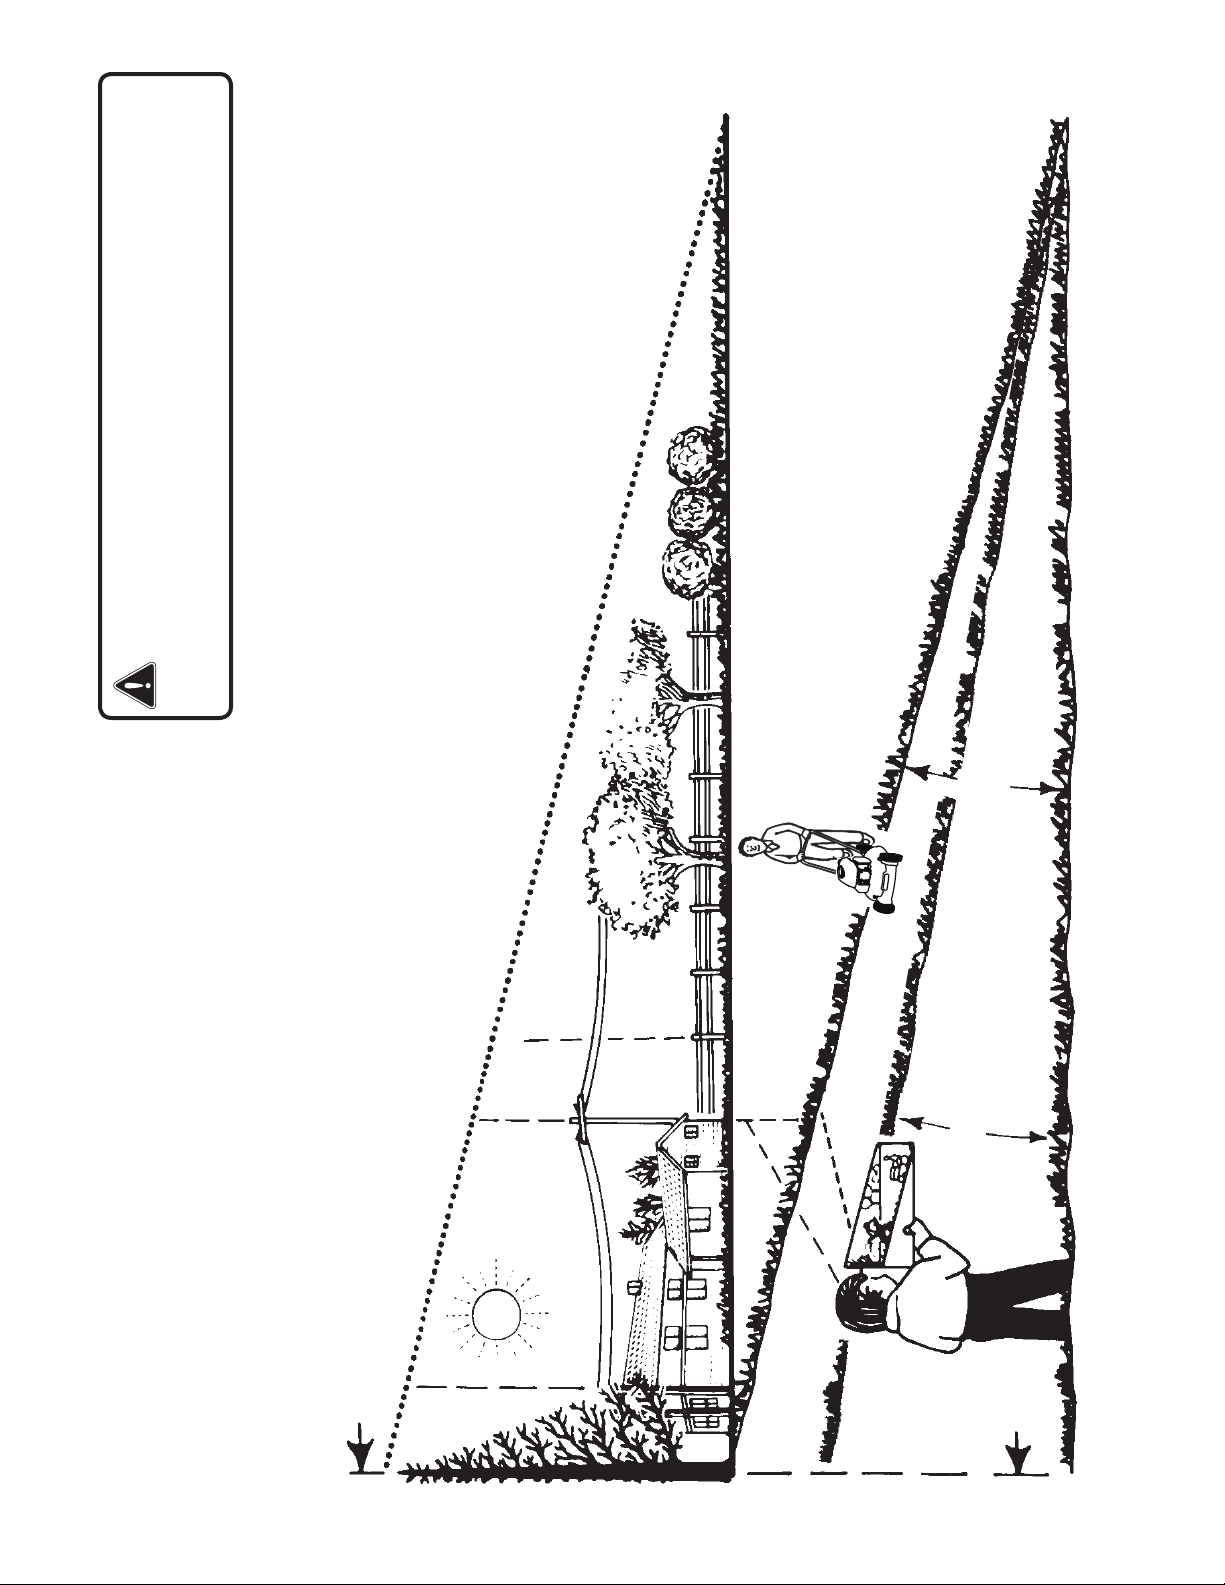
WARNING!
Slopes are a major factor related to slip and fall accidents, which can
result in severe injury. Operation on all slopes requires extra caution.
If you feel uneasy on a slope, do not mow it. Mow across the face of
slopes; never up and down. Exercise extreme caution when chang-
ing direction on slopes.
FOLD ALONG DOTTED LINE
15 Degrees
10 Degrees
SLOPE GUIDE
SIGHT AND HOLD THIS GUIDE LEVEL WITH A VERTICAL TREE, A
CORNER OF A STRUCTURE, A POWER LINE POLE, OR A FENCE.
Use this guide and do not mow on a slope greater than 15 degrees.
A 15-degree slope is a hill that increases in height at approximately 2.5 feet in 10 feet.
Questions? Call Toll Free at 1-800-737-2112 Copyright © 2016 MAT Engine Technologies, LLC
ENG - 6
Page 7

Product Specifications
• Save all instructions
If you need assistance or have any questions,
CALL TOLL FREE: 1-800-737-2112.
Cutting Width . . . . . . . . . . . . . . . . . . . . . . . . 20 in (510 mm)
Cutting Heights . . . . . . . . . . . . . . . .2.25-3.5 in (57-89 mm)
Engine Speed. . . . . . . . . . . . . . . . . . . . . . . . . . . .3000 RPM
Unit Weight. . . . . . . . . . . . . . . . . . . . . . . . . 48.5 lb (22.0 kg)
Gasoline Type....... Regular
Gasoline Capacity . . . . . . . . . . . . . . . . . . . . . . . 1.06 qt (1L)
Oil Type (API SG, SH, SJ or higher) 10W-30 is
recommended for all service temperatures. See page 11 for
Oil Capacity . . . . . . . . . . . . . . . . . . . . . . . . . .15 oz (450 ml)
Unleaded – 87 Octane (min.)
additional information.
Parts & Features
To be able to operate your mower safely and get the best
performance, become familiar with the key product features
(shown below) and all warning and instructions in this manual.
1. Blade Control Lever
2. Primer Bulb
3. Starter Rope Handle
4. Starter Rope Guide
5. Discharge Guard
6. Gasoline Fill
7. Oil Fill
8. Lower Handle
9. Upper Handle
10. Air Filter
11. Muffler
12. Spark Plug
3
4
Spark Plug Model...TORCH K7RTC / Champion RC9YC4
Spark Plug Gap . . . . . . . . . .0.028-0.031 in (0.70-0.80 mm)
Engine Type ............. 4 stroke, single cylinder, OHV
Displacement . . . . . . . . . . . . . . . . . . . . . . . . . . . . . . . 150cc
Torque Rating . . . . . . . . . . . . . . . . . . . . . 5.75 ft-lb (7.8 N.m)
. . . . . . . . . . . . . . . . . . . . . . . . gross torque per SAE J1940
Intake Valve Clearance. . . . 0.004 - 0.008 in (0.1 - 0.2 mm)
Exhaust Valve Clearance 0.006 - 0.010 in (0.15 - 0.25 mm)
Wheel Size . . . . . . . . . . . . . . . . . . . . . . . . . . . . . . . . . . . 7 in
1
9
8
6
10
7
2
5
11
Questions? Call Toll Free at 1-800-737-2112 Copyright © 2016 MAT Engine Technologies, LLC
ENG - 7
12
Page 8
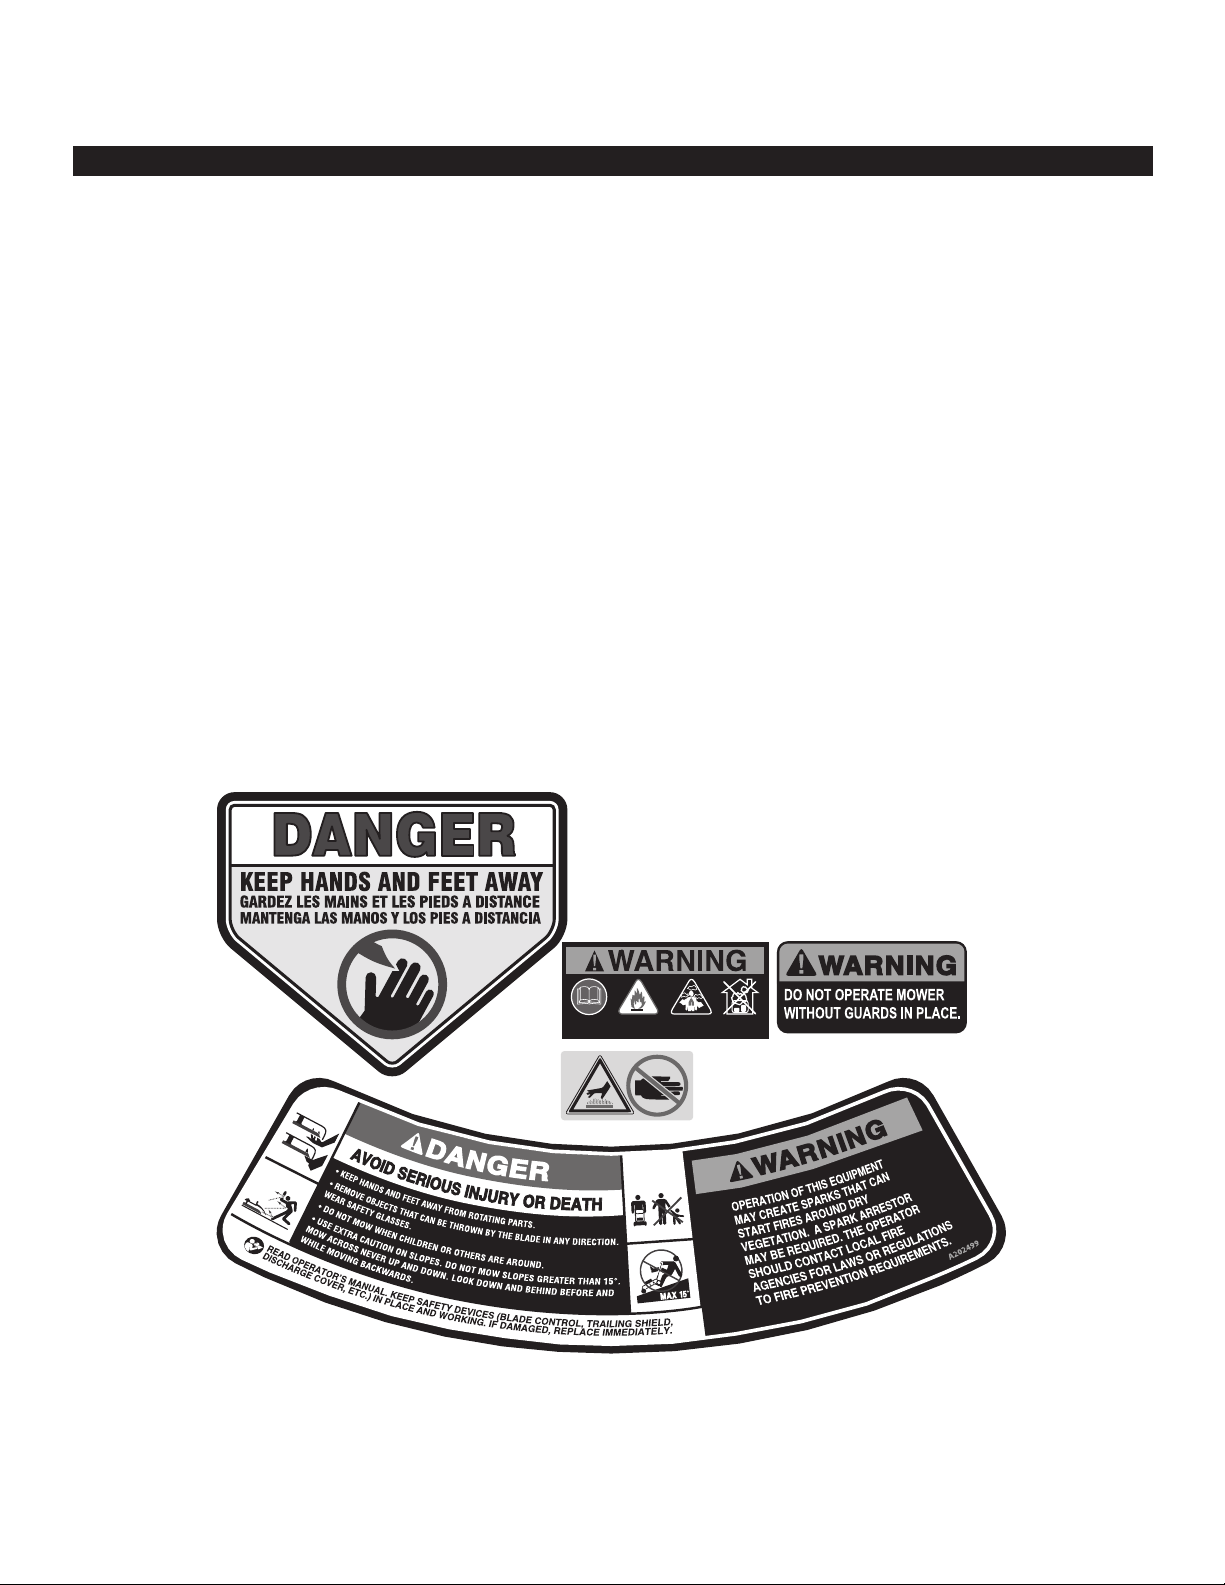
Safety Decals
A202448
A202325
• Gasoline is flammable. Allow engine to cool at least 2 minutes
before refueling.
• Operation of this equipment may create sparks that can start
fires around dry vegetation. A spark arrestor may be required.
The operator should contact local fire agencies for laws or
regulations relating to fire prevention requirements.
Read Userʼs Manual Before Operation
• Save all instructions
This mower has been designed and manufactured to
provide you with the safety and reliability you would expect
from an industry leader in outdoor power equipment manufacturing.
Although reading this manual and the safety instructions it
contains will provide you with the necessary basic knowledge to operated this equipment safely and effectively, we
have placed several safety labels on the mower to remind
you of this important information while you are operating
the unit.
These important safety labels are illustrated below, and are
shown here to help familiarize you with the location and
content to the safety messages you will see as you perform normal mowing operations. Please review these labels now. If you have any questions regarding their meaning or how to comply with these instructions, reread the
complete safety instruction text on the preceding pages, or
contact your local dealer.
Should any of the safety labels become unreadable because of being worn, faded, or otherwise damaged during
the use of your mower, please contact your local authorized dealer to order replacement label.
The safety labels are easily applied, and will act as a constant visual reminder to you and others who may use the
equipment. Following the safety instructions is necessary
for safe, effective operation of your mower.
See “Safety Definitions” section of this manual for
explanations of the safety symbols.
Questions? Call Toll Free at 1-800-737-2112 Copyright © 2016 MAT Engine Technologies, LLC
ENG - 8
Page 9
Assembly
• Save all instructions
NOTE: ALL REFERENCES TO RIGHT OR LEFT SIDE OF THE MOWER ARE FROM THE OPERATOR’S POSITION
BEHIND THE UNIT.
IMPORTANT: THE ASSEMBLY INSTRUCTIONS WERE WRITTEN FOR PERSONS WITH SOME MECHANICAL
ABILITY AND EXPERIENCE. ALL STEPS ARE NOT INCLUDED IN THESE INSTRUCTIONS. PERSONS WITH SOME
MECHANICAL ABILITY ARE FAMILIAR WITH TIGHTENING FASTENERS SO THESE STEPS ARE NOT INCLUDED. DO
NOT ATTEMPT TO ASSEMBLE BEYOND YOUR ABILITY.
If you need assistance or have any questions,
CALL TOLL FREE: 1-800-737-2112.
WARNING
Do not operate the mower if it is damaged or not securely and fully assembled.
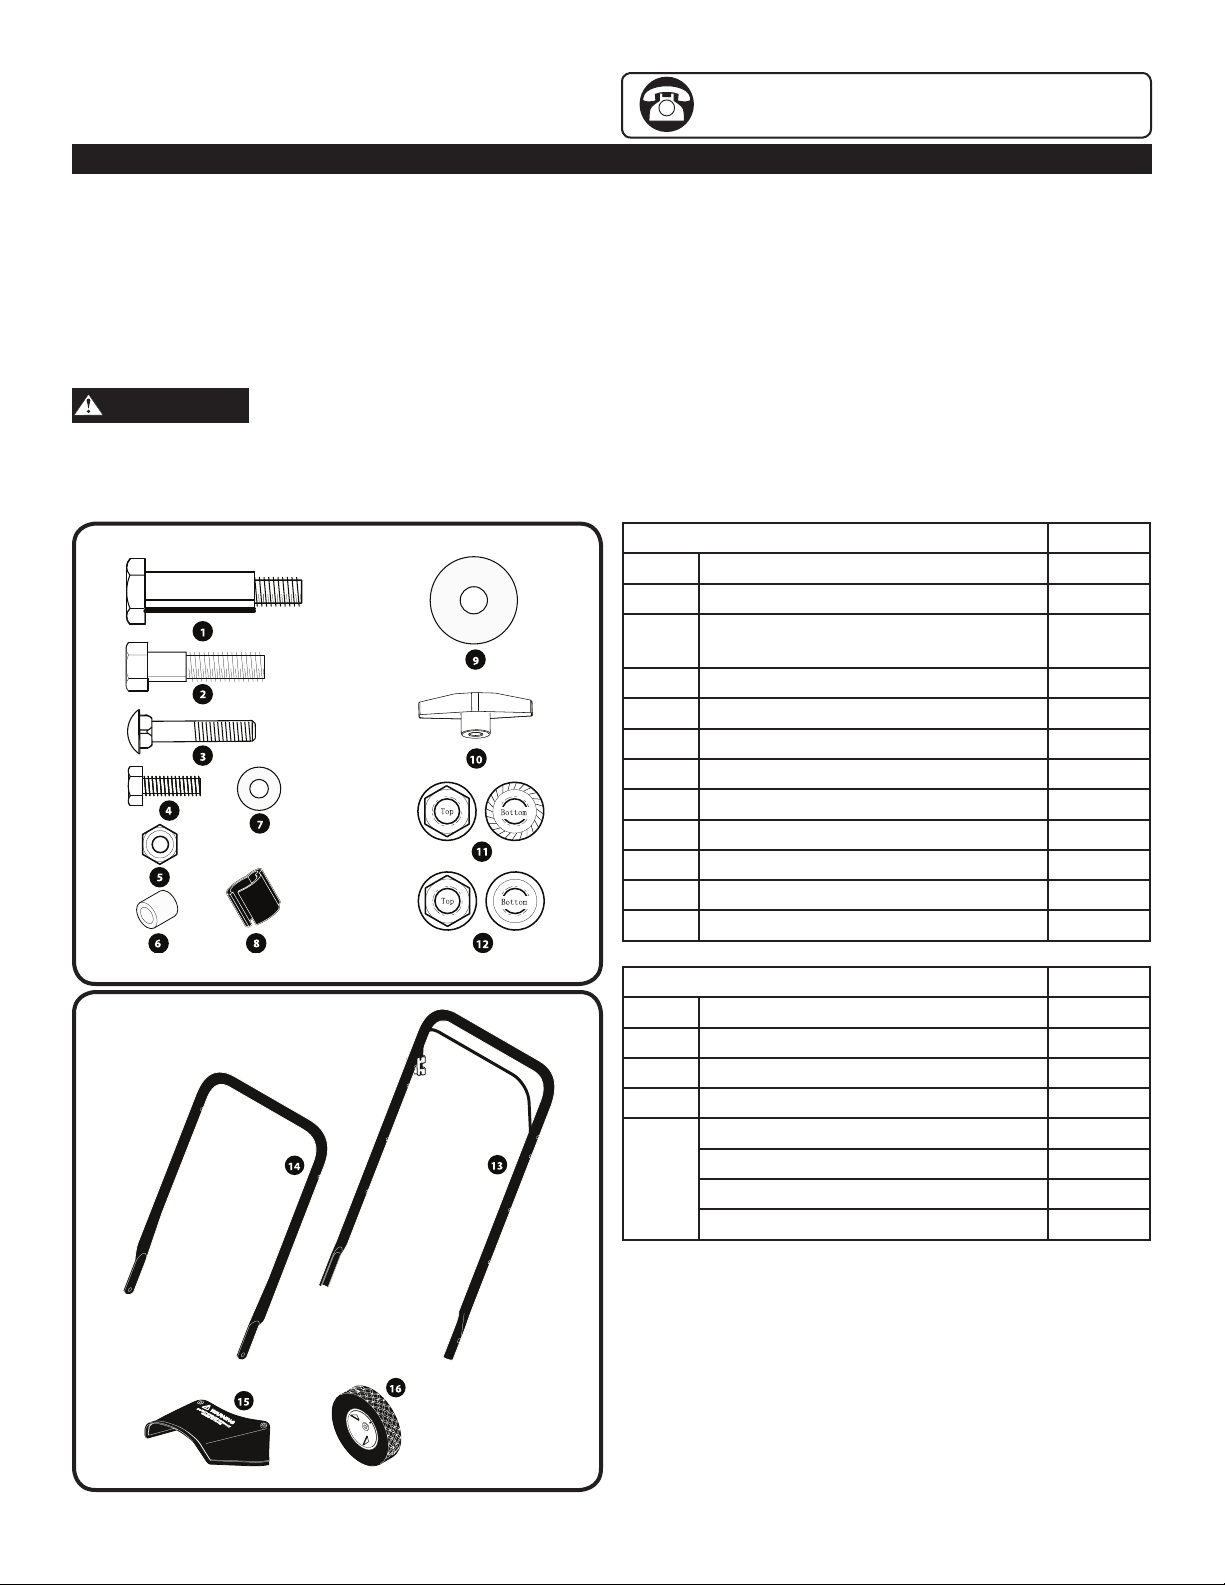
PARTS INCLUDED WITH THE PACKED MOWER
Item in Figure 1 QTY
1 Bolt, Axle - 3/8 in 4
2 Bolt, Hex Head - 3/8-16 X 1 1/2 inch 2
Figure 1
Bolt, Round Head Square Neck - 3/8
3
in
4 Bolt, Hex Head -1/4 in 2
5 Locknut - 1/4 in 2
6 Spacer 2
7 Washer - 1/4 in 2
8 Clip, Cable 1
9 Washer - 3/8 in 6
10 Wingnut, Plastic 2
Nut, Flange (Serrated Bottom) - 3/8 in
11
12 Nut, Flange (Smooth Bottom) - 3/8 in 2
Item in Figure 2 QTY
13 Upper Handle 1
14 Lower Handle 1
15 Discharge Guard 1
16 Wheels 4
Parts Bag 1
not
shown
Operator’s Manual 1
Quick Start Guide 1
4-Stroke Engine Oil 15 oz (450 ml) 1
2
4
Figure 2
Questions? Call Toll Free at 1-800-737-2112 Copyright © 2016 MAT Engine Technologies, LLC
ENG - 9
Page 10
Assembly (Continued)
• Save all instructions
If you need assistance or have any questions,
CALL TOLL FREE: 1-800-737-2112.
NOTICE
COMPLETING THE ASSEMBLY STEPS BELOW.
DURING ASSEMBLY THE ENGINE MAY BE TIPPED
FOR EXTENDED TIMES. OIL CAN DRAIN INTO THE
UPPER PART OF THE ENGINE CAUSING DIFFICULTY IN
STARTING ENGINE.
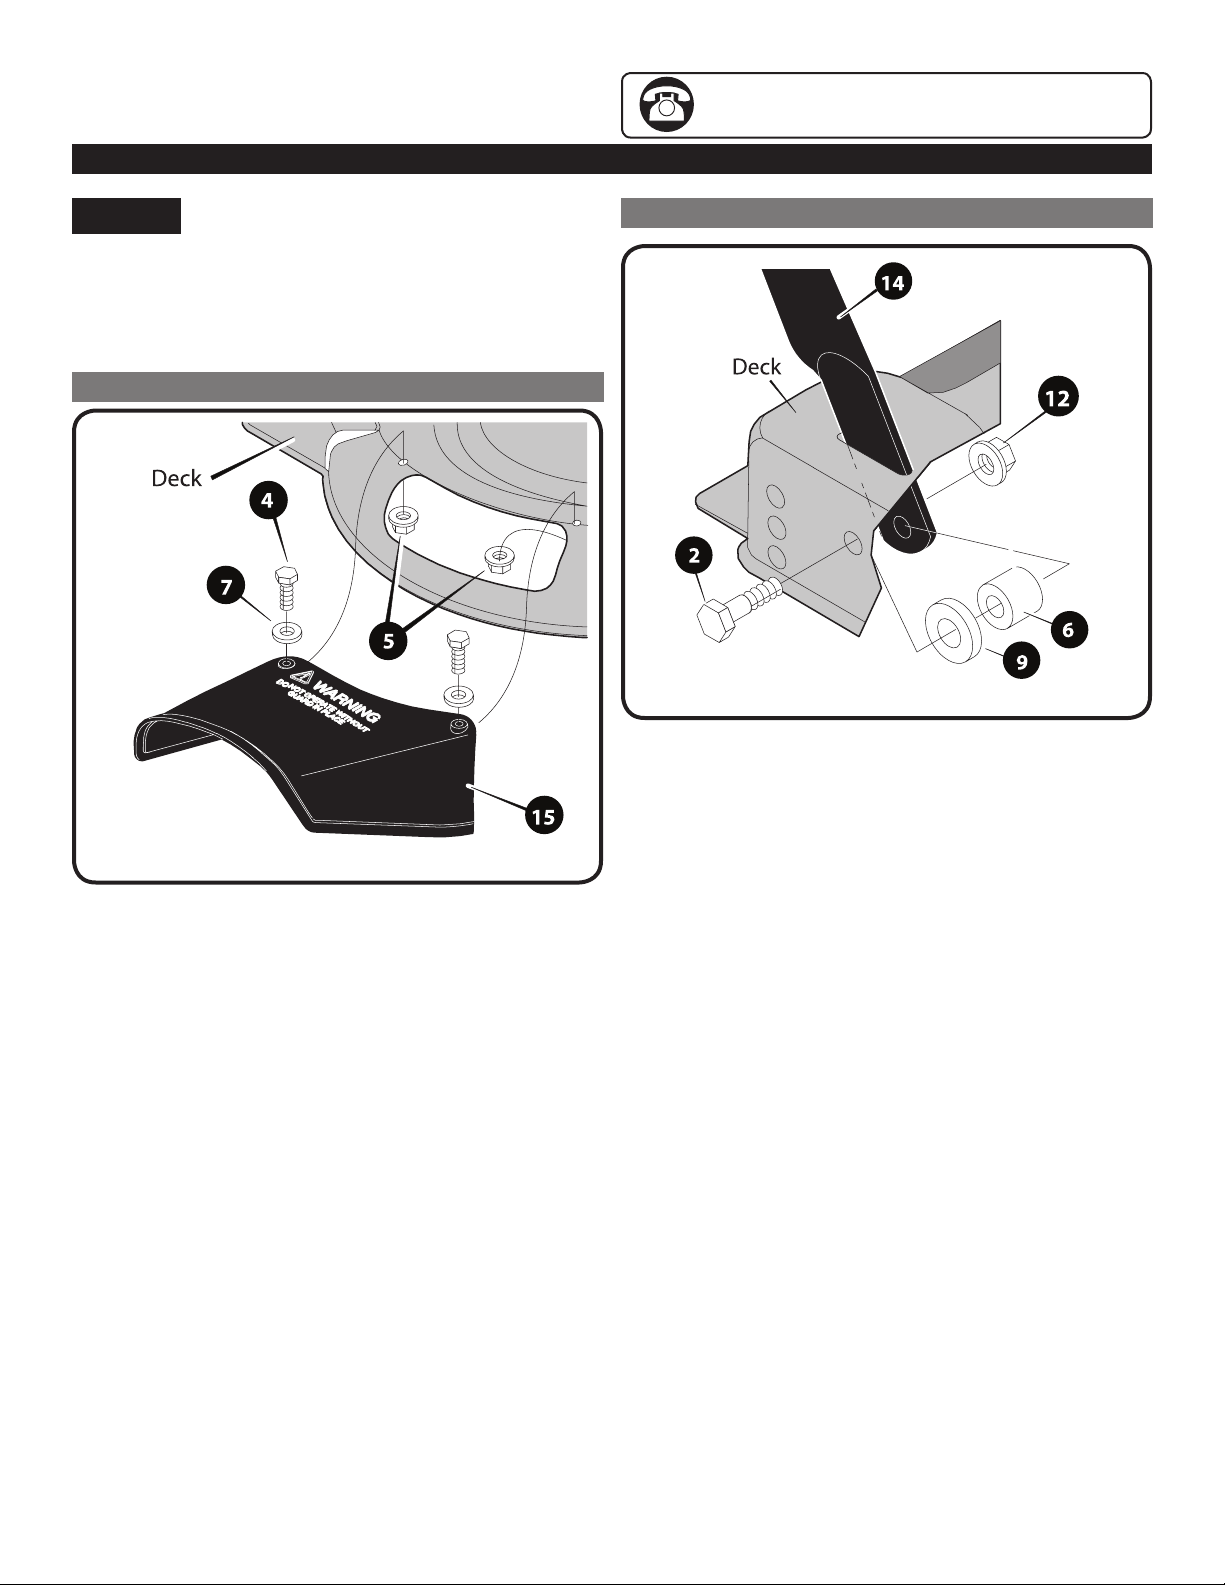
TO ASSEMBLE THE DISCHARGE GUARD
DO NOT ADD ENGINE OIL BEFORE
TO ASSEMBLE THE LOWER HANDLE
Figure 4
Item numbers in assembly instructions and figure correspond
to parts list on page 9.
Figure 3
Item numbers in assembly instructions and figure correspond
to parts list on page 9.
NOTE: Use 7/16 in. wrenches, sockets or adjustable
wrenches to complete the following steps.
1. Holding the holes on the discharge guard (item 15)
aligned with corresponding holes in the mower deck,
insert hex bolts (item 4) through the washer (item 7),
discharge guard (item 15) and through the deck.
2. Secure each bolt with a lock nut (item 5) as shown in
Figure 3.
NOTE: Use 9/16 in. wrenches, sockets or adjustable
wrenches to complete the following steps.
1. Support the rear of the mower deck on a block of
wood or similar support.
2. Insert the lower handle (item 14) into and through the
slots on each side of the rear of the deck, and align
the holes in the deck with the holes in the lower
handle. See Figure 4.
3. On each side of the lower handle and deck, insert
the hex head shoulder bolt through the deck, the
washer (item 9), the spacer (item 6) and through
handle (item 14).
4. Secure the hex head shoulder bolt using the flange
nuts (item 12).
Questions? Call Toll Free at 1-800-737-2112 Copyright © 2016 MAT Engine Technologies, LLC
ENG - 10
Page 11
Assembly (Continued)
• Save all instructions
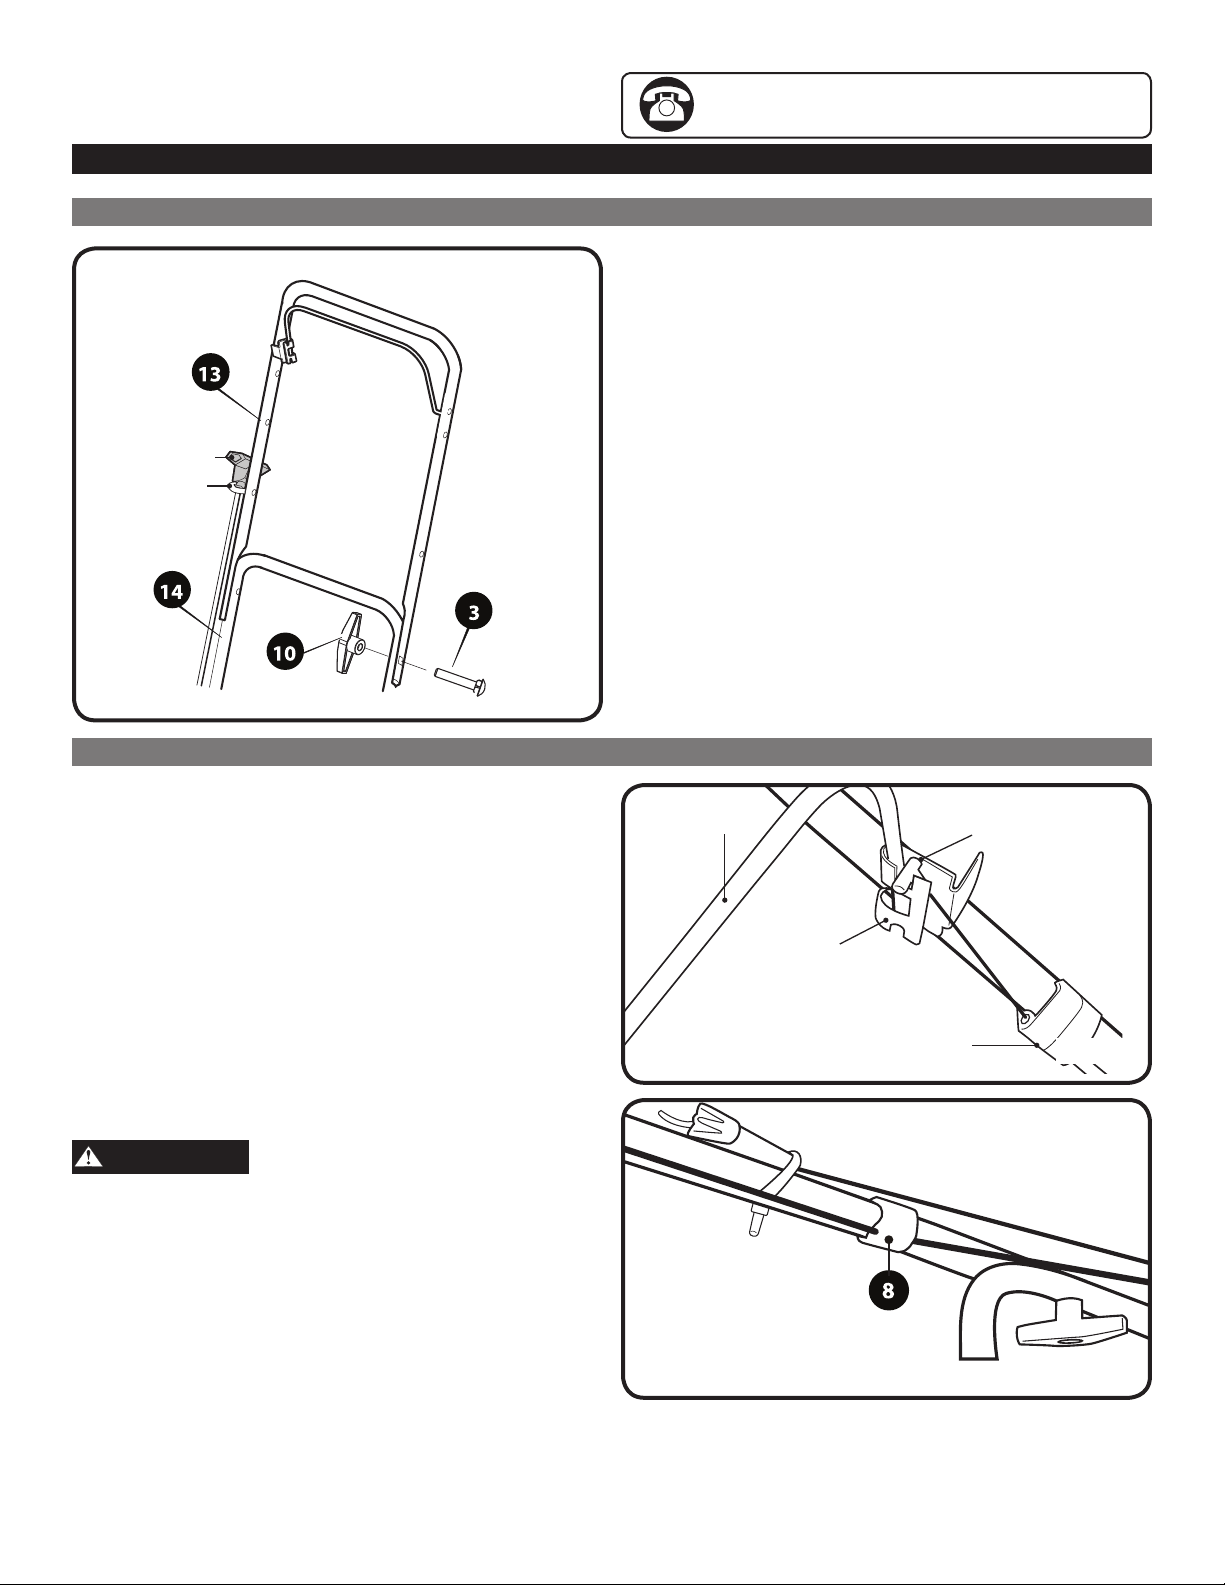
TO ASSEMBLE THE UPPER HANDLE
Recoil Handle
Rope Guide
If you need assistance or have any questions,
CALL TOLL FREE: 1-800-737-2112.
Item numbers in assembly instructions and figure correspond
to parts list on page 9.
1. Place the upper handle (item 13) in position over the
lower handle (item 14). See Figure 5.
2. Insert the round head, square neck bolts (item 3)
through the holes in each side of the upper and lower
handles, and secure with the large wing nuts (item 10).
3. Pull the recoil starter and thread the rope through the
rope guide, as shown in Figure 5.
Figure 5
TO ASSEMBLE THE BLADE CONTROL ASSEMBLY
1. Insert the T-Bar pin into the Bracket as shown in Figure 6.
NOTE: It may be necessary to temporarily remove the
pre-assembled cable clip from the upper handle, to get
enough slack in the cable. Reassemble the clip after the
pin is inserted.
2. Secure the cable to the upper handle with the cable clip
(item 8). See Figure 7.
3. Insert the opposite side (left) end of the blade control
lever into the hole in the upper handle. See Figure 5.
IMPORTANT: After completing these steps, pull the Blade
Control Lever down against the upper handle. This should
actuate the spring loaded brake lever on the engine. The
Blade Control Lever should spring back to the upper position when released.
WARNING
The Blade Control Assembly is required to be able to stop
the engine and brake the blade. Never run the lawn mower
without the Blade Control Assembly correctly assembled.
Blade Control
Lever
Bracket
T-Bar Pin
Pre-assembled
Cable Clip
Figure 6
Figure 7
Questions? Call Toll Free at 1-800-737-2112 Copyright © 2016 MAT Engine Technologies, LLC
ENG - 11
Page 12
Assembly (Continued)
• Save all instructions
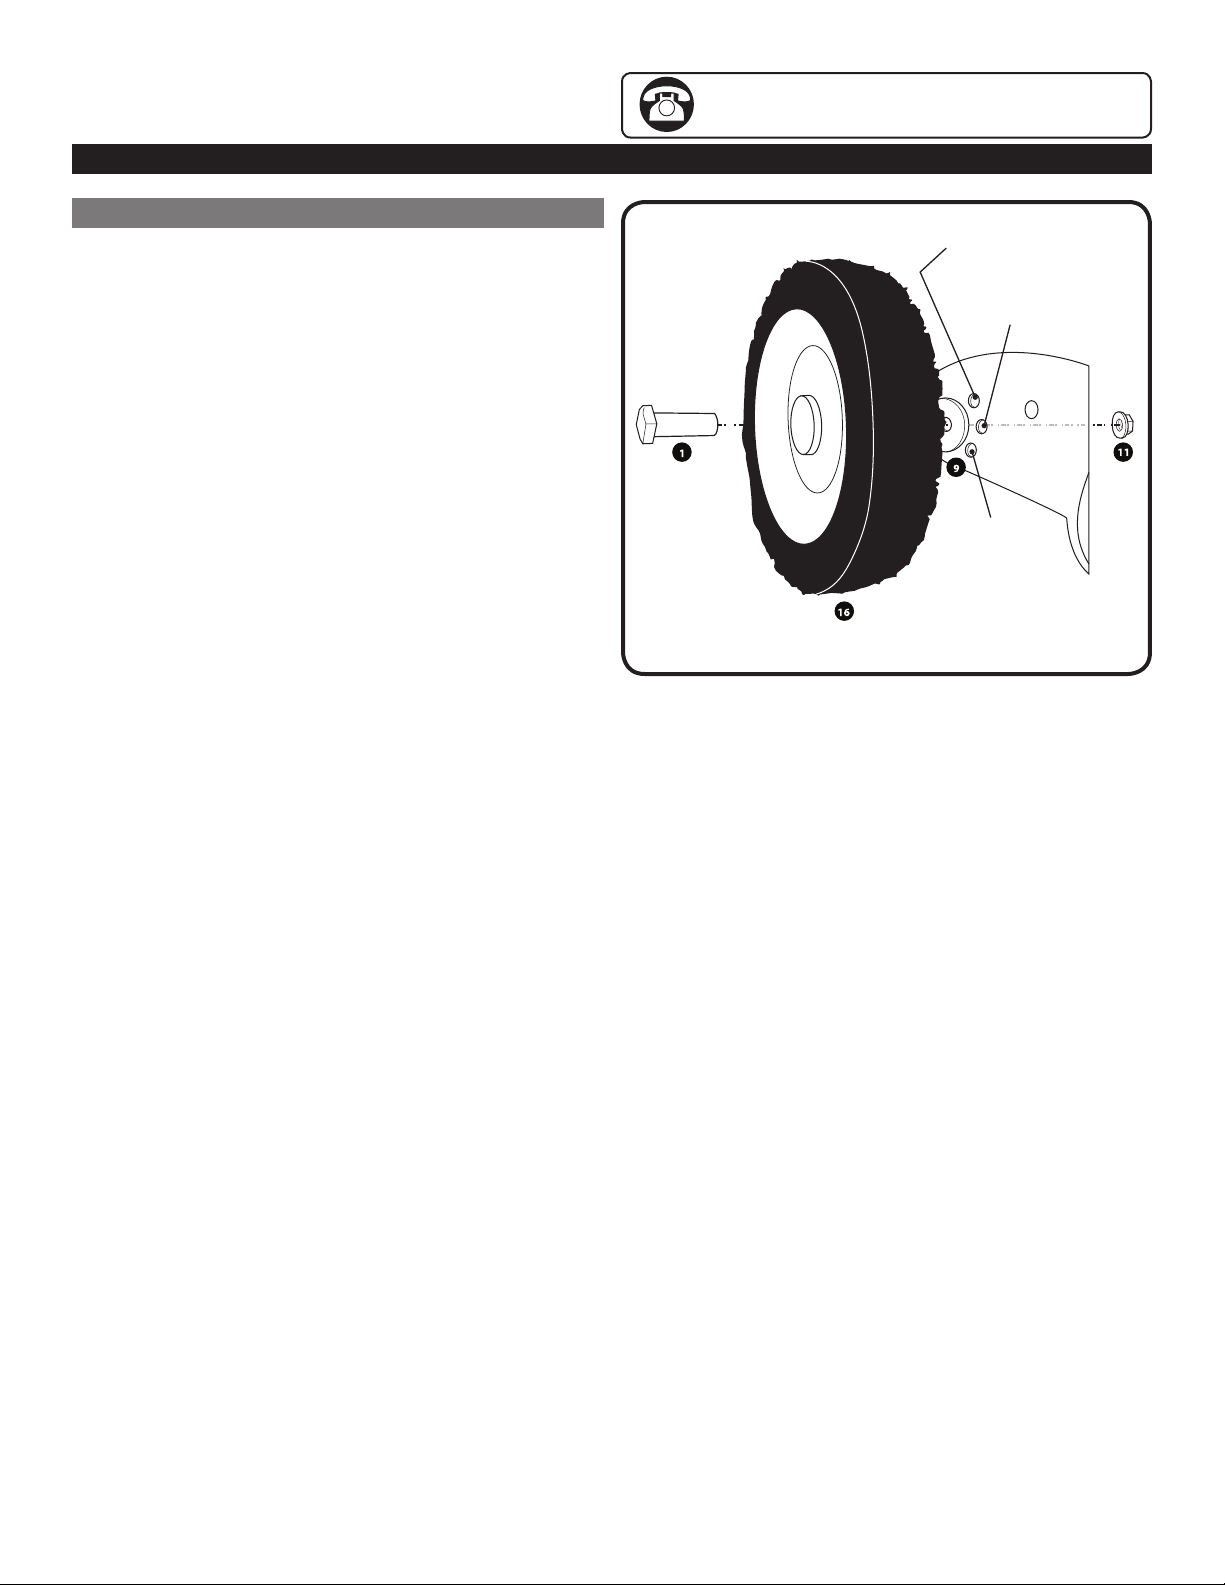
TO ASSEMBLE THE WHEELS (See Figure 8)
IMPORTANT: Before assembling the wheels, consider your
lawn and decide which available cutting height is best for
your lawn. For best results, never cut off more than onethird of the total length of the grass.
NOTE: Use 3/4 and 9/16 in. wrenches, sockets or adjustable wrenches to complete the following steps.
If you need assistance or have any questions,
CALL TOLL FREE: 1-800-737-2112.
Hole for 2.25”
cutting height
Hole for 2.88”
cutting height
Each corner of the mower deck has a group of 3 vertical
holes representing the 3 possible cutting height settings.
The cutting height is fixed and adjusted with the choice of
hole the wheels are assembled. Make sure to assemble
the wheels in the same choice of hole for each corner of
the deck.
Hole for 3.5”
cutting height
Figure 8
Item numbers in assembly instructions and figure correspond
to parts list on page 9.
1. Secure each wheel to the deck by inserting the
axle bolt (item 1) into and through the wheel (item 16),
washer (item 9), and hole in the deck. Secure with
flange nut (item 11).
a. To adjust the cutting height, disassemble each wheel
and re-assemble to your new choice of hole location /
cutting height.
NOTE: Make sure all four (4) wheels are assembled in the
same wheel height position.
Questions? Call Toll Free at 1-800-737-2112 Copyright © 2016 MAT Engine Technologies, LLC
ENG - 12
Page 13
Operation
• Save all instructions
BEFORE STARTING ENGINE
NOTICE
Your mower’s engine is shipped from the factory without
engine oil. A bottle of engine oil (15 fluid oz.) is included
with your mower’s packaging. Check oil level before starting
engine. If you start the engine without oil, the engine will be
damaged beyond repair and will void your warranty.
Checking and Adding Engine Oil
Types of Oil to Use
Use high detergent motor oil having an API service classification of SG, SH, SJ or higher. Choose motor oil viscosity
according to Fig. 15. For most range of service temperatures, 10-30 viscosity oil is recommended.
NOTICE
Use of non-detergent oil or 2-stroke engine oil may damage
the engine and void your warranty.
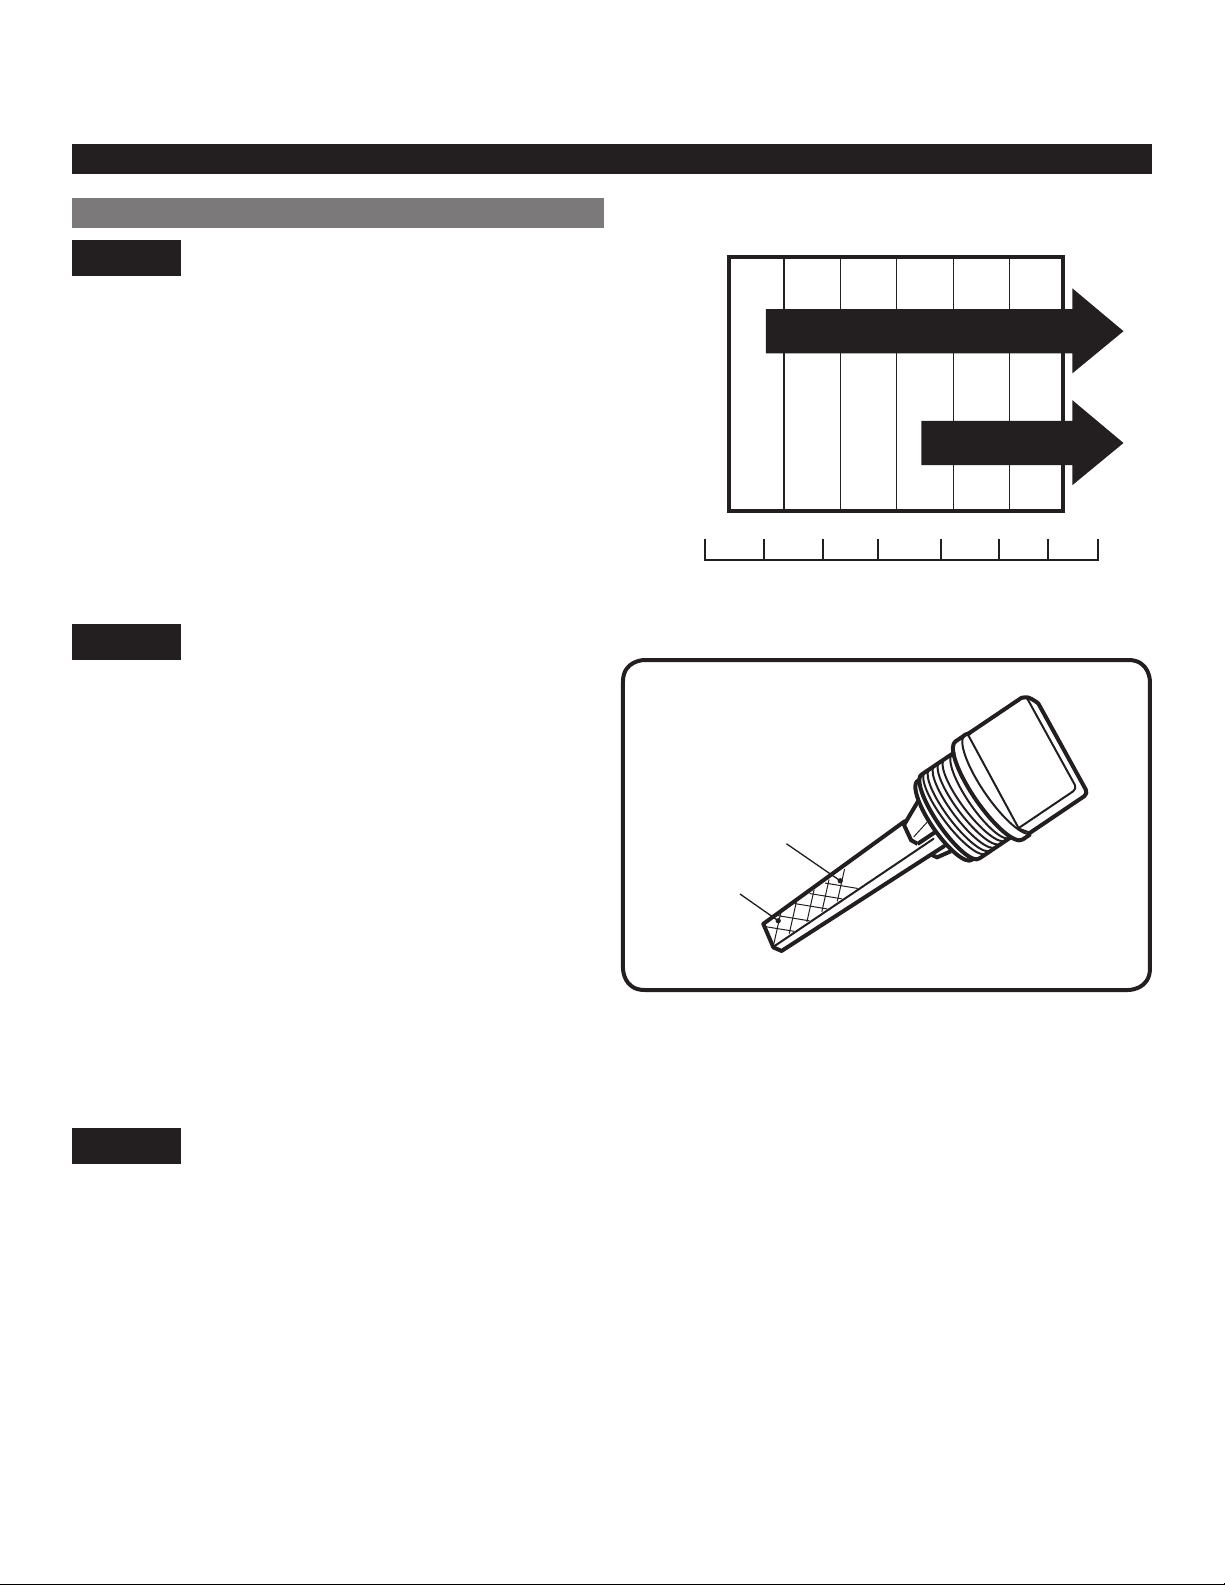
1. Check oil level each time before starting engine.
Check oil level daily or every eight (8) hours of
operation. Keep oil level at UPPER LEVEL on dipstick
(See Figure 9).
2. Always check oil level with engine cool and mower on
flat, level surface.
3. Clean around oil fill spout, remove dipstick and wipe
clean with a cloth.
4. Replace dipstick – without tightening. Make sure
dipstick is fully inserted into oil fill spout. Remove and
check oil level.
5. Oil level should be at UPPER LEVEL on dipstick. See
Figure 9.
6. If oil is needed, add oil slowly through the oil fill
spout and recheck. Do not overfill.
Figure 15
Recommended oil viscosity for ambient service temperatures.
SAE
SAE 10W-30
SAE 30
TEMP
Lower Limit
-20
Upper Limit
20
40
-20-30 -1000
Ambient Service Temperature
60 80
2010
100° F
30
Figure 9
40° C
NOTICE
Overfilling with oil may cause hard starting, spark plug fouling,
and engine smoking.
Questions? Call Toll Free at 1-800-737-2112 Copyright © 2016 MAT Engine Technologies, LLC
ENG - 13
Page 14
Primer Bulb
Push 3
Times
Operation (Continued)
• Save all instructions
BEFORE STARTING ENGINE
Filling the Fuel Tank
DANGER
To avoid personal injury or property damage, use extreme care when handling gasoline. Gasoline is extremely flammable and
the vapors are explosive. Do not smoke or allow smoking near fuel or the mower. Extinguish all cigarettes, cigars, pipes and
other sources of ignition. Never refuel the mower indoors. Refuel outdoors WHERE THERE ARE NO SPARKS OR FLAMES. Never
remove the fuel cap or add fuel with the engine running. Always stop engine and allow to cool before removing fuel cap.
Remove fuel cap slowly. Never overfill fuel tank. Avoid spilling fuel or oil. Wipe up all fuel spills.
Use fresh, clean regular unleaded gasoline with a minimum 87 octane. Fresh fuel prevents buildup of varnish and gum
in the carburetor and fuel system. Commonly available fuel additives which reduce varnish and gum in your engine’s
fuel system can be added according to the manufacturer’s instructions. Do not use gasoline which contains methanol.
Do not mix oil with gasoline.
1. Remove cap slowly. Fill tank to approximately 1-1/2 inches below the top of the filler neck to allow for fuel
expansion. Never overfill fuel tank.
2. After refueling, replace fuel cap and tighten securely.
3. If fuel is spilled on clothing, change clothing immediately.
4. Move at least 10 feet (3 meters) away from fueling site before starting engine.
STARTING THE ENGINE
DANGER
Never start or run the mower inside a closed room or building; breathing exhaust fumes can kill. Do not put hands or feet
near or under the mower. Keep clear of the discharge opening
at all times. Keep children and bystanders away when starting
the engine and out of the mowing area.
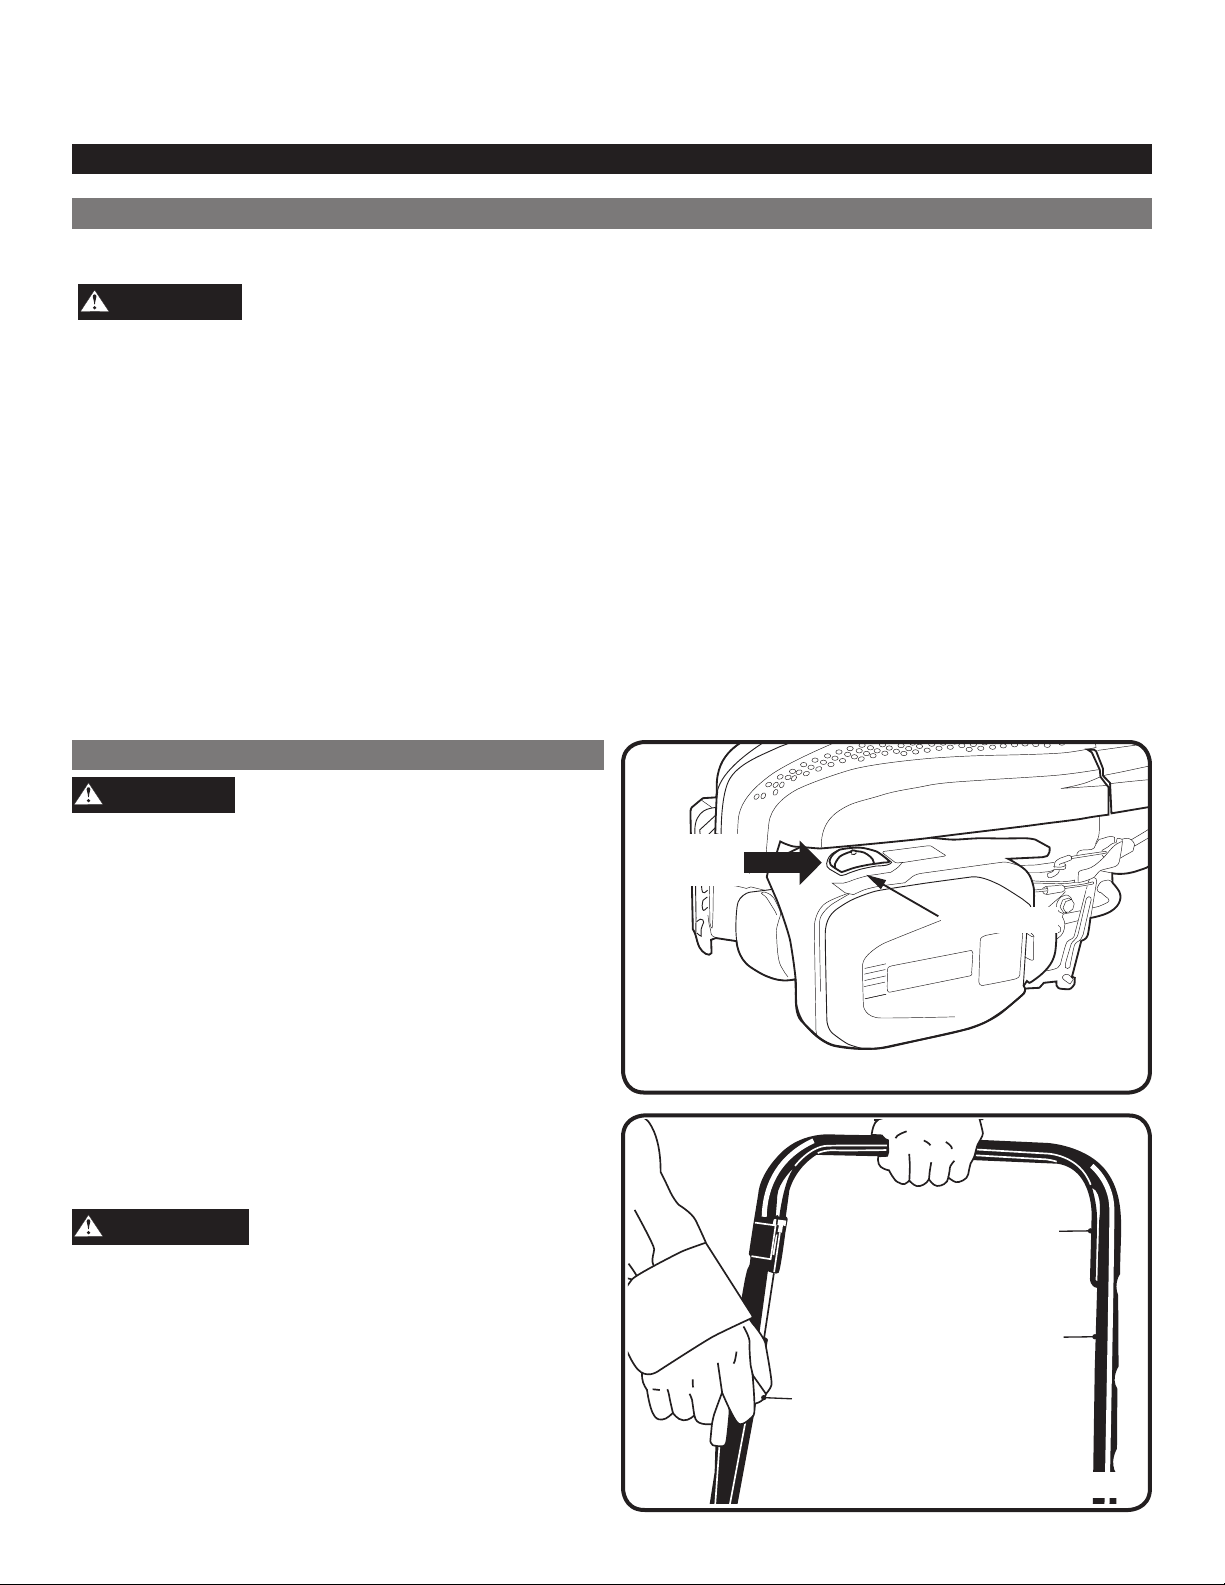
1. Push the primer slowly three times – waiting about 2
seconds between each push (see fig. 10a) When tem peratures are below 55ºF, press primer five times.
When restarting a warm engine, do not use the primer.
2. Stand behind the mower handle, grasp the blade control
lever – holding it firmly against the upper handle. See
fig. 10b.
3. Grasp the starter rope handle and pull slowly until
resistance is felt, then pull rapidly to start engine.
WARNING
Rapid retraction of the starter rope (kickback) may pull your
hand and arm back toward the engine faster than you can let
go. Kickback is typically caused by improper ignition timing. If
kickback is evident, have the engine examined and repaired by
an authorized Service Dealer.
4. Slowly return starter rope handle to the starter rope
guide and release.
IMPORTANT: To avoid damage to the engine’s starter, do not
allow the starter rope to snap back against the rope guide.
Figure 10a
Blade Control Lever
Upper Handle
Recoil Handle Starter
Figure 10b
Questions? Call Toll Free at 1-800-737-2112 Copyright © 2016 MAT Engine Technologies, LLC
ENG - 14
Page 15

Operation (Continued)
• Save all instructions
STOPPING THE ENGINE AND BLADE
WARNING
Wait for the blade to come to a complete stop before
attempting to perform any work on the mower.
1. Release blade control lever to stop the engine and the
blade.
ADJUSTING CUTTING HEIGHT
Reassemble the wheels in the desired wheel height position. Refer to the “To assemble the wheels” section in the
assembly portion of the manual
MOWING TIPS
Thoroughly inspect the area where the mower is to be
used and remove all foreign objects such as rocks, wire,
toys, etc.
WARNING
This mower can throw small objects at high speed causing
personal injury or property damage.
CAUTION
If you strike a foreign object or if the mower starts to vibrate
abnormally, stop the engine. Remove spark plug boot from the
spark plug, thoroughly inspect the mower for any damage, and
repair the damage before restarting and operating the mower.
Vibration is generally a warning of trouble.
For best results:
a) Do not cut wet grass
b) Never cut off more than one-third of the total length of
the grass.
c) Plan ahead and use a mowing path in a counterclock
wise direction that discharges the new grass clippings
away from the remaining area to mow.
d) Adjust your mowing speed to the condition of the lawn.
Do not force mower. It will do the job better, last longer
and with less likelihood of a risk of injury at the rate for
which it was designed.
e) New grass, thick grass or wet grass may require you to
use less than the mower’s full advertised cutting width.
f) When mowing very tall grass, adjust the mower height
to its highest setting and make a first cut. Adjust mower
to the desired height for a second cut.
Questions? Call Toll Free at 1-800-737-2112 Copyright © 2016 MAT Engine Technologies, LLC
ENG - 15
Page 16
Routine Maintenance
• Save all instructions
WARNING
Disconnect the spark plug before performing maintenance.
Maintain the mower with care. Inspect the mower periodically. If the mower is not working properly or damaged,
have it repaired by a qualified service center. Do not
change engine governor setting or overspeed the engine.
Do not remove or modify any parts. Removing or modifying parts could lead to injury, damage the mower and will
void the warranty. Use only genuine Powermate® replacement parts and accessories. Use of any non-Powermate®
parts or accessories could lead to injury, damage to the
unit, and void your warranty.
GENERAL MOWER CARE
1. After each use, remove any grass clippings or debris
from the top of the mower deck and engine area with a
brush or lawn and garden blower.
2. Periodically clean underside of the mower deck to pre
vent buildup of grass clippings, etc.
a) Before cleaning the underside of the deck, always
drain the fuel tank by running the engine till the tank
is empty. Disconnect the spark plug wire before
performing this or any other maintenance.
b) Tip the mower to expose the underside of the
mowing deck.
NOTICE
Always tip the mower so it is resting on the side of the deck
and the air filter side of the engine is facing up. Make sure the
lawn mower is resting in a stable position before beginning to
clean the deck. Never tip the mower more than 90 degrees in
any direction and do not leave the mower tipped for extended
periods of time. Oil can drain into the top part of the engine
and cause starting problems.
c) Scrape excess grass clippings with an appropriate
tool. Do not spray deck with water.
3. Using a light lubricating oil:
a) lubricate pivot points on the blade control lever at
least once each season.
b) lubricate the wheels at least once each season.
Replace when necessary.
a. Before tipping the mower to inspect the blade area,
always drain the fuel tank by running the engine until
the tank is empty. Disconnect the spark plug wire
before performing this or any other maintenance.
b. Tip the mower to expose the underside of the
mowing deck.
To remove / replace the blade:
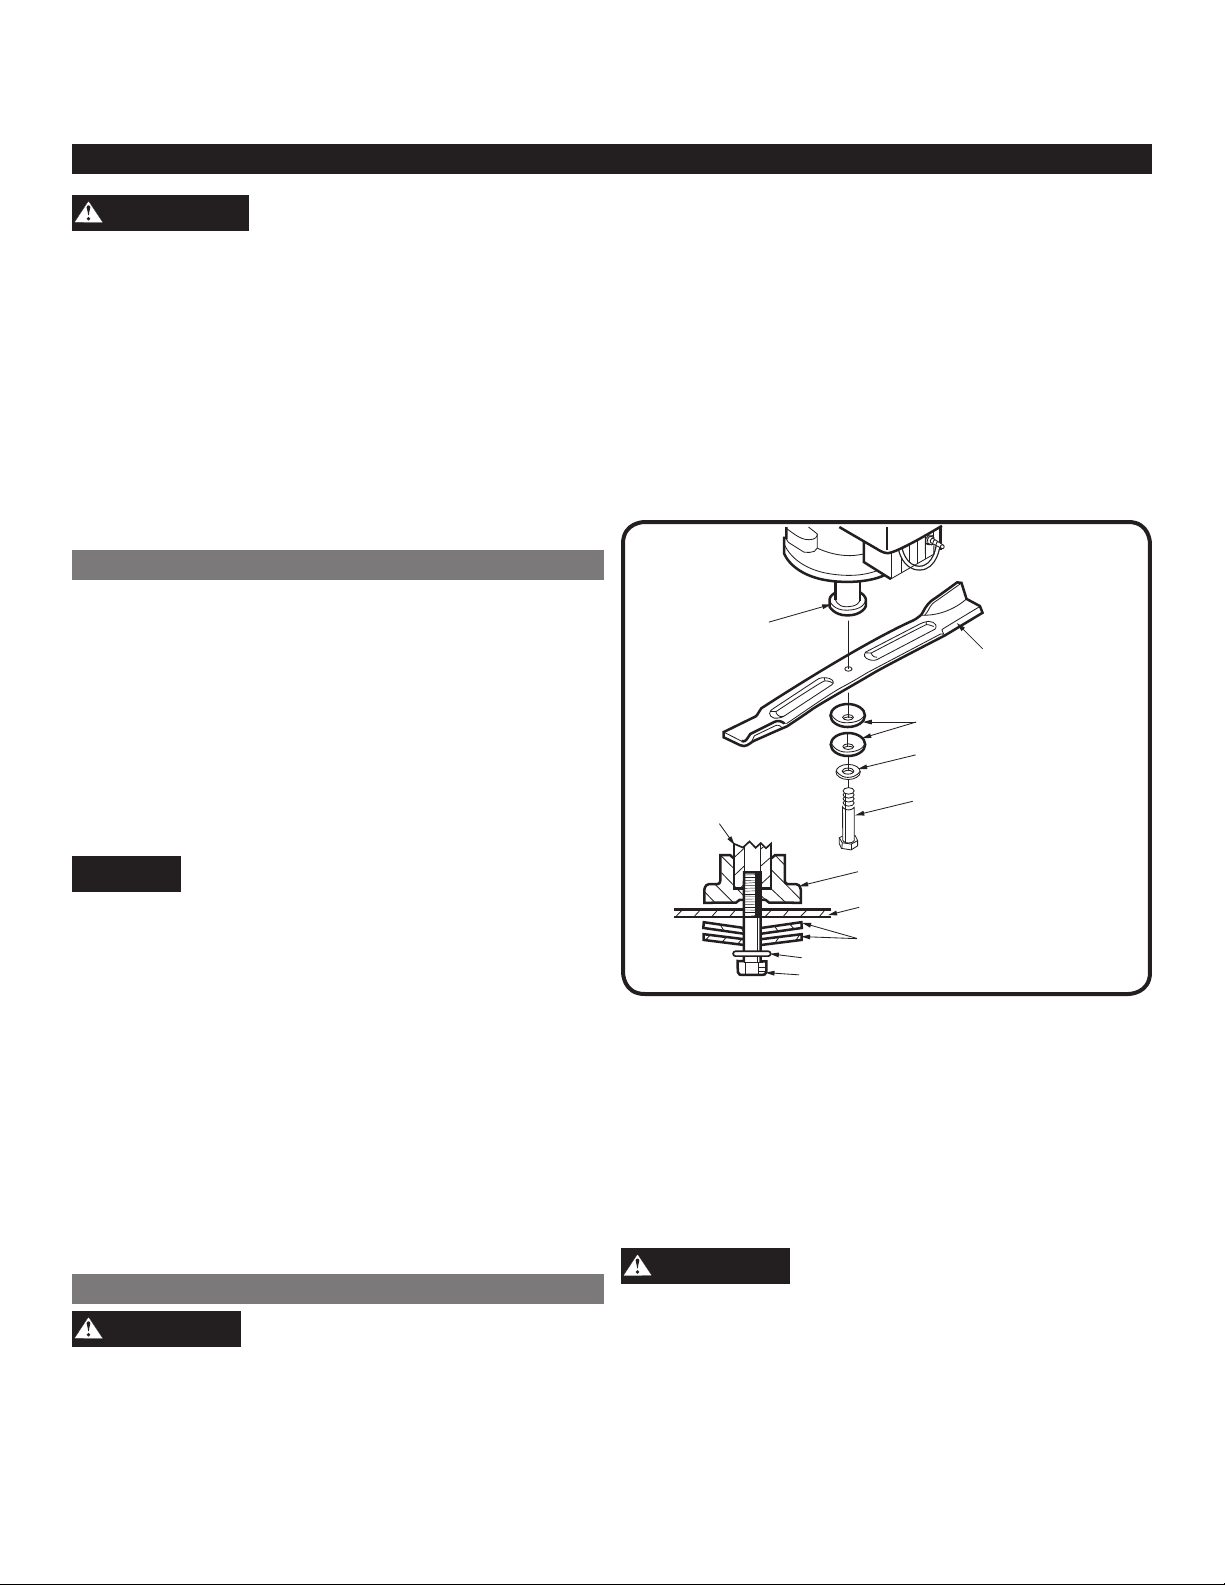
1. Remove the bolt and the washers holding the blade and
the blade adapter to the engine crankshaft.
See Figure 11
Blade Adapter
Blade
Disk Spring Washer
Flat Washer
Crankshaft
Blade Adapter
Blade
Disk Spring Washer
Flat Washer
Bolt
2. Remove blade and adapter from the crankshaft.
3. The blade can be sharpened with a file or on a grinding
wheel. Do not attempt to sharpen the blade while it is
still on the mower. When sharpening the blade, follow
the original angle of grind. Grind each cutting edge
equally to keep the blade balanced. To check for blade
balance, place blade on a round shaft screwdriver.
Remove blade material from the heavy side until it
balances evenly.
Bolt
Figure 11
CAUTION
BLADE CARE
CAUTION
Use extra care when servicing mower blades. Blades are
sharp. To protect your hands, wrap the blade or wear gloves
when handling.
1. Periodically inspect the blade and blade adapter for
wear or damage, especially if you strike a foreign object.
Questions? Call Toll Free at 1-800-737-2112 Copyright © 2016 MAT Engine Technologies, LLC
An unbalanced blade will cause excessive vibration when
rotating at high speeds. It may cause damage to mower and
could break causing personal injury.
4. Lubricate the engine crankshaft and the inner surface
of the blade adapter with light oil. Slide the blade
adapter onto the engine crankshaft.
ENG - 16
Page 17

Routine Maintenance (Continued)
• Save all instructions
5. Position the blade onto the blade adapter in the correct orientation. On each end of the blade, a blade “lift” portion
lies on the opposite side of the blade from the sharpened edge. When positioning the blade onto the blade adapter,
make sure the blade “lift” portion is facing towards the mower deck. See Figure 11.
6. Assemble the retaining bolt through the flat washer, (2) disc spring washers, blade, and blade adapter. Make sure the
flat washer and (2) disc spring washers are in the proper order and orientation shown in fig. 11.
7. Tighten the retaining bolt to 30 – 37 ft –lbs (40-50 N-m).
8. To ensure safe operation of your mower, periodically check the blade bolt for correct torque
ENGINE CARE
A list of key engine maintenance items required for good performance by the mower is given below.
Service Item Each Use First 5 to 8
hours
Check Engine Oil √
Change Engine Oil √ √
Check Air Filter √
Service Air Filter √
Check Spark Plug √
Service Spark Plug √
Clean Around Muffler √
Every Season or
25 hours
Every Season or
50 hours
Every Season or
100 hours
Service Date
Record
1. Check engine oil level before each use and maintain oil level to the full mark on the dipstick. See section titled
“Checking and Adding Engine Oil” on page 13.
2. Service air filter every 25 hours under normal conditions. Clean every few hours under extremely dusty
conditions. Poor engine performance and flooding usually indicates that the air cleaner should be serviced.
Never run the engine without an air filter installed. Running the engine without the filter can cause excessive
engine wear and damage.
3. Clean engine regularly with a cloth or brush. Keep the top of the engine free of debris to permit proper air
circulation. Remove all grass, dirt and combustible material from muffler area.
Questions? Call Toll Free at 1-800-737-2112 Copyright © 2016 MAT Engine Technologies, LLC
ENG - 17
Page 18
Routine Maintenance (Continued)
• Save all instructions
TO SERVICE THE AIR FILTER
A dirty air filter will restrict air intake. Periodic maintenance
of the air filter will help improve engine performance and
reduce emissions.
WARNING
Never clean air filter with gasoline or an easy ignited solvent because it may create a fire hazard.
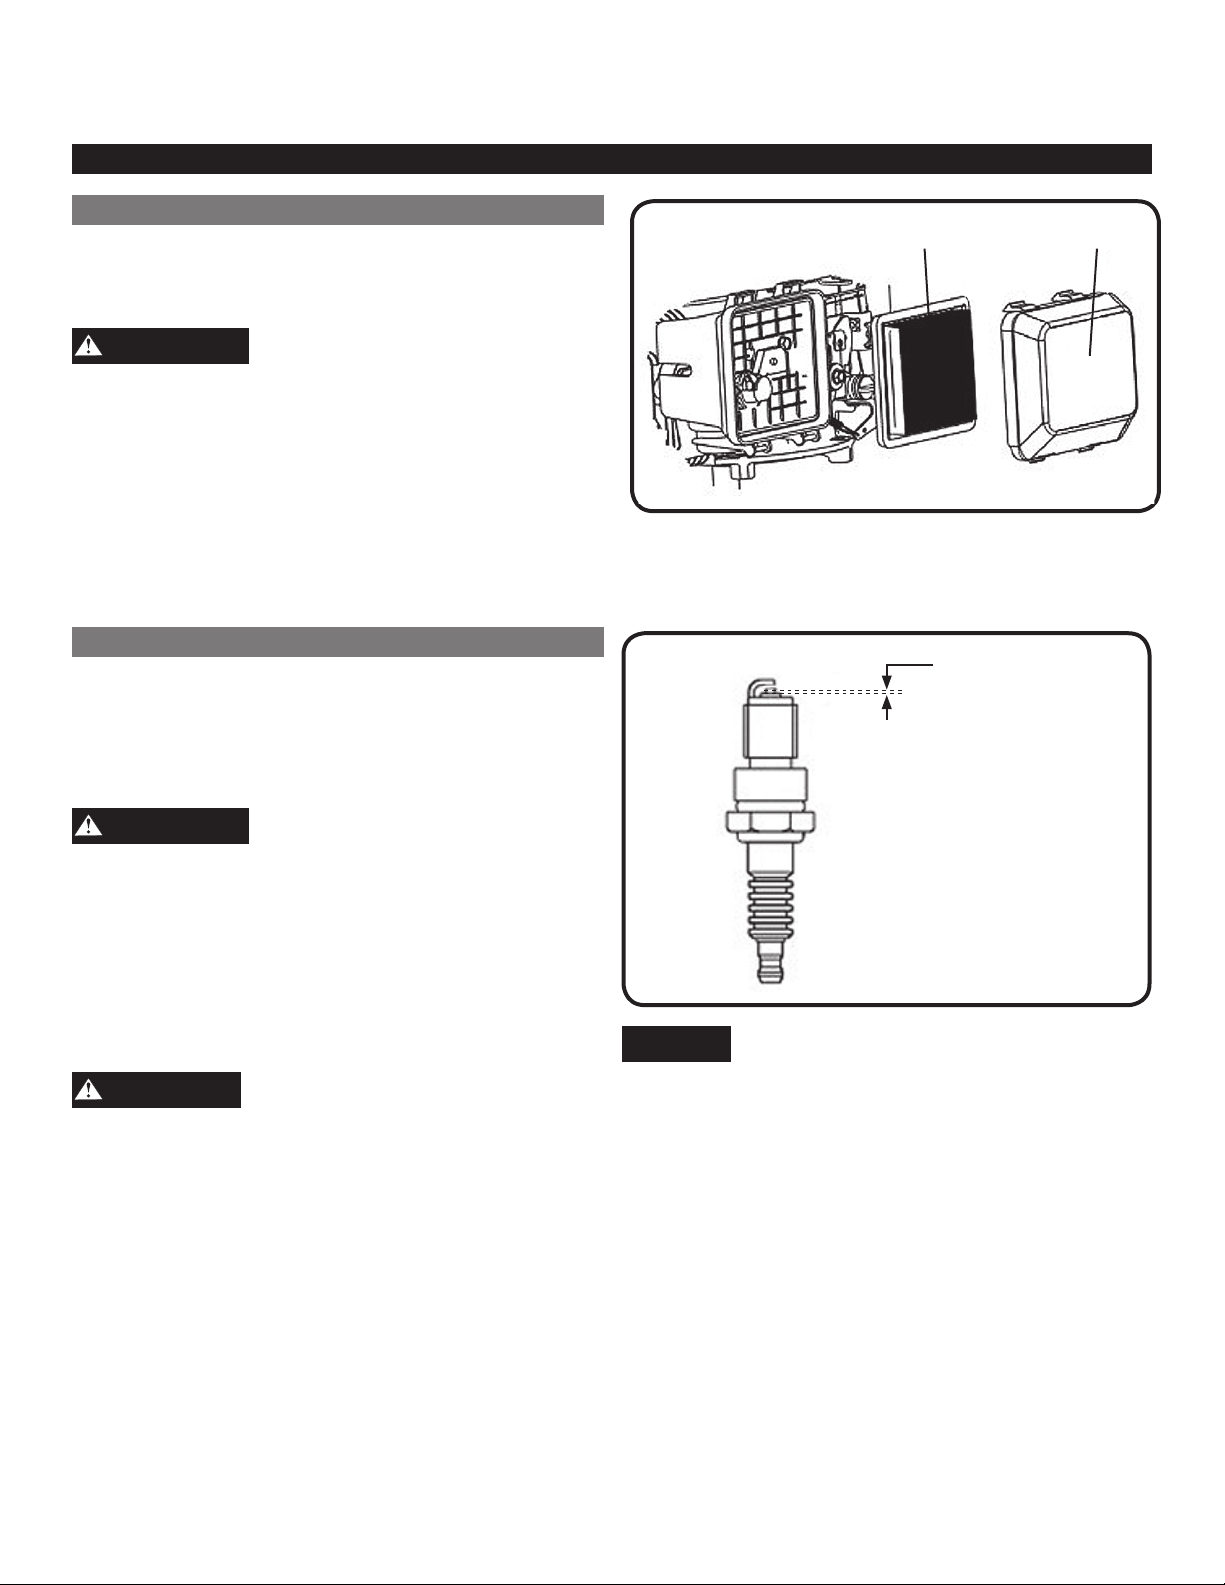
1. Remove the air filter cover, and carefully remove the
filter element. (See Figure 12)
2. Clean all parts. Clean filter element by gently tapping it
on a flat surface. Replace if very dirty
3. Reinstall the filter element and air filter cover.
TO SERVICE THE SPARK PLUG
1. Clean the spark plug and reset the gap once a season.
Spark plug replacement is recommended at the start of
each mowing season. See “PRODUCT
SPECIFICATIONS” on page 6 for correct plug type and
gap specifications.
Filter Element Air Filter Cover
Figure 12
0.028 - 0.031 in.
0.7 - 0.8 mm
WARNING
Do not check for spark with spark plug removed. Do not crank
engine with spark plug removed.
For good engine operation, the spark plug must be free of
deposits or excessive electrode wear.
2. Remove the spark plug wire and remove spark plug with
a spark plug wrench.
CAUTION
If the engine has been running, the muffler will be very hot. Be
careful not to touch the muffler.
3. Visually inspect the spark plug. Discard the spark plug
if there is apparent wear, or if the insulator is cracked or
chipped. Clean the spark plug with a wire brush if it is to
be reused.
4. Measure the spark plug gap with a feeler gauge. Adjust
plug gap as required by bending electrode. See Figure 13
5. Reinstall the spark plug – starting by hand to prevent
cross-threading.
6. After the spark plug is seated, tighten with a spark plug
wrench an additional ¼ turn (18 ft-lbs)
Figure 13
NOTICE
The spark plug must be securely tightened. An improperly
tightened spark plug can become very hot and may damage the engine.
Questions? Call Toll Free at 1-800-737-2112 Copyright © 2016 MAT Engine Technologies, LLC
ENG - 18
Page 19
Routine Maintenance (Continued)
• Save all instructions
TO CHANGE THE OIL
1. Change engine oil after every season or 50 hours of
operation.
2. Drain the fuel tank by running the engine till tank is
empty.
Figure 14
STORAGE
Mowers stored over 30 days need to be drained of fuel to
prevent deterioration and gum from forming in the engines
fuel system. If the gasoline in your engine deteriorates
during storage, you may need to have the carburetor,
and other fuel system components, serviced or replaced.
Commonly available fuel additives which reduce varnish and gum in your engine’s fuel system can be added
according to the manufacturer’s instructions.
1. Remove all fuel from tank by running engine until it
stops from lack of fuel.
2. Change oil. See the section “ To Change the Oil”.
3. Remove spark plug and pour about 1/2 an ounce of
engine oil into cylinder. Replace spark plug and slowly
pull the starter rope several times to distribute oil.
4. Clean grass and debris from around engine, and under,
around and behind muffler.
5. Store in a clean, dry and well ventilated area away from
water heaters, electric motors or switches, furnaces, or
where power tools are operated.
6. Keep the engine level in storage. Tilting can cause fuel
or oil leakage.
3. Clean around oil fill spout, remove dipstick.
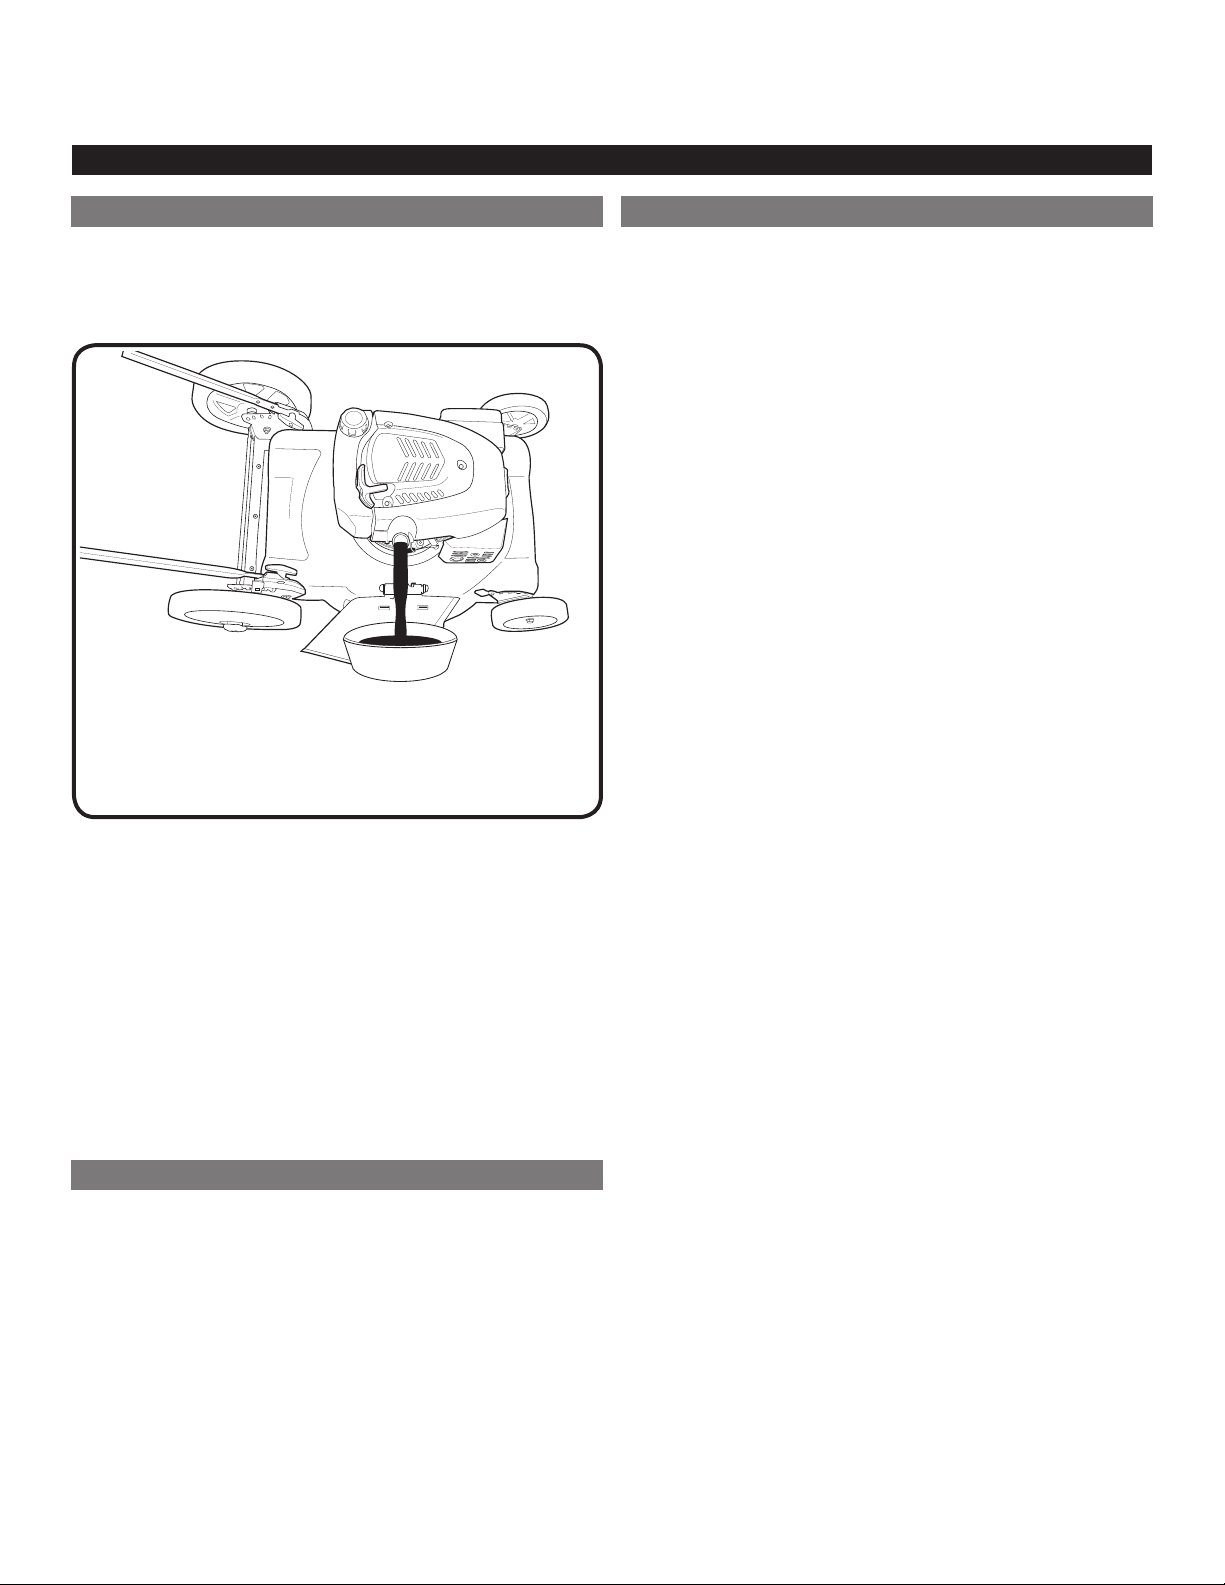
4. Place a suitable container next to mower to catch the
used oil, and then tilt the mower on its right side. The
used oil will drain through the filler neck. Allow oil to
drain completely. See Figure 14.
NOTE: Oil will drain more freely when warm.
IMPORTANT: Used oil is hazardous waste. Place oil in a
sealed container and take to your local recycling center.
Do NOT discard with household waste.
5. Refill engine with oil. Pour slowly. Do not overfill. See
“Checking and Adding Engine Oil” on page 13.
COMMON REPAIR PARTS
1. Air Filter A203228
2. Spark Plug A203244
3. Blade A202068
4. Wheel A202052
Questions? Call Toll Free at 1-800-737-2112 Copyright © 2016 MAT Engine Technologies, LLC
ENG - 19
Page 20

Troubleshooting
• Save all instructions
PROBLEM POSSIBLE CAUSE(S) SOLUTION(S)
Engine will not start 1.
Engine runs rough 1. Loose spark plug wire
Low Engine Power 1. Grass too high, too thick or wet grass
Engine overheats 1. Engine oil level low
Excessive Vibration 1. Mower blade loose or unbalanced
Rough or uneven cut 1. Wheel heights not correct
Fuel tank is empty
2. Blade control lever is not depressed
3. Engine not primed
4. Spark plug wire disconnected
5. Fouled spark plug
6. Clogged air filter
7. Engine is flooded
8. Clogged fuel filter
9. Blocked fuel line
10. Stale or contaminated fuel
11. Other
2. Fouled spark plug
3. Incorrect spark plug gap
4. Clogged air filter
5. Clogged vent in fuel cap
6. Clogged fuel filter
7. Partially blocked fuel line
8. Stale or contaminated fuel
9. Other
2. Buildup of grass and debris under
mower deck
3. Clogged air filter
4. Engine oil level too high
5. Other
2. Clogged air filter
3. Other
2. Bent cutting blade
2. Dull blade
3. Buildup or grass and debris under
mower deck
1. Add fresh fuel.
2. Grasp and hold blade control lever firmly
against handle while pulling starter rope handle.
3. Prime engine as instructed in “Starting The
Engine” on page 14.
4. Attach spark plug wire to spark plug
5. Service spark plug as instructed on page 18.
6. Service air filter as instructed on page 18.
7. Wait a few minutes and restart engine without
priming.
8. Remove fuel filter. Inspect. Replace if
necessary.
9. Clear or replace fuel line.
10. Drain fuel tank. Clean fuel tank. Fill with fresh
fuel.
11. Take unit to an authorized service center.
1.
Securely attach spark plug wire to spark plug
2. Service spark plug as instructed on page 18.
3. Service spark plug as instructed on page 18.
4. Service air filter as instructed on page 18.
5. Clear vent in fuel cap
6. Remove fuel filter. Inspect. Replace if necessary
7. Clear or replace fuel line
8. Drain fuel tank. Clean fuel tank. Fill with fresh fuel
9. Take unit to an authorized service center
1. Raise cutting height or reduce cutting width
as instructed in “Mowing Tips” on page 15. Let
grass dry before cutting.
2. Clean debris on the underside of the mower
deck as instructed in “General Mower Care” on
page 16.
3. Service air filter as instructed in “To Service the
Air Filter” on page 18.
4. Check engine oil as instructed in “Checking
and Adding Engine Oil” on page 13; drain and
adjust oil level as necessary.
5. Take unit to an authorized service center.
1. Add engine oil as instructed in “Checking and
Adding Engine Oil” on page “13”
2. Service air filter as instructed in “To Service the
Air Filter” on page 18.
3. Take unit to an authorized service center.
1. Tighten blade retaining bolt or balance blade as
instructed in “Blade Care” on page 16.
2. Replace with a new blade. If vibration
continues, take unit to an authorized service
center
1. Adjust wheel heights as instructed on page 12.
2. Replace or sharpen blade as instructed in
“Blade Care” on page 16.
3. Clean debris on the underside of the mower
deck as instructed in “General Mower Care” on
page 16.
Questions? Call Toll Free at 1-800-737-2112 Copyright © 2016 MAT Engine Technologies, LLC
ENG - 20
Page 21

Technical Service
You may have further questions about assembling, operating, or maintaining this Mower. If so, you can contact our
Technical Service Department at 1-800-737-2112 (English only).
You may also write to:
METL Corporate Office - CORRESPONDENCE ONLY
ATTN: Technical Service – METL
6700 Wildlife Way
Long Grove, IL 60047
When contacting the Technical Service Department, have ready:
• Your Name
• Your Address
• Your Phone Number
• Model Number of Product
• Date of Purchase (include copy of receipt for written requests)
• Date Code on Unit
If you need assistance or have any questions, CALL
TOLL FREE: 1-800-737-2112.
Warranty
• Save all instructions
Powermate MOWER Limited Warranty
A
Always specify model number when contacting the factory.
We reserve the right to amend these specifications at any time without notice. The only warranty applicable is our standard written
warranty. We make no other warranty, expressed or implied. MAT Engine Technologies, LLC warrants this Lawn Mower and any parts
thereof, to be free from defects in material and workmanship for one year (90 days for commercial use or for reconditioned unit) from
the date of first purchase from an authorized dealer, provided that the product has been properly maintained and operated in accordance with all applicable instructions. This warranty is extended only to the original retail purchaser. The bill of sales or proof of
purchase must be presented at the time a claim is made under this warranty. This warranty does not cover commercial, industrial, or
rental usage, nor does it apply to parts that are not in original condition because of normal wear and tear, or parts that fail or become
damaged as a result of misuse, accident, lack of proper maintenance, tampering, or alteration. Exceptions to the standard warranty
period would be normal wear items such as cutting blades, air filters and spark plugs which are only covered for 60 days against
defects in material or workmanship. Travel, handling, transportation, and incidental costs associated with warranty repairs are not
reimbursable under this warranty and are the responsibility of the owner. To the full extent allowed by the law of the jurisdiction that
governs the sale of the product, this express warranty excludes any and all other expressed warranties and limits the duration of any
and all implied warranties, including warranties of merchantability and fitness for a particular purpose to two years from the date of
first purchase, and MAT Engine Technologies, LLC’s liability is hereby limited to the purchase price of the product and MAT Engine
Technologies, LLC shall not be liable for any other damages whatsoever including indirect, incidental, or consequential damages.
Some states do not allow limitation of how long an implied warranty lasts or an exclusion or limitation of incidental or consequential
damages, so the above limitation of damages may not apply to you. This warranty provides the original purchaser with specific rights.
For information regarding those rights, please consult the applicable state laws.
METL Corporate Office - CORRESPONDENCE ONLY
ATTN: Technical Service – METL
6700 Wildlife Way
Long Grove, IL 60047
The Engine Emissions Control System Warranty is provided by the engine manufacturer, included with this product and administered by
MAT Engine Technologies, LLC.
If you have any questions regarding your warranty coverage,
you should contact METL customer service:
Questions? Call Toll Free at 1-800-737-2112 Copyright © 2016 MAT Engine Technologies, LLC
ENG - 21
If you need assistance or have any questions,
CALL TOLL FREE: 1-800–737-2112
Page 22

Manuel de l’utilisateur
Tondeuse à
gazon poussée
Regarder à l’intérieur pour y trouver
Page
Définitions relatives à la sécurité 2
Renseignements importants sur la sécurité 3-6
Spécifications du produit 7
Pièces et fonctionnalités 7
Décalcomanies sur la sécurité 8
Assemblage 9-12
Fonctionnement 13-15
Entretien de routine 16-19
Pièces courantes de rechange 19
Rangement 19
Dépannage 20
Service technique 21
Garantie 21
N° de modèle
PM2015
IMPORTANT:
Ce mode d’emploi contient des instructions complètes pour une utilisation
sans danger et pour l’entretien de votre tondeuse à gazon. Lisez ces
instructions et conservez-les. Référez-vous à ce mode d’emploi chaque
fois que vous avez l’intention d’utiliser votre tondeuse.
Veuillez noter les éléments suivants pour une référence future :
Modèle N°: ___________________
Code – Date de fabrication : ___________________
Date d’achat : Joignez une copie de votre reçu de caisse.
Numéro sans frais – service à la clientèle : 1-800-737-2112
Référez au site Web pour un manuel sous forme électronique
et un catalogue des pièces. www.powermateoutdoor.com
AVERTISSMENT
Les échappements de moteur, certains éléments constituants et certains composants de produit contiennent ou émettent
de produits chimiques reconnus par l’État de Californie pour causer le cancer, des anomalies congénitales ou d’autres
effets nuisibles sur la reproduction.
Si vous avez une question ou un problème...
AVERTISSEMENT - PROPOSITION 65 –CALIFORNIE
APPELEZ SANS FRAIS : 1-800-737-2112
CONSERVEZ CE MANUEL POUR RÉFÉRENCE FUTURE
07/14/2016 Imprimé en Chine A203240
Page 23

PUSH TO PRIME
Définitions relatives à la sécurité
• Conservez toutes les instructions
Familiarisez-vous avec la signification des symboles d’avertissement figurant sur votre tondeuse à gazon et comprenez-les.
Renseignements importants sur la sécurité
SYMBOLES D’AVERTISSEMENT DE SÉCURITÉ
DANGER
DANGER
KEEP HANDS and FEET AWAY
Indique AVERTISSEMENT, DANGER ou MISE
EN GARDE Faites preuve de bon sens. Signifie
: Attention! Soyez attentif! Votre sécurité est en
jeu.
Veuillez lire le manuel de l’usager, avant de faire
fonctionner cet appareil. Le défaut de suivre
les directives pourrait provoquer de sérieuses
blessures.
Veillez à ce que vos mains et vos pieds restent
suffisamment éloignés des pièces mobiles.
Ne tondez pas des surfaces inclinées de plus
de 15°. Tondez parallèlement aux courbes
d'inclinaison, jamais vers le haut et vers le bas.
La tondeuse pourrait amputer des mains et
des pieds. Pour éviter tout risque de blessure grave, ne mettez pas vos mains ou vos
pieds près de la tondeuse ou au-dessous de
celle-ci. Tenez-vous toujours à distance de
l’ouverture de la goulotte d'éjection.
N’utilisez pas la tondeuse lorsque des
enfants ou d’autres personnes sont à prox-
imité.
Cette tondeuse à gazon peut projeter de
petits objets à grande vitesse et causer ainsi
des blessures aux personnes ou des dom-
mages aux biens. Retirez à l’avance tous
les objets qui pourraient être projetés par la
lame.
Portez des équipements de protection des
yeux qui respectent ou dépassent les exigences de la norme ANSI Z87.1.
Surface chaude. Le silencieux et le moteur
deviennent très chauds et peuvent vous brûler.
Ne les touchez pas.
L’essence est inflammable. Manier avec précaution !
Le gaz d’échappement contient du monoxyde
Les gaz d’échappement du moteur contien-
nent de grandes quantités de monoxyde de
carbone (CO) toxique.
de carbone, un gaz inodore et mortel. Ne
JAMAIS faire fonctionner cette unité à l’intérieur
ou dans un espace mal ventilé.
SYMBOLES DE CONTRÔLE ET DE FONCTIONNEMENT
Appuyez à trois reprises sur l’injecteur
avant de démarrer un moteur froid.
Important : n’appuyez pas sur l’injecteur
pour remettre en marche un moteur
Emplacement de l’orifice de
remplissage d’huile
Ne remplissez pas excessivement
encore chaud.
SYMBOLES D’ALERTE DE SÉCURITÉ
Les symboles ci-dessous identifient des renseignements importants sur la sécurité qui figurent dans ce manuel de
l’utilisateur. Familiarisez-vous avec ces symboles et les avertissements associés à ces symboles.
DANGER
AVERTISSMENT
MISE EN GARDE
AVIS
Indique une situation imminente extrêmement dangereuse qui, si elle n'est pas évitée, causera la mort ou
une blessure grave.
Indique une situation potentiellement dangereuse qui, si elle n'est pas évitée, pourrait causer la mort ou une
blessure grave.
Indique une situation potentiellement dangereuse qui, si elle n'est pas évitée, pourrait causer une blessure
légère/modérée.
Indique une situation pouvant résulter en dommages aux biens / équipements ou peut être en rapport avec
des messages généraux sur la sécurité.
Questions? Appelez sans frais à : 1-800-737-2112 Copyright © 2016 MAT Engine Technologies, LLC
FR - 2
Page 24

Important Safety Information
• Conservez toutes les instructions
AVANT DE COMMENCER À UTILISER LA TONDEUSE
1. LISEZ ET COMPRENEZ TOUTES LES INSTRUCTIONS AVANT DE COMMENCER À UTILISER LA TONDEUSE.
DANGER
La tondeuse pourrait amputer des mains et des pieds ou projeter des objets. Lisez et suivez tous les avertissements et toutes les
consignes de sécurité figurant sur la tondeuse et dans le présent manuel de l’utilisateur. Le non-respect de ces avertissements
et consignes de sécurité risque de causer des blessures graves ou même de tuer des personnes se trouvant à proximité ou vousmême.
2. Évitez les environnements dangereux.
a. Ne vous servez pas de la tondeuse si vous êtes sous l’influence d’alcool, de médicaments ou de drogues.
b. Ne vous servez pas de la tondeuse quand vous êtes fatigué(e).
c. Ne vous servez pas de cette tondeuse si vous n’êtes pas en état mental ou physique de l’utiliser sans danger.
3. Veillez à ce que tous les éléments de fixation soient bien serrés et que les dispositifs de sécurité (protecteurs,
écrans, mécanisme de contrôle de la lame, etc.) soient en place et fonctionnent correctement. Inspectez la
tondeuse pour vous assurer qu’elle ne comporte pas de composants endommagés. Remplacez tous les composants
endommagés.
4. Habillez-vous de façon appropriée lorsque vous utilisez la tondeuse.
a. Portez toujours des chaussures substantielles assurant une bonne protection et un bon équilibre. N’utilisez
pas la tondeuse en ayant les pieds nus ou en portant des sandales ne protégeant pas les pieds.
b. Des pantalons longs épais, des bottes à protection en acier pour les orteils, des gants et des chemises à
manches longues sont recommandés.
c. Ne portez pas de vêtements amples ou de bijoux qui risqueraient d’être attrapés par les pièces mobiles de la tondeuse.
5. Portez des équipements de protection des yeux qui respectent ou dépassent les exigences de la norme ANSI Z87.1.
6. N’utilisez la tondeuse que pendant la journée ou dans de bonnes conditions d’éclairage.
7. Inspectez attentivement la zone dans laquelle vous voulez utiliser la tondeuse et retirez-en tous les corps étrangers
tels que des gros cailloux, des fils de fer, des jouets, etc. qui risqueraient d’être projetés par la lame.
Renseignements importants sur la sécurité
AVERTISSMENT
Cette tondeuse à gazon peut projeter de petits objets à grande vitesse et causer ainsi des blessures aux personnes ou des dommages aux biens.
PENDANT QUE VOUS UTILISEZ LA TONDEUSE
1. Faites preuve de vigilance. Surveillez tout ce que vous faites.
2. N’utilisez pas la tondeuse si elle est endommagée ou si elle n’a pas été complètement assemblée ou si elle a été
assemblée de façon non sécurisée.
DANGER
Il ne faut jamais mettre en marche ou laisser fonctionner la tondeuse à l’intérieur d’un bâtiment ou d’une salle fermée;
l’inspiration des fumées d’échappement pourrait tuer.
AVERTISSMENT
Des accidents tragiques peuvent se produire si des enfants sont à proximité et si l’on ne fait pas attention à eux. Les enfants sont
souvent attirés par la tondeuse et son activité. Ne supposez jamais que des enfants resteront là où vous les avez vus en dernier.
3. Seuls des adultes responsables et ayant reçu les instructions nécessaires doivent se servir de cette tondeuse.
Ne laissez jamais des enfants utiliser la tondeuse.
4. Dites aux enfants et aux autres personnes présentes de ne pas s’approcher de la zone en train d’être tondue. Un
adulte autre que l’opérateur de la tondeuse doit surveiller les enfants présents le cas échéant.
5. Faites preuve de vigilance et arrêtez le moteur de la tondeuse si quelqu’un entre dans la zone dans laquelle vous
utilisez la tondeuse.
6. Faites particulièrement attention à l’approche de coins sans visibilité, quand vous êtes à proximité d’arbres ou
d’arbustes, et d’autres obstacles qui pourraient vous empêcher de voir un enfant.
Questions? Appelez sans frais à : 1-800-737-2112 Copyright © 2016 MAT Engine Technologies, LLC
FR - 3
Page 25

Renseignements importants sur la sécurité (Suite)
• Conservez toutes les instructions
7. Ne laissez jamais une tondeuse en fonctionnement sans surveillance.
Renseignements importants sur la sécurité
8. N’utilisez pas la tondeuse en marche arrière sauf si cela est absolument indispensable. Lorsque vous utilisez la
tondeuse en marche arrière, regardez fréquemment vers le sol et derrière la tondeuse pour vous assurer qu’il n’y a
pas de petits enfants ou d’objets divers. Faites particulièrement attention lorsque vous reculez pour que vos pieds
soient à une distance suffisante de la tondeuse et pour ne pas risquer de perdre l’équilibre.
DANGER
Ne mettez pas les mains ou les pieds près de la tondeuse ou au-dessous de celle-ci. Tenez-vous à toujours à distance de
l’ouverture de la goulotte d’éjection.
9. N’utilisez jamais la tondeuse sans que le couvercle de la goulotte d’éjection, l’écran de protection arrière, le
mécanisme de contrôle de la lame et les autres dispositifs de protection ne soient totalement installés et opérationnels.
AVERTISSMENT
Débranchez le fil de la bougie avant de nettoyer le dessous du plateau ou de réparer la lame. Si vous ne débranchez pas le fil de
la bougie, ceci pourrait causer un démarrage accidentel du moteur pouvant causer une blessure grave, ou même la mort.
10. Arrêtez le moteur et attendez que la lame s’arrête complètement avant de nettoyer la tondeuse ou de désengorger le
couvercle de la goulotte d’éjection.
11. Restez toujours bien équilibré(e). Soyez toujours solidement sur vos pieds ; marchez ; ne courez jamais.
12. Le levier de contrôle de la lame est un dispositif de sécurité. Ne tentez pas de contourner ou de désactiver le levier
de contrôle de la lame. Ceci risquerait de causer des blessures graves résultant du contact avec une lame en
rotation. Restez derrière le guidon lorsque le moteur est en marche.
13. N’orientez jamais la goulotte d’éjection de la tondeuse en direction de quelqu’un. Ne déchargez pas la tondeuse
contre un mur ou une autre obstruction. Les objets risqueraient de ricocher et d’être projetés vers l’opérateur ou
d’autres personnes présentes. Arrêtez le moteur lorsque vous traversez un sentier ou un passage recouvert de gravier.
14. Ne forcez pas la tondeuse. Elle sera plus performante, durera plus longtemps et risquera moins de causer des
blessures si elle fonctionne à la vitesse pour laquelle elle a été conçue.
15. Si la tondeuse commence à vibrer de façon anormale, arrêtez immédiatement le moteur et cherchez à en identifier la
cause. Les vibrations sont généralement indicatives d’un problème.
16. Le silencieux et le moteur deviennent très chauds et peuvent vous brûler. Ne les touchez pas.
LORSQUE QUE VOUS UTILISEZ LA TONDEUSE SUR DES PENTES
AVERTISSMENT
Les pentes sont un facteur important de chutes et de glissades, qui peuvent causer des blessures graves. Il faut faire particulièrement
attention quand on utilise la tondeuse sur une pente. Si une pente vous paraît difficile, ne vous y engagez pas avec la tondeuse.
1. Si une pente a un degré d’inclinaison de plus de 15 degrés, n’utilisez pas la tondeuse. Utilisez la rubrique de ce
manuel qui est consacrée au calcul des pentes (voir page 6) afin de mesurer les pentes avant d’utiliser cette
tondeuse sur une pente ou sur un terrain accidenté.
2. Tondez parallèlement aux courbes d’inclinaison, jamais vers le haut et vers le bas. Faites particulièrement attention
lorsque vous changez de direction sur une pente.
3. Faites preuve de vigilance pour vous assurer qu’ils n’y a pas de trous, d’ornières, de bosses, de rochers ou d’autres
objets cachés. Un terrain irrégulier peut vous faire glisser ou tomber, provoquant ainsi un accident. Des herbes
hautes peuvent dissimuler un obstacle.
4. N’utilisez pas la tondeuse sur de l’herbe mouillée ou sur des pentes très inclinées. Le manque d’équilibre de
l’opérateur pourrait le faire glisser ou tomber, provoquant ainsi un accident.
5. N’utilisez pas la tondeuse près de fossés, talus ou dénivelés. Vous risqueriez de perdre l’équilibre.
6. Si vous perdez l’équilibre, relâchez immédiatement la poignée et le levier de contrôle de la lame.
UTILISATION DU CARBURANT EN TOUTE SÉCURITÉ
AVERTISSMENT
Pour éviter tout risque de blessure ou de dommage aux biens, prenez toutes les précautions nécessaires lors de la manipulation
de carburant. L’essence est extrêmement inflammable et les vapeurs sont explosives.
1. Ne fumez pas et ne laissez personne fumer à proximité de carburant ou de la tondeuse. Éteignez toutes les
Questions? Appelez sans frais à : 1-800-737-2112 Copyright © 2016 MAT Engine Technologies, LLC
FR - 4
Page 26

Renseignements importants sur la sécurité (Suite)
• Conservez toutes les instructions
cigarettes, tous les cigares, toutes les pipes et autres sources d’inflammation.
2. Ne refaites jamais le plein du réservoir de la tondeuse à l’intérieur. Refaites le plein à l’extérieur À UN ENDROIT OÙ
IL N’Y A NI FLAMMES, NI ÉTINCELLES.
3. Utilisez un récipient agréé pour le transport d’essence.
4. Ne remplissez jamais de bidons à l’intérieur d’un véhicule ou sur un camion ou semi-remorque avec revêtement en
plastique. Placez toujours les bidons sur le sol à une distance suffisante de votre véhicule avant de remplir le réservoir.
5. Ne verrouillez pas la buse de carburant en position ouverte.
6. Retirez tous les équipements à essence du camion ou de la remorque, et remplissez leurs réservoirs sur le sol.
Remplissez toujours la tondeuse en utilisant un bidon. Ne remplissez jamais le réservoir de la tondeuse en utilisant
une buse de carburant.
7. Ne retirez jamais le bouchon du réservoir de carburant et n’ajoutez jamais de carburant pendant que le moteur est
en marche. Arrêtez toujours le moteur et laissez-le refroidir avant de retirer le bouchon. Retirez le bouchon du
réservoir de carburant lentement.
8. Ne remplissez jamais excessivement un réservoir de carburant. Évitez de renverser du carburant ou de l’huile.
Essuyez tous les débordements ou renversements de carburant.
9. Après avoir rempli le réservoir, remettez le bouchon en place et serrez bien.
10. Si vous avez renversé du carburant sur vos vêtements, changez immédiatement de vêtements.
11. Éloignez-vous à au moins 10 pi (3 mètres) du lieu de remplissage du réservoir avant de mettre le moteur en marche.
MAINTENANCE ET RANGEMENT DE LA TONDEUSE
1. Débranchez la bougie avant d’effectuer toute opération de maintenance.
2. Entretenez soigneusement la tondeuse. Inspectez la tondeuse périodiquement. Si la tondeuse ne fonctionne pas
correctement ou est endommagée, faites-la réparer par un centre de service après-vente qualifié.
3. Assurez-vous que les pièces mobiles sont bien alignées et qu’elles ne se coincent pas, qu’il n’y a pas de com
posants brisés, que le montage est correct et qu’il n’existe pas d’autres problèmes pouvant affecter son fonctionnement.
4. Inspectez fréquemment les dispositifs de protection et assurez-vous qu’ils sont toujours en place et en bon état de marche.
5. Tout dispositif de protection ou autre composant endommagé doit être réparé correctement ou remplacé par un
centre de service après-vente agréé.
6. Utilisez seulement des pièces de rechange et accessoires Powermate® authentiques. L’utilisation de pièces ou
d’accessoires autres que Powermate® pourrait causer des blessures, endommager la tondeuse et annuler votre
garantie.
7. Entretenez ou remplacez les étiquettes relatives à la sécurité et aux instructions suivant les besoins. Ne retirez pas
les étiquettes relatives à la sécurité et aux instructions de la tondeuse pour quelque raison que ce soit.
8. Ne changez pas le réglage du régulateur de vitesse du moteur et ne faites pas fonctionner le moteur à une vitesse
excessive.
9. Ne retirez et ne modifiez aucune pièce. Le retrait ou la modification de pièces pourrait causer des blessures et/ou
endommager la tondeuse, et ceci annulerait la garantie.
10. Assurez-vous qu’il n’y a pas d’accumulation d’herbe, de feuilles ou d’autres débris. Nettoyez l’huile ou le carburant
renversé, et retirez tous les débris recouverts de carburant.
11. Laissez le moteur refroidir et videz le réservoir de carburant avant de ranger la tondeuse ou de la transporter dans
un véhicule. Mettez le moteur en marche et laissez-le fonctionner jusqu’à ce que tout le carburant se trouvant dans
le carburateur soit éliminé.
12. Faites particulièrement attention lorsque vous manipulez ou nettoyez une lame de la tondeuse. Débranchez le fil de
la bougie avant de nettoyer la tondeuse ou de manipuler une lame au-dessous du plateau de la tondeuse. Les
lames sont tranchantes. Pour vous protéger les mains, enveloppez la lame ou portez des gants avant de la manipuler.
13. Rangez la tondeuse et le carburant à un endroit où les vapeurs de carburant ne peuvent pas atteindre les étincelles
ou flammes vives d’un chauffe-eau, d’un moteur électrique ou d’un interrupteur, d’un appareil de chauffage ou de
tout lieu où des outils électriques sont utilisés.
14. Rangez la tondeuse dans un endroit propre, sec et bien ventilé quand vous ne vous en servez pas.
Renseignements importants sur la sécurité
Questions? Appelez sans frais à : 1-800-737-2112 Copyright © 2016 MAT Engine Technologies, LLC
FR - 5
Page 27

AVERTISSMENT!
Les pentes sont un facteur important de chutes et de glissades, qui
peuvent causer des blessures graves. Il faut faire particulièrement
attention quand on utilise la tondeuse sur une pente. Si une pente vous
paraît difficile, ne vous y engagez pas avec la tondeuse. Tondez paral
lèlement aux courbes d’inclinaison, jamais vers le haut et vers le bas.
Faites particulièrement attention lorsque vous changez de direction
sur une pente.
15 degrés
PLIEZ LE LONG DE LA LIGNE POINTILLÉE
10 degrés
GUIDE POUR LES PENTES
ORIENTEZ CE NIVEAU DE GUIDAGE VERS UN ARBRE VERTICAL,
LE COIN D’UNE STRUCTURE, UN POTEAU DE LIGNE ÉLECTRIQUE OU UNE
CLÔTURE, ET TENEZ-LE DANS CETTE POSITION.
Utilisez ce guide et ne tondez pas la surface d’une pente de plus de 15 degrés
d’inclinaison.
Une pente de 15 degrés est une colline dont la hauteur augmente d’environ 2,5
pi tous les 10 pi.
Questions? Appelez sans frais à : 1-800-737-2112 Copyright © 2016 MAT Engine Technologies, LLC
FR - 6
Page 28

Spécifications du produit
• Conservez toutes les instructions
Si vous avez besoin d’assistance ou si vous avez des
questions, APPELER SANS FRAIS : 1-800-737-2112.
Largeur de coupe ..........................20 po (510 mm)
Hauteurs de coupe.................. 2,25-3,5 po (57-89 mm)
Vitesse du moteur ............................3 000 tr/min
Poids unitaire ............................48,5 lb (22,0 kg)
Type d’essence .....................Ordinaire sans plomb –
87 octanes (min.)
Capacité du réservoir de carburant . . . . . . . . . . . . . . . 1,06 qt (1 l)
Type d’huile (classification API SG, SH, SJ ou plus élevée)
10W-30 est recommandé pour toutes les températures de pour
des renseignements supplémentaires.
Capacité en huile . . . . . . . . . . . . . . . . . . . . . . . . . . 15 oz (450 ml)
Pièces et fonctionnalités
Pour pouvoir utiliser votre tondeuse en toute sécurité et
de la façon la plus performante possible, familiarisez-vous
avec les principales caractéristiques de la machine (montrées ci-dessous) et lisez tous les avertissements et instructions dans le manuel.
1. Levier de contrôle de la lame
2. Poire d’amorçage (injecteur)
3. Poignée du lanceur à rappel
4. Guide de la corde
5. Couvercle de la goulotte d’éjection
6. Orifice de remplissage d’essence
7. Orifice de remplissage d’huile
8. Guidon inférieur
9. Guidon supérieur
10. Filtre à air
11. Silencieux
12. Bougie
3
4
Modèle de bougie.........TORCH K7RTC / Champion RC9YC4
Écartement des électrodes .......0,028-0,031 po (0,70-0,80 mm)
Type de moteur .................... 4 temps, un seul cylindre,
pour véhicule hors route
Déplacement ...................................... 150cc
Couple nominal ......................... 5,75 pi-lb (7,8 N•m)
couple brut selon SAE J1940
Jeu-Soupape d’admission ........0,004 - 0,008 po (0,1 - 0,2 mm)
Jeu – Soupape d’échappement..0,006 - 0,010 po (0,15 - 0,25 mm)
Diamètre des roues ...................................7 po
1
9
8
6
10
7
2
5
11
Questions? Appelez sans frais à : 1-800-737-2112 Copyright © 2016 MAT Engine Technologies, LLC
FR - 7
12
Page 29

Décalcomanies sur la sécurité
A202448
A202325
• Gasoline is flammable. Allow engine to cool at least 2 minutes
before refueling.
• Operation of this equipment may create sparks that can start
fires around dry vegetation. A spark arrestor may be required.
The operator should contact local fire agencies for laws or
regulations relating to fire prevention requirements.
Read Userʼs Manual Before Operation
• Conservez toutes les instructions
Cette tondeuse a été conçue et fabriquée pour vous fournir
la sécurité et la abilité auxquelles vous pouvez vous attendre de la part d’un chef de le de l’industrie de la fabrication
des équipements électriques utilisables à l’extérieur.
Bien que la lecture de ce manuel et des instructions de
sécurité qu’il contient vous fournisse les connaissances
basiques nécessaires pour utiliser cet équipement efcace-
ment et sans danger, nous avons placé plusieurs étiquettes
de sécurité sur la tondeuse pour vous rappeler ces informations importantes pendant que vous utilisez cette machine.
Ces étiquettes de sécurité importantes sont illustrées
ci-dessous, et elles sont montrées ici pour vous aider à
vous familiariser avec l’emplacement et le contenu des
messages de sécurité que vous verrez pendant que vous
utiliserez la tondeuse à gazon. Veuillez lire ces étiquettes
maintenant. En cas de questions sur leur signication ou
la façon de respecter ces instructions, lisez à nouveau le
texte complet des instructions de sécurité aux pages précédentes ou contactez votre revendeur local.
Si l’une quelconque des étiquettes de sécurité devient illisible parce qu’elle est usée, décolorée ou endommagée
d’une quelconque autre manière pendant que vous utilisez
votre tondeuse, veuillez contacter votre revendeur local
agréé pour commander une nouvelle étiquette.
Les étiquettes de sécurité sont faciles à appliquer, et elles
serviront de rappel constant pour vous comme pour toute
autre personne pouvant utiliser cet équipement. Il est nécessaire de respecter les instructions sur la sécurité pour pou-
voir utiliser la tondeuse efcacement et en toute sécurité.
Consultez la section “ Définitions relatives à la sécurité” de
ce manuel pour obtenir les explications des symboles de
sécurité
Questions? Appelez sans frais à : 1-800-737-2112 Copyright © 2016 MAT Engine Technologies, LLC
FR - 8
Page 30

Assemblage
• Conservez toutes les instructions
REMARQUE : TOUTES LES RÉFÉRENCES AU CÔTÉ GAUCHE OU DROIT DE LA TONDEUSE DOIVENT ÊTRE
COMPRISES DEPUIS LA POSITION DE L’OPÉRATEUR SE TENANT DERRIÈRE LA TONDEUSE.
IMPORTANT : LES INSTRUCTIONS RELATIVES À L’ASSEMBLAGE ONT ÉTÉ ÉCRITES À L’INTENTION DE
PERSONNES AYANT UNE CERTAINE EXPÉRIENCE ET CERTAINES COMPÉTENCES EN MÉCANIQUE. CES
INSTRUCTIONS NE DÉCRIVENT PAS TOUTES LES ÉTAPES DU PROCESSUS EN DÉTAIL. COMME LES
PERSONNES AYANT CERTAINES COMPÉTENCES EN MÉCANIQUE SAVENT COMMENT SERRER LES ÉLÉMENTS
DE FIXATION, CES ÉTAPES NE SONT PAS INCLUSES. NE TENTEZ PAS D’ASSEMBLER LA TONDEUSE SI VOUS
NE VOUS EN SENTEZ PAS CAPABLE.
Si vous avez besoin d’assistance ou si vous avez des
questions, APPELER SANS FRAIS : 1-800-737-2112.
AVERTISSMENT
N’utilisez pas la tondeuse si elle est endommagée ou si elle n’a pas été complètement assemblée ou si elle a été assemblée de façon non sécurisée.
PIÈCES INCLUSES AVEC LA TONDEUSE FOURNIE
Article à la Figure 1 Qté
Boulon de blocage d'essieu – 3/8 po
Figure 1
1
Boulon à tête six-pans – 3/8-16 X
2
1 1/2 po
Boulon à collet carré et à tête ronde –
3
3/8 po
Boulon à tête six-pans – 1/4 po
4
Écrou de blocage – 1/4 po
5
Entretoise
6
Rondelle – 1/4 po
7
Pince, câble
8
Rondelle – 3/8 po
9
Écrou à oreilles, plastique
10
Écrou à bride (base striée) – 3/8 po
11
Écrou à bride (base lisse) – 3/8 po
12
4
2
2
2
2
2
1
6
2
4
2
Article à la Figure 2 Qté
Guidon supérieur
13
Guidon inférieur
14
Couvercle de la goulotte d'éjection
15
Roues
16
Sac de pièces détachées
non
illustré
Figure 2
Questions? Appelez sans frais à : 1-800-737-2112 Copyright © 2016 MAT Engine Technologies, LLC
FR - 9
Manuel de l'utilisateur
Guide de démarrage rapide
Huile moteur 4 temps, 15 oz (450 ml)
1
1
1
4
1
1
1
1
Page 31

Assemblage (Suite)
Plateau
• Conservez toutes les instructions
Si vous avez besoin d’assistance ou si vous avez des
questions, APPELER SANS FRAIS : 1-800-737-2112.
AVIS
N’AJOUTEZ PAS D’HUILE MOTEUR AVANT D’AVOIR
RÉALISÉ TOUTES LES ÉTAPES D’ASSEMBLAGE
CI-DESSOUS. PENDANT L’ASSEMBLAGE, LE MOTEUR
PEUT ÊTRE PLACÉ EN POSITION INCLINÉE PENDANT
DES PÉRIODES PROLONGÉES. DE L’HUILE PEUT
ÊTRE DRAINÉE DANS LA PARTIE SUPÉRIEURE
DU MOTEUR, CE QUI RISQUE DE CAUSER DES
PROBLÈMES POUR DÉMARRER LE MOTEUR.
ASSEMBLAGE DU COUVERCLE DE LA GOULOTTE D’ÉJECTION
Plateau
ASSEMBLAGE DU GUIDON INFÉRIEUR
Plateau
Figure 4
Les numéros d’article dans les instructions d’assemblage et
sur la figure correspondent à la liste des pièces à la page 9.
Figure 3
Les numéros d’article dans les instructions d’assemblage et
sur la figure correspondent à la liste des pièces à la page 9.
REMARQUE : Utilisez des clés de 7/16 po, des douilles
assorties ou des clés à ouverture variable pour réaliser les
actions suivantes.
1. Tout en maintenant les trous du couvercle de la goulotte
d’éjection (article 16) alignés sur les trous correspon
dants du plateau de la tondeuse, insérez les boulons
six-pans (article 4) à travers la rondelle (article 7), le
couvercle de la goulotte d’éjection (article 15) et le plateau.
2. Sécurisez chaque boulon avec un écrou de blocage
(article 5) comme illustré à la Figure 3.
REMARQUE : Utilisez des clés de 9/16 po, des douilles
assorties ou des clés à ouverture variable pour réaliser les
actions suivantes.
1. Placez l’arrière du plateau de la tondeuse sur un bloc de
bois ou un support similaire.
2. Insérez le guidon inférieur (article 14) à travers les
fentes de chaque côté de l’arrière du plateau, et alignez
les trous du plateau sur les trous du guidon inférieur.
Voir Figure 4.
3. De chaque côté du guidon inférieur et du plateau,
insérez le boulon avec épaulement à tête six-pans à
travers le plateau, la rondelle (article 9), l’entretoise
(article 6) et le guidon (art. 14).
4. Sécurisez le boulon avec épaulement à tête six-pans en
utilisant les écrous à bride (article 12).
Questions? Appelez sans frais à : 1-800-737-2112 Copyright © 2016 MAT Engine Technologies, LLC
FR - 10
Page 32

Assemblage (Suite)
• Conservez toutes les instructions
ASSEMBLAGE DU GUIDON SUPÉRIEUR
Poignée du
lanceur à
rappel
Guide de
corde
Si vous avez besoin d’assistance ou si vous avez des
questions, APPELER SANS FRAIS : 1-800-737-2112.
Les numéros d’article dans les instructions d’assemblage et
sur la figure correspondent à la liste des pièces à la page 9.
1. Placez le guidon supérieur (article 13) en position au-
dessus du guidon inférieur (article 14). Voir Figure 5.
2. Insérez les boulons à collet carré et à tête ronde
(article 3) à travers les trous de chaque côté des
guidons supérieur et inférieur, et sécurisez avec les
grands écrous à oreilles (article 10).
3. Tirez sur le lanceur à rappel et enfilez la corde à travers
le guide de la corde, comme illustré à la Figure 5.
Figure 5
ASSEMBLAGE DE L’ENSEMBLE DE CONTRÔLE DE LA LAME
1. Insérez la broche à barre en T dans le support comme
illustré à la Figure 6.
REMARQUE : Il peut être nécessaire de détacher temporai-
rement du guidon supérieur la pince à câble qui avait été
assemblée à l’usine pour obtenir suffisamment de jeu dans
le câble. Remontez la pince après avoir inséré la broche.
2. Sécurisez le câble sur le guidon supérieur au moyen de
la pince à câble (article 8). Voir Figure 7.
3. Insérez le côté opposé (gauche) du levier de contrôle de
la lame dans le trou du guidon supérieur. Voir Figure 5.
IMPORTANT : Après avoir exécuté ces actions, abaissez le
levier de contrôle de la lame contre le guidon supérieur.
Ceci devrait actionner le levier de frein à ressort sur le
moteur. Le levier de contrôle de la lame devrait rebondir
dans la position du haut lorsqu’il est relâché.
AVERTISSMENT
L’ensemble de contrôle de la lame doit pouvoir permettre
d’arrêter le moteur et de ralentir la lame. N’utilisez jamais
la tondeuse à gazon sans que l’ensemble de contrôle de la
lame ne soit assemblé correctement.
Levier de
contrôle de la
lame
Support
Broche à barre en T
Pince à câble
assemblée à
l’usine
Figure 6
Figure 7
Questions? Appelez sans frais à : 1-800-737-2112 Copyright © 2016 MAT Engine Technologies, LLC
FR - 11
Page 33

Assemblage (Suite)
• Conservez toutes les instructions
ASSEMBLAGE DES ROUES (voir Figure 8)
IMPORTANT : Avant d’assembler les roues, décidez laquelle
des trois hauteurs de coupe disponibles est la plus appropriée pour votre pelouse. Pour obtenir les meilleurs résul-
tats possibles, ne coupez jamais plus du tiers de la hauteur
totale du gazon.
REMARQUE : Utilisez des clés de 3/4 et 9/16 po, des douilles
assorties ou des clés à ouverture variable pour réaliser les
actions suivantes.
Chaque coin du plateau de la tondeuse a un groupe de
trois trous verticaux représentant les trois réglages pos-
sibles de hauteur de coupe. La hauteur de coupe est fixée
et ajustée en choisissant le trou approprié pour le montage
des roues. Veillez à assembler les roues dans le même
trou à chaque coin du plateau.
Si vous avez besoin d’assistance ou si vous avez des
questions, APPELER SANS FRAIS : 1-800-737-2112.
Hole for 2.25”
cutting height
Hole for 2.88”
cutting height
Hole for 3.5”
cutting height
Figure 8
Les numéros d’article dans les instructions d’assemblage et
sur la figure correspondent à la liste des pièces à la page 9.
1. Sécurisez chaque roue sur le plateau en insérant le
boulon de blocage d’essieu (article 1) à travers la roue
(article 16), la rondelle (article 9) et le trou du plateau.
Sécurisez au moyen de l’écrou à bride (article 11).
a. Pour ajuster la hauteur de coupe, démontez chaque
roue et remontez-la en fonction de nouveau choix de
trou/hauteur de coupe.
REMARQUE : Veillez à ce que les quatre (4) roues soient
assemblées dans la même position de hauteur de roue.
Questions? Appelez sans frais à : 1-800-737-2112 Copyright © 2016 MAT Engine Technologies, LLC
FR - 12
Page 34

Fonctionnement
• Conservez toutes les instructions
AVANT DE METTRE LE MOTEUR EN MARCHE
AVIS
Le moteur de votre tondeuse est expédié de l’usine sans lubrification. Un flacon d’huile moteur (15 onces liquides) est
inclus dans le conditionnement de votre tondeuse. Vérifiez
le niveau d’huile avant de faire démarrer le moteur. Si vous
mettez le moteur en marche sans lubrification, il sera endommagé au point de ne plus être réparable, et la garantie sera
annulée.
Vérification du niveau d’huile et ajout d’huile
Types d’huile à utiliser
Utilisez de l’huile moteur à fort pouvoir détergent ayant une
classification de service API de SG, SH, SJ ou plus élevée.
Choisissez une viscosité d’huile pour moteur en fonction de
la Fig. 15. Pour la plupart des températures de service, une
huile de viscosité comprise entre 10 et 30 est recommandée.
AVIS
L’utilisation d’huile non détergente ou d’huile pour moteur
deux temps pourrait endommager le moteur et annulerait la
garantie.
Figure 15
Viscosité d’huile recommandée pour les températures ambiantes
SAE
de service
SAE 10W-30
SAE 30
TEMP
-20
-20-30 -1000
Température ambiante de service
20
40
Ambient Service Temperature
60 80
2010
100° F
30
40° C
1. Vérifiez le niveau d’huile à chaque fois avant de
démarrer le moteur. Vérifiez le niveau d’huile tous les
jours ou au bout de huit (8) heures de fonctionnement.
Il faut que le niveau d’huile sur la jauge soit au NIVEAU
SUPÉRIEUR (voir Figure 9).
2. Vérifiez toujours le niveau d’huile après avoir placé le
moteur et la tondeuse (à froid) sur une surface plate et
horizontale.
3. Nettoyez autour de l’orifice de remplissage d’huile,
retirez la jauge et nettoyez avec un chiffon propre.
4. Remettez la jauge en place – sans serrer. Veillez à ce
que la jauge soit insérée à fond dans l’orifice de remplis
sage. Retirez la jauge et vérifiez le niveau d’huile.
5. Le niveau d’huile devrait être au NIVEAU SUPÉRIEUR
sur la jauge. Voir Figure 9.
6. S’il faut ajouter de l’huile, ajoutez-en lentement dans
l’orifice de remplissage et vérifiez à nouveau le niveau
ensuite. Ne remplissez pas excessivement.
AVIS
Un excès d’huile pourrait causer des difficultés de démarrage,
entraîner l’encrassement de la bougie et produire de la fumée
en provenance du moteur.
Limite supérieure
Limite inférieure
Figure 9
Questions? Appelez sans frais à : 1-800-737-2112 Copyright © 2016 MAT Engine Technologies, LLC
FR - 13
Page 35

Poire d'amorçage
(injecteur)
Poussez
trois fois
Fonctionnement (Suite)
• Conservez toutes les instructions
AVANT DE METTRE LE MOTEUR EN MARCHE
Remplissage du réservoir d’essence
DANGER
Pour éviter tout risque de blessure ou de dommage aux biens, prenez toutes les précautions nécessaires lors de la manipulation de carburant.
L’essence est extrêmement inflammable et les vapeurs sont explosives. Ne fumez pas et ne laissez personne fumer à proximité de carburant ou
de la tondeuse. Éteignez toutes les cigarettes, tous les cigares, toutes les pipes et autres sources d’inflammation. Ne refaites jamais le plein du
réservoir de la tondeuse à l’intérieur. Refaites le plein à l’extérieur À UN ENDROIT OÙ IL N’Y A NI FLAMMES, NI ÉTINCELLES. Ne retirez jamais le
bouchon du réservoir de carburant et n’ajoutez jamais de carburant pendant que le moteur est en marche. Arrêtez toujours le moteur et laissezle refroidir avant de retirer le bouchon. Retirez le bouchon du réservoir de carburant lentement. Ne remplissez jamais excessivement un réservoir de carburant. Évitez de renverser du carburant ou de l’huile. Essuyez tous les débordements ou renversements de carburant.
Utilisez de l’essence ordinaire sans plomb propre avec un minimum de 87 octanes. L’utilisation d’essence propre évitera l’accumulation
de vernis et de gomme dans le carburateur et le système d’acheminement du carburant. Les additifs pour carburant les plus répandus
qui réduisent le vernis et la gomme dans le système d’acheminement de carburant de votre moteur peuvent être ajoutés en respectant les
instructions du constructeur. N’utilisez pas d’essence contenant du méthanol. Ne mélangez pas d’huile et d’essence.
1. Retirez le bouchon lentement. Remplissez le réservoir jusqu’à environ 1-1/2 po au-dessous du haut du col de remplissage pour tenir
compte du facteur d’expansion du carburant. Ne remplissez jamais excessivement un réservoir de carburant.
2. Après avoir rempli le réservoir, remettez le bouchon en place et serrez bien.
3. Si vous avez renversé du carburant sur vos vêtements, changez immédiatement de vêtements.
4. Éloignez-vous à au moins 10 pi (3 mètres) du lieu de remplissage du réservoir avant de mettre le moteur en marche.
DÉMARRAGE DU MOTEUR
DANGER
Il ne faut jamais mettre en marche ou laisser fonctionner la tondeuse
à l’intérieur d’un bâtiment ou d’une salle fermée; l’inspiration des
fumées d’échappement pourrait tuer. Ne mettez pas les mains ou les
pieds près de la tondeuse ou au-dessous de celle-ci. Tenez-vous à
toujours à distance de l’ouverture de la goulotte d’éjection. Tenez les
enfants et les autres personnes présentes à une distance suffisante
lorsque vous mettez le moteur en marche, et assurez-vous qu’elles ne
sont pas dans la zone où vous allez utiliser la tondeuse.
1. Appuyez lentement à trois reprises sur la poire d’amorçage
– attendez environ deux secondes entre chaque enfoncement
(voir Fig. 10a). Lorsque les températures sont inférieures à 55°F,
appuyez sur la poire à cinq reprises. N’utilisez pas la poire
d’amorçage pour redémarrer un moteur encore chaud.
2. Tenez-vous derrière le guidon de la tondeuse, saisissez le
levier de contrôle de la lame – en le maintenant fermement
contre le guidon supérieur. Voir Fig. 10b.
3. Saisissez la poignée du lanceur à rappel et tirez lentement
dessus jusqu’à ce que vous constatiez de la résistance, puis
tirez rapidement pour démarrer le moteur.
AVERTISSMENT
La rétraction rapide du lanceur à rappel (recul) risquerait d’attirer
votre main et votre bras vers le moteur plus rapidement que vous ne
pourriez le relâcher. L’effet de rebond est généralement causé par
une synchronisation incorrecte de l’allumage. Si cela se produit, faites
examiner et réparer le moteur par un revendeur agréé.
4. Remettez lentement la poignée du lanceur à rappel dans le
guide de la corde, et relâchez.
IMPORTANT : Pour ne pas risquer d’endommager le démarreur du
moteur, ne laissez pas la corde rebondir contre le guide de la corde.
Figure 10a
Figure 10a
Levier de contrôle
de la lame
Guidon supérieur
Lanceur à rappel
Figure 10b
Questions? Appelez sans frais à : 1-800-737-2112 Copyright © 2016 MAT Engine Technologies, LLC
FR - 14
Page 36

Fonctionnement (Suite)
• Conservez toutes les instructions
ARRÊT DU MOTEUR ET DE LA LAME
AVERTISSMENT
Attendez que la lame s’arrête complètement avant de tenter
d’effectuer une opération de maintenance quelconque sur la
tondeuse.
1. Relâchez le levier de contrôle de la lame pour arrêter le
moteur et la lame.
RÉGLAGE DE LA HAUTEUR DE COUPE
Remontez les roues dans la position de hauteur de roue
désirée. Consultez la rubrique intitulée « Assemblage
des roues » dans la section du manuel consacrée à
l’assemblage,
CONSEILS POUR L’EMPLOI DE LA TONDEUSE
Inspectez attentivement la zone dans laquelle vous
voulez utiliser la tondeuse et retirez-en tous les corps
étrangers tels que des gros cailloux, des fils de fer, des
jouets, etc.
AVERTISSMENT
Cette tondeuse à gazon peut projeter de petits objets à grande
vitesse et causer ainsi des blessures aux personnes ou des
dommages aux biens.
MISE EN GARDE
Si vous heurtez un corps étranger ou si la tondeuse commence
à vibrer de façon anormale, arrêtez le moteur. Retirez le couvreborne de bougie, inspectez soigneusement la tondeuse pour
vous assurer qu’elle n’est pas endommagée et réparez tout
dommage éventuel avant de redémarrer et d’utiliser la tondeuse.
Les vibrations sont généralement indicatives d’un problème.
Pour obtenir les meilleurs résultats possibles :
a) Ne coupez pas l’herbe si elle est mouillée.
b) Ne coupez jamais plus du tiers de la hauteur totale de l’herbe.
c) Planifiez votre travail et choisissez un itinéraire dans le
sens contraire des aiguilles d’une montre pour tondre le
gazon afin d’éjecter l’herbe coupée du côté où vous avez
déjà tondu le gazon.
d) Ajustez votre vitesse en fonction de l’état de la pelouse.
Ne forcez pas la tondeuse. Elle sera plus performante,
durera plus longtemps et risquera moins de causer des
blessures si elle fonctionne à la vitesse pour laquelle elle
a été conçue.
e) De l’herbe fraîchement poussée, épaisse ou mouillée
pourra nécessiter que vous utilisiez une largeur de
coupe inférieure à la largeur maximum indiquée pour la
tondeuse.
f) Lorsque vous tondez de l’herbe très haute, ajustez la
hauteur de coupe au niveau le plus élevé et effectuez
une première coupe. Puis ajustez la tondeuse à la
hauteur désirée pour une seconde coupe.
Questions? Appelez sans frais à : 1-800-737-2112 Copyright © 2016 MAT Engine Technologies, LLC
FR - 15
Page 37

Entretien de routine
• Conservez toutes les instructions
AVERTISSMENT
Débranchez la bougie avant d’effectuer toute opération de maintenance.
Entretenez soigneusement la tondeuse. Inspectez la tondeuse
périodiquement. Si la tondeuse ne fonctionne pas correctement
ou est endommagée, faites-la réparer par un centre de service
après-vente qualifié. Ne changez pas le réglage du régulateur
de vitesse du moteur et ne faites pas fonctionner le moteur à
une vitesse excessive. Ne retirez et ne modifiez aucune pièce.
Le retrait ou la modification de pièces pourrait causer des bles-
sures et/ou endommager la tondeuse, et ceci annulerait la
garantie. Utilisez seulement des pièces de rechange et acces-
soires Powermate® authentiques. L’utilisation de pièces ou
d’accessoires autres que Powermate® pourrait causer des bles-
sures, endommager la tondeuse et annuler votre garantie.
ENTRETIEN GÉNÉRAL DE LA TONDEUSE
1. Après chaque emploi, retirez toute l’herbe coupée et les
autres débris du dessus du plateau de la tondeuse et de
la région du moteur avec une brosse ou une soufflante
de pelouse ou de jardin.
2. Nettoyez périodiquement le dessous du plateau de la
tondeuse pour empêcher l’accumulation d’herbe coupée, etc.
a) Avant de nettoyer le dessous du plateau, drainez
le réservoir de carburant en faisant fonctionner
jusqu’à ce que le réservoir soit vide. Débranchez le fil de
la bougie avant d’effectuer cette opération ou toute autre
opération de maintenance.
b) Inclinez la tondeuse pour exposer le dessous du plateau de
la tondeuse.
toujours
le moteur à vide
AVIS
Inclinez toujours la tondeuse de façon qu’elle repose sur le côté du
plateau et que le côté du filtre à air du moteur soit orienté vers le
haut. Assurez-vous que la tondeuse repose dans une position stable
avant de commencer à nettoyer le plateau. N’inclinez jamais la tondeuse de plus de 90 degrés dans quelque sens que ce soit, et ne la
laissez pas en position inclinée pendant une période prolongée. De
l’huile pourrait s’écouler dans la partie supérieure du moteur et causer des difficultés au démarrage.
c) Utilisez un racleur approprié pour détacher l’herbe qui
attache au plateau. Ne pulvérisez pas d’eau sur le plateau.
3. En utilisant une huile de graissage légère :
a) lubrifiez les points de pivotement sur le levier de
contrôle de la lame au moins une fois chaque saison.
b) lubrifiez les roues au moins une fois chaque saison.
ENTRETIEN DE LA LAME
MISE EN GARDE
Faites particulièrement attention lorsque vous manipulez ou nettoyez une
lame de la tondeuse. Les lames sont tranchantes. Pour vous protéger les
mains, enveloppez la lame ou portez des gants avant de la manipuler.
1. Inspectez périodiquement la lame et l’adaptateur de
lame pour vous assurer qu’ils ne sont pas usés ou
endommagés, en particulier après avoir heurté un
obstacle. Remplacez-les quand cela est nécessaire.
a. Avant d’incliner la tondeuse pour inspecter les environs de la
lame, drainez toujours le carburant du réservoir en faisant
fonctionner le moteur jusqu’à ce que le réservoir soit vide.
Débranchez le fil de la bougie avant d’effectuer cette
opération ou toute autre opération de maintenance.
b. Inclinez la tondeuse pour exposer le dessous du plateau de
la tondeuse.
Retrait / remplacement de la lame :
1. Retirez le boulon et les rondelles attachant la lame et l’adaptateur
de lame au vilebrequin du moteur. Voir Figure 11
Adaptateur
de lame
Vilebrequin
Adaptateur de lame
Lame
Rondelle à ressort à disque
Rondelle plate
Boulon
2. Détachez la lame et l’adaptateur du vilebrequin.
3. La lame peut être réaffûtée avec une lime ou une meule.
Ne tentez pas de réaffûter la lame pendant qu’elle est toujours
attachée à la tondeuse. Lorsque vous réaffûtez la lame, suivez
l’angle de meulage d’origine. Meulez chaque bord de coupe
de façon égale pour préserver l’équilibre de la lame. Pour
contrôler l’équilibre de la lame, placez la lame sur un tournevis
à arbre rond. Retirez du matériau de la lame du côté le plus
lourd jusqu’à ce que la lame soit bien équilibrée.
Lame
Rondelle à
ressort à disque
Rondelle plate
Boulon
Figure 11
Questions? Appelez sans frais à : 1-800-737-2112 Copyright © 2016 MAT Engine Technologies, LLC
FR - 16
Page 38

Entretien de routine (Suite)
• Conservez toutes les instructions
MISE EN GARDE
Une lame déséquilibrée causera des vibrations excessives quand elle tournera à haute vitesse. Elle pourrait endommager la tondeuse et se
casser, ce qui risquerait de causer des blessures.
4. Lubrifiez le vilebrequin du moteur et la surface intérieure de l’adaptateur de lame avec une huile légère. Faites glisser l’adaptateur
de lame sur le vilebrequin du moteur.
5. Positionnez la lame sur l’adaptateur de lame dans l’orientation correcte. De chaque côté de la lame, une partie « relevée » de la
lame se trouve du côté opposé de la lame par rapport au bord tranchant. Lorsque vous positionnez la lame sur l’adaptateur de
lame, assurez-vous que la partie « relevée » de la lame est orientée vers le plateau de la tondeuse. Voir Figure 11.
6. Enfilez le boulon de retenue à travers la rondelle plate, les (2) rondelles à ressort à disque, la lame et l’adaptateur de lame.
Assurez-vous que la rondelle plate et les (2) rondelles à ressort à disque sont dans le sens et l’orientation montrés à la Fig. 11.
7. Serrez le boulon de retenue à 30-37 pi-lb (40-50 N-m).
8. Pour assurer un fonctionnement sans danger de votre tondeuse, assurez-vous périodiquement que le boulon de fixation de la lame
est serré avec le couple correct.
ENTRETIEN DU MOTEUR
Une liste des principaux instruments nécessaires pour l’entretien du moteur afin d’assurer la performance optimale de la tondeuse est présentée ci-dessous.
Point d’entretien À chaque
utilisation
Vérier le niveau d'huile
du moteur
Changer l'huile du
moteur
Inspecter le ltre à air
Nettoyer/remplacer le
ltre à air
Inspecter la bougie
Nettoyer/remplacer la
bougie
Nettoyer la région du
silencieux
1. Vérifiez le niveau d’huile du moteur avant chaque utilisation et maintenez-le au niveau maximum indiqué sur la jauge. Voir la
section intitulée « Vérification du niveau d’huile du moteur et ajout d’huile » à la page 13.
2. Nettoyez le filtre à air toutes les 25 heures dans des conditions d’utilisation normales. Nettoyez au bout de quelques heures
si l’environnement est extrêmement poussiéreux. Une mauvaise performance du moteur et des signes d’inondation indiquent
généralement le besoin de maintenance du purificateur d’air. Ne faites jamais fonctionner le moteur sans un filtre à air installé.
Un fonctionnement du moteur sans filtre peut causer une usure excessive du moteur et son endommagement.
3. Nettoyez régulièrement le moteur avec un chiffon ou une brosse. Veillez à ce qu’il n’y ait pas de débris sur le dessus du
moteur pour permettre une circulation d’air suffisante. Retirez toute l’herbe, les saletés et les matériaux combustibles de la
région du silencieux.
√
√
√
Au bout des 5
à 8 premières
heures de fonc-
tionnement
√ √
Chaque saison
ou après 25
heures
√
√
Chaque saison
ou après 50
heures
Chaque saison
ou après 100
heures
√
Enregistre-
ment de la date
de l’opération
d’entretien
Questions? Appelez sans frais à : 1-800-737-2112 Copyright © 2016 MAT Engine Technologies, LLC
FR - 17
Page 39

Entretien de routine (Suite)
• Conservez toutes les instructions
NETTOYAGE DU FILTRE À AIR
Un filtre à air sale réduira l’admission d’air. Un entretien
périodique du filtre à air aidera à améliorer le fonctionnement du moteur et réduira le niveau d’émissions.
AVERTISSMENT
Ne nettoyez jamais un filtre à air avec de l’essence ou un
solvant pouvant prendre feu facilement car cela pourrait
causer un incendie.
1. Retirez le cache du filtre à air et retirez le système de
filtre avec précaution. (Voir Figure 12)
2. Nettoyez toutes les pièces du système. Nettoyez le
filtre en le tapotant doucement sur une surface plate.
Remplacez-le s’il est très sale.
3 . R é i n s t a l l e z l e f i l t r e e t l e c a c h e d u f i l t r e .
NETTOYAGE/REMPLACEMENT DE LA BOUGIE
1. Nettoyez la bougie et contrôlez l’écart entre les
électrodes une fois par saison. Il est recommandé de
remplacer la bougie au début du printemps chaque
année. Voir « SPÉCIFICATIONS DU PRODUIT » à
la page 6 pour connaître le type de bougie nécessaire et
l’écart requis entre les électrodes.
Système de
ltre à air
Cache du ltre à air
Figure 12
0.028 - 0.031 in.
0.7 - 0.8 mm
AVERTISSMENT
Ne tentez pas de détecter des étincelles si la bougie a été
retirée. Ne faites pas démarrer le moteur à la manivelle si la
bougie a été retirée.
Pour que le moteur puisse bien fonctionner, il ne doit pas
y avoir d’accumulation de dépôts sur la bougie et les électrodes ne doivent pas être excessivement usées.
2. Retirez le fil de la bougie, puis retirez la bougie avec une
clé à bougie.
MISE EN GARDE
Si le moteur vient de fonctionner, le silencieux sera très chaud.
Faites attention de ne pas toucher le silencieux.
3. Inspectez visuellement la bougie. Jetez la bougie si
elle semble usée ou si l’isolant est fissuré ou ébréché.
Nettoyez la bougie avec une brosse métallique si vous
voulez la réutiliser.
4. Mesurez l’écart entre les électrodes avec une jauge
d’épaisseur. Ajustez cet écart suivant les besoins en
courbant l’électrode. Voir Figure 13
5. Réinstallez la bougie – en commençant à la main pour
ne pas risquer de fausser le filetage.
Figure 13
6. Après avoir mis la bougie à sa place, serrez avec une
clé à bougie d’un quart de tour en plus (18 pi-lb).
AVIS
La bougie doit être serrée à fond. Une bougie insuffisamment
serrée peut devenir très chaude et endommager le moteur.
Questions? Appelez sans frais à : 1-800-737-2112 Copyright © 2016 MAT Engine Technologies, LLC
FR - 18
Page 40

Entretien de routine (Suite)
• Conservez toutes les instructions
VIDANGE
1. Changez l’huile du moteur à la fin de chaque saison ou
après 50 heures de fonctionnement.
2. Drainez le réservoir de carburant en faisant fonctionner
le moteur jusqu’à ce que le réservoir soit vide.
Figure 14
3. Nettoyez autour de l’orifice de remplissage d’huile, et
retirez la jauge.
4. Placez un récipient approprié à côté de la tondeuse
pour recevoir l’huile usée, puis inclinez la tondeuse pour
la mettre sur son côté droit. L’huile usée sera drainée
par le tube de remplissage. Laissez l’huile se drainer
complètement. Voir Figure 14.
REMARQUE : L’huile sera plus fluide et coulera mieux si elle
est chaude.
IMPORTANT : L’huile usée est un déchet dangereux. Placez
l’huile dans un récipient fermé hermétiquement et apportez
celui-ci dans votre centre de recyclage local. Ne le jetez
PAS avec les ordures ménagères normales.
5. Réapprovisionnez ensuite le moteur avec de l’huile
propre. Versez lentement. Ne remplissez pas
excessivement. Voir la section intitulée « Vérification du
niveau d’huile du moteur et ajout d’huile » à la page 13.
RANGEMENT
Il faut vider le réservoir de carburant des tondeuses devant
être inutilisées pendant plus de 30 jours pour éviter la
détérioration du moteur et la formation de gomme dans le
système d’approvisionnement en carburant. Si l’essence de
votre moteur se détériore pendant que la tondeuse n’est pas
utilisée, vous devrez peut-être nettoyer ou remplacer le carburateur et d’autres composants du système d’alimentation
en carburant. Les additifs pour carburant les plus répan-
dus qui réduisent le vernis et la gomme dans le système
d’acheminement de carburant de votre moteur peuvent être
ajoutés en respectant les instructions du constructeur.
1. Retirez tout le carburant du réservoir en faisant
fonctionner le moteur jusqu’à ce qu’il s’arrête pour cause
de manque de carburant.
2. Vidange. Voir la section « Vidange ».
3. Retirez la bougie et versez environ une demi-once
d’huile pour moteur dans le cylindre. Remettez la bougie
en place et tirez lentement sur la corde à plusieurs
reprises pour distribuer l’huile.
4. Nettoyez l’herbe et les débris pouvant se trouver autour
du moteur et du silencieux, ou sous le silencieux ou
derrière ce dernier.
5. Rangez dans un endroit propre, sec et bien ventilé, loin
de tout chauffe-eau, moteur ou interrupteur, appareil de
chauffage ou lieu où des outils électriques sont utilisés.
6. Rangez le moteur sur une surface plate. Son inclinaison
pourrait causer une fuite de carburant ou d’huile.
PIÈCES COURANTES DE RECHANGE
1. Filtre à air A203228
2. Bougie d’allumage A203244
3. Lame A202068
4. Roues A202052
Questions? Appelez sans frais à : 1-800-737-2112 Copyright © 2016 MAT Engine Technologies, LLC
FR - 19
Page 41

Dépannage
• Conservez toutes les instructions
PROBLÈME CAUSE(S) POSSIBLE(S) SOLUTION(S)
Le moteur ne démarre pas 1.
Le moteur fonctionne de
façon saccadée
La puissance du moteur est
faible
Le moteur surchauffe 1. Le niveau d’huile du moteur est bas
Vibrations excessives 1. La lame de la tondeuse est desserrée ou
Coupe irrégulière ou
inégale
Le réservoir de carburant est vide
2. Le levier de contrôle de la lame n’est pas
enfoncé
3. Le moteur ne s’amorce pas
4. Le fil de la bougie est déconnecté
5. La bougie est encrassée
6. Le filtre à air est bouché
7. Le moteur est noyé
8. Le filtre à carburant est bouché
9. La conduite d’alimentation en carburant est
obstruée
10. Le carburant est vicié ou contaminé
11. Autre problème
1. Le fil de la bougie n’est pas bien raccordé
2. La bougie est encrassée
3. L’écart entre les électrodes est incorrect
4. Le filtre à air est bouché
5. Évent bouché dans le bouchon du réservoir
de carburant
6. Le filtre à carburant est bouché
7. La conduite d’alimentation en carburant est
partiellement obstruée
8. Le carburant est vicié ou contaminé
9.
Autre problème
1. L’herbe est trop haute, trop épaisse ou
mouillée
2. Accumulation d’herbe et de débris sous le
plateau de la tondeuse
3. Le filtre à air est bouché
4. Le niveau d’huile du moteur est trop élevé
5.
Autre problème
2. Le filtre à air est bouché
3.
Autre problème
déséquilibrée
2. La lame de coupe est tordue
1. La hauteur des roues est incorrecte
2. Lame émoussée
3. Accumulation d’herbe et de débris sous le
plateau de la tondeuse
1. Ajouter du carburant.
2. Saisissez et maintenez fermement le lever de contrôle de la lame
contre le guidon tout en tirant sur la poignée du lanceur à rappel.
3. Amorcez le moteur comme indiqué sous la rubrique « Démarrage du
moteur » à la page 14.
4. Raccordez le fil de la bougie à la bougie
5. Nettoyez la bougie comme indiqué à la page 18.
6. Nettoyez le filtre à air comme indiqué à la page 18.
7. Attendez quelques minutes et redémarrez le moteur sans l’amorcer
8. Retirez le filtre à carburant. Inspectez. Remplacez si cela est nécessaire
9. Débouchez ou remplacez la conduite d’alimentation en carburant.
10. Drainez le réservoir de carburant. Nettoyez le réservoir de
carburant. Remplissez avec du nouveau carburant
11. Apportez l’équipement dans un centre de service après-vente agréé.
1. Raccordez de façon sécurisée le fil de la bougie à la bougie
2. Nettoyez la bougie comme indiqué à la page 18.
3. Nettoyez la bougie comme indiqué à la page 18.
4. Nettoyez la bougie comme indiqué à la page 12.
5. Débouchez l’évent dans le bouchon du réservoir de carburant
6. Retirez le filtre à carburant. Inspectez. Remplacez si cela est
nécessaire
7. Débouchez ou remplacez la conduite d’alimentation en carburant
8. Drainez le réservoir de carburant. Nettoyez le réservoir de carburant.
Remplissez avec du nouveau carburant
9. Apportez l’équipement dans un centre de service après-vente agréé.
1. Élevez la hauteur de coupe ou réduisez la largeur de coupe en
suivant les « Conseils d’utilisation de la tondeuse » à la page 15.
Laissez l’herbe sécher avant de la couper.
2. Nettoyez les débris sur le dessous du plateau de la tondeuse en
suivant les instructions de la section « Entretien général de la tondeuse
» à la page 16.
3. Nettoyez le filtre à air comme indiqué dans la section « Nettoyage du
filtre à air » à la page 18.
4. Vérifiez le niveau d’huile du moteur comme indiqué dans la section «
Vérification du niveau d’huile du moteur et ajout d’huile » à la page 13 ;
drainez et ajustez le niveau d’huile suivant les besoins.
5. Apportez l’équipement dans un centre de service après-vente agréé.
1. Ajoutez de l’huile pour moteur comme indiqué dans la section «
Vérification du niveau d’huile du moteur et ajout d’huile » à la page 13
2. Nettoyez le filtre à air comme indiqué dans la section « Nettoyage du
filtre à air » à la page 18.
3. Apportez l’équipement dans un centre de service après-vente agréé.
1. Serrez le boulon de retenue de la lame ou équilibrez la lame comme
indiqué dans la section « Entretien de la lame » à la page 16.
2. Remplacez par une nouvelle lame. Si les vibrations continuent,
apportez l’équipement dans un centre de service après-vente agréé
1. Ajustez la hauteur des roues comme indiqué à la page 12.
2. Remplacez ou réaffûtez les lames comme indiqué dans la section «
Entretien de la lame » à la page 16.
3. Nettoyez les débris sur le dessous du plateau de la tondeuse en
suivant les instructions de la section « Entretien général de la tondeuse
» à la page 16.
Questions? Appelez sans frais à : 1-800-737-2112 Copyright © 2016 MAT Engine Technologies, LLC
FR - 20
Page 42

Service technique
Vous avez peut-être d’autres questions sur l’assemblage, l’utilisation ou l’entretien de cette tondeuse. Si c’est le cas, vous
pouvez contacter notre Département de services techniques au 1-800-737-2112 (anglais seulement)
Vous pouvez également écrire à :
METL Corporate Office - CORRESPONDENCE ONLY
ATTN: Technical Service – METL
6700 Wildlife Way
Long Grove, IL 60047
Lorsque vous contactez le Département de services techniques, ayez
à portée de la main :
• Votre nom
• Votre adresse
• Votre numéro de téléphone
• Le numéro de modèle du produit
• La date d’achat
(inclure une copie du reçu dans le cas des demandes écrites)
• Le code de date sur l’équipement
Si vous avez besoin d’assistance ou si vous avez des
questions, APPELER SANS FRAIS : 1-800-737-2112.
Garantie
• Conservez toutes les instructions
Garantie limitée de la TONDEUSE Powermate
A
Précisez toujours le numéro de modèle lorsque vous contactez l’usine.
Nous nous réservons le droit de modifier ces spécifications à tout moment sans préavis. La seule garantie applicable est notre garantie
écrite standard. Nous n’offrons aucune autre garantie expresse ou tacite. MAT Engine Technologies, LLC garantit que cette tondeuse
à gazon et ses composants ne comportent aucun défaut de matériau ou de façon pendant un an (90 jours en cas d’utilisation commerciale ou d’équipement remis à neuf) à compter de la date d’achat initiale chez un revendeur agréé à condition que le produit ait
été entretenu de façon appropriée et utilisé conformément à toutes les instructions applicables. Cette garantie ne s’applique qu’à
l’acheteur au détail original. L’acte de vente ou un justificatif d’achat doit être présenté pour faire valoir le droit à la garantie. Cette
garantie ne couvre pas une utilisation commerciale, industrielle ou locative, et elle ne s’applique pas aux composants qui ne sont pas
dans leur état d’origine en raison d’usure normale ou aux composants dont la défaillance ou le dysfonctionnement a été causé par une
utilisation inappropriée, un accident, un entretien incorrect, des modifications ou des altérations. Les exceptions à la période de garantie standard seraient les articles s’usant normalement comme les lames de coupe, les filtres à air et les bougies, qui ne sont couverts
que pendant 60 jours contre les défauts de matériau ou de façon. Les frais de déplacement, de manutention, de transport et autres
frais accessoires associés aux réparations sous garantie ne sont pas remboursables en vertu de cette garantie et doivent être pris en
charge par le propriétaire. Dans toute la mesure autorisée par la loi du pays applicable à la vente du produit, cette garantie expresse
exclut toutes les autres garanties et limite la durée de toutes les garanties implicites, y compris les garanties de qualité marchande et
d’adéquation à un but particulier, pendant deux ans à compter de la date d’achat originale, et la responsabilité de MAT Engine Technologies, LLC est limitée par les présentes au prix d’achat du produit, et MAT Engine Technologies, LLC ne sera responsable pour aucun
autre dommage, y compris des dommages indirects, secondaires ou accessoires. Comme certaines provinces ne permettent pas de
limitation des garanties implicites ou d’exclusion ou de limitation des dommages indirects ou secondaires, il est possible que la limitation de responsabilité ci-dessus ne s’applique pas à vous. Cette garantie confère des droits spécifiques à l’acheteur original.
Veuillez consulter les lois provinciales applicables pour plus de renseignements sur ces droits.
METL Corporate Office - CORRESPONDENCE ONLY
ATTN: Technical Service – METL
6700 Wildlife Way
Long Grove, IL 60047
La garantie du système de contrôle des émissions est fournie par le fabricant du moteur et est incluse avec ce produit et administrée
par MAT Engine Technologies, LLC.
Si vous avez des questions au sujet de la couverture
de votre garantie, vous devriez contacter le service a la
clientele de metl
Questions? Appelez sans frais à : 1-800-737-2112 Copyright © 2016 MAT Engine Technologies, LLC
FR - 21
Si vous avez besoin d’assistance ou si vous
avez des questions, APPELER SANS FRAIS :
1-800-737-2112.
Page 43

Manual de operación
CORTACÉSPED DE
EMPUJAR
Modelos Nro.
PM2015
Índice:
Página
Definiciones sobre seguridad 2
Información importante sobre seguridad 3-6
Especificaciones del producto 7
Piezas y características 7
Calcomanías de seguridad 8
Montaje 9-12
Operación 13-15
Mantenimiento de rutina 16-19
Piezas comunes de repuesto 19
Almacenamiento 19
Diagnóstico y resolución de problemas 20
Servicio técnico 21
Garantía 21
IMPORTANTE:
Este manual ofrece instrucciones completas para utilizar y mantener
de manera segura la cortadora de césped. Lea y guarde estas
instrucciones. Consulte este manual antes de usar la cortadora de
césped cada vez que vaya a usarla.
Anote lo siguiente como referencia:
No. de modelo: ___________________
Código de fecha de fabricación: ___________________
Fecha de compra: adjunte una copia de su recibo de compra.
Número gratuito de asistencia al consumidor: 1-800-737-2112
Consúltese el sitio web para obtener una copia electrónica del manual y
el catálogo de piezas. www.powermateoutdoor.com
ADVERTENCIA
Los gases de escape, algunos de sus elementos y ciertos componentes del producto contienen o emiten productos
químicos que, según los conocimientos del Estado de California, producen cáncer y defectos congénitos u otros daños
reproductivos.
Si tiene una duda o un problema...
ADVERTENCIA DE LA PROPUESTA DE LEY 65 DE CALIFORNIA
LLAME SIN COSTO AL: 1-800-737-2112
CONSERVE ESTE MANUAL COMO REFERENCIA
07/14/2016 Impreso en China A203240
Page 44

PUSH TO PRIME
Definiciones sobre seguridad
• Guardar estas instrucciones
Familiarizarse con los símbolos de advertencia en la cortadora de césped y entender el significado de los mismos.
Información importante sobre seguridad
SÍMBOLOS DE ALERTA PARA SEQURADAD
Indica ADVERTENCIA, PELIGRO o CUIDADO.
Aplicar sentido común. Significa: ¡Atención!
¡Manténgase alerta! Su seguridad está en juego.
Leer el manual de operación antes de utilizar esta
máquina. El no seguir las directrices podría conducir a
lesiones graves.
No cortar césped ante niños u otros circunstantes.
Esta cortadora de césped puede lanzar objetos
pequeños a alta velocidad y causar lesiones
corporales o daños materiales. Retirar los objetos
que pudieran ser lanzados por la cuchilla.
Mantener las manos y los pies alejados de las piezas
rotativas.
No cortar césped en pendientes mayores de 15°.
Cortar el césped transversalmente a la pendiente;
jamás longitudinalmente a la misma.
DANGER
DANGER
KEEP HANDS and FEET AWAY
La cortadora de césped puede amputar manos
y pies. Para evitar riesgos o lesiones graves, no
colocar las manos ni los pies cerca de la cortadora
de césped o debajo de la misma. Mantenerse alejado de la abertura de descarga en todo momento.
El escape del motor contiene grandes cantidades
de gas de monóxido de carbono (CO) tóxico.
SÍMBOLOS DE ADVERTENCIA PARA SEGURIDAD
Oprimir el cebador 3 veces antes de
arrancar un motor frío. Importante:
No cebar un motor caliente para
arrancarlo de nuevo.
Usar protección ocular que cumpla o exceda los
requisitos de la norma ANSI Z87.1.
Superficie sumamente caliente. El silenciador y el
motor se calientan y pueden quemar al operador.
No tocarlos.
La gasolina es inflamable. ¡Manejar con cuidado!
Los gases de escape del motor contienen monóxido
de carbono, un gas inodoro y letal. JAMÁS hacer
funcionar la unidad en espacios interiores o en áreas
con ventilación deficiente
Embocadura para llenado de aceite
No sobrellenar
SÍMBOLOS DE CONTROL Y FUNCIONAMIENTO
Los símbolos siguientes identifican información importante sobre seguridad en este manual. Familiarizarse con estos
símbolos y con las advertencias correspondientes a los mismos.
PELIGRO
ADVERTENCIA
CUIDADO
AVISO
Llame sin costo al: 1-800-737-2112 Copyright © 2016 MAT Engine Technologies, LLC
Indica una situación inminentemente peligrosa que, de no evitarse, producirá la muerte o lesiones graves.
Indica una situación potencialmente peligrosa que, de no evitarse, podría causar la muerte o lesiones
graves.
Indica una situación potencialmente peligrosa que, de no evitarse, podría causar lesiones leves o
moderadas.
Indica una situación que podría causar daños al equipo o daños materiales o que podría estar relacionada
con mensajes sobre seguridad general.
SP - 2
Page 45

Información importante sobre seguridad
• Guardar estas instrucciones
ANTES DE UTILIZAR LA CORTADORA DE CÉSPED
1. LEER Y ENTENDER TODAS LAS INSTRUCCIONES ANTES DE UTILIZAR LA CORTADORA DE CÉSPED.
PELIGRO
La cortadora de césped puede amputar manos y pies, y asimismo, lanzar objetos. Leer y acatar toda advertencia e instrucción de seguridad en la cortadora de césped y en este manual. Hacer caso omiso de estas puede producir lesiones graves o la
muerte del operador o circunstantes.
2. Evitar entornos peligrosos
a. No utilizar la cortadora de césped bajo la influencia de alcohol, medicamentos o fármacos.
b. No utilizar la cortadora de césped cuando se esté cansado.
c. No utilizar esta cortadora de césped si mental o físicamente se es incapaz de utilizarla de manera segura.
3. Asegurarse de que todos los sujetadores estén apretados y de que los dispositivos de seguridad (protectores, pan
tallas, control de cuchilla, etc.) estén en posición y funcionen correctamente. Inspeccionar la cortadora de césped
para determinar si hay piezas averiadas. Reemplazar toda pieza averiada.
4. Utilizar la indumentaria apropiada al utilizar la cortadora de césped.
a. Siempre usar calzado adecuado que brinde protección y estabilidad. Jamás utilizar la cortadora de césped
descalzo o en sandalias.
b. Se recomienda usar pantalones largos de trabajo, botas con puntera de acero, guantes y camisa manga larga.
c. No vestir indumentaria holgada o joyería que pudiera atorarse en las piezas móviles de la cortadora de césped.
5. Siempre usar protección ocular que cumpla o supere los requisitos de la norma ANSI Z87.1.
6. Operar la cortadora de césped únicamente en luz diurna o bajo condiciones de iluminación favorables.
7. Inspeccionar exhaustivamente el área en que se va a utilizar la cortadora de césped y retirar todo objeto extraño
tales como rocas, alambre, juguetes, etc., los cuales podrían ser lanzados por la cuchilla.
Información importante sobre seguridad
ADVERTENCIA
Esta cortadora de césped puede lanzar objetos pequeños a alta velocidad y causar lesiones corporales o daños materiales.
MIENTRAS SE UTILIZA LA CORTADORA DE CÉSPED
1. Mantenerse alerta. Prestar atención a lo que se esté haciendo.
2. No accionar la cortadora de césped si está averiada o no está armada de manera segura y completa.
PELIGRO
Jamás arrancar o hacer funcionar la cortadora de césped dentro de una habitación o estructura encerrada; la inhalación de los
gases de escape puede causar la muerte.
ADVERTENCIA
Accidentes trágicos pueden ocurrir si no se está alerta a la presencia de niños. A menudo, los niños se ven atraídos por la cortadora de césped y la actividad de corte. Jamás suponer que los niños permanecerán donde se los vio la última vez.
3. Solo adultos responsables y bien instruidos deben utilizar la cortadora de césped. Jamás permitir que niños utilicen
la cortadora de césped.
4. Mantener a niños y circunstantes fuera del área de corte. Mantener a los niños bajo la supervisión de un adulto
responsable que no sea el operador de la cortadora de césped.
5. Estar alerta y apagar el motor de la cortadora de césped si alguien entra en el área de corte.
6. Tener sumo cuidado al aproximarse a esquinas sin visibilidad clara, arbustos, árboles u otros objetos que pudieran
obstruir la vista de un niño al operador.
7. Jamás dejar desatendida una cortadora de césped con el motor en marcha.
8. A menos que sea absolutamente necesario, no halar la cortadora de césped hacia atrás. Al hacer retroceder la
cortadora de césped, ver hacia abajo y detrás de sí para saber si hay niños pequeños u objetos extraños. Al hacer
retroceder la cortadora de césped, tener sumo cuidado de mantener los pies alejados de la cortadora de césped, así
como también la estabilidad y el equilibrio.
Llame sin costo al: 1-800-737-2112 Copyright © 2016 MAT Engine Technologies, LLC
SP - 3
Page 46

Información importante sobre seguridad (La siguiente)
• Guardar estas instrucciones
Información importante sobre seguridad
PELIGRO
No colocar las manos o los pies cerca de la cortadora de césped o debajo de la misma. Mantenerse alejado de la abertura de
descarga en todo momento.
9. No operar la cortadora de césped sin la totalidad del deflector de la descarga, pantalla posterior, control de la cuchil
la u otros dispositivos protectores de seguridad en posición y en buenas condiciones de funcionamiento.
ADVERTENCIA
Desconectar el cable de la bujía antes de dar mantenimiento a la cuchilla o limpiar bajo la carcasa de la cortadora de césped. El no
desconectar el cable de la bujía podría conducir al arranque accidental del motor, lo cual podría causar lesiones graves o la muerte.
10. Parar el motor y esperar que la cuchilla pare completamente antes de limpiar la cortadora de césped o desobstruir
el deflector de la descarga.
11. Mantener el equilibrio y un apoyo firme de los pies en todo momento. Siempre estar seguro del punto de apoyo;
caminar; jamás correr.
12. La palanca de control de la cuchilla es un dispositivo de seguridad. No intentar evadir o anular la acción de la
palanca de control de la cuchilla. Así hacerlo podría causar lesiones corporales graves por el contacto con una
cuchilla rotativa. Permanecer detrás del asidero cuando el motor esté en marcha.
13. Jamás dirigir la descarga de la cortadora de césped hacia nadie. Evitar descargar la cortadora de césped contra
una pared u otra obstrucción. Los objetos podrían rebotar hacia el operador o circunstantes. Parar el motor antes
de cruzar accesos vehiculares o peatonales con grava.
14. No forzar la cortadora de césped. Esta hará un mejor trabajo, durará más y con una probabilidad menor de riesgo
de lesión a la velocidad para la cual se la diseñó.
15. Si la cortadora de césped comienza a vibrar anormalmente, parar el motor y buscar la causa inmediatamente.
Generalmente la vibración es señal de problemas.
16. El silenciador y el motor se calientan y pueden quemar al operador. No tocarlos.
MIENTRAS SE UTILIZA LA CORTADORA DE CÉSPED EN PENDIENTES
ADVERTENCIA
Las pendientes son uno de los principales factores relacionados con accidentes por deslizamiento y caída, los cuales pueden
causar lesiones graves. La operación en toda pendiente precisa precaución adicional. Si se siente incómodo en una pendiente,
no cortar el césped de la misma.
1. Si una pendiente es mayor de 15°, no cortar el césped de la misma. Utilizar la guía para pendientes incluida en
este manual (ver la p. 6) para medir las pendientes antes de utilizar la cortadora de césped en una pendiente o
un área con pendientes pronunciadas.
2. Cortar el césped transversalmente a las pendientes; jamás longitudinalmente a las mismas. Tener sumo cuidado al
cambiar de dirección en pendientes.
3. Tener cuidado con hoyos, surcos, abultamientos, rocas, u otros objetos ocultos. Los terrenos irregulares pueden
causar un accidente por deslizamiento y caída. El pasto alto puede ocultar obstáculos.
4. No cortar césped húmedo o en pendientes excesivamente pronunciadas. Un apoyo precario de los pies podría
causar un accidente por deslizamiento y caída.
5. No cortar césped cerca de desniveles pronunciados, zanjas o terraplenes. Se podría perder el punto de apoyo o el equilibrio.
6. Si se pierde el equilibrio, soltar el asidero y la palanca de control de la cuchilla inmediatamente.
MANEJO SEGURO DEL COMBUSTIBLE
ADVERTENCIA
Para evitar lesiones corporales o daños materiales, tener sumo cuidado al manipular gasolina. La gasolina es extremadamente
inflamable y los vapores son explosivos.
1. No fumar ni permitir fumar cerca de combustible o de la cortadora de césped. Extinguir todos los cigarrillos, puros,
pipas y otras fuentes de ignición.
2. Jamás reabastecer de combustible la cortadora de césped en espacios interiores. Reabastecerla de combustible al
aire libre DONDE NO HAYAN CHISPAS O LLAMAS.
Llame sin costo al: 1-800-737-2112 Copyright © 2016 MAT Engine Technologies, LLC
SP - 4
Page 47

Información importante sobre seguridad (La siguiente)
• Guardar estas instrucciones
3. Utilizar un contenedor aprobado para gasolina.
4. Jamás llenar contenedores dentro de un vehículo o en un camión o cama de remolque con revestimiento de plástico.
Siempre colocar los contenedores sobre el terreno, alejados del vehículo, antes de llenarlos.
5. No bloquear el gatillo de la boquilla surtidora de combustible en la posición abierta.
6. Retirar del camión o remolque el equipo accionado a gas y reabastecerlo sobre el terreno. Siempre reabastecer la
cortadora de césped con un contenedor portátil. Jamás reabastecer la cortadora de césped con una boquilla
surtidora de combustible.
7. Jamás retirar la tapa del combustible o surtir combustible con el motor en marcha. Siempre parar el motor y dejarlo
enfriar antes de retirar la tapa del combustible. Retirar la tapa del combustible lentamente.
8. Jamás sobrellenar el tanque de combustible. Evitar derrames de combustible o aceite. Enjugar todo derrame de
combustible.
9. Después del reabastecimiento de combustible, colocar la tapa del combustible nuevamente y apretarla de manera segura.
10. Si se derrama combustible sobre la ropa, cambiársela inmediatamente.
11. Alejarse al menos 3 metros (10 pies) del sitio de abastecimiento de combustible antes de arrancar el motor.
MANTENIMIENTO Y ALMACENAMIENTO DE LA CORTADORA DE CÉSPED
1. Desconectar la bujía antes de efectuar mantenimiento alguno.
2. Dar mantenimiento esmerado a la cortadora de césped. Inspeccionar la cortadora de césped periódicamente. Si
la cortadora de césped no está funcionando apropiadamente o está averiada, hágasela reparar en un centro de ser
vicio calificado.
3. Determinar si hay desalineamiento de piezas móviles, atascamiento de piezas móviles, piezas averiadas, montaje
incorrecto, o cualquier otro problema que pudiera afectar su funcionamiento.
4. Revisar los resguardos frecuentemente y mantenerlos en posición y en buen estado.
5. Un centro de servicio calificado debe reparar o reemplazar todo dispositivo de protección u otra pieza dañada.
6. Utilizar únicamente piezas de repuesto y accesorios Powermate® genuinos. El uso de toda pieza o accesorio que
no sea Powermate® puede conducir a lesiones, daños a la unidad e invalidar la garantía.
7. Mantener o reemplazar las etiquetas de seguridad e instrucciones según sea necesario. No retirar las etiquetas de
seguridad o de cualquier otro tipo de la cortadora de césped por ningún motivo.
8. No cambiar la configuración del regulador del motor ni sobreacelerar el motor.
9. No retirar ni modificar ninguna pieza. El retiro o modificación de piezas puede conducir a lesiones, daños a la
cortadora de césped y anula la garantía.
10. Mantener la máquina libre de grama, hojas o acumulación de otros despojos. Limpiar los derrames de aceite o
combustible y retirar todo despojo empapado de combustible.
11. Dejar que el motor enfríe y vaciar el tanque de combustible antes de almacenar o transportar la unidad en un vehículo.
Arrancar el motor y dejarlo marchar hasta que pare al agotarse el combustible en el carburador.
12. Tener sumo cuidado al dar mantenimiento a las cuchillas de la cortadora de césped. Desconectar el cable de la
bujía antes de dar mantenimiento a la cuchilla o limpiar bajo la carcasa de la cortadora de césped. Las cuchillas
son filosas. Para protegerse las manos, envolver la cuchilla o usar guantes al manipularla.
13. Almacenar la unidad y el combustible en un área donde los vapores del combustible no puedan alcanzar chispas o
llamas abiertas de calentadores de agua, motores eléctricos o interruptores, hornos, o donde se utilicen
herramientas mecánicas.
14. Al no utilizársela, almacenar la cortadora de césped en un área limpia, seca y bien ventilada.
Información importante sobre seguridad
Llame sin costo al: 1-800-737-2112 Copyright © 2016 MAT Engine Technologies, LLC
SP - 5
Page 48

¡ADVERTENCIA!
Las pendientes son uno de los principales factores relacionados con ac
cidentes por deslizamiento y caída, los cuales pueden causar lesiones
graves. La operación en toda pendiente precisa precaución adicional.
Si se siente incómodo en una pendiente, no cortar el césped de la misma.
Cortar el césped transversalmente a las pendientes; jamás longi
tudinalmente a las mismas. Tener sumo cuidado al cambiar de
dirección en pendientes.
15 grados
DOBLAR A LO LARGO DE LA LÍNEA ENTRECORTADA
10 grados
GUÍA DE INCLINACIÓN DE PENDIENTES
SOSTENER ESTE NIVEL DE GUÍA EN POSICIÓN DE MIRA CON REFER-
ENCIA A UN ÁRBOL, LA ESQUINA DE UNA ESTRUCTURA, UN POSTE DEL
TENDIDO ELÉCTRICO O UNA CERCA VERTICAL..
Utilizar esta guía y no cortar césped en una pendiente mayor de 15°.
Una pendiente de 15° es una cima que aumenta en altura aproximadamente 0.8
m (2.5 pies) por cada 3 metros (10 pies).
Llame sin costo al: 1-800-737-2112 Copyright © 2016 MAT Engine Technologies, LLC
SP - 6
Page 49

Especificaciones del producto
• Guardar estas instrucciones
Si necesita ayuda o tiene una duda,
LLAME SIN COSTO AL: 1-800-737-2112.
Anchura de corte . . . . . . . . . . . . . . . . . . . . . . 510 mm (20”)
Alturas de corte . . . . . . . . . . . . . . 57 a 89 mm (2.25 a 3.5”)
Velocidad del motor . . . . . . . . . . . . . . . . . . . . . . . 3000 rpm
Peso de la unidad . . . . . . . . . . . . . . . . . . . 22.0 kg (48.5 lb)
Tipo de gasolina.... Regular sin plomo, 87 octanos (mín.)
Capacidad de gasolina. . . . . . . . . . . . . . . 1 l (1.06 cuartos)
Tipo de aceite (API SG, SH, SJ o más alta) . . . . . . . . . . . .
Se recomienda 10W-30 para todas las temperaturas de
servicio. Véase la página 11 para más información.
Capacidad de aceite. . . . . . . . . . . 450 ml (15 onzas fluidas)
Modelo de bujía ....TORCH K7RTC / Champion RC9YC4
Piezas y características
Para poder operar la cortadora de césped de manera segura y obtener el mejor rendimiento, familiarizarse con las
características clave del producto (mostradas abajo) y con
todas las advertencias e instrucciones en este manual.
1. Palanca de control de la cuchilla
2. Bulbo de cebado
3. Empuñadura de la cuerda del arrancador
4. Guía de la cuerda del arrancador
5. Deflector de la descarga
6. Llenado de gasolina
7. Llenado de aceite
8. Asidero inferior
9. Asidero superior
10. Filtro de aire
11. Silenciador
12. Bujía
3
4
Entrehierro de la bujía 0.70-0.80 mm (0.028-0.031")
Tipo de motor ...............................Cuatro
tiempos, un solo cilindro, válvulas en la culata
Cilindrada . . . . . . . . . . . . . . . . . . . . . . . . . . . . . . . . .150 cm³
Par motor nominal . . . . . . . . . . Par motor bruto de 7.8 N·m
(5.75 ft-lb) según SAE J1940
Huelgo de la válvula de admisión . . . . . . . . .0.004 - 0.008"
(0.1 - 0.2 mm)
Huelgo de la válvula de escape. . . . . . . . . . .0.006 - 0.010"
(0.15 - 0.25 mm)
Tamaño de las ruedas ..................177.8 mm (7")
1
9
8
6
10
7
2
5
11
Llame sin costo al: 1-800-737-2112 Copyright © 2016 MAT Engine Technologies, LLC
SP - 7
12
Page 50

Calcomanías de seguridad
A202448
A202325
• Gasoline is flammable. Allow engine to cool at least 2 minutes
before refueling.
• Operation of this equipment may create sparks that can start
fires around dry vegetation. A spark arrestor may be required.
The operator should contact local fire agencies for laws or
regulations relating to fire prevention requirements.
Read Userʼs Manual Before Operation
• Guardar estas instrucciones
Esta cortadora de césped ha sido diseñada y fabricada
para brindar al operador la seguridad y conabilidad que se
esperaría de un líder de la industria en fabricación de equipo
mecánico para uso al aire libre.
Aunque leer este manual y las instrucciones de seguridad
que contiene brinda los conocimientos básicos necesarios
para operarse este equipo de manera segura y ecaz,
hemos colocado varias etiquetas de seguridad en la cortadora de césped para recordar al operador esta importante
información mientras se opera la máquina.
Estas importantes etiquetas de seguridad guran a continuación y se muestran para familiarizar al operador con la
ubicación y el contenido de los mensajes de seguridad que
verá mientras se realizan las operaciones normales de corte
de césped. Revísense estas etiquetas ahora. Si se tienen
preguntas sobre sus signicados o sobre cómo cumplir
estas instrucciones, leer nuevamente el texto completo de
las instrucciones de seguridad en las páginas precedentes o
ponerse en contacto con el concesionario local.
Si alguna de las etiquetas de seguridad se vuelve ilegible por
desgaste, decoloración o sufre otro daño durante el uso de la
cortadora de césped, contactar al concesionario autorizado local para efectuar el pedido de una etiqueta de reemplazo.
Las etiquetas de seguridad son fáciles de aplicar y actúan
como un recordatorio visual constante para el operador y
otros que pudieran usar el equipo. Seguir las instrucciones de seguridad es necesario para la operación segura y
ecaz de la cortadora de césped.
Consulte la sección “ Definiciones sobre seguridad” de este
manual para obtener las explicaciones de los símbolos de
seguridad.
Llame sin costo al: 1-800-737-2112 Copyright © 2016 MAT Engine Technologies, LLC
SP - 8
Page 51

Montaje
• Guardar estas instrucciones
NOTA: TODAS LAS REFERENCIAS AL LADO DERECHO O IZQUIERDO DE LA CORTADORA DE CÉSPED CON-
SIDERAN QUE EL OPERADOR ESTÁ UBICADO DETRÁS DE LA UNIDAD.
IMPORTANTE: LAS INSTRUCCIONES DE MONTAJE SE REDACTARON PARA PERSONAS CON CIERTA HABILIDAD Y
EXPERIENCIA MECÁNICA. ESTAS INSTRUCCIONES NO INCLUYEN TODOS LOS PASOS. LAS PERSONAS CON
CIERTA HABILIDAD MECÁNICA ESTÁN FAMILIARIZADAS CON EL APRETADO DE SUJETADORES POR LO CUAL
ESTOS PASOS NO SE INCLUYEN. NO INTENTAR EL MONTAJE SI NO SE TIENE LA HABILIDAD NECESARIA.
Si necesita ayuda o tiene una duda,
LLAME SIN COSTO AL: 1-800-737-2112.
ADVERTENCIA
No accionar la cortadora de césped si está averiada o no está armada de manera segura y completa.
PIEZAS INCLUIDAS EN EL EMBALAJE DE LA CORTADORA DE CÉSPED
Artículo en la Figura 1 Cantidad
Perno, eje; 3/8"
Figura 1
1
Perno, cabeza hexagonal; 3/8-16 X
2
1 1/2"
Perno, cabeza redonda y cuello
3
cuadrado; 3/8"
Perno, cabeza hexagonal; 1/4"
4
Contratuerca; 1/4"
5
Espaciador
6
Arandela; 1/4"
7
Abrazadera, cable
8
Arandela; 3/8"
9
Tuerca de orejetas, plástica
10
Tuerca, de reborde (fondo dentado);
11
3/8"
Tuerca, de reborde (fondo liso); 3/8"
12
4
2
2
2
2
2
2
1
6
2
4
2
Artículo en la Figura 2 Cantidad
13
14
15
16
No
mostrado
Figura 2
Llame sin costo al: 1-800-737-2112 Copyright © 2016 MAT Engine Technologies, LLC
SP - 9
Asidero superior
Asidero inferior
Deector de la descarga
Ruedas
Bolsa de piezas
Manual de operación
Guía de inicio rápido
450 ml (15 onzas uidas) de aceite
para motor de 4 tiempos
1
1
1
4
1
1
1
1
Page 52

Montaje (La siguiente)
Carcasa
• Guardar estas instrucciones
Si necesita ayuda o tiene una duda,
LLAME SIN COSTO AL: 1-800-737-2112.
AVISO
DE COMPLETAR LOS PASOS DE MONTAJE QUE
APARECEN A CONTINUACIÓN. DURANTE EL MONTAJE
EL MOTOR PODRÍA ESTAR INCLINADO DURANTE
PERÍODOS PROLONGADOS. EL ACEITE PUEDE
DRENAR HACIA LA PARTE SUPERIOR DEL MOTOR Y
CAUSAR PROBLEMAS DE ARRANQUE.
PARA MONTAR EL DEFLECTOR DE LA DESCARGA
NO AGREGAR ACEITE DE MOTOR ANTES
Carcasa
PARA MONTAR EL ASIDERO INFERIOR
Carcasa
Figura 4
Los números de artículo en las instrucciones de montaje y en
la figura corresponden a la lista de piezas en la página 9.
Figura 3
Los números de artículo en las instrucciones de montaje y en
la figura corresponden a la lista de piezas en la página 9.
NOTA: Utilizar llaves para tuercas o cubos de 7/16" o llaves
inglesas ajustables para completar los pasos siguientes:
1. Mientras se alinean los agujeros del deflector de la
descarga (artículo 15) con los agujeros correspondientes
en la carcasa de la cortadora de césped, insertar pernos
hexagonales (artículo 4) a través de la arandela
(artículo 7), el deflector de la descarga (artículo 15) y a
través de la carcasa.
2. Asegurar cada perno con una contratuerca (artículo 5)
como se muestra en la Figura 3.
NOTA: Utilizar llaves para tuercas o cubos de 9/16" o llaves
inglesas ajustables para completar los pasos siguientes:
1. Apoyar la parte posterior de la carcasa de la cortadora
de césped sobre un bloque de madera o apoyo similar.
2. Insertar el asidero inferior (artículo 14) dentro y a través
de las ranuras a cada lado de la parte posterior de la
carcasa, y alinear los agujeros de la carcasa con los
aguje ros en el asidero inferior. Véase la Figura 4.
3. A cada lado del asidero inferior y de la carcasa, insertar
el perno de tope con cabeza hexagonal a través de la
carcasa, la arandela (artículo 9), el espaciador
(artículo 6) y a través del asidero (artículo 14).
4. Asegurar el perno de tope de cabeza hexagonal con las
tuercas de reborde (artículo 12).
Llame sin costo al: 1-800-737-2112 Copyright © 2016 MAT Engine Technologies, LLC
SP - 10
Page 53

Montaje (La siguiente)
• Guardar estas instrucciones
PARA MONTAR EL ASIDERO SUPERIOR
Empuñadura
del arrancador
de retroceso
Guía de la
cuerda del
arrancador
Si necesita ayuda o tiene una duda,
LLAME SIN COSTO AL: 1-800-737-2112.
Los números de artículo en las instrucciones de montaje y en
la figura corresponden a la lista de piezas en la página 9.
1. Colocar el asidero superior (artículo 13) en posición
sobre el asidero inferior (artículo 14). Véase la Figura 5.
2. Insertar los pernos de cabeza redonda y cuello cuadra
do (artículo 3) a través de los agujeros a cada lado de
los asideros superior e inferior, y asegurarlos con las
tuercas de orejetas grandes (artículo 10).
3. Tirar del arrancador de retroceso y enhebrar la cuerda
a través de la abertura de la guía, como se muestra en
la Figura 5.
Figura 5
MONTAJE DEL CONJUNTO DE CONTROL DE LA CUCHILLA
1. Insertar el pasador de perfil T en el soporte como se
muestra en la Figura 6.
NOTA: Para lograr la holgura necesaria en el cable, podría
ser necesario retirar temporalmente la abrazadera premontada del cable del asidero superior. Instalar nuevamente la
abrazadera después de insertarse el pasador.
2. Asegurar el cable al asidero superior con la abrazadera
para cable (artículo 8). Véase la Figura 7.
3. Insertar el extremo del lado opuesto (izquierdo) de la
palanca de control de la cuchilla en el agujero del
asidero superior. Véase la Figura 5.
IMPORTANTE: Después de completar estos pasos, tirar de la
palanca de control de la cuchilla contra el asidero superior.
Esto debe actuar la palanca de freno accionada por resortes
en el motor. La palanca de control de la cuchilla debe retornar elásticamente a la posición superior al soltársela.
ADVERTENCIA
El conjunto de control de la cuchilla es necesario para
poder parar el motor y frenar la cuchilla. Jamás poner en
marcha la cortadora de césped sin el conjunto de control
de la cuchilla montado correctamente.
control de
la cuchilla
Soporte
Abrazadera de
cable premontada
Pasador de perfil TPalanca de
Figura 6
Figura 7
Llame sin costo al: 1-800-737-2112 Copyright © 2016 MAT Engine Technologies, LLC
SP - 11
Page 54

Montaje (La siguiente)
• Guardar estas instrucciones
Si necesita ayuda o tiene una duda,
LLAME SIN COSTO AL: 1-800-737-2112.
PARA MONTAR LAS RUEDAS (ver la Figura 8)
IMPORTANTE: Antes de montar las ruedas, decidir la altura
de corte más adecuada para el césped. Para lograr resultados óptimos, jamás cortar más de una tercera parte de la
altura total de la grama.
NOTA Utilizar llaves para tuercas o cubos de 3/4” y 9/16”
o llaves inglesas ajustables para completar los pasos
siguientes.
Cada esquina de la carcasa de la cortadora de césped
tiene un grupo de 3 agujeros verticales que representan
la configuración de las tres alturas de corte posibles. La
altura de corte se fija y ajusta mediante la selección del
agujero de montaje de las ruedas. Asegurarse de montar
las ruedas en la misma selección de agujero para cada
esquina de la carcasa.
Agujero para altura
de corte de 5.7 cm
(2.25”)
Agujero para altura
de corte de 7.3 cm
(2.88”)
Agujero para
altura de corte
de 8.9 cm
(3.5”)
Figura 8
Los números de artículo en las instrucciones de montaje y en
la figura corresponden a la lista de piezas en la página 9.
1. Asegurar cada rueda a la carcasa mediante la inserción
de un perno-eje (artículo 1) a través de la rueda
(artículo 16), la arandela (artículo 9) y el agujero en la
carcasa. Asegurarla con la tuerca de reborde
(artículo 11).
a. Para ajustar la altura de corte, desmontar cada
rueda y montarla nuevamente según la
nueva selección de ubicación de agujero o altura
de corte.
NOTA: Asegurarse de que las cuatro (4) ruedas estén montadas en la misma posición de altura de rueda.
Llame sin costo al: 1-800-737-2112 Copyright © 2016 MAT Engine Technologies, LLC
SP - 12
Page 55

Operación
• Guardar estas instrucciones
ANTES DE ARRANCAR EL MOTOR
AVISO
El motor de la cortadora de césped se envía desde la fábrica
sin aceite para motor. En el embalaje de la cortadora de
césped se incluye un frasco de aceite para motor (15 onzas
fluidas). Revisar el nivel del aceite antes de arrancar el motor.
Si se arranca el motor sin aceite, el motor sufre daños irreparables y se anula la garantía.
Cómo revisar y agregar aceite para motor
Tipos de aceite a utilizarse
Utilizar aceite altamente detergente para motor con una
clasificación de servicio API de SG, SH, SJ o más alta.
Escoger la viscosidad del aceite para motor según la Fig.
15. Para la mayoría de temperaturas de servicio, se recomienda el aceite con viscosidad 10-30.
AVISO
El uso de aceite no detergente o aceite para motor de dos
tiempos podría dañar el motor y anular la garantía.
Figura 15
Viscosidad recomendada del aceite para temperaturas ambiente de servicio.
SAE
SAE 10W-30
SAE 30
TEMP
-20
-20-30 -1000
Temperatura ambiente de servicio
20
40
Ambient Service Temperature
60 80
2010
100° F
30
40° C
1. Revisar el nivel del aceite siempre antes de arrancar
el motor. Revisar el nivel de aceite diariamente o cada
ocho (8) horas de funcionamiento. Mantener el nivel del
aceite en el NIVEL SUPERIOR de la varilla del nivel de
aceite (ver la Figura 9).
2. Siempre revisar el nivel del aceite con el motor frío y con
la cortadora de césped en una superficie plana, a nivel.
3. Limpiar alrededor del conducto de llenado, retirar la
varilla del nivel de aceite y limpiar con un paño.
4. Colocar nuevamente la varilla del nivel de aceite, sin
apretarla. Verificar que la varilla del nivel de aceite esté
completamente insertada en el conducto de llenado
de aceite. Retirarla y revisar el nivel del aceite.
5. El nivel del aceite debe estar en el NIVEL SUPERIOR
de la varilla del nivel de aceite. Véase la Figura 9.
6. Si se necesita aceite, agregar aceite lentamente
mediante el conducto de llenado de aceite y revisar el
nivel nuevamente. No sobrellenar.
AVISO
El sobrellenado con aceite podría causar dificultad de
arranque, hollinado de la bujía y humeado del motor.
Límite superior
Límite inferior
Figura 9
Llame sin costo al: 1-800-737-2112 Copyright © 2016 MAT Engine Technologies, LLC
SP - 13
Page 56

Bulbo de cebado
Oprimirlo
3 veces
Operación (La siguiente)
• Guardar estas instrucciones
ANTES DE ARRANCAR EL MOTOR
Llenado del tanque de combustible
PELIGRO
Para evitar lesiones corporales o daños materiales, tener sumo cuidado al manipular gasolina. La gasolina es extremadamente inflamable
y los vapores son explosivos. No fumar ni permitir fumar cerca de combustible o de la cortadora de césped. Extinguir todos los cigarrillos,
puros, pipas y otras fuentes de ignición. Jamás reabastecer de combustible la cortadora de césped en espacios interiores. Reabastecerla
de combustible al aire libre DONDE NO HAYAN CHISPAS O LLAMAS. Jamás retirar la tapa del combustible o surtir combustible con el motor en
marcha. Siempre parar el motor y dejarlo enfriar antes de retirar la tapa del combustible. Retirar la tapa del combustible lentamente. Jamás
sobrellenar el tanque de combustible. Evitar derrames de combustible o aceite. Enjugar todo derrame de combustible.
Utilizar gasolina fresca, limpia, regular, sin plomo, de 87 octanos como mínimo. La gasolina fresca evita los depósitos de barniz y
goma en el carburador y en el sistema de combustible. Conforme a las instrucciones del fabricante, se pueden agregar al sistema de
combustible del motor aditivos fácilmente disponibles para reducir el barniz y la goma. No utilizar gasolina con metanol. No mezclar
aceite con gasolina.
1.Retirar la tapa lentamente. Llenar el tanque hasta aproximadamente 1-1/2 pulgadas por debajo de la parte superior del cuello de
llenado para permitir la expansión del combustible. Jamás sobrellenar el tanque de combustible.
2. Después del reabastecimiento de combustible, colocar la tapa del combustible nuevamente y apretarla de manera segura.
3. Si se derrama combustible sobre la ropa, cambiársela inmediatamente.
4. Alejarse al menos 3 metros (10 pies) del sitio de abastecimiento de combustible antes de arrancar el motor.
ARRANQUE DEL MOTOR
Jamás arrancar o hacer funcionar la cortadora de césped dentro de
una habitación o estructura encerrada; la inhalación de los gases
de escape puede causar la muerte. No colocar las manos o los pies
cerca de la cortadora de césped o debajo de la misma. Mantenerse
alejado de la abertura de descarga en todo momento. Mantener a
niños y circunstantes alejados al arrancar el motor y fuera del área
de corte.
1. Con pausas intermedias de aproximadamente 2 segundos,
oprimir el bulbo de cebado lentamente tres veces (ver la fig. 10a).
Cuando las temperaturas son inferiores a 12.8 °C (55 °F),
oprimir el bulbo de cebado cinco veces. Al arrancar
nuevamente un motor caliente, no utilizar el bulbo de cebado.
2. Pararse detrás del asidero de la cortadora de césped, asir la
palanca de control de la cuchilla, sujetándolo firmemente
contra el asidero superior. Véase la fig. 10b.
3. Asir la empuñadura de la cuerda del arrancador y tirar
lentamente hasta sentirse resistencia, luego tirar rápidamente
para arrancar el motor.
La retracción rápida de la cuerda del arrancador (contragolpe) podría
tirar de la mano y brazo hacia el motor más rápido de lo que se puede
ceder. Típicamente, el contragolpe es resultado de una temporización
inapropiada del encendido. Si el contragolpe es evidente, hágase examinar y reparar el motor por un concesionario de servicio autorizado.
4. Lentamente regresar la empuñadura de la cuerda del arrancador
a la guía de la cuerda del arrancador y soltarla.
IMPORTANTE: Para evitar daños al arrancador del motor, no permitir que la cuerda del arrancador golpee bruscamente la guía de
la cuerda.
PELIGRO
ADVERTENCIA
Figura 10a
Palanca de control
de la cuchilla
Asidero superior
Empuñadura del
arrancador de retroceso
Figura 10b
Llame sin costo al: 1-800-737-2112 Copyright © 2016 MAT Engine Technologies, LLC
SP - 14
Page 57

Operación (La siguiente)
• Guardar estas instrucciones
CÓMO PARAR EL MOTOR Y LA CUCHILLA
ADVERTENCIA
Esperar que la cuchilla pare completamente antes de intentar
efectuar trabajo alguno con la cortadora de césped.
1. Soltar la palanca de control de la cuchilla para parar el
motor y la cuchilla.
AJUSTE DE LA ALTURA DE CORTE
Reajustar el montaje de las ruedas a la posición deseada
de altura de las ruedas. Consúltese la sección «Montaje
de las ruedas» en la porción de montaje del manual.
CONSEJOS PARA CORTAR CÉSPED
Inspeccionar exhaustivamente el área en que se va a
utilizar la cortadora de césped y retirar todo objeto extraño tales como rocas, alambre, juguetes, etc.
ADVERTENCIA
Esta cortadora de césped puede lanzar objetos pequeños a alta
velocidad y causar lesiones corporales o daños materiales.
CAUTION
Si se golpea un objeto extraño o si la cortadora de césped
comienza a vibrar anormalmente, parar el motor. Retirar el
enchufe de la bujía, inspeccionar la cortadora de césped exhaustivamente para determinar si hay algún daño, en cuyo caso, repararlos antes de arrancar y utilizar la cortadora de césped nuevamente. Generalmente la vibración es señal de problemas.
Para lograr resultados óptimos:
a) No cortar grama húmeda
b) Jamás cortar más de una tercera parte de la longitud
total de la grama.
c) Planear por adelantado y utilizar una trayectoria de corte
en una dirección en sentido contrario a las manecillas
del reloj para descargar la grama cortada lejos del área
que aún queda por cortarse.
d) Ajustar la velocidad de corte a la condición del césped.
No forzar la cortadora de césped. Esta hará un mejor
trabajo, durará más y con una probabilidad menor de
riesgo de lesión a la velocidad para la cual se la diseñó.
e) La grama nueva, espesa o húmeda podría requerir el
uso de una anchura de corte menor que la nominal de la
cortadora de césped.
f) Al cortar grama muy alta, ajustar la altura de la
cortadora de césped a su valor más alto y efectuar un
primer corte. Ajustar la cortadora de césped a la altura
deseada para un segundo corte.
Llame sin costo al: 1-800-737-2112 Copyright © 2016 MAT Engine Technologies, LLC
SP - 15
Page 58

Mantenimiento de rutina
• Guardar estas instrucciones
ADVERTENCIA
Desconectar la bujía antes de efectuar mantenimiento alguno.
Dar mantenimiento esmerado a la cortadora de césped.
Inspeccionar la cortadora de césped periódicamente. Si la cortadora de césped no está funcionando apropiadamente o está
averiada, hágasela reparar en un centro de servicio calificado.
No cambiar la configuración del regulador del motor ni sobreacelerar el motor. No retirar ni modificar ninguna pieza. El retiro o
modificación de piezas puede conducir a lesiones, daños a la
cortadora de césped y anula la garantía. Utilizar únicamente piezas de repuesto y accesorios Powermate® genuinos. El uso de
toda pieza o accesorio que no sea Powermate® puede conducir
a lesiones, daños a la unidad e invalidar la garantía.
CUIDADO GENERAL DE LA CORTADORA DE CÉSPED
1. Después de cada uso, retirar todo recorte de grama o
despojos de la parte superior de la carcasa y del área del
motor de la cortadora de césped con un cepillo o sopladora
para céspedes y jardines.
2. Periódicamente limpiar el lado inferior de la carcasa de la
cortadora de césped para evitar la acumulación de recortes de
grama, etc.
a) Antes de limpiar el lado inferior de la carcasa, siempre
drenar el tanque de combustible mediante la marcha del
motor hasta que el tanque quede vacío. Desconectar
el cable de la bujía antes de efectuar este o cualquier
otro mantenimiento.
b) Inclinar la cortadora de césped para exponer el lado
inferior de la carcasa de la cortadora de césped.
1. Inspeccionar periódicamente la cuchilla y el adaptador de la
cuchilla para determinar si hay desgaste o daños, especialmente
si se golpea algún objeto extraño. Reemplazarla(o) cuando
sea necesario.
a. Antes de inclinar la cortadora de césped para inspeccionar
el área de la cuchilla, siempre drenar el tanque de
combustible mediante la marcha del motor hasta que el
tanque quede vacío. Desconectar el cable de la bujía antes
de efectuar este o cualquier otro mantenimiento.
b. Inclinar la cortadora de césped para exponer el lado inferior
de la carcasa de la cortadora de césped.
Para retirar o reemplazar la cuchilla:
1. Retirar el perno y las arandelas que sujetan la cuchilla y el
adaptador de la cuchilla al cigüeñal del motor. Véase la Figura 11.
Adaptador de
la cuchilla
Cuchilla
Arandela de muelle
de disco
Arandela plana
Cigüeñal
Perno
AVISO
Siempre inclinar la cortadora de césped de modo que esta descanse
sobre el lado de la carcasa y que el lado del filtro de aire del motor
esté orientado hacia arriba. Antes de comenzar a limpiar la carcasa,
asegurarse de que la cortadora de césped esté descansando en una
posición estable. Jamás inclinar la cortadora de césped más de 90
grados en ninguna dirección, y asimismo, no dejar la cortadora de
césped inclinada durante períodos prolongados. El aceite podría drenar hacia la parte superior del motor y causar problemas de arranque.
c) Raspar el exceso de recortes de grama con una her
ramienta apropiada. No rociar agua en la carcasa de la
cortadora de césped.
3. Con un aceite lubricante liviano:
a) lubricar los puntos de giro en la palanca de control de la
cuchilla al menos una vez cada temporada.
b) lubricar las ruedas al menos una vez cada temporada.
MANTENIMIENTO DE LAS CUCHILLAS
CUIDADO
Tener sumo cuidado al dar mantenimiento a las cuchillas de la cortadora de césped. Las cuchillas son filosas. Para protegerse las
manos, envolver la cuchilla o usar guantes al manipularla.
Adaptador de la cuchilla
Cuchilla
Arandela de muelle de disco
Arandela plana
Perno
2. Retirar del cigüeñal la cuchilla y el adaptador.
3. Se puede afilar la cuchilla con una lima o en una rueda de amolar. No intentar afilar la cuchilla mientras esta aún está en la cortadora de césped. Al afilarse la cuchilla, seguir al ángulo de amolado
original. Amolar cada borde cortante por igual para mantener la
cuchilla equilibrada. Para verificar el equilibrio de la cuchilla, colocar la cuchilla en un destornillador de vástago redondo. Retirar
material del lado más pesado hasta que esté equilibrada.
Figura 11
CUIDADO
Una cuchilla desequilibrada causa vibración excesiva al rotar a velocidades altas. Esta podría causar daños a la cortadora de césped, y
asimismo, romperse y causar lesiones corporales.
4. Lubricar el cigüeñal del motor y la superficie interior del
adaptador de la cuchilla con aceite liviano. Deslizar el
adaptador de la cuchilla sobre el cigüeñal del motor.
Llame sin costo al: 1-800-737-2112 Copyright © 2016 MAT Engine Technologies, LLC
SP - 16
Page 59

Mantenimiento de rutina (La siguiente)
• Guardar estas instrucciones
5. Colocar la cuchilla en el adaptador con la orientación correcta. En cada extremo de la cuchilla, una porción «elevada» de la cuchil
la yace en el lado opuesto de la cuchilla a partir del eje afilado. Al colocarse la cuchilla en el adaptador de la misma, asegurarse
de que la porción «elevada» de la cuchilla esté orientada hacia la carcasa de la cortadora de césped. Véase la Figura 11.
6. Instalar el perno de retención a través de la arandela plana, dos (2) arandelas de resorte de disco, la cuchilla y el adaptador de la
cuchilla. Asegurarse de que la arandela plana y las dos (2) arandelas de resorte de disco estén en el orden apropiado y con la ori
entación mostrada en la fig. 11.
7. Apretar el perno de retención a 40-50 N-m (30-37 pie-lb).
8. Para garantizar la operación segura de la cortadora de césped, revisar periódicamente el par de apriete correcto del perno de la cuchilla.
CUIDADO DEL MOTOR
A continuación aparece una lista de elementos clave del mantenimiento del motor necesarios para el buen rendimiento de la
cortadora de césped.
Artículo de servicio Cada uso Primeras 5 a 8
horas
Revisar el aceite del
motor
Cambiar el aceite del
motor
Revisar el ltro de aire
Dar mantenimiento al
ltro de aire
Revisar la bujía
Dar mantenimiento a la
bujía
Limpiar alrededor del
silenciador
1. Revisar el nivel del aceite del motor antes de cada uso y mantener el nivel de aceite en la marca lleno de la varilla del nivel
de aceite. Ver la sección titulada «Cómo revisar y agregar aceite para motor» en la página 13.
2. Dar mantenimiento al filtro de aire cada 25 horas bajo condiciones normales. Limpiarlo después de unas cuantas horas bajo
condiciones extremadamente polvosas. El rendimiento deficiente del motor y ahogamiento del carburador usualmente indican
que el limpiador de aire necesita servicio. Jamás poner el motor en marcha sin un filtro de aire instalado. Hacer funcionar el
motor sin el filtro puede causar desgaste excesivo y daños al motor.
3. Limpiar el motor habitualmente con un paño o cepillo. Mantener la parte superior del motor libre de despojos para permitir la
circulación apropiada del aire. Retirar toda grama, suciedad y material combustible del área del silenciador.
√
√ √
√
√
Cada temporada
o 25 horas
√
√
Cada temporada
o 50 horas
Cada temporada
o 100 horas
√
Registro de fe-
cha de servicio
Llame sin costo al: 1-800-737-2112 Copyright © 2016 MAT Engine Technologies, LLC
SP - 17
Page 60

Mantenimiento de rutina (La siguiente)
• Guardar estas instrucciones
MANTENIMIENTO DEL FILTRO DE AIRE
Un filtro de aire sucio restringe la admisión de aire. El mantenimiento periódico del filtro de aire ayuda a mejorar el rendimiento del motor y a reducir las emisiones contaminantes.
ADVERTENCIA
Jamás limpiar el filtro de aire con gasolina o con un solvente fácilmente inflamable porque se podría crear un riesgo
de incendio.
1. Retirar la cubierta del filtro de aire y sacar
cuidadosamente el elemento del filtro. (Véase la Figura 12)
2. Limpiar todas las piezas. Limpiar el elemento del filtro
mediante golpes suaves al mismo sobre una superficie
plana. Cambiarlo si está demasiado sucio.
3. Reinstalar el elemento del filtro y la cubierta del filtro de aire.
MANTENIMIENTO DE LA BUJÍA
1. Limpiar la bujía y restaurar el entrehierro una vez
por temporada. Se recomienda cambiar la bujía al
comienzo de cada temporada de corte de césped.
Ver «ESPECIFICACIONES DEL PRODUCTO» en la
página 6 para determinar el tipo correcto de bujía y las
especificaciones del entrehierro.
Elemento ltrante del aire Cubierta del ltro de aire
Figura 12
0.028 - 0.031 in.
0.7 - 0.8 mm
ADVERTENCIA
No revisar la chispa sin la bujía instalada. No intentar arrancar el motor con la bujía no instalada.
Para un buen funcionamiento del motor, la bujía ha de
estar libre de depósitos o desgaste excesivo del electrodo.
2. Retirar el cable de la bujía y retirar la bujía con una llave
para bujías.
CUIDADO
Si el motor ha estado funcionando, el silenciador estará muy
caliente. Tener cuidado de no tocar el silenciador.
3. Inspeccionar la bujía visualmente. Descartarla si hay
desgaste evidente o si el aislamiento está agrietado o
astillado. Si se la va a reutilizar, limpiar la bujía con un
cepillo de alambre.
4. Medir el entrehierro de la bujía con una galga para huelgos.
Ajustar el entrehierro según sea necesario mediante el
doblado del electrodo. Véase la Figura 13.
5. Reinstalar la bujía; comenzar a mano para no estropear
la rosca.
6. Una vez se ha asentado la bujía, apretarla con una llave
para bujías 1/4 de vuelta adicional (24.4 N-m) [18 pie-lb].
Figura 13
AVISO
Se ha de apretar la bujía de manera segura. Una bujía no
apretada adecuadamente podría sobrecalentarse y dañar
el motor.
Llame sin costo al: 1-800-737-2112 Copyright © 2016 MAT Engine Technologies, LLC
SP - 18
Page 61

Mantenimiento de rutina (La siguiente)
• Guardar estas instrucciones
CÓMO CAMBIAR EL ACEITE
1. Cambiar el aceite del motor después de cada temporada
o 50 horas de funcionamiento.
2. Para drenar el tanque de combustible, hacer marchar el
motor hasta que el tanque quede vacío.
Figure 14
3. Limpiar alrededor del conducto de llenado y retirar la
varilla del nivel de aceite.
4. Colocar un contenedor adecuado junto a la cortadora
de césped para captar el aceite usado y, a continuación,
inclinar la cortadora de césped sobre su lado derecho.
Se drena el aceite usado a través del cuello de llenado.
Permitir el drenaje completo del aceite.
Véase la Figura 14.
NOTA: El drenaje del aceite será más fluido al estar tibio.
IMPORTANTE: El aceite usado es un desecho peligroso. Colocar
el aceite en un contenedor sellado y llevarlo al centro de reciclaje local. NO desecharlo con los residuos domésticos.
5. Llenar nuevamente el motor con aceite. Verterlo
lentamente. No sobrellenar. Ver «Cómo revisar y
agregar aceite para motor» en la página 13.
ALMACENAMIENTO
Es necesario drenar el combustible de cortadoras de
césped a ser almacenadas durante más de 30 días para
evitar el deterioro y formación de goma en el sistema de
combustible del motor. Si la gasolina en el motor se deteriora durante el almacenamiento, es posible que se tenga
que dar mantenimiento al carburador y otros componentes
del sistema de combustible o reemplazarlos. Conforme
a las instrucciones del fabricante, se pueden agregar al
sistema de combustible del motor aditivos fácilmente disponibles para reducir el barniz y la goma.
1. Agotar el combustible del tanque mediante la marcha del
motor hasta que este pare por falta de combustible.
2. Cambiar el aceite. Ver la sección «Cómo cambiar el aceite».
3. Retirar la bujía y verter aproximadamente media onza de
aceite de motor en el cilindro. Instalar la bujía
nuevamente y tirar lentamente de la cuerda del arrancador
varias veces para distribuir el aceite.
4. Limpiar la grama y despojos de alrededor del motor, y
debajo, alrededor y detrás del silenciador.
5.Almacenarla en un área limpia, seca y bien ventilada,
alejada de calentadores de agua, motores eléctricos
o interruptores, hornos, o donde se utilicen herramientas
mecánicas.
6. Mantener el motor a nivel en almacenamiento. Inclinarlo
podría causar fugas de combustible o aceite.
PIÈCES COURANTES DE RECHANGE
1. Filtro de aire A203228
2. Bujía A203244
3. Cuchilla A202068
4. Ruedas A202052
Llame sin costo al: 1-800-737-2112 Copyright © 2016 MAT Engine Technologies, LLC
SP - 19
Page 62

Diagnóstico y resolución de problemas
• Guardar estas instrucciones
PROBLEMA CAUSA(S) POSIBLE(S) SOLUCIÓN O SOLUCIONES
El motor no arranca 1.
Marcha irregular del motor 1. Cable de bujía flojo
El tanque de combustible está vacío
2. La palanca de control de la cuchilla no está
accionada
3. Motor no cebado
4. Cable de bujía desconectado
5. Bujía hollinada
6. Filtro de aire obstruido
7. Motor ahogado
8. Filtro de combustible obstruido
9. Tubería de combustible bloqueada
10. Combustible viejo o contaminado
11. Otro
2. Bujía hollinada
3. Entrehierro de bujía incorrecto
4. Filtro de aire obstruido
5. Venteo obstruido en tapa de combustible
6. Filtro de combustible obstruido
7. Tubería de combustible parcialmente
bloqueada
8. Combustible viejo o contaminado
9. Otro
1. Surtir combustible fresco.
2. Asir y sujetar la palanca de control de la cuchilla firmemente
contra el asidero mientras se tira de la empuñadura de la cuerda
del arrancador.
3. Cebar el motor como se indica en «Arranque del motor» en la
página 14.
4. Conectar el cable de la bujía a la bujía
5. Dar mantenimiento a la bujía como se indica en la página 18.
6. Dar mantenimiento al filtro de aire como se indica en la página
18.
7. Esperar unos cuantos minutos y rearrancar el motor sin
cebarlo.
8. Retirar el filtro de combustible. Inspeccionarlo. Reemplazarlo
si fuera necesario.
9. Despejar o reemplazar la tubería de combustible.
10. Drenar el tanque de combustible. Limpiar el tanque de
combustible. Llenarlo con combustible fresco.
11. Llevar la unidad a un centro de servicio autorizado.
1.
Conectar de manera segura el cable de la bujía a esta.
2. Dar mantenimiento a la bujía como se indica en la página 18.
3. Dar mantenimiento a la bujía como se indica en la página 18.
4. Dar mantenimiento al filtro de aire como se indica en la página 12.
5. Despejar la ventilación en la tapa de combustible.
6. Retirar el filtro de combustible. Inspeccionarlo. Reemplazarlo si
fuera necesario.
7. Despejar o reemplazar la tubería de combustible.
8. Drenar el tanque de combustible. Limpiar el tanque de combustible.
Llenarlo con combustible fresco.
9. Llevar la unidad a un centro de servicio autorizado.
Potencia baja del motor 1. Grama demasiado alta, demasiado espesa
o húmeda
2. Acumulación de grama y despojos bajo la
carcasa de la cortadora de césped
3. Filtro de aire obstruido
4. Nivel de aceite del motor demasiado alto
5.
Otro
El motor sobrecalienta 1. Nivel de aceite del motor demasiado bajo
2. Filtro de aire obstruido
3.
Otro
Vibración excesiva 1. Cuchilla de cortadora de césped floja o
desequilibrada
2. Cuchilla de corte doblada
Corte irregular o desigual 1. Alturas incorrectas de ruedas
2. Cuchilla roma
3. Acumulación de grama y despojos bajo la
carcasa de la cortadora de césped
1. Elevar la altura de corte o reducir la anchura de corte como se
indica en «Consejos para cortar césped» en la página 15. Dejar
que la grama seque antes de cortarla.
2. Limpiar los despojos en el lado inferior de la carcasa de la
cortadora de césped como se indica en «Cuidado general de la
cortadora de césped» en la página 16.
3. Dar mantenimiento al filtro de aire como se indica en
«Mantenimiento del filtro de aire» en la página 18.
4. Revisar el aceite del motor como se indica en «Cómo revisar
y agregar aceite para motor» en la página 13; drenar y ajustar el
nivel del aceite según el caso.
5. Llevar la unidad a un centro de servicio autorizado.
1. Agregar aceite de motor como se indica en «Cómo revisar y
agregar aceite para motor» en la página 13.
2. Dar mantenimiento al filtro de aire como se indica en
«Mantenimiento del filtro de aire» en la página 18.
3. Llevar la unidad a un centro de servicio autorizado.
1. Apretar el perno de retención de la cuchilla o equilibrar la cuchilla
como se indica en «Cuidado de la cuchilla» en la página 16.
2. Reemplazarla con una cuchilla nueva. Si la vibración
continúa, llevar la unidad a un centro de servicio autorizado.
1. Ajustar la altura de las ruedas como se indica en la página 12.
2. Reemplazar o afilar la cuchilla como se indica en «Cuidado de
la cuchilla» en la página 16.
3. Limpiar los despojos en el lado inferior de la carcasa de la
cortadora de césped como se indica en «Cuidado general de la
cortadora de césped» en la página 16.
Llame sin costo al: 1-800-737-2112 Copyright © 2016 MAT Engine Technologies, LLC
SP - 20
Page 63

Servicio técnico
Es posible que usted tenga preguntas adicionales relativas al montaje, uso o mantenimiento de esta cortadora de césped.
En dicho caso, póngase en contacto con nuestro Departamento de Servicio Técnico al 1-800-737-2112 (solo inglés).
También se puede enviar correspondencia a:
Oficina Corporativa METL; SOLO CORRESPONDENCIA
ATTN: Technical Service – METL
Si se necesita ayuda o se tienen preguntas, LLAMAR
GRATUITAMENTE AL: 1-800-737-2112
6700 Wildlife Way
Long Grove, IL 60047
Al contactarse al Departamento de Servicio Técnico, tener listos:
• Su nombre
• Su dirección
• Su número de teléfono
• Número de modelo del producto
• Fecha de compra
(incluida una copia del recibo para solicitudes por escrito)
• Código de fecha en la unidad
Garantía
• Guardar estas instrucciones
Garantía limitada para la CORTADORA DE CÉSPED Powermate
A
Siempre especificar el número del modelo al ponerse en contacto con la fábrica.
Nos reservamos el derecho de enmendar estas especificaciones en cualquier momento y sin aviso previo. La única garantía pertinente es nuestra garantía estándar por escrito. No ofrecemos ninguna otra garantía, expresa o implícita. MAT Engine Technologies,
LLC garantiza que esta cortadora de césped y cualesquier piezas de la misma carecen de defectos en materiales y mano de obra
durante un año (90 días para uso comercial o para unidades reacondicionadas) a partir de la fecha de compra original en un concesionario autorizado, siempre y cuando se haya dado mantenimiento apropiado al producto y se lo haya utilizado de conformidad con
todas las instrucciones pertinentes. Se extiende esta garantía únicamente al comprador al por menor original. Se ha de presentar
el contrato de venta o prueba de compra al efectuarse una reclamación bajo esta garantía. Esta garantía no cubre uso comercial,
industrial o de alquiler, y asimismo, no es pertinente a piezas que no estén en su condición original debido a desgaste normal o piezas
que fallen o sufran averías como resultado de uso indebido, accidente, falta de mantenimiento apropiado, manipulación imprudente y
peligrosa, o alteración. Las excepciones del período de garantía serían el desgaste normal de artículos como cuchillas, filtros de aire
y bujías, los cuales están cubiertos únicamente durante 60 días contra defectos en materiales y mano de obra. Los costos de viaje,
manipulación, transporte e incidentales asociados con reparaciones bajo garantía no son reembolsables al amparo de esta garantía y
son responsabilidad del propietario. Hasta donde lo permita la ley de la jurisdicción que gobierne la venta de este producto, esta garantía expresa excluye cualesquier y toda otra garantía expresa y limita la duración de cualquier y toda garantía implícita, incluyendo
las garantías de comerciabilidad e idoneidad para un propósito específico durante dos años a partir de la fecha de compra original, y
por la presente, se limita la responsabilidad de MAT Engine Technologies, LLC al precio de compra del producto y MAT Engine Technologies, LLC no será responsable por ningún otro daño en lo absoluto, incluidos daños indirectos, incidentales o emergentes. Algunos estados no permiten limitaciones sobre la duración de una garantía implícita, ni la exclusión o limitación de los daños incidentales
o emergentes, por lo cual la limitación de daños anterior podría no ser pertinente en algunos casos. Esta garantía brinda al comprador
original derechos específicos.
Para obtener información sobre esos derechos, consúltense las leyes estatales pertinentes.
Oficina Corporativa METL; SOLO CORRESPONDENCIA
ATTN: Technical Service – METL
6700 Wildlife Way
Long Grove, IL 60047
La garantía del sistema de control de emisiones contaminantes está proporcionada por el fabricante del motor y está incluida con este
producto y administrada por MAT Engine Technologies, LLC.
Si se tiene alguna pregunta sobre la cobertura del propietario
al amparo de esta garantía, ponerse en contacto con Servicio
al cliente de METL:
Llame sin costo al: 1-800-737-2112 Copyright © 2016 MAT Engine Technologies, LLC
SP - 21
Si se necesita ayuda o se tienen preguntas,
LLAMAR GRATUITAMENTE AL: 1-800-737-2112
 Loading...