

Page 1

Operator’s Manual
Front Tine
Rotary Tiller
Look inside for:
Page
Safety Definitions 2
Important Safety Information 3-5
Product Specifications 6
Parts & Features 6
Safety Decals 7
Assembly 8-11
Engine Preparation 12
Operation 13-16
Maintenance 17-19
Technical Service 19
Troubleshooting 20
Warranty 21
MODEL No. PFTT142
IMPORTANT:
Thank you for purchasing this Powermate® Tiller.
This manual provides complete instructions for safely operating and maintaining your Tiller. Read and save these
instructions. Refer to this manual each time before using your Tiller.
Record the following for future reference:
Mfg. Date Code: ____________________
Date of Purchase: Attach a copy of your sales receipt.
Consumer Toll Free Number: 1-800-737-2112
Refer to the website for electronic manual and parts book.
www.powermateoutdoor.com
WARNING
Engine exhaust, some of its constituents, and certain product components contain or emit chemicals known to the State
of California to cause cancer and birth defects or other reproductive harm.
If you have a question or problem...
CALIFORNIA PROPOSITION 65 WARNING
CALL TOLL FREE: 1-800-737-2112
KEEP THIS MANUAL FOR FUTURE REFERENCE
06/10/2016 Printed in China A203399
Page 2

Safety Definitions
• Save these instructions
Safety Alert Symbols
Important Safety Information
The following symbols are used on the product and in this manual to alert the operator of potential safety hazards.
Read them carefully, and understand their meaning.
DANGER
WARNING
CAUTION
NOTICE
The following symbols may be found on your tiller. Carefully read and understand their meaning.
Safety Warning Symbols
Indicates WARNING, DANGER, or
CAUTION.
Read operator’s manual before operating
this machine. Failure to follow directions
could result in serious injury.
Do not use if children or bystanders are
present.
Rotating parts can cause serious injury.
Keep hands, feet and clothing away.
Indicates an imminently hazardous situation which, if not avoided, will result in death or serious injury.
Indicates a potentially hazardous situation which, if not avoided, could result in death or serious injury.
Indicates a potentially hazardous situation which, if not avoided, may result in minor/moderate
injury.
Indicates a practice not related to personal injury which, if not avoided, may result in property damage.
Disconnect spark plug wire when not in use
or before servicing, cleaning, or performing
maintenance on the unit.
Engine exhaust contains carbon monoxide,
an odorless and deadly gas. NEVER run unit
indoors or in a poorly ventilated area.
Do NOT touch hot muffler or cylinder. These
parts are extremely hot from operation and
may remain hot for a short time after operation.
To reduce risk of fire, clean spilled gas and
oil and keep unit free from debris. Gasoline is
extremely flammable. Allow machine to cool
before refueling
Wear eye protection complying with ANSI
Z87.1 and hearing protection.
Control and Operating Symbols
Oil Fill Location
Do Not Overfill. Add engine oil and
check quantity at this location
CLUTCH
CONTROL
ENGAGE
DISENGAGE
Clutch Lever
Lifting the lever engages the tines.
Do not use gasoline containing more
than 10% ethanol.
Push primer 3 times before starting
a cold engine.
ENG - 2Questions? Call Toll Free at 1-800-737-2112 Copyright © 2016 MAT Engine Technologies, LLC
starting a hot engine, push only
once.
Ignition Switch
Move switch position to start/stop
engine.
Place free hand on handle bar
before pulling recoil starter handle
with other hand.
Important: For
Page 3

Important Safety Information
• Save all instructions
RESPONSIBILITY OF OPERATOR
1. Carefully read and follow these safety instructions. Failure to do so can result in serious injury.
2.
Know your product. Read and understand this manual before use. Compare the illustrations to unit. Learn location
and function of all controls. Thoroughly understanding the unit before use will result in the best performance and safety.
3. Follow all instructions when assembling the unit. If the unit was purchased in assembled condition, the operator must
check the unit carefully to make sure it was assembled according the instructions in the manual before use.
4. Regularly inspect the tiller. Make sure parts are not bent, damaged, or loose.
5. Use this equipment for its intended purpose only.
6. Operate the unit only with guards, shields, and other safety items in place and working correctly.
7. Service the unit only with authorized or approved replacement parts.
8. Complete all unit maintenance and adjustments according to the instructions in this manual.
Look for this symbol to point out important safety precautions. It means: “ Attention! Become Alert! Your Safety Is
Involved.”
WARNING
Engine Exhaust, some of its constituents, and certain vehicle components contain or emit chemicals known to the State
of California to cause cancer and birth defects or other reproductive harm.
WARNING
To prevent accidental starting when setting up, transporting, adjusting or making repairs, always disconnect spark plug
wire and put wire where it cannot contact the spark plug.
Important Safety Information
PREPARATION SAFETY
WARNING
• Read, understand, and follow all instructions on the machine and in this manual. Be thoroughly familiar with the
controls and the proper use of the tiller before starting. Know how to stop the engine quickly.
• Familiarize yourself with all the safety and operating decals on this equipment.
• Thoroughly inspect the area where the tiller is to be used and remove all foreign objects. Your equipment can propel
small objects at high speed causing personal injury or property damage. Stay away from breakable objects, such as
house windows, auto glass, greenhouses, etc.
• Check that all nuts and bolts are tight and equipment is in good condition before each use.
OPERATION SAFETY
• Never allow children or young teenagers to operate the tiller.
WARNING
• Keep area of operation clear of all bystanders, particularly small children and pets.
• Only allow responsible individuals, who are familiar with the instructions, to operate the tiller.
• Do not operate the tiller while under the influence of alcohol, drugs, or other medication which can cause drowsiness
or affect your ability to operate this machine safely.
• Do not use this machine if you are mentally or physically unable to operate the machine safely.
• Always wear ANSI compliant safety goggles or safety glasses with side shields when operating tiller to protect your
eyes from foreign objects, which can be thrown from the unit.
• Wear appropriate clothing such as a long sleeved shirt or jacket. Also wear long trousers or slacks. Do NOT wear
shorts. Do NOT wear loose clothing, which could get caught in this equipment.
• Always wear work gloves and sturdy footwear such as leather work shoes or short boots. These will protect ankles
and shins from small sticks, splinters, and other flying debris, and improve traction.
• It is advisable to wear protective headgear to protect against being struck by small flying particles, or being struck by
low hanging branches, twigs, or other objects, which may be unnoticed by the operator.
ENG - 3Questions? Call Toll Free at 1-800-737-2112 Copyright © 2016 MAT Engine Technologies, LLC
Page 4

Important Safety Information (Continued)
• Save all instructions
Important Safety Information
WARNING
• Do not put hands or feet near or under rotating parts.
• Exercise extreme caution when operating on or crossing gravel drives, walks, or roads. Stay alert for hidden hazards
or traffic.
• Exercise caution to avoid slipping or falling. Always be sure of your footing; keep a firm hold on the handle and walk;
never run. Never operate the tiller at high transport speeds on slippery surfaces.
• Never operate the tiller without good visibility or light.
DANGER
• Do not run the engine indoors or inside a closed area. The exhaust fumes are dangerous, containing CARBON
MONOXIDE, an ODORLESS AND DEADLY GAS.
• Never leave the tiller unattended when the engine is running. Stop the engine and make sure all moving parts have
stopped. Remove the wire from the spark plug.
• Watch for holes, ruts, bumps, or other rough ground. Tall grass can hide obstacles.
• Always look behind and down and use caution when using reverse or pulling the tiller towards you.
• Never attempt to start the tiller unless both wheels are in the locked position. This acts as a brake for the tiller.
Always start the tiller on the level surface.
WARNING
• Disengage clutch lever and stop engine before leaving the tiller in operating position. Wait until the tines come to a
complete stop before removing debris or making any adjustments to the tiller.
• Do not attempt to till hard soil, till too deep or till at too fast a rate that can overload the tiller.
• If the tiller should start to vibrate abnormally, stop the engine, disconnect the spark plug wire and prevent it from
touching the spark plug. Check immediately for the cause. Vibration is generally a warning of trouble.
FUEL SAFETY
WARNING
• Gasoline is extremely flammable, and gasoline vapors can explode if ignited. Handle with care.
• Use an approved container.
• Check fuel supply before each use, allowing space for expansion as the heat of the engine and/or sun can cause fuel
to expand.
• Fill fuel tank outdoors with extreme care. Never fill fuel tank indoors.
• Never remove gas cap or add fuel with the engine running. Allow engine to cool a minimum of 2 minutes
before refueling.
• Do not smoke while refueling.
• After refueling, replace fuel tank cap securely and wipe up spilled fuel.
• Never store fuel or tiller with fuel in the tank inside a building where fumes may reach an open flame.
• Never fill gasoline containers or the tiller fuel tank inside of a vehicle or in a truck bed. Accidental electrical static dis
charge can ignite fuel vapors which could result in serious injury or death.
STORAGE SAFETY
•
Always refer to the operator’s manual instructions for important details if the tiller is to be stored for an extended period.
• Never store the tiller with fuel in the fuel tank inside a building where ignition sources are present such as water
heaters, space heaters, clothes dryers, etc.
• To reduce fire hazard, keep tiller free of grass, leaves, or other debris build-up.
• Allow the engine to cool before storing in any enclosure.
REPAIR, MAINTENANCE, AND ADJUSTMENT SAFETY
• After striking a foreign object, stop the engine. Remove the wire from the spark plug and keep the wire away from the
plug to prevent accidental starting. Thoroughly inspect the tiller for any damage. If damaged, have the equipment
repaired by a trained technician before restarting and operating.
ENG - 4Questions? Call Toll Free at 1-800-737-2112 Copyright © 2016 MAT Engine Technologies, LLC
Page 5

Important Safety Information (Continued)
• Save all instructions
WARNING
• Stop the engine before cleaning, repairing, or inspecting the unit. Make sure all moving parts have stopped. Let the
engine cool, disconnect the spark plug wire and move it away from the spark plug.
• Never attempt to make any adjustments while the engine is running except when specifically recommended by the
manufacturer.
• Keep the tiller in safe working condition. Check all fasteners at frequent intervals for proper tightness.
• When servicing or repairing the tiller, do not tip the machine over or up unless specifically instructed to do so in this
manual. Service and repair procedures can be done with the tiller in an upright position. Some procedures will be
easier if the machine is lifted on a raised platform or working surface.
• Use only original equipment or authorized replacement parts.
• Never tamper with safety devices. Check their proper operation regularly.
• Do not change the engine governor setting or over-speed engine.
• Clean and replace safety and instruction decals as necessary.
• To guard against engine over-heating, always have engine debris filter mounted and clean.
CHILDREN SAFETY
WARNING
• Tragic accidents can occur if the operator is not alert to the presence of children. Children are often attracted to the
tiller and the tilling activity.
• Keep children out of the tilling area and under the watchful care of a responsible adult.
• Never assume that children will remain where you last saw them.
• Be alert and turn tiller off if children enter the area.
• Before and while moving backwards, look behind and down for small children.
• Never allow children to operate the tiller.
• Use extra care when operating near blind corners, shrubs, trees, or other objects that may obstruct vision.
Important Safety Information
ENG - 5Questions? Call Toll Free at 1-800-737-2112 Copyright © 2016 MAT Engine Technologies, LLC
Page 6

Product Specifications
• Save all instructions
Unit Weight . . . . . . . . . . . . . . . . . . . . . . . . . . . .89 lb (40 kg)
Tilling Width . . . . . . . . . . . . . . . . . . . . up to 21 in (53.3 cm)
Tilling Depths . . . . . . . . . . . . . . . . . . . . . . up to 8” (20.3 cm)
Tine Diameter . . . . . . . . . . . . . . . . . . . . . . . .11 in (27.9 cm)
Gasoline Type .......Regular Unleaded/87 Octane (min.)
Gasoline Capacity . . . . . . . . . . . . . . . . . . . . 1.0 US qt. (1 L)
Engine Oil Type (API SG-SL) . . . . . . . . . . . . . . . . . . . . . . . .
10W-30 is recommended for all service temperatures.
See page (11) for additional information.
Engine Oil Capacity . . . . . . . . . . . . . 15-1/2 US oz (450 ml)
Engine Type . . . . . . . . . . . . . . . . . . . . . . . . . . OHV 4-stroke
REFER TO ENGINE MANUAL FOR DETAILED ENGINE SPECS.
Parts & Features
1. Tines
2. Swing Plate
3. Wheels
4. Muffler
5. Air Filter
6. Recoil Starter Handle
7. Spark Plug / Spark Plug Wire
8. Drag Bar
9. Primer Bulb
10. Fuel Tank Cap
11. Oil Dipstick
12. Clutch Lever
13. Tine Shield
14. Outside Tine Shield
4
14
Engine Displacement . . . . . . . . . . . . . . . . . . . . . . . . . 150cc
Engine Speed . . . . . . . . . . . . . . . . . . . . . . . . . . . . 3400 rpm
Torque Rating .... 5.75 ft-lbs gross torque per SAE J1940
Intake Valve Clearance . . . . . . . . . . . . . . . . . . . . . . . . . . . . .
0.006-0.008 in. (0.15-0.20 mm)
Exhaust Valve Clearance . . . . . . . . . . . . . . . . . . . . . . . . . . .
0.006-0.008 in. (0.15-0.20 mm)
Spark Plug Gap ............0.020-0.028 in. (0.5-0.7 mm)
Spark Plug Type . . . . . . Torch K7RTC (Champion C7YCC)
Wheel Size . . . . . . . . . . . . . . . . . . . . . . . . . . .6.5” (16.5 cm)
12
9
5
2
13
6
11
7
10
8
3
1
Figure 1
ENG - 6Questions? Call Toll Free at 1-800-737-2112 Copyright © 2016 MAT Engine Technologies, LLC
Page 7

Safety Decals
• Save all instructions
This tiller has been designed and manufactured to provide
you with the safety and reliability you would expect from an
industry leader in outdoor power equipment manufacturing.
Although reading this manual and the safety instructions it
contains will provide you with the necessary basic knowledge
to operate this equipment safely and effectively, we have
placed several safety labels on the tiller to remind you of this
important information while you are operating the unit.
These important safety labels are illustrated and are shown
here to help familiarize you with the location and content to
the safety messages you will see as you perform normal tilling
operations. Please review these labels now. If you have any
questions regarding their meaning or how to comply with these
instructions, reread the complete safety instruction text on the
preceding pages, or contact your local dealer.
Should any of the safety labels become unreadable because of being worn, faded, or otherwise damaged during
the use of your tiller, please contact your local authorized
dealer to order replacement labels.
The safety labels are easily applied, and will act as a constant visual reminder to you and others who may use the
equipment. Following the safety instructions is necessary
for safe, effective operation of your tiller.
• Gasoline is flammable. Allow engine to cool at least 2 minutes
before refueling.
• Operation of this equipment may create sparks that can start
fires around dry vegetation. A spark arrestor may be required.
The operator should contact local fire agencies for laws or
regulations relating to fire prevention requirements.
ENG - 7Questions? Call Toll Free at 1-800-737-2112 Copyright © 2016 MAT Engine Technologies, LLC
Page 8

Assembly
• Save all instructions
Read and follow the assembly instructions. Do not discard any parts or materials until the unit is assembled.
References to the right or left side of the tiller are from the viewpoint of the operator’s position behind the tiller.
WARNING
Do not operate tiller if it is damaged or not completely and correctly assembled.
WARNING
Before doing any assembly or maintenance to the unit, remove the wire from the spark plug.
WARNING
Always wear ANSI compliant safety glasses with side shields while assembling the tiller.
The following components will be found in the carton.
Quantities shown in ( ).
1. (1) Tiller
2. (1) Upper Handle Assembly
3. (1) Lower Handle
4. (4) Tines
5. (1) Wheel Assembly
6. (1) Drag bar
7. (2) Outside Tine Shields
8. (1) Tiller Operator’s Manual
9. (1) Engine Manual
10. (1) Bottle of Engine Oil
11. (1) Parts bag containing the following
a. (4) M10 x 25 mm bolts, flat washers and lock washers for assembling lower handle.
b. (4) M8 x 25 mm saddle bolts and flat washers for assembling upper handle to lower handle.
c. (4) Handle knobs, for upper handle to lower handle.
d. (2) M8 x 50 mm bolts, (4) flat washers and (2) lock nuts for assembling outer tines.
e. (2) M10 x 50 mm bolts, (4) flat washers and (2) M10 locknuts for assembling inner tines.
f. (1) Pin, flat washer and hairpin cotter for drag bar.
g. (6) M6 x 16 bolts, lock nuts, and flat washers for installing outside tine shields.
h. (1) Rope guide with nylock nut.
i. (1) Cable Ties.
If you need assistance or find any parts missing, CALL
TOLL FREE: 1-800-737-2112.
How to Remove Tiller from Carton
A
1. Remove all parts and packaging components.
2. Use a utility knife to cut all 4 vertical edges and lay the side panels flat around the tiller.
3. Remove any remaining packaging.
ENG - 8Questions? Call Toll Free at 1-800-737-2112 Copyright © 2016 MAT Engine Technologies, LLC
Page 9
Assembly (Continued)
• Save all instructions
Assembly Instructions
B
The tiller comes assembled except for a few parts. The following instructions will help you complete the tiller assembly.
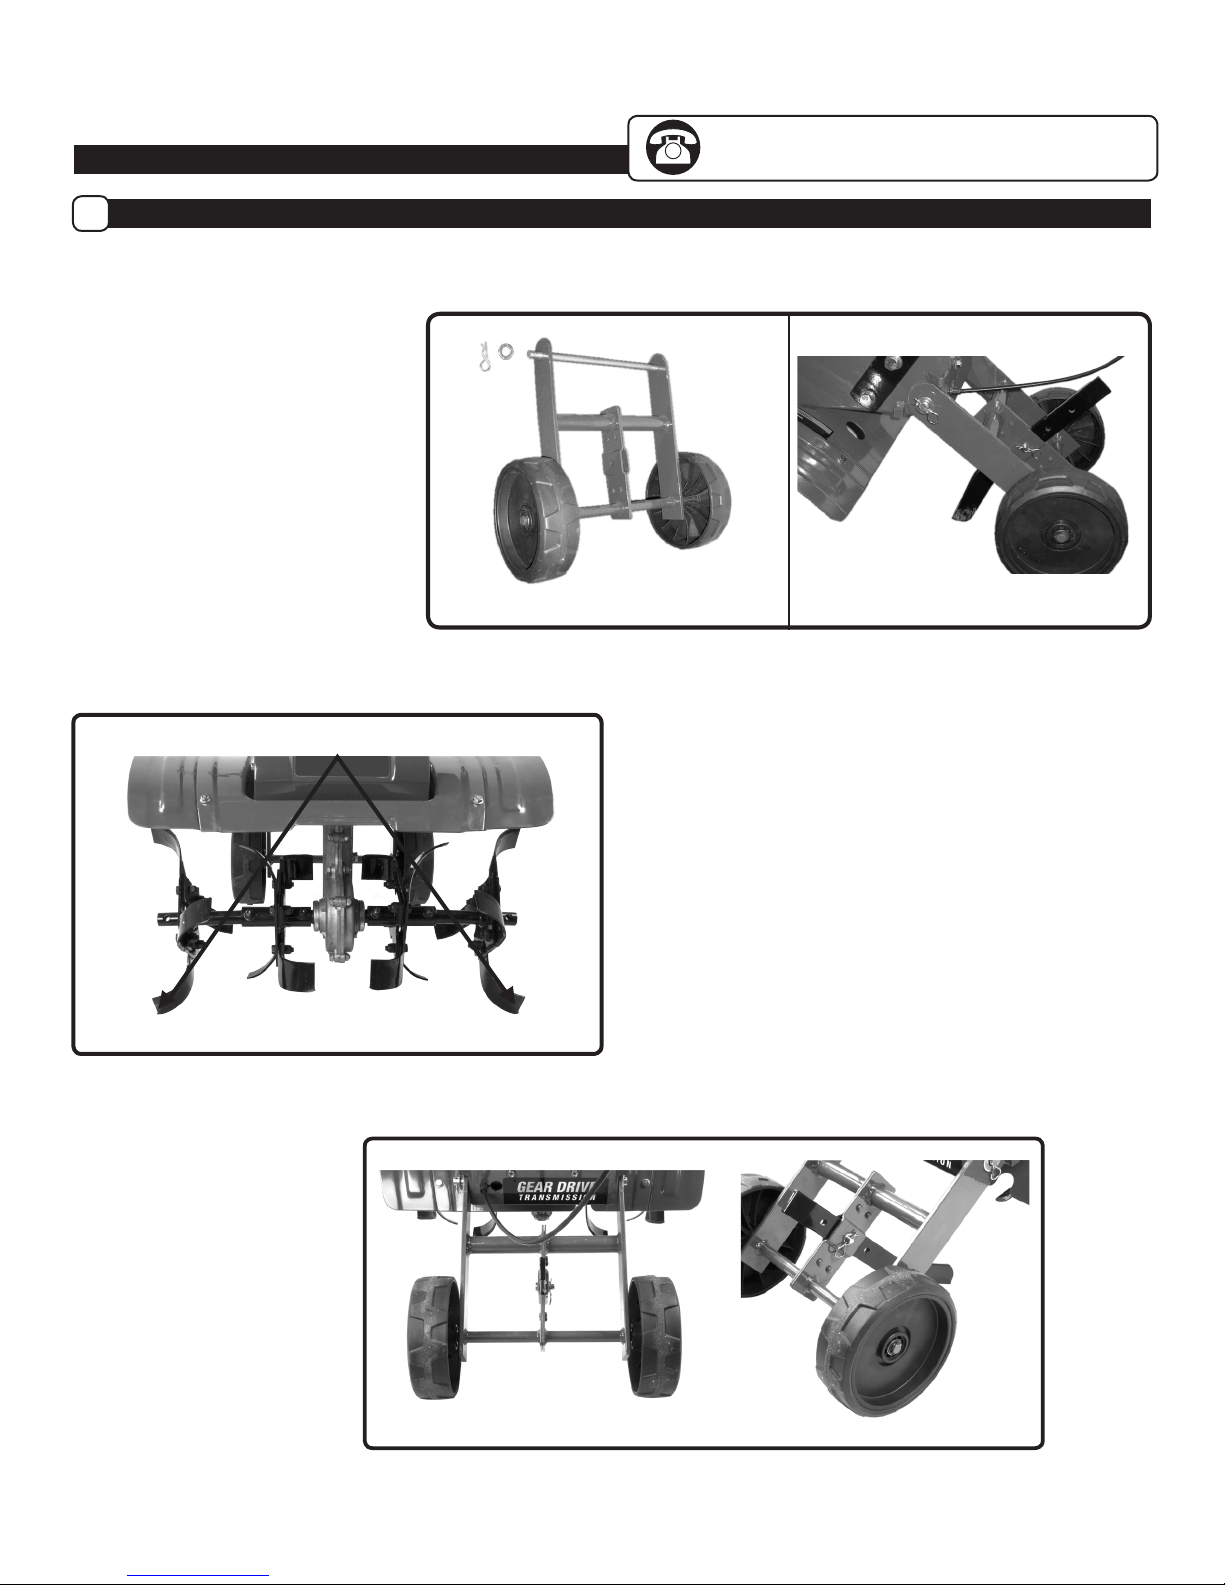
ATTACH THE WHEEL ASSEMBLY
TO THE FRAME
1. Install the wheel assembly to the
frame by removing a hairpin
cotter and at washer from
one end of pivot rod. Remove
rod. Align pivot holes in wheel
assembly to pivot holes in frame.
Install pivot rod and secure by
reinstalling at washer and
hairpin. (See Figure 2)
If you need assistance or find any parts missing, CALL
TOLL FREE: 1-800-737-2112.
Figure 2
Sharp edge of tine should face down to the ground.
INSTALL THE DRAG BAR
1. Insert the drag bar into the
bottom of the wheel bracket
assembly. (See Figure 4)
2. Insert the pin through the
bracket and the middle
hole of drag bar and secure
with flat washer and
hairpin cotter. (See Figure 4)
Figure 3
INSTALL THE TINES (See Figure 3)
1. Slide the tines onto the tine axle. Install the internal tines
first. Sharp edge of the front and top tines should face
down and forward to till the ground. Insert the
M10 x 50 bolt with lock nut provided to secure the
inside tines. Use one flat washer under the head of the
bolt and one under the locknut. Tighten securely.
2. For wide 21” tilling, install the outside tines in the way
that the long half of the tine tube faces towards the
inside tines. For narrow 16” tilling, install the outside
tines in a way that the short half tine tube faces towards
the inside tines.
3. Insert the M8 x 50 bolt with the locknut provided to
secure the outside tines. Use one flat washer under
the head of the bolt and one under the locknut.
Tighten securely.
Figure 4
ENG - 9Questions? Call Toll Free at 1-800-737-2112 Copyright © 2016 MAT Engine Technologies, LLC
Page 10
Assembly (Continued)
• Save all instructions
If you need assistance or find any parts missing, CALL
TOLL FREE: 1-800-737-2112.
INSTALL LOWER HANDLE (See Figure 5)
1. Orient lower handle with upper square holes as
shown. Align lower handle holes with respective
holes in the frame and loosely install two M10 x
25 mm bolts, lock washers and flat washers on
each side.
2. Using a wrench, tighten bolts securely on
each side.
Figure 5
ATTACH UPPER HANDLE (See Figure 6,7)
1. Slide the upper handle down over the lower
handle and align the holes. Orient upper
handle so clutch lever is below handle.
2. Insert the saddle bolts into the holes as shown
and secure with at washers and handle knobs.
3. Tighten the handle knobs securely.
4. Using one cable tie, secure the control cable to
the handle as shown.
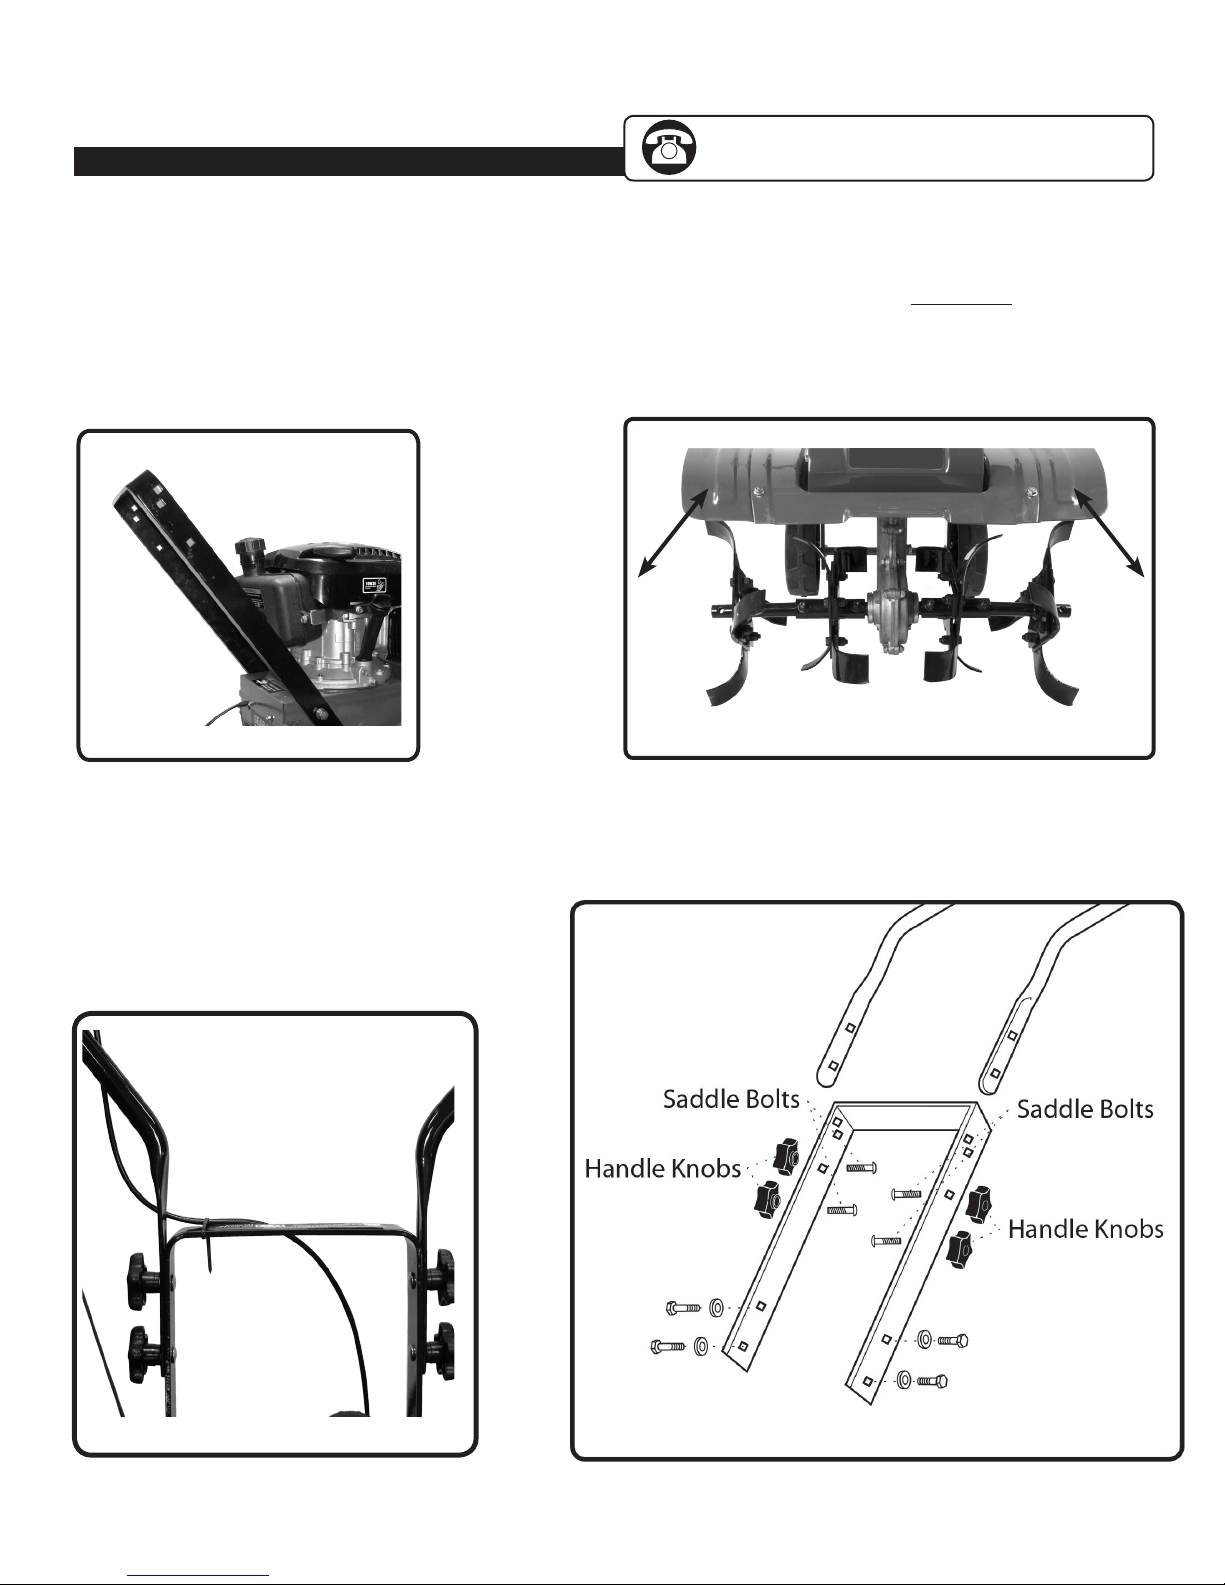
INSTALL THE OUTSIDE TINE SHIELDS (See Figure 8)
1. Each outside tine shield can be installed on
either side of the main tine shield.
2. Place the outside tine shield underneath the
main tine shield and align the holes.
3. Secure each outside tine shield to the main tine
shield with (3) M6 x 16 bolts washers and
lock nuts.
Figure 2
Figure 8
Figure 6
Figure 7
ENG - 10Questions? Call Toll Free at 1-800-737-2112 Copyright © 2016 MAT Engine Technologies, LLC
Page 11
Assembly (Continued)
• Save all instructions
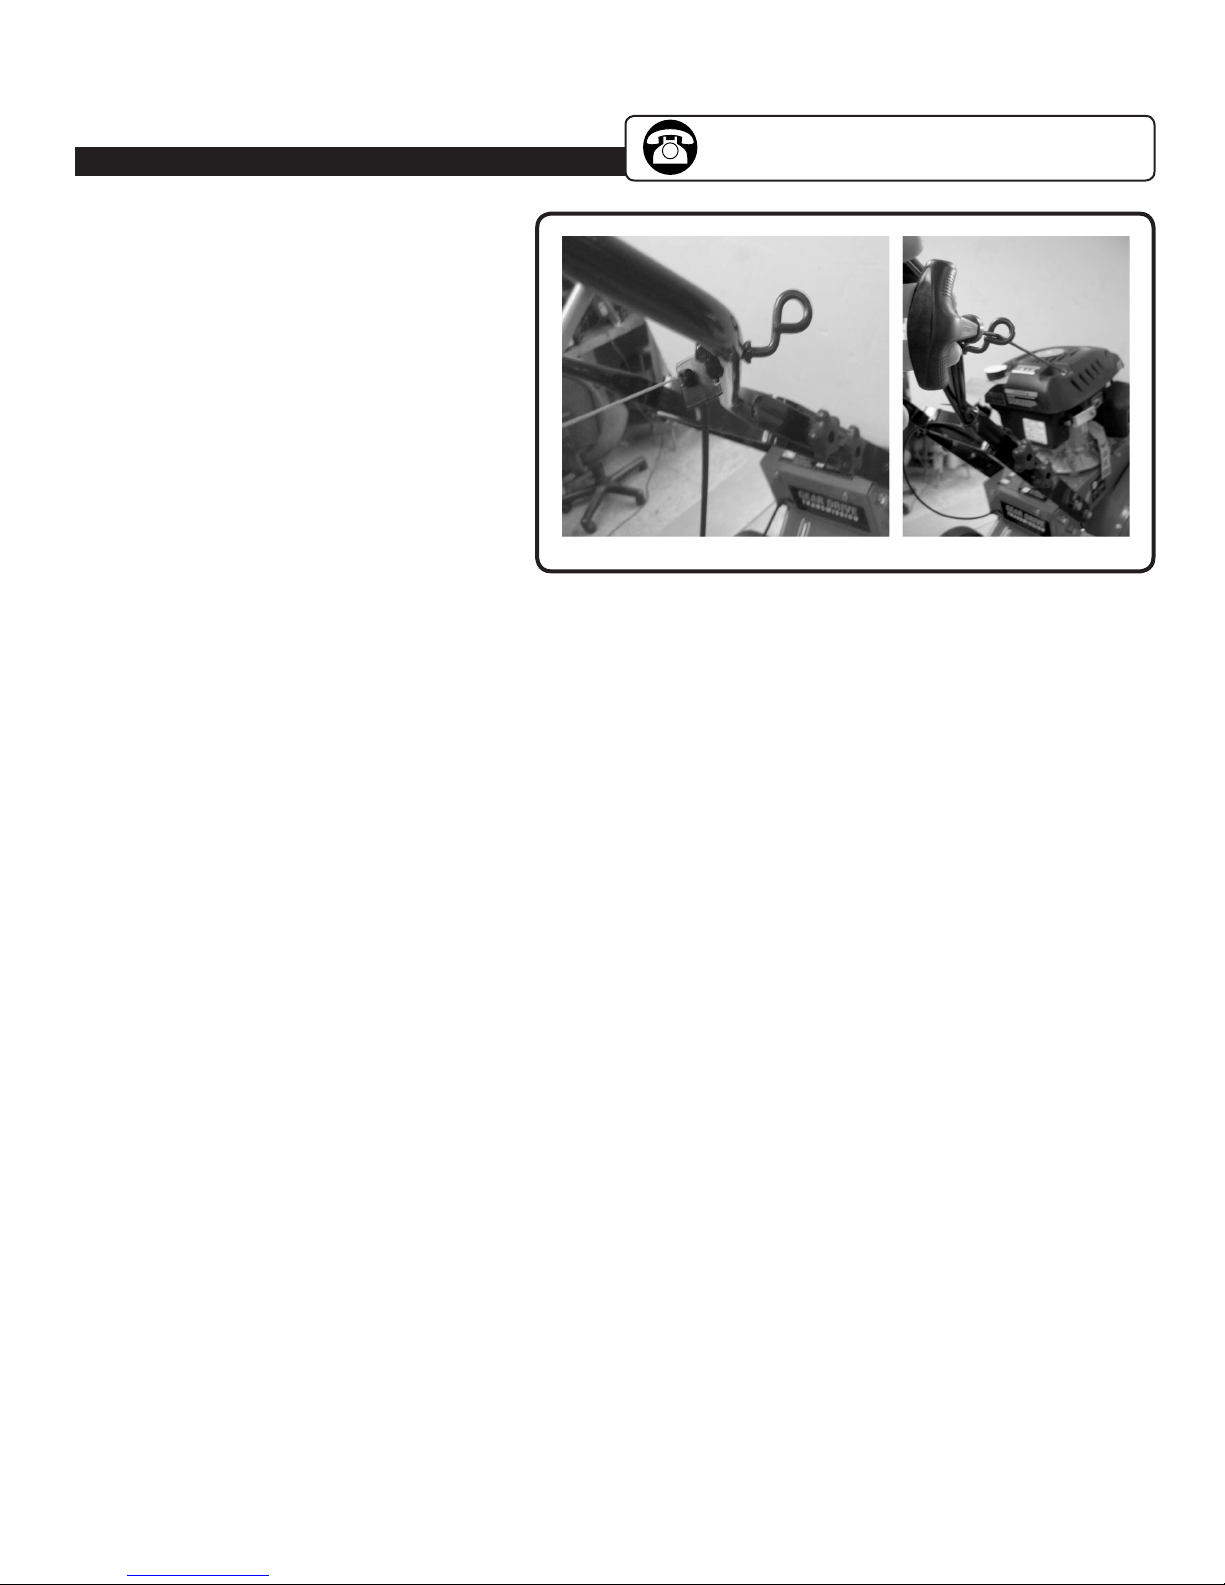
INSTALL THE ROPE GUIDE (See Figure 9)
1. Install the rope guide into the right hand
section of the upper handle as shown.
Install locknut and tighten securely. Pull
engine rope and route through the guide.
If you need assistance or find any parts missing, CALL
TOLL FREE: 1-800-737-2112.
Figure 9
ENG - 11Questions? Call Toll Free at 1-800-737-2112 Copyright © 2016 MAT Engine Technologies, LLC
Page 12
Engine Preparation
Ambient Service Temperature
• Save all instructions
Engine Oil
A
NOTICE
Engine shipped without oil. Failure to add oil will result in
serious engine damage.
A bottle of engine oil is included with your tiller. Refer
to the chart on the right for alternative oil types to use at
different temperatures. Always use a high quality detergent
oil classified “For Service, SG, SH, SJ” or higher. Do not
use special additives.
CAUTION
Always use recommended oil type. Using dirty oil or
incorrect oil type such as 2-stroke engine oil will damage
the engine.
NOTE: Engine Oil Capacity is 450 ml (15 1/2 US oz).
HOW TO CHECK OIL LEVEL AND FILL TO PROPER LEVEL
WARNING
Before checking oil, make sure engine is off, and spark
plug wire has been disconnected from spark plug.
SAE
TEMP
-20
0
-20-30 -10
Fuel Tank Cap
SAE 10W-30
20
0
*10W-30
40
SAE 30
60 80
2010
30
Oil Fill Cap/Dipstick
100° F
40° C
1. Place the tiller on a level surface and make sure the
drag bar is set.
(See Figure 10)
2. Remove the oil ll cap/dipstick and wipe with clean cloth.
3. Insert dipstick into ll spout but do NOT screw in.
Remove dipstick and check oil level.
4. When oil level is full, the oil will be at upper limit on dip
stick. If oil level is near or below the lower limit, oil must
be added. (See Figure 11)
5. Add oil slowly until the oil level reaches the upper limit
of the dipstick. Use a funnel or nozzle to reduce spillage.
NOTICE
Frequently check oil level while filling. DO NOT OVERFILL.
DO NOT UNDERFILL. Running engine at improper oil
level may seriously damage engine.
6. Replace and tighten dipstick.
7. Clean up any spilled oil.
NOTE: The transmission case comes from the factory with
the proper amount and type of lubricant.
Upper Limit
Lower Limit
Drag bar
Figure 10
Oil Fill Cap/
Dipstick
Figure 11
ENG - 12Questions? Call Toll Free at 1-800-737-2112 Copyright © 2016 MAT Engine Technologies, LLC
Page 13
Operation
• Save all instructions
Pre-Start Inspection
A
1. Make sure all safety guards are in place and all nuts and
bolts are secure.
2. Check oil level in engine crankcase. See your engine
manual for procedure and specications.
3. Inspect air cleaner for cleanliness. See your engine
manual for procedure.
4. Check the fuel supply. Fill the fuel tank no closer than 1
inch from top of tank to provide space for expansion.
See your engine manual for fuel recommendations.
5. Be sure spark plug wire is attached and spark plug is
tightened securely.
6. Examine underneath and around engine for signs of oil
or fuel leaks.
7. Inspect fuel hoses for tightness and fuel seepage.
8. Look for signs of engine damage.
9. Remove excessive debris from mufer area and
recoil starter.
10. Remove any debris from tines and tine shafts.
11. Move the tiller to the area of operation.
12. Check position of wheels swing plate should be in the
tilling mode position.
13. Check drag bar position.
CAUTION
Please do not start your tiller until you have read the
manual that came with your engine, and the sections in this
manual title controls, adjustments and safety. If you have
read these, follow the steps below to start your tiller. Always
perform this pre-start checklist before starting the engine.
WARNING
Gasoline is highly ammable and must be handled with
care. Never ll the tank when the engine is hot or running.
Always move outdoors to ll tank.
WARNING
Always keep hands and feet clear of rotating machine parts.
IMPORTANT: Engine is shipped from factory without oil. YOU
MUST ADD ENGINE OIL BEFORE STARTING ENGINE.
Start the Engine
B
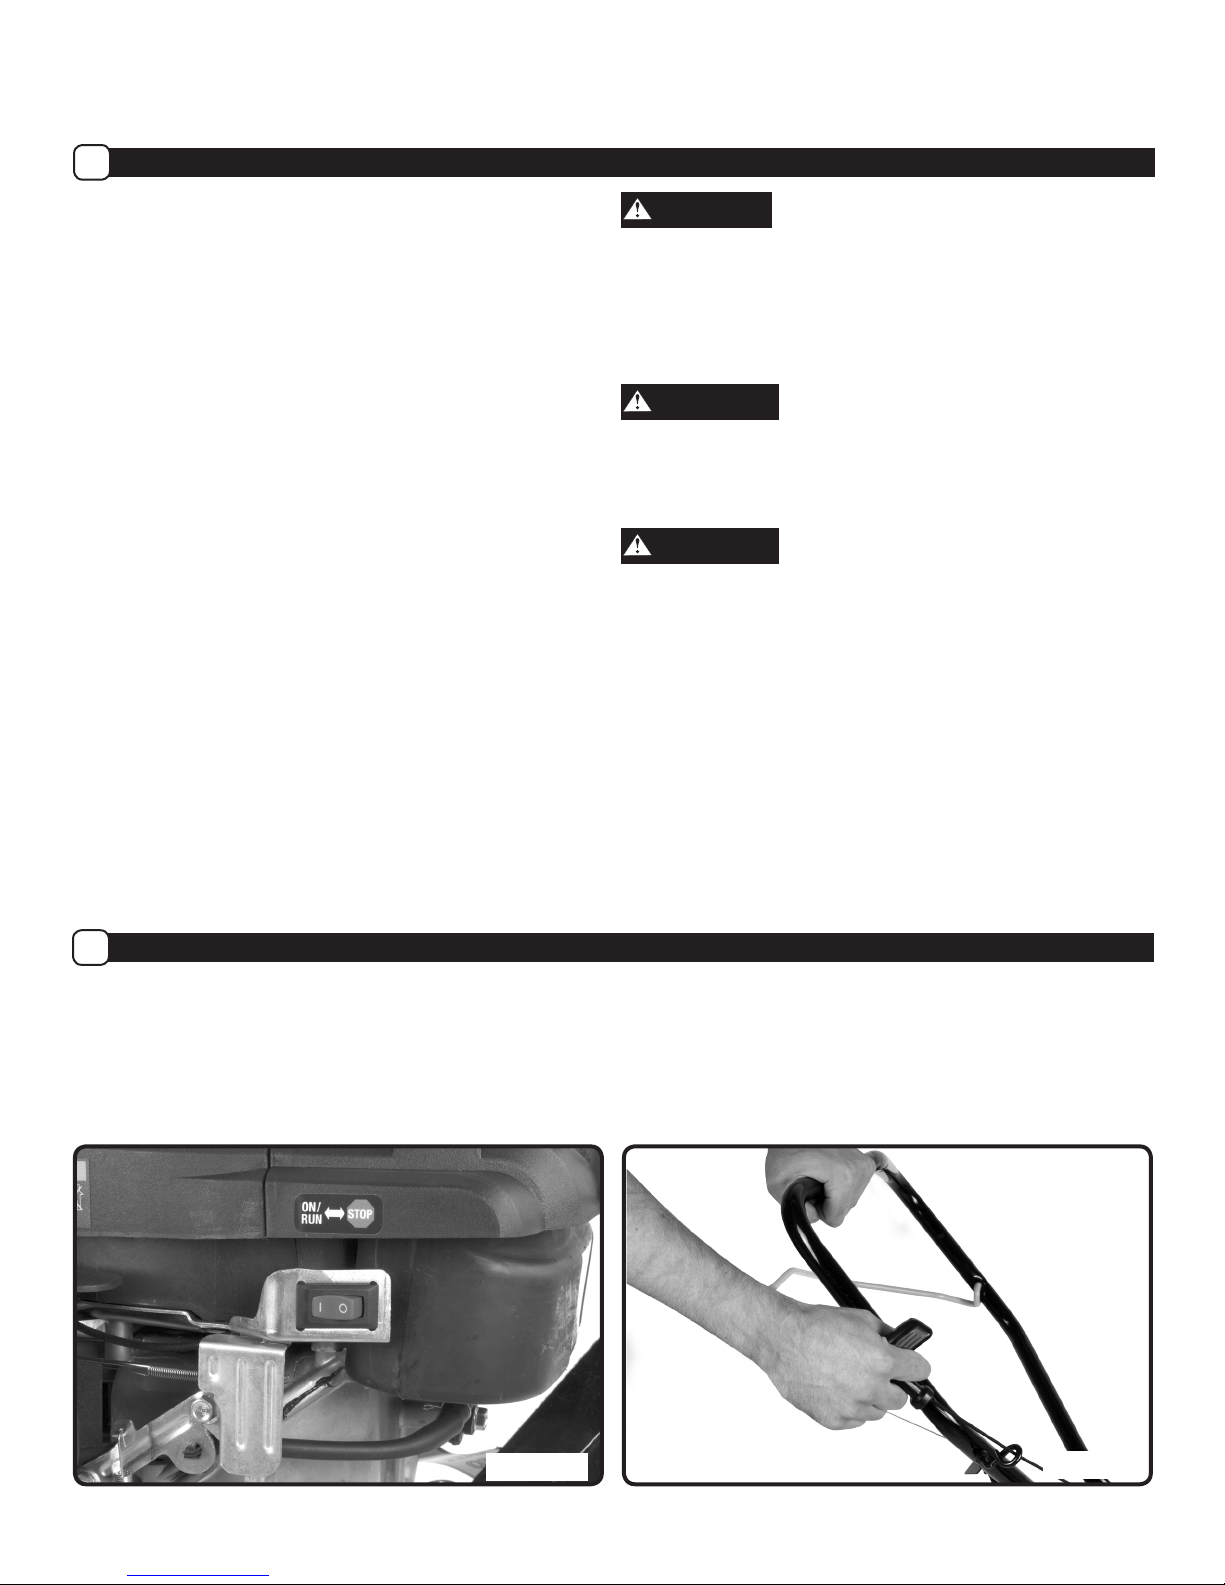
1. Press ON/OFF switch to ON position. (See Figure 12)
2. Push primer bulb 3 times. Wait 2 seconds between each push.
3. Place left hand on upper handle. (See Figure 13)
4. Grasp starter handle and pull out slowly, until you feel tension in the starter rope. (See Figure 13)
5. Pull rope with a rapid full arm stroke until engine starts.
6. Do not allow the starter rope to snap back. Let the starter rope slowly rewind.
Figure 12
Figure 13
ENG - 13Questions? Call Toll Free at 1-800-737-2112 Copyright © 2016 MAT Engine Technologies, LLC
Page 14
Operation (Continued)
• Save all instructions
Stop the Engine
C
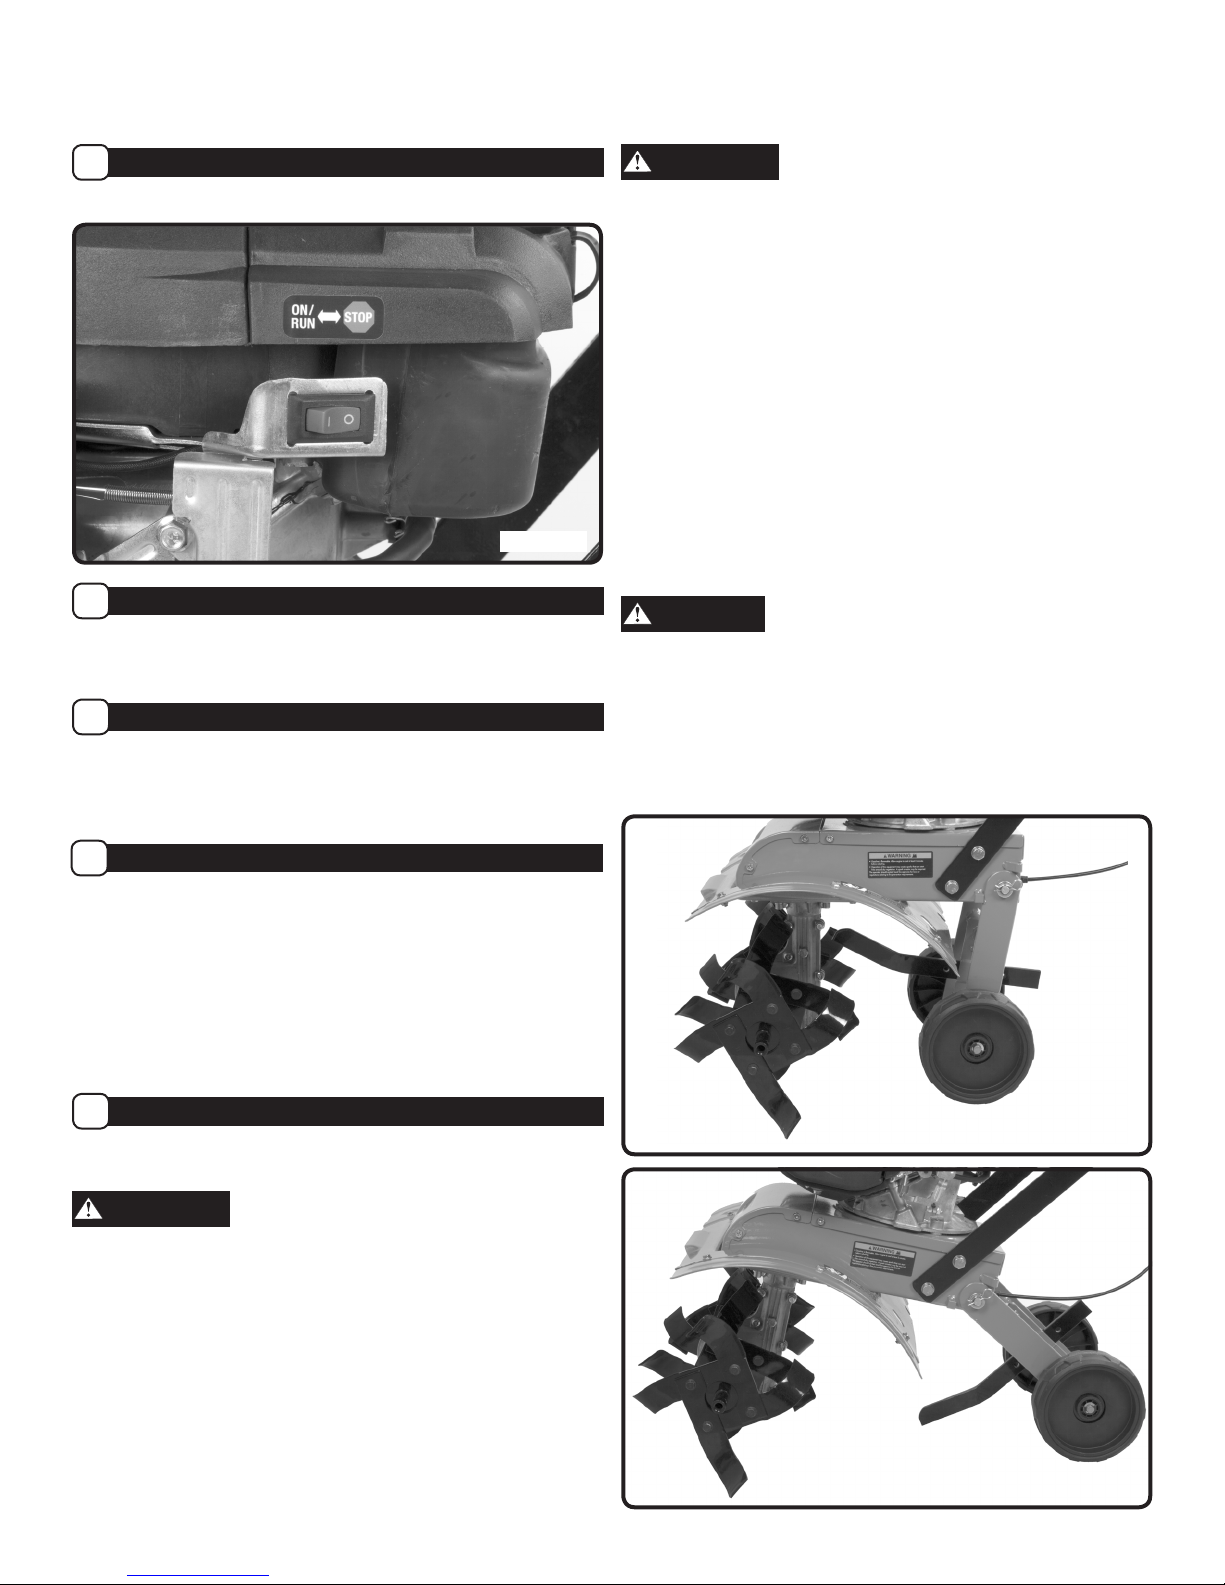
1. Press ON/OFF switch to OFF position.
Figure 14
Operating Speed
D
This tiller is equipped with a fixed throttle that is set for
optimum tilling performance.
Shutting Down
E
To stop the engine at any time, release the clutch lever and
press ON/OFF switch to OFF position. To stop tines at any
time, release clutch lever.
WARNING
Temperature of mufer and nearby areas may exceed
150˚F. Avoid these areas.
Engine, transmission and surrounding parts become
extremely hot during normal use and CAN cause
serious burn injuries if touched before the engine has cooled.
Allow engine to cool completely before touching these
surfaces.
To stop tines at any time, release CLUTCH LEVER to
neutral position. Always release CLUTCH LEVER to neutral
position AND STOP THE ENGINE before adjusting the depth of
the drag bar.
If you do not know how to do these things, read the controls, adjustments and safety sections before proceeding
DANGER
IMPORTANT: Practice operating the controls and tiller with
tines out of ground before beginning to till. It is important
that you know how to use the tiller properly, keep control at
all times, stop the tines, and stop the engine if necessary. If
you do not know how to do these things, read the controls,
adjustments and safety sections before proceeding.
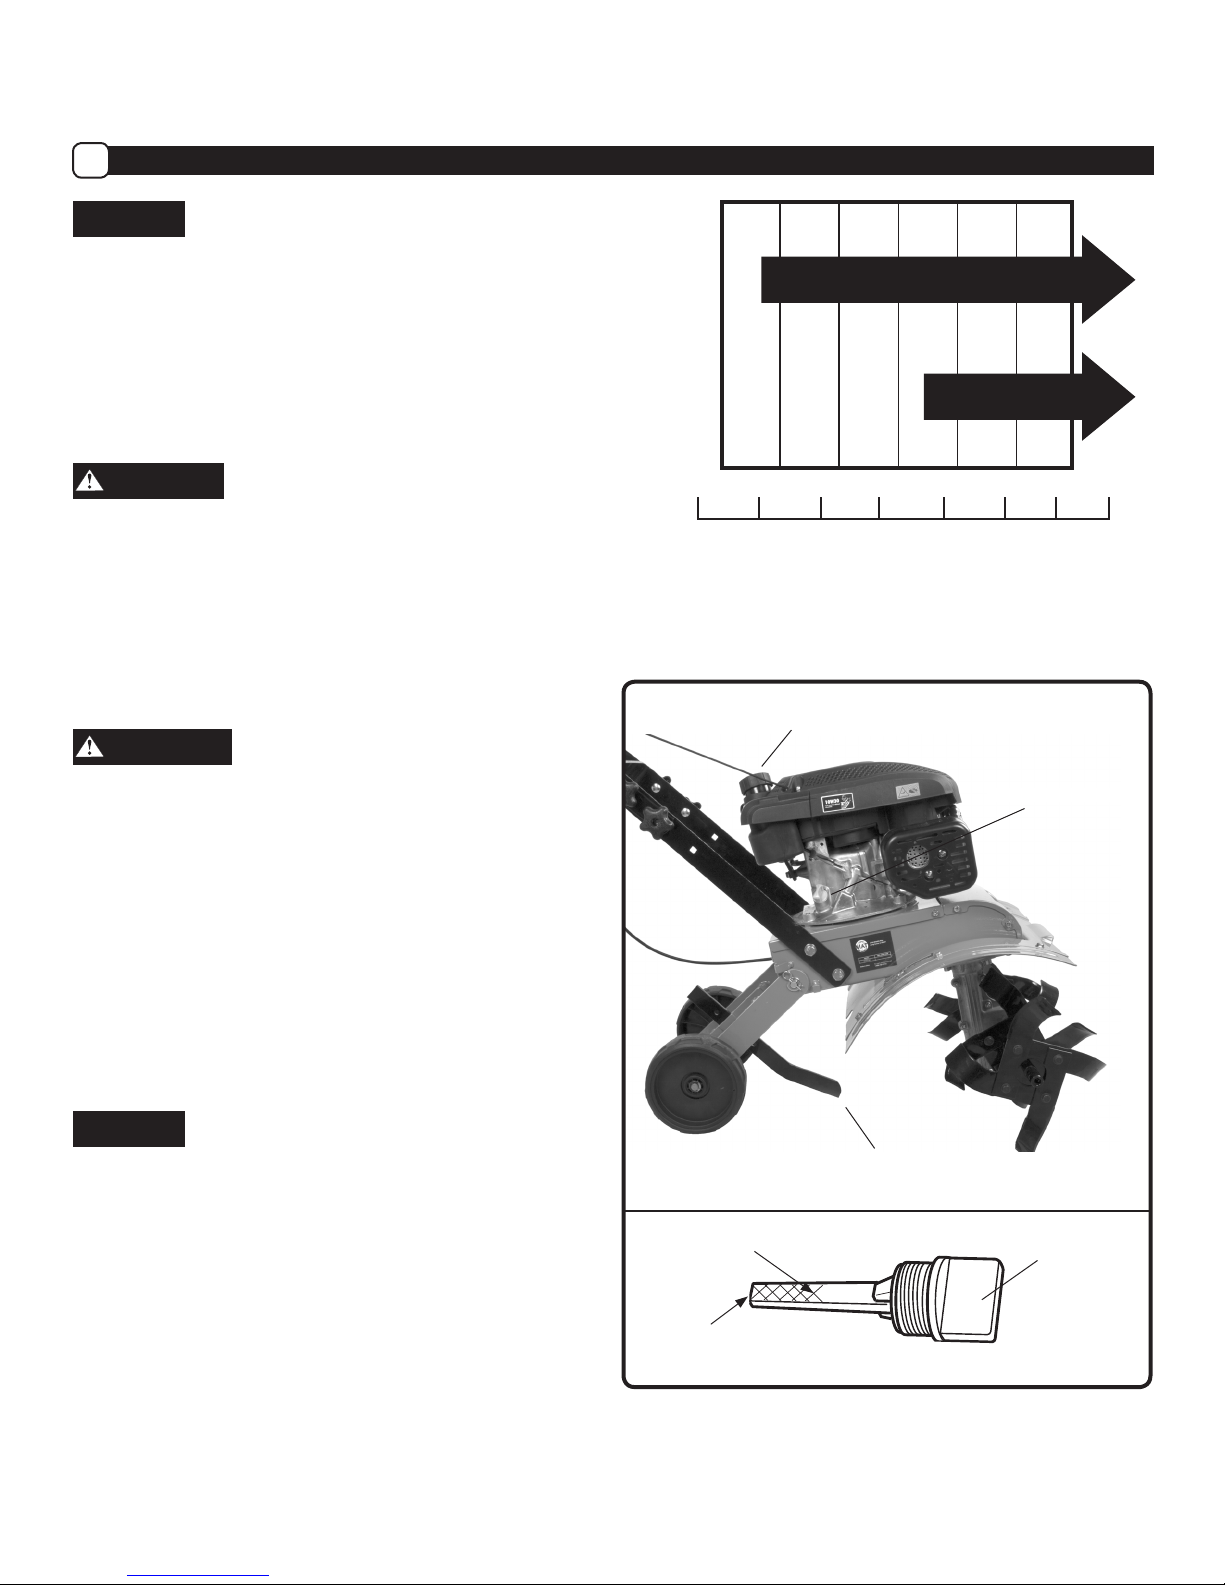
Transport Mode and Tilling Mode (See Figure 15 and 16)
F
Transport Mode
Fold the wheel under the engine for convenient transport.
NOTE: The drag bar must be in the middle or bottom hole
for transporting.
Tilling Mode
Unfold the wheel back for tilling operation.
Tilling
G
1. Adjust the drag bar to desired tilling depth.
WARNING
Lower the drag bar one hole at a time testing tiller
operation after each adjustment. Lowering drag bar down
too low can result in loss of control of tiller.
2. Pulling the clutch lever to the handle will engage the tines.
Figure 15
Figure 16
ENG - 14Questions? Call Toll Free at 1-800-737-2112 Copyright © 2016 MAT Engine Technologies, LLC
Page 15
Operation (Continued)
• Save all instructions
Clutch Lever
H
NOTICE
When tilling, always pull lever completely to the handle.
Failure to do so may result in excessive drive belt wear and
premature drive belt failure.
CAUTION
This information is provided here only to introduce the
controls. Do not start the engine at this time. Starting and
operating instructions are given on page 11. Please read
this section and all operating and safety instructions before
starting your tiller.
WARNING
Do not x the clutch lever in drive position by any other
means than manually using your hand. DO NOT tie or otherwise secure the lever in drive position.
• To stop the tines at any time release the clutch lever.
Adjustments
I
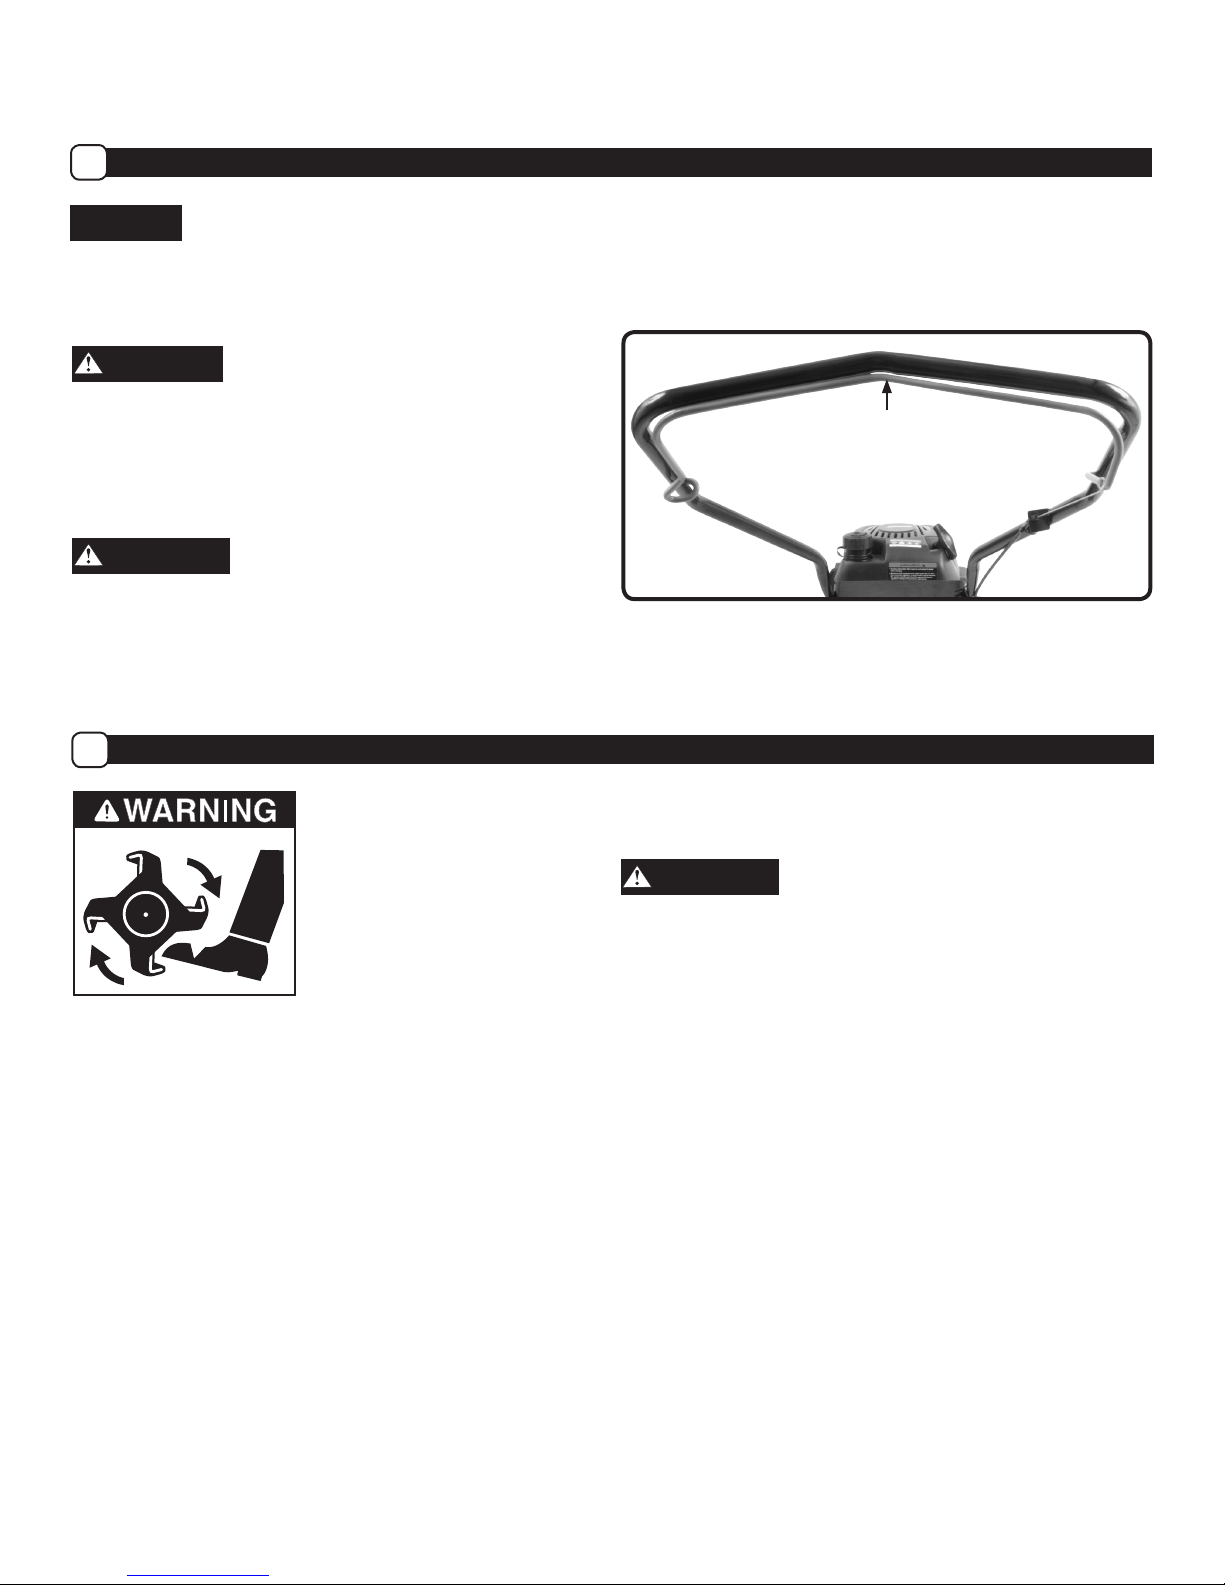
CLUTCH LEVER (See Figure 17)
Engage tines by pulling the clutch lever to the handle.
Releasing the lever stops the tines and brings the tiller to a
complete stop.
Lever Engaged
Figure 17
Engine should be off before adjusting any controls.
DRAG BAR (See Figure 2)
Tilling depth is controlled by the height of the drag bar. To
adjust tilling depth:
1. Remove pin.
2. Adjust the drag bar to position tines at chosen tilling depth.
3. Align hole in drag bar with hole in swing plate bracket and
replace pin.
Drag Bar Up = Shallower tilling.
Place the pin in the bottom hole of the drag bar for
shallowest tilling.
Drag Bar Down = Deeper tilling.
Place the pin in the top hole of the drag bar for deepest tilling.
NOTE: The drag bar must be in the middle or bottom hole for
transporting.
WARNING
Do not adjust tilling depth unless clutch lever is released and engine
is turned off.
ENG - 15Questions? Call Toll Free at 1-800-737-2112 Copyright © 2016 MAT Engine Technologies, LLC
Page 16

Operation (Continued)
• Save all instructions
Tilling Tips
J
• Tilling depth will vary with ground conditions.
• When beginning to till in unbroken ground or in extremely
hard soil, set the pin in the highest hole of the drag bar
(follow instructions under Tilling section). This will allow
for shallow tilling. With the drag stake in this position,
make several light passes over the area to be tilled. Reset
for deeper depths with successive passes.
• If tiller jumps or skids uncontrollably, lower the drag
stake by placing the pin in a higher hole. This will allow
for shallower tilling. Hold firmly to the handlebars to
control sudden lurches.
• If weeds, tall grasses, vines, or other materials clog or
jam the tines, reverse the tiller to unwind vegetation.
WARNING
Immediately release the clutch lever if the tines jam or you
strike a foreign object. With clutch lever in neutral position,
stop the engine. Disengage the spark plug wire. When
tines have stopped, remove foreign objects and check for
damage.
WARNING
Caution must be taken in selecting tilling depth. If you attempt to
till too deeply for soil conditions, that is, with the drag bar in too
high a position, loss of control could result.
When removing material from the tines, stop engine and
remove spark plug wire rst.
Cultivating Tips
K
If you plan to use your tiller for cultivating:
• Plant rows on 20" - 22" centers for ease of turning.
• Set the drag bar with the pin in one of the higher holes. This will allow for shallow cultivation necessary to
turn over weeds, and break up and aerate the soil.
ENG - 16Questions? Call Toll Free at 1-800-737-2112 Copyright © 2016 MAT Engine Technologies, LLC
Page 17

Maintenance
• Save all instructions
Maintenance Schedule
A
WARNING
Before performing any maintenance, turn engine off and remove the wire from the spark plug to prevent accidental starting
and serious injury.
IMPORTANT: The warranty on this tiller does not cover items that have been subjected to operator abuse or negligence. To
receive full value from the warranty, the operator must maintain the tiller as instructed in this manual, and only use genuine
replacement parts. The following table lists required periodic maintenance.
PERIODIC MAINTENANCE SCHEDULE TABLE
Service Records-
Fill in dates as you complete regular
service
Check Engine Oil Level,
Fill to Proper Level
Clean Debris From Unit √ √ √
Lubricate All Pivot Points √ √ √
Check Fasteners for Tightness √ √
Check Drive Belts
Replace if Necessary
Check Tines for Wear or Damage
Replace if Necessary
Check Fuel Line
Replace if Necessary
Lubricate Wheel Axles
Check Spark Plug
Replace if Necessary
Change Engine Oil √ √ √ √
Clean Air Filter
Replace if Necessary
Before
Each Use
√ √
After
Every
10 Hours
of Use
√ √
√ √
After
Every
25 Hours of
Use
√ √
√ √
√ √ √
√ √
After Every
50 Hours of
Use
After
Every
100 Hour
of Use
Before
Each
Season
Before
Storage
See
Note
Below
1
2,3
4
Replace Spark Plug √ √
Clean Combustion Deposits from
Cylinder, Piston, and Valves
CAUTION
IMPORTANT NOTES about Maintenance schedule
1. Re-check tightness of all fasteners after first 2 hours of initial use
2. Change engine oil after first 5-8 hours of initial use
3. Change oil every 25 hours
4. Clean air filter every 10 hours if operating under dusty conditions.
WARNING
Use only GENUINE replacement parts. Other parts may damage the unit or result in injury.
√
ENG - 17Questions? Call Toll Free at 1-800-737-2112 Copyright © 2016 MAT Engine Technologies, LLC
Page 18
Maintenance (Continued)
wire
tab
• Save all instructions
Servicing the Tiller
B
The following information will help you make the necessary
checks and perform the procedures required to follow the
normal care recommendations made for your tiller unit. If
you prefer, your local authorized dealer can make these
checks and perform the required procedures for you.
WARNING
To prevent accidental starting:
Engine must be turned off and cool, and spark plug wire
must be removed and secured from spark plug before
checking and adjusting engine or equipment.
CHANGE BELTS
1. Turn off engine. Engine must be cool completely before
proceeding.
2. Remove spark plug wire and secure from spark plug.
3. Remove the front belt cover.
• Remove the belt from the engine pulley:
- Remove the four engine plate-to-frame bolts.
- Slightly lift the engine and engine plate as an
assembly.
- Slide the belt free of the engine pulley.
- Remove the belt from the front pulley.
• Install new belt:
- Place belt around transmission pulley in groove.
- Place belt onto engine pulley in groove.
- Place backside of belt around idler pulley and belt
guides.
- Reinstall and tighten four engine plate bolts.
- Slowly pull engine rope and observe belt
movement to verify correct routing of belt.
- Reinstall front belt cover.
4. Attach spark plug wire.
5. Follow Operating Instructions- start the engine and
operate the clutch lever.
WARNING
The tines should not rotate with the engine running and the
drive lever not engaged.
Engine Maintenance
C
ENGINE MAINTENANCE
Refer to the engine manual included in your parts packet
for information on engine maintenance. Your engine
manual provides detailed information and a maintenance
schedule for performing the following tasks:
1. Check oil level before each use or after every 8 hours
of operation.
2. Change oil after first 5-8 hours of operation. Change oil
while engine is warm. Refill with new oil of
recommended grade.
3. Check spark plug yearly or every 25 hours of operation.
4. Service air cleaner.
5. Keep engine and parts clean.
6. Check engine and equipment often for loose nuts and
bolts, keep these items tightened.
CHECK OR FILL ENGINE CRANKCASE
IMPORTANT: Engine is shipped from factory without oil. You
must add engine oil before starting engine.
1. Add oil according to engine manual. Do not overfill.
Use a clean, high quality detergent oil. Do not mix oil
with gasoline. Oil level must be full. Check the oil level
by removing oil fill plug.
2. Always check oil level before starting engine. Refer to
engine manual for capacity and type of oil to use.
Maintenance
D
LUBRICATION
Proper lubrication of moving mechanical parts is critical for
proper care and maintenance. Oil the moving parts at 10
hour intervals using 30 weight oil.
CLEAN TINE AXLE SHAFT
1. Turn off engine. Engine must be cool.
2. Remove spark plug wire and secure from spark plug.
3. Tip the tiller backward. Block the tiller in position so that
it rests on the upper handle and the tines are exposed.
4. Remove all vegetation, string, wire, and other material
that may have accumulated on the axle between the
inside set of tines and the seal cover on the
transmission housing.
5. Tip the tiller back to a level position.
6. Replace spark plug wire.
ENG - 18Questions? Call Toll Free at 1-800-737-2112 Copyright © 2016 MAT Engine Technologies, LLC
Page 19
Maintenance (Continued)
• Save all instructions
How to Prepare for Storage
E
WARNING
Never store the tiller indoors with fuel in the fuel tank.
Never store in an enclosed, poorly ventilated area where
fumes could reach an open ame, a spark or a pilot light as
on a furnace, water heater or clothes dryer. Allow engine to
cool before storing unit.
WARNING
Do not remove gasoline while inside a building, near a re,
or while you smoke. Gasoline fumes can cause an explo-
sion or a re.
NOTE: A yearly checkup or tune-up at an authorized service
center will make sure that the tiller will provide maximum
performance for the next season.
When the tiller is put in storage for thirty days or more, the
following steps should be followed to make sure the tiller is in
good condition the next season.
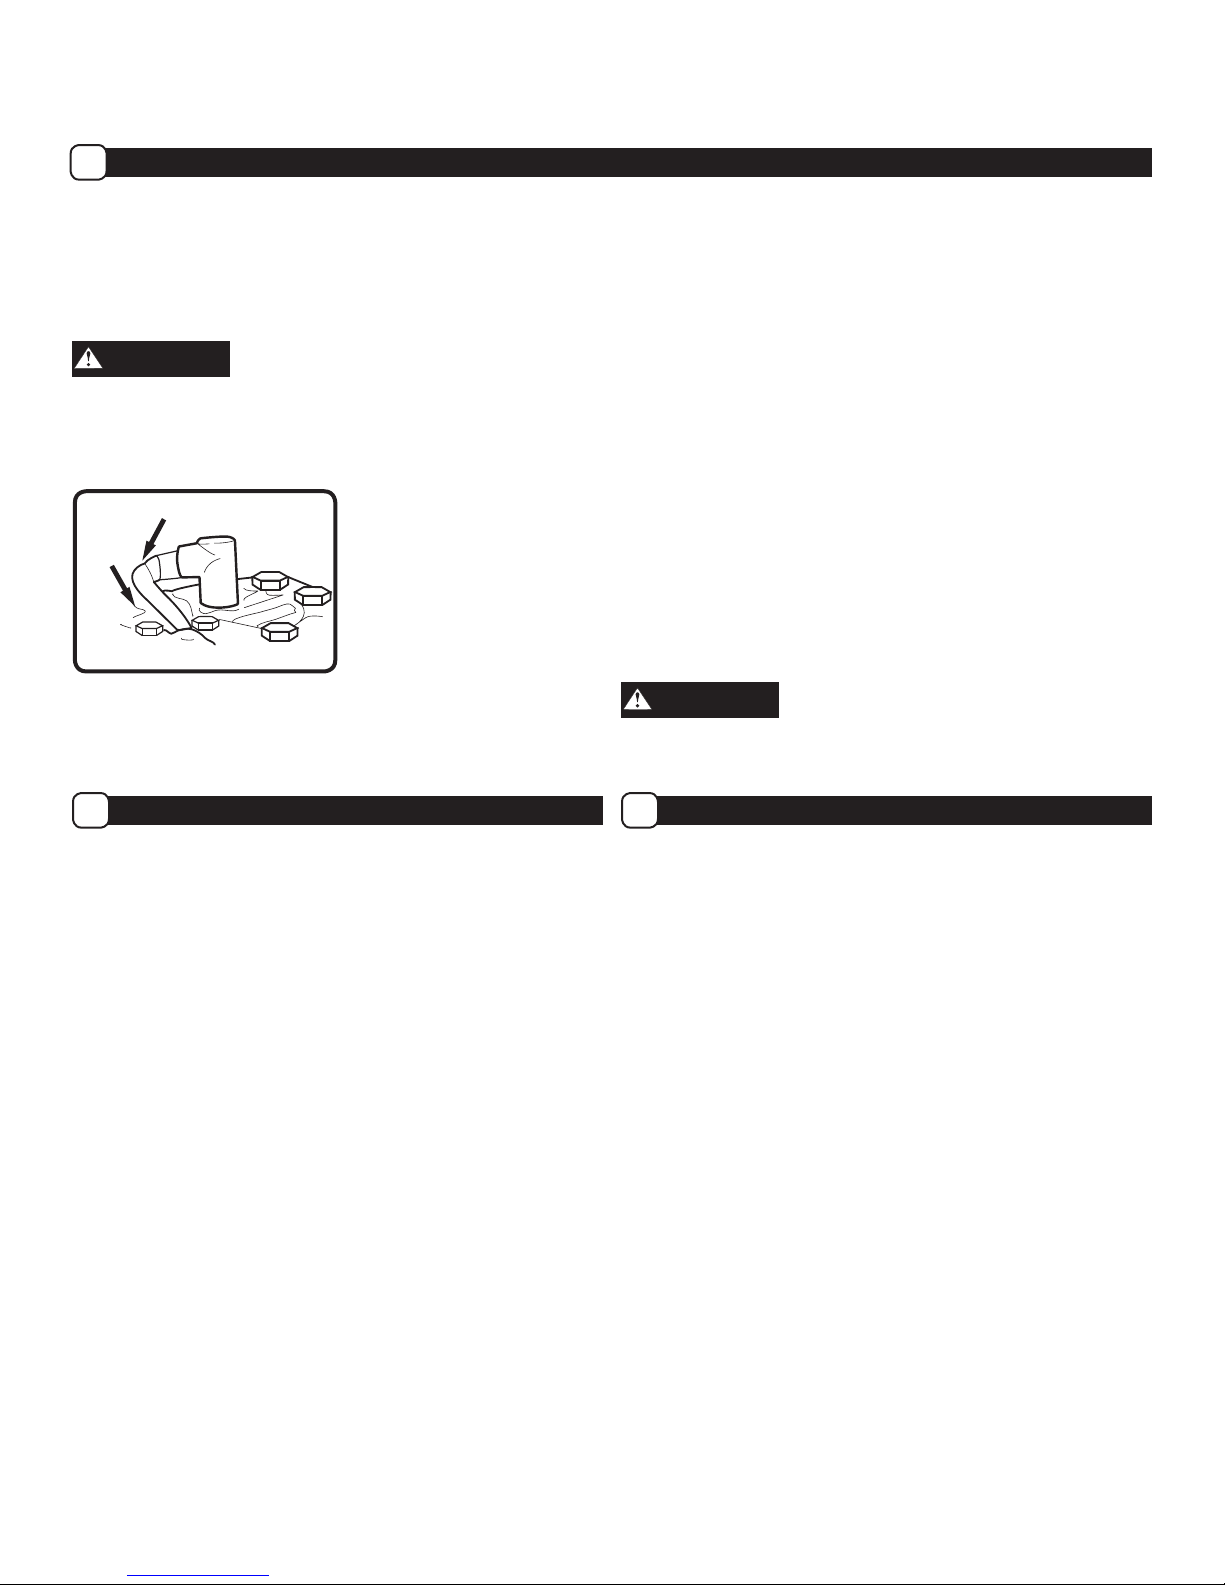
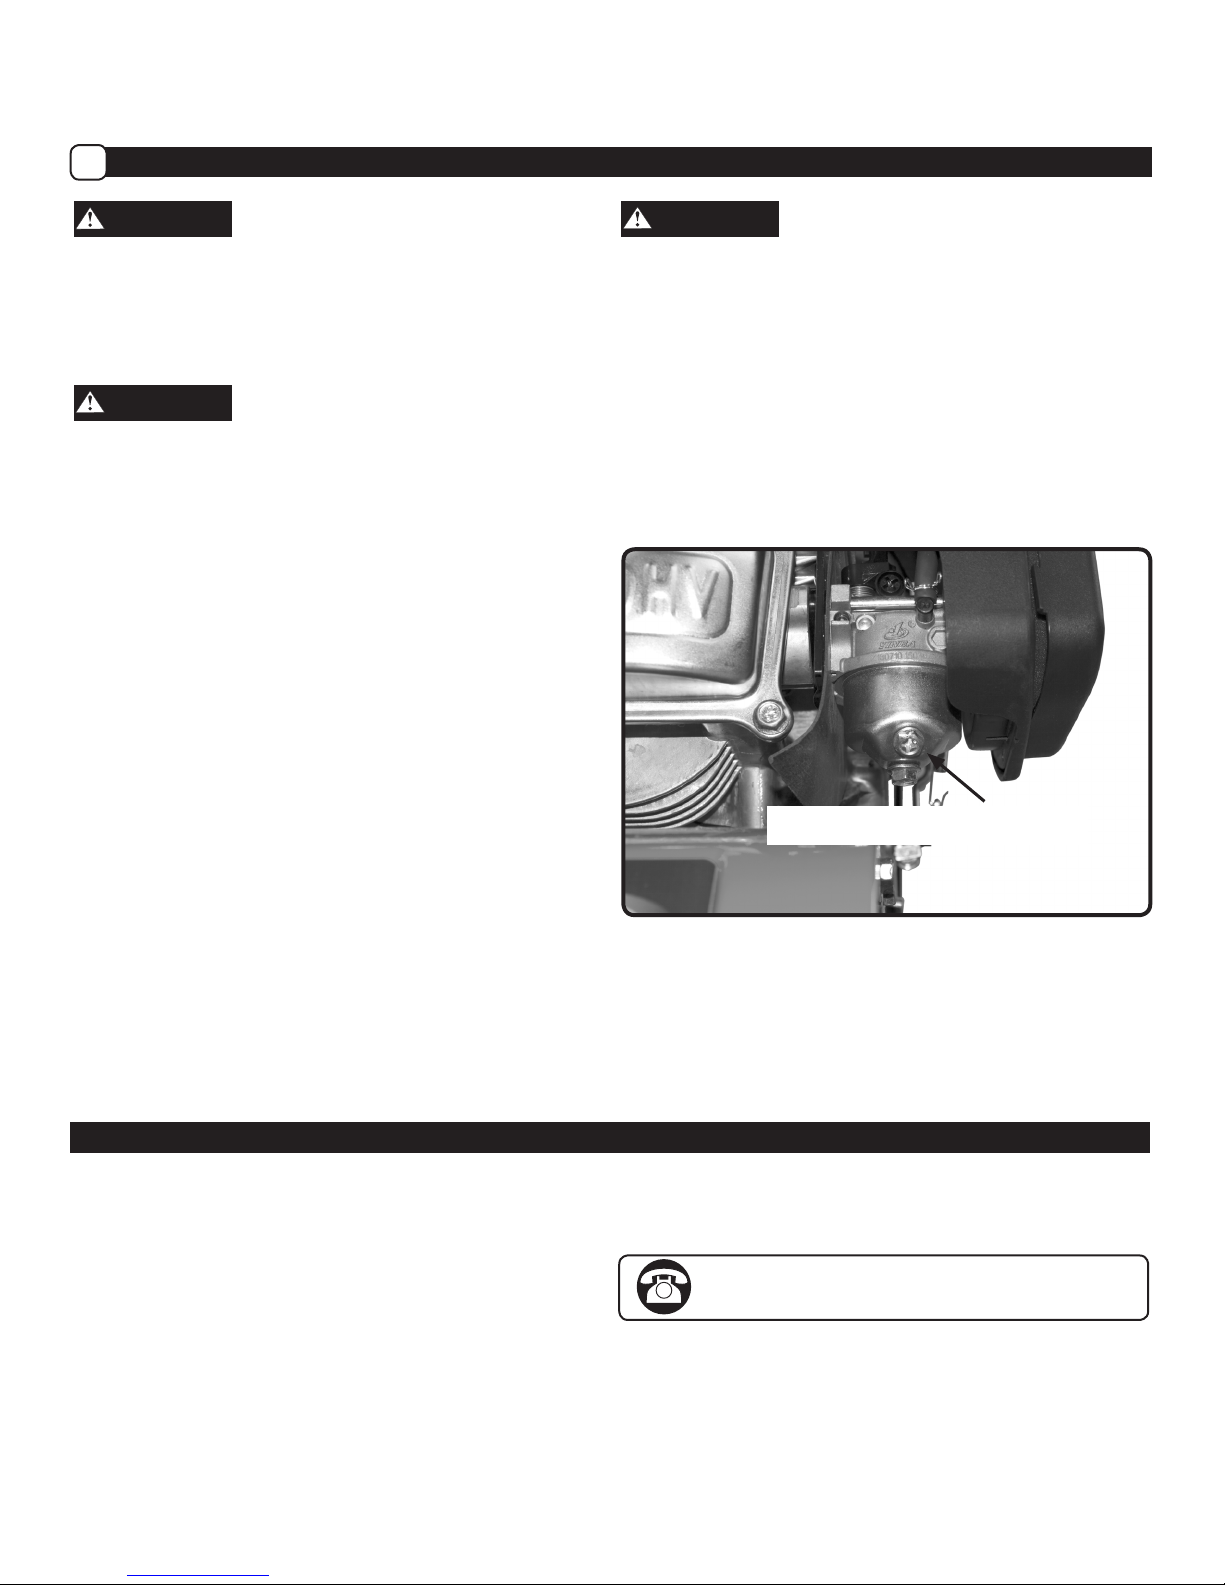
1. Let the engine run until it is out of gasoline. Remove
carburetor screw from bowl and drain fuel. Tilt unit
slightly to remove all fuel. Replace screw. (Figure 18)
2. Change the oil by following instructions under “How to
Change the Oil.”
3. Remove the spark plug from the cylinder. Pour one
ounce (1 oz liq. US / 30 ml) of oil into the cylinder.
Slowly pull the recoil-start handle so that the oil will
protect the cylinder. Install a new spark plug in the
cylinder. Pull starter handle slowly a few times to
distribute oil. Pull recoil handle slowly until resistance is
felt. This will close the cylinder valves.
WARNING
DO NOT attach spark plug wire to spark plug when
storing unit.
4. Clean tiller. Remove all dirt, leaves, debris, grease, etc.
from the tiller - including cylinder cooling fans, recoil
starter cover holes, under fuel tank, and under mufer.
5. Check the tiller for worn or damaged parts. Have
damaged parts replaced if necessary.
6. Tighten any loose hardware.
7. Apply lubrication as directed in Maintenance section.
8. Put the unit in a building that has good ventilation.
9. Cover the tiller with a breathing material.
Remove carburetor screw from
bowl and drain fuel. Replace screw.
Figure 18
Technical Service
You may have further questions about assembling, operating, or maintaining this TILLER. If so, you can contact our
Technical Service Department at 1-800-737-2112 (English only).
You may also write to:
METL Corporate Office - CORRESPONDENCE ONLY
ATTN: Technical Service – METL
6700 Wildlife Way
Long Grove, IL 60047
When contacting the Technical Service Department, have ready:
• Your Name
• Your Address
• Date Code on Product
• Your Phone Number
If you need assistance or have any questions, CALL
TOLL FREE: 1-800-737-2112.
ENG - 19Questions? Call Toll Free at 1-800-737-2112 Copyright © 2016 MAT Engine Technologies, LLC
Page 20

Troubleshooting
• Save all instructions
PROBLEM POSSIBLE CAUSE(S) SOLUTION(S)
Engine difficult to start 1. Out of fuel
2. Engine Switch Off
3. Engine is not primed
4. Spark plug wire disconnected
5. Fouled spark plug
6. Dirty Carburetor
7. Clogged air filter
8. Contaminated Fuel
Engine Problems
Engine smokes excessively
Engine runs very “rough”
Engine runs erratically
Engine cannot maintain full speed
Excessive vibration / noise 1. Loose parts
Tines will not rotate 1. Debris interfering with tines
Tines continue to rotate when
lever is not engaged
Engine will not stop Faulty switch Replace switch
Tines will not cut properly 1. Damaged or worn tines
Frequent engine stalling 1. Excessive tilling speed / depth
1. No Engine Oil
2. Engine oil not at proper level
3. Fouled spark plug
4. Clogged air filter
5. Contaminated Fuel
6. Carburetor out of adjustment
2. Engine problems (above)
2. Tines loose
3. Damaged drive belts
1. Damaged drive belts 1. Replace drive belts
2. Tines assembled incorrectly
2. Engine problems (above)
1. Add fresh fuel
2. Turn engine switch on
3. Push primer 3 times.
4. Attach spark plug wire to spark plug
5. Remove spark plug. Inspect. Replace if
necessary
6. Take unit to an authorized service center
for Carburetor cleaning
7. Remove and clean air filter
8. Drain fuel tank. Clean fuel tank. Fill with
fresh fuel
1. Add engine oil
2. Check engine oil. Add or drain engine oil if
necessary
3. Remove spark plug. Inspect. Replace if
necessary
4. Remove and clean air filter
5. Drain fuel tank. Clean fuel tank. Fill with
fresh fuel
6. Take unit to an authorized service center
for Carburetor adjustment
1. Tighten all fasteners
2. Refer to engine solutions (above)
1. Remove debris from around tines
2. Replace tine bolts and nuts
3. Replace drive belts
1. Replace tines
2. Refer to “Install the Tines” Section
1. Till at a moderate pace. Make multiple
passes.
2. Refer to engine solutions (above)
ENG - 20Questions? Call Toll Free at 1-800-737-2112 Copyright © 2016 MAT Engine Technologies, LLC
Page 21

Warranty
• Save all instructions
Powermate® ROTARY TILLER Limited Warranty
A
Always specify model number when contacting the factory.
We reserve the right to amend these specifications at any time without notice. The only warranty applicable is our standard written
warranty. We make no other warranty, expressed or implied. MAT Engine Technologies, LLC warrants this Tiller and any parts thereof,
to be free from defects in material and workmanship for two years (90 days for commercial use or for reconditioned unit) from the date
of first purchase from an authorized dealer, provided that the product has been properly maintained and operated in accordance with
all applicable instructions. This warranty is extended only to the original retail purchaser. The bill of sales or proof of purchase must be
presented at the time a claim is made under this warranty. This warranty does not cover industrial or rental usage, nor does it apply to
parts that are not in original condition because of normal wear and tear, or parts that fail or become damaged as a result of misuse,
accident, lack of proper maintenance, tampering, or alteration. Exceptions to the standard warranty period would be normal wear items
such as cutting blades, string heads, earth auger blades, air filter, and spark plugs which are only covered for 60 days against defects
in material or workmanship. Travel, handling, transportation, and incidental costs associated with warranty repairs are not reimbursable under this warranty and are the responsibility of the owner. To the full extent allowed by the law of the jurisdiction that governs the
sale of the product, this express warranty excludes any and all other expressed warranties and limits the duration of any and all implied
warranties, including warranties of merchantability and fitness for a particular purpose to two years from the date of first purchase, and
MAT Engine Technologies, LLC’s liability is hereby limited to the purchase price of the product and MAT Engine Technologies, LLC
shall not be liable for any other damages whatsoever including indirect, incidental, or consequential damages. Some states do not allow limitation of how long an implied warranty lasts or an exclusion or limitation of incidental or consequential damages, so the above
limitation of damages may not apply to you. This warranty provides the original purchaser with specific rights.
For information regarding those rights, please consult the applicable state laws.
METL Corporate Office - CORRESPONDENCE ONLY
ATTN: Technical Service – METL
6700 Wildlife Way
Long Grove, IL
60047
The Engine Emissions Control System Warranty is provided by the engine manufacturer, included with this product and administered by
MAT Engine Technologies, LLC.
If you have any questions regarding your warranty coverage,
you should contact METL customer service:
If you need assistance or have any questions,
CALL TOLL FREE: 1-800–737-2112
ENG - 21Questions? Call Toll Free at 1-800-737-2112 Copyright © 2016 MAT Engine Technologies, LLC
Page 22

Manuel de l’usager
Motobêche rotative
à dents avant
No. de modèle PFTT142
Retrouver à l’intérieur : Page
Définitions de sécurité 2
Importante information de sécurité 3-5
Spécifications du produit 6
Pièces et caractéristiques 6
Décalcomanies de sécurité 7
Assemblage 8-11
Préparation du moteur 12
Fonctionnement 13-16
Entretien 17-19
Service technique 19
Dépannage 20
Garantie 21
IMPORTANT :
Félicitations pour l’achat de votre motobêche Powermate®.
Ce manuel comprend les directives complètes pour assurer un fonctionnement et un entretien sécuritaires de votre
motobêche. Veuillez référer à ce manuel avant chaque usage de votre motobêche.
Veuillez noter les éléments suivants pour une référence future :
Code – Date de fabrication : __________
Date d’achat : Joignez une copie de votre reçu de caisse.
Numéro sans frais – service à la clientèle : 1-800-737-2112
Référez au site Web pour un manuel sous forme
électronique et un catalogue des pièces.
www.powermateoutdoor.com
AVERTISSEMENT
Les échappements de moteur, certains éléments constituants et certains composants de produit contiennent ou
émettent de produits chimiques reconnus par l’État de Californie pour causer le cancer, des anomalies congénitales ou
d’autres effets nuisibles sur la reproduction.
Si vous avez une question ou un problème...
AVERTISSEMENT - PROPOSITION 65 –CALIFORNIE
APPELEZ SANS FRAIS : 1-800-737-2112
CONSERVEZ CE MANUEL POUR RÉFÉRENCE FUTURE
06/10/2016 Imprimé en Chine A203398
Page 23

Définitions de sécurité
• Conservez ces directives
Symboles d’alerte de sécurité
Importante information de sécurité
Les symboles suivants sont utilisés sur le produit et dans ce manuel pour alerter l’opérateur de potentiels dangers
concernant la sécurité. Assurez-vous de les lire attentivement et de comprendre leur signification.
DANGER
AVERTISSEMENT
MISE EN GARDE
AVIS
Les symboles suivants peuvent se retrouver sur votre motobêche. Assurez-vous de les lire attentivement et de comprendre leur
signification.
Symboles d’avertissement de sécurité
Signale un AVERTISSEMENT, un DANGER
ou une MISE EN GARDE.
Veuillez lire le manuel de l’usager, avant de
faire fonctionner cet appareil. Le défaut de
suivre les directives pourrait provoquer de
sérieuses blessures.
Ne pas utiliser en présence d’enfants ou de
spectateurs.
Les dents rotatives peuvent causer de
sérieuses blessures. Maintenez les mains,
les pieds et les vêtements à l’écart.
Signale une situation imminente et dangereuse qui, si elle n’est pas évitée, entraînera la mort ou des
blessures graves.
Signale une situation potentiellement dangereuse susceptible, si elle n’est pas évitée, d’entraîner la mort
ou des blessures.graves.
Signale une situation potentiellement dangereuse susceptible, si elle n’est pas évitée, de causer des
blessures de mineures.
Indique une pratique qui n’est pas reliée à des blessures personnelles, mais qui, si elle n’est pas évitée,
peut entraîner des dommages matériels.
Débranchez le câble de bougie d’allumage
lorsqu’il n’est pas utilisé ou avant de
procéder à la réparation, au nettoyage ou à
l’entretien de cette unité.
Le gaz d’échappement contient du monoxyde
de carbone, un gaz inodore et mortel. Ne
JAMAIS faire fonctionner cette unité à
l’intérieur ou dans un espace mal ventilé.
Ne PAS toucher un tuyau d’échappement ou
un cylindre chaud. Ces pièces deviennent ex-
trêmement durant le fonctionnement et peuvent
demeurer ainsi pour une courte période de
temps après le fonctionnement.
Pour réduire le risque d’incendie, nettoyer
les déversements d’essence et d’huile et
maintenez l’unité libre de résidus. L’essence
est extrêmement inflammable. Laissez l’unité
refroidir avant de refaire le plein.
Symboles de contrôle et de fonctionnement
Emplacement de remplissage d’huile
Éviter un trop-plein. Ajoutez de l’huile
à moteur et vérifiez la quantité à cet
endroit.
CLUTCH
CONTROL
ENGAGE
DISENGAGE
Levier d‘embrayage
Le mouvement des dents s’engagera,
en soulevant le levier.
Ne pas utiliser d’essence contenant
plus de 10% d’éthanol.
Enfoncer l’ampoule d’amorce 3
fois avant de démarrer un moteur
froid.
Important : Pour démarrer un
FR - 2Questions? Appelez sans frais à : 1-800-737-2112 Copyright © 2016 MAT Engine Technologies, LLC
moteur chaud, enfoncez une seule
fois.
Interrupteur de démarrage
Déplacer la position de
l’interrupteur pour démarrer/
arrêter le moteur
Placer la main libre sur le guidon
avant de tirer la poignée du
lanceur à rappel de l’autre main.
Page 24

Importante information de sécurité
• Conservez ces directives
RESPONSIBILITÉ DE PROPRIÉTAIRE
1. Veuillez lire et suivre cers directives de sécurité. Le défaut d’y adhérer pourrait provoquer de sérieuses blessures.
2. Apprenez à connaître votre produit. Veuillez lire et comprendre ce manuel avant l’usage. Comparez les illustrations
avec l’unité. Apprenez à connaître l’emplacement et le fonctionnement de tous les contrôles. De comprendre
complètement l’unité avant l’usage offrira plus de rendement et de sécurité.
3. Veuillez suivre toutes les directives lors de l’assemblage de l’unité. Si vous vous êtes procuré l’unité déjà assemblée,
l’opérateur doit vérifier l’unité attentivement pour s’assurer que celle-ci a été assemblée selon les directives du
manuel avant l’usage.
4. Vériez régulièrement la motobêche. Assurez-vous que les pièces ne sont pas repliées, endommagées ou desserrées.
5. N’utilisez cet appareil que pour l’objectif visé.
6. Faites fonctionner l’unité seulement lorsque les protecteurs et autres articles de sécurité sont bien en place et
fonctionnent adéquatement.
7. Réparez l’unité seulement avec des pièces autorisées ou approuvées.
8. Complétez tout l’entretien et les réglages de l’unité, selon les directives retrouvées dans ce manuel.
Recherchez ce symbole pour indiquer d’importantes mises en garde de sécurité. Il signifie : « Attention! Soyez attentif!
Votre sécurité est en jeu.»
AVERTISSEMENT
Les échappements de moteur, certains éléments constituants et certains composants de véhicule contiennent ou
émettent de produits chimiques reconnus par l’État de Californie pour causer le cancer, des anomalies congénitales ou
d’autres effets nuisibles sur la reproduction.
Importante information de sécurité
AVERTISSEMENT
Pour prévenir les mises en marche involontaires lors de la préparation, du transport, de réglages ou de réparations,
assurez-vous de toujours débrancher le câble de la bougie d’allumage et placez ce câble où il ne peut entrer en contact
avec la bougie.
SÉCURITÉ DURANT LA PRÉPARATION
AVERTISSEMENT
• Lisez, comprenez et suivez toutes les directives sur cet appareil et dans ce manuel. Familiarisez-vous complètement
avec les contrôles et l’usage approprié de la débrousailleuse avant de commencer. Apprenez à arrêter le moteur rapidement.
• Familiarisez-vous avec toutes les décalcomanies de sécurité et de fonctionnement sur cet appareil.
• Inspectez minutieusement l’espace où la débrousailleuse sera utilisée et retirez tous les corps étrangers. Votre appareil
peut projeter de petits objets à haute vitesse, pouvant provoquer des blessures ou des dommages matériels. Tenez-vous
loin d’objets cassants, tels : fenêtres de maison, vitres d’auto, serres, etc.
• Vérifiez que le levier de contrôle fonctionne adéquatement. Assurez-vous que le câble est libre et que le levier de
contrôle n’est pas endommagé.
SÉCURITÉ DURANT L’USAGE
• Ne permettez jamais à des enfants ou à de jeunes adolescents d’utiliser la motobêche.
AVERTISSEMENT
• Maintenez l’espace de travail exempt de spectateurs, surtout de jeunes enfants et d’animaux.
• Ne permettez qu’à des personnes responsables et familières avec les directives de faire fonctionner la motobêche.
• N’utilisez pas la motobêche lorsque sous l’influence d’alcool, drogues ou autre médication pouvant provoquer de la
somnolence ou affecter votre capacité à opérer cet appareil en toute sécurité.
• N’utilisez pas cet appareil si vous êtes mentalement ou physiquement inapte à opérer cet appareil en toute sécurité.
• En utilisant la motobêche, portez toujours des lunettes de sécurité conformes à ANSI ou des lunettes de sécurité
avec protecteurs latéraux, pour protéger vos yeux de corps étrangers pouvant être projetés de l’unité.
• Portez toujours des vêtements appropriés tels, une chemise à manches longues ou un gilet. Ne portez PAS de
culottes courtes. Ne portez PAS de vêtements amples, pouvant s’entremêler dans l’appareil.
FR - 3Questions? Appelez sans frais à : 1-800-737-2112 Copyright © 2016 MAT Engine Technologies, LLC
Page 25

Importante information de sécurité (Suite)
• Conservez ces directives
• Portez toujours des gants de travail et de robustes souliers, tels de bottes de travail en cuir ou des bottes courtes.
Importante information de sécurité
Ceux-ci protégeront les chevilles et le bas des jambes contre les petits morceaux de branchage, les éclats de
bois et autres débris volants et améliorera la traction.
• Il est recommandé de porter un casque protecteur pour protéger contre les petites particules volantes ou d’être heurté
par des branches basses ou autres objets passant inaperçus aux yeux de l’opérateur.
• Ne placez pas vos mains ni vos pieds près ou sous les pièces rotatives.
• Faites preuve d’extrême précaution durant le fonctionnement ou en traversant des entrées, passages ou chemins de
gravillons. Demeurez vigilants pour reconnaître les dangers cachés ou le trafic.
• Faites preuve de prudence pour éviter de glisser ou de tomber. Assurez-vous de votre stabilité; maintenez une bonne
prise sur le guidon et marchez; ne courez jamais. N’opérez jamais la motobêche à haute vitesse sur des surfaces
glissantes.
• N’utilisez jamais la motobêche sans avoir une bonne visibilité ou une bonne lumière.
DANGER
• Ne faites pas fonctionner le moteur à l’intérieur ou dans un espace fermé. Les gaz d’échappement sont dangereux et
contiennent du MONOXYDE DE CARBONE, un GAZ INODORE ET MORTEL.
• Ne laissez jamais la motobêche sans surveillance pendant que le moteur tourne. Arrêtez le moteur et assurez-vous
que toutes les pièces mobiles sont arrêtées. Débranchez le câble de la bougie d’allumage.
• Ouvrez l’œil pour la présence de trous, d’ornières, de buttes ou toute autre dénivellation de terrain. Les herbes hautes
peuvent cacher des obstacles.
• Regardez toujours derrière et vers le bas et usez de prudence en mode de marche arrière ou lorsque vous tirez la
motobêche vers vous.
• N’essayez jamais de démarrer la motobêche, à moins que les deux roues ne soient en position bloquée. Cette
méthode agit comme un frein pour la motobêche. Faites toujours démarrer la motobêche sur une surface unie.
AVERTISSEMENT
• Désengagez le levier d’embrayage et arrêtez le moteur, avant de laisser la motobêche en position de marche.
Attendez que les dents soient complètement arrêtées, avant de retirer des débris ou de faire quelque réglage à
la motobêche.
• Ne tentez pas de labourer un sol dur, ni de labourer trop profondément, ni de labourer à un rythme trop rapide,
pouvant surcharger la motobêche.
• Si la motobêche commence à vibrer de façon anormale, arrêtez le moteur, débranchez le câble de la bougie
d’allumage et assurez-vous qu’il n’entre pas en contact avec la bougie. Vérifiez immédiatement la cause.
Normalement une vibration représente un avertissement de problème.
SÉCURITÉ DE COMBUSTIBLE
AVERTISSEMENT
• L’essence est extrêmement inflammable et les vapeurs d’essence peuvent exploser si allumées. Manipulez avec soin.
• Utilisez un récipient approuvé.
• Vérifiez l’alimentation en combustible avant chaque usage, en laissant de l’espace pour l’expansion, car la chaleur du
moteur et /ou du soleil peut provoquer une expansion du combustible.
• Remplissez le réservoir de combustible à l’extérieur avec un soin extrême. Ne jamais remplir le réservoir de combustible
à l’intérieur.
• Ne jamais retirer le bouchon du réservoir de combustible, ni ajouter de combustible lorsque le moteur est en marche.
Laissez le moteur refroidir durant un minimum de 2 minutes, avant un ravitaillement.
• Ne fumez pas durant un ravitaillement.
• Après un ravitaillement, replacez fermement en place le bouchon du réservoir de combustible et essuyez tout
déversement de combustible.
• Ne rangez jamais de combustible ou le motobêche avec du combustible dans le réservoir dans un édifice où les
vapeurs pourraient rejoindre une flamme nue.
• Never fill gasoline containers or the tiller fuel tank inside of a vehicle or in a truck bed. Accidental electrical static dis
charge can ignite fuel vapors which could result in serious injury or death.
FR - 4Questions? Appelez sans frais à : 1-800-737-2112 Copyright © 2016 MAT Engine Technologies, LLC
Page 26

Importante information de sécurité (Suite)
• Conservez ces directives
SÉCURITÉ DE RANGEMENT
• Référez toujours aux directives énoncées dans le mode d’emploi relativement aux détails importants, si la motobêche
est entreposée durant une longue période de temps.
• N’entreposez jamais la motobêche avec de l’essence dans le réservoir, dans un édifice où pourraient se trouver des
sources d’ignition, telles que : chauffe-eau, chaufferette, sécheuse de linge, etc.
• Pour réduire les dangers d’incendie, maintenez le motobêche libre d’une accumulation de gazon, feuilles ou autres débris.
• Laissez le moteur refroidir avant de ranger l’unité dans tout espace fermé.
SÉCURITÉ POUR RÉPARATIONS, ENTRETIEN ET RÉGLAGES
• Après avoir frappé un objet, arrêtez le moteur. Débranchez le câble de la bougie d’allumage et placez-le où il ne peut
entrer en contact avec la bougie, pour prévenir les mises en marche involontaires. Vérifiez soigneusement la moto
bêche, pour détecter tout dommage. En présence de dommages, assurez-vous de faire réparer l’unité par un
technicien formé, avant de redémarrer et de réutiliser l’unité.
AVERTISSEMENT
• Arrêtez le moteur avant de procéder au nettoyage, à l’inspection ou à des réparations de l’unité. Assurez-vous que
toutes les pièces sont immobiles. Laissez refroidir le moteur, débranchez le câble de la bougie d’allumage et placez-le
où il ne peut entrer en contact avec la bougie.
• Ne tentez jamais de procéder à des réglages, lorsque l’unité fonctionne, sauf lorsque spécifiquement recommandé
par le fabricant.
• Maintenez la motobêche en condition sécuritaire de fonctionnement. Vérifiez toutes les attaches à intervalles fréquentes
pour assurer un serrage approprié.
• Lors de réparations ou d’entretien à la motobêche, ne basculez pas l’unité, à moins d’être spécifiquement instruit de
le faire dans le manuel. Les procédures de réparations ou d’entretien peuvent être exécutées lorsque la motobêche
est position usuelle. Certaines procédures seront plus faciles à exécuter, lorsque l’unité est soulevée sur une
plate-forme ou une surface de travail surélevée.
• Utilisez uniquement de l’équipement original ou des pièces de remplacement autorisées.
• Ne trafiquez jamais des dispositifs de sécurité. Vérifiez leur fonctionnement approprié de façon régulière.
• Ne changez pas la configuration du moteur; ne procédez pas à un réglage de surrégime de moteur.
• Nettoyez et remplacez les décalcomanies de sécurité et de directives, selon le besoin.
• Pour protéger contre la surchauffe du moteur, assurez-vous que le filtre à débris est propre et en place.
Importante information de sécurité
SÉCURITÉ DES ENFANTS
AVERTISSEMENT
• Des accidents tragiques peuvent survenir si l’opérateur n’est pas vigilant à la présence d’enfants. Les enfants sont
souvent attirés par le motobêche et le travail accompli.
• Maintenez les enfants à l’écart de la zone de travail et sous la surveillance d’un adulte responsable.
• Ne présumez jamais que les enfants demeureront à l’endroit où vous les avez vus la dernière fois.
• Soyez vigilant et arrêtez la motobêche à l’approche d’enfants dans la zone de travail.
• Avant et pendant que vous reculez, regardez derrière et vers le sol pour détecter la présence d’enfants.
• Ne permettez jamais à des enfants d’utiliser la motobêche.
• Soyez particulièrement prudent en utilisant l’unité près d’angles morts, arbustes, arbres ou autres objets pouvant
bloquer votre vision.
FR - 5Questions? Appelez sans frais à : 1-800-737-2112 Copyright © 2016 MAT Engine Technologies, LLC
Page 27

Spécifications du produit
• Conservez ces directives
Poids de l’unité . . . . . . . . . . . . . . . . . . . . . . . . .40 kg (89 lb)
Largeur de labourage . . . . . . . . . . Jusqu’à 53,3 cm (21 po)
Profondeurs de labourage . . . . . . . .Jusqu’à 20,3 cm (8 po)
Diamètre de dent . . . . . . . . . . . . . . . . . . . . . 27,9 cm (11 po)
Type d’essence . . . . . . . . . . . . . . . . . . . . . . . . . . . . . . . . . . .
Régulière sans plomb – indice d’octane 87 (min.)
Capacité d’essence . . . . . . . . . . . . . . . . 1litre (2.1 pinte US)
Type d’huile (API SG-SL) . . . . . 10W-30 est recommandée
pour toutes les températures de service.
Voir page 11 pour plus d’information.
Capacité d’huile moteur. . . . . . . . . . . 450 ml (15 1/2 oz US)
Type de moteur ............4 temps, à soupapes en tête
Cylindrée du moteur . . . . . . . . . . . . . . . . . . . . . . . . . 150 cc
Vitesse de moteur ................. 3400 tours / minute
Couple nominal ...... Couple brut de 7.79 Nm / 5.75 pi-lb
(Selon SAE J1940)
Jeu – Soupape d’admission . . . . . . . . . . . . . . . . . . . . . . . . .
0.006-0.08in. (0.15 -0.20 mm)
Jeu – Soupape d’échappement . . . . . . . . . . . . . . . . . . . . . .
0.006-0.008 in. (0.15-0.20 mm)
Écartement d’électrode – Bougie d’allumage . . 0.020-0.028
Modèle de bougie d’allumage . . . .Torch K7RTC (Champion
Grandeur de roue . . . . . . . . . . . . . . . . . . . 16,5 cm (6.5 po)
RÉFÉREZ AU MANUEL DU MOTEUR POUR OBTENIR LES SPÉCIFICATIONS DÉTAILLÉES DU MOTEUR.
Pièces et caractéristiques
1. Dents
2. Support de la tourelle
3. Roues
4. Silencieux
5. Filtre à air
6. Poignée de lanceur à rappel
7. Bougie d’allumage/Câble de bougie d’allumage
8. Barre de recouvrement
9. Ampoule d’amorce
10. Capuchon de réservoir d’essence
11. Jauge d’huile graduée
12. Levier d’embrayage
13. Protecteur de dents
14. Protecteur de dents extérieures
11
7
4
14
13
6
10
in. (0.5-0.7 mm)
C7YCC)
12
9
5
2
8
3
1
Figure 1
FR - 6Questions? Appelez sans frais à : 1-800-737-2112 Copyright © 2016 MAT Engine Technologies, LLC
Page 28

Décalcomanies de sécurité
• Conservez ces directives
Cette motobêche a été conçue et fabriquée pour vous offrir
la sécurité et la abilité à laquelle vous attendez, de la part
d’un chef de le industriel dans le domaine de la fabrication
d’équipement extérieur motorisé.
Même si la lecture de ce manuel et les directives de securité
qu’il contient vous procurera les connaissances de base pour
assurer le fonctionnement sécuritaire et efcace de cet appa-
reil, nous avons disposé plusieurs étiquettes de sécurité sur
la motobêche, pour rappeler ces renseignements importants
à l’usage de cet appareil.
Ces importantes étiquettes de sécurité sont illustrées pour
vous aider à vous familiariser avec l‘emplacement et le contenu des messages de sécurité vus durant les travaux normaux de labourage. Veuillez consulter ces étiquettes mainten-
ant. Si vous avez des questions quant à leur signication ou à
la façon de respecter des directives, lisez à nouveau le texte
complet des directives de sécurité des pages précédentes ou
contactez votre détaillant local.
Si jamais ces étiquettes devenaient illisibles parce qu’elles
sont usées, décolorées ou endommagées de quelque
façon, contactez votre détaillant autorisé local pour commander des étiquettes de remplacement.
Il est facile d’appliquer ces étiquettes de sécurité et elles
sauront agir comme constants rappels visuels pour vous et
tous les autres usagers de cet appareil. Suivre ces directives de sécurité est nécessaire pour assurer un fonc-
tionnement sécuritaire et efcace de votre motobêche.
• Gasoline is flammable. Allow engine to cool at least 2 minutes
before refueling.
• Operation of this equipment may create sparks that can start
fires around dry vegetation. A spark arrestor may be required.
The operator should contact local fire agencies for laws or
regulations relating to fire prevention requirements.
FR - 7Questions? Appelez sans frais à : 1-800-737-2112 Copyright © 2016 MAT Engine Technologies, LLC
Page 29

Assemblage
• Conservez ces directives
Veuillez lire et suivre les directives d’assemblage. Ne jetez aucune pièce ou matériaux jusqu’à ce que l’assemblage ne soit
complété. Les références faites à la droite ou à la gauche de la motobêche représentent le point de vue de la position de
l’opérateur, lorsqu’il est placé derrière la motobêche.
AVERTISSEMENT
-N’utilisez pas la motobêche si celle-ci est endommagée ou n’est pas complètement ou correctement assemblée.
-Avant de procéder à l’assemblage ou à l’entretien de l’unité, retirez le câble de la bougie d’allumage.
-Lors de l’assemblage de la motobêche, portez toujours des lunettes de sécurité conformes à ANSI avec protecteurs latéraux.
Vous trouverez les composants suivants dans la boîte.
Les quantités sont indiquées dans les ( ).
1. (1) Motobêche
2. (1) Assemblage de guidon supérieur
3. (1) Guidon inférieur
4. (4) Dents
5. (2) Roues
6. (1) Barre de recouvrement
7. (2) Protecteurs de dents extérieures
8. (1) Mode d’emploi de la motobêche
9. (1) Manuel du moteur
10. (1) Bouteille d’huile à moteur
11. (1) Sac de pièces contenant les articles suivants :
a. (4) Boulons m10 x 25 mm, rondelles plates et contre-écrous pour assembler le guidon inférieur.
b. (4) Boulons de selle m8 x 25 mm et rondelles plates pour assembler le guidon superieur au guidon inferieur
c. (4) Boutons de guidon, pour le guidon superieur et le guidon inferieur.
d. (2) M8 x 30 mm bolts, washers and locknuts for installing wheel axle
e. (2) boulons M10 x 50 mm, (4) rondelles plates et (2) contre-écrous M10 pour assembler les dents intérieures.
f. (1) Cheville, rondelle plate et goupille pour la barre de recouvrement.
g. (6) Boulons m6 x 16, contre-ecrous et rondelles plates pour installer les protecteurs de dents exterieures.
h. (1) Guide de corde avec ecrou nylock
i. (1) Attaches
Si vous avez besoin d’assistance ou devez trouver des pièces
manquantes, APPELEZ SANS FRAIS : 1-800-737-2112.
Comment retirer la motobêche de la boîte
A
1. Retirez toutes les pièces et les composants d’emballage.
2. Utilisez un couteau universel pour couper les 4 rebords verticaux et de déposer les panneaux latéraux à plat autour
de la motobêche.
3. Retirez tout l’excédent d’emballage.
FR - 8Questions? Appelez sans frais à : 1-800-737-2112 Copyright © 2016 MAT Engine Technologies, LLC
Page 30

Assemblage (Suite)
• Conservez ces directives
Directives d’assemblage
B
La motobêche est livrée préassemblée, sauf pour quelques pièces. Les directives suivantes vous aideront à compléter l’assemblage
de la motobêche.
FIXEZ L’ASSEMBLAGE DES
ROUES À LA STRUCTURE
1. Installez l’assemblage des roues
à la structure, en retirant la
goupille et la rondelle plate de
l’une des extrémités de la tige
de pivot. Retirez la tige. Alignez
les orices du pivot de
l’assemblage des roues
aux orices dans la structure.
Installez la tige de pivot et
xez-la en place, en réinstallant
la rondelle plate et la goupille.
Si vous avez besoin d’assistance ou devez trouver des pièces
manquantes, APPELEZ SANS FRAIS : 1-800-737-2112.
Figure 2
Sharp edge of tine should face down to the ground.
INSTALLEZ LA BARRE DE
RECOUVREMENT (Voir Illust.4)
1. Insérez la barre de
recouvrement dans la partie
inferieure de l’assemblage
du support des roues.
2. Insérez la goupille dans
le support et le trou du
milieu de la barre de
traînée et le fixer avec la
rondelle plate et la
goupille fendue.
Figure 3
NSTALLEZ LES DENTS (Voir Illust.3)
1. Glissez les dents sur l’essieu des dents. Installez les
dents intérieures en premier. Le rebord coupant des
dents avant et supérieures devrait être dirigé vers le bas
et vers l’avant pour labourer le sol. Resserrez le boulon
M8 x 50 avec le contre-écrou, pour bien fixer en place
les dents intérieures.
2. Pour un labourage large de 53, 3 cm / 21 po, installez
les dents extérieures de telle façon à ce que la partie
longue de la tubulure soit dirigée vers les dents
intérieures. Pour un labourage étroit de 40,6 cm /
16 po, installez les dents extérieures de telle façon à
ce que la partie courte de la tubulure soit dirigée vers
les dents intérieures.
3. Resserrez le boulon M8 x 50 à l’aide du contre-écrou
fourni, pour fixer les dents extérieures.
Figure 4
FR - 9Questions? Appelez sans frais à : 1-800-737-2112 Copyright © 2016 MAT Engine Technologies, LLC
Page 31

Assemblage (Suite)
• Conservez ces directives
Si vous avez besoin d’assistance ou devez trouver des pièces
manquantes, APPELEZ SANS FRAIS : 1-800-737-2112.
INSTALLEZ LE GUIDON INFÉRIEUR (Voir Illust. 5)
1. Alignez les orifices du guidon inférieur aux
orifices respectifs dans la structure et
sans les resserrer, installez deux boulons
m10 x 25 mm, rondelles de blocage et
rondelles plates de chaque côté.
2. À l’aide d’une clé, resserrez fermement les
boulons de chaque côté.
Figure 5
INSTALLEZ LE GUIDON SUPÉRIEUR (Voir Illust. 6,7)
1. Glissez le guidon supérieur sur le guidon inféri
eur et alignez les orices.
2. Insérez la boulons de selle dans les orices tel
qu’illustré et xez-les en place à l’aide des bou
tons de guidons.
3. Resserrez fermement les boutons de guidons.
4. L’utilisation d’un collier de serrage, xer le câble
de commande à la poignée comme indiqué.
INSTALLEZ LES PROTECTEURS DE DENTS
EXTÉRIEURES (Voir Illust.8)
1. Chaque protecteur de dents extérieures peut être
installé de n’importe quel côté du protecteur principal
de dents.
2. Placez le protecteur de dents extérieures
en-dessous du protecteur principal de dents et
alignez les orifices.
3. Fixez chaque protecteur de dents extérieures au
protecteur principal de dents, à l’aide de (3) boulons
m6 x 16, rondelles et contre-écrous.
Figure 2
Figure 8
Figure 6
Figure 7
FR - 10Questions? Appelez sans frais à : 1-800-737-2112 Copyright © 2016 MAT Engine Technologies, LLC
Page 32

Assemblage (Suite)
• Conservez ces directives
INSTALLER LE GUIDE DE CORDE (Voir Illust.9)
1. Installez le guide de corde dans la section de
la main droite de la poignée supérieure comme
indiqué. Installez l’écrou et serrez fermement.
Tirez la corde du moteur et de la voie à travers
le guide.
Si vous avez besoin d’assistance ou devez trouver des pièces
manquantes, APPELEZ SANS FRAIS : 1-800-737-2112.
Figure 9
FR - 11Questions? Appelez sans frais à : 1-800-737-2112 Copyright © 2016 MAT Engine Technologies, LLC
Page 33

Préparation du moteur (Suite)
• Conservez ces directives
Huile à moteur
A
AVIS
Le moteur et expédié sans huile. Le défaut d’ajouter de l’huile
causera de sérieux dommages au moteur.
Une bouteille d’huile à moteur est incluse avec votre
motobêche. Veuillez référer au tableau à droite pour connaître
les types alternatifs d’huile à utiliser selon les différentes
températures. Utilisez toujours une huile détergente classifiée
«Pour Service, SG, SH, SJ» ou plus élevé. N’utilisez pas
d’additifs spéciaux.
MISE EN GARDE
Utilisez toujours le type d’huile recommandé. L’usage d’huile
souillée ou un type d’huile inapproprié telle l’huile à moteur 2
temps, endommagera le moteur.
REMARQUE : La capacité d’huile du moteur est de 450 ml
(15 1/2 US oz).
COMMENT VÉRIFIER LE NIVEAU D’HUILE ET REMPLIR
AU NIVEAU APPROPRIÉ
AVERTISSEMENT
Avant de vérifier l’huile, assurez-vous que le moteur est arrêté
et que le câble de la bougie d’allumage est bien débranché
de la bougie d’allumage.
SAE
TEMP
SAE 10W-30
-20
0
-20-30 -10
20
40
0
Température ambiante de service
*10W-30
Bouchon du réservoir de combustible
SAE 30
60 80
2010
Bouchon de rem-
plissage d’huile /
jauge graduée
100° F
30
40° C
1. Placez la motobêche sur une surface unie et assurez-vous
que la barre de recouvrement est installée de façon à ce que
la structure de la motobêche est de niveau. (Voir Illust. 10)
2. Retirez le bouchon de remplissage d’huile / jauge graduée
et essuyez à l’aide d’un chiffon propre.
3. Insérez la jauge dans l’ouverture de remplissage mais ne le
vissez PAS. Retirez la jauge et vériez le niveau d’huile.
4. Lorsque le niveau d’huile est plein, l’huile sera située à la
limite supérieure de la jauge graduée. Si le niveau d’huile
est situé est près ou sous la limite inférieure, il faut ajouter
de l’huile. (Voir Figure 11)
5. Ajoutez lentement de l’huile, jusqu’à ce que le niveau
d’huile atteigne la limite supérieure de la jauge graduée.
Utilisez un entonnoir ou une buse pour réduire les
déversements.
AVIS
Vérifiez fréquemment le niveau d’huile durant le remplissage.
FAITES ATTENTION DE NE PAS TROP REMPLIR / OU DE
REMPLIR INSUFFISAMMENT. Faire fonctionner le moteur à un
niveau d’huile inapproprié peut sérieusement endommager le
moteur.
6. Replacez et resserrez la jauge graduée.
7. Nettoyez tout déversement d’huile.
Limite supérieure
Limite inférieure
Barre de recouvrement
Figure 10
Bouchon
de remplis-
sage d’huile
/ jauge
graduée
Figure 11
REMARQUE : Le boîtier de transmission est livré de l’usine, équipé
de lubrifiant de type et de quantité appropriés.
FR - 12Questions? Appelez sans frais à : 1-800-737-2112 Copyright © 2016 MAT Engine Technologies, LLC
Page 34

Fonctionnement
• Conservez ces directives
Inspection avant le démarrage
A
1. Assurez-vous que tous les éléments de sécurité sont
en place et que tous les boulons et écrous sont
fermement resserrés.
2. Vériez le niveau d’huile du carter de moteur. Consultez
le manuel du moteur pour la procédure et les spécications.
3. Vériez la propreté du ltre à air. Consultez le manuel du
moteur pour la procédure.
4. Vériez le niveau de combustible. Remplissez le réservoir
de combustible au maximum, jusqu’à 2.5 cm / 1 po de la
partie supérieure du réservoir pour laisser de l’espace pour
l’expansion. Consultez le manuel du moteur pour les
recommandations relatives au combustible.
5. Assurez-vous que le câble de la bougie d’allumage est
bien xé et que la bougie est fermement resserrée.
6. Examinez en-dessous et autour du moteur pour y
détecter des signes de fuites d’huile ou de combustible.
7. Vériez les tuyaux de combustible pour vous assurer de
leur étanchéité et détecter un suintement de combustible.
8. Vériez pour détecter des signes de dommages au moteur.
9. Retirez des débris excessifs autour du silencieux et du
lanceur à rappel.
10. Retirez tout débris des dents ou des tiges de dents.
11. Déplacez la motobêche vers le site d’utilisation.
12. Assurez-vous que la position du support de la tourelle
des roues soit en position de labourage.
13. Vériez la position de la barre de recouvrement.
IMPORTANT : Le moteur est expédié de l’usine sans huile.
VOUS DEVEZ AJOUTER DE L’HUILE AVANT DE FAIRE
DÉMARRER LE MOTEUR.
MISE EN GARDE
Veuillez ne pas faire démarrer votre motobêche avant
d’avoir lu le manuel fourni avec la motobêche, ainsi que les
sections du manuel relatives aux contrôles, réglages et sé-
curité. Si vous les avez lues, suives les étapes ci-dessous
pour faire démarrer la motobêche. Procédez toujours à une
liste de vérication, avant de faire démarrer le moteur.
AVERTISSEMENT
L’essence est hautement inammable et doit être manipulée avec soin. Ne remplissez jamais le réservoir lorsque
le moteur est chaud ou en marche. Déplacez-vous toujours
vers l’extérieur pour remplir le réservoir.
AVERTISSEMENT
Maintenez toujours les mains et les pieds, à l’écart de toute
pièce rotative de l’appareil.
Démarrer le moteur
B
1. Appuyez sur l’interrupteur ON/OFF en position ‘’ON’’. (Voir Illust. 12)
2. Enfoncez l’ampoule d’amorce 3 fois. Attendez 2 secondes entre chaque fois.
3. Placez la main gauche sur le guidon supérieur (Voir Illust.13)
4. Saisissez la poignée du lanceur et tirez-la lentement, jusqu’à ce que vous sentiez une tension dans le cordon (Voir Illust.13)
5. Tirez le cordon dans un mouvement rapide et complet du bras, jusqu’à ce que le moteur démarre.
6. Ne laissez PAS le cordon de démarrage se rembobiner rapidement. Laissez le cordon de démarrage se rembobiner lentement.
Figure 12
FR - 13Questions? Appelez sans frais à : 1-800-737-2112 Copyright © 2016 MAT Engine Technologies, LLC
Figure 13
Page 35

Fonctionnement (Suite)
• Conservez ces directives
Arrêter le moteur
C
1. Appuyez sur l’interrupteur ON/OFF en position ‘’OFF’’.
Figure 14
Vitesse de fonctionnement
D
Cette motobêche est équipée d’un régulateur ajusté, réglé
pour offrir un rendement optimum de labourage.
Arrêt
E
Pour arrêter le moteur à tout moment, relâchez le levier
d’embrayage et appuyez sur l’interrupteur ON/OFF vers la
position ‘’OFF’’. Pour arrêter les dents, relâchez le levier du
contrôle d’embrayage.
Mode de transport et mode de labourage (voir Illust. 15 et 16)
F
AVERTISSEMENT
La température du silencieux et des zones avoisinantes peut
excéder 65˚c / 150˚f. Le moteur, la transmission et les zones
avoisinantes deviennent extrêmement chauds durant l’usage
normal et si elles sont touchées avant de refroidir, elles peuvent causer de graves brûlures. Laissez le moteur refroidir
complètement, avant de toucher à ces surfaces chaudes.
Pour arrêter les dents à tout moment, relâchez le LEVIER
D’EMBRAYAGE en position neutre. Relâchez toujours le
LEVIER D’EMBRAYAGE vers la position neutre ET ARRÊTEZ
LE MOTEUR, avant de régler la profondeur de la barre de
recouvrement.
Laissez le moteur refroidir complètement, avant de toucher à
ces surfaces.
DANGER
Le moteur et les zones avoisinantes deviennent extrêmement
chauds durant l’usage normal et si elles sont touchées avant de
refroidir, elles peuvent causer de graves brûlures.
Laissez le moteur refroidir complètement, avant de toucher à
ces surfaces chaudes.
IMPORTANT : Pratiquez l’utilisation des contrôles et de la mo-
tobêche avec les dents hors du sol, avant de commencer à
labourer. il est important de bien connaître le fonctionnement
approprié de l’unité, afin d’en garder le contrôle en tout temps
et d’être en mesure d’arrêter les dents et le moteur au besoin.
Si vous ne savez pas comment exécuter ces fonctions, lisez
la section sur les contrôles, les réglages et la sécurité avant
d’utiliser l’appareil.
Mode de transport
Repliez la roue sous le moteur pour faciliter le transport.
REMARQUE : La barre de traînée doit être dans le trou du milieu
ou en bas pour le transport.
Mode de labourage
Dépliez la roue pour reprendre le labourage.
Labourage
G
1. Réglez la barre de recouvrement à la profondeur de
labourage désirée.
AVERTISSEMENT
REMARQUE : abaissez la barre de recouvrement un orifice à la
fois, en procédant à des essais à chaque réglage. Réglez la
barre à un niveau trop bas pourrait provoquer une perte de
contrôle de l’unité.
2. Le mouvement des dents s’engagera, en appuyant le levier
d’embrayage contre le guidon.
AVIS
Appuyez toujours le levier complètement contre le guidon.
Le défaut de suivre cette consigne pourrait provoquer une
usure excessive et une défaillance prématurée de la courroie
d’entraînement.
Figure 15
Figure 16
FR - 14Questions? Appelez sans frais à : 1-800-737-2112 Copyright © 2016 MAT Engine Technologies, LLC
Page 36

Fonctionnement (Suite)
• Conservez ces directives
Clutch Lever
H
AVIS
Durant le labourage, appuyez toujours le levier complètement contre le guidon. Le défaut de suivre cette consigne
pourrait provoquer une usure excessive et une défaillance
prématurée de la courroie d’entraînement.
MISE EN GARDE
Cette information est uniquement fournie pour expliquer
les contrôles. Lisez cette section et toutes les directives de
fonctionnement et de sécurité avant d’utiliser la motobêche.
AVERTISSEMENT
Ne bloquez pas le levier d’embrayage en position de mise
en marche d’aucune autre façon qu’en utilisant la main. NE
bloquez PAS - NE xez PAS de quelque façon le levier en
position de mise en marche.
• Pour arrêter le fonctionnement des dents à tout moment,
relâchez le levier d’embrayage.
Réglages
I
AVERTISSEMENT
LEVIER D‘EMBRAYAGE (Voir Illust. 17)
Engagez le mouvement des dents en appuyant le levier
d’embrayage contre le guidon. En relâchant le levier les
dents cesseront de tourner et amèneront la motobêche à un
arrêt complet.
Levier vers l’avant engagé
Figure 17
Levier de la barre de recouvrement vers le haut =
Labourage plus profond.
Placez la cheville dans l’orifice inférieur du levier de la
barre de recouvrement pour obtenir le labourage le plus
profond.
Le moteur devrait être fermé avant de régler
quelque contrôle.
LEVIER DE LA BARRE DE RECOUVREMENT (Voir Illust. 2)
La profondeur de labourage est contrôlée par la hauteur
du levier de la barre de recouvrement. Pour régler la
profondeur de labourage :
1. Retirez la cheville.
2. Réglez le levier de la barre de recouvrement pour
placer les dents à la profondeur de labourage désirée.
3. Alignez l’orifice du levier de la barre de recouvrement
à l’orifice du support de la barre de recouvrement et
replacez la cheville.
Levier de la barre de recouvrement vers le bas =
Labourage peu profond.
Placez la cheville dans l’orifice supérieur du levier de la
barre de recouvrement pour obtenir le labourage le moins
profond.
REMARQUE : La barre de traînée doit être dans le trou du
milieu ou en bas pour le transport.
AVERTISSEMENT
Do not adjust tilling depth unless clutch lever is released and
engine is turned off.
FR - 15Questions? Appelez sans frais à : 1-800-737-2112 Copyright © 2016 MAT Engine Technologies, LLC
Page 37

Fonctionnement (Suite)
• Conservez ces directives
Conseils de labourage
J
La clé d’un labourage couronné de succès est de commencer
par un premier passage léger en surface et augmenter un peu
de profondeur de 2,5 à 5,0 cm / 1 à 2 po à chaque nouveau
passage.
• La profondeur du labourage variera selon le type et la
condition du sol.
• Lorsque vous commencez à travailler un terrain non-
labouré ou extrêmement dur, installez la cheville dans
l’orifice le plus élevé du levier de la barre de
recouvrement (suivez les directives de la section «
Labourage »), Cette procédure vous permettra de
labourer en surface. Avec la barre de recouvrement dans
cette position, exécutez plusieurs passages dans la zone
à labourer. Ajustez la hauteur pour de nouvelles passes
successives plus profondes.
• Si la motobêche saute ou glisse de façon incontrôlable,
baissez la barre de recouvrement en modifiant la position
de la cheville dans un orifice plus élevé. Cette procédure
vous permettra de labourer en surface. Tenez les guidons
fermement pour éviter les faux bonds.
• Si des mauvaises herbes, des herbes hautes, vignes ou
autres matériaux provoquent un bourrage des dents,
reculez l’appareil pour en dérouler la végétation.
AVERTISSEMENT
Relâchez immédiatement les leviers de contrôle si les dents
bloquent ou si vous frappez un corps étranger. Avec les leviers
de contrôle en position neutre, arrêtez le moteur. Déconnectez
le câble de la bougie d’allumage. Lorsque le fonctionnement
des dents est arrêté, retirez les débris et vérifiez pour détecter
les dommages.
AVERTISSEMENT
Une précaution extrême est requise en choisissant la profondeur
de labourage. Si vous tentez un labourage trop profond dans un
sol difcile, c’est-à-dire avec le levier de la barre de recouvrement
en position trop élevée, une perte de contrôle de l’appareil pourrait
survenir.
Si vous retirez du matériel bloqué entre les dents avec vos
mains, arrêtez le moteur et débranchez d’abord le câble de la
bougie d’allumage.
Conseils de labourage
K
Si vous planifiez utiliser votre motobêche pour travailler la terre :
• Planifiez des rangées centrées à 51-56 cm / 20-22 po, pour tourner facilement.
• Placez le levier de la barre de recouvrement avec la cheville d’arrêt dans un des orifices supérieurs. Ceci permettra
de travailler la terre en surface, nécessaire pour retourner les mauvaises herbes et briser et aérer le sol.
FR - 16Questions? Appelez sans frais à : 1-800-737-2112 Copyright © 2016 MAT Engine Technologies, LLC
Page 38

Entretien
• Conservez ces directives
Maintenance Schedule
A
AVERTISSEMENT
Avant de procéder à tout entretien arrêtez le moteur et débranchez le câble de la bougie d’allumage, pour prévenir les mises en
marche involontaires et les blessures sérieuses.
IMPORTANT : La garantie touchant cette débroussailleuse ne couvre pas les articles soumis à un abus ou négligence de
l’opérateur. Pour recevoir la pleine valeur de la garantie, l’opérateur doit maintenir la débroussailleuse tel que recommandé dans
le manuel et n’utiliser que des pièces originales. Le tableau suivant établit l’entretien périodique requis.
HORAIRE D’ENTRETIEN PÉRIODIQUE
Enregistrement – Service
Consignez les dates à mesure que le
service est complété
Vérifier le niveau d’huile du moteur, Remplir au niveau approprié
Nettoyer les débris de l’unité
Lubriez tous les points de pivot-
ement
Vérier le serrage des attaches
Vérier la courroie d’entraînement
Remplacer au besoin
Vériez les dents pour usure et
dommages
Remplacer au besoin
Vérier le conduit de combustible
Remplacer au besoin
Lubriez les essieux de roues
Vérier la bougie d’allumage
Remplacer au besoin
Changer l’huile du moteur
Avant
chaque
usage
Après
chaque
période
d’usage de
10 heures
Après
chaque
période
d’usage de
25 heures
Après
chaque
période
d’usage de
50 heures
Après
chaque
période
d’usage de
100 heures
Avant
chaque
saison
√ √
√ √ √
√ √ √
√ √
√ √
√ √
√ √
√ √ √
√ √
√ √ √
Avant le
rangement
Consultez les
remarques
plus bas
1
2,3
Nettoyer le ltre à air
Remplacer au besoin
Remplacer la bougie d’allumage
Nettoyer les dépôts de com-
bustion du cylindre, piston et
soupape
MISE EN GARDE
REMARQUES IMPORTANTES au sujet de l’horaire d’entretien
1. Revérifiez le serrage des attaches, après les 2 premières heures de l’usage initial
2. Changez l’huile du moteur après les 5-8 premières heures de l’usage initial
3. Changez l’huile à chaque 25 heures, si le travail s’effectue dans des conditions de travail intense ou sous de hautes températures
4. Nettoyez le filtre à air à chaque bloc de 10 heures d’utilisation, lorsque l’unité est soumise à des conditions hautes en
poussière.
AVERTISSEMENT
N’utilisez que des pièces de remplacement ORIGINALES. D’autres pièces pourraient endommager l’unité et causer des
blessures.
√ √
√
√
FR - 17Questions? Appelez sans frais à : 1-800-737-2112 Copyright © 2016 MAT Engine Technologies, LLC
4
Page 39

Entretien (Suite)
câble
• Conservez ces directives
Entretien de la motobêche
B
L’information suivante vous aidera à faire les vérifications
nécessaires et procéder aux procédures requises, pour suivre
les recommandations normales d’entretien pour votre motobêche. Si vous préférez, votre détaillant local autorisé peut
exécuter ces vérifications et procéder aux procédures requises
pour vous.
AVERTISSEMENT
Pour prévenir tout démarrage accidentel :
Le moteur doit être arrêté et froid et le câble de la bougie
d’allumage doit être retiré et à l’écart de la bougie, avant de
vérifier et régler le moteur ou l’appareil
CHANGER LES COURROIES
1. Arrêtez le moteur. Le moteur doit être complètement
refroidi, avant de procéder.
2. Retirez le câble de la bougie d’allumage et placez-le à
l’écart de la bougie.
3. Retirez le couvercle avant des courroies.
Entretien de moteur
C
ENTRETIEN DE MOTEUR
Référez au manuel du moteur ci-inclus dans votre paquet
de pièces, pour obtenir l’information relative à l’entretien de
moteur. L’entretien de moteur vous procure une information
détaillée et un horaire pour l’exécution des tâches suivantes :
1. Vérifiez le niveau d’huile avant chaque usage ou après
chaque période de 8 heures d’usage.
2. Changez l’huile après les premières 5 à 8 heures d’usage.
Changez l’huile lorsque le moteur est chaud. Remplissez
à l’aide d’une nouvelle huile de type recommandé.
3. Vérifiez la bougie d’allumage une fois l’an ou à chaque
période de 25 heures d’usage.
4. Nettoyez votre filtre à air.
5. Maintenez propres le moteur et les pièces.
6. Vérifiez souvent le moteur et l’appareil, pour détecter la
présence de boulons et d’écrous desserrés. Maintenez
ces articles bien resserrés.
VÉRIFIER OU REMPLIR LE CARTER DE MOTEUR
IMPORTANT : Le moteur est expédié de l’usine sans huile. Vous
devez ajouter de l’huile avant de faire démarrer le moteur.
1. Ajoutez de l’huile selon les directives du manuel de moteur.
Évitez un trop-plein. Utilisez une huile détergente de haute
qualité. Ne mélangez pas d’essence à l’huile. Le niveau
d’huile doit être à son maximum. Vérifiez le niveau d’huile,
en retirant le bouchon de remplissage d’huile.
2. Vérifiez toujours le niveau d’huile, avant de faire démarrer
le moteur. Référez au manuel de moteur pour la capacité
et le type d’huile à utiliser.
• Retirez la courroie de la poulie du moteur :
- Retirez les quatre boulons unissant la plaque du moteur
à la structure
- Soulevez légèrement le moteur et la plaque du moteur
comme un assemblage.
- Retirez la courroie de la poulie avant.
• Installez une nouvelle courroie :
- Desserrez les boulons de montage du moteur
- Placez la courroie dans la rainure autour de la
poulie de transmission.
- Placez la partie arrière de la courroie autour de la
poulie de tension et des guides de courroie
- Réinstallez et resserrez les quatre boulons de la
plaque du moteur
- Tirez lentement la corde du moteur et vérifiez le
mouvement de la courroie, pour vous assurer de la
trajectoire appropriée de la courroie.
- Réinstallez le couvercle avant des courroies.
4. Resserrez le contre-écrou supérieur.
5. Connectez à nouveau de câble de la bougie d’allumage.
6. Suivez les directives de fonctionnement – démarrez le
moteur et actionnez le levier d’embrayage.
AVERTISSEMENT
Les dents ne devraient pas tourner, lorsque le moteur tourne et
que le levier d’embrayage n’est pas engagé.
Entretien
D
LUBRIFICATION
Une lubrification appropriée des pièces mécaniques mobiles
est un élément critique, relativement au soin et à l’entretien.
Lubrifiez les pièces mobiles à des intervalles de 10 heures, à
l’aide d’une huile de grade sae 30.
NETTOYER L’ARBRE DE L’ESSIEU DES DENTS
1. Arrêtez le moteur. Le moteur doit être refroidi.
2. Retirez le câble de la bougie d’allumage et maintenez-le
à l’écart de la bougie,
3. Renversez la motobêche vers l’avant. Bloquez la
motobêche en position, de façon à ce qu’elle repose sur
la structure du moteur et que les dents soient exposées.
4. Retirez toute végétation, corde, fil et quelque autre
matériel ayant pu s’accumuler sur l’essieu entre le jeu
de dents intérieures et le couvercle scellant, situé sur le
boîtier de la transmission.
5. Ramenez la motobêche en position originale de niveau.
6. Replacez le câble de la bougie d’allumage.
FR - 18Questions? Appelez sans frais à : 1-800-737-2112 Copyright © 2016 MAT Engine Technologies, LLC
Page 40

Entretien (Suite)
• Conservez ces directives
Comment se préparer pour le rangement
E
AVERTISSEMENT
Ne rangez jamais la motobêche à l’intérieur avec du
combustible dans le réservoir. Ne la rangez jamais dans
un espace fermé et mal ventilé, où les vapeurs pourraient
rejoindre une amme nue, une étincelle ou une amme
pilote d’une fournaise, chauffe-eau ou sécheuse. Laissez le
moteur refroidir avant de ranger l’unité.
AVERTISSEMENT
Ne retirez pas d’essence lorsque vous êtes dans un édice,
près d’un feu ou pendant que vous fumez. Les vapeurs
d’essence peuvent causer une explosion ou un incendie.
REMARQUE : Une vérication ou une mise au point annuelle
auprès d’un centre de service autorisé vous assurera que la
débroussailleuse vous offrira un rendement maximum pour
la saison prochaine.
Lorsque la motobêche est rangée pour trente jours ou plus, les
étapes suivantes devraient être suivies, pour vous assurer que
la motobêche est en bonne condition pour la saison suivante.
1. Laissez le moteur rouler jusqu’à ce qu’il soit à bout
d’essence. Retirez la vis de la cuve du carburateur et
drainez le combustible. Penchez légèrement l’unité
pour retirer complètement le combustible. Replacez la
vis. (Figure 18)
2. Changez l’huile en suivant les directives dans la section
«Comment changer l’huile à moteur».
3. Retirez la bougie d’allumage du cylindre. Versez 30 ml
(1 oz liq. US) d’huile dans le cylindre. Lentement,
tirez la poignée du lanceur à rappel, de façon à ce que
l’huile protège le cylindre. Installez une nouvelle bougie
d’allumage dans le cylindre. Lentement, tirez la poignée
du lanceur à rappel à quelques reprises pour distribuer
l’huile. Lentement, tirez la poignée du lanceur à rappel,
jusqu’à ce qu’une pression soit ressentie. Cette
procédure fermera les soupapes du cylindre.
AVERTISSEMENT
Ne xez PAS le câble de la bougie d’allumage, lorsque
vous rangez l’unité.
4. Nettoyez la motobêche. Retirez toute trace de saleté,
feuilles, débris, graisse, etc. de la motobêche - incluant
les ventilateurs de cylindre, orices du couvercle de
lanceur à rappel, sous le réservoir de combustible
et sous le silencieux.
5. Vériez la motobêche pour détecter la présence de
pièces usées ou endommagées. Selon le besoin, faites
remplacer les pièces endommagées.
6. Resserrez toute xation desserrée.
7. Appliquez la lubrication, tel que recommandé dans la
section d’entretien.
8. Placez l’unité dans un édice possédant une ventilation
Retirez la vis du carburateur du récipient et drainez
le carburant. Replacez la vis.
Figure 18
Service technique
Vous pourriez avoir d’autres questions au sujet de l’assemblage, du fonctionnement ou de l’entretien de cette
débroussailleuse Si tel est le cas, veuillez contacter notre département de service technique au 1-800-737-2112 (Anglais
seulement). Vous pouvez également nous écrire:
METL - CORRESPONDANCE SEULEMENT
ATT’N: Service technique– METL
6700 Wildlife Way
Long Grove, IL 60047
En contactant le département de service technique, ayez en main :
• Votre nom
• Votre adresse
• Votre numéro de téléphone
Si vous avez besoin d’assistance ou devez trouver des pièces
manquantes, APPELEZ SANS FRAIS : 1-800-737-2112.
• Numéro de modèle du produit
• Date de l’achat
(inclure une copie de votre reçu pour les demandes écrites)
• Code de date sur l’unité
FR - 19Questions? Appelez sans frais à : 1-800-737-2112 Copyright © 2016 MAT Engine Technologies, LLC
Page 41

Dépannage
• Conservez ces directives
PROBLÈME CAUSE(S) POSSIBLE(S) SOLUTION(S)
Moteur difficile à démarrer 1. À court de combustible
2. Interrupteur de moteur fermé (OFF)
3. Moteur non amorcé
4. Câble de bougie d’allumage
débranché
5. Câble ou levier du contrôle des
gaz défectueux
6. Carburateur souillé
7. Filtre à air bloqué
8. Combustible contaminé
Problèmes de moteur
Moteur émet une fumée
excessive
Moteur roule de façon très
irrégulière
Moteur a des ratés
Moteur ne peut maintenir sa
pleine vitesse
Vibration / bruit excessif 1. Pièces desserrées
1. Sand huile de moteur
2. Huile de moteur – niveau
inapproprié
3. Bougie d’allumage encrassée
4. Filtre à air bloqué
5. Combustible contaminé
6. Carburateur en besoin de réglage
2. Problèmes de moteur (haut)
1. Ajoutez combustible frais.
2. Tournez l’interrupteur du moteur sur
3. Allumez le starter
4. Attacher le fil de bougie d’allumage à
bougie
5. Enlever la bougie. Inspecter. Remplacer si
nécessaire
6. Portez l’outil à un centre de service
autorisé pour carburateur Nettoyage
7. Supprimer et filtre à air propre
8. Vidanger le réservoir de carburant.
Réservoir de carburant propre. Remplir
avec du combustible frais
1. Ajoutez de l’huile à moteur
2. Vérifiez l’huile à moteur. Ajoutez ou
drainez l’huile à moteur au besoin
3. Retirez la bougie d’allumage. Inspectez-la.
Remplacez-la au besoin
4. Retirez et nettoyez le filtre à air
5. Drainez le réservoir de combustible.
Nettoyez le réservoir de combustible.
Remplissez de combustible frais
6. Apportez l’unité à un centre de service
autorisé pour un nettoyage du carburateur
1. Resserrez toutes les attaches
2. Référez aux problèmes de moteur (haut)
Les dents ne tournent pas 1. Débris interférant avec les dents
2. Dents desserrées
3. Réglage inapproprié du câble
d’entraînement
4. Courroies d’entraînement
endommagées
Les dents continuent de tourner
même si le levier de conduite
n’est pas engagé
Moteur ne s’arrête pas 1. Interrupteur défectueux 1. Remplacez l’interrupteur
Les dents ne coupent pas
correctement.
Le moteur cale fréquemment 1. Vitesse / profondeur excessive de
1. Réglage inapproprié du câble
d’entraînement
2. Courroies d’entraînement
endommagées
1. Dents endommagées ou usées
2. Dents assemblées incorrectement
labourage
2. Problèmes de moteur (haut)
1. Retirez les débris enchevêtrés autour des
dents
2. Replace tine bolts and nuts
3. Référez à la section de “réglage de
tension pour courroie” pour réduire la
tension de la courroie
4. Remplacez les courroies d’entraînement
1. Référez à la section de “réglage de
tension pour courroie” pour réduire la
tension de la courroie
2. Remplacez les courroies d’entraînement
1. Remplacez les dents
2. Référez à la section “Installez les dents”
1. Labourez à vitesse modérée. Assurez-
vous de faire plusieurs passes.
2. Référez aux problèmes de moteur (haut)
FR - 20Questions? Appelez sans frais à : 1-800-737-2112 Copyright © 2016 MAT Engine Technologies, LLC
Page 42

Garantie
• Conservez ces directives
Garantie limitée MOTOBÊCHE ROTATIVE Powermate®
A
Spécifiez toujours le numéro de modèle en contactant l’usine.
Nous nous réservons le droit de modifier ces spécifications en tout temps sans préavis. La seule garantie applicable est notre garan-
tie régulière écrite. Nous n’offrons aucune autre garantie, expresse ou implicite. MAT Engine Technologies, LLC garantit que cette
débroussailleuse et toute autre pièce constituante sera libre de tout défaut relatif aux matériaux et à la main-d’œuvre, pendant une
période de deux ans (90 jours pour un usage commercial ou une unité remise à neuf), à partir de la date du premier achat auprès
d’un concessionnaire autorisé, à condition que le produit ait été entretenu et opéré adéquatement, selon les directives applicables.
Cette garantie est accordée seulement à l’acheteur original au détail. Le contrat de vente ou la preuve d’achat doit être présentée au
moment où une réclamation est faite au titre de la garantie. Cette garantie ne couvre pas un usage industriel ou de location, ni ne se
applique à des parties qui ne sont pas en état d’origine en raison de l’usure normale, ou des pièces qui échouent ou sont endommagés
à la suite d’un accident, un manque d’entretien, de falsification , ou l’altération. Des exceptions en regard de la période régulière de
garantie touchent l’usure normale de certains articles, tels : lames de coupe, têtes équipées de fils de coupe, lames de tarières, filtres
à air et bougies d’allumage ; ces articles ne sont couverts que pour une période de 60 jours contre tout défaut relatif aux matériaux et
à la main-d’œuvre. Les frais de déplacement, manutention, transport et autres frais additionnels associés aux réparations sous garan-
tie ne sont pas remboursables sous cette garantie et demeurent la responsabilité du propriétaire. Dans la mesure autorisée par la loi
de la juridiction régissant la vente de ce produit, cette garantie expresse exclut toutes les autres garanties expresses et limite la durée
de toutes les garanties implicites, incluant les garanties de qualité marchande ou d’adaptation à un usage particulier à une période de
deux ans, à partir de la date du premier achat et MAT Engine Technologies, LLC ne sera en aucun cas tenu responsable de quelque
dommage que ce soit, incluant les dommages indirects, accessoires ou consécutifs. Certains états / provinces ne permettent la limita-
tion de la durée d’une garantie implicite ou l’exclusion des dommages accessoires ou consécutifs ; ainsi les limitations ci-haut mentionnées pourraient ne pas s’appliquer envers vous. Cette garantie confère à l’acheteur original des droits juridiques spécifiques.
Pour obtenir plus d’information au sujet de ces droits, veuillez consulter les lois applicables selon l’état / province.
METL - CORRESPONDANCE SEULEMENT
ATT’N: Service technique– METL
6700 Wildlife Way
Long Grove, IL
60047
La garantie du système de contrôle des émissions est fournie par le fabricant du moteur et est incluse avec ce produit et administrée par
MAT Engine Technologies, LLC.
SI VOUS AVEZ DES QUESTIONS AU SUJET DE LA
COUVERTURE DE VOTRE GARANTIE, VOUS DEVRIEZ
CONTACTER LE SERVICE A LA CLIENTELE DE METL
Si vous avez besoin d’assistance ou si vous
avez des questions, APPELER SANS FRAIS :
1-800-737-2112.
FR - 21Questions? Appelez sans frais à : 1-800-737-2112 Copyright © 2016 MAT Engine Technologies, LLC
Page 43

Manual de operación
Motocultivadora rotativa con tren
de azadas frontal
Contenido: Página
Definiciones de seguridad 2
Información importante sobre seguridad 3-5
Especificaciones del producto 6
Piezas y características 6
Marbetes de seguridad 7
Montaje 8-11
Preparación del motor 12
Operación 13-16
Mantenimiento 17-19
Servicio técnico 19
Diagnóstico y resolución de problemas 20
Garantía 21
MODELO N.º PFTT142
IMPORTANTE:
Gracias por comprar esta motocultivadora Powermate®
Este manual brinda instrucciones completas para la operación y mantenimiento seguros de la motocultivadora. Leer y
guardar estas instrucciones. Siempre consultar este manual antes de utilizar la motocultivadora.
Anotar lo siguiente para referencia futura:
Código de fecha de fabricación: ______
Fecha de compra: adjuntar una copia del recibo de venta.
Número gratuito para el consumidor: 1-800-737-2112
Consúltese el sitio web para obtener una copia electrónica del manual y el catálogo de piezas.
www.powermateoutdoor.com
ADVERTENCIA
Los gases de escape, algunos de sus elementos y ciertos componentes del producto contienen o emiten productos
químicos que, según los conocimientos del Estado de California, producen cáncer y defectos congénitos u otros daños
reproductivos.
Si se tienen preguntas o problemas...
ADVERTENCIA DE LA PROPUESTA DE LEY 65 DE CALIFORNIA
NÚMERO GRATUITO PARA EL CONSUMIDOR: 1-800-737-2112
GUÁRDESE ESTE MANUAL PARA REFERENCIA FUTURA
06/10/2016 Impreso en China A203398
Page 44

Definiciones de seguridad
• Guardar estas instrucciones
Símbolos de alerta sobre seguridad
Información importante sobre seguridad
Los símbolos siguientes se utilizan en el producto y en este manual para alertar al operador sobre riesgos potenciales de
seguridad. Leerlos detenidamente y entender su significado.
PELIGRO
Indica una situación inminentemente peligrosa que, de no evitarse, producirá la muerte o
lesiones graves.
ADVERTENCIA
CUIDADO
AVISO
Los símbolos siguientes pueden referirse a la seguridad y pueden encontrarse sobre la segadora de hilo. Leerlos cuidadosamente y
comprender su significado.
Símbolos de advertencia sobre seguridad
Indica ADVERTENCIA, PELIGRO o
CUIDADO.
Leer el manual de operación antes de utilizar
esta máquina. El no seguir las directrices
podría conducir a lesiones graves.
No utilizar la motocultivadora ante la
presencia de niños o circunstantes.
Las azadas rotativas pueden causar lesiones
graves. Mantener alejadas las manos, los
pies y la indumentaria.
Indica una situación potencialmente peligrosa que, de no evitarse, producirá la muerte o
lesiones graves.
Indica una situación potencialmente peligrosa que, de no evitarse, podría causar lesiones de
leves a moderadas.
Indica una práctica no relacionada con lesiones personales que, si no se evita, puede
causar daños a la propiedad.
Desconectar el cable de la bujía cuando la
motocultivadora no esté en uso o antes de
dar servicio técnico, limpiar o dar mantenimiento a la unidad.
Los gases de escape del motor contienen
monóxido de carbono, un gas inodoro y letal.
JAMÁS hacer funcionar la unidad en espacios
interiores o en áreas con ventilación deficiente.
NO tocar el silenciador ni el cilindro calientes.
Estas piezas están sumamente calientes debido al funcionamiento y podrían permanecer
calientes durante un período de tiempo corto
después del funcionamiento.
Para reducir el riesgo de incendio, limpiar el
combustible y aceite derramados y mantener
la unidad libre de residuos. La gasolina es
sumamente inflamable. Dejar que la máquina
enfríe antes de reabastecerla de combustible
Símbolos de control y operación
Admisión para llenado de aceite
No sobrellenar. Añadir aceite del motor
y verificar la cantidad en esta
colocación
CLUTCH
CONTROL
ENGAGE
DISENGAGE
Palanca del embrague
El movimiento de las azadas se enganchará, levantando la palanca.
No utilizar gasolina que contiene más
de un 10% de etanol.
Oprimir el bulbo del cebador 3
veces antes de arrancar un motor
frío. Importante: Para arrancar
SP - 2Llame sin costo al: 1-800-737-2112 Copyright © 2016 MAT Engine Technologies, LLC
un motor caliente, presione
solamente una vez
Interruptor de encendido:
Mueva la posición del interruptor
para arrancar/ parar el motor.
Coloque la mano libre sobre
el asidero, antes de jalar la
empuñadura del arrancador de
retroceso con la otra mano.
Page 45

Información importante sobre seguridad
• Conserve todas las instrucciones
RESPONSABILIDAD DEL OPERADOR
1. Leer detenidamente y seguir estas instrucciones de seguridad. El hacer caso omiso de éstas puede conducir a lesiones graves.
2. Conózcase el producto. Leer y entender este manual antes de utilizar la unidad. Comparar las ilustraciones con la
unidad. Aprenderse la ubicación y función de todos los controles. Un entendimiento exhaustivo de la unidad antes de
utilizarla redundará en rendimiento y seguridad óptimos.
3. Seguir todas las instrucciones al montar la unidad. Si se compró la unidad ya montada, el operador ha de revisar la
unidad cuidadosamente para asegurarse que se montó de conformidad con las instrucciones en el manual antes de
utilizarla.
4. Inspeccionar la motocultivadora periódicamente. Vericar que no hayan piezas dobladas, dañadas o ojas.
5. Utilizar este equipo únicamente para su uso previsto.
6. Utilizar la unidad sólo con protectores, cubiertas y otros elementos de seguridad instalados y en buenas condiciones.
7. Utilizar sólo con piezas de repuesto autorizadas o aprobadas par dar mantenimiento a la unidad.
8. Completar todo mantenimiento y ajuste de la unidad conforme a las instrucciones en este manual.
La presencia de este símbolo señala precauciones de seguridad importantes. Signica: «¡Atención! ¡Ponte alerta! Tu
seguridad está de por medio.»
ADVERTENCIA
El gas de escape del motor, algunos de sus constituyentes, y ciertos componentes de vehículos contienen o emiten substancias químicas que, consta al Estado de California, producen cáncer y malformaciones congénitas u otros defectos
reproductivos.
ADVERTENCIA
Para evitar el arranque accidental al montar, transportar, ajustar o efectuar reparaciones, siempre desconectar el cable
de la bujía y colocarlo donde no pueda entrar en contacto con ésta.
Información importante sobre seguridad
SEGURIDAD DURANTE LA PREPARACIÓN
ADVERTENCIA
• Leer, entender y seguir todas las instrucciones en la máquina y en este manual. Familiarizarse completamente con los
controles y el uso apropiado de la motocultivadora antes del arranque. Sépase cómo parar el motor rápidamente.
• Familiarizarse con todos los marbetes de seguridad y funcionamiento en este equipo.
• Inspeccionar completamente el área en que se va a utilizar la motocultivadora y retirar todo objeto extraño. La motocultivadora
puede lanzar objetos pequeños a gran velocidad y causar lesiones personales o daños materiales. Mantenerse alejado de
objetos frágiles, tales como ventanas de viviendas, vidrios de automóviles, invernaderos, etc.
• Verificar, antes de cada uso, que todas las tuercas y pernos estén apretados y que el equipo esté en buenas condiciones.
SEGURIDAD DURANTE LA OPERACIÓN
• Jamás permitir que niños o adolescentes jóvenes operen la motocultivadora.
ADVERTENCIA
• Mantener el área de trabajo libre de circunstantes, particularmente niños pequeños y mascotas.
• Permitir solo a individuos responsables, familiarizados con las instrucciones, operar la motocultivadora.
• No operar la motocultivadora bajo la influencia de alcohol, fármacos u otro medicamento que pudiera causar
somnolencia o afectar la capacidad de operar la máquina de manera segura.
• No utilizar esta máquina si se es mental o físicamente incapaz de operarla de manera segura.
• Al operar la motocultivadora, siempre usar gafas de seguridad con resguardos laterales, homologadas por ANSI, para
protegerse los ojos contra objetos extraños que pudieran ser lanzados por la unidad.
• Vestir indumentaria apropiada tal como una camisa o chaqueta de manga larga. También, vestir pantalones largos.
NO vestir pantalones cortos. NO vestir indumentaria holgada que pudiera atorarse en este equipo.
• Siempre usar guantes de trabajo y calzado robusto tal como zapatos de cuero para trabajo o botas cortas. Éstos protegen
los tobillos y la tibia contra palos pequeños, astillas y otros despojos lanzados. Asimismo, éstos mejoran la tracción.
• Es aconsejable usar equipo para protegerse la cabeza contra golpes de partículas pequeñas lanzadas, o contra golpes
de ramas bajas, ramitas u otros objetos que pudieran pasar desapercibidos por el operador.
SP - 3Llame sin costo al: 1-800-737-2112 Copyright © 2016 MAT Engine Technologies, LLC
Page 46

Información importante sobre seguridad (Continuación)
• Conserve todas las instrucciones
• No colocar ni las manos ni los pies cerca de piezas rotativas o debajo de las mismas.
Información importante sobre seguridad
• Tener sumo cuidado al operar la motocultivadora sobre accesos, andenes o caminos con grava; o bien, al cruzarlos.
Mantenerse alerta por peligros ocultos o tránsito.
• Tener cuidado para no deslizarse o caerse. Siempre asegurar el apoyo de los pies; mantener una sujeción firme del asidero
y caminar; jamás correr. Jamás operar la motocultivadora a velocidades altas de transporte sobre superficies lisas.
• Jamás operar la motocultivadora sin buena visibilidad o luz.
PELIGRO
• No poner en marcha el motor en espacios interiores o dentro de un área encerrada. Los gases del escape son peligrosos;
contienen MONÓXIDO DE CARBONO, un GAS INODORO Y LETAL.
• Jamás dejar la motocultivadora desatendida mientras el motor está en marcha. Parar el motor y asegurarse que todas
las piezas móviles hayan parado. Desconectar el cable de la bujía.
• Tener cuidado con agujeros, surcos, abultamientos u otro terreno escabroso. El pasto alto puede ocultar obstáculos.
• Siempre ver hacia atrás, hacia abajo y tener cuidado al usar el retroceso o tirar de la motocultivadora hacia sí mismo.
• Jamás intentar arrancar la motocultivadora a menos que ambas ruedas estén en la posición inmovilizada. Esto actúa
como un freno para la motocultivadora. Siempre arrancar la motocultivadora en una supercie a nivel.
ADVERTENCIA
• Desenganchar la palanca del embrague y parar el motor antes de dejar la motocultivadora en la posición de operación.
Es perar hasta que las azadas paren completamente antes de retirar despojos o efectuar cualquier ajuste en la
motocultivadora.
• No intentar labrar suelo duro, labrar demasiado profundo o labrar a una velocidad demasiado rápida que pudiera sobrecargar
la motocultivadora.
• Si la motocultivadora comenzara a vibrar anormalmente, parar el motor, desconectar el cable de la bujía y evitar que
éste haga contacto con la bujía. Tratar de identificar la causa inmediatamente. Generalmente, la vibración indica problemas.
SEGURIDAD DEL COMBUSTIBLE
ADVERTENCIA
• La gasolina es sumamente inflamable y los vapores de gasolina pueden explotar si se los enciende. Manipularla con cuidado.
• Utilizar un contenedor aprobado.
• Revisar el nivel de combustible antes de cada uso; dejar espacio para expansión puesto que el calor del motor o el sol
puede causar la expansión del combustible.
• Llenar el tanque de combustible al aire libre con sumo cuidado. Jamás llenar el tanque de combustible en espacios interiores.
• Jamás retirar la tapa del tanque de combustible, ni abastecer combustible con el motor en marcha. Dejar que el motor
enfríe durante un mínimo de 2 minutos, antes de reabastecerlo de combustible.
• No fumar mientras se reabastece combustible.
• Después del reabastecimiento de combustible, colocar nuevamente la tapa del tanque de combustible de manera
segura y enjugar el combustible derramado.
• Jamás almacenar combustible o la motocultivadora con combustible en el tanque dentro de un edificio donde los vapores
podrían llegar a una llama abierta.
• Jamás llenar contenedores de gasolina o el tanque de combustible de la motocultivadora dentro de un vehículo o en
la cama de un camión. Una descarga eléctrica estática accidental puede encender los vapores de combustible, lo cual
podría resultar en lesiones graves o la muerte.
SP - 4Llame sin costo al: 1-800-737-2112 Copyright © 2016 MAT Engine Technologies, LLC
Page 47

Información importante sobre seguridad (Continuación)
• Conserve todas las instrucciones
SEGURIDAD DE ALMACENAMIENTO
• Siempre consultar las instrucciones del Manual del operador para obtener información importante pormenorizada si se
va a guardar la motocultivadora durante un período de tiempo prolongado.
• Jamás almacenar la motocultivadora con combustible en el tanque dentro de un edificio donde haya fuentes de
ignición tales como calentadores de agua, calentadores unitarios, secadoras de ropa, etc.
• Para reducir el riesgo de incendio, mantener la motocultivadora libre de césped, hojas y acumulación de otros residuos.
• Dejar que el motor enfríe antes de almacenarlo en un recinto.
SEGURIDAD DURANTE LA REPARACIÓN, MANTENIMIENTO Y AJUSTE
• Después de golpear un objeto extraño, parar el motor. Desconectar el cable de la bujía y mantenerlo alejado de ésta
para evitar un arranque accidental. Inspeccionar exhaustivamente la motocultivadora para determinar si ha sufrido
daños. Si está dañada, efectuar las gestiones para que un técnico capacitado la repare antes de arrancarla y utilizarla
nuevamente.
ADVERTENCIA
• Parar el motor antes de limpiar, reparar o inspeccionar la unidad. Verificar que todas las piezas móviles hayan parado.
Dejar que el motor enfríe. Desconectar el cable de la bujía y alejarlo de ésta.
• Jamás intentar ajuste alguno mientras el motor esté en marcha, excepto cuando así lo recomiende el fabricante
específicamente.
• Mantener la motocultivadora en condiciones de funcionamiento seguro. Revisar todos los sujetadores a intervalos
frecuentes para una sujeción adecuada.
• Al dar mantenimiento a la motocultivadora o repararla, no inclinar la máquina lateral o longitudinalmente a menos que
así lo instruya este Manual específicamente. Los procedimientos de mantenimiento y reparación se pueden efectuar
con la motocultivadora en la posición vertical. Algunos procedimientos son más fáciles si se coloca la máquina sobre una
plataforma o superficie de trabajo elevada.
• Utilizar sólo equipo original o piezas de repuesto autorizadas.
• Jamás manipular imprudentemente los dispositivos de seguridad. Verificar el funcionamiento apropiado de los mismos
periódicamente.
• No cambiar la configuración del regulador del motor ni sobreacelerar el motor.
• Limpiar y reemplazar los marbetes de seguridad e instrucciones según sea necesario.
• Para prevenir el sobrecalentamiento del motor, siempre tener el filtro de impurezas limpio e instalado en el motor.
Información importante sobre seguridad
SEGURIDAD DE NIÑOS
ADVERTENCIA
• Accidentes trágicos pueden ocurrir si el operador no está alerta a la presencia de niños. A menudo, los niños se ven
atraídos por la motocultivadora y la labranza misma.
• Mantener a los niños fuera del área de labranza y bajo la supervisión de un adulto responsable.
• Jamás suponer que los niños permanecerán donde se los vio la última vez.
• Estar alerta y apagar la motocultivadora si algún niño entra en el área.
• Antes de retroceder y mientras se retrocede, ver hacia atrás y hacia abajo para asegurarse que no haya niños pequeños.
• Jamás permitir que niños operen la motocultivadora.
• Tener sumo cuidado al utilizar la motocultivadora cerca de esquinas sin visibilidad clara, arbustos, árboles u otros objetos
que pudieran obstruir la visión.
SP - 5Llame sin costo al: 1-800-737-2112 Copyright © 2016 MAT Engine Technologies, LLC
Page 48

Especificaciones del producto
• Conserve todas las instrucciones
Peso de la unidad . . . . . . . . . . . . . . . . . . . . . . .40 kg (89 lb)
Anchura de labranza . . . . . . . . . . . hasta 53,3 cm (21 pulg.)
Profundidad de labranza . . . . . . . . . hasta 20,3 cm (8 pulg.)
Diámetro de azada . . . . . . . . . . . . . . . . . 27,9 cm (11 pulg.)
Tipo de gasolina ....Regular, sin plomo, 87 octanos (mín.)
Capacidad de gasolina . . . . . . . . . . . . . . . . 1 L (1.0 qt. US)
Tipo de aceite para motor (API SG-SL) . . . . . . . . . . . . . . . .
Se recomienda 10W-30 para toda temperatura en servicio.
Véase la página 11 para mayor información.
Capacidad de aceite de motor . . . . . 450 ml (15 1/2 oz US)
Tipo de motor ...........Válvula en la culata, 4 tiempos
Cilindrada del motor . . . . . . . . . . . . . . . . . . . . . . . . . . 150cc
Velocidad del motor . . . . . . . . . . . . . . . . . . . . . . . . 3400 rpm
Par de torsión nominal . . . . . . . . . . . . . . 7.79 N·m/5.75 ft·lbf
par de torsión bruto según SAE J1940
Huelgo de la válvula de admisión . . . . . . . . . . . . . . . . . . . . .
0.006-0.008 in. (0.15 -0.20 mm)
Huelgo de la válvula de escape . . . . . . . . . . . . . . . . . . . . . .
0.006-0.008 in. (0.15-0.20 mm)
Salto de chispa de la bujía . . . 0.020-0.028 in. (0.5-0.7 mm)
Modelo de bujía . . . . . . . .Torch K7RTC (Champion C7YCC)
Tamaño de las ruedas . . . . . . . . . . . . . . . 16,5 cm (6.5 pulg.)
CONSULTE EL MANUAL DEL MOTOR PARA ESPECIFICACIONES DETALLADAS DEL MOTOR.
Piezas y características
1. Azadas
2. Placa giratoria
3. Ruedas
4. Silenciador
5. Filtro de aire
6. Empuñadura del arrancador de retroceso
7. Bujía / Cable de bujía
8. Barra de arrastre
9. Bulbo de cebado
10. Tapa del tanque de combustible
11. Varilla medidora del nivel de aceite
12. Palanca del embrague
13. Protector de azadas
14. Protector de azadas exteriores
11
7
4
14
13
6
12
10
9
5
2
8
3
1
Figura 1
SP - 6Llame sin costo al: 1-800-737-2112 Copyright © 2016 MAT Engine Technologies, LLC
Page 49

Marbetes de seguridad
• Conserve todas las instrucciones
Esta motocultivadora se ha diseñado y fabricado para brin-
dar la seguridad y conabilidad que se debería esperar de
un líder de la industria en la fabricación de equipo motorizado para espacios exteriores.
Aunque leer este manual y las instrucciones de seguridad
que contiene le proporcionará el conocimiento básico
necesario para operar este equipo de manera segura y
ecaz, se han colocado varios marbetes de seguridad en la
motocultivadora para recordar al operador esta importante
información mientras opera la unidad.
Estos marbetes importantes de seguridad están ilustrados
para ayudarle a familiarizarse con la ubicación y el contenido
de los mensajes de seguridad vistos durante las operaciones normales de labranza. Revísense estos marbetes
ahora mismo. Si se tiene alguna pregunta con respecto a su
signicado o a cómo cumplir estas instrucciones, leer nuevamente el texto completo de la instrucción de seguridad en las
páginas que anteceden, o bien, contáctese al concesionario
local autorizado.
Si alguno de los marbetes de seguridad se vuelve ilegible
debido al desgaste, desvanecimiento o daño durante el uso
de la motocultivadora, contáctese al concesionario local
autorizado para pedir un marbete nuevo.
Los marbetes de seguridad se aplican fácilmente y actúan
como un recordatorio visual constante para el operario y
otros que pudieran usar el equipo. Seguir las instrucciones de seguridad es necesario para la operación segura y
ecaz de la motocultivadora.
• Gasoline is flammable. Allow engine to cool at least 2 minutes
before refueling.
• Operation of this equipment may create sparks that can start
fires around dry vegetation. A spark arrestor may be required.
The operator should contact local fire agencies for laws or
regulations relating to fire prevention requirements.
SP - 7Llame sin costo al: 1-800-737-2112 Copyright © 2016 MAT Engine Technologies, LLC
Page 50

Montaje
• Conserve todas las instrucciones
Leer y seguir las instrucciones de montaje. No descartar ninguna pieza o materiales sino hasta que la unidad esté
montada. Las referencias al lado derecho o izquierdo de la motocultivadora toman como base el punto de vista desde la
posición del operador detrás de la motocultivadora.
ADVERTENCIA
-No operar la motocultivadora si ésta está averiada o no montada completa o correctamente.
-Antes de efectuar algún montaje o mantenimiento de la unidad, retirar el cable de la bujía.
-Al montar la motocultivadora, siempre usar gafas de seguridad con resguardos laterales, homologadas por ANSI.
La caja contiene los componentes siguientes.
Cantidades mostradas en ( ).
1. (1) Motocultivadora
2. (1) Conjunto del asidero superior
3. (1) Asidero inferior
4. (4) Dents
5. (2) Ruedas
6. (1) Barre de recouvrement
7. (2) Protector de azadas exteriores
8. (1) Manual del operador de la motocultivadora
9. (1) Manual del motor
10. (1) Envase de aceite de motor
11. (1) Bolsa de piezas con el contenido siguiente
a. (4) Pernos m10 x 25 mm, arandelas planas y contratuercas para ensamblar el asidero inferior.
b. (4) Pernos curvos m8 x 25 mm y arandelas planas para ensamblar el asidero superior sobre el asidero inferior.
c. (4) Perillas para el asidero superior y el asidero inferior.
d. (4) Pernos m8 x 50 mm, (8)arandelas planas y (2) contratuercas para ensamblar las azadas.
e (2) Pernos M10 x 50 mm, (4) arandelas planas y (2) contratuercas M10 para ensamblar las azadas interiores.
f. (1) Pasador, arandela plana y clavija para la barra de arrastre.
g. (6) Pernos m6 x 16, contratuercas y arandelas planas para instalar los protectores de azadas exteriores
h. (1) Guía de cuerda con tuerca nylock.
i. (1) Fijaciones
Si se necesita ayuda o falta alguna pieza, LLAMAR
GRATUITAMENTE AL: 1-800-737-2112.
Cómo sacar la motocultivadora de la caja
A
1. Sacar todas las piezas y componentes del embalaje.
2. Utilizar una cuchilla multiuso para cortar las cuatro esquinas verticales y colocar los costados de la caja sobre el piso, alrededor
de la motocultivadora.
3. Sacar el resto del embalaje.
SP - 8Llame sin costo al: 1-800-737-2112 Copyright © 2016 MAT Engine Technologies, LLC
Page 51

Montaje (Continuación)
• Conserve todas las instrucciones
Instrucciones de montaje
B
Excepto por unas cuantas piezas, la motocultivadora viene montada. Las instrucciones siguientes le ayudarán a completar
el montaje de la motocultivadora.
FIJAR EL ENSAMBLAJE DE LAS
RUEDAS SOBRE LA ESTRUCTURA
1. Instalar el ensamblaje de las
ruedas sobre la estructura,
quitando la clavija y la arandela
plana de una de las
extremidades de la varilla del
pivote. Quitar la varilla. Alinear
los agujeros del pivote del
ensamblaje de las ruedas con
los agujeros de la estructura.
Instalar la varilla del pivote y
jarla en su lugar, instalando
de nuevo la arandela plana y la
clavija. (see gure 2)
Si se necesita ayuda o falta alguna pieza, LLAMAR
GRATUITAMENTE AL: 1-800-737-2112.
Figura 2
Sharp edge of tine should face down to the ground.
INSTALAR LA BARRA DE
ARRASTRE
(véase las guras 4)
1. Insertar la barra de ar
rastre dentro de la parte
inferior del ensamblaje
del soporte de las ruedas.
2. Inserte el pasador a
través del soporte y
el oricio central de la
barra de arrastre y
asegurar con arandela
plana y pasador de
horquilla.
Figura 3
INSTALAR LAS AZADAS (véase la guras 3)
1. Deslizar las azadas sobre el eje del tren de azadas.
El borde afilado de las azadas frontales y las superiores
debe estar orientado hacia abajo y hacia el frente para
labrar el terreno. El borde afilado de las azadas debe
estar orientado hacia abajo para labrar el terreno.
Apretar el perno M8 x 50 mm con la contratuerca
provista para asegurar las azadas internas.
2. Para una anchura de labranza de 533 mm (21”), instalar
las azadas exteriores de modo que la porción larga
del tubo de las azadas esté orientado hacia las azadas
interiores. Para una anchura de labranza de 406 mm
(16”), instalar las azadas exteriores de modo que la
porción corta del tubo de las azadas esté orientado
hacia las azadas interiores.
3. Apretar el perno M8 x 50 mm con la contratuerca
Figura 4
SP - 9Llame sin costo al: 1-800-737-2112 Copyright © 2016 MAT Engine Technologies, LLC
Page 52

Montaje (Continuación)
Perillas
Pernos curvos
Perillas
Pernos curvos
• Conserve todas las instrucciones
Si se necesita ayuda o falta alguna pieza, LLAMAR
GRATUITAMENTE AL: 1-800-737-2112.
IINSTALAR EL ASIDERO INFERIOR (Vea Figura 5)
1. Alinear los agujeros del asidero inferior con los
agujeros respectivos en la estructura y sin apre
tarlos, instalar dos pernos m10 x 25 mm, aran
delas de freno y arandelas planas en
ambos lados.
2. Utilizando una llave, apretar firmemente los per
nos en ambos lados.
Figura 5
INSTALAR LOS PROTECTORES DE LAS AZADAS
EXTERIORES (véase la Figura 8)
1. Cada uno de los protectores de las azadas exteriores
se pueden instalar a uno u otro lado del protector
principal de las azadas.
2. Colocar el protector de azadas exteriores debajo del
protector principal de azadas y alinear los agujeros
3. Fijar el protector de azadas exteriores sobre el
protector principal de azadas, utilizando pernos
m6 x 16, arandelas y contratuercas.
INSTALAR EL ASIDERO SUPERIOR (véase la gura 6,7)
1. Deslizar el asidero superior sobre el asidero infe
rior y alinear los agujeros.
2. Insertar los pernos curvos en los agujeros como se
muestra y asegurarlos con las perillas del asidero.
3. Apretar las perillas ajustadamente.
4. Usando un cable tie, asegure el cable de control al
mango como se muestra.
Figure 2
Figura 8
Figura 6
Figura 7
SP - 10Llame sin costo al: 1-800-737-2112 Copyright © 2016 MAT Engine Technologies, LLC
Page 53

Montaje (Continuación)
• Conserve todas las instrucciones
INSTALE LA GUÍA DE CUERDA (véase la gura 9)
1. Instale la guía de la cuerda en la sección de
la mano derecha de la manija superior como se
muestra. Instale la tuerca de seguridad y
apriete firmemente. Tire de la cuerda del motor
y la ruta a través de la guía.
Si se necesita ayuda o falta alguna pieza, LLAMAR
GRATUITAMENTE AL: 1-800-737-2112.
Figura 10
SP - 11Llame sin costo al: 1-800-737-2112 Copyright © 2016 MAT Engine Technologies, LLC
Page 54

Preparación del motor
• Conserve todas las instrucciones
Aceite para motor
A
AVISO
El motor se envía sin aceite. El no agregar aceite causará
daños severos al motor.
Se incluye un envase de aceite de motor con la
motocultivadora. Consultar el gráfico a la derecha para
obtener información sobre tipos alternativos de aceite a
usarse a diferentes temperaturas. Siempre usar un aceite
detergente de alta calidad clasificado «Para servicio, SG,
SH, SJ» o superior. No usar aditivos especiales.
CUIDADO
Siempre usar el tipo de aceite recomendado. Usar aceite
sucio o un tipo de aceite incorrecto, tal como aceite para
motores de dos tiempos, daña el motor.
NOTA: La capacidad de aceite del motor es
(15 1/2 US oz).
450 ml
CÓMO REVISAR EL NIVEL DE ACEITE Y
LLENAR AL NIVEL APROPIADO
ADVERTENCIA
Antes de revisar el aceite, asegurarse que el motor esté
apagado y que se ha desconectado de la bujía el cable de la
misma.
1. Colocar la motocultivadora sobre una superficie plana
y asegurarse de que la barra de arrastre esté colocada
de modo que el bastidor principal de la motocultivadora
esté a nivel. (Véase la Figura 10)
2. Retirar la tapa de llenado / varilla medidora del nivel de
aceite y enjugarla con un paño.
3. Insertar la varilla medidora del nivel de aceite en la
boquilla de llenado pero NO enroscarla. Retirarla y
revisar el nivel del aceite.
4. Al alcanzarse el nivel lleno de aceite, el aceite llegará
al límite superior de la varilla medidora. Si el nivel de
aceite está cerca del límite inferior o por debajo del
mismo, se ha de agregar aceite. (Véase la figura 11)
5. Agregar aceite lentamente hasta que el nivel del aceite
llegue al límite superior de la varilla medidora. Utilizar
un embudo o boquilla para evitar derrames.
AVISO
Revisar el nivel del aceite con frecuencia durante el
llenado. NO SOBRELLENAR. NO SUBLLENAR. Hacer
marchar el motor con un nivel inadecuado de aceite
causará daños severos al motor.
6. Colocar la varilla medidora nuevamente en posición y
apretarla.
7. Limpiar todo aceite derramado.
NOTA: El cárter de transmisión viene de la fábrica con la
cantidad y el tipo apropiados de lubrificante.
SAE
TEMP
Límite superior
Límite inferior
SAE 10W-30
-20
0
-20-30 -10
20
40
0
Temperatura ambiente de servicio
*10W-30
Tapa del tanque de combustible
Barra de arrastre
SAE 30
60 80
2010
Tapa de llenado / varilla
medidora del
nivel de aceite
100° F
40° C
30
Figura 10
Tapa de lle-
nado / varilla
medidora
del nivel de
aceite
Figura 11
SP - 12Llame sin costo al: 1-800-737-2112 Copyright © 2016 MAT Engine Technologies, LLC
Page 55

Operación
• Conserve todas las instrucciones
Inspección prearranque
A
1. Asegurarse que todas las protecciones de seguridad estén
en posición y que todas las tuercas y pernos estén seguros.
2. Verificar el nivel del aceite en el cárter del cigüeñal.
Consultar el procedimiento y las especificaciones en el
manual del motor.
3. Inspeccionar el estado del filtro de aire. Consultar el
procedimiento en el manual del motor.
4. Revisar el nivel de combustible. Llenar el tanque de
combustible, como máximo, hasta 2.5 cm de la parte
superior del tanque para dejar espacio para expansión.
Consultar las recomendaciones sobre combustible en el
manual del motor.
5. Verificar que el cable de la bujía esté conectado a ésta
y que la bujía esté apretada de manera segura.
6. Revisar la posición de las ruedas y de los seguros de
las ruedas.
7. Revisar la posición de la palanca del regulador de
profundidad
8. Examinar debajo y alrededor del motor para determinar
si hay fugas de aceite o combustible.
9. Inspeccionar las mangueras de combustible para
determinar si están apretadas correctamente y si hay
fugas de combustible.
10. Buscar señales de daños en el motor.
11. Retirar residuos excesivos del área del silenciador y
del arrancador de retroceso.
IMPORTANTE: el motor se envía de fábrica sin aceite. SE
HA DE AGREGAR ACEITE ANTES DE ARRANCARSE EL
MOTOR.
CUIDADO
No arrancar la motocultivadora sino hasta haberse leído el
manual enviado con la MOTOCULTIVADORA, y las secciones controles, ajustes y seguridad de la MOTOCULTIVADORA en este manual. Si ya se han leído dichas secciones,
seguir los pasos a continuación para arrancar la motoculti-
vadora. Siempre revisar esta lista de vericación antes de
arrancar el motor.
ADVERTENCIA
La gasolina es sumamente inamable y se la ha de manipular con cuidado. Jamás llenar el tanque cuando el motor esté
caliente o en marcha. Siempre llenar el tanque en espacios
exteriores.
Es preciso que las ruedas estén siempre aseguradas en la
posición de labranza cuando el motor esté en marcha. No
operar la motocultivadora con los seguros de las ruedas no
instalados. Siempre jar las ruedas en la posición de labranza antes de arrancar el motor.
ADVERTENCIA
Siempre mantener las manos y los pies fuera del alcance de
piezas rotativas de la máquina.
Arrancar el motor
B
1. Oprimir el interruptor de encendido y apagado (ON/OFF) para colocarlo en la posición de encendido (ON).
(Véase la Figura 12)
2. Oprimir el bulbo de cebado tres veces. Esperar dos segundos entre cada pulsación.
3. Colocar la mano izquierda en el asidero superior. (Véase la Figura 13)
4. Agarrar la empuñadura del arrancador de retroceso y jálela lentamente, hasta que pueda sentir una tensión en el
arrancador. (Véase la Figura 13)
5. Jalar el arrancador en un movimiento rápido y completo del brazo, hasta que arranque el motor.
6. No permitir el regreso con golpe del arrancador. Dejarlo rebobinar lentamente.
Figura 12
SP - 13Llame sin costo al: 1-800-737-2112 Copyright © 2016 MAT Engine Technologies, LLC
Figura 13
Page 56

Operación (Continuación)
• Conserve todas las instrucciones
Stop the Engine
C
1. Oprimir el interruptor de encendido y apagado (ON/OFF)
para colocarlo en la posición de apagado (OFF).
Figura 14
Velocidad de operación
D
Esta motocultivadora está equipada con un regulador fijo
configurado para rendimiento de labrado óptimo.
Apagado
E
Para parar el motor en cualquier momento, soltar la palanca
del embrague y bascular el interruptor de encendido y apagado
(ON/OFF) hacia la posición de apagado (OFF). Para detener las
azadas en cualquier momento, soltar la palanca del embrague.
ADVERTENCIA
La temperatura del silenciador y áreas cercanas podría
rebasar 65.6 °C (150 °F). Evitar estas áreas.
El motor, la transmisión y las piezas contiguas alcanzan
temperaturas sumamente altas durante el uso normal y
pueden causar quemaduras graves, si se tocan antes
de haberse enfriado el motor. Dejar que el motor enfríe
completamente antes de tocar estas supercies calientes.
PELIGRO
El motor, la transmisión y las piezas contiguas alcanzan temperaturas sumamente altas durante el uso normal y pueden
causar quemaduras graves si se tocan antes de haberse
enfriado el motor.
Dejar que el motor enfríe completamente antes de tocar
estas supercies calientes.
IMPORTANTE: Practicar la operación de los controles y las
azadas con las azadas sin contacto con el terreno antes de
comenzar la labranza.Es importante saber cómo usar la
motocultivadora correctamente, mantener el control de la
misma en todo momento, parar las azadas y parar el motor
si fuera necesario.Si no se sabe cómo hacer éstas, léanse
las secciones sobre controles, ajustes y seguridad antes de
proceder.
Modo de transporte y modo de labranza
F
Modo de transporte (véase la gura 15)
Plegar la rueda bajo el motor para facilitar el transporte.
NOTA: La barra de arrastre debe estar en el agujero del medio
o la parte inferior para el transporte.
Modo de labranza (véase la gura 16)
Desplegar la rueda para operación de labranza.
Labranza
G
1. Ajustar la barra de arrastre a la profundidad de labrado
deseada.
ADVERTENCIA
NOTA: bajar la barra de arrastre un agujero a la vez y
probar el funcionamiento de la motocultivadora después de
cada ajuste. Bajar la barra de arrastre demasiado puede
causar la pérdida de control de la motocultivadora.
2. El movimiento de las azadas se enganchará, apoyando
la palanca del embrague contra el asidero.
AVISO
Durante la labranza, siempre apoyar la palanca
completamente contra el asidero. Al no hacerlo podría
provocar el desgaste excesivo y el fallo prematuro de la
correa de tracción.
SP - 14Llame sin costo al: 1-800-737-2112 Copyright © 2016 MAT Engine Technologies, LLC
Figura 15
Figura 16
Page 57

Operación (Continuación)
• Conserve todas las instrucciones
Palanca del embrague
H
AVISO
Esta información se proporciona aquí solo para introducir los
controles. No arrancar el motor todavía. Las instrucciones de
arranque y operación aparecen en la página 59. Léase esta
sección y todas las instrucciones sobre operación y seguridad
antes de arrancar la motocultivadora.
ADVERTENCIA
No jar la palanca del embrague en la posición de impulsión
por ningún otro medio que la mano del operador. NO atar ni
asegurar de ninguna otra manera la palanca en la posición
de impulsión.
• Para detener las ruedas y las azadas en cual quier
momento, soltar las palancas de control motriz seguro o
PALANCA DEL EMBRAGUE (véase la gura 17)
Enganche las azadas jalando la palanca del embrague hacia
el asidero. Al aflojar la palanca, las azadas se detienen, lo
que resulta en un paro completo de la motocultivadora.
Ajustes
I
El motor debe estar apagado antes de ajustarse cualquier
control.
BARRA DE ARRASTRE
(Véase la gura 4)
La profundidad de labranza está controlada por la altura
de la barra de arrastre. Para ajustar la profundidad de
labranza:
1. Retirar el pasador.
2. Ajustar la barra de arrastre para colocar las azadas a la
profundidad de labrado deseada.
3. Alinear el agujero en la barra de arrastre con el agujero
en el soporte y colocar nuevamente el pasador.
Barra de arrastre arriba = labranza menos profunda.
Colocar el pasador en el agujero inferior de la palanca
reguladora de profundidad para el labrado más superficial.
Palanca de avance accionada
Figura 17
Barra de arrastre abajo = labranza más profunda.
Colocar el pasador en el agujero superior de la palanca
reguladora de profundidad para el labrado más profundo.
NOTA: La barra de arrastre debe estar en el agujero del
medio o la parte inferior para el transporte.
ADVERTENCIA
No ajustar la profundidad de labranza a menos que se suelte la
palanca del embrague y el motor esté apagado.
SP - 15Llame sin costo al: 1-800-737-2112 Copyright © 2016 MAT Engine Technologies, LLC
Page 58

Operación (Continuación)
• Conserve todas las instrucciones
Consejos de labranza
J
La clave para una labranza exitosa es comenzar con
un corte poco profundo en la primera pasada, y luego,
aumentar de dos y medio a cinco centímetros (una a dos
pulgadas) en cada pasada sucesiva.
• La profundidad de labranza varía según las condiciones
del terreno.
• Al comenzar a labrarse en terreno no trabajado
previamente o en un suelo sumamente duro, colocar el
pasador en el agujero más alto de barra de arrastre
(seguir las instrucciones bajo la sección Labranza).
Esto permitirá una labranza poco profunda. Con la
estaca de arrastre en esta posición, efectuar varias
pasadas livianas sobre el área a labrarse. Cambiar la
configuración para mayores profundidades en pasadas
sucesivas.
• Si la motocultivadora salta o patina incontrolablemente,
bajar la estaca de arrastre mediante la colocación del
pasador en un agujero más alto. Esto dará lugar a una
labranza menos profunda. Sujetar las barras del asidero
firmemente para controlar sacudidas repentinas.
• Si maleza, pasto alto, enredaderas u otros materiales
obstruyen o atascan las azadas, invertir la marcha de la
motocultivadora para desenrollar la vegetación.
ADVERTENCIA
Inmediatamente soltar la palanca del embrague seguro si
las azadas se atascan o si se golpea algún objeto extraño.
Con la palanca del embrague en la posición neutra,
parar el motor. Desconectar el cable de la bujía. Cuando
las azadas hayan parado, retirar los objetos extraños y
determinar si hay daños.
ADVERTENCIA
Se ha de tener sumo cuidado al seleccionarse la profundidad de labranza. Si se intenta labrar a demasiada profundidad para las condiciones del suelo, es decir, con la barra
de arrastre en una posición demasiado alta, podría haber
pérdida del control.
Al quitar residuos de las azadas, primero parar el motor y
quitar el cable de la bujía.
Consejos de cultivo
K
Si se planea usar la motocultivadora para cultivar:
• Plantar filas con distancia de 51 a 56 cm (20 a 22”) de centro a centro para virar con facilidad.
• Colocar la palanca del regulador de profundidad con el pasador uno de los agujeros más altos.
Esto permitirá el cultivo poco profundo necesario para virar sobre maleza y desmenuzar y airear el suelo.
SP - 16Llame sin costo al: 1-800-737-2112 Copyright © 2016 MAT Engine Technologies, LLC
Page 59

Mantenimiento
• Conserve todas las instrucciones
Programa de mantenimiento
A
ADVERTENCIA
Antes de cualquier tarea de mantenimiento, apagar el motor y retirar de la bujía el cable de ésta para evitar un arranque
accidental y lesiones graves.
IMPORTANTE: La garantía de esta motocultivadora no cubre elementos que se han visto sujetos a uso indebido o negligencia
del operador. Para recibir el valor completo de la garantía, el operador ha de mantener la motocultivadora como se indica
en este manual y únicamente ha de usar piezas de repuesto genuinas. En la tabla siguiente se detallan las actividades
del mantenimiento periódico necesario.
TABLA DE PROGRAMA DE MANTENIMIENTO PERIÓDICO
Registros de servicio-
Anotar las fechas a medida que se lleve a
cabo el servicio normal
Revisar el nivel del aceite de motor,
llenar al nivel apropiado
Limpiar residuos de la unidad
Lubricar todos los puntos de giro
Revisar el apriete de los sujetadores
Revisar las correas de impulsión
Reemplazarlas si fuera necesario
Revisar si hay desgaste o daños en
las azadas
Reemplazarlas si fuera necesario
Revisar la tubería del combustible
Reemplazarlas si fuera necesario
Lubricar los ejes de las ruedas
Revisar la bujía
Reemplazarlas si fuera necesario
Cambiar el aceite del motor
Limpiar el ltro de aire
Reemplazarlas si fuera necesario
Antes de
cada uso
Después
de cada 10
horas de
uso
Después
de cada 25
horas de
uso
Después
de cada 50
horas de uso
Después de
cada 100
horas de
uso
Antes de
cada tem-
porada
√ √
√ √ √
√ √ √
√ √
√ √
√ √
√ √
√ √ √
√ √
√ √ √
√ √
Antes del
almace-
namiento
Véase
nota
abajo
1
2,3
4
Reemplazar la bujía
Limpiar los depósitos de combustión
del cilindro, pistón y válvulas
CUIDADO
IMPORTANTES sobre el programa de mantenimiento
1. Revisar nuevamente el apriete de todos los sujetadores después de las primeras 2 horas de uso inicial
2. Cambiar el aceite del motor después de las primeras 5 a 8 horas de uso inicial
3. Cambiar el aceite del motor cada 25 horas si se está operando bajo servicio pesado o en altas temperaturas
4. Limpiar el filtro de aire cada 10 horas si se está operando bajo condiciones pulvígenas.
ADVERTENCIA
Utilizar sólo piezas de repuesto GENUINAS. Otras piezas podrían dañar la unidad o causar lesiones.
√
√
SP - 17Llame sin costo al: 1-800-737-2112 Copyright © 2016 MAT Engine Technologies, LLC
Page 60

Mantenimiento (Continuación)
cable
• Conserve todas las instrucciones
Mantenimiento menor de la motocultivadora
B
La información siguiente ayudará a efectuar las revisiones
necesarias y llevar a cabo los procedimientos requeridos para
seguir las recomendaciones del cuidado normal provistas
para la motocultivadora. Si se prefiere, el concesionario local
autorizado puede efectuar estas revisiones y llevar a cabo los
procedimientos requeridos.
ADVERTENCIA
Para evitar un arranque accidental:
El motor ha de estar apagado y frío; el cable de la bujía ha de estar
desconectado y separado de manera segura de la bujía antes de
revisarse y ajustarse el motor o el equipo.
3. Quitar la tapa delantera de las correas.
• Quitar la correa de la polea del motor:
- Quitar los cuatro pernos que unen la placa del motor sobre
la estructura
- Levantar ligeramente el motor y la placa del motor como
un ensamblaje.
- Tirar de la correa de avance hacia abajo y sacarla
- Quitar la correa de la polea delantera.
• Instalar una nueva correa:
- Aflojar los tres pernos de montaje del motor
- Colocar la correa en la ranura de la polea del motor.
- Colocar la parte trasera de la correa alrededor de la polea
et de las guías de correa.
- Vuelva a instalar y a apretar los cuatro pernos de la placa
del motor
- Jalar lentamente la cuerda del motor y verificar el
movimiento de la correa, para asegurarse de la ruta
apropiada de la correa.
- Vuelva a instalar la tapa delantera de las correas.
4. Apretar la parte superior.
5. Conectar el cable de la bujía.
CAMBIAR LAS CORREAS
1. Apagar el motor. El motor ha de estar completamente frío
antes de proceder.
2. Retirar el cable de la bujía y separarlo de manera segura de
la bujía.
Mantenimiento del motor
C
MANTENIMIENTO DEL MOTOR
Consultar el manual del motor incluido en el paquete de piezas para
obtener información sobre mantenimiento del motor. El manual del
motor brinda información detallada y un programa de mantenimiento
para realizar las tareas siguientes:
1. Revisar el nivel del aceite antes de cada uso o después
de cada 8 horas de operación.
2. Cambiar el aceite después de las primeras 5 a 8 horas de
operación. Cambiar el aceite mientras el motor est caliente.
Llenar nuevamente con aceite nuevo del grado recomendado.
3. Revisar la bujía anualmente o cada 25 horas de operación.
4. Revisar el filtro de aire y limpiarlo o reemplazarlo según
sea necesario.
5. Mantener el motor y las piezas limpias.
6 Revisar el motor y el equipo a menudo para determinar si hay
tuercas y pernos flojos; mantener estos componentes apretados.
ADVERTENCIA
Las azadas no deben girar con el motor en marcha y la palanca motriz
no enganchada.
Mantenimiento
D
LUBRICACIÓN
La lubricación correcta de piezas mecánicas móviles es crítica
para el cuidado y mantenimiento adecuados. Aceitar las piezas
móviles a intervalos de 10 horas con aceite de tipo sae 30.
LIMPIAR LA FLECHA DEL EJE DE AZADAS
1. Apagar el motor. El motor ha de estar frío.
2. Retirar el cable de la bujía y separarlo de manera segura de
la bujía.
3. Inclinar la motocultivadora hacia el frente. Bloquear la
motocultivadora en posición de modo que descanse sobre el
soporte del motor y las azadas estén expuestas.
4. Retirar toda vegetación, hebras, alambre y otro material que
pudiera haberse acumulado en el eje entre el juego interior de
azadas y la cubierta de sello en la carcasa de la transmisión.
5. Volver la motocultivadora a la posición a nivel.
6. Reconectar el cable de la bujía.
REVISAR O LLENAR EL CÁRTER DEL CIGÜEÑAL
IMPORTANTE: el motor se envía de fábrica sin aceite. Se ha de
agregar aceite antes de arrancarse el motor.
1. Agregar aceite conforme al manual del motor. No
sobrellenar. Utilizar un aceite detergente limpio y de alta
calidad. No mezclar aceite con gasolina. El nivel de
aceite ha de ser lleno. Retirar el tapón del aceite para
revisar el nivel del aceite.
2. Siempre revisar el nivel del aceite antes de arrancar el
motor. Para obtener información sobre capacidad y tipo
de aceite a usarse, consultar el manual del motor
SP - 18Llame sin costo al: 1-800-737-2112 Copyright © 2016 MAT Engine Technologies, LLC
Page 61

Mantenimiento (Continuación)
• Conserve todas las instrucciones
Cómo preparar la motocultivadora para almacenamiento
E
ADVERTENCIA
Jamás almacenar la motocultivadora en espacios interiores con combustible en el tanque. Jamás almacenarla en
un área encerrada, con ventilación deciente donde los
vapores podrían llegar a una llama abierta, una chispa o
una luz piloto como la de un horno, calentador de agua o
secadora de ropa. Dejar que el motor enfríe antes de almacenarse la unidad.
ADVERTENCIA
No retirar la gasolina dentro de un edificio, cerca de un
fuego o mientras se fuma. Los vapores de gasolina pueden
causar una explosión o un incendio.
NOTA: Una revisión o anado anual en un centro de servi-
cio autorizado asegurará que la motocultivadora rinda al
máximo en la temporada siguiente.
Cuando la motocultivadora se almacena durante treinta
días o más, se deben seguir los pasos siguientes para
asegurarse que la motocultivadora esté en buenas
condiciones para la próxima temporada.
la empuñadura del arrancador lentamente unas cuantas
veces para distribuir el aceite. Tirar del arrancador de
retroceso hasta sentirse resistencia. Esto cierra las
válvulas del cilindro.
ADVERTENCIA
NO conectar el cable de la bujía a ésta al almacenarse la unidad.
4. Limpiar la motocultivadora. Retirar toda mugre, hojas,
residuos, grasa, etc. de la motocultivadora, incluidos los
ventiladores de enfriamiento del cilindro, los agujeros
de la cubierta del arrancador de retroceso, debajo del
tanque de combustible y debajo del silenciador.
5. Revisar la motocultivadora para determinar si hay piezas
gastadas o dañadas. Hacer que se reemplacen las
piezas dañadas si fuera necesario.
6. Apretar todo herraje ojo.
1. Dejar que el motor marche hasta acabarse la gasolina.
Quitar el tornillo de la cuba del carburateur y drenar
el combustible. Doblar ligeramente la unidad para quitar
completamente el combustible. Colocar de nuevo
el tornillo.
2. Cambiar el aceite según las instrucciones bajo «Cómo
cambiar el aceite».
3. Retirar la bujía del cilindro. Verter una onza de aceite
en el cilindro. Lentamente, tirar de la empuñadura
del arrancador de retroceso para que el aceite proteja el
cilindro. Instalar una bujía nueva en el cilindro. Tirar de
Quite el tornillo de carburador del recipiente y drene el
combustible. Vuelva a colocar el tornillo.
Figura 18
Servicio técnico
Es posible que se tengan más preguntas sobre montaje, operación o mantenimiento de esta MOTOCULTIVADORA. En
dicho caso, se puede contactar a nuestro Departamento de Servicio Técnico al 1-800-737-2112 (solo inglés).
También se puede escribir a:
Oficina Corporativa METL; SOLO CORRESPONDENCIA
ATTN: Technical Service – METL
6700 Wildlife Way
Long Grove, IL 60047
Si necesita ayuda o tiene una duda,
LLAME SIN COSTO AL: 1-800-737-2112.
Al contactarse al Departamento de Servicio Técnico, tener listos:
• Nombre
• Dirección
• Número de teléfono
• Número de modelo del producto
• Fecha de compra (incluida una copia del recibo para
solicitudes por escrito)
• Código de fecha sobre producto
SP - 19Llame sin costo al: 1-800-737-2112 Copyright © 2016 MAT Engine Technologies, LLC
Page 62

Diagnóstico y resolución de problemas
• Conserve todas las instrucciones
PROBLEMA CAUSA/S POSIBLE/S SOLUCIÓN / SOLUCIONES
Dificultad para arrancar el motor 1. Sin combustible
2. Interruptor del motor apagado
3. Motor no está cebado.
4. Cable de bujía desconectado
5. Bujía hollinada
6. Carburador sucio
7. Filtro de aire obstruido
8. Combustible contaminado
1. Agregar combustible fresco
2. Colocar el interruptor del motor en la
posición de encendido
3. Activar el estrangulador
4. Conectar el cable de la bujía a la bujía
5. Retirar la bujía. Inspeccionarla.
Reemplazarla si fuera necesario.
6. Llevar la unidad a un centro de servicio
autorizado para limpieza del carburador.
7. Retirar y limpiar el filtro de aire.
8. Drenar el tanque de combustible.
Limpiarlo. Llenarlo con combustible fresco.
Problemas del motor
El motor despide humo
excesivamente
La marcha del motor es muy
«irregular»
El motor funciona erráticamente
El motor no puede mantener la
velocidad plena
Vibración o ruido excesivo 1. Piezas flojas
Las azadas no giran
Las azadas continúan rotando
cuando la palanca motriz no está
engranada
El motor no para 1. Interruptor defectuoso 2. Reemplazar el interruptor
Las azadas no cortan
correctamente
Paro frecuente del motor 1. Velocidad o profundidad excesiva
1. Sin aceite de motor
2. Nivel inadecuado del aceite del
motor
3. Bujía hollinada
4. Filtro de aire obstruido
5. Combustible contaminado
6. Carburador desafinado
2. Problemas del motor (arriba)
1. Los residuos interfieren con las azadas
2. Azadas flojas
3. Correas motrices dañadas
1. Correas motrices dañadas 1. Cambiar las correas motrices
1. Azadas gastadas o dañadas
2. Ensamblaje incorrecto de las
azadas
de labranza
2. Problemas de motor (arriba)
1. Agregar aceite para motor
2. Revisar el aceite del motor. Agregar o
drenar aceite para motor si fuera
necesario.
3. Retirar la bujía. Inspeccionarla.
Reemplazarla si fuera necesario.
4. Retirar y limpiar el filtro de aire.
5. Drenar el tanque de combustible. Limpiar
el tanque de combustible. Llenarlo con
combustible fresco.
6. Llevar la unidad a un centro de servicio
autorizado para ajuste del carburador.
1. Apretar todos los sujetadores
2. Consultar las soluciones para el motor
(arriba)
1. Retirar los residuos de las azadas
2. Reemplazar los pernos y tuercas de las azadas
3. Cambiar las correas motrices
1. Reemplazar las azadas
2. Refiérase a la sección “Instalar las
azadas”
1. Labrar a un ritmo moderado. Efectuar
pasadas múltiples.
2. Consultar las soluciones para el motor
(arriba)
SP - 20Llame sin costo al: 1-800-737-2112 Copyright © 2016 MAT Engine Technologies, LLC
Page 63

Garantía
• Conserve todas las instrucciones
Garantía limitada de la MOTOCULTIVADORA ROTATIVA CON TREN DE AZADA POSTERIO Powermate®
A
Al contactar la fábrica, siempre especificar el número del modelo.
Nos reservamos el derecho de enmendar estas especificaciones en cualquier momento y sin aviso previo. La única garantía pertinentees nuestra garantía estándar por escrito. No ofrecemos ninguna otra garantía, expresa o implícita. MAT Engine Technologies, LLC
garantiza que esta Motocultibadora para césped y todas las piezas de la misma, carecerán de defectos en materiales y mano de obra
durante dos años (90 días para uso comercial o para unidades reacondicionadas) a partir de la fecha de compra original en un concesionario autorizado, siempre y cuando se haya dado mantenimiento adecuado al producto y se lo haya operado de conformidad con
todas las instrucciones pertinentes. Se extiende esta garantía únicamente al comprador al por menor original. Se ha de presentar el
contrato de venta o prueba de compra al efectuarse una reclamación bajo esta garantía. Esta garantía no cubre el uso industrial o de
alquiler, ni se aplica a las partes que no están en condición original debido al desgaste normal por el uso, o piezas que fallen o se han
dañado como resultado de mal uso, accidente, falta de mantenimiento adecuado, manipulación o alteración. Excepciones al periodo
regular de la garantía pueden ser: artículos de desgaste normal como, hojas cortantes, cabezales de hilos, hojas para barrenas, filtros
de aire y bujías que están solamente cubiertos por 60 días contra defectos de materiales o de mano de obra. Los costos de viaje,
manipulación, transporte e incidentales asociados con reparaciones bajo garantía no son reembolsables bajo esta garantía y son
responsabilidad del propietario. Hasta donde lo permita la ley de la jurisdicción que gobierne la venta de este producto, esta garantía
expresa excluye cualesquier y toda otra garantía expresa y limita la duración de cualesquier y toda garantías implícitas, incluyendo las
garantías de comerciabilidad e idoneidad para un propósito específico durante dos años a partir de la fecha de compra original, y por
la presente, se limita la responsabilidad de MAT Engine Technologies, LLC al precio de compra del producto y MAT Engine Technologies, LLC no será responsable por ningún otro daño en lo absoluto, incluyendo daños incidentales o emergentes. Algunos estados no
permiten limitaciones sobre la duración de una garantía implícita, ni la exclusión o limitación de los daños emergentes, por lo cual la
limitación de daños anterior podría no ser pertinente en algunos casos. Esta garantía brinda al comprador original derechos jurídicos
específicos.
Para obtener información sobre esos derechos, por favor consultar las leyes estatales pertinentes.
Sede de METL - SÓLO CORRESPONDENCIA
Atención: Servicio Técnico - METL
6700 Wildlife Way
Long Grove, IL 60047
La garantía del sistema de control de emisiones contaminantes está proporcionada por el fabricante del motor y está incluida con este
producto y administrada por MAT Engine Technologies, LLC.
Si se tiene alguna pregunta sobre la cobertura del propietario
al amparo de esta garantía, ponerse en contacto con Servicio
al cliente de METL:
Si se necesita ayuda o se tienen preguntas,
LLAMAR GRATUITAMENTE AL: 1-800-737-2112
SP - 21Llame sin costo al: 1-800-737-2112 Copyright © 2016 MAT Engine Technologies, LLC
 Loading...