

Page 1

Look inside for:
Page
Safety Definitions ......................2-3
Important Safety Information .............3-4
Product Specifications ...................5
Parts & Features .......................5
Assembly ............................6-7
Operation ............................8-9
Maintenance.......................... 10
Storage.............................. 10
Troubleshooting ...................... 11
Technical Service ..................... 11
Warranty............................. 12
08/03/2018 Printed in China A203970
Operator’s Manual
GASOLINE POWERED
CULTIVATOR
43CC, 2 CYCLE
Model No. PCV43.2
Record the following for future reference:
Mfg. Date Code:________________
Date of Purchase: ____________ Attach a copy of your sales receipt.
Consumer Toll Free Number: 1-800-737-2112
Refer to the website for electronic manual and parts book.
www.powermateoutdoor.com
IMPORTANT:
Thank you for purchasing this Powermate® Cultivator.
This manual provides complete instructions for safely operating, and maintaining your Cultivator. Read and save
these instructions. Refer to this manual each time before using your Earth Auger.
CONTAINS LEAD. May be harmful if eaten or chewed. May generate dust containing lead. Wash hands after use.
Keep out of reach of children.
This product can expose you to chemicals including lead, which is known to the State of California to cause cancer
and birth defects or other reproductive harm. For more information go to www.P65Warnings.ca.gov.
KEEP THIS MANUAL FOR FUTURE REFERENCE
If you have a question or problem...
CALL TOLL FREE: 1-800-737-2112
WARNING
WARNING
Page 2
Questions? Call Toll Free at 1-800-737-2112 Copyright © 2018 MAT Engine Technologies, LLC
ENG - 2
Safety Definitions
• Save all instructions
Important Safety Information
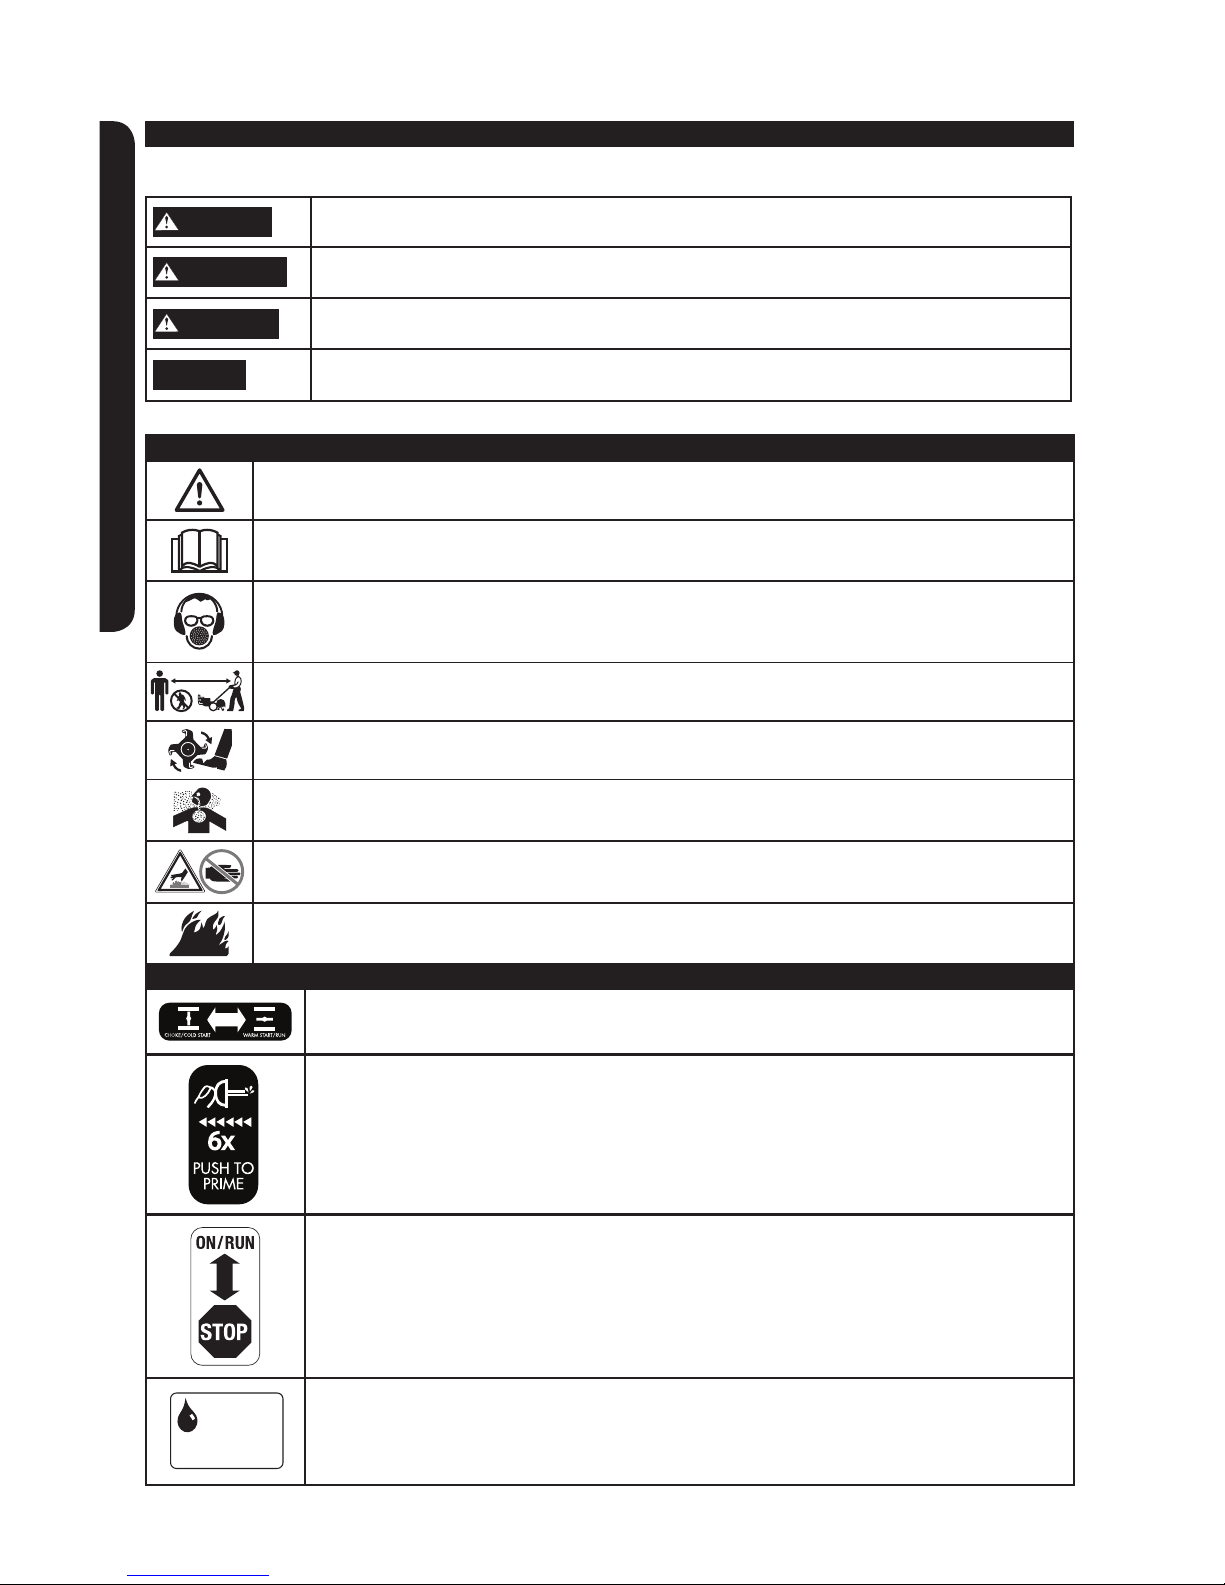
The following symbols may be found on your cultivator. Carefully read and understand their meaning.
Look for this symbol to point out important safety precautions. It means: Attention! Become Alert!
Your Safety Is Involved.
Read operator’s manual before operating this machine. Failure to follow directions could result in
serious injury.
Always wear eye protection that meets or exceeds the requirements of ANSI Z87.1. Wear hearing
protection. Wear breathing protection.
Do not use if children or bystanders are present.
Keep hands, feet, and clothing away from rotating tines. Contact with rotating tines may result in
serious injury.
Engine exhaust contains carbon monoxide, an odorless and deadly gas. NEVER run unit indoors
or in a poorly ventilated area.
Extremely hot surface. Do not touch a hot muffler, gear box or cylinder, you may get burned. These
parts get extremely hot from operation and remain hot for a short time after the unit is turned off.
To reduce risk of fire, clean spilled gas and oil and keep unit free from debris. Gasoline is
extremely flammable. Allow machine to cool completely before refueling.
DANGER
Indicates an imminently hazardous situation which, if not avoided, will result in death or
serious injury.
WARNING
Indicates a potentially hazardous situation which, if not avoided, could result in death or
serious injury.
CAUTION
Indicates a potentially hazardous situation which, if not avoided, may result in minor or
moderate injury.
NOTICE
Indicates a practice not related to personal injury which, if not avoided, may result in
property damage.
The information listed below should be read and understood by the operator. We utilize the symbols below to allow
the reader to recognize important information about their safety.
Safety Alert Symbols:
Choke Control:
Choke/Cold Start • Warm Start/Run
Fuel Primer:
Press 6 times.
Ignition Switch:
ON/RUN
OFF/STOP
Fuel Mixture
50:1
Unleaded Gas: 2 Cycle Oil
Caution: Do Not Use Gas
Mix with More Than 10%
Methanol or Ethanol
Fuel Mixture:
50:1
(Unleaded Gas : 2 Cycle Oil)
Safety Warning Symbols:
Control and Operating Symbols:
Page 3
Questions? Call Toll Free at 1-800-737-2112 Copyright © 2018 MAT Engine Technologies, LLC
ENG - 3
Safety Definitions (Continued)
• Save all instructions
Important Safety Information
• Save all instructions
Important Safety Information
Before Operating Cultivator
NOTE: READ AND UNDERSTAND ALL INSTRUCTIONS BEFORE OPERATING CULTIVATOR. Be thoroughly familiar with the
controls and the proper use of the equipment. Know how to stop the unit and disengage the controls quickly.
WARNING
Read and follow all warnings and safety instructions. Failure to do so can result in serious injury to you or bystanders.
1. Avoid Dangerous Environments
a. Do not operate cultivator while under the influence of alcohol, medications, or drugs.
b. Do not operate cultivator when you are tired.
c. Do not use this cultivator if you are mentally or physically unable to operate safely.
2. Inspect cultivator for damaged parts, and make sure all fasteners and guards are in place and secure. Replace any
damaged parts.
3. Dress properly when operating cultivator.
a. Always wear heavy long pants, boots, gloves, and a long-sleeve shirt.
b. Do not wear loose clothing or jewelry that can get caught in the moving parts of the cultivator.
c. Always wear gloves and substantial foot wear when working outside.
d. Always wear protective hair covering to contain long hair.
4. Always wear a face or dust mask if operation is dusty.
5. Always wear eye protection that meets or exceeds the requirements of ANSI Z87.1.
6. Always wear hearing protection which meets or exceeds ANSI standards.
7. Thoroughly inspect the area where the cultivator is to be used and remove all foreign objects.
8. Keep the area of operation clear of all persons, particularly small children, and pets.
9. Never allow children to operate the equipment. Never allow adults to operate the equipment without proper instruction.
10. Keep in mind that the operator or user is responsible for accidents or hazards occurring to other people, their property,
and themselves.
While Operating Cultivator
1. Stay alert. Use common sense. Watch what you are doing.
2. Do not operate cultivator if it is damaged or not securely and fully assembled.
3. Never operate the cultivator without good visibility or light.
4. Never operate the machine without proper guards, plates, or other safety protective devices in place.
5. Keep all parts of your body away from the rotating tines. Do not put hands or feet near or under rotating parts.
6. Keep children and pets away.
7. Use only for jobs explained in this manual. Do not use cultivator for any job except that for which it is intended.
8. Maintain your balance and proper footing at all times. Do not overload the machine capacity by attempting to till too deep.
9. After striking a foreign object, stop the engine, remove the wire from spark plug, thoroughly inspect the machine for any
damage, and repair the damage before restarting and operating the machine.
10. Never leave the machine unattended. Stop the engine when leaving the operating position.
11. Stop the engine before unclogging the tines, and when making any repairs, adjustments, and inspections.
Control and Operating Symbols: (Continued)
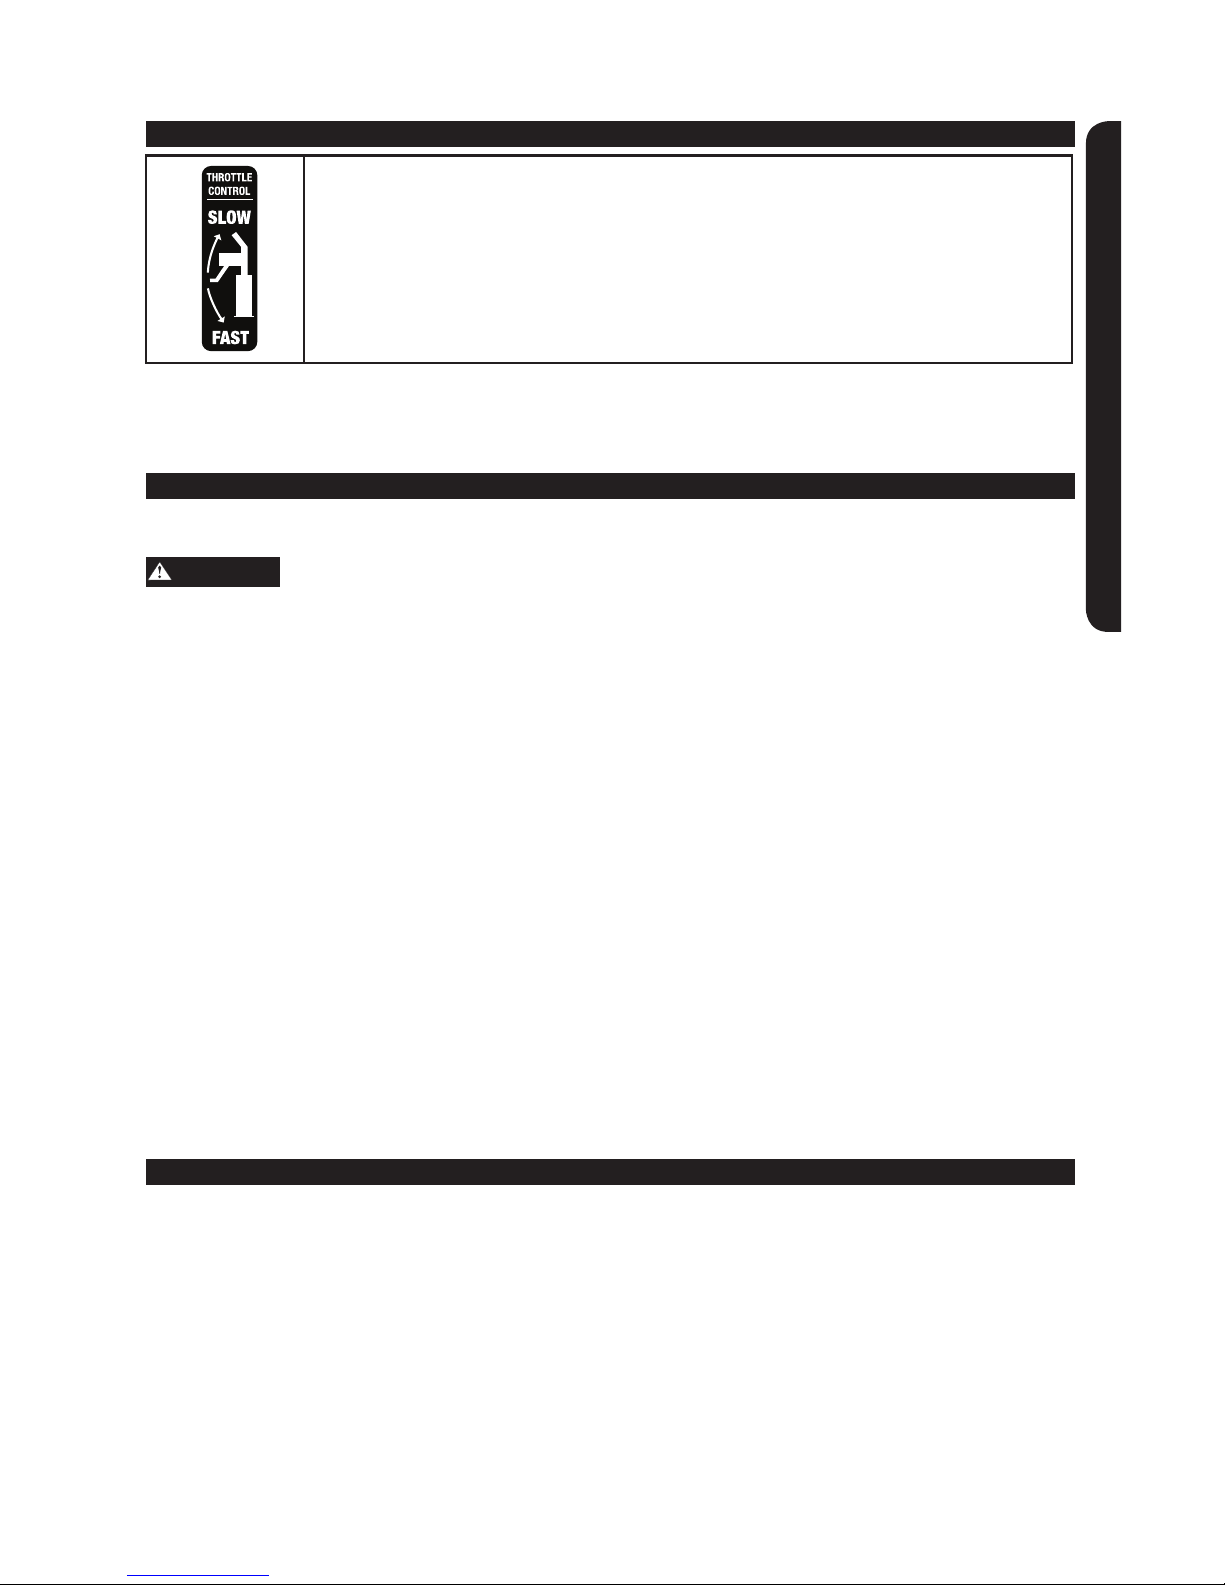
Throttle Control:
SLOW
FAST
Page 4

Questions? Call Toll Free at 1-800-737-2112 Copyright © 2018 MAT Engine Technologies, LLC
ENG - 4
While Operating Cultivator (Continued)
12. Be careful when tilling in hard ground. The tines may catch in the ground and propel the cultivator forward. If this
occurs, let go of the handles and do not restrain the machine.
13. Use extreme caution when pulling the machine towards you.
14. Do not force cultivator. It will do the job better and with less likelihood of a risk of injury at the rate for which it was designed.
DANGER
Never start or run the unit inside a closed room or building; breathing exhaust fumes can kill.
15. Exercise extreme caution when operating on or crossing gravel drives, walks, or roads. Stay alert for hidden hazards
or traffic.
16. Exercise caution to avoid slipping or falling.
17. If the unit should start to vibrate abnormally, stop the engine and check immediately for the cause. Vibration is generally
a warning sign of trouble.
18. Never operate the machine at high transport speeds on hard or slippery surfaces.
19. Start the engine carefully according to instructions and with feet well away from the tines.
20. Never pick up or carry a machine while the engine is running.
CAUTION
Prolonged exposure to vibrations through use of gasoline powered hand tools could cause blood vessel or nerve damage
in fingers, hands, and joints of people prone to circulation disorders or abnormal swellings. Extensive use in cold weather
has been linked to blood vessel damage in otherwise healthy people. If symptoms occur such as numbness, pain, loss of
strength, change in skin color or texture, or loss of feeling in the fingers, hands, or joints, discontinue the use of this tool
and seek medical attention.
Fuel Safety
1. Mix and pour fuel outdoors WHERE THERE ARE NO SPARKS OR FLAMES.
2. Use a container approved for gasoline.
3. Do not smoke or allow smoking near fuel or the cultivator.
4. Avoid spilling fuel or oil. Wipe up all fuel spills.
5. Move at least 10 feet (3 meters) away from fueling site before starting engine. Do not refuel a hot engine.
Do not refuel a running engine.
6. Stop engine and allow to cool before removing fuel cap. Remove fuel cap slowly.
7. Never store engine with fuel in the tank indoors. Fuel and fuel vapors are highly flammable.
8. Replace all fuel tank and container caps securely.
Maintenance & Storage of Cultivator
1. Stop the engine, and disconnect the spark plug before servicing, cleaning, or performing maintenance on the unit.
Never attempt to make any adjustments while the engine is running.
2. Maintain cultivator with care. Inspect cultivator periodically. Keep machine, attachments, and accessories in
safe working condition. If cultivator is not working properly or damaged, have it repaired by a qualified service center.
3. Check for misalignment of moving parts, binding of moving parts, broken parts, and any other condition that
may affect its operation. Check shear bolts, engine mounting bolts, and other bolts at frequent intervals for
proper tightness to be sure the equipment is in safe working condition.
4. Keep guards in place and in working order.
5. A guard or other part that is damaged should be properly repaired or replaced by a qualified service center.
6. Use only genuine Powermate® replacement parts and accessories. Use of any non-Powermate® parts or
accessories could lead to injury, damage the unit, and void your warranty.
7. Do not remove or modify any parts. Removing or modifying parts could lead to injury, damage the machine
and will void the warranty.
8. Keep handles dry, clean, and free from oil and grease.
9. Allow engine to cool and empty the fuel tank before storing or transporting in vehicle. Use up remaining fuel
in the carburetor by starting the engine and letting it run until it stops. If the fuel tank has to be drained, do it outdoors.
10. When not in use, store cultivator indoors in a dry location. Store cultivator above the reach of children or in a
locked area out of the reach of children.
11. Store unit and fuel in area where fuel vapors cannot reach sparks or open flames from water heaters, electric
motors or switches, furnaces, etc.
12. Always refer to the operator’s manual for important details if the cultivator is to be stored for an extended period.
13. Follow manufacturer’s recommendations for safe loading, unloading, transport, and storage of machine.
Important Safety Information (Continued)
• Save all instructions
Page 5
Questions? Call Toll Free at 1-800-737-2112 Copyright © 2018 MAT Engine Technologies, LLC
ENG - 5
Engine ..................... 43 cc, 2 cycle, Full-Crank
Idle Speed ......................... 2,800-3,000 RPM
Tilling Width ................................. 7”-10”
Tilling Depth ............................... Up to 5”
Fuel Tank Capacity..................... 28 oz (840 ml)
Fuel Type ........
Unleaded Gasoline – 89 Octane or higher
Full Speed . . . . . . . . . . . . . . . . . . . . . . . . . . . .8,000-9,000 RPM
2-Cycle Oil Type.........
2-Cycle Oil that meets or exceeds
. . . . . . . . . . . . . . . . . . . . . . . . . . . .
JASO – FC Specifications
Fuel Mixture .................
50:1 (Gasoline: 2-Cycle Oil)
Spark Plug ...................NHSP LD L6, NGK BM6A
. . . . . . . . . . . . . . . . . . . . . . . . . . . . . . . . . .CHAMPION - CJ8
. . . . . . . . . . . . . . . . . . . . . . . . . . . . . . . . . . . . . or equivalent
Net Weight ............................33 lbs (15 kg)
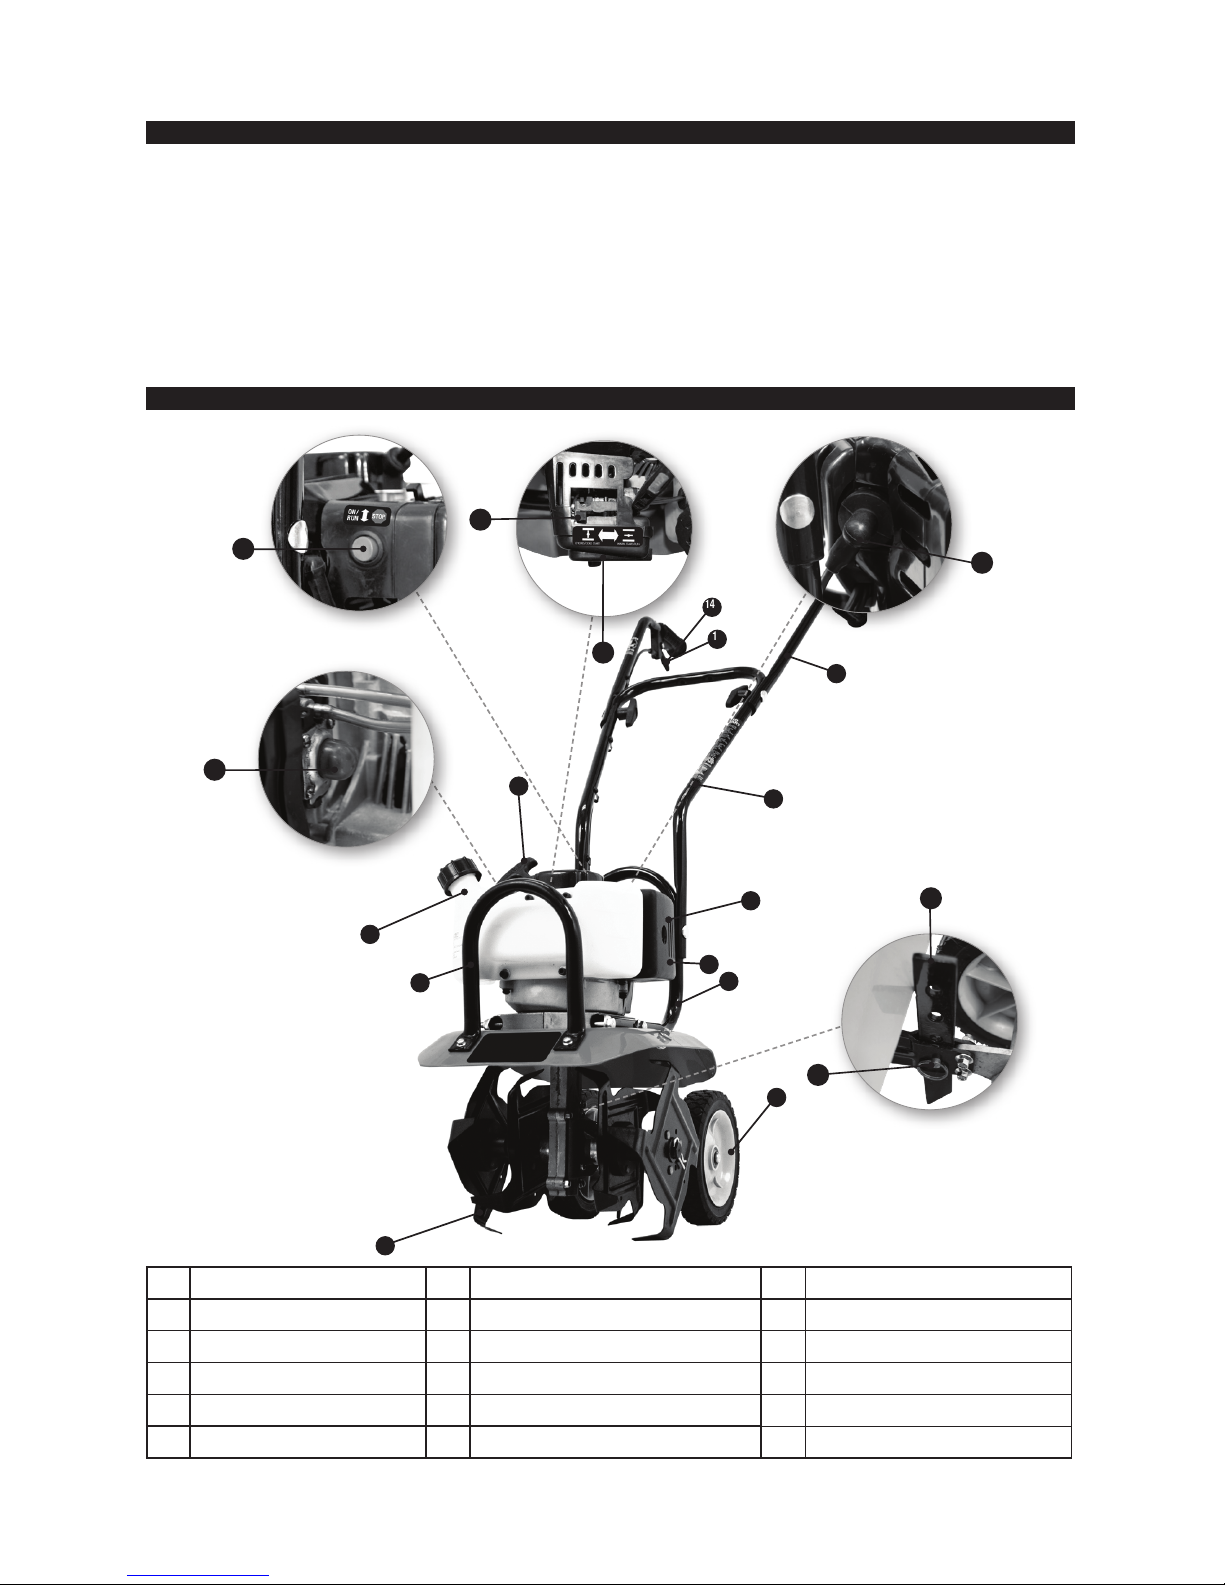
1. Ignition Switch 7. Tines 13. Air Filter Cover
2. Upper Handle 8. Recoil Starter Handle 14. Throttle Trigger
3. Middle Handle 9. Fuel Tank 15. Muffler
4. Lower Handle 10. Spark Plug 16. Drag Stake
5. Front Carry Handle 11. Fuel Primer Bulb 17. Detent Pin
6. Engine 12. Choke 18. Transport Wheels
Product Specifications
• Save all instructions
Parts & Features
6
5
4
1
15
9
7
14
18
8
2
3
1
11
13
12
10
16
17
Page 6
Questions? Call Toll Free at 1-800-737-2112 Copyright © 2018 MAT Engine Technologies, LLC
ENG - 6
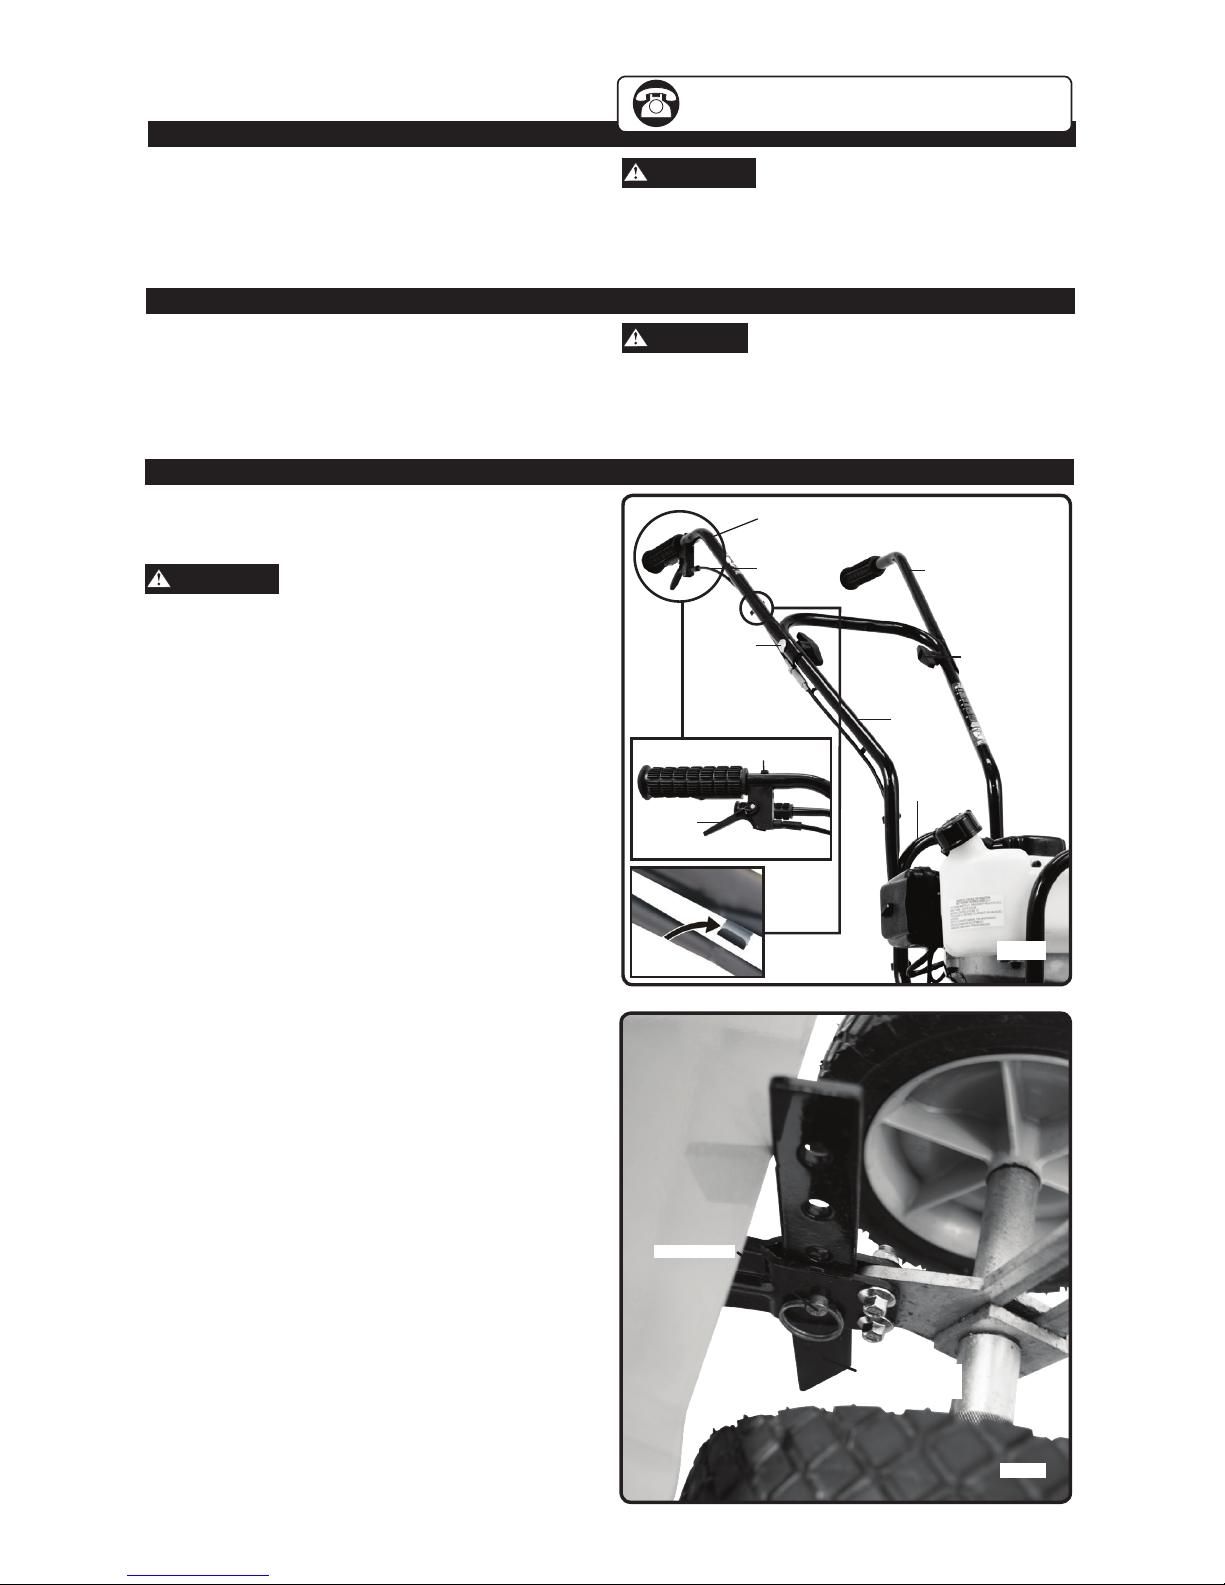
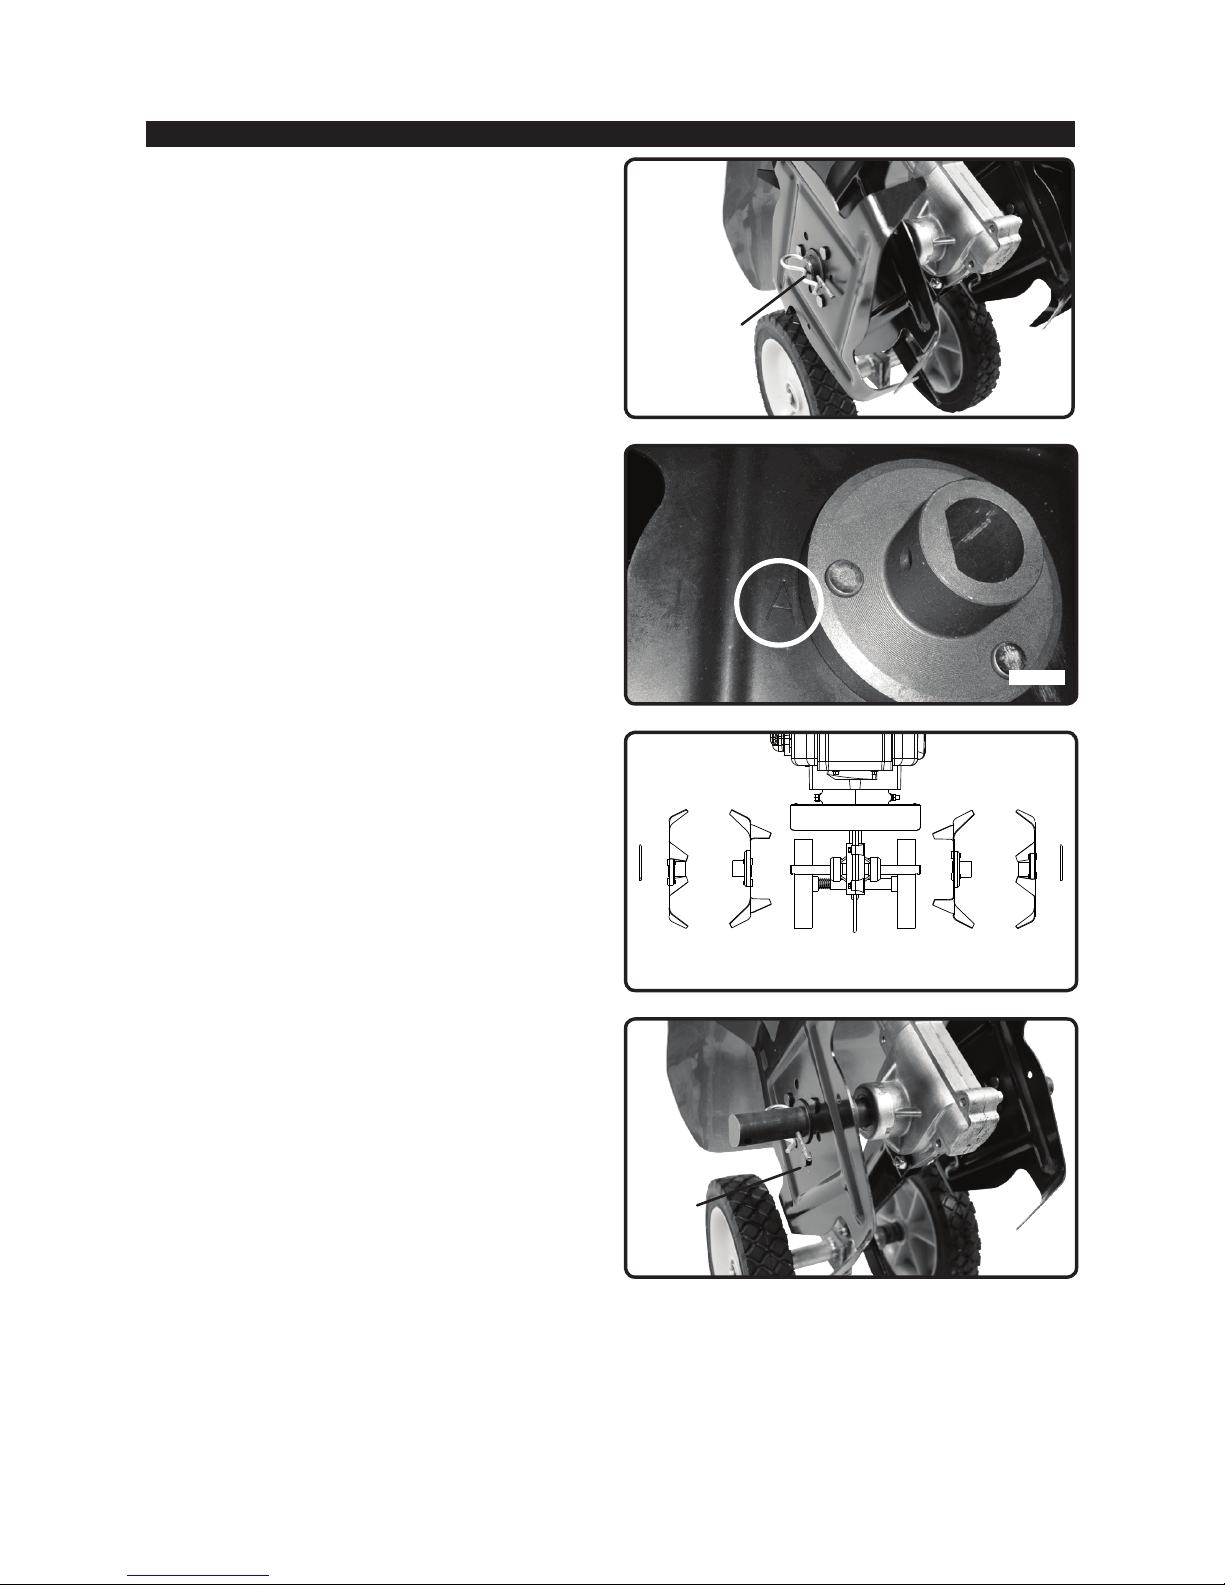
Fig. 2
Drag stake
pointed down
Detent Pin
Assembly
• Save all instructions
Parts Included with Cultivator
• Middle Handle (1)
• Upper Handles (2)
• Wing nuts and bolts (4 ea.)
• Cable Ties (3)
• Operator’s Manual (1)
• 2.6 fl. oz US bottle of 2-Cycle engine oil (1)
How to Unpack Cultivator from Carton
1. Remove all parts and packing components.
2. Use a utility knife to cut all 4 vertical edges. Lay the side
panels flat around the cultivator.
3. Remove inner components and packaging.
Fig. 1
Lower
Handle
Middle
Handle
Left Upper
Handle
Right Upper
Handle
Wingnut
Bolt
Throttle
Wire
Screw
Throttle
Trigger
If you need assistance or find any parts missing,
CALL TOLL FREE: 1-800–737-2112
WARNING
Do not operate cultivator if it is damaged or not securely and
fully assembled.
CAUTION
Use care when removing parts not to damage any cables or
wires that are attached to the parts.
4. Roll the unit out from the carton, and place on a hard
level surface.
How to Assemble the Handles and Drag Stake
1. Place the cultivator upright with tines and wheels on
a hard level surface. Wheels should be set in the
lowest position.
WARNING
Do NOT place the cultivator on a high surface where it can
fall and cause property damage or personal injury.
2. Assemble the middle handle to the lower handle with the
2 bolts and wing nuts. Refer to Figure 1. Firmly hand tighten the wing nuts.
3. Attach the upper handles to the middle handle using the
two remaining bolts and wing nuts. Refer to Figure 1.
4. Assemble the throttle trigger to the right upper handle with
the screw. Use included wrench. See Figure 1.
5. The drag stake is shipped with the point facing upwards.
To use for cultivating, remove detent pin, and turn the
drag stake upside down so the point faces downward.
Re-insert the detent pin. Refer to Figure 2.
6. Secure the throttle cable to the handle with FIVE
retaining clips already mounted to the handle. Refer to
Figure 1.
NOTE: Use the metal retaining clips to secure the throttle
cable, while use cable tie only to secure the ignition wire.
Page 7
Questions? Call Toll Free at 1-800-737-2112 Copyright © 2018 MAT Engine Technologies, LLC
ENG - 7
To Remove Tines:
1. Remove the pins from each end of the tine shaft. Refer
to Figure 3.
2. Slide the four tines off the tine shaft.
To Install Tines:
The 4 different tines are labeled “A”, “B”, “C”, and “D”. Refer
to Figure 4a for the location of the label.
For a 10” tilling width:
1. Assemble the tines as shown in Figure 4b. Make sure
the collars of the tines are facing each other.
2. Insert the pins into the holes at each end of the tine
shaft to lock the tines into place. See Figure 3.
For a 7” tilling width:
1. Only assemble tines B and C (the two inside tines). Do
not assemble tines A and D (the two outside tines).
Refer to figure 4b.
2. Insert the pins into the INSIDE holes of the tine shaft to
lock the tines into place. See Figure 5.
Fig. 3
Pin
D C B A
Fig. 4b
Fig. 4a
Fig. 5
Pin
Assembly (Continued)
• Save all instructions
How to Assemble the Tines
Page 8
Questions? Call Toll Free at 1-800-737-2112 Copyright © 2018 MAT Engine Technologies, LLC
ENG - 8
1. Stop engine and allow it to cool before refueling.
2. Place the unit upright on the ground or on a sturdy
bench and wipe away any debris from around the
fuel cap.
Fig. 9
Fig. 7
COLD START
RUN/WARM
START
Fig. 8
PRIMER BULB
Operation
• Save all instructions
Before Starting the Engine
A
Mixing Fuel / 2-Cycle Oil
WARNING
Do not smoke or allow smoking near fuel or the cultivator.
Mix and pour fuel outdoors WHERE THERE ARE NO
SPARKS OR FLAMES.
The 2-cycle engine on your cultivator requires that fuel and
2-cycle engine oil need to be pre-mixed before adding to
the fuel tank.
WARNING
Always mix the gasoline and 2-cycle oil in a container
approved for gasoline. Never mix fuel directly in the engine
fuel tank.
Use fresh unleaded gasoline with an octane rating of 89 or
higher and less than 10% ethanol.
Use 2-cycle oil that meets or exceeds JASO – FC
specifications and is intended for mixing at a fuel to oil ratio
of 50:1. We recommend the continuous use of a 2 cycle fuel
additive/stabilizer to counteract the effects of ethanol.
These additives also prolong the shelf life of gasoline.
NOTICE
Use of incorrect gasoline such as diesel fuel or gasoline
containing more than 10% ethanol or methanol will damage
the cultivator engine and void your warranty.
NOTICE
Use of incorrect oil, such as automotive oil, 2-cycle marine
outboard oil, or any oil other than specified oil will damage
the cultivator engine and void your warranty.
To mix the fuel and 2-cycle oil, follow instructions on 2-cycle
oil container for mixing fuel. Mix gasoline and 2-cycle oil
at a ratio of 50:1. A mixture with a 50:1 ratio is obtained
by mixing 1 gallon (4 liters) of gasoline with 2.6 ounces of
oil (77 ml). After adding oil to gasoline, shake container
momentarily to ensure proper mixing.
IMPORTANT: Mix only enough fuel for your immediate needs. Do
not store pre-mixed fuel.
Adding Fuel to Cultivator
B
Starting the Engine
C
Starting a Cold Engine
1. Place the cultivator on a flat surface.
2. Move the ignition switch to the “on” position. (See Figure 6)
3. Move the choke lever to the ‘cold start’ position.
(See Figure 7)
4. Press the primer bulb slowly 6 times. (See Figure 8)
5. Grab the recoil starter handle with your right hand, and
support the cultivator with your left hand. (See Figure 9)
6. Pull the recoil starter handle sharply until the engine
starts and runs
7. After engine starts and runs for 10-15 seconds, move
choke lever to “run/ warm start” position. (See Figure 7)
Starting a Warm Engine
1. Place the cultivator on a flat surface.
2. Move the ignition switch to the “on” position. (See Figure 6)
3. Move the choke lever to the ‘run/ warm start’ position.
(See Figure 7)
4. Grab the recoil starter handle with your right hand, and
support the cultivator with your left hand. (See Figure 9)
5. Pull the recoil starter handle sharply until the engine
starts and runs.
Fig. 6
ON
3. Remove fuel cap slowly and use a funnel to pour the
mixture into the tank, and replace the fuel cap.
4. Avoid spilling fuel or oil. Wipe up all fuel spills.
5. Move at least 10 feet (3 meters) away from fueling site
before starting engine.
Page 9
Questions? Call Toll Free at 1-800-737-2112 Copyright © 2018 MAT Engine Technologies, LLC
ENG - 9
Starting a Flooded Engine
1. Place the cultivator on a flat surface.
2. Move the ignition switch to the ON position.
3. Move the choke lever to the ‘run/ warm start’ position.
(see Figure 7)
4. Hold the throttle trigger fully depressed in fast position.
(See Figure 10)
5. Pull the recoil starter handle repeatedly until engine
starts and runs. This could require pulling the recoil
starter handle many times, depending on how badly the
unit is flooded.
6. If the engine still does not start, allow the unit to sit for
about 15 minutes, and repeat steps 1-5.
NOTE: This cultivator is equipped with a centrifugal clutch, so the tines will not turn until the engine speed is increased.
To increase the engine speed, lift up on the throttle trigger. (See Figure 10) To slow the engine down, slowly release the
throttle trigger. Completely releasing the throttle lever will return the engine to idle and will stop the tines from rotating.
1. Release the throttle trigger and allow the engine to idle
for a few moments. (See Figure 10)
Fig. 10
FAST
SLOW
Fig. 11
Drag stake
Detent Pin
Holes
Support Bracket
Fig. 12
Knob
Wheels
Operation (Continued)
• Save all instructions
Starting the Engine (Continued)
C
Adjusting Engine Speed
D
Stopping the Engine
E
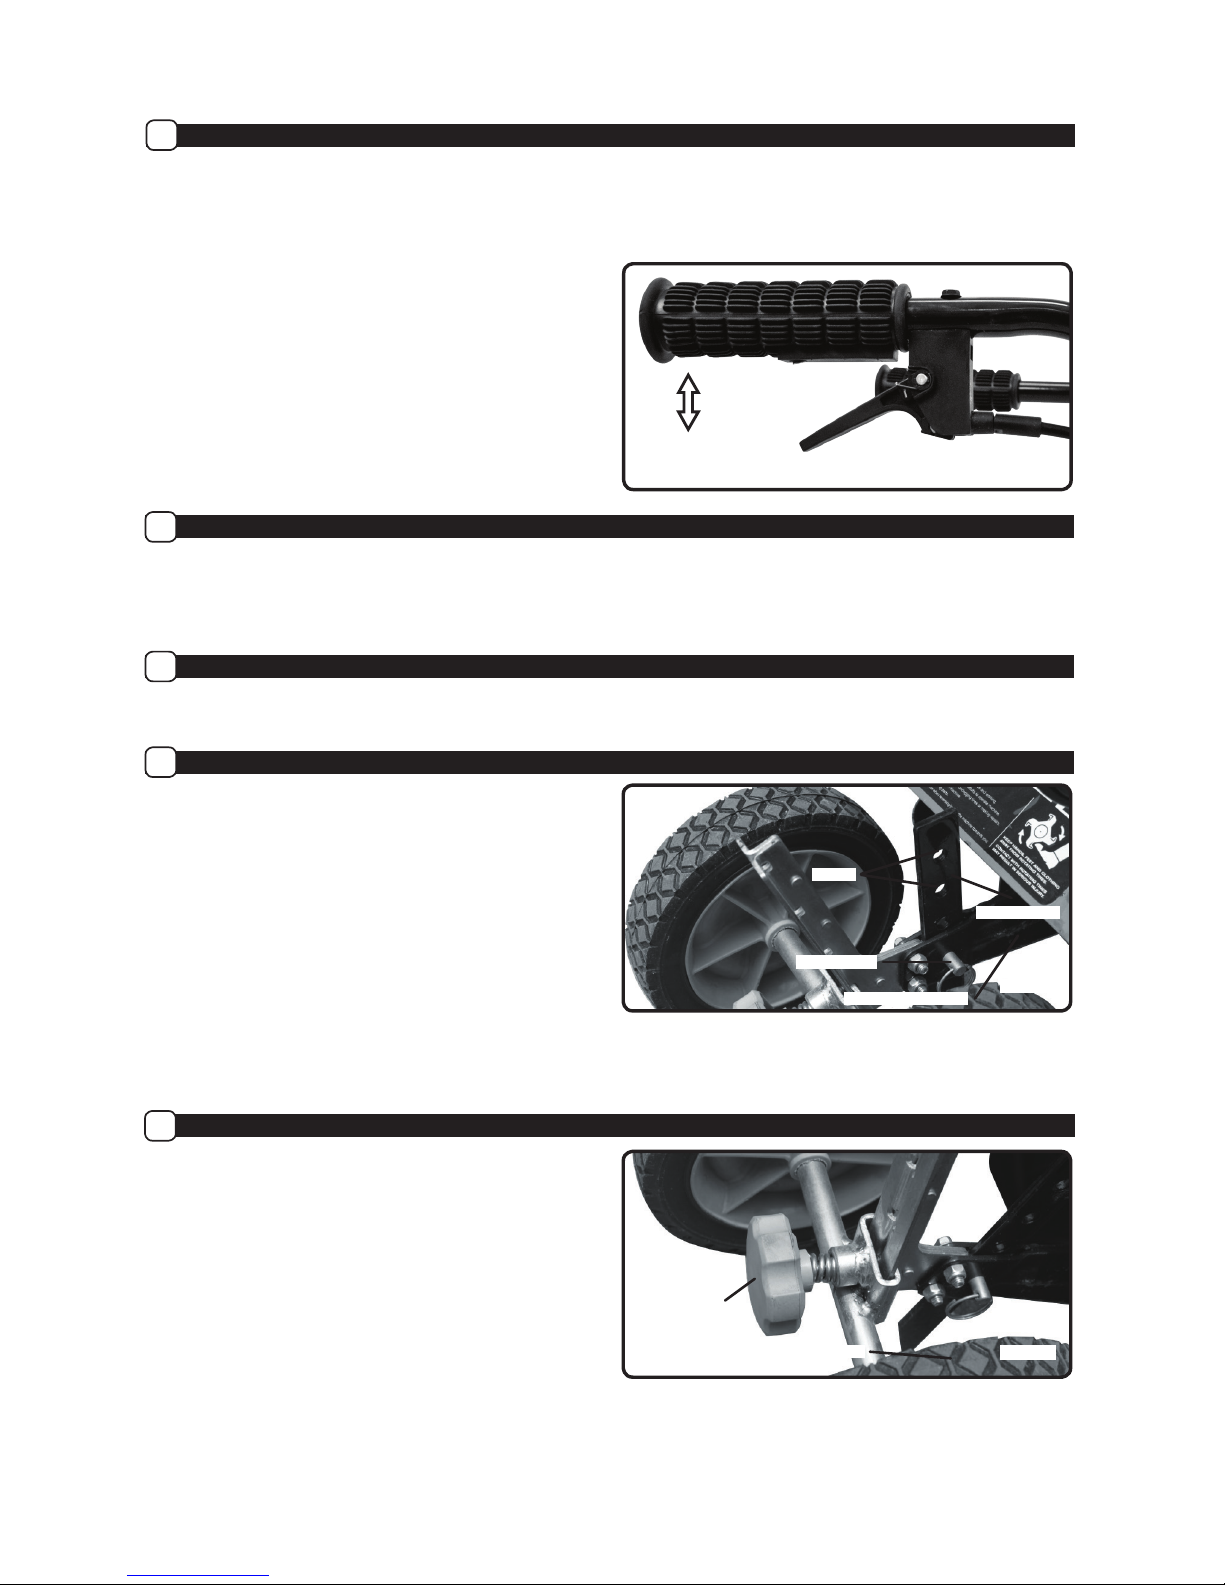
Adjusting the Drag Stake Position
F
The drag stake adds resistance when cultivating which
makes the unit easier to control. It also can be adjusted to
change the depth of cultivating. To adjust the drag stake
position, follow the steps below and refer to Figure 11:
1. Remove the detent pin
2. Slide the stake to the desired position, aligning the hole
in the stake with the holes in the support bracket
3. Insert the detent pin through the holes to secure the
drag stake.
NOTE: For the deepest cultivating depth, set the drag stake in
its lowest position. This will give the greatest resistance and
allow for the deepest depth.
Adjusting the Wheel Height
G
1. Loosen knob.
2. Move the wheels up or down.
NOTE: The upper position is for cultivating, the lower position
is for transport
3. Tighten knob securely after adjusting the wheels to the
desired height.
NOTE: If the unit still doesn’t start, refer to the
TROUBLESHOOTING section of this manual or: If you
need assistance or have any questions, CALL TOLL FREE:
1-800–737-2112
.
2. Move the ignition switch to the ‘stop’ position.
(See Figure 6)
Page 10
Questions? Call Toll Free at 1-800-737-2112 Copyright © 2018 MAT Engine Technologies, LLC
ENG - 10
Inspect the spark plug after every 10-15 hours of use;
adjust spark plug gap and replace spark plug as necessary.
Replace spark plug every year to maintain engine
performance and easy starting.
To inspect or replace the spark plug:
1. Remove the insulated spark plug boot.
2. Use the spark plug wrench to remove the spark plug, by
turning counter-clockwise.
Maintenance
• Save all instructions
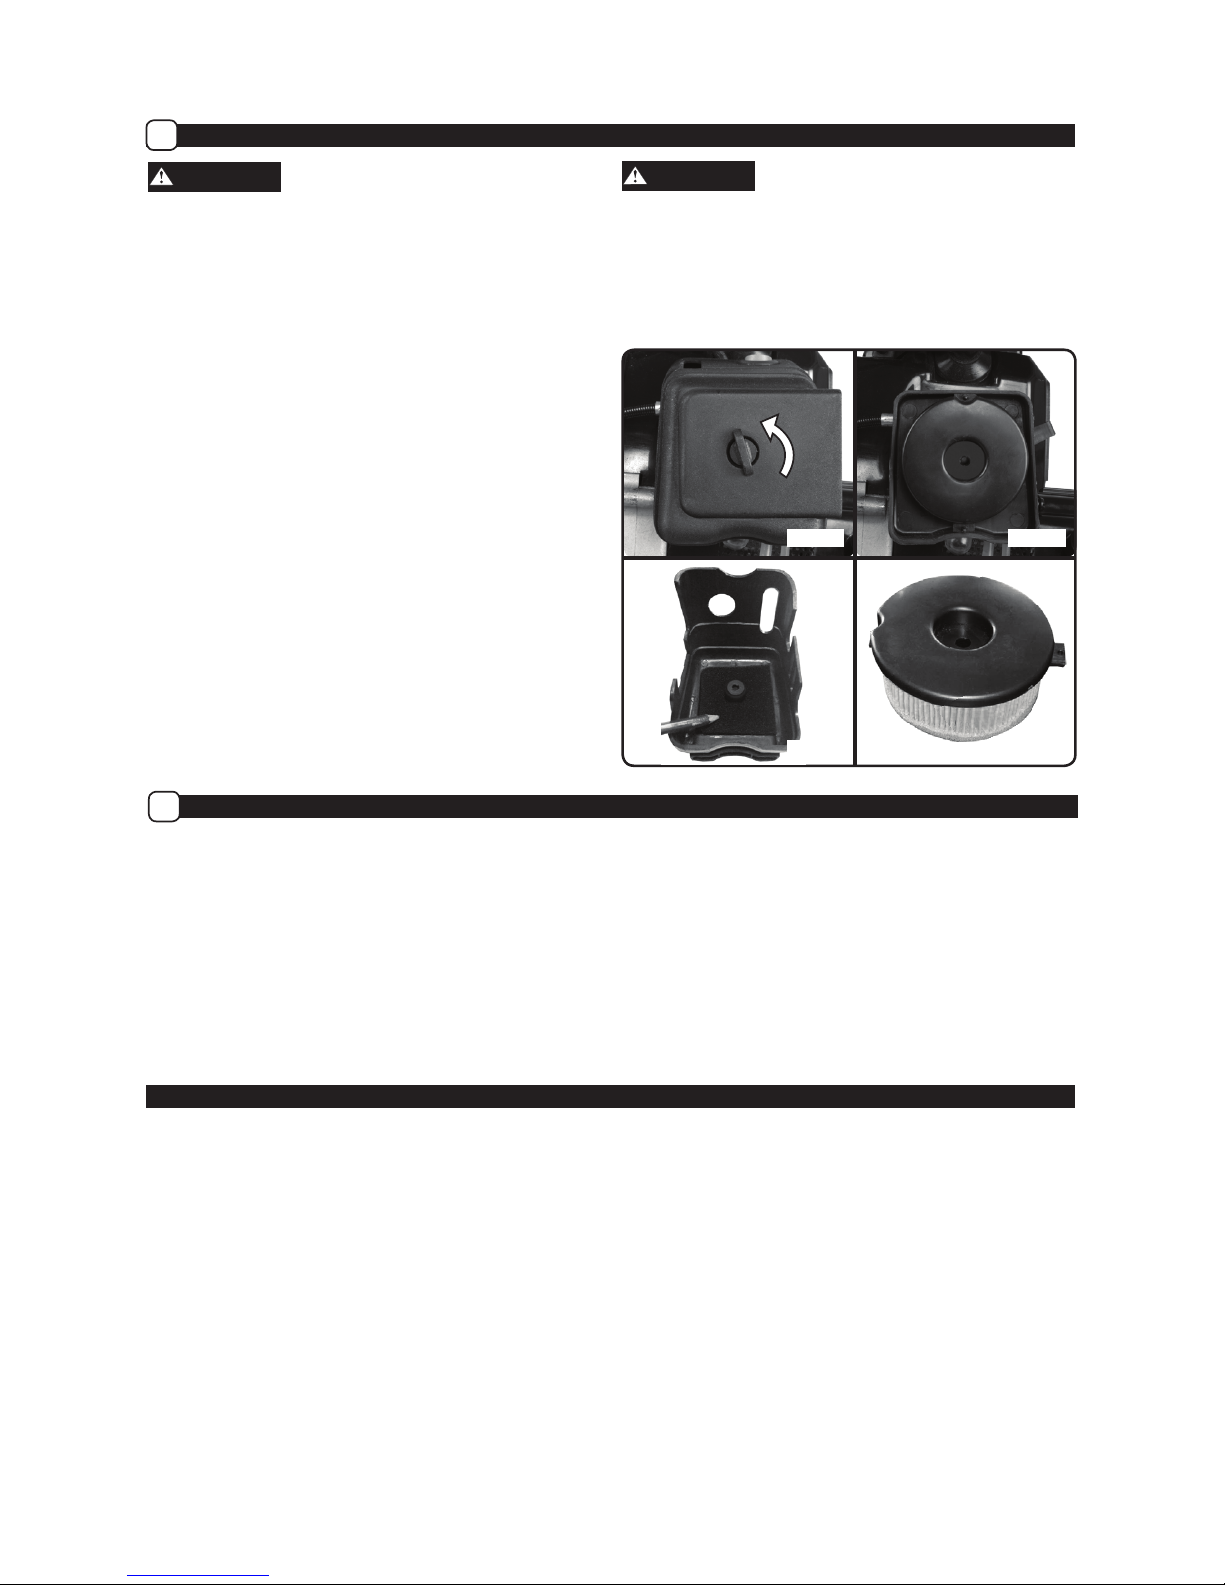
Air Filter
A
WARNING
Turn off ignition switch, and disconnect the spark plug before
performing maintenance except for carburetor adjustments.
Reconnect the spark plug wire after the service is done.
Your cultivator has been equipped with two (2) air filters
inside the air filter housing to prevent dirt and debris from
entering the engine.
Accumulated debris and dust in the air filters will reduce
engine performance, increase fuel consumption, and
increase the risk of damage to the engine. Inspect the air
filters frequently for dust and debris build-up, and clean the
air filters every 5 hours of operation (more frequently in dusty/
dirty conditions).
Both air filters should be cleaned by following these
instructions:
1. Before removing air filter cover, brush away any loose
dirt or debris on and around the filter cover.
2. Remove the screw securing the air filter cover. (Fig 13)
3. Remove and clean foam filter. (Fig 15)
• Light surface dust can readily be removed by
tapping the filter.
• Heavy deposits should be washed out in soap and
water. Squeeze out any remaining water and allow
the filter to completely dry.
Spark Plug
B
Storage
To prevent fuel gum deposits and corrosion in the unit’s
carburetor and fuel system, it is highly recommended to use
a fuel additive/stabilizer formulated for ethanol fuels. Follow
the stabilizer manufacturer’s instructions. Run the engine at
least 5 minutes after adding stabilizer.
1.
Allow engine to cool and empty the fuel tank before
storing or transporting in vehicle. Use up remaining fuel in
the carburetor by starting the engine and letting it run until
it stops.
2. When not in use, store cultivator indoors in a dry
location. Store cultivator above the reach of children or
in a locked area out of the reach of children.
3. Store unit and fuel in area where fuel vapors cannot
reach sparks or open flames from water heaters, electric
motors or switches, furnaces, etc.
4. When preparing the cultivator for storage or when
cultivator will not be used for 30 days or more:
a. Empty fuel tank and use up remaining fuel in the
carburetor by starting the engine and letting it run
until it stops. Squeeze primer bulb several times to
purge fuel from carburetor.
b. Inspect and clean the cultivator thoroughly.
c. Lightly oil all external metal surfaces.
d. Remove the spark plug, place a few drops of
2-cycle engine oil into the cylinder. Pull the recoil
starter several times to distribute the oil. Replace
the spark plug.
e. Inspect and clean air filter as required.
WARNING
Never clean filter in gasoline or other flammable solvents.
4. Add a drop of thin oil to the filters and replace it.
5. Remove the paper air filter element.(Fig 16) Clean filter
by gently tapping it on a flat surface. Replace if
very dirty.
6. Reassemble the filter element and the air filter cover.
3. Visually inspect the spark plug for cracks or damage.
If damaged, replace spark plug with a recommended
replacement (see “Product Specifications”).
4. Clean carbon deposits. If excessive carbon build up,
replace spark plug.
5. Adjust the spark plug gap to 0.024 – 0.028 in.
(0.6 - 0.7mm).
6. Install the spark plug finger tight in the cylinder head,
and then tighten firmly with the spark plug wrench.
7. Re-install the insulated spark plug boot.
Fig. 13 Fig. 14
Fig. 16Fig. 15
Page 11

Questions? Call Toll Free at 1-800-737-2112 Copyright © 2018 MAT Engine Technologies, LLC
ENG - 11
PROBLEM POSSIBLE CAUSE(S) SOLLUTION(S)
Engine will not start. 1.
Ignition Switch in the “OFF” position.
2. Engine flooded.
3. Fuel Tank empty.
4. Spark Plug not firing.
5. Fuel not reaching carburetor.
6. Carburetor requires adjustment.
1. Move ignition switch to the ON position.
2. See Starting a Flooded Engine in
OPERATION section.
3. Fill tank with correct fuel mixture.
4. Replace Spark Plug.
5. Check for kinked or split fuel line; repair or
replace.
6. Contact a qualified service center.
Engine will not accelerate, lacks
power or stalls.
1.
Fuel not reaching carburetor.
2. Air filter dirty.
3. Spark plug fouled.
4. Carburetor requires adjustment.
5. Carbon build-up on muffler outlet
screen.
6. Compression low.
1.
Check for kinked or split fuel line; repair or
replace.
2. Clean air filter.
3. Clean or replace spark plug
4. Contact a qualified service center.
5. Contact a qualified service center.
6. Contact a qualified service center.
Engine smokes excessively. 1. Fuel mixture incorrect.
2. Air filter dirty.
3. Carburetor requires adjustment.
4. Choke lever in the CHOKE/COLD
START position.
1. Empty Fuel Tank and refill with correct fuel
mixture.
2. Clean or replace air filter.
3. Contact a qualified service center.
4. Rotate choke lever to the RUN/WARM
START position.
Engine runs hot. 1. Fuel mixture incorrect.
2. Spark Plug incorrect.
3. Carburetor requires adjustment.
4. Carbon build-up on muffler outlet
screen.
1. See Mixing Fuel / 2-Cycle Oil in
OPERATION section.
2. Replace with correct Spark Plug.
3. Contact a qualified service center.
4. Contact a qualified service center.
Engine will not idle properly. 1. Carburetor requires adjustment.
2. Crankshaft seals worn.
3. Compression low.
1. Contact a qualified service center.
2. Contact a qualified service center.
3. Contact a qualified service center.
You may have further questions about assembling, operating, or maintaining this cultivator. If so, you can contact our
Technical Service Department at 1-800-737-2112 (English only).
You may also write to:
METL Corporate Office - CORRESPONDENCE ONLY
ATTN: Technical Service – METL
6700 Wildlife Way
Long Grove, IL 60047
If you need assistance or have any questions, CALL
TOLL FREE: 1-800–737-2112
Troubleshooting
• Save all instructions
Technical Service
When contacting the Technical Service Department, have ready:
• Your Name
• Your Address
• Your Phone Number
• Model Number of Product
• Date of Purchase (include copy of receipt for written requests)
Page 12

Questions? Call Toll Free at 1-800-737-2112 Copyright © 2018 MAT Engine Technologies, LLC
ENG - 12
Always specify model number when contacting the factory.
We reserve the right to amend these specifications at any time without notice. The only warranty applicable is our standard written
warranty. We make no other warranty, expressed or implied.
MAT Engine Technologies, LLC
warrants this Cultivator and any
parts thereof, to be free from defects in material and workmanship for two years from the date of first purchase from an authorized
dealer, provided that the product has been properly maintained and operated in accordance with all applicable instructions. This
warranty is extended only to the original retail purchaser. The bill of sales or proof of purchase must be presented at the time a
claim is made under this warranty. This warranty does not cover commercial, industrial, or rental usage, nor does it apply to parts
that are not in original condition because of normal wear and tear, or parts that fail or become damaged as a result of misuse,
accident, lack of proper maintenance, tampering, or alteration. Travel, handling, transportation, and incidental costs associated with
warranty repairs are not reimbursable under this warranty and are the responsibility of the owner. To the full extent allowed by the
law of the jurisdiction that governs the sale of the product, this express warranty excludes any and all other expressed warranties
and limits the duration of any and all implied warranties, including warranties of merchantability and fitness for a particular purpose
to two years from the date of first purchase, and
MAT Engine Technologies, LLC’s
liability is hereby limited to the purchase
price of the product and
MAT Engine Technologies, LLC
shall not be liable for any other damages whatsoever including indirect,
incidental, or consequential damages. Some states do not allow limitation of how long an implied warranty lasts or an exclusion or
limitation of incidental or consequential damages, so the above limitation of damages may not apply to you. This warranty provides
the original purchaser with specific rights.
For information regarding those rights, please consult the applicable state laws.
METL Corporate Office - CORRESPONDENCE ONLY
ATTN: Technical Service – METL
6700 Wildlife Way
Long Grove, IL 60047
The Engine Emissions Control System Warranty is provided by the engine manufacturer, included with this product and
administered by MAT Engine Technologies, LLC.
Warranty
• Save all instructions
Powermate® CULTIVATOR Limited Warranty
A
If you have any questions regarding your warranty
coverage, you should contact METL customer service:
If you need assistance or have any questions,
CALL TOLL FREE: 1-800–737-2112
Page 13

Retrouver à l’intérieur :
Page
Définitions de sécurité ..................2-3
Importante information de sécurité.........3-5
Spécifications du produit .................5
Pièces et caractéristiques ................6
Assemblage ..........................7-8
Fonctionnement .......................9-10
Entretien ............................. 11
Rangement........................... 12
Dépannage .......................... 12
Service technique . . . . . . . . . . . . . . . . . . . . 13
Garantie ............................. 13
Veuillez noter les éléments suivants pour une référence future :
Code – Date de fabrication :____________
Date d’achat : __________Joignez une copie de votre reçu de caisse.
Numéro sans frais – service à la clientèle : 1-800-737-2112
Référez au site Web pour un manuel sous forme électronique et un catalogue des
pièces. www.powermateoutdoor.com
IMPORTANT :
Nous vous remercions d’avoir acheté cette motobineuse Powermate®
Veuillez lire et comprendre tous les avertissements et directives dans ce manuel, avant de faire fonctionner cet
appareil. Un usage inapproprié de cet appareil peut causer de sérieuses blessures ou la mort. Conservez ce
manuel pour référence ultérieure.
CONTIENT DU PLOMB. Peut être dangereux si avalé ou mâché. Peut produire de la poussière à teneur en plomb.
Lavez-vous les mains après l’utilisation. Gardez hors de la portée des enfants.
Ce produit peut vous exposer à des produits chimiques, y compris le plomb qui est reconnu par l’état de la Californie
comme pouvant causer le cancer, des anomalies congénitales ou d’autres dommages aux fonctions reproductrices.
Pour obtenir des renseignements supplémentaires, allez sur www.P65Warnings.ca.gov.
CONSERVEZ CE MANUEL POUR RÉFÉRENCE FUTURE
Si vous avez une question ou un problème...
APPELEZ SANS FRAIS : 1-800-737-2112
08/03/2018 Imprimé en Chine A203970
Manuel de l’usager
MOTOBINEUSE À ESSENCE
43 CC, 2 TEMPS
No. de modèle PCV43.2
AVERTISSEMENT
AVERTISSEMENT
Page 14

Questions? Appelez sans frais à : 1-800-737-2112 Copyright © 2018 MAT Engine Technologies, LLC
FR - 2
Définitions de sécurité
• Conservez ces directives
Importante information de sécurité
Les symboles suivants peuvent être trouvés sur votre cultivateur. Lire attentivement et comprendre leur signification.
Recherchez ce symbole qui indiquera d’importantes mises en garde de sécurité, relativement aux
risques de blessures. Il signifie :
“ Attention! Soyez attentifs! Votre sécurité est en jeu.”
Veuillez lire le manuel de l’usager, avant de faire fonctionner cet appareil. Le défaut de suivre les directives pourrait provoquer de sérieuses blessures.
Toujours porter une protection oculaire rencontrant ou excédant les exigences ANSI Z87.1. Porter
une protection auditive. Porter une protection respiratoire.
Ne pas utiliser en présence d’enfants ou de spectateurs.
Maintenir les mains, les pieds et les vêtements à l’écart des dents rotatives. Un contact avec dents
rotatives pourrait se solder par de sérieuses blessures.
Le gaz d’échappement du moteur contient du monoxyde de carbone, un gaz inodore et mortel. Ne
JAMAIS faire fonctionner cette unité à l’intérieur ou dans un espace mal ventilé.
Surface extrêmement chaude. Ne touchez pas un tuyau d’échappement, un multiplicateur de
vitesse ou un cylindre chaud, vous pourriez vous brûler. Ces pièces deviennent extrêmement
chaudes durant le fonctionnement et peuvent demeurer ainsi pour une courte période de temps
après avoir fermé l’unité.
Pour réduire le risque d’incendie, nettoyer les déversements d’essence et d’huile et maintenir l’unité
libre de résidus. L’essence est extrêmement inflammable. Laissez l’unité refroidir avant de refaire
le plein.
DANGER
Signale une situation imminente et dangereuse qui, si elle n’est pas évitée, entraînera la
mort ou des blessures graves.
AVERTISSEMENT
Signale une situation potentiellement dangereuse susceptible, si elle n’est pas évitée,
d’entraîner la mort ou des blessures.graves.
MISE EN GARDE
Indique une situation potentiellement dangereuse qui, si elle n’est pas évitée, peut entraîner
des blessures légères ou modérées.
Indique une pratique non liée à des blessures qui, si elle n’est pas évitée, peuvent entraîner
des dommages matériels.
Les symboles suivants sont utilisés sur le produit et dans ce manuel pour alerter l’opérateur de potentiels dangers
concernant la sécurité. Assurez-vous de les lire attentivement et de comprendre leur signification.
Symboles d’avertissement de sécurité
Contrôle de l’étrangleur :
Démarrage en marche / à chaud (Run/Warm Start)
Démarrage avec étrangleur / à froid (Choke/Cold Start)
Ampoule d’amorce pour carburant :
Comprimez 6 fois.
Interrupteur d’allumage :
MARCHE (ON)
ARRÊT (OFF)
Fuel Mixture
50:1
Unleaded Gas: 2 Cycle Oil
Caution: Do Not Use Gas
Mix with More Than 10%
Methanol or Ethanol
Mélange de carburant :
50:1
(Essence sans plomb : Huile à 2 temps)
Symboles d’avertissement de sécurité
Symboles de contrôle et de fonctionnement
AVIS
Page 15

Questions? Appelez sans frais à : 1-800-737-2112 Copyright © 2018 MAT Engine Technologies, LLC
FR - 3
Définitions de sécurité
• Conservez ces directives
Importante information de sécurité
• Conservez ces directives
Importante information de sécurité
Avant de Faire Fonctionner la Motobineuse
NOTA : Familiarisez-vous complètement avec les contrôles et l’usage approprié de l’appareil. Apprenez à arrêter l’unité et
désengagez les contrôles rapidement.
AVERTISSEMENT
Lisez et suivez tous les avertissements et les directives de sécurité. Le défaut de suivre cette procédure pourrait provoquer de
sérieuses blessures à vous-même et aux spectateurs.
1. Évitez les environnements dangereux.
a. N’opérez pas la motobineuse lorsque vous êtes sous l’influence d’alcool, de médicaments d’ordonnance ou de drogues.
b. N’opérez pas la motobineuse lorsque vous êtes fatigué.
c. N’utilisez pas cette motobineuse si vous êtes mentalement ou physiquement inapte à opérer cet appareil en toute sécurité.
2. Vérifiez la motobineuse pour détecter la présence de pièces endommagées. Assurez-vous que toutes les attaches et les
dispositifs de sécurité sont bien fixés en place. Au besoin, remplacez les pièces endommagées.
3. Portez des vêtements adéquats à l’usage de la motobineuse.
a. Portez toujours des pantalons longs, bottes, gants et une chemise à manches longues.
b. Ne portez pas de vêtements amples ou des bijoux pouvant se coincer dans les pièces mobiles de la motobineuse.
c. Portez toujours des gants et de robustes souliers, lors de travail à l’extérieur.
d. Portez toujours une coiffe protectrice pour contenir les cheveux longs.
4. Portez toujours un masque facial ou anti-poussière, si l’opération est poussiéreuse.
5. Portez toujours une protection oculaire qui rencontre ou excède les exigences ANSI Z87.1.
6. Portez toujours une protection auditive, rencontrant ou excédant les normes ANSI.
7. Vérifiez avec soin la zone où la motobineuse sera utilisée et retirez tous les corps étrangers.
8. Maintenez la zone de travail exempte de spectateurs, surtout de jeunes enfants et d’animaux.
9. Ne laissez jamais les enfants opérer cet appareil. Ne laissez jamais des adultes opérer cet appareil sans les directives
appropriées.
10. Souvenez-vous que l’opérateur ou l’usager est responsable des accidents ou des dangers envers les autres personnes,
leurs biens et eux-mêmes.
Durant le Fonctionnement de la Motobineuse
1. Demeurez vigilant. Utilisez le bon sens. Prenez garde à ce que vous faites.
2. N’utilisez pas la motobineuse si celle-ci est endommagée ou si elle n’est pas assemblée complètement et de façon sécuritaire.
3. N’utilisez jamais la motobineuse sans avoir une bonne visibilité ou une bonne lumière.
4. N’utilisez jamais l’appareil sans vous assurer que les protecteurs, plaques et autres dispositifs de sécurité sont bien en place.
5. Maintenez toutes les parties de votre corps à l’écart des dents rotatives. Ne placez pas les mains ou les pieds près ou
sous les pièces rotatives.
6. Maintenez les enfants et les animaux à l’écart.
7. Utilisez-la uniquement pour effectuer des travaux décrits dans ce manuel. N’utilisez pas cette motobineuse à d’autres
fins que celles pour lesquelles elle a été conçue.
8. Maintenez votre équilibre et tenez-vous bien campé en tout temps. Assurez-vous de ne pas surcharger la capacité de
l’appareil, en tentant de labourer trop profondément.
9. Après avoir frappé un objet, arrêtez le moteur, débranchez le câble de la bougie d’allumage, vérifiez soigneusement
l’appareil pour détecter tout dommage et réparez le dommage avant de redémarrer et d’utiliser à nouveau l’appareil.
Symboles de contrôle et de fonctionnement (Suite)
Contrôle de l’accélérateur :
LENT
RAPIDE
Page 16

Questions? Appelez sans frais à : 1-800-737-2112 Copyright © 2018 MAT Engine Technologies, LLC
FR - 4
10. Ne laissez jamais l’appareil sans surveillance. Arrêtez le moteur, en laissant la position d’opération.
11. Arrêtez le moteur avant de débloquer les dents et lorsque vous effectuez des réparations, réglages et inspections.
12. Soyez prudent en labourant un sol durci. Les dents pourraient se bloquer dans le sol et projeter la motobineuse vers
l’avant. Si une telle situation se produit, relâchez les guidons et ne tentez pas de retenir l’appareil.
13. Faites preuve de prudence extrême, en tirant l’appareil vers vous.
14. Ne forcez pas la motobineuse. Celle-ci offrira un meilleur rendement et ce, avec moins de risque de blessures,
lorsqu’elle est utilisée au rythme pour lequel elle a été conçue.
DANGER
Assurez-vous de ne jamais démarrer ou faire fonctionner l’unité à l’intérieur d’une pièce fermée ou d’un édifice ; respirer
les émanations de l’échappement peuvent tuer.
15. Faites preuve d’extrême précaution, en faisant fonctionner et en traversant des entrées, passages ou chemins de gravillons.
Demeurez vigilants pour reconnaître les dangers cachés ou le trafic.
16. Soyez vigilants pour éviter de glisser ou de tomber
17. Si l’unité commence à vibrer de façon anormale, arrêtez le moteur et vérifiez immédiatement la cause. Normalement une
vibration représente un avertissement de problème.
18. Ne faites jamais fonctionner cet appareil à vitesse rapide sur des surfaces dures et glissantes.
19. Faites démarrer le moteur avec soin, en suivant les directives et en maintenant les pieds bien à l’écart des dents.
20. Assurez-vous de ne jamais soulever ni transporter un appareil, lorsque le moteur est en marche.
MISE EN GARDE
Une exposition prolongée à des vibrations lors de l’usage d’outils motorisés à essence peut causer des dommages aux
vaisseaux sanguins et aux nerfs des doigts, des mains et des articulations des personnes sujettes à des désordres de
circulation ou à des enflures anormales. Un usage intensif par temps froid a été relié à des dommages aux vaisseaux
sanguins, auprès de personnes normalement en santé. Si des symptômes comme l’engourdissement, douleur, perte de
force, changement de couleur ou de texture de peau ou encore, une perte de sensibilité des doigts, des mains ou des
articulations, cessez l’utilisation de cet outil et consultez un médecin.
Manipulation Sécuritaire - Carburant
1. Mélangez et versez le carburant à l’extérieur, OÙ IL N’Y A PAS D’ÉTINCELLES, NI DE FLAMMES NUES.
2. Utilisez un contenant approuvé pour l’essence.
3. Assurez-vous de ne pas fumer, ni de permettre de le faire près de carburants ou de la motobineuse.
4. Évitez de renverser du carburant ou de l’huile. Essuyez tous les déversements de carburant.
5. Déplacez-vous à au moins 3 m (10 pi) à l’écart du point de remplissage, avant de démarrer le moteur.
Ne remplissez pas un moteur chaud. Ne remplissez pas un moteur en marche.
6. Arrêtez le moteur et laissez refroidir, avant de retirer le bouchon de réservoir. Retirez lentement le bouchon de réservoir.
7. Ne rangez jamais à l’intérieur un moteur ayant du carburant dans le réservoir. Le carburant et les vapeurs de
carburant sont hautement inflammables.
8. Replacez fermement tous les bouchons de réservoir et de contenant de carburant.
Entretien et Rangement de la Motobineuse
1. Arrêtez le moteur et débranchez la bougie d’allumage avant de procéder au nettoyage, à l’inspection ou à des
réparations de l’unité. Ne tentez jamais d’effectuer des réglages lorsque le moteur est en marche.
2. Prenez grand soin de la motobineuse. Vérifiez l’unité périodiquement. Conservez l’appareil, les attachements
et accessoires en bon état de fonctionnement. Si la motobineuse ne fonctionne pas adéquatement ou est
endommagée, assurez-vous de la faire réparer dans un centre de service qualifié.
3. Vérifiez pour détecter un alignement défectueux ou un coincement des pièces mobiles, des pièces brisées
et toute autre condition qui pourrait en affecter le fonctionnement. Vérifiez les boulons de cisaillement, boulons
de montage du moteur et autres boulons à intervalles fréquents pour un serrage approprié et vous assurer que
l’appareil est en bon état de fonctionnement.
4. Maintenez les dispositifs de protection en place et en bon ordre de fonctionnement.
5. Un dispositif de protection ou toute pièce endommagée devrait être réparée ou remplacée correctement dans
un centre de service qualifié.
6. Utilisez uniquement des pièces de rechange et accessoires originaux Powermate®. L’utilisation de pièces
de rechange et accessoires autres que Powermate®, pourrait provoquer des blessures, endommager l’unité et
annuler votre garantie.
7. Assurez-vous de ne pas retirer, ni de modifier quelque pièce. Le fait de retirer ou de modifier quelque pièce
pourrait provoquer des blessures, endommager la souffleuse et annulera la garantie.
8. Assurez-vous de conserver les guidons secs, propres et libres d’huile et de graisse.
Importante information de sécurité (Suite)
• Conservez ces directives
Importante information de sécurité
Durant le Fonctionnement de la Motobineuse (Suite)
Page 17

Questions? Appelez sans frais à : 1-800-737-2112 Copyright © 2018 MAT Engine Technologies, LLC
FR - 5
Moteur ... 43 cc, 2 temps, vilebrequin à double roulement
Vitesse au ralenti . . . . . . . . . . . . . . 2,800-3,000 tours/minute
Largeur de labourage . . . . . . . . . . . . . . . De 17,7 à 25,4 cm
Profondeur de labourage. . . . . . . . . . . . . . . Jusqu’à 12,7 cm
Capacité du réservoir de carburant . . 840 ml (28 oz liq US)
Type de carburant . . . . . . . . . . . . . . . .
Essence sans plomb –
indice d’octane de 89 ou plus
Plein régime . . . . . . . . . . . . . . . . . . . . 8,000-9,000 tours/minute
Type d’huile – 2 temps . . . . . .
Huile à 2 temps rencontrant ou
excédant les spécifications JASO – FC
Mélange de carburant . . . . . .
50:1 (Essence : Huile à 2 temps)
Bougie d’allumage . . . . . . . . . . . . . NHSP LD L6, NGK BM6A
CHAMPION - CJ8
ou équivalent
Poids net . . . . . . . . . . . . . . . . . . . . . . . . . . . . . .15 kg (33 lbs)
Importante information de sécurité (Suite)
• Conservez ces directives
Spécifications du produit
• Conservez ces directives
Entretien et Rangement de la Motobineuse (Suite)
9. Laissez le moteur refroidir et videz le réservoir de carburant, avant de le ranger ou le transporter dans un
véhicule. Utilisez le carburant restant dans le carburateur, en démarrant le moteur et en le laissant fonctionner,
jusqu’à ce qu’il s’arrête. Si le réservoir de carburant requiert un drainage, assurez-vous de l’effectuer à l’extérieur.
10. Lorsqu’elle n’est pas en usage, rangez la motobineuse à l’intérieur à un endroit sec. Rangez la motobineuse
au-dessus de la portée des enfants ou dans un endroit sous clé, hors de la portée des enfants.
11. Rangez l’unité et le carburant à un endroit où les émanations de carburant ne peuvent rejoindre des étincelles
ou des flammes nues, provenant de chauffe-eau, moteurs ou interrupteurs électriques, fournaises, etc.
12. Référez toujours au manuel de l’usager concernant des détails importants, su vous devez ranger la
motobineuse durant une période de temps prolongée.
13. Suivez les recommandations du fabricant concernant la sécurité du chargement, déchargement, transport et
rangement de l’appareil.
Page 18

Questions? Appelez sans frais à : 1-800-737-2112 Copyright © 2018 MAT Engine Technologies, LLC
FR - 6
1. Interrupteur d’allumage 7. Dents 13. Couvercle de filtre à air
2. Guidon supérieur 8. Poignée du lanceur à rappel 14. Levier de l’accélérateur
3. Guidon intermédiaire 9. Réservoir de carburant 15. Silencieux
4. Guidon inférieur 10. Bougie d’allumage 16. Barre de recouvrement
5. Poignée avant de transport 11. Ampoule d’amorce pour carburant 17. Cheville de sécurité
6. Moteur 12. Étrangleur 18. Roues de transport
Pièces et caractéristiques
6
5
4
1
15
9
7
14
18
8
2
3
1
11
13
12
10
16
17
Page 19

Questions? Appelez sans frais à : 1-800-737-2112 Copyright © 2018 MAT Engine Technologies, LLC
FR - 7
Fig. 2
Barre de
recouvrement
pointée vers le bas
Cheville de
sécurité
Assemblage
• Conservez ces directives
• Guidon intermédiaire (1)
• Guidons supérieurs (2)
• Boulons et écrous à ailettes (4 de chaque)
• Attaches en plastique pour câbles (3)
• Manuel de l’usager (1)
• Bouteille d’huile à moteur à 2 temps -
(77 ml / 2.6 oz liq US)(1)
AVERTISSEMENT
N’utilisez pas la motobineuse si celle-ci est endommagée ou
incomplètement et incorrectement assemblée.
Comment déballer la motobineuse
1. Retirez toutes les pièces et les composants d’emballage.
2. Utilisez un couteau universel pour couper les 4 rebords
verticaux. Déposez les panneaux latéraux à plat autour
de la motobineuse.
3. Retirez tous les composants internes et l’emballage.
Fig. 1
Guidon
inférieur
Guidon
intermédiaire
Guidon
supérieur
gauche
Guidon supérieur droit
Écrou à
ailettes
Boulon
Câble de
l’accélérateur
Vis
Levier de
l’accélérateur
Pièces incluses avec la motobineuse
Si vous avez besoin d’assistance ou devez trouver des
pièces manquantes, APPELEZ SANS FRAIS :
1-800-737-2112.
MISE EN GARDE
En retirant les pièces, prenez soin de ne pas endommager les
câbles ou fils attachés aux pièces.
4. Déplacez l’unité en la roulant hors de l’emballage et placez-
la sur une surface dure et unie.
Comment assembler les guidons et la barre de recouvrement
1. Placez la motobineuse équipée de ses dents et roués
sur une surface dure et unie. Les roues devraient être
installées dans la position la plus basse.
AVERTISSEMENT
Ne placez PAS la motobineuse sur une surface élevée, où
elle pourrait tomber et causer des dommages matériels ou
des blessures.
2. Joignez le guidon intermédiaire au guidon inférieur, à
l’aide des 2 boulons et écrous à ailettes. Voir la
Figure 1. Resserrez fermement à la main les écrous
à ailettes.
3. Joignez les guidons supérieurs au guidon intermédiaire,
à l’aide des 2 autres boulons et écrous à ailettes. Voir la
Figure 1.
4. Fixez l’interrupteur d’allumage et le levier de
l’accélérateur au guidon supérieur droit, à l’aide d’une
vis. Utilisez la clé incluse. Voir la Figure 1.
5. La barre de recouvrement est expédiée avec l’extrémité
pointue dirigée vers le haut. Afin de l’utiliser pour
labourer, retirez la cheville de sécurité et retournez la
barre de recouvrement à l’envers, de façon à ce qu’elle
soit dirigée vers le bas. Insérez la cheville à nouveau.
Voir Figure 2.
6. Fixez le câble de l’accélérateur au guidon, à l’aide des
CINQ attaches déjà installées sur le guidon. Voir
Figure 1.
REMARQUE: Utilisez les attaches métalliques pour fixer
le câble de l’accélérateur et les attaches en plastique
seulement pour fixer le câble d’allumage.
Page 20

Questions? Appelez sans frais à : 1-800-737-2112 Copyright © 2018 MAT Engine Technologies, LLC
FR - 8
Pour retirer les dents :
1. Retirez les goupilles fendues, chacune située aux
extrémités de l’arbre des dents. Voir la Figure 3.
2. En les glissant, retirez les quatre dents de l’arbre des dents.
Pour installer les dents :
Les 4 unités de dents sont différentes et sont identifiées
“A”, “B”, “C” et “D”. Référez à la Figure 4a pour retrouver
l’emplacement de l’identification.
Pour une largeur de labourage de 25,4 cm :
1. Assemblez les dents, tel qu’illustré à la Figure 4b.
Assurez-vous que les collets des dents se font face.
2. Insérez une goupille fendue à chaque extrémité de
l’arbre des dents, pour bien bloquer les dents en place.
Voir Figure 3.
Pour une largeur de labourage de 17,7 cm :
1. Assemblez uniquement les dents B et C (les deux dents
intérieures). N’assemblez pas les dents A et D (les deux
dents extérieures). Référez à la Figure 4b.
2. Insérez une goupille fendue dans chaque orifice
INTÉRIEUR de l’arbre des dents, pour bien bloquer les
dents en place. Voir Figure 5.
D C B A
Fig. 4b
Goupille
fendue
Fig. 3
Fig. 4a
Fig. 5
Goupille
fendue
Assemblage (Suite)
• Conservez ces directives
Comment assembler les dents
Page 21

Questions? Appelez sans frais à : 1-800-737-2112 Copyright © 2018 MAT Engine Technologies, LLC
FR - 9
Fig. 9
Fig. 7
DÉMARRAGE
À FROID
MARCHE /
DÉMARRAGE
À CHAUD
Fig. 8
AMPOULE
D’AMORCE
Fonctionnement
• Conservez ces directives
Avant de démarrer le moteur
A
Mélange essence / huile à 2 temps
AVERTISSEMENT
Assurez-vous de ne pas fumer, ni de permettre de fumer
près de carburants ou de la motobineuse. Mélangez
et versez le carburant à l’extérieur, OÙ IL N’Y A PAS
D’ÉTINCELLES, NI DE FLAMMES NUES.
Le moteur à 2 temps de votre motobineuse exige d’abord
un prémélange d’essence et d’huile à moteur à 2 temps,
avant de l’ajouter dans le réservoir à carburant.
AVERTISSEMENT
Mélangez toujours l’essence et l’huile à 2 temps dans un
contenant approuvé pour l’essence. Ne mélangez jamais le
carburant directement dans le réservoir à carburant.
Utilisez de l’essence sans plomb fraîche, ne contenant pas
plus de 10% d’éthanol et possédant un indice d’octane
89 ou plus. Utilisez toujours une huile à 2 temps, rencontrant
ou excédant les spécifications JASO – FC et destiné pour
un mélange d’essence et d’huile à un ratio 50:1. Nous
recommandons l’utilisation continue d’un additif/stabilisateur de
carburant à 2 cycles pour contrebalancer les effets de l’éthanol.
Ces additifs prolongent également la durée de vie de l’essence.
AVIS
L’usage de carburant inapproprié comme le combustible
diesel ou de l’essence contenant plus de 10% d’éthanol ou
de méthanol endommagera le moteur de la motobineuse et
annulera la garantie.
AVIS
L’usage d’huile inappropriée, comme l’huile pour
automobiles ou d’huile à 2 temps pour moteur hors-bord
ou toute autre d’huile autre que le type d’huile spécifié
endommagera le moteur de la motobineuse et annulera la
garantie.
Pour mélanger le carburant à l’huile à 2 temps, suivez les
directives sur le contenant d’huile à 2 temps pour mélanger
le carburant. Mélangez l’essence et l’huile à 2 temps à
un ratio 50:1. Un mélange possédant un ratio 50:1 est
obtenu en mélangeant 3,8 litres (1 gallon US) d’essence
et 77 ml (2.6 oz liq. US) d’huile. Après avoir ajouter l’huile
à l’essence, brassez le contenant pour quelques instants,
pour assurer l’homogénéité du mélange.
IMPORTANT : Mélangez seulement la quantité nécessaire
pour subvenir à vos besoins immédiats. Ne rangez pas en un
carburant prémélangé.
Démarrage du moteur
C
Fig. 6
MARCHE
Démarrage de moteur à froid
1. Placez la motobineuse sur une surface unie.
2. Déplacez l’interrupteur d’allumage, en position de
marche (ON) (Voir Figure 6)
3. Déplacez le levier de l’étrangleur, en position de
démarrage à froid (cold start) (Voir Figure 7)
4. Comprimez lentement l’ampoule d’amorce 6 fois
(Voir Figure 8)
5. Empoignez fermement la poignée du lanceur à rappel
de la main droite et stabilisez la motobineuse de la main
gauche (Voir Figure 9)
6. Tirez la poignée de lanceur à rappel fermement, jusqu’à
ce que le moteur démarre et fonctionne.
7. Après avoir démarré et laissé fonctionner le moteur
pendant 10-15 secondes, déplacez le levier de
l’étrangleur en position de “ marche / démarrage à
chaud “ (run/warm start). (Voir Figure 7)
Démarrage de moteur à chaud
1. Placez la motobineuse sur une surface unie.
2. Déplacez l’interrupteur d’allumage, en position de
marche (ON) (Voir Figure 6)
3. Déplacez le levier de l’étrangleur, en position de
démarrage marche / démarrage à chaud “ (run/warm start)
(Voir Figure 7)
1. Arrêtez le moteur et laissez-le refroidir, avant de
procéder au remplissage.
2. Placez la motobineuse en position normale sur le sol ou
sur un banc solide et essuyez tout débris se trouvant
autour du bouchon de réservoir.
3. Retirez lentement le bouchon de réservoir et utilisez
Ajout de carburant à la motobineuse
B
un entonnoir pour verser le mélange dans le réservoir et
replacez le bouchon de réservoir.
4. Évitez de renverser du carburant ou de l’huile. Essuyez
tous les déversements de carburant.
5. Déplacez-vous à au moins 3 m (10 pi) à l’écart du point
de remplissage, avant de démarrer le moteur.
4. Empoignez fermement la poignée du lanceur à rappel
de la main droite et stabilisez la motobineuse de la main
gauche (Voir Figure 9)
5. Tirez la poignée de lanceur à rappel fermement, jusqu’à
ce que le moteur démarre et fonctionne.
Page 22

Questions? Appelez sans frais à : 1-800-737-2112 Copyright © 2018 MAT Engine Technologies, LLC
FR - 10
Démarrage de moteur noyé
1. Placez la motobineuse sur une surface unie.
2. Déplacez l’interrupteur d’allumage, en position de
marche (ON)
3. Déplacez le levier de l’étrangleur en position de “marche
/ démarrage à chaud“ (run/warm start) (Voir Figure 9)
4. Maintenez une pression complète sur le levier de
l’accélérateur en position rapide (Voir Figure 10)
5. Tirez la poignée de lanceur à plusieurs reprises,
jusqu’à ce que le moteur démarre et se mette en
marche. Il est possible que plusieurs tentatives soient
requises, dépendant à quel point le moteur est noyé.
6. Si le moteur ne démarre toujours pas, laissez l’unité
reposer pendant environ 15 minutes et répétez les
étapes 1 à 5.
REMARQUE : Cette motobineuse est équipée d’un embrayage à commande centrifuge, de façon à ce que les dents ne
tourneront pas avant que la vitesse du moteur ne soit augmentée.
Pour augmenter la vitesse du moteur, comprimez le levier de l’accélérateur. (Voir Figure 10)
Pour réduire la vitesse du moteur, relâchez lentement le levier de l’accélérateur. Si le levier est complètement relâché, le
moteur retournera à une vitesse au ralenti et les dents cesseront de tourner.
1. Relâchez le levier d’accélération et laissez tourner le
moteur au ralenti pendant quelques instants.
(Voir Figure 10)
Fig. 10
RAPIDE
LENT
Fig. 11
Barre de
recouvrement
Cheville de sécurité
Orifices
Support
Fig. 12
Bouton de
serrage
Roues
Fonctionnement (Suite)
• Conservez ces directives
Démarrage du moteur (suite)
C
Réglage de la vitesse du moteur
D
Arrêter le moteur
E
Réglage de la position de la barre de recouvrement
F
La barre de recouvrement ajoute un élément de résistance
lors du labourage, facilitant le contrôle de l’unité. Celle-ci
peut également être réglée pour modifier la profondeur du
labourage. Pour régler la position de la barre de recouvrement,
observez les étapes suivantes et référez à la Figure 11 :
1. Retirez la cheville de sécurité
2. Déplacez la barre vers la position désirée, en alignant
l’orifice de la barre aux orifices du support.
3. Insérez la cheville de sécurité à travers les orifices, pour
bien fixer en place la barre de recouvrement.
REMARQUE : Pour la profondeur la plus accentuée, réglez
la barre de recouvrement à la position la plus basse. Cette
procédure offrira la plus grande résistance et la profondeur
la plus accentuée.
Réglage de la hauteur des roues
G
1. Relâchez le bouton de serrage.
2. Déplacez les roues vers le haut ou vers le bas.
REMARQUE : La position supérieure sert au labourage et la
position inférieure sert au transport
3. Resserrez le bouton après avoir réglé les roues à la
hauteur désirée.
REMARQUE : Si l’unité ne démarre toujours pas, consultez la
section du COIN-DÉPANNAGE de ce manuel ou : Si vous
avez besoin d’assistance ou si vous avez des questions,
APPELER SANS FRAIS : 1-800-737-2112.
2. Déplacez et maintenez l’interrupteur d’allumage en
position d’arrêt (stop). (Voir Figure 6)
Page 23

Questions? Appelez sans frais à : 1-800-737-2112 Copyright © 2018 MAT Engine Technologies, LLC
FR - 11
Vérifiez la bougie d’allumage après chaque période de
10-15 heures d’usage; réglez l’écartement d’électrode de
la bougie d’allumage et remplacez la bougie d’allumage au
besoin. Remplacez la bougie d’allumage à chaque année,
pour maintenir le rendement du moteur et en faciliter le
démarrage.
Pour vérifier ou remplacer la bougie d’allumage :
1. Retirez le couvre-borne isolé de la bougie d’allumage.
2. Utilisez la clé de bougie d’allumage pour retirer la
bougie, en tournant dans le sens contraire des aiguilles
d’une montre.
3. Inspectez visuellement la bougie d’allumage pour
détecter la présence de fendillement ou de dommages.
Entretien
• Conservez ces directives
Filtre à air
A
AVERTISSEMENT
Placez l’interrupteur d’allumage en position d’arrêt (OFF)
et débranchez la bougie d’allumage avant de procéder à
l’entretien, sauf pour les réglages de carburateur. Rebranchez
la bougie d’allumage après avoir complété l’entretien.
Pour prévenir l’entrée de poussière et de débris entrent
dans le moteur, votre motobineuse est équipée de deux (2)
filtres à air en mousse, à l’intérieur du boîtier du filtre à air.
La poussière et les débris accumulés dans les filtres à
air réduiront le rendement du moteur, augmenteront la
consommation de carburant et le risque de dommages pour
le moteur. Vérifiez les filtres à air fréquemment pour détecter
une accumulation de poussière et les débris et nettoyez-les à
chaque période de 5 heures d’usage (plus fréquemment sous
des conditions poussiéreuses/sales).
Les deux filtres à air devraient être nettoyés, en observant
les directives suivantes :
1. Avant de retirer le couvercle de filtre à air, dégagez
toute trace de saleté et de débris sur le couvercle de
filtre et autour.
2. Retirez la vis fixant en place le couvercle de filtre à air.
(Figure 13)
3. Retirez et nettoyez les filtres en mousse. (Figure 13)
• Une légère poussière de surface peut être retirée
rapidement en cognant légèrement les filtres.
• Nettoyez les dépôts plus lourds à l’aide d’eau
savonneuse. Retirez l’excédent d’eau et laissez
sécher les filtres complètement.
Bougie d’allumage
B
AVERTISSEMENT
Ne nettoyez jamais les filtres à l’aide d’essence ou d’autres
solvants inflammables.
4. Ajoutez une goutte d’huile légère aux filtres et replacez-les.
5. Retirez l’élément en papier du filtre à air. (Fig. 16)
Nettoyez le filtre en le tapotant doucement sur une
surface plane. Remplacez-le s’il est très sale.6.
Remplacez l’élément filtrant et le couvercle du filtre à air.
6. Remettez l’élément du filtre et le couvercle du filtre à air
en place.
Si elle est endommagée, remplacez-la à l’aide
d’une pièce de rechange recommandée (voir les
Spécifications de Produit).
4. Nettoyez les dépôts de carbone. S’il y a une
accumulation excessive de carbone, remplacez la
bougie d’allumage.
5. Assurez-vous que l’écartement de la bougie d’allumage
mesure 0.6-0.7 mm (0.024-0.028 po).
6. Insérez la bougie d’allumage à la main dans la culasse
et resserrez-la fermement, à l’aide de la clé pour bougie
d’allumage.
7. Réinstallez le couvre-borne isolé de la bougie
d’allumage.
Fig. 13 Fig. 14
Fig. 16Fig. 15
Page 24

Questions? Appelez sans frais à : 1-800-737-2112 Copyright © 2018 MAT Engine Technologies, LLC
FR - 12
PROBLÈME CAUSE(S) POSSIBLE(S) SOLUTION(S)
Le moteur ne démarre pas. 1. L’interrupteur d’allumage est en
position d’arrêt (OFF).
2. Moteur noyé.
3. Réservoir de carburant vide.
4. Aucun feu dans la bougie d’allumage.
5. Le carburant n’atteint pas le
carburateur.
6. Le carburateur requiert un réglage.
1. Déplacez l’interrupteur d’allumage vers la
position de marche (ON).
2. Consultez le démarrage de moteur noyé
à la section FONCTIONNEMENT.
3. Remplissez le réservoir avec le mélange
approprié de carburant.
4. Remplacez la bougie d’allumage.
5. Vérifiez pour détecter une conduite de
carburant pliée ou fendue ; réparez ou
remplacez.
6. Contactez un centre de service qualifié.
Le moteur n’accélère pas, manque
de puissance ou tombe en panne.
1. Le carburant n’atteint pas le
carburateur.
2. Filtre à air vicié.
3. Bougie d’allumage encrassée.
4. Carburateur requiert un réglage.
5. Accumulation de carbone sur la
grille de sortie du silencieux.
6. Basse compression.
1. Vérifiez pour détecter une conduite de
carburant pliée ou fendue ; réparez ou
remplacez.
2. Nettoyez le filtre à air.
3. Clean or replace spark plug
4. Contactez un centre de service qualifié.
5. Contactez un centre de service qualifié.
6. Contactez un centre de service qualifié.
Le moteur fume excessivement. 1. Mélange de carburant incorrect.
2. Filtre à air vicié.
3. Carburateur requiert un réglage.
4. Levier d’étrangleur en position de
démarrage à froid (CHOKE/COLD
START).
1. Videz le réservoir de carburant et
remplissez avec le avec le mélange approprié
de carburant.
2. Nettoyez ou remplacez le filtre à air.
3. Contactez un centre de service qualifié.
4. Déplacez le levier de l’étrangleur en
position “ marche / démarrage à chaud “
(RUN / WARM START).
Le moteur surchauffe. 1. Mélange de carburant incorrect.
2. Bougie d’allumage inadéquate.
3. Carburateur requiert un réglage.
4. Accumulation de carbone sur la
grille de sortie du silencieux.
1. Consultez le mélange d’essence / huile à
2 temps à la section FONCTIONNEMENT.
2. Remplacez par une bougie d’allumage
appropriée.
3. Contactez un centre de service qualifié.
4. Contactez un centre de service qualifié.
Le moteur ne tourne pas
correctement au ralenti.
1. Carburateur requiert un réglage.
2. Joints d’étanchéité de vilebrequin usés.
3. Basse compression.
1. Contactez un centre de service qualifié.
2. Contactez un centre de service qualifié.
3. Contactez un centre de service qualifié.
Dépannage
• Conservez ces directives
Rangement
Pour empêcher les dépôts de gomme d’essence et la corrosion dans le carburateur et le circuit de carburant de
l’appareil, il est fortement recommandé d’utiliser un additif/
stabilisateur de carburant conçu pour les carburants à
l’éthanol. Suivez les instructions du fabricant du stabilisa-
teur. Laissez tourner le moteur pendant au moins 5 minutes
après avoir ajouté le stabilisateur.
1. Laissez le moteur refroidir et videz le réservoir de carbu
rant, avant de le ranger ou le transporter dans un véhicule.
Faites démarrer le moteur et laissez-le fonctionner,
jusqu’à ce qu’il s’arrête, pour utiliser le carburant restant
dans le carburateur.
2. Lorsqu’elle n’est pas en usage, rangez la motobineuse
à l’intérieur à un endroit sec. Rangez-la au-dessus de la
portée des enfants ou dans un endroit sous clé, hors de
la portée des enfants.
3. Rangez l’unité et le carburant à un endroit où les
émanations de carburant ne peuvent rejoindre des
étincelles ou des flammes nues provenant de chauffe-eau,
moteurs ou interrupteurs électriques, fournaises, etc.
4. Lors de la préparation de la motobineuse pour le
rangement ou que celle-ci ne sera pas utilisée pour 30
jours ou plus :
a. Videz le réservoir de carburant et faites démarrer
le moteur et laissez-le fonctionner, jusqu’à ce qu’il
s’arrête, pour utiliser le carburant restant dans le
carburateur. Pressez la poire d’amorçage plusieurs
fois pour purger le carburant du carburateur.
b. Vérifiez et nettoyez la motobineuse complètement.
c. Huilez légèrement toutes les surfaces métalliques
extér eures.
d. Retirez la bougie d’allumage, placez quelques
gouttes d’huile à moteur à 2 temps dans le cylindre.
Tirez à plusieurs reprises la poignée de lanceur
à rappel, pour distribuer l’huile. Replacez la bougie
d’allumage.
e. Vérifiez et nettoyez les filtres à air, selon le besoin.
Page 25

Questions? Appelez sans frais à : 1-800-737-2112 Copyright © 2018 MAT Engine Technologies, LLC
FR - 13
Spécifiez toujours le numéro de modèle en contactant l’usine.
Nous nous réservons le droit de modifier ces spécifications en tout temps sans préavis. La seule garantie applicable est notre
garantie régulière écrite. Nous n’offrons aucune autre garantie, expresse ou implicite. MAT Engine Technologies, LLC garantit que
cette motobineuse et toute autre pièce constituante sera libre de tout défaut relatif aux matériaux et à la main-d’œuvre, pendant
une période de deux ans, à partir de la date du premier achat auprès d’un concessionnaire autorisé, à condition que le produit ait
été entretenu et opéré adéquatement, selon les directives applicables. Cette garantie est accordée seulement à l’acheteur original
au détail. Le contrat de vente ou la preuve d’achat doit être présenté au moment où une réclamation est faite au titre de la garantie.
Cette garantie ne couvre pas un usage commercial, industriel ou locatif; elle ne couvre pas non plus les pièces qui ne sont pas
dans leur condition originale, due à l’usure normale ou des pièces qui sont défectueuses ou qui deviennent endommagées, suite
à un mauvais usage, accident, manque d’entretien approprié, modification ou altération. Les frais de déplacement, manutention,
transport et autres frais additionnels associés aux réparations sous garantie ne sont pas remboursables sous cette garantie et
demeurent la responsabilité du propriétaire. Dans la mesure autorisée par la loi de la juridiction régissant la vente de ce produit,
cette garantie expresse exclut toutes les autres garanties expresses et limite la durée de toutes les garanties implicites, incluant les
garanties de qualité marchande ou d’adaptation à un usage particulier à une période de deux ans, à partir de la date du premier
achat et par la présente, MAT Engine Technologies, LLC ne sera en aucun cas tenu responsable de quelque dommage que ce
soit, incluant les dommages indirects, accessoires ou consécutifs. Certains états / provinces ne permettent pas la limitation de la
durée d’une garantie implicite ou l’exclusion ou la limitation des dommages accessoires ou consécutifs ; ainsi les limitations ci-haut
mentionnées relatives aux dommages pourraient ne pas s’appliquer à vous. Cette garantie confère à l’acheteur original des droits
juridiques spécifiques.
Pour obtenir plus d’information au sujet de ces droits, veuillez consulter les lois applicables selon l’état / province.
METL - CORRESPONDANCE SEULEMENT
ATT’N: Service technique– METL
6700 Wildlife Way
Long Grove, IL 60047
La garantie du système de contrôle des émissions est fournie par le fabricant du moteur et est incluse avec ce produit et administrée
par MAT Engine Technologies, LLC.
Garantie
• Conservez ces directives
Garantie limitée pour motobineuse Powermate®
A
SI VOUS AVEZ DES QUESTIONS AU SUJET DE LA
COUVERTURE DE VOTRE GARANTIE, VOUS DEVRIEZ
CONTACTER LE SERVICE A LA CLIENTELE DE METL
Si vous avez besoin d’assistance ou si vous
avez des questions, APPELER SANS FRAIS :
1-800-737-2112.
Vous pourriez avoir d’autres questions au sujet de l’assemblage, du fonctionnement ou de l’entretien de cette motobineuse.
Dans ce cas, vous pouvez contacter notre département de service technique au 1-800-737-2112 (Anglais seulement).
Vous pouvez également nous écrire :
METL - CORRESPONDANCE SEULEMENT
ATT’N: Service technique– METL
6700 Wildlife Way
Long Grove, IL 60047
Service technique
En contactant le département de service technique, ayez en
main :
• Votre nom
• Votre adresse
• Votre numéro de téléphone
• Numéro de modèle du produit
• Date de l’achat(inclure une copie de votre reçu pour les
demandes écrites)
Si vous avez besoin d’assistance ou si vous avez des
questions, APPELER SANS FRAIS : 1-800-737-2112.
Page 26

08/03/2018 Impreso en China A203970
Contenido:
Página
Definiciones de seguridad ...............2-3
Información importante sobre seguridad ....3-5
Especificaciones del producto .............5
Piezas y características . . . . . . . . . . . . . . . . . . 6
Montaje..............................7-8
Operación............................9-10
Mantenimiento ........................ 11
Almacenamiento....................... 12
Diagnóstico y resolución de problemas ..... 12
Servicio técnico ...................... 13
Garantía . . . . . . . . . . . . . . . . . . . . . . . . . . . . . 13
Manual de operación
MOTOAZADA A GASOLINA
Cilindrada:
43 cm³, 2 ciclos
No. de modelo
PCV43.2
Anotar lo siguiente para referencia futura:
Código de fecha de fabricación: __________
Fecha de compra: _________adjuntar una copia del recibo de venta.
Número gratuito para el consumidor: 1-800-737-2112
Consultar el sitio web para obtener una copia electrónica del manual y
del catálogo de piezas. www.powermateoutdoor.com
IMPORTANTE:
Gracias por comprar esta motoazada Powermate®.
Leer y entender todas las advertencias e instrucciones en este manual antes de usar esta máquina. El uso
indebido del equipo puede causar lesiones graves o la muerte. Guardar este manual para referencia fu
tura.
CONTIENE PLOMO. Pudiera ser nocivo si se ingiere o masca, así como generar polvo con plomo. Lavarse bien las
manos después de usar. Mantener fuera del alcance de los niños.
Este producto puede exponerte a elementos químicos, incluso plomo, que el Estado de California reconoce como
causante de cáncer, malformaciones congénitas u otros daños al sistema reproductivo. Para más información, visita
www.P65Warnings.ca.gov.
GUARDAR ESTE MANUAL PARA REFERENCIA FUTURA
Si tiene una duda o un problema...
LLAME SIN COSTO AL: 1-800-737-2112
ADVERTENCIA
ADVERTENCIA
Page 27

¿Preguntas? Llamar gratuitamente al 1-800-737-2112 Copyright © 2018 MAT Engine Technologies, LLC
SP - 2
Definiciones de seguridad
• Guarde todas las instrucciones
Información importante sobre seguridad
Los siguientes símbolos pueden encontrarse en su cultivador. Leer con cuidado y entender su significado.
Busque este símbolo que indica precauciones de seguridad importantes, respecto a riesgos de
lesiones. Significa: ¡Atención! ¡Esté alerta! Su seguridad está en juego.
Leer el manual de operación antes de utilizar esta máquina. El no seguir las directrices podría
conducir a lesiones graves.
Siempre usar protección ocular que cumpla o supere los requisitos de la norma ANSI Z87.1.
Utilizar protección auditiva.
Utilizar protección respiratoria.
No utilizar la motoazada ante niños o circunstantes.
Mantener las manos, los pies y la indumentaria alejados de las azadas rotativas. El contacto con
las azadas rotativas puede causar lesiones graves.
Los gases de escape contienen monóxido de carbono, un gas inodoro y letal. JAMÁS hacer
funcionar la unidad en espacios interiores o en áreas con ventilación deficiente.
Superficie sumamente caliente. No tocar el silenciador, la caja de engranajes o el cilindro después de operar
la motoazada: éstos podrían causarle quemaduras. Estas piezas alcanzan temperaturas sumamente altas y
permanecen calientes durante un período de tiempo corto después de apagarse la unidad.
Para reducir el riesgo de incendio, limpiar el combustible y aceite derramados y mantener la unidad
libre de residuos. La gasolina es sumamente inflamable. Dejar que la máquina enfríe antes de
reabastecerla de combustible.
PELIGRO
Indica una situación inminentemente peligrosa que, si no se evita, resultará en muerte o lesiones
graves.
ADVERTENCIA
Indica una situación potencialmente peligrosa que, si no se evita, podría resultar en lesiones
graves o la muerte.
CUIDADO
Indica una situación potencialmente peligrosa que, si no se evita, podría resultar en lesiones
menores o moderadas.
AVISO
Indica una práctica no relacionados con lesiones personales que si no se evita, podrán resultar
en daños a la propiedad.
El operador debe leer y entender la información que aparece abajo. Para señalar al lector información importante
sobre su propia seguridad, el manual utiliza los símbolos siguientes:
Símbolos de alerta sobre seguridad:
Control del estrangulador:
Marcha / arranque en caliente
Estrangulador / arranque en frío
Cebador de combustible:
Oprimirlo 6 veces.
Interruptor de encendido:
ON/RUN (ENCENDIDO / MARCHA)
OFF/STOP (APAGADO / PARAR)
Fuel Mixture
50:1
Unleaded Gas: 2 Cycle Oil
Caution: Do Not Use Gas
Mix with More Than 10%
Methanol or Ethanol
Mezcla de combustible:
50:1
(Gasolina sin plomo: Aceite para motores de dos tiempos)
Símbolos de advertencia sobre seguridad:
Símbolos de control y operación:
Page 28

¿Preguntas? Llamar gratuitamente al 1-800-737-2112 Copyright © 2018 MAT Engine Technologies, LLC
SP - 3
Definiciones de seguridad (Continuación)
• Guarde todas las instrucciones
Información importante sobre seguridad
• Guarde todas las instrucciones
Información importante sobre seguridad
Antes de operar la motoazada
NOTA: LEER Y ENTENDER TODAS LAS INSTRUCCIONES ANTES DE OPERAR LA MOTOAZADA. Familiarizarse
completamente con los controles y el uso apropiado del equipo. Saber cómo parar la unidad y desengranar los
controles rápidamente.
ADVERTENCIA
Leer y seguir todas las advertencias e instrucciones de seguridad. El hacer caso omiso de esta directriz puede conducir a
lesiones graves del operador o de circunstantes.
1. Evitar entornos peligrosos
a. No operar la motoazada bajo la influencia de alcohol, medicamentos o fármacos.
b. No operar la motoazada al estar cansado.
c. No utilizar esta motoazada si no se es capaz, mental o físicamente, de operarla de manera segura.
2. Inspeccionar la motoazada para determinar si hay piezas averiadas; asegurarse de que todos los sujetadores y
protecciones estén en posición y seguros. Reemplazar toda pieza averiada.
3. Vestir indumentaria apropiada al operar la motoazada.
a. Siempre usar pantalones largos gruesos, botas, guantes y camisa de manga larga.
b. No vestir indumentaria holgada o joyería que pudiera atorarse en las piezas móviles de la motoazada.
c. Siempre usar guantes de trabajo y calzado robusto al trabajar al aire libre.
d. En caso de tener el cabello largo, mantenerlo recogido dentro de un gorro protector.
4. Siempre usar una máscara para la cara o contra el polvo si la operación genera mucho polvo.
5. Siempre usar protección ocular que cumpla o supere los requisitos de la norma ANSI Z87.1.
6. Siempre usar protección auditiva que cumpla o supere los requisitos de las normas ANSI.
7. Inspeccionar completamente el área en que se va a utilizar la motoazada y retirar todo objeto extraño.
8. Mantener el área de trabajo libre de personas (particularmente niños pequeños) y mascotas.
9. Jamás permitir que niños operen la motoazada. Jamás permitir a adultos operar el equipo sin la debida instrucción de uso.
10. Téngase en cuenta que el operador o usuario es responsable por accidentes o riesgos causados a otras personas, a
la propiedad de éstas y a sí mismo.
Durante la operación de la motoazada
1. Mantenerse alerta. Aplicar el sentido común. Prestar atención a lo que se está haciendo.
2. No operar la motoazada si ésta está dañada o no montada de manera segura o completa.
3. Jamás operar la motoazada sin buena visibilidad o iluminación.
4. Jamás operar la máquina sin dispositivos de protección, placas u otros dispositivos protectores de seguridad instalados.
5. Mantener todas las partes del cuerpo alejadas de las azadas rotativas. No colocar las manos ni los pies cerca de
piezas rotativas o bajo éstas.
6. Mantener alejados a niños y mascotas.
7. Utilizarla sólo para las labores explicadas en este manual. No usar la motoazada para ninguna otra labor que no sea
para la cual está prevista.
8. Mantener el equilibrio y un apoyo firme de los pies en todo momento. Para evitar sobrecargar la máquina, no intentar
un labrado demasiado profundo.
9. Después de golpear un objeto extraño, parar el motor, desconectar el cable de la bujía, inspeccionar la máquina para
determinar si ha sufrido daños y reparar dichos daños antes arrancarla y utilizarla nuevamente.
10. Jamás dejar la máquina desatendida. Parar el motor al dejarse la posición de operación.
11. Parar el motor antes de desobstruir las azadas, y asimismo, al reparar, ajustar o inspeccionar la unidad.
Símbolos de control y operación: (Continuación)
Control del regulador:
LENTA
FRÁPIDA
Page 29

¿Preguntas? Llamar gratuitamente al 1-800-737-2112 Copyright © 2018 MAT Engine Technologies, LLC
SP - 4
Información importante sobre seguridad (Continuación)
• Guarde todas las instrucciones
Durante la operación de la motoazada (Continuación)
12. Tener cuidado al labrarse suelo duro. Las azadas podrían atorarse en el suelo e impulsar la motoazada hacia adelante.
Si esto ocurriera, soltar las empuñaduras y no restringir la máquina.
13. Tener sumo cuidado al retroceder o tirar de la máquina hacia sí mismo.
14. No forzar la motoazada. Ésta realizará un mejor trabajo y con menos probabilidad de un riesgo de lesión cuando se
la utiliza conforme al régimen para el cual se la diseñó.
PELIGRO
Jamás arrancar o tener en marcha la unidad dentro de una habitación o edificio cerrado; la inhalación de los gases de
escape puede causar la muerte.
16. Tener sumo cuidado al operar la motoazada sobre accesos, andenes o caminos con grava; o bien, al cruzarlos.
Mantenerse alerta por peligros ocultos o circulación de vehículos.
17. Tener cuidado para no deslizarse o caerse.
18. Si la motoazada comenzara a vibrar anormalmente, parar el motor y buscar la causa inmediatamente. Generalmente,
la vibración indica problemas.
19. Jamás operar la motoazada a velocidades altas de transporte sobre superficies duras o resbaladizas.
20. Arrancar el motor cuidadosamente según las instrucciones y con los pies alejados de las azadas.
21. Jamás levantar o cargar una máquina mientras el motor esté en marcha.
CUIDADO
La exposición prolongada a vibraciones a través de herramientas mecánicas manuales podría causar daños en los
vasos sanguíneos o a los nervios en los dedos, las manos y en las articulaciones de personas propensas a trastornos
circulatorios o inflamaciones anormales. Se ha relacionado el uso extensivo en clima frío con daños a los vasos sanguíneos
de personas normalmente saludables. Si ocurrieran síntomas como entumecimiento, dolor, pérdida de fuerza, cambio en
el color o la textura de la piel o pérdida de sensación en los dedos, las manos o las articulaciones, descontinuar el uso de
esta herramienta y buscar atención médica.
Manejo seguro del combustible
1. Mezclar y verter el combustible en espacios exteriores DONDE NO HAYAN CHISPAS NI LLAMAS.
2. Utilizar un contenedor aprobado para gasolina.
3. No fumar ni permitir fumar cerca del combustible o de la motoazada.
4. Evitar derrames de combustible o aceite. Enjugar todo derrame de combustible.
5. Mover la motoazada al menos 3 metros (10 pies) del sitio de abastecimiento de combustible antes de arrancar
el motor. No reabastecer de combustible un motor caliente. No reabastecer de combustible un motor en marcha.
6. Parar el motor y dejarlo enfriar antes de retirar la tapa del combustible. Retirar la tapa del combustible lentamente.
8. Jamás almacenar en espacios interiores la motoazada con combustible en el tanque. La gasolina y los vapores
de gasolina son sumamente inflamables.
9. Colocar nuevamente las tapas del tanque y del contenedor de manera segura.
Mantenimiento y almacenamiento de la motoazada
1. Parar el motor y desconectar la bujía antes de dar servicio técnico, limpiar o dar mantenimiento a la unidad. Jamás
intentar ajuste alguno mientras el motor esté en marcha.
2. Dar mantenimiento esmerado a la motoazada. Inspeccionar la motoazada periódicamente. Mantener la máquina y
sus accesorios en condiciones de funcionamiento seguro. Si la motoazada no está funcionando correctamente o está
averiada, acúdase a un centro de servicio calificado para que la reparen.
3. Revisar la unidad para determinar si hay piezas móviles desalineadas, piezas móviles atascadas, piezas rotas o
cualquier otra condición que pudiera afectar su funcionamiento. Revisar el apriete de los pernos de seguridad, los
pernos de montaje del motor y otros pernos a intervalos frecuentes para asegurarse de que el equipo esté en
condiciones de funcionamiento seguras.
4. Mantener todos los protectores instalados y en buenas condiciones.
5. Un centro de servicio calificado debe reparar o reemplazar todo dispositivo de protección u otra pieza dañada.
6. Utilizar únicamente piezas de repuesto y accesorios Powermate® genuinos. El uso de cualquier pieza o accesorio que
no sea Powermate® puede conducir a lesiones, daños a la unidad e invalidar la garantía.
7. No retirar ni modificar ninguna pieza. El retiro o modificación de piezas podría conducir a lesiones, daños a la
motoazada e invalidará la garantía.
8. Mantener los asideros secos, limpios y libres de aceite y grasa.
9. Dejar que el motor enfríe para vaciar el tanque de combustible antes de almacenar o transportar la motoazada en
un vehículo. Arrancar el motor y dejarlo marchar hasta que pare al agotarse el combustible en el carburador. Si se ha
de drenar el tanque de combustible, hacerlo al aire libre.
10. Cuando no esté en uso, almacenar la motoazada en un espacio interior seco. Almacenar la motoazada a una altura
inalcanzable por niños o en un área bajo llave, fuera del alcance de niños.
Información importante sobre seguridad
Page 30

¿Preguntas? Llamar gratuitamente al 1-800-737-2112 Copyright © 2018 MAT Engine Technologies, LLC
SP - 5
Información importante sobre seguridad (Continuación)
• Guarde todas las instrucciones
Especificaciones del producto
• Guarde todas las instrucciones
Motor ............ Cilindrada: 43 cm3, 2 ciclos, cigüeñal
completo apoyado en ambos extremos
Velocidad de marcha en vacío. . . . . . . . . . 2800 a 3000 rpm
Anchura de labrado . . . . . . . . . . . . . . . . . . . . 178 a 254 mm
Profundidad de labrado . . . . . . . . . . . . . . . . . Hasta 127 mm
Capacidad del tanque de combustible. . . . . . . . . . . . 840 ml
(28 onzas fluidas)
Tipo de combustible . . . . . . . . . . . . . . . . . . . . . . . . . . . . . . . .
Gasolina sin plomo, de 89 octanos o superior
A toda velocidad. . . . . . . . . . . . . . . . . . . . . 8,000-9,000 RPM
Aceite para motores de dos tiempos . . . . . . . . . . . . . . . . . . .
Aceite para motores de 2 tiempos que cumple o supera las
especificaciones JASO - FC
Mezcla de combustible. . . . . . . . . . . . . . . . . . . . . . . . . . . . . .
50:1 (gasolina: aceite para motores de dos tiempos)
Bujía ........................NHSP LD L6, NGK BM6A
CHAMPION - CJ8 o equivalente
Peso neto . . . . . . . . . . . . . . . . . . . . . . . . . . . . . . 15 kg (33 lb)
Mantenimiento y almacenamiento de la motoazada (Continuación)
11. Almacenar la unidad y el combustible en un área donde los vapores del combustible no puedan llegar a chispas o
llamas abiertas de calentadores de agua, motores o interruptores eléctricos, hornos, etc.
12. Siempre consultar el manual de operación para obtener información importante pormenorizada si se va a guardar la
motoazada durante un período de tiempo prolongado.
13. Seguir las recomendaciones del fabricante para la carga, descarga, transporte y almacenamiento seguros de la máquina.
Page 31

¿Preguntas? Llamar gratuitamente al 1-800-737-2112 Copyright © 2018 MAT Engine Technologies, LLC
SP - 6
1. Interruptor de encendido 7. Azadas 13. Cubierta del filtro de aire
2. Asidero superior 8. Empuñadura del arrancador de retroceso 14. Gatillo del regulador
3. Asidero intermedio 9. Tanque de combustible 15. Silenciador
4. Asidero inferior 10. Bujía 16. Estaca de arrastre
5. Asidero frontal para transporte 11. Bulbo de cebado de combustible 17. Pasador de detención
6. Motor 12. Estrangulador 18. Rueda de transporte
Piezas y características
6
5
4
1
15
9
7
14
18
8
2
3
1
11
13
12
10
16
17
Page 32

¿Preguntas? Llamar gratuitamente al 1-800-737-2112 Copyright © 2018 MAT Engine Technologies, LLC
SP - 7
Fig. 2
Estaca de
arrastre
orientada
hacia abajo
Pasador de
detención
1. Colocar la motoazada en posición vertical, con las
azadas y las ruedas sobre una superficie dura a nivel.
Se deben colocar las ruedas en la posición más baja.
ADVERTENCIA
NO colocar la motoazada en una superficie elevada de
donde pueda caer y causar daños materiales o lesiones
personales.
2. Instalar el asidero intermedio en el asidero inferior con
los dos pernos y tuercas de orejeta. Véase la Figura 1.
Apretar firmemente, a mano, las tuercas de orejeta.
3. Instalar los asideros superiores en el asidero intermedio
con los dos pernos y tuercas de orejeta restantes.
Véase la Figura 1.
4. Con el tornillo, montar el interruptor de encendido y el
gatillo del regulador en el asidero superior derecho.
Utilizar la llave incluida. Véase la Figura 1.
5. La estaca de arrastre se envía con la punta orientada
hacia arriba. Para labrado, retirar el pasador de
detención e invertir la posición vertical de la estaca
de arrastre para que la punta esté orientada hacia
abajo. Reinsertar el pasador
de detención. Véase la Figura 2.
6. Fijar el cable del regulador sobre el asidero, utilizando
CINCO bridas de retención metálicas ya instaladas
sobre el asidero.Refiérase a la Figura 1.
NOTA: Utilizar las bridas de retención metálicas para fijar
el cable del regulador, pero utilizar sólo una atadura para
cables para fijar el cable de encendido.
Montaje
• Guarde todas las instrucciones
• Asidero intermedio (1)
• Asideros superiores (2)
• Tuercas de orejetas y pernos (4 de c/u)
• Ataduras para cables (3)
• Manual de operación (1)
• Envase de aceite para motores de dos tiempos, 2.6 onzas (1)
ADVERTENCIA
No operar la motoazada si ésta está dañada o no montada
de manera segura o completa.
1. Sacar todas las piezas y componentes del embalaje.
2. Cortar las cuatro esquinas verticales con una cuchilla
multiuso. Colocar los costados de la caja sobre el piso,
alrededor de la motoazada.
3. Retirar todos los componentes internos y el embalaje.
Fig. 1
Asidero
inferior
Asidero
intermedio
Asidero
superior
izquierdo
Asidero superior
derecho
Tuerca de
orejetas
Perno
Cable del
regulador
Tornillo
Gatillo
del
regulador
Piezas incluidas con la motoazada
Si se necesita ayuda o hacen falta piezas, LLAMAR
GRATUITAMENTE AL: 1-800-737-2112
Cómo sacar la motoazada de la caja
CUIDADO
Tener cuidado al sacar piezas para no dañar ningún cable o
alambre instalado en las piezas.
4. Rodar la unidad para sacarla de la caja y colocarla en una
superficie plana y sólida.
Cómo armar los asideros y la estaca de arrastre
Page 33

¿Preguntas? Llamar gratuitamente al 1-800-737-2112 Copyright © 2018 MAT Engine Technologies, LLC
SP - 8
Para sacar las azadas
1. Retirar los pasadores de cada extremo del eje de azadas.
Véase la Figura 3.
2. Deslizar las cuatro azadas para sacarlas del eje de azadas.
Para instalar las azadas
Las cuatro azadas están rotuladas «A», «B», «C» y «D».
Véase la Figura 4a para determinar la ubicación de la
etiqueta.
Para una anchura de labrado de 254 mm (10”):
1. Instalar las azadas como se muestra en la Figura 4b.
Asegurarse de que las bridas de las azadas estén una
frente a otra.
2. Insertar los pasadores en los agujeros en ambos
extremos del eje de azadas para asegurar las azadas
en posición. Véase la Figura 3.
Para una anchura de labrado de 178 mm (7”):
1. Sólo montar las azadas B y C (las dos azadas internas).
No montar las azadas A y D (las dos azadas externas).
Véase la Figura 4b.
2. Insertar los pasadores en los agujeros INTERNOS del
eje de azadas para asegurar las azadas en posición.
Véase la Figura 5.
Fig. 3
El pasador
D C B A
Fig. 4b
Fig. 4a
Fig. 5
El pasador
Montaje (Continuación)
• Guarde todas las instrucciones
Cómo montar las azadas
Page 34

¿Preguntas? Llamar gratuitamente al 1-800-737-2112 Copyright © 2018 MAT Engine Technologies, LLC
SP - 9
Fig. 9
Fig. 8
BULBO DE
CEBADO
Fig. 7
ARRANQUE
EN FRÍO
MARCHA /
ARRANQUE
EN CALIENTE
Fig. 6
ENCENDIDO/
MARCHA
1. Parar el motor y dejarlo enfriar antes de reabastecerlo
de combustible.
2. Colocar la unidad en posición vertical sobre el terreno
o sobre un banco de trabajo robusto y enjugar todo
despojo alrededor de la tapa de combustible.
3. Retirar la tapa de combustible lentamente y usar un
Operación
• Guarde todas las instrucciones
Antes de arrancar el motor
A
Mezcla de combustible con aceite para motores de dos tiempos
ADVERTENCIA
No fumar ni permitir fumar cerca del combustible o de la
motoazada. Mezclar y verter el combustible en espacios
exteriores DONDE NO HAYAN CHISPAS NI LLAMAS.
El motor de dos tiempos de la motoazada precisa que se
mezcle el combustible con aceite para motores de dos
tiempos antes de agregarlo al tanque de combustible.
ADVERTENCIA
Siempre mezclar la gasolina y el aceite de dos tiempos
en un contenedor aprobado para gasolina. Jamás mezclar
combustible directamente en el tanque del motor.
Utilizar gasolina fresca sin plomo, de 89 octanos o superior
y menos de 10% de etanol.Utilizar aceite para motores de
dos tiempos que cumpla o supere las especificaciones JASO
- FC, previsto para mezclar el combustible con el aceite en
una proporción de 50:1. Recomendamos el uso continuo de
aditivo/estabilizador de combustible para motor de 2 ciclos
a fin de contrarrestar los efectos del etanol. Estos aditivos
prolongan también la vida útil de la gasolina almacenada.
CUIDADO
El uso de gasolina incorrecta, tal como combustible diesel o
gasolina que contenga más de un 10% de etanol o metanol,
dañará el motor de la motoazada y anulará la garantía de ésta.
CUIDADO
El uso de aceite incorrecto, tal como aceite automotriz,
aceite para motores fuera de borda de dos tiempos, o
cualquier otro aceite distinto del especificado dañará el
motor de la motoazada y anulará la garantía de ésta.
Para mezclar el combustible y el aceite para motores de dos
tiempos, seguir las instrucciones en el contenedor del aceite
para motores de dos tiempos sobre cómo mezclarlo con
combustible. Mezclar la gasolina y el aceite de dos tiempos
en una proporción de 50:1. Una mezcla con una proporción
50:1 se obtiene al mezclar 4 litros (1 galón) de gasolina con
77 ml (2.6 onzas) de aceite. Después de agregar aceite a
la gasolina, agitar el contenedor momentáneamente para
asegurar una mezcla apropiada.
IMPORTANTE: Mezclar únicamente suficiente combustible para las
necesidades inmediatas. No almacenar combustible premezclado.
Cómo agregar combustible a la motoazada
B
Arranque del motor
C
Cómo arrancar el motor en frío
1. Colocar la motoazada sobre una superficie plana.
2. Mover el interruptor de encendido a la posición de
encendido («ON»). (Véase la Figura 6)
3. Mover la palanca del estrangulador a la posición «COLD
START» («ARRANQUE EN FRÍO»). (Véase la Figura 7)
4. Oprimir el bulbo de cebado, lentamente, seis veces.
(Véase la Figura 8)
5. Empuñar el arrancador de retroceso con la mano
derecha y sujetar la motoazada con la mano izquierda.
(Véase la Figura 9)
6. Tirar de la empuñadura del arrancador de retroceso
rápidamente hasta que el motor arranque y se ponga
en marcha.
7. Después de que el motor arranque y esté en marcha
durante 10 a 15 segundos, mover la palanca del
estrangulador a la posición «RUN/WARM START»
(«MARCHA / ARRANQUE EN CALIENTE». (Véase la
Figura 7)
Cómo arrancar el motor en caliente
1. Colocar la motoazada sobre una superficie plana.
2. Mover el interruptor de encendido a la posición de
encendido («ON»). (Véase la Figura 6)
3. Mover la palanca del estrangulador a la posición
«Marcha / Arranque en caliente». (Véase la Figura 7)
4. Empuñar el arrancador de retroceso con la mano
derecha y sujetar la motoazada con la mano izquierda.
(Véase la Figura 9)
embudo para verter la mezcla en el tanque; luego,
colocar la tapa nuevamente.
4. Evitar derrames de combustible o aceite. Enjugar todo
derrame de combustible.
5. Mover la motoazada al menos 3 metros (10 pies) del
sitio de abastecimiento de combustible antes
de arrancar el motor.
5. Tirar de la empuñadura del arrancador de retroceso
rápidamente hasta que el motor arranque y se ponga
en marcha.
Page 35

¿Preguntas? Llamar gratuitamente al 1-800-737-2112 Copyright © 2018 MAT Engine Technologies, LLC
SP - 10
Fig. 11
Estaca de
arrastre
Pasador de detención
Agujeros
Soporte de apoyo
Fig. 12
Perilla
Ruedas
Cómo arrancar un motor ahogado
1. Colocar la motoazada sobre una superficie plana.
2. Mover el interruptor de encendido a la posición de
encendido («ON»).
3. Mover la palanca del estrangulador a la posición
«Marcha / Arranque en caliente». (Véase la Figura 7)
4. Mantener el gatillo completamente accionado en la
posición FAST («RÁPIDA»). (Véase la Figura 10)
5. Tirar de la empuñadura del arrancador de retroceso
repetidamente hasta que el motor arranque y se
ponga en marcha. Esto podría hacer necesario tirar de
la empuñadura del arrancador de retroceso muchas
veces, dependiendo de cuán ahogada esté la unidad.
6. Si el motor aún no arranca, dejar la unidad en reposo
durante aproximadamente 15 minutos; luego, repetir los
pasos del 1 al 5.
NOTA: Esta motoazada está equipada con un embrague centrífugo; así, las azadas no giran sino hasta que se aumenta
la velocidad del motor. Para aumentar la velocidad del motor, apretar el gatillo del regulador. (Véase la Figura 10) Para
disminuir la velocidad de marcha del motor, soltar lentamente el gatillo del regulador. Al soltarse completamente la palanca
del regulador el motor vuelve a la marcha en vacío y las azadas dejan de rotar.
1. Soltar el gatillo del regulador y dejar que el motor
marche en vacío momentáneamente.
(Véase la Figura 10)
Fig. 10
FAST
SLOW
Operación (Continuación)
• Guarde todas las instrucciones
Arranque del motor (Continued)
C
Cómo ajustar la velocidad del motor
D
Cómo parar el motor
E
Cómo ajustar la posición de la estaca de arrastre
F
La estaca de arrastre añade resistencia al labrado, lo cual
facilita el control de la unidad. También se la puede ajustar
para cambiar la profundidad de labranza. Para ajustar la
posición de la estaca de arrastre, seguir los pasos que
aparecen a continuación y consultar la Figura 11:
1. Retirar el pasador de detención.
2. Deslizar la estaca de arrastre hacia la posición deseada
y alinear el agujero en la estaca con los agujeros en el
soporte de apoyo.
3. Insertar el pasador de detención a través de los agujeros
para asegurar la estaca de arrastre.
NOTA: Para la profundidad máxima de labranza, fijar
la estaca de arrastre en la posición más baja. Dicha
configuración ofrece resistencia máxima y produce la mayor
profundidad de labranza.
Cómo ajustar la altura de las ruedas
G
1. Aflojar la perilla.
2. Mover las ruedas hacia arriba o hacia abajo.
NOTA: La posición superior es para labrar; la inferior para
transporte.
3. Después de ajustar las ruedas a la altura deseada,
apretar la perilla de manera segura.
NOTA: Si la unidad aún no arranca, consúltese la sección
DIAGNÓSTICO Y RESOLUCIÓN DE PROBLEMAS de
este manual o: Si se necesita ayuda o se tienen preguntas,
LLAMAR GRATUITAMENTE AL: 1-800-737-2112
2. Oprimir y retener el interruptor de encendido en la
posición «STOP» («PARAR»). (Véase la Figura 6)
Page 36

¿Preguntas? Llamar gratuitamente al 1-800-737-2112 Copyright © 2018 MAT Engine Technologies, LLC
SP - 11
Mantenimiento
• Guarde todas las instrucciones
Filtro de aire
A
ADVERTENCIA
Colocar el interruptor en la posición de apagado («OFF»)
y desconectar la bujía antes de efectuar labores de
mantenimiento, excepto por ajustes al carburador.
Reconectar el cable de la bujía al completarse el servicio.
La motoazada está equipada con dos (2) filtros de aire
alveolares dentro de la carcasa del filtro de aire para evitar
que suciedad y despojos entren al motor.
Los despojos y el polvo acumulados en el filtro de aire
reducen el rendimiento del motor, aumentan el consumo
de combustible y el riesgo de averías del motor. Revisar
los filtros de aire frecuentemente para determinar si hay
acumulación de polvo y despojos. Limpiar los filtros de aire
cada 5 horas de operación (con mayor frecuencia bajo
condiciones con mucho polvo o mugre).
Para limpiar ambos filtros de aire se deben seguir las
instrucciones siguientes:
1. Antes de retirar la cubierta del filtro de aire retirar con un
cepillo la mugre o despojos sueltos sobre o alrededor de
la cubierta del filtro.
2. Retirar el tornillo que asegura la cubierta del filtro de aire.
Véase la. (Fig 13)
3. Retirar y limpiar el filtro alveolar.(Fig 15)
• Se puede retirar fácilmente el polvo leve de la
superficie mediante golpecitos al filtro.
• Se deben eliminar los depósitos espesos
mediante lavado con jabón y agua. Exprimir el
agua remanente y dejar que el filtro seque
completamente.
Verificar la bujía después de cada periodo de 10 a 15 horas de uso; ajustar la separación de la bujía y reemplazar la bujía
si es necesario. Reemplazar la bujía cada año, para mantener el rendimiento del motor y facilitar el arranque. Para verificar
o reemplazar la bujía:
1. Retirar el enchufe aislado de la bujía.
2. Utilizar la llave de bujía para retirar la bujía mediante el giro antihorario de la misma.
3. Inspeccionar la bujía visualmente para determinar si tiene grietas o averías. Si está averiada, reemplazar la bujía con
un repuesto recomendado (véase «Especificaciones del producto»).
4. Limpiar los depósitos de carbono. Si hay acumulación excesiva de carbono, reemplazar la bujía.
5. Ajustar la separación de la bujía a un valor de 0.024 a 0.028 pulgadas (0.6 - 0.7mm).
6. Instalar la bujía en el cabezal del cilindro mediante apriete a mano; luego, apretarla con la llave para bujías.
7. Reinstalar el enchufe aislado de la bujía.
Para inspeccionar o reemplazar la bujía
B
Almacenamiento
• Guarde todas las instrucciones
Para prevenir la corrosión y los depósitos de carburante en
el sistema de alimentación de combustible y el carburador
de la unidad, se recomienda enfáticamente usar un aditivo/
estabilizador formulado para combustibles con etanol.
Seguir las instrucciones del fabricante del estabilizador.
Dejar que el motor funcione por al menos 5 minutos antes
de agregar el estabilizador.
1. Dejar que el motor enfríe para vaciar el tanque
de combustible antes de almacenar o transportar
la motoazada en un vehículo.
Arrancar el motor y dejarlo marchar hasta que pare al
agotarse el combustible en el carburador.
2. Cuando no esté en uso, almacenar la motoazada en un
espacio interior seco. Almacenar la motoazada a una
altura inalcanzable por niños o en un área bajo llave,
fuera del alcance de niños.
3. Almacenar la unidad y el combustible en un área donde
los vapores del combustible no puedan llegar a chispas
o llamas abiertas de calentadores de agua, motores o
interruptores eléctricos, hornos, etc.
ADVERTENCIA
Jamás limpiar el filtro en gasolina u otro solventes
inflamables.
4. Agregar una gota de aceite liviano al filtro y reinstalarlo.
5. Retirar el papel del filtro de aire. (Fig. 16) Limpiar el
filtro golpeándolo suavemente sobre una superficie
plana. Reemplazar si está muy sucio.
6. Reponer el elemento filtrantes y la cubierta del filtro
de aire.
Fig. 13 Fig. 14
Fig. 16Fig. 15
Page 37

¿Preguntas? Llamar gratuitamente al 1-800-737-2112 Copyright © 2018 MAT Engine Technologies, LLC
SP - 12
PROBLEMA CAUSA/S POSIBLE/S SOLUCIÓN / SOLUCIONES
El motor no arranca. 1. Interruptor de encendido en la
posición de apagado («OFF»).
2. Motor ahogado.
3. Tanque de combustible vacío.
4. Bujía sin chispa.
5. El combustible no llega al
carburador.
6. El carburador necesita un ajuste.
1. Mover el interruptor de encendido a la
posición de encendido («ON»).
2. Véase Cómo arrancar un motor ahogado
en la sección OPERACIÓN.
3. Llenar el tanque con la mezcla de
combustible correcta.
4. Cambiar la bujía.
5. Buscar tubería de combustible abollada o
cortada; repararla o reemplazarla.
6. Ponerse en contacto con un centro de
servicio calificado.
El motor no acelera, carece de
potencia o se apaga.
1. El combustible no llega al
carburador.
2. Filtro de aire sucio.
3. Bujía hollinada.
4. El carburador necesita un ajuste.
5. Acumulación de carbono en la
malla de salida del silenciador.
6. Baja compresión.
1. Buscar tubería de combustible abollada o
cortada; repararla o reemplazarla.
2. Limpiar el filtro de aire.
3. Limpiar o reemplazar la bujía.
4. Ponerse en contacto con un centro de
servicio calificado.
5. Ponerse en contacto con un centro de
servicio calificado.
6. Ponerse en contacto con un centro de
servicio calificado.
El motor humea excesivamente. 1. Mezcla incorrecta de combustible.
2. Filtro de aire sucio.
3. El carburador necesita un ajuste.
4. Palanca del estrangulador en la
posición «CHOKE/COLD START»
(«ESTRANGULADOR/ARRANQUE
EN FRÍO»).
1. Vaciar el tanque de combustible y llenarlo
nuevamente con la mezcla correcta de combustible.
2. Limpiar o reemplazar el filtro de aire.
3. Ponerse en contacto con un centro de
servicio calificado.
4. Rotar la palanca del estrangulador a la
posición «RUN / WARM START» «(MARCHA
/ ARRANQUE EN CALIENTE»).
El motor recalienta. 1. Mezcla incorrecta de combustible.
2. Bujía incorrecta.
3. El carburador necesita un ajuste.
4. Acumulación de carbono en la
malla de salida del silenciador.
1. Véase Cómo mezclar combustible con
aceite para motores de dos tiempos en la
sección OPERACIÓN.
2. Reemplazarla con la bujía correcta.
3. Ponerse en contacto con un centro de
servicio calificado.
4. Ponerse en contacto con un centro de
servicio calificado.
El motor no marcha correctamente
en vacío.
1. El carburador necesita un ajuste.
2. Sellos del cigüeñal gastados.
3. Baja compresión.
1. Ponerse en contacto con un centro de
servicio calificado.
2. Ponerse en contacto con un centro de
servicio calificado.
3. Ponerse en contacto con un centro de
servicio calificado.
Diagnóstico y resolución de problemas
• Guarde todas las instrucciones
Almacenamiento
• Guarde todas las instrucciones
4. Al prepararse la motoazada para almacenamiento o
cuando no se va a usar la motoazada durante 30 ó
más días:
a. Vaciar el tanque de combustible y usar el
combustible remanente en el carburador mediante
el arranque y marcha del motor hasta que pare.
Apretar varias veces el bulbo o perilla de cebado
para purgar el combustible del carburador.
b. Inspeccionar y limpiar la motoazada
exhaustivamente.
c. Aceitar levemente todas las superficies externas
de metal.
d. Retirar la bujía, colocar unas cuantas gotas de
aceite para motores de dos tiempos en el cilindro.
Tirar del arrancador de retroceso varias veces para
distribuir el aceite. Reinstalar la bujía.
e. Inspeccionar y limpiar el filtro de aire según
sea necesario.
Page 38

¿Preguntas? Llamar gratuitamente al 1-800-737-2112 Copyright © 2018 MAT Engine Technologies, LLC
SP - 13
Siempre especificar el número del modelo al ponerse en contacto con la fábrica.
Nos reservamos el derecho de enmendar estas especificaciones en cualquier momento y sin aviso previo. La única garantía
pertinente es nuestra garantía estándar por escrito. No ofrecemos ninguna otra garantía, expresa o implícita. MAT Engine
Technologies, LLC garantiza que esta Motoazada y todas las piezas de la misma carecerán de defectos en materiales y
mano de obra durante dos años a partir de la fecha de compra original en un concesionario autorizado, siempre y cuando se
haya dado mantenimiento adecuado al producto y se la haya operado de conformidad con todas las instrucciones pertinentes.
Se extiende esta garantía únicamente al comprador al por menor original. Se ha de presentar el contrato de venta o prueba
de compra al efectuarse una reclamación bajo esta garantía. Esta garantía no cubre uso comercial, industrial o de alquiler,
y asimismo, no es pertinente a piezas que no estén en su condición original debido a desgaste normal o piezas que fallan
o sufren averías como resultado de uso indebido, accidente, falta de mantenimiento apropiado, manipulación imprudente y
peligrosa, o alteración. Los costos de viaje, manipulación, transporte e incidentales asociados con reparaciones bajo garantía
no son reembolsables al amparo de esta garantía y son responsabilidad del propietario. Hasta donde lo permita la ley de la
jurisdicción que gobierne la venta de este producto, esta garantía expresa excluye cualesquier y toda otra garantía expresa
y limita la duración de cualquier y toda garantía implícita, incluyendo las garantías de comerciabilidad e idoneidad para un
propósito específico durante dos años a partir de la fecha de compra original, y por la presente, se limita la responsabilidad de
MAT Engine Technologies, LLC al precio de compra del producto y MAT Engine Technologies, LLC no será responsable
por ningún otro daño en lo absoluto, incluidos daños indirectos, incidentales o emergentes. Algunos estados no permiten
limitaciones sobre la duración de una garantía implícita, ni la exclusión o limitación de los daños incidentales o emergentes,
por lo cual la limitación de daños anterior podría no ser pertinente en algunos casos. Esta garantía brinda al comprador
original derechos específicos.
Para obtener información sobre esos derechos, consúltense las leyes estatales pertinentes.
Oficina Corporativa METL; SOLO CORRESPONDENCIA
ATTN: Technical Service – METL
6700 Wildlife Way
Long Grove, IL 60047
La garantía del sistema de control de emisiones contaminantes está proporcionada por el fabricante del motor y está incluida
con este producto y administrada por MAT Engine Technologies, LLC.
Garantía
• Guarde todas las instrucciones
Garantía limitada de la MOTOAZADA Powermate®
A
Si se tiene alguna pregunta sobre la cobertura del propietario
al amparo de esta garantía, ponerse en contacto con Servicio
al cliente de METL:
Si se necesita ayuda o se tienen preguntas,
LLAMAR GRATUITAMENTE AL: 1-800-737-2112
Es posible que se tengan preguntas adicionales sobre el montaje, la operación o el mantenimiento de esta motoazada. En
dicho caso, contáctese a nuestro Departamento de Servicio Técnico al 1-800-737-2112 (solo inglés).
También se puede enviar correspondencia a:
Oficina Corporativa METL; SOLO CORRESPONDENCIA
ATTN: Technical Service – METL
6700 Wildlife Way
Long Grove, IL 60047
Si se necesita ayuda o se tienen preguntas, LLAMAR
GRATUITAMENTE AL: 1-800-737-2112
Servicio técnico
Al contactarse al Departamento de Servicio Técnico, tener listos:
• Su nombre
• Su dirección
• Su número de teléfono
• Número de modelo del producto
• Fecha de compra (incluida una copia del recibo para solicitudes
por escrito)
 Loading...