

Power Acoustik PACD-875 Instruction Manual

ANTI-THEFT FULL DETACHABLE PANEL
AUTO-LOADING COMPACT DISC PLAYER
AM/FM-STEREO DIGITAL PLL TUNING RADIO
INSTRUCTION MANUAL
TUNE
BND
EQ
ELR
LOC
VOL
4/RDM2/RPT1/TOP
LUD
3/INT 5 6 APS
MUT
CLK
RPW
SEL
PACD-875

1
DEAR CUSTOMER
Selecting fine audio equipment such as the unit you have just purchased is only the
start of your musical enjoyment. Now it is time to consider how you can maximize the
fun and excitement your equipment offers. We want you to get the most out of your
equipment by playing it at a safe level. One that lets the sound come through loud and
clear without annoying blaring or distortion - and, most importantly, without affecting
your sensitive hearing. Sound can be deceiving. Over time your hearing "comfort level"
adapts to higher volumes of sound. So what sounds " normal " can actually be loud
and harmful to your hearing. Guard against this by setting your equipment at a safe
level BEFORE your hearing adapts.
To establish a safe level:
Start your volume control at a low setting.
Slowly increase the sound until you can hear it comfortably and clearly, and without
distortion, we want you listening for a lifetime.
Once you have established a comfortable sound level:
Set the dial and leave it there.
Taking a minute to do this now will help to prevent hearing damage or loss in the future.
After all, we want you listening for a lifetime.
ABOUT THIS MANUAL
This product features a number of sophisticated functions ensuring superior reception
and operation. All are designed for the easiest possible use, but many are not selfexpanatory. This operation manual is intended to help you benefit fully from their
potential and to maximize your listening enjoyment. We recommend that you familiarize
yourself with the functions and their operation by reading through the manual before
you begin using this product. It is especially important that you read and observe the
" precaution " on the next page and in other sections. In this operation manual, the
Basic Operation for each sound source is outlined at the beginning of its explanation,
covering simple operation for that source, such as merely playing music.
CUSTOMER NOTICE
2
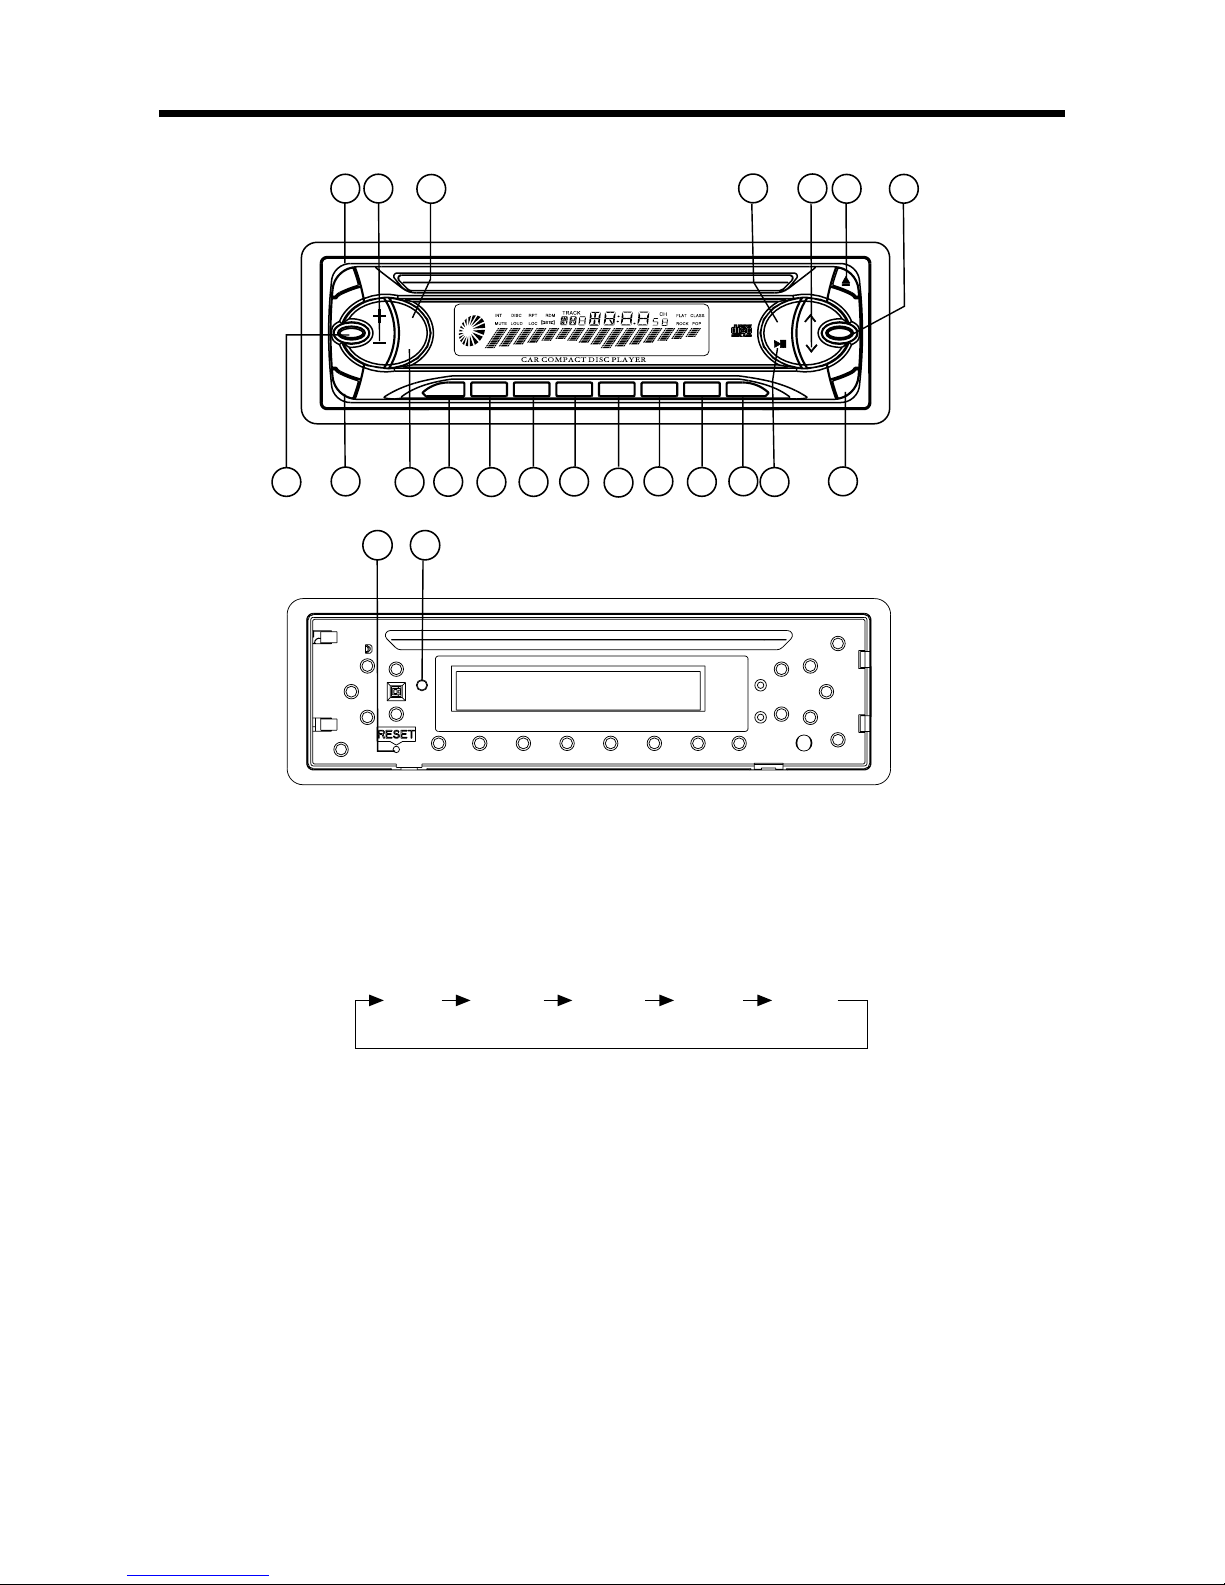
1. REL BUTTON
Press it to detach the front panel when you want to take the unit away.
2.8. SEL( AUDIO MODE SELECT)/+/- BUTTONS
Press SEL button to change the mode in the sequence of
A. The volume level can be adjusted at any time by pressing the audio level + or - button
as select mode has been initially defaulted at volume mode.
B. The volume level is also obtained by stepping through the SEL button until the
function VOL is displayed and then press + or - button to adjust the sound level.
C. Press and hold the + or - button to adjust the sound level.
D. Adjust sound balance between front and rear speakers by using + and - buttons.
3. LOC BUTTON
Press the LOC button to select between local setting for reception of strong station
and distant setting for reception of weak stations when tuning.
4. MUTE BUTTON
Press it to eliminate the sound immediately.
BASIC OPERATION
VOL BAS TRE BAL FAD
(Volume) (Bass) (Treble) (Balance) (Fader)
1
2
3
4
5
6
7
9
11
12
13
14
15
16
17
10
8
18
19
20
TUNE
BDN
EQ
REL
LOC
VOL
4/RDM2/RPT1/TOP
LUD
3/INT 5 6 APS
MUT
CLK
PWR
SEL
21 22

3
5. TRACK UP/DOWN BUTTONS
During CD mode, press
button allow you to track forwards. Hold the button
allow you to skip forwards.
During AUDIO mode, press and hold
or for more than 2 seconds you can auto
search channel. Then press
or , you can have manual search channel.
6. EJECT BUTTON
Press it to eject the CD DISC.
7. CLOCK ADJUSTMENT BUTTON
During frequency display, press it to change into clock display function. Press the
button for more than 2 seconds, until time flashes, and you can adjust time now.
To adjust hour:
with time be flashed on display, push the tune
button to adjust hour, when
adjustment is completed, release the button.
To adjust minute:
with time be flashed on display, push the tune
button to adjust minute. When
adjustment is completed, release the button.
9. BAND BUTTON
Press it to select your desired radio band and the band which is selected will be
displayed on LCD.
10. EQ BUTTON
Press it to switch between 4 preset equalizer curves: FLAT, POP, CLAS, ROCK. The
sound quality will be changed.
11. LOUD BUTTON
When reduce the volume to half level, press it to enhance the bass effect.
12-13-14-15. 16-17. PRESET MEMORY BUTTONS
A. 18To memorize the current frequency, press any one of the six preset Buttons hold
for more than 2 seconds.
B. To recall the preset memory, press one of the preset buttons [1-6].
C. In CDP mode, press 1 TOP button to play first track.
D. In CDP mode, press 2 RPT button to continuously repeat same track. Press again
to stop repeating.
E. In CDP mode, press 3 INT button to play first ten seconds part of each track on disc.
Press again to stop scan and listen to track.
F. In CDP mode, press 4 ROM button to play all tracks on disc in random order. Press
again to stop random play.
18. AS/PS BUTTON
In radio mode:
When short pressing, the radio searches for each preset station. When the field
strength level is more than the threshold level of Stop level, the radio is holding at
that preset number for few secretary with releasing mute, and then searches again.
In FM band, FM 1, FM 2 and FM 3 is checked one at a time.
When long pressing (more than 1 second), the radio searches from the current
frequency and checks the signal strength level until 1 cycle search is finished. And
then 6 strongest stations are preset to the corresponding preset number. The AS
operation is implemented in the each band of selected band. When the AS
operation is finished, the radio executes the preset scan.
BASIC OPERATION
 Loading...