

Page 1

Quick Start & Troubleshooting Guide
www.powakaddy.com
Page 2

Page 3

Quick Start and Troubleshooting Guide
Mode d’emploi rapide et conseils pratiques
Kurzanleitung und Fehlersuche
Guida di avvio rapido e alla risoluzione dei problemi
Manual de inicio rápido y resolución de problemas
Hurtig start og fejlndingsguide
Guide för snabbstart och felsökning
Page 4
GB
Quick Start Guide
Please follow these instructions to ensure the correct setup and use
of your new electric trolley.
For further information please contact us below or visit our website
www.powakaddy.com
PowaKaddy International Ltd
Castle Road
Sittingbourne
Kent
ME10 3RN
sales@powakaddy.com
01795 473 555
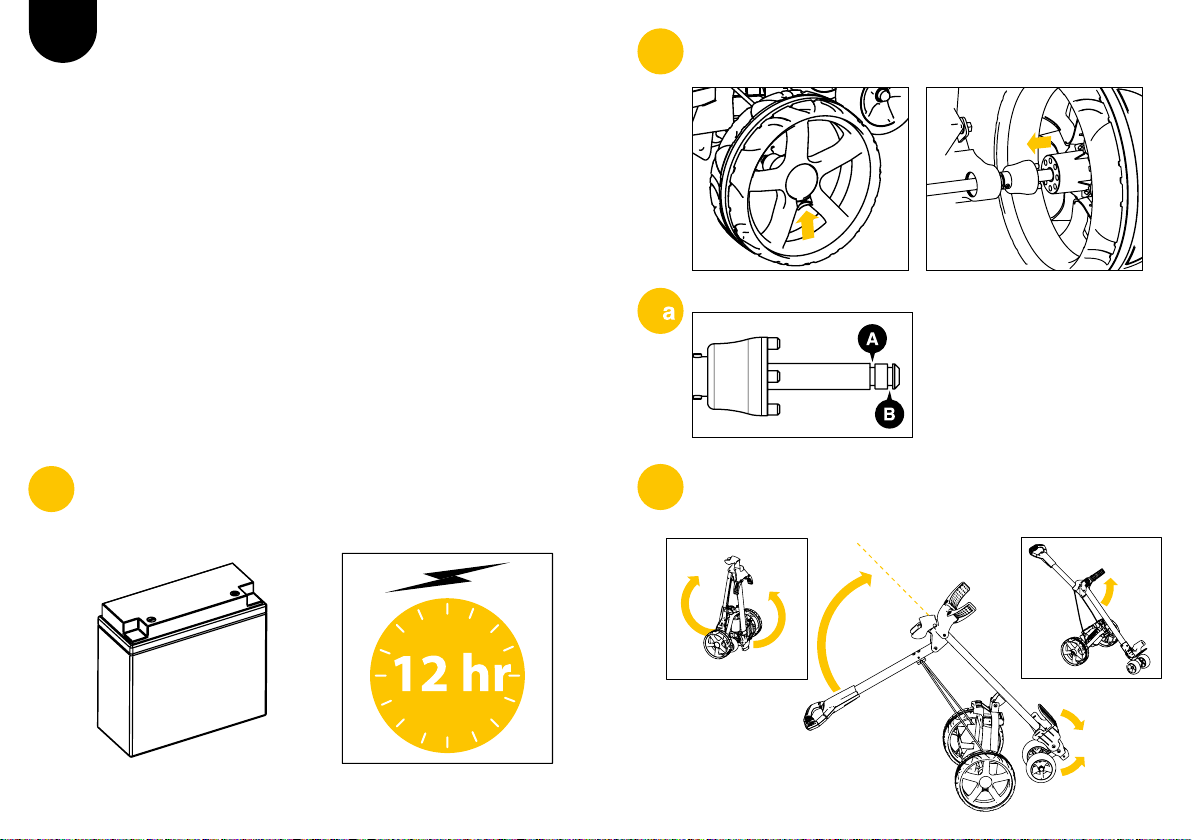
Next t your wheels; simply slide the wheel onto the spindle, press
2
the yellow button and click home.
Wheel Positions
2
Groove A. Wheels will be
powered by the motor.
Groove B. Wheels will be free
wheeling and not powered by
the motor.
You will need to put your battery on charge straight away.
*
1
Before you play a round it will need a full 12 hour charge minimum.
*
To unfold the trolley, pull the handle up in one motion. The trolley
3
will unfold, at this point the bag stay can be raised.
Page 5
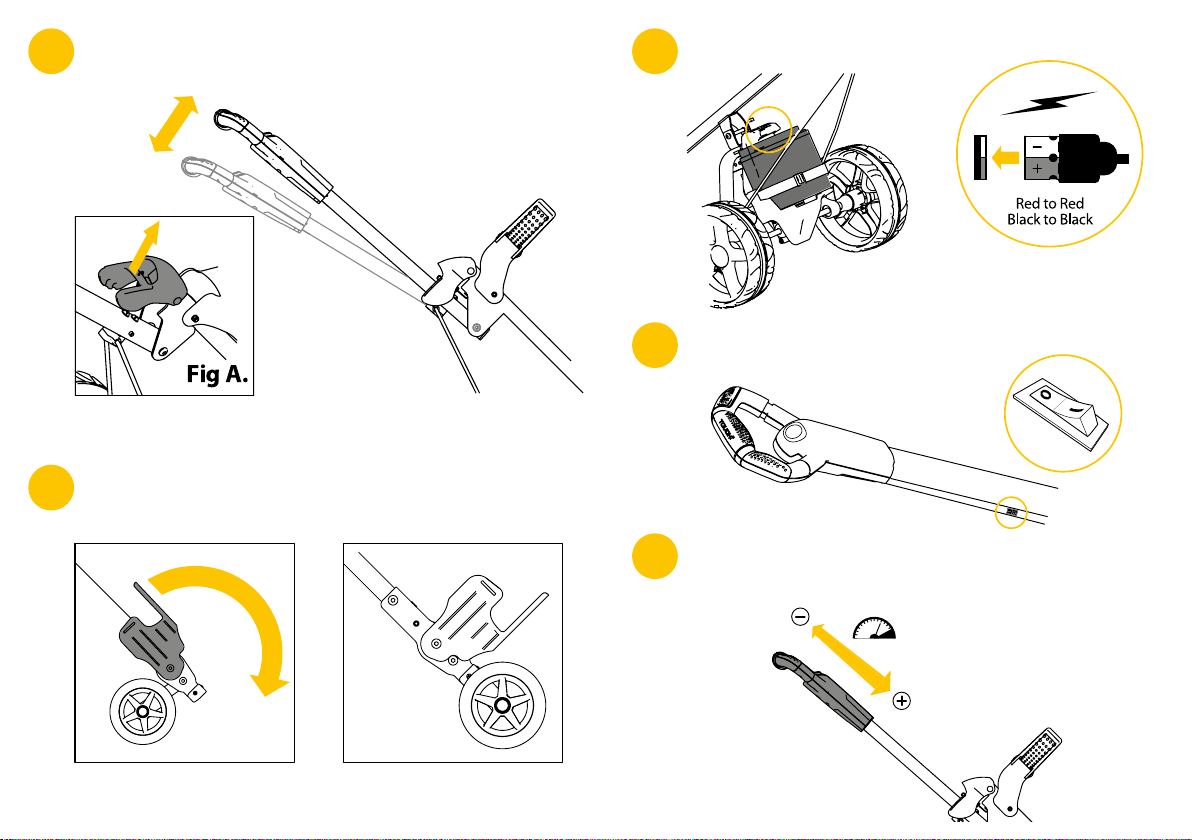
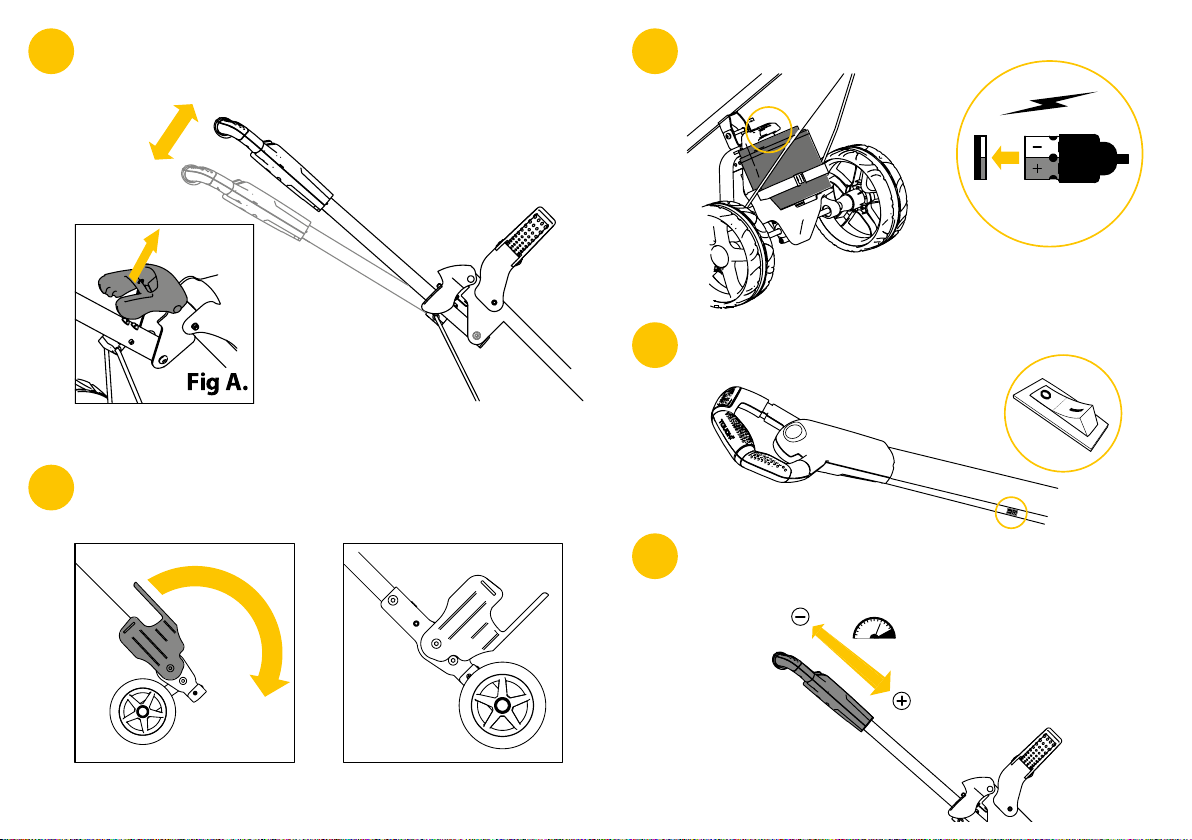
The handle can be set at two heights. Ensure the latch (Fig A.) has
4
sprung into position to lock the handle at the correct height.
To open the front wheels simply open the bag stay as shown below.
5
The front wheels will automatically move into position.
Next place your battery in position shown below and connect.
6
Turn on the trolley by pressing the power button located on the
7
right side of the handle tube.
To start the trolley pull back all the way on the handle, the trolley is
8
now ready to go. Move the handle forward to increase the speed
of the trolley and pull back to decrease.
Page 6

Troubleshooting Guide
Problem: My trolley doesn’t start
1
Solution
1:1. Ensure the switch is turned on.
1:2. Check your battery is fully charged and connected correctly.
1:3. Pull the handle all the way back to the “stop” position and
push it forward again.
1:4. Check all the external leads are connected.
If the above doesn’t solve the problem contact your nearest
service agent.
Problem: My trolley will not stop
2
Solution
2:1. Pull the handle all the way back to the “stop” position.
If this does not correct the problem, turn the trolley o
via the switch, or disconnect the battery and contact your
nearest service agent.
Problem: The lower bag stay gear mechanism is jammed or
3
does not operate
Solution
3:1. Remove any mud or debris clogging the wheel mechanism.
If the above doesn’t solve the problem contact your nearest
service agent.
Problem: My trolley doesn’t run straight
Solution
4:1. Remove any mud or debris clogging the wheel mechanism.
4:2. The front wheel alignment can be adjusted using a standard
3mm Hex key also known as an ‘Allen Key’ (included).
There are two hex screws visible by the lower bag stay, one each
side, which when tightened or loosened angle the front wheels
left to right.
4:2:1. To angle the wheels right loosen the left screw clockwise and
then tighten the right screw anti-clockwise.
4:2:2. To angle the wheels left loosen the right screw clockwise and
then tighten the left screw anti-clockwise.
If the above doesn’t solve the problem contact your nearest
service agent.
To nd your nearest service agent visit www.powakaddy.com
Page 7
F
Mode d’emploi rapide
Veuillez suivre les instructions de cette notice pour monter et utiliser
correctement votre nouveau chariot électrique.
Pour de plus amples informations, veuillez nous contacter par courrier
à l’adresse ci-dessous, par courriel ou via notre site Internet
www.powakaddy.com
Buva Sports NV
Karrewegstraat 104
9800 Deinze
Belgium
info@buvasport.com
0938 68744
Mettre les roues en place. Enler simplement chaque roue sur
2
la tige, appuyer sur le bouton jaune et pousser jusqu’à
enclenchement (un déclic se fera entendre).
Positions des roues
2
Rainure A. Les roues sont
entraînées par le moteur.
Rainure B. Les roues sont
libres (et non pas entraînées
par le moteur).
*La batterie doit immédiatement être mise en charge.*
1
Il est nécessaire de charger la batterie au moins pendant 12 heures
avant d’utiliser le chariot.
Pour déplier le chariot, tirer d’un coup la poignée vers le haut. Le
3
chariot se déploiera. La tablette où doit reposer le sac peut alors
être relevée.
Page 8
La poignée est réglable en hauteur sur deux niveaux. Vérier que
4
le système de blocage (schéma A) à ressort est bien en position
et que la poignée est bloquée à la hauteur voulue.
Schéma A.
Pour accéder aux roues de devant, il sut de redresser la tablette
5
comme indiqué dans le schéma ci-dessous. Les roues de devant
se mettront automatiquement en position.
Ensuite, installer et connecter la batterie comme indiqué
6
ci-dessous.
Rouge + rouge
Noir + noir
Mettre en route le chariot en appuyant sur l’interrupteur à droite
7
sur le tube de la poignée.
Pour démarrer le chariot, tirer complètement en arrière la poignée.
8
Le chariot est prêt. Pour accélérer pousser la poignée vers l’avant
et la tirer vers l’arrière pour ralentir.
Page 9

Conseils pratiques
Problème : Le chariot ne bouge pas
1
Solution
1:1. Vériez que l’interrupteur est enclenché et l’appareil en
marche.
1:2. Vériez que la batterie est chargée à fond et connectée
correctement.
1:3. Tirez sur la poignée jusqu’en position « arrêt », puis poussez-la
vers l’avant à nouveau.
1:4. Assurez-vous que tous les ls externes sont bien connectés.
Si le problème subsiste, veuillez contacter notre représentant
de support technique le plus proche de chez vous.
Problème : Le chariot ne s’arrête pas
2
Solution
2:1. Tirez sur la poignée complètement jusqu’en position « arrêt ».
Si le problème subsiste, utilisez l’interrupteur pour éteindre
le chariot ou déconnectez la batterie et contactez notre
représentant de support technique le plus proche de chez
vous.
Problème : L’engrenage au niveau de la tablette repose-sac est
3
enrayé ou ne fonctionne pas.
Solution
3:1. Nettoyez l’engrenage au niveau des roues en éliminant toute
trace éventuelle de boue ou de saletés qui l’encombrent.
Si le problème subsiste, veuillez contacter notre représentant
de support technique le plus proche de chez vous.
Problème : Le chariot va de travers.
Solution
4:1. Nettoyez l’engrenage au niveau des roues en éliminant toute
trace éventuelle de boue ou de saletés qui l’encombrent.
4:2. Il est possible d’ajuster l’alignement des roues de devant à l’aide
d’une clef hexagonale ou clef Allen standard de 3mm (fournie).
Au niveau de la tablette inférieure où repose le sac, de chaque côté
se trouve une vis à tête hexagonale. Il sut de serrer ou de desserrer
les vis an de réaligner les roues.
4:2:1. Pour ajuster l’angle des roues vers la droite, desserrez légèrement
la vis de gauche en tournant dans le sens des aiguilles d’une montre
puis resserrez la vis de droite dans le sens contraire des aiguilles d’une
montre.
4:2:2. Pour ajuster l’angle des roues vers la gauche, desserrez
légèrement la vis de droite en tournant dans le sens des aiguilles
d’une montre puis resserrez la vis de gauche dans le sens contraire des
aiguilles d’une montre.
Côté droit
Si le problème subsiste, veuillez contacter notre représentant
de support technique le plus proche de chez vous.
Pour trouver notre représentant de support technique le plus
proche de chez vous, consultez notre site Internet
www.powakaddy.com
Côté gauche
Page 10

D
Kurzanleitung
Bitte beachten Sie die folgenden Anweisungen zur sachgemäßen
Einrichtung und Bedienung Ihres neuen Elektro-Trolleys.
Für weiterführende Informationen verwenden Sie die untenstehenden
Kontaktangaben oder besuchen Sie uns im Internet bei
www.powakaddy.com
Green Grass Golf Europe
Hunsdorfer Weg 27
46569 Huenxe
Germany
info@greengrassgolf.de
0285 8917980
Befestigen Sie dann die Räder. Schieben Sie das Rad einfach auf
2
die Achse, drücken Sie den gelben Knopf ein und lassen Sie das
Rad mit einem Klick einrasten.
Radstellungen
2
Laufrille A. Die Räder werden
vom Motor angetrieben.
Laufrille B. Die Räder laufen
frei und werden nicht vom
Motor angetrieben.
*Sie müssen den Akku zunächst auaden.*
1
Bevor Sie eine Runde spielen können, benötigen Sie einen voll
aufgeladenen Akku. Die Ladedauer beträgt mindestens 12 Stunden.
Um den Trolley aufzuklappen, ziehen Sie den Handgri in einer
3
Bewegung nach oben. Der Trolley klappt auf und die Bag-Stange
kann aufgerichtet werden.
Page 11

Der Handgri hat zwei Höheneinstellungen. Vergewissern Sie sich,
4
dass die Verriegelung (Abb. A) eingerastet ist, damit der Handgri
sicher in der richtigen Höhe feststeht.
Abb. A
Zum Önen der Vorderräder einfach die Bag-Stange aufklappen
5
(siehe Abbildung). Die Vorderräder bewegen sich automatisch
in die erforderliche Stellung.
Setzen Sie nun die Batterie, wie unten gezeigt, ein und schließen
6
sie an.
Rot an Rot
Schwarz an Schwarz
Schalten Sie den Trolley durch Drücken der Ein-/Aus-Taste, die sich
7
rechts am Grirohr bendet, ein.
Zum Starten des Trolleys ziehen Sie den Handgri ganz nach
8
hinten. Der Trolley ist nun fahrbereit. Bewegen Sie den Handgri
nach vorn, um die Geschwindigkeit des Trolleys zu erhöhen.
Ziehen Sie ihn nach hinten, um langsamer zu fahren.
Page 12

Fehlersuche
Problem: Mein Trolley startet nicht
1
Lösung
1.1 Vergewissern Sie sich, dass der Trolley eingeschaltet ist.
1.2 Überprüfen Sie, ob der Akku vollständig aufgeladen
und richtig angeschlossen ist.
1.3 Ziehen Sie den Handgri ganz nach hinten in die
„Anschlagstellung“ und schieben Sie ihn dann wieder nach vorn.
1.4 Vergewissern Sie sich, dass alle externen Leitungen
angeschlossen sind.
Falls Sie das Problem mithilfe der oben genannten Schritte
nicht lösen können, wenden Sie sich bitte an einen
Servicevertreter in Ihrer Nähe.
Problem: Mein Trolley hält nicht an
Lösung
2
2.1 Ziehen Sie den Handgri ganz nach hinten in die
„Anschlagstellung“.
Falls sich das Problem auf diese Weise nicht beheben
lässt, schalten Sie den Trolley am Ein-/Aus-Taster aus oder
trennen Sie die Batterie und wenden Sie sich an einen
Servicevertreter in Ihrer Nähe.
Problem: Der untere Getriebemechanismus der Bag-Stange ist
verklemmt oder funktioniert nicht
3
Lösung
3.1 Entfernen Sie Verschmutzungen vom Radmechanismus.
Falls Sie das Problem mithilfe der oben genannten Schritte
nicht lösen können, wenden Sie sich bitte an einen
Servicevertreter in Ihrer Nähe.
Problem: Mein Trolley fährt nicht geradeaus
Lösung
4.1 Entfernen Sie Verschmutzungen vom Radmechanismus.
4.2 Der Radstand der Vorderräder lässt sich unter Zuhilfenahme
eines gewöhnlichen 3mm Inbusschlüssels (auch als
Sechskantschlüssel bekannt und im Lieferumfang enthalten)
justieren.
An der unteren Bag-Stange benden sich zwei
Sechskantschrauben, je eine auf jeder Seite. Wenn diese
Schrauben angezogen oder gelockert werden, lassen sich die
Vorderräder nach links oder rechts neigen.
4.2.1 Um die Räder nach rechts zu neigen, lockern Sie die linke
Schraube durch Drehen im Uhrzeigersinn und ziehen Sie dann die
rechte Schraube entgegen dem Uhrzeigersinn an.
4.2.2 Um die Räder nach links zu neigen, lockern Sie die rechte
Schraube durch Drehen im Uhrzeigersinn und ziehen Sie dann die
linke Schraube entgegen dem Uhrzeigersinn an.
Rechte Seite
Falls Sie das Problem mithilfe der oben genannten Schritte
nicht lösen können, wenden Sie sich bitte an einen
Servicevertreter in Ihrer Nähe.
Einen Servicevertreter in Ihrer Nähe nden Sie über unsere
Website www.powakaddy.com
Linke Seite
Page 13

I
Guida di avvio rapido
Seguire queste istruzioni per garantire la corretta installazione e utilizzo del nuovo carrello elettrico.
Per ulteriori informazioni non esitate a contattarci qui sotto o visitare il
nostro sito web www.powakaddy.com
Intergolf S.R.E
Via Podere La Vigna 6
Settimo Milanese
Milando
Italy
20019
ordini@intergolf.it
0289 456400
Successivamente montare le ruote; semplicemente far scorrere la
2
ruota sul perno, premere il tasto giallo e cliccare per agganciare.
Posizioni delle ruote
2
Scanalatura A. Le ruote
saranno azionate dal motore.
Scanalatura B. Le ruote
gireranno a ruota libera e non
azionate dal motore.
*Sarà necessario mettere immediatamente sotto carica la
1
batteria
Prima di giocare una partita avrà bisogno di una carica completa
di 12 ore al minimo.
.
*
Per aprire il carrello, tirare il manico verso l’alto con un movimento
3
unico. Il carrello si aprirà, a questo punto il supporto sacca può
essere sollevato.
Page 14
Il manico può essere impostato a due altezze. Assicurarsi che il
4
dispositivo di chiusura (Fig. A) si sia agganciato in posizione per
bloccare il manico alla giusta altezza.
Per aprire le ruote anteriori semplicemente aprire il supporto
5
sacca come mostrato sotto. Le ruote anteriori si sposteranno
automaticamente in posizione.
Successivamente, mettere la batteria nella posizione mostrata
6
sotto e collegarla.
Da rosso a rosso
Da nero a nero
Attivare il carrello premendo il pulsante di accensione posto sul
7
lato destro del tubo del manico.
Per avviare il carrello tirare completamente indietro il manico,
8
il carrello è pronto a partire. Spostare in avanti il manico per
aumentare la velocità del carrello e tirarlo indietro per diminuirla.
Page 15

Guida alla risoluzione dei problemi
Problema: Il mio carrello non si avvia
1
Soluzione
1:1. Assicurarsi che l’interruttore sia acceso.
1:2. Controllare che la batteria sia completamente carica e
collegata correttamente.
1:3. Riportare il manico completamente indietro alla posizione
“STOP” e spingerlo nuovamente in avanti.
1:4. Controllare che tutti i cavi esterni siano collegati.
Se quanto sopra non risolve il problema, contattare il
rappresentante di servizio più vicino.
Problema: Il carrello non si ferma
2
Soluzione
2:1. Tirare completamente indietro il manico alla posizione di
“stop”.
Se questo non risolve il problema, spegnere il carrello
tramite l’interruttore, o scollegare la batteria e contattare il
rappresentante di servizio più vicino.
Problema: Il meccanismo inferiore dell’ingranaggio del
3
supporto sacca è bloccato o non funziona
Soluzione
3:1. Rimuovere l’eventuale fango o detriti che intasano il
meccanismo della ruota.
Se quanto sopra non risolve il problema, contattare il
rappresentante di servizio più vicino.
Problema: Il carrello non marcia in linea retta
Soluzione
4:1. Rimuovere l’eventuale fango o detriti che intasano il
meccanismo della ruota.
4:2. L’allineamento della ruota anteriore può essere regolato
usando una chiave esagonale standard da 3mm conosciuta anche
come il nome di ‘chiave a brugola’ (inclusa).
Vicino al supporto sacca inferiore sono visibili due brugole, una
per lato, il cui serraggio o allentamento sposta l’angolo delle ruote
anteriori verso destra o sinistra.
4:2:1. Per cambiare l’angolo delle ruote verso destra, allentare
la vite sinistra in senso orario e poi serrare la vite destra in senso
antiorario.
4:2:2. Per cambiare l’angolo delle ruote verso sinistra, allentare la vite
destra in senso orario e poi serrare la vite sinistra in senso antiorario.
Lato destro
Se quanto sopra non risolve il problema, contattare il
rappresentante di servizio più vicino.
Per trovare il più vicino rappresentante di servizio visitare
www.powakaddy.com
Lato sinistro
Page 16

ESP
Manual de inicio rápido
Siga estas instrucciones para garantizar un montaje y un uso adecuados de su nuevo carrito eléctrico.
Para obtener más información, puede ponerse en contacto con
nosotros escribiendo a la dirección que se muestra a continuación o
visitando nuestra página web en www.powakaddy.com
Hill Billy SL
Avenida Marques Del Duero
Autosol Local 1 29688
Cancelada
Malaga
Spain
frank@hillbilly.es
0952 882688
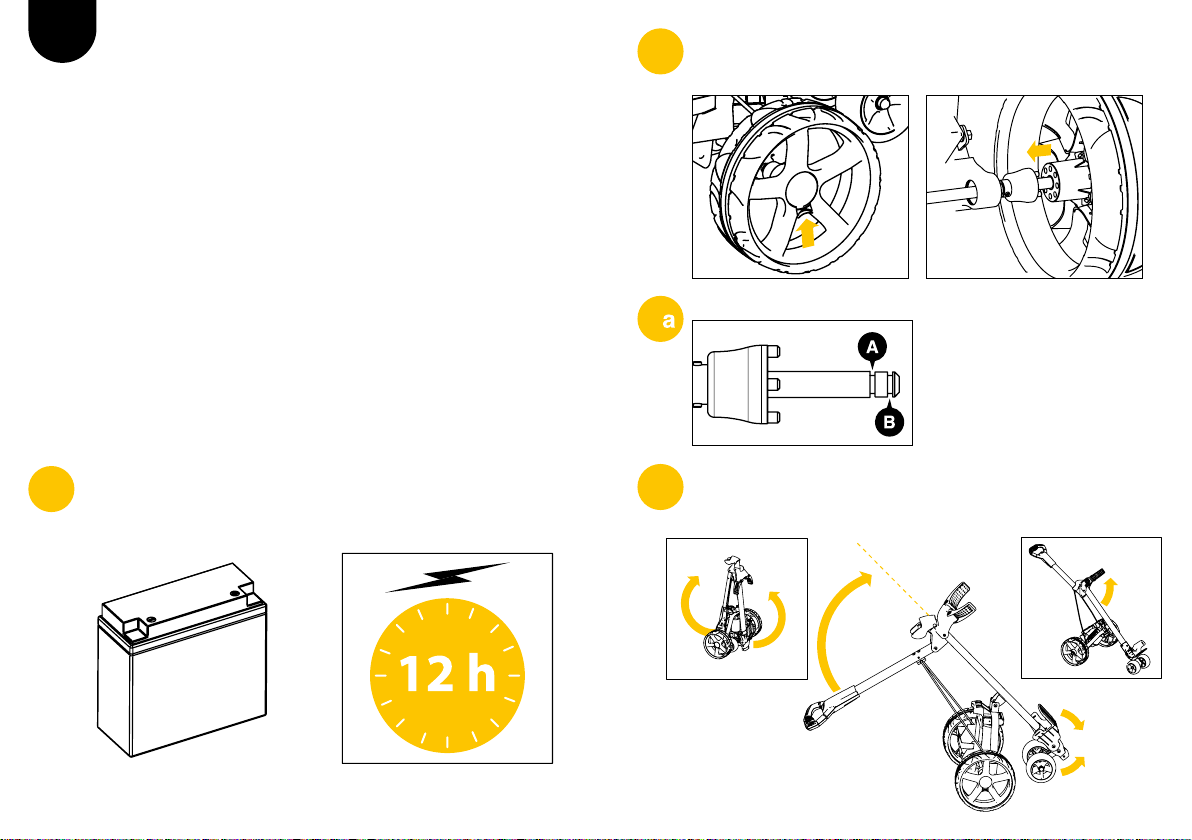
*Ponga a cargar la batería lo antes posible.*
1
Para poder jugar un recorrido deberá cargar la batería durante un
mínimo de 12 horas.
A continuación acople las ruedas. Para ello basta con deslizarlas
2
por los ejes y pulsar el botón amarillo hasta que oiga un clic.
Posiciones de las ruedas
2
Para desplegar el carrito tire del mango en un único movimiento.
3
El carrito se desplegará y a partir de entonces podrá levantar el
soporte de la bolsa.
Posición A. El motor impulsa
las ruedas.
Posición B. Las ruedas giran
libremente sin la tracción del
motor.
Page 17

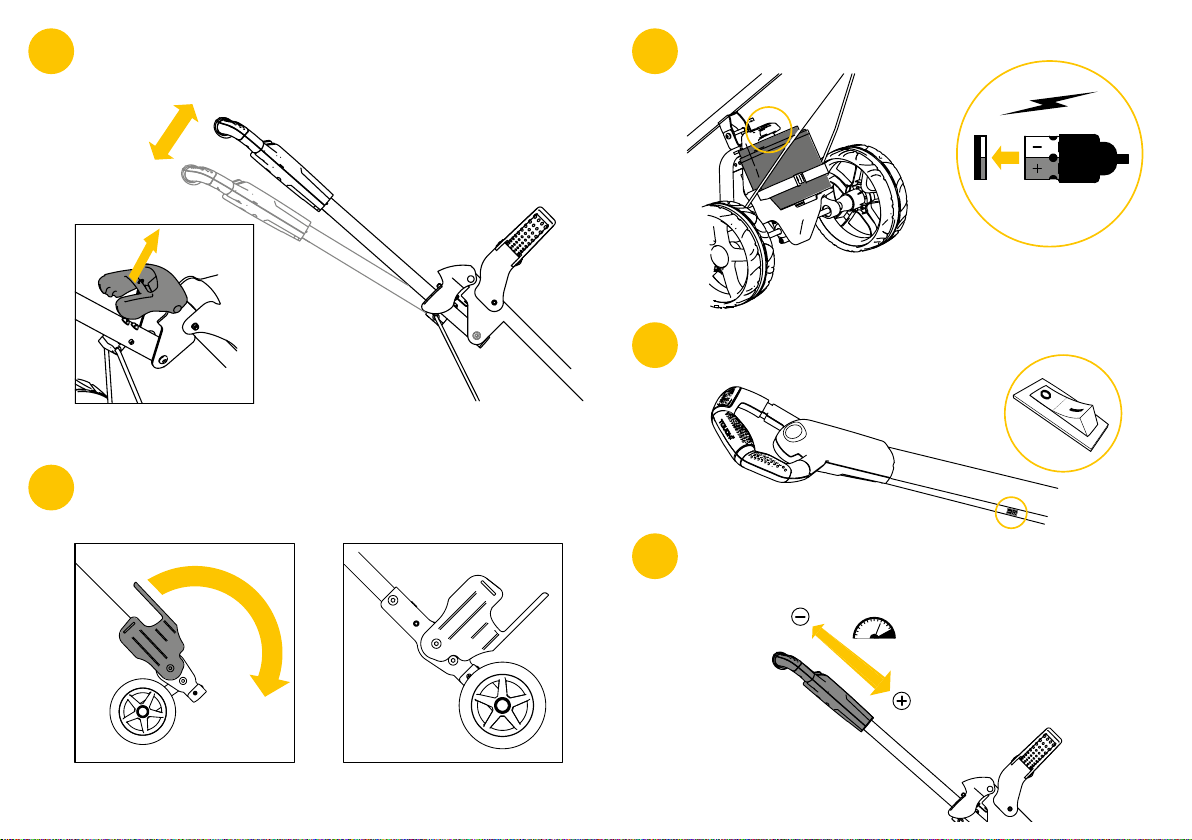
El mango puede colocarse a dos alturas. Asegúrese de que
4
el pasador (Fig. A.) se encuentra en posición sosteniendo
el mango a la altura correcta.
Para desplegar las ruedas frontales abra el soporte de la bolsa
5
como se muestra a continuación. Las ruedas frontales se colocarán
en posición automáticamente.
Seguidamente coloque la batería siguiendo las instrucciones
6
de la imagen y conéctela.
Rojo a rojo
Negro a negro
Encienda el carrito pulsando el interruptor ubicado en la parte
7
derecha del mástil del mango.
Para arrancar el carrito, tire del mango. En ese momento estará
8
listo para funcionar. Empuje el mango hacia adelante para
aumentar la velocidad del carrito y tire de él hacia atrás para
reducirla.
Page 18

Manual de resolución de problemas
Problema: El carrito no arranca
1
Solución
1:1. Asegúrese de que el interruptor se encuentra en la posición
de encendido.
1:2. Compruebe que la batería este cargada y conectada
correctamente.
1:3. Tire del mango hacia atrás hasta colocarlo en la posición de
“parada” y a continuación vuelva a empujar hacia adelante.
1:4. Compruebe que todos los cables externos esten
conectados.
Si las acciones anteriores no resuelven el problema, póngase
en contacto con el servicio técnico más cercano.
Problema: El carrito no se detiene
2
Solución
2:1. Tire del mango hacia atrás hasta colocarlo en la posición de
“parada”.
Si con esto no se soluciona el problema, apague el carrito
en el interruptor o desconecte la batería. Seguidamente
lleve el dispositivo al servicio técnico más cercano.
Problema: El engranaje del soporte inferior de la bolsa está
3
atascado o no funciona
Solución
3:1. Elimine cualquier resto de barro u otros residuos que
puedan estar atascando el mecanismo.
Si las acciones anteriores no resuelven el problema, póngase
en contacto con el servicio técnico más cercano.
Problema: El carrito no avanza en línea recta
Solución
4:1. Elimine cualquier resto de barro u otros residuos que puedan
estar atascando el mecanismo.
4:2. La alineación de las ruedas frontales puede ajustarse
utilizando una llave Allen de 3mm (incluida).
En ambos lados del soporte inferior de la bolsa pueden verse dos
tornillos Allen. Al apretarlos o aojarlos el ángulo de las ruedas
frontales oscila hacia la derecha o la izquierda.
4:2:1. Para orientar las ruedas hacia la derecha aoje el tornillo
izquierdo en el sentido de las agujas del reloj y acto seguido apriete el
tornillo derecho en el sentido contrario.
4:2:2. Para orientar las ruedas hacia la izquierda aoje el tornillo
derecho en el sentido de las agujas del reloj y acto seguido apriete el
tornillo izquierdo en el sentido contrario.
Lado derecho
Si las acciones anteriores no resuelven el problema, póngase
en contacto con el servicio técnico más cercano.
Visite www.powakaddy.com para encontrar el servicio técnico
más cercano.
Lado izquierdo
Page 19

DK
Hurtig start guide
Følg venligst denne vejledning for at sikre, at din nye elektriske trolley
klargøres og bruges på korrekt vis.
Du er velkommen til at kontakte os nedenfor eller besøge vores hjemmeside www.powakaddy.com for at få yderligere informationer.
Lars Kjaer & Co A/S
Birkemosevej 32 C
Postbox 33
Hasselager
Denmark
8361
lkc@lars-kjaer.dk
0874 76900
Monter dernæst hjulene; lad blot hjulene glide på akslen; tryk på
2
den gule knap og klik dem på plads.
Hjulpositioner
2
Rille A. Hjulene vil blive
drevet af motoren.
Rille B. Hjulene vil rulle frit og
ikke være drevet af motoren.
Batteriet skal stilles til opladning med det samme.
*
1
Inden du spiller en runde, skal det lades helt op i mindst 12 timer.
*
Trolleyen foldes ud ved at trække op i håndtaget i én og samme
3
bevægelse. Trolleyen foldes ud og taskeholderen kan nu hæves.
Page 20

Håndtaget kan indstilles til to forskellige højder. Sørg for at lås
4
(Fig. A) er faldet på plads, så håndtaget låses i den ønskede højde.
Forhjulene åbnes ved blot at åbne taskeholderen som vist nedenfor.
5
Forhjulene vil automatisk falde på plads.
Placer derefter batteriet som vist nedenfor og tilslut det.
6
Rød til rød
Sort til sort
Tænd for trolleyen ved at trykke på afbryderknappen, der sidder
7
på højre side af håndtaget.
Træk håndtaget helt tilbage for at starte trolleyen, som nu er klar
8
til at rulle. Skub håndtaget fremad for at øge trolleyens hastighed
og træk tilbage for at sænke hastigheden.
Page 21

Fejlndingsguide
Problem: Min trolley starter ikke
1
Løsning
1:1. Tjek om kontakten er tændt.
1:2. Tjek om batteriet er helt opladet og tilsluttet på korrekt vis.
1:3. Træk håndtaget helt tilbage i ”stop”-position og skub det
fremad igen.
1:4. Tjek om alle de eksterne ledninger er tilsluttede.
Hvis ovenstående ikke løser problemet, bedes du kontakte
det nærmeste servicecenter.
Problem: Min trolley vil ikke stoppe
2
Løsning
2:1. Træk håndtaget helt tilbage i ”stop”-position.
Hvis dette ikke løser problemet, skal du slukke for trolleyen
på kontakten eller afbryde batteriet og kontakte det
nærmeste servicecenter.
Problem: Drejemekanismen til den nedre taskeholder sidder
3
fast eller virker ikke
Løsning
3:1. Fjern eventuelt mudder og snavs der blokerer
hjulmekanismen.
Hvis ovenstående ikke løser problemet, kan du kontakte
det nærmeste servicecenter.
Problem: Min trolley ruller ikke lige
Løsning
4:1. Fjern eventuelt mudder og snavs der blokerer
hjulmekanismen.
4:2. Sporing af forhjulene kan indstilles ved hjælp af en almindelig
3mm unbrakonøgle også kendt som en ”stiftnøgle” (medfølger).
Der sidder to synlige unbracoskruer ved den nedre taskeholder,
en på hver side, som vinkler forhjulene mod venstre eller højre,
når de strammes eller løsnes.
4:2:1. For at vinkle hjulene til højre skal du løsne den venstre skrue i
urets retning og dernæst stramme den højre skrue mod urets retning.
4:2:2. For at vinkle hjulene til venstre skal du løsne den højre skrue i
urets retning og dernæst stramme den højre skrue mod urets retning.
Højre side
Hvis ovenstående ikke løser problemet, bedes du kontakte
det nærmeste servicecenter.
Find det servicecenter som er tættest på dig på
www.powakaddy.com
Venstre side
Page 22

S
Snabbstartsguide
Följ helst dessa instruktioner för att försäkra dig om att du monterar
och använder din nya elektriska vagn på rätt sätt.
För mer information, kontakta oss gärna enligt nedan eller besök vår
hemsida www.powakaddy.com
GV Sport AB
Spitgaten 2
Vellinge
Sweden
23532
info@gvsport.se
0404 26090
Sätt sedan på hjulen. Låt helt enkelt hjulet glida på axeln, tryck
2
in den gula knappen och klicka fast.
Hjullägen
2
Skåra A. Hjulen kommer
drivas av motorn.
Skåra B. Hjulen kommer rulla
fritt utan att drivas av motorn.
*Du måste sätta batteriet på laddning omedelbart.*
1
Det krävs en full laddning om minst 12 timmar innan du kan spela
en runda.
För att fälla ut vagnen, drag handtaget uppåt i en enda rörelse.
3
Vagnen kommer fällas upp, du kan nu fälla bagstödet.
Page 23

Handtaget kan ställas in i två höjder. Se till att spärren (Fig A.) har
4
kommit i rätt position så att handtaget låses fast i rätt höjd.
För att öppna framhjulen, fälla ut bagstödet som på bilden.
5
Framhjulen kommer automatiskt yttas till rätt läge.
Sätt sedan fast batteriet på den plats som visas nedan och koppla
6
in det.
Rött mot rött
Svart mot svart
Sätt på vagnen genom att trycka in strömbrytaren på höger sida
7
om handtagsröret.
För att starta vagnen, drag handtaget bakåt hela vägen. Vagnen
8
är nu färdig att köras. För handtaget framåt för att öka vagnens
hastighet och dra det bakåt för att minska hastigheten.
Page 24

PK6970
Felsökningsguide
Problem: Min vagn startar inte
1
Lösning
1:1. Se till att strömbrytaren är påslagen.
1:2. Kontrollera att batteriet är fulladdat och inkopplat på rätt
sätt.
1:3. Drag handtaget hela vägen bakåt till “stopp”-läget och för
det sedan framåt igen.
1:4. Kontrollera att alla yttre sladdar är inkopplade.
Om inget av ovanstående hjälper, kontakta närmsta
servicerepresentant.
Problem: Min vagn stannar inte
2
Lösning
2:1. Drag handtaget hela vägen bakåt till “stopp”-läget.
Om detta inte rättar till problemet, stäng av vagnen med
hjälp av strömbrytaren, eller koppla ur batteriet och
kontakta närmsta servicerepresentant.
Problem: Det nedre bagstödets bromsmekanism har fastnat
3
eller fungerar inte.
Lösning
3:1. Ta bort eventuell lera eller smuts som täpper till
hjulmekanismen.
Om inget av ovanstående hjälper, kontakta närmsta
servicerepresentant.
Problem: Min vagn kör inte rakt
Lösning
4:1. Ta bort eventuell lera eller smuts som täpper till
hjulmekanismen.
4:2. Framhjulens balans går att justera med hjälp av en standard
3mm insexnyckel, även kallad sexkantsnyckel (inkluderad).
Det sitter två synliga insexskruvar vid det nedre bagstödet, en på
varje sida. Framhjulen vinklas åt höger eller vänster genom att
man drar åt eller lossar på skruvarna.
4:2:1. För att vinkla hjulen åt höger, lossa den vänstra skruven genom
att vrida den medurs. Dra sedan åt den högra skruven genom att
vrida den moturs.
4:2:2. För att vinkla hjulen åt vänster, lossa den högra skruven genom
att vrida den medurs. Dra sedan åt den vänstra skruven genom att
vrida den moturs.
Höger sida
Om inget av ovanstående hjälper, kontakta närmsta
servicerepresentant.
För att nna din närmsta servicerepresentant, gå till
www.powakaddy.com
Vänster sida
® PGA is a registered trademark of The Professional Golfers’ Association Limited
Ocial Partner
“Touch ‘n’ Go” technology is under license from Necessitas Limited, Patent Number GB2443732. International patents pending.
 Loading...