

Powakaddy SPORT Instruction Manual

Ocial Partner
® PGA is a registered trademark of The Professional Golfers’ Association Limited
PK3811-02

Instruction Manual • Manuel d’instructions • Bedienungsanleitung • Manuale d’istruzioni
Manual de instrucciones
Betjeningsvejledning • Bruksanvisning
•


Step 1: Assembling your trolley
Step 2: Powering up your trolley
Step 3: Programming your trolley
Step 4: Troubleshooting guide
Paso 1: Montaje del carro
Paso 2: Puesta en marcha del carro
Paso 3: Programación del carro
Paso 4: Manual de resolución de problemas
Étape 1 : Montage de votre chariot
Étape 2 : Mise en route de votre chariot
Étape 3 : Programmation de votre chariot
Étape 4 : Guide de résolution des problèmes
Schritt 1: Montage Ihres Trolleys
Schritt 2: Einschalten Ihres Trolleys
Schritt 3: Programmieren Ihres Trolleys
Schritt 4: Fehlersuche
1 passo: Assemblaggio del carrello
2 passo: Accensione del carrello
3 passo: Programmazione del carrello
4 passo: Guida alla risoluzione dei problemi
Trin 1: Saml din trolley
Trin 2: Tilslut din trolley
Trin 3: Programmer din trolley
Trin 4: Fejlfindingsguide
Steg 1: Montering av din vagn
Steg 2: Ladda igång din vagn
Steg 3: Programmering av din vagn
Steg 4: Felsökningsguide
1: Assembling your trolley
PowaKaddy Sport
Instruction Manual.
To ensure the correct setup of your new PowaKaddy Sport
electric golf trolley please use the following instructions:
Step 1: Assembling Your Trolley
Step 2: Powering Up Your Trolley
Step 3: Programming Your Trolley
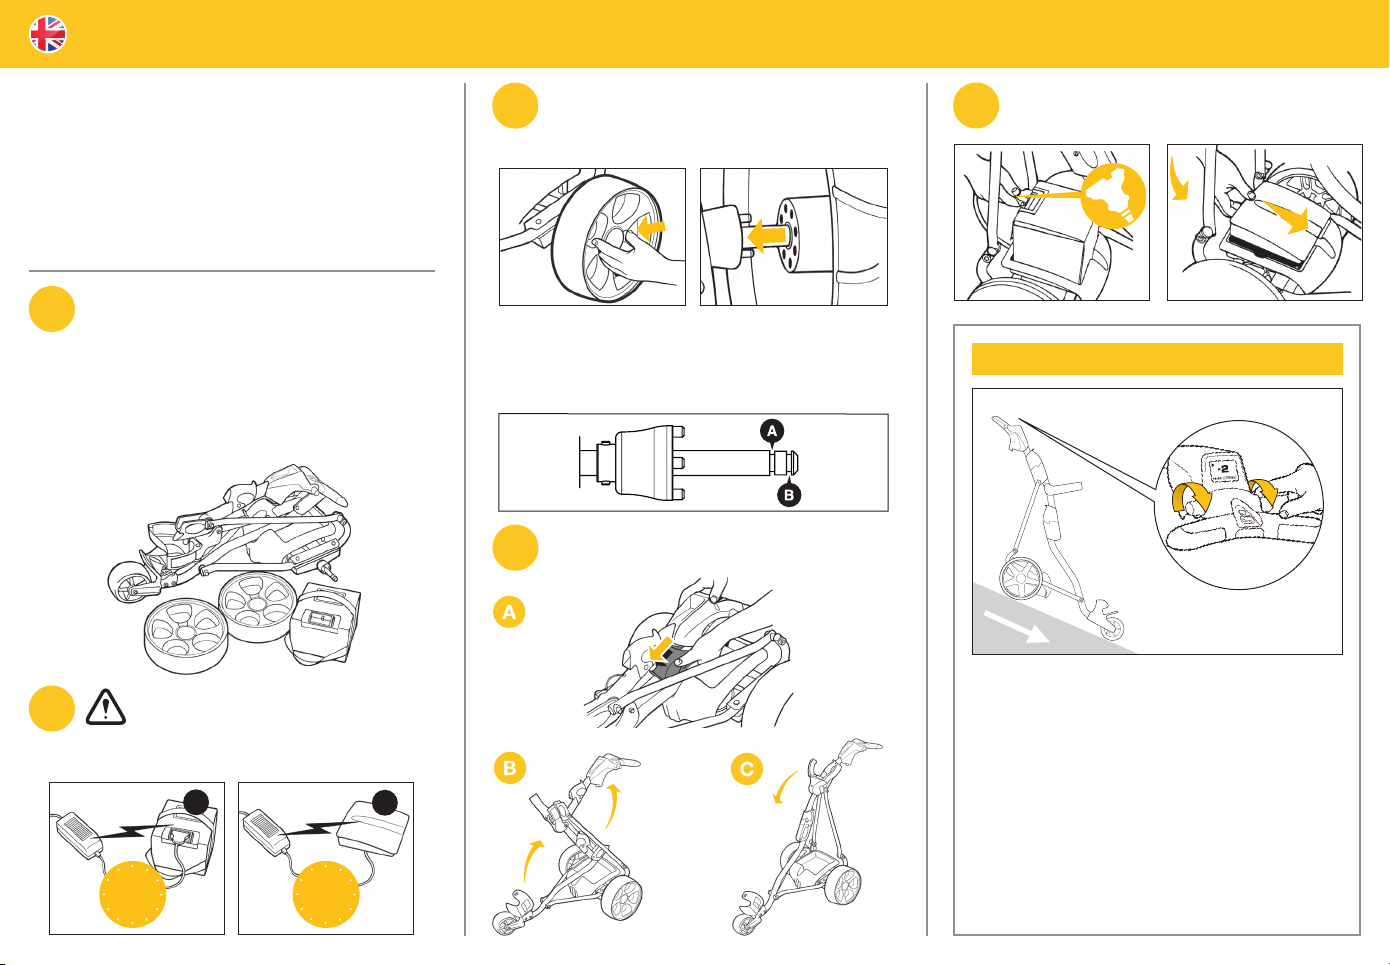
When you receive your new PowaKaddy Sport you
will have the following:
1
1x Trolley
1x Battery (Lead Acid or Lithium)
1x Charger (Lead Acid or Lithium)
2x Wheels
1x Instruction Pack
Please note: All 36 hole batteries will be sent in a
separate box.
Fitting your wheels.
3
Simply press the yellow button firmly, slide the
wheel onto the spindle and click home. The wheels
can go on either side of the trolley.
Wheel Positioning
Groove A. Wheels will be powered by the motor.
Groove B. Wheels will be free wheeling and not powered
by the motor.
The trolley erects to the ‘ready to use’ position in
three easy steps.
4
Once charged and with the trolley assembled,
connect your battery as shown. The lead acid battery
5
connector is offset so please connect correctly.
EBS MODELS ONLY
IMPORTANT: You must fully charge your
2
reduce the life of your battery. See battery care/warranty
instructions for more information.
battery for a minimum of 12 hours before
using your trolley. Failure to do so could
Pb
Li
12hr 12hr
Getting the most from your EBS trolley
1. Your EBS trolley uses a limited slip differential to
allow braking and give manoeuverability.
2. Try to avoid traversing hills as this will cause the
higher wheel to slip and spin.
3. If your trolley loses traction and the wheels spin, push
down on the handle to increase traction.
4. Engage braking progressively as you descend a hill.
5. Higher gearing on an EBS trolley gives excellent
torque up hills but top speed will not be the same as
a standard Sport trolley.
6. Extreme conditions and the use of winter wheels will
increase the drain on your battery. Always make sure
your battery is fully charged before playing.
2: Powering up your trolley
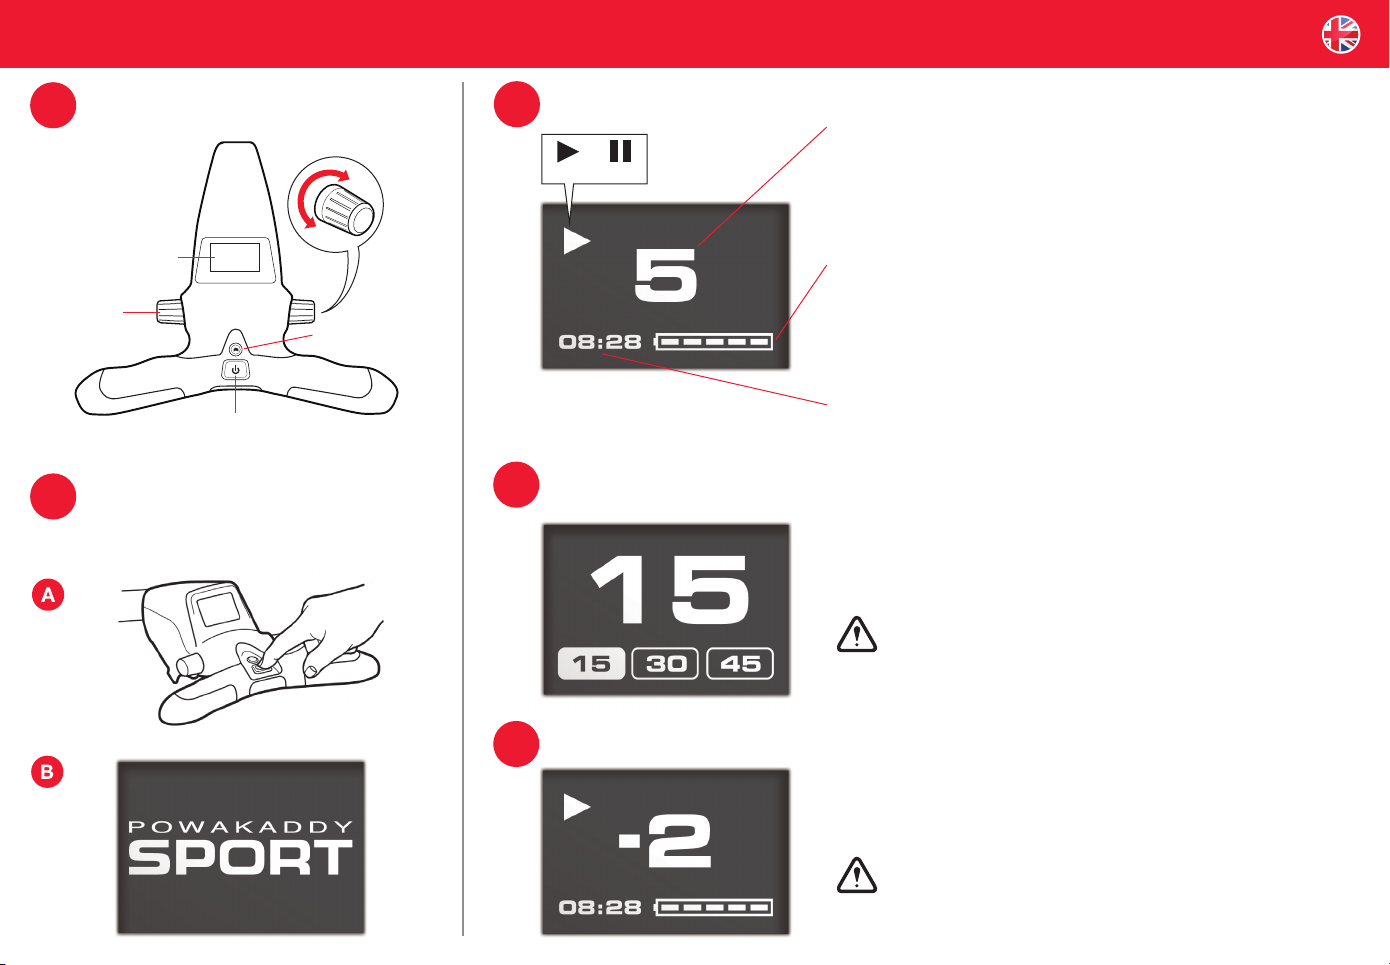
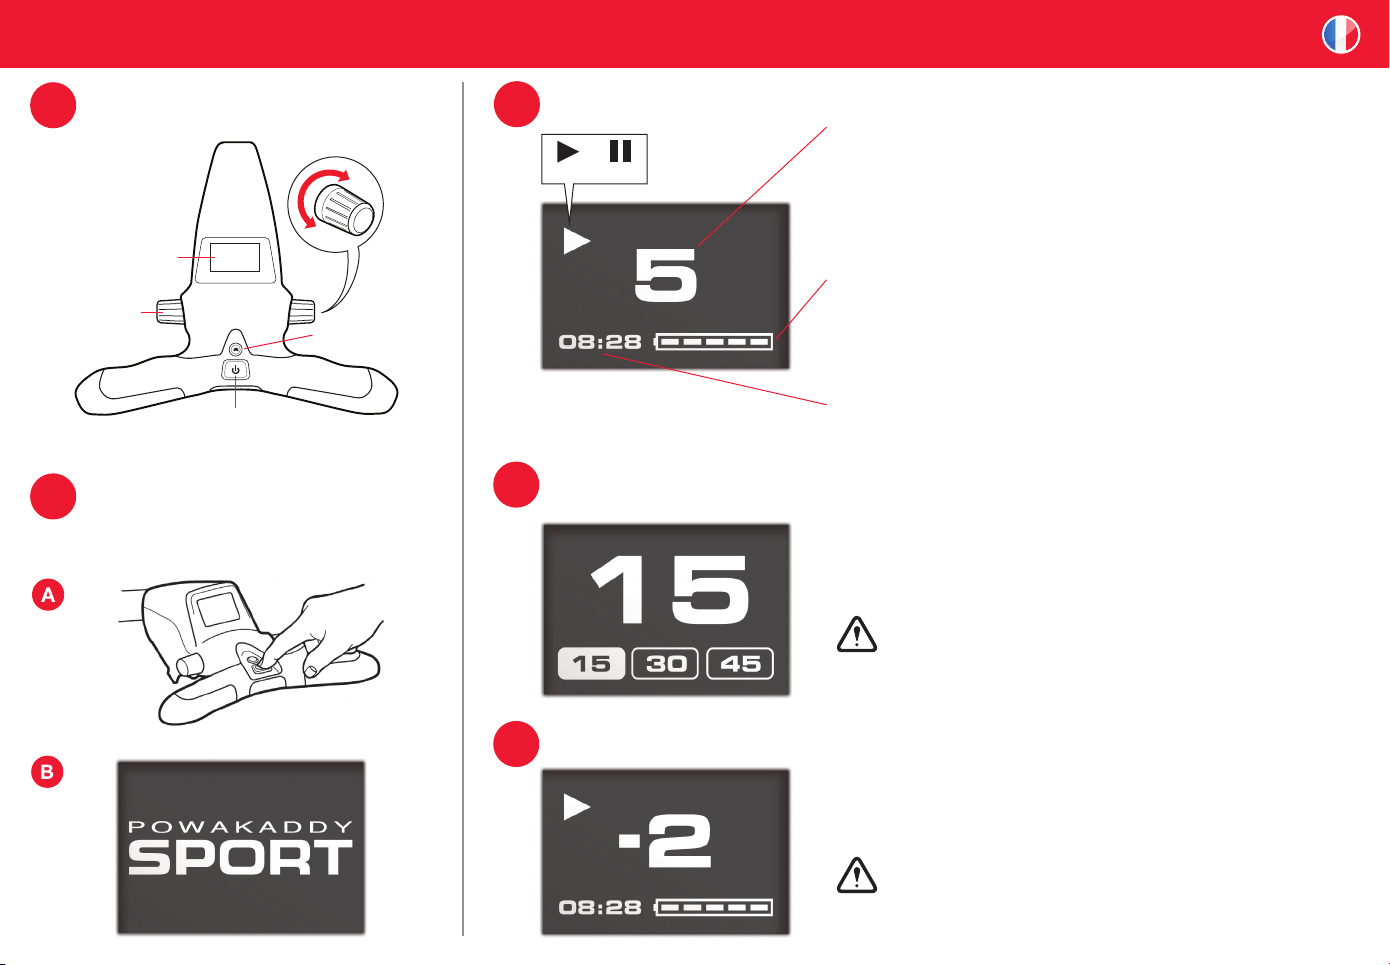
Getting to know your PowaKaddy Sports handle
features.
1
LCD Screen
Speed
Control
Roller
On/Off
Turning your trolley on for the first time. Press
and hold down the ‘On/Off’ button for 3 seconds
2
(See image A) until the PowaKaddy Sport logo
appears (See image B).
Distance
Function
Once the welcome screen has appeared you will then be presented with the primary screen.
3
Speed Display
or
Play Pause
Your new PowaKaddy Sport is fitted with a Digital Distance Function (DDF).
The DDF will allow your machine to proceed ahead of you for a pre-determined distance and speed, then stop.
4
This is adjusted from ‘0’–’9’ by operating the speed control rollers. Each speed
has 4 intervals, which means there are 33 speeds in total to choose from. Not
just 1-9 shown on the screen. The screen will display a pause icon when the
machine is stopped. When you press the ‘On/Off’ button the pause icon will be
replaced by a play icon and power will be applied to the motor at the requested
speed, then the machine will move off.
Battery Indicator
The battery indicator gives an indication of the battery condition. When fully
charged, 5 bars will be shown and a full 18 hole round can be expected, or 36
holes if using a 33Ah battery. It is normal for the display bars to reduce through
the round. Please note that the lithium battery is designed for 18 hole use.
Digital Clock
The digital clock can be set as explained in the ‘Programming Your Trolley’
section.
To begin press the ‘Distance Function’ button and the DDF screen
will be displayed, offering you a choice of 15, 30 and 45 yards/metres
approximately. Select your chosen distance using the ‘Distance Function’
button and then select using the ‘On/Off’ button.
IMPORTANT: Before using the DDF function you should ensure that
the route is flat and clear of obstacles (e.g water hazards, trees, other
golfers, etc).
If you have purchased the PowaKaddy Sport Lithium brake model you will have the added advantage of a
Electronic Braking System (EBS).
5
The Electronic Brake System is activated by rolling the speed control rollers
towards you until you go below zero, the display will then show between -1
and -3 dependant on the amount of braking required.
IMPORTANT: EBS is an assisted electronic braking system and not
a 100% parking brake. This should not be used as a parking brake or
to stop on steep slopes.
1 : Li
3 : L iPo
2 : Pb
1 : Li
Me tr e / Ya rd : Y
Ba tte ry Ty pe : Pb
Ge ar Box Ty pe : S
Tim e : 0 9 : 00
3 : L iPo
2 : Pb
1 : St anda rd ‘S ’ Bo x
2 : L SD Ge ar B ox
3: Programming your trolley
1 : Li
Time S et
05 : 46
Metr e / Ya rd : Y
Ba tte ry Ty pe : Pb
Ge ar Box Ty pe : S
Time : 0 9 : 00
3 : L iPo
2 : Pb
1 : St anda rd ‘S’ B ox
2 : L SD Ge ar B ox
1 : Li
3 : L iPo
2 : Pb
The PowaKaddy Sport has been factory set with
the required settings for your product type, and
1
should not need adjustments.
Should you need to change any of these options you can
edit them via the programming menu.
To enter the programming mode, disconnect the battery and
then reconnect it whilst simultaneously holding down the
‘On/Off’ button, after 5 seconds a programming screen will
be displayed.
Programming menu.
2
Use the roller to scroll between the categories
displayed and the ‘On/Off’ button to select.
Tim e : 0 9 : 00
Me tr e / Ya rd : Y
Ba tte ry Ty pe : Pb
Ge ar Box Ty pe : S
Setting the time.
3
Scroll and highlight the time category and then press
the ‘On/Off’ button to select. Now scroll towards
you to move along the digits and away from you to adjust
the highlighted field, once the time is set press the ‘On/Off’
button to return to the main menu.
Time S et
05 : 46
Clock battery replacement.
A lithium cell battery is fitted in the handle. The battery is
removable and should be disposed of in an appropriate
recycling facility. We strongly recommend that removal
or replacement should be done by a PowaKaddy Service
Agent.
Metres/Yards.
4
Scroll and highlight the metre/yard category and
press the ‘On/Off’ button to select. Use the roller to
highlight your preferred units and press the ‘On/Off’ button.
1 : Me tre
2 : Yar d
Battery type.
5
Using the roller highlight the category and then
press the ‘On/Off’ button to select. Use the roller
to select your battery type and press the ‘On/Off’ button.
Select ’PB’ for Lead Acid battery, ‘Li’ for Lithium Ion battery
and ‘LiPo’ for Lithium Ion Phosphate battery. It is important
that the battery setting is correct to ensure that the battery
indicator and low battery setting work properly.
1 : Li
2 : Pb
3 : L iPo
Gear Box Type.
Scroll and highlight the gear box category and then
press the ‘On/Off’ button to select. Use the roller to
highlight your preferred gear box and then press the ‘On/Off’
button. Select ’Standard ‘S’ Box’ for Lead Acid and Lithium
Sport and ‘LSD Gear Box’ for Sport EBS only.
1 : St anda rd ‘S ’ Bo x
2 : L SD Ge ar B ox
Once you have programmed your desired
settings, unplug the battery and the settings
will be saved.
IMPORTANT: If you have purchased the
‘PowaKaddy Sport Lithium’ its performance will
be noticeably greater and more powerful than
the ‘PowaKaddy Sport Lead Acid’.
Getting the best from your trolley:
Never: Use your trolley if any of the cables or
connections are damaged or frayed.
Never: Use a damaged battery.
Never: Use Digital Distance Function (DDF) on a
downhill slope.
Never: Jetwash your trolley. Use a sponge and soapy
water to clean.
Never: Air hose your trolley when wet.
Do: Remove the battery from the battery tray before
storing or transporting the trolley.
Do: Ensure that whilst in transit (car boot for example)
the battery cannot move around and that the
terminals of the battery cannot come into contact
with other metal objects/surfaces.
Do: Regularly check your trolley for signs of damage or
wear, all repairs must be carried out by an
authorised PowaKaddy Service Centre.
Do: Follow the instructions provided with your battery
and charger.
Contact us.
For more information please contact us below or visit
www.powakaddy.com
PowaKaddy International Ltd
Castle Road, Sittingbourne
Kent, ME10 3RN
Tel: + 44 (0) 1795 473 555
Fax: + 44 (0) 1795 474 586
Email: sales@powakaddy.com

4: Troubleshooting guide
Problem: No Power - motor does not run, screen
does not illuminate.
1
Solution:
1:1. Make sure the T connector is correctly inserted
into the lead acid battery.
1:2. Make sure the lithium battery contacts are not
damaged. If you believe the contacts have been
damaged, contact your local service agent as
these can be simply re-formed.
1:3. Check your battery is charged. All batteries
require charging for 12 hours before use and for
maximum life, batteries are best left on trickle
charge when not in use.
1:4. Check all leads are connected properly and
undamaged.
If the above doesn’t solve the problem contact
your nearest service agent.
Problem: Low battery icon comes on when you
power up your trolley.
2
Solution:
2:1. Ensure your battery is fully charged.
2:2. Check your trolley is correctly set for the type of
battery you are using (See section 3: Programming
your trolley > Battery type).
2:3. If possible check with a known good battery.
If the above doesn’t solve the problem contact
your nearest service agent.
Problem: Digital distance function is not accurate.
3
Solution:
3:1. The Digital Distance Function works on a timer
and distances are approximate, however the
distance will be 30% out if the trolley is
programmed for the wrong gear box. Check
that your trolley is set to the correct gearbox and
to yards or metres (See section 3: Programming
your trolley > Gear box type).
3:2. Distance will also vary on slippery or hilly terrain.
Problem: Clock will not keep time.
4
Solution:
4:1. The clock battery needs to be replaced (See
section 3: Programming your trolley > Setting
the time).
Please contact your nearest service agent.
Problem: The trolley will not run straight.
5
Solution:
5:1. Make sure both wheels are engaged with their
clutches.
5:2. The front wheel alignment can be easily adjusted
using a 13mm spanner. Simply loosen the bolt
and straighten the front wheel (See diagram).
If the above doesn’t solve the problem contact your
nearest service agent.
To find your nearest service agent please visit
www.powakaddy.com
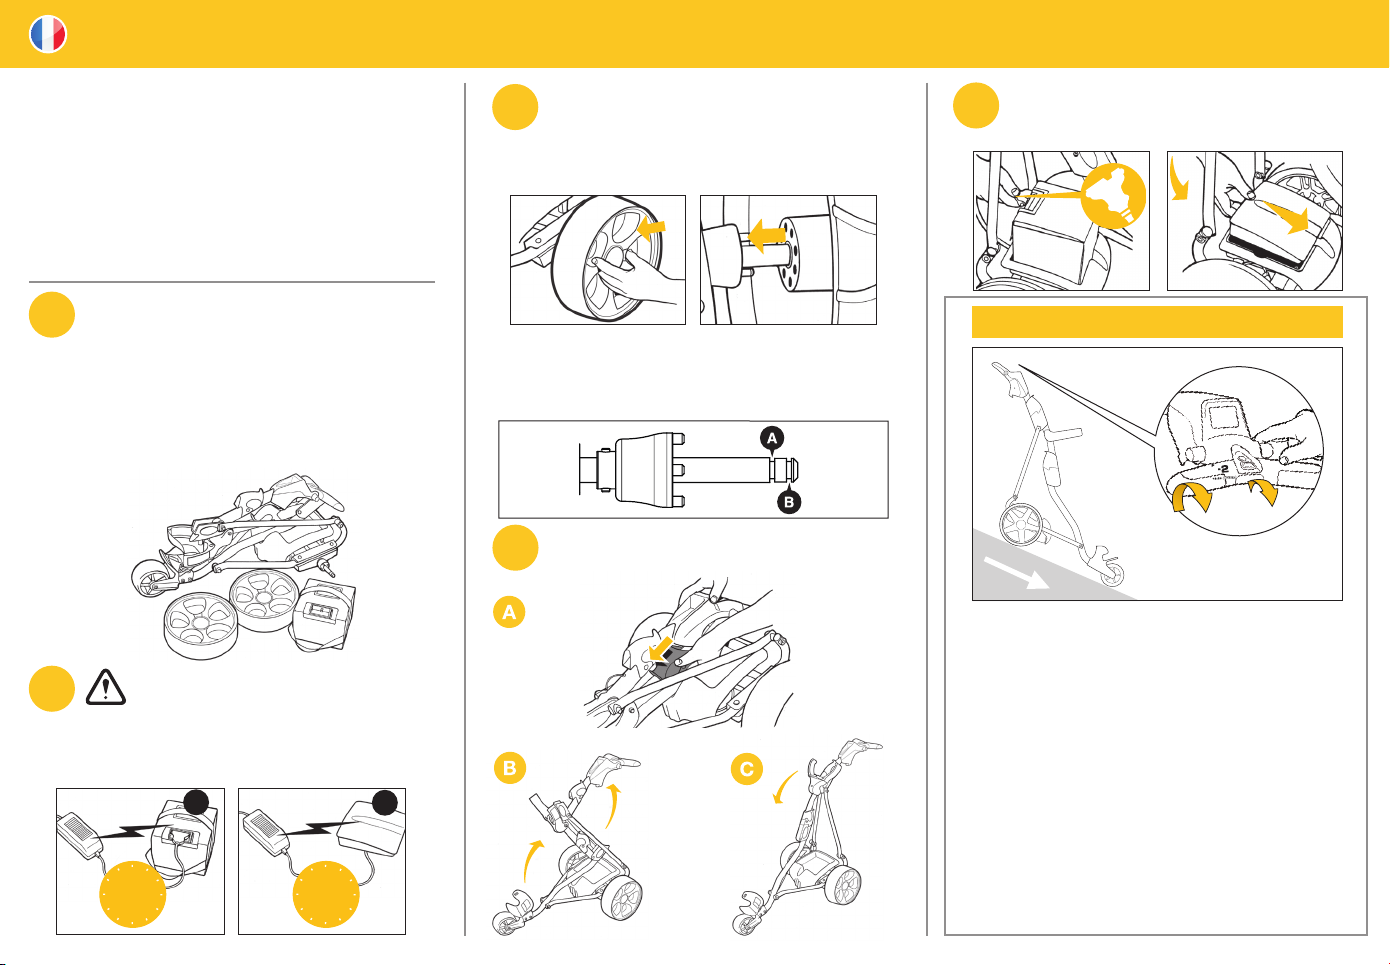
Warning Icons
The PowaKaddy Sport has three electronic protection
settings that will appear if activated.
What to do when you see one of the following screens:
Reset your trolley.
Contact your service
agent.
If the icons above appear please do the following:
Press and hold both buttons together and note the
error code displayed. This is useful to your service
agent should a problem persist.
Disconnect and reconnect the battery from your
trolley.
If the problem persists please contact your service
agent.
Your battery charge
is running low.
If the above doesn’t solve the problem contact
your nearest service agent.
1: Montage de votre chariot
PowaKaddy Sport
Manuel d’instructions.
Afin de garantir l’assemblage et le réglage corrects de votre
chariot de golf électrique PowaKaddy Sport, veuillez vous
référer aux instructions suivantes :
Étape 1 : Montage de votre chariot
Étape 2 : Mise en route de votre chariot
Étape 3 : Programmation de votre chariot
À la réception de votre nouveau chariot PowaKaddy
Sport, vous devez disposer des pièces suivantes :
1
1x Chariot
1x Batterie (plomb ou lithium)
1x Chargeur (plomb ou lithium)
2x Roues
1x Manuel d’instructions
Remarque : Les batteries 36 trous font
systématiquement l’objet d’un envoi séparé.
IMPORTANT : Avant d’utiliser votre chariot,
2
de cette consigne est susceptible de réduire la durée de vie
de la batterie. Reportez-vous aux instructions relatives aux
précautions d’emploi et à la garantie de votre batterie pour
davantage d’informations.
la batterie doit être complètement chargée
pendant au moins 12 heures. Le non respect
Pb
Li
12h 12h
Assemblage des roues.
3
Maintenez simplement le bouton jaune enfoncé
et faites glisser la roue à fond sur la tige jusqu’à
entendre un ‘ clic ‘. Les roues peuvent être installées aussi
bien d’un côté que de l’autre du chariot.
Positionnement des roues
Sillon A. Les roues sont entraînées par le moteur.
Sillon B. Les roues sont ‘ libres ‘ (et non entraînées par
le moteur).
Le chariot se déplie en position ‘ prêt à l’emploi ‘ en
trois étapes simples.
4
Une fois la batterie chargée et le chariot assemblé,
branchez la batterie comme indiqué.
5
Le connecteur de la batterie au plomb est décalé ;
veillez à le raccorder correctement.
MODÈLES EBS UNIQUEMENT
Optimiser le fonctionnement de votre chariot EBS
1. Votre chariot EBS utilise un différentiel à glissement
limité afin de permettre le freinage et la manœuvrabilité.
2. Évitez autant que possible de traverser des collines ;
cela pourrait entraîner le glissage et le patinage de la
roue supérieure.
3. Évitez autant que possible de traverser des collines ;
cela pourrait entraîner le glissage et le patinage de la
roue supérieure.
4. Engagez le freinage progressivement lorsque vous
descendez une colline.
5. L’embrayage supérieur des chariots EBS offre un
excellent couple dans la montée des collines mais la
vitesse maximale sera différente de celle d’un chariot
Sport standard.
6. Le fonctionnement en conditions extrêmes ainsi
que l’utilisation de roues d’hiver augmentera la
consommation de votre batterie. Assurez-vous
systématiquement que votre batterie est complètement
chargée avant de jouer.
2: Mise en route de votre chariot
Familiarisez-vous avec les fonctionnalités
de la poignée de votre chariot PowaKaddy Sports.
1
LCD Screen
(Écran LCD)
Speed
Control Roller
(
Roulette de contrôle
de la vitesse)
Première mise en route de votre chariot.
Maintenez le bouton ‘ Marche/Arrêt ‘ enfoncé
2
pendant 3 secondes (voir image A) jusqu’à ce que
le logo PowaKaddy Sport apparaisse (voir image B).
On/Off
(Marche/Arrêt)
Distance
Function
(Fonction de Distance)
Une fois passé l’écran d’accueil, vous vous trouverez face à l’écran principal.
3
Affichage de la vitesse
ou
Marche Pause
Votre nouveau chariot PowaKaddy Sport est équipé d’une Fonction de Distance Numérique (FDN).
Celle-ci permet à votre appareil d’avancer devant vous sur une distance et à une vitesse prédéterminées, puis
4
de s’arrêter.
La vitesse est réglable de 0 à 9 au moyen des roulettes de contrôle de la vitesse.
Chaque vitesse dispose de 4 intervalles, ce qui signifie que vous pouvez
choisir entre 33 vitesses au total. L’écran n’indique pas uniquement une valeur
comprise entre 1 et 9. Il affiche également un témoin ‘ Pause ‘ lorsque l’appareil
est arrêté. Lorsque vous appuyez sur le bouton ‘ Marche/Arrêt ‘, le témoin
‘ Pause ‘ est remplacé par un témoin ‘ Marche ‘, le moteur est mis en marche à
la vitesse sélectionnée et l’appareil commence à se déplacer.
Indicateur de batterie
L’indicateur de batterie vous informe de l’état de la batterie. Lorsque celle-ci
est complètement chargée, 5 barres sont affichées, vous permettant de réaliser
un parcours 18 trous entier, ou 36 trous si vous utilisez une batterie 33Ah.
Il est normal que le nombre de barres indicatrices de batterie diminue au fil
du parcours. Notez que la batterie lithium est conçue pour une utilisation 18
trous.
Horloge numérique
L’horloge numérique peut être réglée en suivant les explications contenues
dans la section ‘ Programmation de votre chariot ‘.
Pour l’activer, appuyez sur le bouton ‘ Fonction de Distance ‘ ; l’écran
FDN apparaîtra, vous permettant de sélectionner une distance d’environ
15, 30 ou 45 yards/mètres. Choisissez la distance souhaitée en utilisant
le bouton ‘ Fonction de Distance ‘, puis sélectionnez-la à l’aide du bouton
‘ Marche/Arrêt ‘.
IMPORTANT : Avant d’utiliser la fonction FDN, assurez-vous que
le passage est plat et libre d’obstacles (obstacles d’eau, arbres,
autres golfeurs, etc.).
Si vous avez fait l’acquisition d’un modèle de freinage PowaKaddy Sport Lithium, vous pourrez de plus profiter
des avantages du système de freinage électronique EBS (Electronic Braking System).
5
Le système de freinage électronique EBS s’active en faisant tourner les
roulettes de contrôle de la vitesse dans votre direction. L’écran affiche alors
une valeur comprise entre -1 et -3 selon l’importance du freinage requis.
IMPORTANT : L’EBS est un système de freinage électronique assisté
et non un frein à main 100 %. Il ne doit pas être utilisé comme frein
à main ou pour arrêter l’appareil dans des pentes abruptes.
 Loading...