

Page 1

OWNERS INSTRUCTION GUIDE
Freeway and
Classic Legend Models
Page 2

Index
Page 1 Freeway Assembly Instructions.
Page 2 Getting to know your Freeway.
Page 3
Freeway/Classic Legend with Distance Function (E.D.F.)
Page 4 Freeway with Electronic Braking (E.B.S.)
Page 5 Freeeway Sports Digital.
Page 6 Freeway Sports Digital Distance Control.
Page 7 Classic Legend Assembly.
Page 8 Getting to know your Classic Legend.
Page 9 Battery Care - All Models.
Page 11 Maintenance – All Models
Page 12 Questions and Answers - All Models.
GB
PowaKaddy UK Customer Services 01795 473555
Page 3
Freeway Models
Getting to know your Freeway
2
When switching on your Freeway, check that the rotary control switch is at
zero, the furthest point anticlockwise and then turn on the on/off rocker switch.
Now apply the power slowly by turning the speed control knob in a
clockwise direction (away from you).
N.B your PowaKaddy is fitted with a safety cut out that checks the
machine to ensure safe operation, should the machine not function on the
first attempt, disconnect the battery, turn the rocker switch off and the
rotary control to zero. Connect the battery and proceed as above.
To switch off, either use the on/off rocker which when turned on again will
resume at the trolleys finishing speed or use the rotary control switch to
reduce speed and stop as required.
Relax and enjoy your game, by adjusting the speed to your walking
pace, on flat fairways, leave the machine to travel freely.
To fold the Freeway for convenient storage fold the upper bag stay
upwards towards the upper handle tube, now release both spring
catches and fold flat, the last 5cm of travel clicks the hold down catch
into place, if required ease the spring clip forward to assist engagement.
Your Freeway is supplied with the wheels engaged and ready to work.
Should the need arise, it is possible to disengage the wheels to an outer
position in order to free wheel easily. Simply release the yellow “pip”
catch on the wheel and pull the wheel away from the machine until it
clicks into the outer groove.
Please note that your Freeway will not work electrically in the outer position.
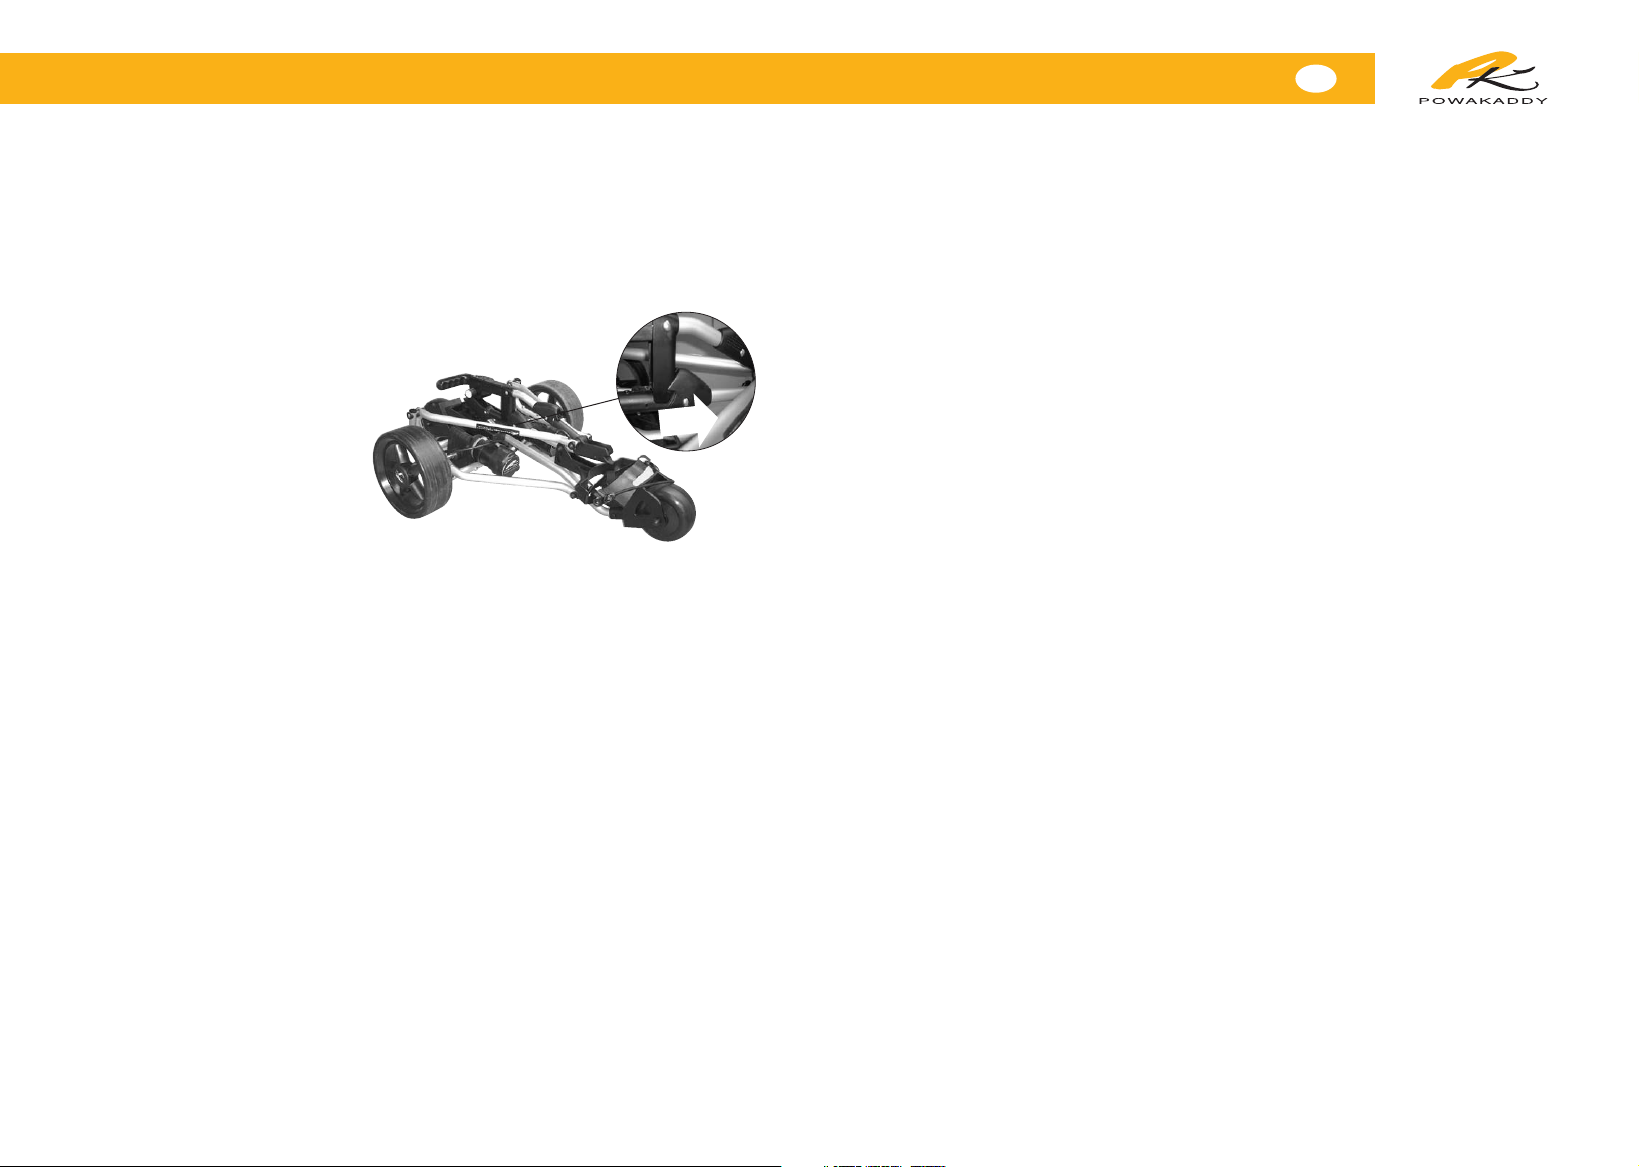
Your trolley is supplied factory adjusted to go straight. Should the need
arise, there is adjustment available via slots in the front wheel housing.
Simply remove the nut covers, losen the nut and adjust as required.
Refer to your specific model instructions for further details
Your new PowaKaddy Freeway comprises of three parts, the main body
of the trolley the battery and the charger.
With the main section flat on the
floor, stand behind the trolley.
Release the locking catch
beneath the handle by sliding
it forward, at the same time lift
the main handle.
As the handle reaches the
“in use” position, the main
shaft will “click” and lock into
place. Once both catches have
locked into position lower the upper bag stay into place.
Place the battery into the battery bag supplied. The best way to do this is
to lay the battery flat on the floor with the connecting clip downwards and
away from you. Now feed the bag over the battery and fasten the Velcro.
Sit the battery into the moulded battery tray with the connector facing left
or right. Using the strap attached to the battery tray fasten the battery to
the tray firmly. Never allow this strap to hang loose beneath the machine
while in operation, should it get caught it will cause irreparable damage.
Check that the on/off rocker and the rotary control switches are both off.
Carefully insert the T-shaped plug into the socket on the battery, note that
it will only fit one way round, this ensures maximum safety and avoids
reverse polarity.
NOTE:
Never lift your Freeway by the handle when in the closed position, this
will cause undue pressure on the holding catch.
General Assembly instructions for all Freeway models
1
GB
Page 4

EDF (Electronic Distance Function) Models
4
If you have selected either the Freeway or Classic Legend with EDF you
will need to read the following guidelines in order to get the best from
your PowaKaddy.
Please note that this is a factory fitted option and not available after sale.
Your PowaKaddy is fitted with an electronic distance function in order to
give you more freedom on the course. With a little practice you will be
able to set your machine off to your desired location whilst you relax and
concentrate on your next shot.
The handle has an additional Green push button to those already
described on previous pages.
After setting up your machine as previously described, turn the on/off
rocker switch to “on”, now you have three choices of distance: 15 metres,
30 meters or 45 meters (all approximate). One push of the distance
button gives the lower distance two presses the middle distance whilst
three presses gives the longest distance.
Note, Pressing the button 4 times will activate a safety cut-out on the EDF
system; this can be reset by disconnecting the battery.
Practice makes perfect, so try the shorter distance first and note the
following safety guidelines-
●
NEVER press the EDF button when the trolley is in motion.
●
Practice in an open area away from people or property.
●
Never aim the machine at people or property.
●
Never aim your machine at hills, up or down.
●
Avoid traversing a slope without offering support.
●
Never send your machine where it will go out of sight.
●
Support will be needed on undulating terrain.
EBS (Electronic Braking System)
3
If you have chosen the Freeway with EBS (Electronic Braking System)
you will need to read the following instructions to get the most from your
Freeway.
The Freeway EBS is fitted with a differential gear box and an additional
Red push button on the handle.
The differential gear box gives easier manoeuvrability and as an
additional benefit will, with the on/off switch off, stop the machine free
wheeling effectively working as a partial brake.
The “Brake” button reduces the speed of the trolley giving an effective
downhill brake. To activate the brake press the button down and hold
until you wish to release the brake.
Note, as soon as the brake button is released the trolley will revert to its
previous speed.
In some cases the most effective way of braking will be to tap the brake
button in succession.
The Freeway EBS cannot ‘freewheel’ in normal operation, should you
wish to freewheel your machine you will need to relocate both wheels
onto the outer groove of the axle as follows -
Depress the yellow “pip” catch on each wheel and pull the wheel
outwards about 5mm until it clicks into the outer groove.
Please note that your PowaKaddy will not work electrically with the
wheels in the outer position.
Practice using the brake before your first round, get used to the severity
of the brake and learn how and when this valuable feature can improve
your caddying experience.
Please note that the EBS system is not available on the standard Freeway
or Classic Legend models as an option after purchase.
Freeway Models
GB
Page 5

Freeway Sports Digital Distance Control
Your new Freeway Digital Sport is supplied with a distance function,
this allows you to send the machine off to pre determined distances,
the following instructions will help you to get the best from this valuable
feature.
With the digital display flashing, press and hold in the rotary control
switch for about 2 seconds, the display will turn to a flashing “F” for
function now release the knob. The “F” will flash for about 3 seconds,
during this period you can press the knob again either once, twice or
three times, each push will be registered by the display with either a
1, 2 or 3. The numbers relate to 15 metres for 1, 30 metres for 2 and
45 metres for 3 (all distances are approximate).
The machine will now take itself forward by the desired distance. During
travel you can adjust the speed by rotating the rotary control knob or you
can stop the timer function by pressing the knob in once at any time.
With a little practice you will be able to set your machine off to your
desired location whilst you relax and concentrate on your next shot.
Practice makes perfect, a bit like golf really, so try the shorter distance
first and note the following safety guidelines-
●
Practice in an open area away from people or property.
●
Never aim the machine at people or property.
●
Never aim your machine at hills, up or down.
●
Avoid traversing a slope without offering support.
●
Never send your machine where it will go out of sight.
●
Support will be needed on undulating terrain.
Getting to know your Freeway Digital Sport
When you have connected and secured the battery, the digital display
will flash “0”; this indicates that your machine is off but ready for use. By
rotating the rotary control, the numbers in the display will change; these
numbers are directly related to the speed of the trolley. All the time that
the display is flashing, no power will reach the motor.
The rotary control switch also has a push
function, a quick push will turn the flashing
display into a solid one, practice this in the
zero position.
With the display solid (not flashing) apply the
power slowly by turning the speed control
knob in a clockwise direction (away from you),
you will notice the numbers increase and the
trolley will move forwards, the maximum speed
is achieved at speed nine. When you reach
your desired destination, either slow the cart to
zero or simply tap the end of the rotary control to turn the machine off,
this will turn your solid display into a flashing display.
NOTE:
The rotary control switch has no end stop, it will keep moving in both
directions, however, the display will show the minimum of zero and the
maximum of nine.
Relax and enjoy your game, by adjusting the speed to your walking
pace, on flat fairways, leave the machine to travel freely.
NOTE:
Avoid accidentally turning on/off your Freeway Digital sport by unintentionally
pushing the end of the rotary control switch whilst holding the handle.
SPORTs DIGITAL
65
GB
Page 6

Getting to know The Classic Legend
When switching on your Classic Legend, check that the rotary control
switch is at zero, the furthest point anticlockwise and then turn on the
on/off rocker switch. Now apply the power slowly by turning the speed
control knob in a clockwise direction.
N.B. your PowaKaddy is fitted with a safety cut out that checks the
machine for safe operation, should the machine not function on the first
attempt, disconnect the battery, turn the rocker switch off and the rotary
control to zero. Connect the battery and proceed as above.
To switch off, either use the on/off rocker which when turned on again will
resume at the trolleys finishing speed or use the rotary control switch to
reduce speed and stop as required.
Relax and enjoy your game by adjusting the speed to your walking pace,
on flat fairways, leave the machine to travel freely.
On hills or rugged ground guide the PowaKaddy to your intended
destination.
When taking your Classic Legend apart, always disconnect the battery
first and then remove the jack plug from its socket, failure to do this will
result in damage to the cable.
Your trolley is supplied factory adjusted to go straight. Should the need
arise, there is adjustment available via slots in the front wheel housing.
Simply remove the nut covers, losen the nut and adjust as required.
8
Assembling your Classic Legend
7
With practice, your PowaKaddy will take less than 20 seconds to
assemble.it comprises of 5 components:
– The Main chassis section – The front wheel unit
– The handle unit – The battery – The charger
Locate the plunger at the front of the chassis unit and lift the knurled cap.
Insert the front wheel tube with the locating hole facing uppermost,
release the plunger, locking the tube firmly in place.
Take the handle unit and insert the notched end into the round neck of
the chassis, ensure that the notch is located within the chassis and then
tighten the locking collar firmly, now connect the jack plug lead from the
base of the handle by inserting it fully home into the socket on the back
of the chassis.
Place the battery into the battery bag supplied. The best way to do this is
to lay the battery flat on the floor with the connecting clip downwards and
away from you. Now feed the bag over the battery and fasten the Velcro.
Sit the battery into the moulded battery tray with the connector facing the
handle. Check that the on/off rocker and the rotary control switches are
both off. Carefully insert the T-shaped plug into the socket on the battery,
note that it will only fit one way round, this ensures maximum safety and
avoids reverse polarity.
Push the upper bag stay on the handle firmly downwards against the
main tube. Now put your bag squarely onto the machine and fasten the
elastic base strap and the webbing upper strap firmly.
Your Classic Legend is supplied with the wheels engaged and ready to
work. Should the need arise, it is possible to disengage the wheels to an
outer position in order to free wheel easily. Simply release the yellow
“pip” catch on the wheel and pull the wheel away from the machine until
it clicks into the outer groove.
Please note that your Classic Legend will not work electrically in the
outer position.
Classic Legend Models
GB
Page 7

Complete Guide to Battery and Charger Care
Your battery should always be charged with its lid uppermost, in practical
terms this is when the vent strip is uppermost and Crisscross pattern is
underneath (Sonnenschein) or lid with + and - (Yuasa) is uppermost. If your
battery is in a PowaKaddy battery bag, the see through business card
pocket should be uppermost.
These lead-acid cyclic batteries use the latest technology to immobilise the
electrolyte in the battery. This makes them very safe to use and maintenance
free for the whole of their serviceable life.
The battery must be put on charge for a period of 24 hours, this will "activate"
the battery. You will find that the "charge complete" light comes on before the
24 hours are up, you must keep the battery on charge.
The battery must only be used for a maximum 18 holes (unless you have a
36 hole battery)after which time the battery should be re-charged as soon as
possible (within a 24 hour period). Playing more than 18 holes could over
discharge the battery to the point of damage.
Leave the battery connected to the charger with the mains supply switched on
all the time the battery is not being used. If you prefer not to leave your battery
on charge as you know that you will not be playing for at least a month, you
can store the battery. Fully charge the battery, remove from the charger and
store in place where the ambient temperature is above 10 degrees Celsius
(+10˚C) and less than 30 degrees Celsius (+30˚C). Recharge every 3 months
or 24 hours before your next round.
When charging the battery do not place the battery on a concrete floor, have
the battery raised off the floor on wooden blocks or place the battery on a shelf.
The batteries used by PowaKaddy are NOT nickel-cadmium, you should
never fully discharge the battery with a light bulb or other means. This will, if
done, cause severe damage to your battery and if the voltage has fallen
below 9 Volts the charger will not be able to recover the battery.
The life of the battery will depend on several variables:
1) Frequency of use.
2) Number of holes played each round.
3) Type of course, flat or hilly.
4) Weight of bag and clubs.
5) Compliance to all of the attached recommendations.
109
All Models
GB
The chargers used with all PowaKaddy products are specially designed to
charge the battery at optimum levels. The unit is very simple to use - simply
plug the charger into the battery and switch on the mains. Before using the
charger, read all the instructions and cautionary markings on the rear of the
charging unit and instructions supplied.
Do not expose the charger to any form of moisture. Place on a hard surface in
a well ventilated area. Do not use in a sealed container or cover the ventilation
slots, and do not operate the charger on carpet or similar soft material.
If you disconnect the battery or interrupt the power supply the charger will
automatically assume that a different battery has been attached and take it
through the 6.5 hour charging cycle again, please avoid this.
Hints and Tips
Always charge the battery with its lid uppermost.
Always connect the battery to the charger before connecting to the mains.
Always put your battery on charge as soon as you return from the golf club.
Always keep your battery on charge all the time it is not being used.
Always have your charger regularly checked. (Ideally each time you buy
a new battery)
Always keep your battery and charger in a dry place.
Always recharge your battery after every round, even if you've only
played 5 holes.
Always charge in a well ventilated area.
Never play more than 18 holes of golf from one charge.
Never drop the battery or allow it to roll around in your car boot.
Never leave the charger switched off with the battery connected.
Never operate the charger with a damaged lead.
Never fully discharge the battery.
Never leave the battery in a discharged condition; recharge as soon
as possible.
✔
✘
Page 8

All Models
GB
11 12
Questions and Answers
Q. Will I damage my battery if I leave it on charge indefinitely.
A. No, in fact it is recommended that you do so.
Q. Is the efficiency of the battery impaired if it is used every single day?
A. No, so long as the full charging cycle of at least 12 hours has been
adhered to.
Q. How do I store my battery in Winter or when I am not able to play for a
month or more and would prefer not to leave it on charge?
A. Charge your battery fully for at least 12 hours, now remove from charge
and store at room temperature. Mark the battery and your diary with a
date three months forward. On that date recharge again for a minimum
of 12 hours.
Q. Will I harm my battery if I play more than 18 holes of golf?
A. Yes, the life of your battery will be adversely affected if you play more
than 18 holes unless you have a 36 hole battery.
Q. Would you recommend buying an additional battery?
A. Yes, but only if you play more than 18 holes at a time, in which case,
it is also recommended that you have two chargers. Consider buying a
36 hole battery.
Q. How long will my battery last?
A. This will depend on use, type of course, trolley and bag weight and the
charging regime. Following the guidelines on page 10 will assist you in
getting a long and effective life.
Q. Who can help me with servicing or problems with my machine?
A. We have a network of service agents up and down the country who will
be happy to help, a list was provided with your new machine. A full list is
available from our Website at www.powakaddy.com.
Maintenance – All Models
It is worth remembering that a four hour round of golf played once a
week for 12 months is the equivalent to around 4 years use of a
lawnmower. The steps below will help you to get a long and reliable life
from your PowaKaddy.
To keep the machine clean, use a mild detergent and warm water, never
use a high powered pressure washer.
Clean out any debris from the front wheel housing after every game and
wipe away any excess moisture.
Remove the main wheels periodically by depressing the spring clip and
pulling off. Now clear away any debris etc that may cause the wheels
to drag.
Before putting the wheels back on, wipe the spindle and lightly grease,
now put the wheels back on.depressing the spring clip and locating
firmly in the groove.
Never lubricate the Clutches with any type of oil or lubricant spray. This
will do more harm than good.
Every 6 months or so give your machine a thorough check over and
report any symptoms of wear to your local PowaKaddy service agent.
Once a year take your PowaKaddy to your local service agent for its
annual service.
All of these points will help keep your PowaKaddy in tip top condition
and ensure that it remains your reliable partner.
You can get useful hints and tips from our Website at
www.powakaddy.com
Page 9

OFFICIAL CART
SUPPLIER
PowaKaddy International Ltd
Sittingbourne Industrial Park, Sittingbourne
Kent ME10 3JH England
Tel: (01795) 473555 Fax: (01795) 474586
E-mail: sales@powakaddy.com
Website: www.powakaddy.com
 Loading...