

Page 1

OFFICIAL CART
SUPPLIER
PowaKaddy International Ltd
Sittingbourne Industrial Park, Sittingbourne
Kent ME10 3JH England
Tel: (01795) 473555 Fax: (01795) 474586
E-mail: sales@powakaddy.com
Website: www.powakaddy.com
OWNERS INSTRUCTION MANUAL
RoboKaddy
Page 2

Index
Page 1 Assembly.
Page 3
Handset information
Page 5 RoboKaddy hints and tips.
Page 6 Special Features.
Page 7 Straight line running.
Page 8 Questions and Answers.
Page 9 Trouble Shooting.
Page 11 Remote Control Detail.
Page 12 Maintenance.
Page 13 Complete Guide to Battery and Charger Care.
RoboKaddy
This device complies with Part 15 of the FCC Rules. Operation is
subject to the following two conditions:
1. This device may not cause harmful interference,
and
2. This device must accept any interference received, including
interference that may cause undesired operation.
This machine is designed solely for the transportation of golf
equipment on a golf course.
Changes or modifications not expressly approved by Powakaddy
Limited could void the users authority to operate the equipment.
Page 3
RoboKaddy
l
As the handle reaches the “in use” position
the mechanism will “click” and lock into
place. Once locked in, lower the upper bag
stay into position. Now fit the zero tip wheel
by placing the wheel housing on the rear
tube and pulling the plunger, allow the plunger
to click into place.
l
Screw the antenna into the screw terminal on the handle.
l
Using the carry strap, carefully place a fully charged battery into the
RoboKaddy battery tray with the lead connector facing the right hand
side of the trolley.
NOTE: All of the RoboKaddy system LED’s will illuminate to produce a short
“lamp test” when the battery is first connected.
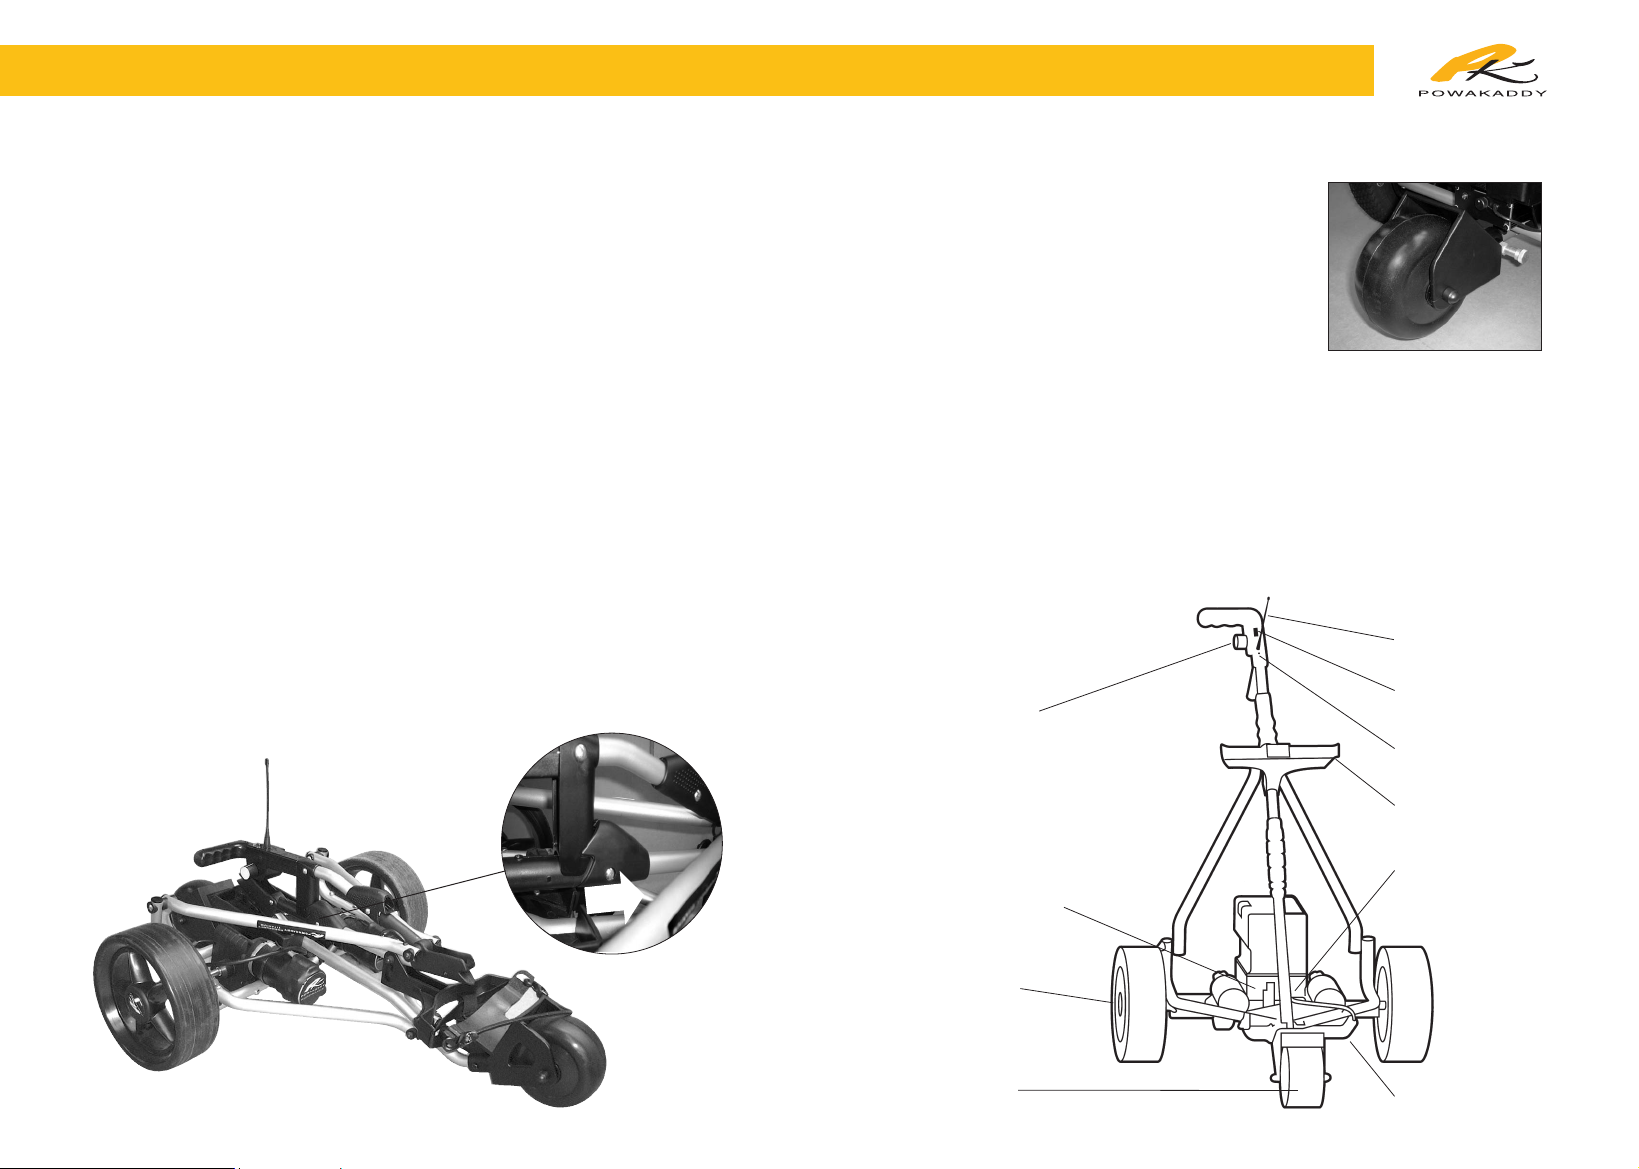
Parts Identification
Antenna
Rotary Speed
Control Knob
Wheel
Spring Clip
Battery
Connection
Lead
Base Power Unit
under battery tray
Front Wheel
Assembly
Lower
Bag Stay
Handle LED Indicator
Manual/Remote
rocker switch
Upper Bag Stay
Assembly
Thank you for purchasing a PowaKaddy RoboKaddy.
Your RoboKaddy is factory programmed and ready for use. However, please
take time to read this manual and practice the various controls before your
first game.
l
Before you do anything else, please put your battery on charge for at
least 24 hours to activate it. To do this, connect your charger to the battery with the special PowaKaddy Interconnect lead. Now plug the charger
into the mains and leave for 24 hours to activate it.
l
Meanwhile, take time to read this manual and learn about your exciting
new purchase. For a “Quick Start” use the card inside the back cover of
this guide.
l
The PowaKaddy RoboKaddy compromises of a one piece machine that
“snaps” into place in two easy moves, an antenna, handset, zero tip
wheel, battery and charger.
l
With the main section flat on the floor, stand behind the trolley, release the
locking catch beneath the handle by sliding it forward as shown and
pulling up on the main handle.
1 2
Page 4

RoboKaddy
3 4
Transmitter Information
IMPORTANT
PRACTICE IN AN OPEN SPACE AWAY FROM OBSTRUCTIONS
Study your handset and learn the functions below. Later in this manual you will
find some advanced features. The ones below, however, will get you started.
Connect the battery and push the Manual/Remote switch to Remote (I) the
LED will switch from red to green. NOTE: If the battery is connected with the
rotary speed control turned up the machine will remain stationary and the
handle LED will flash red and green until enabled by first winding the rotary
speed control back to zero.
NOTE:
By starting the machine with either the left or right keys the RoboKaddy will
turn on the spot and stop as soon as you release your finger. This is ideal for getting
out of a tight corner. Please be aware that should the machine hit any obstruction in
this mode, you will need to help it out manually. Continuing to attempt the pirouette
when the RoboKaddy is stuck will result in damage to your machine.
Brake Keys –
There are two ways of stopping your RoboKaddy, for a gentle
controlled stop press the off key . For an emergency stop, press the central
emergency stop button .
Reverse –
Reverse is achieved by pressing either the off or emergency stop
keys and then pressing the minus key. Once in reverse you can steer left and
right too. Reverse has only one preset speed. To go into forward mode, you must
first press the off or emergency stop key.
l
Your RoboKaddy handset has been designed for ease of use whether you
are left or right handed.
l
Take time to practice the difference between a single touch of the key and
a prolonged push especially with left and right functions.
l
The clip on the back of the handset makes it ideal for clipping to a pocket
or belt. Don't store it in your pocket in case you accidentally engage any of
the remote modes.
l
Never store the handset in a pocket with, for instance, loose change.
Never allow the handset to get immersed in water.
l
The handset takes a replaceable 9 volt battery, you will need to remove the
two small screws on the back in order to replace it.
NOTE: Do not use a rechargeable battery in the hand set as these batteries
do not give sufficient voltage for this hand set.
The rate at which course correction, i.e. left/right, is achieved will depend on
course conditions, speed and weight of the loaded bag.
Press this key once and the
RoboKaddy will start to move
in a forward direction. Keeping
your finger on the key will take the
RoboKaddy to maximum speed. As
soon as you release your finger the
RoboKaddy will continue at that speed.
Press this key to slow down
your RoboKaddy. As soon as
you release your finger the
RoboKaddy will continue at that speed.
Please note that this key will not stop
the trolley, it will take it only to the slowest speed.
A gentle push of this key will
turn the RoboKaddy left and
then continue straight in the
new direction. A prolonged push will
result in a tighter turn. You may have to
practice this to perfect it as load and
surface will affect the turn.
To turn right, the procedure is
exactly the same as described
in “left arrow”. Ensure you
practice both ways.
LED, flashes red
with transmission
Emergency stop
Gentle stop
and off
Left turn
or pirouette
Right turn
or pirouette
Slower or reverse
Forward or faster
ROBOKADDY
To operate the machine manually, ensure the rotary control knob is at zero
and turn the rocker switch to Manual (0), the red light on the handle will illuminate.
By turning the rotary control switch forward the machine will speed up.
You can now use like a conventional electric trolley.
Page 5

RoboKaddy
RoboKaddy hints and tips
To get the best from your RoboKaddy the following hints and tips should
be followed –
l
Practice using your RoboKaddy away from obstructions. It is worth
practicing with your golf bag fitted and on grass. The machine will react
very differently on a car park surface without a bag.
l
Do not overload the base pockets of your golf bag. The more weight on
the front wheel of the machine the less maneuverable it will be and it will
use more power from the battery.
l
The RoboKaddy is a sophisticated machine and will
carry your clubs across most normal
golf course terrain. However, it will
not operate properly if
asked to emulate a
mountain goat!
Wherever the terrain is
difficult, move to manual mode.
l
Should the machine get caught against
an obstruction, please stop and either reverse
or use manual mode. This is particularly
important when using the left/right keys
whilst stationary. If you keep trying you will
overload the motors.
l
Do not keep your finger pressed on any
key for more than 5 seconds as this could
cause damage to your RoboKaddy.
Special Features
Your RoboKaddy is fitted with some special features to give you maximum control
and adaptability. You will not need them often. However it is worth reading the
instructions now to familiarise yourself with the range of features available to you.
LED Signal Indicators
Your RoboKaddy is fitted with three sophisticated LED signal indicators one on
the handset, one on the handle and one on the base controller under the battery
tray. These will help you to diagnose any problems.
Handle:
l
RED Manual control mode (potentiometer).
l
GREEN Remote Control Mode.
l
FLASHING RED/GREEN Manual mode entered with rotary control knob
not set to zero. Return potentiometer to zero to enable Manual control.
Base Power Unit:
l
FLASHING GREEN Unit ready with no errors.
l
SOLID ORANGE The battery is at a very low voltage, the system will re-set
as soon as a fully charged battery is connected.
l
FLASHING ORANGE Receiving valid command data.
l
SOLID RED The units over-temperature cut-out has been activated (unit will
re-enable automatically when it cools to a safe operating temperature).
l
FLASHING RED The units over-current cut-out activated, the total
current drawn by the motors has exceeded the maximum capability
of the system. The unit will automatically re-enable itself in the idle
condition after a short delay.
Handset:
The red LED on the handset will illuminate when a button is
pressed showing that the signal has been sent.
Please see the trouble shooting guide for further details.
5 6
Page 6

RoboKaddy
7 8
Left/Right Tracking adjustment
Your machine has been factory set to go in a straight line, however, minor
adjustments can be made using the trimmer (see below) or bigger adjustments
can be made using the front wheel adjuster. Remove the nut covers on the front
wheel and loosen the nut slightly until you can move the wheel left and right within
a slot, then re-tighten the bolt. Put the machine into freewheel mode with the
wheels in the outer position and push the cart forwards freely, keep adjusting
until a straight line on a flat surface like Tarmac or concrete is achieved. Repeat
this process until the trolley runs straight. This will take time and practice to perfect.
NOTE:
If you have air tires insure that they are both between 20 - 24 psi
(1.38-1.65 bar) before you start this process.
Electronic Trimming
Ensure that your "Robokaddy" is on a flat level surface, and that it is not
obstructed. It is useful to align your RoboKaddy with an object in the distance
so that you know when the "Robokaddy" is traveling in a straight line.
Hold the "Emergency Stop" and "Off" buttons down simultaneously to activate
the Trim Mode. The Robokaddy will set off forwards at a pre-determined speed.
Use the Left and Right Turn buttons until the "Robokaddy" is traveling in a
straight line.
TIP: If the Robokaddy has been traveling in a left arc, the Right Turn button is
used to compensate this.
Press the "Emergency Stop" button to store the new settings. The Robokaddy
will now operate as normal.
NOTE –
The degree of turn may vary from one side to the other depending on
bag load and course conditions.
PowaKaddy Customer Care 1-800-569-2122 OR
+4401795 473 555 customercare@powakaddy.co.uk
Questions and Answers
How do I switch the trolley from manual control to remote control?
a)
Ensure that the rotary control knob is set at zero and put the rocker switch
into the Remote (I) position, the handle LED will show green, you can now
use in remote control mode.
How do I regain manual control from remote mode?
a)
Ensure the rotary control knob is set to zero.
b) Turn the rocker switch to manual (O).
c)
Turn the rotary speed control knob to the desired setting.
How do I use the trolley in manual mode from the start?
a) Turn the rotary speed control knob to zero.
b)
Turn the rocker switch to manual (O) the handle LED will now show red.
c)
Turn the rotary speed control knob and adjust to the desired setting.
How do I brake the trolley on a downhill slope when in remote mode?
a)
Press the off key once and the motors will stop. However the trolley can still
move forward down the slope against the motors. If an “emergency stop” is
required you must press the emergency stop key for more than 1/2 second.
b)
On steep slopes your tires may slip. In these conditions, as with any trolley,
you will need to hold the handle and help the trolley along in manual mode.
Are there any special conditions that I should be aware of?
a)
On steep uphill slopes we recommend that you use manual mode.
However, you may like to try either zigzagging up the hill or directing the
trolley to a lesser gradient.
b)
On steep slopes down hill ensure that you keep full control of the
RoboKaddy. In the most difficult of conditions it is best to hold the handle
and walk it down in manual mode.
How do I disengage the wheels for freewheel use?
a)
On each wheel slide the yellow lever on the hub cap and pull the wheel
outwards by a couple of millimetres. Now release the yellow lever and
pull out again until it clicks into place. The wheel will now freewheel. To
re-engage, reverse the instructions above ensuring the pins enter the holes
on the inside of the wheels.
Straight Line Running
Your machine and hand set are factory calibrated and ready to
work, however should you ever lose the hand set OR find that
your playing partners machine interferes with your RoboKaddy,
please contact PowaKaddy on the telephone number or email
address shown below.
Page 7

RoboKaddy
9 10
PROBLEM POSSIBLE CAUSE WHAT TO TRY
My RoboKaddy will not work.
My RoboKaddy stops on
the course without my
command.
My battery has failed and I
can’t push my RoboKaddy.
Machine is out of range.
Batteries are running
very low.
Have you disengaged
the wheels?
Machine not stationary
Move closer and try again.
Recharge main battery/
replace. Have the main
battery checked/replaced.
Check and follow section
on disengaging wheels in
Q and A.
Main battery flat.
Handset battery flat.
Main battery not connected.
Switching from remote
to manual.
Fully charge main battery.
Check the LED in the centre
of the handset, if flashing
red when activated all is ok.
Try RoboKaddy in manual
mode. Check battery
connections.
Turn the machine off then on
with the rocker switch and
try again.
My RoboKaddy will not go
in reverse.
The trolley must be stationary
and off or stop keys pressed
before you can select reverse.
PROBLEM POSSIBLE CAUSE WHAT TO TRY
The LED on the base
controller is displaying a
red light.
The LED on the base
controller is flashing
red light.
The LED on the base
controller is displaying an
orange light
The current overload has
been tripped.
The main battery has
fallen to below the required
voltage to operate.
The handle is communicating
correctly with the base
controller.
Avoid the obstruction or
circumstance that has
caused this. The unit will
re-set after a short while in
the idle position
If you are attempt more than
18 holes, this may sometimes
occur. If you have forgotten
to charge the battery, this
will occur. At any other time
speak with your service agent
or PowaKaddy for help.
The thermal overload has
been tripped.
Avoid the obstruction or
circumstance that has caused
this.The unit will re-set when
a safe working temperature
has been reached.
The LED on the base
controller is displaying a
flashing orange light.
No action needed.
Trimmer function requires
adjustment.
Tracking is out of
adjustment.
Air tire models, tire soft
on one side
My trolley pulls to left or right
on a flat surface.
See page 7 for trimmer
details.
See page 7 for tracking
instructions.
Ensure tires are both
between 20 - 24 psi
(1.38 -1.65 bar).
Trouble Shooting Trouble Shooting
Page 8

RoboKaddy
11 12
Remote Control Detail
Your RoboKaddy complies with all current telecommunications regulations.
Your RoboKaddy is designed to operate within a range of 50 yards,
depending on atmospheric conditions, such as damp and foggy weather
and/or wet ground. Additionally overhead cables, hills and trees can
affect range.
We strongly recommended not Exceeding 50 yards while operating in
remote control mode. The greater the distance between you and the
RoboKaddy, the greater the chance of losing contact with it. Should this
happen however, the RoboKaddy will stop automatically.
Interference can take many forms. Nearby high voltage power lines,
cellular phones or CB radios are all typical sources. Certain
obstructions such as mounds, clusters of trees etc. will reduce the
distance of transmission.
The battery contained in the handset must be replaced periodically
depending on frequency of use.
In car parks, confined spaces, down steep hills or where there are lots
of people, we recommend that you only use manual mode.
SAFETY NOTES: The RoboKaddy is more safely used when you select
manual mode to go across bridges, narrow paths, steep slopes or between
trees. Avoid directing the RoboKaddy around cars or buildings using remote
mode and never direct the machine at people, animals or other trolleys.
Maintenance
Wipe your PowaKaddy RoboKaddy after each outing to ensure it runs
smoothly and keeps it’s good looks.
To keep the machine clean, use a mild detergent and warm water. Do not
use any high pressure jet washers as the contents of the handset, the
handle and the base controller can be damaged by water ingress.
Remove the main wheels every few months and remove any debris that
might cause the wheels to drag. Clean the spindle and lightly grease
before replacing the wheels.
The screws in the battery tray are sealed in the factory to prevent water
getting into the controller underneath. If you loosen these screws for
any reason, you MUST re-seal them with silicone sealant.
A four hour round of golf played once a week for 12 months is equivalent
to, say, four years use out of a lawnmower. So once a year, thoroughly
inspect your machine, and arrange a full service with your PowaKaddy
service centre.
It is advisable to have your charger checked periodically, particularly
when buying a new battery. This will ensure that your charger is still
charging correctly and ensure maximum life of your new battery.
Always put your machine together before connecting the battery.
If you prefer not to leave your battery on charge, as you know that you
will not be playing for at least a month, you can store the battery. Fully
charge the battery, remove from the charger and store in a place where
the ambient temperature is above 10 degrees Celsius (+10ºC) and less
than 30 degrees Celsius (+30ºC). Recharge every 3 months for 24 hours
and before your next round.
Page 9

✔
✘
RoboKaddy
13 14
Complete Guide to Battery and Charger Care
Your battery should always be charged with its lid uppermost, in practical
terms this is when the vent strip is uppermost and Crisscross pattern is
underneath (Sonnenschein) or lid with + and - (Yuasa) is uppermost. If your
battery is in a PowaKaddy battery bag, the see through business card
pocket should be uppermost for charging only.
These lead-acid cyclic batteries use the latest technology to immobilise the
electrolyte in the battery. This makes them very safe to use and maintenance
free for the whole of their serviceable life.
The battery must be put on charge for a period of 24 hours, this will "activate"
the battery. You will find that the "charge complete" light comes on before
the 24 hours are up, you must keep the battery on charge.
The battery must only be used for a maximum 18 holes after which time the battery
should be re-charged as soon as possible (within a 24 hour period). Playing
more than 18 holes will over discharge the battery to the point of damage.
Leave the battery connected to the charger with the mains supply switched
on all the time the battery is not being used. If you prefer not to leave your
battery on charge as you know that you will not be playing for at least a month,
you can store the battery. Fully charge the battery, remove from the charger
and store in place where the ambient temperature is above 10 degrees
Celsius (+10˚C) and less than 30 degrees Celsius (+30˚C). Recharge every
3 months or 24 hours before your next round.
When charging the battery do not place the battery on a concrete floor,
have the battery raised off the floor on wooden blocks or place the battery
on a shelf.
The batteries used by PowaKaddy are NOT nickel-cadmium, you should
never fully discharge the battery with a light bulb or other means. This will,
if done, cause severe damage to your battery and if the voltage has fallen
below 9 Volts the charger will not be able to recover the battery.
The life of the battery will depend on several variables:
1) Frequency of use.
2) Number of holes played each round.
3) Type of course, flat or hilly.
4) Weight of bag and clubs.
5) Compliance to all of the attached recommendations.
The chargers used with all PowaKaddy products are specially designed to
charge the battery at optimum levels. The unit is very simple to use - simply
plug the charger into the battery and switch on the mains. Before using the
charger, read all the instructions and cautionary markings on the rear of the
charging unit and instructions supplied.
Do not expose the charger to any form of moisture. Place on a hard surface
in a well ventilated area. Do not use in a sealed container or cover the ventilation
slots, and do not operate the charger on carpet or similar soft material.
If you disconnect the battery or interrupt the power supply the charger will
automatically assume that a different battery has been attached and take it
through the 6.5 hour charging cycle again, please avoid this.
Hints and Tips
Always charge the battery with its lid uppermost.
Always connect the battery to the charger before connecting to the mains.
Always put your battery on charge as soon as you return from the golf club.
Always keep your battery on charge all the time it is not being used.
Always have your charger regularly checked. (Ideally each time you buy
a new battery)
Always keep your battery and charger in a dry place.
Always recharge your battery after every round, even if you've only
played 5 holes.
Always charge in a well ventilated area.
Never play more than 18 holes of golf from one charge.
Never drop the battery or allow it to roll around in your car boot.
Never leave the charger switched off with the battery connected.
Never operate the charger with a damaged lead.
Never fully discharge the battery.
Never leave the battery in a discharged condition; recharge as soon
as possible.
Page 10

15
Please use this space to record your date of purchase, serial number and code.
RoboKaddy Serial Number :
Battery Serial Number :
Charger Serial Number :
Date of purchase :
Quick Start Guide
If missing please call
PowaKaddy Customer Care
1-800-569-2122
NOTES
RoboKaddy
 Loading...