

Page 1

Sits
Pouton
m
Read Special
SAFETY CENTER SPREAD
each time you use
your MICRO 25
BEAIRD-POULAN/WEED EATER
Division Emerson Electric Co.
5020 Flournoy-Lucas Road
Shreveport, Louisiana 71109
CHAIN SAW
OPERATOR’S MANUAL
Page 2
N
CONTROLLING KICKBACK by Lloyd Tuggl
CONTENTS
Controlling Kickback .
Your Micro 25 Chain Saw ..........................3
Assembly Hand Guard ...........................
Attaching Guide Bar and
Chain. Adjusting Chain...........................5
Fueling Bar & Chain Oil ............................6
Starting - Good Performance
SAFETY CENTER SPREAD
Types of Cutting .................................10-11
Adjusting Carburetor
Air Filter ................................................... 13
Sharpening Chain
& Guide Bar Maint...................................14
Starter Rope
............................................
..............................
....................
...................
.......................
PAGE
.4
8-9
.12-13
15
Read
SAFETY CENTER SPREAD
FREQUENTLY
KICKBACK may happen when the nose or tip of the moving chain touches an object while the saw is
2
7
operating. This contact may abruptly STOP the cutting action and in some cases may cause a lightning
fast reverse REACTION, kicking the saw tip up or down and back. KICKBACK has caused some
operators to lose control of the saw. The cutting chain can then cause serious injury if it comes in
contact with any part of the body.
As a chain saw user you can take several steps to avoid an accident or injury due to kickback.
1. By simply UNDERSTANDING and knowing about kickback you take out the element of SURPRISE. It's the
SURPRISE that really contributes to accidents.
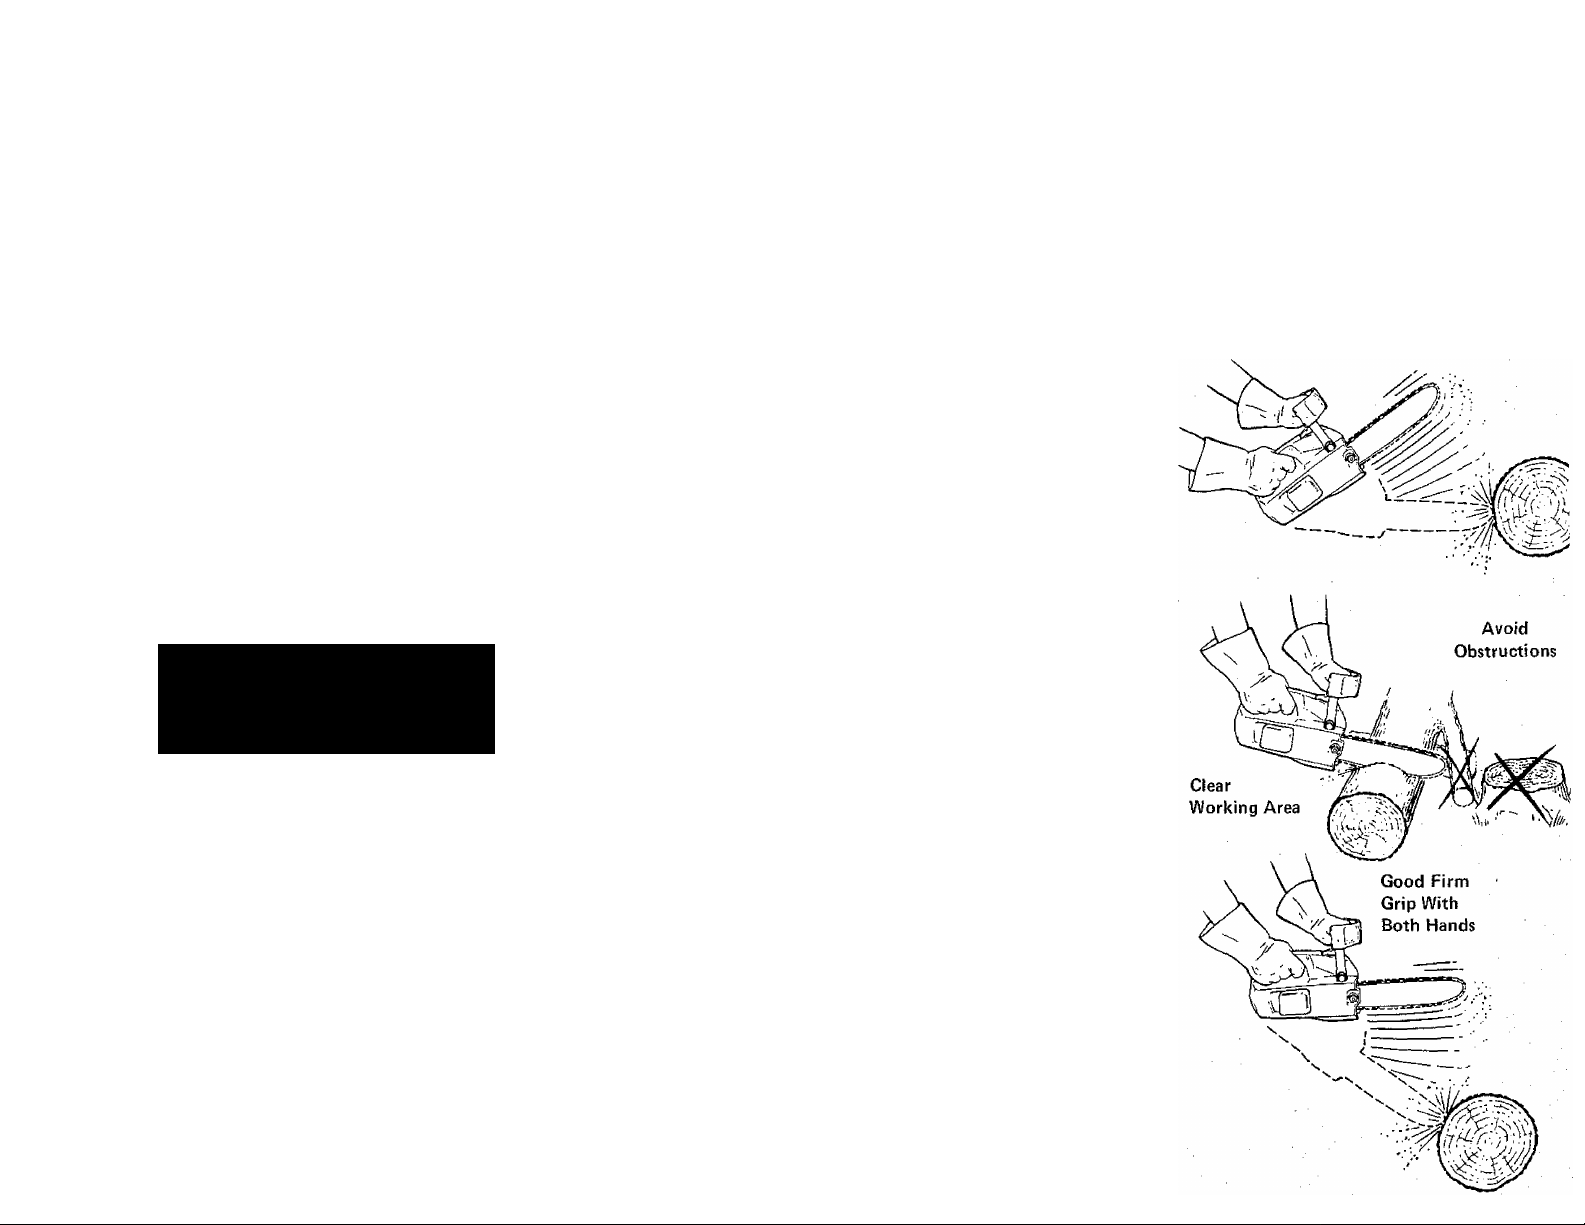
2. Make sure your HAND GUARD is securely fastened to the
handlebar AT ALL TIMES.
3. Make sure the area in which you are cutting is FREE
FROM OBSTRUCTIONS such as other trees, branches,
rocks, fences, stumps, etc. Eliminate or’avoid any obstruc
tions that your saw chain could hit while you are cutting
through a particular log or branch.
4. Keep a good firm grip on-the saw with BOTH hands. (Left
hand completely around the front handlebar with thumb
under and the right hand completely around the rear
handle.) A FIRM GRIP can neutralize kickback and help
you maintain control of the saw. DON'T LET GO.
r---------------------------
SAFETY FEATURES:
•Control TIpTMOulde Bar
•Low Kick Chain
•Hand Guard
Your Poulan chain saw is a reliable and powerful cutting toot.
Please use it safely and carefully so that each cutting job is
SUCCESSFUL AND SAFE. Controlling kickback is really a
partnership between you and Poulan. GOOD CUTTING.
Lloyd Tuggle, Senior Vice President
Manufacturing and Engineering, Beaird-Poulan
Page 3
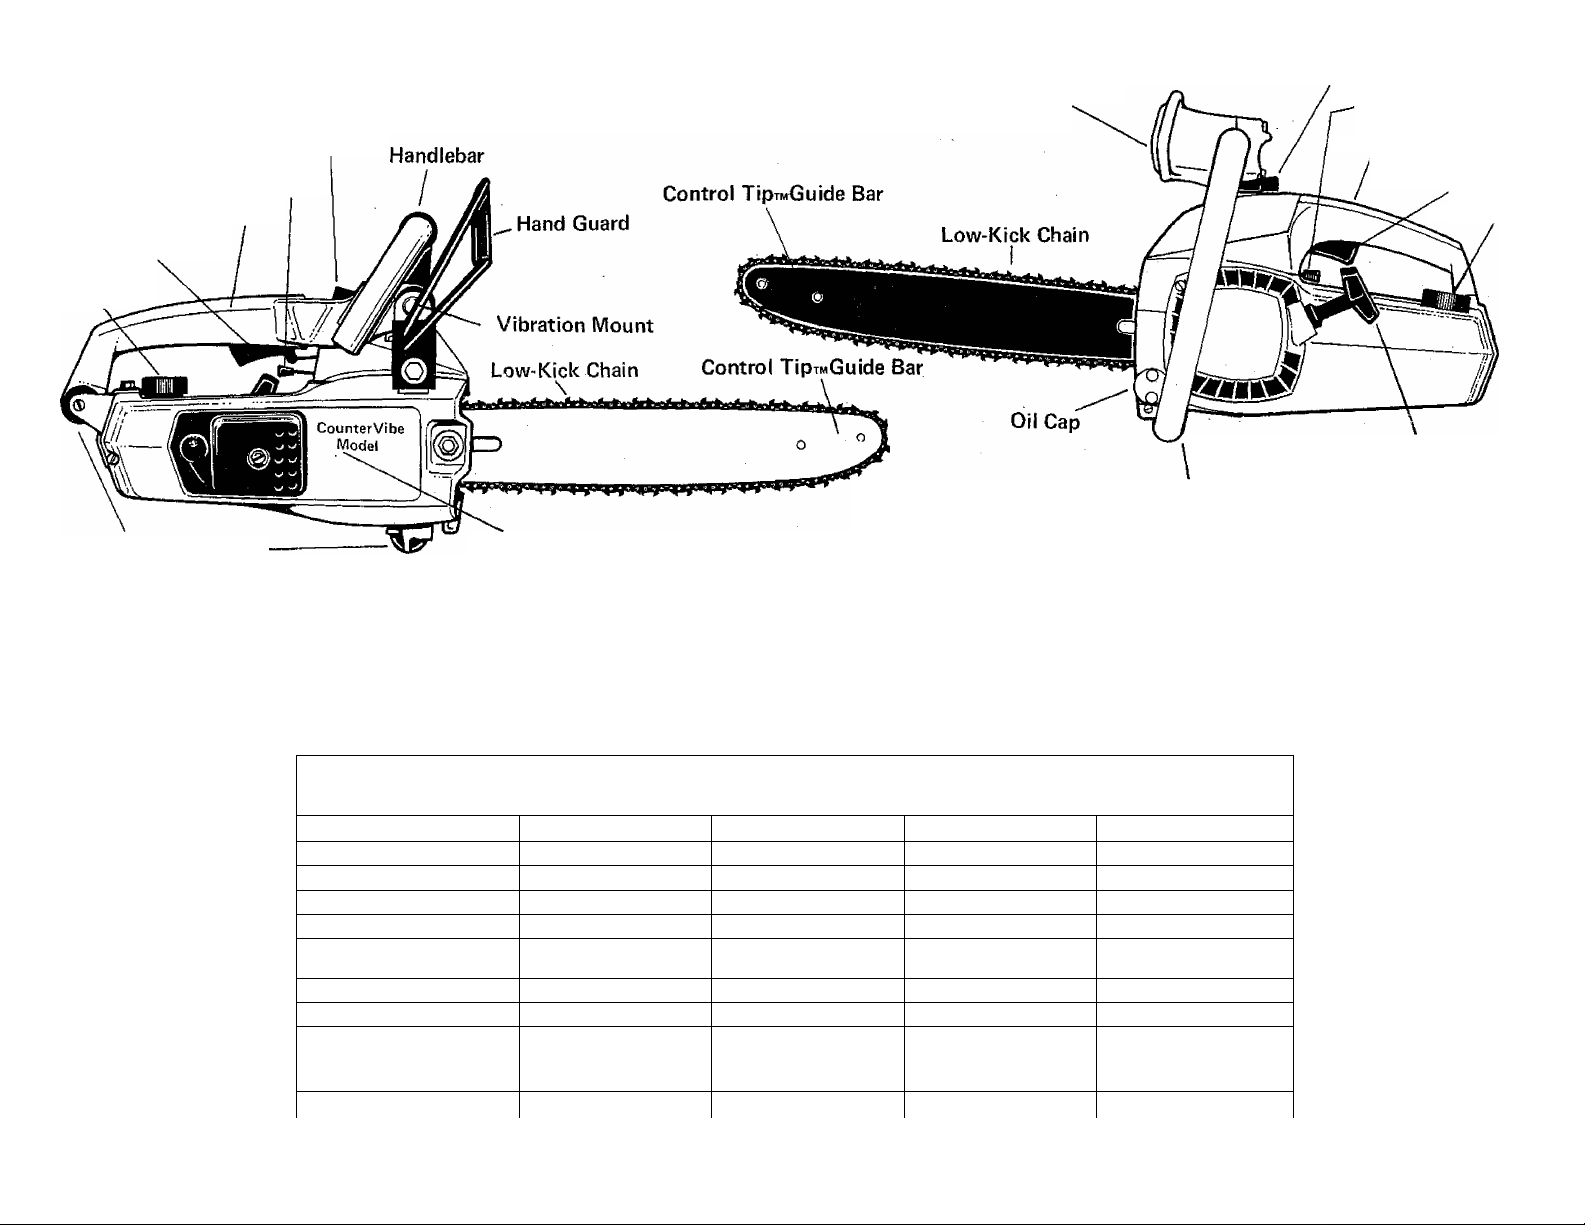
YOUR MICRO 25 CHAIN SAW
THIS SAW INTENDED FOR OCCASIONAL USE ONLY.
Choke Knob
Start/Stop Switch
Control Handle
Throttle Trigger
Fuel Cap
Hand Guard
Choke Knob
Stop Start Switch
Control Handle
Throttle Trigger
Fuel Cap
Starter Handle
Handlebar
Vibration Mounts
WHO SHOULD USE IT
The occasional user of a chain saw.
The non-professional.
SPECIFICATIONS ю saw
ENGINE DISPLACEMENT
SPARK PLUG
SPARKPLUG GAP
IGNITION
MODULE AIR GAP
FUEL MIX
OILER
GUIDE BAR
CHAIN
MUFFLER
Bar Clamp
WHAT IT SHOULD BE USED FOR
Cutting your own firewood.
Clearing wooded sites.
Cleaning up storm damage.
Light pruning at ground level.
12" SAW
2.0 Cu. In. 2.0Cu. in.
Champion CJS
.023 to .027"
Solid State Solid State
.008 to .014" .008 to .014"
(16:1) У2 Pt.Oil to
1 Gat. Reg. Gasoline
Automatic only
10" Control Tip™
Low Profile 3/8 Pitch
40 Drive Links
Spark Arresting
Champion CJS
.023 to ,027"
(16:1) Vz Pt. Oil to
1 Gal. Reg. Gasoline
Automatic only
12" Control Tip™
Low Profile 3/8 Pitch
Chrome Cutters
45 Drive Links
Spark Arresting
WHAT IT SHOULD NOT BE USED FOR
Not for commercial or heavy, continuous
use.
Not for carpentry work.
Not to cut any material other than wood.
14" SAW
2.0 Cu. In. 2.0CU. In.
Champion CJ8 Champion CJS
.023 to ,027"
Solid State Solid State
.008 to .014"
(16:1) % Pt. Oil to
1 Gal. Reg, Gasoline
Automatic only
14" Control TipTM
Low Profile 3/8 Pitch
Chrome Cutters
52 Drive Links
Spark Arresting
16" SAW
.023 to .027"
.008 to .014"
(16:1) Pt. Oil to
1 Gal. Reg, Gasoline
Automatic only
16" Control TipTM
Low Profile 3/8 Pitch
Chrome Cutters
56 Drive Links
Spark Arresting
Page 4
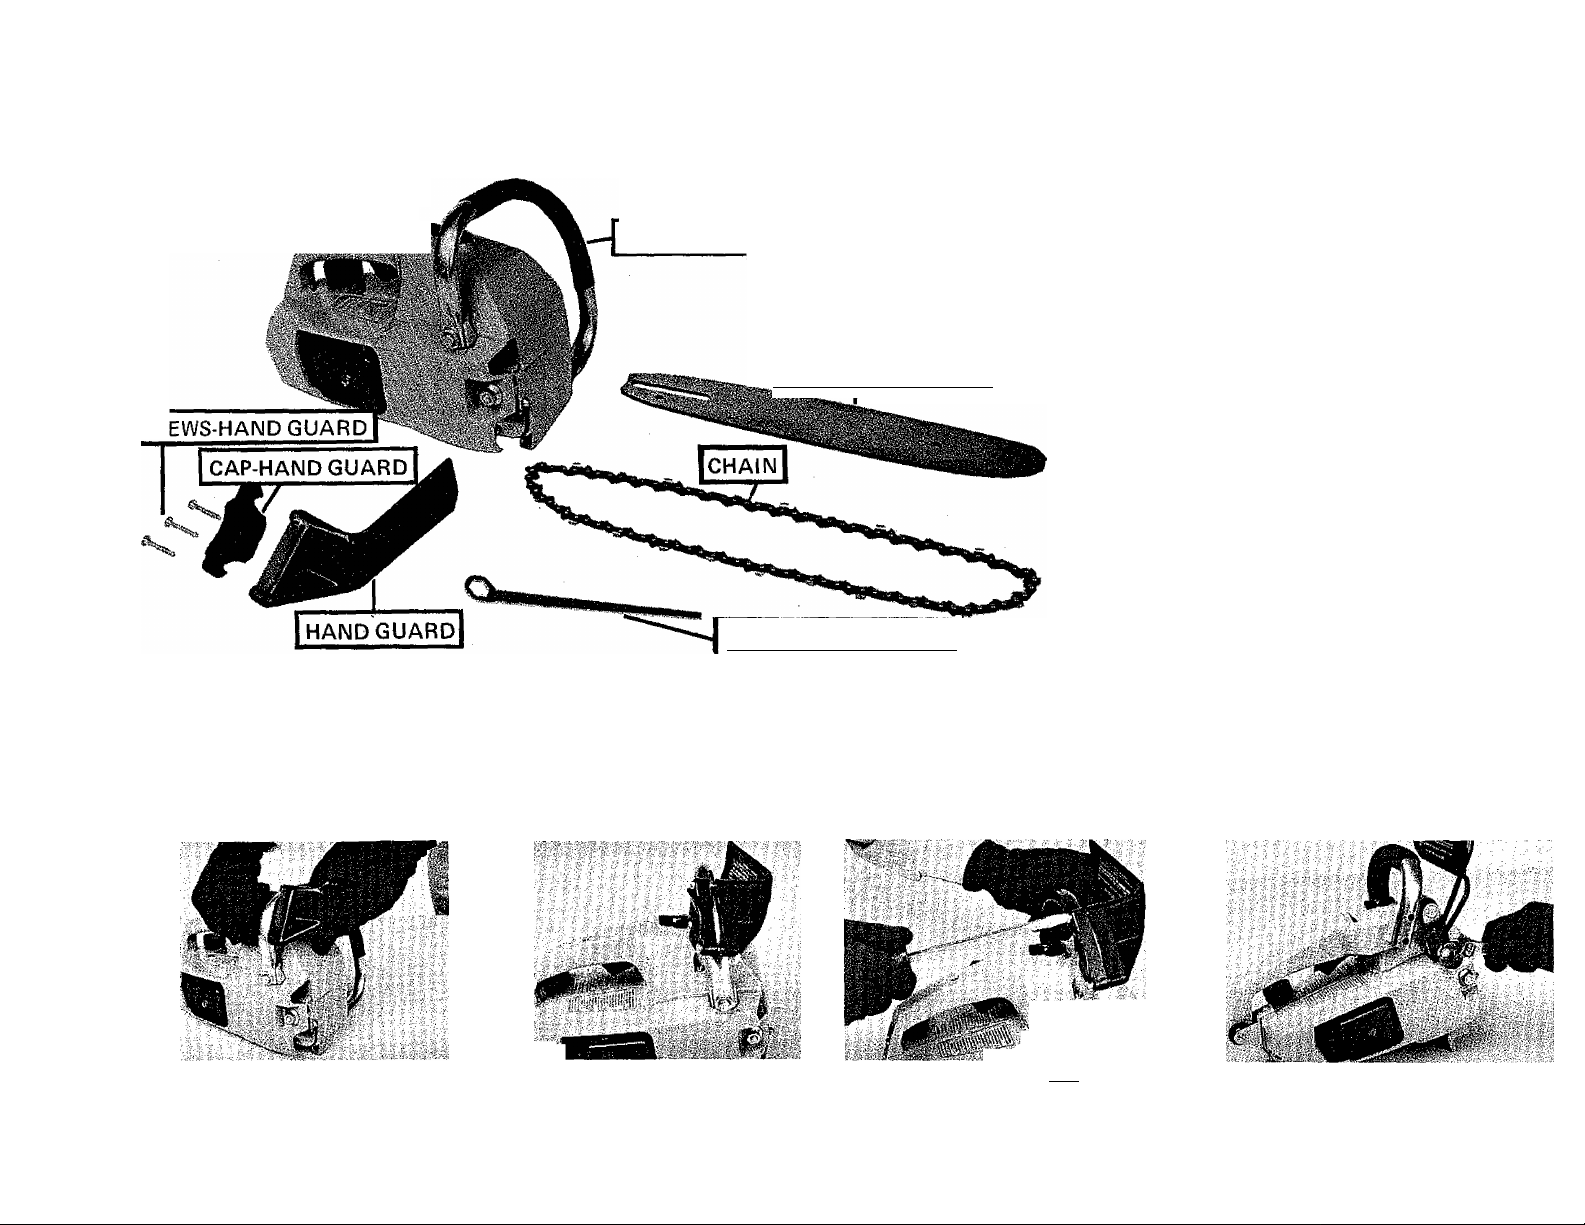
ASSEMBLY - PARTS AND TOOLS
Check the box for each item shown here. If something is
missing, please call place of purchase.
.■-. is- i'
SCP
CHAIN SAW POWER HEAD
rCONTRQL TIRmBAR \
BAR ADJUSTING TOOl]
YOU WILL NEED:
AH of the items shown here plus a large
screwdriver, work gloves, uncluttered work
area, approved mixing container for fuel.
For CounterVibe Model, a small adjustable
wrench.
YOU WILL;
• Attach the hand guard.
• Mount the bar and chain.
• Adjust the chain.
FOR MIXING FUEL AND ADDING CHAIN OIL:
You will need the proper fuel mixture, (see
the fueling section of this manual, page 6),
and, bar and chain lube or clean SAE 30 oil.
ATTACHING THE
HAND GUARD
1. Align 2 parts of hand guard around
handlebar so knob of guard fits the
hole in the handlebar.
The hand guard helps prevent the hand from coming in contact with the cutting chain
should your hand slip off the handlebar. It does not eliminate the possibility of injury
from kickback or loss of control of the saw. Please lift and carry the chain saw by the
handlebar or the control handle, NOT by the hand guard, so it will not come loose.
Retighten, if it ever does come loose. DO NOT USE THE SAW WITHOUT THE HAND
GUARD IN PLACE.
2. Insert the 3 mounting screws into
the 3 holes on hand guard.
3.Turn each screw a little at a time
clockwise to tighten until the two
halves meet and are tight. Move
from 1 screw to the next, a couple
of turns to secure guard evenly.
COUNTERVIBE MODELS
Remove 6-sided hex bolt from
CounterVibe Bracket. Place hand
guard base over the bracket. Tight
en the bolt.
Page 5

ATTACHING THE BAR AND CHAIN
Always wear your gloves when working on or with your saw. The Top Sharp Chain on your Power Sharp saw is
extremely sharp and can easily cut you even when it is not moving! Your saw is equipped with a Control Tip bar and
a Low-Kick chain to help avoid accidents due to kickback. When replacing these items, always use the Control Tip and
Low-Kick chain designed for your particular chain saw model.
, ■■
Read
SAFETY CENTER SPREAD
FREQUENTLY
1. Remove the 6-sided hex nut near the
front of the saw. Loosen by turning hex
wrench counterclockwise. Remove small
screw in back.
5. Making sure the guide bar is still flat
against the side of the saw and the chain
is still on the sprocket, replace the bar
clamp and finger tighten the hex nut.
Don't tighten it down as you are going
to adjust the chain before you finish
tightening the nut. Replace the small
bar clamp screw in back and tighten.
2. Remove the bar clamp. Find the small
adjusting pin and screw just to the right
and below the bar mounting stud (silver
bolt). Turn the adjusting screw counter
clockwise to position the pin nearly alt
the way to the rear.
6. Holding the tip of the bar up, turn the
adjusting screw clockwise just until the
chain does not sag beneath the bar.
3. To install the guide bar as shown, slide
the guide bar behind the clutch drum
with the large bolt fitting in the slot in
the bar and the small adjusting pin
through the small hole in the bar. Once
the guide bar is in position, keep it flat
against the side of the saw during chain
mounting.
7. When you have the proper tension on
the chain it will move freely around the
bar but only lift about 1/8" from the
bar as shown above. Now while holding
the tip of the bar up, tighten the hex
nut completely and recheck the rear
screw.
4. Pick up the chain so that the top links
have the cutters facing in the direction
shown above. Place the chain behind the
clutch drum on the sprocket. Bring the
chain along the top of the bar, setting it
in the groove. If the chain does not set
in easily at the tip, pull the chain
forward and let the groove guide the
chain around the tip.
NOTE; The chain stretches during use
(especially when new) and it will be neces
sary to adjust and tighten it occasionally.
Check the chain tension each time you use
the saw. A loose chain will wear the bar
and itself, A loose chain can also jump off
the bar while you are cutting. A chain that
is too tight can damage the saw and/or
break. Either situation, too loose or too
tight, could cause injury. Keep the chain
out of the dirt. Cutting into the dirt or cut-
ing a dirty piece of wood will immediately
dull the chain.
Page 6

FUELING
Inhaling gasoline vapors is dangerous so fuel your chain saw only outside or in a
well-ventilated area. Eliminate or stay away from all sources of ignition. No
smoking, no open flames, no tools nor work that could cause sparks.
Your chain saw operates on a mixture of gasoline and oil. CAUTION: Using straight
gasoline will burn out your engine.
POULAN
16n
OIL
+
1
GALLON
REGULAR
GASOLINE
Read
SAFETY CENTER SPREAD
FREQUENTLY
Do not leave fuel in the fuel tank for more than 8 weeks. This will cause hard
starting and can damage the engine. Remove old fuel mixture or allow the saw to
run out of fuel before storing.
BAR AND CHAIN OIL
OR
POULAN
32:1
OIL
+
PINT
Mix 1/2 pt. (8 02.) Poulan 16:1 oil with 1 gallon of regular leaded gasoline; or 1/2
pt. {8 02.) Poulan 32:1 oil with 2 gallons of gasoline. If Poulan oil is not available,
use a good grade of 2 stroke cycle air cooled engine oil and mix 1/2 pt. (8 02.) oil
with 1 gallon of gasoline.Do not use gasohol because it could have harmful effects
on your engine. Pour the oil into an approved container, add the gasoline and shake
mixture well. Do not try to mix the oil and gasoline directly in the saw.
The fuel tank on your chain saw is toward the back and the fuel tank cap is marked
FUEL MIX. Carefully fill the tank, but DO NOT OVERFILL. Wipe up spills.
1
GALLON
REGULAR
GASOLINE GASOLINE
1
GALLON
REGULAR
The bar and chain oil tank is in front of the saw. Keep it full to lubricate the bar
and chain or both can be damaged. Use straight bar and chain tube above 30
Fahrenheit. If bar and chain lube is not available use a good grade SAE 30 oil.
Between 30° F and 0° F use a mixture of 95% bar and chain lube and 5% either
kerosene or # 1 diesel fuel. For below 0 F operation increase the kerosene or
diesel fuel to 10%.
Turn the saw on its side with the oil cap UP. Remove the cap. Fil
Wipe up any spills.
Fill the bar and chain oil tank each time you refuel. As long as you see oil
lubricating the bar and chain during saw operation, your oil supply is adequate. If
you are using less oil and the oil tank is full, the oil hole on the guide bar might be
blocked. Remove the bar clamp and bar and chain. Clear the oil hole in the bar anc
replace the bar, chain, and bar clamp.
After you have turned off the saw, a small amount of oil may appear under the saw
This is normal, oil will drain from the bar and chain after use.
the oil tank
Page 7

STARTING YOUR CHAIN SAW
IMPORTANT; Make sure you have read and understand the entire safety center spread and the infornnation on
kickback (pg. 2) before starting or using your chain saw. Now, move away from the area in which you fueled your saw.
Make sure you are on solid footing. Make sure the saw handles are free of gas and oil, and that you have the proper
chain tension. Don't forget to wear your protective gear.
1. Move the choke lever to your right, to the CHOKE po
sition. Move the START/STOP switch to START. Hold
the control handle in your right hand and squeeze the
throttle trigger. Firmly grip the starter rope handle in
your left hand.
2. Now, push the saw away from you with your right
hand while holding the starter handle stationary. Make
short, 12" to 14" strokes. Hold the saw and the rope
firmly. Do not let the rope snap back into the saw. Let
it rewind slowly. After a few pulls the engine should
fire, when it does, return the choke to its original
position. While again squeezing the throttle trigger, pull
the starter rope until the engine runs, if engine does
not fire after 5 to 6 pulls, it may be flooded. Push
choke off (clockwise) and pull starter several times
while holding trigger at wide open throttle. If saw has
run out of fuel, 8 to 10 pulls with choke on may be
required to restart engine. When restarting a hot
engine, or one which has just been refueled, you may
have to choke the engine for one or two pulls.
3. To stop your chain saw, push the START/STOP switch
to STOP.
Do not run the engine at high speed when not in a cut.
Squeeze the throttle trigger just before entering the cut
and keep the saw at full throttle the entire time you
are cutting.
Page 8

Your Planning and Preparation
Do not handle or operate a chain saw when you
are fatigued, tired, or upset; or if you are under
the influence of alcoholic beverages, medi
cation, or drugs. You must be in good phy
sical condition and mentally alert.
Always wear personal protective gear. Wear safety
footwear, protective gloves, snug-fitting clothing,
and eye, hearing and head protection devices.
Use caution when handling fuel. No smoking
when fueling or operating the saw. Handle fuel
only in open, well-ventilated areas. Wipe up spills.
Keep the handles dry, clean and free of oil or fuel
mixture.
Conditions in Your Work Area
Do not operate a chain saw that is damaged, is
improperly adjusted, or is not completely and
securely assembled. Keep all screws and fasten
ers tight.
Move the chain saw at least 10 feet (3m) from the
fueling point, before starting the engine.
Make sure chain is sharp and at proper tension.
Carry the chain saw with the engine stopped, the
guide bar and chain covered and to the rear, and
the muffler away from your body.
Before you let anyone use your saw, be certain
the person understands and can apply the safety
rules, precautions, and operating instructions
found in this manual.
All chain saw service other than the items listed in the oper
ator’s manual maintenance instructions, should be performed
by competent chain saw service personnel.
Do not attempt to cut if the weather is bad—strong wind,
rain, snowing, or other adverse weather conditions. You
need good visibility, so don’t cut at night.
Operate the chain saw only in well-ventilated areas. Don’t
operate it in an enclosed, confined area because you need
room to perform the cutting and good ventilation.
Do not start cutting until you have a clear work area, secure
footing, and a planned retreat path from the falling tree (if
you are cutting down trees).
Do not allow other persons to be near the chain saw wh
starting or cutting with the chain saw. Keep bystanders a
animals out of the work area.
Operate the chain saw on level, solid ground. DO NOT op
ate the saw from a ladder.
Do not operate the chain saw in a tree unless you have be
specifically trained to do so.
Never carry your saw while climbing. You need both har
for safe climbing.
Page 9

OPERATING YOUR CHAIN SAW
Wear your protective gear.
Before you start the engine, make sure the saw chain is not
contacting anything.
Keep all parts of your body away from the saw chain when
the engine is running.
Hold the chain saw firmly with both hands when the engine
Is running. Use a firm grip with thumbs and fingers encircling
the chain saw handles. Keep your left hand on the front
handle and your right hand on the rear handle.
Do not let the nose of the guide bar contact a log, branch,
the ground, or any other obstruction, to help prevent kick-
back.
Guard against kickback. Kickback is the upward motion of
the guide bar which occurs when the saw chain at the nose
of the guide bar contacts an object. Kickback can lead to
dangerous loss of control of the chain saw.
Do not overreach. You might lose your balance.
Do not cut above shoulder height. Don’t cut overhead, since
you would have poor control of the saw and the saw would
be too close to your face and body.
When cutting a limb that is under tension be alert for spring-
back, so that you will not be struck by the limb when the ten
sion in the wood fibers is released.
Be sure that the saw chain stops moving when the throttle
control trigger is released. If the chain does not stop moving,
refer to the maintenance section and adjust the carburetor
as outlined.
After cutting, shut off the engine before setting the saw
down.
Let the saw cool in a non-combustible area, not on dry
leaves or paper.
Wipe off oil before storing the chain saw. Do not store your
chain saw in any room with any type open flame heater or
stove. Store the saw in a locked area or in an area away from
children.
Follow manufacturer’s sharpening and maintenance in
structions for the saw chain.
Always do your cutting at high engine speed.
Please read message on kickback from Lloyd Tuggle,
Senior Vice President, Engineering, Beaird-Poulan. This il
lustrated message is located on the inside front cover of this
manual.
Page 10

TYPES OF CUTTING for the occasional chain saw user
There are several types of wood cutting you can do successfully and safely. Please read the Safety Center Spread for
safe preparation of your saw and your work area, and for safe operation of the saw. If the weather is bad delay cutting
until it improves.
FELLING A TREE
DON’T PUT YOURSELF IN THESE POSITIONS
Plan or determine the direction the tree will fall by studying its lean, wind
conditions and weight of the branches (to one side or another), and
whether or not the tree is on a hill. Make sure there is enough room for the
tree to fall. Make sure the area you are going to stand and work in is free
from obstacles. Plan a clear retreat path in the opposite direction of the
fall.
If you cannot determine direction of fall, or if you are considering working near electrical
wires, buildings or other structures, leave it to the professional.
Read
SAFETY CENTER SPREAD
FREQUENTLY
SMALL TREES -
WEAR YOUR PROTECTIVE GEAR
Less than 8" across. If you know the direction of fall make a single felling cut on the side away from the direction of
fall. Cut all the way through. When the tree starts to fall, stop the saw, put it down and GET AWAY QUICKLY. If you
are not sure which way the tree will fall, use the NOTCH METHOD shown here.
NOTCH METHOD
Remove the wedge.
through the notch.
BE CAREFUL WHEN IN THE WOODS. DON'T START FOREST FIRES!
Page 11

DEBRANCHING
Bucking is cutting a fallen tree to desired log size. It can be done when a tree section is resting on another log, or when a tree section is placed on a
BUCKING
bucking stand. Use both hands — grip the saw firmly. Stand uphill because a log that is cut loose will roll downhill.
In area "A", come up from the bottom 1/3 of the way.
►U-A-^
Finish by coming down from the top.
In area "B", come down from the top 1/3 of the way.
Finish by coming up from the bottom.
Do not turn the saw upside down to undercut. Position
the guide bar under the log and exert light pressure
upward.
WARNING; When coming up from the bottom using the
top of the bar (undercutting) the saw will push back at
you, hold it firmly.
Never debranch in a tree. It's too dangerous. Once the tree is down debranching can be done properly and safely. Keep chain
out of dirt.
Cut from the side of the tree opposite the branch you are cutting. Do not let
the tip of the cutting bar touch anything that might cause kickback. Keep a
firm grip on the saw, left hand around the handlebar, right hand around the
control handle. Do not cut overhead. Limit your debranching to chest level or
below. Work slowly, watching out for branches that are bent or under
pressure, and for supporting limbs. BE ALERT FOR SPRINGBACK — the
release of tension a branch or even a whole tree might be under. Keep your
body clear of possible springback. Frequently clear branches out of the way
so you won't trip over them.
Using a bucking stand, in area A
come up from bottom 1 /3 of the
way first. Finish by cutting down
from the top. In area B come down
from top 1/3 of the way. Finish by
cutting up from bottom.
If saw becomes wedged in a log,
don't try to force it out. Stop the
saw and drive in a wedge until saw
can be removed easily. Be careful
not to damage the chain with the
wedge.
Second
Cut
B
Second
Cut
PRUNING
Cutting branches off a tree while the tree is still standing can be done safely by the non-professional
when branches are shoulder height or lower. If they are higher, get a professional. Never climb into a
tree to debranch, nor work overhead.
Keep both hands on the saw with firm grips, be sure of your footing and balance. Do not turn saw
upside down to cut, watch out for springback and where the branch will fall. Clear fallen branches
frequently so you don't trip over them.
V'
FIRST CUT
Using iaB side of bar and
chain, make first cut from
bottom. Make finishing cut
from top. Do not turn the saw
upside down.
11
Page 12

ADJUSTING THE CARBURETOR
CAUTION: The chain could be moving during this procedure. Wear your protective gear and observe all of your
safety precautions.
The carburetor has been carefully adjusted at the factory
but due to changes in altitude and operating conditions,
your carburetor may require additional adjustments.
PRELIMINARY ! Stop the engine. Be sure you have fresh fuel mix at the proper gasoline/oii ratio (see mixing
instructions), and a screwdriver.
1. Remove the carburetor cover by loosening and
removing the 2 screws on either side of the choke
knob.
CLOCKWISE
4. Turn the idle speed screw 1/2 turn ciockwise. (The
engine should idle without the chain turning when you
start the engine). Turning the idle speed screw clock
wise increases idle speed. Turning it counterclockwise
decreases idle speed. Run the engine for a few minutes
to bring it up to operating temperature for the best
carburetor adjustment.
2. Find the 3 adjusting screws; idle speed screw (1), low
speed mixture screw (2) and high speed mixture screw
(3). Turn the low speed mixture screw and the high
speed mixture screw clockwise just until they stop.(DO
NOT TIGHTEN. YOU MAY DAMAGE THE NEEDLE
SEATS.)
5. Turn the low speed mixture screw slowJy clockwise
until the RPM starts to drop. Then turn the low speed
mixture screw counterclockwise until the RPM speeds
up and then starts to drop again. Position the low
speed mixture screw at the mid point.
3.Turn both screws — Low speed mixture screw and high
speed mixture screw one full turn counterclockwise.
Start the engine. If the engine stops, when the trigger is
not squeezed (idle position).............
6. If the chain is turning at the best idle setting, turn the
idle speed screw counterclockwise until the chain
stops, it may be necessary to recheck the low speed
mixture screw for the best idle, after the idle speed has
been reduced.
12
Page 13

Read
SAFETY CENTER SPREAD
FREQUENTLY
7, When the idle speed has been adjusted, squeeze the
throttle trigger. If the saw accelerates without
hesitating, make a test cut. Be careful to keep chips
and dirt out of the carburetor. If the saw seems to
smoke or have low power in the cut it is set too rich.
Turn the high speed mixture screw 1/16th of a turn
clockwise and repeat the test cut. Repeat this adjust
ment until the saw runs smoothly.
10, Be sure the idle speed screw is set properly and the
chain is not turning. Before replacing the carburetor
cover, clean the mating surfaces of the housing and
cover. Move the choke knob all the way to the choke
position and move the choke shutter to the choke
position and replace cover. (Refer to Fig, 1, Page 12).
CAUTION: NEVER SET THE HIGH SPEED MIX
TURE LESS THAN 7/8THS TURN OPEN. A LEAN
SETTING WILL RUIN YOUR ENGINE.
8, If the engine does not have power in the test cut, and
quits, it is set too lean. Turn the high speed mixture
screw 1/16th turn counterclockwise. Test cut again.
Repeat adjustment until saw runs smoothly.
CLEANING AIR FILTER
9. When you have completed these adjusments, recheck
for proper idle mixture screw setting per instructions in
views No. 5, 6, and 7. Check for acceleration. If there
is a slight hesitation, turn the low speed mixture screw
1/16 turn counterclockwise at a time until you have
smooth acceleration.
The air filter, located in front of the carburetor, captures
dirt and dust and prevents it from entering the engine. It
is oil coated. The filter should be cleaned after every 10
tanks of fuel or every 5 hours of operation.
Wash the air filter with soap and water. Do not use
gasoline or other flammable liquid. Squeeze dry and add a
small amount of oil to coat, but not to soak the filter.
Squeeze out any excess oil. Replace the filter in housing,
tuck in edges, and smooth it flush with the housing.
Replace carburetor cover.
13
Page 14

SHARPENING THE CHAIN
Remember to wear your gloves!
A sharp chain will make your cutting chores much easier. The wood chips your saw makes should be about the size of
the teeth of the chain. If, instead they are small and powdery, the chain is dull and needs sharpening. When the chain is
cutting well, light pressure should b6 enough. If you have to force the saw through the cut with heavy pressure or if the
saw cuts to one side, the chain is dull or the guide bar worn or both.
To sharpen your chain you will need:
• Your gloves
• 5/32” file
• 6” file holder
• Medium flat file
• Gaugit
Your Poulan dealer has everything listed.
You will also need a vise to hold the
guide bar as you sharpen the chain.
1. Adjust the tension as tightly as you can and still be
able to move the chain around the bar. Place guide bar
in a vise, clamping the center of the bar.
2. Sharpen all the cutting edges on one side first. Then
sharpen the cutting edges on the other side. Mark your
starting point so you will know when you have
finished. File in 1 direction only — 2 or 3 strokes per
cutting edge is sufficient.
GUIDE BAR MAINTENANCE
Wear your gloves. Work in
cutting harder.
Check the underside of the chain for wear which could be causing wear to the guide bar. A lack of OIL in the chain oil
tank can damage both the chain and the bar. Make sure there is oil in the tank and that you have proper tension on the
u
Correct Groove Worn Grooves File Edges Square
14
lUfOt
chain. Improper tension will also cause excessive wear to guide bar.
The figure on the left shows a cross-section of the guide bar groove. Check
the tip and rails of the guide bar often for wear. If the inside groove of the
guide bar rail or nose is worn replace the guide bar.
3. After sharpening the cutting edges, place the gaugit
over the depth gauge. If the depth gauge sticks out, file
it off with the flat file. Do this for each depth gauge.
Your chain should now be sharp.
a lighted area with chain cooled off. A worn guide bar will damage the chain and make
Page 15

STARTER ROPE MAINTENANCE
Repairing the recoil starter rope requires a certain degree of mechanical skill. You may decide to let your dealer handle
this procedure. If you do try the procedure and the pulley spring pops out, take the unit to your dealer.
1, Remove the two screws on the side of the fan housing. 2. Then, remove the large screw at the rear of the control 3. Pull the gas line off the fitting going into the saw
handle and the small screw directly below it.
SAFETY CENTER SFREAP
FREbuENTLY
handle. Pull off the fan housing. Remove the fuel cap,
slide the fuel tank from the fan housing, replace the
cap and set it aside.
4. If the starter rope has broken, the tension on the
starter spring, which is located under the pulley, will be
released. If rope is not broken, release the spring
tension by pulling about 10 inches of rope from the
pulley and catch the rope in the notch as shown. Turn
the pulley counterclockwise until the spring tension is
released. Remove the pulley screw in the center of the
pulley. Carefully lift the pulley while gently twisting it
counterclockwise. Remove the old rope.
5, Move away from the fuel tank and burn the end of the
new rope which is going into the pulley. Pull the burnt
end through a rag while still hot, to smooth it. Feed
the rope through the housing and through the round
starter hole. Put the rope into the pulley groove and up
through the hole. Tie a knot into the end of the rope
and pull it tightly against the pulley. Rewind all the
rope onto the pulley, turning counterclockwise.
6.Set the pulley into the housing, push it down and
engage the spring. Replace and tighten the pulley
screw. Pull out 10" of rope and catch the rope in the
slot in the pulley. Turn the pulley 2 complete turns
clockwise winding up the spring. Holding the pulley,
pull the starter rope to the full extent and then let the
rope rewind slowly. Replace the fuel tank in the fan
housing and replace the housing. Make sure the fuel
line is not pulled loose or pinched. Replace the four
screws and the fuel line over the fitting. -[g
Page 16

PARTS AND SERVICE
Your POULAN Chain Saw has been expertly engineered and carefully manufactured with rigid
quality standards. As with all mechanical products, some adjustment or part replacement may
be necessary during the life of your unit.
FOR SERVICE OR REPLACEMENT PARTS;
1. Consult the yellow pages of your phone directory for the name of the nearest Beaird-Poulan/
Weed Eater Master Service Center {under Saws ) or Skil Service Center (under tools-electric).
2. For replacement parts, have available the following information:
a. Name of the unit
b. Model number
c. Description of part.
NOTE: Beaird-Poulan/Weed Eater provides parts and service through its authorized distributors
and dealers. All requests for parts and service should be directed to your local dealerfs).
Your dealer can keep you informed about improvements in our products as they are
placed on the market also. Parts and repair service are not available directly from BeairdPoulan/Weed Eater, Division Emerson Electric Co.
BEAIRD POULAN/WEED EATER
Division Emerson Electric Co.
Attn: Accessory Manager P.O. Box 9329
Shreveport, Louisiana 71129 ■iii—iiiii- . .■
64567 10/81
 Loading...