

Page 1
_ORTANT
Do Not Throw Away
0
&WARNING:
Carefully read and follow
Safety Rules, Precautions
and Operating Instruc-
tions. Failure to do so can
result in serious injury.
Page 2
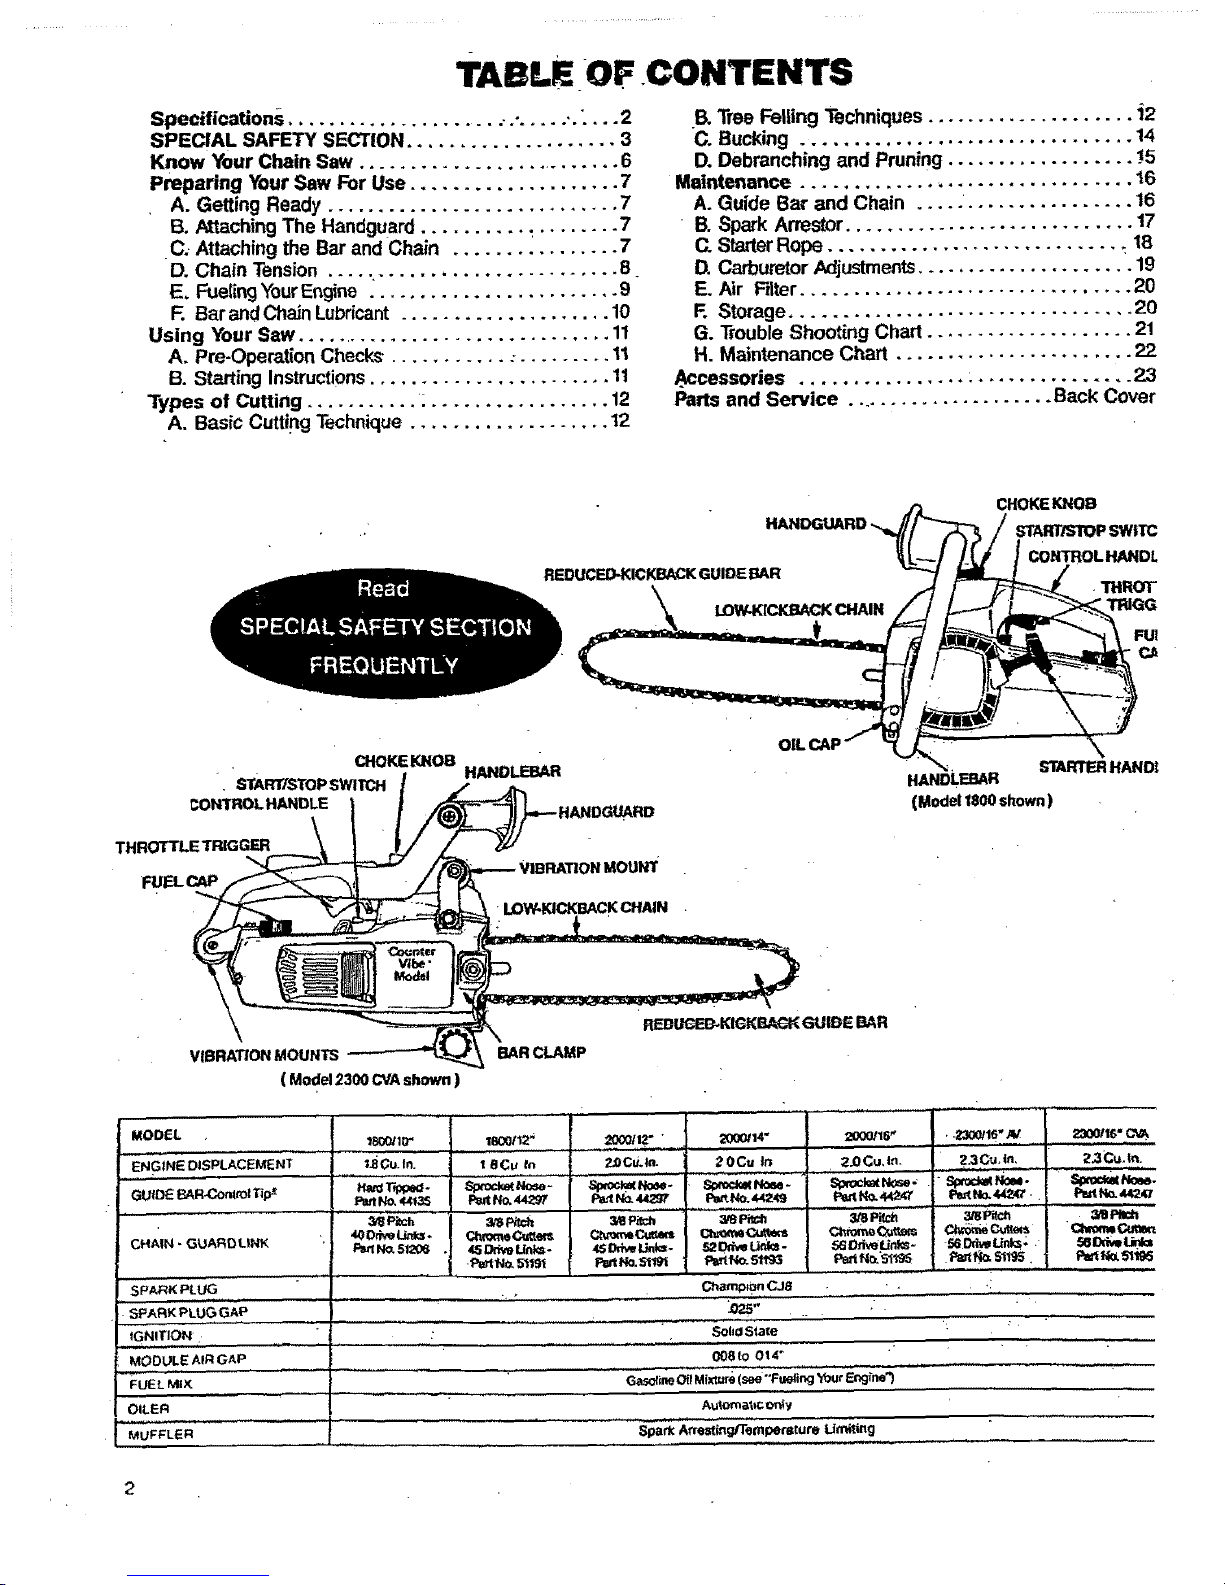
TABLE OF CONTENTS
Specifications .................... .,....... ,. :,..2
SPECIAL SAFETY SECTION .................... 3
Know Your Chain Saw .......................... 6
Preparing Your Saw For Use .................... 7
A. Getting Ready ............................ 7
B. Attaching The Handguard .......... _........ 7
(3.-Attaching the Bar and Chain ................ 7
D. Chain Tension ..... ....................... 8
E. Fueling YourEngine ........................ 9
F. Bar and Chain Lubricant .................... 10
Using Your Saw ............................... 11
A. Pro-Operation Checks• ........... : ......... 11
B. Starting Instructions ....................... 11
Types of Cuffing ........... : ................. 12
A. Basfc CutU.ngTechnique ................... 12
13.Tree Felling Techniques .................... i2
CoBucking ................................ 14
D. Debranching and Pruning .................. !5
Maintenance ................................ 16
A. Guide Bar and Chain ..... ................ 16
B. Spark Arrestor............................ 17
C. StarterRope ............................ _ 18
D. CarburetorAdjustments..................... 19
E. Air Filter ................................ 20
F. Storage ................................. 20
G. _ouble Shooting Chart .................... 21
H. Maintenance Chart ....................... 22
Accessories ................ : ............... 23
Paris and Service ..................... Back Cover
REDUCIED_ICKBACK GUIDE BAR
CHOKEKNOB
STAI_,'STOPSWITC
•THROT
TRIGG
CHOKEKNOB
• START/STOP swnrcH
¢ONTROLHANDLE
THROTTLETRIGGER
FUEL CAP
HANDLEBAR
•LOW-KICKBACK CHAIN
STARTER HAND_
HANDLEBAR
(Model 1800 shown)
\
VIBRAT/ONMOUNTS
(Model2300CVAshown)
BAR CLAMP
MODEL
ENGINE DISPLACEMENT '_
GUIDE BAR_::on_o!Tip_
CHAIN - GUARD L_NK
, u,I
SPARKPLUG..... ,
SPARK PLUGGAP
IGNITION
.O0UL A,. AP
OILER
MUFFLER
..... ,,,,, _,,,
;_ Cu. In.
2000116'*
2.0 Cu,4n.
1800t12 _ L_00_II_"
t 8Cu In 22,Cu._,.
PadI_ ,14,,_F
Rut N_ 44f35 PeJtN_ 44291"
R.1 No,5_."_ 45 DdveL_ks-
.P_INt_ b-'119'/
56 Drk_ Unks;,
Pa_tf;_ 51195.
2000414"
20Cu _n
P_R_o.44249
_P_
56 Drive Unks -
PsrINo_51_'J5
, ,. _. ,,,,,,,,,J ,
3/8Pitch 3/8 Pi¢_
_Odv,eL_ks- 520d_L_k=-
P_t 1_5_191 PartNo_fit'tg_
..... Cham_n C J8 " -
.......... _'" Soh_ State
008_o 014_
.......... ......... i,i
Ga,,so_ine_ Mixture (see -Fu_ng Your F_n_ne'J
Autoraat_corgy
Spark Arre_ing/Tempem_ure Um_ting
2.3Cu,_, 23Cu._•
.... | ,,,, ,N,,
P_No.44_4"t.. P_l, io.44,_1_
3/BPII_
, ............ ,, ,
,, _ ,,,, ,,,
,,,.,
Page 3
I IIIl . II IIIII I I II I ii I I
fill i
SPECIAL SAFETY SECTION
1 I IIIIIIIIII I III II III I I I IIIII I Illl
GUARD AGAINST KICKBACK
Kickback is adangerous reaction that can leadto ssdous
injury. Do not rely only on the safety devices provided
with your saw. As a chain saw user, you must take
special safety precautions tohelp keep your cutting jobs
free from accident or injury.
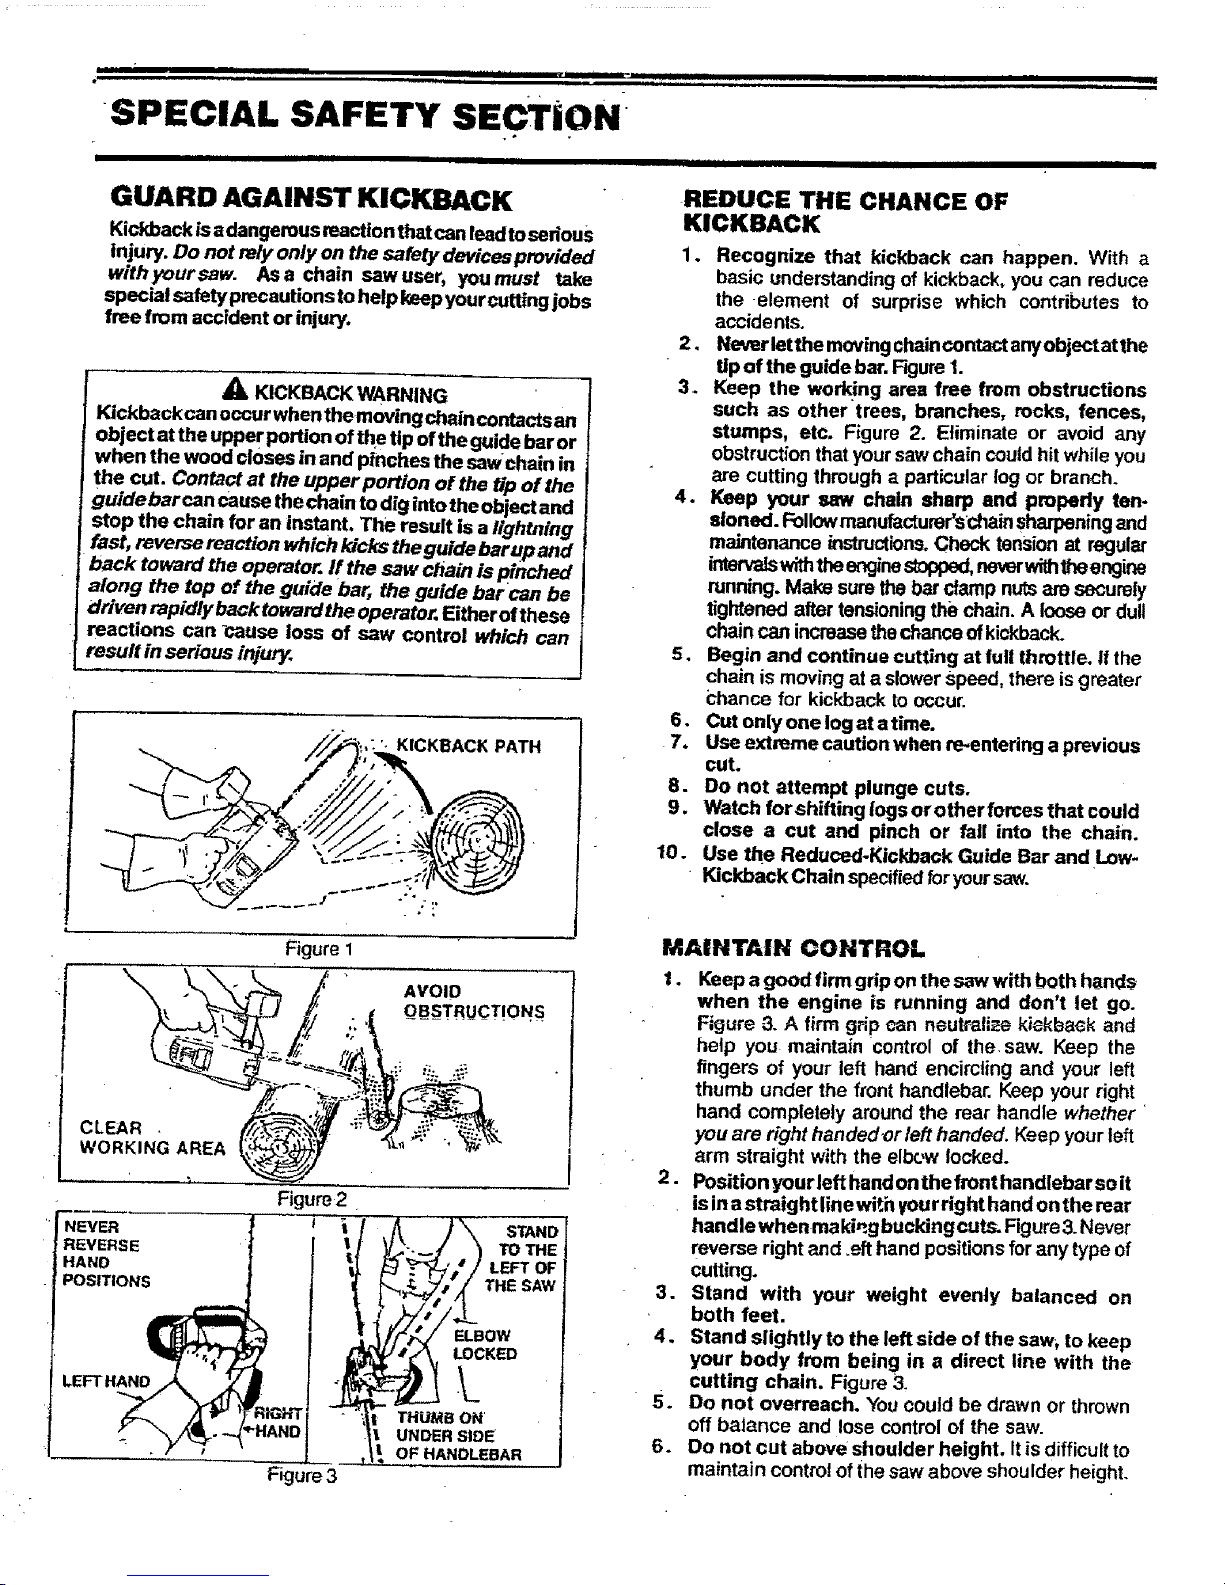
KICKBACK WARNING
Kickbackcan occur whenthemovingchain contactsan
object at the upper portion of the tip of the guide baror
when the wood closes in and pinches the sawchain in
the cut. Contact at the upper portion of the tip of the
guidebarcan cause thechain to dig into the object and
stop the chain for an instant. The result is a lightning
fast, reverse reaction which kicks the guide bar up and
back toward the operator, ff the saw chain is pinched
along the top of the guide bar, the guide bar can be
driven rapidly back toward the operator. Either ofthese
reactions can -cause loss of saw control which can
result in serious injury.
NEVER
REVERSE
HAND
POSI_ONS
STAND
TO THE
LEFT OF
THE SAW
LEFT HAND
Figure 3
ELBOW
LOCKED
THUb]BON
UNDER SIDE
OF HANDLEBAR
REDUCE THE CHANCE OF
KICKBACK
1. Recognize that kickback can happen. With a
basic understanding of kickback, youcan reduce
the element of surprise which contributes to
accidents.
2. Ne_erlet the movingchaincontact anyobject atthe
tip of the guide bar. Figure 1.
3. Keep the working area free from obstructions
such as other trees, branches, rocks, fences,
stumps, etc. Figure 2. Eliminate or avoid any
obstruction that your sawchain could hit while you
are cutting through a particular log or branch.
4. Keep your saw chain sharp end propedy ten.
sloned. Followmanufacturer's chain sharpeningand
maintenance instructions.Check tension a_ regular
it_"_mlswi_ lhe er_ir_ _ nev_wilh_eengi_
running. Make sure the bar clamp nutsam securely
tightened alter tensioningthe chain.A loose or dull
chain can increasethe chance ofkickback.
5. Begin and continue cutting at full throttle. It the
chain is moving at a slower speed, there is greater
{:hence for kickback tooccur.
Cut oniy one log at a time.
Use extreme caution when re-entering a previous
cut.
8. Do not attempt plunge cuts.
9. Watch for shifting iogsorotherforcesthat could
close a cut and pinch or fail into the chain.
Use the Reduced-FJckback Guide Bar and Low-
Kickback Chain specifiedforyoursaw.
°
7.
10.
MAIXTAIN OONTROL
1. Keep a good firm grip on the saw with both h_nds
when the engine is running and don't let go.
Figure -3. A firm g_ipcan neutralize kickback and
help you maintain control of the saw. Keep the
fingers of your left hand encircling and your left
thumb under the f_onthandlebar..Keep your right
hand completely around the rear handle whether
you are right handed or /eft handed. Keep your left
arm straight with the elbuw locked.
2. Position yourleft handonthe front handlebarso it
isin a straightiine with yourright hand onthe rear
handle whenma king bucking cuts. Figure3. Never
reverse right and .eft hand positions for any type of
cutting.
3. Stand with your weight evenly balanced on
both feet.
4. Stand slightly to the left side of the saw_ to keep
your body from being in a direct line with the
cutting chain. Figure 3
5. Do not overreach. Youcou|d be drawn or thrown
off balance and lose control of the saw.
6. Do not cut above shoulder height. It is difficultto
maintain control ofthe saw above shoulder height.
Page 4
i ii i II !llllllllllll i I i IIIHII i,i i I I I! ill ill ,lll,i
SPECIAL SAFETY SECTION (conUnued)
II I ; II |1 i III I
Because achainsawis a high-speed wood-cuttingtool, special safetyprecautions must be
observed to reduce the risk of accidents, Careless or improper use can cause serious
injury.
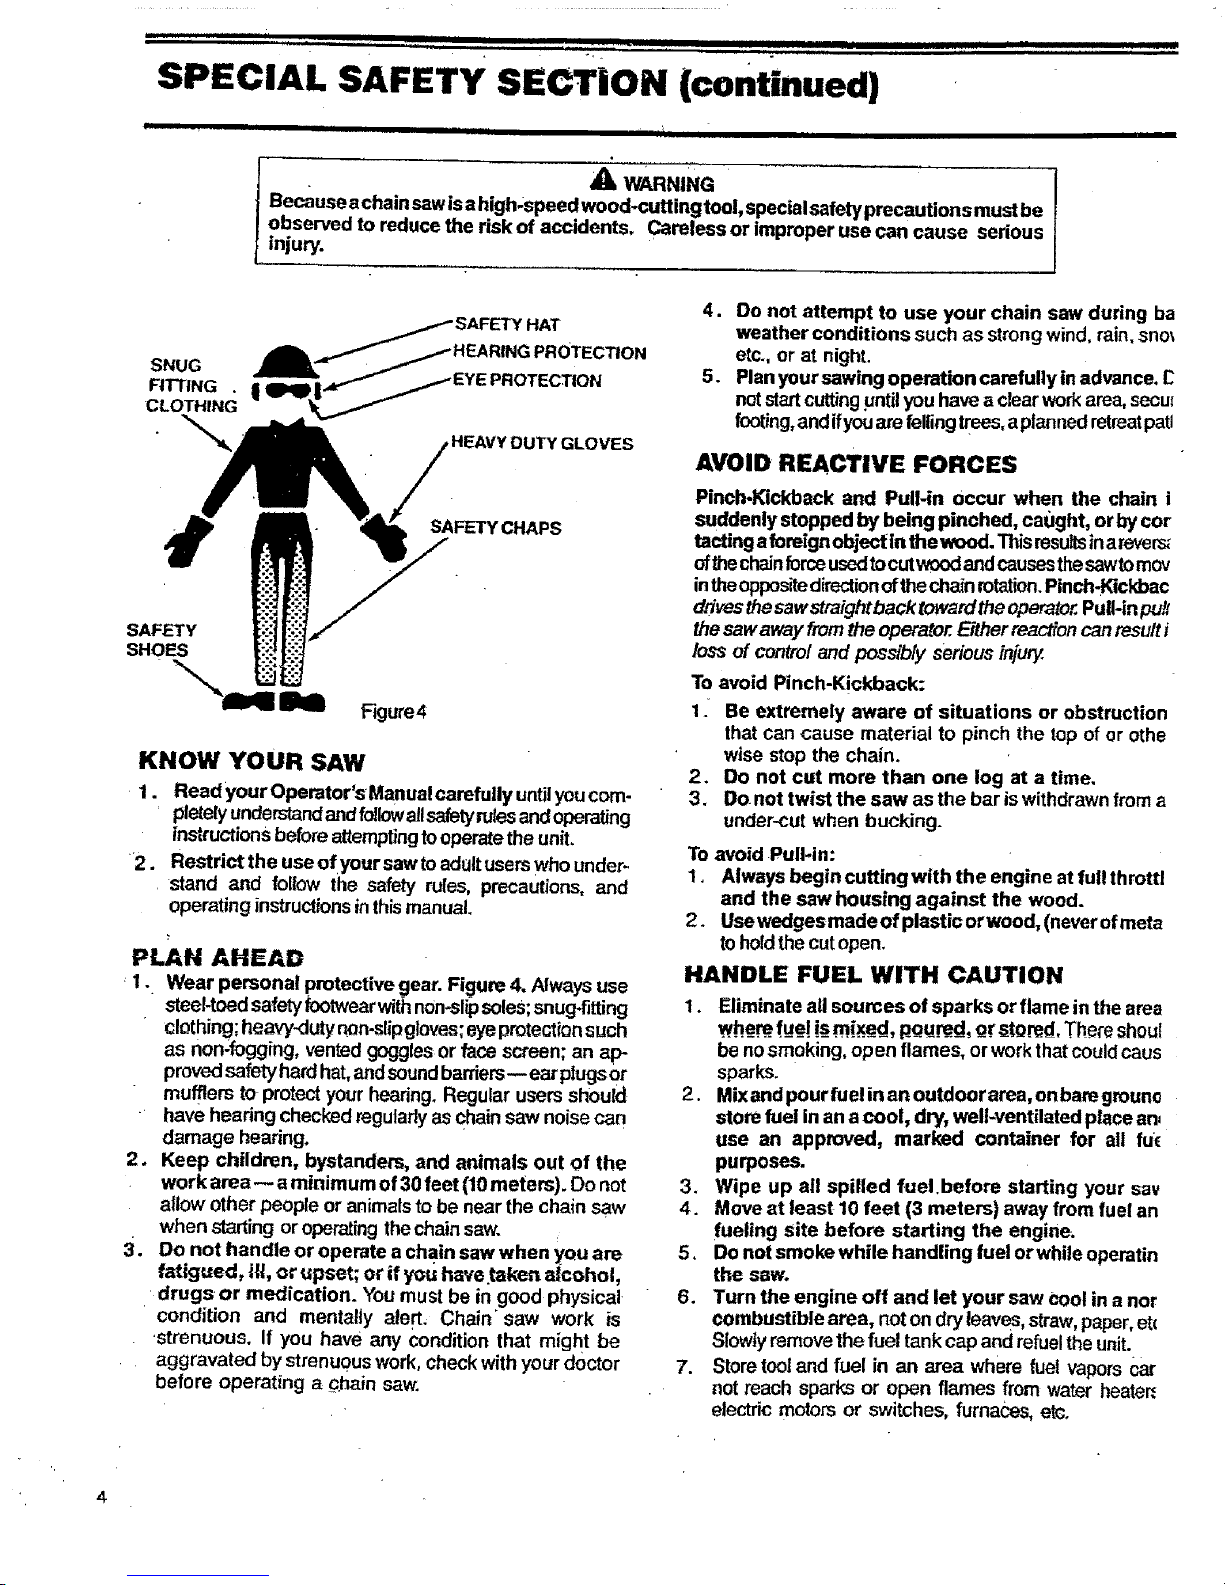
SNUG A _'_SAFETY HAT "
FITTING . | gw_
CLOTHING
_ r HEAVY DUTY GLOVES
SAFETY CHAPS
F'_jure4
KNOW "/'OUR SAW
1. Read your Operator's Manual carefully untilyoucom-
pletelyunderstandandfollowalls_ety rulesandoperating
instructionsbeforeattempting tooperatetheunit.
2. Restrict the useofyoursawte adUltusemwho under-
stand and follow the safety rures, precautions, and
operating instructions inthismanual.
PLAN AHEAD
1. Wear personal protective gear. Figure 4. Always use
steel-toedsafety footwearwithn0n-slipsoles;snug-fitting
clothing; heavy-duty non.slipgloves;eyeprotectionsuch
as non;fogging, vented gogglesor face screen; an ap-
provedsafetyhardhat,andsoundbarriers-- ear plugsor
mufflers to protectyour hearing. Regular usersshould
have hearing checked regularlyas chainsaw noisecan
damage hearing.
2. Keep children, bystanders, and animals out of the
work area N aminimum of 30feet (10 meters). Do not
allow other peotYeor animalsto be near the chain saw
when starting oropera_ngthe chainsaw.
3. Do not handle oroperate a chain saw when yQuare
fatigued, ill, or upset; or if you have.takeft alcohol,
. drugs or medication. You must be in good physical.
condition and mentatly alert; Chain_saw work is
'strenuous. If you have any condition that might be
aggravated by strenuous work, checkwith your dOctor
before operating a qhain saw.
4. Do not attempt to use your chain saw during ba
weather conditions such as strong wind, rain,sno_
etc., or at night.
5. Planyour sawing operation carefullyin advance, E
notstartcutting.untilyou havea clearworkarea, secu=
footing,andifyouarefelling trees,a plannedretreatpatl
AVOID REACTIVE FORCES
Pinch-Kickback and Pull-in occur when the chain i
suddenly stopped by being pinched, ca0ght, orby cur
tatting aforeign objectin the wood. Thisrasuttsina revers_
ofthechainforceusedtocutwoodandcausesthesawtomov
intheoppositedirectionofthechainrotation.Pinch-Kickbac
drivesthesawstraightback toward the operato,,:Pull-inpuS,,
thesaw away fromthe operator.Eitherreactioncan resu/ti
loss of controland possibly seriousin[u_
To avoid Pinch-Kickback:
1. Be extremely aware of situations or obstruction
that can cause material to pinch the top of or othe
wise stop the chain.
2. Do not cut more than one log at a time,
3. Do.not twist the saw as the bar is withdrawnfrom a
under-cut when bucking.
To avoid Pull-in:
1. Always begin cuttingwith the engine at full throttl
and the saw housing against the wood.
2. Use wedgesmade of plastic orwood, (never ofmeta
toholdthe cutopen.
HANDLE FUEL WITH CAUTION
1. Eliminate all sources of sparks or flame in the area
.whe_m.fue! is_m!_d, gQ_!md, Qr stored, There shou!
be nosmoking, open flames, or workthatcould caus
sparks.
2. Mixand pour fuel in an outdoor area,on baregrouno
store fuel in ana cool, dry, well-ventilated place an_
use an approved, marked container for all fuc
purposes.
3. Wipe up all spilled fuel.before starting your say
4. Move at least 10 feet (3 meters) away from fuel an
fueling site before starting the engine.
5. Do not smoke while handling fuel or while operatin
the saw.
6. Turn the engine off and let your saw cool in a nor
combustible area, noton dryleaves, straw,paper, etc
Slow|y removethe fuel tankcap and refueltheunit.
7. Storetooland fuel in an area where fuel vapors Car
not reach sparks or open flames from water heate_
electric motors or switches, furnaces, et¢.
4
Page 5

II i i,,,, , IIIll I
II I I IIIIIIIII
{mum] u II L I _rit
OPERATE YOUR SAW SAFELY
;. Do not operate a chain saw that is damaged, im-
properly adjusted , or not completely and securely
assembled.
2. Operate the chain saw only in outdoor areas.
3, Do not operate the saw from a ladder or in a tree,
4. Position all parts of your body to the left of cut and
. away from the saw chain when the engine is
running.
5. Cut wood only, DonotcutmeteJ,plastice,masonry,non-
woodbuilolngmaterials,etc.Donut useyoursawtopryor
shoveaway limbs,rootsorotherobjects.
6. Makesurathe chain willnot make contact with anyob-
ject while starting the engine. Never tryto startthe saw
when the guidebar is ina cutorkerf,
7. Use extreme caution when cutting small size brush
and saplings. Slender material can catch the saw
chain and be whipped toward you or pull you off
balance.
8. Be alert for springback when cutting a limb that is
under tension so you will notbe struck by the limb or
• saw when the tension in the wood fibers is released.
9. Do not put pressure on the saw at the end of acut.
This can cause you to lose control when the cut is
completed.
10. Stop the engine before setting the saw down.
MAINTAIN YOUR SAW IN GOOD
WORKING ORDER
1, Haveall chain saw service performed by a qualified
service dealer with the exception of the items listed
in the maintenance section of this manual. For
•examp!e, if improper tools axeused _ remove or hold
the flywheel when servicing the dutch, structural
damage to the flywheel can occur and cause the
flywheel to burst.
2. Keep fuel and oii caps, screws and fasteil_f_
securely tightened.
3. Keep the handles dry, clean, and free of oil or fuel
mixture.
4. Make certain the saw chain stops moving when the
throttle trigger is released. For correction, refer to
page 19 for carburetor idle adjustment instructions.
5. Stop the_saw if the chain strikes a foreign object. In-
spectthe unitand repairorreplace parts as necessary.
6. Disconnect the spark plug before performing any
: maintenance except for carburetor adjustments.
7, Never modify your saw in any way. Use only attach_
ments supplied or specifically recommended by the
•, manufacturer.
8, Always replace the handguard immediately if it
becomes damaged, or broken or is otherwise
"removed.
9. For Model 2300 AV & 2300 CVA, keep the vibration
isolators in good condition. Periodically inspect
isolatorsfor tears,ripsorseparationofthe rubberportion
fromthemetal mountings. Navea qualifiedserviCedeaJer
replacethe isolatorsif worn or damaged, if vibration
increases orifmounts developan outofroundorswollen
• shape from exposuretogasoline and/orot. It isrecom-
mendedthatallisolatorsbe replacedwhenafailuretoone
Occurs.
CARRY AND STORE YOUR SAW SAFELY
1. Hand carry the unit with the engine stopped, the
muffler away from your body, and the guidebar and
chainto therearcovered preferablywithascabbard.
2. Before transporting in any vehicle or storing in any
enclosure, allow your saw to cool completely, cover
the bar and chain and properly secure to avoid
turnover, fuel spillage or damage.
3. Empty the fueltank before stodng the tool. Use
upfuelleffinthecarburetorbystarting the eng-
ine and letting the engine run until it stops.
4. Store in a dry area out of the reach of children and
away from where fuel vapors can reach sparks or an
open flame from hotwater heaters,furnaces,etc.
THISCHAIN SAW IS FOR OCCASIONAL USE ONLY.
NOTE: Exposure tovibrations through prolonged use of
chain saws may produce Whitefinger disease
(Raynaud'_ pherm.,'_enon). This phenomenDn
reduces the hand's ability to feel and regulate
temperature, produces numbness and burning
sensations and can cause nerve and circulation
damage and tissue necrosis.
An anti-vibration system designed to reduce
engine vibration isrecommended forthose using
chain saws on a regular or sustained basis and is
providedon Model 230OAV and2300 CVA.An anti-
.vibrationsystemdoes not guarantee theavoidance
of Whitefinger disease, Continual and regular
usersmust monitor closely theiruse ofchainsaws
and physical condition.
.Notice: Refer to the Code of Federal Regulations, Section
• ' 1910.266(5); 2.5.1 of American National Standard
• Safety Requirements for Putpwood Logging,ANSI
03.1-1978;and rete'4ant state safety codes when
using a chain saw for logging purposes;
SAVE THESE INSTRUCTIONS
Page 6
KNOW YOUR CHA!NsAW +
A. INTRODUCTION
* Your saw hasbeen designed withsafetyinmind and
includesthefollowingfeatures asstandardequipment:
-- Reduced-Kickback Guide Bar (Control Tip_)
-- Low-Kickback Chain (Guard Link)
-- Spark Arrestor
-- Muffler Shield
-- Handguard
-- Anti-Vibration System (Model 2300AV_CVAonly)
WARNING
The followingfeatures are included on yoursawto help
reduce the hazardofkickback, however, suchfeatures
will not totally aliminate this dangerous reaction. Asa
chain sawuser, do not rely onlyon safety devices. You
must follow all wamklgs and safety instructions and
maintenance inthis manua[tohelp avoidkickback and
otherforceswhich can resultinserious injury.
B. KICKBACK SAFETY FEATURES
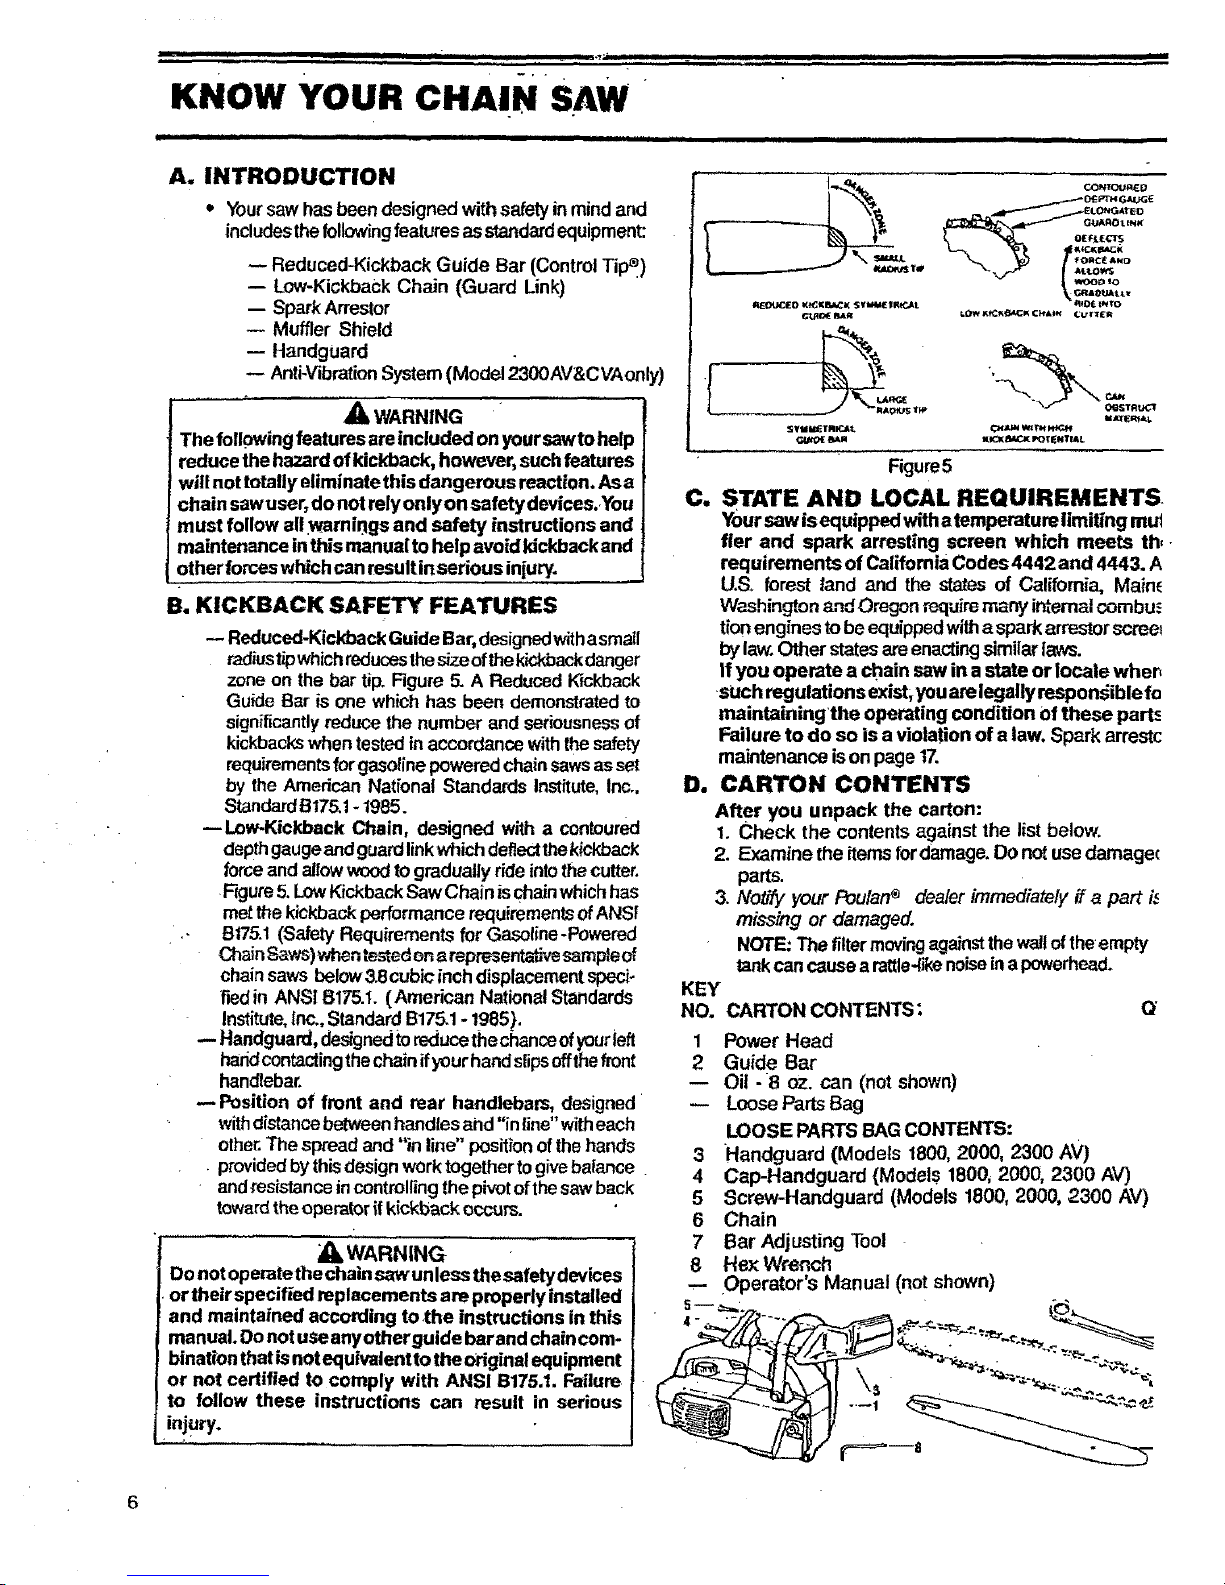
-- Reduccd-Kicid)ackGuide Bar,designedwithasmall
radiustipwhichreducesthesizeofthekickbackdanger
zoneon the bar tip.Figure 5. A Reduced K'mkback
Guide _3aris one whichhas been demonstratedto
significantlyreduce the number and seriousnessof
kickbackswhen testedinaccordancewiththe safety
requirementsforgasolinepoweredchainsawsas set
by the Amedcan National Standards Institute,Inc.,
StandardBI75.t - 1985.
--Low-Kickback Chain, designed with a contoured
depthgaugeandguardlinkwhich deflectthekickback
force and allowwoodtograduallyride intothecutter.
Figure5.LowKickbackSaw Chainis chainwhichhas
metthekickback performancerequirements ofANS!
Bt75.1(Safety Requirements for Gasoline-Powered
ChainSaws)whent_ted onarep_en_-_'¢e sampleof
chainsaws below38cubio inch displacement specJ-
fledin ANSI 8175.t. (American National Standards
Institute,_nc.,StandardB175.1- 1985}.
-- Handguard,designed toreduce the chanceofyourleft
haridcontactingthe chain ifyour handslipsoffthe front
handlebar.
-- Position of front and rear handlebars, designed
withdistancebetweenhandlesarid "in line" witheach
other.The swead and "in line" positionofthehands
• providedbythisdesignworktogethertogivebalance
and_esistanceincontrollingthe pivotofthesawback
towardtheoperatorffkickback occurs.
_WARNING
Donot operate thechain saw unlessthe safety devices
or their specified replacements are properly installed
and maintained according to,the instructions in this
manual. Do notuSeanyotherguide barand chaincom-
binationthatis notequivalentto the Originalequipment
or not certified to comply with ANSI B175,1. Failure=
to follow these instructions can result in serious
injury.
Figure5
C. STATE AND LOCAL REQUIREMENTS
Yoursaw is equipped witha temperatumlimiting rout
tier and spark arresting screen which meets th,-
requirements of Califomia Codes 4442 and 4443. A
U.S+forest tand and the states of California, Main_
WashingtonandOregon require many internalcombu_
tionenginesto beequipped witha sparkarrestor ecree+
bylaw.Other statesareenactingsimilarlaws.
If you operate a chain sawin a state or locale whep
such regulations exlst,youare legallyresponsible fo
maintainingthe operating condition of these parts
Failure to do so is a violation of alaw. Spark arrest(:
maintenance isonpage 17.
D. CARTON CONTENTS
After you unpack the carton:
1. Check the contents against the list below.
2. Examine the itemsfor damage.Do not usedamager
parts.
3. No_ your Poulan_ dealer immediately# a part i_
missing or damaged.
NOTE: The filtermovingagainstthewallof theempty
tankcanc_usea rattle-_]kenoise[napowerhead.
KEY
NO. CARTON CONTENTS: Q"
1 Power Head
2 Guide Bar
-- Oil -8 oz. can (not shown)
-- LooseParts Bag
LOOSE PARTS BAG CONTENTS:
3 Handguard (Models 1800,2000, 2300 AV)
4 Cap-Handguard (Models 1800, 2000, 2300 AV)
5 Screw-Handguard (Models 1800, 2000, 2300 AV)
6 Chain
7 Bar Adjusting Tool
8 He× Wrench
-- Operator's Manual (not shown)
Page 7

i fill iiI I J]i i
PREPARING YOUR SAW FOR USE
,,,,,,, ,, = i ii i ii iiii
i i iiiiiiii i i iiii
A. GETTING READY
1. READ YOUR OPERATOR'S MANUAL
CAREFULLY.
YourOperator'sManual hasbeendevelopedto help
you prepare yoursaw foruse andtounderstandils
safe operation. It is importantthat you read your
manual completelyto becomefamiliar withthe unit
beforeyoubeginassemblyorattemptoperation.Your
Poutan_ Dealer is available to show you how to
operateyoursaw.Be sure toaskforhisassistance.
2. HAVE THE FOLLOWING AVAILABLE:
a, Protective gloves.
b. Approved, marked fuel container,
c. Regular, leaded or unleaded gasoline.
d. 2-cycle engine oil(See page 9).
eoBar and Chain Oil (See page10).
fo Baradjusting tool providedwithyourunit.Oneend
of the toolserves as a wrench; the other can be
usedas ascrewdriver.
g. Phillips screwdriver.
h. Hex wrench -provided withyouruniL
15. ATTACHING THE HANDGUARD -- MODELS 1800, 2000, 2300 AV
(Model 2300 CVAand 2350 CVA are assembled with the Handguard on the saw).
The Handguard is a protective device designed to
reduce the chance of your left hand contacting the
chain if your hand slips off the front handlebar.
• Lift and-carry the chain saw by the handlebar,
not by the handguard.
• Keep the handguard securely fastened at all
times. Check the handguard screwseach time the
saw is used.
To install:
1._ign the HandguardandHandguardCap aroundthe
handlebar as shown in Figure6.
2: F_tthemountingp_nonthe Handguardintotheholein
the handlebar.Figure6, (inset).
•3. Insert the3 mounting screws intothe 3 holeson the
Handguard Cap.
4. Turneachscrewalittleatafirneclockwise, witha Phillips
screwdriveruntilthe HandguardCap andHandguard
meet and there isnogap betweenthe'_ paps.
• ,,,,, i ,L V,H,,,,,, HHHH'H' "U"'"'" :
C. ATTACHING THE BAR AND CHAIN
.l & WARNING
•_Do not start engine wzthout guide bar and chain
_ completely assembled. Otherwise, the clutch can
j come off and serious injury can result.
e Your saw is equipped with a Reduced-Kickback
Guide Bar and a Low-Kickback Chain.
• Use only the Reduced-Kickback Guide Bar and
Low_KicP,back Chain specifiedforyourchain saw
model, when replacing these parts. See
"Specifications"
ICAUTION: 1Wear protective gloves when handling
or operating your saw. The chain is sharp and can
Cut you even when it is not moving!
1. Remove'the followingpartsas showninFigure 7.
Use the Bar AdjustingTooiand HexWrench pro-
videdwith the unit.
a.) Bar Clamp Nut.
bJ Rear Bar Clamp Screw.
c,) Bar Clamp,
HAN UARD CAP
HANDLE_,__
HANDGUARD
Figure6
j _I=WARNING
Do not use the saw without the handguard in place.
Always immediately replace the handguard if it
i becomes damaged, broken or is otherwise removed.
BAR STUD
Figure 8
Page 8
:_.Turn
.
4.
5.
the Adjusting Scr-ew countbrclockwise
to move the AdjustingPin almost as far
as it will go tothe rear. Figure 7.
Hold chain with cutters facing as shown in
Figure8.
Place chain over and behind the clutch drum,
onto the sprocket. Figure8.
PlacetheGuideBaronthesawwiththelargeslotover
theBarStudand theMountingPins(oneithersideof
theBarStud).Fittheadjustingpinintothe roundhole
beFowthe largeslot.Figure7and9.
NOTE: BesuretheGuideBarispositionedwiththe
adjusting pin holebelowthelarge slot.
6. StartatthetopoftheguidebarandfitthechaJndrive
linksintogroovearound theguide bar.Figure9.
I .C:_.UTION: !Make sure that the tab on the bottom
ofthe fuel tank is allgned in the slot provided in
the fan housing. Figure 10,
7. Hold the Guide Bar against the saw frame and
install the Bar Clamp.
8. Secure the Bar Clamp withthe Bar Clamp Nut,
finger tight only Tighten Bar Clamp Nut after
chain is tensioned.
9..Replace the Rear Bar Clamp Screw and tight-
en securely.
10. Follow "Chain Tension" instructionsbelow.
PIN HOLE
Figure9
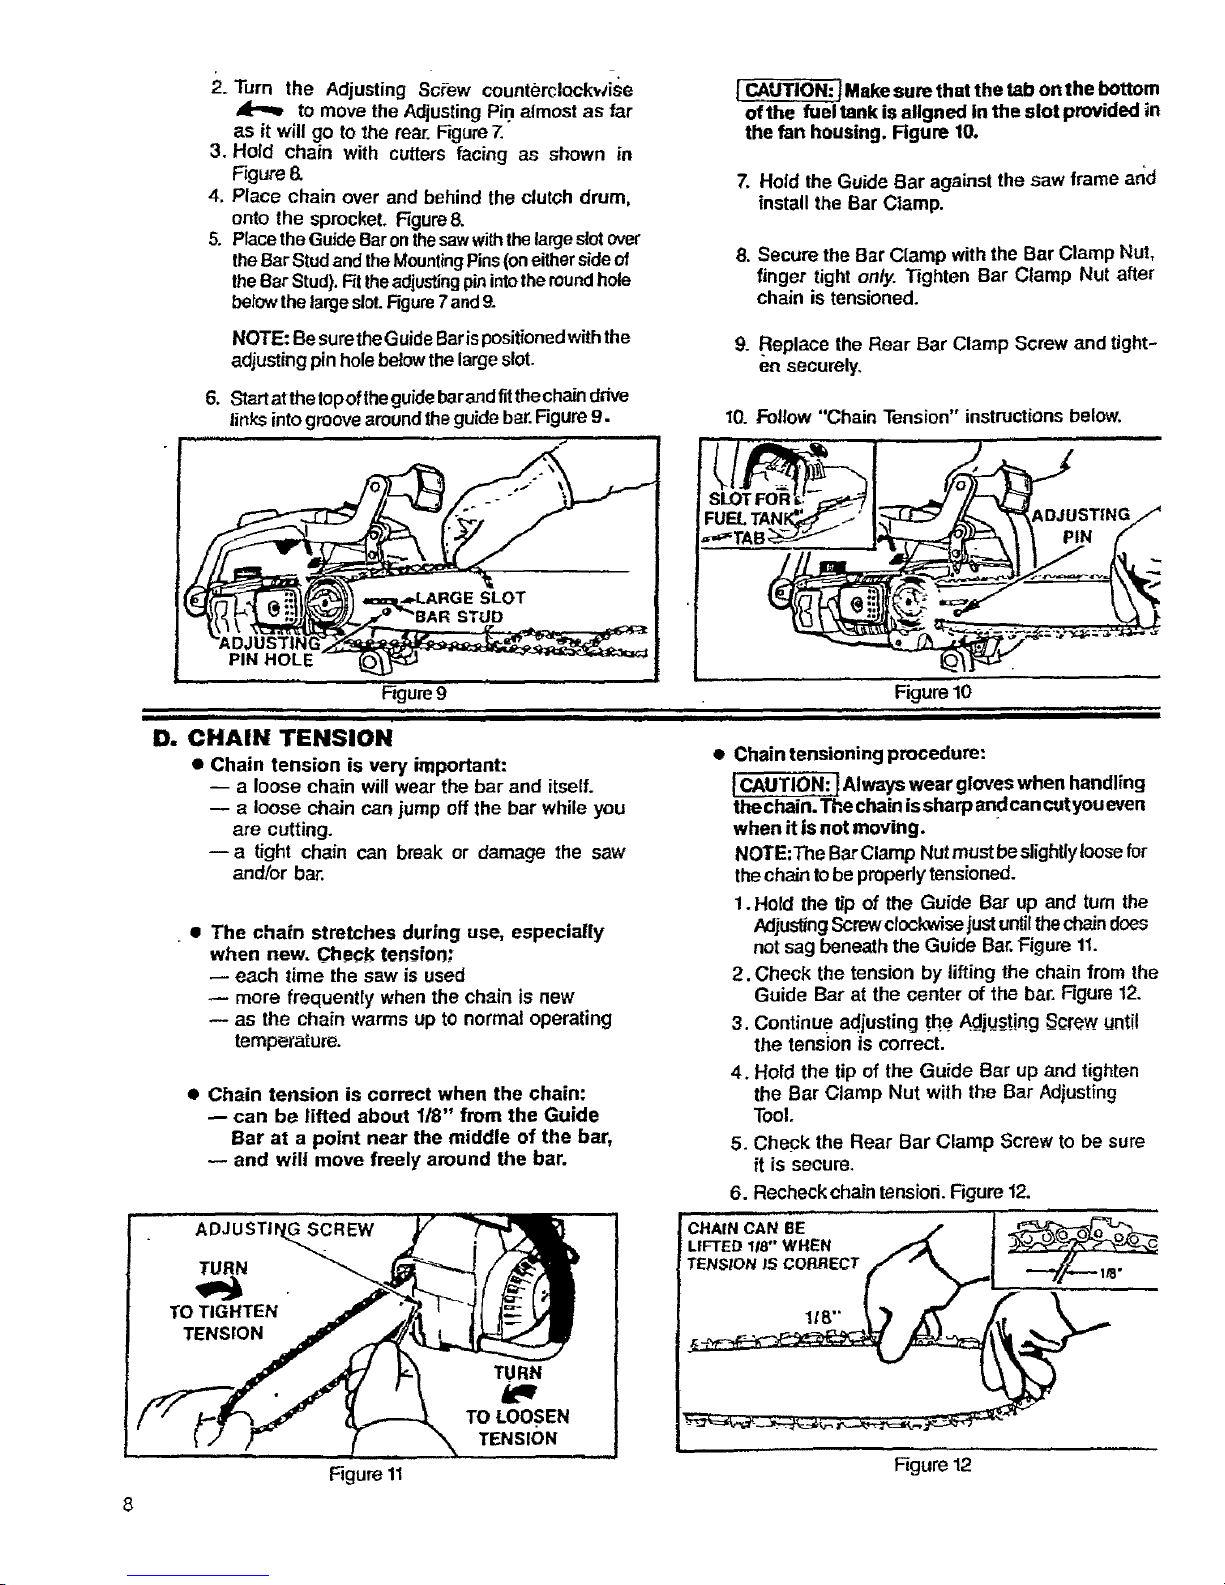
D. CHAIN TENSION
• Chain tension is very important:
-- a loose chain will wear the bar and itself.
u a loose chain can jump off the bar while you
are cutting.
--a tight chain can break or damage the saw
and/or bar.
• The chain stretches during use, especially
when new, Check tension.."
each time the saw is used
more frequently when the chain is new
-- as the chain warms up to normal operating
temperature.
• Chain tension is correct when the chain:
can be lifted about 118" from the Guide
Bar at a point near the middle of the bar,
and will move freely around the bar.
ADJUSTIN,_REW
TURN
TO TIGHTEN
TENSION
TENSION
Figure10
i
• Chain tensioning procedure:
ICAUTION: !Always wear gloves when handling
the chain. The chain issharp andcancut youeven
when it is not moving.
NOTE:The Bar Clamp Nutmust beslightlyloose for
thechain tobe properlytensioned.
1. Hold the tip of the Guide Bar up and turn the
AdjustingScrewclockwisejustuntilthechaindoes
not sag beneath the Guide Bar.Figure 11.
2. Check the tension by lifting the chain from the
Guide Bar at the center of the bar. Figure 12.
3. Continue adjusting the A_ju_sJing_S_crewuntil
the tension is correct.
4. Hold the tip of the Guide Bar up and tighten
the Bar Clamp Nut with the Bar Adjusting
Tool.
5. Check the Rear Bar Clamp Screw to be sure
it is secure.
6. Recheck chain tension.Figure 12.
Figure 11
Figure12
Page 9

E. FUEMNG YOUR ENGINE
1. FUEL SAFETY
a. Use only recommended fuel mixtures.
b. Mix and pourfuel outdoors and where there are
no sparks or flames.
c. Use a container approved for fuel,
d. Do notsmokeorallowsmoktng near fuelor the
tool or while using the tool.
e. Wipe up all fuel spills before starting engine.
f, Move at least 10 feet away from fueling site
before starting engine.
g. Stop engine before removing fuelcap.
h. Empty the fuel tank before storing the tool.
Use up fuel left in the carburetor bystarting
the eng ine and letting the engine run until
it stops.
i. Store tool and fuel inanarea where fuel vapors
cannot reach sparks oropen flames from water
•heaters, electric motors or swltches,•furnaces,
etc.
2. FUELMIXTURE
• Your tool is powered by a two-cycle engine
which requires afuel mL_ure of regular unlead-
ed gasolineand ahigh quality engine oil
specially made for 2-cycle, air cooled
engines. The internal design ofthe2-cycle engine
requireslubrication of movingparts.Lubrication is
provided when the mcommend_l mixture of
gasolineand oil isused.
e Genuine POULAN ® or _,%EB EATER ® 40:I
Engine Oilis stronglyrecommended forthepro-
tection of your unit. Extensiveengineering tests
haveproventhatPoulan® orWeed EateP or'lresisLs
breakdown at operatingtemperatures commonto
2-cycle engines, resultingin dependable perfor-
mance and longerengine life.
• GaSoline must be clean and fresh. After a short
periodoftime,gasolinewillchemicallybreak down
and formcompoundsthat cause handstarting and
damage in 2-tyPe engines.
e The correct measure of gasoline to oil is very
important. ToomuchoI inthemixturewillfoul the
spark plug.
II_AUTION:] Too little oi! or incorrect oil will
cause the engine to overheat and seize.
• Always mix the fuel thoroughly in a container
sincegasolineandoiidonotreadilycombine. Donot
•mix aaso/ine and oil directlvin the fuel tank.
,, , ,,,ll,, ,,,,,,_........... _=..... ,,i,
3. USE THE FOLLOWING ONLY:
Poulan® or Weed Eater® 40:1 EngineOil is strongly
recommended,Availableinthe followingconvenient
containerSizes,Poulan• orWeed Eater_ 40:I Engine
Oilshouldbe mixedas follows:
3.2 oz. Container...Mix with I gallon gasoline.
8 oz.Container...Mix with 2-112gallons gasoline.
Ifnoneofthe above oilsare available,useagoodqua-
lity,two-cycle,aircooled engineoilmixedata ratioof
16:1(8oz. oilto 1gallon gasoline).
4. DONOr USE:
• BIA OIL (Boating InstituteofAmerica)--
--Does not have proper additives for air-cooled
2_3,'cleenginesandcancauseenginedamage.
• AUTOMOTIVE OIL--
•---Does not have proper additives for 2-cycle
enginesand can cause damage.
5. HOW TO MIX FUEL AND FILL TANK
a. Pour 1/2gallonregular unleaded gasoline intoan
approved, marked container,Do not mix gasoline
and oiidirectfyin the fuel tank.
b. Addentiremeasure of engine oil.
c. Covercontainertightly and shake forone minute,
d- Slow{yremm,e_uelconta{ner cover.
e. Add remainder of gasoline.
f. Covercontainertightly and shake again.
g. Slowly remove fuel container cover.
h. Slowlyremove fuel cap. See"Specifications;'
for location.
i. Fill thetank using a spoutor funnel.
j- Reinstallthe fuelcap securely,
Page 10

K BARANDC_/M LUBRICANT-
• The Guide Bar and Cuffing Chain req_]m
continuous lubdcaffon in order.tb remain in
operating condition. Lubricationis provided
by the aulomaticoilersystemwhenthe oillank
_ keptfilled.
-- Lackof oil willquickly ruinthebarand chain,
Toolittle oilwigcause overheating shownby
smokecomingfromthe chainandlordiscolora*
lionof theguidebar rails;
• Genuine Poulan® Barand Chain OI! is recom-
mended to protectyour unitagainst excessive
wearduetoheatandfriction. Poulan® lubricant
resistshightemperaturethinning.IfPoular_ bar
andchaino_lisnotavailable,useagood gradeSAE
30 oil.Neverusewasteoil forthispurpose.
O
in freezing weather oil will thicken, making
it rmosssary to thin bar and chain oil with a
small amount, of Diesel Fuel #1 or
Kerosene, Bar and chain oilmust be free Flow-
ingfor the oi!systemto pumpenough oilfor ad-
equate lubrication.
1. USETHE FOLLOWING:
30°F or above --lubricant -- undiluted.
30o-0° F_ 95% lubricant tO5% Diesel Fuel
# 1or Kerosene.
.Below 0°F--90% lubricant to 10% Diesel
Fuel #1 orKerosene.
3- IMPORTANT POINTS TO REMEMB ER
a, Fill the oil tank each time you refill the fuel"
tank Io ensure there willbe sufhctent odforthe
cha=nwhenever youstart and run thesaw
b. The saw will normally use about 1/2 tank of
chain oil for each tank of fuel mixture. If less
oil is used, check for a plugged oil hole in the
guide bar.
c. Keep sawdust and debris cleaned from the
oil holes in the guide bar lo allowan adequate
odflow tothe bar and cha=.n
d.
Keepspifled and spattered oilwiped from the
unitto avoidsatgduat and debrisbuilt-up. Pay
particularattentiontooil onthefan housingand
starterassemblytoavoidov_heatingthe engine.
It is normal for a small amount of oil to ap-
pear under the saw after the engine stops. •
ThtssSdue tooddralmngfromthe bar _,ndchain
when not=nuse.
Generally, less oil is required for softor
freshly cut wood end maximum oil is requir-
ed for hat_fwood or wood that has been
cut for a periodoftimeo
•2. HOWTO RLLTHE OILTANK
a. Stoptheengine.
b. Tum saw on its side withoil cap up.
c. Loosencapslowlyandwaitforpmssureinthe
tank tobe released before removingthecap.
Figure14.
d. Fillthe oil tank.
e. Repla_ the _f _ap securely.
Rgure 14
i iiiiii iiiiinul I
............. ,,, ,,,,,,,.,,
NOTES
. ,,_,,,i,
10
Page 11

w. / J iii ii I I ,, ,,
USING YOUR SAW
[ iiiiii i i i iil[ii/i ii
A. PRE-OPERATION CHECKS
Before operating your saw, always:
1. _,Check over safety rules and precautions in
this manual. Make Cedain you completely
understand and can apply each one.
2, ,,-Check personal protective gear. Always use
eye, hearing, and head protection devices,
safety footwear, protective gloves, and
snug.fitting clothing.
3. J Checkthesawforloosebolts, nuts,orfittings.
Tighten,repairorreplacepartsas necessary.Tools
requiredlistedin'_ssembly:'
4. ,,, Check the air fiiter. Ctean the51terbeforestart-
ingthe engine.Forlocation,see '_r Filter."
5. ,,,Check the sew chain. The chain should be
sharp and al the correct tension.
6. ,,,Check the fuel tank and oil tank. Both tanks
should be filled.
7. ,,,Check the handles. Handles should be dry
and free of fuel mixture and oil.
8. ,.-CheCk weather conditions. Do not use )'our
saw at night or during bad conditions such
as strong wind, rain, snow, etc.
9. ,,- Check theworkarea. Keepchildren,bystanders,
andanimals asafe distanceawayfromtheworkarea
whenstarting oroperating the saw-- aminim umof
30 feet.
i iiiii iii i , iiiiiiiiiiii ii i iii i i i i iii iiii
8. STARTING INSTRUCTIONS (Refer to "Specifications," page 2, for location of controls.)
1, BASIC PROCEDURE
a, Hold saw firmly with the saw chain free to turn
without contacting any object,
b, Move ignitionswitch to"Start" position, Figure 15,
c. Adjustchokeaccordingto"StartingProcedurefor
Varying Conditions" below, Figure 16.
d. Squeezetriggerwithyour righthand whilepush!ng
sawaway from youand pulling thestartermpe with
your left hand. Figure 17.
e. Release the trigger after engine starts,allowingthe
engine to idle,
J , WARN,NG i 1
| Thechain must not move when the engine runs atidle I
| speed. Refer to "Carburet.or Ad|ustments; for I •
[corre=ion.
f, St_p engine by m_v_;g the ignition =_ttch to the
"Stop" position. Figure 15.
IGN ITION SWI TCH
CHOKE
FULL
": HALF
START-.aE--"Jm - STOP OFF
F_gure_5 ' Rgure 16
Push saw away wilh right
hand while pulling starter
r0Pe wiih let= hand.
Figure 17
15.18inches
of rope per pull.
I
dl_ WARNING !
Always wear gloves; safety footwear; snug-fitting l
clothing; and eye, hearing, and head protection
t
devices when operating a chain saw.
2. STARTING PROCEDURE FOR VARYING
CONDITIONS
NOTE: Be sureto follow"'1. Basic Procedure," as
describedonthispage.
a. COLD ENGINE
1.)push choketofull chokeposition.Figure16.
2.)Pull starterropeuntilengineattempts torun
3.)Pushchokeuntilhalfpositionisfelt. Figure15.
4.)Pullstarterropeuntilengineruns.
5.)After 5 second warm up, push choke to the
offp_i_n.
& WARNING
Avoidbodilycontact with the mufflerwhen starting or
using a warm engine to _oia se_-iousburns.
b. WARM ENGINE
1,)Leave chokeattheoff position.Rgure 16.
2.| Pullstarter rope untilengine runs.
c. REFUELED WARM ENGINE AFTER RUNNING
OUT OF FUEL
1.)Pushchoketo fullchoke position.Rgure t5.
2.)Pullstarter rope untilengine attemptsto run.
3.)Push choketotheoff position. Figure16,
4.)Pullstarter ropeuntilengine runs.
3. IMPORTANT POINTS TO REMEMBER
• a. When pulling the starter rope, donotusethe lull
extentoftheropeasthiscancausetheropetobreak.
Do notletthe starter ropesnap back,Hdldthe han-
dle and letthe roperewindslowly.
b. If engine floods, letthe unitset fora fewminutes.
thenrepeatstartingprocedureusingthehalf.choke
position.
c. Forcold weather _dar_, a,_owenginetowan_ up
(1.2min.)attheh_ position,lt_n movectx_
choketotheoff_. Dono(cutwiththechokeat
Ihe '_11"nr "h_lf" nn.r,_nn.
Page 12

TYPES OF CUTTING
III I -- i IIIIIIIIIIIII I
A, BASIC CUTTING TECHNIQUE
JIIIIIIIIIIIIIII III IIIII II III
2. UNDERSTAND REACTIVE FORCES
1. IMPORTANT POINTS
a. Cut wood only, Do not cut metal, plastics,
masonry,non-weodbuildingmatedals,etc.Do not
useyoursawtopryorshoveawaylimbs, rootsor
otherobjects.
b. Stop the sawif the chainstrikesaforeign object.
Inspect the saw and repairor replace parts ds
necessary.
c. Keep the chain out of dirt and sand. Even a
small amount of dirtwillquicklydull a chain and
thus increase the possibility of kickback.
• k KICKBACK WARNING
Kickbackcan occur when the movingchain contacts
anobject atthe upper portionofthe tipoftheguidebar
orwhen the wood closes in andpinches the saw chain
in the cut. Con tact at the upper portion of thetip of the
guidebarcan causethechain todig intotheobjectand
stop the chain for an instant. The result is a lightning
fast, reverse reaction which kicksthe guide bar upand
back toward the operator, ff thesaw chain ispinched
along the .top of the guide bar, the guide bar can be
driven rapidly back toward the operator. Either of
these reactions can cause loss of saw control which
can result in serious inju[y.
,,J,,,, ,
B_GIN CLI'_J;ING WITH . .
THE BOTTOM OF THE
SAW AGAINST THE LOG.
Figure 18
Pinch-Kickback and Pull-In occur when thechain
issuddenly stopped by being pinched, caught, or
by contacting a foreign object in the wood, This
resultsinareversa!ofthechainforceusedtocutwood
andcausesthesawtomove intheoppose directionof
chainrotation.Eitherreactioncanresultinloss0fcon-
trotandpossiblesedousinjury.
;,Pinch-Kickback-
--occurs when the chain, on top of the bar is
suddenlystoppedwhen the topof the bar isused
forcutting.
--rapid/y drives the saw straight back toward the
operator.
• Pull-In
--can occur when the chain on the bottomof the
bar is suddenly stopped.
--pulls the sawrapidlyforward.
3. PROCEDURE
Practicecuttingafewsmalllogsusingthefo!lowingtechni-
que toget the"feel" ofusingyour sawbeforeyoubegina
major sawing operation.
a. Acceferatetheengineto fullthrottlejust before
entering the cut bysqueezing the throttletrigger.
b. Begin cutting with the saw frame against the log.
Figure 18.
c, Keep the engine at full throttle the entire time you
are cutting,
d. Allow the chain to cut for you; exert only light
downward pressure, if you force thecut,damageto
thebar.chain,or en.qinecan result.
e, Release the th,'_Ule trigger assoon _sth_ cut is
completed, al/owtngthe engine toidle.If yourunthe
sawat fullthrottlewithouta cuttingload, unnecessary
wear can occurto thechain, bar, an.dengine.
f. Do not put pressureon tllesawat the end ofthe cut
toavoidlosingcontrolwhen the cut is complete.
g. Stopthe engine before setting the sawdown after
cutting.
B.
TREE FELLING TECHNIQUES
1. PLAN YOUR SAWING OPERATION CARE-
FULLY IN ADVANCE
a. Clear the work area. You need a clear area all
around the.tree where you can have secure :
foot_r_g.
b. Study the natural conditions that can cause
the tree to fall in a particuta=:direction,
1.) The WIND directionand speed.
2.) The LEAN of thetree.
3 ) WEIGI-WED withBRANCHES on one side.
4.) SurroundingTREES and OBSTACLES,
c Lookfordecayand rot.Ifthetrunkisrotted,itcan
snap and fal!towardtheoperator,
d. Check for broken or dead branches whichcan
fallon youwhile cutting.
e. Makesure thereis enough room forthetree to
fall.Maintainadistanceof 2V2treelengthsfromthe
neare_ perSonorother objects.Enginenoisecan
drownout a warningcall.
f Remove dirt, stones, loose bark, nails,
staples, and wire from the tree where cuts
are to be made.
g. Ptan to stand on the up-hill side when cut-
ting on a slope.
h. Plan a clear retreat path to the rear and
diagonal to the line of fall. Figure_9.
12
Page 13

2. FELLING SMALL TREES -- LESS THAN
6" IN DIAMETER
a. Ifyouknowthedirectionoffall:
1.) Make a singlefellingcut on lhe sideaway
from thedirectionof fall
2.) Cutallthewaythrough.
3.) Stop the saw, put it down, and get away
quicklyonyourplanned retreat path.
•b. If you arenot sure whichway the tree will fall,
use the notch method described for felling
large trees.
_WARNING
DO NOT CUT:
near electrical wires or buildings.
if you do not know the direction of tree fall.
at night since you will not be able to see well.
--during bad weather- strong' wind, snow, rain,
etc.
3. FELLING LARGE TREES-- 6" DIAMETER
OR MORE
The notch method is used to cut large trees. A
notch is cut on the sideofthe tree in lhe desired
direction of fall. After a felling cut _smade on the
opposite side of the tree, the tree wifJtend to falt
=intothe notch.
NOTE: tf the tree has large buttress roots, re-
move before making the notch. Cut into the but-
tresses vertically,thenhorizontally. Figure20.
a. Make the notchcut.Figure21.
1.) Cut the bottom of the notch first, through
1/3of thediameter ofthe tree.
2.) Complete the notch by making the slant
cut.
3.) Remove thenotchofwood.
b. Make the fellingcut on theopposite side of the
notch about 2" higher than the bottQm of the
notch..
(;_ Leave ene_Jh u,'_ut w¢.<_ between the felling
cut and the notch to formahinge. Figure22.
NOTE: The hinge helps to keep the tree.from
twisting.andfa ling in the wrong direction.
d. Use a wedge ifthere is any chance that thetree
willnot fatl inthe desired direction.
Checkthewind.
Don'tcutdownw_nd.
Figure 19
/ \
\
Figure21 Figure22
AWAR.ING
Stayon the uphillside oftheterrain toavoidthetree rott-
ingor sliding downhill after it has fallen.
NOTE: Before the felling cut iscomplete, drive
wedges to open up the cut when necessary to
control the direction offall. Use woodor plastic
wedges butneversteelor iron,toavoidkickback
and chain damage.
e. Be alert for signs that thetree isreadyto fall:
1.) craoking sounds.
2,) widening of the fellingcut.
3.) movement inthe upper branches.
f. As the tree starts to fall, stop the saw; put it
down_ and get awa.Y qu]qk/yon.yQiJrplanned
retreat path.
g. Beextmmelycautiouswithpar'daliyfallenL,eesthat
may bepoodysupported. Whenatree doesn'tfall
completery,setthes_vaside andpulldownthetree
witha cable winch, blockand tackleortractor.To
avoidinjury,do notcut down a partiallyfallentree
with yoursaw.
DON'T PUT YOURSELF IN THESE POSITIONS
%
Check the lean.
Don't cuton lean side.
Checkthebalance.
Don'tcutonweightedside.
Page 14

i iiiiiiiillllwi
=, =,
i I ,ul 1",,, IIIIJIL _iiI ,i],i i F_I "iiiiiiiiiii ii i iil ii
C. BUCKING
Bucking isthe term used for cutting a fallen tree
to the desired log size.
1. IMPORTANT POINTS
a. Cut only one logat a time.
b. Cut shattered wood very carefully. Sharp
pieces of wood could be flung toward the
operator_
c. Use a sawhorse to cut small logs. Never
allowanother persontO hold the logwhilecut-
ringand never holdthelog withyourlegorfoot.
d. Do not cut in an area where logs, limbs and
rootsaretangled suchas ina blown downarea.
Dragthelogsintoaclearareabeforecuttingbypuii-
ingoutexposed and cleared logsfirst.
e. Make the first bucking cut 1/3 of the way
through the fog and finish with a 2/3 cut on
the opposite side. Asthe logis being cut,itwill
tendto bend, The saw can become pinched or
,hung in the logif you make the first cut deeper
than 1/3 of the d_ameterofthe log.
f. ;Give special attention to logs under strain to
.pt_wentthesawfrem pinching. Make thefirst cut
onthepressuresidetorelievethestressontheJog,
Figure23.
1STCtrr
PRESSURESlDE _ 4---
iiii i i
2NOCUT
• "---t <---
lsrc PRESSURES OE
ure2a
Figure24
2. TYPES OF CUTTING USED Figure 24
•--Ovemutting--begin an the topsideof thelog with
the bottom of the saw against the log; exert light
pressuredownward.
--Undercutting-- beginon theunder side of thelog
with the top of the sawagainst the log; exert light
..pressureupward.Dudngundercutting,thesawwiUtend
topushbackatyo_J,_ preparedf_r_reaction andhold
thesawfirmlytomaintaincontrol.
tl. A WARNING . "
] Neverturnthesawupsidedowntounderout.Thesaw
t
I cannot be controlled inth=s position.
WARNING
If saw becomes pinched orhung in a log, don't try to
force itout. Youcan losecontrol of thesaw resulting in
serious injury and/or damage to the saw. Stopthe
saw, drive a wedge of plastic or wood into the cut
until the saw can be removed easily. Figure 25,
Restartthesew and carefully reenter the cut. To
avoid kickback and chain damage, do not use a
metal wedg_ Do not attempt to restart your saw
when it ispinched or hung in a log.
3." BUCKING--WITHOUT A SUPPORT
_. Overcut witha 1/3 diameter cut,
b. Rol[Iogover andfinish withan overcut,
14.
USING
ANOTHER
LOG AS A SUPPORT
Rgum26
1st
Cut
!-I 8 I,!
1st \V,// 2nd \VIi 1st
ou,yu,
Figure27
Page 15

L=I iiiiii
D_
-'.- _ %
4-_BUCKING -- U'SING ANO1TIER LOG AS A'
SUPPORT (Figure 26):
a. InareaA:
1.) Undercutll3ofthewaythmughlheiog.
2.) Finishwithan overcut.
b. InareaB:
1.) Overcut, 1/3of lhewaythroughthelog.
2.) Finishwith anundercut.
5. BUCKING-- USING A STAND (Figure 27):
a. In area A:
1.) Undercut l/3ofthewaythroughthelog.
2.) Finishwith anovercut.
b. In area B:
1.) Over cut 1/3oftheway threughthe log.
2.) Finish Withan undercut.
iiiii ,Jl.........
• Work slowly, keeping both hands on the saw
with a firm grip. Maintain secure footingand bal-
ance.
e Watch out for springpoles. Use extremecaution
when cutting small size limbs. Slender material
may-catch the saw chain and be whippedtoward
you or pull you offbalance.
• Be alert for springback. Watch out for branches
_thatare bent or under pressure as you are cutting
toavoid being struck by thebranchorthesaw when
thetension inthe woodfibersis released.
: • Keep a clear work area. Frequently clear bran-
chesout of the way toavoid trippingoverthem.
!-
L_WARNiNG
Do not stand on the logbeing cuL Any porUon can roll
causing loss of footing and control. .i
USE COMMON SENSE
........... i i
IIIIIIHII[IIjI[I i
2. PRUNING
a. Limit pruning to limbs shoulder height or
below. Do not cut if branches are higherthan
your shoulder. Get a pro{essiona; to do the
job.
b. Refer to Figure29 for the pruning tech-
nique.
1.) Undercut 1/3 of the way through the timb
near thetrunkofthe tree.
2.) Finishwith an overcut farther outfromthe
trunk,
3.) Keep outofthe way ofthe falling limb.
4.) Cut the stumpflush near the trunkof the
tree.
] A WA..I.G
] Never ctimb into a tree to debranch or prune. Do
j not stand on ladders, platforms, a logorin any posi
J ti0n which can cause you to lose your balance or
j control of the saw.
1. DEBRANCHING
a. Always debranch a tree after itis cut down,
Only then can debranchingbe done safely
and properly.
b, Leave the larger lower limbs tosupport the
tree as you work.
c. Start at the base of the felled tree and work
towards the top, cutting branches and
limbs. Remove small limbs with onecut. Fig-
:ure 28,
d. Keep the tree between you and the chain.
Cut from the side of the tree opposite the
branch you are cutting.
" eo Remove larger, supporting branches with
the 1/3, 2/3 cutting techniques described in
" the bucking section.
1.) Start with an undercuL
2.) Finish with anovercut.
f. Always use an overcut to cut small and
freely hanging limbs. Undercutting could
cause limbs tofailand pinchthesaw.
A, WARNING
Be alert for and guard against kickback. Do not
allow the moving chain to contact any other
branches or objects at the nose of the guide bar
when debranching or prun{n9. Allowing such con-
tact can result in serious injury.
Removesmall limbs
withonecut.
Figure28
" Figure29
15
Page 16

I I 111 I" - -IIIIIIIIII - _ , E _ I IIII iii jiiiijiiiiiiiiiiii I I I IIIIIIIIIIIIIII
........................... , i _ ,_ ............ ill ...... i i l i,
MAINTENANCE
................................... I
A good maintenance program of regular inspec-
tion and care will increase the service life and
help to maintain lhe safety and performance of
your saw,
• Make all adjustments or repairs (except car. "
buretor adjustments) with:
--spark plug wire disconnected
-- engine cool as opposedto a saw that has just
been run,
i[ i, L, I ,,
_ iiiiiiiii iii ii iiiiiii i i i I I I
A. GUIDE BAR AND CHAIN
Increase the service life of your Guide Bar and
Chain by:
.-; Using the saw properly and as recommended in
this manual.
Maintaining correct Chain Tension, page 8.
-- PrOper lubrication, page 10.
--Regular maintenance as described in this
section.
1, CHAIN MAINTENANCE
• Sharpen the chain when:
wood chips are small and powdery. Wood
=chipsmade bythe sawchain shouldbe about
the size of the teeth of the chain.
--saw has to be forced through the cut.
-_saw cuts tO one side.
{CAUTION: IAIways wear gloves when handling the
chain. The chain can be sharp enough to cut you even
though it;is 'too dull to cut wood.
a. SHARPENING INSTRUCTIONS
Items required:
Gloves Rat File
5/32" Dia.file Depth Gauge Tool
6" Fileholder
1,) Stop engine.
2.) Adjust the chain for proper tension; page 8.
3.) Work at the midpoint of the bar, movingthe
chain forward by handas each cutter is filed.
4.) Sharpen cuttem.
a.) Positionthefileholderlevelon thetop plate
ofthe cutterand depthgauge as shownin
Figure30.
b.) Alignthe30° fileholder marks paraJIeiwith +
thebar and totho centerofthe chain.
Figure31.
c.) File from inside toward outside of cutter,
straight across on forward stroke in one +
d_re_ c.'_f. Use 2 _,r 3 strokes pe_ cut-
ting edge. Figure 31.
d.) Keep all cutters the same length. Figure
32.
e.) Fiie enough to remove any, damage tO
cutting edges (side plate and top plate) of
critter. Figure 32.
f.) File P100S and PI01S chain to meet
specifications shown in Figure 33.
16
I IIIIII
' • Check the saw for loose bolts, screws, nuts
and tittings regulady, Loose fasteners can
cause an unsafe condition as well as damage
to your saw.
_I_WARNING
Haveailchaln sawservlce performedbyaquallfied ser-
vicedealer except the items listedinthe maintenance
section of this manual.
II I II IIII I lil l I il " I II IIIIII ' ' II"
,_WARNING
Maintain the proper hook angle according to the
manufacturer's speclfleatton for the chain you am
using.Improper hook anglewill lncreasethe chance of
kickback which can result In serious Injury. Rgure
33&35.
5.) Correct Depth Gauges.
a.) Place depth gauge tool over each cutter
depth gauge. Figure 34.
b.) File level with the flat file if depth gauge
is higher than the depth gauge tool.
c.) Maintain rounded front comer of depth
gauge with a flat file. Figures 34 & 35+
NOTE: The verytop of the depth gauge should befiat with
thefronthalf rounded off with a fiat file.
'l &WARNING +
| Depth gauge tool is required to insure proper depth
gauge. Filing the depth gauge too deep will increase
i the chance of kickback which can result in serious
!l,jury.
b. CHAIN REPLACEMENT
1.) Use only the Low-KickChain specified for
your saw in "Specifications;' for replace-
ment ch_.-
2.) Replace the chain when cutters or links
break,
3.) See a qualified service dealer to replace
and sharpen iridividuai_utte_ for ttl_tteli-
ing your chain.
4.) Always have a worn sprocket replaced by
aqualified service dealer when installing
anew chain to avoid excessive wear tothe
chain.
FILEHOLDER
I_LE
+
[GAUGE i
Figure 30
CUTTER
Figure31
Page 17

2.GUIDEBARMAINTENANCE
• Conditionswhich can require guide bar
maintenance:
--saw cuts to one side
--saw has to be forced through a cut
--inadequate supply of oil to bar and
chain.
• Check the condition o! the guide bar each
time the chain is sharpened. A worn guide
bar will damage the chain and make cut-
ting more difficult.
• Replace the guide bar when."
--the inside groove of the guide bar rails is
WORN.
-- the guide bar is bent or cracked.
• Use only the Reduced-Kickback Guide Bar
specified foryour sawin "Specifications" lot
replacemenL
a. Remove the guide bar to service.
b. Clean oil holes at least once for each five
hours of operation.
C. Remove sawdust from the guide bar
groove periodically with a putty knife or a
wire. Figure 36.
d. Remove burrs by filing the side edges of
theguide bar groovessquarewith a flat file.
Figure 37.
e. Restore square edges to an uneven rail
top by filing with a fiat file. Figure 37.
CUTTERS
"SAMELENGTH
REMOVE DAMAGE
SIDE PLATE TOP PLATE
Figure32
Figure33
/
DEPTH GAUGE TOOL
_, GAUGE
Figure34
, , , ',,H ,;,;,;, ........... , , ,,,,,,,,,,,,,,,,,,,,,,,,
HOOK TOO MUCH SQUARED
• o.co..E.
RIGHT WAY WRONG WAY [
Figure35
REMOVE SAWDUST "' _L
FROM GU,DE BAR GROOVtE_s_F
V
............. ; =
IIIIIIII
Figure36
GROOVES FILE EDGES_'_
GROOVE SQUARE
Figure37
B. SPARK ARRESTOR
.e
Carbon deposits build up on the spark ar-
restor, as thesawisusedand must beremovedto
_avoidcreatingafirehazardorcausing enginedam-
age.
e, Rep_.acethe sp_,rkat_,.,_-tm-,if breaks OCt-tiT.
• Keep the spark arrestor clean at all times.
Clean:
--as required
--at least onceforeach 25-30 hoursof operation
Itemsrequired: wire brush,3/8'_wrench
RgUre 38
1.Disconnect thesperk plugwire.
2. Remove the Muffler Cover.Figure38.
3.Remove the screen from the baffle.
4.Cleanthe screen with a wire brush or replace if
5.breaks are found.
6.Reassemble parts.
Page 18

-- iiiiiiii i r i' iiiiiil,lmlll . lull IIIII II II Jf
18
C_ STARTER ROPE
• A starter rope that breaks next to the'pulley
can be repaired.
• Replace the starter rope if the rope breaks mote
than 2-3 inches away from the pulley as the rope
will be too short to repair properly.
NOTE:A recoil springliesbeneaththepulleyand is
under tension,if the recoil spdng is disturbed,
considerable time and effort will be required to
reinstall. For this reason,you may wantto let a
qualifiedservicedealerhandlethisrepair,Ifyou do
trytorepairthesta_tetmpeand them_oilspringpops
out,takethe sawtoyourdealer.
WARNING
Always wear eye protection when servicing the
starter rope. The recoil spring beneath the pulley
is undertension. If the spring pops out, serious
injury can result.
1. Drain fuel tank,
2. Removethetwoscrewsont,hesideofthefanhousing
and the screw on the bottom of the fan housing.
Figuro39.
3. Remove the large screwat the rearof the control
handle and the small screw directly below it.
Figure 40,
•4. Pullthegaslinefromtheflttinggoinginthesawhan-
die(foundonall modelsexcept2300 CVA.)
5. Separale the fan housing from the unit.
6. Ifthe starter ropeis notbroken,releasethe spring
tension by pulling about t0 inches of rope from
the pulley and catch the rope in the notch as
shown. Figure 41.
• NOTE: The tension on the starlet spring will
be released if the rope has broken.
7. Turn the pulley counterclockwise unlil the
spring tension iS released.
_9.Remove the pulley screw in the canter 0)' the
pulley. Figure 42.
9, Lift the pulley caretully while gently twisting
it counterclockwise _.
!0. Remove lhs _ld rope.
11. Moveaway from thefueltank and melttheendofthe
rope tobe installed.
12. Allow the melted end todrip once;then while the
rope is stillhot, pull themelted endthrough a rag
to obtain a smooth, pointed end.
13. Feed the rope through the housing and through
the round starter hole. Figure42.
14. Guide rope insidepulley,thenthroughthe topside
pulleyholeby pushingtherope from theunderside
hole with a small round object,such, as a Phillips
screwdriver.See insert.Figure42.
15. Wrap rope counterclockwise _ around
pulley ratchet and tuck loose end back under
rope leaving a 3/8 to 3/4 inch tail laying in the
rope groove. Figures 41 & 42.
16. Pull rope tightly around the ratchet and wind the
rope on the pulley counterclockwise _._.
17. Set the pulley into the housing; push it down
and engage the spring.
18. Replace and tighten the pulley screw,
19. Pui! out 10 inches of rope and set the rope in the
notch in the pulley. Figure 43,
20. Turn the pulley 2 complete turns clockwise
winding up the spring.
2t. Hold the pulley and pull the starter rope to
the full extent of length and let the rope re-
wind slowly,
22 Replacethefuel lineintheslctinthefanhousing(on
all modelsexcept2300CVA). Becertaln fuelline is
notpinched.
NOTE: Make sure that the tab on the bottom of
thefuel tank isaligned inthe slot providedin the
fan housing, figure 10.
23. Replace tan housing.
REMOVE
FAN HOUSING
SCREWS
Figure39
Figure40
Figure41
NOTCH
Figure 43
Page 19

__ i i ii iii i i
__ i iiiff ,L III I I
D. CJLRBURETOR ADJUSTMENTS
• Poorengineperformancecanbe_zmsultotother
causes such as dirty air filter,caH_onbuild-up on
muffler outlets, etc. See "Trouble Shooting
Chart" before proceeding with carburetor
adjustments.
• For best results, Poulan recommends that you
have a qualified service dealer make all car-
buretor adjustments. Yourdealerhas the training,
experience and toolsnecessaryto properly adjust
yoursaw to meet ourfactoryperformancespecifica-
tions. This service is notcoveredby.warrant, if it
becomes necessary for you to make carburetor
adjustmentsyourself,followthe procedures below
veryc_refully.
• Tho carburetorhasbeenadjustedatthefactoryforsea
levelcondit_ons.Adjustmentsmaybecomenecessary
ifthesaw isusedatsignificantlyhigheraltitudesor if
younoticeany oflhe following conditions:
NOTE: Be sure to propedy prepare the saw as
describedin"1. Preparation" below,before making
any adjustments.
Chain moves when the engine runs at idle
speed. See "2, Idle Speed Adjustment:'
-- Saw will not idle. See "2, Idle Speed Adjust°
roent" and "3. Low Speed Mixture Adjust-
ment."
Enginediesor hesitates when itshould accel-
erate. See "4, Acceleration Adjustment."
-- Loss of cutting power whlch is not corrected
byairfiltercleaning. "See"5. High Speed Mix-
ture Adjustment."
[CAUTION:I Permanent damage willoccurto any
2-cycle engine if incorrect carburetor adjust-
ments are rnade.
ifthe unit w'dlnotoperate prol_edy after making
these adjustroents,take the sawton qualified ser-
vice dealer.
t AWAR"iNG i
The chain will be moving during most of this pro-
cedure. Wear your protective gear and observe all
safety precautions.
i. PREPARATION
a. Stop engine.
b. Use a fresh fuel mixture with proper gasoline/
oil ratio.
c. Placethesawonasclid,flatsurfaceand roakesure
the chainwilinotcontactany object.
d. Loca_ the three (3) c_'buretor adjusting screw
openingstothedghtofthe airfittercover.Figure44.
e. Startthe engine and allowengine toidle 3 minutes
to warm up. The engine must be at operating
temperature for proper adjustments to be made.
CHOKE _ _ HIGH SPEED
CLOSED __ Mix SCREW
IDLE SPEED __,._ _- LOW SPEED
SCREW _'_':%' MIX SCREW
ii i ii i| ii
2, IDLE SPEED ADJUSTMENT
• a. Altowenginetoidle.
b. AdjustIdta Speed Screwuntilenginecontinues to
runwithoutstallingand withoutthechain.moving.
--Turn screw clockwise _ to increase
engine spe_l ff enginestatlsordies.
-- Turnscrew counterc/ockwise_ to slow
engine down and!orto keep the chain from
turning.
c. No further adjustments are necessary if the
chaindoes notmove at idlespeedandifperfor-
mance iS satisfactory.
I ,t_ WARNING
Recheck idlespeed aftereach adjustment below. The
I chain must not move at idle speed to avoid sedous
injury.
3. LOW SPEED MIXTURE ADJUSTMENT
a. Allowengine to idle.
b Turn the Low Speed Mixture Screw slowly
clockwise _ untilthe RPM starts to drop.
Note the position.
c. TurntheLowSpeed Mixture Screwcounterclock-
wise _ untiltheRPM speedsup andstads
todropagain. Notethe posltion_
d. Set the Low Speed Mixture Screw at the mid-
pointbetween thetwo positions.
4. ACCELERATION ADJUSTMENT
Ifeeginediesorhesitatesinsteadof acceleraling,turo
theLow Speed Mixture Screw1/16ofaturnatatim_
counterclockwise _ until you have smooth
acceleration.
5. HIGH SPEED MIXTURE ADJUSTMENT
|CAUTION: ! Adjustments as small as 1/16 of a
"turncan affect engine performance. It is impor-
tantto turnthe screw only1/16ofaturn peradjust-
ment and test the performanceof thesawbefore
making further adjustments.
a. Make a test cut.
b. hz_ustth_HighSp_edMixtumS_ew !1!6of a_tu[n
aSfollows:
Clockwise _ ifsawsmokesorlosespower.
-- Counterclockwise_ ifthesaw hasspeed
out ofthe cutbutlackspower inthe cut,
c. Repeat test cut.
d. Continue 1/16of a turn adjustments until the saw
runs smoothly in cut.
_-CAUT!ON: JAtoo lean highspeed setting(clock-
wise _ adjustment) wil! cause engine
damage to any 2-cycle engine from overheating
ahcilack of ta"b_ca't'_n. N_tsetthehlgh sp_i
roixtum screw so far clockwise _ that you
have high speed but tackpowerwhile cutting, An
effective approach follows:
.--Turn screw counterclockwise _ unti!
engine loses power while cutting.
• --Then, turn screw clockwise _ in 1/16of a
turn increments only until the engine has
power while cuffing.
NOTE: If the unit will not operate properly.after
making these adjustments, take the saw to a
Page 20

E.
i .,,pl,ii i,,i., . ,,, Hill II I JI II
[111 I I 1,,,,,,,,I,, • " H..H .11 I I m IIIIIIIIIIIII
IIIIIIIIIIIIIII III I I I I
AIR FILTER
• A dirty air filten
reduces cutting power
-- increases fuel consumption
• Clean the Air Filter:.
--frequently, especially under very dusty
conditions.
--always after 10 tanks of fuel mixture or 5
hours of operation whichever is less.
t. Clean off the carburetor cover and the area
around it to keep dirt and sawdust from falling
into the carburetor chamber when the cover is
removed.
2. Remove the carburetor cover screws and car*
buretor cover. Figure 45,
3. Pull out the air filter.
4. Wash the filter in soap and water.
Never operate the unit without the air
filter in place to avoid damage tothe engine.
I CAUT|ON: j Do not use gasoline or other flam-
mable liquid to clean the filter to avoid creating
a fire hazard.
Figure45
5. Squeeze the filter dry.
6. Add a small amount of oil to coat the filter.
NOTE: Avoid soaking the filter with oil.
7. Squeeze out excess oil.
8. Replace filter by tucking in edges and
smoothing it llush with the carburetor housing.
NOTE: Be careful when replacing the car-
buretor cover as incorrect placement will pre-
vent the choke from working properly,
,,, ;' / /,;;; : _-.......
9. Move the choke knob all the way tolhe right.
10. Check the choke shuttertobe sure it isclosed.
Figure 45.
11. Reinstall the carburetor cover and tighten the
carburetor"cover screws.
12. Check the operation of the choke.
NOTE: tf the choke knobsticks or will not move,
remove the cover and repeat steps 9-12 above.
....i ii iiiiiiiiiiiiiiii ii iii ii iiiiiiiii i i i II II I i_
F. sTORAGE
When your saw is to be stored for over 30 days,
always:
0rain fuellank sna safe man net,(See FuelingYour
Engine".)
2. Starl engine and allOW to run at idle
sp_ed until th_ engine stops.
NOTE: This will remove most of the fuel from
the fuel system.
3. Drain oil tank.
ICAUTION:j Wear protective gloves when han-
dling the chain. The chain is sharp and can
cul you even when it is not moving.
I Ii iiiiiiii I i
.... i,
.... j[i ii i i
NOTES
4. Remove, clean, and dry the bar and chain.
5. Store the chain in a container filled with of!
tO prevent rust,
6. Apply a coating of oil to the entire surface of
the bar and wrap it in heavy paper, cloth or
plasti'c.
7. Clean the outside surfaces of the engine.
8. Store the saw in a dry place, out of the reach
of children, and away from where fuel vapors
can reach open flames from hot water heater,
furnaces, etc.
.v, •
2O
Page 21

G. TROUBLE SHOOTING CHART
TROUBLE CAUSE
ENGINE WILL NOT START
ENGINE WILL NOT IDLE ..........
PROPERLY
ENGINE WILL NOT
ACCELERATE, JACKS
POWER OR DIES
IN THE CUT
r .... ,,,,,,,,,,
ENGINE SMOKES
EXCESSIVELY
.......,, ,,,,
ENGINE RUNS HOT
0 INADEOUAEmR'
AND CHAIN
LUBRICATION
, , ,, , , ,L ,,,,,,,,,l.....
1. IgnitionSwitchoff.
2. Fueltankempty.
3, SParkPlugnotfiring.
4. Fuelno{reachingcarburetor,
5. Engineflooded.
6. Compression low.
1. Idle speed set too low.
!2. Idleslseedset too high.
3, Low speed screw requires adjustmeo{.
4_ Crankshaft seals worn.
5 Compressionlow.
,,,, ,
1, Cad_retorrequiresa_justmenL
• 2. Airfilterisdirty.
3 8park plugfouled.
4. Carbonbuild-upon exllaustport_
5. LowCompressinn
, , ,,,,,_ , ,, ,
1. Fuel mixture incorrect.
2. Choke partialtyon.
3, Highspeed needle requires adjustmenL
4. Air lilter dirty.
5. Crankcase leak. "
1. Fan housing/cylinder fins dirty.
REMEDY
1. Moveswitch to"Starl:"
2. Fill lank wi_ correctfuel mixture.
3. Install neW plug and._r check ignllionsystem.
4_ Checkfordirtyfuelfitter;clean. Checkfor
kinked orsplit fuel line; repairorreplace.
5. See Starling Instructions.
6. ConraD{a qualified servicedeeler.
1. Adiust idlespeed _ clo_wise to
inciease speed.
;2" Adjustidle speed sinew ceunte/c_ockwise to
reduce speed.
3, SeeCarburetor Adjuslmeets.
4. Contact a qualified serv'_edeal_.
5. Contact a q ualified service dealer,
] ,,,,,,,,,,,,,,,,,,,,,,,,,,,,,,,,,,_l ,,
1. SeeCarburetorA_juslments,
2. Clean or replace ab"lilter.
3. C/ean or replace SpadcPlug aed mgap.
4. ContactaqualifiedservicedeaJer,
5. Contact a qualified service dealer.
,,,,,,,,,,....... i, ,, ,,,
1. Ernpty fuel tank and refillwith correo{fuef
mixlure.
,2. PushChoke ixl.
3. See Carburetor Adjustments.
4, Clean or replace air f_ter.
5. Contact a qualified service dealer,
.......,,,,,,,,,,,,,,, ........,
1. Clean area.
2. Fu_ Mixture incorrect I2. See Engine Fuel Mixture.
3. High Speed Mlxtute set too low. 3, See Catburetor Adjustments.
4. Ca{ben build-upon spark arrestor screen. 4. See "Spark Arrestor".
15. Spark Plug incorrect. 5. Rep_acewithcorrectptugo
6. Carbonbuild_.uponexhaustpotts. 6. Contactaquatifiedservicedealer.
i ,,,,,,,u,,,,,,,,,, _ ,,, ..... i ,,,,, ,,,,, , ,,,,,
t Olltankempty. I. Filloiltank.
2. lmproperlyadjustedofler. 2. Adjustoiler,
3. Oilpumporoilfilterelogged. 3. Contactaqualifiedservicedeeler,
4. Guidebare_hotebfocked. 4. Removebarandc_ean,
CHAIN MOVES AT 1.
IDLE SPEED 2.
,.,, ,,, , _ , , ,
CHAIN DOES NOT MOVE 1.
WHEN ENGINE IS 2.
ACCELERATED 3.
4.
2.
3.
CHAIN CLATTERS OR
CUTS ROUGHLY
CHAIN STOPS WITHIN 1.
THE CUT 2.
3.
€_NCUTS AT
AN ANGLE
Idlespeed requires adjustment.
Clutch requires repair.
Chain _sion too t!g_.
Carburetor requires adjust menL
Guide bar rails pinched.
Clutchslipping.
3.
4.
1,Cutters damaged after striking foreign
material.
Chain tension incorrect or loose, 2.
Chain wear due to contact with di_ sand or 3.
metalobject in wood.
Sprockel worn. : 4.
Cutters dull, impropedy sharpened; depth
gauges too high, 5.
............. ......... _ ,,,., ,
Chakl cutter tops not filed fiat. 1.
Guide bar burred orbent; rail uneven. 2.
Clutch slipping. 3.
1. See Carburetor Adjustmenls.
2. Con_o{ =qualified serv_.:cedealer.
1, SeeCha,nTen_o_..
! 2. SeeCarburetorAdj_ustments.
Repairor replace.
Contact a qualified service dealer.
Contact a.qualified servicedeale_.
See Chain Tension.
Resharpen or replace chain.
Contact a qualified service de_Jer,
See Chain Sharpening Inslractions.
See Chain Sharpening Instructions,
Repair or replace Guide Bar,
Contact aqualified service dealer.
1. Cutters damaged on one side.
2. Chain duffon one side.
3. Guide bar bent, or worn.
1,
!2.
3.
Resharpen until all cutters haveequal angle_
and lengths.
Resharpen untilall cutters have equalangtes
and lengths.
Replace guide bar.
Page 22

| i i , ,, , • • _..............
...... .. _ ", ,i i ,, ,,, i i,I,!Illl T ,_,,H • III •
if. MAINTENANCE CHART
__ = 2==
t'D "_
lit i _ -- --
Tlvottletrtg_r, safe_ytllrOttie kx:k. stop switc{l
F_term tuel tank
Fuel lank
Cha=n or/tank
Chain lubrication
Saw chain
Gu_e I_ar
'LLLLUL,_. ' .........
Chain sprocket
!._r f_lter
,, , , ,
Exh=ust ports
Cyhnderfins
, , =,
Carburetor
Visual inspection (condition, leaks)
Cla'an
!Check operabon
.... i Repracefiiter_bly-Lwhen cl_"
dirty
Clean
,,, ,,,,,h ,,,,,,,= , ,,
Clean
Check
tnspecL also check sharpness
Check chain tenstort
Sharpen -- when dull
Inspect (wear. damage)
Ciean (whenever chain is removed for
maintenance}
Lubncate sprocket nose
Deburr
Replace -- when wOrnordamaged
x
X
x
x
X x
X x
x
X
x
_,,,,,,_,
x X
x
• .=
....... , ,L ..........
Check-- eachtimebar,orchainisremoved x
=_
,, , : ..... ., ,,
Clean x
Replace -- when worn or damaged
Clean x
, , ,,.,,,,, ,|,,± ,,,i i,,, L,| I ...... ] X
Clean
_.
.................... , ,,,,,,
Checkiae _*djustment
chain must not turn x
,,-,_ ....... ± '" I ' "I .... l ..... !
Read_us_Mle _ when chain turns at_e
Sparkplug
Allaccessiblescrewsandnuts
(notadjustingscrews) "
Vibrationmounts
Replace -- when fouled ordamaged
!
iRel_ghten ....... x _I
Inspect x
Replace.-- whenwornoi'damaged
,,,,_ . ,, ,,,,,,._
x
Repiace--whenwornordamaged
....,,,,,,,,,, , ,,, ,,,,,,, ,, ,,,, L ,,,,, ,.,
inspect
Spark arrestor scre_
22
Page 23

....... I i II ii I I, _11 i ,,,i ,, iiiiiiiii !
_b JI , ........ .-; .......... r I '1 I il I I'111I_ I
POULAN ® ACCESSORIES
iiiiiiluil•
f III iiiiiiiiiiiiiiiiiiii " : ii i iiiiiiiiiiiiiiiiiiii _ ii iiiiiii
See your Poulan® dealer1oraccessories sndpsrls,
Electric Sharpener (with all stones) ..... 952-800516
Sharpener Stones ................. 952-093094
File - Fiat - 6" ...................... 952-055027
File - Round - 5/32". .............. _..952-055026
F_le & Holder - 5/32". ............... .:852-055031
Depth Gauge ................. ...... 552-055028
Bar Wrench ........................ 952-031096
Carry Case ......................... 952-030116
Safety Helmet ....................... 952-030013
Sound Suppressor ................... 952-006315
Safety Goggles ..................... 852062003
Safety Face Shield ................... 952-701601
Sprocket - 3/8 _ Spur ................. 952-048078
Spark Plug. ..... , ........... , ...... 952030037
Fuel & Oil Caps ..................... 952-010436
Air Filter ........................... 530.023791
2-_ycie Engine Oil
3.2 oz.-40:1 ....................... 952`030133
• 8 oz._10:l ........................ 552-030128
Bar & Chain Lubricant
32 oz.......... ".................. 952.030129
i gal .............................. 952-030130
Chain Brake Kit ..................... 952-069201
illustrated Parts List
Model 1800 & 2000 ................ 530.056069
Model 2300 AV, 2300 CVA .......... 530-064828
Operators Manual ................... 530-066921
iiiii ii .... ........
• i Iiiiii ii iii i i iiiii i I I i
IIIII i i i ]llllllllUllll i
NOTES
Page 24

k_ ii illllll if i ,,i ............._1 I I Ili ........ II I I I¸ IIII1' I III
PARTS AND SERVICE
Your Poulan _/Weed Eater_ product has been expertlyengineered and carefully
manufactured to rigid quality standards. As with all mechanical products, some.
adjustments or part replacement may be necessary during the life of your tool.
FOR SERVICE OR REPLACEMENT PARTS:
1. ,Consult the yellow pages of your phone directory for the name of the nearest
Poulan/Weed Eater Master Service Dealer (under"saws" for Chain Saws or under
"lawnmowers" for Trimmers, Brushcutters and Blowers) or Skii Service Center
(under "tools-electric").
2. For replacement parts, have available the following information:
a. Descriptionof the tool.
b. Model number.
.c. Part Number or description ofpart.
NOTE: Poulan/Weed EaterDivisionprovides partsand service through itsauthorized.
distributersand dealers; therefore, all requests for p_,tt_tlhd sewice should
bedirected to your localdealer(s). The philosophy ofPoulan/Weed EaterDivi,
sion is to continually improveall of its products, Written notices of changes
and improvements aresent toauthorized Poutan/weedEater Dealers. Ifthe
operatingcharactedstics orthe appearance ofyourproduct differsfrom those
described in thisOperator's Manual, please contact your local Poulan/V_bed
Eater Dealer for updated information and assistance.Alwaysupdate your tool
when improvements are made available, especially those related to safety.
Parts and repair service are not available directly from Poulan/Weed,Eater
Division White Consolidated Industries, inc.
DIVISION WHITE CONSOLIDATED INDUSTRIES, INC.
Shreveport, Louisiana 71139-9329 ' ........"...... ........ '.............
............ j
,Hi NH illll
 Loading...