

Poulan Pro 2025 LE Series, 2075 LE Series, 2150 LE Series, 2050 LE Series, 2175 LE Series Instruction Manual
...Page 1
Poulan
Please do not return unit to retailer.
Por favor, no devuelva el aparato al lugar de compra.
Veuillez ne pas retourner I'outil au d_taillant.
• 1-800-554-6723
www.poulan.com
Instruction Manual
Manual de Instrucciones
Manuel d'lnstructions
!
&
1950 / 2025 / 2050 / 2075
2150 / 2175 / 2350 / 2375
For Occasional Use Only
WARNING:
Read and follow all Safety Rulesand Operating Instructionsbefore
usingthis product. Failure to do so can resultin serious injury.
LE Series i
C_US
ADVERTENCIA:
Lea el manual de instruccionesy sigatodas las advertencias e en-
struccionesde seguridad. El nohacerlopuede resultaren lesiones
graves.
AVERTISSEMENT:
Life le manuel d'instructions et bien respecter tous les avertisse-
ments et toutes les instructionsde s_curit&. Toutd6faut de le faire
pourraitentraTnerdes blessuresgraves.
ElectroluxHomeProducts,Inc.
250 BobbyJonesExpressway
Augusta, GA30907
[] Ftom the _ Group. The wo,dd's No.l choice.
t.n_,,tr_N,CL_A_IRG,_D otrmooR_ppLout'C_L_4_VB_
Copyright ©2002 Electrolux Home Products, Inc,
53(_66523
4/9/02 !
Page 2
- B
WARNING! This chain Read and understand the
saw can be dangerou!! Care- instruction manual before
lessor improper usecancause usingthe chain saw.
seriousoreven fatal injury.
-_ Always wear appropriate ear protection, eye protectionand headprotection.
@
Always use two hands when operating the chain saw.
WARNING! Contacting the guide bar tipwith any object
should be avoided; tip contact may cause the guide barto
movesuddenly upwardandbackward, whichmay cause se-
riousinjury.
Measured maximum kickbackvalue without chain brakefur the bar
and chain combination on the label.
_k WARNING: Always disconnect
spark plug wireand place wirewhere it can-
notcontact spark plugto prevent accidental
starting when setting up, transporting, ad-
justing or making repairs except carburetor
ad ustments.
Because a chan saw s a high-speed wood-
cu_ing tool, special safety precautions must
be observed to reduce the riskof accidents.
Careless or improper use of this tool can
cause serious injury.
PLAN AHEAD
• Read this manual carefully until you com-
pletelyunderstandand can followall safety
rules, precautions, and operating instruc-
tionsbefore attemptlingto use the unit.
• Restrictthe use of your sawto adult users
who understand and can follow safety
rules, precautions, and operating instruc-
tions found in this manual
• Wear protective gear. Always use steel-
toed safety footwear with non-sSp soles;
snug-fitting clothing; heavy*duty, non-slip
gloves; eye protection such as non-fog-
ging, vented goggles or face screen; an
approved safety hard hat;andsound barri-
ers (ear plugsor mufflers) to protect your
hearing. Regular usersshouldhave hear-
ing checked regulady as chain saw noise
can damage hearing. Secure hair abeve
shoulder length.
Hearing Saf_y Hat
Protection _ Eye
"_i IMp_AI" Protection
Snug
Heavy Duty
Clothing Gloves
Safety Safety Chaps
Shoes
• Keep allparts of yourbody away from the
chain when the engine is running.
• Keep children, bystanders, and animals a
minimum of30 feet (10 meters) awayfrom
the work area. Do not allow other people
oranimals to benear the chain saw when
startingor operating the chain saw.
• Do not handleor operate a chainsawwhen
youare fatigued, ill, or upset, or if youhave
taken alcohol, drugs, or medication. You
must be ingoodphysicalconditionandmen-
tally alert. Chain saw work isstrenuous. If
youhave any conditionthat migl_ be aggra-
vated by strenuouswork, check with your
doctorbefore operatinga chain saw.
Page 3
• Carefully plan your sawing operation inad*
vance. Do notstartcutting unffiyou have a
clear work area, secure footing, and, ifyou
are felling trees, a planned retreat path.
OPERATE YOUR SAW SAFELY
• Donot operate a chain saw with one hand.
Serious injurytothe operator, helpers, by-
standers orany combination of these per-
sons may result from one-handed opera-
tion. A chain saw is intended for
two-handed use.
• Operate the chain saw only in awerl-venti*
lated outdoor area.
• Do not operate saw from a ladder or in a
tree.
• Make sure the chain will not make contact
with any object while starting the engine.
Never tryto start the saw when the guide
bar is in a cut.
• Do not put pressureon the saw at the end
of the cut. Applying pressure can cause
you to lose control when the cut is com-
pleted.
• Stop the engine before setting the saw
down.
• Do not operate a chain saw that is dam-
aged, irnpropedy ad usted, or not com-
pletely and securely assembled. Always
replace bar, chain, hand guard, or chain
brake immediately ff itbecomes damaged,
broken or is otherwise removed.
• With the engine stopped, hand carry the
chain saw with the muffler away from your
body, and the guide bar and chain to the
rear, prMerably covered with a scabbard.
MAINTAIN YOUR SAW IN GOOD
WORKING ORDER
• Have all chain sawservice performed bya
qualified service dealer with the exception
of the items listed inthe maintenance sec-
tionof thismanual. For example, if improp-
ertools are usedto remove orhold the fly-
wheel when servicingthe clutch,structural
damage to the flywrheel can occur and
cause the flywheel to burst.
• Make certain the saw chain stops moving
when the throttle trigger is released. For
correction, refer to CARBURETOR AD-
JUSTMENTS.
• Never modify your saw in any way.
• Keep the handles dry, clean, and free of oil
or fuel mixture.
• Keep fuel and oil caps, screws, and fas-
teners securely tightened.
• Use only Poulan® accessories and re-
placement paris as recommended.
HANDLE FUEL WITH CAUTION
• Do not smoke while handling fuel or while
operating the saw.
• Eliminate all sources ef sparks orflame in
the areas where fuel is mixed or poured.
There shouldbe no smoking,openflames,
orworkthat could cause sparks. Allowen-
gine to cool before refueling.
• Mix and pour fuel in an outdoor area on
bare ground; store fuel in a cool, dry,well
ventilated place; and use an approved,
marked container for all fuel purposes.
Wipe up all fuel spills before starting saw.
• Move at least 10 feet (3meters) from fuel-
ing site before starting engine.
• Turn the engine off and let saw cool in a
non-combustible area, not on dry leaves,
straw, paper, etc. Slowly remove fuel cap
and refuel unit.
• Store the unitand fuel inan area where fuel
vapors cannot reach sparks or open
flames fromwater heaters, electric motors
or switches, furnaces, etc.
KICKBACK
WARNING: Avoidkickbackwhich
can result inserious injury. Kickback isthe
backward, upward orsudden forward motion
of the guide bar occurring when the saw
chain near the uppertip oftheguide barcon*
tacta any object such as a log or branch, or
when the wood closes in and pinches the
saw chain inthe cut. Contacting a foreign ob-
ject in the wood can also result in loss of
chain saw control.
• Rotational Kickback can occur when the
moving chain contacts an ob ect at the up-
per tip of the gu de bar. Th s contact can
cause the chain to di_ into the object,
which stops the chain for an instant. The
result is a lightnin9 fast, reverse reaction
which kicks the guide bar up and back to*
ward the operator,
• Pinch-Kickback can occur when the the
wood closes in and pinches the moving
saw chain in the cut along the top of the
guide bar and the saw chain is suddenly
stopped. This sudden stopping of the
chain results in a reversal of the chain
force used to cut wood and causes the
sawtomove in the opposite direction of the
chain rotation. The saw is driven straight
back toward the operator.
• Pult-tn can occur when the moving chain
contactsa foreignobject in the wcod inthe
cutalongthebottomof theguidebarandthe
sawchainis suddenlysto)pped.This sudden
stopping pulls the saw forward and away
fromthe operatorand couldeasilycause the
operatorto losecontrol of the saw.
Avoid Pinch-Kickback:
• Be extremely aware of situations or oh*
strucfionsthat can cause material topinch
the top of or otherwise stop the chain.
• Do notcut more than one log at a time.
• Do not twist the saw as the bar is with-
drawnfrom an undercutwhen bucking.
Avoid Pug-In:
• Always begincuttingwiththe engine atfull
speed andthe saw housing against wood.
• Use wedges made of plastic or wood.
Never use metal to hold the cutopen.
Kickback Path
Page 4
Avoid Obstructions
Clear The Working Area
REDUCE THE CHANCE OF
KICKBACK
• Recognize that kickback can happen.
With a basic understanding of kickback,
you can reduce the element of surprise
which contributesto accidents.
• Never let the movingchaincontact any ob-
Ject at the tip ofthe guide bar.
• Keep the workingarea free from obstruc-
tions suchasothertrees, branches, rocks,
fences, stumps, etc. Eliminate or avoid
any obstruction that your saw chain could
hit while you are cutting. When cutting a
branch, do not let the guide bar contact
branch or other objects around it.
• Keep your saw chain sharp and properly
tensioned. A loose or dull chain can in-
crease the chance of kickback oocurhng.
Follow manufacturer's chain sharpening
and maintenance instructions. Check ten-
sion at regular intervals with the engine
stopped, never with the engine running.
Make sure the chain brake nuts are se-
• cutely tightened after tensioning the chain.
Begin and continue cuttingat full speed. If
the chain is moving at a slower speed
there s greater chance of kickback occur-
ring.
• Cut one log at a time.
• Use extreme caution when re-entering a
pl
revious cut.
• Do not attempt cuts starting withthe tip of
• the bar (plunge cuts).
Watch forshifting logsorother forces that
could close a cut and pinch or fall into
chain.
• Use the Reduced-Kickback Guide Bar
and Low-Kickback Chain specified for
yoursaw.
MAINTAIN CONTROL
Stand to the
left of the saw
Thumb on
underside of
handlebar
Never reverse
hand positions
Elbow locked
Thumb on underside of
handlebar
• Keep agood, firm grip on the saw with both
hands when the engine is running and
don't let go. A firmgrip will help you reduce
kickback and maintain controlof the saw.
Keep the fingers of your left hand encir-
cling and your left thumb under the front
handlebar. Keep your right hand com-
pletely around the rear handle whether
your are right handed or left handed. Keep
your left arm straight with the elbow
locked.
• Position your left hand onthe front handle-
bar soit is in a straight line with your right
hand on the rear handle when makin
a
bucking cuts. Never reverse right and le_
hand positions for any type of cutting.
• Stand with yourweight evenly balanced on
bath feet.
• Stand slightly to the left side of the saw to
keep your body from being in a direct line
with the cut_ngchain.
• Do not overreach. You could be drawn or
thrown off balance and lose control of the
saw.
• Donotcutaboveshoulder beight. Itisdiffi-
cult to maintain control of saw above
shoulder height.
KICKBACK SAFETY FEATURES
A_' WARNING: The following features
are included on your saw to help reduce the
hazard of kickback; however, suchfeatures
will not totally eliminate this danger. As a
chain saw user, do notrelyonly onsafety de-
vices. You must follow all safety precau-
tions, instructions, and maintenance in this
manual to help avoid kickback and other
forces which can result in serious in u_y.
• Reduced-Kickback Guide Bar, des gned
with a small radius tip which reduces the
size of the kickback danger zone on the
bar tip. A Reduced-Kickback Guide Bar
has been demonstrated to significantly re-
duce the numberandseriousness of kick-
backs when tested in accordance with
safety requirementsfor gasoline powered
chain saws as set by ANSI B175.1.
4
Page 5
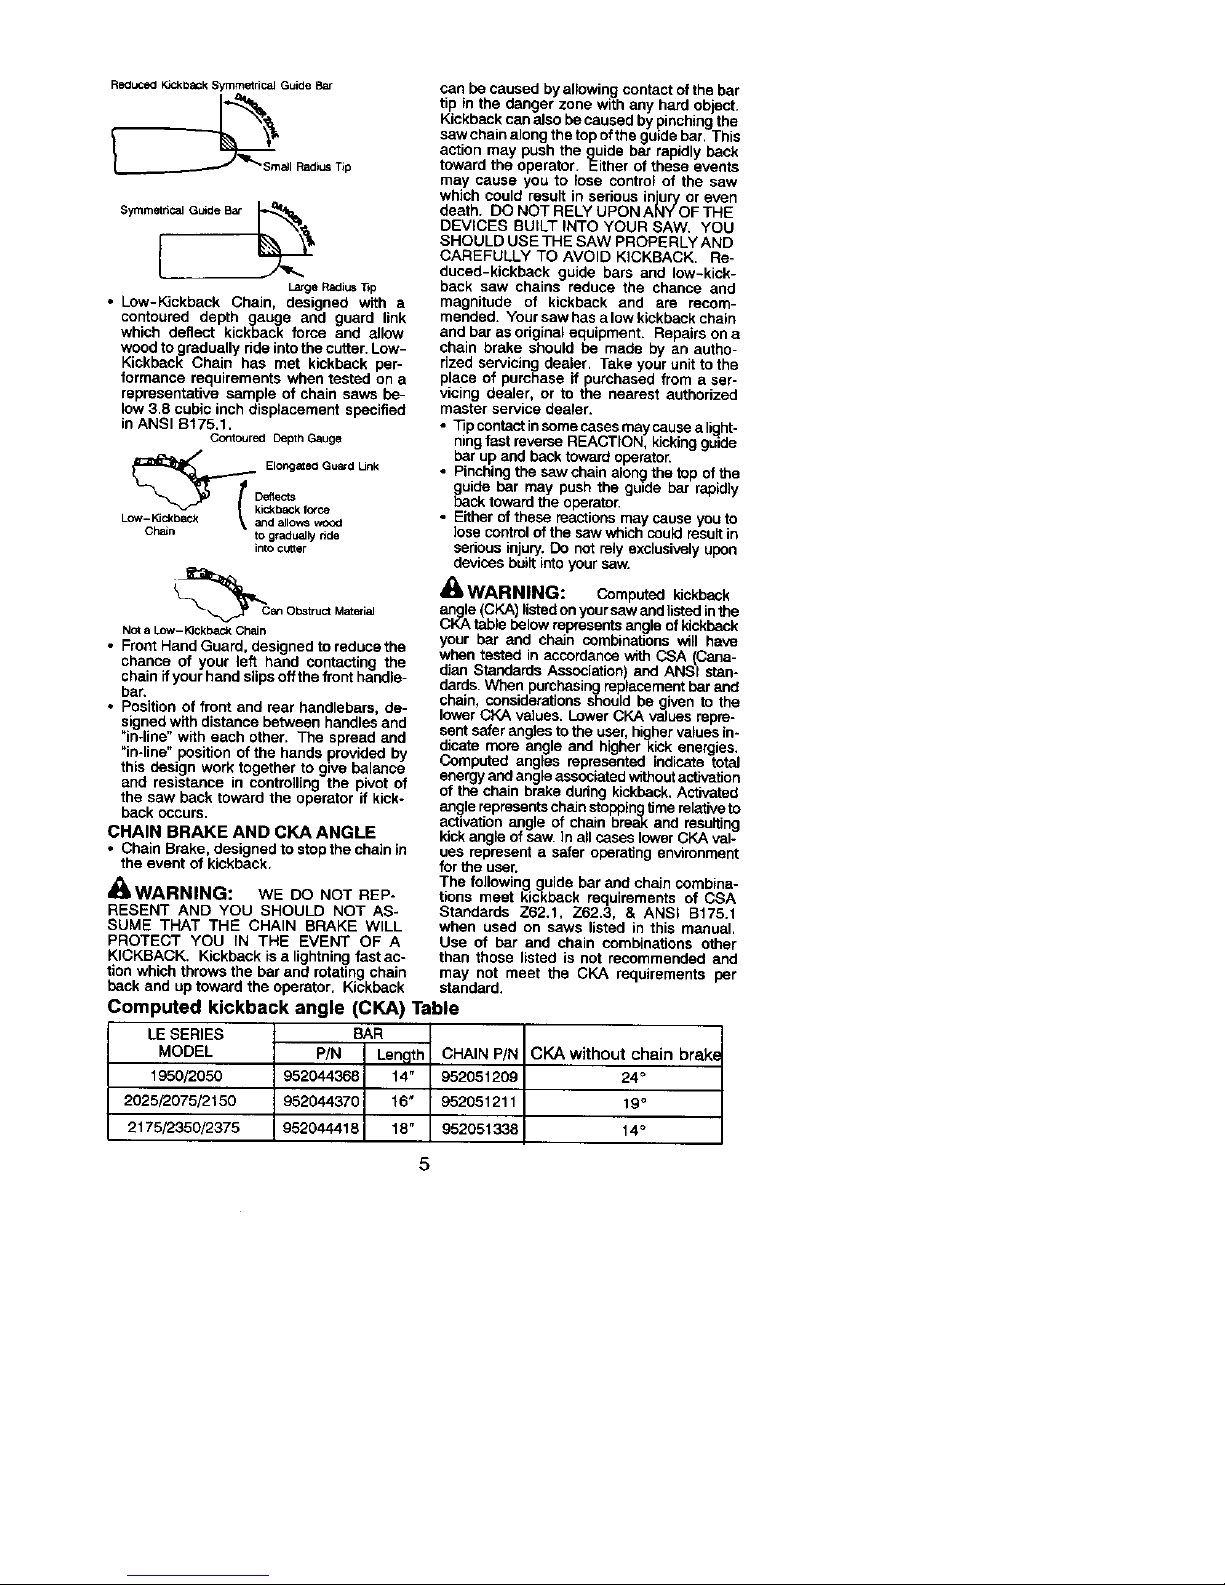
Reduced KickbaCk Symmetrical Guide Bar
aJI Radius T_p
Symmetrical GL_de Bar I,_1_
Large Radius 13p
• Low-Kickback Chain, designed with a
contoured depth gauge and guard link
which deflect kickback force and allow
wood to gradually ride intothe cutter.Low-
Kickback Chain has met kickback per-
formance requirements when tested on a
representative sample of chain saws be-
low3.8 cubic inch displacement specified
inANSI B175.1.
Contoured Depth Gauge
__ Elong=ed Guard Unk
Deflects
ic_baCk fc_ce
Low-K3c_back _ and allowS woc_l
Chain to gradually ride
into cu_er
i_Can Obst rue1Material
Not a Low- _0ckback Chain
• Front Hand Guard, designed to reduce the
chance of your left hand contacting the
chain if your hand slipsoff the front handle-
bar.
• Position of front and rear handlebars, de-
signed with distance between handles and
"in-line" with each other. The spread and
"in-line" position of the hands provided by
this design work together to give balance
and resistance in controlling the pivot of
the saw back toward the operator if kick-
back occurs.
CHAIN BRAKE AND CKA ANGLE
• Chain Brake, designed to stop the chainin
the event of kickback.
_I=WARNING: WE DO NOT REP-
RESENT AND YOU SHOULD NOT AS-
SUME THAT THE CHAIN BRAKE WILL
PROTECT YOU IN THE EVENT OF A
KICKBACK. Kickback is a lightningfast ac-
tion which throws the bar and rotatingchain
back and up toward the operator. Kickback
Computed kickback angle (CKA) Table
LE SERIES BAR
MODEL P/N Length CHAIN P/N
1950/2050 952044368 14" 952051209
2025/2075/2150 952044370 16" 952051211
2175/2350/2375 952044418 18" 952051338
can becaused byallowing contactof the bar
tip in the danger zone with any hard object.
Kickbackcanalso be caused by pinchingthe
saw chainalong thetopofthe guide bar. This
action may pushthe g=uidebar rapidly back
toward the operator. Either of these events
may cause you to lose control of the saw
which could result in serious in'ulurv(oreven
death. DO NOT RELY UPON ANY'OF THE
DEVICES BUILT INTO YOUR SAW. YOU
SHOULD USE THE SAW PROPERLY AND
CAREFULLY TO AVOID KICKBACK. Re-
duced-kickback guide bars and low-kick-
back saw chains reduce the chance and
magnitude of kickback and are recom-
mended. Your saw has a lowkickback chain
and bar as original equipment. Repairs on a
chain brake should be made by an autho-
rized servicing dealer. Take yourunit to the
place of purchase if purchased from a ser-
vicing dealer, or to the nearest authorized
master service dealer.
• 33pcontactinsomecasesmaycause a light-
ningfast reverse REACTION, kickingguide
bar upand backtoward operator.
• Pinchingthe saw chain alon9 thetop ofthe
guide bar may push the guide bar rapidly
back towardthe operator.
• Either of these reactionsmaycause youto
lose control of thesaw which couldresultin
sedous injury.Do notrely exclusivelyupon
devicesbuilt intoyoursaw.
_1' WARNING: Computed kickback
_nK_e(t_bCKA)listed on yoursaw and listedinthe
le below representsangleof kickback
your bar and chain combinations will have
when tested in accordancewith CSA(qCana-
dian Standards Association and ANS_ stan-
dards.When purchasng repacement bar and
chain, considerations should be givento the
lower CKA values. Lower CKA values repre-
sent safer anglesto the user,higlhervalues in-
dicate more angle and higberkick energies.
Domputod angles represented indic_e total
energyand angleassociatedwithoutactivation
of the chain brake duringkickback.Activated
an_le representschainstopeingtime relativeto
astwatlen angle of chain break and resulting
kickangle ofsaw. ]n allcases lowerCKA val-
ues representa safer operating environment
for the user.
The following g=uidebar andchain combina-
tions meet kickback requirements of CSA
Standards Z62.1, Z62.3, & ANSI B175.1
when used on saws listed in this manual.
Use of bar and chain combinations other
than those listed is not recommended and
may not meet the CKA requirements per
standard.
CKA without chain brak_
24°
19°
14°
5
Page 6

NOTE: If this saw is to be used for corn*
mercial logging, a chain brake is required
and shall not be removed or otherwise dis-
abled to complywith Federal OSHA Regula-
tions for Commercial Logging.
SAFETY NOTICE: Exposureto vibrations
throughprelonged use of gasoline powered
handtools couldcause bloodvessel ornerve
damage in the fingers, hands, and ointsof
peope prone to crcuaton dsorders or
abnormal swellings. Prolonged use in cold
v_ather has been linked to blood vessel
damage in othenNise healthy people. If
symptoms occur such as numbness, pain,
lossofstrength,changeinskin colorortexture,
orlossoffeeling inthefingers,hands,orjoints,
discontinue the use of this tool and seek
medical attention. An anti-vibration system
does not guarantee the avoidance of these
problems.Users who operate power tools on
a Continualand regular basis must monitor
closely their physical condition and the
conditionofthistool.
SPEClAL NOTICE: Yoursaw isequipped
witha temperature limitingmufflerand spark
arresting screen which meets the
requirements of California Codes 4442 and
4443. All U.S. forest land and the states of
California, Idaho, Maine, Minnesota, New
Jersey, Oregon, and Washington requireby
law that many internal combustion engines
to be equipped witha sparkarresting screen.
Ifyouoperate a chain saw ina state orlocale
where suchregulationsexist, you are legally
responsible for maintaining the operating
condition of these parts. Failure to do so is
a violationofthe law. R_fer tothe SERVICE
section for maintenance of the spark
arresting screen.
FailuretofollowallSafety Rules andPrecau-
tionscan resultin serious injury. If situations
occur whlch are notcovered in this manual,
use care and goodjudgement. If you need
assistance, contactyour authodzed service
dealer or call t-800-554-6723.
STANDARDS: This saw islistedbyUnder-
writer'sLaboratories,Inc., in accordancewith:
ANSI B175.1-2000 American National
Standards for Gasoline-Powered Chain
Saws - Safety Requirements
CSA Z62.1-1995 Chain Saws - Occupa-
tional Health and Safety
CSA Z62.3-1996 Chain Saw Kickback Oc-
cupational Health and Safety
The chain issharpand cancut youevenwhen
it is notmoving!
• Loosen and remove the chain brake nuts
and the chain brake from the saw.
• Remove the plastic shipping spacer (if
present).
Location of shipping spacer
_O
a_ Chain Brak_e
Ch Nuts
Bar Tool
• An edju_ng pinand screw is usedto adjust
the tensionof the chain. Itisvery important
whenassemblingthepar,thatthepin located
on the adjustingscrew aligns into a hole in
the bar.Turningthe screwwill move the ed-
ustmeot pinup and downthe screw.Locate
ths adjustment before you begin mounting
the baronto the saw. See illustrationbelow.
Inside view of
/'4 C_aln Brake
Adjustment located on Chain Brake
• Turn the adustingscrew by hand counter-
clockwise until the adusting pin just
touches the stop. Th sshould allow thepin
to be near the correct position.
• Slide guide bar behind clutch drum until
guide bar stops against clutch drum
sprocket.
• Carefullyremovethe chain from the pack-
age. Hold chain with the dnve links as
shown.
Protective gloves (not provided) should be
wom duringassembly.
An'ACHING THE BAR & CHAIN (If not
already attached)
_I_WARNING: If received assembled,
repeatallsteps to ensure your saw iswopelty
assembledand all fasteners are secure. Al-
ways wear gloves when handlingthe chain.
6
_p of
Bar
3UTTERS MUST FACE IN I
DIIRECTION OF ROTATION
Page 7

Cutters Depth Gauge
Drive Links
Place chain onto the sprocket
• Place chain over and behind clutch, fitting
the drive links in the crutch drum sprocket.
• Fit bottom of drive links between the teeth
in the sprocket in the nose of the guide bar.
• Fit chain drive links into bar groove.
• Pull guide barforward until chain is snug in
guide bar groove. Ensure all drive links
are in the bar groove.
NOTE: CHAIN BRAKE MUST BE
DISENGAGED BEFORE INSTALLA-
TION ON THE SAW. TO DISENGAGE
CHAIN BRAKE, PULL THE FRONT
HAND GUARD BACK TOWARD THE
REAR OF THE CHAIN BRAKE AS
FAR AS POSSIBLE (SEE ILLUSTRA-
TION),
DISENGAGED _
Front Hand Guard
/
ENGAGED
Chain Brake
• Now, install chain brake making sure the
adjusting pin ispositioned inthe lower hole
in the guide bar. Remember this pin
moves the bar forward and backward as
the screw is tamed.
• Install chain brake nuts and finger tighten
only. Once thechain istensioned, you will
need to tighten chain brake nuts.
CHAIN TENSION
(Including units with chain already installed)
NOTE: When adusting chain tension,
make sure the cha n brake nuts are finger
tight only. Attempting to tension the chain
when the chain brake nuts are tight can
cause damage.
Checking the tension:
Use the screwdriver endof the chainadjust-
menttool (bartool)to movethe chain around
the bar, If the chaJndoes not rotate, it istoo
tight,fftoo loose, the chain willsag belowthe
bar.
Chain Ad ustment
Chain Brake Nuts Too Bar Tool)
Adjusting the tension:
Chain tension is very important. Chain
stretches durin_luse. This isespecially true
duringthe first tew times you use your saw.
Always check chain tension each time you
use and refuel your saw.
You.can ed'ustJthe chain tension byloosen-
ing the cham brake nuts and turningthe ad-
justing screw 1/4 of a turnwhile lifting up on
the bar.
• Ifchainistootight,turnadjusting screw 1/4
turn counterclockwise.
• If chain is too loose, turn adjusting screw
1/4 turn clockwise.
Chain Brake Nuts Guide Bar
Adjusting Screw - 1/4 Turn
• Lift up the tip of the bar and tighten the
chain brake nuts with the bar tool.
• Recheck chain tension.
WARNING: If the saw isoperated
with a loose chain, the chain could ump off
the guide bar and resultin serious injury.
Page 8

KNOWYOURCHAINSAW
READTHISINSTRUCTION MANUAL AND SAFETY RULES BEFORE OPERATING YOUR
CHAIN SAW, Compare the illustrations with your unit to familiarize yourself with the location of
the various controls and adjustments. Save this manual for future reference.
Chain Front Hand Guard--=- _ f'%./ Front Handle
Adjustment Tool I I_--
(BarTool) I_l J l\ _ / Starter Rope
I_ k_ LaY-_,_=_ / ON/STOP
(_tt======_ _/_, Switch
Chin Muffler _ _'_/_ Pdmer
Bulb
Bar Oil Fill Cap Housing Fuel Mix Fill Cap
Cylinder Cover
Fast
Throttle Chain
Direction
Rear of Travel
Handle
Throttle Choke Ba0
Trigger Knob Chain Chain Nuts Sprocket
Brake Catcher Hole
ON/STOP SWITCH
The ON!STOP SWITCH is used to stopthe
engine.
THRO'I-I'LE TRIGGER
.me THROTTLE TRIGGER controlsengine
spend.
THROTTLE LOCK-OUT
.me THROTTLE LOCK-OUT must be
pressedbefem you can squeeze the throttle
l_gger. This feature prevents you from acci-
dentally squeezingthe _gger.
FAST IDLE LOCK
.me FAST IDLE LOCK hoidsthe throttletrigger
in the starting position.Activate the fast idle
lock by pressing the throttle lockout and
squeeTJngthe throttletdgger.With the throttle
gger squeezed, press the fast idlelock. Re-
leasethe throttle lockoutandthgger whilehold-
ingthe fast idlelock button.
CHOKE KNOB
.me CHOKE KNOB activates the choke to
provideadditionalfeel to theengine duringcold
starting.
PRIMER BULB
The PRIMER BULB circulatesfuel to the car-
buretorto providequickerstarting.
CHAIN BRAKE
The CHAIN BRAKE is a device designedto
stop the chain if kickback occurs..me chain
Ixake activates automatically in the event of
kickback. The chainbrake activates manually
if the fronthand guard is pushed forward,.me
chain brake isdisengaged by pullingthe front
handguardbeck toward the front handle as far
as possible.
CHAIN TENSION
Itis normalf(x a new chalotostretch dudnqfirst
30 minutes of operation. You shouldc'fheck
your chain tension frequently. See CHAIN
TENSION under the ASSEMBLY section.
_1, WARNING: Muffler isvery hot dur-
ing and after use. Do not touch the muffler or
allow combustible material such as dry
grass or fuel to do so.
Page 9

/1=WARNING: Removefuelcapslow-
lywhen refueling,
FUELING ENGINE
This engine is certified to operate on un-
leaded gasoline. Before operation, gasoline
mustbe mixedwith a _ood quality synthetic
2-cycle air-cooled engine oil desislgnedto be
mixed at a ratio of 40:1, Poulan/Weed Eater
brand synthetic oil isrecommended. A40:1
ratio is obtained by mixing 3.2 ounces of oil
with 1gallon of unleaded gasoline. Included
withthis saw isa 3.2 ouncecontainerof Pou-
lan/Weed Eater brand synthetic oil Pourthe
entirecontentsofthiscontainer intoI gallonof
gasolineto achievethe properfuelmixture,
DO NOT USE automotive or boatoil. These
oilswillcause engine damage, When mixing
fuel follow the instructions printed on the
container, Always read and follow the safety
rules listed under HANDLE FUEL WITH
CAUTION.
BAR AND CHAIN LUBRICATION
The bar and chain require continuous lubri-
cation. Lubrication is provided by the auto-
matic oiler system when the oil tank iskept
filled. Lack of oil willquickly ruin the barand
chain, Too little oil will cause overheating
shownby smoke comingfrom the chain and/
or discolorationof the bar,
In freezing weather oil willthicken, making it
necessary to thin bar and chain oil with a
small amount 5 to 10%) of #1 Diesel Fuel or
kerosene. Bar and chan oil must be free
flowing for the oil system to pump enough oil
for adequate lubrication.
Genuine Poulan ® bar and chainoil is recom-
mended to protect your unit against exces-
sive wear from heat and friction. Poutan®
oil resists high temperature thinning. IfPou-
lan® barandebain oilisnofavailable, usea
good grade SAE 30 oil.
• Never use waste oilfor bar and chain lubd-
cation.
• Always stop the engine before removing
the oHcap.
IMPORTANT
Experience indicates that alcohol-blended
fuels (called gasohol or using ethanol or
methanol) can attract moisturewhich leads
to separation and formation of acids during
storage. Acidic gas can damage the fuel
system of an engine while in storage. To
avoid engine problems, the fuel s,y.'stem
should be emptied before storage for 30
days or longer. Drain the gas tank, start the
engtineand let it run until the fuel lines and
carburetor are empty. Use fresh fuel next
season. See STORAGE section for addi-
tional information.
9
_ WARNING:
The chain must not
move when the engine runsat idle speed. If
the chain moves at idle speed refertoCAR-
BURETOR ADJUSTMENT within this
manual, Avoid contact withthe muffler. A hot
mufflercan cause serious burns.
To stop the enbgine move the ON/STOP
switch tothe STOP position,
To start the engine hold the saw firmly on
the ground as illustrated. Make sure the
chain is free to turn without contacting any
object,
Use only15"-18" of rope per pull.
Hold saw firmly while pulling starter rope
Starair rope handle
Left hand
on front
handle
Right foot through rear handle
IMPORTANT POINTS TO REMEMBER
When pullin_g the starterrope, do not use the
full extent of the rope as this can cause the
rope to break. Do not let starter ropesnap
back. Hold the handle and let the rope re-
wind slowly.
NOTE: Do not attempt to cut material with
the fast idlelock button inthe locked position.
STARTING A COLD ENGINE (or
warm engine after running out of
fuel)
ON/STOP SWITCH
(SIDE VIEW)
sO"op
• Move ON/STO Pswitchto the ON position.
• Pull choke knob out to the furlextent.
• Slowly pressprimer bulb 6 times,
• Squeeze and hold throttle trigger. With
thumb press fast idle lock down; then re-
lease throttle trigger,
Fast idle lock button
Throttle _ •
Iock-ou
Throttle_l_.----J / Cbakeknob
trigger
• Sharply pull the starter rope handle 5times
with your right hand. Then, proceed to the
next step.
NOTE: Ifthe engine sounds as if it is try-
ing to start before the 5th pull, stop pulling
and immediately proceed to the next step.
Page 10

• Push the choke knobin completely (tothe
OFF position);pull the starter ropeun_lthe
engine starts.
CHOKE
Choke knob OFF FULL
• Allow the en_line to run for approximately5
seconds. Then, squeeze and release
throttle trigger'to alk_w engine to returnto
idle speed.
STARTING A WARM ENGINE:
• Move ON/STOP switch tothe ON position.
• Push the choke knob in completety (tothe
OFF position).
• Slowly press primer bulb 6 times.
• Squeeze and hold throttle trigger. With
thumb press fast idle Inck down; then re-
lease throttle trigger.
• Sharply pull thestarter ropewith yourright
hand untilthe engine starts.
• Squeeze and release throttle triOger to al-
lowengine to return to idle speed.
DIFFICULT STARTING (or starting a
flooded engine):
The engine may be flooded with too much
fuel if it has not started after 10 pulls.
Flooded engines can be cleared of excess
fuel by following the warm engine starting
procedure listed above. Insure the ON/
STOP switch is in the ON position.
Starting could require pullingthe starter rope
handle many times depending on how badly
the unit is flooded. If enginefailsto start,refer
to the TROUBLESHOOTING TABLE or call
1-800.554o6723.
CHA|N BRAKE
_WARNING: If the brake band is
worn too thin it may break when the chain
brake Istfiggared. With abroken brake bend,
the chain brake will not stop the chain. The
chain brake shouldbe replaced by an autho-
rized service dealer ifany part is worn to less
than 0.020" {0.5 ram) thick. Repairs on g
chain brake should be made by an autho-
rized service dealer. Take your unit to the
place of purchase if purchased from a sar-
v_cing dealer, or to the nearest authodzed
master service dealer.
• This saw is equipped with a chain brake.
The brake isdesigned to stop the chain if
kickback occurs.
• The inertia-activated chain brake is
activated ifthe front hand guard ispushed
forward, either manually (by hand) or
automatically _bysudden movement).
• If the brake is already activated, it is
disengaged by pullingthe front hand guard
back toward the front handle as far as
possible,
• When cutting with the saw, the chain brake
must be disengaged.
Disengaged
:i_Engaged
,,
Braking function control
CAUTION: The chain brake must be
checked several times daily. The engine
mustbe runningwhen performing this proce-
dure. This istheonly instance when the saw
should be placed on the ground with the en-
gine running.
Place the saw on firm ground. Grip the rear
handle withyour righthand and the frontban-
die with your [efthand. Apply full throttle by
fully depressing the throttle trigger. Activate
the chain brake by turning your left wrist
against the hand guard without releasing
your griparound the front haedle. The chain
shouldstop immediately.
Inertia activating function control
,_WARNING: When performing the
following procedure, the engine must be
turned off.
Grip the rearhandle with yourright hand and
the front handte with your left hand. Hold the
chain saw approximately 14" (35 cm)above
a stump or other wooden surface. Release
your grip on the front handle and use the
weight of the saw to let the top of the guide
bat fall forward and contact the stump.
When the tip of the bar hits the stump, the
brake should activate.
IMPORTANT POINTS
• Check chain tension before first use and
after 1 minute of operation. See CHAIN
TENSION in the ASSEMBLY section.
• Cut wood orgy. Do not cut metal plastics,
masons/ non-,,_od building materials, etc.
• Stop the saw dthe chain str kes a fore gn
object. Inspect the saw and repair or re-
I_e ptirts as p,ecessary.
• Keep the chainoutof dirtand sand. Evena
small amount ofdirtwill quicklydull a chain
and thus increasethe possibilityofkickback.
• practice cutting a few small logs usingthe
followingtechniques toget the "feel" ofus-
Ing your saw before you begin a major
sawing operation.
• Squeeze the throttle trigger and allow
the engine to reach full speed before
cutting.
• Begin cutting with the saw frame
against the log.
Keep the engine at fullspeed the entire
i time are cutting.
you
Allow the chain tocutforyou. Exertonly
light downward pressure, if you force
the cut, dame e tothe bar,chain, oren-
gine can rescue.
10
Page 11

• Release the throttle triggereras soonas
the cut is completed, allowing the en-
the to idle. If you run the saw at full
gi_rottlewithouta cutting load, unneces-
sary wear can occur to the chain, bar,
andengine. It is recommended that
the engine not be operated for lon-
er than 30 seconds at full throttle.
• _ avoid losingcontrol when cut iscom-
plete, do notputpressure onsaw atend
of cut.
• Stop the engine before setting the saw
down after cutting,
TREE FELLING TECHNIQUES
_ikWARNING: Check for broken or
dead branches which can fall while cutting
causing serious injury. Do not cutnear build-
ings or elect ricalwires ifyou do not knowthe
direction of tree fall, norcut at nightsinceyou
will not be ale to see well, nor during bad
weather such as rain,snow,or strongwinds,
etc. Ifthe tree makes contact with any utility
line, the utility company should be notified
immediately.
• Carefully plan yoursawing operation in ed-
vance,
• Clear the workarea. You need a clear area
all aroundthe tree so you can have secure
• footings.
The chain saw operator should keep on
the uphillside ofthe terrain as the tree is
likel=ytorollorslide downhillafter itisfelled.
• Study the naturalconditionsthatcan cause
the treeto fall ina gerticular direction.
Natural conditionsthat can cause a tree to
fall ina particular direction include:
• The wind direction and speed.
• The lean of the b'ee. The lean of a tree
might not be apparent due to uneven or
slopingterrain. Usea plumb orlevel tode-
termine the direction oftree lean.
• Weight and branches on one side.
• Surrounding trees and obstacles.
Lookfor decay and rot Ifthe trunk isrotted,
it can snap and fall toward the operator.
Check for broken or dead branches which
can fall on youwhile cutting.
Make sure there isenough room fur the tree
to fall. Maintain a distance of 2-1/2 tree
lengths from the nearest person or other ob*
ects. Engine noisecan drown out awaming
ca ,
Remove dirt, stones, loose bark, nails, sta-
es, and wire fromthe tree where cuts are to
_:_made.
Plan a clear retreat path to the rear and diag-
onal to the line of fall.
_,_,, Plan a clear retreat path
_--- -_._--""_- Direction of Fail
45 ° _
M0
FELLING LARGE TREES
(6 inches in diameter or larger)
The notch method is used to fell large trees.
Anotch iscut onthe sideof thetree inthede-
sired direction of fall. After a felling cut is
made on the opposite side of tree, the tree
will tend to fall into the notch.
NOTE: If the tree has large buttress
roots, remove them before making the
notch. If using sawto remove buttress
roots, keep saw chainfrom contacting
ground to prevent dulling of the chain.
NOTCH CUT AND FELLING THE
TREE
• Make notch cut by cutting the top of the
notchfirst. Cut through 1/3ofthe diameter
ofthe tree. Nextcomplate the notch bycut-
ting the bottom of the notch. See illuatra-
ben. Once the notch is cut remove the
notch ofwood from the tree.
Final (felling) cut here. 2 in-
ches above center of notch.
Pirsfeut\
Notch _. - 2"
s.ono
• After removing the wood from the notch,
make the felling cut on the oppositeside of
the notch.This isdonebymakinga cutabout
two inches higher than the center of the
notch. This will leave enough uncutwood
between the felling cutand the notchtoform
a hinge. This hinge will help preventthebee
fromfalling in the wrongdirection.
Hinge holds tree on stump and helps
control fall
Opening
of felling
7
Closing of
notch
NOTE: Before felling cut is complete, use
wedges to open the cut if necessaLryto
controlthe directionof fall. Toavoid kickback
and chain damage, use wood or plastic
wedges, but never steel or ironwedges.
• Be alert to signs that the tree is ready to
fall: cracking sounds, widening of the fell-
ing cut, or movement in the upper
branches.
• As tree startstofall, stopsaw, put itdown,
and get away quickly onyour planned re-
treat path.
11
Page 12

• DO NOT cut down a partially fallen tree
withyour saw. Beextremely cautious with
partially fallen trees that may be pooorly
supported. When atree doesn't fall com-
pletely, setthe sawaside and pulldownthe
tree with a cable winch, block and tackle,
or traator,
CUTTING A FALLEN TREE
(BUCKING)
Buckingis the term used for cutting a fallen
tree tothe desired log size.
_ WARNING: Do notstand onthe log
being cut. Any portioncan rollcausing loss
of footing and control. Do not stand downhill
of the log being cut.
IMPORTANT POINTS
• Cut only one log at a time.
• Cut shattered wood very car_uJly; sharp
pieces ofwoodcould beflung towardopera-
to_
• Use a sawhorse to cut small logs. Never
allow another person to holdthe log while
cutting and never hold thelog with your leg
or foot.
• Do not cut in an area where logs, limbs,
and rootsare tangled such as in a blown
downarea, Dragthe logs intoa clear area
before cutting by pulling out exposed and
cleared logs first.
TYPES OF CU'I'rlNG USED FOR
BUCKING
_I_WARNING: if saw becomes
pinched or hung in a log,don't try toforce it
out, You can lose controlof the saw resulting
in injuryand/or damage to the saw. Stopthe
saw, driveawedge ofplasticorwoodinto the
cut until the saw can be removed easily. Re-
startthesaw andcarefullyreenter the cut. To
avoid kickback and chain damage, do not
usea metalwedge. Do notattemptto restart
yoursaw when it is pinchedor hung in a log.
Use a wedge to remove pinched saw
Turn saw OFF and use a plastic or
wooden wedge to force cut open.
Ovemutting begins on the top side of the log
with the bottom of the saw against the log.
When overcutting use light downward pres-
sure.
g
Undercutting involvescuttingonthe under-
side ofthe log withtop of sawagainst the log,
When undercutting use light upward pres-
sure, Hold saw firmly and maintain control,
The saw willtend to push back toward you.
_ WARNING: Never turn saw upside
down to undercut. The saw cannot be con-
trolled inthis position.
Always make your first cuton the compres-
sionside of the log. The compression side of
the log is where the pressure of the log's
weight is concentrated.
First cut on compression side of log
%.
7_ _ =_ .
Second cut
Second cut
First cut on compression side of log
BUCKING WITHOUT A SUPPORT
• Overcut through 1/3of the diameter of the
log.
• Roll the log over and finish with a second
overcut.
• Watch for logswith a compression side to
prevent the saw from pinching. See il-
luatrationsforcuttinglogswith a compres-
sion side,
BUCKING USING A LOG OR
SUPPORT STAND
• Remember your first cut isalways on the
compression side ofthe log..
(Refer to the illustrations below for your
first and secondcut)
• Your first cut should extend 1/3 of the
diameter of the log,
• Finish with your second cut.
Using a log for support
" '_"_" .--_......?_
_lSt CUt
12
Page 13

Using a support stand
2ndCut
LIMBING AND PRUNING
WARNING: Be alert for and guard
against kickback. Do not allow the moving
chaintocontactanyotherbranchesor objects
at the nose of the guide bar when limbingor
pruning.._lowing such contact can result in
senous injury.
_ WARNING: Never dimb into a tr_ to
limb or prune. Do not stand on ladders,plat-
forms, a log,or inanypositionwhichcan cause
you to loseyour balance or control of the saw.
IMPORTANT POINTS
• Work slowly, keeping both hands firmly
grippedon thesaw. Maintainsecurefooting
and balance.
• Watch outfor spriogpoles. Spdngpolesare
small size limbs which can c_ch the saw
cbainandwhiptowardyouor pullyou offbal-
ance. Use extTemecaution when cutting
smallsize limbs or slender material.
• Be alert for spdogback. Watch out for
branches that are bent orunder pressure.
Avoid being struck by the branch or the
saw when the tension inthe woodfibers is
released.
• Keep a clear work area. Frequently clear
branches out of the way to avoid tipping
over them,
UMBING
• Always limbatree after itiscutdown. Only
then can limbingbe donesafely and prep-
edy.
• Leave the largerlimbsundemeaththe felled
tree to supportthe tree as you work.
• Startat the base of the felledtree and work
towardthe top, cutflngbranchesand limbs.
Remove small limbswith one cut.
• Keep the tree between you and the chain.
Cut from the side of the tree oppositethe
branchyou are cutting.
• Remove larger, supportingbranches with
the cuttin techai ues desc_bed in SUCK-
ING WITHOUT A_UPPORT.
• Alwaysuse an overcutto cut smalland free-
lyhanginglimbs. Undercuttingcouldcause
limbs to fall and pinch the saw.
PRUNING
WARNING: Umlt pruningto limbs
shoulder height or below. Be not cut ff
branchesare higherthan yourshoulder.Get a
prefesaionaito dothe job.
• Make yourflrstcut 1/3ofthe waythreughthe
bottomof the limb.
• Next make a 2nd cutall the way through
the limb. Then cuta thirdovercut leaving a
1 to2 inchcollar from the truckofthe tree.
i"i Seoondc '!J
aWARNING: Disconnect the spark
plug before performing maintenance except
for carburetor adjustments,
We recommend all service andadjustments
not listed in this manual be performed byan
authorized or Master Service Dealer.
MAINTENANCE SCHEDULE
Lubricate bar
sprock_ hole ....... After each use
Check:
Fuel mixture level .... Before each use
Barlubrication ....... Before each use
Chain tension ....... Before each use
Chain sharpness .... Before each use
For damaged pa_s .. Before each use
For loose caps ...... Before each use
For loose fasteners... Before each use
For loose parts ...... Before each use
Inspect and Clean:
Bar ................ Before each use
Complete saw ....... After each use
Air filter............. Every 5 hours*
Chain brake ........ Every5 hours*
Spark arresting screen
and muffler ......... Every 25 hours*
Replace spark plug . Yearly
iRep ace fue filter... Yearly
i* Hours of Operation
AIR FILTER
CAUTION: Do not clean filter in gasoline
or otherflammable solvent to avoid creating
a fire hazard or producing harmfutevapora*
tive emissions.
Cleaning the air filter:
A dirty air filter decreases engine perform-
ance and increases fuel consumption and
13
Page 14

harmful emissions. Always clean after every
5 hoursof operation.
• Clean the cover and the area around it to
keep dirtand sawdust from falling into the
carburetor chamber when the cover is re-
moved.
• Remove the parts as illustratedbelow.
• Wash the filter in soap and water. Air dry
• completely before reinstalling.
Lightly oil air filter before installing to im-
prove the efficiency of the air filter. Use
2-cycle engine oil or motor oil (SAE 30).
Squeeze excess oilfrom filter.
• Reinstall parts.
Air Filter
INSPECT MUFFLER AND SPARK
ARRESTING SCREEN
_kWARNING: The muffler on this
product contains chemicals known to the
State of California to cause cancer.
As the unit isused, carbon depositsbuild up
on the muffler and ssparkarresting screen,
and must be removed to avoidcreating afire
hazard or affecting engine performance.
Replace the spark arresting screen ifbreaks
occur.
CLEANING THE SPARK ARREST-
ING SCREEN
Cleaning is required every 25 hours of op-
eration or annually, whichever comes first.
Outlet
Guide
Muffler
/
Muffler
Backplate Bolts
Muffler
Gasket
Locknut
• Loosen and remove the Iocknut from the
belt cover.
• Remove the boltcover.
• Loosen and remove the 2 muffler belts.
Remove the muffler, mufflergasket, outlet
guide and beckplata. Notice the orienta-
tion ofthese portsfor reassembling.
• Locate the 2 outlet cover screws on the
muffler. Loosen and remove beth screws.
• Remove the outlet cover.
Outlet Cover BACK VIEW OF
i MUFFLER
Muffler
Screws
Screen
• Remove spark arrestingscreen.
• Clean the sparkarrestingscreen witha wire
brush. Replace screenif anywires are bro-
ken or screen is blockedaftercleaning.
• Reinstallsparkarrestingscreen.
• Reinstall outlet cover and 2 screws. En-
sure outlet coverand both screws are re-
installed correctly (see illustrations)topre-
vent damage to the saw. The exhaust
outlet mustface the chain brake (bar side)
of the saw.
Exhaust _%_ C'_et Cover
Exhaust Outlet must face chain
brake (bar side) of chain saw
• Inspect the muffler gasket and replace if
damaged.
• Reinstall backplate, outlet guide, muffler
gasket, and muffler using muffler belts.
13ghten until secure.
• Reinstall belt cover and Iocknut. ]ighten
securely.
CARBURETOR ADJUSTMENTS
Your carburetor is equipped with limiter
caps. Carburetor adjustment is a compli-
cated task. We recommend that you take
our unit to an authorized service dealer.
I_amage willoccur ifyouturnthe needles be-
yond the limiter stops.
BAR MAINTENANCE
Ifyour saw cuts to oneside, has tobe forced
through the cut,or been runwithan improper
amount of bar lubrication it may be neces-
sary to service yourbar, Awornbarwilldam-
age yourchain and make cuffingdifficult.
After each use, ensure ON/STOP switch is
in theSTOP position, then clean all sawdust
from the guide bar and sprocket hole.
To maintain guide bar:
• Move ON/STOP switchtothe STOP posi-
tion.
• Loosen and remove chain brake nutsand
chain brake. Remove barand chain from
saw.
• Clean the oil holes and bar groove after
each 5 hours ofoperation.
14
Page 15

Remove Sawdust From
Guide Bar Groove
O,Ho,es .
• Add lubricant to sprocket hole after each
use.
• Burring of guide bar rails is a normal
process of rail wear. Remove these burrs
witha flatfile.
• When rail top is uneven, use a flat file to re-
store square edges and sides.
_F_ "_- File Rail Edges_- I"1N
a'_du_ir_eS I''1
Worn Groove Correct Groove
Replace guide bar when the groove is worn,
the guidebar isbent or cracked,orwhenexce-
ss heating or burring of the railsoccurs. If re-
placement is necessary, use onlythe guidebar
specifiedfur your saw mthe repair parts listor
on the decal located on the chainsaw.
CHAIN SHARPENING
Chain sharpening is a complicated task that
requires special tools. We recommended
you refer chain sharpening to a professional
chain sharpener.
IGNITION TIMING
Ignition timing is fixed and nonadjustable.
SPARK PLUG
The spark plug should be replaced each
year to ensure the engine starts easier and
runs better.
• Loosen 3 screws oncylinder cover.
• Remove the cylinder cover.
• Pull offthe spark plug boot.
Remove spark plug fromcylinderand dis-
card.
• Replace with Champion RCJ-7Y spark
plug and tighten securely with a 3/4 inch
socket wrench. Spark plug gap should be
0.025 inches.
• Reinstall the spark plug boot.
• Reinstall the cylindercover and 3 screws.
Tighten securely.
Screws
STORAGE
_kWARNING: Stop engine and allow
to cool, and securethe unit before stodng_or
transporting in a vehicle. Store unitand _uel
in an area where fuel vapors cannot reach
sparks or open flames from water heaters,
electric motors or switches, furnaces, etc.
Store unitwithallguards inplace. Positionso
that any sharp object cannot accidentally
cause injuryto passersby. Storethe unitout
of reach of children.
• Before stodng, drain all fuel from the unit.
Start engine andallow to run until itstops,
• Clean the unitbefore storing. Pay particu-
lar attention to the air intake area, keeping
it free of debds. Use a mild detergent and
sponge to clean the plastic surfaces.
• Do notstore the unit orfuel ina closed area
where fuel vapors can reach sparks or an
open flame from hot water heaters, electric
motors or switches,furnaces, etc.
• Store in a dry area out of the reach of chil-
dren.
CAUTION: It is important to prevent gum
deposits fromformingin essential fuel system
parts such as the carburetor, fuel filter, fuel
hose, or fuel tank dudng storage. Alcohol
blendedfuels called gasohstor usingethanol
or methano) can attractmoisturewhichleads
to fuel mixture separation and formation of
acidsdudng storage.Acidicgas can damage
the engine.
NEED ASSISTANCE?
Call1-800-554-6723.
NEED SERVICE PART?
Contactyourdealerorplaceofpurchase.
Plug
15
Page 16

TROUBLESHOOTING TABLE
_k WARNING: Always stop unitand disconnect spark plugbefore performing all of
the recommended remedies belowexcept remedies that require operation of theunit.
TROUBLE
Engine will not
start orwill run
only a few
seconds after
starting.
I
; CAUSE
I
: • Ignition switch off.
i • Engine flooded.
I
• Fuel tank empty.
• Spark plug not firing.
• Fuel not reaching
carburetor.
Engine will • Carburetor requires
not idle adjustment
properly. • Crankshaft seals worn.
REMEDY
Engine will not ] • Air filter dirty.
accelerate, i ° Spark plug fouled.
lacks power. ; • Chain brake engaged.
or dies under I • Carburetor requires
a load. i adjustment.
i
'' asne_gTC°olimUOho,1 mixed with
• Move ignition switchto ON.
• See "DifficuRStarting" in
Operation Section.
• Fill tank with correct fuel mixture.
• Install new spark plug.
• Check for dirty fuel filter; replace.
Check forkinked or split fuel line;
repair or replace.
Contact an authorized service dealer.
Contact an authodzed service dealer.
• Clean or replace air filter.
• Clean or repiace plug and regap.
• Disengage chain brake.
• Contact an authorized service dealer.
Engine • Empty fuel tank and refillwith
smokes correctfuel mixture.
excessively.
ELECTROLUX HOME PRODUCTS, INC,,
warrants to the original purchaser that each
new Poulan brand gasoline chain saw is
free fromdefects in material and workman-
ship and agrees to repair or replace under
this warranty any defective gasoline chain
saw as followsfrom the original date of pur-
chase.
1 YEAR - Parts and Labor,when used for
Household purposes.
60 DAYS - Parts and Labor, when used for
Commercial, Professional, or Income Pro-
ducinlg purposes.
30 DAYS - Parts and Labor,if usedfor rental
urpuses,
_his warranty is not transferable and does
not cover damage or liability caused by im-
proper handling, improper maintenance, or
the use of accessories and/or attachments
not sbecificail;lyrecommended by ELEC-
TROLUX HOME PRODUCTS, INC,, for this
chain saw. Additionally, this warranty does
not cover damage caused by improper han-
dling,improper maintenance, or if thesaw is
altered inany way whichin ourjudgement af-
fects itsconditionoroperation. This warranty
does not cover tune-up, sparkplugs, filters,
starterropes, starter springs, chain sharpen-
ing, bars, chains, and other partswhichwear
and require replacement with reasonable
use dudngthe warranty period. Thiswarran-
ty does notcover predeliveryset-up, instal-
lationof guide barand chain, and normalad-
justments explained in the instruction
manual such ascarburetor adustmentslu_,and
chain tension adjustments. 'This warranty
does not cover transportation costs.
THIS WARRANTY GIVES YOU SPECIFIC
LEGAL RIGHTS, AND YOU MAY HAVE
OTHER RIGHTS WHICH VARY FROM
STATE TO STATE.
NO CLAIMS FOR CONSEQUENTIAL OR
OTHER DAMAGES WILL BE ALLOWED,
AND THERE ARE NO OTHER EXPRESS
WARRANTIES EXCEPT THOSE EX*
PRESSLY STIPULATED HEREIN.
SOME STATES DO NOT ALLOW LIMITA-
TIONS ON HOW LONG AN IMPLIED WAR-
RANTY LASTS OR THE EXCLUSION OR
LIMITATIONS OF INCIDENTAL OR CON-
SEQUENTIAL DAMAGES, SO THE
ABOVE LIMITATIONS OR EXCLUSION
MAY NOT APPLY TO YOU.
The poli_cyof ELECTROLUX HOME PRO-
DUCTS, INC., isto continuously improve its
products.Therefore, ELECTROLUX HOME
PRODUCTS, INC., reserves the right to
change, modify, or discontinue models, de-
signs, specifications, and accessories of all
productsat any time without noticeorobliga-
tionto any purchaser.
16
Page 17

YOUR WARRANTY RIGHTS AND OB-
LIGATIONS: The U.S. Environmental
Protection Agency, California Air Resources
Board, Environment Canada and POULAN/
WEED EATER. DIVISION OF WCI OUT-
DOOR PRODUCTS, INC., are pleased to
explain the emissions control system war-
rantyonyouryear 2000-2003 small off-road
engine. In California, all new small off-road
engines must be designed, built, and
equipped to meet the State's stringent anti-
smog standards. POULAN/WEED EATER
must warrantthe emission controlsystem on
your small off-toed en=gl_ineforthe periodsof
time listed below providedthere has been no
abuse, negFect, or improper maintenance of
your small off-road engine engine. Your
emission control system includes partssuch
as the carburetor and the ignition system.
Where awarrantable condition exists, POU-
LAN/WEED EATER will repair your small
off-road engine engine at no cost toyou. Ex-
penses covered under warranity mclude
dia_,nosis,partsand labor. MANU]FACTUR-
ER S WARRANTY COVERAGE: If any
emissions related part on your engine (as
listed under Emissions Control Warranty
Parts Ust) isdefective ora defect in the ma-
terialsor workmanship ofthe engine causes
the failure of such an emission related pert,
the partwill be repaired orreplaced by POU-
I-AN/WEED EATER. OWNER'S WAR*
RANTY RESPONSIBILITIES: As the small
off-road engine engine owner, you are re-
spensible for the performance of the re-
quired maintenance listedin your instruction
manual. POULAN/WEED EATER recom-
mends that you retain all receipts covering
maintenance on our small off-road en ine,
but POULAN/W_ED EATER cannot _eny
warranty solely for the backof receipts or for
your failure to ensure the performance of all
scheduled maintenance. As the small off-
road engine engine owner, you should be
aware that POULAN/WEED EATER may
deny you warranty coverage if your small
off-road engine engine or a part of it has
failed due to abuse, neglect, improper main-
tenance, unapproved modifications, or the
use of parts not made or approved by the
original equipment manufacturer. You are
responsible for presentin[mgyour small off-
road engine to a POULAN/WEED EATER
authorized repair center as soon as a prob-
lem exists. Warranty repairs should be com-
pleted in a reasonable amountof time, not to
exceed 30 days. If you have any questions
regarding your warranty hghts and responsi-
bilities, you should contact your nearest au-
thorized service center or call POULAN/
WEED EATER at 1-800-554-6723.
WARRANTY COMMENCEMENT DATE:
The warranty period begins onthe date the
small off-road eegme is purchased,
LENGTH OF COVERAGE: This warranty
shall be for a period oftwo years from theini-
tial date of purchase. WHAT IS COVERED:
REPAIR OR REPLACEMENT OF PARTS,
Repair orreplacement of any warrar_ed part
will be performed at no charge to the owner
at an approved POULAN/WEED EATER
servicingcenter. If you have any questions
re_jardiegyourwarranty rightsand raspensi-
bihties, you should contact your nearest au-
thodzed service center or call POULAN/
WEED EATER at 1-800-554-6723.
WARRANTY PERIOD: Any warranted part
which is not scheduled for replacement as
required maintenance, or which is sched-
uled=only for regular inspectionto the effect
of repair or replace as necessary" shall be
warranted for 2 years. Any warranted part
which is scheduled for replacement as re-
uired maintenance shall be warranted for
t_e period oftime uptothefirst scheduled re-
J_lacementpointfor that part. DIAGNOSIS:
he owner shall not be charged fordiagnos-
tic laborwhich leads to the determination that
awarranted part is defective if thediagunostic
work isperformed atan approved POULAN/
WEED EATER servicing center. CONSE-
QUENTIAL DAMAGES: POULAN/WEED
EATER may be liable for damages to other
engine components caused by the failure of
awarranted part stillunder warranty. WHAT
IS NOT COVERED: All failures caused by
abuse, neglect, or improper maintenance
are not covered. ADD-ON OR MODIFIED
PARTS: The useof add-on or modifiedparts
can be grounds for disallowing a warranty
claim. POULAN/WEED EATER is not liable
to cover failures ofwarranted parts caused
bythe use ofadd-on or medified parts. HOW
TO FILE A CLAIM: If you have any ques-
tions re_arding your warranty rights and re-
spensibdities,you shouldcontact your near-
est authorized service center or call
POULAN/WEED EATER at
1-800-554-6723. WHERE TO GET WAR-
RANTY SERVICE: Warranty services or re-
pairs shall be provided at all POULAN/
WEED EATER service centers, call:
1-800-554-6723 MAINTENANCE, RE-
PLACEMENT AND REPAIR OF EMIS-
SION RELATED PARTS: Any POULAN/
WEED EATER approved replacement pert
used in the performance of any warranty
maintenance or repair on emissnonrelated
parts willbe provided without charge to the
owner if thepart is under warranty. EMIS-
SIGN CONTROL WARRANTY PARTS
LIST: Carburetor, Ignition System: Spark
Plug covered upte maintenance schedule,
Ignition Module, Muffler ncedng catalyst.
MAINTENANCE STATEMENT: The owner
is responsible for the performance of all re-
quired maintenance as defined in the in-
structionmanual.
17
Page 18

The information onthe product label indicates which standard your engine is certified.
Example: (Year) EPA Phase 1 or Phase 2 and/or CALIFORNIA.
This engine is certified to be emissionscompliant for the following use:
[] Moderate (50 hours)
[] Intermediate (125 hours)
[] Extended (300 hours)
18
 Loading...