

Page 1
Page1/
4
pottery barn kids
Cameron
Counter Cabinet Base
PRE-ASSEMBLY:
For your safetyandease, assemblybytwoadults is recommended.
Please readallinstruction
s
before begi
nning assembly. The illustrationsprovided allowforeasier assembly
when used in conjunction with theassemblyinstructions.
Remove allpartsandhardware from boxandlayoutonacarpete
d or scratch
-
free work surface.
The shipping
box providesandideal
work surface.Donotdispose of any contentsuntil assemblyiscompleted to avoid
accidentallydiscarding smallparts or hardware.
Use the parts and hardware lists to identify and separate each of the pieces included prior to starting
assembly.
Note: DO
not fully tighten
the
bolts until all parts are in place. Failure to follow these instructions may cause
the bolts to misalign during assembly.
The use of power tools for assembly is not recommended
. Po
wer tools can damage hardware or
split wood.
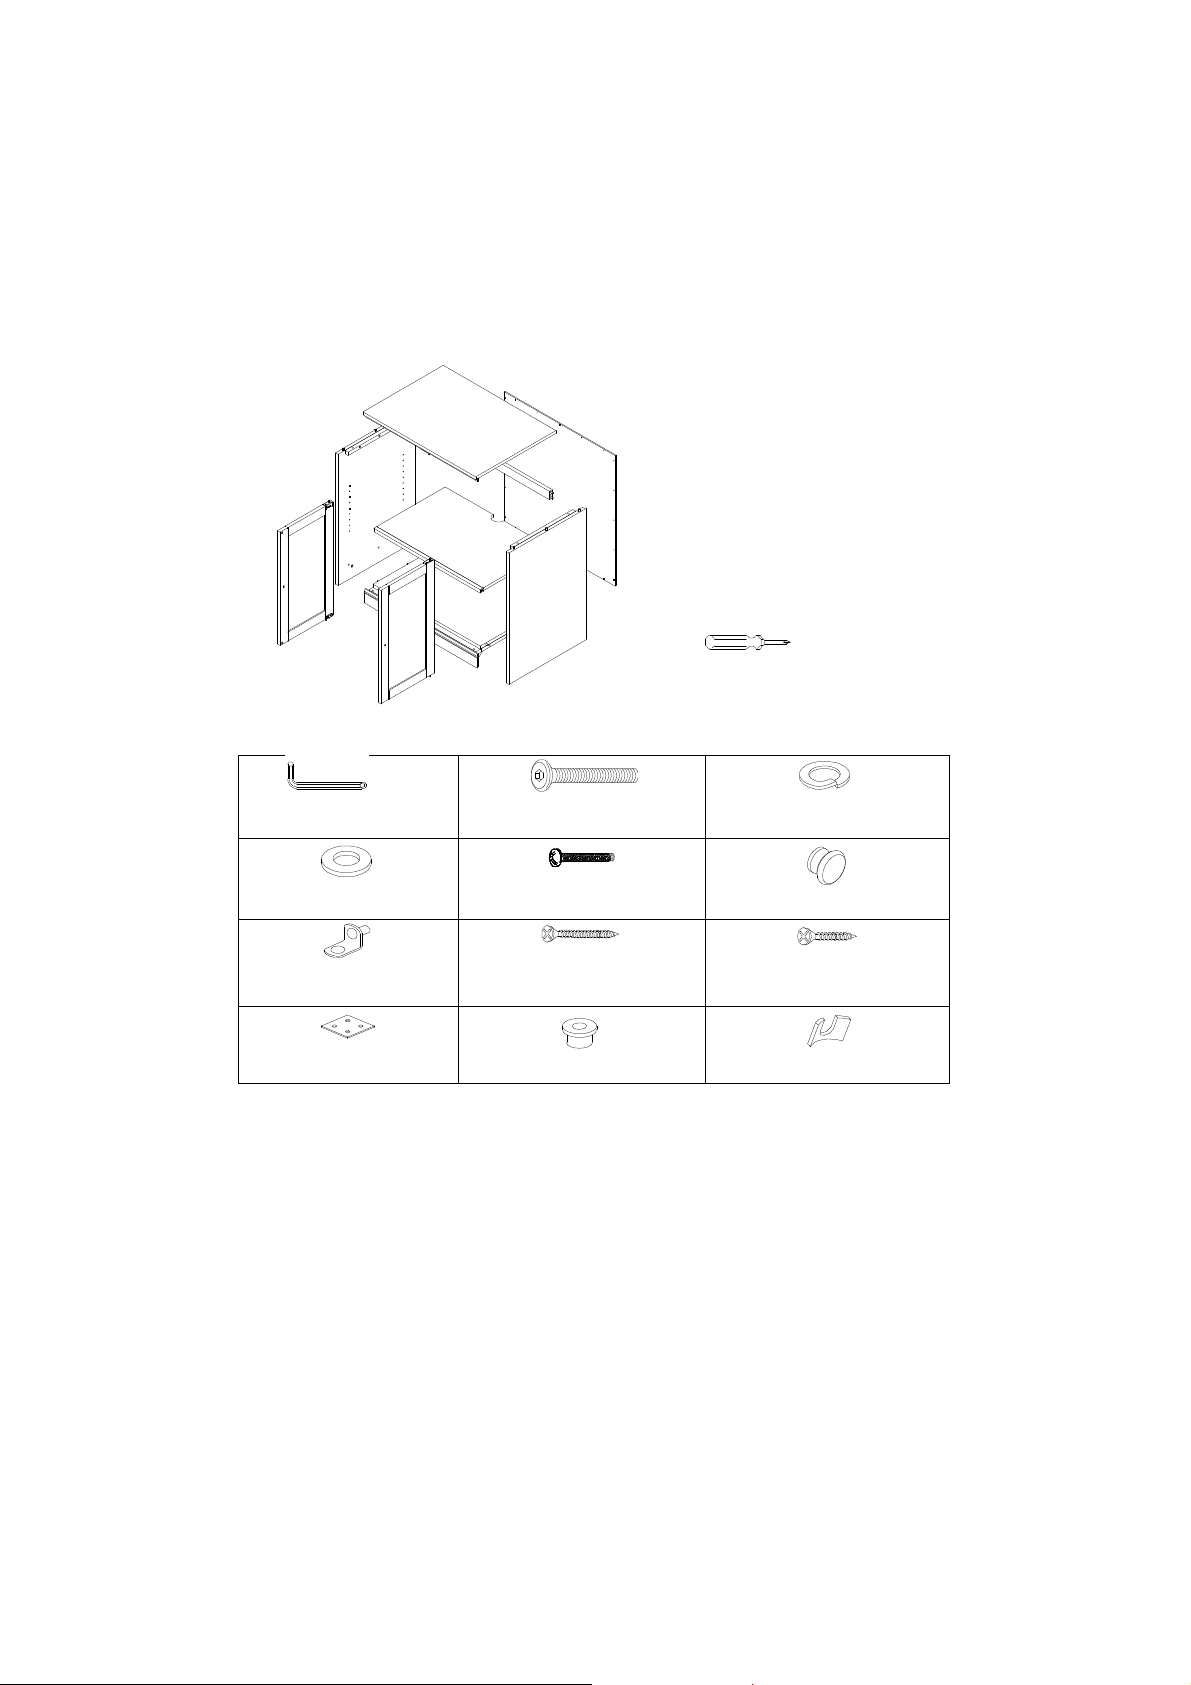
HARD
WARE INCLUDED:
(I) Allen Key
–
1pc
(J) Bolt 1/4
”
x 28mm
–
10pcs
(K) Spring Washer
–
8pcs(L)Flat Washer
–
8pcs
(M) Machine Screw5/32
“
x 25mm
–
2pcs
(N)
Wood
Knob–2pcs
(O) Shelf Support
er–4pcs
(P)
Long Wood Screw3.5 x 15mm
–20pcs
(Q) Short Wood Screw
3 x 12mm
–
8pcs
(R) Connecting Bracket
–2pcs(S) Plastic Cap
–
4pcs
(T)
Half-moon Washer
–
2pcs
A.B.C.G.D.H.H.E.F.
PARTS INCLUDED:
(A)
Top Panel
–
1pc
(B)
Left Side Panel
–1pc
(C) Right Side Panel
–
1pc
(D) Bottom Panel
–
1pc
(E) Rear Top Rail
–
1pc
(F) Back Panel
–
1pc
(G) Adjustable Shelf
–
1pc
(H) Door
–
2pcs
TOOLS REQUIRED:
Philips Screwdriv
er (Not included)
Page 2
Page2/
4
ASSEMBLY INSTRUCTIONS:
1.Connect
the Bottom Panel(D)to the Left Side Panel
(B). Sli
de a Spring Washer(K),Flat Washer (L) onto
a Bolt (J). Insertthe Bolt from wood cleat located onbottom of the Bottom Panel intothepre
-
drilled holes
locatedon theLeftSide Panel (B).
Secure
the Left SidePanel
with (2)Bolts.
Do not fullytighten.
2.
Align and connectthe wooden dowel
s
located on theRearTop Rail (E) to the pre
-
drilled hole
s
located on
the Left SidePanel(B). Place a
Half-Moon Washer(T)ontothe c
ut-out onthe Rear Top Rail(E)and
secure it withaBolt(J).
3.
Repeat the abovesteps to secure the Right Side Panel (C)to the Bottom Panel and the Rear Top Rail.
The Right SideP
a
nel is securedto
the
BottomPanelby(2) Bolts
, (2) SpringWasher,(2) Flat Washer
and securedtotheRear Top Rail by
(1) Half
-
Moon Washer,
(1) Bolt
.
C.
I.J.K.L.I.J.T.D.B.
E.
Page 3

Page3/
4
4.
Turn the
assembled piece
upright
.
Place the TopPanel
(A)onthe
assembledpiece.
InsertthePlastic
Cap (S) intothepre
-
drilled holeson bottomoftheTop Panel and the Bottom Panel.
5.
Lift t
he Top Panel
(A)
a little bittoallowthe hinges
on
the Door
s
(H) to go intothePlastic Cap
s
(S). Check
alignment
s
and securetheTop Panel (A) to the
L
eft/RightSide Panels
by sliding aSpringWasher (K),
Flat Washer(L)ontoa Bolt (J) and inserting th
e Bolt
into the fixed woodcleats located on insideof the
left/RightSide Panels.
The Top Panel is secure
d
to the Left/RightSide Panel by (2) Bolts re
s
pectively.
Check alignmentbefore tightening all bolts.
6.
Attach aWoodKn
ob (N) to outsideoftheleft door and secure it using a MachineScrew (M). Repeat with
the right door.
M.
N.
A.H.H.S.S.
Page 4

Page4/
4
7.Attach the BackPanel(F) to the rear side assembled piece
and secureitbyusing
(20) LongWood
Screws (P).
8.
Insert t
he (4) ShelfSupporter (O) into thepre
-
drilled holeson interior sides of the Left/RightSide Panels.
Place the Adjustable Shelf ontotheShelfSupporters.
M
ENDING PLATE CONNECTIONS:
When
connecting
c
ubby piece
(sold separa
tely)tothe Cabinet
Base piece, use (2)
Connecting
Bracket
(R)
and(8)
Short
Wood Screw
s (Q)
.
CARE INSTRUCTIONS:
Dust often usinga clean, soft, dry lint
-
free cloth.
B
lot spills immediately, and wipe witha clean, damp, c
loth.We do not
recommend theuse of chemical cleansers, abrasives, orfurniture polishon our lacquered
finish.
Thank you for your purchase.
stores | catalog | www.potterybarnkids.com
USA 1.800.290.8181
Q.
R.
F.P.G.
G.
 Loading...