


Read all instructions before assembly and use of this product.
The Original
and
The Mini
Conve r t i b l e
Couchette jumelée CO-SLEEPERMD de ARM’S REACHMD
Cama adosable CO-SLEEPER® de ARM’S REACH®
! WARNING: Failure to follow these warnings and instructions could result in serious injury or death.
THIS UNIT IS NOT INTENDED TO BE USED AS EITHER A FULL OR NON-FULL SIZE CRIB
! AVERTISSEMENT: Le non-respect de ces avertissements et des instructions peut provoquer des blessures graves, voire mortelles. CE PRODUIT N’EST PAS CONÇU POUR SERVIR DE LIT D’ENFANT EN FORMAT STANDARD OU SPÉCIAL
! ADVERTENCIA: El incumplimiento de estas advertencias e instrucciones puede resultar en lesiones graves o incluso la muerte. ESTA UNIDAD NO ESTÁ DESTINADA PARA EL USO COMO SEMICUNA NI CUNA COMPLETA
I N S T R U C T I O N M A N U A L
MANUEL D’INSTRUCTION • EL MANUEL DE LA INSTRUCCION
•Setting up a basic playard
•Attaching mattress pads
•Attaching to parental bed
•Converting to a free-standing unit
•Converting to a changing table
KEEP THIS BOOKLET HANDY FOR FUTURE REFERENCE GARDER CE PETIT LIVRE POUR GUIDE FUTUR CONSERVE ESTA LIBRO PARA FUTURAS REFERENCIAS

! WARNING – secure UMBRELLA CANOPY TM to the CO-SLEEPER® bassinet or playard by fastening all Velcro® tabs. (Umbrella CanopyTM is an optional accessory)
2

Read all instructions BEFORE assembly and USE of this product.
! WARNING:Failure to follow these warnings and instructions could result in serious injury or death.
THIS UNIT IS NOT INTENDED TO BE USED AS EITHER A FULL OR NON-FULL SIZE CRIB
SUFFOCATION HAZARD. Discard all packing materials immediately after opening. Plastic bags and ties may cause suffocation or choking. Caution: do not discard the anchor plate with the two 10 foot long straps, as this is necessary for using the product in the co-sleeping configuration.
• NEVER LEAVE your child unattended in the Arm’s Reach® CO-SLEEPER® bassinet.
•IMPORTANT! Check this product for damaged hardware, loose joints, missing parts,or sharp edges before assembly and periodically during use. DO NOT use if any parts are missing, damaged, or broken. Contact Arm’s Reach Concepts, Inc. for replacement parts and instructions if needed. Never substitute parts.
•To reduce the risk of SIDS, pediatricians recommended healthy infants be placed on their backs to sleep, unless otherwise advised by your physician.
•FALLING HAZARD: Remove infant from Arm’s Reach® CO-SLEEPER® bassinet before starting any conversion.
•NEVER LEAVE infant unattended on changing table. Changing table is not intended for sleeping.
•The playard, including side rails and bottom pad, must be fully erected prior to use. Top rails and bottom rails must be completely locked, in all configurations, before putting an infant /child into the unit.
•NEVER USE more than 4–2” (5 cm) extension segments with Arm’s Reach® CO-SLEEPER® bassinet. ONLY use leg extensions on the CO-SLEEPER® bassinet when it is attached to the parental bed.
• IMPORTANT! Be sure to put the mattress pad in the liner, not under the liner.
DO NOT put the mattress pad directly on the support bars without the liner installed.
Infant may fall through the opening created without the liner. DO NOT use mattress pad in upper position without fabric liner installed beneath mattress.
•! WARNING: CHOKING HAZARD Make sure removable bar is in the upper (playard)
position before attempting to fold up your playard/CO-SLEEPER® bassinet. Folding playard/® CO-SLEEPER® bassinet with removable bar in lower (CO-SLEEPER® bassinet) position may result in loosening of snaps.
•! WARNING: NEVER LEAVE infant in playard with SIDES DOWN. Infant may roll into
space between pad and loose mesh side causing suffocation.
•NEVER LEAVE child in unit without the TOP HORIZONTAL RAIL installed in the upper most position, unless the unit is in the CO-SLEEPER® bassinet configuration and the parent/caregiver is in the adult bed.
•Discontinue use of the products when child is able to climb out or reaches the height of 35 in.(890mm).
3

• When used as a playard, the Arm’s Reach® CO-SLEEPER® bassinet is intended for use by a child who is unable to climb out of the playard and is less than 34 inches (66.4 cm) tall and weighs less than 30 lbs. (13.5 kg.)
•When child is able to pull up to standing position, remove bumper pads, large toys, and other objects that could serve as steps for climbing out.
•DO NOT leave child in product with side lowered. Be sure side is raised and locked position whenever child is in product.
•When converting to the playard configuration, remove the plastic hangers and the liner, and lower the floor to the lowest level. Place the removable bar in the highest position.
•FALLING HAZARDTo help prevent falls, DO NOT use this product when the infant begins to push up on hands and knees or has reached manufacturer’s recommended maximum weight, whichever comes first.
•Discontinue use as an attachable baby bed when child is able to roll over and pull him or herself up to a kneeling, sitting or standing position.
!WARNING: SUFFOCATION HAZARD-
•INFANTS CAN SUFFOCATE
•In gaps between a mattress too small or too thick and product sides.
•On soft bedding
•NEVER add a mattress, pillow, comforter, or padding. Use ONLY the pad provided by manufacturer.
•If a sheet is used with the pad, use only the one provided by the bassinet or cradle manufacturer or one specifically designed to fit the dimension of the bassinet or cradle mattress
•NEVER use plastic shipping bags or other plastic film as mattress covers not sold and intended for that purpose. They can cause suffocation.
•SUFFOCATION HAZARD _ To help prevent suffocation and entrapment, use only the mattress pad provided by Arm's Reach Concepts Inc. NEVER use additional padding or mattress.
•SUFFOCATION HAZARD: Make sure liner flap is snugly attached to prevent fabric liner from loosening inside the sleeping area at front of mattress, or being drawn back into the sleeping area and covering the infant.
•Make sure all Velcro® straps are secured and tight when used in the changer / CO-SLEEPER® bassinet positions. Tighten straps periodically.
•STRANGULATION / SUFFOCATION HAZARD: The top edge of the bumper bar/shelf must be level with or below the top of the adult bed mattress when used as a
4

CO-SLEEPER® bassinet. The level of the CO-SLEEPER® bassinet mattress must be a minimum of 4 inches below the top edge of the bumper bar/shelf. NEVER raise the level of the CO-SLEEPER® bassinet mattress level with, or above the top of the bumper bar/shelf.
•NEVER USE the CO-SLEEPER® bassinet without the anchor plate attached and locked as shown. Failure to use this anchoring system could result in serious injury or death to the infant. Make sure all straps are secured and tight. Check straps before each use.
•Failure to use this securing system will allow Arm’s Reach® CO-SLEEPER® bassinet to move away from adult bed and could result in infant falling out of the CO-SLEEPER® bassinet. NEVER leave infant unattended in the CO-SLEEPER® bassinet.
•STRANGULATION HAZARD: When anchor plate and strap assembly is not in use, store in a safe place not accessible to children.
•DO NOT place product near a window where cords from blinds or drapes may strangle a child.
•Strings can cause strangulation! DO NOT place items with a string around a child’s neck, such as hood strings, pacifier cords. DO NOT suspend strings over the unit in any configuration or attach string to toys.
•Keep playard away from stoves, heaters, campfires and other hazards.
•DO NOT allow children to climb or play on or under unit in any configuration.
•Always provide the supervision necessary for the continued safety of your child. When used for playing, never leave child unattended.
•Discontinue using your ARM’S REACH® CO-SLEEPER® bassinet should it become damaged or broken.
•Periodically check your product to make certain all screws, nuts rivets, or bolts are tightened securely.
•DO NOT use a water mattress with this product.
•If refinishing, use a nontoxic finish specified for children’s products.
•! WARNING – when attaching the Umbrella CanopyTM to the CO-SLEEPER® bassinet or playard make sure to fasten all Velcro® tabs. (Umbrella CanopyTM is an optional accessory)
•! WARNING – To prevent serious or fatal injury from falls always keep child within arm's reach. Never leave your child unattended.
5

Instructions How to set up basic playard
! WARNING: STRANGULATION HAZARD: When anchor plate and strap assembly is not in use, store in a safe place not accessible to children.
Step 1
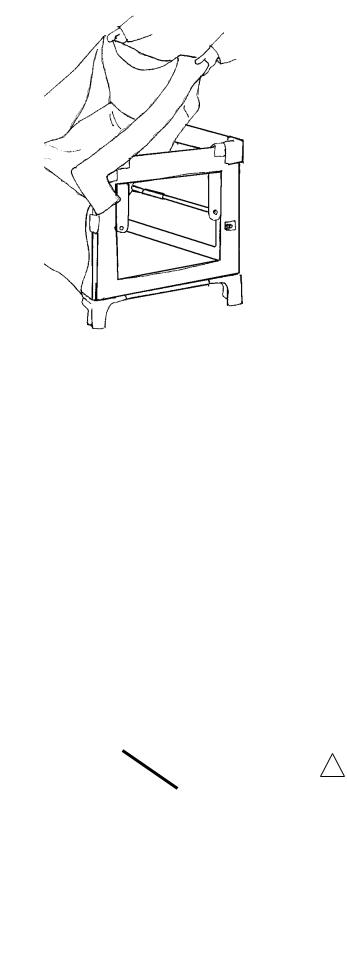
•Unzip bag. Remove playard and stand playard upright.
•Unhook Velcro® tabs.
•Set mattress aside.
DO NOT PUSH CENTER DOWN OR LOCK LOWER BARS
BEFORE LOCKING ALL TOP BARS.
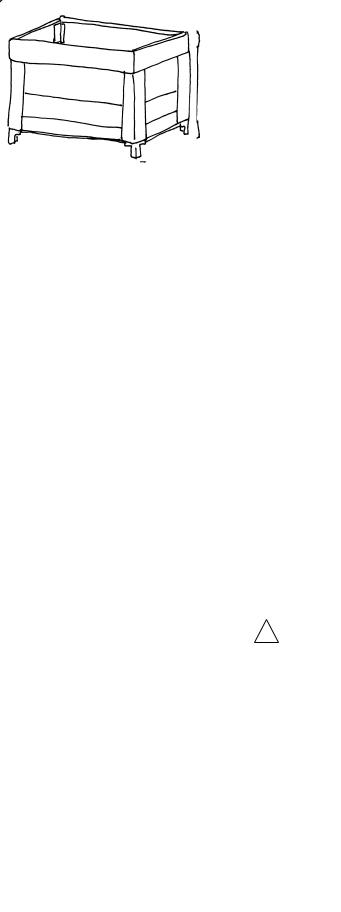
Step 2
•Separate the four corner posts. Leaving center up.
•Lock all top bars by grasping top bar in center and pulling up until you hear a "click"
•Repeat on all 4 sides until all top bars are rigid.
Step 3
•Place foot on outside center pocket of bottom bar and push down to lock.
•Repeat on all 4 sides until playard is fully erect.
Step 4
A.To cover mattress with fitted sheet open the 4 Velcro® tabs with snap found on corner ends of mattress.
B.Feed Velcro® tabs thru buttonholes in sheet corners & place in bottom of playard with Velcro® tabs extended.
C.Feed Velcro® tabs thru corresponding buttonholes in floor of playard corners and attach to snap on outside of leg.
!WARNING: When converting to the playard configuration, remove the plastic hangers, the liner
and floor support rods. Lower the floor to the LOWEST level. Place the removable bar in the HIGHEST position.
•Always make sure all top and bottom rails are securely locked, in all configurations, before putting an infant /child into the unit.
•NEVER LEAVE infant in playard with SIDES DOWN. Infant may roll into space between pad and loose mesh side causing suffocation.
6

Instructions How to fold your playard
Step 1
LIFT UP ON LOWER HORIZONTAL BAR BEFORE ATTEMPTING
TO UNLOCK UPPER BAR!!
•Place foot under lower bar and lift bar up into inverted V position. Bottom bar must be completely unlocked to unlock top bar.
Step 2
A.With bottom bar in inverted V shape, place fingers over center of top bar with thumbs on buttons marked," PRESS TO UNLOCK".
B.Push buttons in while lifting bar slightly to release lock and push down into "U" shape. If top bar is in V shape one side is not unlocked.
C.Pull up on center of playard floor.
Step 3
•Gather unit together.
•Do not force.
Step 4
•Wrap the mattress around your unit.
•Feed the strap through the bottom corner belt loop.
•Fasten together the other 2 Velcro® straps.
Step 5
•Insert playard into bag as shown and zip closed.
•Store sheet in end of unit.
Step 6
• Be sure carrying handle comes through opening in bag.
7

Assembly Arm's Reach® CO-SLEEPER® Bassinet
Playard with side lowered for assembly as
a CO-SLEEPER® bassinet
8

! WARNING:Failure to follow these warnings and instructions could result in serious injury or death.
Read all instructions before assembly and use of this product.
Converting playard to Arm's Reach® CO-SLEEPER® Bassinet
STEP 1
LIFT UP ON LOWER HORIZONTAL BAR
BEFORE ATTEMPTING TO UNLOCK UPPER BAR!!
Place foot under lower bar and lift bar up into inverted V position.
Bottom bar must be completely unlocked to unlock top bar.
STEP 2
A.With bottom bar in inverted V shape, place fingers over center of top bar with thumbs on buttons marked," PRESS TO UNLOCK".
B.Push buttons in while lifting bar slightly to release lock and push down into U shape.
C.Open 2 front Velcro® flaps on each side of nylon side panel just below plastic corners (receivers).
D.Find locking tab inside both upper plastic corner pieces and push towards
FIG. 1
center of playard.
You may now raise the plastic connector up and out of receiving slot. (Fig.1)
E.Insert connector into lower slot and push down until locking tab clicks shut. Repeat same on other side.
F.Pull up on center of top bar until it locks. (Fig. 2)
G.Lock bottom bars.
FIG. 2
|
– – |
|
– |
|
|
|
|
– |
– |
|
– |
|
|
|
– |
– |
|
|
– |
|
FIG. 3
STEP 3
Assemble and install hangers and floor support rods as shown in figure 3.
Install both hanger and floor support tubes into unit as shown in figure 4.
FIG. 4
9
STEP 4
A. Lay liner over co-sleeping frame with long flap over lower bar. (Fig. 5)
FIG. 5
B.Pull back corners over frame and secure them into place with snaps.
C.Secure overhanging fabric section to 3 Velcro® patches found on lower Nylon panel of playard. (Fig. 6)
FIG. 6
4” minimum
! WARNING: SUFFOCATION / ENTRAPMENT HAZARD
This step prevents fabric liner from loosening inside sleeping area at front side of mattress.
STRANGULATION / SUFFOCATION HAZARD: The top edge of the bumper bar/shelf must be level with or below the top of the adult bed mattress when used as a CO-SLEEPER® bassinet. The level of the CO-SLEEPER® bassinet mattress must be a minimum of 4 inches below the top edge of the bumper bar/shelf.
10
Instructions for attaching mattress pad
! WARNING:Failureto follow these warnings and instructions could result in serious injury or death.
SUFFOCATION HAZARD - To help prevent suffocation and entrapment, use only the mattress/pad provided by Arm's Reach Concepts, Inc. Never use additional padding or mattress.
•DO NOT use shipping or other bags as mattress covers since they can cause suffocation.
•DO NOT use mattress pad in upper position without fabric liner installed beneath mattress.
STEP 5
After installing fabric liner, install playard floor as mattress. Secure playard floor to metal support bars with Velcro® straps through slits in fabric liner. Thread Velcro® strap down through one slit in fabric liner around metal support bar back up through other slit in fabric liner and secure to matching Velcro® on mattress pad. Repeat connection on other three locations.
! WARNING: Be sure to put the mattress pad in the liner, not under the liner. DO NOT put the mattress pad directly on the support bars without the liner installed. Infant may fall through the opening created without the liner.
• Make sure all Velcro® straps are secured and tight. Check straps before each use.
11

Instructions for securing the CO-SLEEPER® bassinet to parental bed
Connects to single, full, queen, king and California king adult beds.
STEP 6
Unroll nylon straps from the plastic resistance plate and lay straps across the adult bed to line up with the center of the desired position of your CO-SLEEPER® bassinet.
The straps must now be positioned between upper and lower mattress or box spring.
This can be done by sliding the straps between both mattresses using a back and forth “sawing” motion and at the same time pulling downward until the straps and resistance plate are at the desired position.
One strap should come out on each side of the CO-SLEEPER® bassinet. Pass through “belt loop” found at front leg of CO-SLEEPER® bassinet.
Connect into the female buckle at the rear leg of CO-SLEEPER® bassinet.
Pulling on excess strap, tighten CO-SLEEPER® bassinet against adult bed. Repeat on other side.
Take excess strap and pass it back through “belt loop” and push it between adult mattresses.
4” minimum
You must use the nylon straps and the resistance plate provided.
! WARNING: STRANGULATION / SUFFOCATION HAZARD: The top edge of the bumper bar/shelf must be level with or below the top of the adult bed mattress when used as a CO-SLEEPER® bassinet. The level of the CO-SLEEPER® bassinet mattress must be a minimum of 4 inches below the top edge of the bumper bar/shelf. NEVER raise the level of the CO-SLEEPER® bassinet mattress level with, or above the top of the bumper bar/shelf.
•Never use as a CO-SLEEPER® bassinet without the anchor plate attached and locked as shown. Failure to use this anchoring system could result in serious injury or death to the infant. Make sure all straps are secured and tight. Check straps before each use.
•Failure to use this securing system will allow CO-SLEEPER® bassinet to move away from adult bed and could result in infant falling out of CO-SLEEPER® bassinet. NEVER leave infant unattended in CO-SLEEPER® bassinet.
!WARNING: STRANGULATION/ CHOKING HAZARD
Do not allow excess strap (or any other loose object) to find its way into the CO-SLEEPER® bassinet.
•Do not allow excess strap to lay loose on floor because someone may trip on it.
•Make sure all Velcro®straps are secured and tight when used in the changer/CO-SLEEPER® bassinet positions.Tighten straps periodically.
•Use only fitted sheets for the CO-SLEEPER® bassinet manufactured by Arm's Reach Concepts, Inc.
12

To convert to a changing table
Simply disconnect securing straps from CO-SLEEPER® bassinet and put the unit where you desire.
! WARNING:STRANGULATION When anchor plate and strap assembly is not in use, store in a safe place not accessible to children.
• FALLING HAZARD Never leave infant unattended in changing table. Changing table is not intended for sleeping.
To convert to a free-standing unit
! WARNING: Failure to follow these warnings and instructions could result in serious injury or death.
FALLING HAZARD: Remove infant from
CO-SLEEPER® bedside sleeper before starting this conversion.
Starting from the completely assembled CO-SLEEPER® bassinet (with side lowered and liner installed)
STEP 1
A.Release Velcro® on bottom front flap of liner from playard frame.
Place front flap over CO-SLEEPER® bassinet mattress to expose front bar.
B.Open fabric flaps that cover the upper female receivers.
B |
STEP 2 |
|
Unlock lower bar following instructions for Step 1 and Step 2 on page 9.
A
13
B |
STEP 3 |
|
A |
A. Install removable bar into upper female receivers through the liner openings |
|
|
B. |
Pull up on removable bar to lock it into place |
C |
C. |
Lock lower bar. |
|
|
|
STEP 4
Pull front fabric panel over locked upper bar.
STEP 5
Locate Velcro straps on left and right side of lower front flap of liner.
Thread strap thru belt loop on front panel and secure to front flap
Repeat on opposite side.
STEP 6
Pull fabric panel down and fasten it to the three Velcro® tabs on the bottom nylon rail of the playard.
! WARNING: SUFFOCATION HAZARD: Make sure liner flap is snugly attached to prevent fabric liner from loosening inside the sleeping area at front of mattress, or being drawn back into the sleeping area and covering the infant.
STEP 7
Secure fabric flaps to close the inside corners of the bassinet liner
14
 Loading...