

Page 1

pottery barn kids
CAMERON ART CUBBY
IMPORTANT SAFETY INSTRUCTIONS:
Please read all instructions carefully before assembling.
For your safety, assembly by two people is recommended.
PART LIST
(A) Top Panel - 1 pc
(B) Bottom Panel - 1 pc
(C) Shelf - 1 pc
(D) Outer Side Board - 2 pcs
(E) Back Panel - 1 pc
(F) Insert Shelf - 2 pcs
(G) Inner Side Board - 2 pcs
PRE-ASSEMBLY:
• Remove all parts and hardware from the box and lay out on a clean, carpeted, or scratch-free work surface,
as this will avoid damaging any parts during assembly. The shipping box provides an ideal work surface. Do
not dispose of any contents until assembly is completed to avoid accidentally discarding small parts or
hardware.
• Use the parts and hardware lists above to identify and separate each of the pieces included.
• The illustrations provided allow for easier assembly when used in conjunction with the assembly
instructions.
• Note: Do not fully tighten all bolts until all parts are in place. Failure to follow these instructions may cause
the bolts to misalign during assembly.
• If using power tools to aid in assembly please use caution. Power tools can damage hardware or split
wood.
ASSEMBLY INSTRUCTIONS:
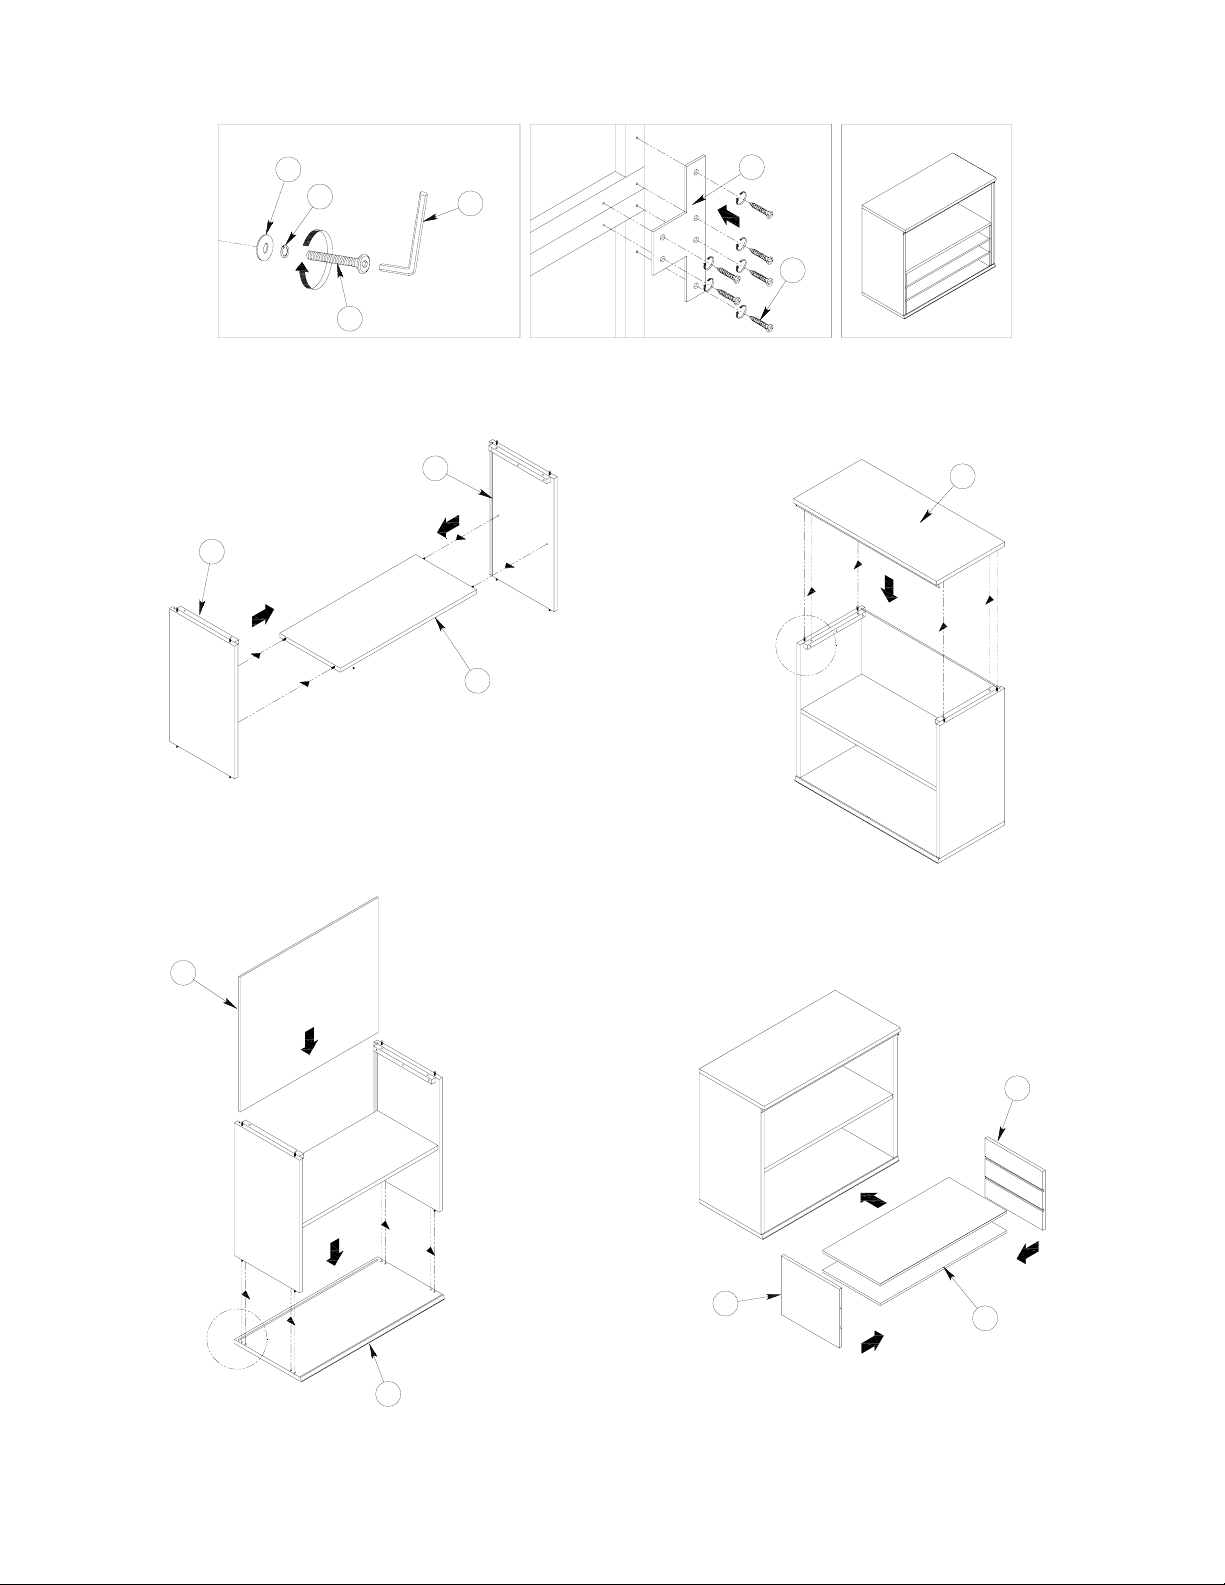
1. Carefully attach Outer Side Boards (D) to Shelf (C) as shown in Fig 1.
2. Slide the Back Panel (E) into the slots on the backside of the Outer Side Panels. Attach the Bottom Panel
(B) as shown using (4) Allen Bolts (I), Flat Washers (K) & Spring Washers (J). Note: The correct order for
the washers to go on the Allen Bolt is: Spring Washer first, Flat Washer second. Please see Fig. 2.
3. Set the Top Panel (A) on the already assembled pie ce s and secure with remaining 4 Allen Bolts (I), Flat
Washers (K) & Spring Washers (J). Please see Fig. 3.
4. Place (2) Insert Shelf (F) to the slots on the Inner Side Board (G) and slide into the bottom compartment of
the assembled piece. Please see Fig 4.
5. If connecting Art Cubby piece to Base piece use (12) Screws (M) and (2) Connecting Brackets (L) as
shown. Screws are self-drilling and are designed to go into wood easily
6. If connecting Art Cubby piece to Cubby piece use (4) screws (T) and (1) Square Connecting Bracket (S)
as shown. Screws are self-drilling and are designed to go into wood easily.
7. Fully tighten all the screws and bolts to complete the assembly.
8. For Anti Tip Kit, please see separate instruction s.
CARE INSTRUCTIONS:
• Dust with a clean, soft cloth.
• Avoid the use of chemicals and harsh cleaning a gents.
• Do not climb on the Cubby.
HARDWARE LIST
(H) Allen Key
(I. Bolt ¼“ x 30mm
(J. Spring Washer ¼“
(K. Flat Washer ¼“
(L) Connecting Bracket
pcs
(M) Screw (for C. Bracket)
pcs
(N) Plastic Restraint
(O) Plastic Wall Bracket
pcs
Thank you for your purchase.
stores | catalog | www.potterybarnkids.com
- 1 pc
- 8 pcs
- 8 pcs
- 8 pcs
- 2
- 12
- 1 pc
- 2
(P) Long Screw
(Q). Short Screw
(S) Square Bracket
(T) Screw (for S. Bracket)
- 2 pcs
- 2 pcs
- 1 pc
- 4 pcs
Page 2
K
J
H
L
M
I
D
A
D
C
(Fig. 1)
(Fig. 3)
E
G
G
F
(Fig. 2) (Fig. 4)
B
Page 3

S
T
S
T
Page 4

FURNITURE TIPPING RESTRAINT
Young children may be injured by tipping furniture. The use of a tipping restraint is highly
recommended.
When properly installed, this restraint could provide protection against the unexpected tipping
of furniture due to small tremors, bumping or climbing. We recommend mounting this restraint
to a wall stud.
WARNING: This product is only a deterrent. It is not a substitute for proper adult supervision.
Installation Instructions:
1. Attach one of the
inserting the
Plastic Wall Brackets (O) near the top back edge of the furniture piece by
Short Screw (Q).
2. Determine the final position of the furniture piece. Mark location on the wall approximately
2” below the bracket mounted to the back of the furniture.
3. Drill a starter hole into the wall stud. If wall stud is not available, drill a hole into the wall and
insert plastic anchor. Gently tap the anchor until the flange of the anchor is flush with the
wall.
4. Attach the second Plastic Wall Bracket (O) by inserting the Long Screw (P) through the
bracket and into the wall.
5. Position the furniture so the bracket on the back edge is in line with the bracket on the wall.
6. Lace one end of the
Plastic Restraint (N) down through each bracket. Bring both ends
together and slide the beaded end until it snap locks into the keyhole slot.
7. To double-lock, return the beaded end back through the keyholes, as shown.
8. Check to make sure the strap is securely laced and locked to the brackets. Do not
overtighten.
 Loading...