

Page 1
pottery barn kids
surf shack
hutte de surf
for age 3 and up ⎯ à partir de 3 ans
PRE-ASSEMBLY:
• Read all instructions before beginning assembly.
• For your safety and ease, assembly by two adults is
recommended.
• Remove all part and hardware from the box and lay
out on a clean carpet, or scratch - free work
surface. Be careful as some parts or hardware may
have sharp points or edges.
• Do not dispose of any contents until assembly is
completed to avoid accidentally discarding small parts
and hardware.
• Use the parts and hardware lists to identify and
separate each of the pieces included.
• Note: Do not fully tighten all bolts until all parts are in
place. Failure to follow these instructions may cause
the bolts misalign during assembly.
• The use of power tools for assembly is not
recommended. Power tools can damage hardware or
split wood.
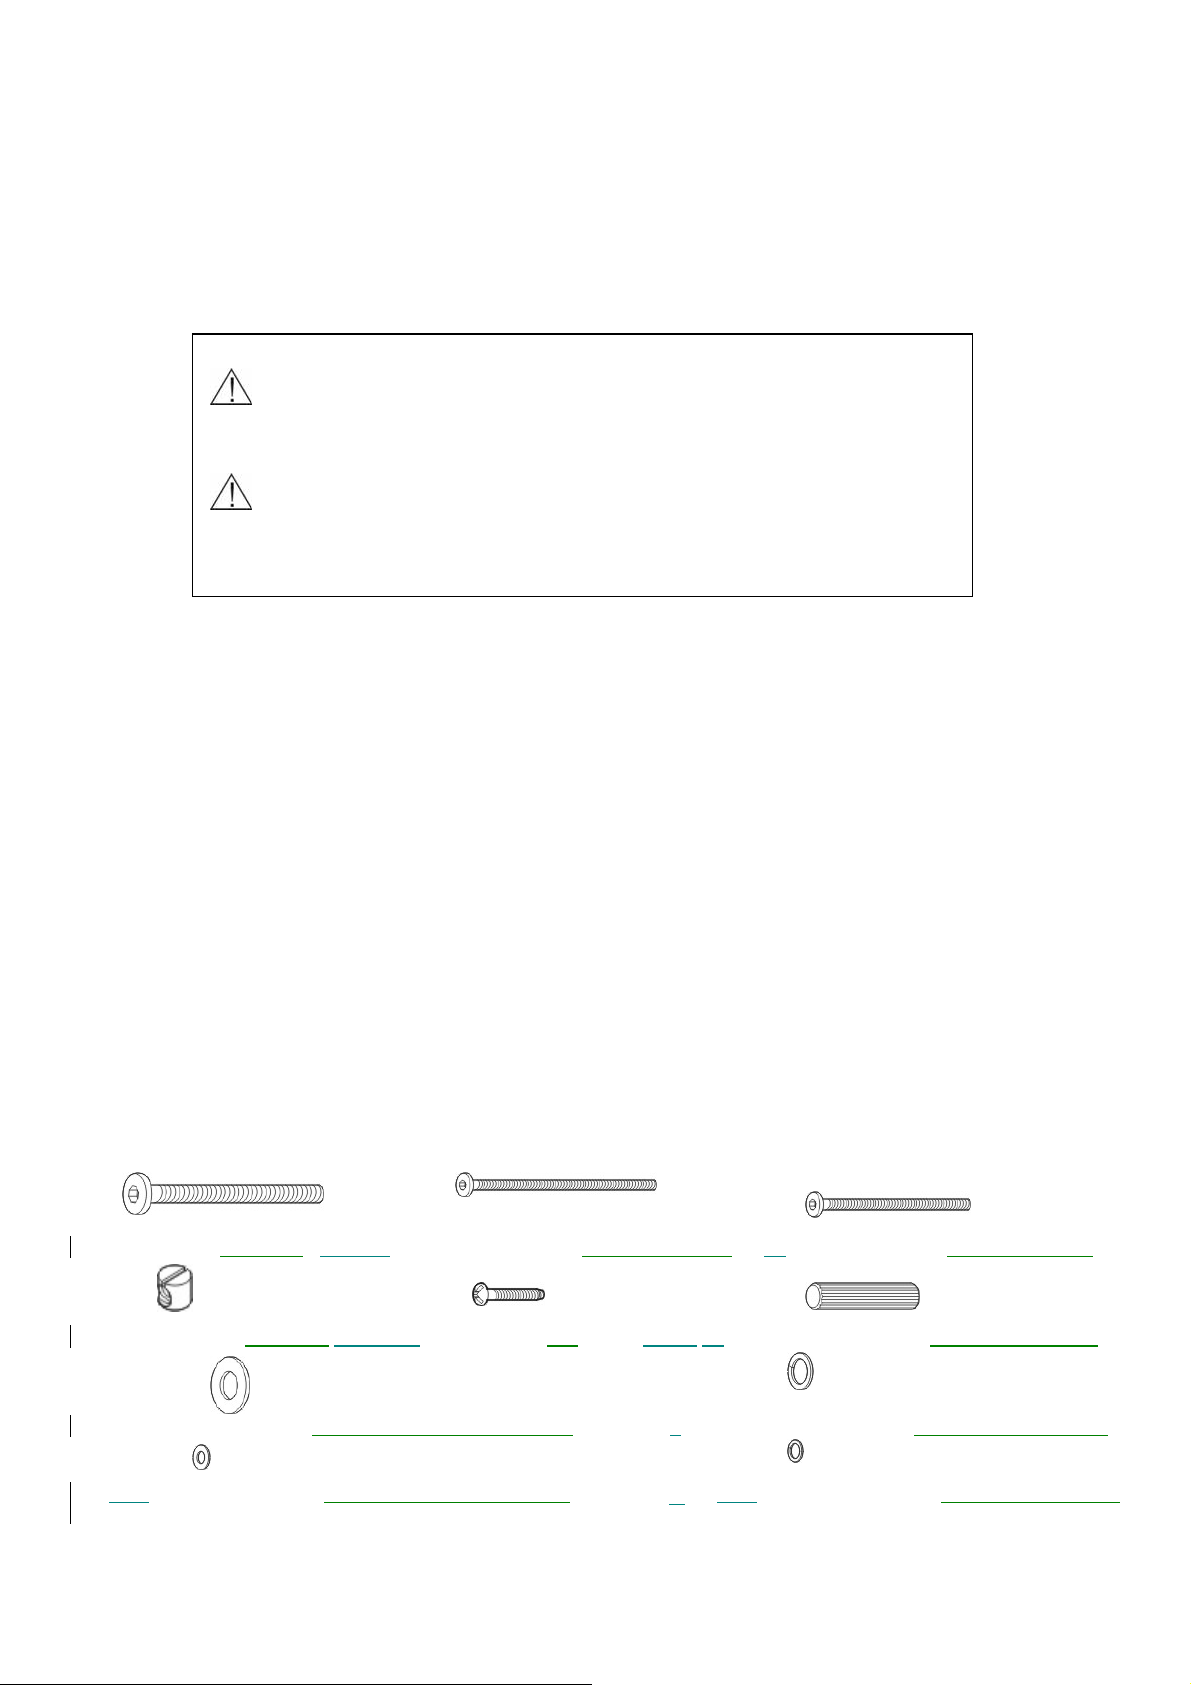
HARDWARE INCLUDED / MATÉRIEL COMPRISES:
1. (2) M8 Bolt/ VERROU 2. (8) M6 Long Bolt / LONG VERROU 3. M6 Short Bolt / COUR VERROU
4. (8) Barrel Bolt / VERROU
7. (2) Large Flat Washer / GRANDE RONDELLE PLATE
9. (14)
Small Flat Washer / PETITE RONDELLE PLATE 10. (14) Small Lock Washer / PETITR RONDELLE
CAUTION: Adult assembly required. This item contains small
parts in the unassembled state and care should be taken in the
unpacking and assembly of the product.
MISE EN GARDE : Assemblage par un adulte nécessaire. Non
assemblé, cet article comprend de petites pièces et il faut donc
le déballer et l’assembler avec soin.
AVANT DE COMMENCER L’ASSEMBLAGE :
‧ Veuillez lire toutes les instructions avant de commencer
l’assemblage.
‧ Pour votre sécurité et votre confort, l’assemblage
devrait être fait par deux adultes.
‧ Retirez toutes les pièces et le matériel contenus dans la
boîte et disposez-les dans une aire dégagée sur du
tapis ou une surface qui ne causera pas d'éraflures.
Faites attention puisque des pièces ou du matériel
peuvent avoir des pointes ou des arêtes affûtées.
‧ Ne jetez rien du contenu avant que l’assembla ge ne
soit terminé afin d’éviter de jeter par mégarde de petites
pièces ou du matériel.
‧ Servez-vous de la liste des pièces et du matériel ci
dessus
pour identifier et séparer toutes les pièces
incluses.
‧ Remarque : Ne serrez pas les boulons complètement
avant d’avoir installé toutes les pièces. Si vous ne
suivez pas ces instructions, les boulons pourraient mal
s’aligner durant l’assemblage.
‧ Il n’est pas recommandé d’utiliser des outils électriques
pour l’assemblage. Les outils électriques peuvent
endommager la quincaillerie ou fendre le bois.
5. (4) Screw / VIS 6. (12) Wood dowel / GOUJON EN BOIS
8. (2) Large Lock asher / GRANDE RONDELLE
Page 1 of 5
Page 2
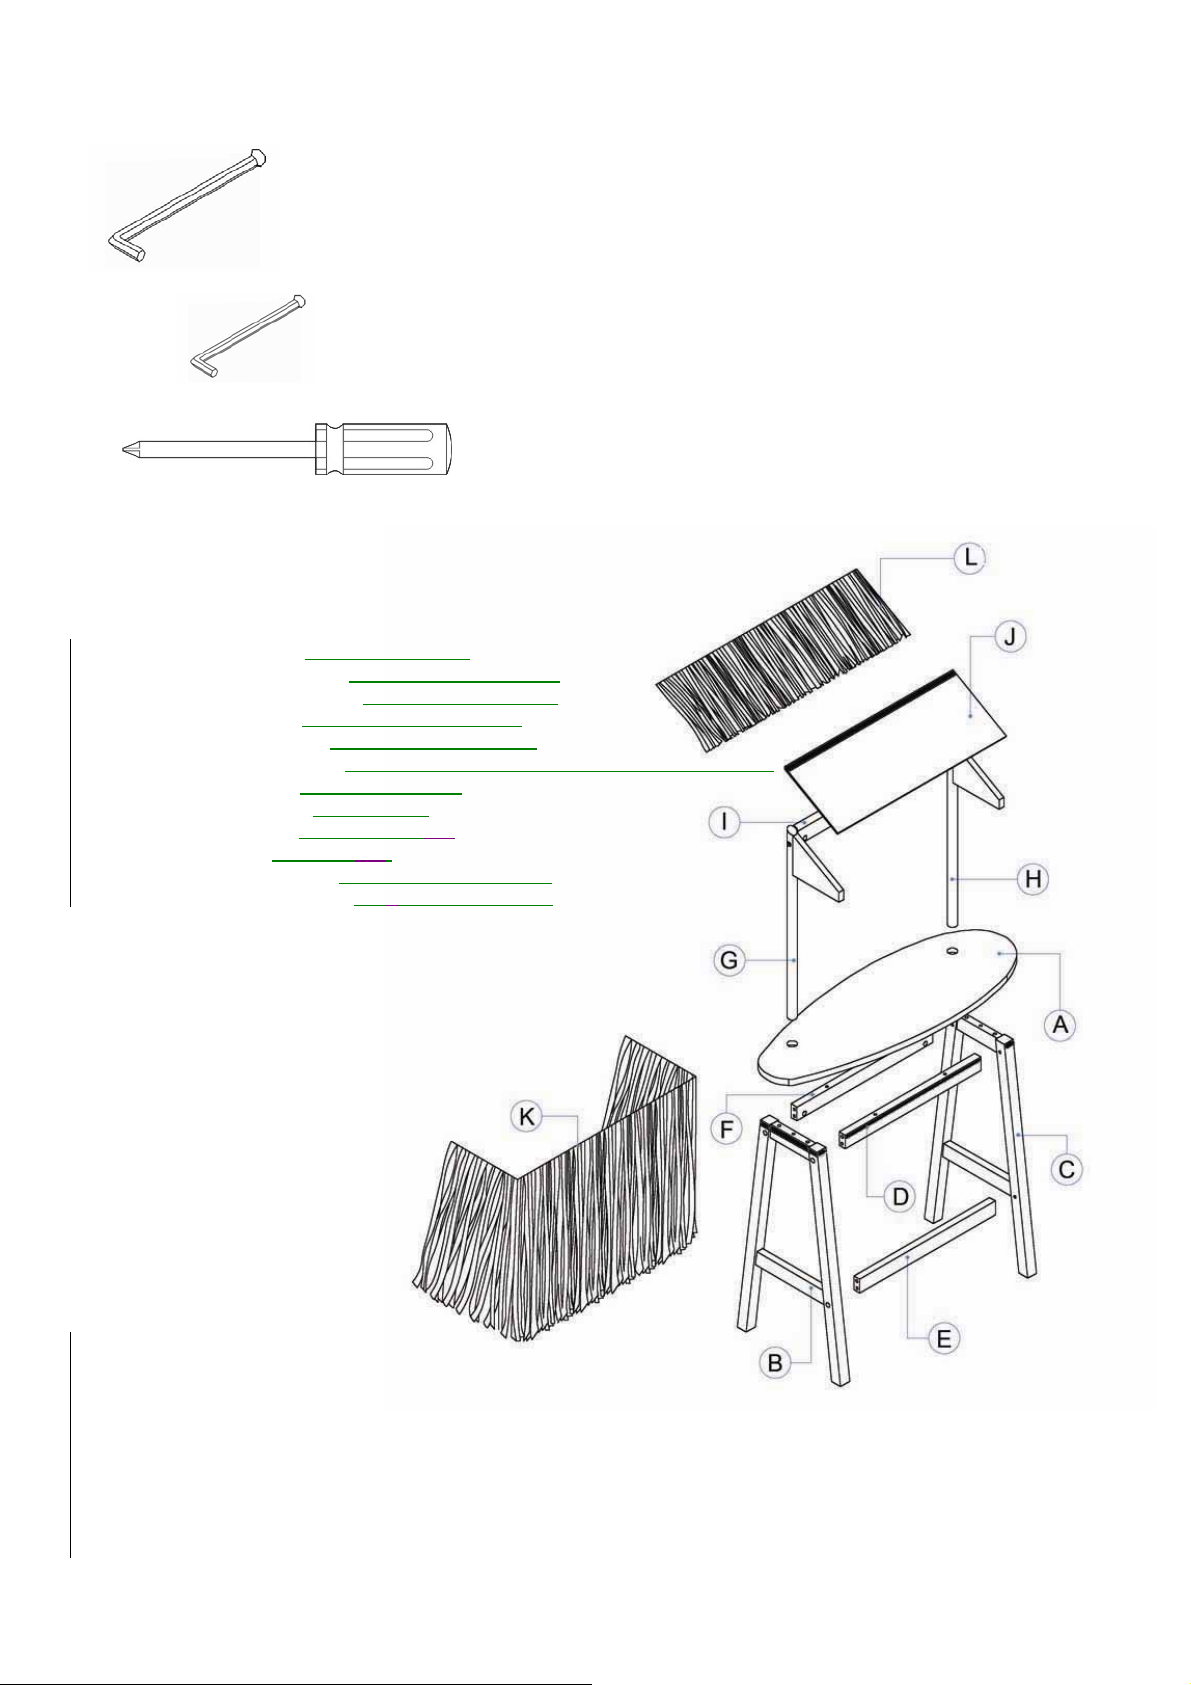
TOOLS REQUIRED/OUTILS REQUIS:
11. (1) #5 Allen Key (Included) / #5 Clé Allen (compris)
12. (1) #4 Allen Key (Included)
13. Phillip Head Screwdriver (Not Included)
PARTS INCLUDED / PIÈCES COMPRISES:
A. (1) Surf Board Top / Panneau superieur
B. (1) Left Side Leg Frame / Sommet du pied gauche
C. (1) Right Side Leg Frame / Sommet du pied droite
D. (1) Top Cross Rail / Barre Supérieure Croisée
E. (1) Bottom Cross Rail / Barre Inférieure Croisée
F. (1) Top Back Cross Rail /Partie Supérieure de la Barre Postérieure Croisée
G. (1) Left Rack Post / Poteau de Gauche
H. (1) Right Rack Post / Poteau droite
I. (1) Roof Cross Rail Barre Croisée toit
J. (1) Roof Board / Panneau toit
K. (1) Paper Raffia Apron / Tablier en papier Raphia
L. (1) Paper Raffia Canopy / DAIS en papier Raphia
/ #4 Clé Allen (compris)
/ Tournevis Phillips (non compris)
Page 2 of 5
Page 3

ASSEMBLY/ASSEMBLAGE:
1. First assemble the shack base.
Take the front top cross rail (D), back top cross rail (F)
and bottom cross rail (E) and install between the
left side leg frame (B) and the right side leg frame (C)
using six dowels (6) and six M6 long bolt sets (2),
each set consisting of a M6 long bolt (2),
small lock washer (10) and small flat washer (9).
Two barrel nuts (4) have to be inserted into the
back of the cross rails (D,E and F) before bolting.
Use the #4 allen key (12) to screw in the small bolts.
See diagram
1er Etape Assembler la base.
Prendre la partie frontale de la barre supérieure croisée(D) , la
partie postérieure de la barre supérieure croisée(F) et la barre
inférieure croisée(E) et installer entre le sommet du pied
gauche(B) et le sommet du pied droite(C) utilisant six
goujons(6) et six M6 verroux longues(2), tous les series sont
constitués de M6 verroux longues(2)petite rondelle (10)et
rondelle plate petite(9). Deux écrous pour la barre(4) doivent
etre inserer dans la partie postérieure Des barres
écroissées(D,E et F) avant le boullonage. Utiliser le clé Allen #4
(12) et le visser dans les verroux. Regarder le diagramme ci-
dessous
2. Ins ta ll the surf bo ard top (A) on to the sur f shac k ba se
(assembled in step 1) with four wood dowels (6) and
six M6 short bolt sets (3), each consisting of a M6 short bolt,
small lock washer and small flat washer (3, 10 and 9
Use the #4 allen key (12) to screw in the M6 bolts.
See diagram below .
Installer la base due l’hutte de surf (assemblé dan le premier
etape) avec quatre goujons (6) et six Série M6 des courts
goujons(3), qui sont constitués par un verrou court M6, une
Petite rondelle et une petite rondelle plate(3,10 et 9) Ut iliser le
verrou allen #4 (12) et le visser dans les verrous M6.
Reagarder le diagramme ci-dessous.
Page 3 of 5
Page 4

3. Assemble the Rock Post,
take the roof cross rail (I) and install it between
the Left Rack Post (G) and Right Rack Post (H)
using two Wood Dowels (6) and two M6 Long Bolt sets (2).
Two Barrel Nuts (4) have to be inserted into the back of
the Roof Cross Rail (I) before bolting..
Use #4 Allen key for tightening bolts.
Attach the Roof Board (J) to the assembled Rack post
using four Screws (5) by Phillip Head Screwdriver
(Not Included). See diagram below
4. Install the assembled Rack into the Surf Board Top (A)
using two M8 Bolt sets(1), each consisting of a M8 short bolt,
small lock washer and small flat washer (1, 8 and 7).
Use #5 Allen key(11) to screw the M8 bolts.
Wrap the Paper Raffia Apron (K) around the shack rim under.
the Surf Board Top (A) and Paper Raffia Canopy (L)
on the Roof Board (J).
Attach via Velcro strips on the Paper Raffia Apron (K) and
Paper Raffia Canopy (L) to the Shack.
Pressing firmly to secure.
See diagram below
Assembler le pateau, prendre la barre croissé(I) et l’ istaller
entre le poteau gauche (G) et le poteau droite(H) en
utilisant deux goujons en bois(6) et deux M6 seriés des
longues verroux (2). Deux écrou tonneau (4) doivent être
Insérées dans la partie postérieure de lbarre toit croisée (I)
avant le boullonage. Utiliser la clé Allen #4 pour serrer les
verroux Attacher le Panneau toit (J) au poteau assemblé en
utilisant quatre Vis (5) par le tournevis Philip (pas inclus).
Regarder le diagramme ci-dessous
Page 4 of 5
Installer le poteau assemblé dans le Panneau Supérieur
Surf (A) en utilisant deux seriés des verroux M8 (1) qui
consistent d’un court verrou M8, une petite rondelle et
une Petite platte rondelle (1,8 et 7). Utiliser le clé Allen
#5(11) pour visser les verroux M8 En ve lop per le tablier
en papier Raffia (K) tout autour le bord de cabane au
dessous le panneau supérieur Surf (A) et le Daifs papier
en Raffia (L) au cabane. Presser pur l’assurer.
Regarder le diagramme ci-dessous
Page 5

Care Instructions:
‧ Dust often using a clean, soft, dry, lint-free
cloth.
‧ Blot spills immediately, and wipe with a clean,
damp cloth.
‧ We do not recommend the use of chemical
cleansers, abrasives, or furniture polish.
Stores/catalog/www.potterybarnkids.com
Thank you for your purchase
1.800.290.8181
ENTRETIEN :
‧ Époussetez régulièrement à l’aide d’un linge
doux, sans peluche, sec et propre.
‧ Épongez les déversements immédiatement et
essuyez avec un linge propre et humide.
‧ Nous recommandons de ne pas utiliser de
Page 5 of 5
nettoyants chimiques, d'abrasifs ou de poli pour
meubles.
magasins | catalogue | www.potterybarnkids.com
Nous vous remercions de votre achat.
1.800.290.8181
 Loading...