

Page 1

Read all instructions before assembly and use of this product.
The
Original
and
The
Mini
Convertible
Couchette jumelée
de ARM’S REACH
Cama adosable
de ARM’S REACH
!
WARNING
THIS UNIT IS NOT INTENDED TO BE USED AS EITHER A FULL OR NON-FULL SIZE CRIB
!
AVERTISSEMENT:
des blessures graves, voire mortelles.
D’ENFANT EN FORMAT STANDARD OU SPÉCIAL
: Failure to follow these warnings and instructions could result in serious injury or death.
Le non-respect de ces avertissements et des instructions peut provoquer
CE PRODUIT N’EST PAS CONÇU POUR SERVIR DE LIT
CO-SLEEPER
MD
CO-SLEEPER
®
MD
®
!
ADVERTENCIA:
lesiones graves oincluso la muerte.
SEMICUNA NI CUNA COMPLETA
El incumplimiento de estas advertencias e instrucciones puede resultar en
INSTRUCTION MANUAL
MANUEL D’INSTRUCTION •EL MANUEL DE LA INSTRUCCION
•Setting up a basic playard
•Attaching mattress pads
•Attaching to parental bed
•Converting to a free-standing unit
•Converting to a changing table
KEEP THIS BOOKLET HANDY FOR FUTURE REFERENCE
GARDER CE PETIT LIVRE POUR GUIDE FUTUR
CONSERVE ESTA LIBRO PARA FUTURAS REFERENCIAS
ESTA UNIDAD NO ESTÁ DESTINADA PARA EL USO COMO
Page 2

!
WARNING
fastening all Velcro
– secure UMBRELLA CANOPYTMto the CO-SLEEPER®bassinet or playard by
®
tabs. (Umbrella CanopyTMis an optional accessory)
2
Page 3

Read all instructions BEFORE assembly and USE of this product.
!
WARNING
THIS UNIT IS NOT INTENDED TO BE USED AS EITHER A FULL OR NON-FULL SIZE CRIB
SUFFOCATION HAZARD. Discard all packing materials immediately after opening. Plastic bags and
ties may cause suffocation or choking. Caution: do not discard the anchor plate with the two 10
foot long straps, as this is necessary for using the product in the co-sleeping configuration.
:
Failure to follow these warnings and instructions could result in serious injury or death.
• NEVER LEAVE your child unattended in the Arm’s Reach
®
CO-SLEEPER®bassinet.
• IMPORTANT! Check this product for damaged hardware, loose joints, missing parts,or
sharp edges before assembly and periodically during use. DO NOT use if any parts are
missing, damaged,or broken. Contact Arm’s Reach Concepts, Inc. for replacement parts
and instructions if needed. Never substitute parts.
• To reduce the risk of SIDS, pediatricians recommended healthy infants be placed on
their backs to sleep, unless otherwise advised by your physician.
• FALLING HAZARD: Remove infant from Arm’s Reach
®
CO-SLEEPER®bassinet before
starting any conversion.
•
NEVER LEAVE infant unattended on changing table. Changing table is not intended
for sleeping.
• The playard, including side rails and bottom pad, must be fully erected prior to use.
Top rails and bottom rails must be completely locked, in all configurations, before
putting an infant /child into the unit.
• NEVER USE more than 4–2” (5 cm) extension segments with Arm’s Reach
®
CO-SLEEPER
bassinet. ONLY use leg extensions on the CO-SLEEPER®bassinet when it is attached to
the parental bed.
®
• IMPORTANT! Be sure to put the mattress pad in the liner, not under the liner.
DO NOT put the mattress pad directly on the support bars without the liner installed.
Infant may fall through the opening created without the liner. DO NOT use mattress
pad in upper position without fabric liner installed beneath mattress.
!
•
WARNING: CHOKING HAZARD Make sure removable bar is in the upper (playard)
position before attempting to fold up your playard/CO-SLEEPER
®
playard/
CO-SLEEPER®bassinet with removable bar in lower (CO-SLEEPER®bassinet)
®
bassinet. Folding
position may result in loosening of snaps.
!
•
WARNING: NEVER LEAVE infant in playard with SIDES DOWN. Infant may roll into
space between pad and loose mesh side causing suffocation.
• NEVER LEAVE child in unit without the TOP HORIZONTAL RAIL installed in the upper
®
most position, unless the unit is in the CO-SLEEPER
parent/ caregiver is in the adult bed.
•
Discontinue use of the products when child is able to climb out or reaches the height
of 35 in.(890mm ).
3
bassinet configuration and the
Page 4

• When used as a playard, the Arm’s Reach
by a child who is unable to climb out of the playard and is less than 34 inches (66.4 cm)
tall and weighs less than 30 lbs. (13.5 kg.)
®
CO-SLEEPER®bassinet is intended for use
• When child is able to pull up to standing position, remove bumper pads, large toys, and
other objects that could serve as steps for climbing out
.
• DO NOT leave child in product with side lowered. Be sure side is raised and locked
position whenever child is in product.
• When converting to the playard configuration, remove the plastic hangers and the liner,
and lower the floor to the lowest level. Place the removable bar in the highest position.
• FALLING HAZARD- To help prevent falls, DO NOT use this product when the infant
begins to push up on hands and knees or has reached manufacturer’s recommended
maximum weight, whichever comes first.
• Discontinue use as an attachable baby bed when child is able to roll over and pull him
or herself up to a kneeling, sitting or standing position.
!
WARNING: SUFFOCATION HAZARD-
•
INFANTS CAN SUFFOCATE
• In gaps between a mattress too small or too thick and product sides.
• On soft bedding
•
NEVER add a mattress, pillow, comforter, or padding. Use ONLY the pad provided by
manufacturer.
• If a sheet is used with the pad, use only the one provided by the bassinet or cradle
manufacturer or one specifically designed to fit the dimension of the bassinet or
cradle mattress
• NEVER use plastic shipping bags or other plastic film as mattress covers not sold and
intended for that purpose. They can cause suffocation.
• SUFFOCATION HAZARD
mattress pad provided by Arm's Reach Concepts Inc. NEVER use additional padding
or mattress.
_
To help prevent suffocation and entrapment, use only the
• SUFFOCATION HAZARD: Make sure liner flap is snugly attached to prevent fabric
liner from loosening inside the sleeping area at front of mattress, or being drawn back
into the sleeping area and covering the infant.
•
Make sure all Velcro
CO-SLEEPER
®
bassinet positions. Tighten straps periodically.
®
straps are secured and tight when used in the changer /
• STRANGULATION / SUFFOCATION HAZARD: The top edge of the bumper bar/shelf
must be level with or below the top of the adult bed mattress when used as a
4
Page 5

CO-SLEEPER®bassinet. The level of the CO-SLEEPER®bassinet mattress must be a
minimum of 4 inches below the top edge of the bumper bar/shelf. NEVER raise the
level of the CO-SLEEPER
®
bassinet mattress level with, or above the top of the bumper
bar/shelf.
• NEVER USE the CO-SLEEPER
®
bassinet without the anchor plate attached and locked
as shown. Failure to use this anchoring system could result in serious injury or death
to the infant. Make sure all straps are secured and tight. Check straps before each use.
• Failure to use this securing system will allow Arm’s Reach
move away from adult bed and could result in infant falling out of the CO-SLEEPER
®
CO-SLEEPER®bassinet to
®
bassinet. NEVER leave infant unattended in the CO-SLEEPER®bassinet.
• STRANGULATION HAZARD: When anchor plate and strap assembly is not in use,
store in a safe place not accessible to children.
• DO NOT place product near a window where cords from blinds or drapes may strangle
a child.
• Strings can cause strangulation! DO NOT place items with a string around a child’s
neck, such as hood strings, pacifier cords. DO NOT suspend strings over the unit in
any configuration or attach string to toys.
• Keep playard away from stoves, heaters, campfires and other hazards.
• DO NOT allow children to climb or play on or under unit in any configuration.
• Always provide the supervision necessary for the continued safety of your child. When
used for playing, never leave child unattended.
• Discontinue using your ARM’S REACH
®
CO-SLEEPER®bassinet should it become
damaged or broken.
• Periodically check your product to make certain all screws, nuts rivets, or bolts are
tightened securely.
• DO NOT use a water mattress with this product.
• If refinishing, use a nontoxic finish specified for children’s products.
!
•
WARNING – when attaching the Umbrella CanopyTMto the CO-SLEEPER®bassinet
or playard make sure to fasten all Velcro
®
tabs. (Umbrella Canopy
accessory)
!
•
WARNING – To prevent serious or fatal injury from falls always keep child within arm's
reach. Never leave your child unattended.
TM
is an optional
5
Page 6
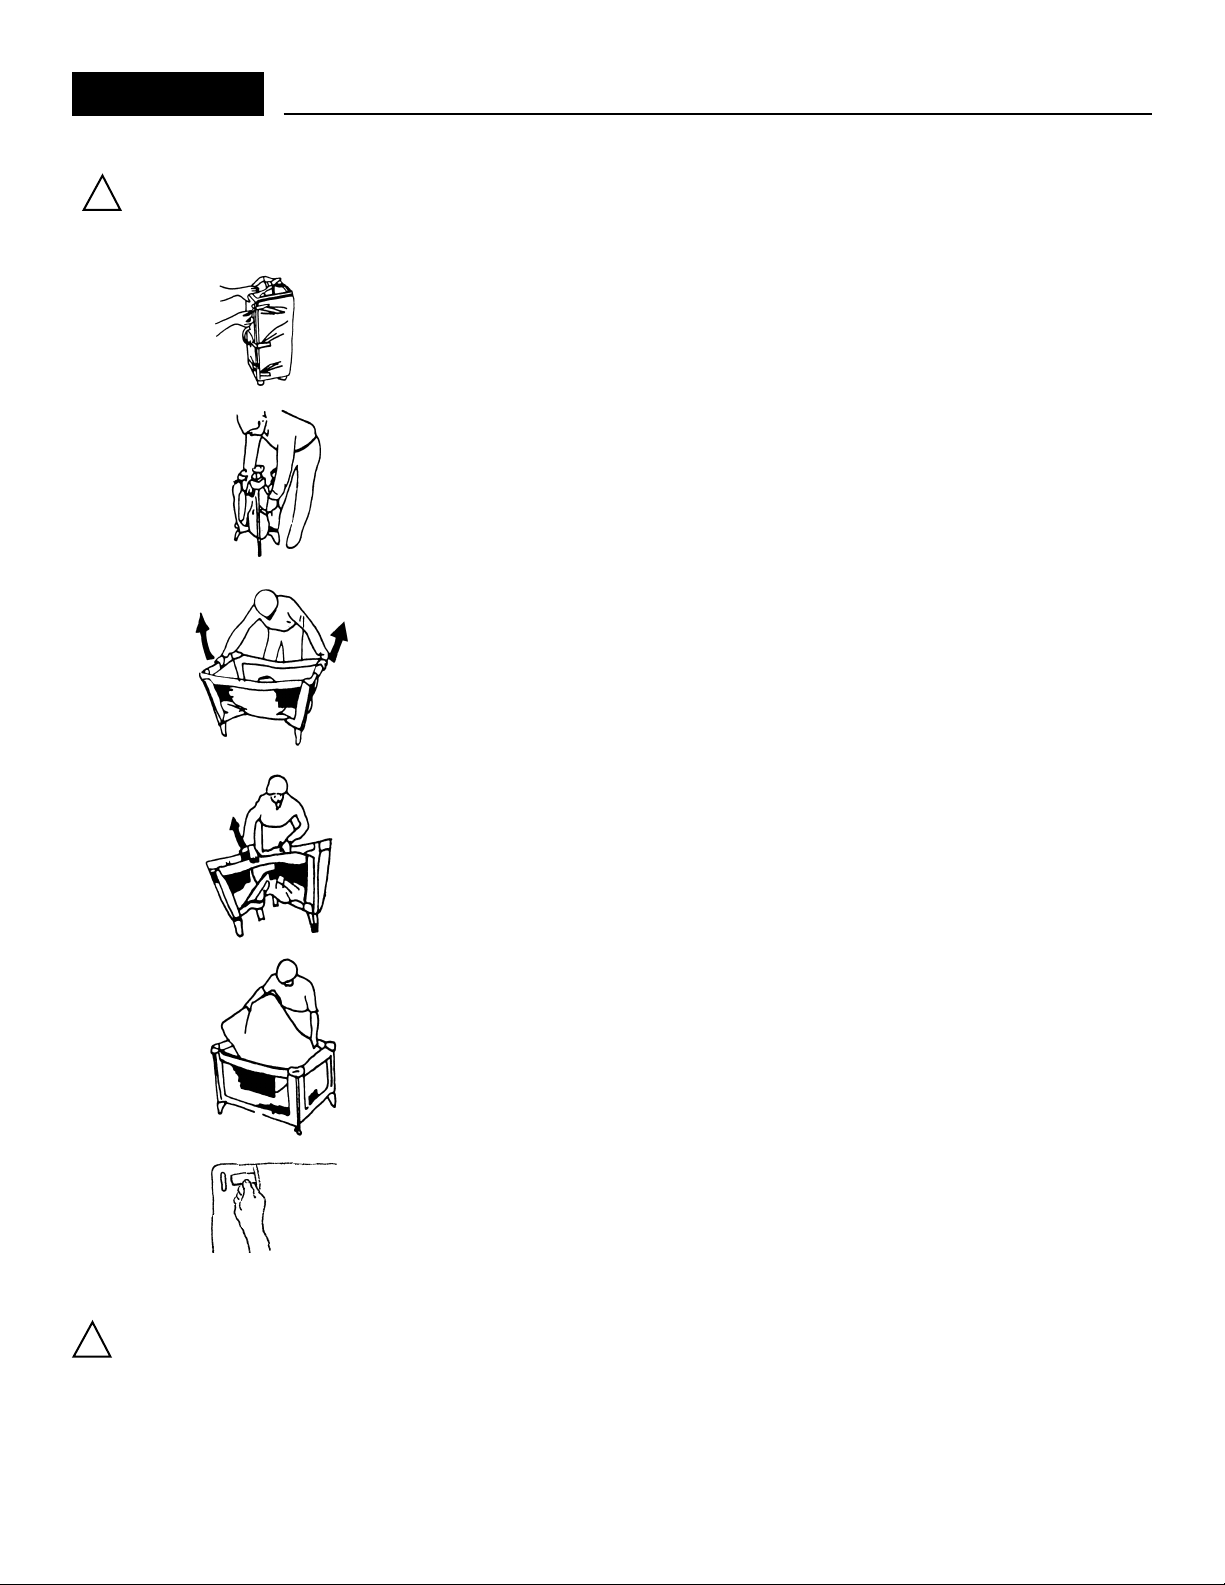
Instructions How to set up basic playard
!
WARNING:
store in a safe place not accessible to children.
STRANGULATION HAZARD: When anchor plate and strap assembly is not in use,
Step 1
•
Unzip bag. Remove playard and stand playard upright.
•
Unhook Velcro®tabs.
•
Set mattress aside.
DO NOT PUSH CENTER DOWN OR LOCK LOWER BARS
Step 2
•
Separate the four corner posts. Leaving center up.
•
Lock all top bars by grasping top bar in center and pulling up until
you hear a "click"
•
Repeat on all 4 sides until all top bars are rigid.
BEFORE LOCKING ALL TOP BARS.
Step 3
•
Place foot on outside center pocket of bottom bar and push down to lock.
•
Repeat on all 4 sides until playard is fully erect.
Step 4
A. To cover mattress with fitted sheet open the 4 Velcro®tabs with snap
found on corner ends of mattress.
B. Feed Velcro®tabs thru buttonholes in sheet corners & place in bottom
of playard with Velcro®tabs extended.
C. Feed Velcro®tabs thru corresponding buttonholes in floor of playard
corners and attach to snap on outside of leg.
!
WARNING:
When converting to the playard configuration, remove the plastic hangers, the liner
and floor support rods. Lower the floor to the LOWEST level. Place the removable bar in the HIGHEST position.
• Always make sure all top and bottom rails are securely locked, in all configurations, before putting an
infant/child into the unit.
• NEVER LEAVE infant in playard with SIDES DOWN. Infant may roll into space between pad and loose mesh
side causing suffocation.
6
Page 7
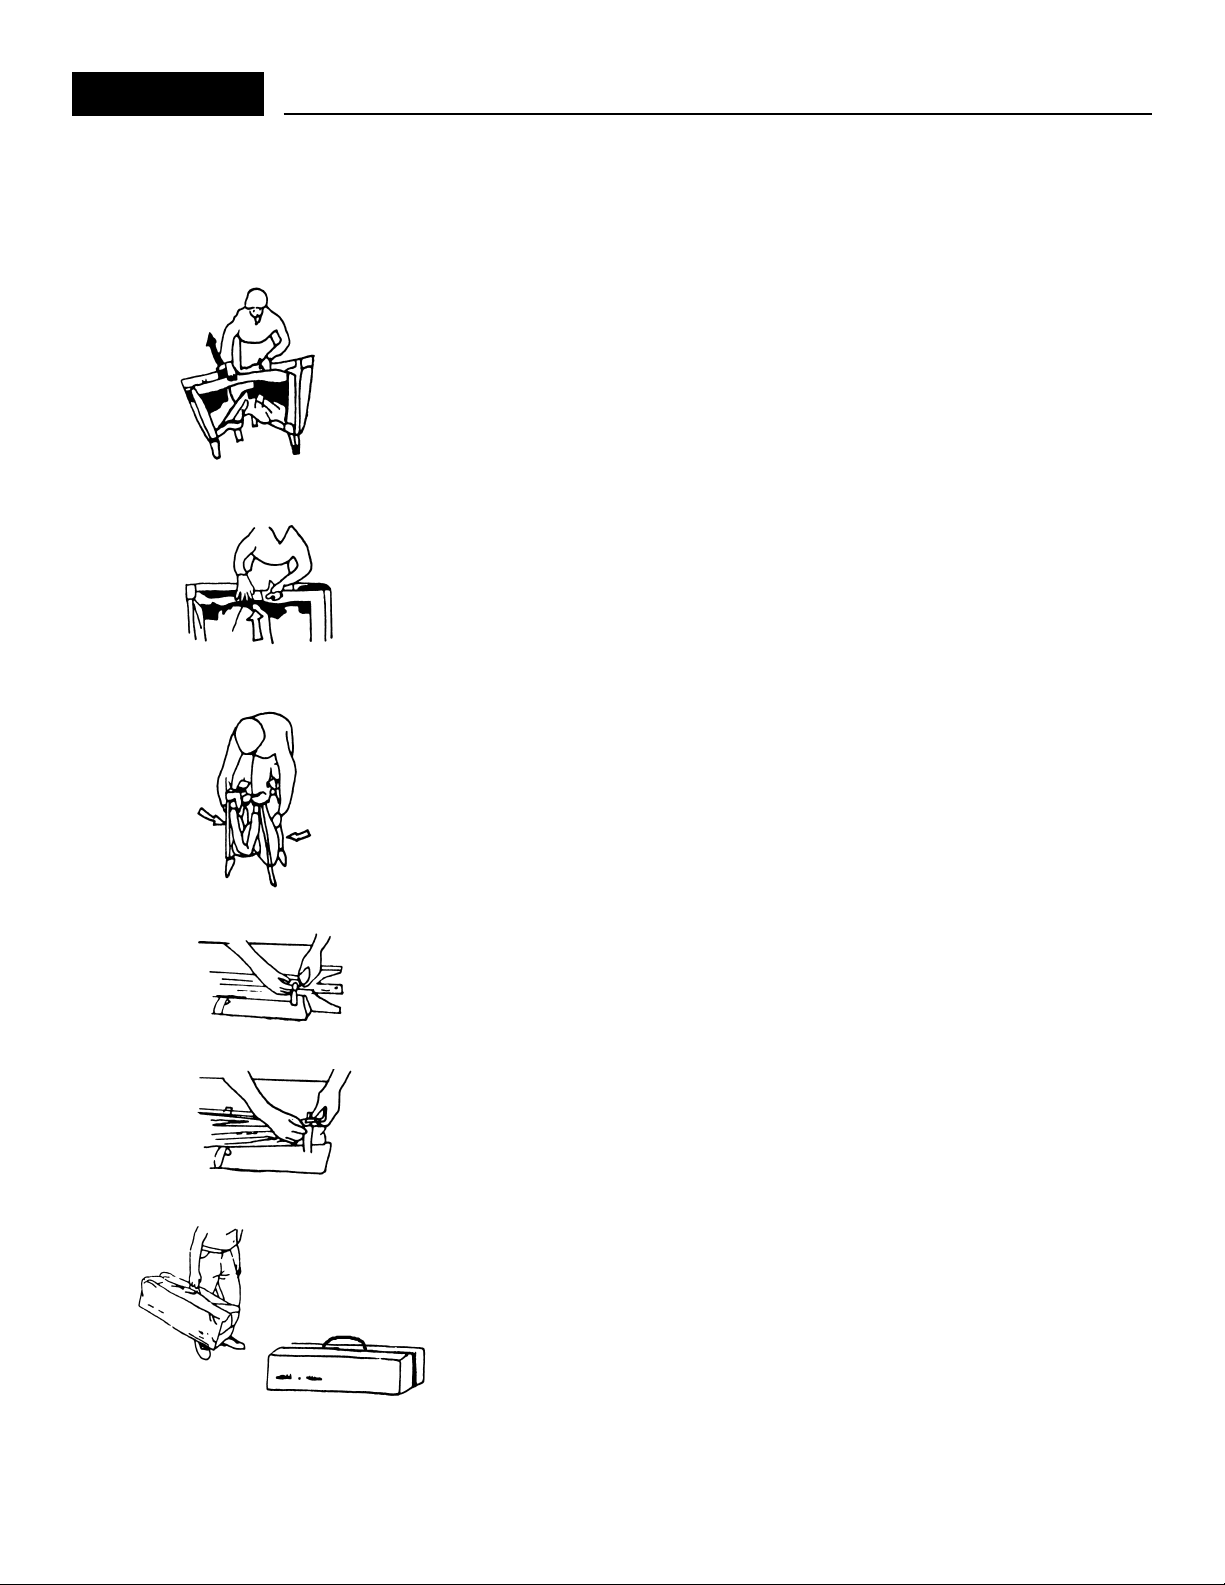
Instructions How to fold your playard
Step 1
LIFT UP ON LOWER HORIZONTAL BAR BEFORE ATTEMPTING
•
Place foot under lower bar and lift bar up into inverted V position.
Bottom bar must be completely unlocked to unlock top bar.
Step 2
A. With bottom bar in inverted V shape, place fingers over center of top
bar with thumbs on buttons marked," PRESS TO UNLOCK".
B. Push buttons in while lifting bar slightly to release lock and push down
into "U" shape. If top bar is in V shape one side is not unlocked.
C. Pull up on center of playard floor.
TO UNLOCK UPPER BAR!!
Step 3
•
Gather unit together.
•
Do not force.
Step 4
•
Wrap the mattress around your unit.
•
Feed the strap through the bottom corner belt loop.
•
Fasten together the other 2 Velcro®straps.
Step 5
•
Insert playard into bag as shown and zip closed.
•
Store sheet in end of unit.
Step 6
•
Be sure carrying handle comes through opening in bag.
7
Page 8
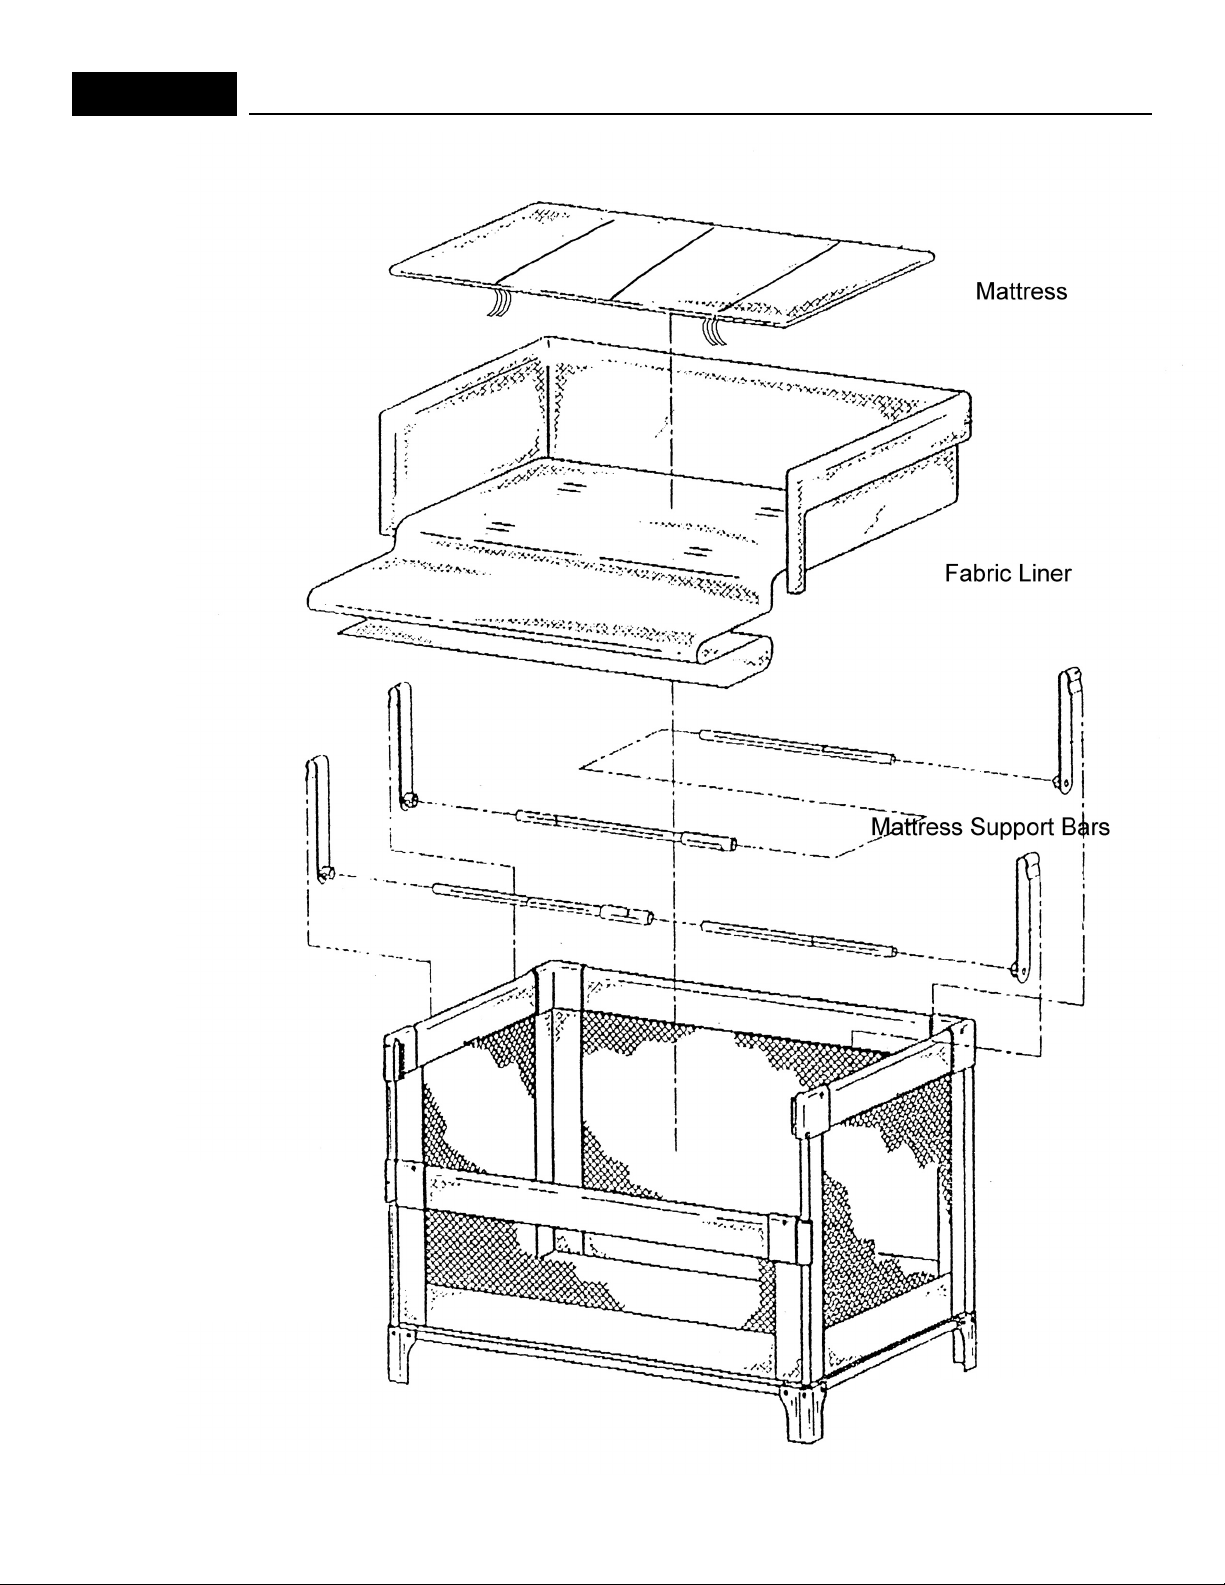
Assembly Arm's Reach
®
CO-SLEEPER®Bassinet
Playard with side lowered
for assembly as
a CO-SLEEPER
®
bassinet
8
Page 9
!
–
–
–
–
–
–
–
–
–
WARNING
:
Failure to follow these warnings and instructions could result in serious injury or death.
Read all instructions before assembly and use of this product.
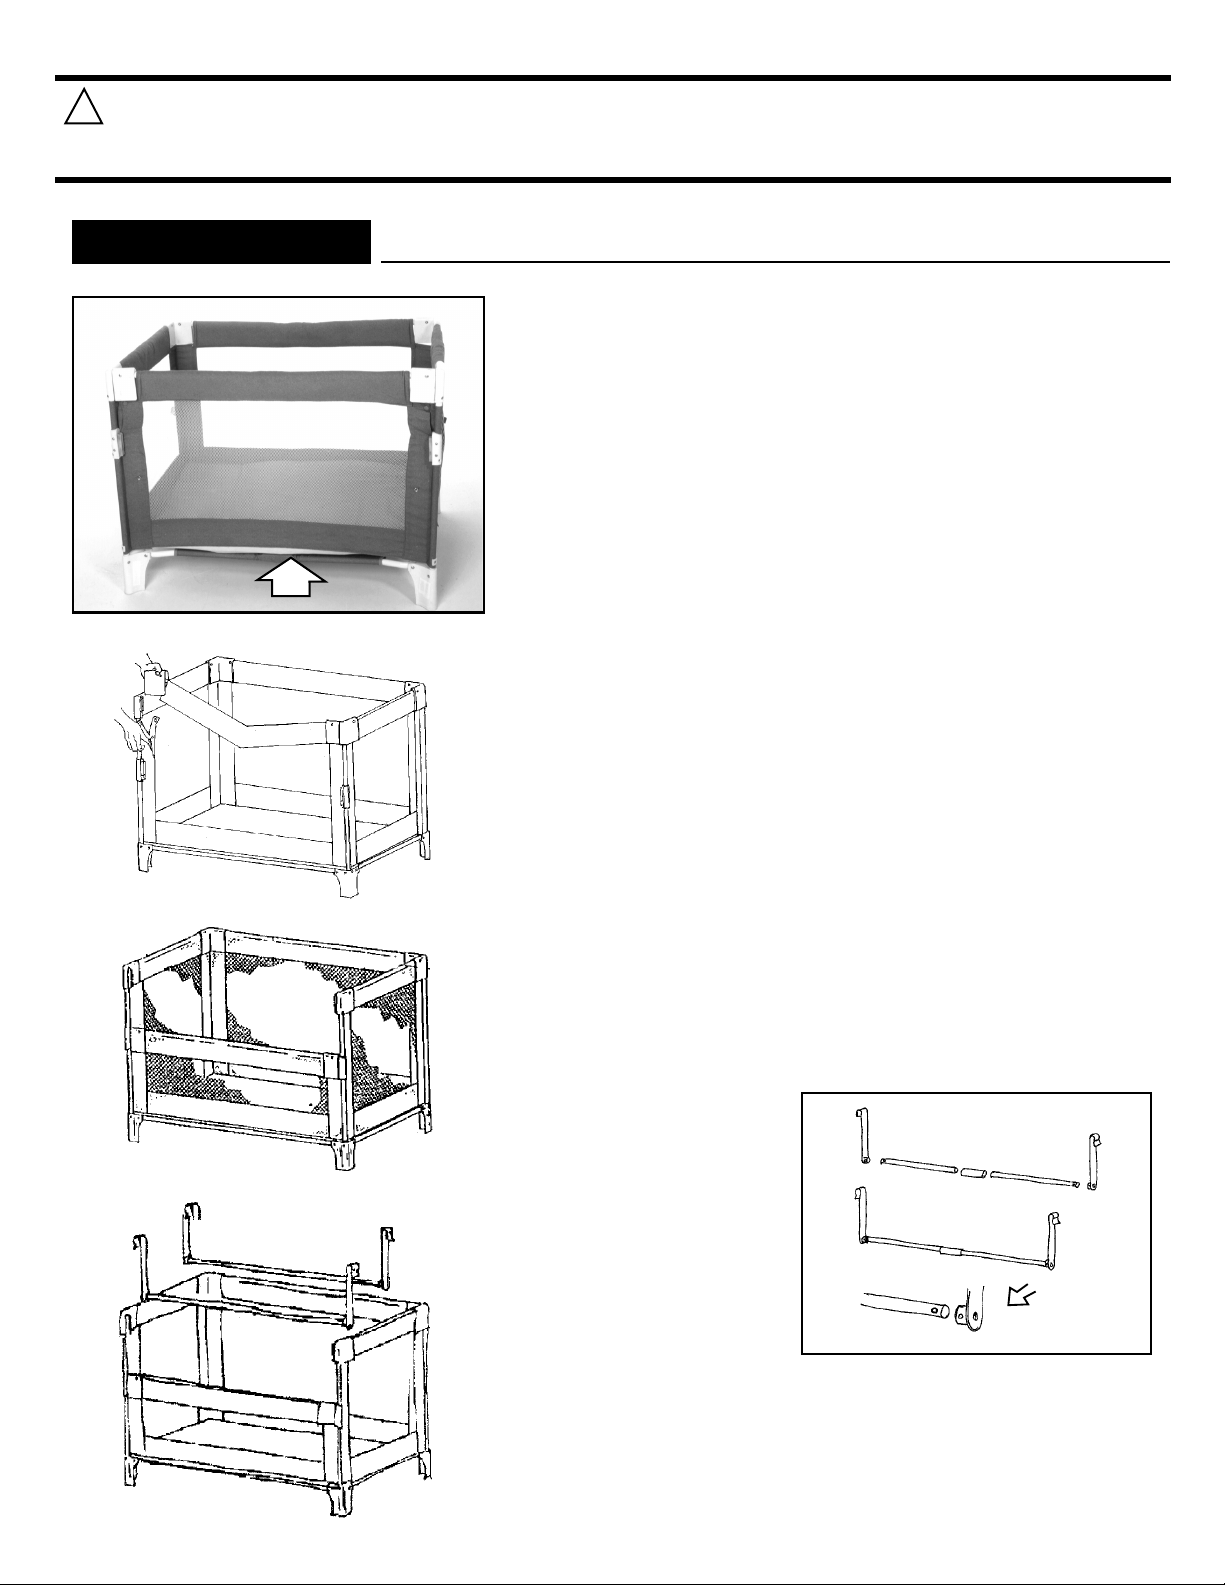
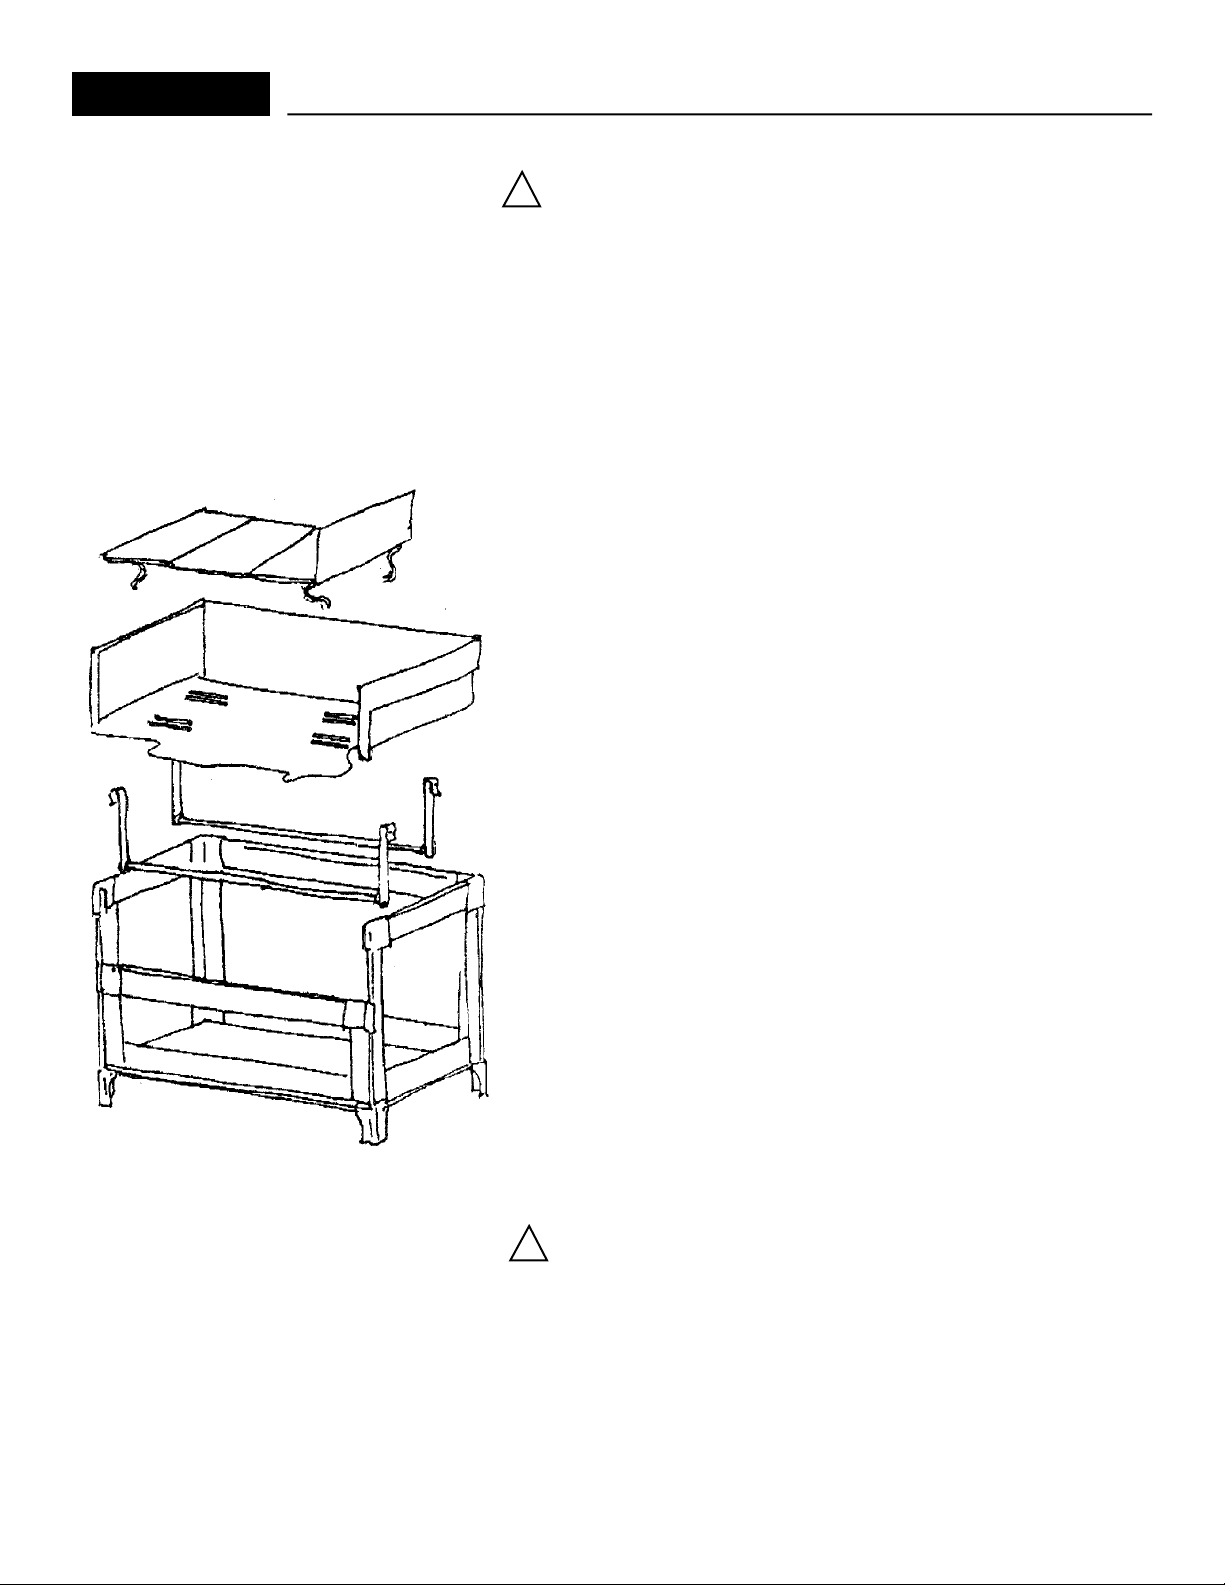
Converting playard to Arm's Reach
STEP 1
Place foot under lower bar and lift bar up into inverted V position.
Bottom bar must be completely unlocked to unlock top bar.
STEP 2
A. With bottom bar in inverted V shape, place fingers over center of top bar
with thumbs on buttons marked," PRESS TO UNLOCK".
B. Push buttons in while lifting bar slightly to release lock and push down into
U shape.
C. Open 2 front Velcro
plastic corners (receivers).
FIG. 1
D. Find locking tab inside both upper plastic corner pieces and push towards
center of playard.
You may now raise the plastic connector up and out of receiving slot. (Fig.1)
E. Insert connector into lower slot and push down until locking tab clicks shut.
Repeat same on other side.
F. Pull up on center of top bar until it locks. (Fig. 2 )
G. Lock bottom bars.
®
CO-SLEEPER®Bassinet
LIFT UP ON LOWER HORIZONTAL BAR
BEFORE ATTEMPTING TO UNLOCK UPPER BAR!!
®
flaps on each side of nylon side panel just below
FIG. 2
FIG. 3
STEP 3
Assemble and install hangers and floor support rods as shown in figure 3.
FIG. 4
Install both hanger and floor support tubes into unit as shown in figure 4.
9
Page 10
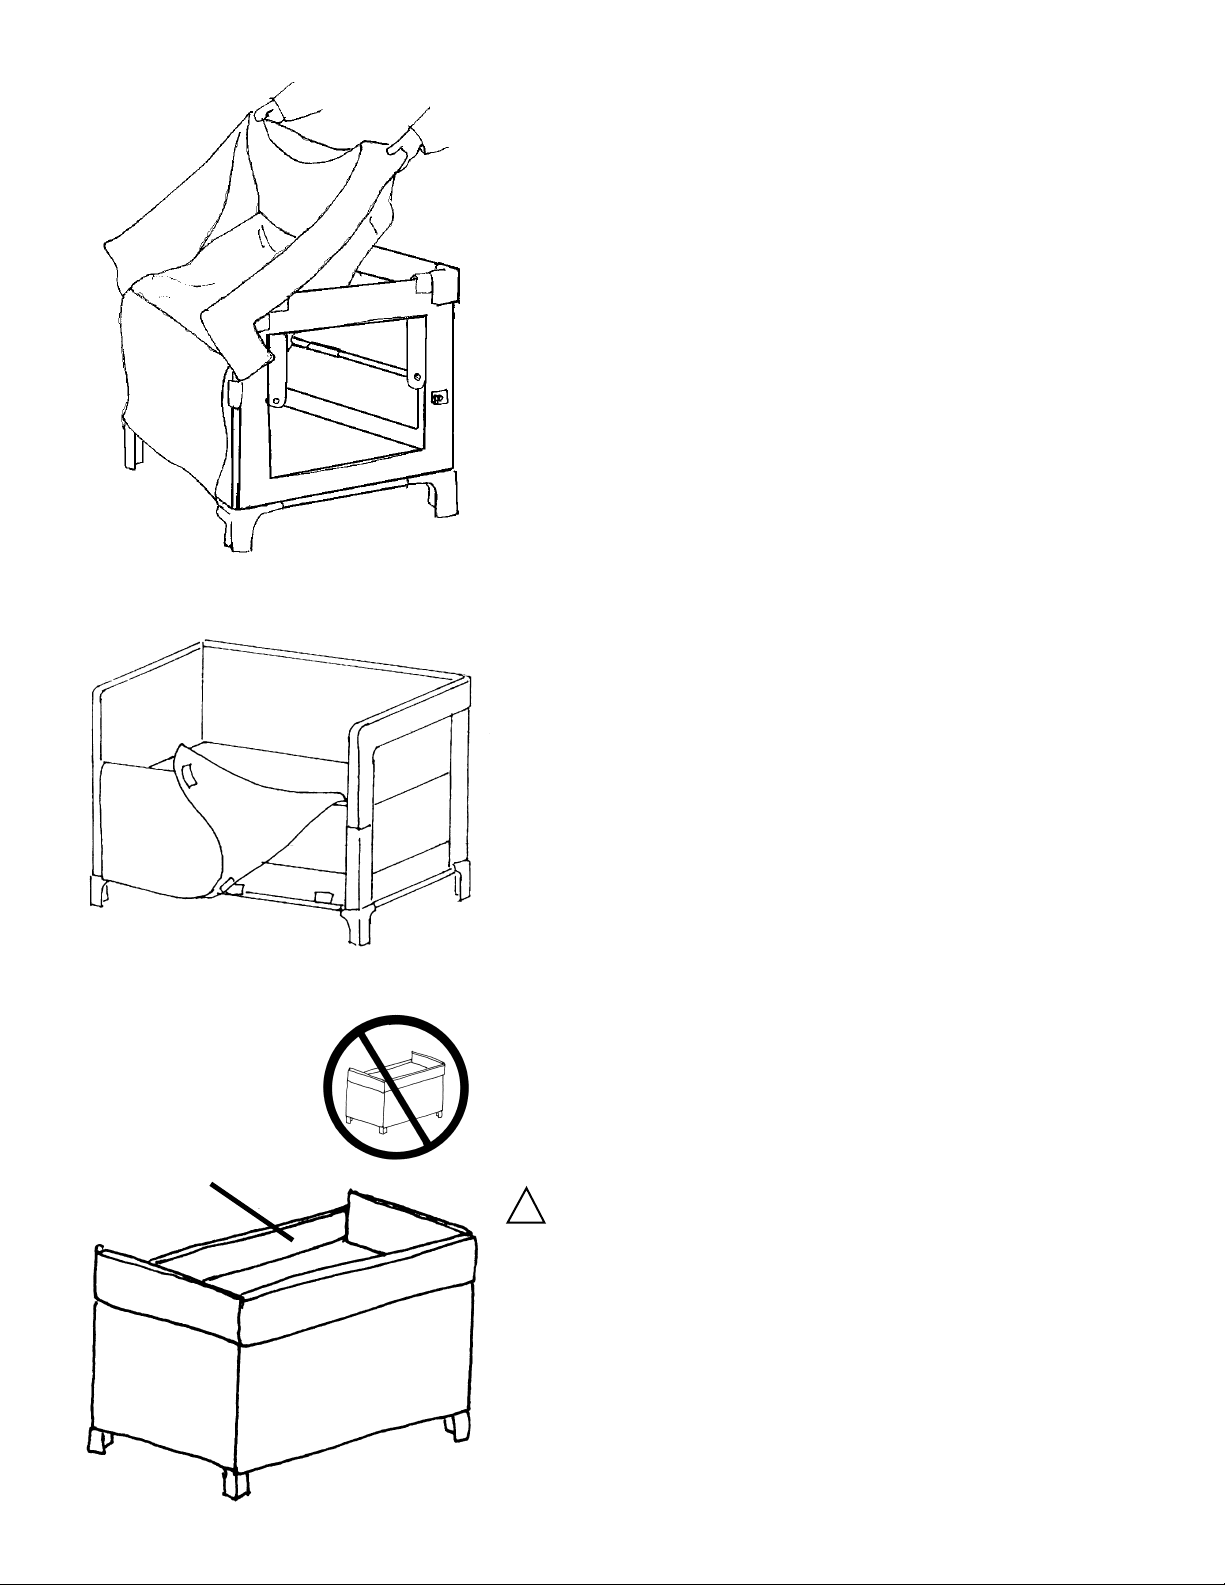
FIG. 5
STEP 4
A. Lay liner over co-sleeping frame with long flap over lower bar. ( Fig. 5)
B. Pull back corners over frame and secure them into place with snaps.
FIG. 6
4” minimum
C. Secure overhanging fabric section to 3 Velcro
Nylon panel of playard. (Fig. 6 )
!
WARNING:
SUFFOCATION / ENTRAPMENT HAZARD
®
patches found on lower
This step prevents fabric liner from loosening inside sleeping area
at front side of mattress.
STRANGULATION / SUFFOCATION HAZARD: The top edge of
the bumper bar/shelf must be level with or below the top of the
adult bed mattress when used as a CO-SLEEPER
®
level of the CO-SLEEPER
bassinet mattress must be a minimum of
4 inches below the top edge of the bumper bar/shelf.
10
®
bassinet. The
Page 11
Instructions for attaching mattress pad
!
WARNING:
could result in serious injury or death.
SUFFOCATION HAZARD - To help prevent suffocation and
entrapment, use only the mattress/pad provided by Arm's Reach
Concepts, Inc. Never use additional padding or mattress.
• DO NOT use shipping or other bags as mattress covers since
they can cause suffocation.
• DO NOT use mattress pad in upper position without fabric liner
installed beneath mattress.
Failureto follow these warnings and instructions
STEP 5
After installing fabric liner, install playard floor as mattress. Secure playard
floor to metal support bars with Velcro
Thread Velcro
support bar back up through other slit in fabric liner and secure to matching
®
Velcro
on mattress pad. Repeat connection on other three locations.
!
WARNING:
®
strap down through one slit in fabric liner around metal
Be sure to put the mattress pad in the liner,
®
straps through slits in fabric liner.
not under the liner. DO NOT put the mattress pad directly
on the support bars without the liner installed. Infant may
fall through the opening created without the liner.
• Make sure all Velcro
®
straps are secured and tight. Check
straps before each use.
11
Page 12

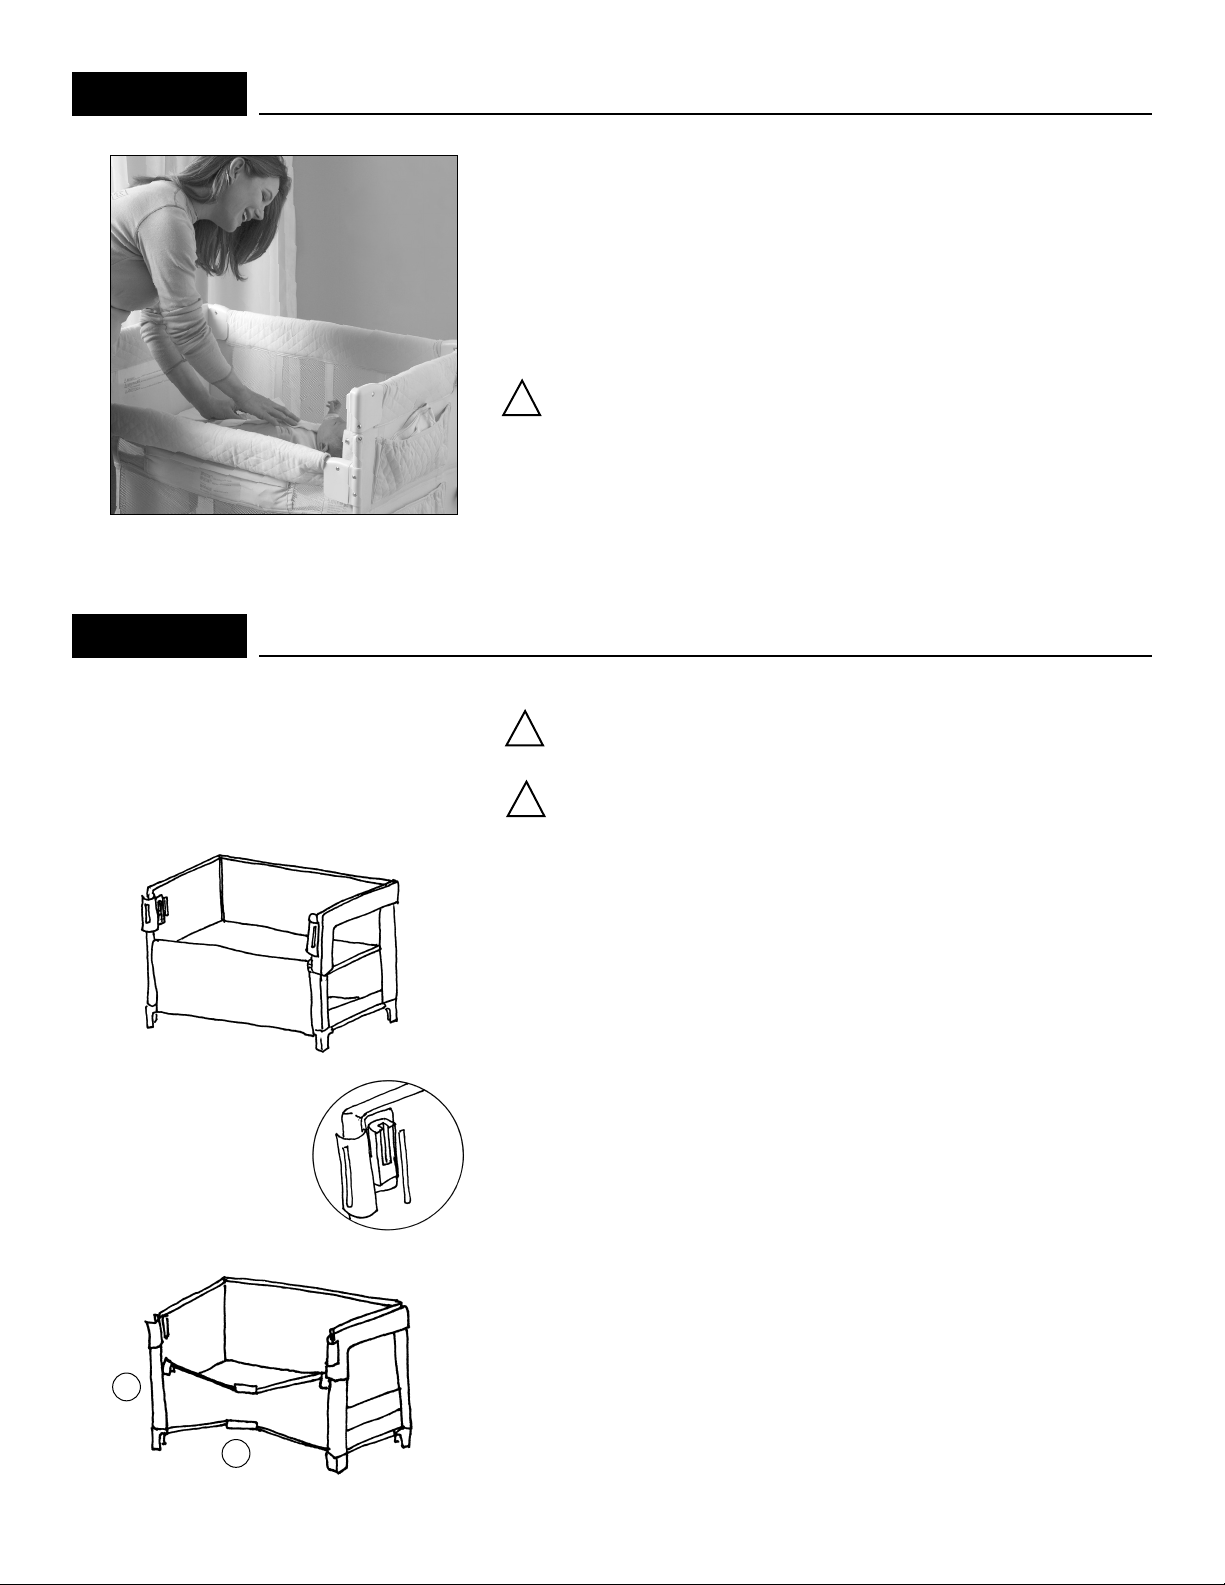
Instructions for securing the CO-SLEEPER®bassinet to parental bed
Connects to single, full, queen, king and
California king adult beds.
STEP 6
Unroll nylon straps from the plastic resistance
plate and lay straps across the adult bed to line
up with the center of the desired position of
your CO-SLEEPER
The straps must now be positioned between
upper and lower mattress or box spring.
This can be done by sliding the straps
between both mattresses using a back and
forth “sawing” motion and at the same time
pulling downward until the straps and
resistance plate are at the desired position.
One strap should come out on each side of
the CO-SLEEPER
“belt loop” found at front leg of CO-SLEEPER
bassinet.
®
bassinet.
®
bassinet. Pass through
You must use the nylon straps
and the resistance plate provided.
®
Connect into the female buckle at the rear leg of
CO-SLEEPER®bassinet.
Pulling on excess strap, tighten CO-SLEEPER
bassinet against adult bed. Repeat on other side.
Take excess strap and pass it back through
“belt loop” and push it between adult mattresses.
4” minimum
!
®
WARNING:
The top edge of the bumper bar/shelf must be level with or below
STRANGULATION / SUFFOCATION HAZARD:
the top of the adult bed mattress when used as a CO-SLEEPER
bassinet. The level of the CO-SLEEPER®bassinet mattress must be
a minimum of 4 inches below the top edge of the bumper bar/shelf.
®
NEVER raise the level of the CO-SLEEPER
bassinet mattress level
with, or above the top of the bumper bar/shelf.
®
• Never use as a CO-SLEEPER
bassinet without the anchor plate
attached and locked as shown. Failure to use this anchoring
system could result in serious injury or death to the infant. Make
sure all straps are secured and tight. Check straps before each use.
• Failure to use this securing system will allow CO-SLEEPER
bassinet to move away from adult bed and could result in infant
®
falling out of CO-SLEEPER
®
in CO-SLEEPER
!
WARNING:
bassinet.
bassinet. NEVER leave infant unattended
STRANGULATION/ CHOKING HAZARD
Do not allow excess strap (or any other loose object) to find its
®
way into the CO-SLEEPER
bassinet.
• Do not allow excess strap to lay loose on floor because someone
may trip on it.
®
• Make sure all Velcro
changer/CO-SLEEPER
• Use only fitted sheets for the CO-SLEEPER
straps are secured and tight when used in the
®
bassinet positions.Tighten straps periodically.
®
bassinet manufactured
by Arm's Reach Concepts, Inc.
®
®
12
Page 13
To convert to a changing table
Simply disconnect securing straps from CO-SLEEPER®bassinet and put the
unit where you desire.
!
WARNING:
assembly is not in use, store in a safe place not accessible to children.
•
FALLING HAZARD
Changing table is not intended for sleeping.
To convert to a free-standing unit
STRANGULATION
When anchor plate and strap
Never leave infant unattended in changing table.
!
WARNING:
Failure to follow these warnings and instruc-
tions could result in serious injury or death.
!
WARNING:
®
CO-SLEEPER
Starting from the completely assembled CO-SLEEPER
bassinet (with side lowered and liner installed)
STEP 1
A. Release Velcro
Place front flap over CO-SLEEPER
B. Open fabric flaps that cover the upper female receivers.
bedside sleeper before starting this conversion.
®
FALLING HAZARD: Remove infant from
on bottom front flap of liner from playard frame.
®
bassinet mattress to expose front bar.
®
B
A
STEP 2
Unlock lower bar following instructions for Step 1 and Step 2 on page 9.
13
Page 14

B
STEP 3
A
A. Install removable bar into upper female receivers through the liner openings
B. Pull up on removable bar to lock it into place
C. Lock lower bar.
C
STEP 4
Pull front fabric panel over locked upper bar.
STEP 5
Locate Velcro straps on left and right side of lower front flap of liner.
Thread strap thru belt loop on front panel and secure to front flap
Repeat on opposite side.
STEP 6
Pull fabric panel down and fasten it to the three Velcro
nylon rail of the playard.
!
WARNING:
SUFFOCATION HAZARD:
®
tabs on the bottom
Make sure liner flap is
snugly attached to prevent fabric liner from loosening inside the sleeping
area at front of mattress, or being drawn back into the sleeping area and
covering the infant.
STEP 7
Secure fabric flaps to close the inside corners of the bassinet liner
14
Page 15

Trouble shooting
Arm's Reach®CO-SLEEPER®bassinet as a free-standing unit
Q.
“I am having trouble getting the upper bar to unlock. The buttons are hard to push in.”
A. A. Locate the “dimple” on the end of the right and left elongated spring directly behind
the “press to release” words on the nylon sleeve that cover the tube steel locking bar. (See A)
B. Gently push in on each spring as you lift and lower the locking mechanism with a short up
and down motion. (see B) By doing this, the locking buttons will “find” their way into the
alignment holes and the upper bar will be unlocked and fold downward. (See C)
C. Make sure that both bars (right and left) are unlocked. If one side is longer than the other,
then you have not unlocked both bars and the unit will not fold up properly.
Q.
“I am having trouble getting the lower bar to unlock. One of the two bars unlock when I lifted up
on the locked bars but the second one seems to be stuck.”
A. A. Make sure all of the upper bars are completely unlocked and folded downward.
B. Unlock all of the lower locking bars by lifting up on them. Get at least one of the two bars
to unlock on each of the four sides.
C. Gather the CO-SLEEPER
on the floor.
D. Gently push downward on the CO-SLEEPER®bassinet until you feel the second bar
unlock from its locked position.
E. Repeat this motion on the remaining sides until you are able to fold the unit together so that
the upper four plastic corners are touching each other to form a neat square.
®
bassinet together as seen in the drawing and lay it on its side
Q.
“I can’t get the plastic hangers off the CO-SLEEPER®bassinet's top bar. They are very tight
and I can’t pull them off.”
A. Try rotating them off of the upper bar. Instead of trying to pull the hanger straight up, hold
on to the bottom (opposite the hooked end) and slide the hanger along the mesh side of
the CO-SLEEPER®bassinet in a circular motion. It will peel off the upper rail with little effort.
If you have any questions or need further assistance please call (800) 954-9353.
Cleaning Instructions
Spot clean
Launder
Machine wash on lukewarm setting and drip-dry.
NO BLEACH.
Arm’s Reach®CO-SLEEPER®bassinet
Arm’s Reach®CO-SLEEPER®bassinet fitted sheet and liner:
with damp cloth.
15
Page 16

!
AVERTISSEMENT – Si vous installez l'abri Umbrella Canopy
ou sur le parc d'enfant, assurez-vous de bien attacher toutes les bandes VelcroMD(l'abri Umbrella
Canopy™est un accessoire optionnel).
™
sur le CO-SLEEPERMDbassinet
16
Page 17

Lisez toutes les instructions AVANT d'assembler et d'UTILISER ce produit
!
AVERTISSEMENT:
Le non-respect de ces avertissements et des instructions peut provoquer
des blessures graves, voire mortelles.
CE PRODUIT N'EST PAS CONÇU POUR UNE UTILISATION À TITRE DE LIT DE BÉBÉ
PLEINE GRANDEUR OU FORMAT SPÉCIAL
RISQUE DE SUFFOCATION : Jetez tous les matériaux d'emballage immédiatement après l'ouverture
de la boîte. Les attaches et les sacs en plastique peuvent causer une suffocation ou un étouffement.
Mise en garde : Faites attention de ne pas jeter la plaque d'ancrage et les deux courroies de 3 mètres.
Ces accessoires sont nécessaires pour utiliser le produit en position de couchette jumelée.
•
NE LAISSEZ JAMAIS un enfant sans surveillance dans le CO-SLEEPER
•
IMPORTANT! Avant l'assemblage et périodiquement durant l'utilisation, vérifiez le produit pour voir
MD
bassinet de Arm’s ReachMD.
s'il y a des fixations endommagées, des joints desserrés, des pièces manquantes ou des rebords
pointus. NE PAS utiliser si des pièces sont manquantes, endommagées ou cassées. Si nécessaire,
contactez Arm's Reach Concepts, Inc. pour demander des pièces de rechange et des instructions.
Ne substituez jamais de pièce.
•
Pour réduire les risques de syndrome de mort subite, les pédiatres recommandent que les enfants
en bonne santé soient placés sur le dos pour dormir, sauf si le médecin vous donne des instructions
contraires.
•
RISQUE DE CHUTE : Avant de commencer une conversion, retirez l’enfant du CO-SLEEPER
de Arm’s Reach
•
Il ne faut jamais laisser l'enfant sans surveillance sur la table à langer. La table à langer n’est pas
MD
.
MD
bassinet
conçue pour y laisser dormir un bébé.
•
Le parc de bébé doit être totalement monté (avec les traverses latérales et le tapis de fond) avant de
l’utiliser. Avant de poser un bébé dans le parc ou le lit, assurez-vous toujours que les traverses
supérieures et inférieures sont solidement bloquées, quelle que soit la configuration.
•
NE JAMAIS UTILISER plus de 4 rallonges (segments d'extension de 5 cm / 2 po) par patte
avec votre CO-SLEEPER
UNIQUEMENT lorsque le CO-SLEEPER
MD
bassinet de Arm’s ReachMD. Les rallonges de pattes peuvent être utilisées
MD
bassinet est fixé au lit d'adulte.
•
Le parc de bébé doit être totalement monté (avec les traverses latérales et le tapis de fond) avant de
l’utiliser. Avant de poser un bébé dans le parc ou le lit, assurez-vous toujours que les traverses
supérieures et inférieures sont solidement bloquées, quelle que soit la configuration.
•
IMPORTANT! Assurez-vous de bien placer le matelas dans la housse et non sous la housse.
NE PLACEZ PAS le matelas directement sur les barres d'appui sans installer la housse. Un bébé peut
tomber par l'ouverture créée lorsque la housse n'est pas utilisée. N'UTILISEZ PAS le matelas en
position supérieure sans que la housse en tissu soit installée sous le matelas.
!
•
AVERTISSEMENT : RISQUE DE SUFFOCATION – Avant de plier le CO-SLEEPERMDbassinet/parc
d’enfant, assurez-vous que la barre amovible est en position relevée (parc d’enfant). Si vous pliez le
CO-SLEEPER
MD
bassinet/parc d’enfant avec la barre amovible en position basse (CO-SLEEPER
MD
bassinet), des boutons-pression risquent de se desserrer.
!
•
AVERTISSEMENT: NE LAISSEZ JAMAIS un bébé dans le parc avec les CÔTÉS ABAISSÉS. Le bébé
pourrait rouler dans l’espace entre le matelas et le filet latéral mou, puis suffoquer.
17
Page 18

•
Il ne faut JAMAIS laisser le bébé dans ce meuble sans que la TRAVERSE SUPÉRIEURE soit installée
à sa position la plus haute, à moins que le meuble soit en configuration CO-SLEEPER® bassinet et
qu’un parent ou tuteur soit dans le lit d’adulte.
•
Cessez l’utilisation de l’article une fois que l’enfant peut grimper hors du lit ou qu’il mesure 90 cm(35 po).
•
Lorsqu'il est utilisé à titre de parc d'enfant, le CO-SLEEPER
qu'à un enfant ne pouvant grimper hors du parc, mesurant moins de 86 cm (34 po) et pesant moins
de 13,5 kg (30 lb).
•
Une fois que l’enfant peut se mettre debout, enlevez les coussins de protection, les jouets de grande
taille et tout autre objet dont il pourrait se servir pour grimper hors du parc/lit.
•
NE LAISSEZ JAMAIS l’enfant dans le lit ou le parc lorsque le côté est baissé. Lorsque l'enfant est
placé à l'intérieur du produit, assurez-vous que le côté est relevé et verrouillé.
•
Lorsque le produit est converti en parc de jeu, enlevez les supports en plastique et la housse, puis
abaissez le fond le plus possible. Placez la barre amovible à la position la plus haute.
•
RISQUES DE CHUTE – Pour éviter les chutes, CESSEZ l'utilisation de ce produit dès que l'enfant
commence à se redresser avec ses mains et ses genoux ou lorsqu'il a atteint le poids maximal
recommandé par le fabricant, selon la première de ses deux éventualités.
•
Cessez d'utiliser la configuration en couchette jumelée dès que l'enfant peut se rouler seul et se
placer en position assise, agenouillée ou debout.
MD
bassinet de Arm’s ReachMDne doit servir
!
AVERTISSEMENT : RISQUE DE SUFFOCATION -
- UN BÉBÉ PEUT S'AXPHYXIER
•
dans l'espace formé entre un matelas trop mince ou trop épais et les côtés du produit.
•
sur un lit trop mou.
•
Il ne faut JAMAIS ajouter de matelas, d’oreiller, de couette ou de couvre-matelas. Utilisez unique
ment le matelas fourni par le fabricant.
•
Si vous désirez utiliser un drap avec le matelas, utilisez uniquement celui fourni par le fabricant avec
le produit ou un drap spécialement conçu pour s'ajuster aux dimensions du matelas.
•
N’utilisez JAMAIS comme couvre-matelas les sacs d’expédition ou autres emballages en plastique
qui ne sont pas vendus et destinés à cette utilisation. Ils peuvent asphyxier l'enfant.
•
RISQUES DE SUFFOCATION – Pour éviter les risques de suffocation, utilisez uniquement le
matelas/tapis fourni par la société Arm’s Reach Concepts, Inc. Il ne faut JAMAIS utiliser d’autres
matelas ou du rembourrage supplémentaire.
•
RISQUE DE SUFFOCATION : Assurez-vous que le rabat de la housse est bien serré pour éviter que
la housse en tissu se desserre là où l’enfant dort, sur l’avant du matelas ou, qu’elle s’enlève et
couvre l’enfant.
Lorsque le produit est utilisé dans les positions de table à langer/CO-SLEEPER
•
vous que toutes les bandes en VelcroMDsont solides et serrées. Resserrez-les périodiquement.
MD
bassinet, assurez
18
Page 19

•
RISQUE DE STRANGULATION/SUFFOCATION : Lorsque le produit est utilisé en configuration
CO-SLEEPER
bas que le dessus du matelas du lit d'adulte. Le dessus du matelas du CO-SLEEPER
être à au moins 4 pouces (10 cm) sous le rebord supérieur de l'étagère/barre anti-choc. Il ne faut
JAMAIS que le matelas du CO-SLEEPER
MD
bassinet, le rebord supérieur de l'étagère/barre anti-choc doit être à égalité ou plus
MD
bassinet soit relevé pour être à égalité ou au-dessus de
MD
bassinet doit
la tablette/barre d’amortissement.
•
Il ne faut JAMAIS utiliser ce produit en configuration CO-SLEEPER
MD
bassinet sans que la plaque de
fixation soit solidement installée et bloquée, conformément à l’illustration. Si le système d’attache
n’est pas utilisé, l’enfant pourrait subir des blessures graves, voire mortelles. Assurez-vous que
toutes les courroies sont serrées et solides. Vérifiez les courroies avant chaque utilisation.
•
Si le système d’attache n’est pas utilisé, le CO-SLEEPER
et l’enfant pourrait tomber de son lit. Il ne faut JAMAIS laisser l'enfant dans le CO-SLEEPER
MD
bassinet risque de s’éloigner du lit d’adulte
MD
bassinet
sans surveillance.
•
RISQUE DE STRANGULATION : Lorsque la plaque de retenue et les sangles de fixation ne sont pas
utilisées, rangez-les hors de portée des enfants.
•
NE PLACEZ JAMAIS ce produit près d'une fenêtre à laquelle pendent les cordons d'un store ou d'un
rideau pouvant étrangler l'enfant.
•
Les cordons peuvent provoquer une strangulation! NE PLACEZ JAMAIS un article comportant un
cordon à proximité du cou de l'enfant (comme les cordons d'une bavette ou d'une sucette).
NE SUSPENDEZ JAMAIS de cordons au-dessus du Co-SleeperMDet n'attachez jamais de cordon aux jouets.
•
Le parc de bébé doit demeurer à bonne distance de la cuisinière, des appareils de chauffage, d’un
feu de camp et de tout autre danger.
•
Il ne faut JAMAIS laisser l'enfant grimper ou jouer sur / sous le meuble, quelle qu’en soit la configuration.
•
Assurez toujours la supervision nécessaire pour la sécurité de votre enfant. Lorsque le produit est
utilisé pour le jeu, ne laissez jamais l'enfant sans surveillance.
•
Si le CO-SLEEPERMDbassinet de ARM’S REACHMDest endommagé ou cassé, cessez-en l'utilisation.
•
Vérifiez périodiquement l’état du produit pour voir si les vis, les rivets et les boulons sont bien serrés.
•
N’UTILISEZ pas de matelas d’eau dans ce produit.
•
Si vous deviez refaire la finition du lit, n’utilisez que des produits non toxiques conçus pour les
produits destinés aux enfants.
!
•
AVERTISSEMENT – Si vous installez l'abri Umbrella Canopy™ sur le CO-SLEEPER
MD
bassinet ou sur
le parc d'enfant, assurez-vous de bien attacher toutes les bandes VelcroMD(l'abri Umbrella Canopy™
est un accessoire optionnel).
!
•
AVERTISSEMENT– Pour éviter les chutes pouvant causer des blessures graves voire mortelles, l'en-
fant doit toujours demeurer à portée de main d'un adulte. Ne laissez jamais votre enfant sans surveillance.
19
Page 20

Instructions pour assembler le parc de bébé
!
AVERTISSEMENT:
sont pas utilisées, rangez-les hors de portée des enfants.
RISQUE D'ÈRANGLEMENT.
Étape
1
•
Ouvrez la fermeture à glissière du sac. Sortez le parc de bébé et placezle debout
•
Détachez les bandes VelcroMD.
• Mettez le fond de côté.
NE PAS POUSSER LE CENTRE VERS LE BAS NI VERROUILLER
AVANT D'AVOIR VERROUILLÉ TOUTES LES BARRES SUPÉRIEURES.
Étape 2
• Séparez les quatre poteaux de coin.
• Laissez le centre relevé et verrouillez toutes les barres
supérieures en saisissant la barre supérieure par le centre et
en tirant jusqu'à ce que vous entendiez un « clic ».
• Répétez sur les 4 côtés jusqu'à ce que toutes les barres
supérieures soient rigides.
Lorsque la plaque de retenue et les sangles de fixation ne
LES BARRES INFÉRIEURES
Étape 3
• Placez le pied sur la pochette centrale extérieure de la barre
inférieure et poussez vers le bas jusqu'à ce que la barre soit
verrouillée.
• Répétez sur les 4 côtés jusqu'à ce que le parc soit complètement
dressé.
Étape 4
MD
!
AVERTISSEMENT:
A. Pour couvrir le matelas avec un drap contour, ouvrez les 4 bandes Velcro
avec bouton pression sur les coins du matelas.
MD
B. Enfilez les bandes Velcro
et installez-le dans le fond du parc avec les bandes VelcroMDouvertes.
C. Enfilez les bandes VelcroMDdans les trous de bouton correspondants dans
les coins du plancher du parc, puis fermez le bouton pression sur
l'extérieur de la patte.
dans les trous de bouton sur les coins du drap
Lorsque le produit est converti en parc de jeu, enlevez les supports en plastique,
la doublure du fond et les barres de fixation du fond. Puis abaissez le fond le plus possible. Placez la barre amovible
à la position la plus haute.
• Assurez-vous toujours que les traverses supérieures et inférieures sont solidement bloquées, quelle que soit
la configuration, avant de poser un bébé dans le parc.
• NE JAMAIS LAISSER in bébé dans le parc avec les côtés abaissés. Le bébé pourrait rouler dans l’espace entre
le coussin et le filet latéral mou, puis suffoquer.
20
Page 21

Instructions pour assembler le parc de bébé
Étape 1
TIRER LA BARRE HORIZONTALE INFÉRIEURE VERS LE HAUT
AVANT D'ESSAYER DE DÉBLOQUER LA BARRE SUPÉRIEURE!
• Placer le pied sous la barre inférieure et soulever la barre en
position de V inversé. Pour pouvoir débloquer la barre
supérieure, la barre inférieure doit être entièrement débloquée.
Étape 2
A. Alors que la barre inférieure est en V inversé, placez les doigts
sur le centre de la barre supérieure avec les pouces sur les
boutons marqués «PRESS TO UNLOCK»(appuyer pour débloquer).
B. Enfoncez les boutons a en soulevant légèrement la barre de
façon à débloquer le verrou, puis poussez vers le bas pour
obtenir un « U ». Si la barre supérieure forme un V, un côté n'est
pas bien débloqué.
C. Tirez le centre du plancher du parc vers le haut.
Étape 3
•
Junte la unidad .
•
No la fuerce.
Étape 4
•
Envuelva el
•
Pase la correa a través del bucle de correa en la esquina inferior.
•
Enganche las otras dos lengüetas de VelcroMD.
Étape 5
•
Introduzca el corral de juego en la bolsa según se muestra y cierre la
colchón
alrededor de su unidad.
cremallera.
•
Guarde la sábana en un extremo de la unidad.
Étape 6
•
Asegúrese de que los asideros de acarreo pasen a través de la abertura
en la bolsa.
21
Page 22

Assembly Arm's Reach
MD
CO-SLEEPERMDBassinet
Matelas
le panneau en tissu
Parc d'enfant avec côté
abaissé pour assemblage
CO-SLEEPER®bassinet.
en
les tubes de suppport
22
Page 23

!
–
–
–
–
–
–
–
–
–
AVERTISSEMENT:
Le non-respect de ces avertissements et des instructions peut provoquer
des blessures graves, voire mortelles.
Lire toutes les instructions avant d’assembler ou d’utiliser ce produit.
Conversion du parc d'enfant en CO-SLEEPERMDbassinet
Étape 1
TIRER LA BARRE HORIZONTALE INFÉRIEURE VERS LE HAUT
AVANT D'ESSAYER DE DÉBLOQUER LA BARRE SUPÉRIEURE!
Placer le pied sous la barre inférieure et soulever la barre en position de
V inversé.
Pour pouvoir débloquer la barre supérieure, la barre inférieure doit être
entièrement débloquée.
Étape 2
A. Alors que la barre inférieure est en V inversé, placer les doigts sur le
centre de la barre supérieure avec les pouces sur les boutons marqués
PRESS TO UNLOCK » (appuyer pour débloquer).
B. Enfoncer les boutons tout en soulevant légèrement la barre de façon
à débloquer le verrou, puis pousser vers le bas pour obtenir un U.
MD
avant sur chaque côté du panneau latéral
FIG. 1
C. Ouvrir les 2 bandes Velcro
en Nylon, juste en dessous des coins en plastique (récepteurs).
D. Trouver la languette de blocage à l’intérieur des deux coins en plastique
supérieurs et appuyer vers le centre du parc.
Il est désormais possible de soulever le connecteur en plastique et de le
faire sortir de la fente. (Fig. 1)
E. Insérer le connecteur dans la fente inférieure et appuyer jusqu’à ce que
la languette de blocage s’enclenche.
Répéter cette opération pour l’autre côté.
F. Soulever le milieu de la barre jusqu’à ce que celle-ci se bloque. (Fig. 2)
G. Bloquez les barres inférieures.
FIG. 2
FIG. 3
Étape 3
Assembler et monter les supports et les tubes de support de plancher
comme l’indiquent les figure 3.
FIG. 4
Monter le support et les tubes de support de plancher dans l’extension
de lit comme l’indiquent les figure 4.
23
Page 24

FIG. 5
Étape 4
A Étaler la housse sur le cadre de l’extension de lit de sorte que le long
rabat se trouve sur la barre inférieure. (Fig. 5)
B. Tirer les coins par-dessus le cadre et les fixer en place avec les agrafes.
FIG. 6
4” minimum
C. Repérer les bandes Velcro
avant de la housse. Enfiler la courroie dans la boucle de ceinture sur
le panneau avant, puis fixer sur le rabat avant.
Répéter sur le côté opposé.
!
AVERTISSEMENT:
EMMELEMENT
Cette étape empêche la doublure en tissu de se
MD
à gauche et à droite du rabat inférieur
DANGER DE SUFFOCATION/
dégager sur le devant du matelas, sous le dormeur.
RISQUED'ÈTRANGLEMENT/SUFFOCATION:
utilisé en configuration CO-SLEEPER
MD
bedside sleeper, le rebord supérieur de
Lorsque le produit
est
l'étagère/barre anti-choc doit être à égalité ou plus bas que le dessus du
matelas du lit d'adulte. Le dessus du
matelas du CO-SLEEPERMDbedside sleep
er
doit être à au moins 4 pouces (10 cm) sous le rebord supérieur de l'étagère /
barre anti-choc.
24
Page 25

Instructions pour l’installation du tapis de fond
!
AVERTISSEMENT:
et des instructions peut provoquer des blessures graves, voire
mortelles.
RISQUES DE SUFFOCATION : Pour éviter les risques de suffocation,
utilisez uniquement le matelas/tapis fourni par la société Arm’s
Reach Concepts, Inc. Il ne faut jamais utiliser d’autres matelas ou du
rembourrage supplémentaire. IL NE faut jamais utiliser le papier
d’emballage ou d’autres sacs pour recouvrir le matelas car
ils peuvent provoquer une suffocation.
• Ne pas utiliser la housse de matelas en position haute sans doublure
en tissu sous le matelas.
Le non-respect de ces avertissements
Étape 5
Après l’installation de la housse en tissu, installez le fond du parc de bébé
en guise de matelas. Fixez le fond du parc de bébé sur les barres métalliques
en insérant les courroies Velcro
courroie en Velcro dans une fente de la housse, puis autour de la barre
métallique et dans l’autre fente de la housse. Ensuite, fixez le tout avec la
bande Velcro
opération avec les trois autres bandes.
!
AVERTISSEMENT:
MD
correspondante sur le tapis de fond. Refaites la même
fond dans la housse et non sous la housse.
MD
dans les fentes de la housse. Enfilez une
N’oubliez pas de placer le tapis de
Il ne faut jamais placer
le tapis de fond directement sur les barres d’appui sans installer
la housse.
Le bébé risque de tomber dans l’ouverture créée par
l’absence de doublure.
MD
• Assurez-vous que toutes les bandes en Velcro
sont solides et
serrées. Resserrez les bandes avant chaque utilisation.
25
Page 26

Instructions de fixation du CO-SLEEPERMDbassinet à un lit d'adulte
Peut se connecter à un lit de format simple,
double, queen, king et California king
Étape 6
Déroulez les courroies en nylon autour de la
plaque de résistance, puis étalez les courroies
en travers du lit d’adulte, de façon à aligner la
plaque avec le centre de la position désirée pour
le CO-SLEEPER
Installez ensuite les courroies entre les deux
matelas ou entre le matelas et le sommier.
Vous pouvez les installer en glissant les courroies
entre les deux matelas, avec un mouvement de
scie en aller-retour, tout en tirant vers le bas
jusqu’à ce que les courroies et la plaque de
résistance soient à l’emplacement désiré.
Une courroie devrait sortir sur chaque extrémité
de l’emplacement du CO-SLEEPER
Enfilez les courroies dans la “boucle de courroie”
sur chaque patte avant du CO-SLEEPER
La connecter ensuite dans la boucle femelle sur
le pied arrière du CO-SLEEPER
En tirant sur le surplus de sangle, serrer le
CO-SLEEPER
Répéter cette opération de l’autre côté.
Prendre le surplus de sangle et le faire passer
dans la “ganse” et l’enfoncer entre le matelas et
le sommier de lit pour adultes.
MD
bassinet
MD
bassinet contre le lit pour adultes.
.
MD
bassinet.
MD
bassinet.
MD
bassinet.
4 pouces
Vous devez utiliser les courroies en
nylon et la plaque de résistance qui
sont fournies.
!
ADVERTENCIA:
PELIGRO DE ESTRANGULACIó
El borde superior de la barra o repisa de contacto debe estar a nivel
con la superficie del colchón de los adultos, o más abajo, cuando la
unidad se use como CO-SLEEPER
CO-SLEEPER
MD
bassinet debe estar a un
debajo del borde superior de la barra/repisa de contacto. NUNCA
eleve el nivel del colchón del CO-SLEEPER
MD
bassinet. El nivel del colchón del
mÌnimo de 4 pulgadas
MD
bassinet hasta quedar a
nivel o arriba del nivel de la barra o repisa de contacto.
MD
• Nunca use el producto como CO-SLEEPER
bassinet sin la placa de
anclaje acoplada y fija según se muestra. El incumplimiento de usar
este sistema de anclaje podría resultar en lesiones graves o la muerte
del bebé. Asegúrese de que todas las correas estén fijas y ajustadas.
Inspeccione las correas antes de cada uso.
• El incumplimiento de usar este sistema de seguridad permitirá que
el CO-SLEEPER
MD
bassinet se separe de la cama de los adultos, lo cual
podría provocar que el bebé se caiga del CO-SLEEPER
NUNCA deje desatendido al bebé en el CO-SLEEPER
N/ASFIXIA:
MD
MD
bassinet.
por
bassinet.
!
AT TENTION:
DANGER DE STRANGULATION / SUFFOCATION
Ne pas laisser le surplus de sangle pendre sur le plancher, car cela
risquerait de faire trébucher quelqu’un.
• Ne pas laisser le surplus de sangle (ou tout autre objet mobile) traîner
dans l’extension de lit.
MD
• Assurez vous que toutes les bandes en Velcro
rées dès que le meuble est utilisé dans les positions table à langer/
CO-SLEEPER
MD
bassinet. Reserrez périodiquement les bandes.
• Utilisez uniquement des draps contour fabriqués pour le
sont solides et ser-
CO-SLEEPER
MD
bassinet par Arm’s Reach Concepts, Inc.
26
Page 27

Conversion en table à langer
Il suffit de dégrafer les sangles de fixation de l’extension de lit et de placer
l’élément à l’emplacement choisi.
!
AVERTISSEMENT:
RISQUE D'ÈRANGLEMENT.
Lorsque la plaque de retenue et les sangles de fixation ne sont pas
utilisées, rangez-les hors de portée des enfants.
•
l ne faut jamais laisser un enfant sans surveillance sur la table à langer.
La table à langer n’est pas
conçue pour y laisser dormir un bébé
Instructions pour convertir en meuble autonome à quatre côtés
.
!
AVERTISSEMENT:
Le non-respect de ces avertissements
et des instructions peut provoquer des blessures graves, voire mortelles.
!
AVERTISSEMENT:
commencer la conversion, retirez l’enfant du CO-SLEEPER
Il faut d’abord que leCO-SLEEPERMDbassinet soit complètement assemblé
(avec le côté abaissé et la housse installée)
Étape 1
A. Détachez la bande VelcroMDretenant le rabat inférieur avant de la
housse sur l'armature du parc.
Placez le rabat avant sur le matelas Co-Sleeper de façon à exposer
la barre avant.
B. Ouvrez les rabats en tissu recouvrant les récepteurs femelles
supérieurs.
RISQUE DE CHUTE:
Avant de
MD
bassinet
B
A
Étape 2
Débloquez la barre inférieure conformément aux instructions de l'étape 1 y
l'étape 2 en page 23.
27
Page 28

B
Étape 3
A
A. Installez la barre amovible dans les récepteurs femelles supérieurs en
la aisant passer dans les ouvertures de la housse.
B. Tirez la barre amovible vers le haut pour la verrouiller.
C. Verrouillez la barre inférieure.
C
Étape 4
Tirez le panneau en tissu avant par-dessus la barre supérieure verrouillée.
Étape 5
Repérer les bandes VelcroMDà gauche et à droite du rabat inférieur
avant de la housse. Enfiler la courroie dans la boucle de ceinture sur
le panneau avant, puis fixer sur le rabat avant.
Répéter sur le côté opposé.
Étape 6
Tirez le panneau en tissu vers le bas et fixez-le aux trois languettes Velcro
sur la traverse inférieure en nylon du parc de bébé.
!
AVERTISSEMENT
vous que le rabat de la housse est bien serré
:
RISQUE DE SUFFOCATION :
pour
éviter que la housse
Assurez-
MD
en tissu se desserre là où l’enfant dort, sur l’avant du matelas ou, qu’elle
s’enlève et couvre l’enfant.
Étape 7
Fixez les rabats en tissu pour fermer les coins intérieurs de la housse.
28
Page 29

Dépannage le
Q
.
“J’ai de la difficulté à débloquer la barre supérieure. Les boutons sont difficiles à enfoncer. ”
CO-SLEEPERMDbassinet de Arm’s Reach
MD
R. A. Repérez la “bosse ” sur l’extrémité des ressorts d’élongation de droite et de gauche, directement
derrière les mots “ press to release ” (appuyer pour détacher) sur le manchon en nylon qui
recouvre la barre de blocage tubulaire en acier (voir A).
B. Poussez délicatement sur chaque ressort pendant que vous relevez et abaissez le mécanisme de
blocage, avec un petit mouvement de haut en bas (voir B). En agissant ainsi, les boutons de
blocage se placeront dans les trous d’alignement, puis la barre supérieure sera déverrouillée et
repliée vers le bas (voir C).
C.
Assurez-vous que les deux barres (droite et gauche) sont déverrouillées. Si un côté est plus long
que l’autre, vous n’avez pas déverrouillé les deux barres et le meuble ne se repliera pas correctement.
Q
.
“J’ai de la difficulté à déverrouiller la barre inférieure. L’une des deux barres se déverrouille lorsque je
tente de soulever les barres verrouillées, mais la deuxième résiste. ”
R.. A. Assurez-vous que toutes les barres supérieures sont complètement déverrouillées et repliées
vers le bas.
B. Déverrouillez toutes les barres de blocage inférieures en les tirant vers le haut. Faites en sorte
qu’au moins une des deux barres soit débloquée sur chacun des quatre côtés.
Q
C. Prenez tout le
D. Poussez délicatement sur le
barre se débloquer.
E. Répétez cette opération sur les autres côtés jusqu’à ce que vous puissiez replier le lit et que les
quatre coins en plastique supérieurs se touchent pour former un carré parfait.
.
“Je n’arrive pas à détacher les supports en plastique sur la barre supérieure du
Ils sont très serrés et il m’est impossible de les retirer. ”
CO-SLEEPERMDbassinet
CO-SLEEPERMDbassinet
, comme dans le schéma, et posez-le par terre sur le côté.
jusqu’à ce que vous sentiez la deuxième
CO-SLEEPERMDbassinet
R. Essayez de les faire tourner jusqu’à ce que vous puissiez les détacher de la barre supérieure. Au lieu de
de tirer sur le support directement vers le haut, tenez-le par le bas (à l’opposé du crochet) et faites glisser
le support sur le long du côté maillé du
détachera du rail supérieur avec très peu d’effort.
Si vous avez des questions ou si vous avez besoin d’assistance supplémentaire, composez le 1-800-954-9353.
CO-SLEEPERMDbassinet
, avec un mouvement circulaire. Il se
Instructiones de nettoyage
Votre CO-SLEEPER®bassinet de Arm’s Reach®peut être nettoyé avec un tissu humide.
®
Lavage de la housse et du drap contour de votre CO-SLEEPER
Laver à la machine avec de l'eau tiède et sécher par égouttement.
PAS DE JAVEL.
bassinet de Arm’s Reach®:
29
Page 30

!
ALERTA:
Asegure el UMBRELLA CANOPYTMa CO-SLEEPER
sujetando a los parches Velcro
®
®
. ( La sombrilla Umbrella CanopyTMes un accesorio opcional)
bassinet o corral de juego
30
Page 31

Lea todas las instrucciones antes de ensamblar o usar este producto.
!
ADVERTENCIA:
El incumplimiento de estas advertencias e instrucciones puede resultar
en lesiones graves o incluso la muerte.
ESTA UNIDAD NO ESTÁ DESTINADA PARA EL USO COMO SEMICUNA NI COMO CUNA.
RIESGO DE ASFIXIA. Deseche todos los materiales de embalaje inmediatamente después de abrir la
caja. Las bolsas plásticas y las amarras pueden causar asfixia o ahogamiento. Precaución: no deseche
la placa de anclaje con las dos correas de 10 pies de longitud, ya que éstas son necesarias para el uso
del producto en la configuración de cama adosable.
•
NUNCA DEJE desatendido su bebé en el
•
¡IMPORTANTE! Antes del ensamblaje, y periódicamente durante el uso, inspeccione este producto
para determinar que no haya herrajes dañados, juntas sueltas, piezas faltantes ni bordes filosos.
NO use este producto si falta o está roto o dañado alguno de los componentes. Si es necesario,
comuníquese con Arm’s Reach Concepts, Inc. para obtener piezas de repuesto e instrucciones.
Nunca sustituya las piezas.
•
A fin de reducir el riesgo del síndrome de muerte infantil súbita, los pediatras recomiendan que
los bebés sanos se acuesten de espaldas, boca arriba, para dormir, a menos que su médico lo
indique de manera diferente.
•
RIESGO DE CAÍDAS: Antes de realizar conversión alguna retire al bebé del
bassinet
de
Arm’s Reach®.
CO-SLEEPER® bassinet
de
Arm’s Reach®.
CO-SLEEPER
®
•
NUNCA DEJE desatendido al bebé en la mesa para cambiar pañales. La mesa para cambiar pañales
no está destinada para usarse como cama.
•
Antes del uso, es necesario que el corral de juego, incluidos los rieles laterales y la colchoneta del
fondo estén completamente fijos en posición. En cualquier configuración, es necesario que los rieles
superior e inferior estén completamente fijos en posición, antes de colocar al bebé o niño en la unidad.
•
NUNCA USE más de 4 extensiones (segmentos de extensión de 2 pulgadas (5 cm)) por pata con
el CO-SLEEPER®bassinet de Arm’s Reach®. Use extensiones de pata en el CO-SLEEPER
SOLAMENTE cuando éste se encuentre adosado a la cama de los adultos.
•
¡IMPORTANTE! Cerciórese de colocar la almohadilla acolchada del colchón en el forro, no debajo
del mismo. NO coloque la almohadilla acolchada del colchón directamente sobre las barras de
apoyo sin antes instalar el forro. El bebé puede caer por la abertura que se crea si no se coloca el
forro. NO use la almohadilla acolchada del colchón en la posición superior antes de instalar el
forro de tela debajo del colchón.
!
•
ADVERTENCIA: RIESGO DE ASFIXIA Cerci rese de que la barra desmontable esté en la posición
superior (corral de juego) antes de intentar plegar el corral de juego/
Al plegar el corral de juego/CO-SLEEPER®bassinet con la barra desmontable en la posición inferior
(
CO-SLEEPER®bassinet
!
•
ADVERTENCIA: NUNCA DEJE al bebé en el corral de juego si éste tiene los LADOS ABAJO.
El bebé puede rodar hasta caer en el espacio entre la colchoneta y la malla lateral suelta y asfixiarse.
) puede provocar que se aflojen los remaches.
CO-SLEEPER®bassinet
®
bassinet
.
•
NUNCA DEJE al bebé en la unidad si el RIEL HORIZONTAL SUPERIOR no está instalado en la
posición más elevada, a menos que la unidad esté en la configuración
y los padres o el cuidador esté en la cama para los adultos.
31
CO-SLEEPER®bassinet
Page 32

•
Suspenda el uso de los productos cuando el bebé ya pueda trepar y salirse de la unidad o cuando
mida 35 pulgadas (890 mm) de altura.
•
Cuando se usa como corral de juego, el
para que lo use un bebé que no pueda trepar y salirse del corral, mida menos de 34 pulgadas
(86 cm) de altura y pese menos de 30 libras (13.5 kg).
•
Cuando el bebé ya pueda pararse, retire las almohadillas de tope, los juguetes grandes y otros
objetos que pudiesen servir como apoyo para trepar y salirse.
•
NO deje a su bebé en la unidad cuando los lados de ésta estén abajo. Cerciórese de que los lados
de la unidad estén elevados y fijos en posición antes de colocar al bebé en la unidad.
•
Al configurar la unidad como corral de juego, retire los colgadores de plástico y el forro, y baje
el piso hasta el nivel más bajo. Coloque la barra desmontable en la posición más elevada.
•
RIESGO DE CAÍDAS – Para ayudar a prevenir las caídas, NO use este producto cuando el bebé
comience a empujarse y colocarse sobre las manos y rodillas ni cuando el bebé haya alcanzado
el peso máximo recomendado por el fabricante, lo que ocurra primero.
•
Suspenda el uso de la unidad como cuna adosada cuando el bebé ya pueda rodar y colocarse en
posición de rodillas, sentado o parado.
!
ADVERTENCIA: RIESGO DE ASFIXIA-
- LOS BEBÉS SE PUEDEN ASFIXIAR
CO-SLEEPER®bassinet
de
Arm’s Reach®está destinado
•
En las separaciones entre un colchón demasiado pequeño o demasiado grueso y los lados del producto.
•
En ropa de cama blanda o mullida
•
NUNCA agregue un colchón, almohadas, edredones o almohadillas. Use SOLAMENTE la almohadilla
suministrada por el fabricante.
•
Si usa una sábana con la almohadilla, use solamente la que suministra el fabricante de la unidad
o cuna, o uno que esté específicamente diseñada para cubrir las dimensiones del colchón de la
unidad o de la cuna.
•
Nunca utilice las bolsas plásticas de embalaje ni otras películas plásticas como forros de colchón
que no se vendan o estén destinadas para dicha finalidad. Éstas pueden causar asfixia.
•
RIESGO DE ASFIXIA – Para ayudar a prevenir la asfixia y el entrampamiento, use solamente la
almohadilla del colchón suministrada por Arm's Reach Concepts, Inc. NUNCA use almohadillas
ni colchones adicionales.
•
RIESGO DE ASFIXIA: Cerciórese de que la solapa del forro esté sujetada firmemente para impedir
que el forro de tela se afloje en el área para dormir al frente del colchón o que se recoja en el área
para dormir y cubra al bebé.
•
Cerciórese de que todas las lengüetas de Velcro®estén firmemente sujetadas cuando la unidad
se utilice como mesa para cambiar pañales o como
periódicamente.
CO-SLEEPER®bassinet
. Apriete las correas
32
Page 33

•
RIESGO DE ESTRANGULACIÓN / ASFIXIA: Cuando la unidad se use como CO-SLEEPER
el borde superior de la barra/repisa de tope debe estar a nivel o debajo del nivel superior del
colchón de los adultos. El nivel del colchón del
mínimo de 4 pulgadas por debajo del borde superior de la barra/repisa de tope. NUNCA eleve
el nivel del colchón del
repisa de tope ni más arriba del mismo.
•
NUNCA USE el
muestra. El incumplimiento de usar este sistema de anclaje puede causar lesiones graves o la
muerte al bebé. Cerciórese de que todas las correas estén fijas y apretadas. Inspeccione las correas
antes de cada uso.
•
El incumplimiento de usar este sistema de seguridad permitirá al
Arm's Reach®separarse de la cama de los adultos y podría provocar la caída del bebé. NUNCA
deje desatendido al bebé en el
•
RIESGO DE ESTRANGULACIÓN: Cuando la placa de anclaje y el conjunto de la correa no estén
en uso, guárdelos en un sitio seguro que sea inaccesible para los niños.
•
NO coloque el producto cerca de una ventana donde los cordones de las persianas o cortinas
puedan causar el estrangulamiento de un niño.
•
¡Las cuerdas pueden causar estrangulamiento! NO coloque artículos con cuerdas alrededor del
cuello de un bebé, tales como los cordones de gorros, cuerdas de chupones. NO cuelgue cuerdas
sobre la unidad en ninguna configuración ni ate cuerdas a los juguetes.
CO-SLEEPER®bassinet
CO-SLEEPER®bassinet
sin la placa de anclaje acoplada y bloqueada según se
CO-SLEEPER®bassinet
CO-SLEEPER®bassinet
hasta el nivel del borde superior de la barra/
CO-SLEEPER®bassinet
.
debe quedar a un
®
bassinet
de
•
Mantenga el corral de juego lejos de estufas, calefactores, fogatas y otros peligros.
•
NO deje que los niños trepen ni jueguen encima o debajo de la unidad en ninguna configuración.
•
Siempre proporcione la supervisión continua necesaria para la seguridad de su bebé.
•
Cuando la unidad se use como corral de juego, nunca deje desatendido al bebé.
•
Deje de usar el
•
Inspeccione periódicamente la unidad para cerciorarse de que todos los tornillos, tuercas y
pernos estén apretados firmemente.
•
NO use colchones de agua con este producto
•
Si reacaba, utilice un final no tóxico especificado para los productos de los childrenâs.
!
•
ADVERTENCIA – Al acoplar la sombrilla Umbrella CanopyTMal
de juego cerciórese de sujetar todas las lengüetas de Velcro®. (La sombrilla Umbrella Canopy
es un accesorio opcional)
!
•
ADVERTENCIA – Para evitar lesiones graves o mortales por caídas, siempre mantenga al bebé
dentro del alcance de sus manos. Nunca deje desatendido a su bebé.
CO-SLEEPER®bassinet
de
Arm’s Reach®si éste se daña o se rompe.
CO-SLEEPER®bassinet
o corral
TM
33
Page 34

Instructions para instalar el corral de juego básico
!
ADVERTENCIA
sujeción, guárdelo en un lugar seguro fuera del alcance de los niños.
:
PELIGRO DE ESTRANGULACIóN: Cuando no esté en uso el conjunto de la placa y la correa de
Paso 1
•
Abra la cremallera de la bolsa.
Saque el corral de juego y colóquelo verticalmente.
•
las lengüetas de Velcro®.
•
Coloque a un lado el panel de piso.
NO EMPUJE EL CENTRO HACIA ABAJO NI FIJE LAS BARRAS INFERIORES
ANTES DE FIJAR TODAS LAS BARRAS SUPERIORES.
Paso 2
•
Separe los cuatro postes esquineros.
•
Deje el centro en posición elevada, fije todas las barras superiores
y para ello sujete la barra superior por la parte amedia y tire de
la misma hacia arriba hasta escuchar un "chasquido ".
•
Repita el procedimiento en los 4 lados hasta que todas las barras
superiores queden rígidas.
Paso 3
•
Coloque el pie en la cavidad central exterior de la barra inferior
y empújela hacia abajo para fijarla.
•
Repita el procedimiento en los 4 lados hasta que el corral de
juego esté completamente extendido.
Paso 4
A. Para cubrir el colchón con una sábana de forro abra las 4 lengüetas de
Velcro®con el broche incluido en cada esquina del colchón.
®
a través de los ojales en las esquinas de
®
a través de los ojales correspondientes en
!
ADVERTENCIA
B. Pase las lengüetas de Velcro
la sábana y colóquelas en la parte inferior del corral de juego con las
lengüetas de Velcro®extendidas.
C. Pase las lengüetas de Velcro
el piso de las esquinas del corral de juego y engánchelas en el broche
de la parte exterior de la pata.
:
Al convertir la unidad a la configuración de corral de juego, retire los colgadores plásticos, el forro
y las barras de apoyo del piso. Baje el piso hasta el nivel más bajo. Coloque la barra desprendible en la posición más alta.
•
Siempre asegúrese de que todos los rieles, supe-riores e inferiores, estén firmemente enganchados en cualquier
configuración antes de colocar al niño o al bebé en la unidad.
•
NUNCA DEJE al bebé en el corral de juego cuando el corral tenga los LADOS ABAJO. El bebé podría rodar hacia el espacio
entre la colchoneta y la malla suelta y asfixiarse.
34
Page 35

Instructions cómo plegar su corral de juego:
Paso 1
LIFT UP ON LOWER HORIZONTAL BAR BEFORE ATTEMPTING
TO UNLOCK UPPER BAR!!
Coloque el pie debajo de la barra inferior y levante la barra hasta una
posición V invertida. Es necesario desenganchar completamente la barra
inferior para desenganchar la barra superior.
Paso 2
A. Con la barra inferior en posición V invertida, coloque los dedos sobre
la sección central de la barra superior, con los pulgares sobre los
botones marcados con "PRESS TO UNLOCK" (HAGA PRESIÓN PARA
DESENGANCHAR).
B. Haga presión en los botones a la vez que levanta la barra levemente para
liberar el bloqueo y empuje la barra hacia abajo para formar una "U".
Si la barra superior tiene forma de V, uno de los lados no está bloqueado.
C. Tire hacia arriba el centro del piso del corral de juego.
Paso 3
•
Junte la unidad .
•
No la fuerce.
Paso 4
•
Envuelva el
•
Pase la correa a través del bucle de correa en la esquina inferior.
•
Enganche las otras dos lengüetas de Velcro
Paso 5
•
Introduzca el corral de juego en la bolsa según se muestra y cierre
colchón
alrededor de su unidad.
®
.
••
la cremallera.
•
Guarde la sábana en un extremo de la unidad.
Paso 6
•
Asegúrese de que los asideros de acarreo pasen a través de la abertura
en la bolsa.
35
Page 36

Instrucciones Arm's Reach®CO-SLEEPER®Bassinet
colchón
el forro de tela
Corral de juego con un lado
abajo para el ensamblaje
como CO-SLEEPER
®
bassinet
los tubos de apoyo
36
Page 37

!
–
–
–
–
–
–
–
–
–
ADVERTENCIA:
El incumplimiento de estas advertencias e instrucciones puede resultar en
lesiones graves oincluso la muerte.
Lea todas las instrucciones antes de ensamblar o usar este producto.
Conversión de corral de juego a CO-SLEEPER®bassinet
PASO 1
¡LEVANTE LA BARRA HORIZONTAL INFERIOR
ANTES DE INTENTAR EL DESENGANCHE DE LA BARRA SUPERIOR!
Coloque el pie debajo de la barra inferior y levante la barra hasta una
posición V invertida. Es necesario desenganchar completamente la barra
inferior para desenganchar la barra superior.
PASO 2
A. Con la barra inferior en posición V invertida, coloque los dedos sobre
la sección central de la barra superior, con los pulgares sobre los botones
marcados con "PRESS TO UNLOCK" (HAGA PRESIÓN PARA DESENGANCHAR).
B. Haga presión en los botones a la vez que levanta la barra levemente para
liberar el bloqueo y empuje la barra hacia abajo para formar una "U".
C. Abra 2 lengüetas delanteras de Velcro
de nailon justo debajo de las esquinas plásticas (receptores)
®
a cada lado del panel lateral
D.
L
FIG. 1
FIG. 2
FIG. 4
ocalice las orejetas de sujeción dentro de ambas piezas esquineras
de plástico superiores y empújelas hacia el centro del corral de juego.
Ya se puede levantar el conector plástico hacia arriba y hacia afuera de
la ranura receptora. (Fig. 1)
E. Introduzca el conector en la ranura inferior y empújelo hacia abajo
hasta que el enganche de la orejeta se cierre. Repita el procedimiento
para el otro lado.
F. Tire hacia arriba en el centro
de la barra hasta que ésta
se enganche. (Fig. 2)
G. Enganche las barras
inferiores.
FIG. 3
PASO 3
Ensamble e instale los colgadores y las varillas de apoyo al piso según
se muestra en las figura 3.
Instale ambos colgadores y los tubos de apoyo en la extensión de colchón
según se muestra en las figura 4.
37
Page 38

FIG. 5
PASO 4
A. Extienda el revestimiento sobre el bastidor de la extensión de colchón
con la solapa larga sobre la barra inferior. (Fig. 5)
B. Tire de las esquinas para colocarlas sobre el bastidor y sujételas en su
lugar con los cierres de desconexión rápida.
FIG. 6
mÌnimo de 4 pulgadas
®
C. Sujete la sección colgante de tela a los 3 áreas de Velcro
encuentran en el panel inferior de Nilón del corral de juego. (Fig. 6)
!
ADVERTENCIA:
PELIGRO DE ASFIXIA / ENTRAAMPADO
que se
Este paso evita que el forro de tela se afloje dentro del área para dormir
en el lado frontal del colchón.
PELIGRODE ESTRANGULACIÓN /ASFIXIA:
o repisa de contacto debe estar a nivel con la superficie del colchón de los
adultos, o más abajo, cuando la unidad se use como CO-SLEEPER
El nivel del colchón del CO-SLEEPER®bassinet debe estar a un
4 pulgadas
por debajo del borde superior de la barra/ repisa de contacto.
38
El borde superior de la barra
®
bassinet.
mÌnimo de
Page 39

Instrucciones para colocar la colchoneta
!
ADVERTENCIA:
instrucciones podría resultar en lesiones graves o la muerte.
El incumplimiento de estas advertencias e
PELIGRO DE ASFIXIA -
Para ayudara prevenirel riesgo de asfixia y entrampado,
use solamente el colchón o colchoneta provistos por Arm's Reach
Concepts, Inc. Nunca use colchonetas ni colchones adicionales.
•
NO use las bolsas de emba-laje ni de otro tipo como forros del colchón
ya que ellas pueden causar asfixia.
•
NO USE la colchoneta en posición superior si no hay instalado un
forro de tela debajo del colchón.
PASO 5
Después de instalar el forro de tela, instale el piso del corral de juego como
colchón. Sujete el piso del corral de juego a las barras de apoyo metálicas
con tiras de Velcro
de Velcro
barra metálica de apoyo de regreso hacia arriba a través de otra ranura en
el forro de tela y fíjela al parche de Velcro
Repita la conexión en otras tres ubicaciones.
!
®
a través de una ranura en el forro de tela y pásela alrededor de la
ADVERTENCIA:
forro, y no debajo del forro.
las barras de apoyo sin antes instalar el forro.
®
a través de las ranuras en el forro de tela. Pase una tira
®
correspondiente en el colchón.
Asegúrese de colocar la colchoneta en el
Nunca coloque el colchón directamente sobre
El bebé puede caerse por la
abertura creada por la ausencia del forro.
•
Asegúrese de que todas las tiras de Velcro®estén fijas y ajustadas.
Inspeccione las tiras antes de cada uso.
39
Page 40

Instrucciones para fijar el CO-SLEEPER®bassinet a la cama de los adultos
Se instala a camas individuales, dobles,
Queen, King y California King para adultos.
PASO 6
Desenrolle las correas de nilón de la placa
de resistencia y coloque las correas a través
de la cama de los adultos para alinearla con el
centro de la posición deseada del
CO-SLEEPER
Las correas deben ahora estar colocadas
entre los colchones superior e inferior o base
de resortes.
Esto puede hacerse deslizando las correas
entre ambos colchones utilizando un movimiento de vaivén o "aserrado" y al mismo
tiempo tirando hacia abajo hasta que las
correas y la placa de resistencia estén en
la posición deseada.
Una correa debe salir a cada lado del
CO-SLEEPER
Pásela a través del "bucle de correa" que se
encuentra en la pata frontal del CO-SLEEPER
bassinet.
Luego debe conectarse a la hebilla hembra
en la pata posterior del CO-SLEEPER
bassinet.
Recoja el exceso de correa, apriete la
CO-SLEEPER
de adulto. Repita el procedimiento para el
otro lado.
Tome el exceso de correa, páselo de nuevo
por el “bucle de correa”y empújelo entre los
colchones de la cama de adulto.
®
bassinet de costado de cama.
®
bassinet.
®
bedside sleeper, contra la cama
mÌnimo de 4 pulgadas
la placa de resistencia
®
!
ADVERTENCIA:
PELIGRO DE ESTRANGULACIóN/ASFIXIA:
El borde superior de la barra o repisa de contacto debe estar a nivel con la
superficie del colchón de los adultos, o más abajo, cuando la unidad se use
como CO-SLEEPER
®
®
bassinet. El nivel del colchón del CO-SLEEPER
®
bassinet
debe estar a un mÌnimo de 4 pulgadas por debajo del borde superior de
la barra/repisa de contacto. NUNCA eleve el nivel del colchón del
CO-SLEEPER
®
bassinet hasta quedar a nivel o arriba del nivel de la barra
o repisa de contacto.
•
Nunca use el producto como CO-SLEEPER
®
bassinet sin la placa de anclaje
acoplada y fija según se muestra. El incumplimiento de usar este sistema
de anclaje podría resultar en lesiones graves o la muerte del bebé.
Asegúrese de que todas las correas estén fijas y ajustadas. Inspeccione las
correas antes de cada uso.
•
El incumplimiento de usar este sistema de seguridad permitirá que el
CO-SLEEPER
provocar que el bebé se caiga del CO-SLEEPER
desatendido al bebé en el CO-SLEEPER
®
bassinet se separe de la cama de los adultos, lo cual podría
®
bassinet.
®
bassinet. NUNCA deje
!
ADVERTENCIA:
PELIGRO DE ESTRANGULACIóN/ASFIXIA:
No deje el exceso de correa sobre el piso, a fin de evitar que alguien
pudiera tropezar con las correas.
•
No permita que el exceso de correa (ni ningún otro objeto suelto) se
acomoden sobre la extensión de colchón.
•
Asegúrese de que todas las tiras de Velcro® estén fijas y ajustadas cuando
se usa como mesa para cambio de pañales o CO-SLEEPER
® bassinet.
Ajústelas periódicamente.
•
Use solamente los forros ajustados fabricados por Arm's Reach Concepts Inc.
40
Page 41

Conversión a mesa para cambio de pañales
Sólo desconecte las correas de seguridad de la extensión de
colchón y coloque la unidad en el lugar deseado.
!
ADVERTENCIA:
Cuando no esté en uso el conjunto de la placa y la correa de sujeción,
guárdelo en un lugar seguro fuera del alcance de los niños.
•
Nunca deje desatendido al bebé en la mesa para cambio de pañales.
La mesa para cambio de pañales no debe usarse como cama.
Conversión a unidad independiente
PELIGRO DE ESTRANGULACI
óN:
!
ADVERTENCIA
:
El incumplimiento de estas advertencias
e instrucciones podría resultar en lesiones graves o la muerte.
!
ADVERTENCIA:
CO-SLEEPER
Comenzar con el CO-SLEEPER®bassinet completamente ensamblado
(con un costado abajo y el forro instalado)
PASO 1
A. Libere el Velcro
corral de juego.
Coloque la lengüeta delantera sobre el colchón Co-Sleeper para exponer
la barra frontal.
B. Abra las lengüetas de tela que cubren los receptores hembra superiores.
®
bassinet antes de comenzar la conversión.
®
en la lengüeta delantera inferior del forro del marco del
RIESGO DE CAIDA:
Retire el niño del
B
A
PASO 2
Para desenganchar la barra inferior, siga las instrucciones para el paso 1 y
el paso 2 en la página 37
41
Page 42

B
PASO 3
A
C
A. Instale la barra desmontable en los recibidores hembra a través de las
aberturas en el forro.
B. Tire hacia arriba la barra desmontable para engancharla en posición.
C. Enganche la barra inferior.
PASO 4
Tire el panel de tela frontal y páselo sobre la barra superior enganchada.
PASO 5
Localice las lengüetas de Velcro
lengüeta delantera inferior del forro. Pase la correa a través del bucle
de correa en el panel frontal y fíjelo a la lengüeta delantera. Repita el
procedimiento para el otro lado.
®
en el lado izquierdo y derecho de la
PASO 6
Tire hacia abajo el panel de tela y fíjelo a las tres lengüetas de Velcro
la baranda inferior de nilón del corral de juego.
!
ADVERTENCIA
:
RIESGO DE ASFIXIA:segúrese que el
®
en
faldón del forro esté bien ajustado para impedir que el forro de tela se
afloje dentro del área para dormir en el lado frontal del colchón, o se
desprenda hacia el área para dormir y cubra al niño.
PASO 7
Fije los faldones de tela para cerrar las esquinas
interiores en el forro de la unidad.
42
Page 43

Resolución de problemas ensamblaje del CO-SLEEPER®bassinet de Arm’s Reach
®
P.
“Tengo problemas para desenganchar la barra superior. Los botones son difíciles de sumir. ”
A. A. Localice el "hoyuelo" en el extremo de los resortes alargados, izquierdo y derecho, directamente
detrás de las palabras "Press to Release" ("presione para desenganchar") en la funda de nilón
que cubre la barra de bloqueo de acero tubular. (Ver A)
B. Suma cuidadosamente cada uno de los resortes a la vez que levanta y desciende el mecanismo
de cerrojo con un movimiento corto hacia arriba y hacia abajo. (Ver B) Al hacer esto, los
botones de cerrojo "encajarán" en los agujeros de alineamiento y se desenganchará la barra
superior para después doblarse hacia abajo. (Ver C)
C. Asegúrese de que ambas barras (izquierda y derecha) estén desenganchada. Si un lado es más
largo que el otro, entonces no estarán desenganchadas ambas barras y no podrá plegar
apropiadamente la unidad.
P.
“Tengo problemas para desenganchar la barra inferior. Una de las dos barras se desengancha cuando
levanto una de las barras bloqueadas pero la segunda parece estar agarrotada.”
A. A. Asegúrese de que todas las barras superiores estén completamente desenganchadas y plegadas
hacia abajo.
B. Desenganche todas las barras de bloqueo inferiores tirando de ellas hacia arriba. Desenganche
al menos una de las dos barras en cada uno de los cuatro lados.
C.
P. .
Ensamble el
sobre el piso.
D. Empuje cuidadosamente hacia abajo el CO-SLEEPER®bedside sleeper hasta que sienta que
la segunda barra se desenganche de su posición de bloqueo.
E. Repita este movimiento en los lados restantes hasta que pueda plegar la unidad de tal manera
que las cuatro esquinas plásticas estén en contacto entre sí para formar un cuadrado perfecto.
“No puedo desenganchar los colgadores de plástico de la barra superior del
sleeper. Están muy ajustados y no los puedo separar.”
CO-SLEEPER®bedside sleeper
según se muestra en el diagrama y colóquelo de costado
CO-SLEEPER
®
bedside
A.
Gírelos para desengancharlos de la barra superior en vez de tratar de tirar del colgado hacia arriba,
sujete la parte inferior (opuesta al extremo con gancho) y deslice el colgador a lo largo del lado de la
malla del
CO-SLEEPER®bedside sleeper
con un movimiento circular. Esto desprenderá el riel superior
con poco esfuerzo.
Si tiene alguna pregunta adicional o si necesita más ayuda llame al (800) 954-9353.
Instrucciones para la limpieza
Para limpiar las manchas en el CO-SLEEPER®bassinet de Arm’s Reach®use un paño húmedo.
Lavado de la sábana de forro y el revestimiento de su CO-SLEEPER
Lave a máquina con agua tibia y escúrralo para que seque.
NO USE LEJÍA.
43
®
bassinet de Arm’s Reach®:
Page 44

If you have any questions – call or write Arm’s Reach Concepts, Inc.
2081 N Oxnard Blvd., PMB#187, Oxnard, CA 93036-2964
(800 ) 954-9353 fax: 805-604-7982 w w w. ar m s r each.com
Hours: 9:00 A.M. - 4:00 P.M. Pacific Time
©2006 ARM’S REACH CONCEPTS INC. ARM'S REACH, CO-SLEEPER, Mother & Child Logo and all
other trademarks are strigently protected. All rights reserved. This product is covered by U.S. patent
5,845,349 ARC product 12/2003 8/06
©2006 ARM’S REACH CONCEPTS INC. ARM'S REACH, CO-SLEEPER, le logo de la mère avec l'enfant
et toutes les autres marques de commerce sont rigoureusement protégés. Tous les droits sont réservés.
Ce produit est protégé par le brevet américain 5,845,349 Produit ARC 12/2003 8/06
©2006 ARM’S REACH CONCEPTS INC. ARM'S REACH, CO-SLEEPER, el logotipo de la Madre e hijo
y todas las otras marcas comerciales están rigurosamente protegidos. Derechos reservados. Este
producto está cubierto por la patente de EE.UU. 5,845,349 producto ARC 12/2003 8/06
 Loading...