

Page 1

pottery barn kids
ARMOIRE CHANGING TABLE
!
WARNING:
FALL HAZARD
-
To prevent death or serious injury from
falls, always keep child within arm’s reach.
Read all instructions before use of the changing table. K
EEP
INSTRUCTIONS FOR FUTURE
USE
.Be
fore each use check the changing table for damage, loose parts, or sharp edges. D
O
NOT
use the changing table if it is damaged or broken.
Set up this table to be level, stable, and structurally sound.
This changing table may be used with or without a pad.
The only pad approved for use with it
is the Contour Changing Pad available for purchase from pottery barn kids.
This pad is
designed to be used in a space of at least 810 mm x 400 mm (32 inches x 16 inches).
If used,
place it within the
rail-bound
ed c
hanging area
of the changing
table
.NEVER LEAVE THE CHILD UNATTENDED and always use the restraining system.
This changing table is intended for us
e with children weighing up to
30
pounds.
PRE
-
ASSEMBLY:
Please read all instruction before beginning assembl
y.
The illustrations provided allow for easier assembly
when used in conjunction with the assembly instructions.
Remove all parts and hardware from box and lay out on a carpeted or scratch
-
free work
surface,
as t
his will
avoid damaging any parts during ass
embly. The shipping box provides and ideal work surface
.
Do not dispose
of any contents until assembly is completed to avoid accidentally discarding small parts or hardware.
For your safety and
ease, adult assembly
by t
wo people is recommended.
Save all p
acking materials until assembly is complete to avoid accidentally discarding smaller parts or
hardware.
Use the parts and hardware lists to identify and separate each of the pieces included prior to starting
assembly.
Note: Do not fully tighten all bolts
until all parts are in place. Failure to follow these instructions may cause the
bolts to misalign during assembly.
If using power tools to aid in assembly please use caution. Power tools can damage hardware or split wood.
Page 2
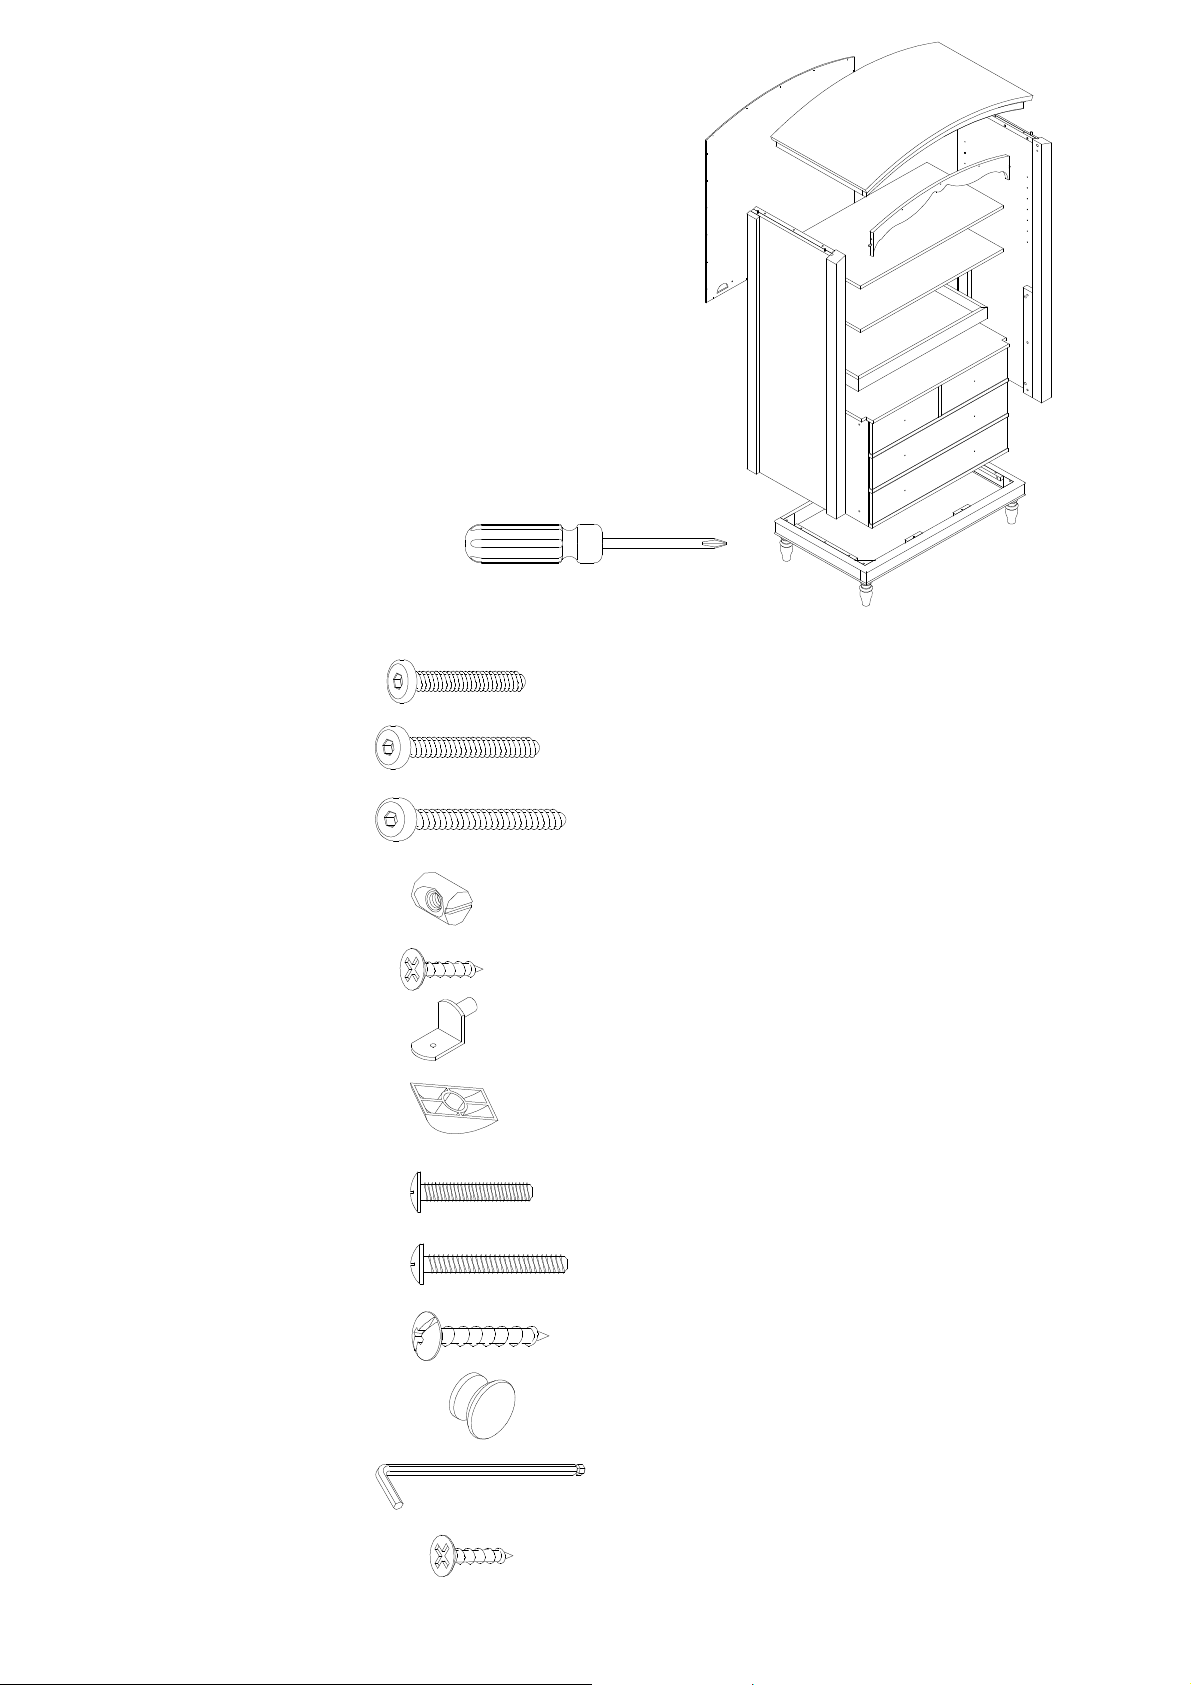
PARTS INCLUDED:
(A)Top-1pc(B)
Left panel
-1pc(C)Right panel
-1pc(D)Front rail
-1pc(E)Adjustable shel
ves-2pcs(F)Drawer Box
-1pc(G)B
ase-1pc(H)
Legs
-4pcs(I)
Topper
-1pc(K)Back panel
-
upper
-1pc
TOOLS
REQUIR
ED:
Phillips head
screwdriver (not included)
HARDWARE
ENCLOSED
:(L)1/4x32mmBolts
-8pcs(M)1/4x38mmBolts
-8pcs(N
) 1/4
x64mmBolts
–6pcs(O)Nuts
–6pcs(P)#3x20mm
Screws
–30
pcs(Q)Shelf support
s–8pcs(R)Curve washer
s–2pcs(S)#5x20
mm
Screw
s–2pcs(T)#5x3
2
mm Screw
s–6pcs
(X)
#8x30mm Screw
s–7
pcs(Y)Knobs
–6pcs(Z) 4mm Allen Key
–
1pc
(W) #3x15mm
Screws
–
8pc
s
ABCDEFGHI
K
Page 3
(U) Ø8x30mm Dowel
s–8pcs
ASSEMBLY
INSTRUCTIONS
:
1.
Insert do
wels(U)into left panel (B) and right panel (C)
.
(See Fig.1)
(Fig. 1)
2
.
Remove
all drawers from
theDrawer Box
(F).(See Fig.
2
)
(Fig.2)
FBC
U
Page 4

3.Lay the
Drawer Box (F)
down on the Left Panel (B
).A
lign the pre
-
drilled holes
ofDrawer Box (F) to
the pre
-
drilled holes
of
Left Panel (B)
and fasten using Bolts (L).
Tighten with
Allen Key (Z).Insert Front Rail (D) into the
pre-drilled holes
of
Left
Panel (B) and fasten using Bolts (M) with
Curve Wash
er (R).
Tighten with
Allen Key (Z).
(
See Fig.
3
)
(Fig.3)4. Place the Right Panel (C) onto the
Draw
er Box (F).
A
lign the pre
-
drilled holes
of
Right Panel (C)
to
the pre
-
drilled holes
of
Drawer Box (F) and fasten using Bolts (L).
Tighten with
Allen Key (Z).Insert Front Rail (D) into the
pre-drilled holes
of
Right Panel (C)
and fasten usin
g Bolts (M) with
Curve Washer (
R).
Tighten with
Allen Key (Z).
(See Fig.
4
)
(Fig.4)
FBDRMLCMRLF
Page 5

5
. Attach the Base (G)
to the bottom of
Drawer Box (F) and fasten using Bolts (M).
Tighten with
Allen Key (Z).
(
See Fig.
5
)
(Fig.5)6
. Attach the legs (H) to the Base (G).Fasten the wood blocks to the the Base (G) using Screws (X).
Tighten with
Phillips head
screwdriver.
(
See Fig.
6
)
(Fig.
6
)
GMX
H
Page 6

7.Attach Top (A)
to the
panels and fasten using Bolts (N) with Nuts (O).
Tighten with
Allen Key (Z).
(
See Fig.
7
)
(Fig.7)8.
Turn the armoire upright.
A
lign the pre
-
drilled holes
of
Top (A)
to
the pre
-
drilled holes
of
Front Rail (D) and fasten u
sing
Screws (X).
Tighten with Phillips head
screwdriver.
(
See Fig.
8
)
(
Fig.8)
ANO
X
Page 7
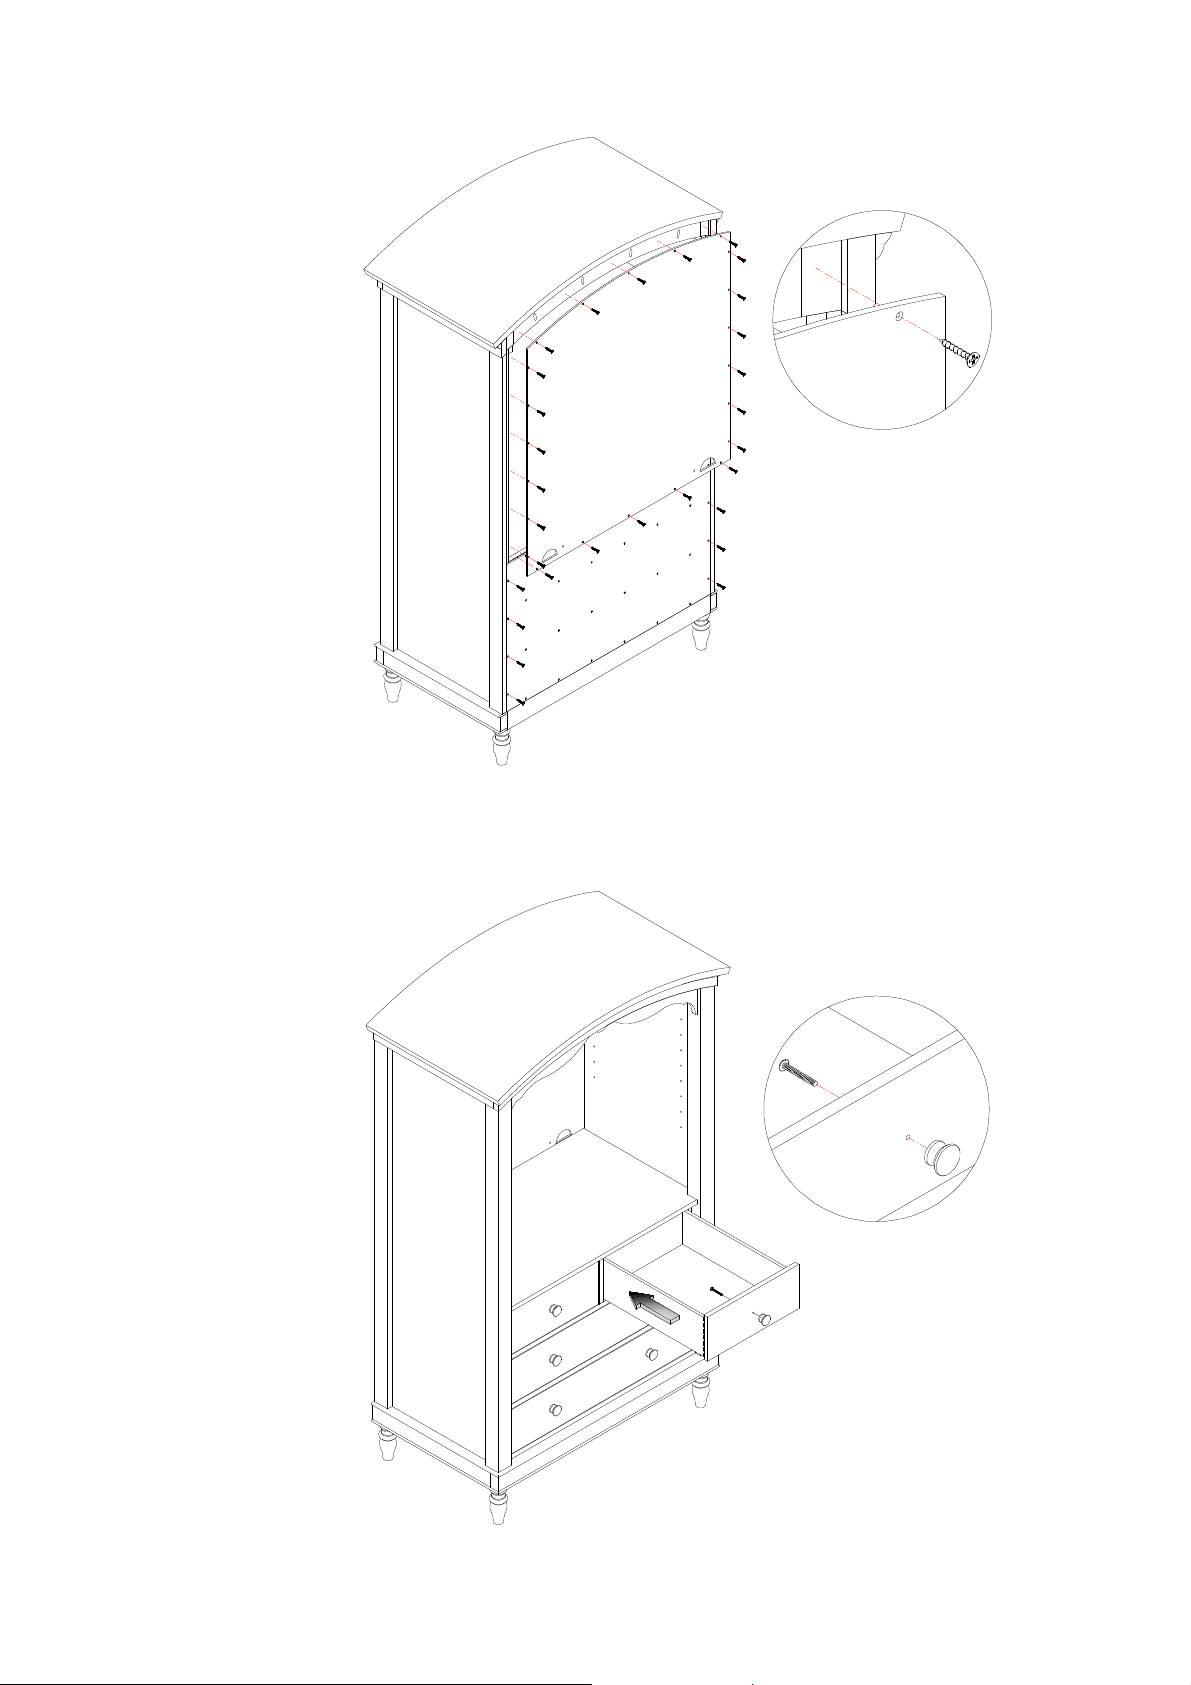
9
.
Fasten
B
ack
Panel
-
Upper (K)
to
the assembled parts
using Screws (
P
). Tighten with Phillips head
screwdriver.
(
See Fig.
9
)
(Fig.9)10.
Fasten Knobs (
Y
) to drawers using Screws (
T
). Tighten with Phillips head
screwdriver.
(
See Fig.
10
)
(
Fig.10)
PKT
Y
Page 8

11.
Insert
Shelf Supports (
Q
) into the pre
-
drilled holes
of the
side panels at the des
ired height.
Place the
Adjustable
Shel
ves(E
) onto the Shelf Supports (
Q
). Ensure
the Adjustable
Shel
ves(E)are
properly supported by all Shelf
Supports (
Q).
Note:
I
nstall only one shelf in the highest position while being used as a changing table
. Store t
he second shelf for
future
use when converting to an Armoire
.
(See Fig.1
1
)
(
Fig.11)12.Fasten the Scews(
W
) to the hole of
Adjustable
Shel
ves(E).
Tighten with Phillips head screwdriver
.(See Fig.1
2
)
(
Fig.12)13.
Page 9

Carefully place the Topper (
I
) on
Drawer Box ( F).
(
See Fig.1
3
)
(
Fig.13)1
4
. Align the pre
-
drilled holes of the Topper (
I
) to
the pre
-
drilled holes at the
B
ack
Panel
-Upper (K)
of the
a
rmoire
andfasten using
Screws(S).
Tighten with Phillips head screwdriver.
(
See Fig.1
4
)
(
Fig.14
)
S
I
Page 10

1
5
. If your floor is not perfectly even, the furniture may not sit level. Determine which corner does not touch the ground
correc
tly
With two
people follow these steps:
•
Carefully elevate the item slightly to provide access to the levelers attached to the bottom.
•
Turn the levelers in a counter
-
clockwise direction.
•
Gently set down the piece and check stability.
•
Repeat steps until the furn
iture sits firmly on the ground. (See Fig.
15)
(
Fig.15)CARE INSTRUCTIONS:
Dust often using a clean, soft, dry lint
-
free cloth.
Blot spills immediately, and wipe with a clean, damp, cloth.
We do not recommend the use of
chemical cleansers, abrasives, or furniture polish on our lacquered
finish.
T
hank you for your purchase
stores | catalog | www.potterybarnkids.
com
 Loading...