

Posturite WL9820099, 9820102WL User Manual
User Guide
POSTURITE
Penguin_User-Guide_0517_all-translations.indd 1 06/07/2017 15:30:21
posturite.co.uk/penguin
GB F D JP
Back
Back
H
E
F
J
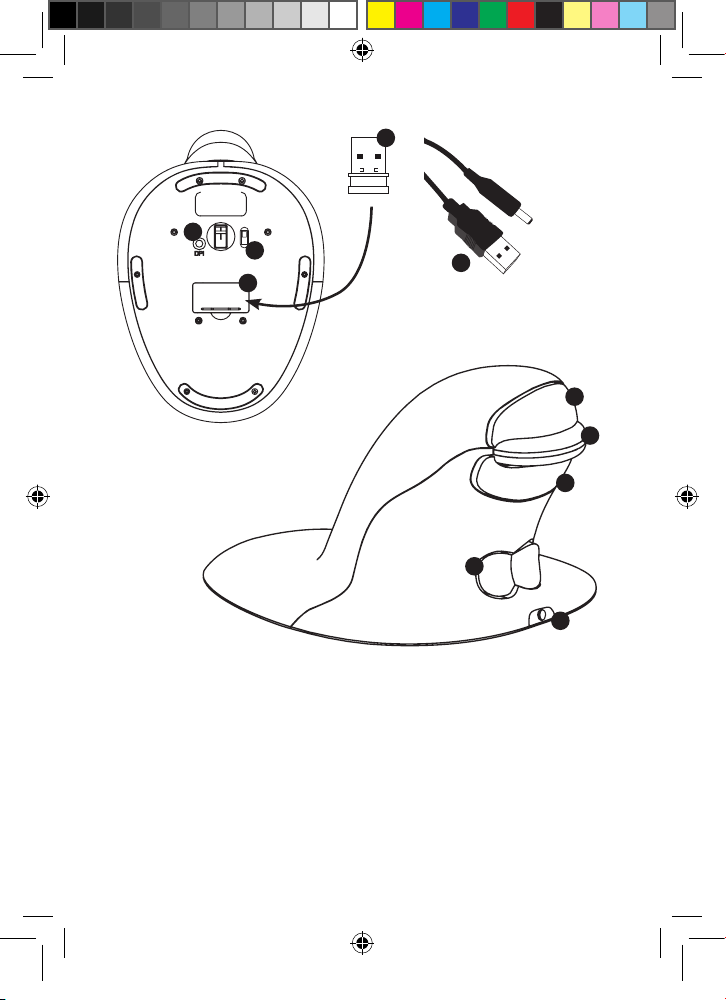
A. Left Click
B. Right Click
C. Scroll Wheel
D. Rocker Switch - ‘Bow Tie’
(L/R Hand Switch)
E. DPI Button
F. ON/OFF switch
(wireless only)
G
D
G. USB/DC Recharging Cable
(wireless only)
H. 1 x USB Micro Receiver
(wireless only)
I. Recharging DC Port
(wireless only)
J. Micro Receiver Dongle Housing
(wireless only)
A
C
B
I
Penguin_User-Guide_0517_all-translations.indd 2 06/07/2017 15:30:21

WIRED VERSION
1. Plug the USB cable into any spare USB port.
WIRELESS VERSION
2.4 GHz USB Micro Receiver
The micro receiver is located inside the housing on the underneath of the Penguin (J).
1. Remove the micro receiver and insert into a spare USB port of your computer or
laptop. Wait for a short time for your PC to recognise the penguin mouse.
2. Make sure the ON/OFF switch (F) on the base is in the ‘ON’ position.
On/off switch
For normal working conditions, make sure the ON/OFF switch (F) is turned to the
‘ON’ position. The ON/OFF switch is located on the base of the Penguin.
Note: It is advised to switch to the ‘OFF’ position if the Penguin is to be transported
as this will conserve power.
Auto power save
After approximately 20 seconds inactive - Penguin enters power save mode
After approximately 5 minutes - Penguin enters deep sleep mode
Inactive - click any button to reawaken
Rechargeable battery
The Wireless Penguin has an internal rechargeable battery. There may be a certain
amount of charge already in the battery.
To fully charge the battery, insert the USB end of the cable (G) into a spare USB port
of your computer and the DC end of the cable into the front of your mouse (I) see
diagram. Refer to the Charging Light Sequence section to indicate the battery level.
Rechargeable battery low power level indicator
Ice Blue light flashing Low battery (approximately 20% charge remaining)
Charging light sequence
When the charging cable is connected, a series of coloured lights in the illuminated
‘P’ logo will indicate different battery levels.
Penguin_User-Guide_0517_all-translations.indd 3 06/07/2017 15:30:21

Penguin in ACTIVE mode:
Orange light + flashing Ice Blue light Battery charging (below 20% charge)
Orange light + constant Ice Blue light Battery charging (above a 20% charge)
Ice Blue light only Battery fully charged
Penguin in INACTIVE mode:
Orange ‘P’ light Battery charging
Orange ‘P’ light turns off once fully charged.
BOTH VERSIONS
Plug & play
The Penguin Mouse uses Plug & Play technology. No additional software is
required.
Right & left handed use
The Penguin is set as a Right Handed mouse by default. To use with your left
hand, simply depress the raised section of the rocker switch - ‘Bow Tie’ (D) at
the front of the Penguin. This will adjust the direction of the scroll wheel.
Variable DPI [400-600-800-1200] - Pointer Speed
The default setting is 400 DPI. To adjust, press and release the DPI button (E)
on the base of the Penguin. The illuminated ‘P’ logo will ash to indicate the
DPI has been changed.
Penguin_User-Guide_0517_all-translations.indd 4 06/07/2017 15:30:21
DPI (pointer speed) Number of Flashes Speed
400 DPI 1 ‘P’ Flash Slow
600 DPI 2 ‘PP’ Flash Medium
800 DPI 3 ‘PPP’ Flash Fast
1200 DPI 4 ‘PPPP’ Flash Fastest

Precision scroll wheel with auto scroll
As well as a soft touch and feel Precision Scroll Wheel (C), the Penguin Mouse
has an Auto Scroll feature. To activate this, click the Scroll Wheel inwards or
downwards and the auto scroll is activated. Move the Penguin forwards or
backwards to start auto scrolling at the desired speed. Click the scroll wheel
again and the Auto Scroll is stopped.
TROUBLESHOOTING GUIDE
Penguin (wired version)
• Make sure your Penguin is rmly plugged into your computer’s USB port
• Try using a different USB port. If possible plug it directly into the computer
i.e. not through any monitors/keyboards/hubs etc.
• Although your Penguin is plug & play, make sure your computer is up to
date with the latest drivers/operating software for pointing devices
• Check that the sensor on the underside of the Penguin isn’t covered and
has a clear line of sight to the surface below. Also check that your Penguin
has not been dropped which could dislodge the laser.
• Try using the Penguin on a mouse mat / non-reective surface
• Close your computer down and reboot
Penguin (wireless version)
Note: USB is found inside compartment on Penguin base.
• Make sure that the Penguin is charged via the USB/DC charging cable.
• Make sure the ON/OFF switch on the underside of the base is in ‘ON’
position (rechargeable models only)
• Make sure your Penguin’s dongle (micro receiver) is rmly plugged in to
your computer’s USB port
• Try unplugging the Penguin dongle (micro receiver), then plugging it back
in again
Penguin_User-Guide_0517_all-translations.indd 5 06/07/2017 15:30:21

• Try holding the Penguin close to the sensor for 30 seconds whilst
intermittently clicking the top button – it sometimes takes this to get the
dongle to recognise the hardware
• Try using a different USB port to connect your Penguin. If possible plug it
directly into the computer, i.e. not through any monitors/keyboards/hubs
etc.
• Remove the USB Dongle and turn ‘OFF’ the Penguin switch. Reboot
your computer. Now re-insert USB dongle, wait 10/15 seconds and turn
Penguin switch back ‘ON’
• Although your Penguin is plug & play, make sure your computer is up to
date with the latest drivers / operating software for pointing devices
• Check that the sensor on the underside of the Penguin isn’t covered and
has a clear line of sight to the surface below. Also check that your Penguin
has not been dropped which could dislodge the laser
• Try using the Penguin on a mouse mat / unreective surface
• Make sure the charging cable is rmly attached into the USB port of your
computer and the DC end is rmly pushed into the front of the Penguin.
The ‘P’ Logo should light an orange colour. Recharge directly via a USB
port on your computer NOT via a multi-USB hub.
• Try your Penguin mouse on a different PC/laptop to check if the issue is
still present.
If you attempt all of the above suggestions and still there appears to be a
problem, please contact your supplier.
Penguin_User-Guide_0517_all-translations.indd 6 06/07/2017 15:30:21
IMPORTANT INFORMATION
Health
Long periods of time at your workstation without regular breaks may cause
discomfort. Should discomfort persist, see a qualied health professional.
User advice/Maintenance
Try to avoid contact with strong medicated hand creams/sanitisers whilst

using the Penguin mouse. Regularly remove dust and dirt build-up from the
underneath of your Penguin mouse to ensure a smooth glide movement.
Disclaimer
We make every effort to ensure that the information and procedure in this
guide is accurate and complete, no liability can be accepted for any errors or
omissions and we reserve the right to make any changes without further notice
herein.
Guarantee
The Penguin mouse is guaranteed for a period of 24 months from the date of
the purchase. This guarantee does not apply to misuse or normal wear and
tear.
ANTIMICROBIAL PROTECTION
Penguin_User-Guide_0517_all-translations.indd 7 06/07/2017 15:30:21
BioCote® - the antimicrobial brand you can trust.
Based on silver ions BioCote
®
is proven to offer antimicrobial protection for the
expected lifetime of the product.
®
keeps your Penguin Ambidextrous Vertical Mouse fresher and
BioCote
cleaner for longer, protecting against odour causing and staining microbes,
such as bacteria and mould.
®
has been proven to reduce bacteria/microbes on products by up to
BioCote
99.5% in two hours OR 99.99% in 24hrs.
®
tested in a laboratory, proven in real life, antimicrobial quality
BioCote
guaranteed.
®
protected products are quality control checked to the appropriate
BioCote
test standard.
Please Note
BioCote® technology does not protect users or others against disease causing
bacteria, germs, viruses or other harmful organisms. This technology is not a
substitute for good hygiene and/or cleaning practises.

Penguin_User-Guide_0517_all-translations.indd 8 06/07/2017 15:30:21
Mode d’emploi
POSTURITE
Penguin_User-Guide_0517_all-translations.indd 9 06/07/2017 15:30:21
posturite.co.uk/penguin
F
Back
Back
H
E
F
J
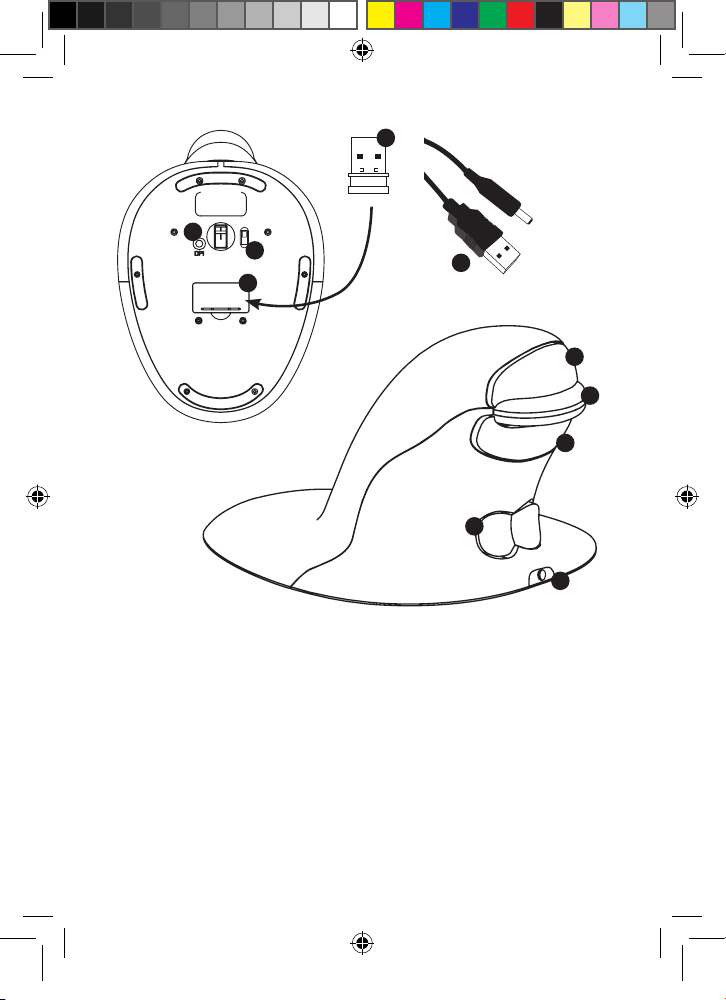
A. Bouton gauche
B. Bouton droit
C. Roulette de délement
D. Interrupteur de basculement -
« Nœud papillon » (Interrupteur
main gauche / droite)
E. Bouton DPI
F. Interrupteur ON / OFF (mise
en marche / arrêt)
(sans l uniquement)
G
D
G. Câble de recharge USB / DC
(sans l uniquement)
H. 1 x micro-récepteur USB
(sans l uniquement)
I. Port de recharge DC (sans l
uniquement)
J. Logement de la clé électronique
du micro-récepteur (sans l
uniquement)
A
C
B
I
Penguin_User-Guide_0517_all-translations.indd 10 06/07/2017 15:30:21

VERSION FILAIRE
1. Connectez le câble USB à l’un des ports USB libres.
VERSION SANS FIL
Micro-récepteur USB 2,4 GHz
Le micro-récepteur se trouve à l’intérieur du logement situé en dessous de la souris
Penguin (J).
1. Retirez le micro-récepteur et insérez-le dans l’un des ports USB de votre ordi-
nateur de bureau ou de votre ordinateur portable. Patientez quelques instants,
an de permettre à l’ordinateur de reconnaître la souris Penguin.
2. Veillez à ce que l’interrupteur ON / OFF (F), situé sur la base, soit en position
« ON » (En marche).
Bouton ON / OFF
Pour que le produit fonctionne normalement, veillez à ce que l’interrupteur ON / OFF
(F) situé sur la base soit en position « ON ». L’interrupteur ON / OFF se trouve sur la
base de la souris Penguin.
Remarque: il est conseillé de mettre l’interrupteur en position « OFF » (Arrêt) pour
transporter la souris Penguin, an d’économiser la batterie.
Mode automatique permettant d’économiser la batterie
Après environ 20 secondes d’inactivité, la souris Penguin activera le mode automatique permettant d’économiser la batterie
Après environ 5 minutes, la souris Penguin activera le mode sommeil profond
Inactif – Cliquez sur un bouton quelconque pour « réveiller » la souris
Batterie rechargeable
La souris Penguin sans l est équipée d’une batterie rechargeable. Il est possible que
la batterie soit déjà partiellement chargée.
Pour la charger entièrement, insérez l’extrémité USB du câble (G) dans un port USB
libre sur votre ordinateur et l’extrémité DC du câble dans le port situé à l’avant de
votre souris (I) (voir le schéma). Reportez-vous à la section Séquence d’illumination
indicatrice de charge pour en savoir plus sur l’indication du niveau de charge de la
batterie.
Penguin_User-Guide_0517_all-translations.indd 11 06/07/2017 15:30:21
 Loading...