


V6 User’s Manual
FCC Notice
This device complies with Part 15 of the FCC Rules. Operation is subject to the following two conditions: (1) this device
may not cause harmful interference, and (2) this device must accept any interference received, including interference that
may cause undesired operation.
This equipment may generate, use and/or radiate radio frequency energy. If not installed and used in full accordance with
this User’s Manual, interference to radio communications may occur. This equipment complies with the limits for a Class A
Information Technology Equipment pursuant to Part 15 of the FCC Rules, which are designed to provide reasonable
protection against such interference when operated in a commercial environment. Operation of this equipment in a
residential area may also cause interference. In such case the user, at his/her expense, will be required to correct the
interference using whatever means necessary.
Trademarks
POSTEK is a registered trademark by POSTEK Electronics Co., Ltd.
Microsoft, Windows are registered trademarks by Microsoft Corporation.
Copyright
© 2010 – 2015 by POSTEK Electronics Co., Ltd. All rights reserved. Under the copyright laws, this manual cannot be
reproduced in any form without the prior written permission of POSTEK. No patent liability is assumed with respect to th e
use of the information contained herein.
POSTEK V6 Portable Label Printer User’s Manual
5th edition February 2015
Disclaimer
This manual has been validated and reviewed for accuracy. The instructions and descriptions it contains are accurate for
POSTEK V6 Label Printer at the time of this manual’s printing. However, succeeding printers and manuals are subjected to
change without notice. POSTEK assumes no liability for damages incurred directly or indirectly from errors, omissions or
discrepancies between printers and this manual.
Although this manual describes and details many issues which could possibly occur, the manufacturer cannot warrant
against unpredictable conditions during the printing process. For problems such as the printer not working, printing content
lost or printing quality poor, etc., contact the manufacturer or an authorized service providers for appropriate corrective
measures (in complianc e with the POSTEK printer’s warranty). In no event shall the manufacturer or resellers involved be
liable for any damages whatsoever (including without limitation: damages for loss of business profits, business interruption,
loss of business information, or other pecuniary losses) arising from the use of, the results of use or inability to use this
product, even if the manufacturer has been advised of the possibility of such damages.
i

V6 User’s Manual
Important Safety Instructions
♦ Only qualified and trained authorized POSTEK service providers should attempt to disassemble or repair the printer.
Incorrect disassembling of the product or its power adaptor may cause an electronic short, human injury or printer
component damages.
♦ Do not place the printer or the battery on or near a heat source. Do not load, unload or recharge the battery near a heat
source. Do not heat the battery with any heating devise. Do not discard V6 or its battery into fire.
♦ If the printer or its battery is wet or broken, stop using it immediately and contact an authorized service provider.
♦ Handle a charged battery properly. Do not touch the battery’s electrodes with conductors such as keys, metal or jewelry,
as this can cause injury. Use only POSTEK provided batteries.
♦ In case of electrolyte leaks, do not rub eyes. If electrolyte contacts eyes, wash eyes immediately and thoroughly with
running water. Contact a doctor if needed.
♦ If electrolyte spills on skin or clothes, rinse thoroughly with water.
♦ To avoid getting an electric shock, do not use a worn or damaged power cord and avoid placing heavy objects on cord.
If the power cord becomes damaged or frayed, replace it immediately.
Warnings:
This is a Class A product. In a domestic environment this product may cause radio interference in which case the user may
be required to take adequate measures (see FCC Notice).
Static electricity that accumulates on the surface of the human body or other objects can damage the print head or electronic
components in the V6 printer. Observe proper electrostatic safety precautions when handling.
Power off the printer when not in use for extend periods.
ii

V6 User’s Manual
Table of Contents
Table of Contents
Preface ....................................................................................................................................................................................... 1
Chapter 1: Introduction ........................................................................................................................................................... 2
T echnical Specif icati ons ..................................................................................................................................................... 2
Printer Specifications .................................................................................................................................................. 2
Power Adapter Specifications ..................................................................................................................................... 3
Contents of Box .................................................................................................................................................................. 3
Packing List ................................................................................................................................................................ 3
Chapter 2: Setup and Use ........................................................................................................................................................ 5
Printer Setup ....................................................................................................................................................................... 5
Main Parts and Structures ........................................................................................................................................... 5
Connecting the Printer ........................................................................................................................................................ 8
Windows Driver and Label Software .................................................................................................................................. 8
Using the Battery ................................................................................................................................................................ 9
Installing the Battery ................................................................................................................................................... 9
Charging the Battery ................................................................................................................................................. 10
Installing the Ribbon ......................................................................................................................................................... 10
Installing a Media Roll ..................................................................................................................................................... 12
Reflective Media Sensor ................................................................................................................................................... 14
Media Sensor Calibration ................................................................................................................................................. 15
Chapter 3: Operations and Settings ...................................................................................................................................... 16
Keyboard........................................................................................................................................................................... 16
Keyboard Layout ...................................................................................................................................................... 16
Keyboard Functions .................................................................................................................................................. 17
LED Indicators .................................................................................................................................................................. 18
Basic Operations ............................................................................................................................................................... 19
Power On .................................................................................................................................................................. 19
Power Off .................................................................................................................................................................. 19
LCD Opening Screen ................................................................................................................................................ 19
Menu Settings ................................................................................................................................................................... 21
Menu and Sub Menu Descriptions ............................................................................................................................ 21
Self Test .................................................................................................................................................................... 23
Reset ......................................................................................................................................................................... 23
Detect Length ............................................................................................................................................................ 23
Adjusting Darkness ................................................................................................................................................... 24
Working with Bluetooth .................................................................................................................................................... 25
Chapter 4: Create , Downl o ad and Print La bel s ................................................................................................................... 30
Design Label ..................................................................................................................................................................... 30
Open a Stored Label.................................................................................................................................................. 30
Create a New Label Using the LCD Screen ............................................................................................................. 31
iii

V6 User’s Manual
Table of Contents
Input Methods ........................................................................................................................................................... 32
Downloading Label Forms ............................................................................................................................................... 33
Working with Fixed and Variable Input .................................................................................................................... 34
Form Index ................................................................................................................................................................ 36
Delete a Form ........................................................................................................................................................... 36
Function Key ............................................................................................................................................................ 37
Chapter 5: Maintenance ......................................................................................................................................................... 39
Cleaning the Printhead ...................................................................................................................................................... 39
Cleaning the Cutter ........................................................................................................................................................... 39
Cleaning the Platen Roller ................................................................................................................................................ 40
Cleaning the Printer Interior ............................................................................................................................................. 40
Cleaning the Media Sensor ............................................................................................................................................... 40
Chapter 6: Troubleshooting ................................................................................................................................................... 41
Error Indicators ................................................................................................................................................................. 41
Media Error Displayed .............................................................................................................................................. 41
Ribbon Error Displayed ............................................................................................................................................ 41
Miscellaneous ................................................................................................................................................................... 42
Vertical Blank Lines Appear ..................................................................................................................................... 42
Printer Timeout Error Message ................................................................................................................................. 42
Data Sent but Not Printing ........................................................................................................................................ 42
Poor Printing Quality ................................................................................................................................................ 43
Appendix 1: ASCII Table ....................................................................................................................................................... 44
iv

V6 User’s Manual
Preface
Preface
Your POSTEK V6 barcode label printer provides many outstanding features to enjoy. It is a versatile and portable printer
allowing for one-the-spot label creation or by downloading label forms previously created using label software with the
capacity to store hundreds of forms for easy retrieval. The V6 also has Bluetooth built in, providing an optimal solution for
managing off-site label printing applications. The printer supports both direct thermal and thermal transfer printing
methods, has many ease-of-use features, is lightweight, weighing only 1.2 kgs, and is powered by a long lasting Lithium ion
rechargeable battery.
This ma nual explains how to set up and begin using your POSTEK V6 printer. It also provides detailed information on
configuring your V6 printer, basic operations, maintenance and troubleshooting.
Please read this manual carefully and completely before using the POSTEK V6 printer.
1
V6 User’s Manual
Chapter 1: Introduction
Mode
V6
Width: 2.17″ (55 mm) max., 0.4″ (10 mm)
1D Barcode
Codebar, Interleave 2
of 5, UPC A/E
Chapter 1: Introduction
Technical Specifications
Printer Specifications
Printing method Direct Thermal and Thermal Transfer
Printing resolution 203 dpi (8 dots/mm)
Max printing width 1.89″ (48 mm)
Max printing length 39.37″ (1,000 mm)
Memory 8MB FLASH ROM, 8 MB SDRAM
Media
Label thickness (includes liner) 0.0023″ ~ 0.008″ (0.06 mm ~ 0.20 mm)
Ribbon
Media sensor Reflective
Bar Code types
LCD Display 4 line, 128*64 Graphical LCD
Interfaces USB 2.0, Bluetooth V2.0
Battery 7.4V 2200mAh Lithium ion rechargeable battery
Weight 2.64 lbs (1.2 kgs) including battery
Dimensions
Operation environment
Storage environment
Optional items* Manual Cutter, Hand Holding Strap
* Some optional items may require a minimum quantity purchase or factory installation.
OD: 3″ (76.2 mm) max., ID: 1″ (25.4 mm) min.
Max width: 2.0″ (51 mm); Max length: 82′ (25 m)
OD 1″ (25.4 mm) max., ID 0.05″ (12.7 mm)
Ink side: Out
s: Code 39, Code 93, Code 128/subset A, B, C,
2 and 5 add-on, EAN-13/8/128, UCC-128
2D Barcodes: MaxiCode, PDF417, Data Matrix, QR Code
W 5.12 x D 10.3 x H 4.02 inches
(W 130 x D 262 x H 102 mm)
Temperature: 32° F ~ +104° F
(0° C ~ 40° C)
Relative humidity: 5% - 85% non condensing
Temperature: 1 month: -4° F ~ +140° F (-20° C ~ +60° C)
3 months: -4° F ~ +113° F (-20° C ~ +45° C)
> 1 year: -4° F ~ +77° F (-20° C ~ +25° C)
Relative humidity: 5% ~ 85% non condensing
2

V6 User’s Manual
Chapter 1: Introduction
Output
DC 9V, 4.0 A
Power Adapter
1 pc
Lithium ion rechargeable battery
1 pc
Sample Media Roll
1 pc
V6 Quick Start Guide
1 pc
CD-ROM pack*
1 pc
Power Adapter Specifications
Input AC 100 ~ 240 V, 47 ~ 63 Hz
Environment
32° F ~ 104° F (0° C ~ 40° C)
Contents of Box
Inspect the shipping carton(s) for possible shipping damage, if damage is discovered, notify the shipping company to
report the nature and extent of the damage.
Please check the items according to the Packing List. If there are any items missing, notify your authorized reseller.
Packing List
V6 Printer 1 pc
USB interface cable 1 pc
Media Spindle 1 pc
Media Roll Guide 1 pc
Sample Ribbon 1 pc
Shoulder Strap 1 pc
Protective Carrying Case 1 pc
*Note: CD-ROM pack includes V6 printer driver, label software, User’s Manual and Programming Manual.
3
V6 User’s Manual
Chapter 1: Introduction
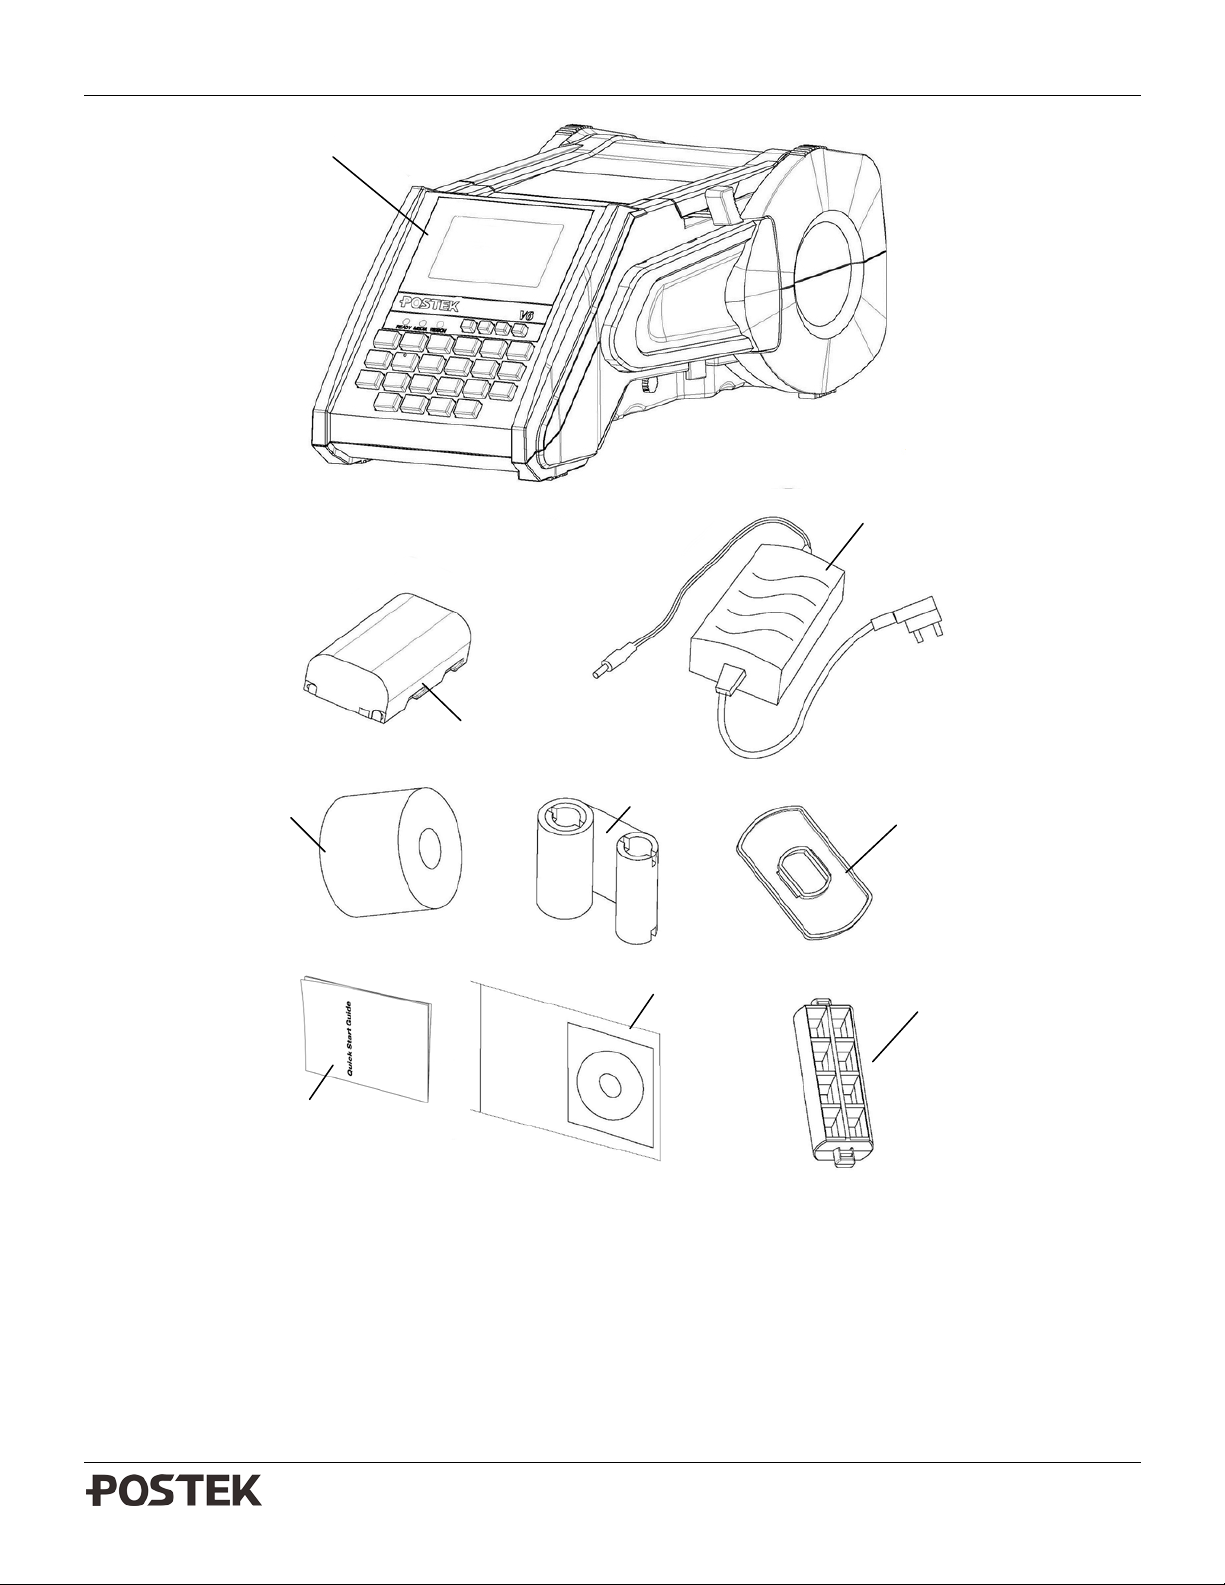
V6 Printer
Media Roll Guide
Power Adaptor
Sample Media
Ribbon
Media Spindle
Battery
Quick Start Guide
Note: Figure does not show USB interface cable, shoulder strap or protective carrying case.
Figure 1-1: Printer and Components
4
V6 User’s Manual
Chapter 2: Setup and Use
4
3 7 9
10
11
12
13
8
6
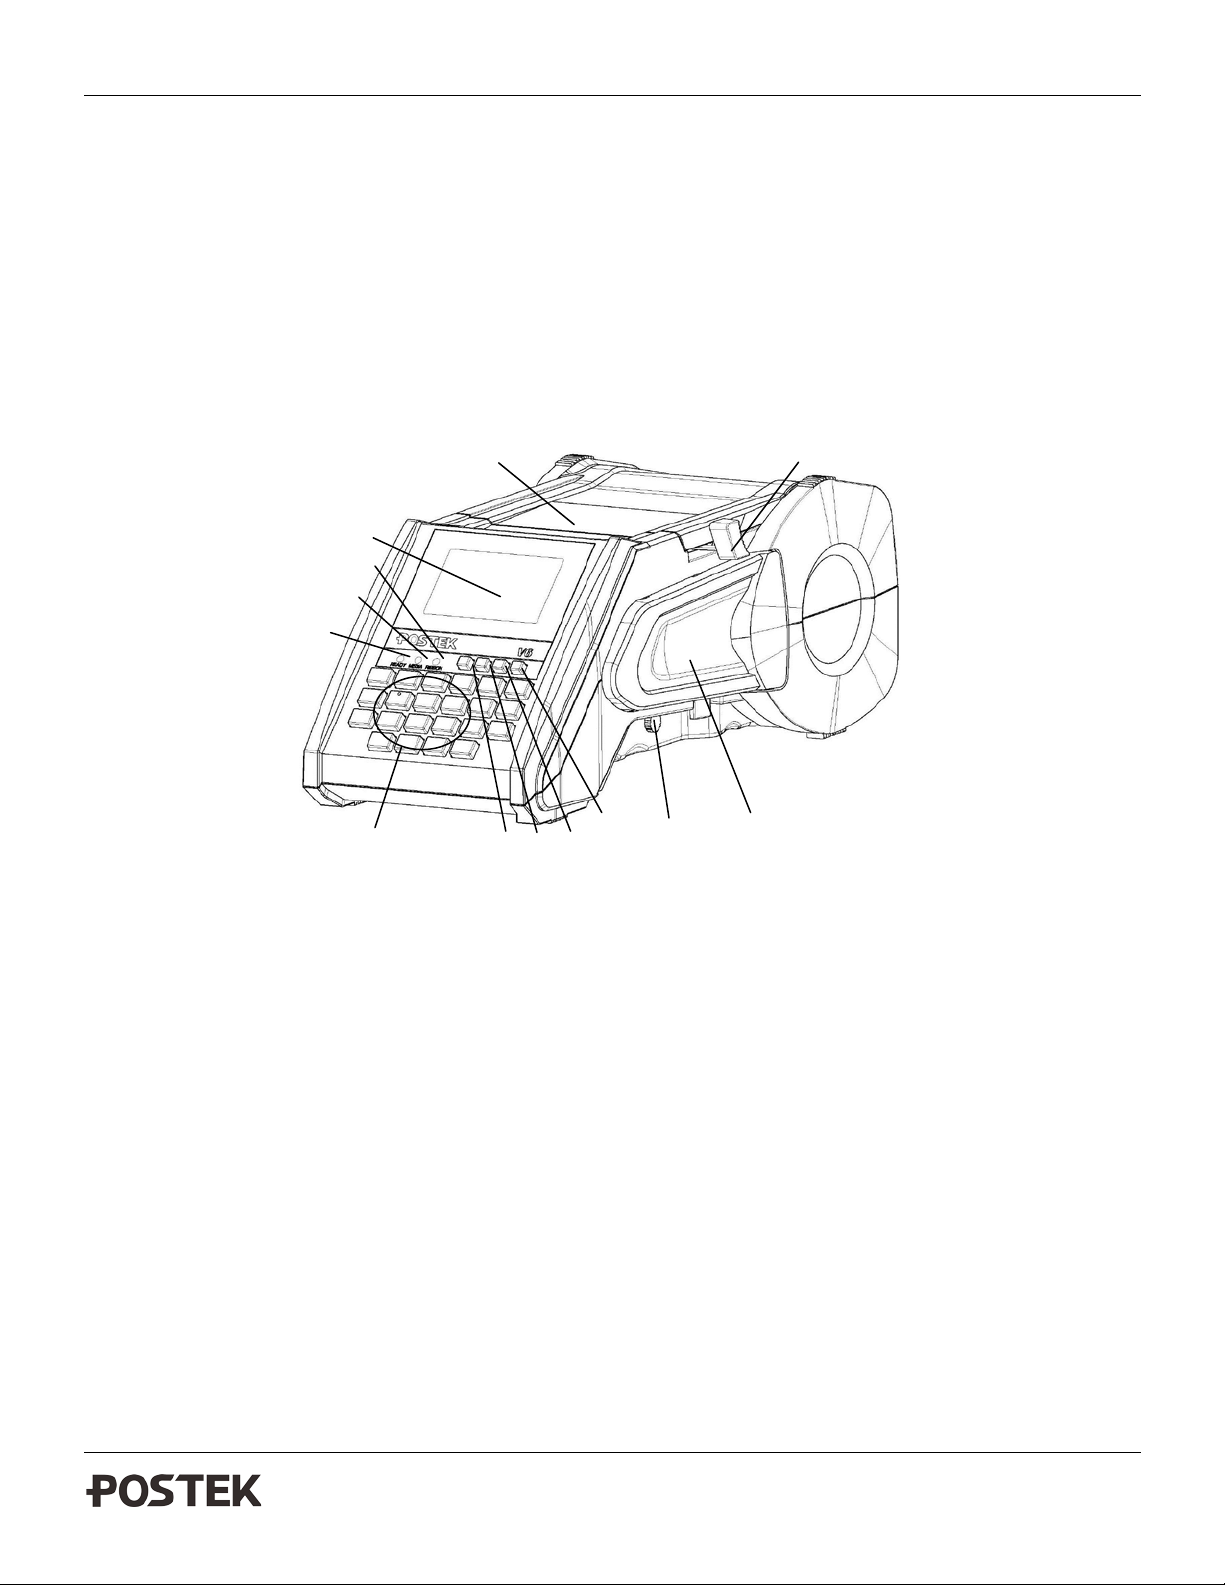
Chapter 2: Setup and Use
Printer Setup
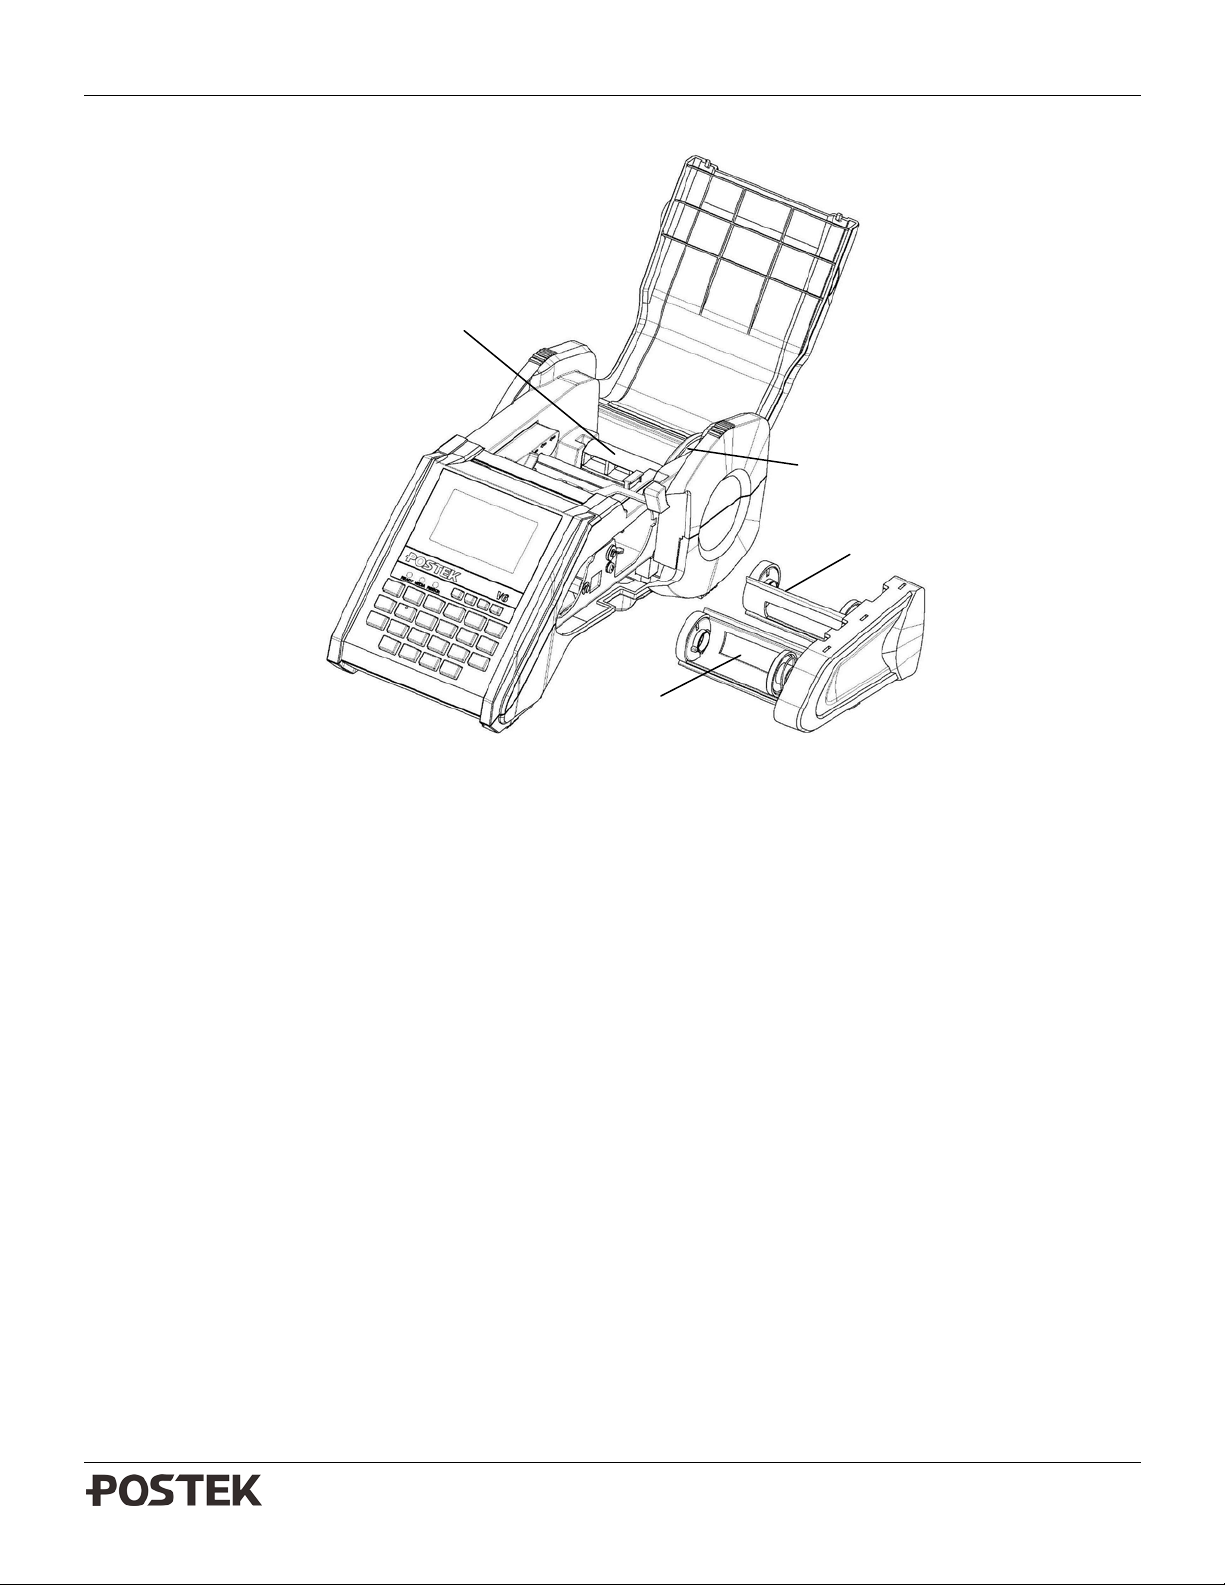
Main Parts and Structures
5
1
2
Figure 2-1
1. Status Indicator
2. Charge Indicator
3. DC Power Indicator
4. Keyboard
5. LCD Screen
6. Cover
7. Locking Lever
8. Cutter Handle (the Manual Cutter is an optional item)
9. Ribbon Cartridge
10. Power Switch
11. Feed Button
12. Pause Button
13. Cancel Button
5
V6 User’s Manual Chapter 2: Setup and Use
1 2 3
4
Figure 2-2
1. Media Spindle
2. Media Roll Guide
3. Ribbon Take-Up
4. Ribbon Supply
6
V6 User’s Manual Chapter 2: Setup and Use
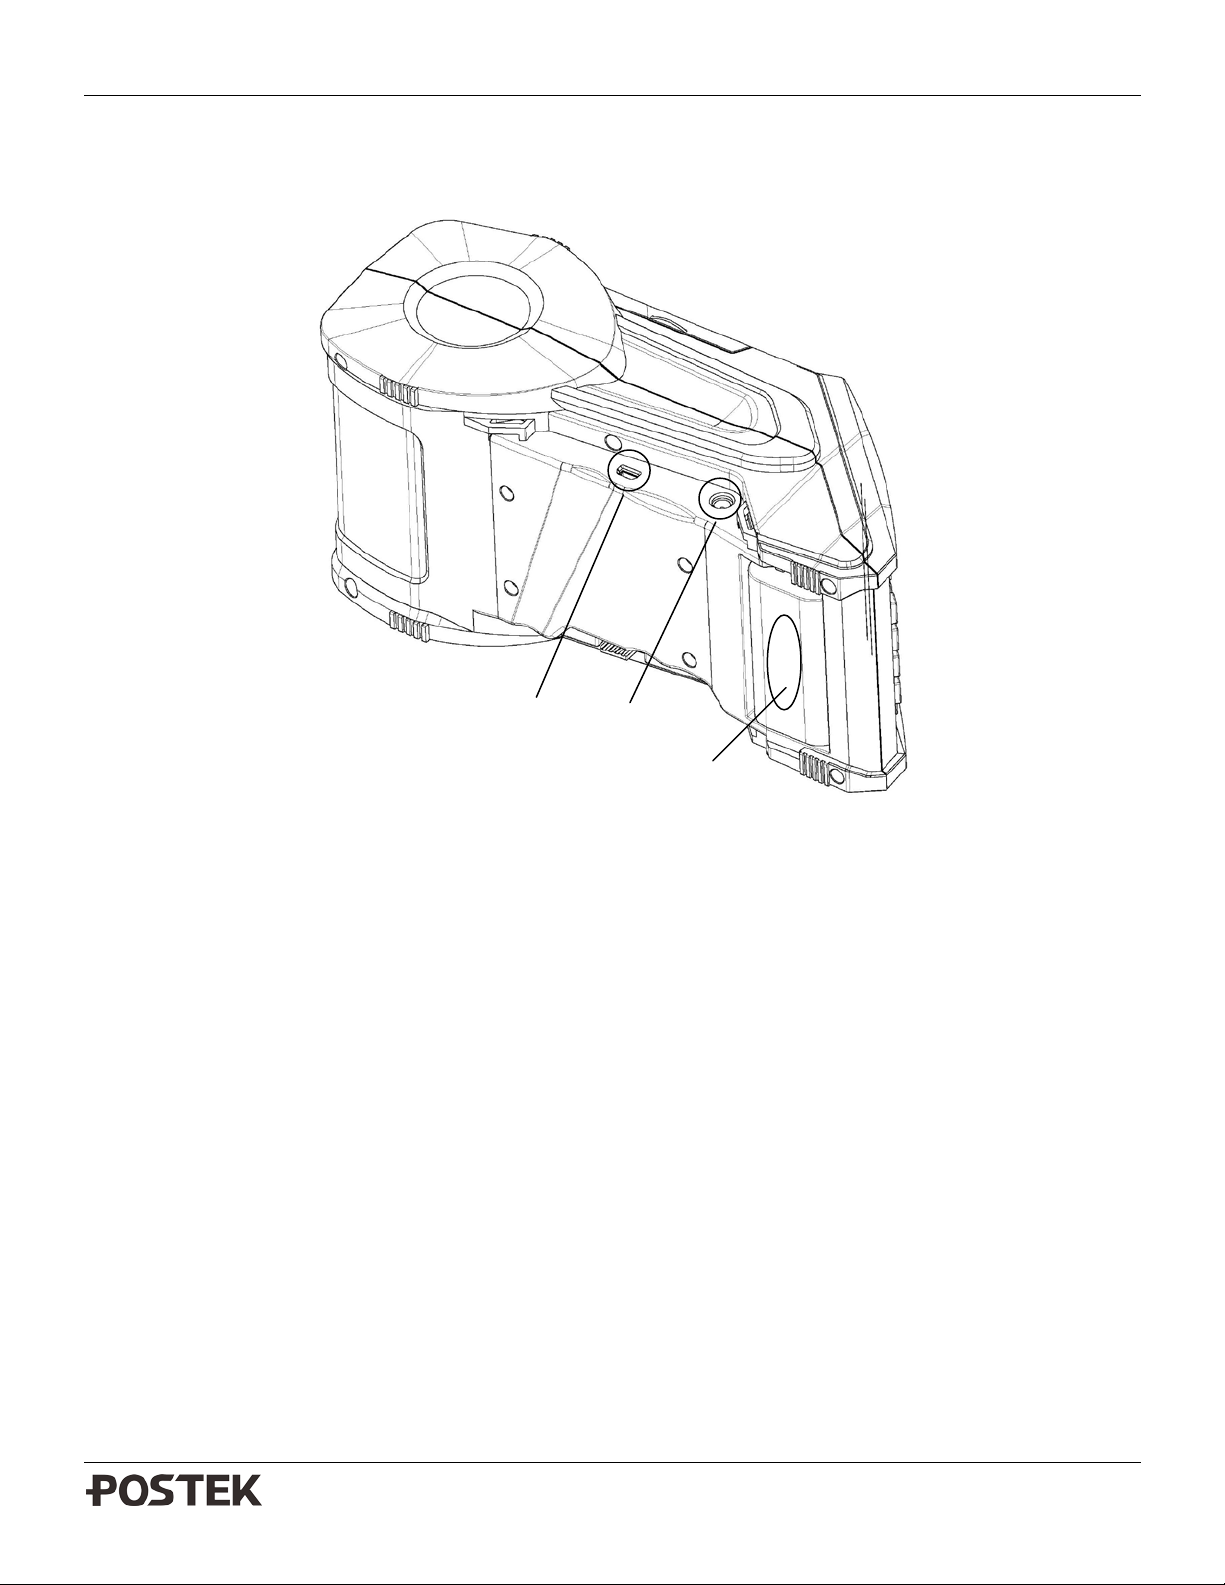
1
2
3
Figure 2-3
1. USB Interface
2. DC IN Port
3. Battery Pack
7

V6 User’s Manual Chapter 2: Setup and Use
Windows 7
Windows ME
Windows XP
Windows 2000
Windows NT
Windows 98
Connecting the Printer
Warnings:
(1) Using the wrong power adapter wil l cause damage to your printer. POSTEK assumes no liability for any damage in
such cases. The rating for the printer is 9VDC.
(2) Do not operate the printer or the battery near heat sources, liquids or corrosive chemicals.
1. Connect the power cord to the power adapter.
2. Connect the power adapter’s DC output plug to the DC IN port on the side of the printer.
3. Plug the power cord into a live wall outlet.
Interface Connection
♦ The V6 uses a USB interface to connect to a computer.
Note: When connecting the V6 to a computer via the USB cable, make sure to utilize the same USB port used
during the driver installation process, which enables the printer to retrieve needed commands or data from the
PC. If the same USB port is not available or not known, then in the driver open Printer Properties, click on the
Ports tab, and ensure the current port location is checked.
Windows Driver and Label Software
The V6 printer driver is packaged with the printer in the CD-ROM pack, and is compatible with the following operating
systems:
•
•
Windows V ista • Windows 2003
•
•
Drivers can also be downloaded from www.postektechnologies.com
Note: Before updating a driver, always first remove the old version(s) that may be loaded on your computer.
Each V6 printer comes with a powerful barcode label editing software which is on the CD-ROM supplied with the
printer.
•
•
•
• Windows 95
8
V6 User’s Manual Chapter 2: Setup and Use
Click
Using the Battery
Warnings:
(1) Be sure to read the Important Safety Instructions section in this manual before using the battery.
(2) Using a battery other than the one supplied with the V6 may cause fire, explosion, leakage or other dangers. Using
an improper or damaged battery may cause fire, explosion or other dangers.
(3) Follow local regulations for proper disposal or recycling of the battery.
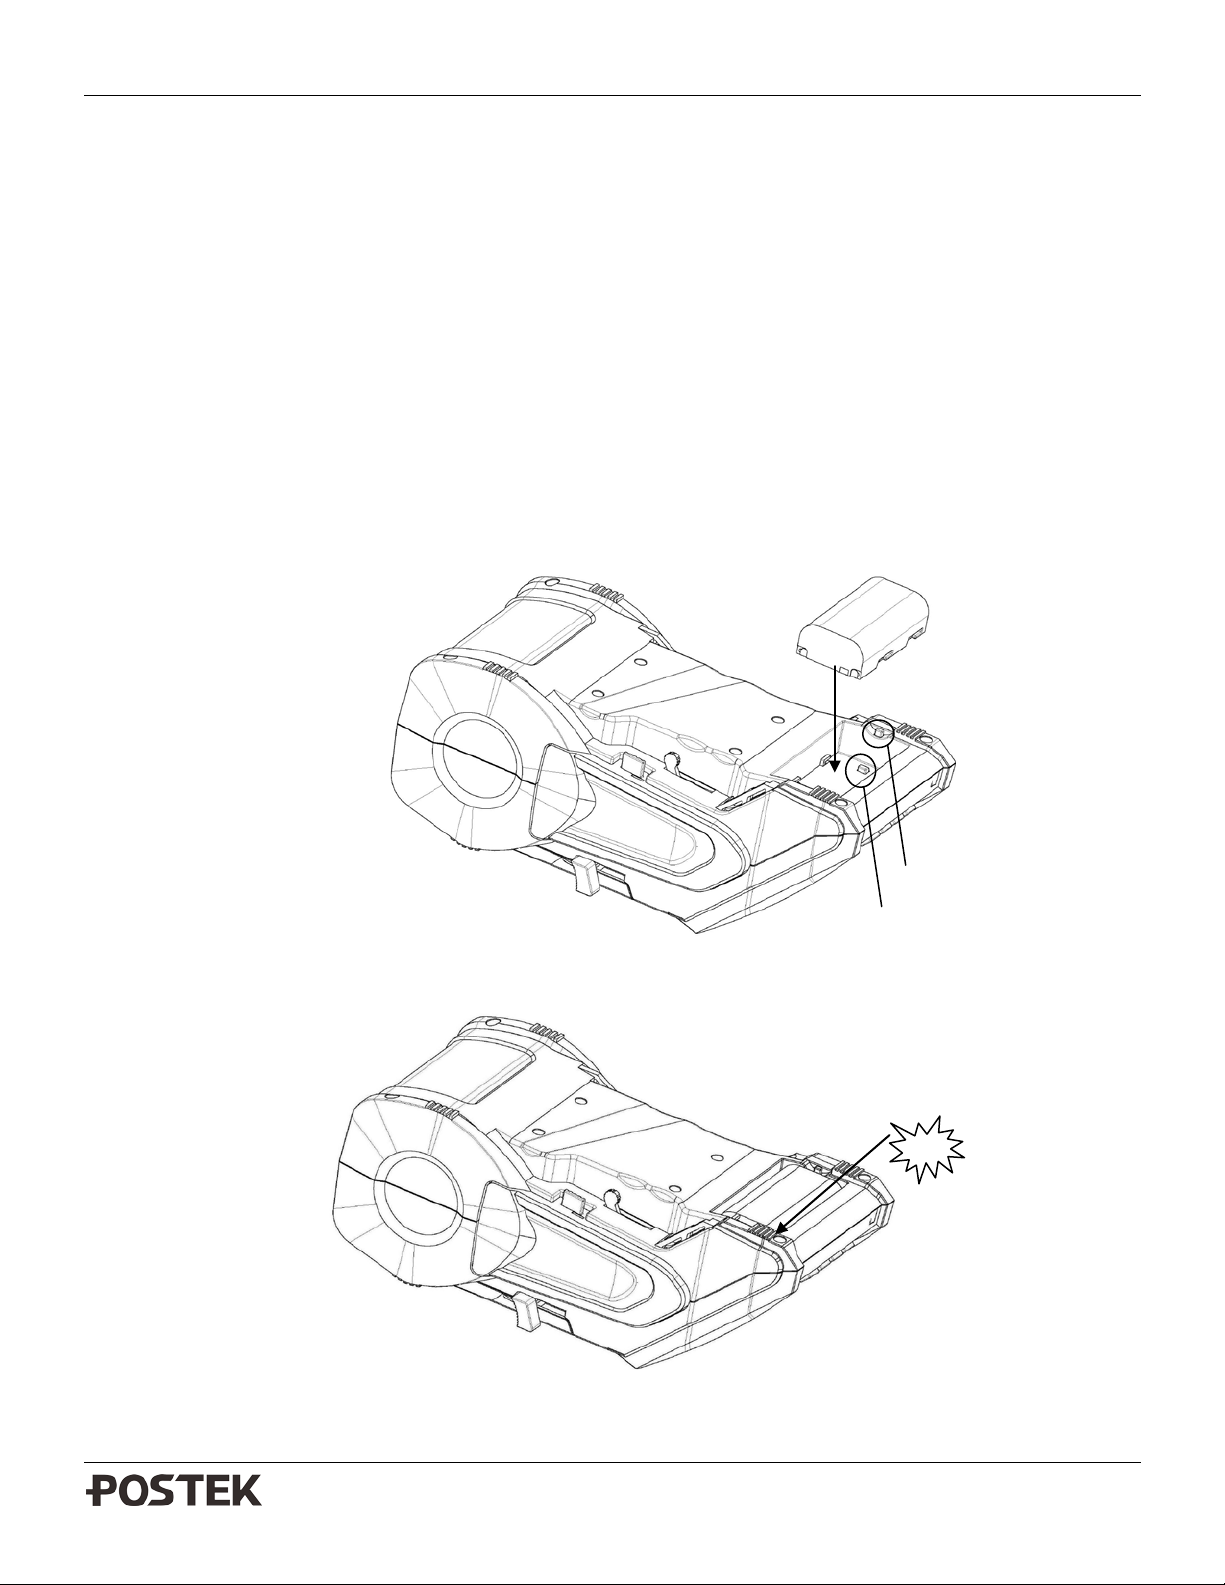
Installing the Battery
1. Place the battery into the V6 as shown (Figure 2-4)
2. Firmly slide the battery to the left until you hear a click (Figure 2-5)
Figure 2-4
Figure 2-5
Battery Release Lever
Battery Lock Lever
9
V6 User’s Manual Chapter 2: Setup and Use
Charging the Battery
Note: The battery is shipped uncharged. Before use, charge the battery for a minimum of eight hours.
Insert the battery into the V6 and charge by connecting the V6 to a power supply using the Power Adaptor. The V 6
power switch can be on or off while the battery charges.
Installing the Ribbon
Warnings:
(1) The V6 supports ribbons with ink on the outside only.
(2) Always install a ribbon with the ink side facing outwards. The ink side of the ribbon must face the media and NOT
the Printhead.
1. Push the Locking Lever, located on the bottom right side of the printer, to the unlocked position.
2. Remove the Ribbon Cartridge from the printer by sliding it out (Figure 2-6).
3. Unpack and load the ribbon roll onto the ribbon supply side, making sure to align the Guide Wheel Ridge with the
grooves in the ribbon core (Figure 2-7).
4. Load the leading edge of the ribbon to the ribbon core in the ribbon take-up area.
5. Turn the Guide Wheel on the left side of the core to smooth out the ribbon (Figure 2-8).
6. Insert the loaded ribbon cartridge into the printer.
7. Push the Locking Lever to the locked position to close the Printhead and lock the ribbon cartridge in place.
Figure 2-6
10

V6 User’s Manual Chapter 2: Setup and Use
Ribbon Core Grooves
Pressure Plate
Guide Wheel
Guide Wheel Ridge
Figure 2-7
Turn the Guide Wheel to tighten the ribbon.
Figure 2-8
11

V6 User’s Manual Chapter 2: Setup and Use
Installing a Media Roll
Warnings:
(1) Labels may be wound inward or outward. Regardless of how labels are wound, always load the media roll with
labels facing down.
(2) Don’t forget to perform a Media Calibration after loading media.
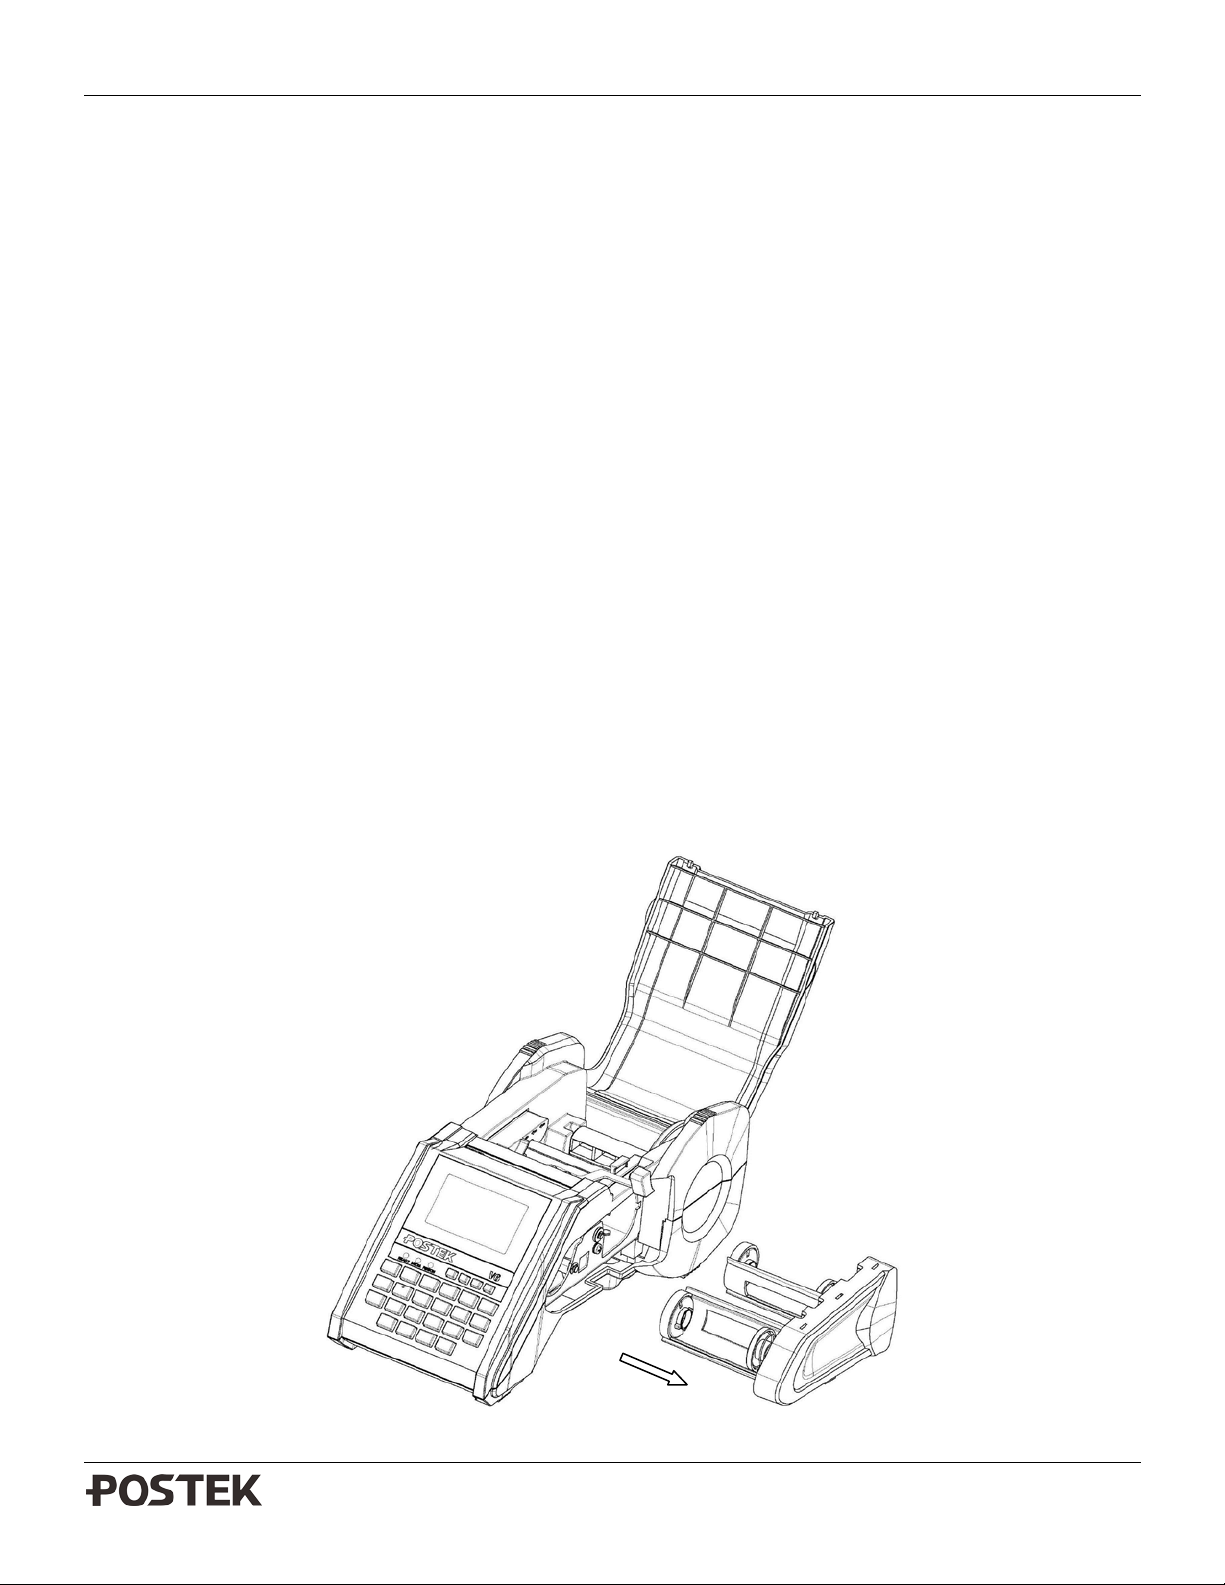
1. With the printer turned off and the Locking Lever in the Locked position, open the printer’s top cover (Figure 2-9)
to remove the Media Spindle and Media Roll Guide (Figure 2-10) from the media compartment.
2. Load a Media Roll, with labels facing down, onto the Media Spindle.
3. Slide the Media Roll Guide onto the Media Spindle from the right side with its smooth surface facing towards the
media (Figure 2-11).
4. Insert the complete unit back into the media compartment.
5. Lead the media above and over the two supporting rods, following the path shown by the small arrows on the side
wall (Figure 2-12); push the labels inward as far as possible.
6. Slide the Media Guide to the outside of the media.
7. Power on the printer and press Feed to feed the media and ensure proper tracking.
8. Always perform a media calibration after each new roll of labels has been installed. (See
Calibration).
Media Sensor
Figure 2-9
12

V6 User’s Manual Chapter 2: Setup and Use
Media Spindle
Load media according to path indicated
by small arrows on side wall
Media Roll
Figure 2-10
Figure 2-11
Media Roll Guide
Figure 2-12
13

V6 User’s Manual Chapter 2: Setup and Use
Figure 2-13
Reflective Media Sensor
The V6 employs a non-adjustable Reflective media sensor positioned on the left side of the unit. The media sensor will
automatically detect the media’s gaps, black marks or notches after a successful media calibration (see
Calibration).
If utilizing custom ordered labels with black marks for notches, ensure they are positioned on the left side of the media,
and that black marks or notches are no less than 3 millimeters from the edge of the media.
Media Sensor
14

V6 User’s Manual Chapter 2: Setup and Use
Media Sensor Calibration
A Media Sensor Calibration is necessary after each new roll of media has been loaded.
1. After loading media, turn the printer on and press
“SYSTEM MODE” release the
2. Press
calibration is complete
Notes:
(1) For fast calibration, under the opening screen, press the
(2) If label length is greater than 100 mm, set the DETECT LENGTH option from the Setup menu. (See
Length).
, the V6 printer will feed several labels. The “STATUS” indicator will stop blinking; the media sensor
button
, hold for 4 seconds, when the LCD screen displays
key, and then press the key.
Detect
15

V6 User’s Manual Chapter 4: Create, Download and Print Labels
Chapter 3: Operations and Settings
The front panel of the V6 printer comprises the following parts:
♦ Keyboard
♦ 3 LED indicators:
- DC_POWER indicator
- CHARGE indicator
- STATUS indicator
♦ Graphical LCD Screen.
Keyboard
Keyboard Layout
Figure 3-1
16

V6 User’s Manual Chapter 4: Create, Download and Print Label s
Keyboard Functions
Become familiar with the V6 keyboard functions:
Power button
Advances to the next label
Pauses current printing job
Cancels current printing job
Exits and reverts back to the previous menu
Increases the value
Decreases the value
Jumps to the previous item
Jumps to the next item
Enters / Confirms
Deletes a character or a label form
Inputs a character (see Input Methods
Toggles through input methods
Prints a label
Saves the currently displayed form
).
Activates the secondary functions on the other keys
17

V6 User’s Manual Chapter 4: Create, Download and Print Label s
2.
4.
2.
4.
2.
LED Indicators
DC_POWER: This indicator is on when the printer is powered by an external DC power adaptor.
CHARGE: This indicator is on when battery charging is in process. When charging is complete, it turns off.
STATUS: Green indicates that the printer is in working order and red indicates that an error has occurred.
Indicator descriptions:
: Off : Green light : Red light : Green light blinking
Power When indicators display: State of printer is:
Power off
Start/Shutdown
1.
Error
Battery use only
Connected via the DV 9V Power Adaptor,
with or without a fully charged loaded battery.
1. In working order
Transferring data
1.
Pauses
2.
Configuring s yst e m
3.
Setting
Powered off
Start/Shutdown
1.
Error
1. In working order
Transferring data
1.
Pauses
2.
Configuring s yst e m
3.
Setting
Power off
Connected via the DV 9V Power Adaptor
while the battery is charging.
18
Start/Shutdown
1.
Error
1. In working order

V6 User’s Manual Chapter 4: Create, Download and Print Label s
4.
1 2 3 4 5
6
Transferring data
1.
Pauses
2.
Configuring s yst e m
3.
Setting
Basic Operations
The basic operations of the V6 printer follow.
Power On
Press and hold the power button for 1 second before releasing. The red STATUS indicator and backlight will light
up. Wait until STATUS turns green and the opening screen appears; the printer is ready.
Power Off
With the printer turned on, press and hold the power button , the STATUS indicator will turn red, then release the
power button to power off the printer.
LCD Opening Screen
The opening screen of the LCD display will be the starting point for desired tasks. Follow the descriptions below for
an overview of what each display means.
Figure 3-2
Descriptions:
The printer is in Ready mode.
1.
2.
Press
to open or create a label.
19

V6 User’s Manual Chapter 4: Create, Download and Print Label s
3.
4.
Press
Press
to select a label form which has previously been downloaded into the printer.
to enter the setup menu to set up menu options (See Menu and Sub Menu Descri pti ons).
20

V6 User’s Manual Chapter 4: Create, Download and Print Label s
Real time clock display
5.
Battery condition icons or power icon:
6.
When in battery use, the battery icon changes as the battery charge depletes:
When operating with the power adapter, the icon changes to:
Menu Settings
To set up the printer, turn the printer on and from the opening screen, press for Setup. To easily operate the
menu, use the following keys:
:Jump to the previous option
:Jump to the next option
:Enter/Select
:Exits and reverts back to the previous menu
:Increases the current value displayed
:Decreases the current value displayed
Menu and Sub Menu Descriptions
MAIN
MENU
COMMON
SET
SUB MENU DESCRIPTION
PRINT MODE Options: "DIRECT THERMAL” or "THERMAL TRA NSFER";
Default setting: THERMAL TRANSFER
TEAR OFF Options: ENABLE, DISABLE;
Default setting: DISABLE.
CUTTER Options: ENABLE, DISABLE;
Default setting: DISABLE.
When set at 0, printer will accept the default setting or command setting,
21

V6 User’s Manual Chapter 4: Create, Download and Print Label s
RETURN
Return to main menu.
existing value or
CUTTING
Default setting: +00.
Sets LCD to Chinese language.
ENGLISH
Sets LCD to English language. Default: English
Select the stored graphic, and press Enter to delete the one with the name
currently displayed.
screen backlight distinguishes.
RETURN
Return to main menu.
PRINT
A Self T est will be printed.
RETURN
Return to main menu.
Adjust the media sensor calibration to accommodate labels longer than
Options: 100mm, 200mm, 300mm, 400mm, 500mm.
RETURN
Return to main menu.
EXIT
Exit
DARKNESS if not set at ‘0’, printer will not accept the default setting or command
setting.
Default setting: 10.
OFFSET
SET
TEAR OFF Set value. Default setting: +00
POSITION’G An abbreviation for Positioning, this shows the pixel value. The set pixel
value is 0.125 mm. Increasing the value adds to the
command value. Default setting: +00.
RETURN Return to main menu.
LANGUAGE
中文
RETURN Return to the main menu.
CLEAR SET CHANGES Clears only those settings accomplished through the front panel.
VIEW To view label names that contain graphics.
GRAPHICS
DEL 1 by 1
DEL AL L Delete all the graphics stored.
RETURN Return to main menu
DISPLAY
SET
SET DATE Set system date.
SET TIME Set system time.
DATEFORMAT Specifies date format.
TIMEFORMAT Specifies time format.
LCD DELAY Sets the amount of time from no keyboard activity to when the LCD
PW DELAY Sets the amount of time from no printer activity to when the printer is
power off.
CONTRAST Adjust LCD brightness. Range from 0 – 99.
SELF TEST
RESET RESET Reset the printer to the factory default settings.
CANCEL Cancels the reset operation.
DETECT
LENGTH
LENGTH
100mm.
Default: 100mm.
Following are a few examples of options that can be performed under Setup.
22

V6 User’s Manual Chapter 4: Create, Download and Print Label s
Self Test
1. Press under the opening screen to enter the setup menu.
2. Toggle through the menu using the
3. Enter the
indicator will stop blinking and remain lit. The printer is back to a normal state
The following information will be printed on the self-test report:
- Hardware configuration and status
- Firmware version
- Label parameters
- Font list
enter key again to select PRINT, the printer will print out a configuration report. The STATUS
key and select the option SELF TEST using the enter key.
Reset
1. Press under the opening screen to enter the setup menu.
2. Toggle through the menu using the
key and select the option RESET using the enter key.
3. Press
4. The printer will be reset to the factory default settings
5. Power off printer after a RESET.
Note: The printed label count and printed length may not be reset.
to confirm
Detect Length
The default media detecting length is 100 mm. To set the detection for labels longer than 100 mm, use the minimum
value available exceeding the media length. For example, to calibrate a 230 mm label length, set the de tect length to
300 mm.
23

V6 User’s Manual Chapter 4: Create, Download and Print Label s
Adjusting Darkness
When the V6 has a fully charged battery or is connected by the power adaptor, the printer will obtain optimal darkness
when set to 10.
When using the battery, as t he battery’s charge empties, print output may become lighter due to power consumption. To
adjust the printing darkness to obtain a better printing effect, increase the darkness value in the setup menu.
Press
1.
Select the option COMMON SET using the
2.
Toggle through the menu using the
3.
Use the key to increase the darkness value. Use the key to decrease the darkness value. The value
4.
range is from 0 to 20.
Press the enter key to select the desired value.
5.
Press
6.
under the opening screen to enter the setup menu.
enter key.
key and select the option DARKNESS using the enter key.
to save changes.
24

V6 User’s Manual Chapter 4: Create, Download and Print Label s
Working with Bluetooth
Note: Bluetooth is a standard feature in the V6; however, some models manufactured prior to Dec. 2012 may not
include this feature.
Bluetooth is built into the V6 to accommodate a wireless standard of connectivity which emulates a Serial Port Profile
(SPP). With Bluetooth, operators can connect wirelessly within the standard range of approximately 30 feet. Make sure
the V6 is within wireless range of your laptop or other device.
After the V6 Bluetooth device is discovered by your computer, it will automatically operate when the printer is on and
when the correct Bluetooth port is configured in the driver. To connect the V6 Bluetooth functionality with a computer
or laptop, follow the steps below.
Note: The following instructions reflect connecting a Bluetooth device using the Windows 7 operating system. Other
operating systems may have a different appearance or slightly different steps involved; however, the basic procedures
will be similar.
1. Ensure the computer or laptop connecting with the V6 has the ability search for Bluetooth devices. This will
require Bluetooth connectivity to be built-in the computer or a Bluetooth adaptor to be utilized. From the
computer’s Devices and Printers, select “Add a device.” All discoverable devices will display. The Postek V6
device will display as POSTEK, as shown in Figure 3-3.
2. Double click the POSTEK Bluetooth device icon to open the Pairing Code screen.
Figure 3-3
25

V6 User’s Manual Chapter 4: Create, Download and Print Label s
Select “Enter the device’s pairing code” as shown in Figure 3-4, and input “1234” as shown in Figure 3-5, and click Next.
Figure 3-4
Figure 3-5
3. The POSTEK V6 Bluetooth device has now been added successfully, as shown in Figure 3-6.
Figure 3-6
26

V6 User’s Manual Chapter 4: Create, Download and Print Label s
4. Now, set the V6 driver port to the assigned Bluetooth port. To determine the assigned Bluetooth port, from the
computer’s Devices and Printers right click on the POSTEK Bluetooth icon and select the Hardware tab. The port
will be displayed, such as COM1, COM2 or COM3, as shown in Figure 3-7. Make a note of the displayed port.
Figure 3-7
5. Next, right click on the V6 driver, select the Printer Properties option, and select the Ports tab. Place a checkmark
next to the assigned port and Apply the port. Once the port is applied, it will show next to the port in the port list,
as shown in Figure 3-8.
Figure 3-8
27

V6 User’s Manual Chapter 4: Create, Download and Print Label s
#UM>BTSET_EN_ON
Display the Bluetooth icon on the
the screen after connected.
#UM>BTSET_PINXXXX
Reset the PIN code
#UM>BTSET_PIN4321
6. Check to make sure the V6 driver remains online. If the printer driver is offline, right click on the driver, choose
Printing preferences, and click on See what’s printing. Click Printer from the top menu, and make sure Use
Printer Offline is unchecked. See Figure 3-9.
Figure 3-9
7. The printer is now set for Bluetooth connectivity.
For further reference, below are basic parameters, command formats and specifications.
Basic Parameters:
Device Name (1) POSTEK
Initial PIN Code
1234
(Pairing code)
The Device Name and PIN may be modified by sending the below commands to the printer:
Command Format Function Example
#UM>BT_SET_EN_OFF Not to Display the Bluetooth icon on
#UM>BTXXXXXX Modify the Device Name #UM>BTPOSTEK2
28
screen after connected.
Change the device name to POSTEK2
Set the PIN Code to 4321

V6 User’s Manual Chapter 4: Create, Download and Print Label s
Frequency
2.4GHz
Transmission Range
Class 2 (10m)
Stop bit
1 bit
Specifications:
Bluetooth Protocol Bluetooth V2.0
Bluetooth Service Serial Port Profile (SPP)
Class of Device (COD) IF 00 (2)
Note: The COD must be set as shown or connection failure may occur.
Configuration Parameters:
Baud Rate 38400 (Constant)
Data Format Start bit 1 bit
Data bit 8 bits
Parity none
29

V6 User’s Manual Chapter 4: Create, Download and Print Label s
Chapter 4: Create, Download and Print Labels
The V6 printer can print labels with or without connecting to a computer by the USB interface. There are two methods
of printing labels when not connected to a computer via the USB interface or Bluetooth: pre-designed label forms may be
downloaded into the printer’s FLASH ROM and selected for printing (see Downloading Label Forms
created directly in the V6 using the printer’s LCD screen and keypad using the Design Label function.
Design Label
The Design Label option allows a user to open a previously stored label created from the printer’s LCD, or allows the
creation of a new label using the LCD screen and keyboard input.
Note: The Design Label feature in the LCD screen is intended for on-the-spot label creation when access to label software
is unavailable. This feature supports numeric, alphabetic and symbol input elements only. If a label requires barcodes or
other graphics, pre-design the label using label software and download the label form into the printer.
), or labels may be
Open a Stored Label
Press
1.
Press
2.
feature only. Downloaded labels are stored in the Form Index and may be retrieved using the Select Form
feature.
Use
3.
display “No label”. Press
Select an existing label. Press
4.
If desired, press
5.
Press
6.
on the opening screen to enter the Design Label submenu.
to open a label from an existing label list. This list includes labels made with the Design Label
and keys to toggle through all stored labels. If no labels are stored, the LCD screen will
to input the number of copies to print, and then press to confirm.
to return.
to open the label.
to rename and save as a new label, press to confirm.
30

V6 User’s Manual Chapter 4: Create, Download and Print Label s
Create a New Label Using the LCD Screen
When creating a new label using the LCD screen, the label form must be formatted before content can be added.
Formatting a New Label
Press
1.
Press
2.
Press
3.
auto-center, and return.
Use
4.
to select the element. Then, use the character keys to input the desired values or use the
desired option.
Once format elements have been set, select Return by pressing the
5.
on the opening screen to enter the Design Label submenu.
under Design Label submenu to create a new label.
to format a new label. Format elements include the label width, height, max rows, media type,
and keys to toggle through all format elements. To set each format element, press
key to select the
key.
Adding Label Content
After the label format has been set, in the New Label submenu press
1.
Input label content for each row. The active row will be highlighted. The maximum number of characters
2.
allowed for each row will be different according to the current font size and the label width. If the maximum
number of characters exceeds the limit, a warning will alert. When several rows are formatted, not all rows will
to add label content.
display in the LCD. Press to line feed down to the next row, or the and keys to toggle
up and down rows.
Refer to the Input Methods
3.
delete a character, place the cursor in front of the character then press the key.
Press
4.
Press
5.
to name and save the new label, press to confirm.
to input the number of copies to print, and then press to confirm.
31
section to add numeric content, alphabetic content, and symbol content to a row. To

V6 User’s Manual Chapter 4: Create, Download and Print Label s
Input Methods
The V6 supports three types of input methods: numeric, alphabetic, and symbols. Press the Input key to
toggle through the input methods. Once the input method is active, simply input the desired information.
1. Number input: When numeric input is activated, 123 will be displayed at the lower right corner of LCD
2. Uppercase input: When uppercase alphabetic input is activated, ABC will be displayed at the lower right corner of
LCD
3. Lowercase input: When lowercase alphabetic input is activated, abc will be displayed at the lower right corner of
LCD
Symbols
Use the key to insert symbols. Pressing the key will toggle through available symbols. To select a
symbol, once the symbol is highlighted, press the
enter key to confirm.
Title Case
When using the lowercase input method, press to switch to title case (first letter of every word will be
capitalized).
Predictive Text Inputting
POSTEK’s V6 provides the technology of predictive text input, which allows some common letters to be entered by a
single key press instead of toggling through adjacent letters to find the desired one. For example, when in the
alphabetic input method, typing “4663” will spell the word “good” due to predictive text input.
Note: POSTEK V6 supports predictive text inputting for over 70 languages; English and Chinese are standard.
32
V6 User’s Manual Chapter 4: Create, Download and Print Label s
Downloading Label Forms
The V6 can also store downloaded label forms from a PC when connected via the USB interface cable and when using
PosLabel Express label software. Approximately 200 forms can be stored depending on file size in the V6’s Flash
memory.
Note: When connecting the V6 to a computer via the USB cable, make sure to utilize the same USB port used during
the driver installation process, which enables the printer to retrieve needed commands or data from the PC. If the
same USB port is not available or not known, then in the printer’s Properties Dialogue Box, under the Ports tab,
ensure the current port location is checked.
To download forms to the printer:
1. Ensure the V6 is connected to the computer using the USB interface.
2. Using PosLabel Express software, created the form as desired. Save the label.
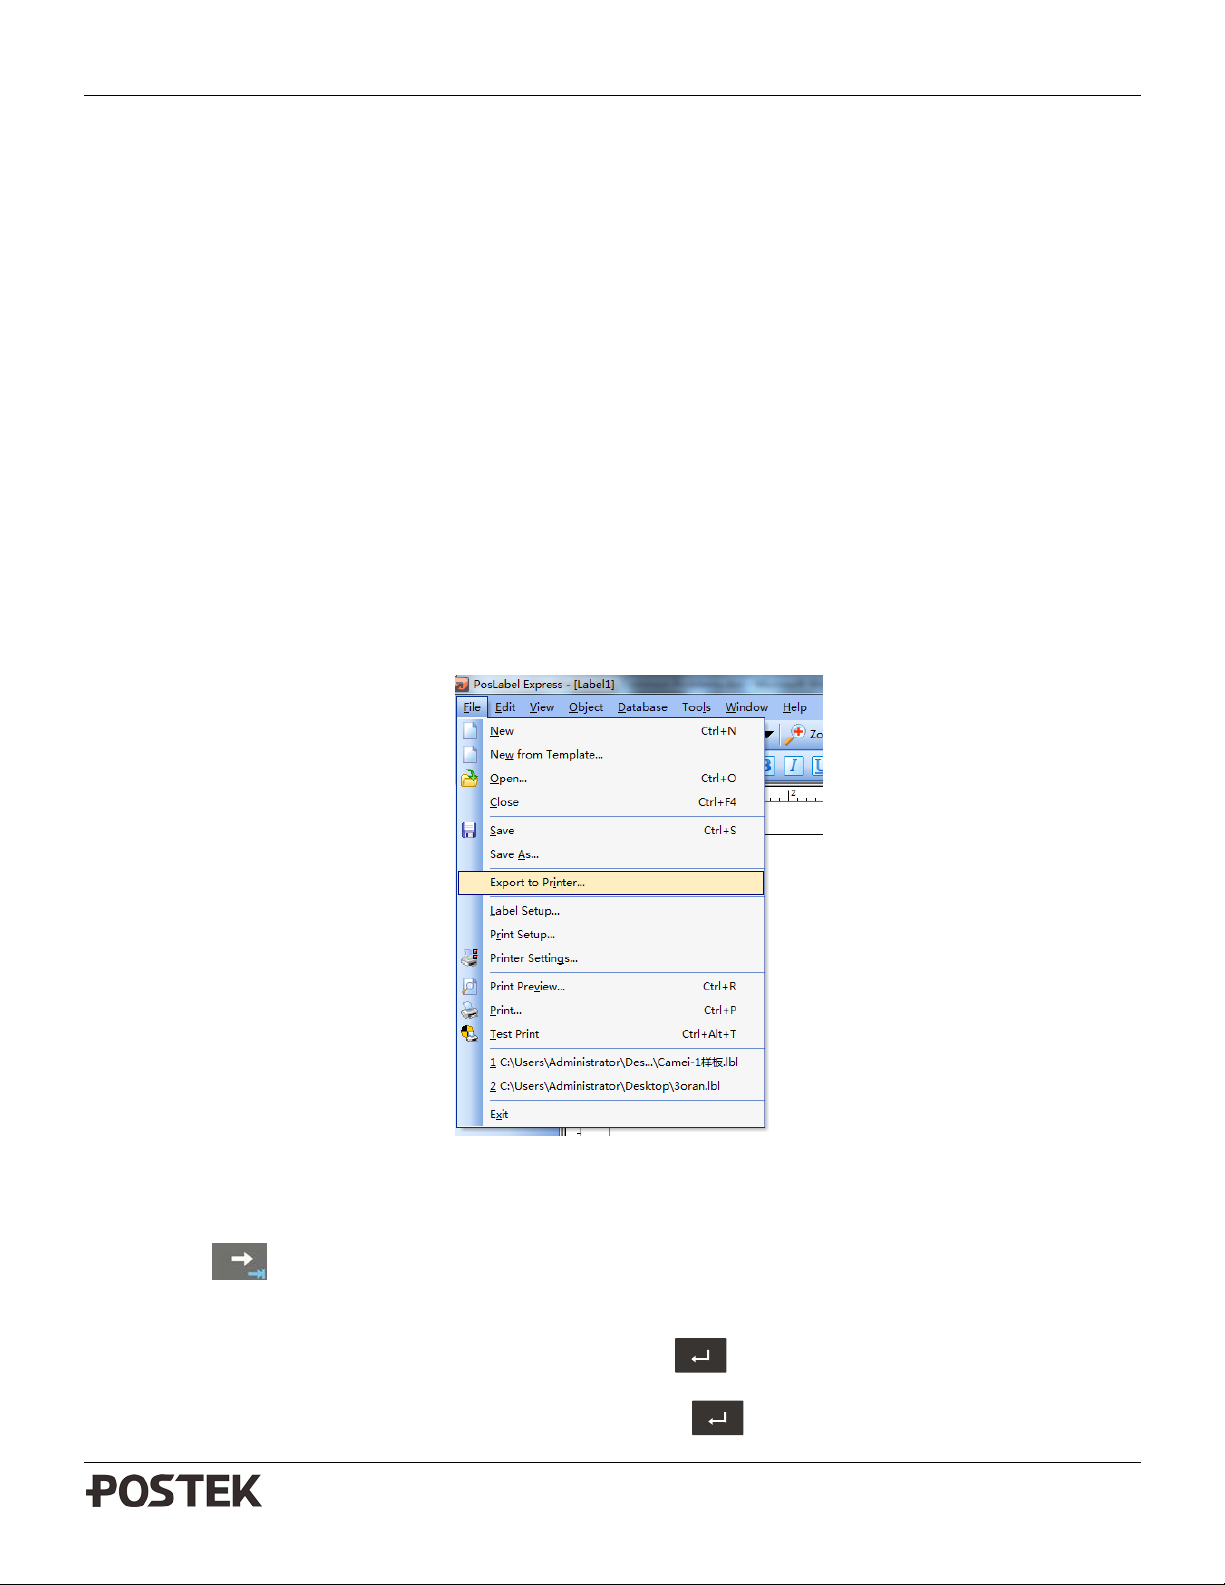
3. Select File, Export to Printer, as shown. The form name will be the same as the label file name. See Figure
4-1.
Figure 4-1
4. The form is now stored in the V6. To select it, enter “Select Form” from the opening screen menu and use the
key to locate and select the stored form. Forms will be stored in alphabetical order.
5. If no forms are downloaded, a “No label form” warning will show.
6. Select the desired form from the LCD by pressing the
7. Input the number of labels needed to print and press the
33
key when the form is highlighted.
enter key again to print.

V6 User’s Manual Chapter 4: Create, Download and Print Label s
Working with Fixed and Variable Input
When creating labels in the label software, they may be created with both fixed and variable information. Refer to
the software user’s manual for label creation instructions.
Variable input may also include input prompts; a great feature to alert the user for the needed variable input prior to
printing a label. Variable input may also include sequential output such as a counter or serial number.
Note: When designing labels with variable input, PosLabel Express offers the option to use a Prefix or Suffix. This
option operates only when labels are printed using the USB interfaces connection. Prefix or Suffix information will
not download into the printer as a label form.
Fixed Input Fonts
There are no limitations on the type of fonts which may be used when creating labels with fix input, regardless of
whether the label is printed using the USB interface or is printed from a previously downloaded form. However,
on-the-spot label creation using the printers Design Label function will only access the printer’s internal fonts.
Variable Input Fonts
There are no limitations on the type of fonts which may be used when sending labels to the printer while the printer is
connected with the USB interface or when sending labels to the printer through the Bluetooth wireless connection.
However, since the V6 is designed for portable usage, more than likely there will be situations when label forms will
be downloaded to the printer and require user input for variable information at a later time.
When designing variable input labels as a downloadable form, utilize only the Postek internal printer fonts for the
variable input components. Postek internal fonts are built into the printer’s firmware and are therefore rendered in the
printer. These fonts do not rely on any other device or system, which enables the printer to use them to print variable
input on the label. Select the Printer Fonts icon from the font menu bar and then select one of the POSTEK fonts as
shown in Figure 4-2.
34

V6 User’s Manual Chapter 4: Create, Download and Print Label s
Figure 4-2
Postek internal fonts may also be selected while inputting a Text element using the Font Select browse button, as shown
in Figure 4-3. Ensure the Internal Fonts icon is also selected from the font menu bar; otherwise the internal fonts will not
appear in the list.
Figure 4-3
35

V6 User’s Manual Chapter 4: Create, Download and Print Label s
Form Index
Form index is used when searching or selecting from multiple stored forms.
To locate an indexed form, press down the number key (1-9) which contains the first letter of the form name. The LCD
will display the total number of forms all form names stored under that number.
Forms are searched by the following rules when pressing number keys:
1 ― Character that is equal or less than: @
2 ― Character that is equal or less than: C
3 ― Character that is equal or less than: F
4 ― Character that is equal or less than: I
5 ― Character that is equal or less than: L
6 ― Character that is equal or less than: O
7 ― Character that is equal or less than: S
8 ― Character that is equal or less than: V
9 ― Character that is equal or less than: Z
Press either the
next form.
or keys to select the previous form; press either the or keys to select the
Delete a Form
From the Select Form menu, toggle to select the desired label form, ensure the desired form is highlighted, and then
press
to delete the highlighted form.
36

V6 User’s Manual Chapter 4: Create, Download and Print Label s
Printer
FONT
3mm
Display “Fn”
Figure 4-4
Function Key
Press function key to activate the secondary functions on the keys. “Fn” will display in the LCD s creen to
indicate that the Function key is activated. The current font size will also display (See Figure 4-4).
Font size
With the Function key activated, implement the following functions by pressing keys:
: Enter Row Coordinate settings interface to set the start coordinates of the current row. Select 1. to enter the
value for the x axes, and 2. to enter the value for the y axes. Press
Note: Prior to setting x and y coordinates, first disable the Auto-Center function, which is one of the formatting
options when creating a new label using the Design Label function. Select Design Label / Create / Formatting, and
toggle to Auto-Center, and toggle again to Disable and select.
: Enter Margins settings interface (Top, Bottom, Left and Right). Specify margin values (in millimeters). Press
to return.
to return.
: Enter Frame settings interface to draw a frame for the label (if desired). Press to return.
: Copy data from current row.
: Paste data to current position, the number of characters should not exceed 99.
: Enter Orientation Settings interface to set the orientation of the current row (Landscape or Portrait) or to rotate
the row 0, 90, 180, or 270 degree. Press
: Undo the Paste action (applicable for the current row).
37
to return. (See Orientation Signs for a list of sign descriptors).

V6 User’s Manual Chapter 4: Create, Download and Print Label s
: Adjust the characters’ horizontal scale value on the current row. Options include: Full-width, Half-width, 2/3,
Double-width, and Auto.
: Increase the font size by 1 mm, the maximum size is 48 mm.
: Decrease the font size by 1 mm, the minimum size is 3 mm.
: Set the cursor to the beginning position of the current row.
: Set the cursor to the end position of the current row.
: Delete the row.
Note: When the Function key is activated, pressing any key other than the ones listed above will result in returning to
the Label Editing interface.
Orientation Signs
In the label editing interface, an orientation sign appears in the lower right corner of the LCD screen. Orientation signs
indicate orientation of the label text.
:Horizontal, 0 degree with frame (inversed color
:Horizontal, 0 degree
: Horizontal, 90 degree.
: Horizontal, 270 degree.
: Vertical, 0 degree.
signs represent labels that include a frame).
: Horizontal, 180 degree.
: Vertical, 90 degree
: Vertical, 180 degree
38

V6 User’s Manual Chapter 5: Maintenance
Chapter 5: Maintenance
Warnings
(1) Make sure the printer is powered off before performing maintenance operations.
(2) The Printhead may be hot due to recent printing. Wait until the Printhead cools before performing maintenance.
(3) Use only anhydrous isopropyl alcohol to clean the print head.
Cleaning the Print head
The Printhead is the mechanism that enables the ink to impact the label. Due to the Printheads precision construction and
necessary location in t he printer, i t com es into contact with consum able s and ther efore is sus ceptible t o dirt accum ulat ion. If
dirt is not removed, the Printhead may be damaged. To ensure longevity of the Printhead, follow the recommended
maintenance guidelines below:
Note: A Printhead damaged by misuse is not covered under warranty.
Clean the Printhead
Clean the Printhead after every (1) roll of ribbon use or every (3) rolls of label media use. To clean the Printhead:
1. Turn printer power off
2. Open the top cover of V6 printer
3. Remove the cutter, if installed (see “Cleaning the Cutter”, item 3)
4. Move the Locking Lever to the unlocked position and remove the ribbon and media
5. Use a cotton swab dipped in anhydrous isopropyl alcohol. Rub the swab along the Printhead until the swab no longer
accumulates ink
6. Let the Printhead dry before using the V6 again
Cleaning the Cutter
Cleaning the cutter, if installed, is recommended after 1,000 cuts to protect the cutter from damage by paper dust, glue, etc.
To clean the Cutter:
1. Turn printer power off
2. Open the top cover of the V6 printer
3. Remove the two screws holding the cutter in place, and remove the cutter
4. Use a cotton swab dipped in anhydrous isopropyl alcohol. Rub the swab along the blade until clean.
39

V6 User’s Manual Chapter 5: Maintenance
Cleaning the Platen Roller
The Platen Roller, located at the exit point and underneath labels, supports the labels as they feed out of the printer. The
roller can accumulate debris from consumables, such as dirt, sand, dust or glue. To ensure longevity of the Platen Roller,
follow the recommended maintenance guidelines below:
Clean the Platen Roller after every (3) rolls of label media used. To clean the Platen Roller:
1. Turn off the printer.
2. Open the top cover.
3. Move the Locking Lever to the unlocked position and remove the ribbon and media.
4. Use a cotton swab dipped in anhydrous isopropyl alcohol. Rub the swab along the Platen Roller while rotating the roller
until the swab no longer accumulates ink or debris.
Cleaning the Printer Interior
Over time, the printer’s interior may collect dust or debris from the consumables. It is advised to periodically clean the
printer’s interior in order to prevent the accumulated debris from damaging internal parts.
To clean the printer interior, use a cotton swabs dipped into anhydrous isopropyl alcohol and remove any debris.
Cleaning the Media Sensor
To clean the media sensor, blow the surface and the gap of the media sensor with a blowing device such as a rubber bulb.
If needed,
use a cotton swab dipped in anhydrous isopropyl alcohol to remove visible debris.
40

V6 User’s Manual
Chapter 6: Troubleshooting
• Check if media is loaded correctly.
set in the software and driver
Ribbon roll is installed
Chapter 6: Troubleshooting
Error Indicators
Printer errors will disable the printer from printing. The STATUS indicator may blink. When the Printhead is open, the
error information will display on the LCD screen and the printer will stop printing.
Possible errors are as follows:
Media Error Displayed
Cause Corrective Action
The media sensor
cannot detect labels
Media runs out Load a new media roll
Media jammed Remove the jammed paper
The Media Guide is not
firmly positioned
against media
Media sensor is broken Contact an authorized POSTEK service provider for technical support.
Ribbon Error Displayed
Cause Corr ective Action
Ribbon runs out Load a new ribbon roll
Ribbon jammed Clear ribbon jam
improperly
• Check the position of the media sensor for proper placement.
• Perform a Media Sensor Calibration.
Note: When using continuous media, make sure “continuous paper ” is
Adjust Media Guide position to firmly press against the media
Re-install the ribbon roll properly (See Installing the Ribbon)
Ribbon sensor is broken Contact an authorized POSTEK service provider for technical support.
41

V6 User’s Manual
Chapter 6: Troubleshooting
Printhead.
Miscellaneous
Vertical Blank Lines Appear
If the printer prints vertical blank lines as shown in the below picture, it may be due to a dirty or defective
Printhead. See the table below for possible causes and solutions.
Cause
The Printhead is dirty.
Vertical lines still appear
after cleaning the
Corrective Action
Clean the Printhead. Follow the recommended maintenance guidelines
for cleaning the Printhead.
Contact an authorized POSTEK service provider for technical support.
Printer Timeout Error Message
Execute following corrective actions:
1. Check the interface cable for proper connection.
2. Ensure the V6 printer is powered on.
If the trouble still exists, please contact an authorized POSTEK service provider for technical support.
Data Sent but Not Printing
1. Ensure the correct driver is chosen in the label software.
2. Ensure the correct USB port is selected in the printer driver.
3. Reset the V6 printer.
If the trouble still exists, please contact an authorized POSTEK service provider for technical support.
42

V6 User’s Manual
Chapter 6: Troubleshooting
Poor Printing Quality
When experiencing poor print quality, check the following:
1. Adjust print darkness setting value in the driver under Printing Preferences/Options Tab.
2. Adjust print speed setting value in driver under Printing Preferences/Options Tab.
3. Clean the Printhead and the platen roller.
4. Poor quality printing may be caused from using a low quality ribbon. Change to higher quality ribbon.
5. Poor quality printing may be caused from using low quality media. Change to higher quality media.
Note: The darkness may also be adjusted in printer’s menu. This function is a sub-settings under common settings from
the Setup menu.
Note: For errors not listed here, please contact an authorized POSTEK Service Provider for further assistance.
43

V6 User’s Manual Appendix 1: ASCII Table
4
$ 4 D T d
t
5
6
7
BEL ‘ 7 G W g
w
E
SO
RS . > N ^ n ~
F
Appendix 1: ASCII T able
0 1 2 3 4 5 6 7
NUL 0 @ P ` p
0
SOH XON ! 1 A Q a q
1
STX “ 2 B R b r
2
3
XOFF # 3 C S c s
NAK % 5 E U e u
ACK & 6 F V f v
8
9
A
B
C
D
Remarks: € sign is included in the embedded table at DEC128 or HEX 80.
BS ( 8 H X h x
) 9 I Y i y
LF * : J Z j z
ESC + ; K [ k {
FF , < L \ l |
CR - = M ] m }
SI US / ? O _ o DEL
44

 Loading...