

Page 1
Page 2

TX Series User’s Manual
FCC Notice
This device complies with Part 15 of the FCC Rules. Operation is subject to the following two conditions: (1) this device
may not cause harmful interference, and (2) this device must accept any interference received, including interference that
may cause undesired operation.
This equipment may generate, use and/or radiate radio frequency energy. If not installed and used in full accordance with
this instruction manual, interference to radio communications may occur. This equipment complies with the limits for a
Class A Information Technology Equipment pursuant to Part 15 of the FCC Rules, which are designed to provide
reasonable protection against such interference when operated in a commercial environment. Operation of this
equipment in a residential area may also cause interference. In such case the user will be required, at own expense, to
correct the interference using whatever means necessary.
Trademarks
ARM is a registered trademark of Advanced RISC Machines Ltd.
Centronics is a registered trademark of Centronics Data Computer Corporation.
Microsoft, Windows are registered trademarks of Microsoft Corporation.
POSTEK is a registered trademark of Postek Electronics Co., Ltd.
Copyright
© by Postek Electronics Co., Ltd. All rights reserved. Under the copyright laws, this manual cannot be reproduced in any
form without the prior written permission of Postek. No patent liability is assumed, with respect to the use of the
information contained herein.
TX Series Label Printer User’s Manual
7th edition September 2016
Disclaimer
This manual has been validated and reviewed for accuracy. The instructions and descriptions it contains are accurate for
the Postek TX Series label printer at the time of this manual’s distribution. However, succeeding printers and manuals are
subject to change without notice. Postek assumes no liability for damages incurred directly or indirectly from errors,
omissions or discrepancies between the printer and this manual.
Although this manual describes and details many issues which could possibly occur, the manufacturer cannot warrant
against unpredictable conditions during the printing process. For problems such as the printer not working, lost or
unclear print content, etc., the manufacturer and resellers are responsible for correcting these issues (according to Postek
Printer Warranty Clauses). In no event shall the manufacturer or the resellers involved be liable for any damages
whatsoever (including, without limitation, damages for loss of business profits, business interruption, loss of business
information, or other pecuniary loss) arising from the use of, the results of use or inability to use this product, even if the
manufacturer has been advised of the possibility of such damages.
i
Page 3

TX Series User’s Manual
Important Safety Instructions
Only qualified and trained service technicians should attempt to repair the printer.
Do not place the printer on or near a heat source.
Be sure that the output of the power adapter is 24VDC and your power source matches the rating listed on the power
adapter. Be certain your power source is grounded.
To avoid getting an electric shock, do not use a worn or damaged power cord. If the power cord becomes damaged or
frayed, replace it immediately.
Do not insert anything into the ventilation slots or openings on the printer.
The printer and power adapter should never be operated in a location where either one can get wet. Personal injury
may result.
The printhead becomes hot while printing. To protect from damaging the printhead and risk of personal injury, avoid
touching the printhead.
To get increased printhead longevity and higher quality printouts, always use approved labels, tags and thermal
transfer ribbons. Approved supplies can be ordered from your Postek authorized reseller.
Static electricity that accumulates on the surface of the human body or other surfaces can damage or destroy the
printhead or electronic components in this device. DO NOT touch the printhead or the electronic components with
bare hands.
Place the printer on a flat, firm, solid surface.
Never operate in a high temperature environment.
Turn off the power when not in use for extended periods.
Follow all recommendations and setup instructions included in this manual.
Warnings:
This is a Class A product. In a domestic environment this product may cause radio interference in which case the user
may be required to take adequate measures (see FCC Notice).
Static electricity that accumulates on the surface of the human body or other objects can damage the print head or
electronic components in the TX printer. Observe proper electrostatic safety precautions when handling.
ii
Page 4

TX Series User’s Manual
Table of Contents
Preface ....................................................................................................................................................................................... 1
Important Notice, Read Me First ............................................................................................................................................ 1
Chapter 1: Introduction ........................................................................................................................................................... 2
Printer Specifications .......................................................................................................................................................... 2
Contents of Box .................................................................................................................................................................. 3
Packing List ................................................................................................................................................................ 3
Chapter 2: Setup and Use ........................................................................................................................................................ 4
Setting up the Printer .......................................................................................................................................................... 4
Main Parts and Structures ........................................................................................................................................... 4
Loading Path ............................................................................................................................................................... 8
Connecting the Printer ................................................................................................................................................ 9
Interface Connection ................................................................................................................................................... 9
Loading the Ribbon .......................................................................................................................................................... 10
Loading the Media ............................................................................................................................................................ 13
Standard Mode .......................................................................................................................................................... 13
Peel-off and Tear-off Mode: ...................................................................................................................................... 17
Cutting Mode: ........................................................................................................................................................... 17
Chapter 3: Operations and Settings ...................................................................................................................................... 18
Basic Operations ............................................................................................................................................................... 18
Power Switch ............................................................................................................................................................ 18
The Front Panel ......................................................................................................................................................... 18
LCD Display ............................................................................................................................................................. 19
Tear-off ..................................................................................................................................................................... 23
Manual Peel-off ........................................................................................................................................................ 23
Cutting Mode ............................................................................................................................................................ 24
Adjusting the Pressure of the Printhead ............................................................................................................................ 26
Windows Driver and Label Software ................................................................................................................................ 27
Chapter 4: Maintenance ......................................................................................................................................................... 28
Cleaning the Printhead ...................................................................................................................................................... 28
Cleaning the Platen Roller ................................................................................................................................................ 29
Cleaning the Printer Interior ............................................................................................................................................. 29
Chapter 5: Troubleshooting ................................................................................................................................................... 30
Error Indications ............................................................................................................................................................... 30
Miscellaneous ................................................................................................................................................................... 31
Vertical Blank Lines Appear ..................................................................................................................................... 31
Printer Timeout Error Message ................................................................................................................................. 31
Data Sent but Not Printing ........................................................................................................................................ 31
Poor Printing Quality ................................................................................................................................................ 31
Recovery ................................................................................................................................................................... 31
Appendix A: Interface Specifications .................................................................................................................................... 32
Appendix B: ASCII Table ...................................................................................................................................................... 27
iii
Page 5

TX Series User’s Manual Preface, Important Notice
Preface
Your POSTEK TX Series high performance industrial barcode label printer features innovative state-of-the-art
technology and superior quality workmanship. Boasting an all metal frame and unique core construction, the TX
achieves a sturdy and durable stationary platform for smooth printing. A powerful control system can easily handle the
most complicated printing requirements, and advanced thermal transfer/direct thermal technology offers optimum
printout clarity.
This manual explains how to set up and begin using your TX Series printer. It also provides detailed information on
configuring your printer, basic operations, care and troubleshooting.
Please read this manual carefully before using the POSTEK TX Series printer.
Important Notice, Read Me First
The thermal printhead can be easily damaged due to its precision construction. A printhead damaged by misuse is not
covered under the terms of the warranty. To ensure longevity of the printhead, please note the following:
1. DO NOT scrape or use tools that might damage the printhead surface.
2. To protect from corroding the printhead, DO NOT touch the printhead with bare hands.
3. DO NOT use thermal paper or thermal transfer ribbons which contain Na, K or Cl.
4. Keep printhead from any form of liquid or dampness.
5. Only use a cotton swab dipped in anhydrous isopropyl alcohol to clean the printhead.
6. Always use high-quality consumables:
When the printhead module is closed, pressure is placed directly onto the printhead; dirt such as paper scraps,
sand, dust and glue can scrape or damage the printhead.
The TPH is also easily damaged by static electricity, which may be generated by poor quality ribbons.
7. Always inspect consumables for high quality before purchasing.
Note: The TX Series printer functions under Direct Thermal or Thermal Transfer print methods. Thermal Transfer is
set as the factory default (requires ribbon for printing). However, if you need to print on Direct Thermal materials
(ribbon is not required), please contact your printer supplier or service provider to reduce the printhead pressure. This
can protect your printhead from early performance deterioration due to direct contact with the thermal media. Any
physical printhead damage caused by direct thermal printing is not covered under warranty.
1
Page 6
TX Series User’s Manual Chapter 1: Introduction
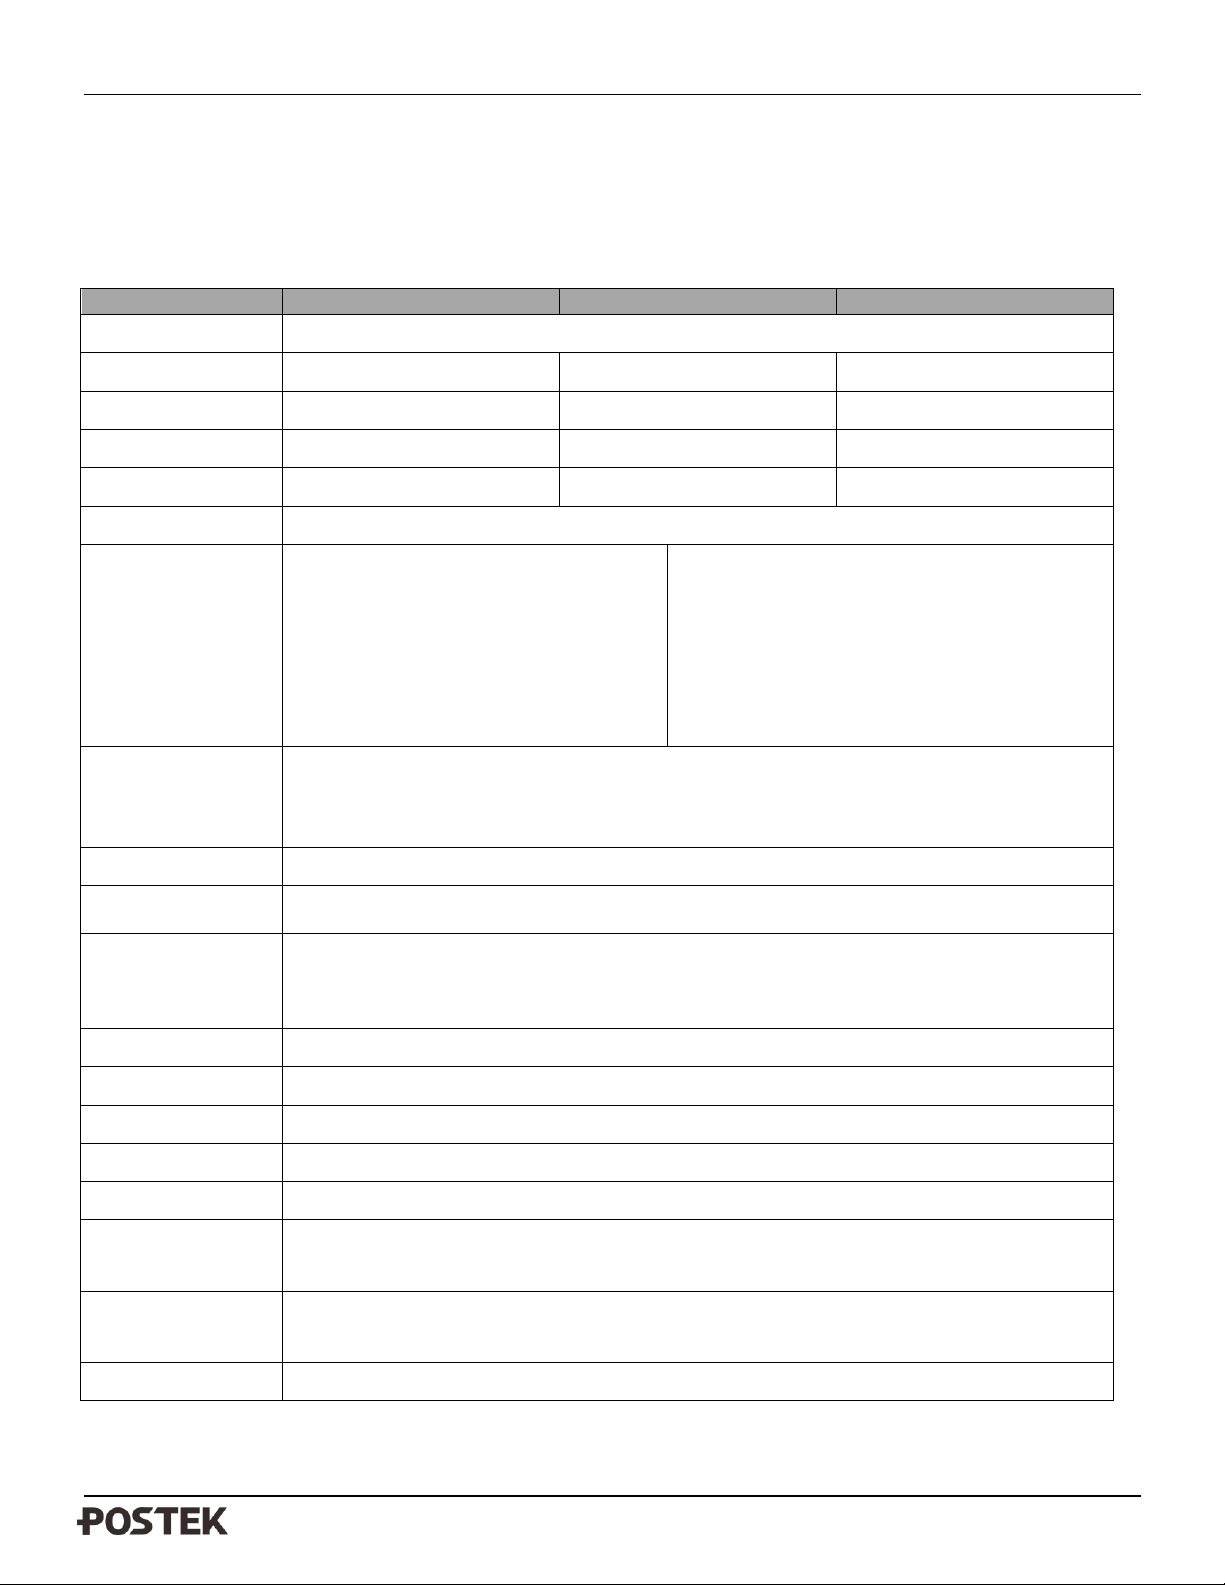
Mode
TX2
TX3
TX6
Printing method
Thermal Transfer
Printing resolution
203 dpi (8 dots/mm)
300 dpi (11.8 dots/mm)
600 dpi (23.6 dots/mm)
Max printing speed
10 ips (254.0 mm/s)
8 ips (203.2 mm/s)
4 ips (101.6 mm/s)
Max printing width
4.09″ (104 mm)
4.17″ (106 mm)
4.16″ (105.6 mm)
Max printing length
157″ (4000 mm)
79″ (2000 mm)
19.6″ (500 mm)
CPU/Memory
8 MB FLASH ROM, 16 MB SDRAM
Media
Width: 4.56″ (116 mm) max, 0.39" (10
mm) min.
Total thickness (including liner, if any):
0.0024″ (0.06 mm) ~ 0.012″ (0.305 mm).
Supply roll: OD 8″ (203.2 mm) max. ID
1.5″(38 mm) min.
Width: 4.56″ (116 mm) max, 0.98" (25mm) or
0.39" (10 mm) (supporting clip removed) min.
Total thickness (including liner, if any): 0.0024″
(0.06 mm) ~ 0.012″ (0.305 mm).
Supply roll: OD 8″ (203.2 mm) max. ID 3"
(76.2mm) or 1.5″(38 mm) (supporting clip
removed) min.
Ribbon
Max width: 4.65″ (118 mm), Max length: 1968’ (600 m)
Ink side: both In and Out
Ribbon roll: OD 3.3″ (84 mm) max., ID 1″ (25.4 mm) min.
Media sensor
UP&Down Reflective (Adjustable) / Transmissive (Adjustable)
Fonts
Five built-in dot matrix ASCII fonts, user-downloadable TrueType Fonts
Barcode types
1D Barcode: Code 39, Code 93, Code 128/subset A,B,C, Codabar, Interleave 2 of 5, UPC A/E
2 and 5 add-on, EAN-13/8/128, UCC-128, etc;
2D Barcode: MaxiCode, PDF417, Data Matrix, QR, etc.
Interfaces
RS-232 Serial, USB Device 2.0, Centronics Parallel, USB Host, 100/10 Mb Ethernet.
LCD display
Graphic Dot Matrix
Power rating
110/220 VAC ±10%, 50/60 Hz.
Weight
33.06 lbs (15 kgs)
Dimensions
W 11.3″ (286 mm) x D 17.6″ (448 mm) x H 11.0″ (280 mm)
Operation
environment
Temperature: 32 F ~ +104 F (0 C ~ 40 C)
Relative humidity: 5% - 85% non condensing
Storage environment
Temperature: -40 F ~ +140 F (-40 C ~ 60 C)
Relative humidity: 5% - 85% non condensing
Optional items
External Rewinder; Rotary Cutter.
Chapter 1: Introduction
Printer Specifications
2
Page 7
TX Series User’s Manual Chapter 1: Introduction
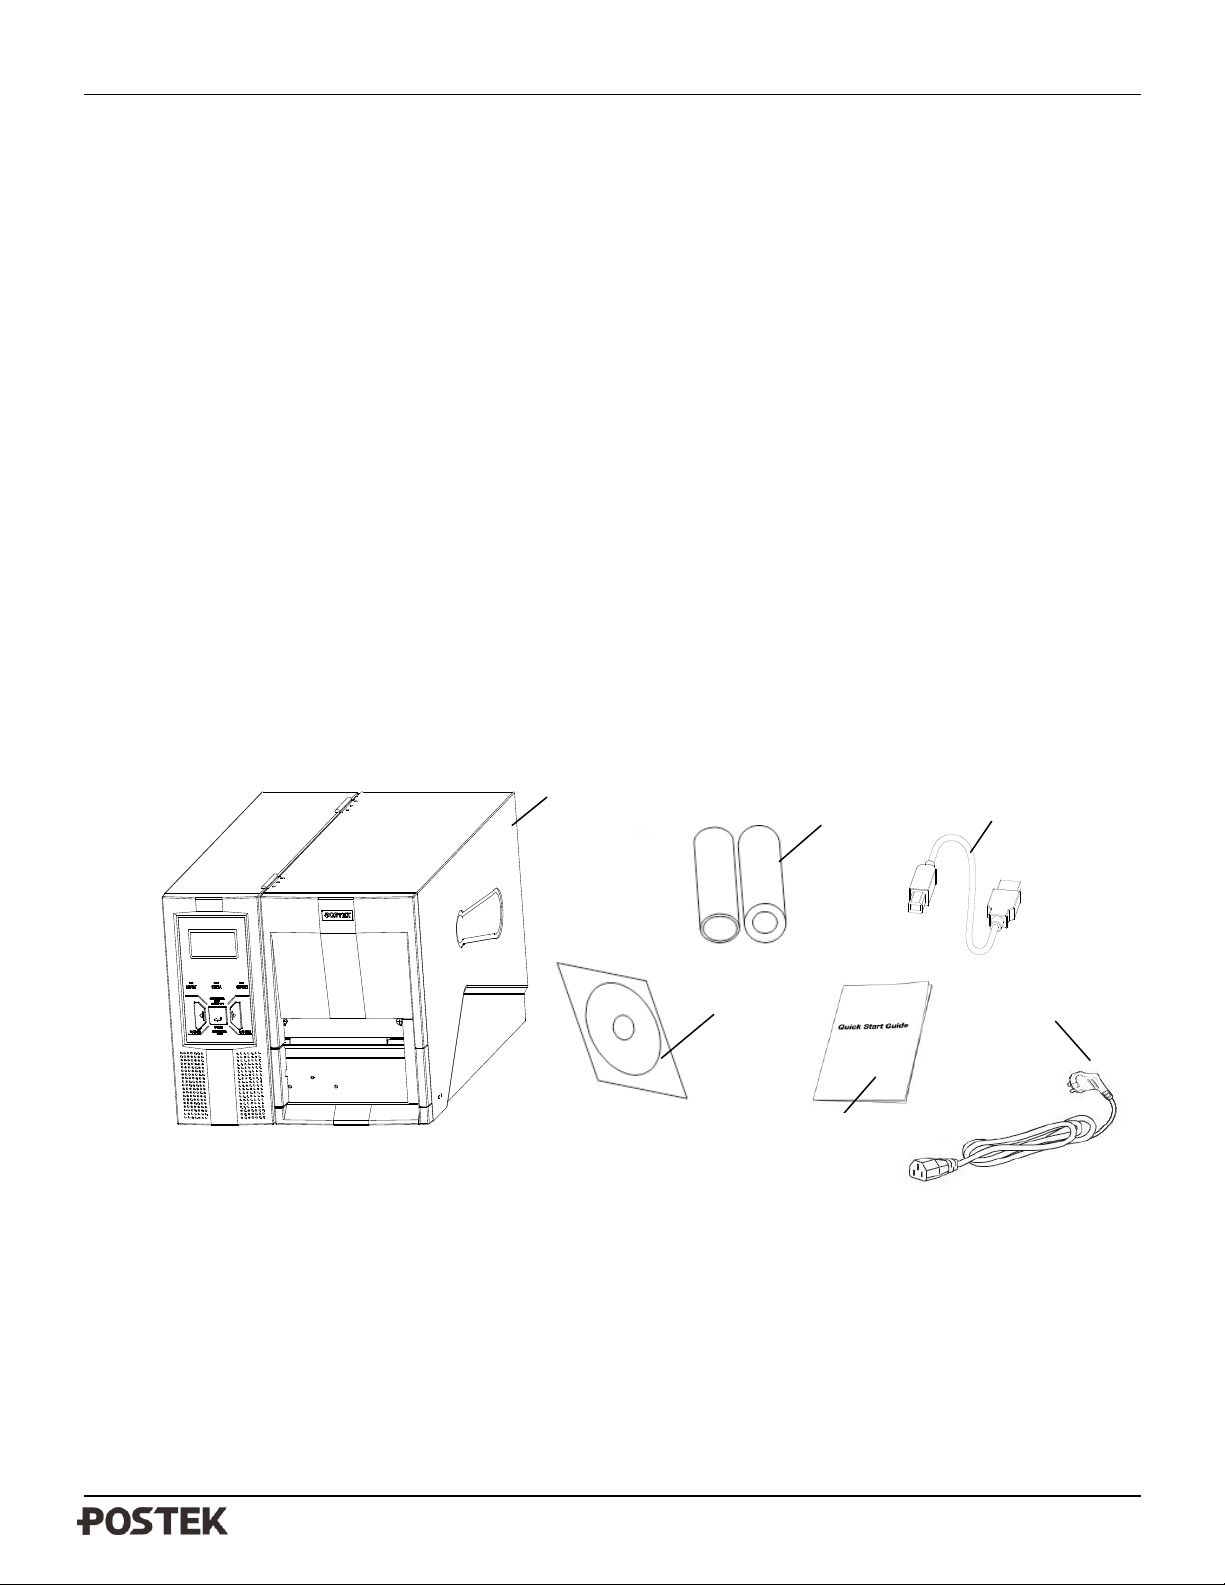
TX Series Printer
1 pc
Power Cord
1 pc
USB interface cable
1 pc
Sample Ribbon
1 pc
TX Quick Start Guide/Sheet
1 pc
*CD-ROM
1 pc
Ribbon
CD ROM
CD-Rom
TX Series Printer
Power Cord
Quick Start Guide
USB Cable
Contents of Box
Inspect the shipping carton(s) for possible shipping damage, if damage is discovered, notify the shipping company to
report the nature and extent of the damage.
Please check the items according to the Packing List. If there are any items missing, notify your authorized reseller.
Packing List
*Note: CD-ROM pack includes TX printer driver, label design software, TX Series User’s Manual and the
Programming Manual.
Figure 1: Printer and Accessories
3
Page 8
TX Series User’s Manual Chapter 2: Setup and Use
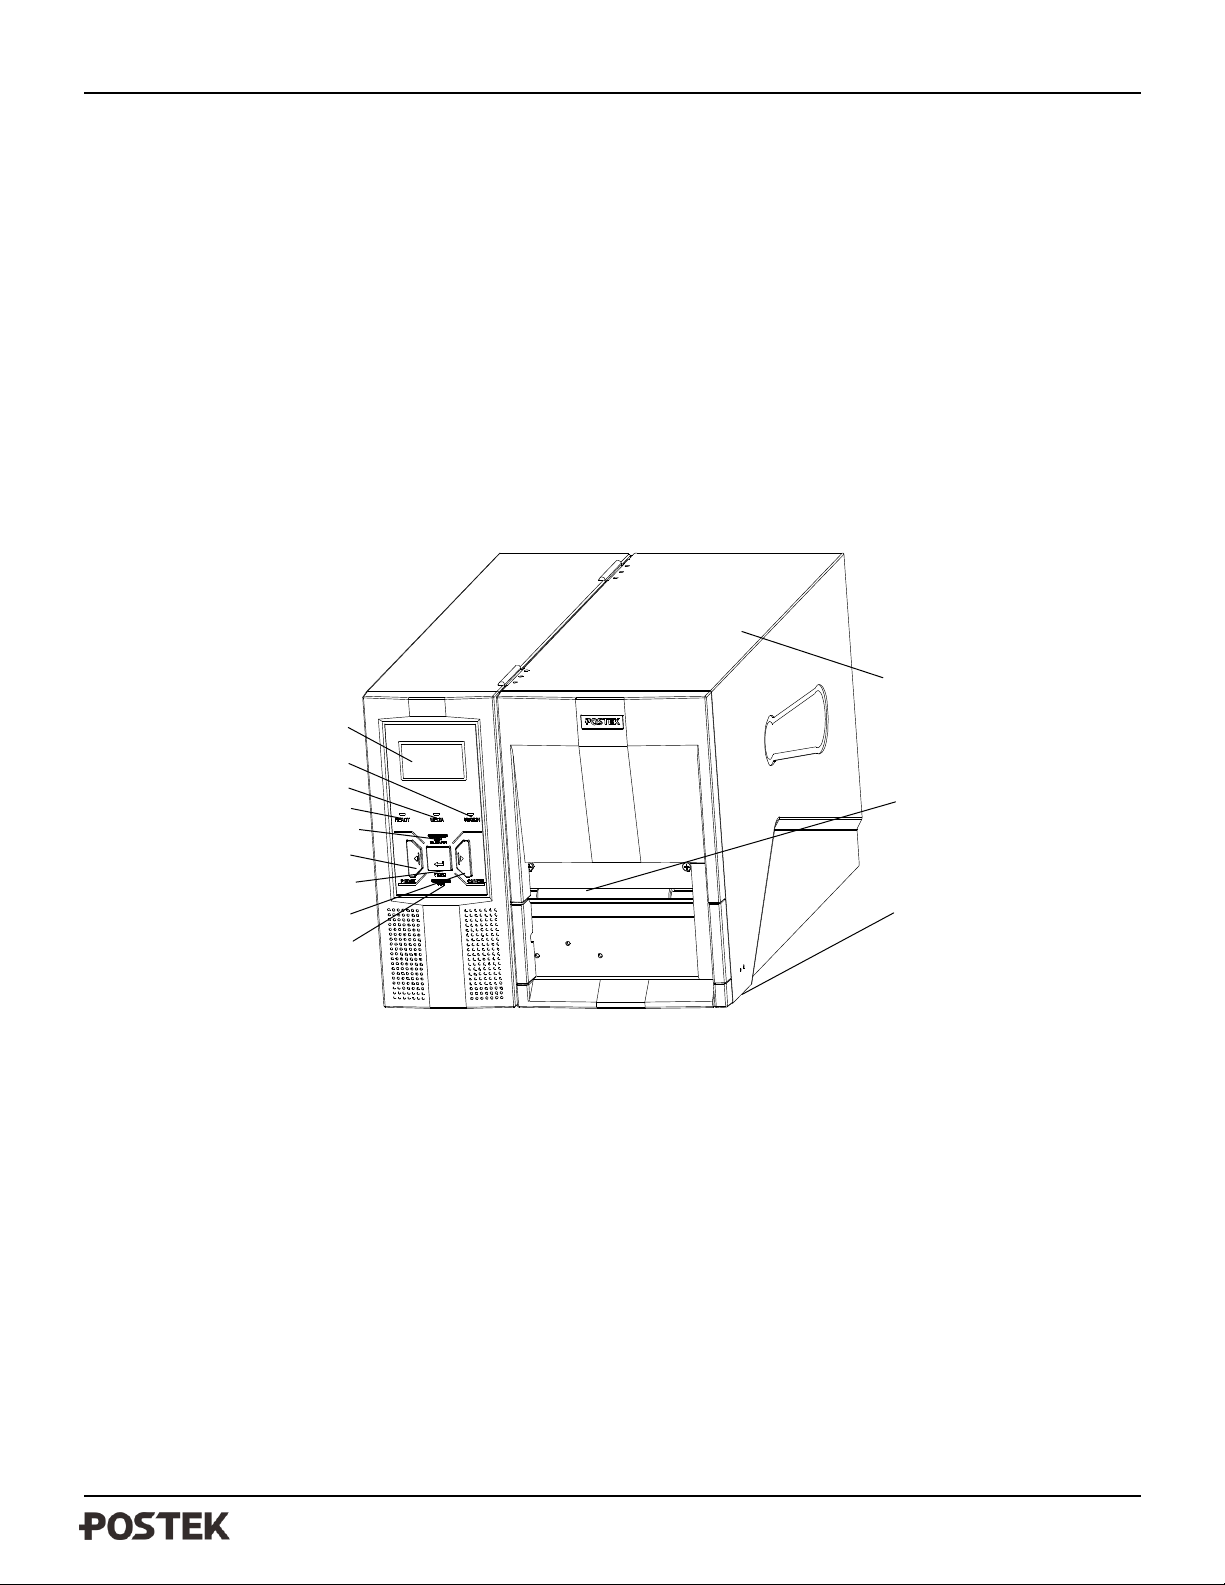
1. MENU Button
5. Media Calibration
9. LCD
2. CANCEL Button
6. READY Indicator
10. READY Indicator
3. FEED Button
7. MEDIA Indicator
11. Media Outlet
4. PAUSE Button
8. RIBBON Indicator
12. Cover Handle
2
6
1 4 3 7 8
12
11
10 9 5
Chapter 2: Setup and Use
Setting up the Printer
Before setting up the printer consider the following:
1. Make sure there is adequate space around the printer for loading consumables and proper ventilation.
2. Make sure the printer is close to the host so the interface cable is easily accessible at either end.
Main Parts and Structures
Note: The structure of TX3 and TX6 (see figure 3-b) is not exactly same with TX2 (see figure 3-a), the main
differences are in the media compartment, the improved media supporting module in TX3 and TX6 reduces the
minimum allowed label height to only 4mm.
Figure 2-1
4
Page 9
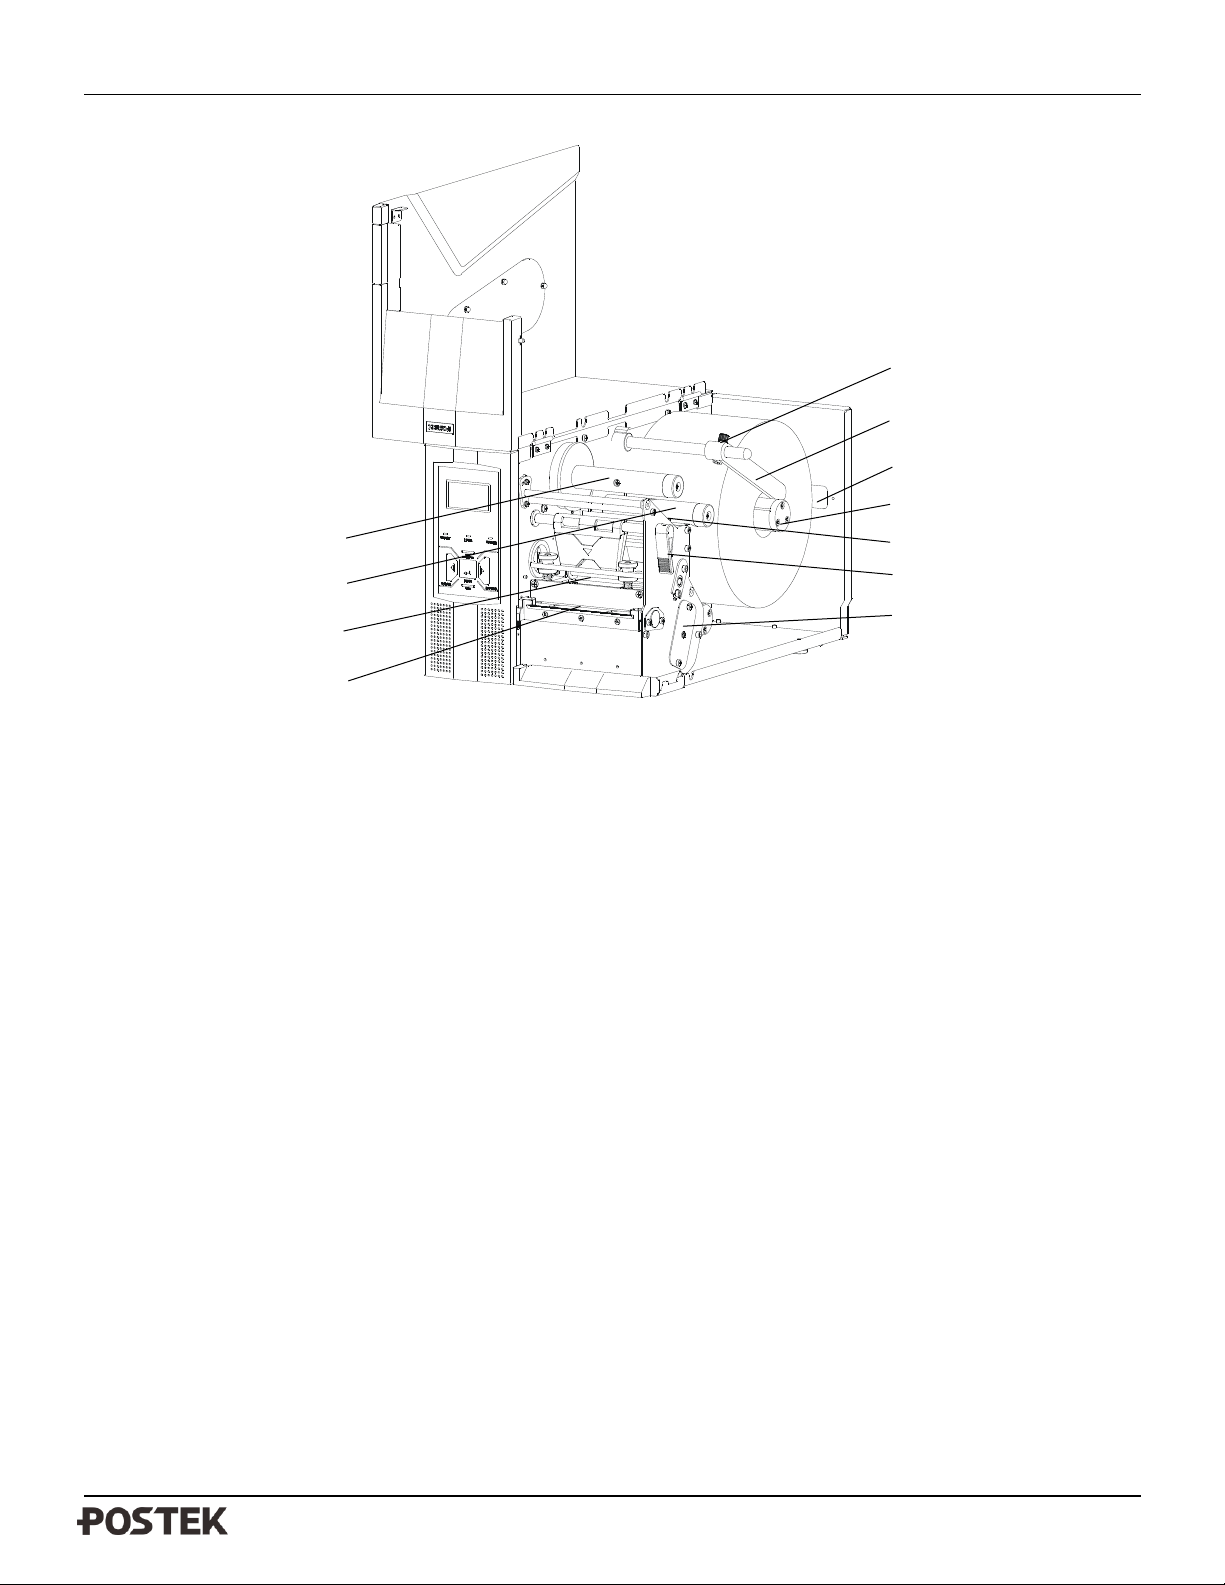
TX Series User’s Manual Chapter 2: Setup and Use
1. Platen Roller
5. Bolt
9. ESD Brush
2. Printhead Module
6. Positioning Arm – Media Roll
10. Lever
3. Ribbon Supply Spindle
7. External Media Loading
Opening
11. Media Sensor Cover Plate
4. Ribbon Take-up Spindle
8. Media Spindle
4
6
5
8
10
11
1
3
7
2
9
Figure 2-2(a)
Note: Figure 2-2(a) shows the detailed structure of TX2.
5
Page 10
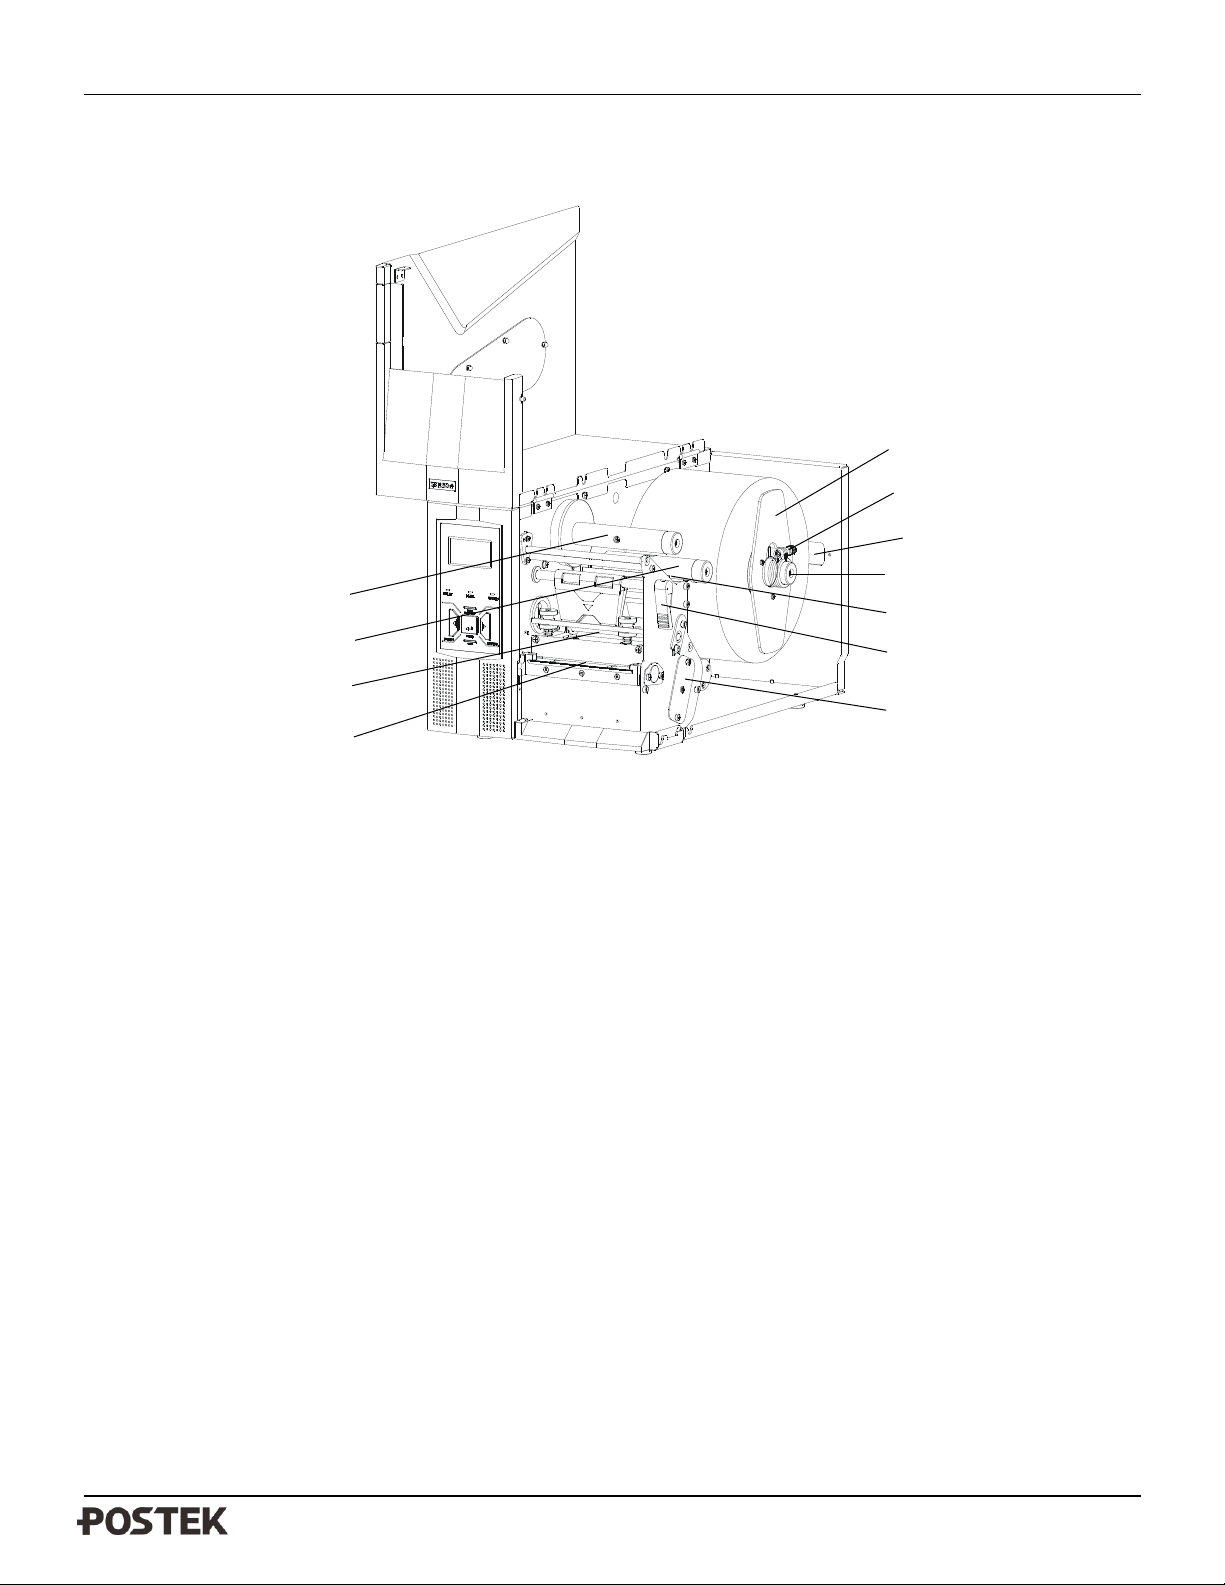
TX Series User’s Manual Chapter 2: Setup and Use
1. Platen Roller
5. Media Roll Guide (out)
9. ESD Brush
2. Printhead Module
6. Bolt
10. Handle
3. Ribbon Supply Spindle
7. External Media Loading
Opening
11. Media Sensor Cover Plate
4. Ribbon Take-up Spindle
8. Media Spindle
4
6
5
8
10
11 1 3
7 2 9
Figure 2-2(b)
Note: Figure 2-2(b) shows the detailed structure of TX3 and TX6.
6
Page 11
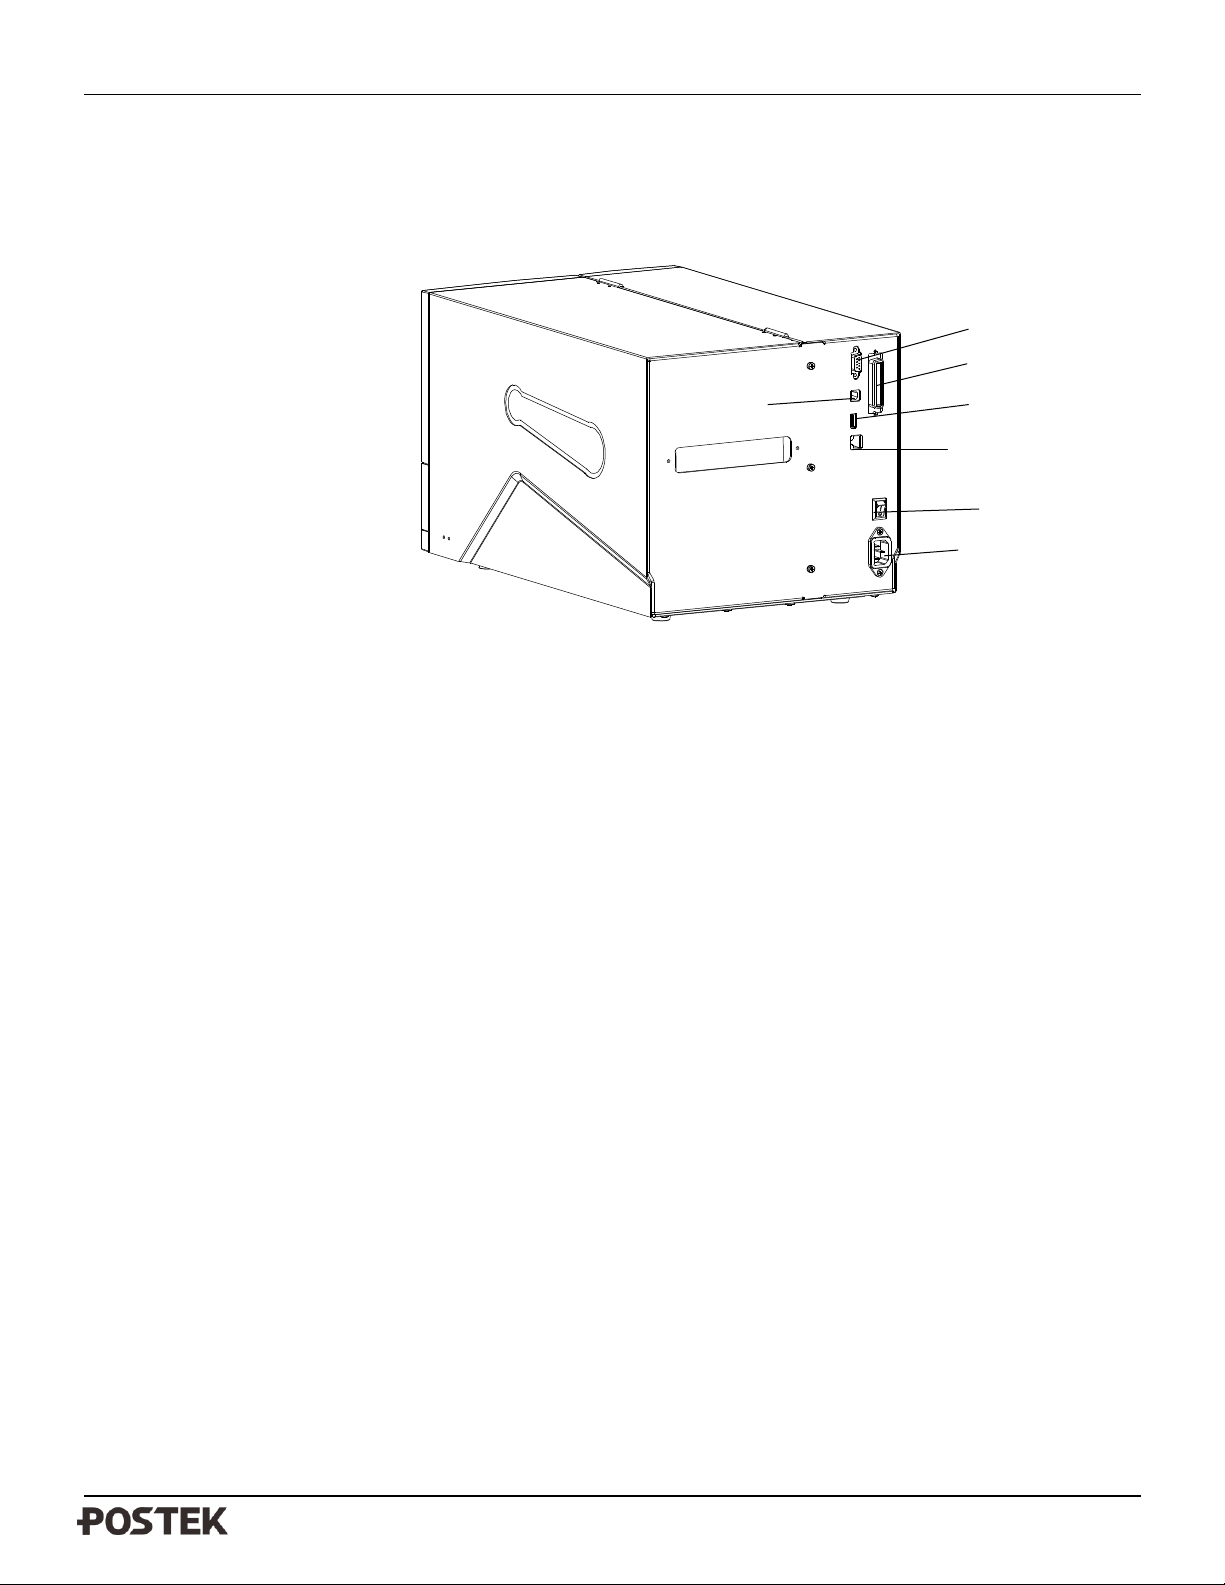
TX Series User’s Manual Chapter 2: Setup and Use
1. Centronics Port
4. RS-232 Serial Port
7. Power Switch
2. USB Host
5. AC In Port
3. Ethernet Port
6. USB Device 2.0
4
3
5
1 6 2
7
The Postek TX-Series printer is equipped with multiple interfaces, and the Ethernet Interface is optional. See Figure
2-3.
Figure 2-3
7
Page 12
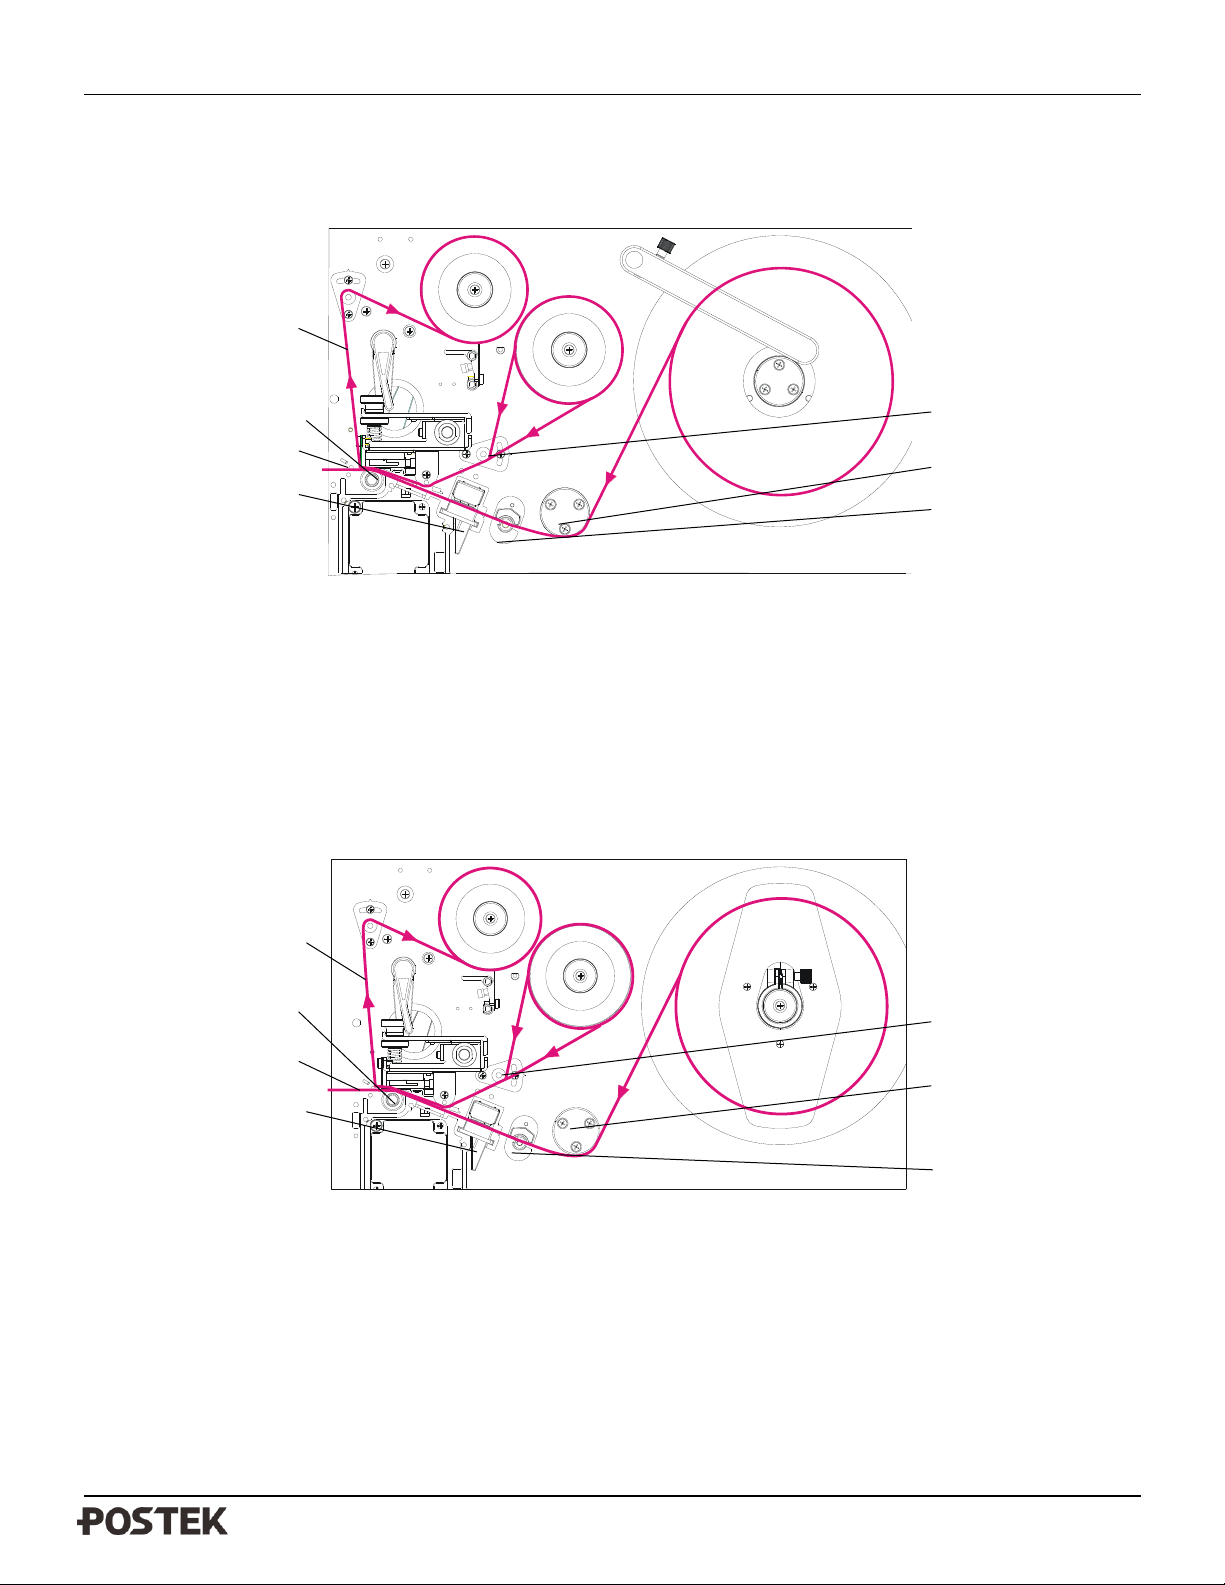
TX Series User’s Manual Chapter 2: Setup and Use
1. Media Sensor Handle
4. Ribbon Path
7. Media Guide Slide
2. Media Path
5. Ribbon Guide
3. Platen Roller
6. Media Guide Lever
1. Media Sensor Handle
4. Ribbon Path
7. Media Guide Slide
2. Media Path
5. Ribbon Guide
3. Platen Roller
6. Media Guide Lever
2
3
1
7 6 5
4
2
3
1
7 6 5
4
Loading Path
See figure 2-4(a) shows the loading path in TX2.
Figure 2-4(b) shows the loading path in TX3 and TX6.
Figure 2-4(a)
Figure 2-4(b)
8
Page 13

TX Series User’s Manual Chapter 2: Setup and Use
Connecting the Printer
Warnings:
(1) Do not use the printer near liquids or corrosive chemicals.
(2) Using the wrong power cord may cause damage to your printer. POSTEK assumes no liability for any damage in
such cases. The rating for the printer is 110/220 VAC ±10%, 50/60 Hz.
1. Make sure the printer is switched OFF.
2. Connect the power cord to the AC Port on the back of the printer.
3. Plug the power cord into a live wall outlet.
Interface Connection
The TX supports RS-232 Serial, USB, Centronics Parallel, Ethernet and USB Host interface connections.
To connect:
1. Make sure the printer is powered OFF.
2. The printer will identify the communication port automatically.
3. The default values of printer port can be obtained from the self-test report. (See Chapter 2: Operation Basics/
Advanced Functions/ Self Test)
4. Cable configurations for Serial (RS-232C) interface is found in Appendix A of this guide.
5. Please take the following measures to reduce cable noise.
- Restrict the length of the interface cable to less than 6’ (1.83 M) if possible.
- Keep the interface cable separate from power cords.
9
Page 14
TX Series User’s Manual Chapter 2: Setup and Use
Ribbon
Label
Lever
Printhead Module
Loading the Ribbon
Note: Load ribbon only when using the thermal transfer printing method. Remove any ribbon that may be loaded
when using the direct thermal printing method.
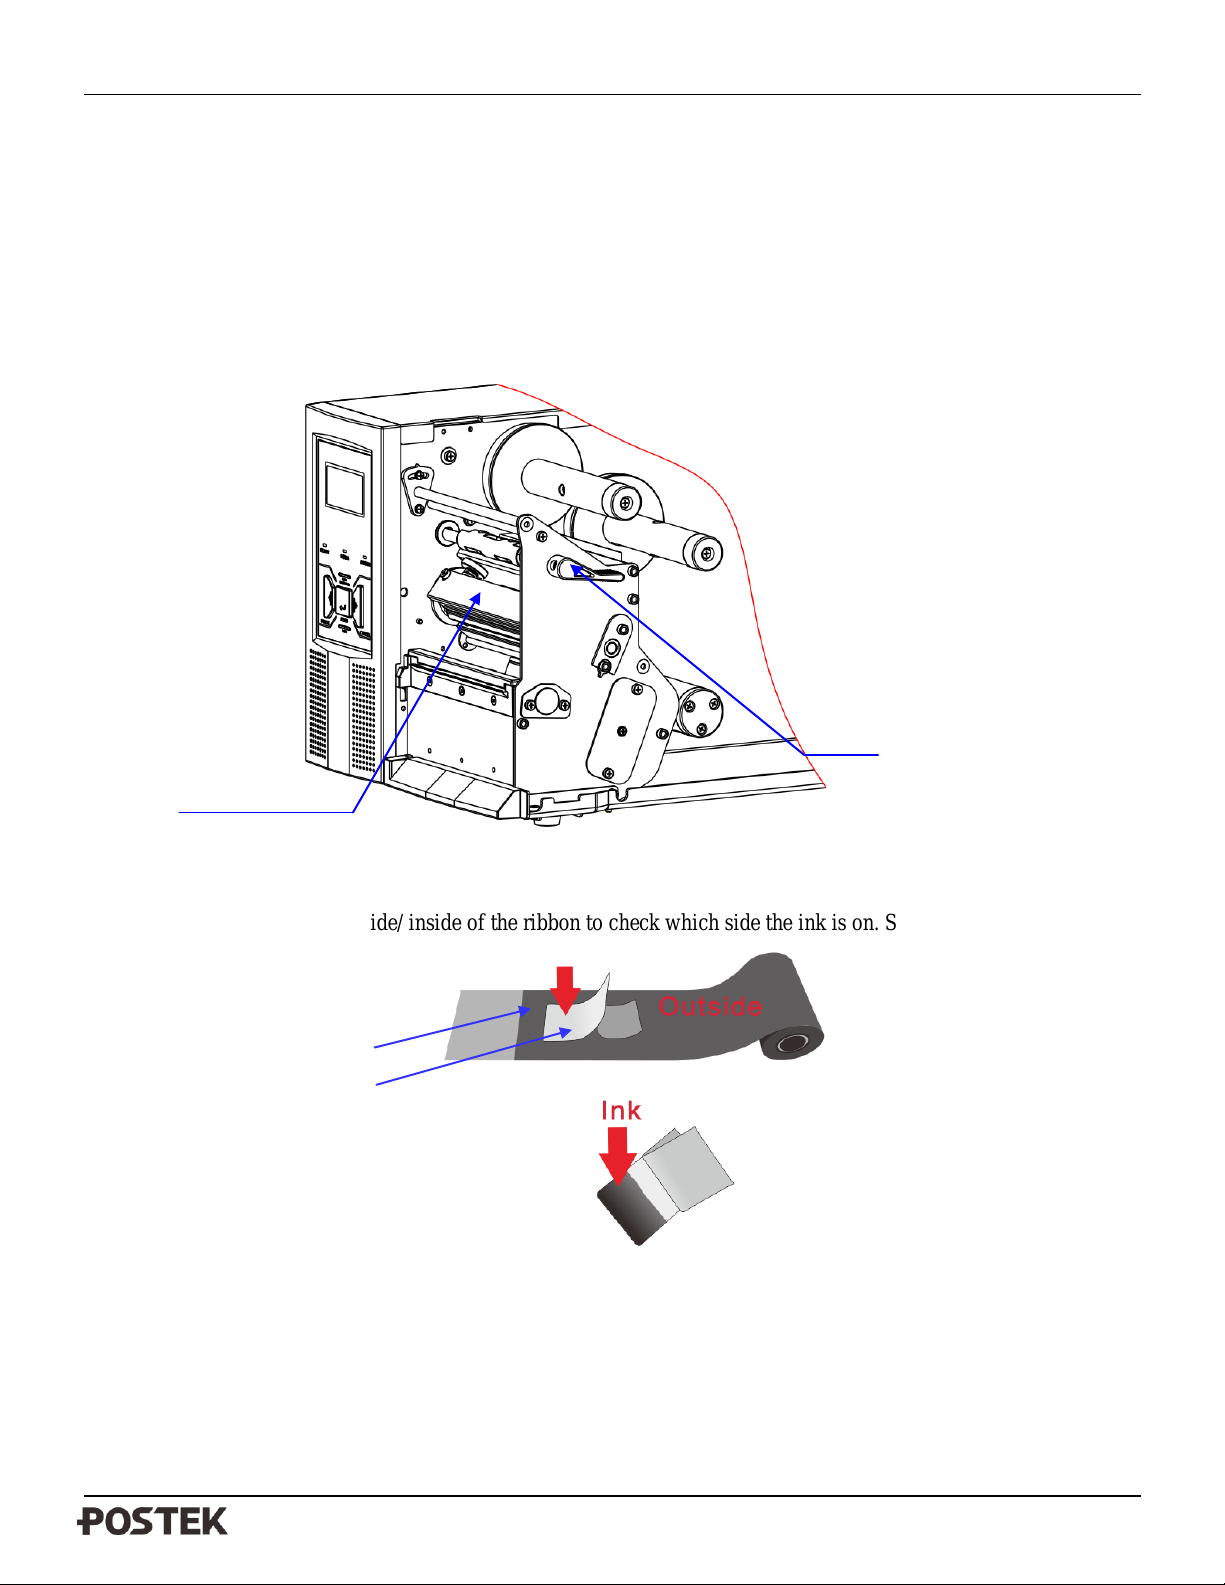
To install the ribbon:
1. Lift to open the right cover of the printer.
2. Turn the Lever counter clockwise to release the Printhead Module.
Figure 2-5
3. Stick a label to the outside/ inside of the ribbon to check which side the ink is on. See Figure 2-6.
Figure 2-6
10
Page 15
TX Series User’s Manual Chapter 2: Setup and Use
Ribbon Core
Ribbon Core Insert
Ribbon Take-up
Ribbon Supply
Ribbon Path
Ribbon Guide
Printhead Module
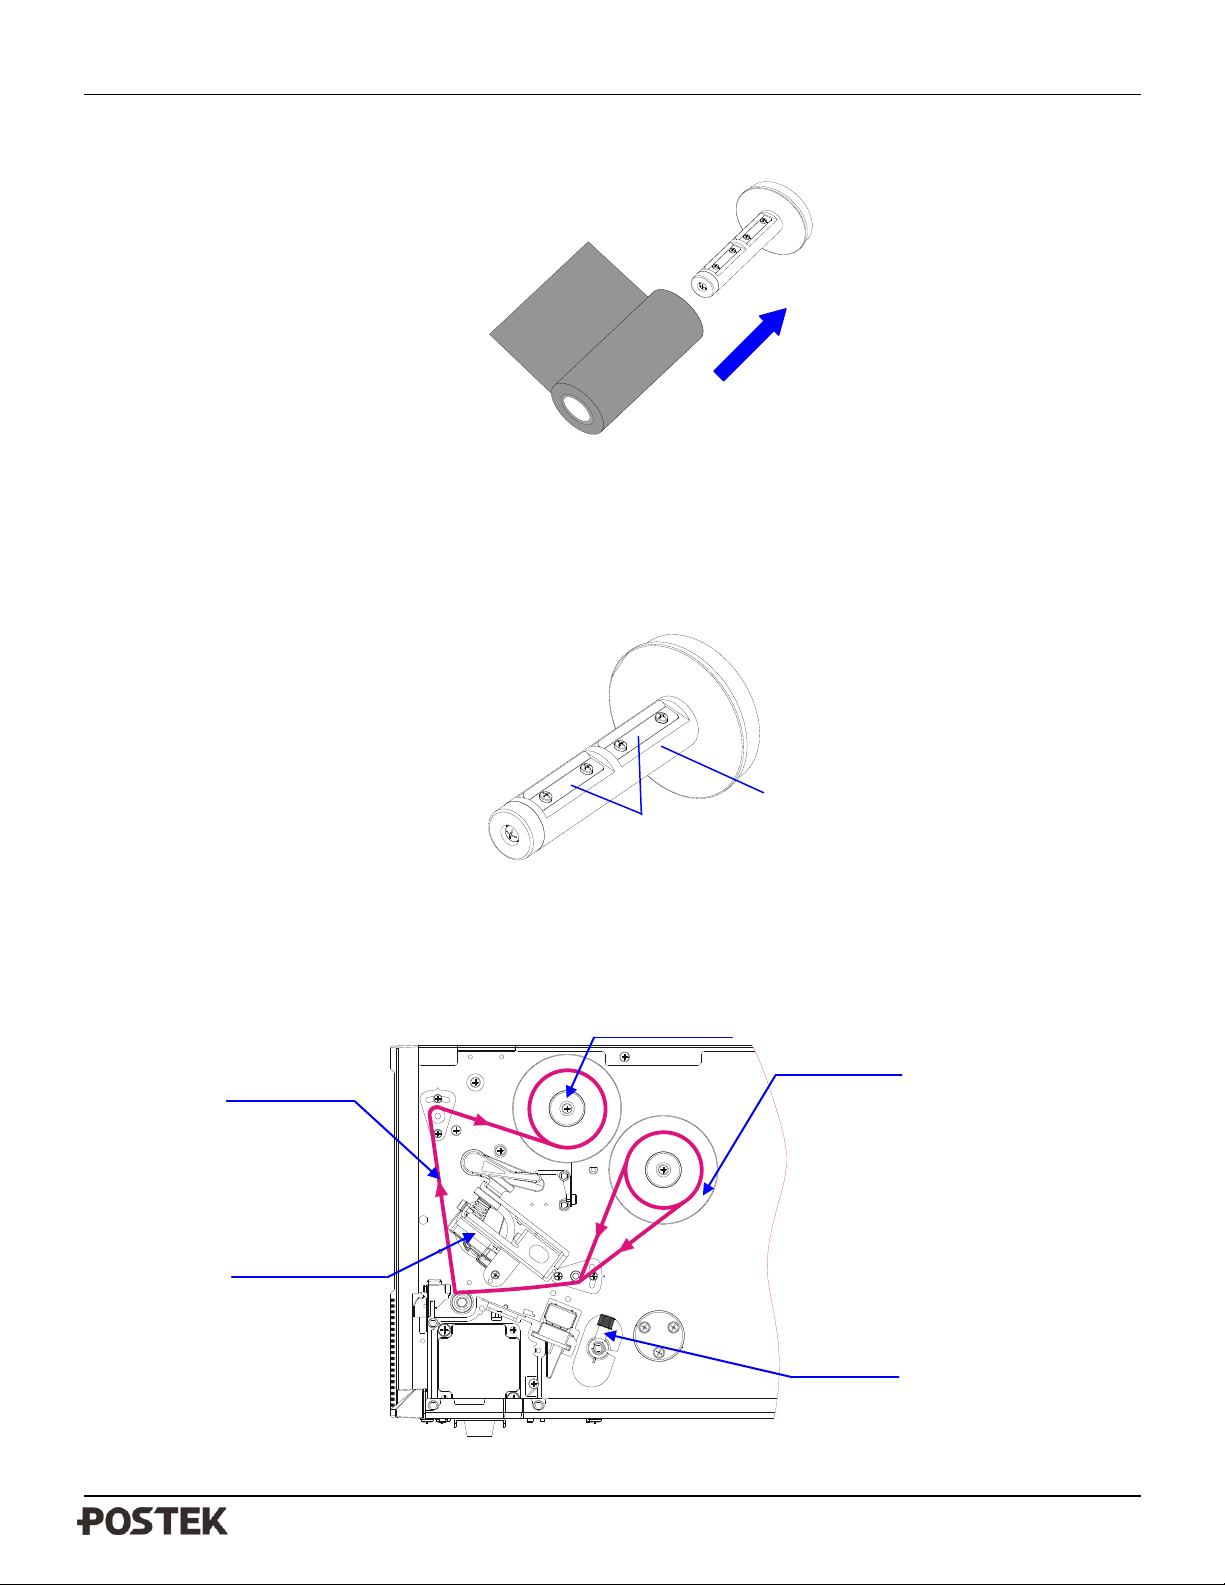
4. Unwrap the ribbon roll and separate the ribbon roll and the core. Place the roll into the Ribbon Spindle,
adjusting the brackets (see Figure 2-7). Make sure the ribbon roll is firmly in place.
Figure 2-7
5. Adjust the shrapnel of the ribbon spindle to ensure adequate pressure between the ribbon roll and the ribbon
spindle. See Figure 2-8. Loosen the screws on the Ribbon Core Insert. Moving the Ribbon Core Insert outward or
inward can increase or decrease the friction between the Ribbon Supply Spindle and the Ribbon Core. Tighten
the screws after adjusting the shrapnel to the appropriate position.
Figure 2-8
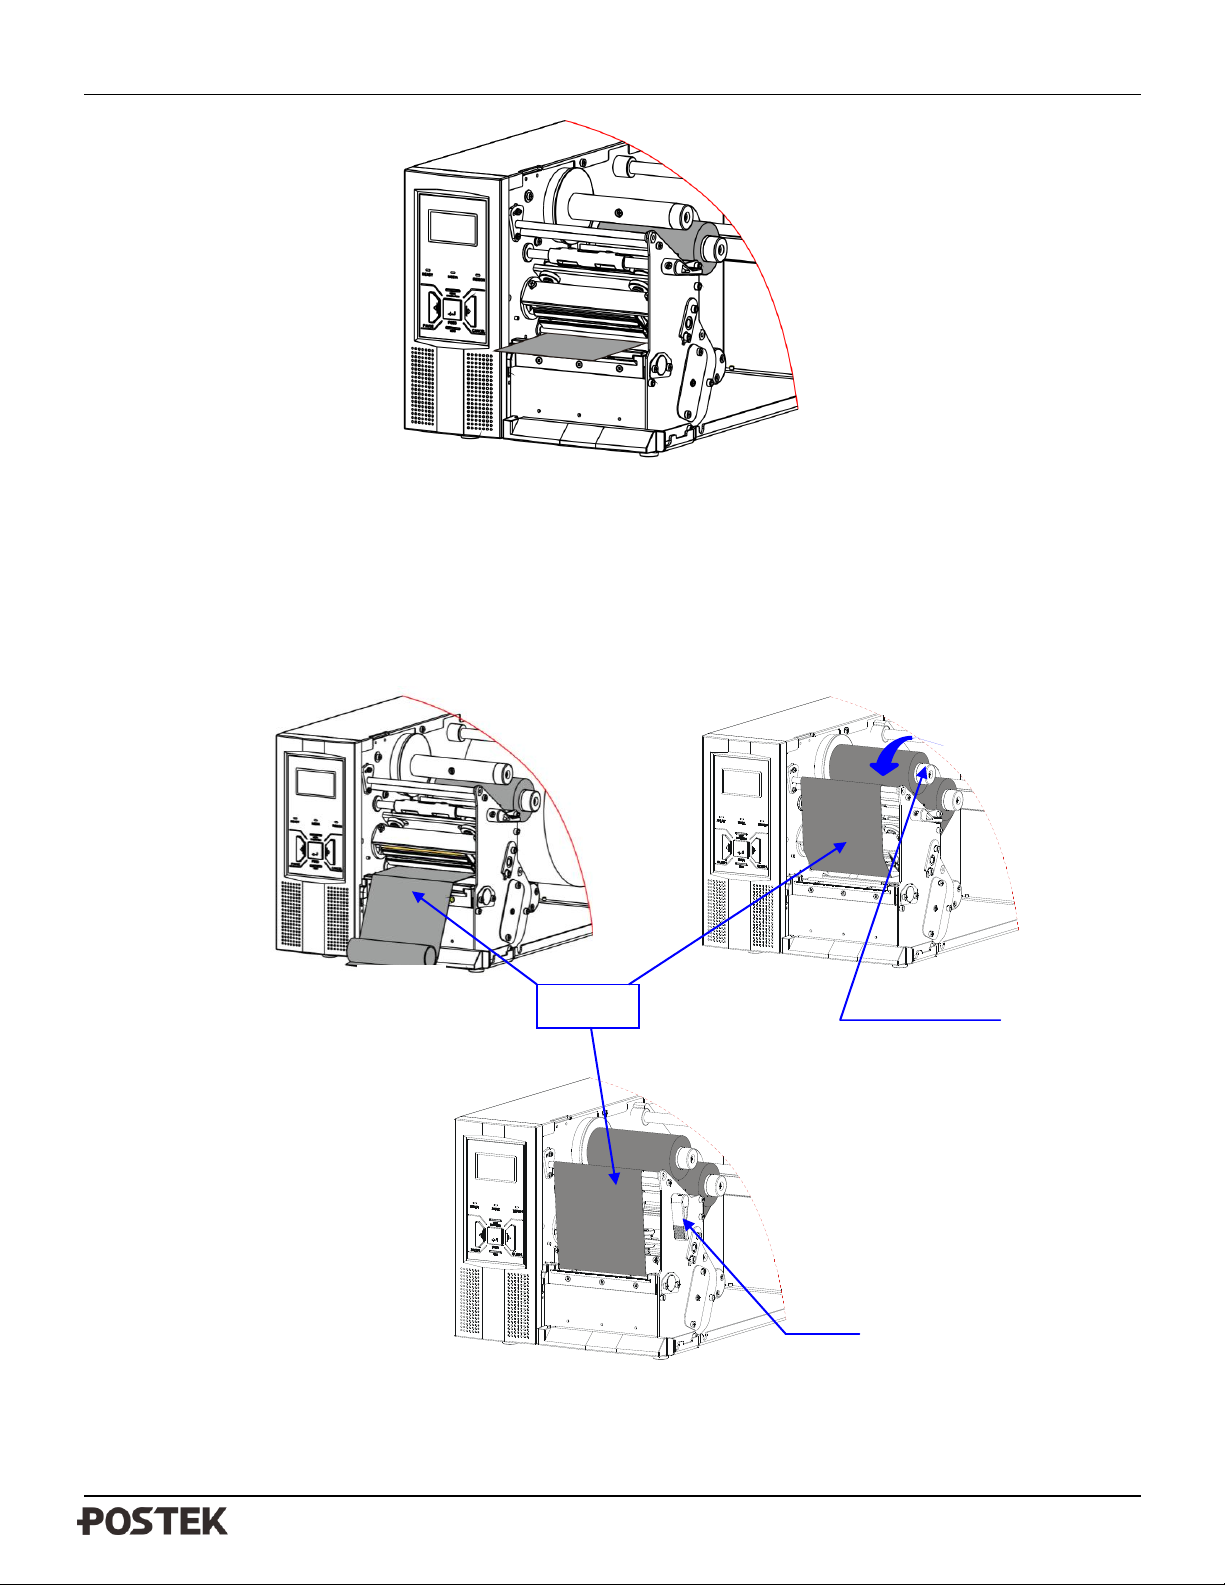
6. Follow the ribbon path indicated in Figure 2-9(a), lead the ribbon under the Ribbon Guide and pass the Printhead
Module, ensuring the ribbon’s ink side is facing the media. See Figure 2-9(b).
(a)
11
Page 16
TX Series User’s Manual Chapter 2: Setup and Use
Ribbon
(a)
(b)
Ribbon Take-up
Lever
(b)
Figure 2-9
7. Secure the leading edge of the ribbon to the core. See Figure 2-10(a).
8. Slide the core onto the Ribbon Take-up Spindle to push it firmly to the inside edge of the Spindle. Turn the
Take-up Spindle until the ribbon is tightly wound. See Figure 2-10(b).
9. Turn the Lever to the close position. See Figure 2-10(c).
(c)
Figure 2-10
12
Page 17
TX Series User’s Manual Chapter 2: Setup and Use
Positioning Arm
Media Spindle
Lever
Media Roll
Loading the Media
TX Series printers can be operated in four different modes: Standard mode, Tear-off mode, Peel-off mode and
Cutting mode.
- In Standard mode, each printed label remains on the backing liner.
- In Tear-off mode, each printed label’s gap is stopped at the media outlet and tore off manually.
- In Peel-off mode, each printed label is peeled away from the backing liner manually.
- In Cutting mode, the printer and cutter automatically cuts the label after it is printed.
Standard Mode
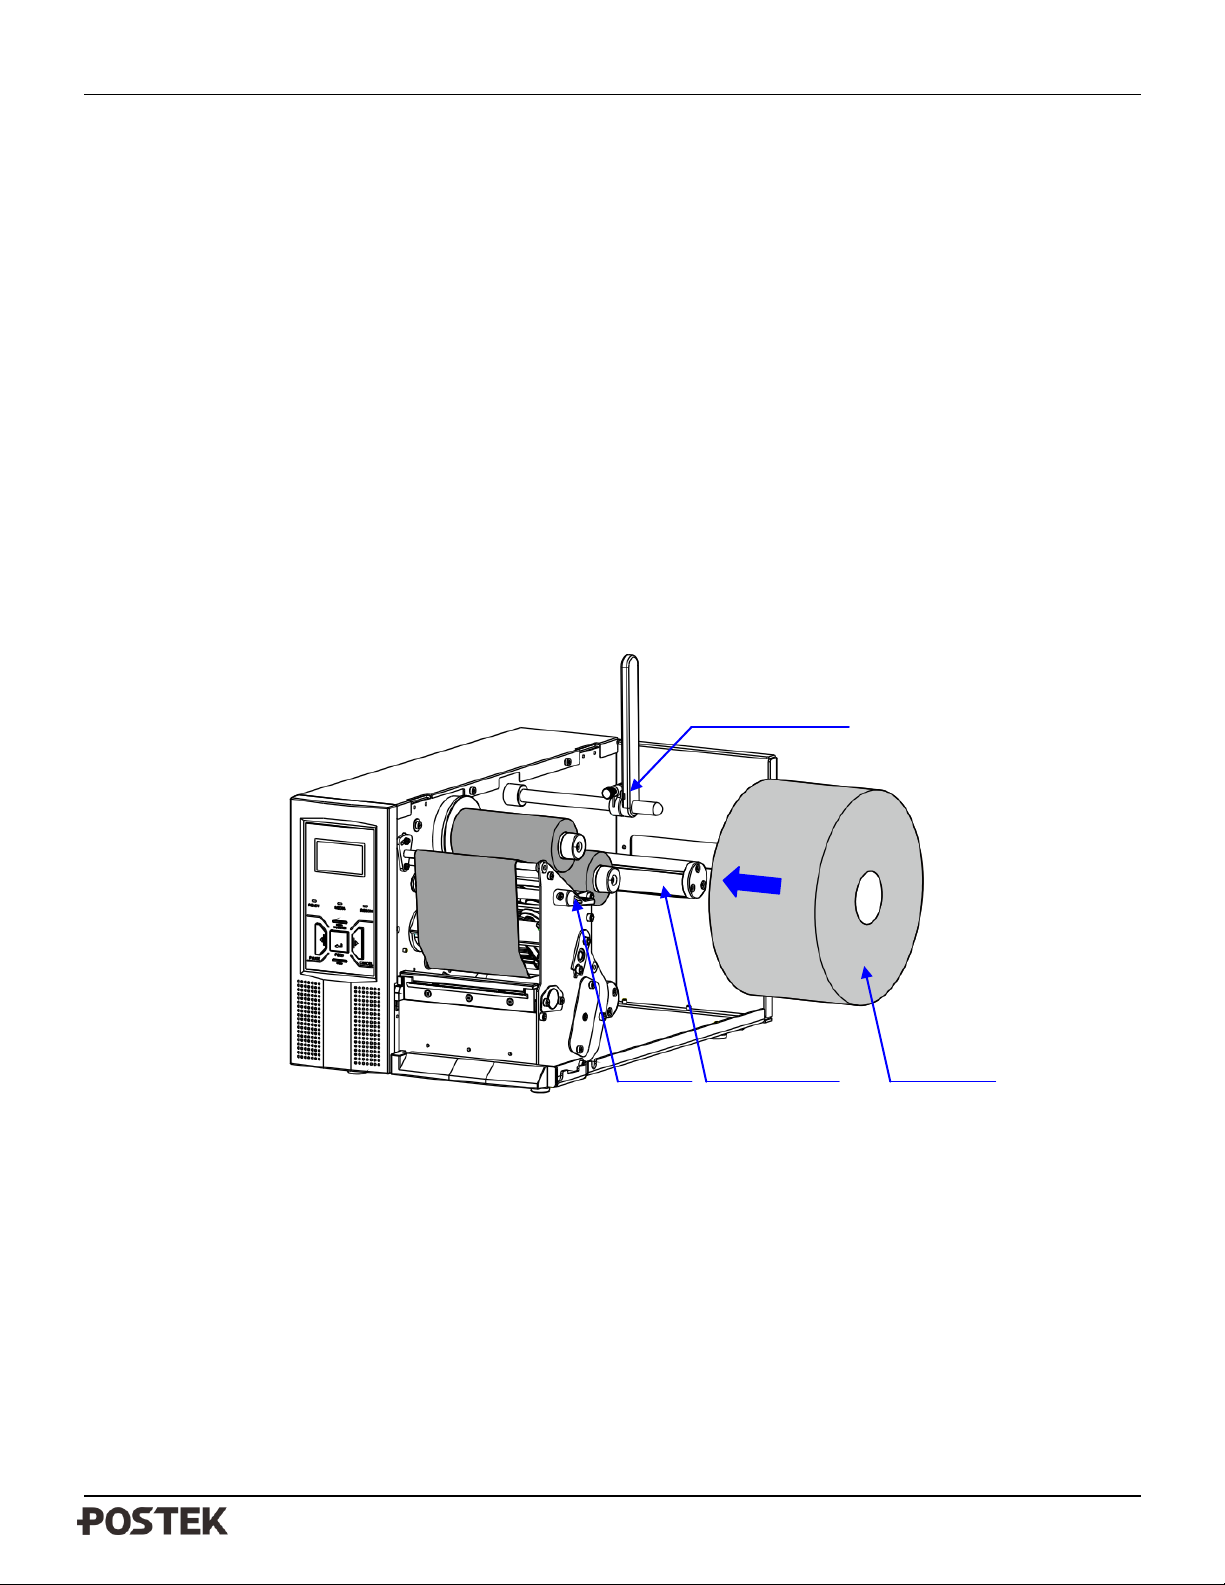
To load media into TX Series while using Standard Mode:
1. Lift to open the right cover.
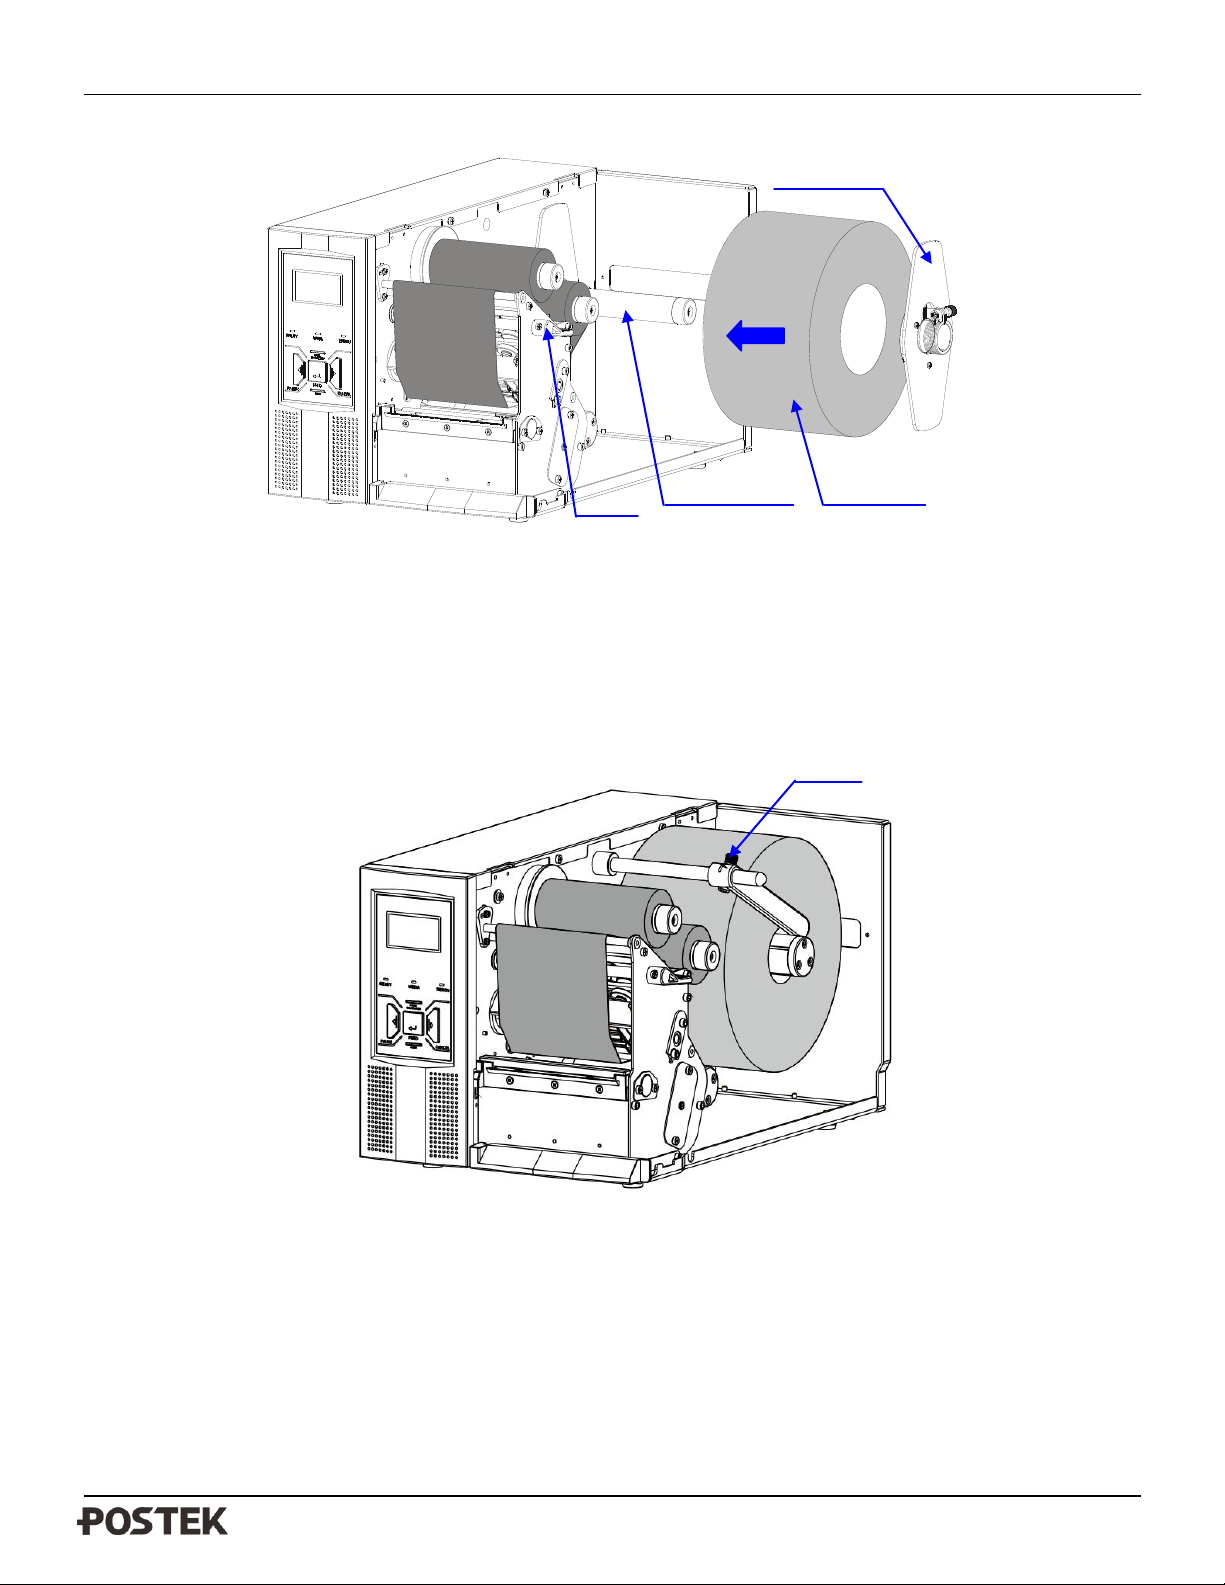
2. Lift the Positioning Arm of the Media Roll for TX2 or take the Media Roll Guide out for TX3 and TX6, and
insert a media roll onto the Media Spindle, pushing it firmly to the inside edge, see figure 2-11(a) and 2-11(b).
Figure 2-11(a)
Figure 2-11(a) shows the media loading of TX2.
13
Page 18
TX Series User’s Manual Chapter 2: Setup and Use
Media Roll
Guide (out)
Media Roll
Media Spindle
Lever
Bolt
Figure 2-11(b)
Figure 2-11(b) shows the media loading of TX3 and TX6.
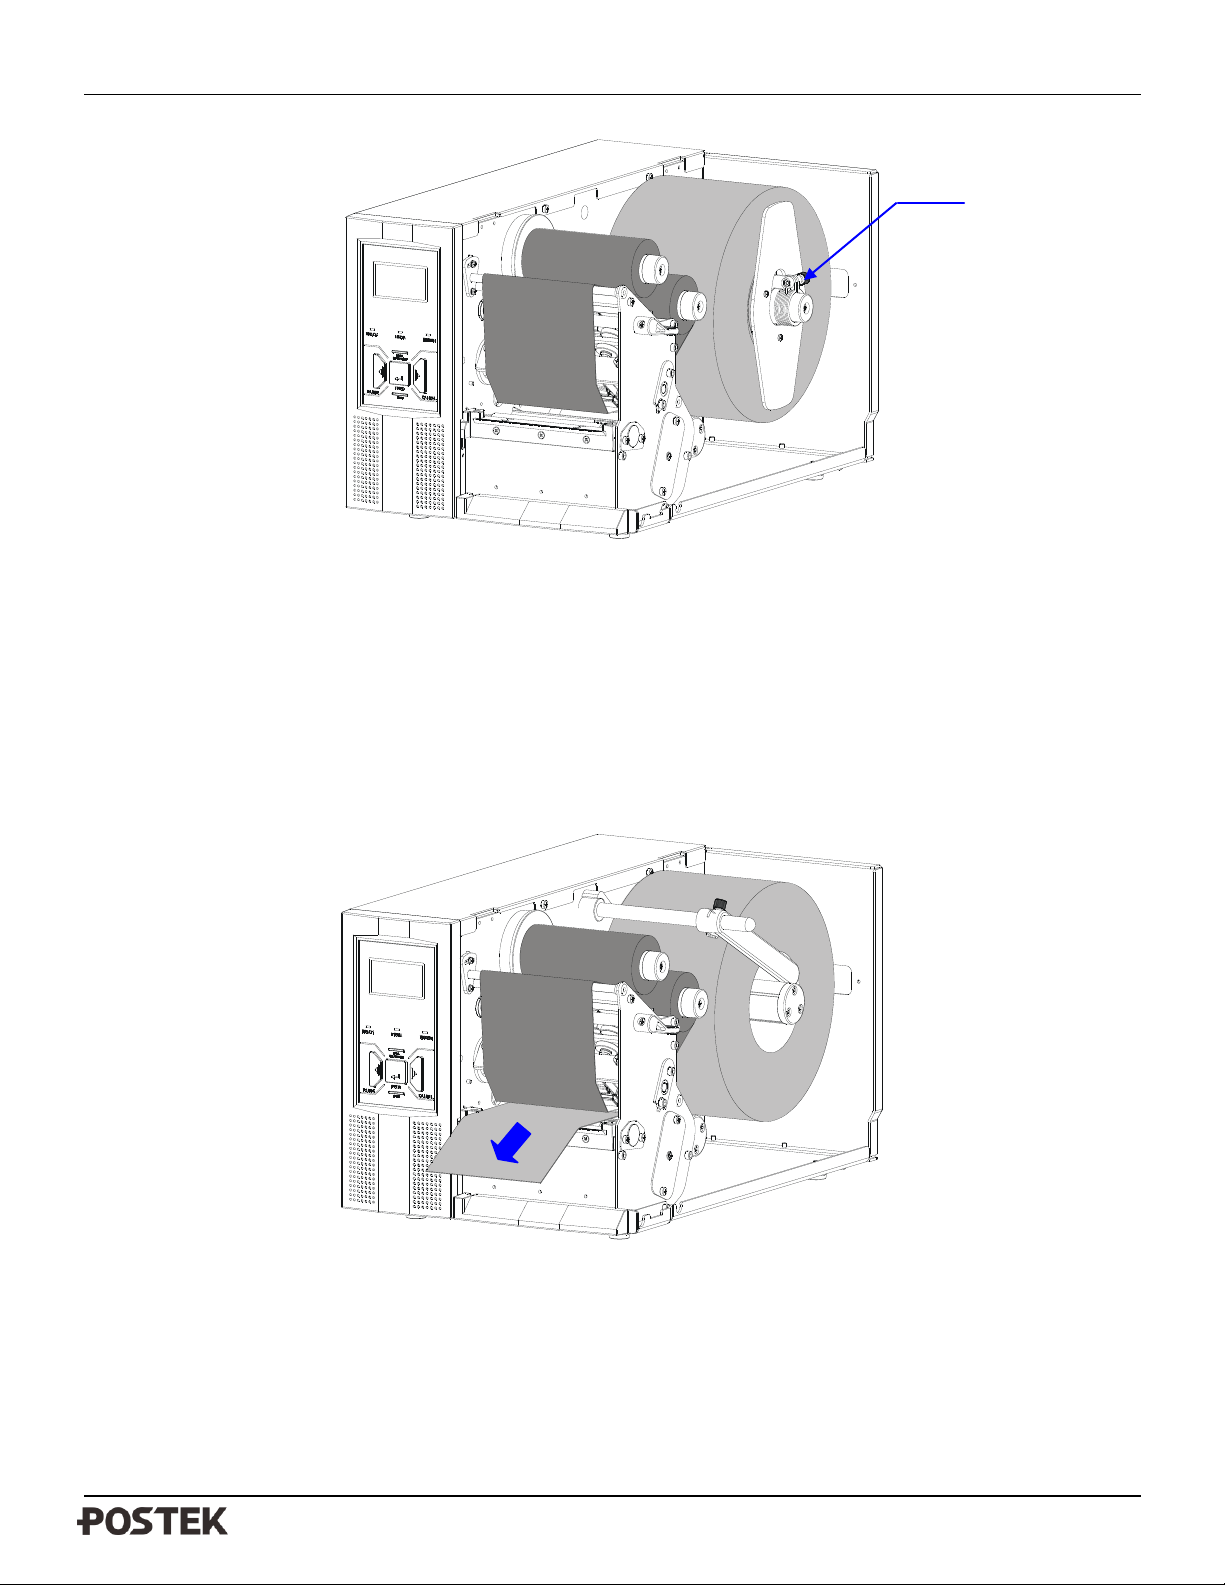
3. Adjust the Positioning Arm by pushing it down and align it to the outside edge of the media roll (see figure
2-12(a)), or slide the media roll guide onto the media spindle until it’s snug against the media roll (see figure
2-13(b)), then tighten the Bolt to lock it in place.
Figure 2-12 (a)
Figure 2-12(a) shows the media loading of TX2.
14
Page 19
TX Series User’s Manual Chapter 2: Setup and Use
Bolt
Figure 2-12 (b)
Figure 2-12(b) shows the media loading of TX3 and TX6.
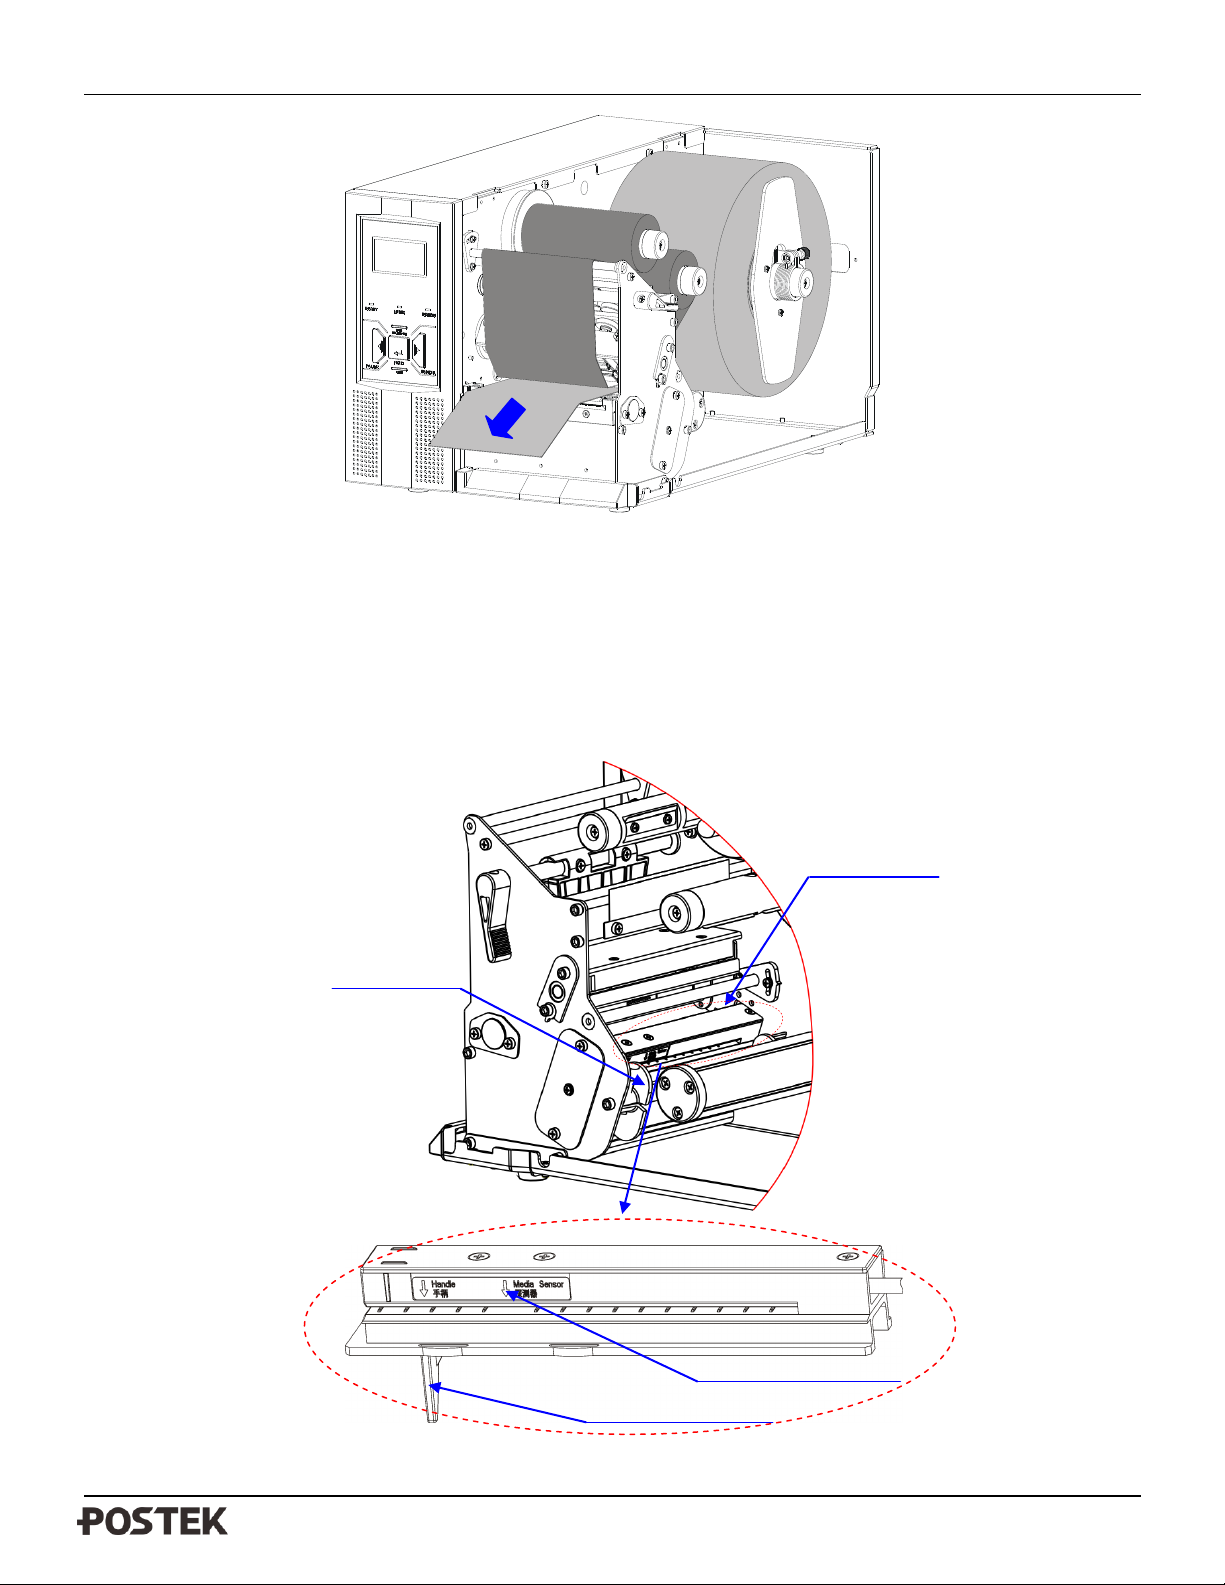
4. Turn the Lever counter clockwise to release the Printhead Module. Referring to Figure 2-4(a) or 2-4(b), lead the
media that follows the media guide to place the media under the Media Guide Lever, and in-between the Media
Sensor.
5. Pull the media pass and under the Printhead Module, see figure 2-13(a) and 2-13(b)
Figure 2-13 (a)
Figure 2-13(a) shows the media loading of TX2.
15
Page 20
TX Series User’s Manual Chapter 2: Setup and Use
Media Sensor Pointer
Media Sensor Handle
Media Guide
Media Sensor
Figure 2-13 (b)
Figure 2-13(b) shows the media loading of TX3 and TX6.
6. Move the Media Sensor to the appropriate position (see Figure 2-14). Adjust the Media Sensor to ensure that its
position is aligned above the media’s separation identifier (e.g. gap, black line, perforation, hole, etc.)
7. Move the Media Guide Slide to the edge of the media, making sure not to pinch or squeeze the media; keep the
media flat and smooth, see figure 2-14.
Figure 2-14
16
Page 21
TX Series User’s Manual Chapter 2: Setup and Use
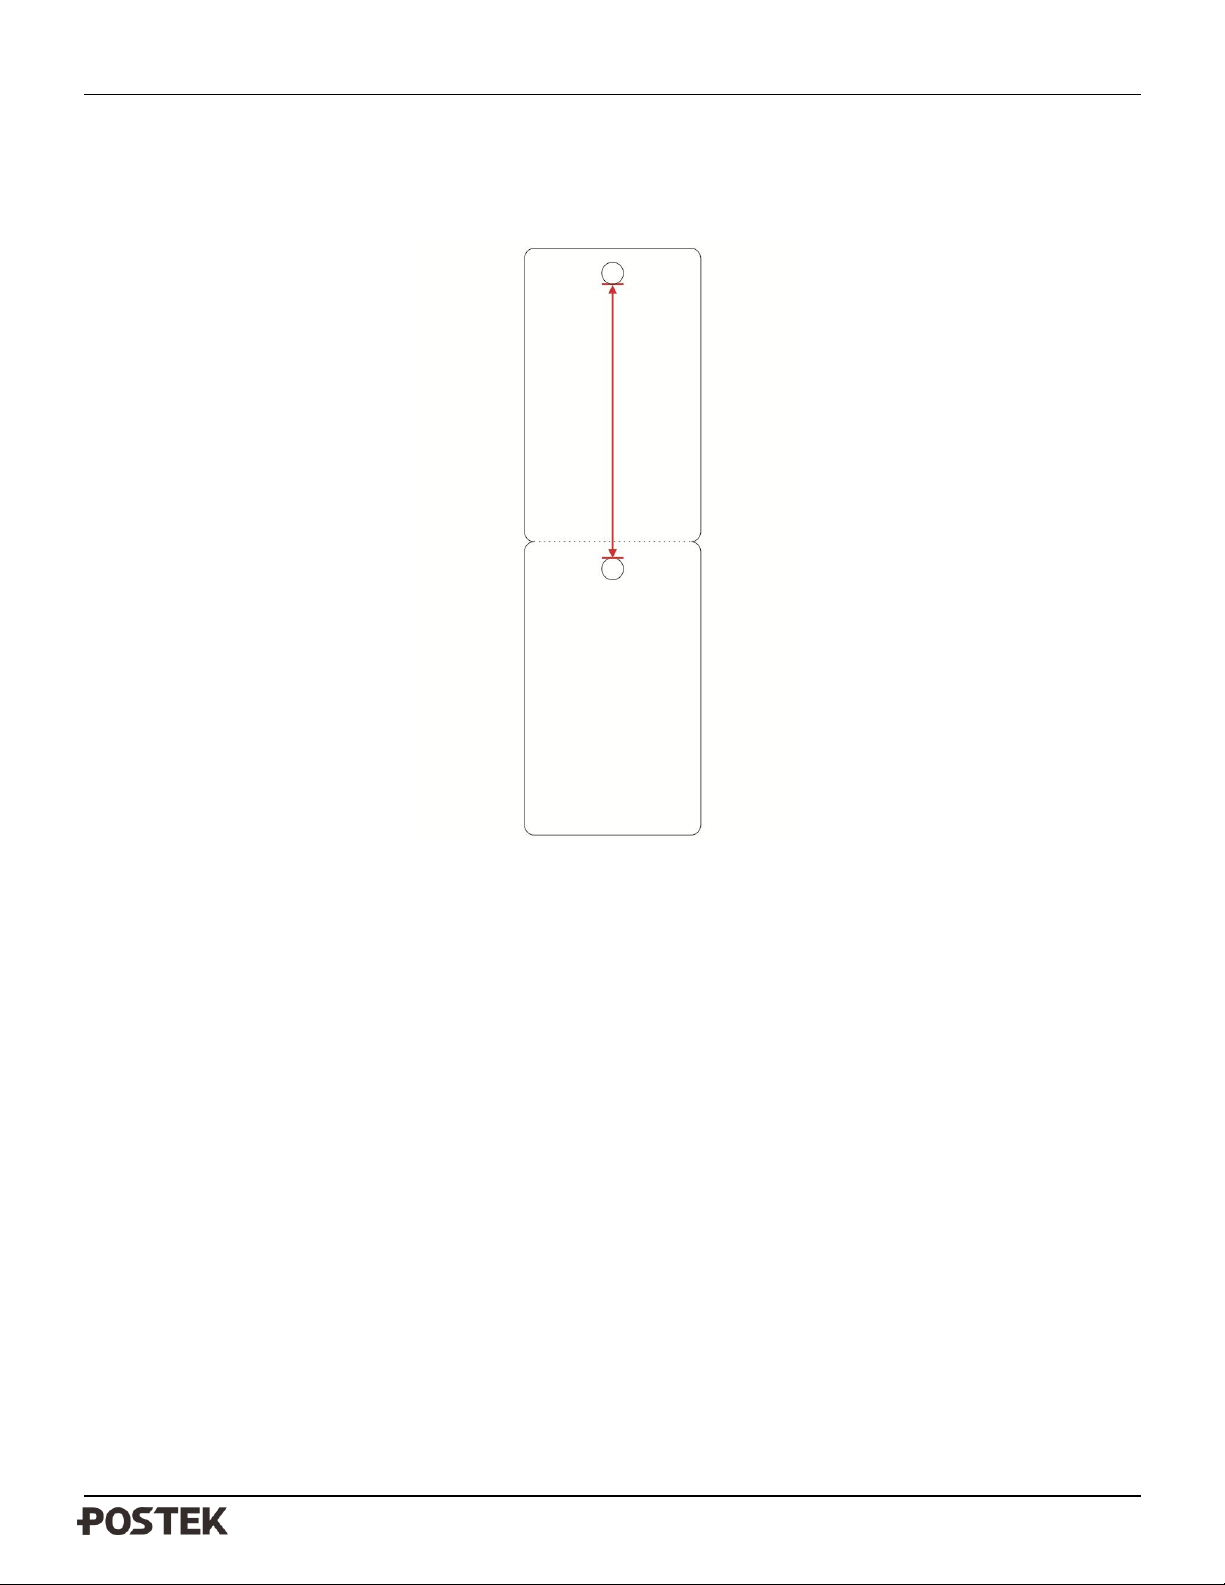
Note: (1) The TX Series printer has three types of media sensors: the up/down reflective media sensor and the
transmissive media sensor. Please see the “LCD Panel Operation” guide to select the sensor’s type.
(2) When using the transmissive media sensor to detect the tag with hole (see figure 2-15), the tag height
should be set as the distance between the bottom of a hole and the top of the next one.
Figure 2-15
8. Turn the lever clockwise to close the Printhead Module;
9. Close the cover and turn on the printer, or press the “FEED” button if the printer is already on.
Peel-off and Tear-off Mode:
To load media into the TX while using Peel-off and Tear-off Mode, use the Standard Mode procedures.
Cutting Mode:
Using the TX in Cutting Mode requires an optional rotary cutter. See an authorized Postek Reseller for additional
information. With the optional rotary cutter, the media loading instructions are provided.
17
Page 22
TX Series User’s Manual Chapter 3: Operations and Settings
Figure 3-1
Chapter 3: Operations and Settings
Basic Operations
Power Switch
The power switch is on the back panel of the printer. The symbols on the switch are defined as follows:
━ —ON
〇 —OFF
The Front Panel
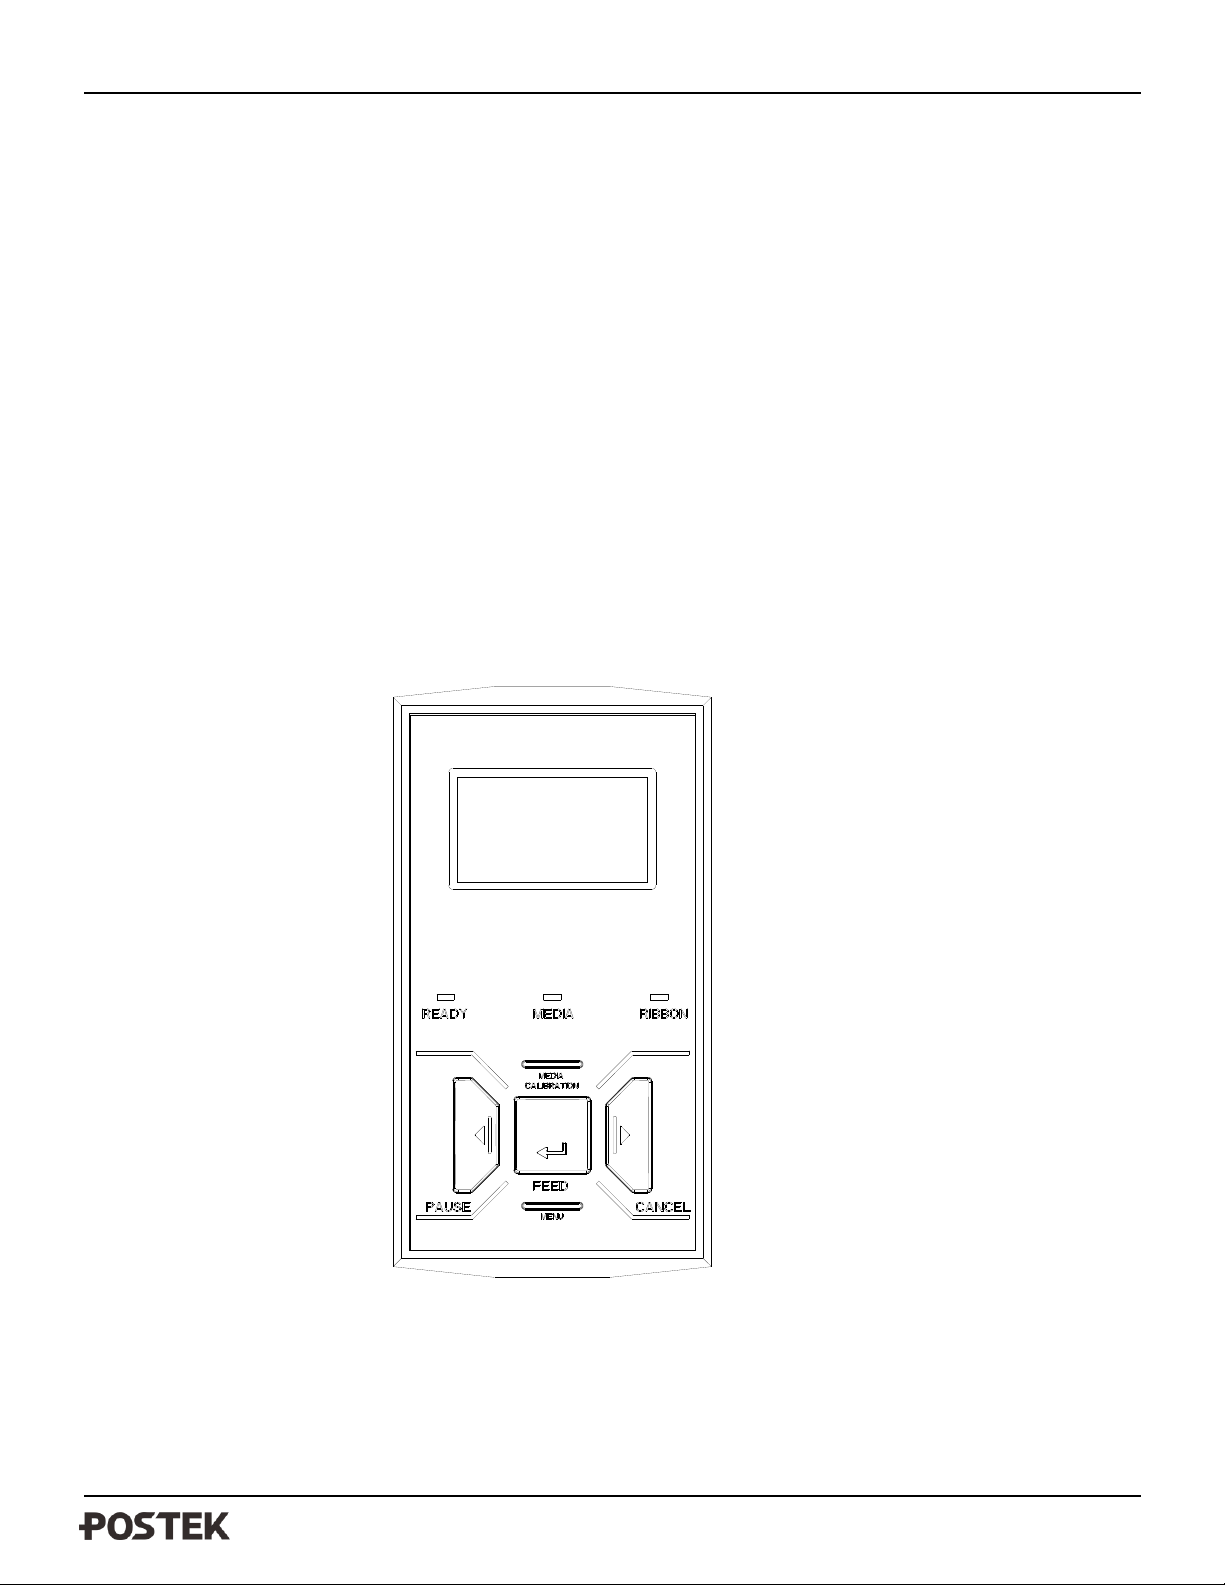
The Front Panel of the TX printer consists of:
- Three Indicator Lamps: MEDIA, READY and RIBBON
- Five multi function buttons: PAUSE, FEED, CANCEL, MEDIA CALIBRATION and MENU
18
Page 23
TX Series User’s Manual Chapter 3: Operations and Settings
Mode
Function
FEED
Feed one label
PAUSE
- Press once to pause current print job
- Press a second time to resume printing
CANCEL
- Cancel current batch of labels
- Forces the printer to continue working after an error has been corrected
MEDIA CALIBRATION
Performs media sensor calibration
MENU
Enter/exit setup menu
READY
MEDIA
RIBBON
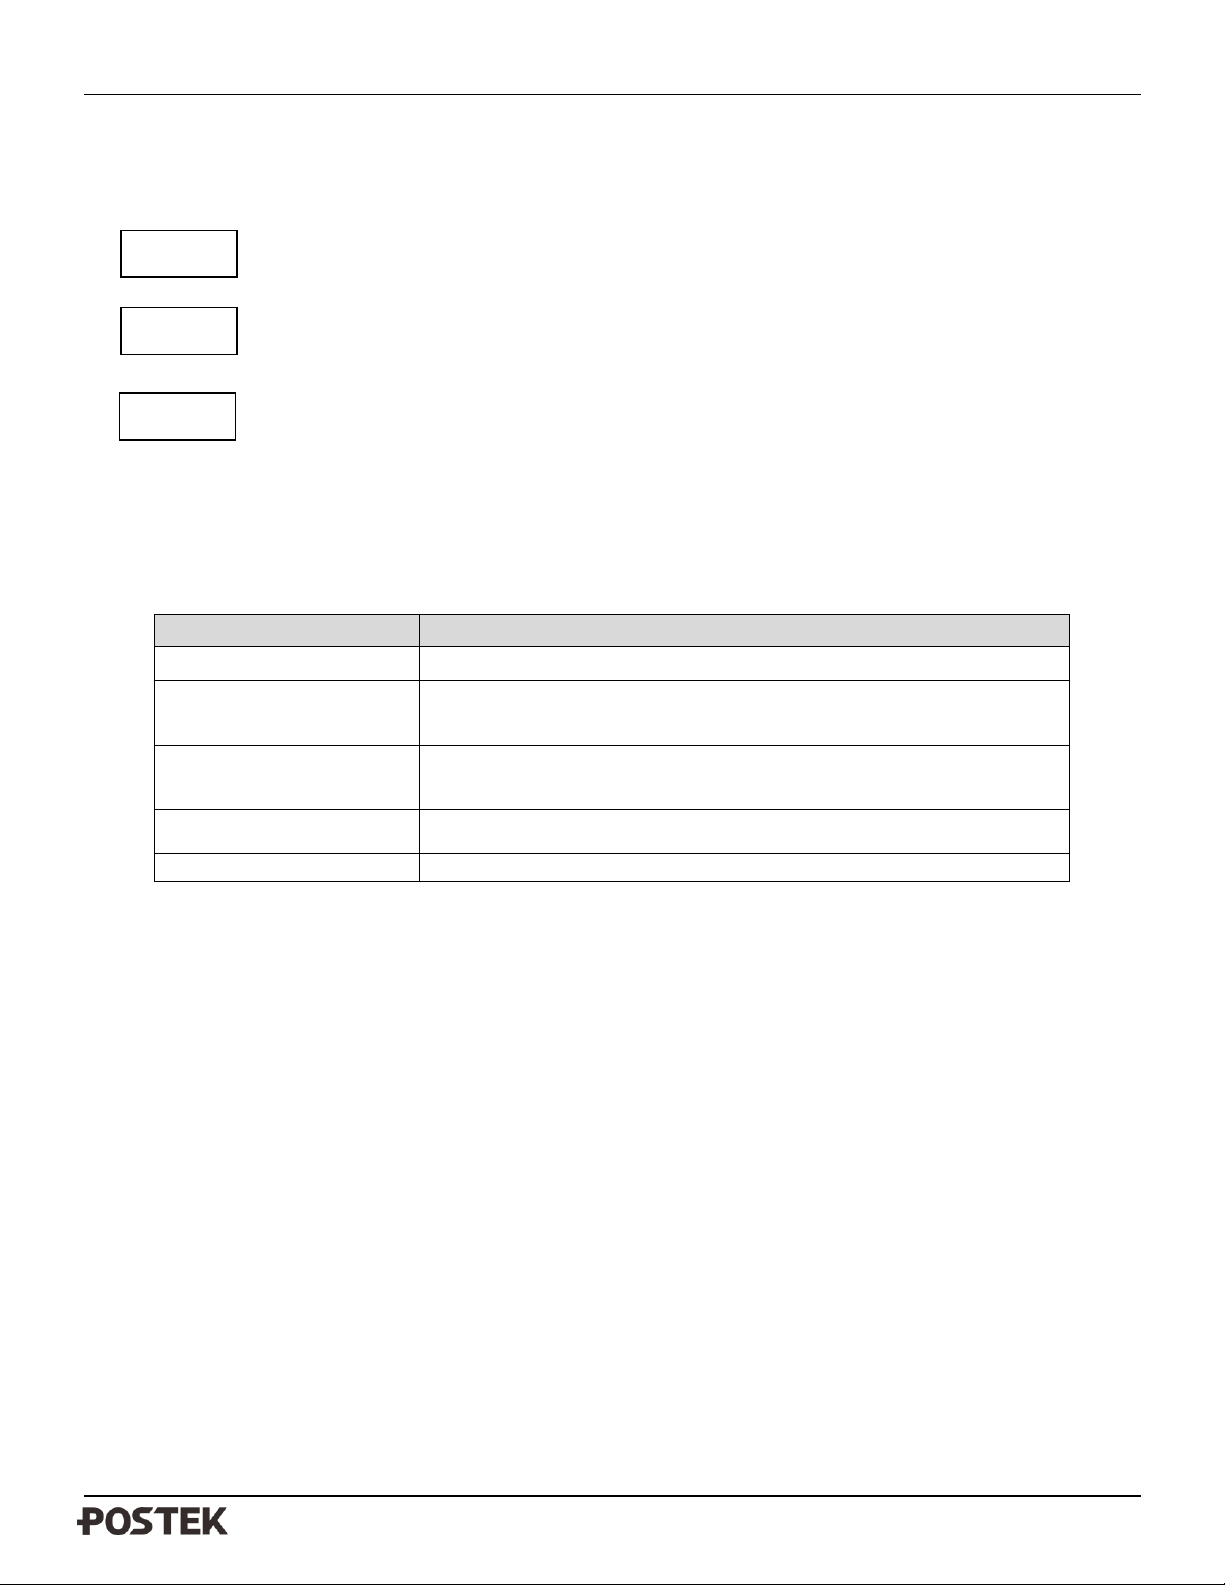
LED Indicators
The three lamps indicate the status of the printer (please refer to Chapter 4: Troubleshooting, for error indicators).
- Solid: Indicates the printer is in the normal state;
- Blinking: Indicates the printer is in the ‘PAUSE’ state.
- Solid: Indicates the printer is in the normal state;
- Blinking simultaneously with READY: Running out of media;
- Solid: Indicates thermal transfer printing;
- Off: Direct thermal printing (no ribbon installed);
- Blinking simultaneously with READY: Running out of ribbon.
Panel Buttons
The five buttons have different functions based on the mode of the operation is performed.
LCD Display
A graphic dot matrix LCD display is affixed to the front panel. Data in the form of characters, letters and numbers
are shown on the LCD display. Please see below “LCD Panel Operation”.
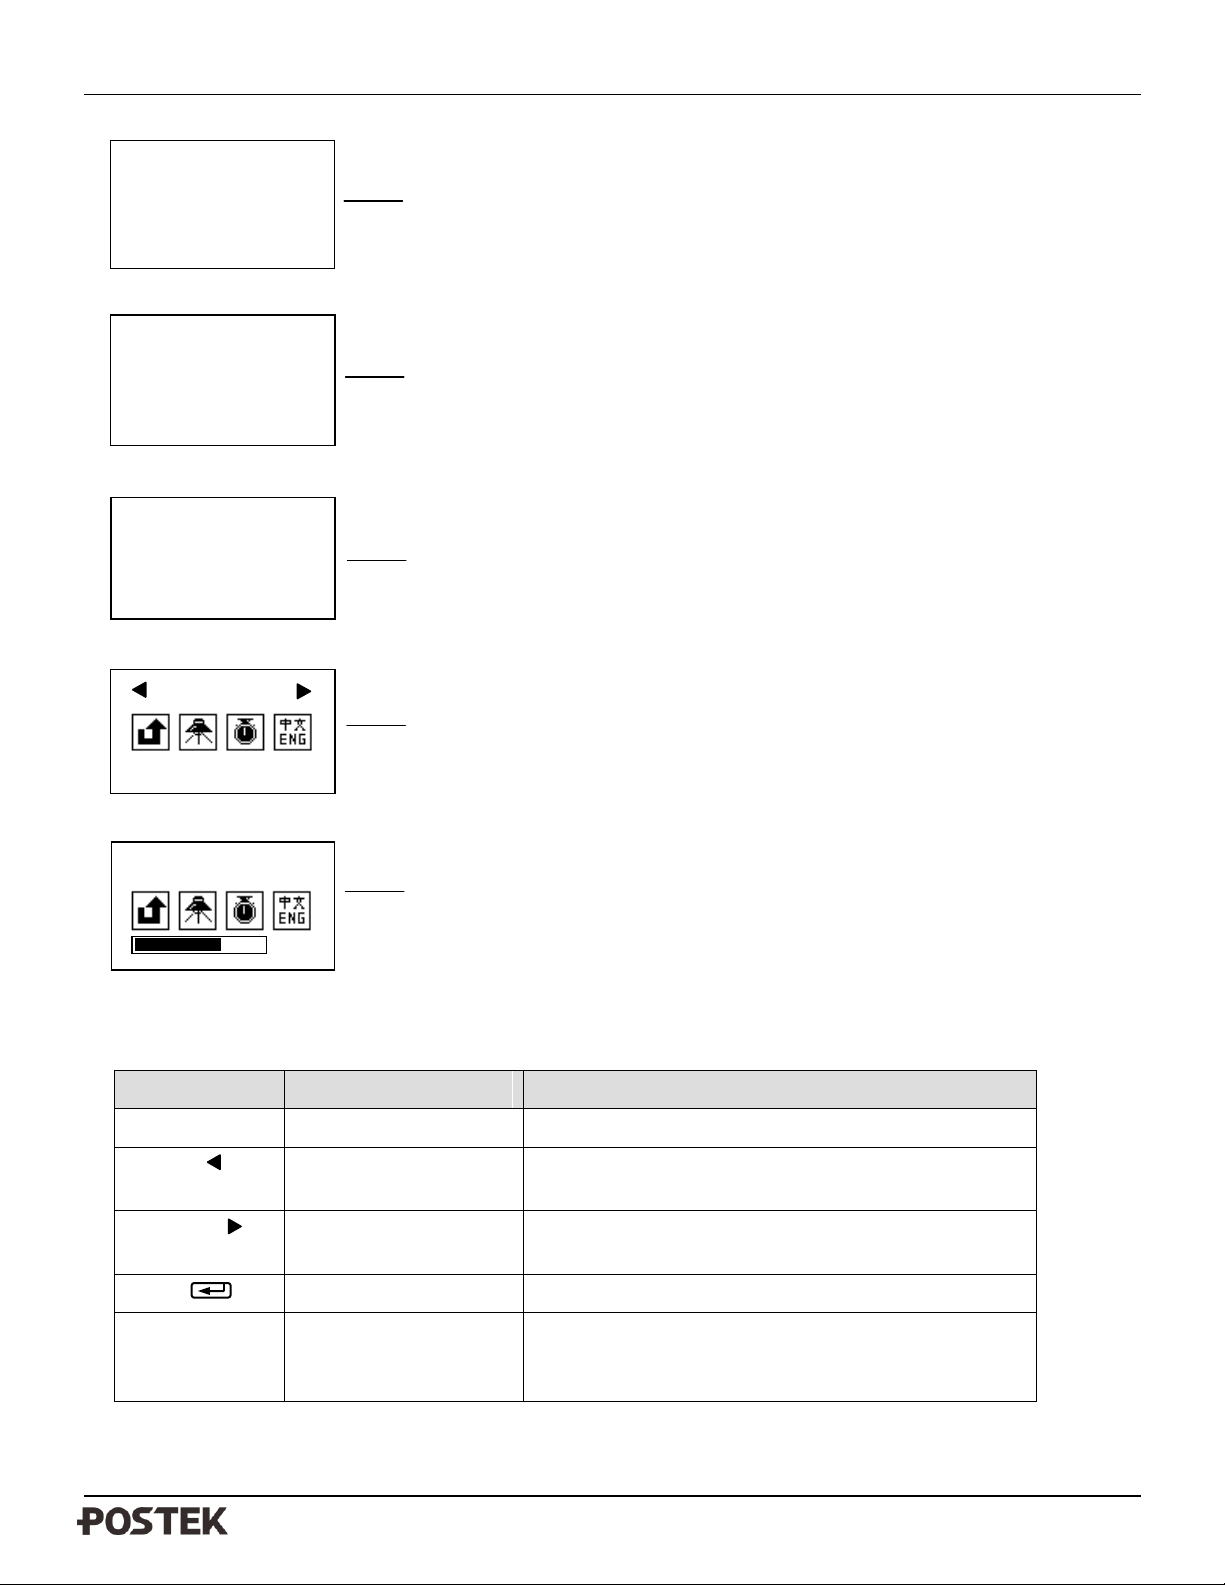
LCD Panel Operation
The LCD can display the printer’s status, total print quantities, error messages, and is also valuable when
configuring the printer. Following are common examples of LCD displays.
19
Page 24
TX Series User’s Manual Chapter 3: Operations and Settings
BUTTON
FUNCTION
DESCRIPTION
MENU
Enter/exit
Enter/exit setup mode
PAUSE
Item/Parameter
Selection
Descending Item/Parameter selection
CANCEL
Item/Parameter
Selection
Increasing Item/Parameter selection
FEED
Confirmation
Confirm selection
PAUSE + FEED
Enter setup mode while
printing
Press PAUSE to pause the current printing job, then
press and hold FEED for about 4 seconds, then the LCD
will display menu for printing setup
Changing an Option’s Value
XXXX is the name of the activated option.
Status Bar and Value.
Settings Menu
XXXX is the name of the currently selected
option, icons in the middle represents different
settings options.
Selected/Total (Option Number)
Pause Status
Total printed labels (pages) count, will be reset
to 0 if cycle the printer power.
Firmware Version
Current Date, Current Time
Ready Status [Resolution]
Total printed labels (pages) count, will be reset
to 0 if cycle the printer power.
Firmware Version
Current Date. Current Time
XXXX
01/36
Ready [203DPI]
Total: 888
Version: 1.76
2016-01-01 08:08:08
Pause
Total: 888
Version: 1.76
2016-01-01 08:08:08
Printing Pause Status
Remaining labels (pages) count of the current
job / Total labels (pages) qty of the current job,
will be reset to 0 if cycle the printer power.
Current Date, Current Time
Pause
100/888
2016-01-01 08:08:08
XXXX
12
Button functions:
20
Page 25
TX Series User’s Manual Chapter 3: Operations and Settings
SUB MENU
DESCRIPTION
Exit
Exit from the menu, with or without saving the changes.
Darkness
When set at ‘0’, the printer will accept the default setting or command setting,
if not, the printer will not accept the default setting or command setting.
Speed
Language
Options: English, Chinese
Default: English
Print Method
Direct Thermal, Thermal Transfer.
Default: Thermal Transfer.
Tear Off
Options: Enable, Disable.
Default: Disable.
Cutter
Manual Peel Off
Media Sensor Type
Options: Down Reflective, Up Reflective, Transmissive.
Default:: Down Reflective.
Baud Rate
Options: 9600, 19200, 38400, 57600.
Default:: 38400.
Data Bit
Options: 7 Bit, 8 Bit.
Default: 8 Bit.
Parity
Options: None, Odd, Even
Default: None.
Tear-off Offset
The increment, per TX model are as follows:
– TX2 is 0.125mm
– TX3 0.085 mm,
– TX6 is 0.0423 mm.
Positioning Offset
Cutting Offset
Peeling Offset
Horizontal Offset
Vertical Offset
Cutting Frequency
After the specific copies of labels printing will the cutter cut once.
Default value: 01.
Error Report
Allow or forbid the printer to send back error information to the host.
Options: Enable, Disable
IP Address
The range of XXX is 0-255, press PAUSE to decrease, CANCEL to
increase, FEED to move to next XXX. Upon completion, pressing
FEED will proceed to the “Save/Abort” screen.
Gateway
Subnet Mask
Port
Set Date
Set system date.
Set Time
Set system time.
View Fonts
Browse the stored fonts.
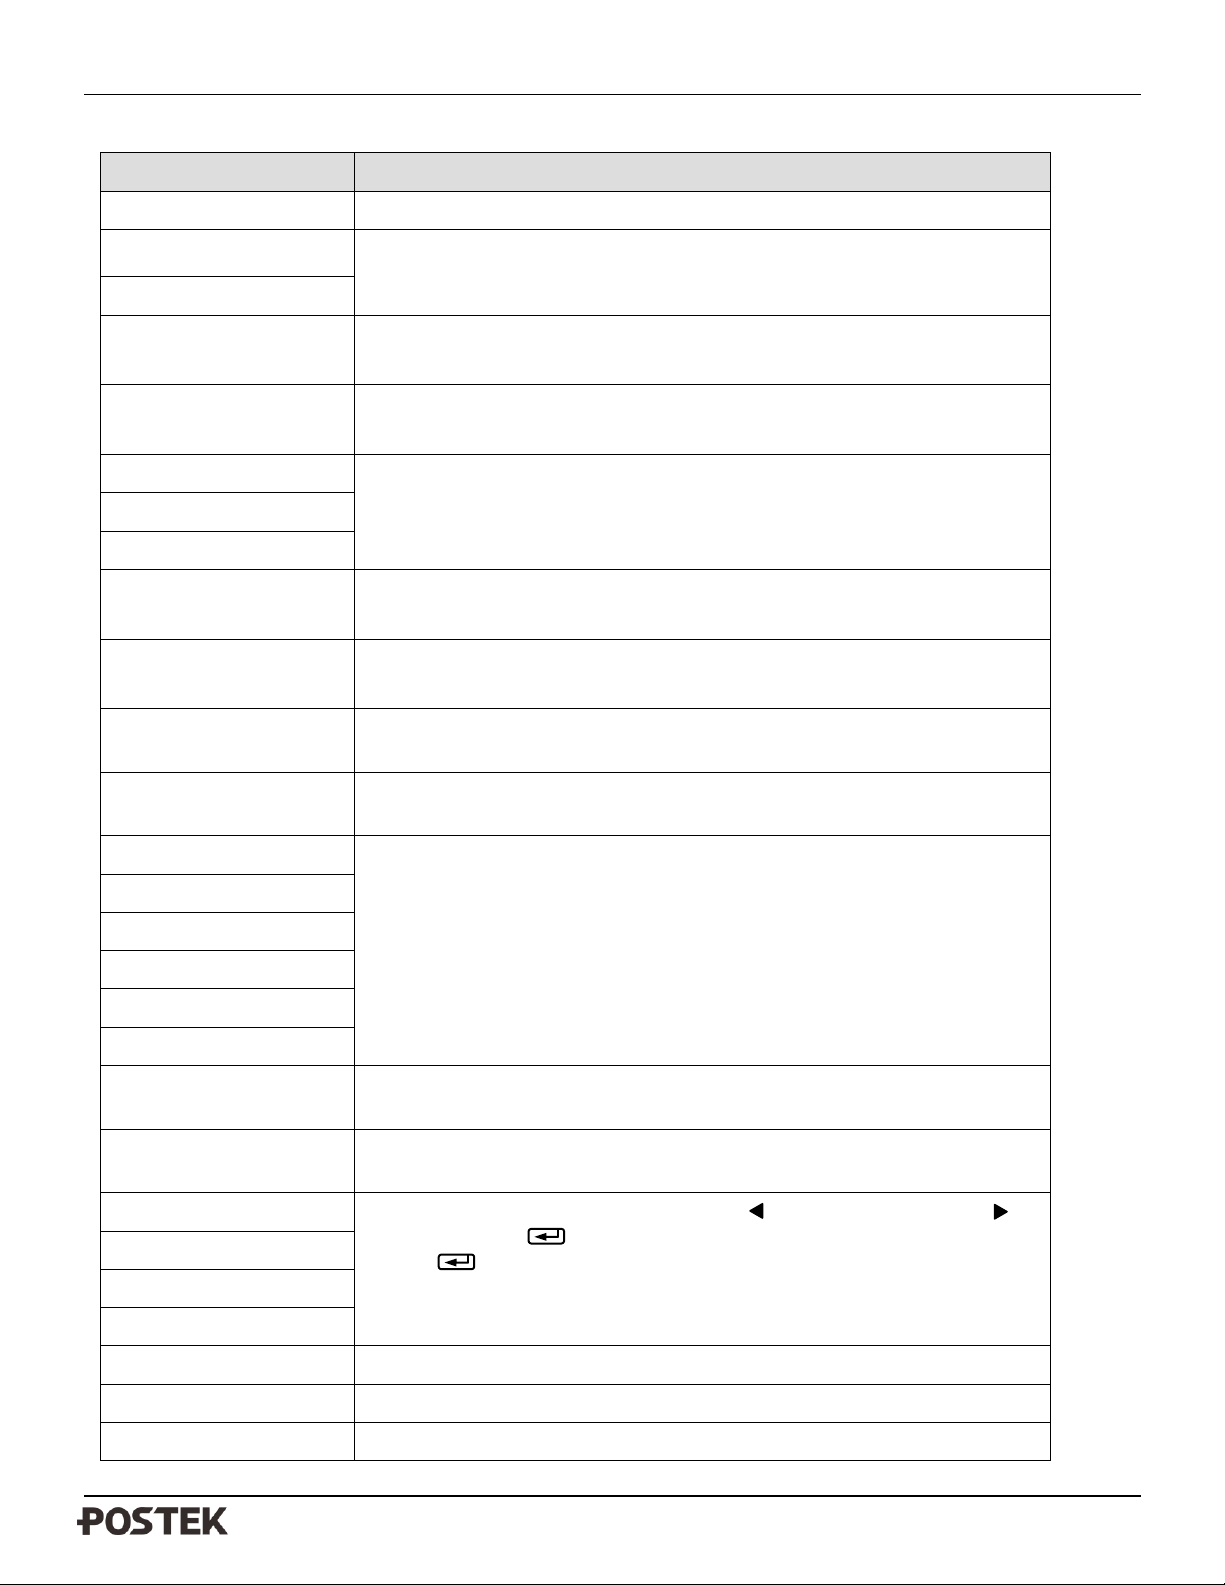
Items to be set and operating guide:
21
Page 26

TX Series User’s Manual Chapter 3: Operations and Settings
Delete Fonts
Delete stored fonts.
Command Type
Options: PPLE, PPLZ
Default: PPLE
DHCP
Options: Enable, Disable
Default: Disable
After DHCP is enabled, the printer will ask for a restart. As the printer being
powered on again, the LCD will prompt “DHCP CONFIGURING, PLEASE
WAIT…” Normally it takes 2 minutes to finish the network settings. If failed,
the printer will disable the DHCP and prompt “DHCP DISABLED, CHECK
CONNECTIONS!”
For printers with firmware versions before V6.28, LCD displays
“INITIALIZING PLEASE WAIT…”
Dump Mode
Options: Enable, Disable
Default: Disable
Detect Length
The Media feed length when perform Media Calibration.
Default 200, Unit mm.
Offline Printing
Browse the pre-stored label forms, select one to print.
Clear Form
Clear the forms downloaded to the printer.
Clear Graphic
Clear the graphics downloaded to the printer.
Clear Setting
Clears only those settings accomplished through the front panel.
* Please read the content in “Important Notice” section before setting your printer to direct thermal mode.
22
Page 27
TX Series User’s Manual Chapter 3: Operations and Settings
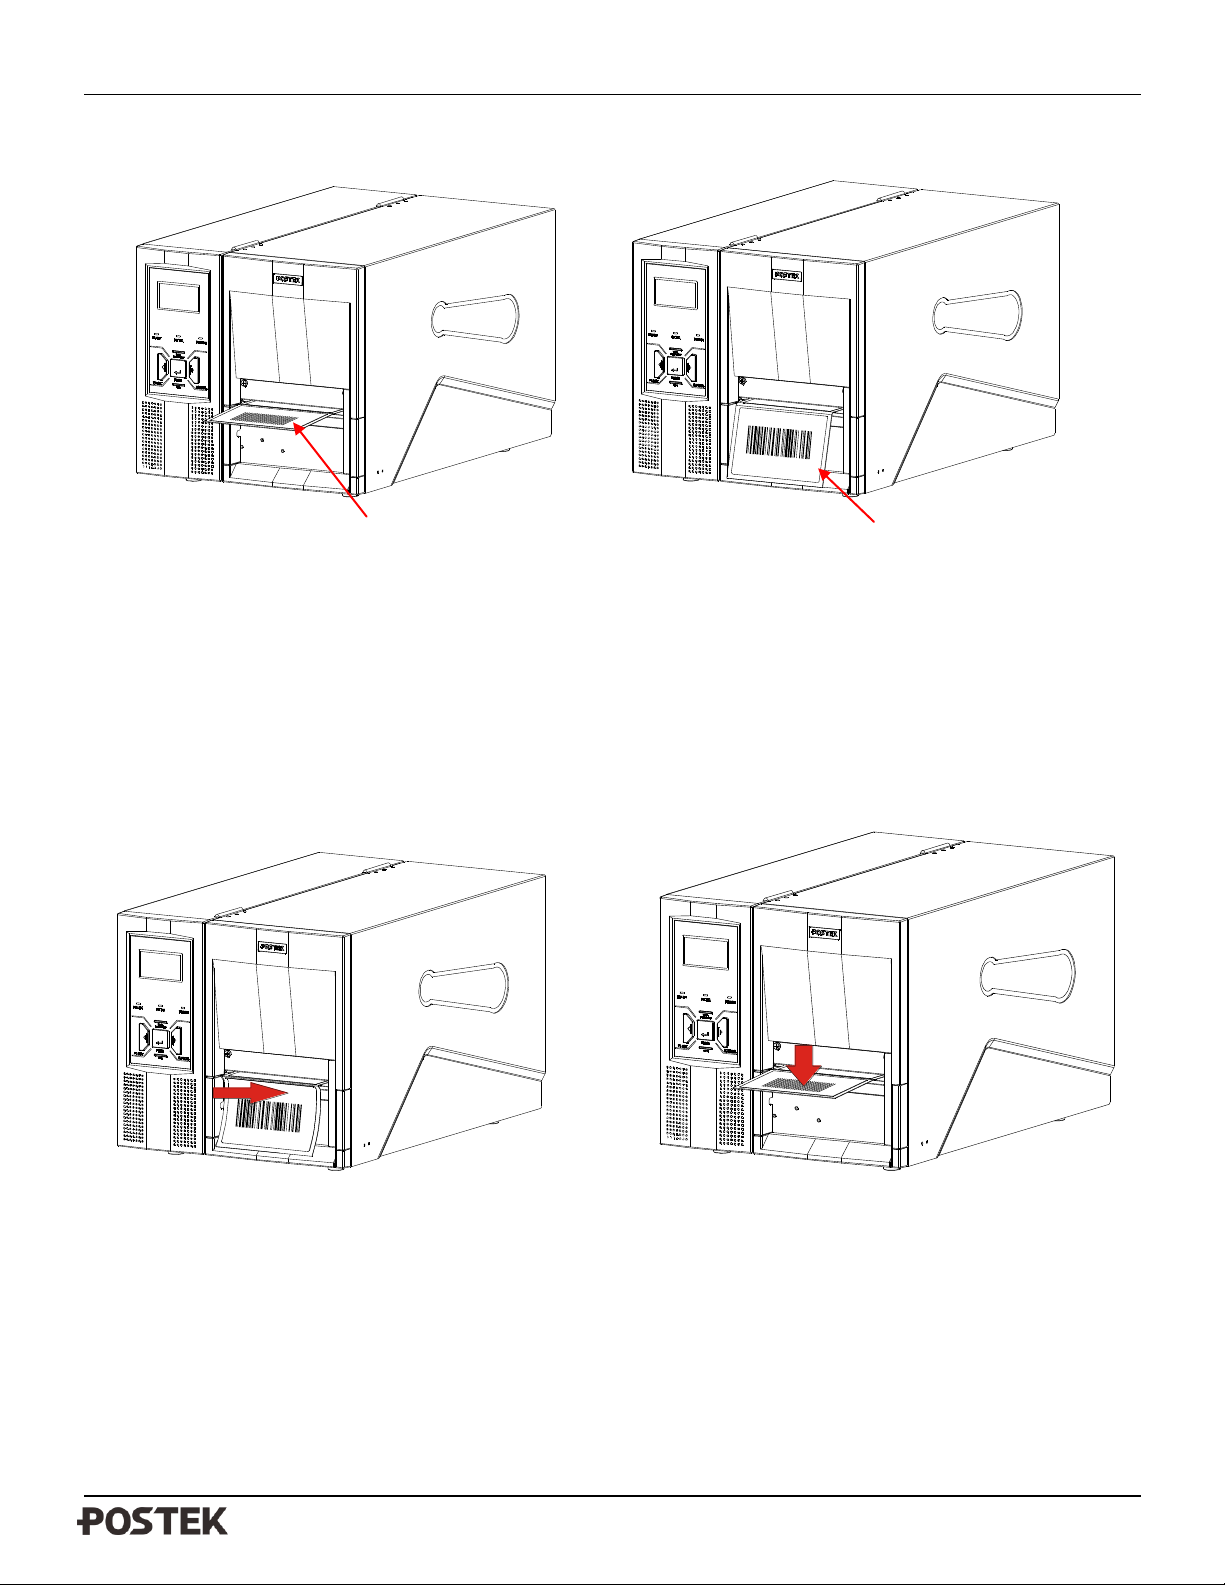
a. Grab printed label
b. Tear down
Tear-off
Figure 3-2
1. Press MENU to enter setup menu: Tear Off, select Enable.
2. Follow the directions shown in Figure 3-2 to tear off the label.
3. If the tear-off position needs to be adjusted, press MENU to enter setup menu: Tear-off Offset, and then input
suitable offset value.
Manual Peel-off
a. Press the printed label downwards b. Press the label to printer
23
Page 28
TX Series User’s Manual Chapter 3: Operations and Settings
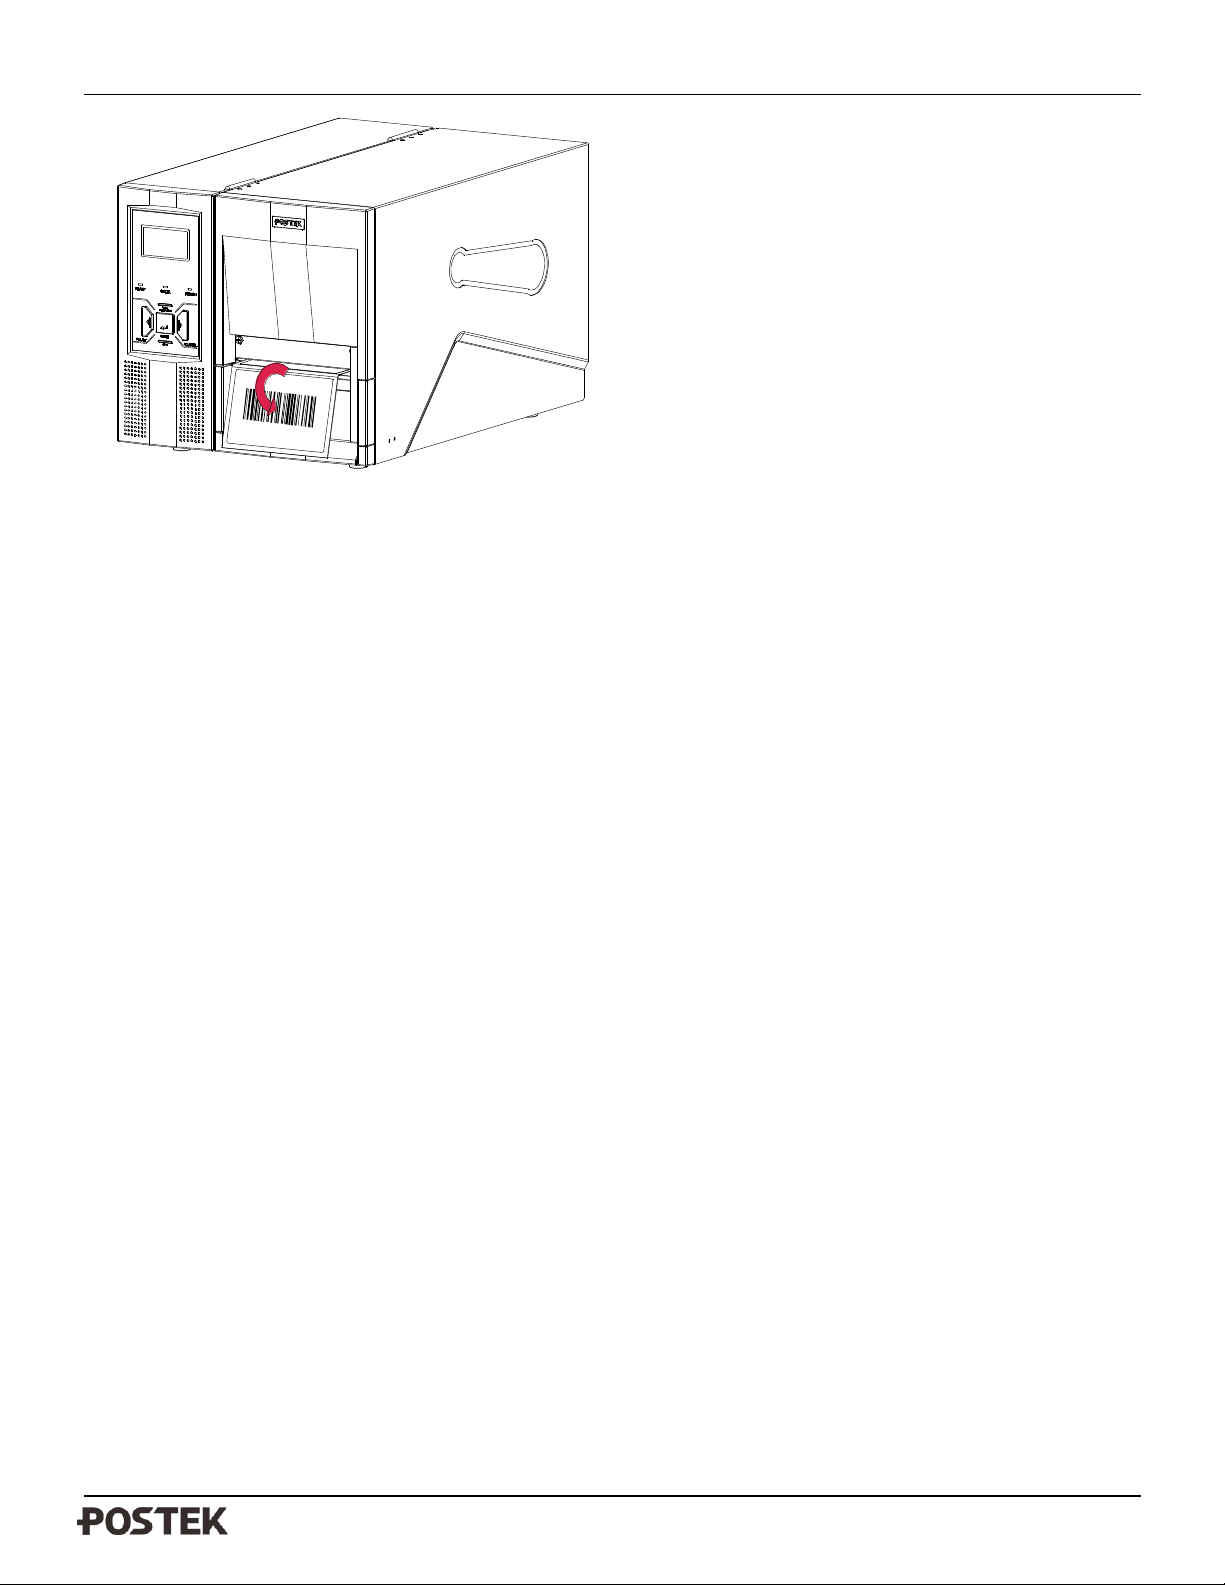
c. Remove the label
Figure 3-3
1. Press MENU to enter setup menu: Manual Peel Off, select Enable.
2. Follow the directions shown in Figure 3-3 to peel off the label.
3. Press PAUSE to print next label.
4. If the peeling position needs to be adjusted, press MENU to enter setup menu: Peeling Offset, input suitable
offset value.
Cutting Mode
Note: The Rotary Cutter Kit is an optional accessory.
1. Turn on the printer and enter the Setup Menu by pressing the Setup/Exit button on the Front Panel.
2. Enable the cutter under the LCD menu. Please note that the ‘Manual Peel Off’ mode and the ‘Cutter’ mode
cannot be set as ‘Enable’ simultaneously, so the ‘Manual Peel Off’ should be set as ‘Unable’ before installing the
Cutter.
3. Reset the printer: press and hold the Cancel button for 4 seconds, the three LED indicators will blink
simultaneously; release and press the Cancel button again, the three indicators stop blinking and remain lit. The
printer is now in its normal status.
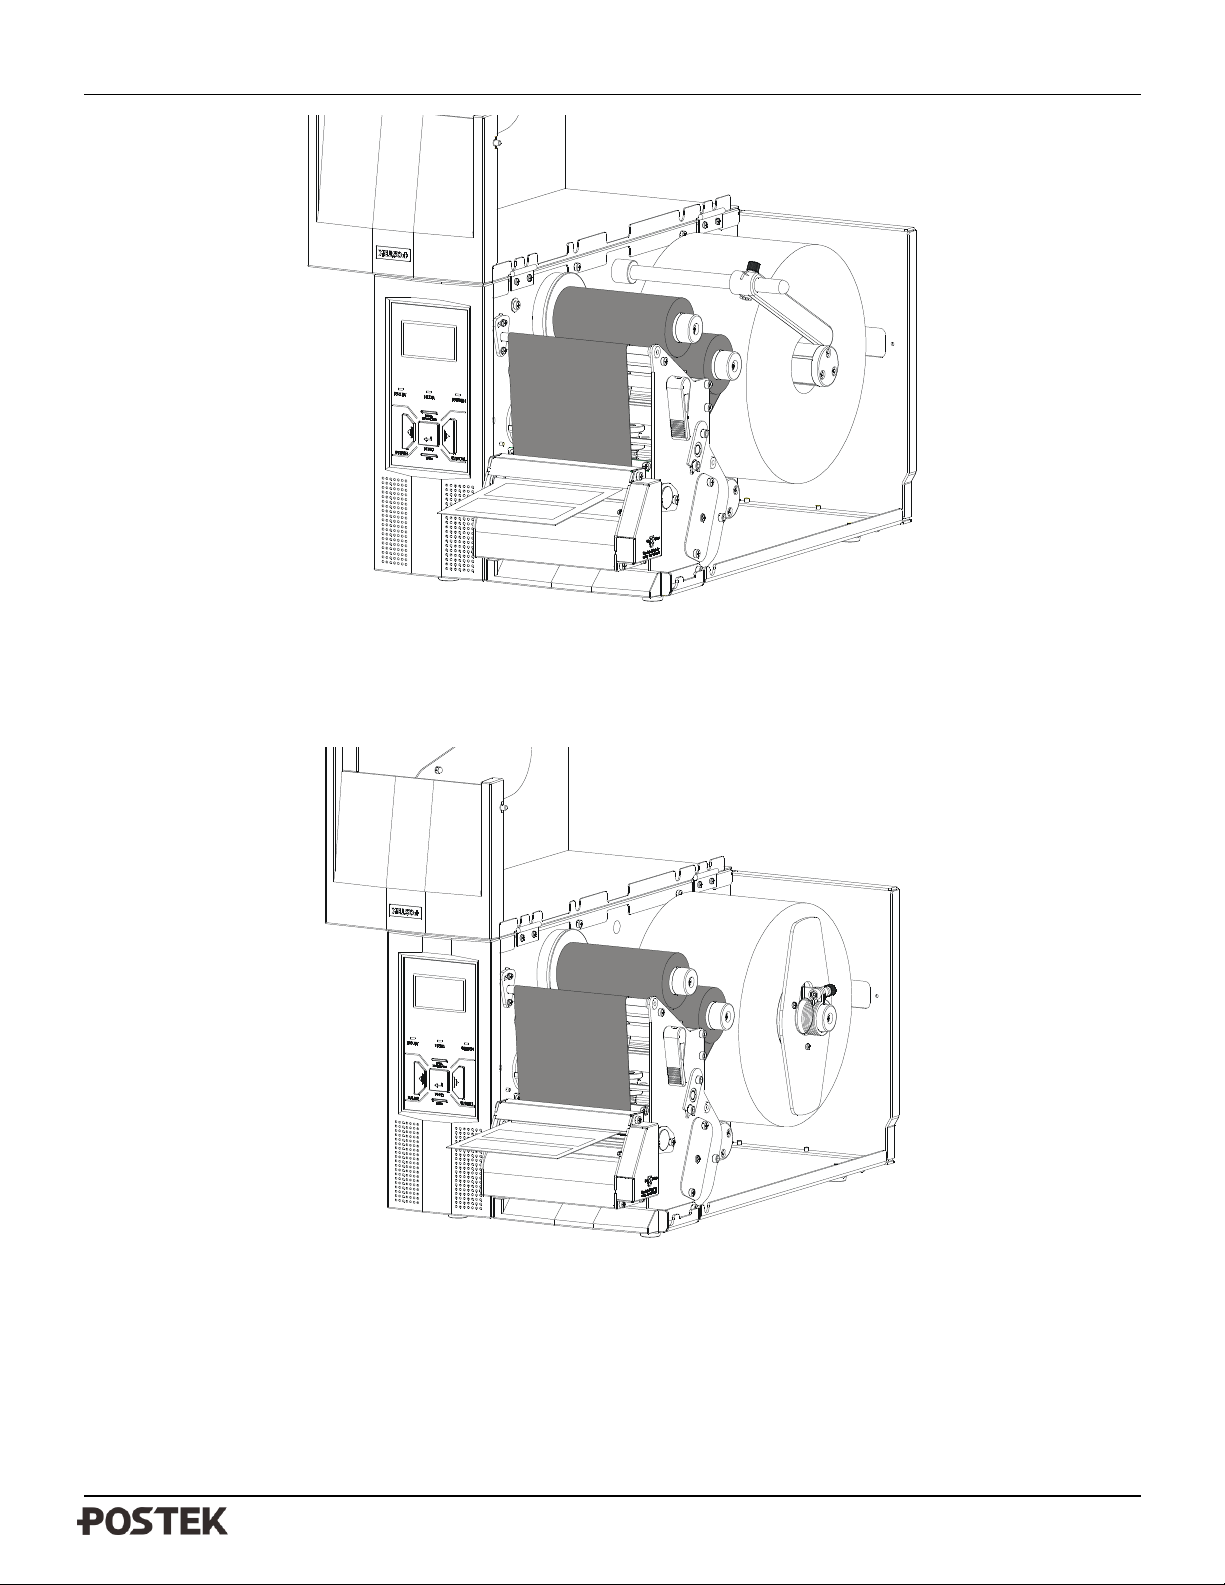
4. Turn the handle counter clockwise to release the Printhead Module, load the media and ribbon on the printer,
lead the label pass and through the cutter. Then close the printhead, the cutter is now ready to use. See Figure
3-4(a) and 3-4(b).
24
Page 29
TX Series User’s Manual Chapter 3: Operations and Settings
Figure 3-4(a)
Figure 3-4(a) shows the cutting mode of TX2.
Figure 3-4(b)
Figure 3-4(b) shows the cutting mode of TX3 and TX6.
25
Page 30
TX Series User’s Manual Chapter 3: Operations and Settings
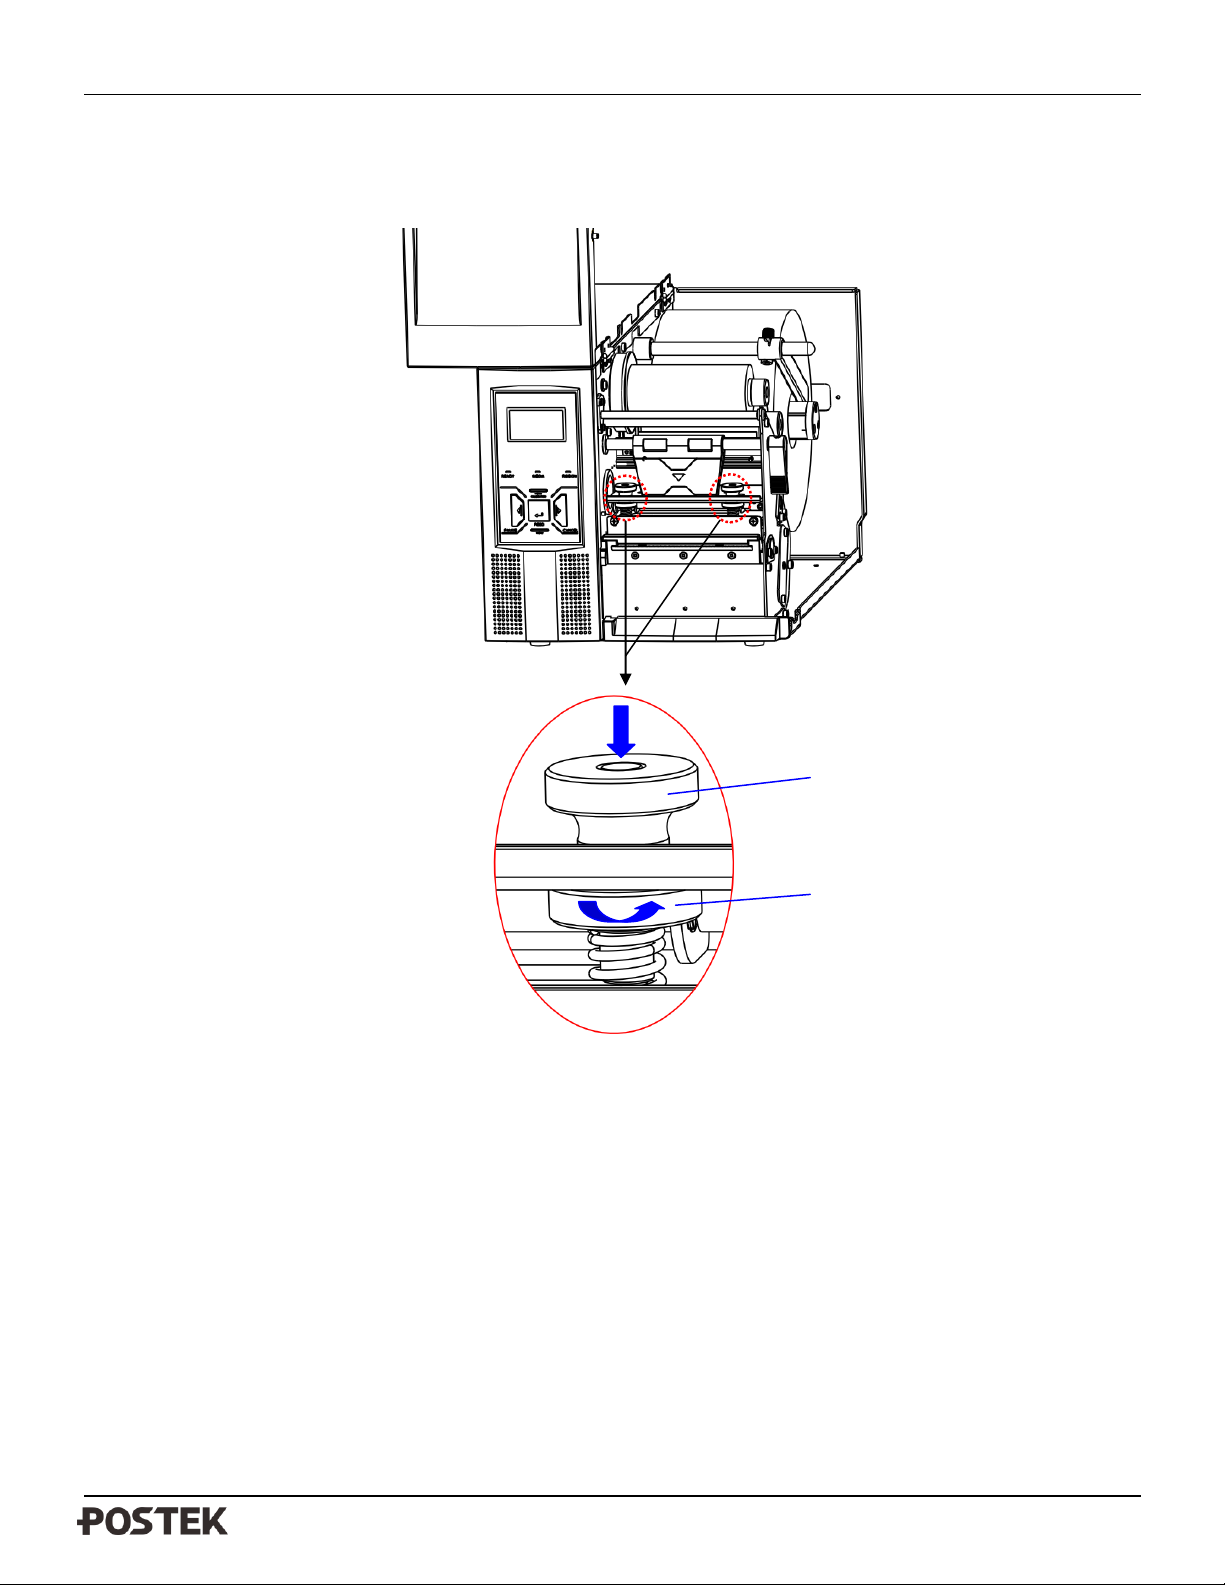
Cap nut
Collar nut
Adjusting the Pressure of the Printhead
Figure 3-5
As shown in Figure , there are two set of nuts and screws for adjusting the pressure of Printhead.
The procedures of adjusting the pressure of printhead
1. Unscrew the cap nut counterclockwise to loosen it, please mind that do not separate the nut from the screw;
2. Press down the cap nut, and then screw the collar nut to adjust the pressure for printhead; the pressure will be
increased when the nut screws counterclockwise (as shown in figure 3-5), whereas the pressure will be decreased
if it screws clockwise.
3. When the collar nut has been adjusted to the appropriate position, fasten the cap nut to lock the position。
4. Apply steps 1~3 on the other set of nuts and screw, then the pressure adjustment are completed.
26
Page 31

TX Series User’s Manual Chapter 3: Operations and Settings
Windows 10
Windows 8
Windows 7
Windows Vista
Windows XP
Windows 98
Windows 2000
Windows 2003
Windows 95
Windows 2008
Windows NT
Windows XP
Windows Driver and Label Software
The TX Series Industrial printer driver is packaged with the printer in the CD-ROM pack, and is compatible with the
following operating systems:
Drivers can also be downloaded from www.postek.com.cn and www.postektechnologies.com
Each TX Series Industrial printer is also packaged with powerful barcode label editing software.
27
Page 32

TX Series User’s Manual Chapter 4: Maintenance
Chapter 4: Maintenance
Warnings:
(1) Make sure the printer is powered off before performing maintenance operations.
(2) The Printhead may be hot due to recent printing. Wait until the Printhead cools before performing maintenance.
(3) Use only anhydrous isopropyl alcohol to clean the print head.
Cleaning the Printhead
The Printhead is the mechanism that enables the ink to impact the label. Due to the Printheads precision construction and
necessary location in the printer, it comes into contact with consumables and therefore is susceptible to dirt accumulation.
If dirt is not removed, the Printhead may be damaged. To ensure longevity of the Printhead, follow the recommended
maintenance guidelines below:
Note: A Printhead damaged by misuse is not covered under warranty.
1. Clean the Printhead
2. Clean the Printhead after every (1) roll of ribbon use or every (3) rolls of label media use. To clean the Printhead:
3. Turn printer power off
4. Open the top cover of the printer
5. Turn the handle to open.
6. Remove the ribbon (if applicable) and media
7. Use a cotton swab dipped in anhydrous isopropyl alcohol. Rub the swab along the Printhead until the swab no longer
accumulates ink
8. Let the Printhead dry before using the TX again
28
Page 33

TX Series User’s Manual Chapter 4: Maintenance
Cleaning the Platen Roller
The Platen Roller, located at the exit point and underneath labels, supports the labels as they feed out of the printer. The
roller can accumulate debris from consumables, such as dirt, sand, dust or glue. To ensure longevity of the Platen
Roller, follow the recommended maintenance guidelines below:
Clean the Platen Roller after every (3) rolls of label media used. To clean the Platen Roller:
1. Turn off the printer.
2. Open the top cover.
3. Release and lift the Printhead Module
4. Remove the ribbon (if applicable) and media.
5. Use a cotton swab dipped in anhydrous isopropyl alcohol. Rub the swab along the Platen Roller while rotating the
roller until the swab no longer accumulates ink or debris.
Cleaning the Printer Interior
Over time, the printer’s interior may collect dust or debris from the consumables. It is advised to periodically clean the
printer’s interior in order to prevent the accumulated debris from damaging internal parts.
To clean the printer interior, use a cotton swabs dipped into anhydrous isopropyl alcohol and remove any debris.
29
Page 34
TX Series User’s Manual Chapter 5: Troubleshooting
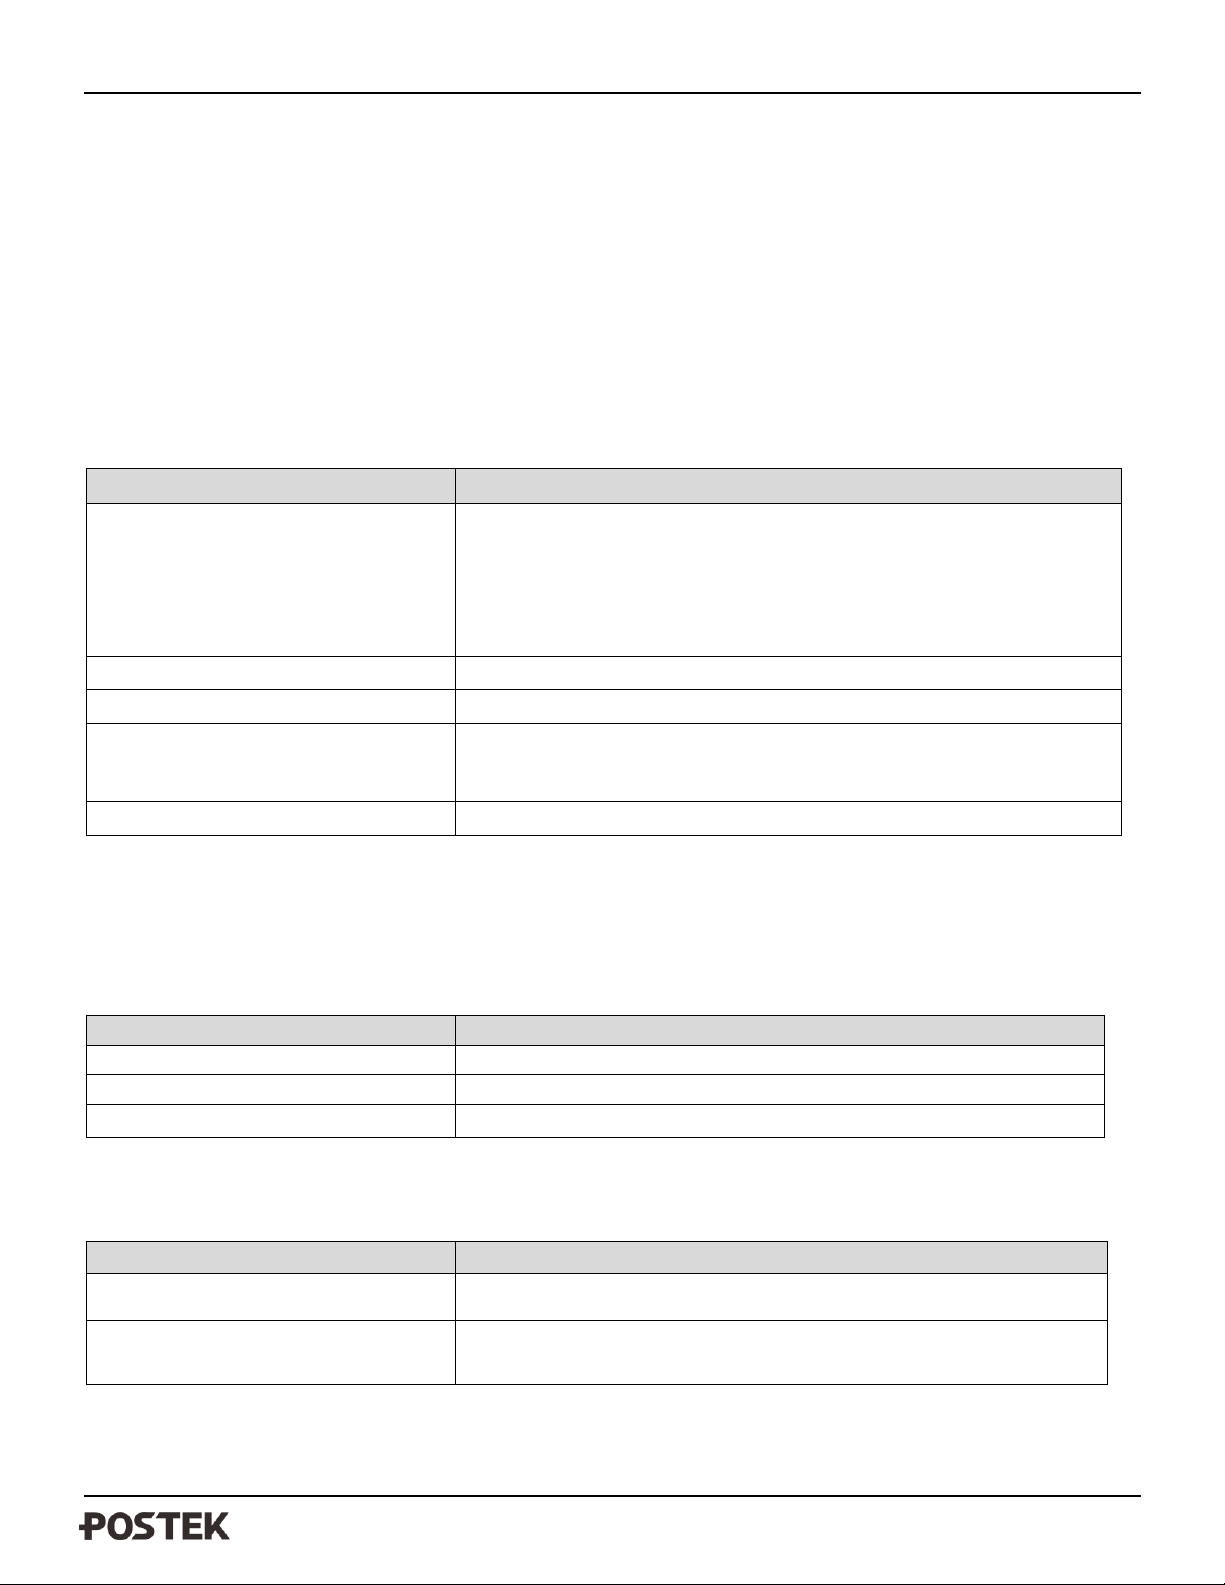
Possible Cause
Recommended Solutions
Media sensor cannot detect labels
a) Check and confirm the media has been loaded correctly
b) Check the position of the media sensor and confirm it could detect the
media gap or black line
c) Calibrate the media sensor
d) If using continuous media, ensure correct settings in chosen in the
label software
Media ran out
Load a roll of media
Media jammed
Clear the jam
The Media Roll Guides are not firmly
positioned against the Media or have
not been installed.
Install the Media Roll Guides correctly and press them firmly press the
media.
Media sensor is broken
Contact an authorized POSTEK service provider for technical support.
Possible Cause
Recommend Solutions
Ribbon ran out
Load a new roll of ribbon
Ribbon jammed
Clear the jam
Ribbon Sensor error
Contact an authorized POSTEK service provider for technical support.
Possible Cause
Recommend Solutions
Serial I/O error
Check LCD menu for the baud rate settings
Memory overflow
a) Restart the printer
b) Reset the printer
Chapter 5: Troubleshooting
Occasionally situations occur that require some troubleshooting. Possible issues and potential solutions are listed in this
section. While not every situation is addressed, you may find some of these tips useful.
Error Indications
Typically, when the printer is not functioning, one or two of the three indicator lamps will begin blinking. The possible
situations addressed by the status of the three indicator lamps are listed bellow.
READY and MEDIA Lamps blink simultaneously:
Note: If you are using continuous media without gaps or black lines, please make sure the correct Media Type
settings are input in PosLabel software.
If the printer is switched on during the overall process, the outstanding printing task can be continued by
press ‘Feed’ button after the new media is loaded correctly or the issues are solved.
READY and RIBBON Lamps blink simultaneously:
Note: If the printer is switched on during the overall process, the outstanding printing task can be continued by
press ‘Feed’ button after the new ribbon is loaded correctly or the issues are solved.
Only READY Lamp blinks:
30
Page 35
TX Series User’s Manual Chapter 5: Troubleshooting
Cause
Corrective Action
The Printhead is dirty.
Clean the Printhead. Follow the recommended maintenance guidelines
for cleaning the Printhead.
Vertical lines still appear after cleaning
the Printhead.
Contact an authorized POSTEK service provider for technical support.
Miscellaneous
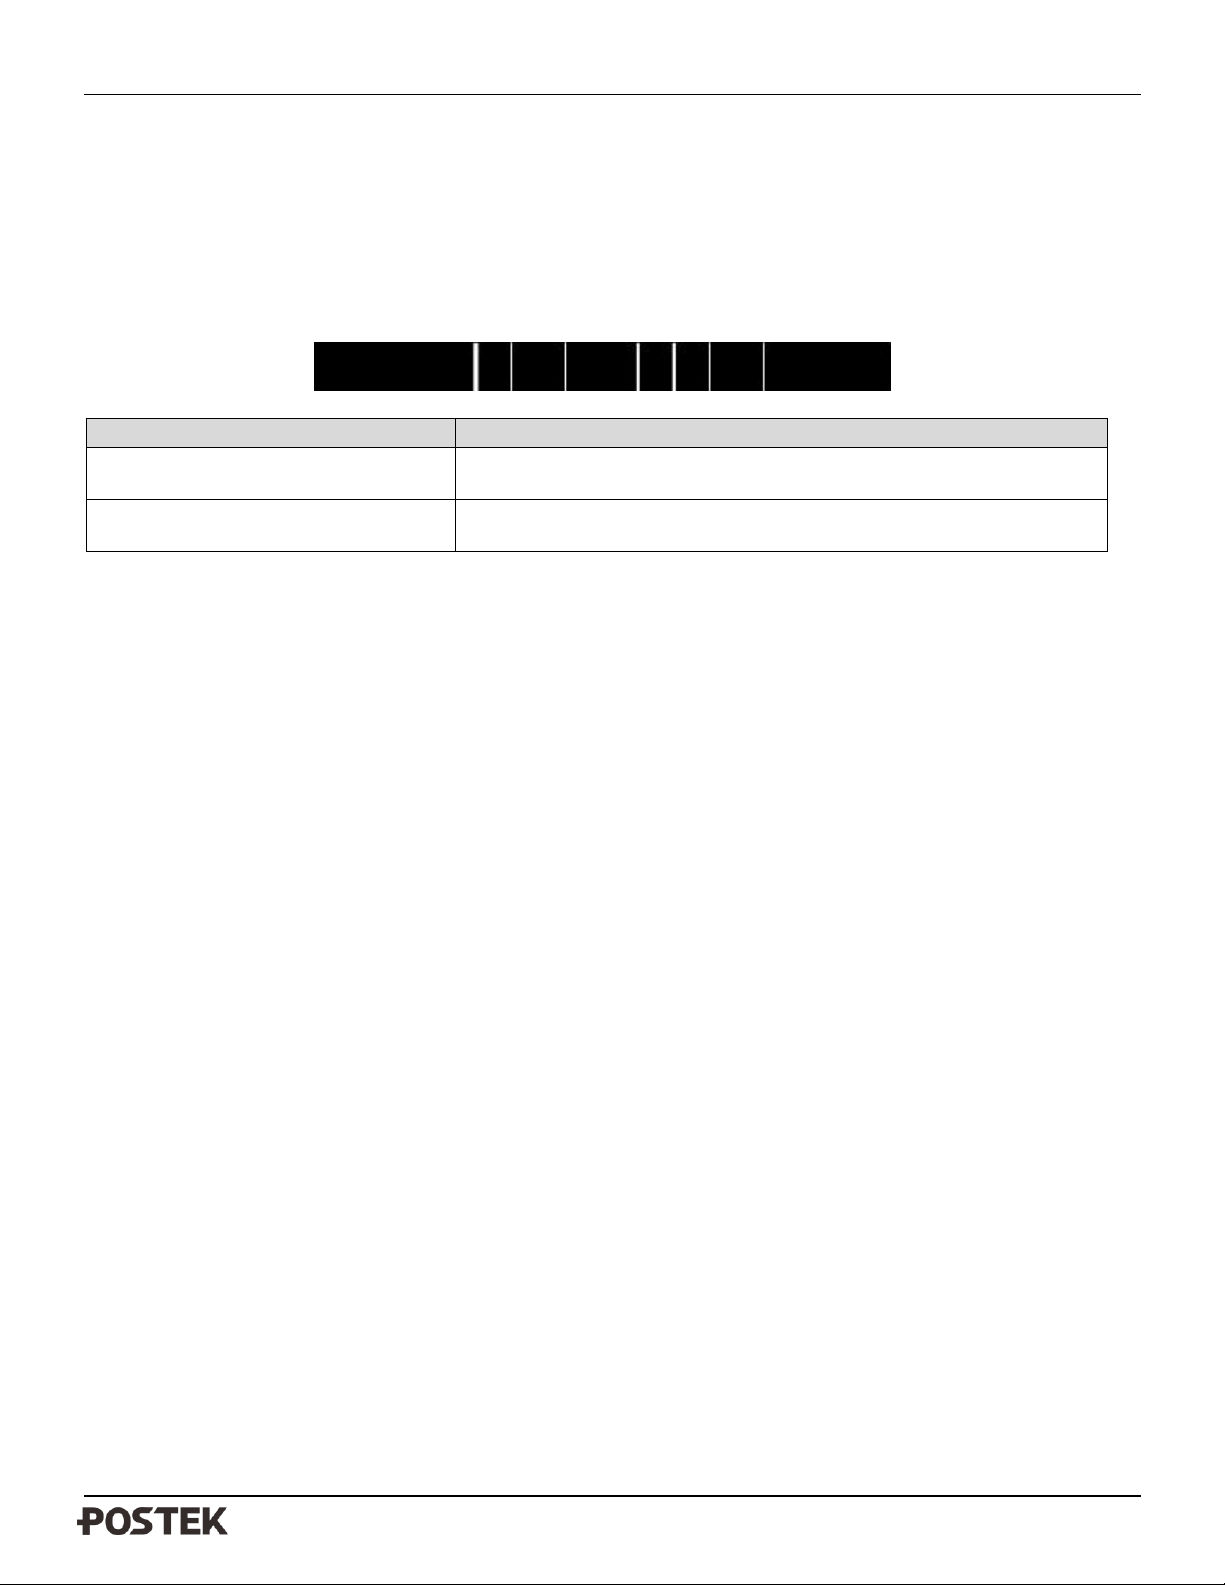
Vertical Blank Lines Appear
If the printer prints vertical blank lines as shown in the below picture, it may be due to a dirty or defective Printhead. See
the table below for possible causes and solutions.
Printer Timeout Error Message
Execute following corrective actions:
1. Check the interface cable for proper connection.
2. Ensure the TX printer is powered on.
If the trouble still exists, please contact an authorized POSTEK service provider for technical support.
Data Sent but Not Printing
1. Ensure the correct driver is chosen in the label software.
2. Reset the TX printer.
If the trouble still exists, please contact an authorized POSTEK service provider for technical support.
Poor Printing Quality
When experiencing poor print quality, check the following:
1. Adjust print darkness setting value.
2. Adjust print speed setting value.
3. Clean the Printhead and the platen roller.
4. Poor quality printing may be caused from using a low quality ribbon. Change to higher quality ribbon.
5. Poor quality printing may be caused from using low quality media. Change to higher quality media.
Recovery
After the miscellaneous has been cleared, press the CANCEL button to clear the alarm or restart the printer to resume the
printing automatically.
Note: For errors not listed here, please contact an authorized POSTEK Service Provider for further assistance.
31
Page 36
TX Series User’s Manual Appendix A: Interface Specifications
Pin
Direction
Definition
1 / /
2
Out
TX
3
In
RX 4 In
CTS
5 - Ground
6
Out
RTS
7
In
DSR
8
Out
DTR
9 / /
Host 25S
Printer 9P
Host 9S
Printer 9P
TX 2
………
3 RX
RX 2
………
2 TX
RX 3
………
2 TX
TX 3
………
3 RX
DSR 6
………
8 DTR
DTR 4
………
7 DSR
DTR 20
………
7 DSR
DSR 6
………
8 DTR
RTS 4
………
4 CTS
RTS 7
………
4 CTS
CTS 5
………
6 RTS
CTS 8
………
6 RTS
GND 7
………
5 GND
GND 5
………
5 GND
Host 25S
Printer 9P
Host 9S
Printer 9P
TX 2
………
3 RX
RX 2
………
2 TX
RX 3
………
2 TX
TX 3
………
3 RX
GND 7
………
5 GND
GND 5
………
5 GND
pin 4
pin 4
pin 5
pin 6
pin 6
pin 7
pin 20
pin 8
Appendix A: Interface Specifications
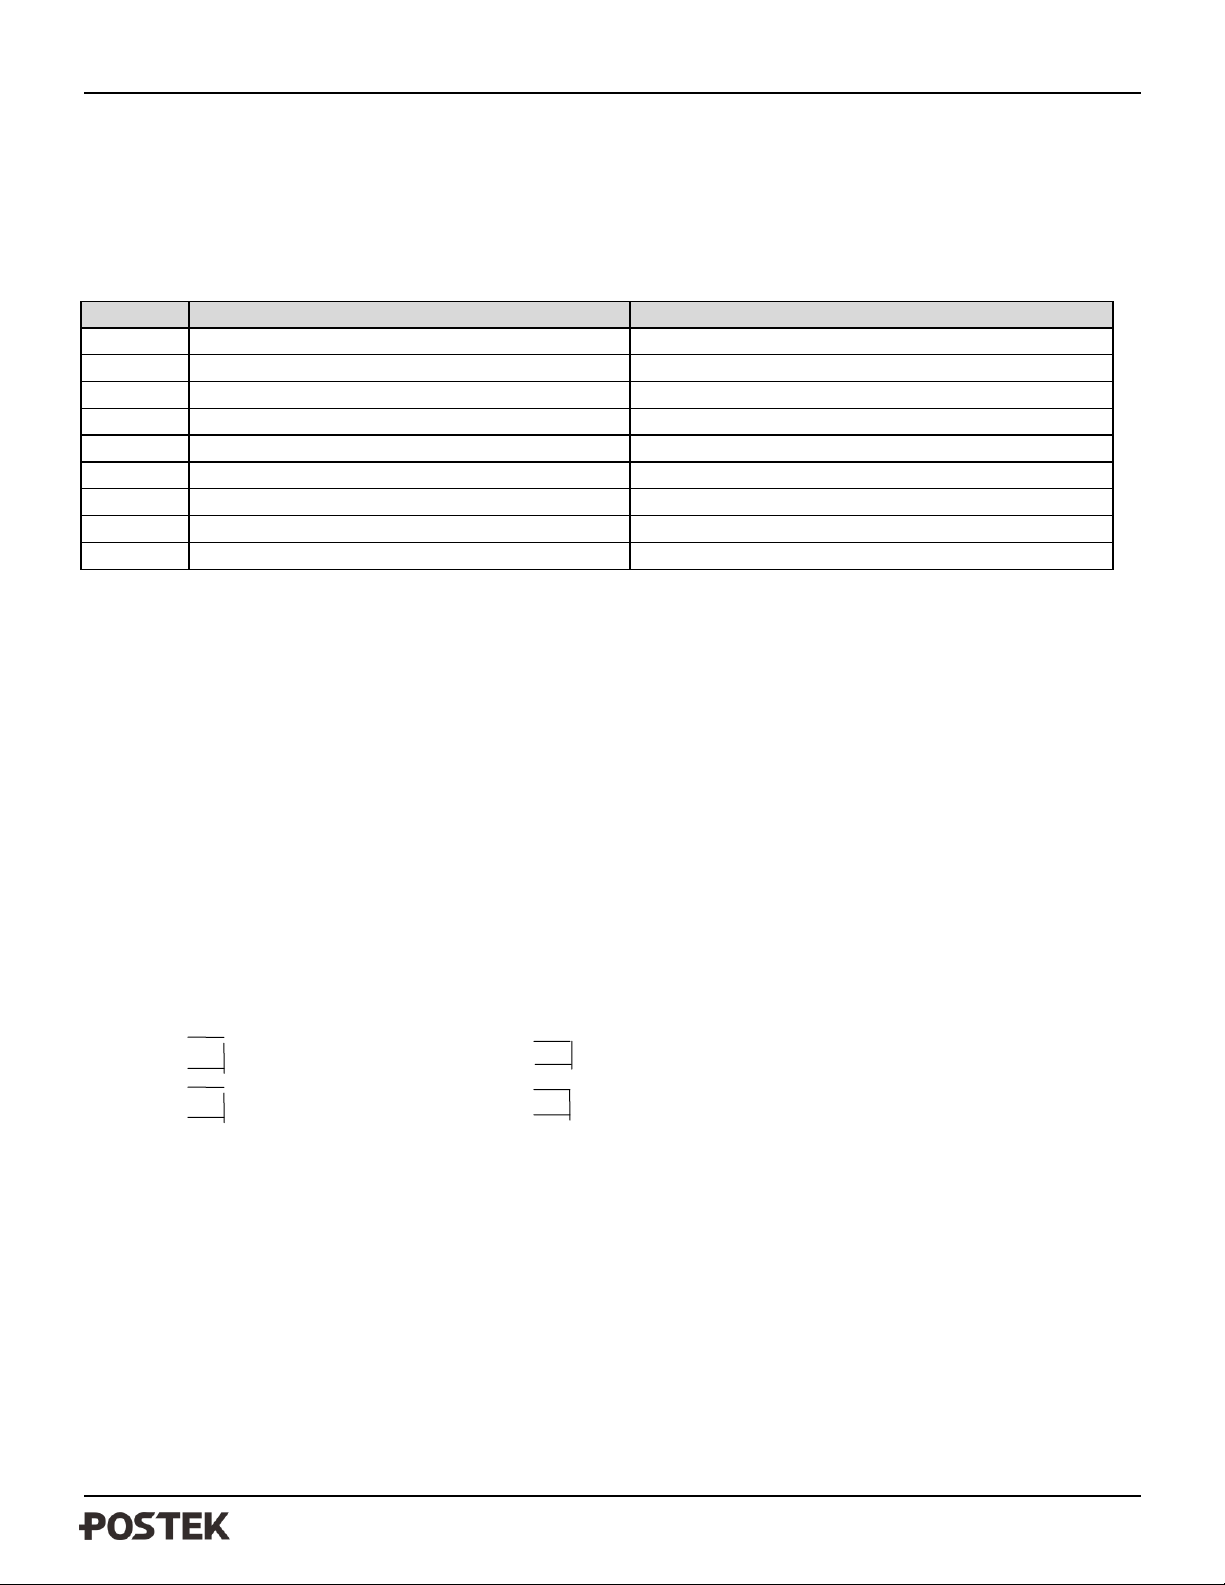
RS232 Serial
The RS232 connector on the printer is a DB9F:
Connection with host:
Alternately you can just connect the 3 wires as follows:
– Baud rate: 9600, 19200, 38400, 57600
– Data format: always 8 data bits, 1 start bit and 1 stop bit.
– Parity: always non parity.
– Flow control: RTS/CTS (Hardware flow control).
If you are using software or drivers under the Windows environment, the flow control must be set to “hardware.”
– Any communications port can transmit data from the host (RS232, Ethernet, or USB). Preliminary communications
settings are not required since the printer will automatically detect which port is active.
Note: Never send data from 2 ports at the same time. Data cannot be sent to more than one port simultaneously or data
corruption and print errors may occur.
32
Page 37

TX Series User’s Manual Appendix B: ASCII Table
0 1 2 3 4 5 6 7
0
NUL
0 @ P ` p
1
SOH
XON
! 1 A Q a
q
2
STX
“ 2 B R b r 3
XOFF
# 3 C S c
s
4
$ 4 D T d
t
5
NAK
% 5 E U e
u
6
ACK
& 6 F V f v
7
BEL
‘ 7 G W g w 8 BS ( 8 H X h
x 9 ) 9 I Y i
y A LF * : J Z j
z
B
ESC
+ ; K [ k
{
C
FF , < L \ l
|
D
CR - = M ] m
}
E
SO
RS . > N ^ n ~ F SI
US / ? O _ o DEL
Appendix B: ASCII Table
Note: The € sign is included in the embedded table at DEC128 or HEX 80
27
 Loading...