Page 1

1 6 6 1
Aura Series
(PP-7000-III / PP-7000U-III)
THERMAL PRINTER
TECHNICAL INFORMATION
A. INTERFACES
1. Peripheral interface
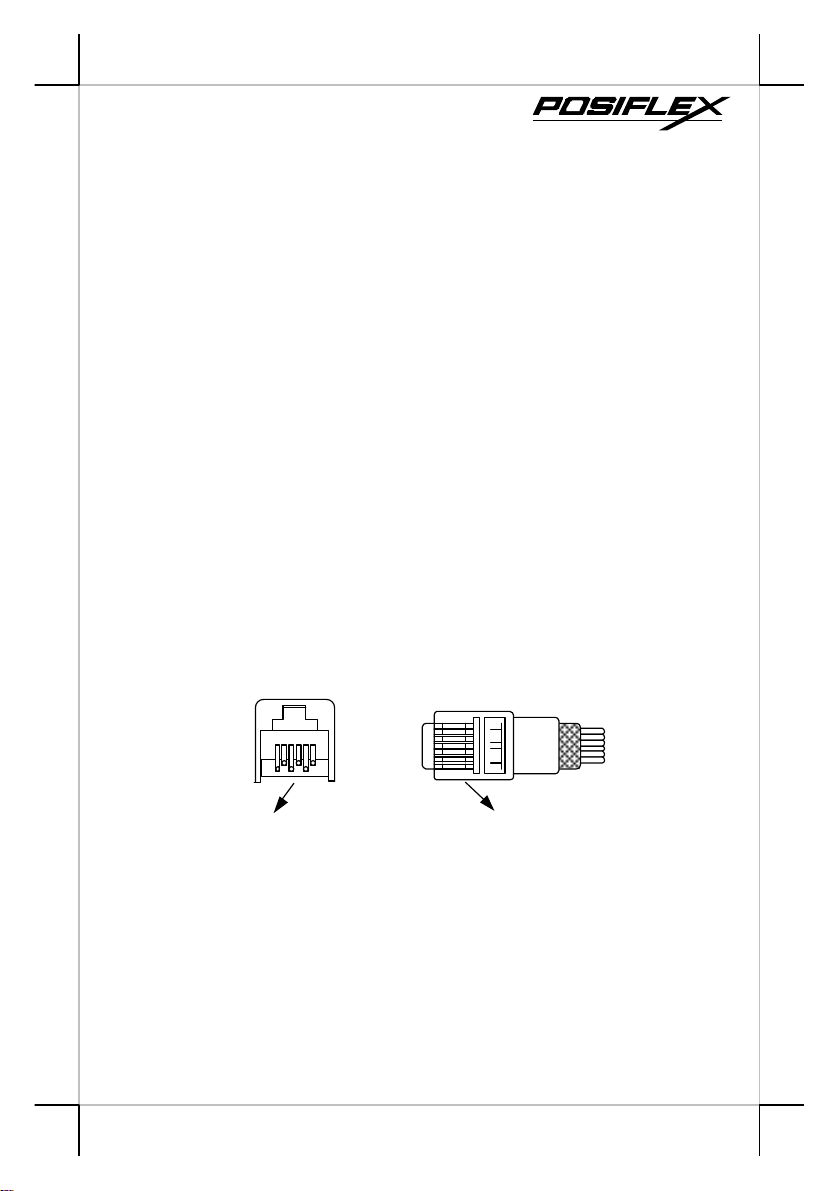
The connector for peripheral control is a 6P6C RJ11 jack with
the following pin assignment. The best recommended cash drawers to
this connector are Posiflex CR3100, CR3200, CR4000 and CR4100.
Using the cable 20863018001 (CCBLA-180-1) delivered with the
cash drawer, the Aura series can control one dedicated cash drawer.
However, by using an optional split cable 20867023800 (CCBLA-
238), Aura series controls two cash drawers through this connector.
Please connect the CR1 plug to the cash drawer (CRA) to be opened
by command Esc p 1 n1 n2 and the CR2 plug to the cash drawer
(CRB) to be opened by command Esc p 0 n1 n2
6P6C RJ11 jack
6 pin plug
Part 1
Page 2

Drawer kick for cash drawer controlled by
Drawer kick for cash drawer controlled by
RS232 baud rate definition or Parallel interface definition
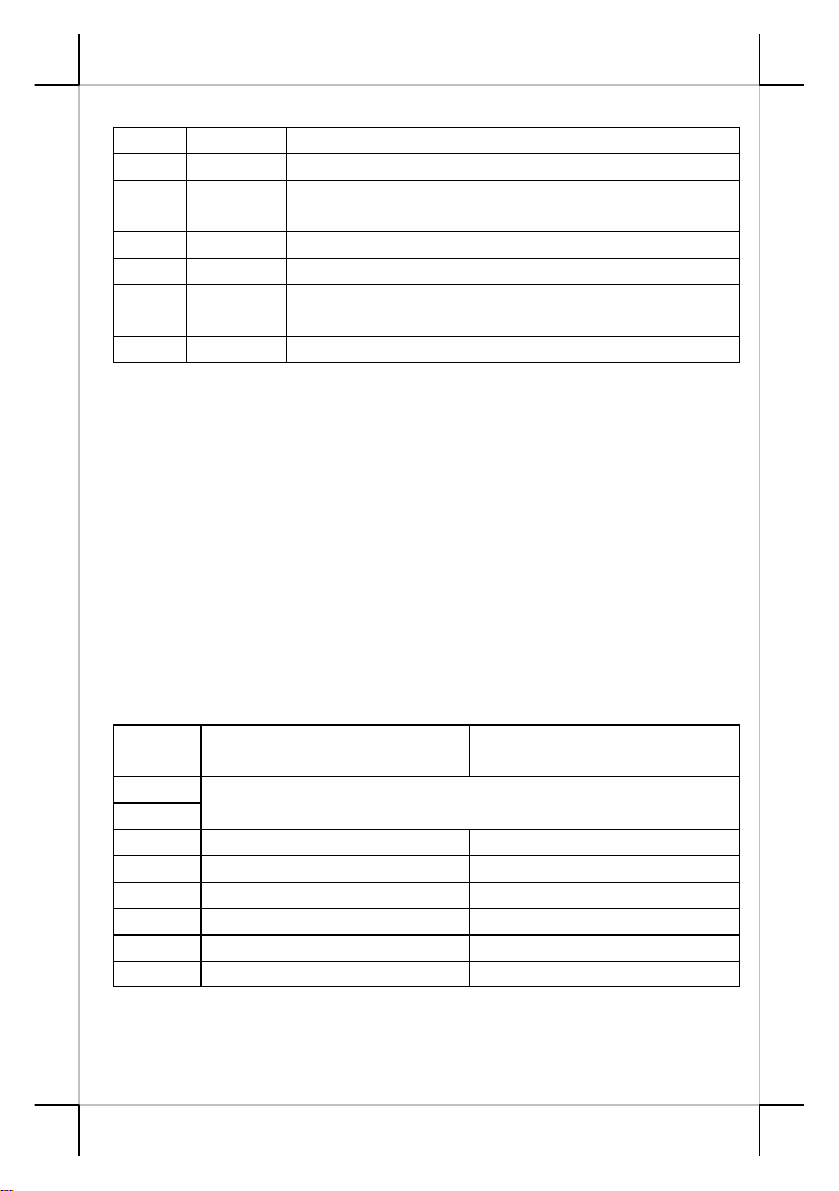
PIN # Definition Description
1 FG Frame ground
2 CRB
3 SENSE Input peripheral status
4 VCC + 24 V DC supply
5 CRA
6 SG Signal ground
software command Esc p 0 n1 n2
software command Esc p 1 n1 n2
B. SETUP WINDOW
On bottom cover of the Aura series thermal printer, there is
screwed a metal plate for setup window. In this window, there is
a 8 position DIP switch for printer setup. Please use proper tool
to change the switch setting when necessary. The switch
position counting starts from the nearest edge of printer. The
ON direction points to the connector area of the printer. The
OFF direction points to the power switch. The functions of each
position may evolve with the revisions of the firmware. The
information below applies to the latest version to the date of
print of this manual.
This 8 position DIP switch works as following:
Switch
position
ON OFF
1
(ref. separate table below)
2
3 Even parity None parity
4 XON handshaking Hardware handshaking
5 Busy on “buffer full” Busy on “off line”
6 Immediate cut Protective cut
7 CR code effective CR code ineffective
8 Factory internal setting Application standard mode
Part 2
Page 3

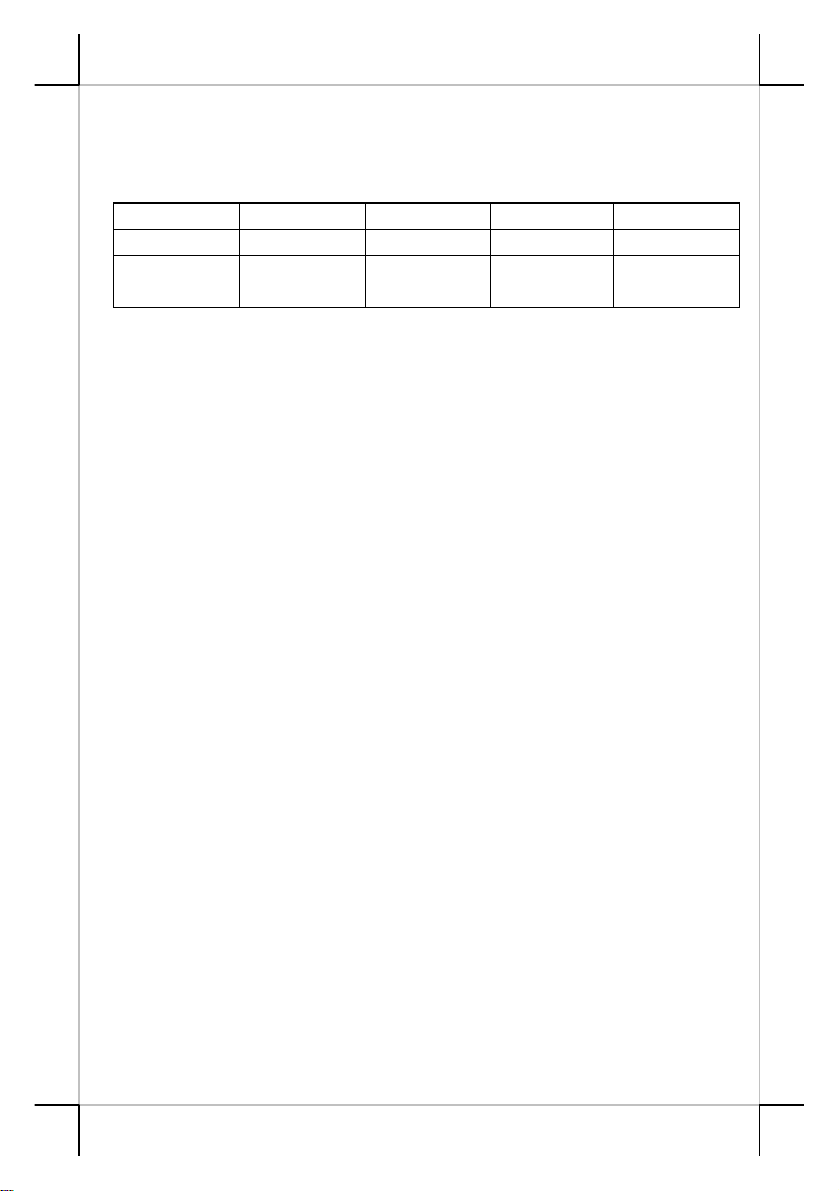
Effect of positions 1 & 2 on baud rate is defined as in table below
with parity check set according to position 3, number of data bits
always set to 8, and stop bit set to 1. When the parallel interface is
used, please set both positions to ON.
SW Pos. 1
SW Pos. 2
Baud rate
or Interface
ON OFF ON OFF
ON ON OFF OFF
38400 bps /
(Parallel)
4800 bps 9600 bps 19200 bps
Switch position 3 defines the parity check regulation in serial
interface. In Aura, it is selectable between even and none.
Switch position 4 defines the handshaking method in serial
interface. When it is set to ON, the printer transmits an “XOFF” for
busy and sends an “XON” for not busy. When it is set to OFF, the
printer signifies the busy status over hardware signals that can be
detected by the host as “DSR” or “CTS”. When parallel interface is
used, both switch positions 3 and 4 should be set to OFF.
For switch position 5, if the switch is set to ON, the busy signal is
sent to host only when input buffer is full. When it is set to OFF, busy
signal is sent to host whenever an off line status occurs. Therefore,
signals including the paper near end detect will generate busy signal to
the host. Consequently, the printing may be stopped even when there is
still a long way to go before the paper roll is actually exhausted. Taking
the paper out beep into consideration, the printer will keep on beeping
at Paper End (completely no paper) till paper is replaced when S1-5 is
ON. Yet when S1-5 is OFF, the printer will keep on beeping every 3
seconds at Paper Near End (still long paper in replace) till paper is
replaced.
For switch position 6, when it is set to OFF, there will be a 20
mm paper feed before cutting when software does not define this point
and there will be further 10 mm paper after cutting to prevent paper jam.
Before setting this switch to ON, please make sure that your software
will take care of enough paper feed for the paper jam prevention issue.
For switch position 8, when it is set to ON in the field, the printer
maybe subject to unpredictable damages and must be strictly prevented.
The factory default for each position is listed below:
Part 3
Page 4

Switch Position 1 2 3 4 5 6 7 8
Serial interface
w/ auto cutter
Parallel interface
w/ auto cutter
OFF OFF OFF OFF OFF OFF OFF OFF
ON ON OFF OFF OFF OFF OFF OFF
C. INTERNAL SWITCH
There is an extra internal 4 position DIP switch in PP-7000-III
series for more technical settings. To access these setup, please first
turn off the printer power and disconnect every cable from the printer.
Remove 4 screws from bottom of printer and remove the plastic bottom
cover with the power switch pressed. The 4 position DIP switch seats
beside the 8 position DIP switch for setup window with the switch
position counting starts from the nearest side to the 8 position DIP
switch.
This 4 position DIP switch works as following:
Switch position Setting Effect
ê
1
Factory internal setting Disable Default
2
3
4
The Switch position 1 default set to ON. The print speed is fixed
at 42.5 lines/sec.
Switch position 2 is usually set to OFF for use with 80 mm paper
width. When the printer is installed with the 58 mm paper guide adaptor
for use with the paper roll of 58 mm width, the switch should be set to
ON in PP-7000-III & PP-7000U-III.
Switch position 3 is usually set to OFF for ESC/POS command
application that prints at 512 dots / line. Only technical users shall set
this switch to ON and make the printer work in the 576 dots / line
format.
Function ON OFF
Paper width 58 mm 80 mm
Line format 576 dots / line 512 dots / line
Reserved N. A. N. A.
D. SOFTWARE COMMANDS
The Aura thermal printer supports all commands applicable to
Epson printer TM-T88III. The only difference is the smoothening
command in enlarged text fonts. Please visit our web site
http://www.posiflex.com or http://www.posiflex.com.tw for detail
Part 4
Page 5

description of the supported commands if required.
1. Paper out alarm
When Paper End signal is detected, the printer keeps on intensive
beeping and stops receiving data till the signal is neutralized. When
Paper Near End signal is detected, the printer gives a beep every 3
seconds and stops receiving data.
2. Enhancement commands
Following commands are included in the printer firmware version
since ver. 3.2:
ESC ‘o’: Beep command
GS ‘o’ m: Beep definition (0 < m ≦ 16, default 3 seconds)
ESC ‘p’ m n1 n2: Cash drawer kick or kitchen bell drive
command
GS ‘p’ m n: Beep when cash drawer remain open (0 < m < 256, n
= ‘0’ or ‘1’)
Explanations as below:
ESC ‘o’: Beep command
Hexadecimal codes are: 1B 6F
Printer beeps when this command is received per condition set by
beep definition.
GS ‘o’ m: Beep definition (0 < m ≦ 16, default 3 seconds)
Hexadecimal codes are: 1D 6F m
This command defines length of beep as m seconds when beep
command is received. When m = 0, default applies.
ESC ‘p’ m n1 n2: Kitchen bell drive command (m = ‘0’, 0 ≦
n1 ≦ n2 ≦ 255)
Hexadecimal codes are: 1B 70 m n1 n2
This command can be used to drive a kitchen bell purchased
from Posiflex when this printer is used as a kitchen printer and the
environment could be so noisy that the beeper for reminding the kitchen
staff of the printing can be not loud enough. After fixing the kitchen
Part 5
Page 6

bell onto say a kitchen wall, connect the cable from the bell to the
peripheral connector on the printer. Then use this command with m set
to 0 and both n1 and n2 set to 255. The printer will be able to drive the
kitchen bell for about half a second on each such command. If this
command is sent to the printer multiple times consecutively, the bell
will ring for about half a second and rest for also about half a second
then ring again for multiple times.
GS ‘p’ m n: Beep when cash drawer remain open (0 < m <
256, n = ‘0’ or ‘1’)
Hexadecimal codes are: 1D 70 m n
If the cash drawer connected to the printer remains open for more
than m seconds, the printer beeps until the drawer is closed. If m = 0,
this function is disabled. The factory default of the printer is set to
disable this function. The parameter n in this command identifies the
way cash drawer indicates drawer open status. n = ‘0’ (30H) applies
to drawers giving an “open” signal when cash drawer is opened. n =
‘1’ (31H) applies to drawers giving a “short” signal when drawer is
opened. Any value of the parameters outside the defined range will
cause the entire command ignored.
E. CHARACTER CODE PAGES
Aura PP-7000-III & PP-7000U-III series support all code pages
and international character sets applicable to Epson printer TM-T88.
There are five models for character sets application as standard model,
European model, Greek model, Arabic model and Lithuanian model
Page 0 (PC437: USA for Standard / European / Greek / Arabic /
Lithuanian model)
Page 1 (Katakana for Standard / Arabic / Lithuanian model)
Page 2 (PC850: Multilingual for Standard / European / Greek / Arabic /
Lithuanian model)
Page 3 (PC860: Portuguese for Standard / European / Greek / Arabic /
Lithuanian model)
Page 4 (PC863: Canadian-French for Standard / Arabic model)
Page 5 (PC865: Nordic for Standard / Arabic / Lithuanian model)
Page 17 (PC866: Cyrillic #2 for European / Greek model)
Page 18 (PC852: Latin II for European / Greek model)
Part 6
Page 7

Page 19 (PC858: Euro Dollar Sign included in PC850 for European /
Greek model)
Page 253 (Greek437 as Default setting for Greek model)
Page 255 (Thai for Standard model)
Page 255 (Greek for European / Greek model)
Page 255 (PC864: Arabic as Default setting for Arabic model)
Page 255 (Lithuanian as Default setting for Lithuanian Model)
Further support to some double byte language systems can be
achieved by adding each relevant font chip in standard model:
Japanese: Kanji
Korean: KCS5601
Traditional Chinese: Big 5
Simplified Chinese: GB2312
The international character sets supported in basic ASCII range
include USA; France; Germany; UK; Denmark I; Sweden; Italy; Spain;
Japan; Norway; Denmark II; Spain II; Latin America; Korea for
character set code from 0 to D and Ex-Jugoslavia for character set code
F.
If any undefined code (<00> to <1F>) or an undefined <ESC>, <FS>,
or <GS> command sequence beyond these tables is received, the code
or the sequence of codes will be discarded. (However, when received
within image print data, character registration data, or command
parameters, they are handled as ordinary data.)
The user may visit our web at http://www.posiflex.com.tw or
http://www.posiflex.com for a view of the fonts in the code pages and
character sets.
Part 7
 Loading...