

Porta-Nails PORTAMATIC Owner's Manual
OWNER’S MANUAL
PORTAMATIC
®
Pneumatic Nailer
For Tongue and Groove Solid Wood & Hardwood
Laminate Flooring, Roof Decking and Wood Sub Flooring
CAUTION - Read important safety instructions AND operation instructions
BEFORE operating your PORTAMATIC® Pneumatic Nailer.
Your new PORTAMATIC® Pneumatic Nailer is a quality-built
machine, capable of dependable performance throughout its lifetime.
To take full advantage of these capabilities you should thoroughly
understand the proper method and technique of its operation.
Therefore, we suggest you read this manual before operating, and
PO Box 1257, Wilmington, NC 28402
910-762-6334 • 800-634-9281 • Fax 910-763-8650
that you save it for future reference.
Home Page:
www.porta-nails.com E-mail: www.info@porta-nails.com
For use with PORTAMATIC® Nailers Starting with Serial No. 00004000
FORM P/N 750209 (7/1/2004)
32
1
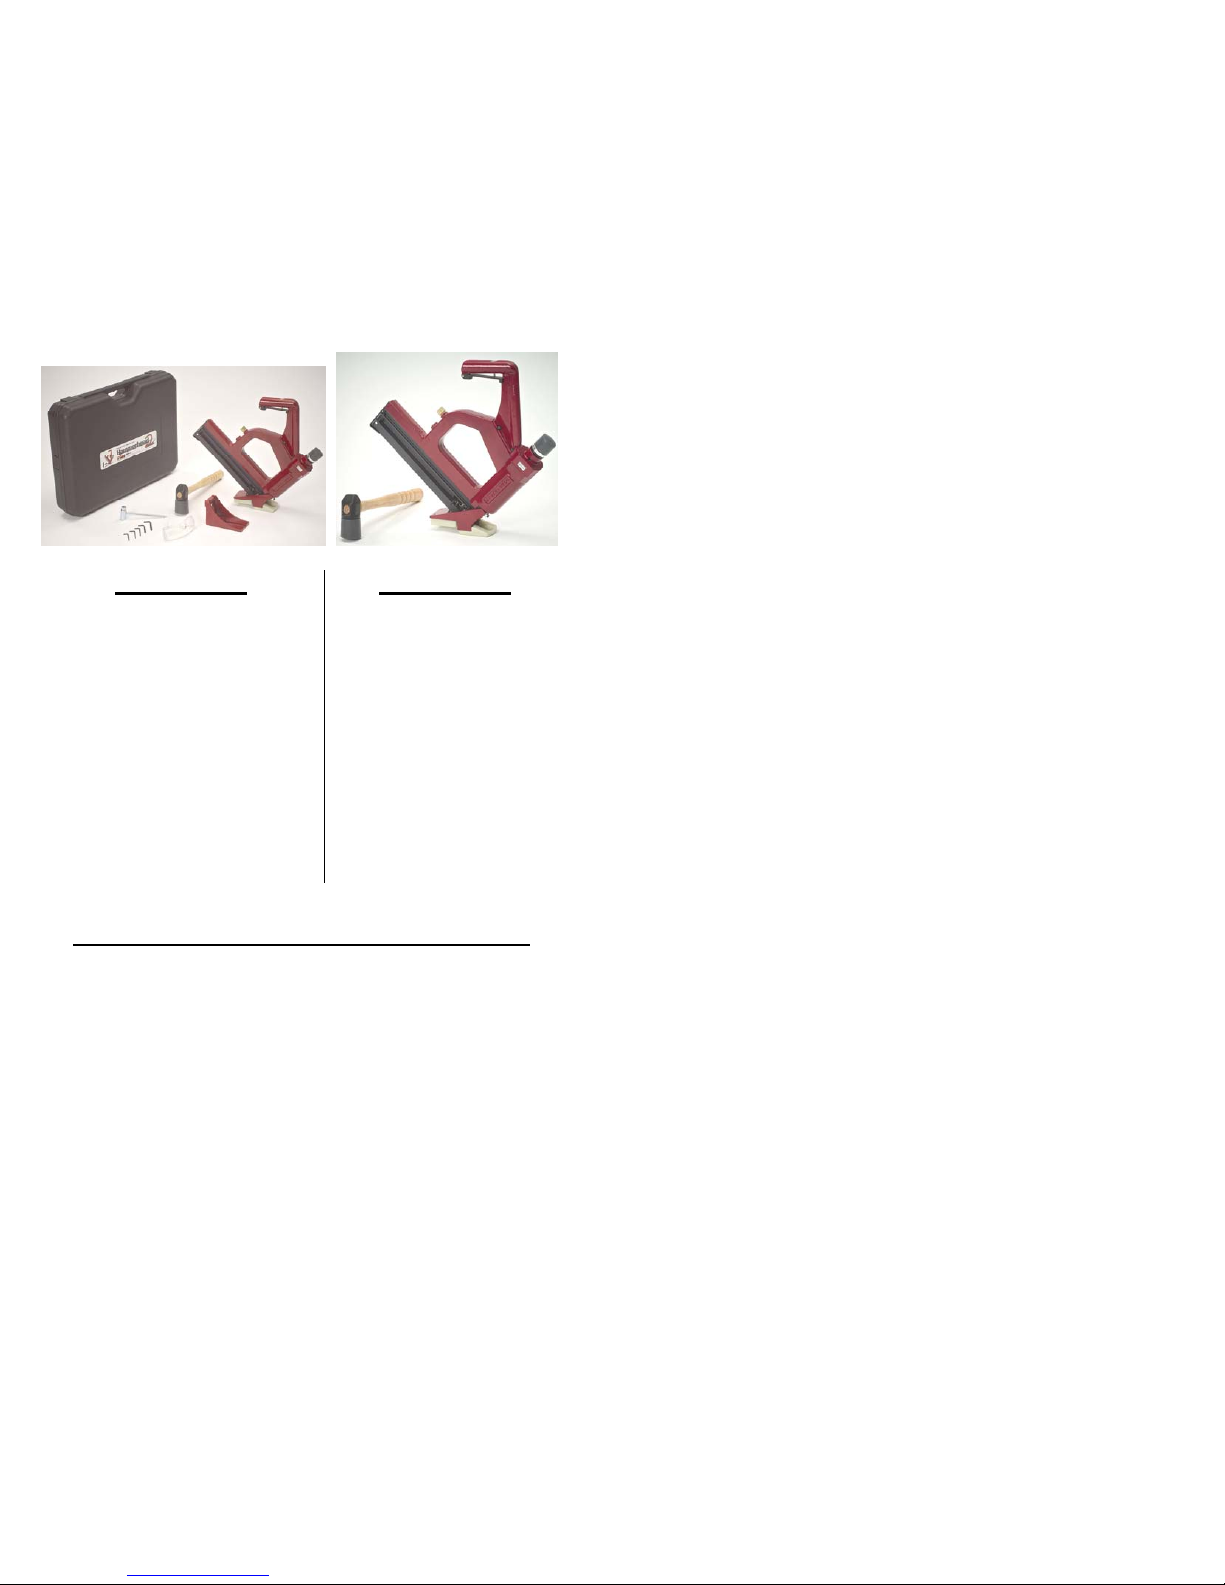
CAT. NO. 421
2
Specifications / Contents
Model 421 PORTAMATIC®
with Angled Shoe to be used for
installing 3/4”- 33/32” Tongue and
Groove Flooring, a Face Shoe to be
used for face nailing the first four (4)
rows and the last five (5) rows of
Tongue and Groove Flooring.
Package Contents Include:
PORTAMATIC® Nailer, Hammer,
Face Shoe, Owner’s Manual,
Wrenches, Safety Glasses, Carrying
Case.
CAT. NO. 422
Specifications / Contents
Model 421 PORTAMATIC®
with Angled Shoe to be used for
installing 3/4”- 33/32” Tongue and
Groove Flooring
Package Contents Include:
PORTAMATIC® Nailer,
Hammer, Owner’s Manual,
Wrenches, Safety Glasses.
PORTAMATIC® SPECIFICATIONS
ETL Listed: Control Num ber 9801577
US Patent Numbers: 6,095,392 & D419,048
Fastener Type: Use only Porta-Nails*
Operating Pressure: 90 P.S.I. (See Operating Instructions Pg. 8)
Firing Mode: Hammer Actuated
Jam Clearance: Lever Type, Quick Release Gate (See
Clearing a Jam Pgs. 10-11)
Dimensions: 19” High x 20” Long x 3” Wide
Weight: Approximately 13 LBS. (Tool Only)
*Porta-Nails Must Be Purchased Separately
31
30
NOTES:
3
PNI’s LIMITED ONE YEAR WARRANTY
PNI is proud of the products that it manufactures and warrants them to be free of
defects from workmanship and material for a period of 1 year from the date of original
purchase (Exceptions: rubber O-rings, Seals and Driver Blades). In the unlikely
event that a problem occurs, return the product to our plant freight prepaid and allowed,
so that a determination of the fault can be made. If the fault is determined to be
defective materials or workmanship, a no-charge replacement or repair will be made, at
our discretion. The product will be returned to you freight prepaid and allowed.
WARRANTY WILL BE VOID IF OIL IS USED IN TOOL
. This warranty does
not cover accidents, abuse or misuse and in no case will PNI be liable for incidental or
consequential damages. No other warranty written or verbal is authorized.
Returns for warranty service or repair must have a RMA number
prior to returning; contact Customer Service at 800-634-9281.
Returns should be sent to:
Porta-Nails, Inc. 4235 US Hwy. 421 N. Currie, NC 28435
Attention Service Dept.
Safety Instructions
1. KNOW YOUR POWER TOOL
Read the owner's manual
carefully. Learn its applications
and limitations as well as the
potential hazards specific to this
tool.
2. THE OPERATOR AND ALL
OTHER PERSONNEL MUST
WEAR PROPER EYE AND
EAR PROTECTION IN THE
WORK AREA.
Wear safety goggles at all times.
(Must comply with ANSI Z87.1).
Everyday eyeglasses have impact
resistant lenses only. They are
NOT safety glasses. Also, wear
ear protectors (plugs or muffs)
during extended periods of
operation
3. KEEP WORK AREA CLEAN
Cluttered areas and benches invite
accidents. Floor must not be
slippery due to sawdust.
4. KEEP CHILDREN AWAY
All visitors should be kept a safe
distance from work area.
5. WEAR PROPER APPAREL
Do not wear loose clothing, gloves,
neckties or jewelry (rings,
wristwatches) that could get caught
in moving parts. Wear non-slip
footwear. Wear protective hair
covering to contain long hair. Roll
long sleeves above the elbow.
6. SECURE WORK
Be sure the tongue and groove of
the flooring strips are properly
interlocked and secured in place
before nailing.
7. STAY ALERT
Watch what you are doing. Use
common sense. Do not operate
tool when you are tired or while
under the influence of medication,
alcohol or drugs.

4
29
8. ALWAYS INSPECT TOOL
BEFORE OPERATING.
Tool must be inspected prior to
use to insure proper use of power
supply. Tool must be inspected to
insure proper working order. An
improperly functioning tool must
not be used.
9. KEEP HANDS, FEET AND
OTHER BODY PARTS AWAY
FROM NAIL EJECTION
AREA.
Serious injury could occur if body
parts are not kept away from nail
ejection area.
10. ALWAYS ASSUME THE
TOOL CONTAINS
FASTENERS.
Do not activate the tool unless the
tool is placed firmly against the
work piece.
11. NO HORSEPLAY.
Do not point the tool toward
yourself or anyone whether it
contains fasteners or not.
12. NEVER DESENGAGE OR
RENDER THE SAFETY INOPERABLE.
13. NEVER TRANSPORT TOOL
WHILE DEPRESSING THE
TRIGGER.
14. DISCONNECT TOOL FROM
AIR SUPPLY WHEN:
Moving the tool to a new location,
performing any maintenance or
repair, clearing a jam or tool is
unattended.
15. NEVER SERVICE WHILE
ATTACHED TO AIR SUPPLY.
Always disconnect the tool from
the power source when servicing,
or replacing parts.
16. DO NOT USE TOOL IF
OPERATING CONTROLS
ARE INOPERABLE.
Do not remove, tamper with, or
otherwise cause the tool operating
controls or safety controls to
become inoperable.
17. DO NOT OPERATE TOOL IF
SAFETY FEATURES NOT
WORKING PROPERLY.
Disconnect tool from power source
if safety trigger or operating
controls are not working properly.
18. USE ONLY PORTA-NAIL
FASTENERS.
Only use fasteners recommended
by the manufacturer. Use of other
fasteners may cause serious injury,
jamming of tool or improper
operation.
19. USE ONLY PRESSURE-
REGULATED POWER
SOURCE.
Use only a pressure regulated
power source set at 125 PSI
maximum. The power so urce must
have a safety relief valve set at 135
PSI maximum.
20. THE TOOL SHOULD NOT BE
OPERATED AT THE
MAXIMUM AIR PRESSURE.
The tool air-line should be
connected to the power source
through an airline pressure
Regulator and an airline Filter.
The air line Regulator should never
be set higher than 110 PSI as
marked on the tool. Lower
pressures may be used as
recommended by the manufacturer.
21. HAZARDOUS POWER
SOURCES SHALL NOT BE
USED.
Hazardous power sources
including, but not limited to,
Oxygen, Combustible gases,
sources whose pressure can exceed
200 PSI if the pressure Regulator
fails, bottled gases, including air
should never be used.
PROBLEM
OR
QUESTION
CAUSE CORRECTIVE ACTION
Ram is stuck
in down
position
Driver Blade
(Ref. #58)
could be bent
Check and replace if needed.
Oil could have
been used in the
tool
Clean, replace O-Rings and grease as
recommended in the Owner’s Manual.
Cylinder
Cushion Ring
(Ref. #5) could
be loose or
damaged or has
been installed
upside down.
Check Cylinder Cushion Ring (Ref. #5) and
replace if loose or damaged. Check for
proper installation. (See Figure 12)
Tool partially
fires when air
hose is
connected
Main Valve
(Ref. #41) is not
seating in Valve
Housing (Ref.
#46).
Check the Return Spring (Ref. #8) under the
Main Valve (Ref. #41) to make sure it is not
damaged and that the Return Spring Washers
(Ref. #3) are not damaged. Replace if
needed.
Check for smoothness and free movement of
the Main Valve (Ref. #41) in the Valve
Housing (Ref. #46). If too tight, replace the
O-Rings on the Main Valve.
O-Rings on the
Discharge
Valve (Ref.
#11) may be
damaged.
Check and replace if needed.
Discharge
Valve Springs
(Ref. #9) not
aligned
Check and re-align if needed.
Cylinder
Exhaust Valve
Screw (Ref.
#50) may be
loose.
Check and tighten if needed. Use
LOCTITE® 242 (Blue) on screw.
Nailer
partially fires
when trigger
is pulled and
before Ram is
struck
Main Valve Lip
Seal (Ref. #41)
is not sealing
Check Lip Seal. If damaged, replace Main
Valve (Ref. #41).
PROBLEM
OR
QUESTION
CAUSE CORRECTIVE ACTION
28
Nailer is
shooting two
nails.
End of Rail
(Ref. #26) is
worn.
Turn Rail (Ref. #26) around to use other
end in Guide if this has not been previously
done. If Rail has already been turned
previously, replace Rail.
Screws holding
Magazine (Ref.
#29) may be
loose
preventing Rail
(Ref. #26) from
being held
properly in
place.
Tighten Screws (Ref. #43, #29) that secure
the Magazine (Ref. #28) to the Guide (Ref.
#21) and the back Magazine Retainer
Bracket (Ref. #27).
Nails are not
being counter
sunk into
wood and are
left sticking
out of wood.
Not driving
Nails into the
tongue area
Always drive Nails into the tongue area, not
the groove.
Tip of Driver
Blade (Ref.
#58) broken
Check Driver Blade (Ref. #58) and replace
if tip is broken.
Air pressure
too low
Set air pressure to 100-110 PSI
Using air
compressor
that is too
small
Follow recommendations in the Owner’s
Manual relative to size and volume of air
compressor
Using an air
line that is too
small
Always use 3/8” ID air line.
The Piston
Cushion (Ref.
#10) could be
damaged
preventing the
Piston (Ref.
#56) from
completing full
stroke.
Check Piston Cushion (Ref. #10) and
replace if needed.
Nailer does
not fire when
trigger is
pulled.
This is a safety
feature
The Nailer is not supposed to fire when the
Trigger is pulled. In order to fire the Nailer,
the Trigger must be pulled and the Ram
Head (Ref. #47) struck with the hammer, in
that order.
APPLICATIONS
Your model 421 PORTAMATIC® Nailer is designed for Face
Nailing and Angle Nailing 9/16”, 25/32”, and 33/32” Hardwood
Tongue and Groove Flooring. (See Shoe Accessory Applications
section)
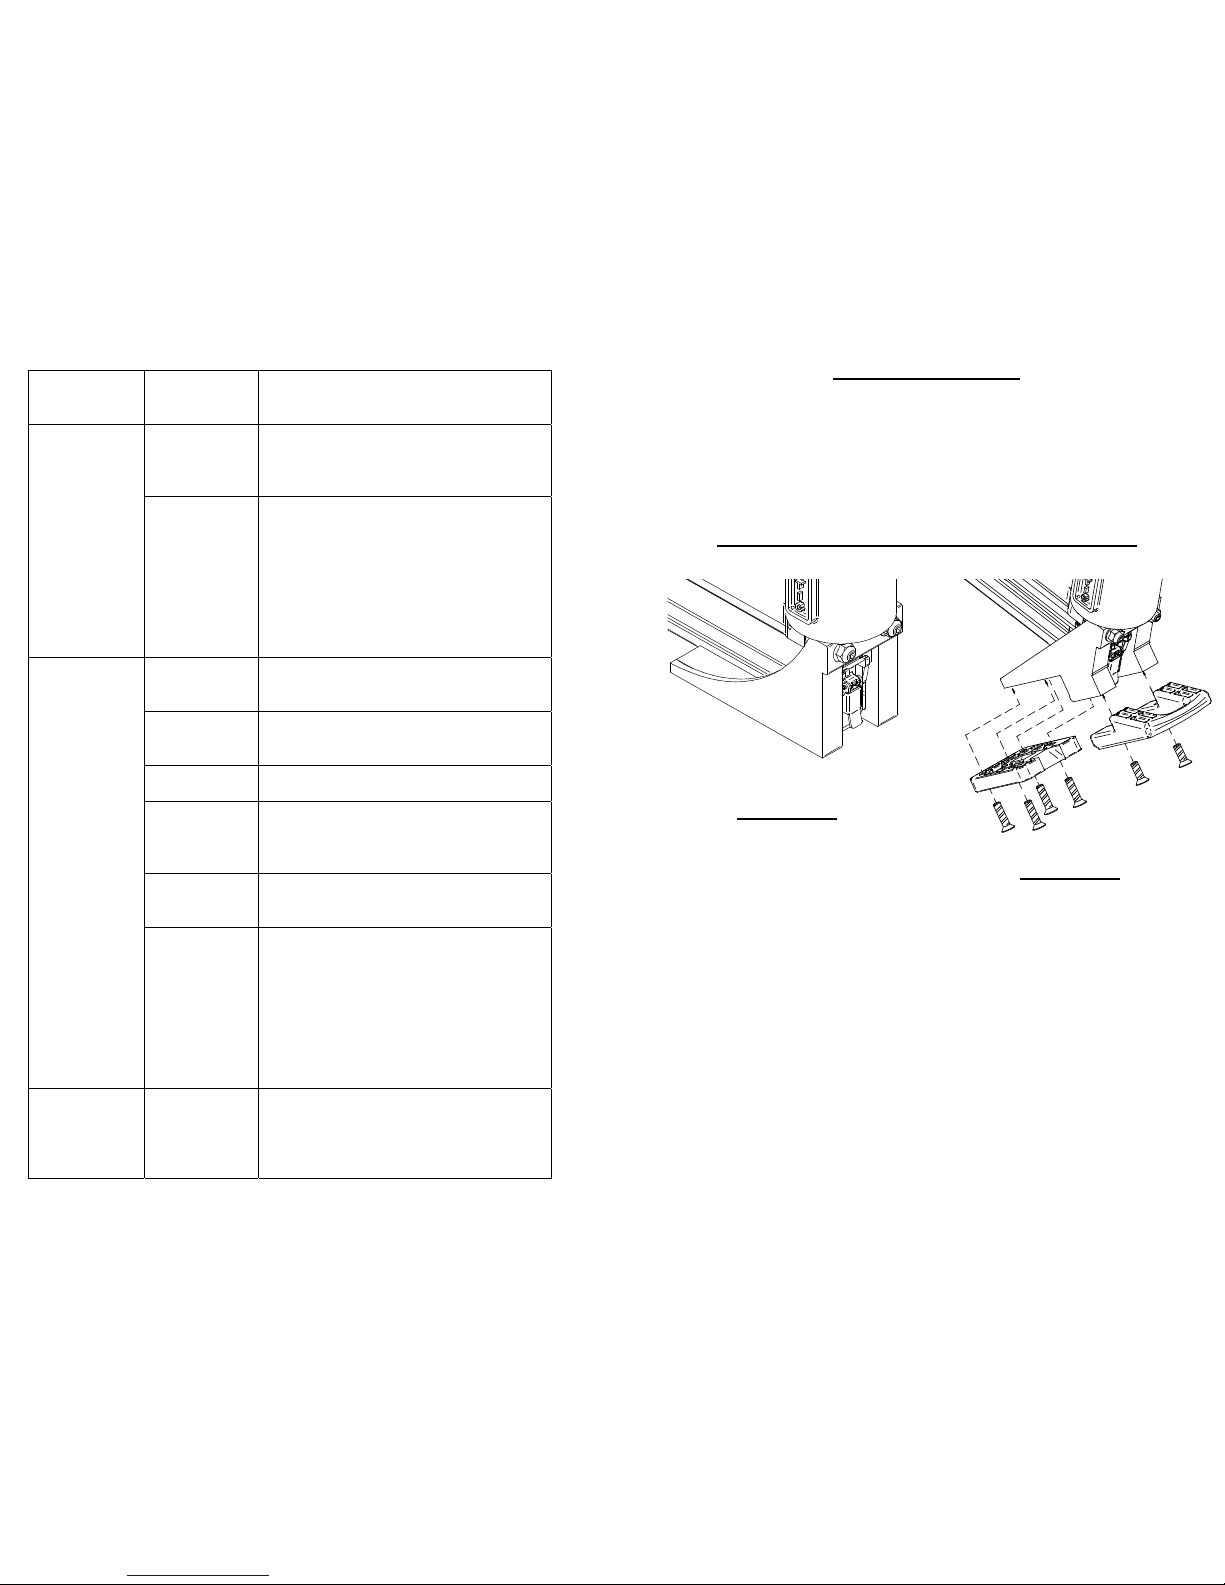
PORTAMATIC
®
ACCESSORY SHOE APPLICATIONS
5
FIGURE 1
Face Nailing
Accessory Shoe Cat. No. 50477
FIGURE 2
Tongue Nailing 33/32”
Flooring
Shoe P/N 50125
Shoe Base P/N 50185 (Green)
Shoe Pad P/N 50182 (Green)
 Loading...