

Porta-Nails 418A Operation And Safety Manual
www.porta
-
nails.com
800-634-9281
SAFETY TOPICS:
Tool Application:
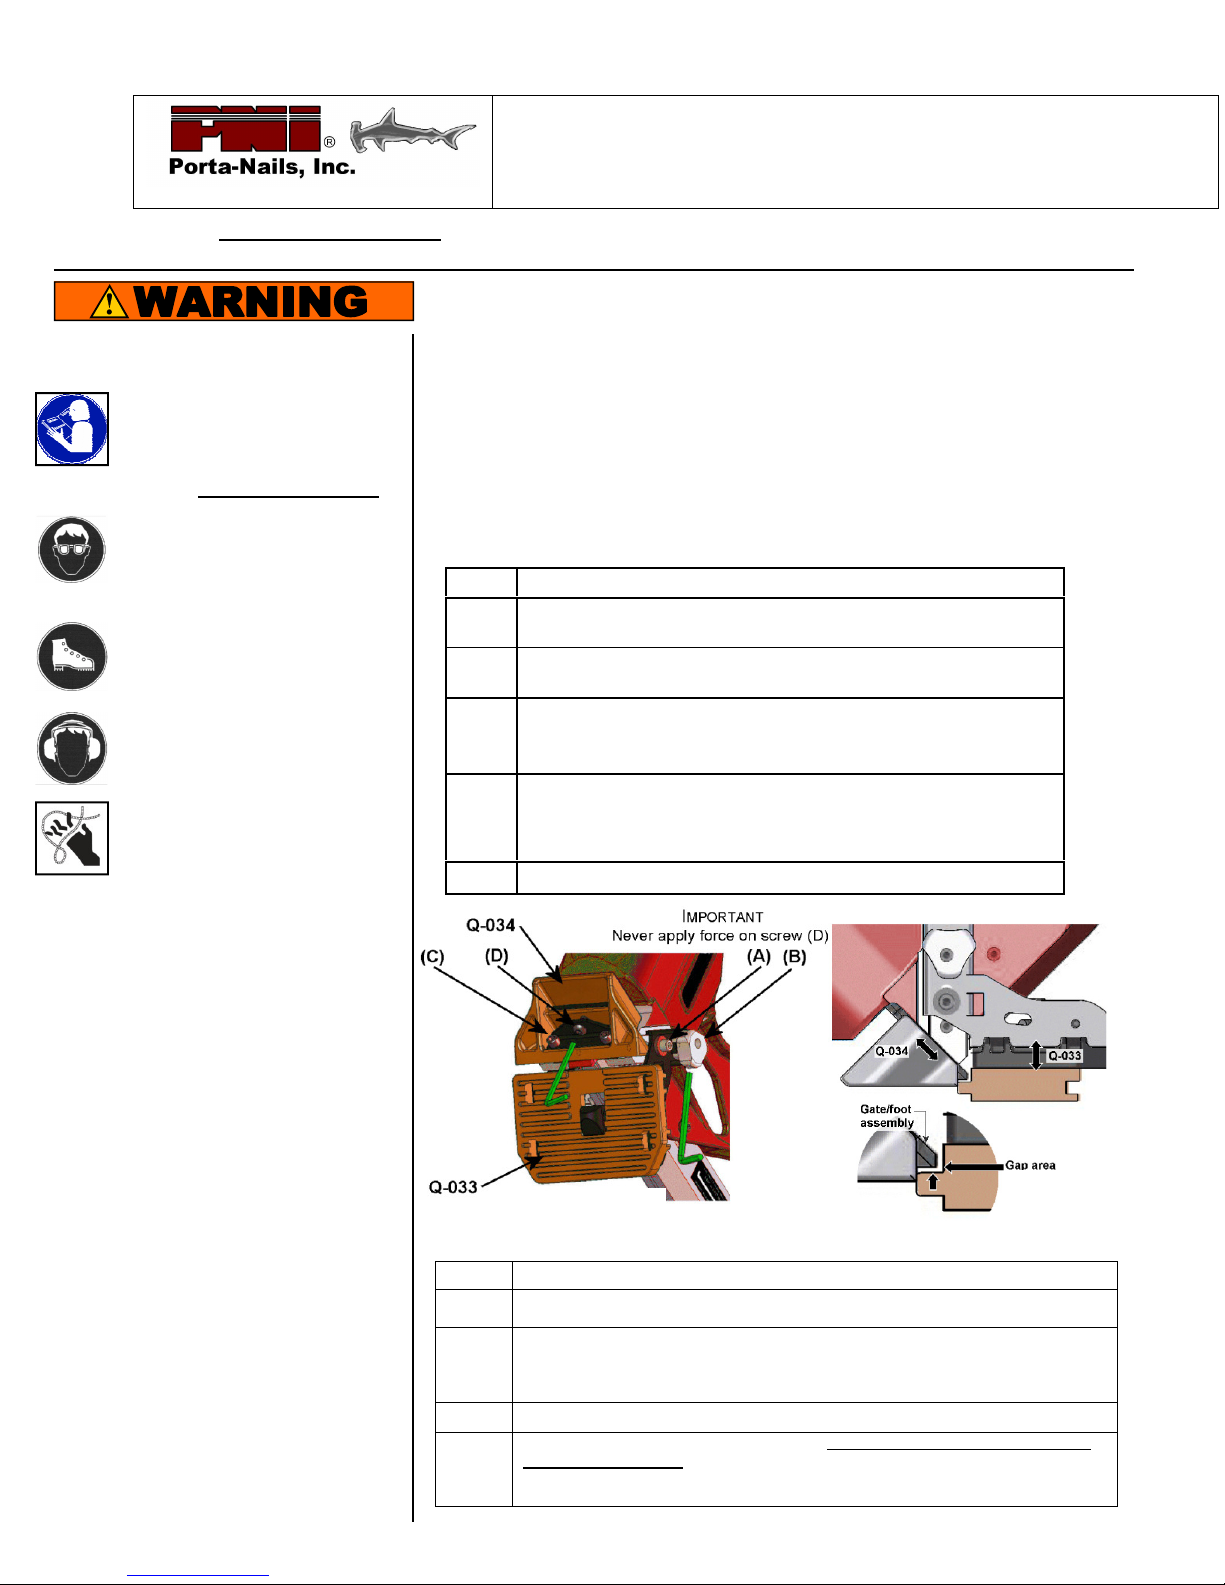
Using the supplied Allen wrench, loosen but do not remove screws (A); one
With the tool in an upside down position, place a short piece of flooring
Adjust the height of the shoe base to obtain a small gap between the
gate/foot assembly and the top side of the tongue of the sample board. A
gap of 1/32”, about half the thickness of the nail, should be adequate for
Operation and Safety Guide
Portamatic Evolution – 18ga. Wood Flooring Cleat Nailer
Model # 418A
Vendor Website:
Support Phone No.
ALWAYS refer to the owners
manual for complete safety and use
instructions. A copy is included with
the product or may be downloaded
by visiting www.porta-nails.com
ALWAYS wear OSHA-required Z-87
safety glasses with side shields
when using this or other pneumatic
and or hand tools
ALWAYS wear proper foot
protection while the air hose is
connected to the pneumatic tool.
ALWAYS wear proper ear
protection while the air supply is
connected to the pneumatic tool.
ALWAYS keep hands and body
away from the nail ejection area as
this may cause serious injury
.
.
SAFETY CHECKLIST:
Tool Operation: This tool is designed for fastening 3/8” – ¾” tongue and
groove flooring using 18ga flooring cleat nails. Operating air pressure is 70 to 85psi – never exceed 100psi.The 418A is fitted with a fully adjustable shoe
base designed to prevent contact with the top edge of the flooring. Because
this tool can be used on varying flooring dimensions it is important to adjust
the nailer to fit the flooring to be installed for proper nail placement prior to
any installation. It is necessary to adjust the Shoe Base Q-033 for the flooring
thickness and the Resting Block Q-034 for the flooring tongue. Follow these
instructions for proper adjustment:
Adjusting the Shoe Base Q-033 for Flooring Thickness
Step Action
1
2
3
4
5
These proper safety guidelines
should always be followed to
work safely with the pneumatic
nailer model 418A.
ALWAYS carry or manipulate the
tool by its handle while the air
supply hose is connected.
ALWAYS disconnect the air supply
when the tool is not in use.
ALWAYS handle the tool with care.
Never engage in horseplay.
ALWAYS make sure that the tool is
properly oriented with the work
surface.
DO NOT strike the head cap of the
actuator if shoe base is not sitting
perfectly on the work surface.
DO NOT service or attempt to repair
the tool, clear obstructions or make
adjustments while the air supply is
connected.
(E)
Adjusting the Resting Block Q-034 for Width of the Tongue
Step
1
2
3
4
Fastening Engineered and Solid Wood Flooring
on each side of the tool.
against the gate/foot assembly (E).
Engage the Allen wrench in knob (B) as shown in (Fig.1); rotate to move the
shoe base up or down. Note that knob (B) has a rotation range of only ½
turn. Do not apply force when a limit is reached.
most situations as shown in (Fig. 2).
Tighten both screws (A) to lock in position.
Fig. 1
Action
Using the Allen wrench, loosen by about ½ turn – do not remove the two screws
(C).
With the Short piece of flooring still against the gate/foot assembly, adjust the gap
between the resting block Q-034 and the flooring tongue with screw (D). A small
gap of 1/32”, about half the thickness of the nail, should be adequate for most
situations as shown in (Fig. 2).
Tighten both screws (C).
Ensure that screw (D) is slightly tightened. Do not apply force on the screw once
screw (C) is tightened.
After completing the adjustments procedure, proceed with the installation of
a few boards. Carefully check for the proper placement of the nail.
Fig. 2
 Loading...