

Page 1
110-875 032114
Page 2

www.cuisinetechnology.com 22
PolyScience Vacuum Sealing Systems
CONTENTS
Important Safeguards �������������������������������������������������������� 4
Introduction ����������������������������������������������������������������������� 6
Package Contents �������������������������������������������������������������� 7
Seal Bar Installation ���������������������������������������������������������� 7
Components ���������������������������������������������������������������������� 8
Control Panel ��������������������������������������������������������������������� 9
Digital Display & LED Status ������������������������������������������� 13
Set-Up ������������������������������������������������������������������������������ 14
Electrical Power ����������������������������������������������������������� 14
Creating a Preset Program ������������������������������������������� 14
Vacuum / Seal Preset ��������������������������������������������� 15
Marinate Preset ������������������������������������������������������ 15
Making a Heat-Seal Bag from a Roll ����������������������������� 16
Day-to-Day Operation ������������������������������������������������������ 17
Turning the Unit On ������������������������������������������������������ 17
Placing the Heat-Seal Bag in the Vacuum Chamber ������� 17
Selecting the Vacuum Level ����������������������������������������� 17
Setting the Seal Time ��������������������������������������������������� 18
Automatic Vacuuming Packaging ���������������������������������� 18
Bags ���������������������������������������������������������������������� 18
Canisters & Bottles ������������������������������������������������� 19
Manual Vacuuming Packaging �������������������������������������� 20
Marinating or Pickling Food Item ���������������������������������� 21
Bag Marinating ������������������������������������������������������� 21
Canister Marinating ������������������������������������������������ 22
Running a Preset Program ���������������������������������������������� 23
Calibration ������������������������������������������������������������������������������24
Page 3

www.cuisinetechnology.com 43
PolyScience Vacuum Sealing Systems
When using this electrical appliance, basic safety precautions
should always be observed, including the following:
1� Do not touch hot surfaces�
2� Do not operate this Vacuum Sealer with a damaged power cord
or plug, or if it has been dropped, damaged or malfunctions�
3� Do not let power cord touch hot surfaces or hang over the edge
of table or counter�
4� Unplug from electrical outlet when not in use�
5� To avoid the possibility of personal injury, always unplug the
Vacuum Sealer from the electrical outlet before cleaning the
unit�
6� Do not immerse Vacuum Sealer or power cord in water or any
other liquid�
7� Do not touch the vacuum chamber lid, vacuum chamber or seal
bar while the unit is operating�
8� Do not use an extension cord with this Vacuum Sealer�
9� This Vacuum Sealer is intended for indoor use only; do not use
outdoors�
10� Do not let this Vacuum Sealer come in direct contact with food�
All foods should be placed in FDA approved boilable bags or
canisters�
11� Carefully review the safety section in included literature�
12� This appliance should not be used by children� To avoid
accidental injury, close supervision is necessar y when this
appliance is used where children may be present�
13� Do not operate in the presence of explosive and/or ammable
fumes�
14� Do not use this Vacuum Sealer for other than the intended
purpose�
15� Do not use this Vacuum Sealer on wet or hot surfaces or near a
direct heat source�
16� To disconnect power, turn any control “Off,” then unplug directly
from electrical outlet; do not disconnect by pulling on the power
cord�
17� This appliance is not intended for use by persons (including
children) with reduced physical, sensory or mental capabilities,
or lack of experience and knowledge, unless they have been
given supervision or instruction concerning use of the appliance
by a responsible person responsible for their safety�
18� Use only heat-seal bags, accessories and attachments�
19� Read all of the instructions carefully before using appliance�
Restoring Factory Default Settings ���������������������������������������25
Routine Cleaning ��������������������������������������������������������������������25
Troubleshooting ���������������������������������������������������������������������26
Error Messages �����������������������������������������������������������������������27
Technical Specifications ��������������������������������������������������������28
Replacement Bags ������������������������������������������������������������������29
Disposal ����������������������������������������������������������������������������������29
Warranty ����������������������������������������������������������������������������������30
CONTENTS (CONTINUED) IMPORTANT SAFEGUARDS
Page 4
www.cuisinetechnology.com 65
PolyScience Vacuum Sealing Systems
!
!
!
PolyScience
6600 W� Touhy Avenue
Niles, IL 60714 USA
Phone:
Email:
1�800�229�7569
1� 8 47�6 47�0 611
culinary@polyscience�com
Be sure to activate your new PolyScience Vacuum Sealer warranty
at www�cuisinetechnology�com
It is important to note that vacuum packaging cannot reverse the
deterioration of foods; it can only slow down changes in quality� It is
difcult to predict how long foods will retain their avor, appearance
or texture since it depends on the age and condition of the food
when it was vacuum packaged�
WARNI NG: As with any storage container, it is
important to inspect food that has been vacuum
packaged for spoilage prior to consumption�
WARNI NG: Never vacuum package garlic or fungi
(such as mushrooms)� A dangerous chemical reaction
takes place when air is removed, causing these foods
to be dangerous if ingested�
WARNI NG: Vacuum packaging is not a substitute
for refrigeration or freezing� Any perishable foods
that require refrigeration must still be refrigerated or
frozen after vacuum packaging� Vacuum packaging is
not a substitute for canning�
WARNI NG: Be careful not to touch or come in
contact with the Seal Bar when Vacuum Chamber Lid
is open as it may be hot� Never press the Seal button
when the Vacuum Chamber Lid is open as this will
apply heating power to the Seal Wire and can present
a burning hazard�
WARNI NG: This Chamber Vacuum Sealer is
equipped with a grounded power cord� Connect the
appliance only to earthed (grounded) power sockets�
Do not use appliance if the grounding prong on the
plug is missing or damaged or with a grounding
adapter. Contact a qualied electrician if the plug
does not t into the electrical outlet you intend on
using�
Thank you for choosing the PolyScience 300 Series Chamber
Vacuum Sealer� It is one of the strongest and easiest to use vacuum
packaging systems available� With this Vacuum Sealer, you will
be able to keep food fresher and for longer periods of time in your
freezer, refrigerator and pantry� You can also use your Chamber
Vacuum Sealer to quickly marinate meats, poultry and sh or pickle
fruits and vegetables�
The 300 Series Chamber Vacuum Sealer is a chamber vacuum
system which offers two distinct advantages over non-chamber,
external bag type units� First, a much higher level of vacuum can
be achieved, which means a longer shelf life for foods that you
package� Secondly, liquids and liquid-rich foods such as fresh
meats, sh, soup and stews can be effectively vacuum packaged.
Marinated vegetables and meats can also be packaged quickly and
easily, without mess�
The 300 Series Chamber Vacuum Sealer also allows you to package
a wide variety of sizes and shapes� Prep and store smaller, individual
portions as well as bulk items� The maximum bag with is 12 inches
(30�5 c m)�
We recommend that you begin operating your 300 Series Chamber
Vacuum Sealer immediately to conrm that it is operating properly. In
the unlikely event that the unit was damaged during shipping or does
not operate properly, contact:
INTRODUCTION
Page 5
www.cuisinetechnology.com 87
PolyScience Vacuum Sealing Systems
The items included with your 300 Series Chamber Vacuum Sealer
are:
• 300 Series Chamber Vacuum Sealer
• Seal Bar Assembly (must be installed prior to use)
• External Vacuum Hose
• User’s Manual
• Quick-Start Guide
• 6 x 10 in� chamber vacuum heat seal bags (15)
• 8 x 12 in� chamber vacuum heat seal bags (15)
• 12 x 14 in� chamber vacuum heat seal bags (15)
Before plugging the unit in, locate the seal bar found in the top foam
packaging insert� Place the seal bar onto the two posts located
inside the Vacuum Chamber� DO NOT remove the non-stick tape
covering the seal bar; this tape is required for proper operation�
PACKAGE CONTENTS
SEAL BAR INSTALLATION
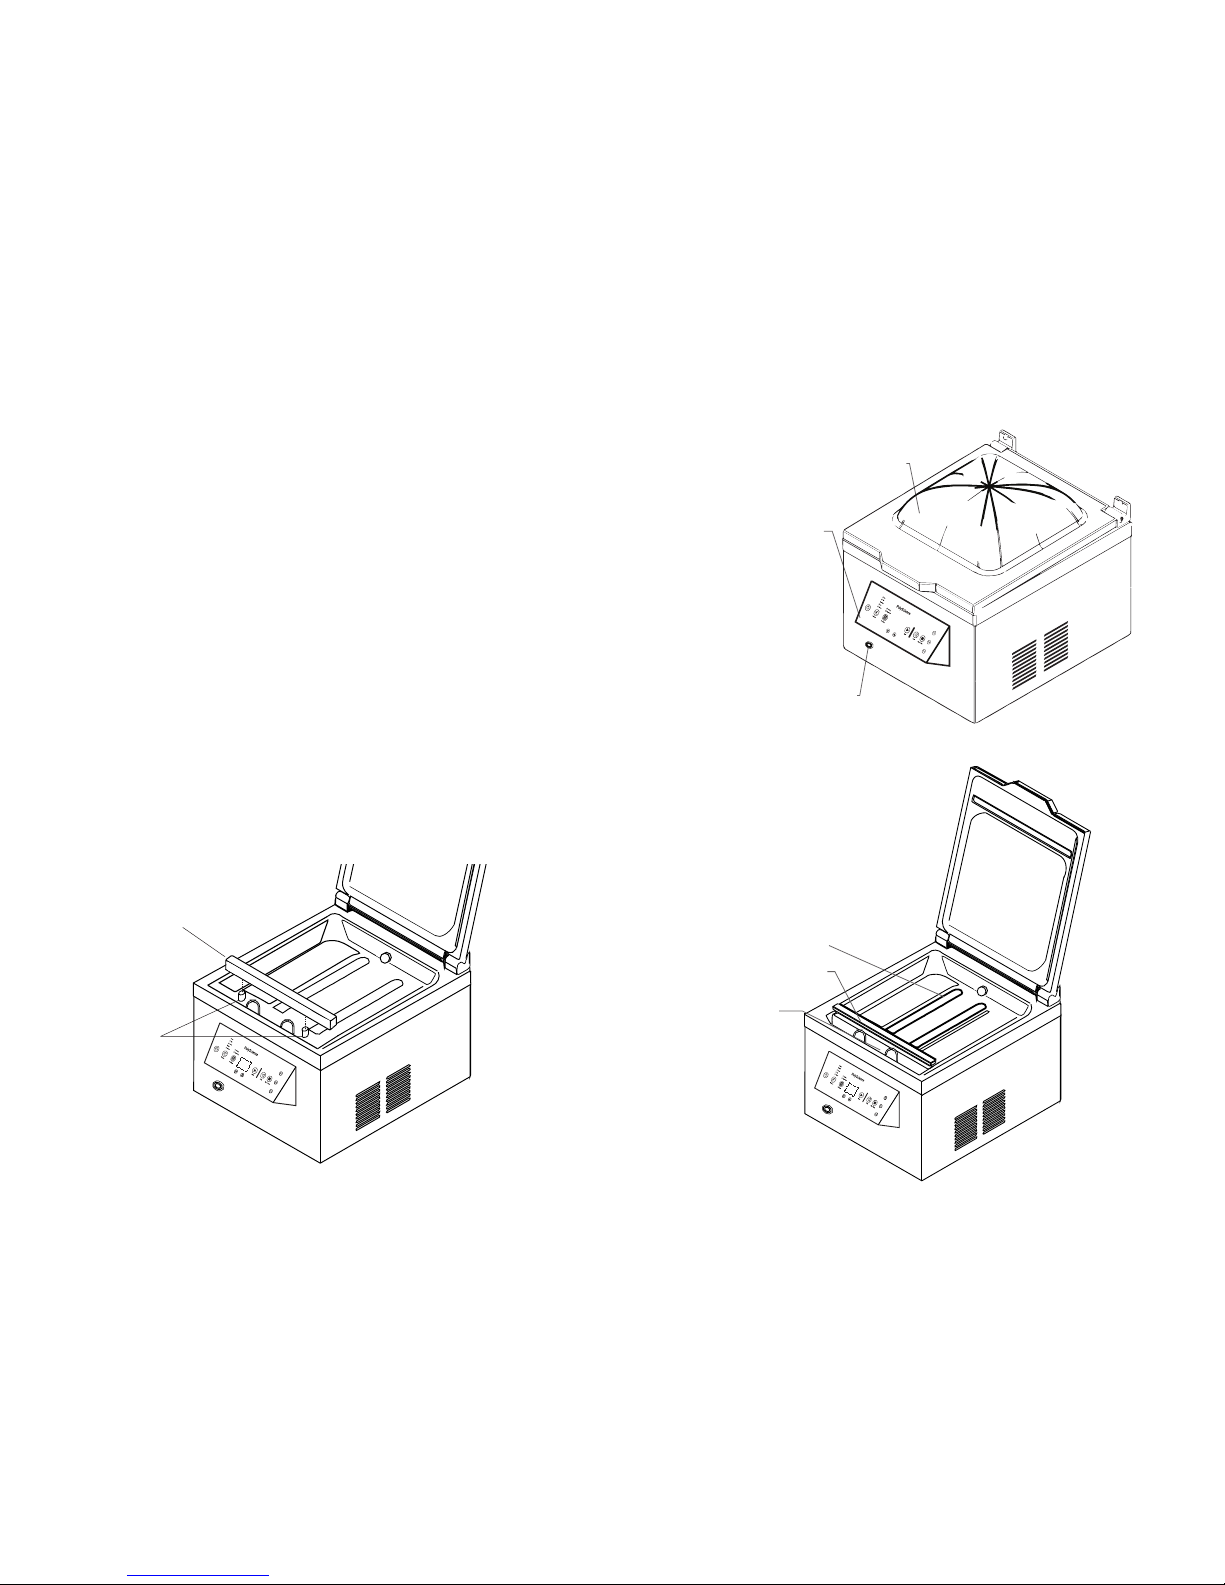
COMPONENTS
Vacuum Chamber Lid
Control Panel
External Vacuum Port
Vacuum Chamber
Seal Bar
Bag Clamp
Seal Bar
Posts
Page 6
www.cuisinetechnology.com 109
PolyScience Vacuum Sealing Systems
Vacuum
Level
(LE D light s)
Time
(seconds)
InHg
(Inches of
Merc ury)*
Tor r
(Millime ters of
Merc ury)*
InHg
(Gauge —
Inches of
Merc ury)**
Tor r
(Gauge —
Millimet ers of
Merc ury)**
Maximum 30-45 0�35 9 -29�55 -750
High 22�8 1�02 26 -28�88 -733
Medium 17� 3 2�24 57 -2 7�6 6 -702
Low 13�2 4�09 104 -25�81 - 655
Minimum 10 6�42 16 3 -23�48 -596
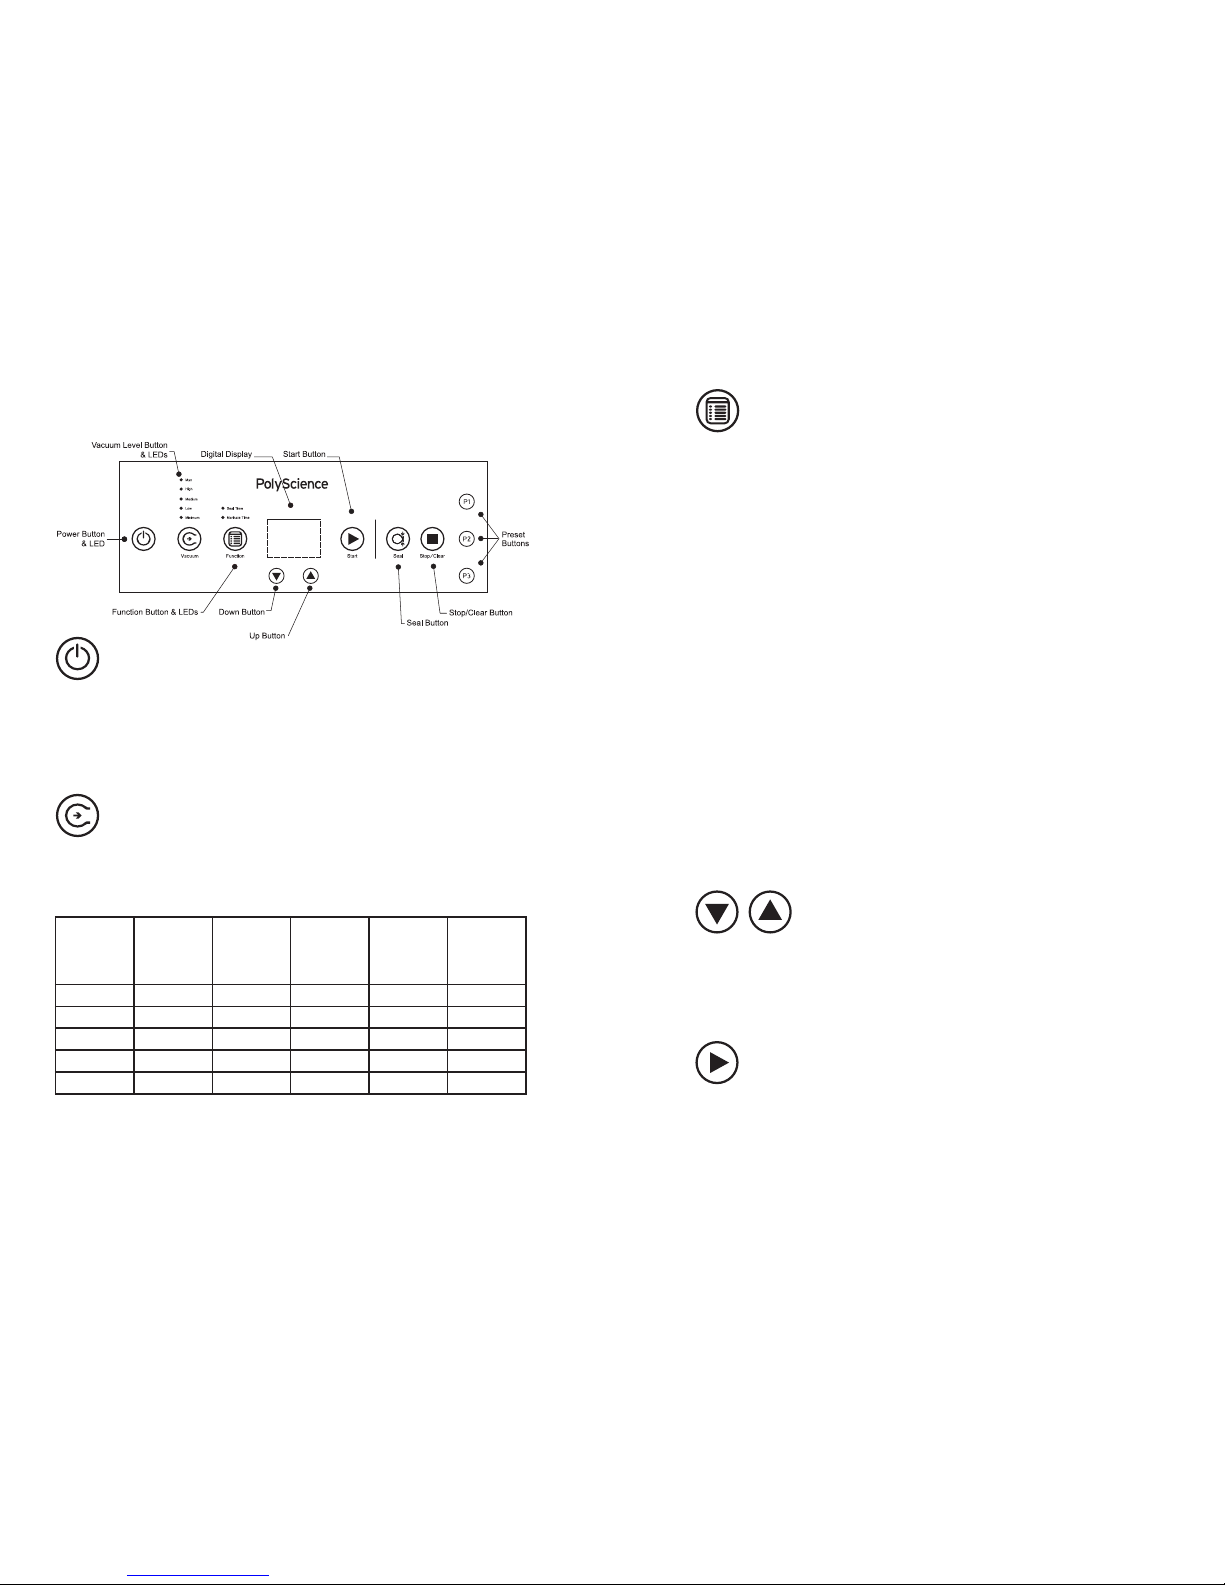
CONTROL PANEL
Power Button — This button turns the Chamber Vacuum Sealer On
and Off� When the unit is powered On, the blue LED associated with
the last selected Vacuum Level lights and the last used Marinate
Time and Seal Time settings are each displayed for two seconds�
The display reads 00 when the unit is ready for use�
Vacuum Level Button — This button allows you to set the desired
Vacuum Level� Each time it is pressed, one of the blue LEDs above
the button illuminates. Any of the ve Vacuum Levels may be
selected:
* Values are approximate and based on an ambient temperature of 25ºC (77ºC) at sea level
(29�9 InHg / 760 Torr)�
** Gauge vacuum equivalents are listed to provide a reference to vacuum sealers with vacuum
gauges�
Function Button — This button is used to select and set the
Marinate Time and/or the Seal Time� Pressing the button toggles
between the choices� The LED associated with the selected function
lights blue when selected� The desired Marinate Time or Seal Time
is set using the Down / Up arrow buttons�
Marinate Ti me — This is particularly useful for marinating and pickling.
Allows you to set the Marinate Time in 9 minute cycles, with each cycle
consisting of a vacuum/hold/release process. Each vacuuming step
takes approximately one minute (depending on the Vacuum Level set)
and each hold step takes approximately 8 minutes. At the end of each
cycle, the vacuum is released. If Sealing has been activated, the bag
will be sealed prior to the release of vacuum in the nal cycle. The
maximum number of vacuum/hold cycles is 11 (99 minutes).
EXAMPLE: If a marinate time of 27 minutes is selected, the unit will
pull the vacuum at the selected level, hold it for 8 minutes and then
release the vacuum. This vacuum/hold cycle is then repeated two more
times for a total marinate time of approximately 27 minutes.
When 00 is selected, the marinate function is not active.
Seal Time — This function allows you to set the amount of time
needed to seal the storage bag and helps ensure that bags of different
thicknesses are sealed properly. The Seal Time may be set anywhere
from 00 to 06 seconds. If you do not want to seal the bag, the Seal
Time should be set to 00.
Down / Up Buttons — These buttons are used in conjunction with
the Function button to set the Marinate Time and/or Seal Time� The
Down button decreases the displayed value; the Up button increases
the displayed value�
Start Button — Pressing this button initiates the marinate process,
vacuum and/or sealing process� The process may be set either
manually or by selecting one of the three Preset programs (P1, P2,
P3)�
Page 7

www.cuisinetechnology.com 1211
PolyScience Vacuum Sealing Systems
Seal Button — This button is used to immediately begin sealing
using the last programmed Seal Time; it overrides any process
currently in progress and initiates sealing� If vacuuming is in process,
vacuuming will continue until the sealing process is complete� If
marinating is in process, sealing will be initiated (and no further
vacuum will be pulled)� Following the completion of the sealing
process, the remaining chamber vacuum will be released and
product can be removed� If Seal Time is set to 00, pressing the Seal
button has no effect on the process in progress�
Stop / Clear Button — Pressing this button after entering a
Marinate Time, Seal Time or Calibration value resets the Digital
Display to 00 and activates a single one-second audible signal�
Pressing it while a process is running immediately stops the process
and activates two one-second beeps; the chamber vacuum will be
released and bag sealing will be skipped or stopped�
Pressing the Stop / Clear button a second time resets the Digital
Display to 00; three one-second beeps also sound�
Preset Buttons — These buttons allow you to set, select and
run frequently used Vacuum Level, Marinate Time and Seal Time
combinations� Although the Presets are pre-programmed at the
factory, you can change them to meet your specic requirements.
The factory Presets are as follows:
Preset Vacuum Level Marinate Time
(minutes)
Seal Time
(seconds)
Maximum 00 03
Medium 00 03
Medium 27 00
When a Preset is selected, the blue LEDs associated with the
Preset’s programmed settings (Vacuum Level, Marinate Time and
Seal Time) light and the Preset ID appears on the Digital Display
for two seconds� The Marinate Time setting will then appear on the
Digital Display for two seconds followed by the Seal Time setting for
two seconds� The unit is ready for use when the Preset ID is steadily
displayed�
Digital Display — Displays the Marinate Time, Seal Time and
Calibration values as they are input� Time is entered in minutes or
seconds, depending on the function selected� It also displays the ID
of a selected preset as well as the duration or the time remaining
in a process as it is being run. It ashes 00 when the process is
complete�
Page 8

www.cuisinetechnology.com 1413
PolyScience Vacuum Sealing Systems
1� Plug the power cord into a properly grounded electrical outlet�
2� Press � The unit will run through a brief (~6 seconds) start-up
sequence�
Your PolyScience 300 Series Chamber Vacuum Sealer is simple to
set up and operate�
!
DIGITAL DISPLAY & LED STATUS
The 300 Series Chamber Vacuum Sealer ’s Digital Disp lay and LEDs convey
operational information as process parameters are entered and processes run�
Event Vacuum
Level LED
Marinate
Time LED
Seal Time
LED
Digital Display
Power On Last selected
level LED
ashes for
two seconds
and then on
steady
Off Off 00 for two
seconds
Previous
Marinate Ti me
value for two
seconds
Previous S eal
Time value for
two seconds
00 steady until
Start or Preset
Button pressed
Set Vacuum
Level
Initially on
steady at last
selected level,
changes whe n
a different
level is
selected
Off Off 00
Set Marinate
Time
LED for last
selected level
on steady
On when
Function
button
pressed once
Off Current Marinate
Time setting
Set Seal Time LED for last
selected level
on steady
Off when
Function
button
pressed to
advance to
Seal Time
On when
Function
button
pressed to
advance
from
Marinate
Time to Seal
Time
Current Seal
Time setting
SET-UP
• The LED next to the last selected Vacuum Level will ash for two
seconds and then remain lit�
• 0 0 will appear on the digital display for t wo seconds�
• The last selected Marinate Time will appear on the display for two
seconds�
• The last selected Seal Time will appear on the display for two seconds�
• 0 0 will be displayed steadily on the readout, indicating that the unit is
ready for use�
The 300 Series Chamber Vacuum Sealer’s presets allow you to
create and run frequently used Vacuum Level, Seal Time and
Marinate Time combinations� These are particularly convenient if
you usually use the same settings for processing large batches or
particular types of foods�
WARNING: Make sure that the electrical outlet is
the same voltage and frequency as your Chamber
Vacuum Sealer� The correct voltage and frequency
are indicated on a label on the rear of the unit� The
use of extension cords is not recommended�
IM P OR TA NT: If you intend to use a preset for use
with external canisters, you should not include a seal
step�
Electrical Power
Creating a Preset Program
Page 9

www.cuisinetechnology.com 1615
PolyScience Vacuum Sealing Systems
1� Pull out a length of roll sized to t the item you wish to vacuum
package� Be sure to allow for at least 1�75 inch (4�5 cm) of space
at the top and the bottom of the food item�
2� Cut the roll to size�
3� Place one end of the cut piece across the seal bar in the
Vacuum Chamber and secure the open end of the vacuum bag
in the bag clamp located in front of the seal bar� Make sure
the seal bar spans the entire width of the roll and that there are
no wrinkles in the bag material�
4� Close the Vacuum Chamber Lid�
5� Press until the Seal Time LED lights�
6� Press the and/or buttons until the desired Seal Time
settings appear on the Digital Display�
7� Press � The Seal Time will count down from the current setting
to 00� Three one-second audible tones will sound when the
sealing process is complete�
8� Open the Vacuum Chamber Lid, remove the bag and check for
proper seal�
!
Making a Heat-Seal Bag from a Roll
NOTE: A positive seal will look “clear” upon
inspection� If the seal is spotty or incomplete,
increase the seal time; if the seal is white or milky,
decrease the seal time�
Vacuum / Seal Preset
1� Press �
2� Press until the LED adjacent to the desired Vacuum Level
lights�
3� Press until the Seal Time LED lights�
4� Press the and/or buttons until the desired setting appears
on the Digital Display� Enter a value of 00 if you want the bag to
remain unsealed�
5� Press and hold the preset button ( , or ) you want to
associate with this vacuum / seal combination for ten seconds�
Two one-second beeps sound and the preset ID (P1, P2, P3)
appears on the Digital Display�
6� Press to run the preset program; press if you do not wish
to run the program at this time (the Digital Display will reset to
00)�
Marinate Preset
1� Press �
2� Press until the LED adjacent to the desired Vacuum Level
lights�
3� Press until the LED adjacent to Marinate Time lights�
4� Press the and/or buttons until the desired Marinate Time
appears on the digital display�
5� If you wish to seal the bag once the marinating process is
complete, press until the LED adjacent to Seal Time lights
then use the and/or buttons to set the desired seal time�
6� Press and hold the preset button ( , or ) you want to
associate with the program for ten seconds� Two one-second
beeps sound and the preset ID (P1, P2, P3) appears on the
Digital Display�
7� Press to run the preset program; press if you do not wish
to run the program at this time (the Digital Display will reset to
00)�
Page 10

www.cuisinetechnology.com 1817
PolyScience Vacuum Sealing Systems
Turning the Unit On
DAY-TO-DAY OPERATION
Press � The unit will run through a short start-up sequence during
which the last selected Vacuum Level, Marinate Time and Seal Time
will be displayed (see Set-Up, page 14)� The unit is ready for use
when 00 is displayed continuously on the readout�
!
NOTE: The Chamber Vacuum Sealer stores the most
recently used operational settings when the unit is
turned Off or if electrical power is disrupted�
Placing the Heat-Seal Bag in the Vacuum Chamber
Selecting the Vacuum Level
Your 300 Series Chamber Vacuum Sealer features ve Vacuum
Levels� Depending on the Vacuum Level selected, it may take from
10 to 45 seconds to pull the desired vacuum (see Control Panel
Overview, Vacuum Level Button, page 9)�
!
NOTE: Delicate foods (such as seafood, berries,
peas, etc�) may be crushed or damaged if packaged
using too great a Vac uum Level�
Press until the LED adjacent to the desired Vacuum Level lights�
Setting the Seal Time
Automatic Vacuum Packaging
• The vacuum pump turns On and the LED associated with the
selected Vacuum Level begins ashing; the LEDs for lower Vac uum
Levels light as those levels are achieved� The time on the Digital
Display counts up (in seconds) until the selected Va cuum Level is
achieved�
• When the selected Vacuum L evel is achieved, the LED associated
with the level lights steady and the vacuum pump turns Off�
• The seal step is initiated if Seal Time is 01 or greater�
• The time remaining in the seal step is displayed on the digital
readout�
• When the display reaches 00, it begins ashing and three one-
second audible signals sound to indicate that the process is
complete� You may also notice the bag tightening around the product
as air is let back into he vacuum chamber�
Correct placement of the heat-seal bag within the Vacuum Chamber
is crucial to the vacuuming and sealing process� Here are some
guidelines to follow that will help ensure that your products are
properly vacuum packaged�
1� Allow at least 1�75 inch (4�5 cm) of space between the top of the
food item and the open end of the bag�
2� Lay bag at in the Vacuum Chamber with the opening of the
bag across the seal bar� If packaging a bag containing liquids
or wet product, keep the contents of the bag below the height of
the seal bar�
3� Secure the open end of the vacuum bag in the bag clamp
located in front of the seal bar�
The Seal Time on your 300 Series Chamber Vacuum Sealer is
adjustable to help ensure proper sealing when bags with different
wall thicknesses are used� The Seal Time setting can be set from 00
(no sealing) to 6 seconds in 0�5 second increments�
1� Press until the Seal Time LED lights; the last selected Seal
Time will appear on the Digital Display�
2� Press the and/or buttons until the desired setting appears
on the Digital Display�
Bags
1� Select the Vacuum Level and set the Seal Time as required (see
Selecting the Vacuum Level and Setting the Seal Time,
page 17-18)�
2� Open the Chamber Vacuum Lid�
3� Place the food item in a suitably sized heat-seal bag and secure
in the Chamber Vacuum Sealer (see Placing the Heat-Seal Bag
in the Vacuum Chamber, page 17)�
4� Close the Vacuum Chamber Lid�
5� Press � The vacuum and seal process will proceed as follows�
6� Open the Vacuum Chamber Lid�
7� Open the clamp, remove the bag and check for proper vacuum
and seal�
Page 11

www.cuisinetechnology.com 2019
PolyScience Vacuum Sealing Systems
WARNI NG: Be sure to store vacuum packaged items
properly after sealing� All perishable foods must be
refrigerated or frozen to prevent spoilage� Vacuum
packaging is not a substitute for canning�
NOTE: The quality of the vacuum can be checked by
looking at the tightness of bag around the product� If
you notice air pockets, increase the vacuum one level�
NOTE: You can press at any point during
vacuuming or sealing to cancel the process�
!
WARNI NG: When vacuum packaging product in
canisters or bottles, always set the seal time to 00� This
prevents the seal bar from heating�
!
NOTE: A positive seal will look “clear” upon inspection�
If the seal is spotty or incomplete, increase the seal
time; if the seal is white or milky, decrease the seal
time�
!
!
Canisters & Bottles
Your 300 Series Chamber Vacuum Sealer can also be used for the
vacuum sealing of canisters as well as bottles with vacuum bottle
stoppers�
• The vacuum pump turns On and the LED associated with the
selected Vacuum Level begins ashing; the LEDs for lower
Vacuum Levels light as those levels are achieved� The time
on the Digital Display counts up (in seconds) until the selected
Vacuum Level is achieved�
• When the selected Vacuum Level is achieved, the LED
associated with that level lights steady and the vacuum pump
turns Off and three one-second audible signals sound to
indicate that the process is complete�
!
NOTE: Store vacuum sealed bottles vertically, making
sure that the liquid is not in contact with the stopper�
Manual Vacuum Packaging
When sealing powdered or granulated foods in canisters, cover
them with a paper towel before vacuuming to prevent the food from
traveling into the vacuum system�
When sealing bottles, allow at least 1 inch (2�5 cm) of space
between the bottom of the stopper and the liquid in the bottle�
1� Place the canister lid on the canister or the vacuum bottle
stopper in the bottle�
2� Attach the vacuum hose to the front panel External Vacuum
Port�
3� Attach the vacuum hose to the vacuum por t on the canister lid or
bottle stopper�
4� Place vacuum port in the “vacuum” position (canisters only)�
5� Adjust the Vacuum Level as required (see Selecting the Vacuum
Level, page 17)�
6� Press � The vacuum process will proceed as follows:
7� Place the vacuum port on the canister in the “Closed” or “Lock”
position (canisters only)�
8� Remove the vacuum hose from the canister or bottle�
Delicate foods (such as seafood, berries, peas, etc�) may be crushed
or damaged while liquids or wet products may boil or be drawn out
of the bag if packaged using automatic vacuum packaging� Manual
vacuuming and sealing gives you more precise control over the
vacuum process to help prevent these problems�
1� Select the Vacuum Level and set the Seal Time as required (see
Selecting the Vacuum Level and Setting the Seal Time,
page 17-18)�
2� Open the Vacuum Chamber Lid�
3� Place the food item in a suitably sized heat-seal bag and secure
in the Vacuum Chamber (see Placing the Heat-Seal Bag in the
Vacuum Chamber, page 17)�
4� Close the Vacuum Chamber Lid�
5� Press and observe the bag closely as air is removed�
6� When the desired vacuum is achieved, press to seal the bag
and complete the manual vacuum packaging process� Three
one-second audible tones will sound to indicate that the
packaging process is complete�
7� Open the Vacuum Chamber Lid�
8� Open the clamp, remove the bag and check for proper vacuum
and seal�
!
Page 12
www.cuisinetechnology.com 2221
PolyScience Vacuum Sealing Systems
Canister Marinating
1� Place the food item and marinade in the canister and place lid
on the canister�
2� Attach the vacuum hose to the front panel External Vacuum
Port�
3� Attach the vacuum hose to the vacuum por t on the canister lid�
4� Place vacuum port in the “vacuum” position�
5� Adjust the Vacuum Level as required (see Selecting the Vacuum
Level, page 17)�
6� Press � The LED adjacent to Marinate Time will light�
7� Press the and/or buttons until the desired Marinate Time
appears on the Digital Display�
8� Press � The vacuum process will proceed as follows:
11� Open the Vacuum Chamber Lid�
12� Open the clamp, remove the bag and check for proper seal (as
needed)�
Bag Marinating
1� Adjust the Vacuum Level as required (see Selecting the Vacuum
Level, page 17)�
2� Press � The LED adjacent to Marinate Time will light�
3� Press the and/or buttons until the desired Marinate Time
appears on the Digital Display�
4� Press � The LED adjacent to Seal Time will light�
5� Press the and/or buttons until the desired Seal Time
appears on the Digital Display� Set Seal Time to 00 if you wish to
leave the bag unsealed�
6� Press until the LED adjacent to Marinate Time lights�
7� Open the Vacuum Chamber Lid�
8� Place the food item you wish to marinate and the marinade in
a suitably sized heat-seal bag and secure in the Vacuum
Chamber (see Placing the Heat-Seal Bag in the Vacuum
Chamber, page 17)�
9� Close the Vacuum Chamber Lid�
10� Press � The marinate process will proceed as follows:
Marinating or Pickling Food Items
You can use your 300 Series Chamber Vacuum Sealer to quickly
marinate or pickle products in either bags or canisters�
Marinating/pickling time is set in 9 minute cycles, with each cycle
consisting of two main steps: vacuum and hold� The maximum
number of vacuum/hold cycles is 11 (99 minutes)�
Each vacuum step takes approximately 1 minute (depending on
the Vacuum Level set) and each hold step takes approximately 8
minutes� At the end of each cycle, the vacuum is released� If sealing
has been activated and a bag is being used, the bag is sealed at the
end of the nal cycle.
• The vacuum pump turns On and the LED associated with the
selected Vacuum Level begins ashing; the LEDs for lower
Vacuum Levels light as those levels are achieved�
• When the selected Vacuum Level is achieved, the LED
associated with that level lights steady and the vacuum pump
turns Off and a hold cycle begins� The Digital Display begins
counting down (in minutes) from the original Marinate Time
setting�
• If the Marinate Time was set for more than one cycle (18
minutes or more), the vacuum and hold process repeats until all
time has elapsed�
• A seal step is initiated if Seal Time is 01 or greater and the time
remaining in the seal step is displayed on the digital readout�
• When the display reaches 00, it begins ashing and three one-
second audible signals sound to indicate that the process is
complete�
WARNI NG: When marinating product in canisters,
always set the seal time to 00� This prevents the seal
bar from heating�
!
• The vacuum pump turns On and the LED associated with the
selected Vacuum Level begins ashing; the LEDs for lower
Vacuum Levels light as those levels are achieved� The Digital
Display begins counting down (in minutes) from the original
Marinate Time setting�
• When the selected Vacuum Level is achieved, the LED
associated with that level lights steady and the vacuum pump
turns Off and a hold cycle begins� The Digital Display continues
counting down�
Page 13

www.cuisinetechnology.com 2423
PolyScience Vacuum Sealing Systems
RUNNING A PRESET PROGRAM
Your 300 Series Chamber Vacuum Sealer features three Presets
that allow you to set, select and run frequently used Vacuum Level,
Marinate Time and Seal Time combinations� Although the Presets
are pre-programmed at the factory, you can change them to meet
your specic requirements. (See Creating a Preset Program, page
14)�
The factory-programmed Presets are as follows:
CALIBRATION
• If the Marinate Time was set for more than one cycle (18
minutes or more), the vacuum and hold process repeat until
all time has elapsed� When the display reaches 00, it begins
ashing and three one-second audible signals sound to indicate
that the process is complete�
9� Place the vacuum port on the canister in the “Closed” or “Lock”
position�
10� Remove the vacuum hose from the canister�
A Preset is run as follows:
1� Place the heat-seal bag in the Vacuum Chamber or attach the
external vacuum hose to the front panel External Vacuum Port
and the port on the lid of the canister�
2� Press the button associated with the preset you wish to run
( , or ); a single one-second audible tone will sound and
the ID for that preset will appear on the display (P1, P2, P3)�
3� Press � The vacuum packaging or marinating process will
begin running� Three one-second audible tones will sound when
the process is complete�
4� Remove the heat-seal bag from the vacuum chamber or detach
the external vacuum hose from the External Vacuum Port and
canister lid ports�
Preset Vacuum Level Marinate Time
(minutes)
Seal Time
(seconds)
Maximum 00 03
Medium 00 03
Medium 27 00
The time it takes to achieve the desired Vacuum Level can be
adjusted to compensate for changes in altitude and/or other
requirements by shortening or lengthening the storage bag
evacuation time by -5 to +45 seconds� Adding time increases the
level of vacuum pulled; subtracting time decreases the level of
vacuum pulled�
The Vacuum Levels are adjusted as follows:
1� Press to turn the Chamber Vacuum Sealer Off�
2� Press and hold and simultaneously while pressing �
3� Continue holding and until CL appears on the Digital
Display (about 3 seconds)�
4� Release and ; 00 (or the most recent calibration
adjustment value) will appear on the display�
5� Use the and/or buttons to decrease or increase the
vacuum time�
6� Press and simultaneously to save the updated calibration
information; press to cancel the calibration�
7� 00 will appear on the Digital Display indicating that the Chamber
Vacuum Sealer is ready for use�
RESTORING FACTORY
DEFAULT SETTINGS
You can restore your Chamber Vacuum Sealer to the original factory
settings as follows:
1� Press to turn the Chamber Vacuum Sealer Off�
2� Press and hold and simultaneously while pressing �
3� Continue holding and until rS appears on the Digital
Display (about 3 seconds)�
4� Release the and buttons� Your unit has now been reset to
the original factory settings�
Vacuum Level Marinate Time Seal Time
Manual Maximum 00 03
Preset 1
Maximum
00 03
Preset 2 Medium
00
03
Preset 3 Medium
27
00
Calibration
Adjustment
00 s N/A N/A
Page 14

www.cuisinetechnology.com 2625
PolyScience Vacuum Sealing Systems
Vacuum Sealer does not pull a complete vacuum with bag�
• Vacuum Level and/or Seal Time may be insufcient; increase as
required�
• Edge of bag not across seal bar; properly position bag�
• Bottom of bag mouth not clamped properly; place bottom of bag
mouth in clamp and close clamp�
• Bag improperly positioned in Vacuum Chamber; reposition as
required�
• Wrinkles in bag along seal bar; smooth out bag�
• Sealed end of bag (from roll) not completely sealed; check for
gaps or aws in seal.
• Crumbs or other debris on bag or seal bar; clean as required�
Heat-Seal bag loses vacuum af ter being sealed�
• Bag punctured� Sharp items can put small holes in bags� Cover
sharp edges with a paper towel and vacuum package in new
bag�
• Out-gassing� Some fruits and vegetables can release gases if
not properly blanched or frozen before packaging� Open bag
and check for spoilage� If spoilage has not yet begun, consume
immediately�
Canisters not vacuuming properly�
• External vacuum hose not properly attached� Make sure vacuum
hose is completely inserted into the lid of the canister and
attached securely to the vacuum hose port on the Chamber
Vacuum Sealer�
• Port on canister in incorrect position�
• Insufcient head space in canister. Allow at least 1 inch (2.5 cm)
of space between the surface of the items in the canister and the
lid�
• Damaged canister lid or body� Check canister, lid and seal for
damage�
ROUTINE CLEANING
Always clean and dry your Chamber Vacuum Sealer completely
after use� Be sure to protect it from contact with equipment or other
objects that could damage its control panel when storing�
WARNI NG: Always disconnect your Vacuum Sealer
from the electrical power outlet before cleaning�
External Surfaces — Use a clean, damp cloth and mild soap to
remove dust, crumbs and spilled liquids�
Seal Bar — Use a soft brush to gently remove crumbs or other
materials�
Vacuum Chamber — Remove crumbs and loose debris and then
wipe down all internal surfaces using a clean cloth and food-safe
sanitizer�
External Vacuum Hose — Immerse in hot, soapy water; rinse
thoroughly with clean hot water� Dry completely before use�
TROUBLESHOOTING
Vacuum Sealer will not turn On�
• Unit not plugged in� Check that the electrical cord is plugged into
a working, grounded electrical outlet�
• Unit plugged in but not turned On� Press �
• Damaged or worn electrical power cord� DO NOT USE UNIT;
RETURN FOR REPAIR�
1� Press to turn the Chamber Vacuum Sealer Off and then
unplug the unit from the electrical outlet�
2� Remove seal bar by lifting up and out of the Vacuum Chamber�
3� Clean the various components as follows:
WARNI NG: If spoilage has begun or if in doubt, discard
immediately� DO NOT CONSUME�
!
Page 15

www.cuisinetechnology.com 2827
PolyScience Vacuum Sealing Systems
TECHNICAL SPECIFICATIONS
Electrical Requirements:
Overall Dimensions:
(L x W x H)
Chamber Dimensions:
(L x W x H)
Weight:
Pu mp Type :
Maximum Bag/Roll Width:
Model VSCH -300AC1B - 120 VAC, 60Hz
Model VSCH -300AC2E - 240 VAC, 50Hz
18�5 x 14 x 14�5 inches
47 x 35�6 x 36�8 cm
13�8 x 12 x 4�3 inches
35 x 30�5 x 11 cm
50�7 lb s
23 kg
Dry Piston
12�0 inches
30�5 cm
ERROR MESSAGES
Error Code Description Troubleshooting
E1
Vacuum Mode
Failure
Ensure that the Vacuum Chamber Lid is
fully closed
Check the Vacuum Chamber Lid Gasket
for any gaps, damage or debris
Disconnect hose from the External
Vacuum Port, if attached
Contact dealer or factor y
E2 Seal Mode Failure
Ensure that the Vacuum Chamber Lid is
fully closed
Check the Vacuum Chamber Lid Gasket
for any gaps, damage or debris
Disconnect hose from the External
Vacuum Port, if attached
Contact dealer or factor y
LP
Electrical Power
Failure
Press to return the Chamber
Vacuum Sealer to its previous operating
parameters (last selected Vacuum
Level, Marinate Time and Seal Time)�
00 will appear on the Digital Display�
Bags not sealing properly�
• Seal Time insufcient; increase Seal Time as required�
• Bag improperly positioned along seal bar; make sure entire
bag is over the seal bar and there are no wrinkles in the bag
material�
• Food particles or debris in seal area of bag; wipe inside of bag
clean�
!
IMPORTA N T: It is strongly recommended that you
carefully check the food and/or integrity of the bag seal
before using as the selected Vacuum Leve l, Marinate
Time or Seal Time may not have been achieved prior to
the loss of power�
Page 16

www.cuisinetechnology.com 3029
PolyScience Vacuum Sealing Systems
Count
250
250
250
Part number
VBF-0610
VBF- 0 812
VB F-1214
A variety of heat-seal bags are available for your 300 Series
Chamber Vacuum Sealer:
REPLACEMENT BAGS WARRANTY
This limited warranty supersedes all previous warranties on this
product� This limited warranty is available for consumers only� You
are a consumer if you were the original purchaser of the product
at retail for personal, family or household use� PolyScience agrees
to correct for the consumer, either by repair, or at PolyScience’s
election, by replacement, any defects in material or workmanship
which develop within twelve (12) months after delivery of this product
to the consumer for pars and labor� In the event of replacement,
the replacement unit will be warranted for (A) ninety (90) days from
the date of delivery of the replacement, or (B) the remainder of the
original warranty period, whichever is longer�
If the product should require service, contact PolyScience for
instructions� When return of the product is necessary, a return
authorization number is assigned and the product should be
shipped, transportation charges pre-paid, to the indicated service
center� To insure prompt handling, the return authorization number
should be placed on the outside of the package� A detailed
explanation of the defect must be enclosed with the product�
Notwithstanding the above, this warranty shall not apply if the defect
or malfunction was caused by accident, neglect, unreasonable
use, improper service or other causes not arising out of defects in
material or workmanship�
THERE ARE NO WARRANTIES, EXPRESS OR IMPLIED,
INCLUDING, BUT NOT LIMITED TO, THOSE OF
MERCHANTABILITY OR FITNESS FOR A PARTICULAR
PURPOSE, WHICH EXTEND BEYOND THE DESCRIPTION AND
PERIODS SET FORTH HEREIN�
POLYSCIENCE’S SOLE OBLIGATION UNDER THIS WARRANTY
IS LIMITED TO THE REPAIR OR REPLACEMENT OF A
DEFECTIVE PRODUCT AND POLYSCIENCE SHALL NOT, IN ANY
EVENT BE LIABLE FOR ANY INCIDENTAL OR CONSEQUENTIAL
DAMAGES OF ANY KIND RESULTING FROM USE OR
POSSESSION OF THE PRODUCT�
Some states do not allow (A) limitations on how long an implied
warranty lasts, or (B) the exclusion or limitation of incidental or
consequential damages, so the above limitations or exclusions may
not apply to you. This warranty gives you specic rights, and you
may have other rights which vary from state to state�
This equipment is marked with the crossed out wheeled bin symbol
to indicate it must not be disposed of as unsorted municipal waste�
It is your responsibility to correctly dispose of this equipment at
lifecycle-end by handing it over to an authorized facility for separate
collection and recycling� By doing so, you will help to conserve
natural and environmental resources and you will ensure that your
equipment is recycled in a manner that protects human health�
For more information, please contact PolyScience�
DISPOSAL
Size (W x L)
6 x 10 in� / 15�25 x 25�4 cm
8 x 12 in� / 20�3 x 30�5 cm
12 x 14 in� / 30�5 x 35�6 cm
Chamber Vacuum Heat-Seal Bags
All can be ordered online at: www�cuisinetechnology�com
Page 17

31
PolyScience Vacuum Sealing Systems
Be sure to activate your new PolyScience 300 Series Chamber
Vacuum Sealer warranty at www�cuisinetechnology�com
PolyScience
6600 W� Touhy Avenue
Niles, IL 60714 USA
Toll-free USA and Canada: (800) 229-7569
Worldwide: +1 (847) 647-0611
Email: culinary@polyscience�com
 Loading...