

Page 1

Vortex EF2280
Reference Manual
Page 2

Page 3

VORTEX EF2280 REFERENCE MANUAL
Introduction....................................................................................................2
Product Features .................................................................................................... 3
Pre-Installation...............................................................................................4
EF2280 Front and Rear Panels.............................................................................. 5
Installation .....................................................................................................7
Mounting the EF2280 ............................................................................................. 7
Connecting the EF2280 to Other Equipment ......................................................... 7
Device IDs on the EF Bus....................................................................................... 9
Connecting Multiple EF2280s................................................................................ 9
Factory Default Settings (Preset 0) ........................................................................ 11
Check Surrounding Equipment............................................................................... 13
Integrating the EF2280 Into Your System.....................................................15
Input Settings .......................................................................................................... 15
Calibration.............................................................................................................. 15
Build Your Echo Canceller Reference.................................................................... 17
Echo Canceller Reference for Multiple EF2280s................................................... 18
Configure the Automatic Microphone Mixer.......................................................... 20
Automixer Settings for Multiple EF2280s .............................................................. 22
Configure the Matrix Mixer.................................................................................... 23
Building Your System with Multiple EF2280s........................................................ 23
Presets..................................................................................................................... 25
Other EF2280 Features.......................................................................................... 25
LCD Menu Structure .....................................................................................26
System Menu ........................................................................................................... 29
Inputs ...................................................................................................................... 30
Outputs.................................................................................................................... 31
Automixer Menu...................................................................................................... 32
Matrix Menu ........................................................................................................... 34
Parametric EQ Menu.............................................................................................. 35
Troubleshooting .............................................................................................36
Automatic Microphone Mixer................................................................................. 36
Matrix Mixer........................................................................................................... 37
Echo Canceller Reference ...................................................................................... 37
Residual Echo ......................................................................................................... 37
Contacting Technical Support ................................................................................ 42
Technical Specifications ................................................................................43
Compliance............................................................................................................. 43
Conference System Design............................................................................46
EF2280 Block Diagram .................................................................................47
Connector Pinouts..........................................................................................48
Connecting Unbalanced RCA to Balanced Mini Phoenix...................................... 50
Making an EF Bus Terminator............................................................................... 50
Additional Notes ..................................................................................................... 51
Warranty Information ....................................................................................52
Definition of Terms .......................................................................................54
Index ..............................................................................................................57
Polycom, Inc., Copyright 2001 Technical Support: 800.932.2774 1
Page 4

I
NTRODUCTION
Welcome Congratulations on your purchase of the Vortex EF2280!
INTRODUCTION
How to Use This
Manual
This is a reference manual for your EF2280. It is structured to provide the information you need quickly and conveniently. The following is an overview of each section:
• Introduction
• Conference System Design gives suggestions on topics to consider when design-
ing your system.
• Pre-Installation includes information about the contents of the box, tools needed
for installation and front and rear panel descriptions.
• Installation covers connections of inputs/outputs and calibration of inputs of the
EF2280.
• Integrating the EF2280 Into Your System describes adjustments to take into consideration when integrating the EF2280 with surrounding equipment in your system.
•LCD Menu Structure describes an overview of the LCD menu structure and also
gives a system overview of features and options available.
• Troubleshooting helps to debug problems with installation.
• Technical Specifications provides the technical specifications of the EF2280.
• EF2280 Block Diagram shows the inside of the EF2280.
• Connector Pinouts shows pinout diagrams for EF2280 input and output connec-
tors.
• Warranty Information
• Definition of Terms explains terms used in this manual, as well as terms used in
our technology of echo cancellation, noise cancellation, and audio conferencing.
About the EF2280 The EF2280 is a 12-input, 12-output, 8-channel acoustic echo and noise canceller
with matrix mixing and automatic microphone mixing capabilities. It includes a total
of 12 analog inputs (8 mic/line level inputs and 4 line level inputs), 12 analog outputs,
and 4 digital expansion busses. Acoustic echo cancellation (AEC) and noise cancellation can be applied to each of the 8 mic/line level inputs, and each of these inputs
can then be sent to one of the two internal automatic microphone mixers. The system
also contains a 25 x 18 main matrix, and four 7 x 3 submatrices. The 25 x 18 main
matrix has the following inputs: input channels 1-8 (gated or ungated), input channels
A-D, the internal signal generator, and 3 mixes of each of the four digital busses (3
mixes times 4 busses equals 12 inputs). The 25 x 18 main matrix has the following
outputs: outputs 1-8 and A-D, AEC reference 1 and 2, and W, X, Y, and Z outputs to
the digital expansion bus. The EF2280 has 24 bit resolution, 32-bit floating point
computation, and a 48 kHz sampling rate.
Polycom’s proprietary noise cancellation on each of the 8 mic/line inputs helps to
keep overall ambient noise to a minimum. Polycom echo cancellers are the only ones
on the market to feature this patent pending technology. Noise cancellation filters out
ambient background noise such as noise from heating, ventilating and air conditioning (HVAC), LCD projectors, and road noise. Our noise cancellation technology is
not a noise gate. It actually removes noise. Therefore, it enhances the operation and
VORTEX EF2280 Reference Manual 2 Technical Support: 800.932.2774
Page 5

INTRODUCTION
improves the sound quality of an automixer, for example, by preventing it from bringing the noise level up and down when microphones are gated on and off. By cancelling the noise picked up by each microphone, the overall signal to noise ratio (SNR) is
preserved. The result is crystal clear speech over a greater decibel range than any
other echo canceller. That means reduced listener fatigue and a higher quality audio
conference.
Warranty
Registration
Please take a moment to fill out and return your warranty registration card. This
information will help us to provide you with better customer support and will allow us
to notify you with updated product features and software.
PRODUCT FEATURES
Product • Front panel LCD for controlling and configuring the product without a computer
• 5-band equalizer on all Inputs and Outputs (Parametric, High/Low Pass, High/
Low Shelf)
• Echo cancellation on Inputs 1-8
• Noise cancellation up to 15 dB
• Two internal automatic microphone mixers for Inputs 1-8
• 25 x 18 full cross point matrix mixer with expansion bus
• Internal signal generator for calibration mode and noise masking applications
• 2 year warranty
AEC • 24 bit resolution
• 48 kHz sampling rate, >20 kHz bandwidth
• 270 ms AEC tail length
• 40 dB/sec convergence rate
• Can function in rooms with more than 10 dB of room gain
Inputs and Outputs • 8 microphone/line level inputs with phantom power on each input
• 24 VDC Phantom Power
• 4 line level auxiliary inputs with nominal level of 0 dBu
• 12 digitally controlled analog trimpots for the 12 input signals
• 12 line level outputs with default nominal level of 0 dBu
• Automatic Gain Control (AGC) on Inputs 1-8.
• Phoenix connectors for audio input and output
Remote Control • RS-232 port for remote control
• Reconfigurable parallel logic input/output
• ASPI bus for controlling multiple EF devices from a single controller
• EF bus for linking multiple EF2280s.
• Digital bus with 4 audio busses, 48 kHz sampling rate
• Up to 8 devices can be linked, each device providing 4 audio signals on the bus
© Polycom, Inc. 3 VORTEX EF2280 Reference Manual
Page 6
PRE-INSTALLATION
PRE-I
NSTALLATION
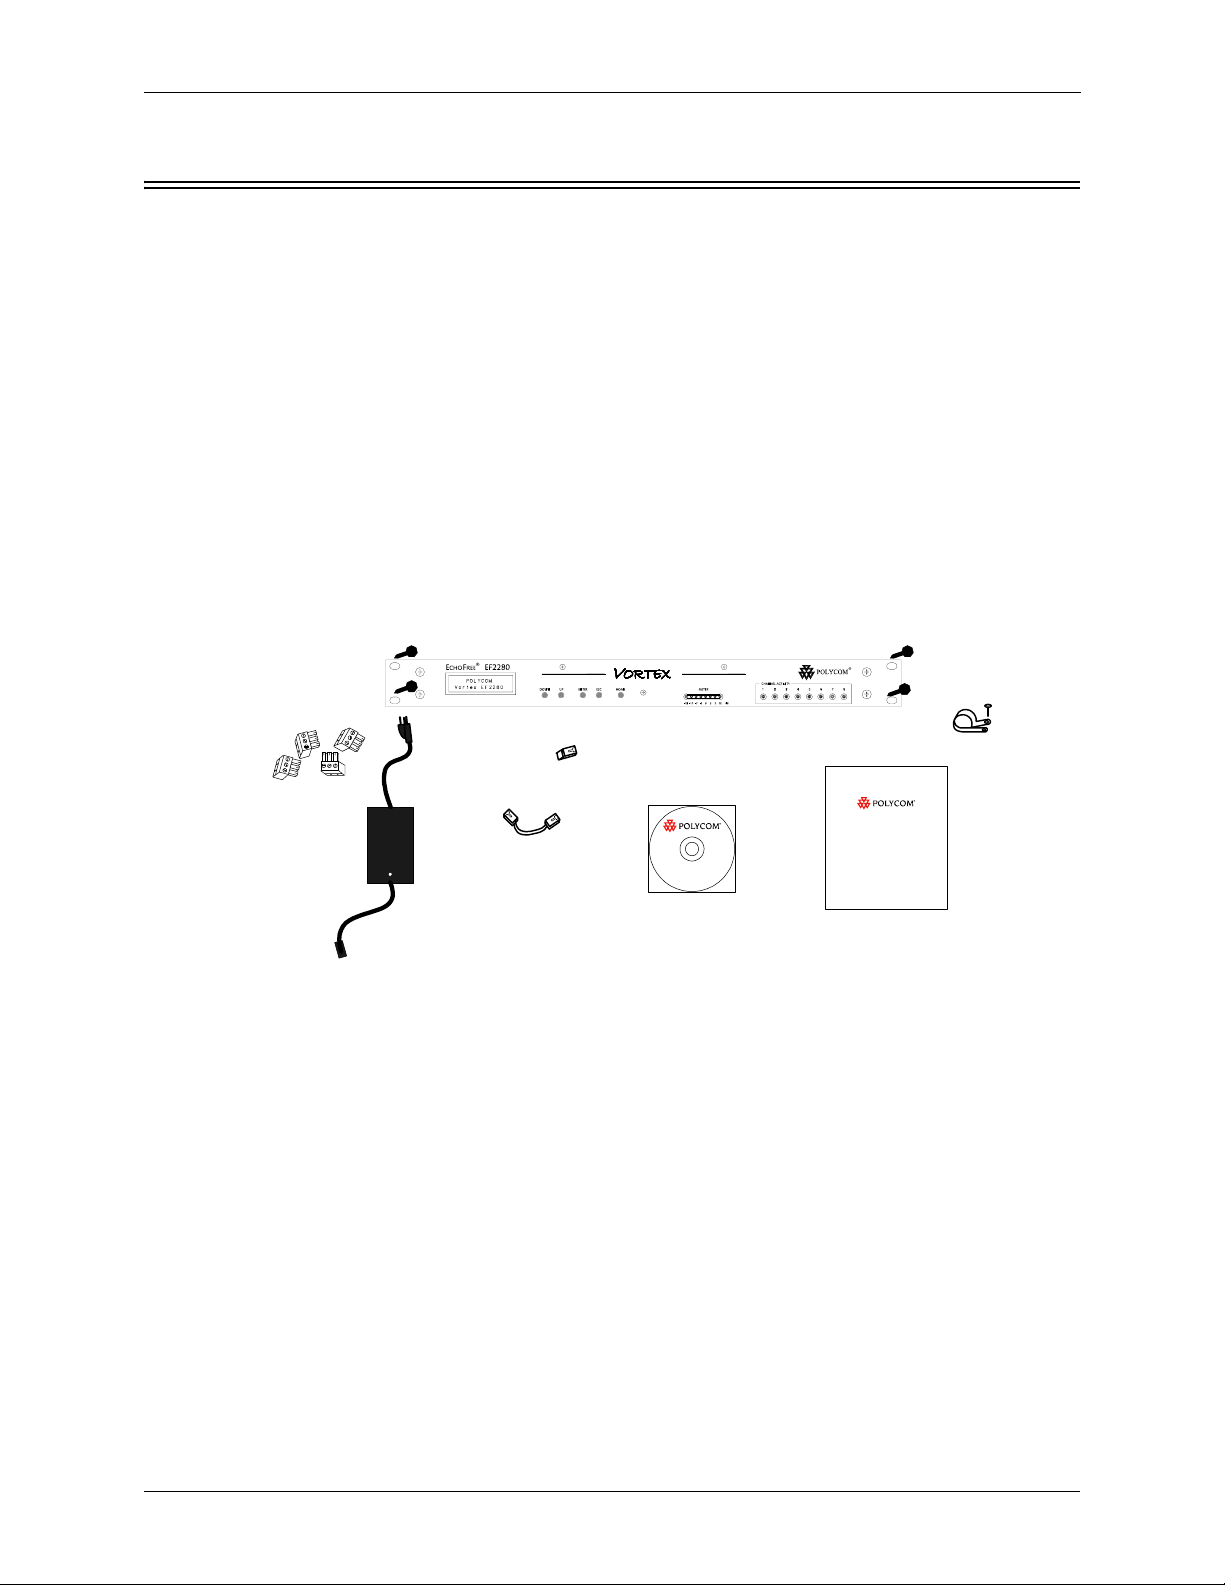
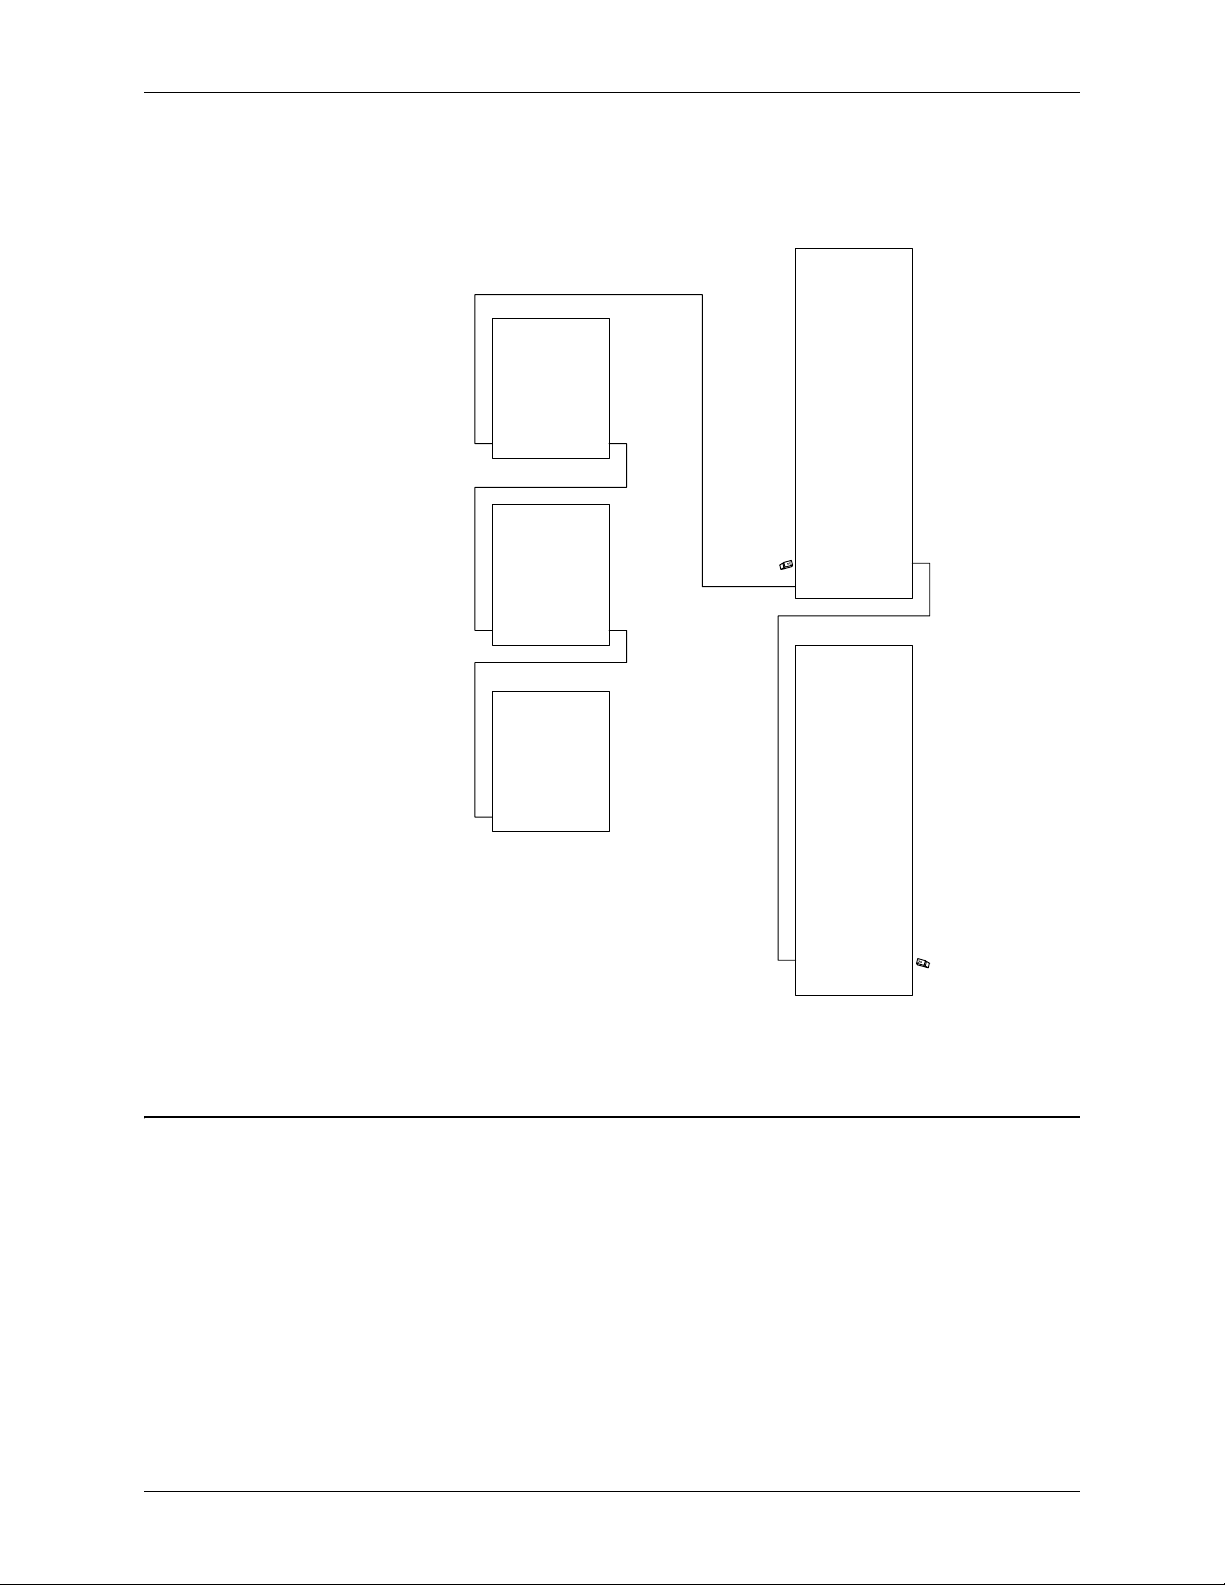
What’s Included The Vortex EF2280 product package includes the following items:
• Vortex EF2280 Reference Manual
• Vortex EF2280
• External power supply
• Cat 5 cable for EF Bus or ASPI Bus
• EF Bus terminator
• Rack mount screws (4)
• Phoenix connectors (24)
• Cable clamp and screw
• CDROM containing other manuals and Conference Composer software
• Warranty Registration Card
Rackmount
Phoenix
Connectors (24)
Screws (4)
x
x
EF Bus
Terminator
Vortex® EF2280
CDROM with
control software and manuals
Vortex® EF2280
Reference Manual
x
x
Cable Clamp
and screw
External
Power Supply
1-Cat 5 cable (6 inches)
for EF
Bus
or ASPI Bus
Vortex EF2280 Reference Manua l
Figure 1. What’s Included with your Vortex EF2280.
What’s Not Included The following equipment is not included with the EF2280 product package, but may
be necessary to create a completely functional system:
• Microphones
• Loudspeakers
• Audio amplifier (or amplified loudspeaker)
• EF200 Phone Add
• Audio cables
• Videoconferencing codec or other four-wire interface (optional)
• RS-232 remote control device (optional)
Tools Needed for
Installation
• Screwdriver to mount the EF2280 in your rack.
• Phoenix connector screwdriver
VORTEX EF2280 Reference Manual 4 Technical Support: 800.932.2774
Page 7

PRE-INSTALLATION
EF2280 F
RONT AND REAR PANELS
134 5 7
10 1211 15 16 17 18 19
9 1413
2 86
Figure 2. EF2280 Front and Rear Panels
1. LCD DISPLAY. Displays menu instructions for configuration and operation of
the EF2280.
2. D
decreases the value of a parameter.
3. U
the value of a parameter.
4. E
5. E
6. H
7. L
8. C
inputs.
OWN BUTTON. Scrolls backward through menu items at a particular level or
P BUTTON. Scrolls forward through menu items at a particular level or increases
NTER. Enters the menu and allows you to select and change parameter values.
SC. Returns to the next highest level of menus.
OME. Returns to the top of the menu structure.
EVEL INDICATOR. Indicates the level of the selected channel or parameter.
HANNEL ACTIVITY LEDS. Indicates gating activity of the 8 mic/line channel
© Polycom, Inc. 5 VORTEX EF2280 Reference Manual
Page 8
PRE-INSTALLATION
10 1211 159 1413
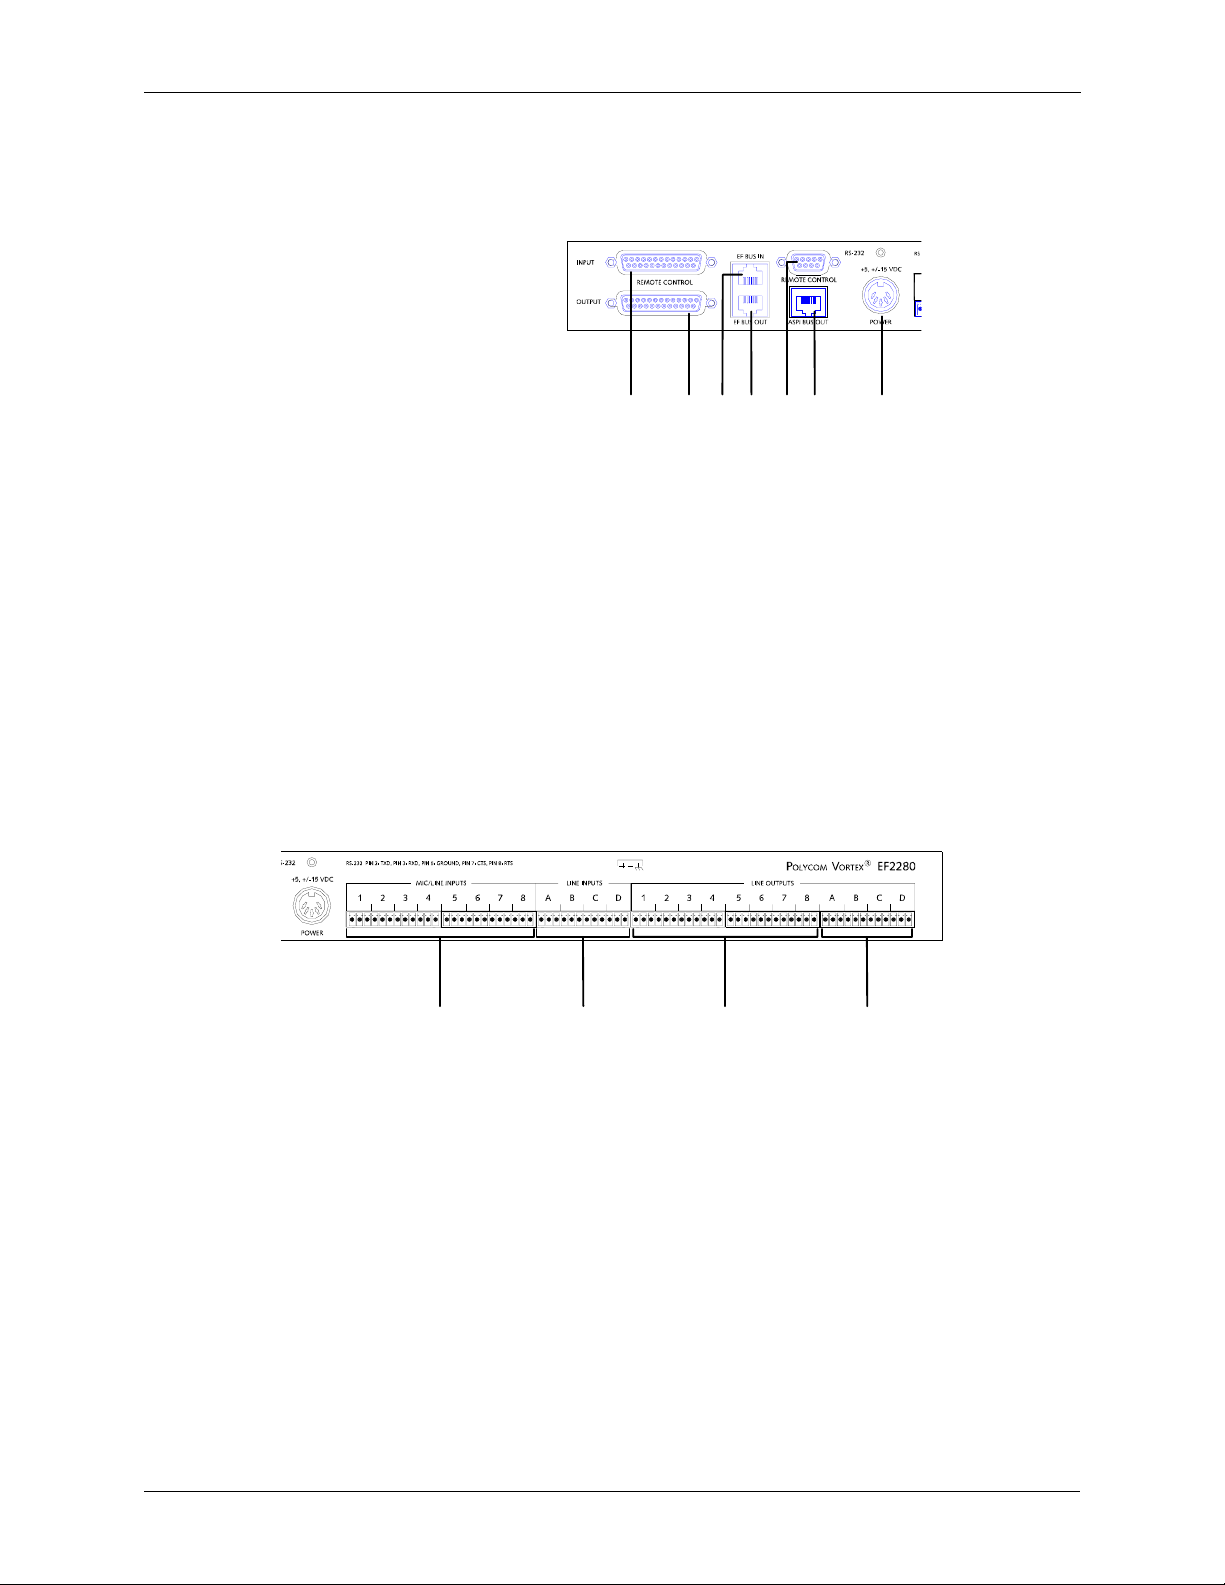
Figure 3. Parallel remote control, EF BUS, serial remote control, ASPI BUS OUT,
and power supply input on back panel of the EF2280.
9. INPUT PARALLEL PORT. Parallel logic input.
10. O
UTPUT PARALLEL PORT. Parallel logic output.
11. EF B
12. EF B
13. RS-232 S
14. ASPI B
15. P
US IN. Connects to EF BUS OUT of another EF2280.
US OUT. Connects to the EF BUS IN of another EF2280.
ERIAL PORT. Connect this to an optional RS-232 remote control device,
such as a touch panel or personal computer COM port.
US. Connects to the ASPI Bus of another EF device (an EF1210 or an
EF200) to be used for RS-232 control from a single control device.
OWER SUPPLY INPUT. Connects to the external power supply provided with the
EF2280.
19181716
Figure 4. Inputs and outputs on back panel of the EF2280.
16. M
IC/LINE INPUTS. Connects to microphone at either mic or line level, with or
without phantom power.
17. L
INE INPUTS. Inputs A-D at line level.
18. L
INE OUTPUTS. Outputs 1-8 at line level.
19. L
INE OUTPUTS. Outputs A-D at line level.
VORTEX EF2280 Reference Manual 6 Technical Support: 800.932.2774
Page 9

I
NSTALLATION
M
OUNTING THE
INSTALLATION
EF2280
The EF2280 can be mounted in a rack enclosure using four large screws (10-32x1/2”)
included with the unit. One EF2280 fits in a single rack space.
Recommendation
For Easy Access
Instructions for
Securing Power
Supply to Back of
EF2280
C
ONNECTING THE
While not required, leave a single rack space in between the EF2280 and other units
in your rack. This gives you easier access to the back panel. If you cannot leave a
single rack space, mount the EF2280 below units that are longer in length so that you
can access the Phoenix connectors on the back panel more easily.
• Locate the cable clamp on the back panel of the EF2280 above the RS-232 port.
• Remove the screw and thread the power cord through the cable clamp.
• Attach the cable clamp to the back panel of the EF2280 and tighten the screw.
Align the clamp so that the power cable does not interfere with the connectors on
the EF2280 back panel.
• Plug in the power supply.
• We recommend that you also Ty-wrap the power supply to the rack. The purpose
of securing the power supply to the back panel is so that if the power supply were
to drop, it would pull where the cord is attached with the cable clamp and not pull
the plug out of the EF2280.
Caution! Do not use any other power supply other than the one pro-
vided with this unit.
EF2280 TO O
THER EQUIPMENT
Grounding The EF2280 has 8 mic/line inputs plus 4 line level inputs and 12 line level outputs.
Each input/output is “Pin 1 compatible” — this means that the ground pin of each
input/output is tied to chassis ground. Chassis ground is connected to the input power
ground.
Typical EF2280
Connections
© Polycom, Inc. 7 VORTEX EF2280 Reference Manual
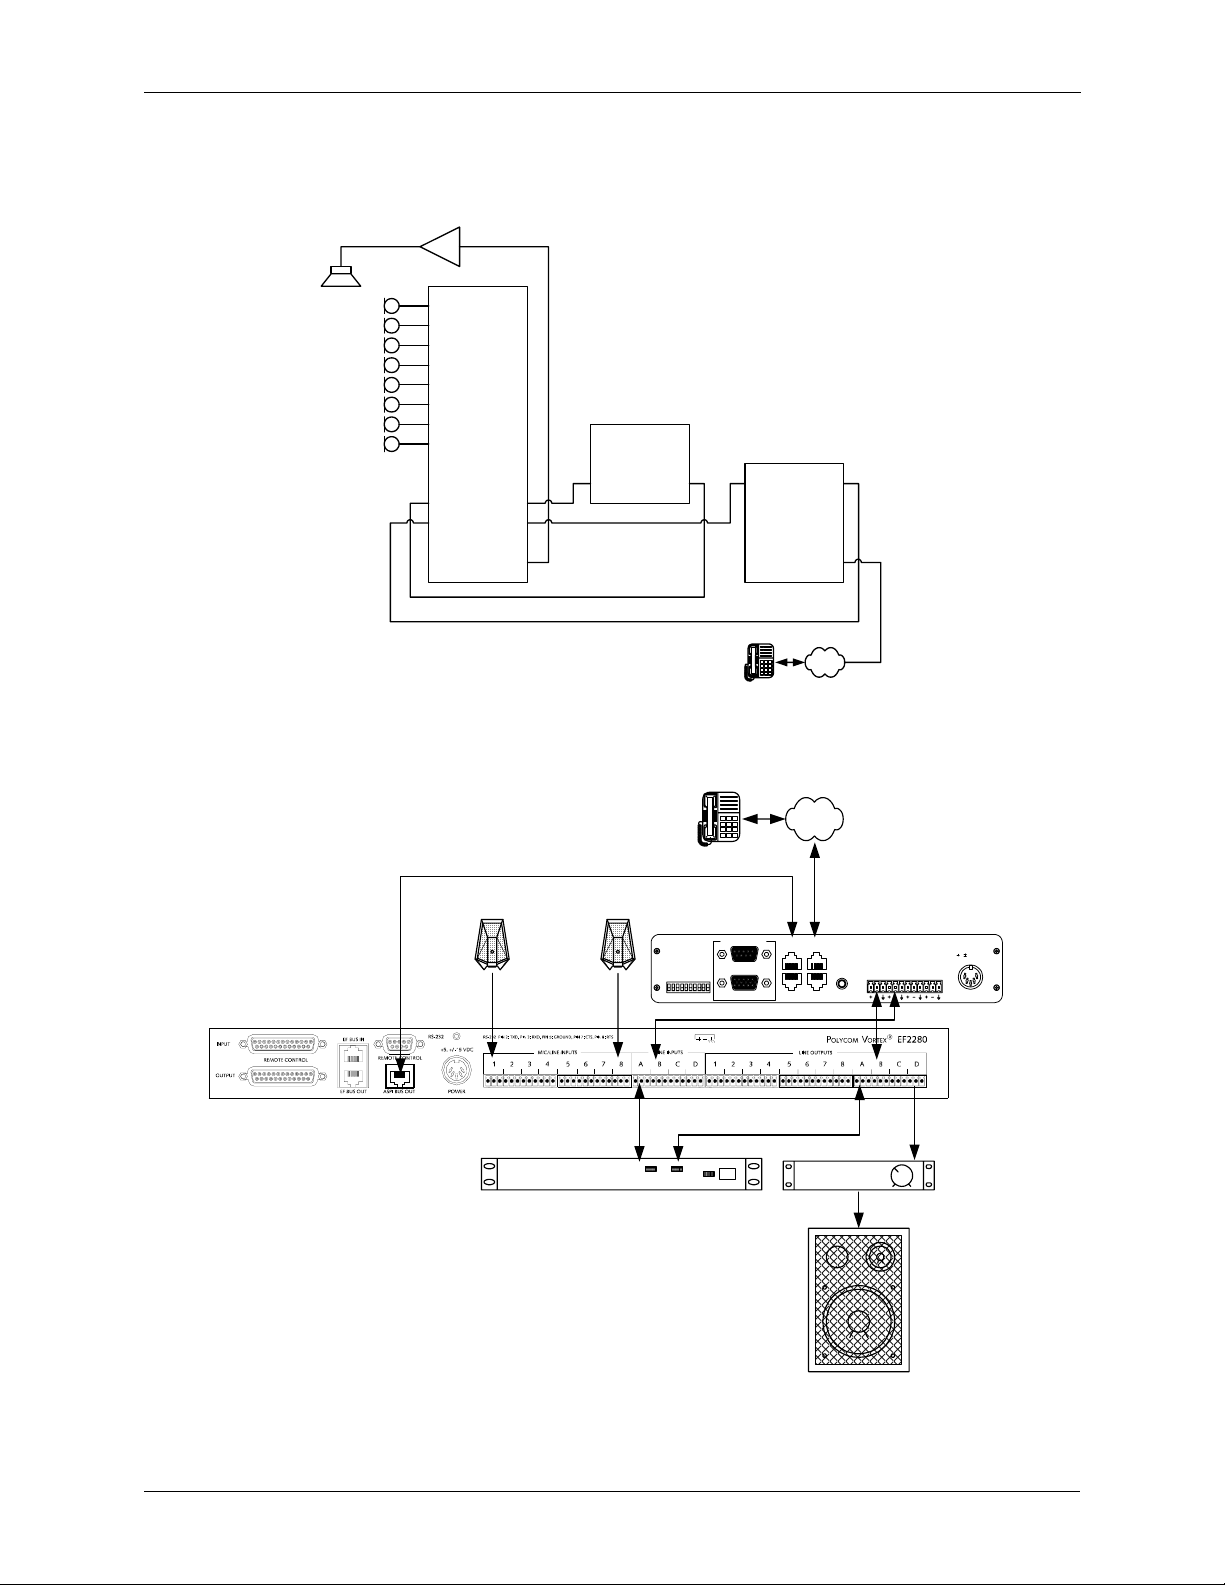
The EF2280 will typically be connected to other equipment in a single room setup as
shown below in Figure 5 and Figure 6.
Page 10
INSTALLATION
Vortex
EF2280
Out 1
Out 2
Out 3
Out 4
Out 5
Out 6
Out 7
Out 8
®
Out A
Out B
Out C
Out D
Video
CODEC
Line In Line Out
From AEC
From Rem.
EF200
To AEC
To Rem.
Phone
In 1
In 2
In 3
In 4
In 5
In 6
In 7
In 8
In A
In B
In C
In D
PSTN
Figure 5. Block diagram of typical EF2280 connections: a single room using one EF2280.
PSTN
ASPI Bus Connection for RS-232 Control
®
EF2280
Vortex
Figure 6. Typical EF2280 connections.
8 microphones
. . .
Polycom Video Codec
4-wire Connection
POLYCOM CODEC
O
N
O
FF
TX RX
ASPI BUS
REMOTE CONTROL
RS-232
OISE SUPPRESSION
EVICE ID 3DEVICE ID 2DEVICE ID 1DEVICE ID 0
ESERVED (SET TO OFF)
PROM OVERRI DE
D
R
N
RESERVED (SET TO OFF)
DEVICE ID 4
AGC
E
LOGIC IN/OUT
ASPI BUS
OUT
TO PHONE
IN
TO LINE
EF200 Phone Add (Optional)
FROM
EF400
AECTOAEC
INTERFACE
FROM
REMOTETOREMOTE
5, 15 VDC
Reference Input
Room Amplifier
Audio
Amplifier
VORTEX EF2280 Reference Manual 8 Technical Support: 800.932.2774
Page 11

INSTALLATION
The following steps are typically used to setup the EF2280:
• Connect a microphone to each of the 8 mic/line level inputs. The mic/line input
accepts mini-Phoenix connectors. See “Connector Pinouts” on page 48 for
pinouts of Phoenix connectors.
• Connect one line output to an amplifier or powered loudspeaker.
• Connect the reference input (Input A, B, C, or D) to T
you have multiple EF200’s, connect only one reference) or to the output of the
codec.
• Connect one line output to F
codec.
• If RS-232 remote control is desired, connect the RS-232 R
of the EF2280 to the remote control device, such as an RS-232 interface to a
touch panel or a COM port on a personal computer. If you are using an EF200
Phone Add, connect the ASPI B
EF200.
ROM AEC on the EF200 or to the input of your
US on the EF2280 to the ASPI BUS IN on the
O AEC on the EF200 (if
EMOTE CONTROL port
Note. If you are linking multiple EF2280s, you must use the EF bus
to link the units. If you are linking a EF2280 to other EF
devices, such as the EF200 Phone Add, for RS-232 control,
use the ASPI bus. See Figure 8 on page 11.
D
EVICE
C
ONNECTING
IDS
ON THE
M
ULTIPLE
• Connect the external power supply to the P
EF2280.
EF B
When considering which Device IDs can be used for which Vortex device, decide
how many devices have the ability to transmit on the W, X, Y, and Z busses, and how
many have the ability to transmit on the P Bus. The EF2280, for example can only
transmit on the W, X, Y, and Z busses while the EF2241 can transmit on the W, X, Y,
and Z busses as well as the P bus. Up to 8 devices can transmit on the W, X, Y, and Z
busses. Similarly, up to 8 devices can transmit on the P bus. Note that the EF2241
counts as one of both types.
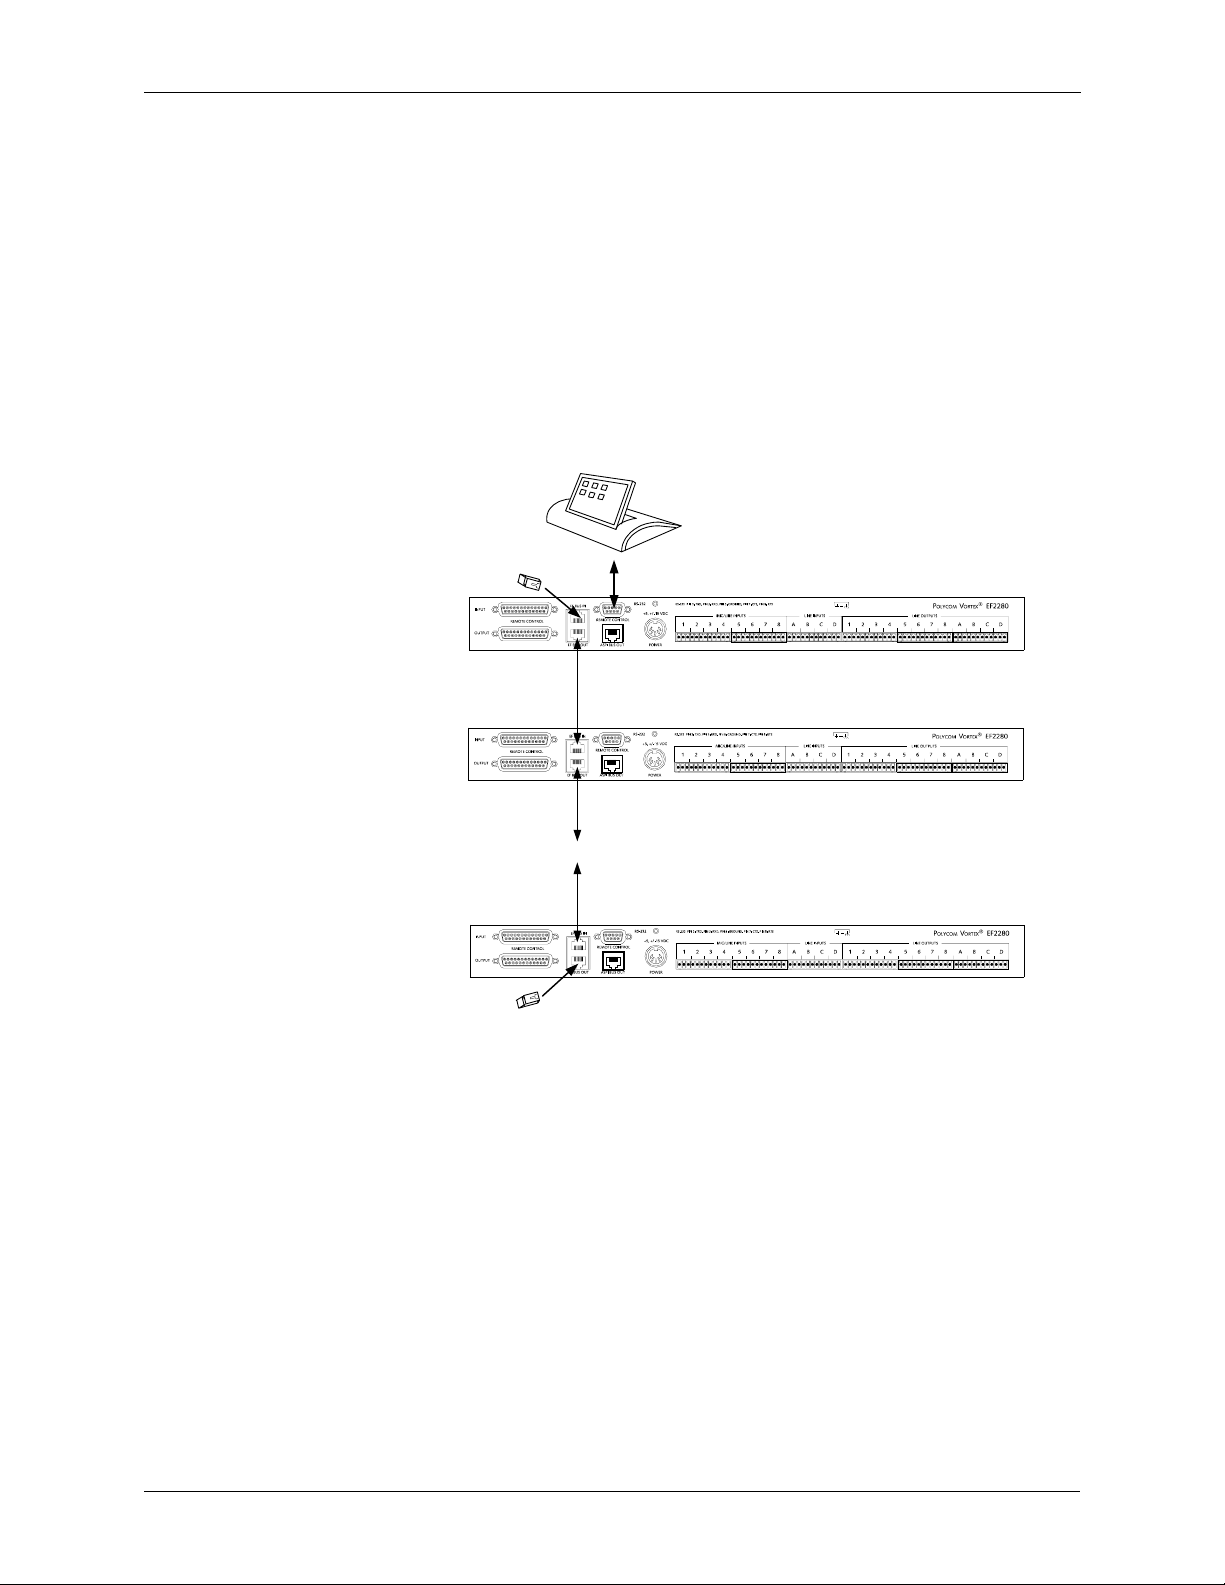
Up to 8 EF2280s can be linked together at one time. Each unit in the chain must have
a unique Device ID. Use the EF Bus to link multiple EF2280s together.
The following steps should be followed to connect the EF Bus:
1. Set a unique Device ID for each EF2280
2. Power off all units
3. Connect the RS-232 remote control device to any EF2280 in the chain.
4. Connect the provided Cat-5 cable between the EF B
US
EF2280
and the EF B
S
US IN of the second device.
OWER SUPPLY INPUT jack of the
US OUT of the first device,
Note. The EF Bus must be connected so that the EF Bus In of one
box is connected to the EF Bus Out of another. Connecting
the EF Bus In to another EF Bus In (or Out to Out) will not
work.
© Polycom, Inc. 9 VORTEX EF2280 Reference Manual
Page 12
INSTALLATION
5. Connect another Cat-5 cable between the EF BUS OUT of the second device and
the EF B
6. Terminate the chain of EF2280s using the instructions below.
7. Power on all units at the same time
US IN of the third device, and so on.
Terminating the
EF2280
The EF2280 must be terminated with the provided EF Bus terminator. Place a terminator in the EF B
US IN of the first device in the chain and also in the EF BUS OUT of
the last device. If you lose the terminator provided with your EF2280 unit, see “Making an EF Bus Terminator” on page 50 for information and instructions on how to
make one.
EF Bus Terminator
Cat-5 cable
Cat-5 cable
...
Connecting the
EF2280 with Other
EF Devices
Cat-5 cable
EF Bus Terminator
Figure 7. Connecting and terminating multiple EF2280s.
The EF2280 does not have to be terminated if you are using a single unit not connected together with another EF2280.
If you are linking multiple EF2280s, you must use the EF bus to link the EF2280s to
each other. If you are linking a EF2280 to other EF devices, such as the EF200 Phone
VORTEX EF2280 Reference Manual 10 Technical Support: 800.932.2774
Page 13
INSTALLATION
Add, for RS-232 control, use the ASPI bus. The ASPI Bus does not need to be terminated. See Figure 8 below.
From AEC
From Rem.
EF200
ASPI
Bus In
From AEC
From Rem.
EF200
ASPI
Bus In
From AEC
From Rem.
EF200
ASPI
Bus In
To AEC
To Rem.
Phone
ASPI
Bus Out
To AEC
To Rem.
Phone
ASPI
Bus Out
To AEC
To Rem.
Phone
ASPI
Bus Out
EF Bus
Terminator
In 1
In 2
In 3
In 4
In 5
In 6
In 7
In 8
In A
In B
In C
In D
ASPI Bus
In 1
In 2
In 3
In 4
In 5
In 6
In 7
In 8
In A
In B
In C
In D
ASPI Bus
Vortex
EF2280
EF Bus OutEF Bus In
Vortex
EF2280
EF Bus OutEF Bus In
®
®
Out 1
Out 2
Out 3
Out 4
Out 5
Out 6
Out 7
Out 8
Out A
Out B
Out C
Out D
Out 1
Out 2
Out 3
Out 4
Out 5
Out 6
Out 7
Out 8
Out A
Out B
Out C
Out D
EF Bus
Terminator
Figure 8. Linking the EF2280 to other EF devices.
F
ACTORY DEFAULT SETTINGS
(P
RESET
0)
The following is a list of the factory default settings of the EF2280. Since the microphones and other equipment in your application may have different nominal levels,
you can start with a F
ronment and then save it within the EF2280 as a U
you’ve saved a U
ACTORY PRESET (Presets 0-15), change it to match your envi-
SER PRESET (Presets 16-47). Once
SER PRESET, set the POWER ON PRESET to that USER PRESET (or
© Polycom, Inc. 11 VORTEX EF2280 Reference Manual
Page 14

INSTALLATION
whichever preset you want to come up after power up). The unit will need to be configured for your system.
PROGRAM PARAMETERS FACTORY DEFAULT PRESET VALUE
SYSTEM PARAMETERS
Preset 0
Device ID 0
AUTOMIX PARAMETERS
Chairman Mode Off
Decay Time 1000 ms
Hold Time 500 ms
Last Mic On Mode On (on Automixer 1)
Max NOM per Automixer 8
Off Attenuation -15 dB
INPUT CHANNELS
Acoustic Echo Cancellation On
Automatic Gain Control On
Automixer 1
Echo Canceller Reference Ref1
Filtering Off
Gate Priority 1
Gate Ratio 10 dB
Gate Threshold Adaptive
Gating Auto
Input Gains 15 dB for Inputs 1-8
0 dB for Inputs A-D
Manual Threshold 60 dB
Mute Off
Noise Cancellation On
Noise Cancellation Level 10 dB
Phantom Power On
OUTPUT CHANNELS
Mute Off
NOM Attenuation Off for Outputs 1-8
On for Outputs A-D
Output Gain 0 dB
VORTEX EF2280 Reference Manual 12 Technical Support: 800.932.2774
Page 15

INSTALLATION
Presets and Multiple
EF2280s
C
HECK SURROUNDING EQUIPMENT
Pick a Standard
Signal Level
PRESET 0 is preconfigured for a system with multiple EF2280s. Microphones are
bussed out to other units on the W Bus. Microphones are also input into each EF2280
on the W Bus (I
If you have multiple EF2280s in your system, save settings to a preset on each
EF2280. Saving a preset will only save the preset on that particular unit. Also,
remember to set the P
Now that the physical connections to the EF2280 are set up, it may be necessary to
check the surrounding equipment to make sure levels are set correctly. The following
suggestions may be helpful in integrating the EF2280 into your system:
A standard nominal signal level should be used throughout the audio system. Any
equipment that does not operate at this standard level should be compensated for as
close to the piece of equipment as possible. A 0 dB nominal level is a good standard
signal level. For example, a consumer VCR will probably generate a -8 dBu level.
As soon as the VCR signal arrives at an input with some gain control, the input gain
should be adjusted so that you get a 0 dB level.
NPUT WM0 in the Matrix).
OWER ON PRESET to the correct Preset.
Check Levels to the
Codec
Configure the matrix mixer output to the codec input. The output
gain of the matrix mixer should be set to match the nominal input level of the codec.
For example, if the codec accepts -10 dBV (-8 dBu) inputs, 8 dB of attenuation should
be applied at the matrix mixer output to the codec.
Configure the matrix mixer input from the codec output. The input
gain of the matrix mixer should be set to match the nominal output level of the codec.
For example, if the codec outputs a -10 dBV (-8 dBu) level, 8 dB of gain should be
applied on the matrix mixer input. This will bring the codec level up to 0 dBu inside
the matrix.
Configure Output to
Amplifier or
Loudspeakers
The loudspeaker level may be adjusted in several places: at the amplifier or at the
loudspeaker output of the matrix mixer in the EF2280. We suggest that you adjust the
loudspeaker level at the amplifier to preserve good gain structure. You should try to
have a 0 dBu nominal level at the outputs by applying input gain (See I
Conference Composer) to obtain a 0 dB level at the input.
NPUTS tab on
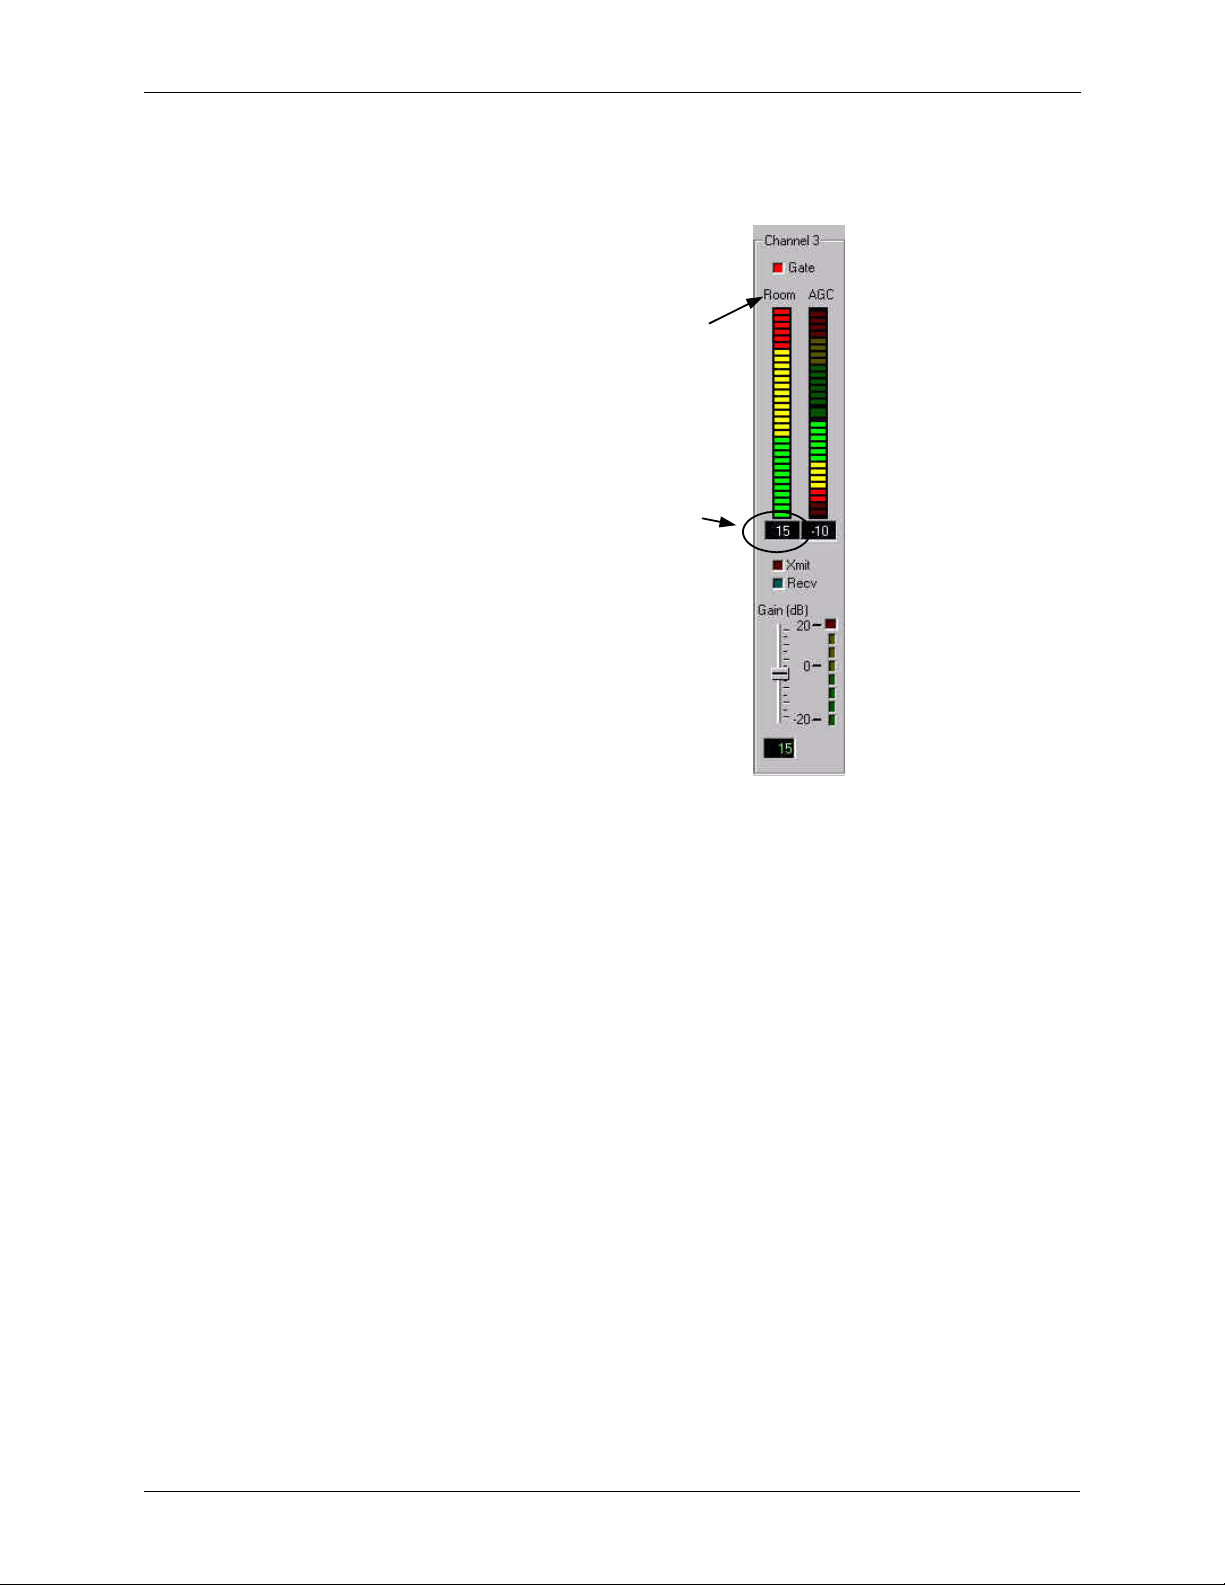
Verify Room Gain After adjusting the loudspeaker level, verify the room gain in your system using the
R
OOM GAIN meter on the DIAGNOSTICS page of Conference Composer. See Figure 9
below. The meter shows the room gain, which is the relative level of the output level
and the input level. While the EF2280 will operate in positive room gain conditions,
the room gain should be around 0 dB or a negative value. If you have a positive room
gain, make adjustments in the following areas:
1. Decrease the Input Gain of the microphone.
2. Decrease the Output Gain of the microphone.
© Polycom, Inc. 13 VORTEX EF2280 Reference Manual
Page 16
INSTALLATION
3. OR adjust the placement of the microphone relative to the loudspeaker.
Room Gain Meter
Read Room Gain
from here
Configure Program
Audio Sources
Figure 9. Room Gain Meter on the Diagnostics page of the Conference Composer
control software.
Set the gains on the matrix mixer inputs from the program audio sources so that program audio is played into the room at a level similar to that of speech from the remote
site. This should also ensure that the program audio levels are good when sent to the
remote site.
VORTEX EF2280 Reference Manual 14 Technical Support: 800.932.2774
Page 17

I
NTEGRATING THE
EF2280 I
INTEGRATING THE EF2280 INTO YOUR SYSTEM
NTO YOUR SYSTEM
Operating the
EF2280
I
NPUT SETTINGS
Set Inputs 1-8 for
Mic or Line Level
Select Phantom
Power for Inputs 1-8
The EF2280 can be operated in two ways: through the LCD menu on the front panel
or through RS-232. For control via RS-232, please refer to the EF2280 Programming
Guide, which includes programming tips as well as the EF2280 RS-232 commands.
For operation using the PC control software, Conference Composer, please refer to
the Conference Composer User Guide.
Use Conference Composer Software to easily configure the EF2280 with a PC, or
refer to the Applications Guide for different configurations that are already programmed into factory presets.
Configure Inputs 1-8 for mic or line level using the LCD menu (See “Level” on
page 30) or Conference Composer Control Software (See the Conference Composer
User Guide).
Turn phantom power On or Off for Inputs 1-8 using the LCD menu (See “Phantom
Power” on page 31) or Conference Composer Control Software (See the Conference
Composer User Guide). Phantom power should be turned On for condenser and electret microphones.
C
ALIBRATION
Set Mic/Line Input
Channel Gains
When using the power on Preset 0, the following calibration can be used.
In Preset 0, Automatic Gain Control (AGC) is On and the microphone gains on Inputs
1-8 are set to 15 dB. The AGC will compensate for the microphone gain. If you are
using ceiling microphones, set the microphone gain to 28 dB.
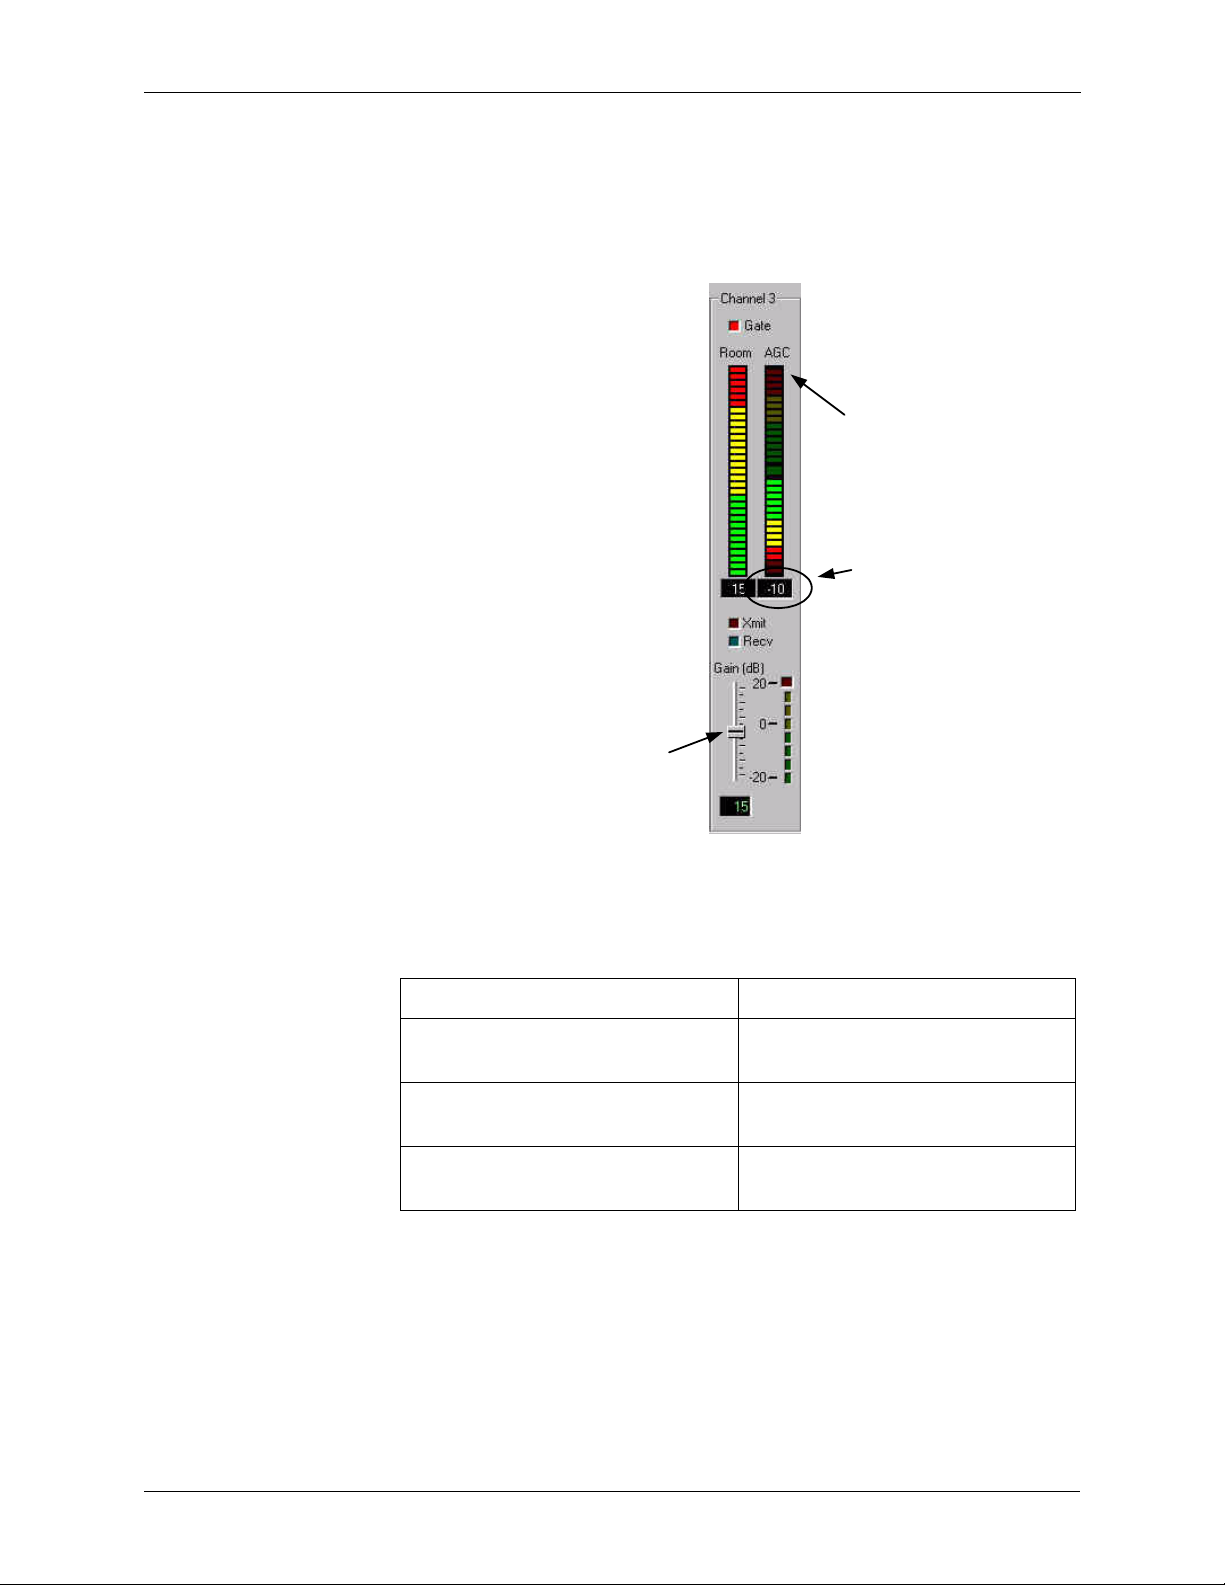
Fine tune the Input Gain using the Automatic Gain Control (AGC)
meter on Conference Composer Software.
Software, go to the D
one is talking into the particular channel that you are adjusting. Watch the number in
the box at the bottom of the AGC meter (See Figure 10 below). This is the amount of
gain that the AGC is applying. The goal is to have the AGC meter on average staying
around 0. If the level that you see in the box is negative, decrease the input gain by
the average number that you see in the box because the AGC is attenuating the channel’s input gain because the level is too high. If the number in the box is positive,
increase the input gain on that channel because the AGC is boosting the signal
because it is too low. For example, if the meter is showing an average gain of -15 dB,
IAGNOSTICS page. Watch the meter labelled AGC while some-
In the Conference Composer
© Polycom, Inc. 15 VORTEX EF2280 Reference Manual
Page 18
INTEGRATING THE EF2280 INTO YOUR SYSTEM
you should increase your input gain by 15 dB. If the meter shows an average gain of
+10 dB, you should decrease your input gain by 10 dB.
AGC Level Meter
Read AGC le
Adjust Input Gain here
Figure 10. AGC Meter on the Diagnostics page of the Conference Composer software.
I
F THE AGC METER SHOWS... ADJUST THE INPUT GAIN IN THIS WAY.
positive gain Increase gain by the level
shown in the box.
negative gain Decrease gain by the level
shown in the box.
an average level of 0 dB You’ve set the Input Gain
to a good level!
Table 1: How to set the Input Gain using the AGC meter on the Conference
Composer Diagnostics page.
Set Levels on Line
Input Channels
Set the line input channel gains (Channels A-D) to match the nominal level of the
incoming equipment. The line inputs have a maximum nominal level of 0 dBu. If
your incoming line level inputs have a higher nominal level than 0 dBu you will want
to use a pad to remove the level.
VORTEX EF2280 Reference Manual 16 Technical Support: 800.932.2774
Page 19

INTEGRATING THE EF2280 INTO YOUR SYSTEM
Customize Setting
for Your Particular
The following sections will describe customizing parameters on the EF2280 for your
particular application if you are not using Preset 0.
Application
B
UILD YOUR ECHO CANCELLER REFERENCE
The acoustic echo canceller (AEC) reference should generally contain exactly the
same audio signals as what is coming out of your loudspeaker(s), since the signal output from the loudspeaker is what is then picked up by the room’s microphones causing acoustic echo. Note that this statement is a general statement. Conditions for this
being true follow:
If your system does
NOT have sound
reinforcement,
• The AEC reference should contain exactly the same audio as the loudspeaker
output: all far end audio, audio from the phone add, program audio, etc.
• If your system contains stereo inputs and outputs, the reference must contain a
mix of both stereo inputs. For example, if your VCR audio is in stereo, the reference should contain both the left and right signals each attenuated by 3 dB, as
well as any other audio that is going to your loudspeaker.
• If you are using crosspoint gains in the loudspeaker mix, apply the same gains to
the signals in your reference.
If your system has
sound
reinforcement,
• Do NOT mix your room microphones into the reference, but include all other
audio (program audio, remote audio, phone audio, etc.).
• An exception to this rule is when you use one EF2280 split to operate independently in two rooms. If the two rooms communicate with each other (along with
communicating via codec and the phone line), the reference in the first room
must contain the microphones from the second room and vice versa. See Figure
11 below.
© Polycom, Inc. 17 VORTEX EF2280 Reference Manual
Page 20

In 1
In 2
In 3
In 4
In 5
In 6
In 7
In 8
In A
In B
In C
In D
Vortex
EF2280
INTEGRATING THE EF2280 INTO YOUR SYSTEM
If Room 1's loudspeaker contains a mix of Room 2's
microphones, then Room 1's AEC reference should also
contain Room 2's microphones. The same is true for Room 2's
AEC reference.
From AEC
To AEC
From Rem.
From AEC
From Rem.
EF200
EF200
To Rem.
Phone
To AEC
To Rem.
Phone
PSTN
PSTN
Polycom Video
Out 1
Out 2
Out 3
Out 4
Out 5
Out 6
Out 7
Out 8
®
Out A
Out B
Out C
Out D
CODEC
Line In Line Out
Polycom Video
CODEC
Line In Line Out
Figure 11. AEC reference for two rooms that communicate with each other with one
EF2280.
E
CHO CANCELLER REFERENCE FOR
In a system with multiple devices, we recommend that one device be designated as
the unit that provides the EF bus reference for the acoustic echo cancellers. This unit
takes one of its reference signals (either Ref 1 or Ref 2) and places it on the EF bus.
All other units that are linked together may use the EF bus reference as the reference
for their echo canceller, or they can use their own internal references. The references
may include a mix of any input, with crosspoint gains, including W, X, Y, and Z busses. Set the EF Bus Reference in the System Menu of the LCD Menu (See “EF Bus
Reference” on page 29).
Setting up the Bus
Reference
If all far end audio and program audio sources are on the same
EF2280,
1. Assign far end audio and program audio sources to Reference 1 on the originating EF2280.
2. On the EF Bus page in Conference Composer for the originating EF2280, set the
Exported Signals to R
reference on the EF Bus as the Bus Reference.
3. On all linked EF2280s, set the echo canceller reference to B
M
ULTIPLE
EF2280
S
EFERENCE 1. Only one EF2280 can put an echo canceller
US.
For example, a system uses 2 EF2280s, 1 EF200, and 1 Polycom VS4000 video
codec. The originating sources for far end audio is EF2280 with ID 0. The Matrix for
VORTEX EF2280 Reference Manual 18 Technical Support: 800.932.2774
Page 21

INTEGRATING THE EF2280 INTO YOUR SYSTEM
this EF2280 in Conference Composer is shown in Figure 12 and the EF Bus page in
Figure 13. Conference Composer will not allow more than one EF2280 assign their
echo canceller reference as the Bus Reference. Notice that the EF200 and VS4000
inputs are both assigned to Reference 1 on the originating EF2280. The Matrix for
any linked EF2280s is shown in Figure 14.
Figure 12. Matrix page of origin EF2280 (ID 00) Figure 13. EF Bus page of origin EF2280 (ID 00)
Figure 14. Matrix page of linked EF2280s
© Polycom, Inc. 19 VORTEX EF2280 Reference Manual
Page 22

If far end audio and program audio sources are on several
EF2280s,
1. Bus each far end audio and program audio source to each EF2280. Do this by
assigning each signal input to either the W, X, Y or Z bus.
2. Assign an echo canceller reference on each EF2280 that will include all far end
audio and program audio sources.
C
ONFIGURE THE AUTOMATIC
The EF2280 contains two independent automatic microphone mixers. Each input
may be assigned to automatic mixer 1, automatic mixer 2, or neither (but not both).
Assign all microphones to the same automixer when using all microphones in the
same room but in different zones, so that a person does not activate microphones in
two different zones (which they would tend to do if each zone had its own automatic
mixer). Use both automatic mixers when the EF2280 is split to operate independently
between two rooms. One automatic mixer is used in each room. The advantage of
having two independent automatic mixers is that when used in two rooms, microphone signals in one room do not affect the gating behavior of microphones in the
other room. Set an input channel to use neither automatic mixer if an input is not
actually a microphone, but is a program audio input. For instance, if you only have 6
microphones and you have an extra stereo program audio source that you want automatic gain control (AGC) on and/or noise cancel, you could set its channels to be on
neither automatic mixer.
If you have a PC, use the Conference Composer software (See the Conference Composer User Guide) to set the automixer parameters. If you would like to set automixer
parameters using the LCD menus, see “Automixer Menu” on page 32 for instructions
on setting automixer parameters.
M
ICROPHONE
INTEGRATING THE EF2280 INTO YOUR SYSTEM
M
IXER
Automixer
Parameters
The following parameters configure how the EF2280 automatic microphone mixer
operates. Parameters include the following: Decay Time, Hold Time, Camera Gating
Threshold, Chairman Mode, Chairman Mic, Last Mic On Mode, Last Mic Number,
Local Max NOM, Global Max NOM, Off Attenuation, Threshold Type, Gating
Mode, Gate Ratio, Manual Threshold, and Microphone Priority.
Signal Level
Channel turns on
when signal level
is above gate ratio
Channel ON
G
ATE RATIO
Channel OFF
Ambient Level
Microphone
Audio
D
ECAY
T
IME
OFF A
H
OLD
T
IME
TTENUATION
Time
Figure 15. Off Attenuation, Hold Time, Gate Ratio, and Decay Time.
VORTEX EF2280 Reference Manual 20 Technical Support: 800.932.2774
Page 23

INTEGRATING THE EF2280 INTO YOUR SYSTEM
Global Settings.
Decay Time. Decay time is the amount of time the microphone audio takes to
ramp down to the Off Attenuation level after Hold Time. Decay Time values
range from 0 to 5000 msec. The default value is 1000 msec.
Hold Time. This is the amount of time the microphone stays On after the energy
in the channel drops below the gating threshold. The default value is 500 msec.
The range is 1 to 5000 msec. Microphone channels gating On and Off too frequently during short pauses in speech might be the result of setting the Hold
Time too low while too many microphones gating on at the same time may be the
result of Hold Time values that are too high.
Camera Gating Threshold. Specifies the hold time for camera gating informa-
tion.
Mixer Settings.
Bus Mixer. This command is used to assign one of the two internal automixers
to one of the EF Bus automixer groups. For example, consider three EF2280s
each of which has four microphones assigned to Automixer 1 and 4 microphones
assigned to Automixer 2. Now, if each of these EF2280s sets their Automixer 1
to use Bus Mixer 5, then the three automixers (one from each EF2280) will work
as a single automixer containing 12 (3 x 4) microphones. Setting Bus Mixer to 0
means that the automixer is not grouped on the EF Bus.
Chairman Mode. Enables or disables Chairman Mode for the specified auto-
mixer.
Chairman Mic. Sets the Chairman Microphone for the specified automixer.
Last Mic On Mode. Sets “Last Mic On” mode for the specified automixer.
Last Mic Number. Sets the microphone number that will remain on when “Last
Mic On” mode is set to manual. Setting this value to 0 will cause the automixer
to leave the last open microphone on. The last microphone number is specified
for each automixer, but is only used in manual “Last Mic On” mode.
Local Max NOM. Sets the maximum number of open microphones (NOM)
limit for the specified automixer. This NOM limit is a “local” limit, meaning that
this limit applies only to the specific EF2280 that it is set on.
Global Max NOM. Sets the global maximum number of open microphones
(NOM) limit for each linked automixer. The maximum value for this command
is 64. This NOM limit is a “global” limit, meaning that this limit applies to all
linked automixers with the same Bus ID.
Off Attenuation. Sets the Off Attenuation (in dB) for the specified automixer.
Setting this value to 18 would result in the microphone signals being attenuated
by 18 dB when gated off. This value is set independently for each of the automixers.
Channel Settings.
Automixer (Inputs 1-8). This allows you to select which automatic microphone
mixer (1 or 2) a particular microphone channel is assigned to. A microphone
may only be assigned to automatic mixer 1, automatic mixer 2, or neither (but not
both).
Threshold Type. Sets automatic (also referred to as adaptive) or manual auto-
matic gating thresholds per input.
Gating Mode. Sets the automixer gating control mode for specified input chan-
nel. The possible modes are Normal Gating, Microphone Forced On, or Microphone Forced Off.
Adaptive Threshold. This allows you to determine when to gate a microphone
on based on an estimate of the background noise level. The default value is to
© Polycom, Inc. 21 VORTEX EF2280 Reference Manual
Page 24

A
UTOMIXER SETTINGS FOR
When using more than one EF2280 in your room system, you have several possibilities for how you configure the automixer. Each EF2280 can operate as one of the following:
• One automixer, independent of other EF2280s linked to it
• Two automixers, independent of other EF2280s linked to it
• One large automixer, sharing automixer functions with other EF2280s linked to it
• Two large automixers, sharing automixer functions with other EF2280s linked to
INTEGRATING THE EF2280 INTO YOUR SYSTEM
gate a channel on if it is more than 10 dB louder than the background noise level.
Values range from 0 to 100 dB. To set the gate ratio, scroll through the gate ratio
range and select the desired gate ratio by pressing E
Manual Threshold. Sets the automixer gating threshold for the specified input
channel. This value is only used if the input set to Manual Gating via the
T
HRESHOLD TYPE option.
Microphone Priority. The priority of each microphone can be assigned a value
ranging from 1 to 4. Priority 1 microphones have priority over priority 4 microphones for gating. The default is to have all microphones set to priority 1. If
Chairman Mode is enabled, all microphones including ones with priority of 1
will be gated off when the Chairman mic gates on.
M
ULTIPLE
it
EF2280
S
NTER.
Figure 16. EF2280 Automixer Settings in Conference Composer Software
Automixer and Bus
Mixer Settings
VORTEX EF2280 Reference Manual 22 Technical Support: 800.932.2774
To operate the EF2280 in any of the above possibilites, two global parameters need to
be changed: the A
parameter chooses which automixer the input channel will be on (this is changed
either on the A
page).
The B
US MIXER parameter is used to assign one of the two internal automixers to one
of the EF Bus automixer groups. For example, consider three EF2280s each of which
has four microphones assigned to Automixer 1 and 4 microphones assigned to Automixer 2. Now, if each of these EF2280s sets their Automixer 1 to have Bus ID 5, then
the three automixers (one from each EF2280) will work as a single automixer containing 12 (3 x 4) microphones. Setting B
not grouped on the EF Bus.
UTOMIXER and the BUS MIXER (see Figure 16). The AUTOMIXER
UTOMIXER page in Conference Composer or on the MATRIX MIXER
US MIXER to 0 means that the automixer is
Page 25

INTEGRATING THE EF2280 INTO YOUR SYSTEM
Operating as an
Independent
Automixer
Operating as One
Automixer with
To set the EF2280 to operate as an independent automixer (or two), set the BUS
M
IXER parameter to 0, or to a number that is different from any other automixer group
on the EF Bus.
To set the EF2280 to operate as one automixer across several EF2280s, set the BUS
M
IXER parameter on all EF2280s to the same automixer group.
Multiple EF2280s
Default Settings In the default preset (Preset 0), the Bus Mixer for Automixer 1 is set to 1 and the Bus
Mixer for Automixer 2 is set to 2. This means that in the default mode, all linked
EF2280s will work together as one complete automixer.
C
ONFIGURE THE
M
ATRIX
M
IXER
The matrix mixer allows arbitrary crosspoint gains in 1 dB increments between any
input and output signal.
If you have a PC, use the Conference Composer software (See the Conference Composer User Guide) to set the matrix parameters. If you would like to set matrix
parameters from the LCD menus, see “Matrix Menu” on page 34 for descriptions and
instructions on setting matrix mixer parameters.
B
UILDING YOUR SYSTEM WITH
The following is a checklist for building a system with mutliple EF2280s:
1. Assign Inputs.
2. Assign Outputs.
3. Configure submatrix (the EF Bus).
4. Configure your echo canceller reference.
M
ULTIPLE
EF2280
S
1. Assign Inputs Assign each audio source to an input. Remember to include the conferencing equip-
ment such as the EF200 Phone Add or a video codec and any program audio.
2. Assign Outputs Try to assign as many outputs as you can to each EF2280 to make a simpler subma-
trix. Remember that Outputs 1-8 can also be used as outputs of the matrix. The bussing can get very complicated very quickly if you choose to spread your outputs over
several units.
3. Configure the
To link multiple EF2280 devices together, use the submatrix on the EF Bus.
submatrix.
© Polycom, Inc. 23 VORTEX EF2280 Reference Manual
Page 26

INTEGRATING THE EF2280 INTO YOUR SYSTEM
Submatrix
WB0WB1WB2WB3WB4WB5WB6WB7
XB0XB1XB2XB3XB4XB5XB6XB7
YB0YB1YB2YB3YB4YB5YB6YB7
ZB0ZB1ZB2ZB3ZB4ZB5ZB6ZB7
The EF Bus The EF Bus is a high speed, low delay digital bus that includes the W, X, Y, and Z
audio busses as well as the echo canceller reference and remote control information
(for other EF2280s) and can link up to 8 EF2280 devices. All busses include NOM
information and can be used for sharing microphone inputs, or for sharing mono or
stereo program information.
Crosspoint Mix Minus Bus. Each EF2280 device in the system can create
four output mixes (W, X, Y, and Z) and place them on the bus. Each device also can
create three input mixes each from the W, X, Y, and Z busses of the other devices (for
a total of 12 mixes). The mixes can have crosspoint gains on the signals from the
other devices. See Figure 17 below. All 12 mixes become inputs to the main matrix
and can be mixed with the other inputs to create outputs 1-8, A-D, Ref 1, Ref 2, and
W, X, Y, and Z bus outputs.
Bus W
Bus X
Bus Y
Bus Z
Figure 17. W, X, Y, and Z submatrices.
EF Bus Reference. In a system with multiple devices, if all devices need the
same echo canceller reference, one device should be designated to put its echo canceller reference (either Ref 1 or Ref 2) on the EF bus to be used as the EF Bus Reference.
All other EF2280s
cellers, or they can use their own internal references. The references may include a
mix of any input, with crosspoint gains, including W, X, Y, and Z busses.
NOM Bus. All busses on the EF Bus contain NOM information. See HeadingRu-
nIn(page 31) for more information on how NOM attenuation is applied.
Note. The EF Bus must be connected so that the EF BUS OUT of one
EF2280 device is connected to the EF B
EF2280. Connecting EF B
O
on page 48 for pinout of Cat 5 cable.
may use the EF bus reference as the reference for their echo can-
US IN of another
US IN to another EF BUS IN (or EF BUS
UT to EF BUS OUT) will not work. See“Connector Pinouts”
VORTEX EF2280 Reference Manual 24 Technical Support: 800.932.2774
Page 27

INTEGRATING THE EF2280 INTO YOUR SYSTEM
4. Configure Your
Echo Canceller
Reference
P
RESETS
O
THER
EF2280 F
Review what inputs need to be included in your echo canceller reference — See
“Build Your Echo Canceller Reference” on page 17. Remember that each microphone needs to have an echo canceller reference. If all microphones are in the same
room and use the same reference, configure the echo canceller reference on one
EF2280 and assign it to the EF Bus as the EF Bus Reference. Only one EF2280 out
of multiple units linked together can put an echo canceller reference on the EF Bus.
For each additional unit, assign the echo canceller reference to use the EF Bus Reference.
For systems with more than one room, you will need to use the W, X, Y, or Z subbusses to share the echo canceller reference in your additional rooms if the EF Bus
Reference has already been assigned to the EF Bus.
After configuring your EF2280, save your settings to a User Preset (PRESETS 16-47).
Also, set the P
If you have multiple EF2280s in your system, save to a User Preset on each unit and
set the P
OWER ON PRESET to the User Preset you have saved to.
OWER ON PRESET accordingly.
EATURES
For information on Macros, Logic Inputs, Logic Outputs, Input Filters and Output
Filters, please refer to the Conference Composer User Guide.
© Polycom, Inc. 25 VORTEX EF2280 Reference Manual
Page 28

LCD MENU STRUCTURE
LCD M
ENU STRUCTURE
LCD Menu Tree The EF2280 LCD menu structure is made up of seven menu trees: SYSTEM, INPUTS,
O
UTPUTS, AUTOMIXER, MATRIX, PARAMETRIC EQ, and PRESETS. Each menu tree is
organized by levels and branches into multiple subcategories. The branches end with
an adjustable parameter or value.
EF2280 System
Settings
Parametric EQ (In 1-8)
Input/Output EQ
Channel
Band
Filter Type
Frequency
Bandwidth
Gain
Slope
Filter Enable
Presets
Restore
Save
Presets 16-47
Delete
Presets 16-47
Power On Preset
Acknowledgement
Mode
Bus Reference
Error Messages
Front Panel Lock
Front Panel Password
Device ID
LCD Contrast
Meter
Non-Volatile Memory
Lock
Non-Volatile Mem
Password
Screen Saver
Software Version
Reboot Vortex
Acoustic Echo
Cancellation (In 1-8)
Automatic Gain Control
(AGC), In 1-8
AGC Maximum
(In 1-8)
AGC Minimum
(In 1-8)
Gain
Level Min/Line
(In 1-8)
Mute
Noise Cancellation
(In 1-8)
Noise Cancellation Level
(In 1-8)
Phantom Power
(In 1-8)
Reference Assign
(In 1-8)
AEC Suppression
(In 1-8)
Output Gain
Mute Output
NOM Attenuation
On/Off
Output Delay
AutomixerOutputsInputs 1-8, A-DSystem
Global Settings
Decay
Hold Time
Camera Gating
Threshold
Mixer Settings
(AM1/AM2)
Bus ID
Chairman Mode
Chairman Mic
Last Mic On Mode
Last Mic Number
Local Max NOM
Global Max NOM
Off Attenuation
Channel Settings
(Inputs 1-8)
Automixer
Threshold Type
Gating Mode
Adaptive Threshold
Manual Threshold
Mic Priority
Matrix
Main Matrix
Gain
Gate (In 1-8)
Mute
SubMatrix
Gain
Mute
Figure 18. LCD Menu Tree.
D
OWN UP ENTER ESC HOME
Scrolls backward
through menu
items at particular
level or decreases
the value of a
parameter
Scrolls forward
through menu
items at particular
level or increases
the value of a
parameter.
Enters the menu
and allows you to
select and change
parameter values.
Returns to the top
of the next highest level of menus
Returns to the top
of the menu structure.
Table 2: Summary of button functions on the EF2280.
The EF2280 has five menu buttons on the front panel for navigation in the menu tree.
Press the H
menu. The E
OME button from anywhere in the menu tree to return to the top of the
NTER button enters the menu and the ESC button returns to the next high-
est level of menus. To scroll back through menu items at a particular level, use the
VORTEX EF2280 Reference Manual 26 Technical Support: 800.932.2774
Page 29

LCD MENU STRUCTURE
DOWN button. To scroll forward through menu items at a particular level, use the UP
button.
To adjust a parameter, first locate the parameter by scrolling to the appropriate menu
(with combinations of the U
parameter field and the parameter value. To change the parameter, the parameter
must be flashing. To make the parameter flash (assuming the front panel is not
locked) press E
NTER. Once the parameter is flashing, use the UP and DOWN buttons
to adjust the parameter value. The parameter is instantly updated while it is being
adjusted — you should hear changes as the parameter is changing. RS-232 control
strings are also sent via the RS-232 port so your remote control device is instantaneously updated as well. Press E
E
SC to cancel the selected value and return to the old value. Pressing HOME has the
effect of pressing E
SC then HOME, so the selected value will be cancelled and the
menu will return to the top of the menu tree.
Parameters that toggle or select among a list of options will wrap around when you
reach the end, but parameters that adjust numeric values will not wrap around once
the maximum or minimum value is reached. While adjusting a parameter, the U
D
OWN button must be held down briefly before the repeat rate increases.
P/DOWN and ENTER buttons). The display will show the
NTER to select and store the parameter value or press
P/
© Polycom, Inc. 27 VORTEX EF2280 Reference Manual
Page 30

LCD MENU STRUCTURE
System Overview Table 3 below shows a summary of EF2280 parameters and their ranges..
EF2280 Software Control Parameters Worksheet
System Parameters
Program Parameter Options
Preset 0-47
Macros 0-255
Set Passcode Passcode
Device ID 0-7
Unit ID Number Factory programmed
Auto Mix Parameters AM1 AM2
Program Parameter Options
Chairman Mic On, Off
Decay 0 to 5000 (1000)
Hold Time 1 to 5000 (500)
Last Mic On Mode Last On, Off, or Any microphone
Max NOM per Automixer Off, 1 to 8, (8)
Off Attenuation 0 to -100 dB (-15)
Input Channels 12345678ABCD
Program Parameter Options
Acoustic Echo Cancellation On, Off
Automatic Gain Control (AGC) On, Off
Automixer 1 or 2, Off
Echo Canceller Reference Ref1, Ref2, External Bus Ref
Filtering On, Off
Gain - mic level, Inputs 1-8 0 to 30 dB, 15 dB
Gain - line level, Inputs 1-8 0 to 30 dB, 0 dB
Gain, Inputs A-D 0 to 20 dB, 0 dB
Gate Priority 1 to 4 (1)
Gate Ratio 0 to 100 dB (10)
Gate Threshold Manual, Adaptive
Gating Auto, Forced On/Off
Manual Threshold 0 to 100 (60)
Mute On, Off
Noise Cancellation Off, 6dB, 10dB
Output Channels 12345678ABCD
Program Parameter Options
Mute On, Off
Gain -100 to 20 dB, 0 dB
NOM Attenuation, Outputs 1-8 On, Off
NOM Attenuation, Outputs A-D On, Off
Table 3: EF2280 Parameters Worksheet
Trademark Notice: Vor t e x® is a registered trademark of Polycom, Inc.
VORTEX EF2280 Reference Manual 28 Technical Support: 800.932.2774
Page 31

S
YSTEM
M
System
ENU
LCD MENU STRUCTURE
The SYSTEM menu contains POWER ON PRESET, ACKNOWLEDGEMENT MODE, BUS
R
EFERENCE, ERROR MESSAGES, FRONT PANEL LOCK, FRONT PANEL PASSWORD,
D
EVICE ID, LCD CONTRAST, METER, NON-VOLATILE MEMORY LOCK, NON-VOLA-
TILE MEMORY PASSWORD, SCREEN SAVER, SOFTWARE VERSION, and REBOOT
EF2280 configurations.
Power On Preset
Acknowledgement
Mode
Bus Reference
Error Messages
Front Panel Lock
Front Panel Password
Device ID
LCD Contrast
Meter
Non-Volatile Memory
Lock
Non-Volatile Mem
Password
Screen Saver
Power On Preset. Choose the EF2280 Preset for power up.
Acknowledgement Mode. This command controls whether or not status mes-
sages are sent.
EF Bus Reference. This designates which EF2280 device, when multiple devices
are linked together, will put one of their echo canceller references on the EF bus to be
used as the EF bus reference.
Error Messages. Turns error messages On or Off.
Front Panel Lock. Locks or unlocks the front panel. When the front panel is
locked, you can see the parameters but you cannot change them.
The default passcode is aspi (case is important).
Front Panel Passcode. Once the device has been unlocked, the passcode may
be changed. At the F
passcode and press E
RONT PANEL PASSCODE menu, press ENTER and then enter a
NTER until you reach the end of the screen.
Device ID. Selects the Device ID of the unit.
LCD Contrast. Controls the contrast level of the front panel liquid crystal display
(LCD). Higher numbers result in darker characters on the display, lower numbers
result in lighter characters.
Meter. Selects which signal is displayed on the front panel LED meter.
Non-Volatile Memory Lock. Controls the non-volatile lock feature. When
the non-volatile memory is locked, you can query the settings but will get an error if
you try to change them.
Software Version
Reboot Vortex
Figure 19. EF2280
System submenu
tile lock password. This password is used in conjunction with N
ORY LOCK. The default password is aspi (case is important).
Screen Saver. Enables or disables the screen saver on the LCD panel. You can
also set the idle time.
Software Version. Queries the software version.
ON-VOLATILE MEM-
Reboot EF2280. Cycles power on the EF2280.
© Polycom, Inc. 29 VORTEX EF2280 Reference Manual
Non-Volatile Memory Password. This feature sets or queries the non-vola-
Page 32

I
NPUTS
Inputs 1-8, A-D
Acoustic Echo
Cancellation (In 1-8)
Automatic Gain Control
(AGC), In 1-8
AGC Maximum
(In 1-8)
AGC Minimum
(In 1-8)
Gain
LCD MENU STRUCTURE
The input menu allows the user to adjust functions related to the input signals to the
EF2280. This menu contains A
C
ONTROL, AGC MAXIMUM, AGC MINIMUM, GAIN ADJUST, LEVEL MIC/LINE,
M
UTE, NOISE CANCELLATION, NOISE CANCELLATION LEVEL, PHANTOM POWER,
R
EFERENCE ASSIGN, and AEC SUPPRESSION. The menu is organized around the
COUSTIC ECHO CANCELLATION, AUTOMATIC GAIN
Inputs (1-8) and (A-D), so that you first select an input and then select settings for that
input. You can also choose to apply the settings to all Inputs, Inputs 1-8, or Inputs AD.
Acoustic Echo Cancellation. This allows you to enable or disable the acoustic
echo canceller on a particular channel. The default is On.
Automatic Gain Control. This enables automatic gain control (AGC) on
Inputs 1-8. The default is On.
AGC Max. Sets the maximum gain value that the AGC can apply.
AGC Min. Sets the minimum gain value that the AGC can apply.
Level Min/Line
(In 1-8)
Mute
Noise Cancellation
(In 1-8)
Noise Cancellation Level
(In 1-8)
Phantom Power
(In 1-8)
Reference Assign
(In 1-8)
AEC Suppression
(In 1-8)
Figure 20. EF2280
Inputs submenu
Gain. This parameter adjusts the gain level of the 12 inputs. This is normally con-
figured during the calibration process. The default setting is 15 dB for microphone
signals and 0 dBu for line level signals. See “Level” above for setting mic/line level
for Inputs 1-8. The L
level of the channel whose gain is being adjusted.
Figure 21 below shows the gain adjust on Inputs 1-8 and A-D and the matrix crosspoints.
Input Channel (1 of 8) Matrix Cross point Output Channel (1 of 12)
Mic Preamp
Adjustable 33 to 53 dB
Input Channel (A, B, C, or D) Matrix Cross point Output Channel (1 of 12)
Input Level
Adjustable 0 to 20dB
EVEL INDICATOR on the front panel automatically reflects the
Matrix Cross Point
Adjustable 20 to -100dB
Matrixer
Matrix Cross Point
Adjustable +20 to -100dB
Matrixer
Gain Adjust
+20 to -100dB
Gain Adjust
+20 to -100
Output
Output
Figure 21. Gain adjust and matrix crosspoints of Inputs 1-8 and A-D.
Level. Use this parameter to select mic or line level on Inputs 1-8.
Mute. This selects which input channel (1-8, A-D) or the W, X, Y, or Z input is
muted. The default is not muted.
Noise Cancellation (Inputs 1-8). This allows you to select the level of noise
VORTEX EF2280 Reference Manual 30 Technical Support: 800.932.2774
Page 33

O
UTPUTS
Output Gain
Mute Output
Outputs
LCD MENU STRUCTURE
cancellation. The default is 10 dB.
Noise Cancellation Level (Inputs 1-8). Selects the amount of noise cancel-
lation. This ranges from 0 to 15 dB.
Phantom Power. Use this parameter to turn phantom power On or Off for inputs
1-8.
Echo Canceller Reference. This parameter decides which reference is associ-
ated with which zone. Choose between R
EF1, REF2, or the external bus reference.
AEC Suppression. Sets the amount of double talk suppression used in the AEC.
The values correspond to the following settings: 1 = No Suppression, 2 = Light Suppression, 3 = Heavy Suppression, 4 = Half-Duplex.
The OUTPUT menu contains GAIN, NOM ACTIVE, and MUTE. As with the INPUT
menus, this is done on a per channel basis including the W, X, Y, and Z busses.
Output Gain. Choose the gain applied to each output signal using this parameter.
The default setting is 0 dBu. Though the EF2280 allows for positive output gain,
you should always try to adjust input gains to a good level so that the output gain is 0
dB. If you find that you need a positive output gain from the EF2280, first check your
input gain to make sure you are getting a good level (around 0dB). Keep the output
gain at around 0 dBu. Then, for the best gain structure, use your amplifier to raise the
volume in your system.
NOM Attenuation
On/Off
Output Delay
Figure 22. EF2280
Outputs submenu
Mute Output. Use this to mute or unmute each Output.
NOM Active. This allows you to select whether the NOM attenuator is active for
a particular output channel (Outputs 1-8, A-D). The NOM attenuator will attenuate
the output signal by 10*log
in that particular output channel. NOM is calculated based on the number of open
microphones for each signal that is in the output, including the W or X bus which
carry NOM information. This option is not valid on Outputs W, X, Y, Z, or the EF
Bus reference (you cannot apply NOM attenuation to these busses).
(NOM) where NOM is the number of open microphones
10
Output Delay. This allows you to add delay to the output. The default value is 0.
The range of values is 0 to 340.0 ms in 0.1 ms increments.
© Polycom, Inc. 31 VORTEX EF2280 Reference Manual
Page 34

A
UTOMIXER
Automixer
Global Settings
M
ENU
LCD MENU STRUCTURE
These parameters configure how the EF2280 automatic microphone mixer operates. Parameters include the following: D
G
ATING THRESHOLD, BUS ID, CHAIRMAN MODE, CHAIRMAN MIC, LAST MIC ON
M
ODE, LAST MIC NUMBER, LOCAL MAX NOM, GLOBAL MAX NOM, OFF
A
TTENUATION, AUTOMIXER, THRESHOLD TYPE, GATING MODE, GATE RATIO,
M
ANUAL THRESHOLD, and MIC PRIORITY.
ECAY TIME, HOLD TIME, CAMERA
Mixer Settings
Channel Settings
Figure 23. EF2280
Automixer submenu
Automixer
Global Settings
Decay
Hold Time
Camera Gating
Threshold
Signal Level
Channel turns on
when signal level
is above gate ratio
Channel ON
G
ATE RATIO
Channel OFF
Ambient Level
Microphone
Audio
D
ECAY
T
IME
OFF A
H
OLD
T
IME
TTENUATION
Time
Figure 24. Automixer parameters.
Global Settings.
Decay Time. Decay time is the amount of time the microphone audio takes to
ramp down to the Off Attenuation level after Hold Time. Decay Time values
range from 0 to 5000 msec. The default value is 1000 msec.
Hold Time. This is the amount of time the microphone stays On after the energy
in the channel drops below the gating threshold. The default value is 500 msec.
The range is 1 to 5000 msec. Microphone channels gating On and Off too frequently during short pauses in speech might be the result of setting the Hold
Time too low while too many microphones gating on at the same time may be the
result of Hold Time values that are too high.
Camera Gating Threshold. Specifies the hold time for camera gating informa-
tion.
VORTEX EF2280 Reference Manual 32 Technical Support: 800.932.2774
Page 35

Automixer
Mixer Settings
(AM1/AM2)
Bus ID
Chairman Mode
Chairman Mic
Last Mic On Mode
Last Mic Number
Local Max NOM
Global Max NOM
Off Attenuation
LCD MENU STRUCTURE
Mixer Settings.
Bus ID. This command is used to assign one of the two internal automixers to
one of the EF Bus automixer groups. For example, consider three EF2280s each
of which has four microphones assigned to Automixer 1 and 4 microphones
assigned to Automixer 2. Now, if each of these EF2280s sets their Automixer 1
to have Bus ID 5, then the three automixers (one from each EF2280) will work as
a single automixer containing 12 (3 x 4) microphones. Setting Bus ID to 0 means
that the automixer is not grouped on the EF Bus.
Chairman Mode. Enables or disables Chairman Mode for the specified auto-
mixer.
Chairman Mic. Sets the Chairman Microphone for the specified automixer.
Last Mic On Mode. Sets “Last Mic On” mode for the specified automixer.
Last Mic Number. Sets the microphone number that will remain on when “Last
Mic On” mode is set to manual. Setting this value to 0 will cause the automixer
to leave the last open microphone on. The last microphone number is specified
for each automixer, but is only used in manual “Last Mic On” mode.
Local Max NOM. Sets the maximum number of open microphones (NOM)
limit for the specified automixer. This NOM limit is a “local” limit, meaning that
this limit applies only to the specific EF2280 that it is set on.
Global Max NOM. Sets the global maximum number of open microphones
(NOM) limit for each linked automixer. The maximum value for this command
is 64. This NOM limit is a “global” limit, meaning that this limit applies to all
linked automixers with the same Bus ID.
Off Attenuation. Sets the Off Attenuation (in dB) for the specified automixer.
Setting this value to 18 would result in the microphone signals being attenuated
by 18 dB when gated off. This value is set independently for each of the automixers.
Automixer
Channel Settings
(Inputs 1-8)
Automixer
Threshold Type
Gating Mode
Adaptive Threshold
Manual Threshold
Mic Priority
Channel Settings.
Automixer (Inputs 1-8). This allows you to select which automatic microphone
mixer (1 or 2) a particular microphone channel is assigned to. A microphone
may only be assigned to automatic mixer 1, automatic mixer 2, or neither (but not
both).
Threshold Type. Sets automatic (also referred to as adaptive) or manual auto-
matic gating thresholds per input.
Gating Mode. Sets the automixer gating control mode for specified input chan-
nel. The possible modes are Normal Gating, Microphone Forced On, or Microphone Forced Off.
Adaptive Threshold. This allows you to determine when to gate a microphone
on based on an estimate of the background noise level. The default value is to
gate a channel on if it is more than 10 dB louder than the background noise level.
Values range from 0 to 100 dB. To set the gate ratio, scroll through the gate ratio
range and select the desired gate ratio by pressing E
Manual Threshold. Sets the automixer gating threshold for the specified input
channel. This value is only used if the input set to Manual Gating via the
T
HRESHOLD TYPE option.
Microphone Priority. The priority of each microphone can be assigned a value
ranging from 1 to 4. Priority 1 microphones have priority over priority 4 microphones for gating. The default is to have all microphones set to priority 1. If
Chairman Mode is enabled, all microphones including ones with priority of 1
will be gated off when the Chairman mic gates on.
NTER.
© Polycom, Inc. 33 VORTEX EF2280 Reference Manual
Page 36

M
ATRIX
Main Matrix
Gate (In 1-8)
M
Matrix
Gain
Mute
SubMatrix
Gain
ENU
LCD MENU STRUCTURE
The MATRIX contains commands for assigning input signals to output signals with
appropriate gains applied or mutes applied. It also allows for Gating to be turned on
for Inputs 1-8. This menu can apply gains to both the M
TRIX.
AIN MATRIX and the SUBMA-
Crosspoint Gains. Assign input signals to output signals with appropriate gains
applied.
Gate. Applies gating from Inputs 1-8 to an Output.
Mute. Applies mute to the crosspoint.
Mute
Figure 25. EF2280
Matrix submenu
VORTEX EF2280 Reference Manual 34 Technical Support: 800.932.2774
Page 37

P
ARAMETRIC
Parametric EQ (In 1-8)
Input/Output EQ
Channel
Band
Filter Type
Frequency
Bandwidth
Gain
Slope
Filter Enable
Figure 26. EF2280
Parametric EQ sub-
menu
EQ M
LCD MENU STRUCTURE
ENU
The input equalizer is comprised of up to 5 bands of filtering. The whole group of filters for the channel can also be enabled/disabled without losing the settings for each
band. For each band, you first select the type of filter from the following: Parametric/
Peaking, High Shelf, Low Shelf, Lowpass, or Highpass.
Parametric/Peaking.
• Center Frequency: in Hz, between 20 Hz and 20,000 Hz in 1 Hz steps.
• Bandwidth: in octaves, between 0.05 and 2 octaves in 0.05 octave steps.
• Gain: in dB, between -20 and +20 in 1 dB steps.
High Shelf.
• Center Frequency: in Hz, between 20 Hz and 20,000 Hz in 1 Hz steps.
• Bandwidth: in dB/octave, between 1 and 24 dB/octave, but is always less
than or equal to 1.2 x Gain.
• Gain: in dB between -20 and +20 in 1 dB steps.
Low Shelf.
• Center Frequency: in Hz, between 20 Hz and 20,000 Hz in 1 Hz steps.
• Bandwidth: in dB/octave, between 1 and 24 dB/octave, but is always less
than or equal to 1.2 x Gain.
• Gain: in dB between -20 and +20 in 1 dB steps.
Lowpass.
• Cutoff Frequency: in Hz, between 20 Hz and 20,000 Hz in 1 Hz steps.
Highpass.
• Cutoff Frequency: in Hz, between 20 Hz and 20,000 Hz in 1 Hz steps.
Center frequency on Parametric/Peaking is the point with the most (or least) gain.
Bandwidth is the width halfway up the peak (so if the peak is 10 dB, it is the width
between the points where the gain is 5 dB).
Center frequency on shelving filters is the frequency where it crosses the point halfway between 0 dB and the gain of the filter, halfway up the slope.
© Polycom, Inc. 35 VORTEX EF2280 Reference Manual
Page 38

T
ROUBLESHOOTING
A
UTOMATIC
M
ICROPHONE
M
TROUBLESHOOTING
IXER
No microphones are
gating
Some microphones
are not gating
• Check if the microphones are muted.
• Are microphones part of one of the 2 automixers?
• Check if the microphones are assigned to an automixer.
• Check if the microphones are muted.
• Check microphone levels. Are microphones set to the appropriate mic or line
level? Is phantom power on where needed?
• The Hold Time may be too low. Microphone channels gating On and Off too frequently during short pauses in speech might be the result of setting the Hold
Time too low.
• Check Gating settings. Are microphones Forced Off?
• Is Chairman Mode on? If you have assigned a Chairman Mic, all other microphones will gate Off once this microphone gates on.
• Check Gating Priority. If your inputs have a Gating Priority of 4, the microphones may not gate as frequently.
• Check Maximum Number of Open Microphones. This parameter sets the number of open microphones allowed at any time. If this parameter is set too low, the
microphones may not gate as often as you wish.
• Adjust the Gate Ratio if the Gate Threshold is set to Adaptive or adjust the Manual Threshold if the Gate Threshold is set to Manual. For Adaptive Gate Threshold, set the Gate Ratio lower so that the microphone will gate On when lower
level signals are present at the microphone. For Manual Gate Threshold, set the
Manual Threshold to a lower absolute threshold.
Too many
microphones are
gating
VORTEX EF2280 Reference Manual 36 Technical Support: 800.932.2774
• The Hold Time might be too high. Too many microphones gating on at the same
time may be the result of Hold Time values that are too high.
• Assign a Chairman Mic. This will cause all other microphones to gate Off once
this microphone gates on and will prevent too many microphones from gating.
• Set Gating Priority so that not all microphones have the same priority. The
default value for each input is a Gating Priority of 1, which is the highest priority.
• Adjust the Gate Ratio if the Gate Threshold is set to Adaptive or adjust the Manual Threshold if the Gate Threshold is set to Manual. For Adaptive Gate Threshold, set the Gate Ratio higher so that the microphone will gate when only louder
signals are present at the microphone. For Manual Gate Threshold, set the Manual Threshold to a higher absolute threshold.
• Using the Adaptive Gate Threshold is recommended for more accurate gating.
Page 39

M
ATRIX
M
IXER
Don’t hear output • Make sure the output is not muted.
• Check that the input you’re expecting to hear is included in the output that you’re
listening to.
E
CHO CANCELLER REFERENCE
TROUBLESHOOTING
Room Audio Sounds
Choppy
R
ESIDUAL ECHO
Reverberation vs.
Acoustic Echo
If you hear the local room’s audio from the loudspeakers and it sounds choppy, you
may have included the room’s microphones in the echo canceller reference. The echo
canceller reference should NOT include the local room’s microphones -- it should
only contain the remote end’s audio and program audio. You can still add the local
room’s microphones to the local output with the matrix, but do not add them to the
echo canceller reference. For more specific guidelines on what to include in your
echo canceller reference, see “Build Your Echo Canceller Reference” on page 17.
You may hear residual echo if system levels are not set properly. Improper level settings anywhere in the audio path can introduce nonlinearities that hamper the operation of the EF2280. If you hear residual echo, one of the following conditions may be
causing the problem.
Do not confuse the residual echo of remote speech with the reverberation of local
speech. Reverberation of local speech is caused when the speech signal arrives at the
microphone via several paths (the direct path and multiple reflections from surfaces in
the room). This is a local room phenomenon that gives the talker’s voice a hollow or
resonant sound (as heard at the remote end).
© Polycom, Inc. 37 VORTEX EF2280 Reference Manual
Page 40

Figure 27. Reverberation vs. Acoustic Echo.
TROUBLESHOOTING
AEC
Reverberation
Acoustic Echo
Reverberation is not an artifact of the echo canceller. It is mainly affected by the distance of the microphone from the speech source and by the resonances of the room.
While reverberation can be unpleasant, it is not compensated for by the acoustic echo
canceller (AEC), which only removes reflections of remote speech. If the remote end
complains that they hear echo, ensure that they are referring to hearing their own
voice and not echoes of local talkers.
You cannot remove the effects of reverberation by changing the EF2280’s settings,
but you can minimize reverberation by moving microphones closer to talkers and, if
necessary, adding acoustical treatment to the room.
Finding the Source
of Echo
Try muting one channel at a time to see if the echo that the remote end is hearing goes
away when a particular channel is muted. If you find that the echo goes away when a
particular channel is muted, the microphone may not be calibrated correctly. Check
one or more of the following issues.
Room Gain The most common cause of poor echo cancellation performance is incorrectly
adjusted room gain. This may be explained as follows. The reference signal seen by
the AEC is sent to a loudspeaker output, where it is amplified and sent to the room
loudspeakers. The loudspeaker audio is coupled into the room microphones acoustically, through direct and reflected acoustic paths, and perhaps also through mechanical coupling. The microphone signal is then amplified and sent to the AEC as the
local microphone input signal. The room gain of a microphone channel refers to the
relative levels of the signal sent to the loudspeaker output (before any amplification)
VORTEX EF2280 Reference Manual 38 Technical Support: 800.932.2774
Page 41

TROUBLESHOOTING
and the level of this signal that is reflected as the microphone input (after microphone
amplification).
A
AEC
B
Room Gain = 20 log (B/A)
Figure 28. Room Gain.
Excessive Room
Gain
If the electrical level of the reflected signal picked up by microphone is the same as
the level of the electrical signal sent from the AEC to the loudspeaker output, the
room gain of this microphone channel is said to be 0 dB. If the reflected signal picked
up by the microphone is higher than the level of the signal sent to the loudspeaker output, that microphone channel has positive room gain. The more positive the room
gain, the harder the AEC must work to determine which signal is an echo and which
is a local speech signal.
Excessive room gain can be caused through a number of mechanisms:
1. The most common is excessive amplification of the remote (reference) signal at
the local loudspeaker output. This may be explained as follows. If the reference
signal is too low coming into the EF2280, i.e. the codec audio signal is too low,
the room audio amplifier is usually used to compensate and bring the room audio
to an acceptable level. For example, if the reference signal is 12 dB too low, the
room audio will need to be amplified by approximately 12 dB to bring it to a reasonable listening level. This adds 12 dB to the room gain, which will most likely
cause it to exceed the amplifier room gain limit (See “Verify Room Gain” on
page 13). This situation can be remedied by applying enough gain to the codec,
phone or program audio inputs (Inputs A-D) which will make up the Reference
input signal so that the acoustic echo canceller (AEC) sees a good reference signal rather than trying to compensate at the amplifier.
2. Another common cause of room gain failure is excessive microphone amplification. For example, if a microphone is "hot" by 6 dB, then the reflections of the
loudspeaker output signal which are picked up by the microphone will be amplified by 6 dB more than necessary. This adds 6 dB to the room gain, which may
be sufficient to cause room gain problems. This situation could easily arise if, for
example, the conferencing equipment is set up so that participants are too far
from the microphone. In such a situation, after correct microphone setup the
local microphone audio level may be too low because of the distance from the
© Polycom, Inc. 39 VORTEX EF2280 Reference Manual
Page 42

TROUBLESHOOTING
talker to the microphone. The microphone audio will most likely also be muddy
and reverberant. The installer or user may try to solve these microphone audio
quality problems by turning up the microphone amplification, thus adding to the
room gain. This problem can be remedied by proper microphone selection
(pickup pattern, directionality) and placement, coupled with proper microphone
input calibration.
3. A third common cause of room gain problems is excessive coupling between
loudspeaker audio and microphones. This can be addressed by reducing the
microphone coupling, either by positioning microphones so that their pickup patterns are biased away from the loudspeaker audio (and direct reflections of loudspeaker audio), repositioning loudspeakers, or reducing the loudspeaker
amplification.
In summary, any amplification applied between the reference input and the microphone inputs can add to room gain problems. To avoid problems, ensure that the Reference input signal is not too low, and the microphone input signals are not too high.
Run the built-in EF2280 Room Gain test to verify that you do not have room gain
problems (See “Verify Room Gain” on page 13).
C
OMMON CAUSES OF EXCESSIVE
R
OOM GAIN
REMEDY
In-Conference
Quick Check
Excessive remote (reference) input
amplification
Excessive microphone amplification Select proper microphones for talker
Excessive coupling between loudspeaker audio and microphones
Table 4: Summary of Excessive Room Gain.
If you experience residual echo problems during a conference, you can quickly check
that the reference and microphone levels are calibrated and not causing room gain
problems by using the Room Gain parameter (See “Verify Room Gain” on page 13).
If this excessive coupling activity level is evident on only one microphone input channel, that microphone channel should either be redirected to reduce coupling to loudspeaker audio, or recalibrated as it will need to be turned down. If the excessive
coupling activity is observed on all (or most) microphone channels, then this indicates
either that the room audio is too loud or the reference signal may need to be recalibrated (this will be indicated by observing low activity levels on the S
M
ETER).
Apply enough gain to the codec, phone
or program audio inputs which will
make up the Reference input signal.
distance according to pickup pattern
and directionality and properly calibrate mic inputs.
Reduce mic coupling by repositioning
mics or loudspeakers, or by reducing
loudspeaker amplification.
IGNAL LEVEL
Excessive
Microphone
Amplification
VORTEX EF2280 Reference Manual 40 Technical Support: 800.932.2774
For the EF2280 to adapt effectively, saturation (overload or clipping) must not occur
at the A/D converter supplying the microphone input. Saturation introduces nonlinear signal distortions into what the AEC expects is a linearly echoed version of the
remote speech.
Page 43

TROUBLESHOOTING
Nonlinear distortion causes a degradation or divergence of the AEC’s internal model
of the room acoustics. In this situation, the EF2280 cannot effectively cancel room
echoes and a substantial amount of echo may be heard by the remote party.
Excessive microphone amplification also increases room gain (See “Excessive Room
Gain” on page 39.). You can check for excessive microphone amplification by
observing the front panel L
yellow LED should illuminate frequently. If the second yellow LED is illuminated
constantly during normal speech or if the red LED illuminates or even flickers, reduce
the microphone input level.
EVEL INDICATOR during a normal conference. The first
Note. Before you readjust the microphone input levels, check to
make sure you are looking at the correct channel on the L
I
NDICATOR.
EVEL
Note. If you adjust the MIC/LINE INPUT level, you will affect the
room gain. Check to make sure that the room gain limit is not
exceeded. See “Verify Room Gain” on page 13.
Insufficient
Microphone
Amplification
Grossly insufficient microphone gain degrades EF2280 performance and weakens the
out-bound speech power level. This has the effect of reducing the signal-to-noise
ratio of the microphone signal, which is analogous to raising the background noise
level in the room. Because this noise is uncorrelated with the echoes within the room,
the EF2280’s ability to adapt and cancel echoes will be less than optimal.
A second effect of insufficient microphone gain is that the power of the microphone
input signal may be substantially lower than that of the remote input signal. This
reduces the ability of the decision logic to determine whether the AEC should be in
transmit, receive, or double-talk mode. This effect may reduce the effectiveness of
the EF2280 in canceling echoes.
You can check for insufficient microphone amplification by observing the front panel
L
EVEL INDICATOR during normal conferencing conversation. The first yellow LED
should illuminate frequently. If the L
or two green LEDs during normal speech, increase the microphone’s input level.
EVEL INDICATOR never illuminates beyond one
Note. Before you readjust the microphone input levels, check to
make sure you are looking at the correct channel on the L
I
NDICATOR.
EVEL
Note. If you adjust the MIC/LINE INPUT level, you will affect the
room gain. Check to make sure that the room gain limit is not
exceeded. See “Room Gain” on page 38.
Nonlinearity Overdriving the loudspeaker or inserting a dynamics processor before the EF2280
may distort the signal that the microphones see causing ineffective AEC operation.
The EF2280 relies on the linearity of the acoustic feedback path — D/A, amplifier,
loudspeaker, microphone, and A/D — to cancel acoustic echoes. If you overdrive the
loudspeaker or insert a dynamics processor before the echo canceller, the acoustic
reflections picked up by the microphone do not match the signal fed to the loudspeaker. They are distorted copies of this signal. The EF2280 cannot effectively cancel this distorted signal.
© Polycom, Inc. 41 VORTEX EF2280 Reference Manual
Page 44

If you suspect the loudspeaker is introducing nonlinearities into the room acoustic
path, take these steps to minimize its influence on the echo canceller.
• Keep the loudspeaker’s volume level at less than three-eighths of full scale. If
higher volume is required, the EF2280 should operate effectively at volume settings of up to 50 percent of full scale. At more than 50 percent, most audio systems and loudspeakers introduce significant nonlinearities. The EF2280 may not
adapt under these conditions, and echoes may be heard.
• If the loudspeaker has a bass control, lower it. Excessive bass can cause a boomy
effect that is nonlinear. In addition, excessive bass may cause substantial
mechanical coupling to the microphone through vibrations induced in the housings and support structures.
• Increase the separation distance between microphones and the loudspeaker. The
EF2280 handles up to 10 dB of room gain between the loudspeaker and the
microphone. You may be exceeding this limit if the loudspeaker is pointed
directly at the microphones or if the loudspeaker volume is excessive (loudspeaker placement is not critical, but it should not be pointed directly at the
microphones).
C
ONTACTING TECHNICAL SUPPORT
TROUBLESHOOTING
If these troubleshooting guidelines don’t resolve the problem you are experiencing
with the EF2280, please check our web site (http://www.aspi.com) for the most current technical support information (go to Technical Resources, then to Technical Support). If you have further questions, please contact us at:
Applications Engineering
Polycom Installed Voice Business Group
1720 Peachtree Street NW Suite 220
Atlanta, GA 30309-2439
Phone: (800) 932-2774
Fax: (404) 892-2512
Email: vortex@polycom.com
Before contacting us, please review the warranty and repair policy on page 52.
Trademark Notice: Vortex® is a registered trademark of Polycom, Inc. All Rights Reserved.
VORTEX EF2280 Reference Manual 42 Technical Support: 800.932.2774
Page 45

TECHNICAL SPECIFICATIONS
T
ECHNICAL SPECIFICATIONS
M
ECHANICAL SPECIFICATIONS
Dimensions 19” (483 mm) W x 9.6” (244 mm) L x 1.75” (45 mm) H (full rack unit)
Weight 4 lb. (1.8 kg) dry
5.5 lb. (2.5 kg) shipping
Connectors Audio: Mini (3.5mm) quick connect terminal blocks
RS-232: DB9F
EF Bus In/Out: RJ45
ASPI Bus: RJ45
Control/Status: DB25F
E
LECTRICAL SPECIFICATIONS
Power 110 - 240 VAC; 47-63 Hz
Power Consumption 25 W
Phantom Power 24 V, software selectable
A
UDIO I/O
Microphone Input Level -30 dBu to 0 dBu/-66 dBu to -33 dBu, nominal; software selectable
Line Input Level -20 dBu to 0 dBu, nominal; software selectable
Line Output Level -20 dBu to 0 dBu, nominal; software selectable
Input Impedance 10 kOhms
Output Impedance 50 Ohms (drives 600 Ohms)
Headroom 20 dB, nominal
P
ERFORMANCE SPECIFICATIONS
Frequency Response 20 Hz to 22 kHz
Acoustic Echo Cancellation Span 270 ms
Total Cancellation > 65 dB
Convergence Rate 40 dB/second
Noise Cancellation 0 dB to 15 dB, software selectable
Control Inputs Contact closure
Status Outputs 5V, 20 mA each
C
OMPLIANCE
The Vortex EF2280 complies with the ITU G.167 Recommendation for AEC, FCC
part 15, and CE requirements.
© Polycom, Inc. 43 VORTEX EF2280 Reference Manual
Page 46

TECHNICAL SPECIFICATIONS
USA and Canada This device complies with part 15 of the FCC Rules. Operation is subject to the
following two conditions:
1. This device may not cause harmful interference, and
2. This device must accept any interference received, including interference that
may cause undesired operation.
NOTE This equipment has been tested and found to comply with the limits for a Class A dig-
ital device, pursuant to part 15 of the FCC Rules. These limits are designed to provide reasonable protection against harmful interference when the equipment is
operated in a commercial environment. This equipment generates, uses, and can radiate radio frequency energy and, if not installed and used in accordance with the
instruction manual, may cause harmful interference to radio communications. Operation of this equipment in a residential area is likely to cause harmful interference in
which case the user will be required to correct the interference at his own expense.
In accordance with part 15 of the FCC rules, the user is cautioned that any changes or
modifications not expressly approved by Polycom Inc. could void the user’s authority
to operate the equipment.
CE Mark – LVD and
EMC Directive
VCCI Class A
This Class [A] digital apparatus complies with Canadian ICES-003.
Cet appareil numérique de la classe [A] est conforme à la norme NMB-003 du Canada.
This Vortex EF2280 has been marked with the CE mark. This mark indicates compliance with EEC Directives 89/336/EEC and 73/23/EEC. A full copy of the Declaration of Conformity can be obtained from Polycom Ltd, 270 Bath Road, Slough,
Berkshire, SL1 4DX, UK.
Rest of World
EMC CLASS A ITE
VORTEX EF2280 Reference Manual 44 Technical Support: 800.932.2774
WA R NI N G
This is a Class A product. In a domestic environment this product may cause radio
interference in which case the user may be required to take adequate measures.
Page 47

TECHNICAL SPECIFICATIONS
Installation
Instructions*
Plug acts as
Disconnect Device*
Installation must be performed in accordance with all relevant national wiring rules.
L’Installation doit être exécutée conformément à tous les règlements nationaux applicable au filage électrique.
The socket outlet to which this apparatus is connected must be installed near the
equipment and must always be readily accessible
© Polycom, Inc. 45 VORTEX EF2280 Reference Manual
Page 48

C
ONFERENCE SYSTEM DESIGN
Good audio or video conferencing is more than acoustic echo cancellation. Before
installing the EF2280, you should consider how your whole conference system will
work together. The goals of conference system design are the following:
• Transmit intelligible speech
• Reproduce received speech intelligibly
• Prevent echoes
• Interface properly with transmission equipment
• High quality program audio
• Intelligible sound reinforcement (if needed)
CONFERENCE SYSTEM DESIGN
Noise and
Reverberation
Intelligibility can be affected by noise and reverberation. Noise comes from various
sources such as HVAC, computers, projectors, or traffic. Some ways to improve the
Signal to Noise Ratio (SNR) in your system include placing microphones closer to the
talkers, using electronic noise cancellation, and applying acoustical treatments. The
EF2280 is a great way to reduce noise in your system and improve the SNR. Polycom’s patent pending noise cancellation algorithm, included in the EF2280, removes
up to 10 dB of ambient background noise and improves perceived quality as well as
intelligibility.
Reverberation in a conference system can reduce intelligibility in a room. To reduce
reverberation and increase intelligibility, use directional microphone and loudspeakers, place microphones closer to the talker, and use acoustical treatment.
Consider Room Gain When planning your conferencing system, you should also consider the room gain
that will occur as a result of your microphone and loudspeaker placement. Room gain
refers to the relative level of the audio going to your amplifier (remote end speech or
telephone speech) and the level of this audio being picked up by the microphone. We
recommend a room gain of 0 dB or less for the best results. But for difficult acoustic
environments, the EF2280, as well as any of the EF products, can handle up to 10 dB
room gain, which means that it offers great flexibility in your conference system
design.
To help you measure room gain, the EF2280 includes a room gain detector. You
should check your room gain after you have set up the EF2280.
A
AEC
B
Room Gain = 20 log (B/A)
Figure 29. Room Gain.
VORTEX EF2280 Reference Manual 46 Technical Support: 800.932.2774
Page 49

EF2280 BLOCK DIAGRAM
EF2280 B
Output D
Output C
Output B
Output A
Output 8
Output 7
Output 6
Output 5
Output 4
Output 3
Output 2
Output 1
Line
Line
Line
Line
Line
Line
Line
Line
Line
Line
Line
Line
LOCK DIAGRAM
+-
+-
+-
+-
+-
+-
+-
+-
+-
+-
+-
+-
Delay
Delay
Delay
Delay
Delay
Delay
Delay
Delay
Delay
Delay
Delay
D/A D/AD/AD/AD/AD/AD/AD/AD/AD/AD/AD/A
Delay
PEQ
PEQ
PEQ
PEQ
PEQ
PEQ
PEQ
PEQ
PEQ
PEQ
PEQ
PEQ
RS-232
ASPI Bus
Control/Status
EF Bus
PEQ
PEQ
PEQ
PEQ
EN
EN
Matrixing
EN
EN
EN
EN
EN
EN
A/D
Level
A/D
Level
A/D
Level
A/D
Level
A/D
Level
A/D
Level
A/D
Level
A/D
Level
A/D
Level
A/D
Level
A/D
Level
A/D
Level
+-
+-
+-
+-
Input D
Input C
Input B
Input A
Gated
Ungated
Parameters
Line
adjust
Line
adjust
Line
adjust
Line
adjust
+-
adjust
Mic/Line
Phantom
Mic/Line 8
On OffOn OffOn Off
+-
+-
+-
Mic/Line 7
Mic/Line 6
Mic/Line 5
PEQ GateMute
Parameters
AGC
adjust
Mic/Line
Phantom
adjust
Mic/Line
Phantom
adjust
Mic/Line
Phantom
+-
adjust
Mic/Line
Phantom
Mic/Line 4
Noise
Canceller
+-
+-
+-
Mic/Line 3
Mic/Line 2
Mic/Line 1
EN (Echo Canceller, Noise Canceller)
Echo
Canceller
EC1, EC2, Bus
adjust
Mic/Line
Phantom
adjust
Mic/Line
Phantom
adjust
Mic/Line
Phantom
Figure 30. Inside the EF2280
Trademark Notice: Vortex® is a registered trademark of Polycom, Inc.
© Polycom, Inc. 47 VORTEX EF2280 Reference Manual
Page 50

C
L
L
ONNECTOR PINOUTS
EF BUS IN
81
EF BUS OUT
CONNECTOR PINOUTS
EF Bus
The EF Bus uses RJ45 connectors. These should be
used with category five twisted-pair cable.
The total distance of the EF Bus should be less than
4 m.
81
The EF Bus must be connected so that the EF Bus In
of one box is connected to the EF Bus Out of
another. Connecting the EF Bus In to another EF
Bus In (or Out to Out) will not work.
Cat-5 Plug Pinout
18
Cat 5 Plug
(Front View)
ASPI BUS
REMOTE CONTRO
REMOTE CONTRO
RS-232
1 - White/Orange
2 - Orange
3 - White/Green
4 - Blue
5 - White/Blue
6 - Green
7 - White/Brown
8 - Brown
ASPI Bus
The ASPI Bus uses RJ45 connectors. These should
be used with category five twisted-pair cable.
The total distance of the ASPI Bus should be less
than 15 m.
RS-232 Port (9600 8-N-1)
The RS-232 port is wired as DCE. It accepts a male
DB-9 connector. Only pins 2, 3, and 5 are required
15
69
by the EF2280
Connect pins straight through (do not use null
®
but pins 7 and 8 are supported.
modem).
1 DCD; 2 TXD; 3 RXD 4 DSR; 5 ground; 6 DTR; 7
CTS; 8 RTS; 9 No connection
VORTEX EF2280 Reference Manual 48 Technical Support: 800.932.2774
Page 51

INPUT
25 14
REMOTE CONTROL
OUTPUT
5, 15 VDC 5, 12 VDC
15
1
3
4
5
2
CONNECTOR PINOUTS
Input/Output Remote Control Port
113
Logic Input: Pins 1-24 are inputs 1-24, respectively. Pin 25 is ground.
Logic Output: Pins 1-20 are outputs 1-20, respectively. Pins 21-25 are ground. Each ground pin
should be used with only 4 outputs. For example,
outputs 1-4 could be connected to LEDs, which are
connected to ground pin 1.
LEDs can be used without series resistors (we have
provided series resistors in the circuitry). For best
results, LEDs with Vf=2.0 V and If=20 mA should
be used. Larger values may be used, but may result
in dimmer LEDs. An LED with Vf less than 1.4 V
should not be used without additional series resistance.
Power Supply Input
The power supply input accepts a 5-pin DIN male
connector. Only use the power supply provided by
Polycom. Use of other power supplies will void the
warranty.
1 Ground; 2 Ground; 3 +5Vdc @ 3 A; 4 -15Vdc @
0.3 A; 5 +15Vdc @ 1.2 A
Mic/Line Inputs, Line Inputs, Line Outputs
These audio connectors accept a mini (3.5 mm) 3
conductor terminal block (provided). See Note
below for manufacturer information.
From left to right the conductors are positive signal,
negative signal, and shield ground.
Note The information below lists manufacturer information for the Phoenix connector that
is compatible with the parts we use:
Manufacturer: Phoenix Contact
Description: Mini-COMBICON 3-position plug, 3.5 mm pitch
Type Number: MC 1.5/3-ST-3.5 or MC 1,5/3-ST-3,5
Part Number: 1840379
For proper operation, a ferrite should be positioned on control and data cables.
© Polycom, Inc. 49 VORTEX EF2280 Reference Manual
Page 52

C
ONNECTING UNBALANCED
RCA TO B
ALANCED
M
INI PHOENIX
CONNECTOR PINOUTS
RCA Male
Tip
Red
Black
Ring
Figure 31. Cable construction for connecting unbalanced RCA to balanced mini Phoenix (3 conductor terminal
block).
1. Connect RCA Tip to Phoenix pin 1.
2. Connect RCA Ring to Phoenix pin 2.
3. Connect Phoenix pin 3 to Shield, and leave Shield floating on RCA end.
Mini (3.5 mm) Phoenix
+
Red
Black
-
Shield
Caution! Do NOT connect the shield at both ends.
Caution! On the EF2280, Phoenix pin 3 is connected to
chassis ground. Under no circumstances should
Phoenix pin 3 be connected to pin 1 or to pin 2.
Doing so will add noise to the audio signal.
M
AKING AN
EF BUS T
ERMINATOR
1
2
3
12345678
110 Ω
Figure 32. The EF2280 terminator
Instructions To make a EF2280 terminator, use an RJ45 connector. Connect pin 3 to pin 6 with an
110 Ohm resistor.
VORTEX EF2280 Reference Manual 50 Technical Support: 800.932.2774
Page 53

A
DDITIONAL NOTES
Caution! Failure to use all four screws to attach the EF2280 to
Caution! Ensure that the power supply is securely located such
Caution! When mounting a EF2280 in a rack, consideration
Caution! Consideration should be given to the connection of
Caution! Reliable earthing of rack-mounted equipment should
CONNECTOR PINOUTS
the rack may result in uneven loading and cause a
safety hazard.
that it cannot become dislodged and fall. Such a fall
could cause personal injury or equipment failure.
should be given to airflow and operating ambient
temperatures inside the rack. T o ensure safe operation
of the EF2280, ambient operating temperatures inside
the rack should not exceed 40 degrees Celsius. Allow
2 inches (51mm) of open space in front of the
EF2280, 2 inches (51mm) on either side, and 4 inches
(102 mm) behind the unit for proper ventilation.
Equipment should not be installed in the rack in such
a way as to interfere with the ventilation of the
EF2280.
the equipment to the supply circuit and the effect that
overloading of circuits could have an overcurrent protection and supply wiring. Appropriate consideration
of equipment nameplate ratings should be used when
addressing this concern.
be maintained. Particular attention should be given to
supply connections other than direct connection to
the Branch (use of power strips).
© Polycom, Inc. 51 VORTEX EF2280 Reference Manual
Page 54

WARRANTY INFORMATION
W
ARRANTY INFORMATION
What is covered Any defect in materials or workmanship.
For how long Two years.
What we will do If your Polycom EF2280 product is defective and returned within two years of the
date of purchase, we will repair or, at our option, replace it at no charge to you.
If we repair your Polycom EF2280 product, we may use new or reconditioned
replacement parts. If we choose to replace your Polycom EF2280 product, we may
replace it with a new or reconditioned one of the same or similar design. The repair or
replacement is warranted for either (a) 90 days or (b) the remainder of the original
two-year warranty period, whichever is longer.
Limitations Polycom shall not be responsible for special, incidental, indirect, or consequential
damages resulting from any breach of warranty, or under any other legal theory,
including but not limited to loss of profits, downtime, goodwill, damage to or replacement of equipment and property, and any cost of recovering, reprogramming, or
reproducing any program or data stored in or used with Polycom EF2280 products.
Some states do not allow limitations on how long an implied warranty lasts, or the
exclusion of incidental or consequential damages, so the above exclusions or limitations may not apply to you.
What we ask you to
do
Trademark Notice: Vortex® is a registered trademark of Polycom, Inc. All Rights Reserved.
To obtain warranty service for your Polycom EF2280 product, call us at (800) 9322774 or fax us at (404) 892-2512 and we will issue a Return Material Authorization
number (RMA#). Use the original packaging materials to return the product. Ship the
product prepaid to:
Polycom Installed Voice Business Group
Attention: Warranty Repair
RMA# (Must be on package)
1720 Peachtree Street NW, Suite 220
Atlanta, Georgia 30309-2439 USA
Please be sure to include your name, company, address, phone number, and a description of the problem. After repairing or replacing your Polycom EF2280 product, we
will ship it to you via a surface carrier of our choice at no cost to you. If you wish it
shipped via a specific carrier at your cost, you must arrange it when you obtain the
RMA#.
Repair or replacement of your Polycom EF2280 product is your exclusive remedy.
VORTEX EF2280 Reference Manual 52 Technical Support: 800.932.2774
Page 55

WARRANTY INFORMATION
What this warranty
does not cover
No User Serviceable
Parts
This warranty does not cover defects resulting from accidents, damage while in transit to our service location, alterations, unauthorized repair, failure to follow instructions, misuse, fire, flood, lightning, acts of God, or use in those countries where such
use violates Part 779 of the Export Administration Regulations of the United States
Department of Commerce.
If your Polycom EF2280 product is not covered by our warranty, call us at (800) 9322774 or fax us at (404) 892-2512 for advice about whether we will repair your Polycom EF2280 product and for other repair information, including charges. Polycom, at
its sole discretion, may replace rather than repair your Polycom EF2280 product with
a new or reconditioned one of the same or similar design. The repair or replacement is
warranted for 90 days.
The limited warranties and remedies set forth above are exclusive and in lieu of all
other warranties, whether oral or written, express or implied. Polycom specifically
disclaims any and all implied warranties, including, without limitation, the warranties
of merchantability and fitness for a particular purpose.
This product contains no user serviceable parts. Please contact Polycom Installed
Voice Business Group for repairs. Attempts to repair this product by an unauthorized
technician will void your warranty.
State Law Rights This limited warranty gives you specific legal rights, and you any have other rights
that may vary from state to state.
© Polycom, Inc. 53 VORTEX EF2280 Reference Manual
Page 56

DEFINITION OF TERMS
D
EFINITION OF TERMS
Acoustic Echo Acoustic echo occurs in a conferencing or distance learning system when the remote
speech played in the loudspeakers is picked up by microphones in the room and is
transmitted back to the remote end. This transmitted signal is a delayed version of the
original, which causes the echo.
Acoustic Gain Acoustic gain is a term used in conjunction with sound reinforcement. It refers to
how much louder the audio is with sound reinforcement compared to without sound
reinforcement.
Ambient Level The ambient level, also referred to as noise floor, is the background noise heard in a
room when no one on the near or remote end is talking.
The ASPI Bus The ASPI bus is used to link EF devices for RS-232 control using a single controller,
such as a touch panel or PC.
Automatic Gain
Control (AGC)
Automatic
Microphone Mixer
Automatic gain control increases or decreases the gain on an audio signal to an
acceptable value.
A microphone mixer that turns microphone channels on and off based on the signal
level going into the microphone.
Convergence Rate Convergence rate refers to the amount of echo a line or acoustic echo canceller can
cancel per unit time, typically expressed in dB/sec. Better echo cancellers have a
higher (faster) convergence rate. This term is typically used to quantify the time it
takes to completely remove the echo from a conferencing system. Echo occurs due to
a complete change of the acoustic environment such as the beginning of a phone call
in a conference, a change of microphone-speaker placement, or speaker volume
adjustment.
Crosspoint Mix
Minus Bus
A mix minus bus allows each device (i.e., a EF2280 unit) to create a mix of signals
without its own. Each device in the system can create four mixes (W, X, Y, and Z)
and place them on the bus. Each device also can create three mixes each from the W,
X, Y, and Z busses of the other devices (for a total of 12 mixes). One mix is hardwired as a normal mix minus. That is, it is a unity gain mix of the signals from all
other devices. The other two mixes can have crosspoint gains on the signals from the
other devices.
VORTEX EF2280 Reference Manual 54 Technical Support: 800.932.2774
Page 57

DEFINITION OF TERMS
Echo Canceller An echo canceller estimates the echo in an audio signal by using a reference and pre-
forms processing to eliminate the echo from the signal.
EF Bus The EF Bus is a digital bus that includes the W, X, Y, and Z audio busses as well as
the echo canceller reference and remote control information. It can be used to link
multiple EF2280 devices.
Equalization Equalization is the process of adjusting frequency characteristics of an audio signal.
Line Echo Line echo is caused by reflections of the audio signal from the telephone hybrid. The
EF200 Phone Add is an example of a unit that has a line echo canceller.
Macros An arbitrary set of commands that can be replayed.
Matrix Mixer A matrix mixer allows you to choose which inputs are included in each output. Some
matrix mixers allow you to assign crosspoint gains to the inputs.
Noise Cancellation Noise cancellation is a digital signal process that removes noise from an audio signal
corrupted by real-world interferences such as HVAC, office noise, crowd noise, or
road noise. Generally, there are two parts of a noise cancellation algorithm: a method
to detect the noise and a method to remove the noise. The Polycom noise cancellation
algorithm (patent pending) is capable of removing 10 dB or higher of noise with no
degradation at all to the resulting speech signal. This method does not attenuate
speech, and removes noise during both speech and idle periods.
NOM NOM refers to the number of open microphones in a system.
NOM Attenuation NOM attenuation is the gain applied to the overall system gain to the microphone sig-
nals to compensate for how many microphones are open. The amount of attenuation
is calculated by 10*log
(NOM).
10
NOM Bus A NOM bus carries signal information as well as NOM information (i.e., the number
of open microphones in the system, NOM).
Presets Presets correspond to configuration parameters that have been previously saved to
EEPROM.
© Polycom, Inc. 55 VORTEX EF2280 Reference Manual
Page 58

DEFINITION OF TERMS
Room Gain The room gain of a conferencing system refers to the relative levels of the signal sent
to the line output to your amplifier (before any amplification) and the level of this signal that is reflected at the microphone input (after microphone amplification). If the
electrical level of the reflected signal picked up by the microphone is the same as the
level of the electrical signal sent from the AEC to the line output to your amplifier,
the room gain of this microphone channel is said to be 0 dB. If the reflected signal
picked up by the microphone is higher than the level of the signal sent to the line output to your amplifier, that microphone channel has positive room gain. The more
positive the room gain, the harder the AEC must work to determine which signal is an
echo and which is a local speech signal.
VORTEX EF2280 Reference Manual 56 Technical Support: 800.932.2774
Page 59

INDEX
A
ASPI Bus 3, 6, 9, 11, 43, 48, 54
Automatic Gain Control (AGC) 3, 30, 54
Automixer, Automatic Microphone Mixer 2, 3, 20, 32, 54
C
Calibration 15
Compliance 43
D
Digital Bus 2, 3, 24, 55
E
Echo Cancellation 2, 3, 31, 43, 46
EF Bus 6, 9, 10, 23, 24, 31, 43, 48, 55
EF Bus Reference 24, 29
EF200 Phone Add 4, 9, 10, 55
Equalization 55
Equalizer 3
F
Factory Default 11
G
Ground 48, 49
Grounding 7
I
Inputs 2, 3, 5, 6, 7, 9, 15
L
LCD Menu 3, 5, 15, 18, 26
Link, Linked 3, 23, 29, 55
M
Matrix, Matrix Mixer 2, 3, 23, 34
Mix Minus 24, 54
N
Noise Cancellation 2, 3, 30, 43, 46, 55
NOM 24, 31, 55
NOM Attenuation 55
NOM Bus 24, 55
O
Outputs 13, 31
P
Parallel Remote Control 3, 6
Phantom Power 6, 15, 31, 43
Phoenix Connectors 3, 4, 7, 9, 49
Pin 1 Compatible 7
R
Reference, AEC 2, 9, 17–18, 24, 31, 55
Remote Control. See RS-232, Serial Remote Control or Parallel Remote Control.
INDEX
© Polycom, Inc. 57 VORTEX EF2280 Reference Manual
Page 60

Reverberation 46
Room Gain 13, 38, 56
RS-232, Serial Remote Control 3, 4, 6, 9, 15, 24, 27, 30, 43, 48
S
Signal Generator 2, 3
INDEX
VORTEX EF2280 Reference Manual 58 Technical Support: 800.932.2774
Page 61

Page 62

Polycom, Inc.
Installed Voice Business Group
1720 Peachtree Street NW, Suite 220
Atlanta, GA 30309-2439
Phone: (800) 932-2774, (404) 892-3200
Fax: (404) 892-2512
www.polycom.com
Technical Support:
(800) 932-2774
vortex@polycom.com
Polycom
ous countries. Copyright © 2002 Polycom, Inc. All rights reserved.
1725-80012-001 Rev B
®
, Vortex®, and the Polycom logo are registered trademarks of Polycom, Inc. in the United States and vari-
*1725-80012-001-B*
 Loading...