

Page 1

VIU-323 Terminal Adapter
User Guide
P/N 61421-00005 Rev A
Page 2

Page 3

Notice
© 2000 RADVision Ltd
RADVision Ltd. and are protected by United States copyright laws, other applicable copyright
laws and international treaty provisions. RADVision Ltd. retains all rights not expressly
granted.
No part of this publication may be reproduced in any form whatsoever or used to make any
derivative work without prior written approval by RADVision Ltd.
No representation of warranties for fitness for any purpose other than what is specifically
mentioned in this guide is made either by RADVision Ltd. or its agents.
RADVision Ltd. reserves the right to revise this publication and make changes without
obligation to notify any person of such revisions or changes. RADVision Ltd. may make
improvements or changes in the product(s) and/or the program(s) described in this
documentation at any time.
If there is any software on removable media described in this publication, it is furnished
under a license agreement included with the product as a separate document. If you are
unable to locate a copy, please contact RADVision Ltd. and a copy will be provided to you.
Unless otherwise indicated, RADVision registered trademarks are registered in the United
States and other territories.
Microsoft and Windows are registered trademarks of the Microsoft Corporation. Other brands
and their products are trademarks or registered trademarks of their respective holders and
should be noted as such.
VIU-323 Terminal Adapter version 2.0 User Guide Ed.2, February 2000.
. All intellectual property rights in this publication are owned by
RADVision Ltd.:
24 Raul Wallenberg
Tel Aviv 69719, Israel
Tel: +972-3-645-5220
Fax: +972-3-647-6669
Video: +972-3-648-9010
email: support@tlv.radvision.com
http://www.radvision.com
RADVision Inc.:
575 Corporate Drive
Mahwah, NJ 07430, USA
Tel: (201) 529-4300
Fax: (201) 529-3516
Video: (201) 529-3714, (201) 529-1906
email: support@radvision.com
Page 4

Page 5

Contents
About this User Guide
Finding Specific Information vii
Conventions viii
Year 2000 Compliance viii
Introducing the VIU-323
Introducing the VIU-323 1-1
VIU-323 Features 1-1
VIU-323 Physical Description 1-2
Front Panel 1-2
Rear Panel 1-3
Overview
The OnLAN 323 Product Series 2-1
OnLAN 323 Product Collaboration 2-2
VIU-323 and L2W-323 Gateway 2-2
VIU-323 and MCU-323 2-3
An Introduction to H.323 2-4
What is the H.323 Standard 2-4
H.323 Network Components 2-4
Installing the VIU-323
Package Contents 3-1
Site Considerations 3-1
Physical Location 3-3
Cables 3-3
Power Connection 3-4
LAN Connection 3-5
Connecting the Y-Cable 3-5
Connecting to the Console Port 3-6
Next Step: Configuration 3-8
i
Page 6

Contents
Preparing for Configuration
Planning the Configuration 4-1
Prerequisites 4-1
Configuration PC Requirements 4-3
Installing the Configuration Software 4-3
Upgrading the Configuration Software 4-3
Navigating the Configuration Software Screens 4-4
Configuration
Configuration Checklist 5-1
Configuring the VIU-323 5-1
Setting IP Addresses via a Terminal Session 5-1
Running OnLAN Configure 323 5-1
Selecting the VIU-323 for Configuration 5-2
Setting Unit Identification Parameters 5-7
Setting Network Parameters 5-8
Setting LAN Port Parameters 5-9
Setting Dialing Parameters 5-11
Saving VIU-323 Configuration Parameters 5-12
After Configuration 5-14
Making Calls with the VIU-323
Setting up a Call 6-1
Bandwidth 6-1
Basic Dialing 6-2
Dialing Examples 6-2
Changing Outgoing Bandwidth 6-4
Why Change the Default Outgoing Bandwidth? 6-4
How to Change the Bandwidth 6-5
Dialing Examples 6-6
Changing Incoming Bandwidth 6-7
Why Change the Default Incoming Bandwidth of the Remote VIU-323? 6-9
How to Change the Default Bandwidth 6-9
Dialing Examples 6-9
Changing Both Incoming and Outgoing Bandwidth 6-10
ii
Page 7

Upgrading the VIU-323
Upgrading the VIU-323 Software 7-1
Installing the Software Upload Utility on the Configuration PC 7-1
Uploading the New VIU-323 Software Version 7-2
Monitoring the VIU-323
Monitoring the VIU-323 8-1
Accessing the Diagnostic Menus 8-1
Prerequisites 8-2
Modem Connection 8-3
Using the Diagnostics Menus 8-3
Tips and Troubleshooting
LED Indications 9-1
Common Problems 9-1
Analyzing Problems 9-2
Network Quick Check 9-2
Verify Component Interactions 9-4
Eliminate the Network 9-4
Network Problems 9-5
IP Address Problems 9-6
Defining IP Addresses via a Terminal Session 9-6
Contents
Cable Connectors and Pin-outs
RJ-45 LAN Port A-1
LAN 10BASE-T RJ-45 Connector A-1
Straight–Through Ethernet Cable A-1
Serial Connector and Null Modem Cable A-1
RS-232 9-pin Male Connector Pin-Out A-2
RS-232 9-pin Female Connector Pin-Out A-2
Null Modem Cable A-3
DCE Mode V.35/RS-366 Y-Cable A-5
V.35/RS-366 Connector Pin-Out A-5
Safety Considerations
iii
Page 8

Contents
Safety Considerations B-1
High Voltage B-1
Grounding B-1
IP Addressing
IP Addressing Scheme C-1
Subnets and Using a Subnet Mask C-2
Hexadecimal Notation C-3
Technical Specifications
Interfaces D-1
Operating Bit Rate D-1
LEDs D-1
Physical Dimensions D-1
Power Supply D-1
Environmental Requirements D-2
Certifications D-2
Glossary
Index
iv
Page 9

Contents
Table of Figures
Figure 1 - VIU-323 front panel................................................................................................... 1-2
Figure 2 - VIU-323 rear panel.................................................................................................... 1-3
Figure 3 - H.320 room system connected to a VIU-323 communicating with an H.320 terminal
on the WAN, via a Gateway...................................................................................... 2-2
Figure 4 - Mixed WAN-LAN multipoint multimedia conference.................................................. 2-3
Figure 5 - Connecting the Y-Cable............................................................................................ 3-6
Figure 6 - Select Unit screen..................................................................................................... 5-2
Figure 7 - Configuration Source screen..................................................................................... 5-3
Figure 8 - Software Version screen ........................................................................................... 5-4
Figure 9 - Change Password screen ......................................................................................... 5-5
Figure 10 - Source list of configuration files for VIU-323 configuration parameters................... 5-6
Figure 11 - Unit Identification screen......................................................................................... 5-7
Figure 12 - Network Parameters screen.................................................................................... 5-8
Figure 13 - LAN Port Settings screen........................................................................................ 5-9
Figure 14 - Dialing Parameters screen.................................................................................... 5-11
Figure 15 - Save Setup screen................................................................................................ 5-13
Figure 16 - Confirm Configuration screen................................................................................ 5-14
Figure 17 - Software Upload Utility screen ................................................................................ 7-2
Figure 18 - Straight-through Ethernet cable ..............................................................................A-1
Figure 19 - Null modem connectors...........................................................................................A-3
Figure 20 - Null modem cable ...................................................................................................A-4
Figure 21 - IP address classes, their identifying bits and the prefix/suffix division.....................C-1
Figure 22 - Class C subnet mask ..............................................................................................C-3
v
Page 10

Contents
vi
Page 11

About this User Guide
This guide provides all the information you need to install, configure and operate the
VIU-323 Video Interface Unit and provides information on product features, utilities and
troubleshooting. The guide is written for network administrators or users with equivalent
network experience and requires familiarity with LAN terminology, interface protocols and
Windows 95/98/NT.
Finding Specific Information
This table shows where to find specific information in this guide.
To see… Go to…
A summary of VIU-323 functions and features Chapter 1
An overview of the OnLAN product line, interoperability, and
H.323
How to install the VIU-323 and connect the VIU-323 to the
LAN
How to set up the configuration PC Chapter 4
How to complete configuration with the configuration utility Chapter 5
How to make calls using the VIU-323 Chapter 6
How to upgrade to a new version of VIU-323 software Chapter 7
Information on the Remote Diagnostics utility Chapter 8
Troubleshooting information Chapter 9
Cable pin-out diagrams, safety information, technical
specifications, IP addressing information, and a list of terms
used in this guide.
Chapter 2
Chapter 3
Appendices and Glossary
vii
Page 12

About this User Guide
Conventions
The following table lists the visual conventions used throughout this guide.
Convention Description
Note:
Warning
Menu commands,
Information note that describes important features or instructions.
Information that alerts you to potential danger to yourself or the
Gateway.
Menu commands, button names and text-boxes appear in bold.
buttons and textboxes
Glossary terms
The first time a Glossary entry appears in the text, it is bolded.
Year 2000 Compliance
For information on the Year 2000 compliance and RADVision products, see the Products
section of the RADVision Web site at http://www.radvision.com/.
viii
Page 13

1
Introducing the VIU-323
This chapter introduces RADVision’s VIU-323 terminal adapter. It covers
the following topics:
Introducing the VIU-323
!
VIU-323 Features
!
VIU-323 Physical Description
!
Page 14

Page 15

Introducing the VIU-323
The VIU-323 is a self-contained terminal adapter that translates between H.320 and H.323
communications protocols. The VIU-323 connects your H.320 videoconferencing system
(“room system” or “group system”) to an IP network (LAN, Internet or intranet) and
provides complete end-to-end interoperability between the room system and all other H.323
devices on the network. By opening up your room system to the previously inaccessible
world of H.323 networking without losing any H.320 functionality, the VIU-323 preserves
and enhances your room system investment.
VIU-323 Features
VIU-323 features include:
!
Interoperates with RADVision’s Gateways, MCU-323, and other H.323 gateways or
endpoints.
!
Supports H.323 Version 2.
!
An RS-232 modem connection port for remote diagnostics.
!
Dialing signals (for incoming calls) and address translation.
!
Session speeds of up to 768 Kbps.
!
One IEEE 802.3 LAN (Ethernet) UTP connection.
!
Dual V.35 DCE interface with RS-366.
!
FECC (Far End Camera Control) support.
!
SNMP-based configuration program.
!
Front panel LED display.
!
Dialing profiles to set bandwidth utilization.
!
Audio: G.711, G.722
!
Video: H.261 CIF and QCIF.
!
T.120 up to High Speed.
1
G.722 support only for rates of 384/768 Kbps.
1
, G.728 (transparent support).
1-1
Page 16
Introducing the VIU-323
VIU-323 Physical Description
The VIU-323 is built in a low-profile unit designed to comfortably fit in the cabinet of your
H.320 videoconferencing system or in a 19-inch rack.
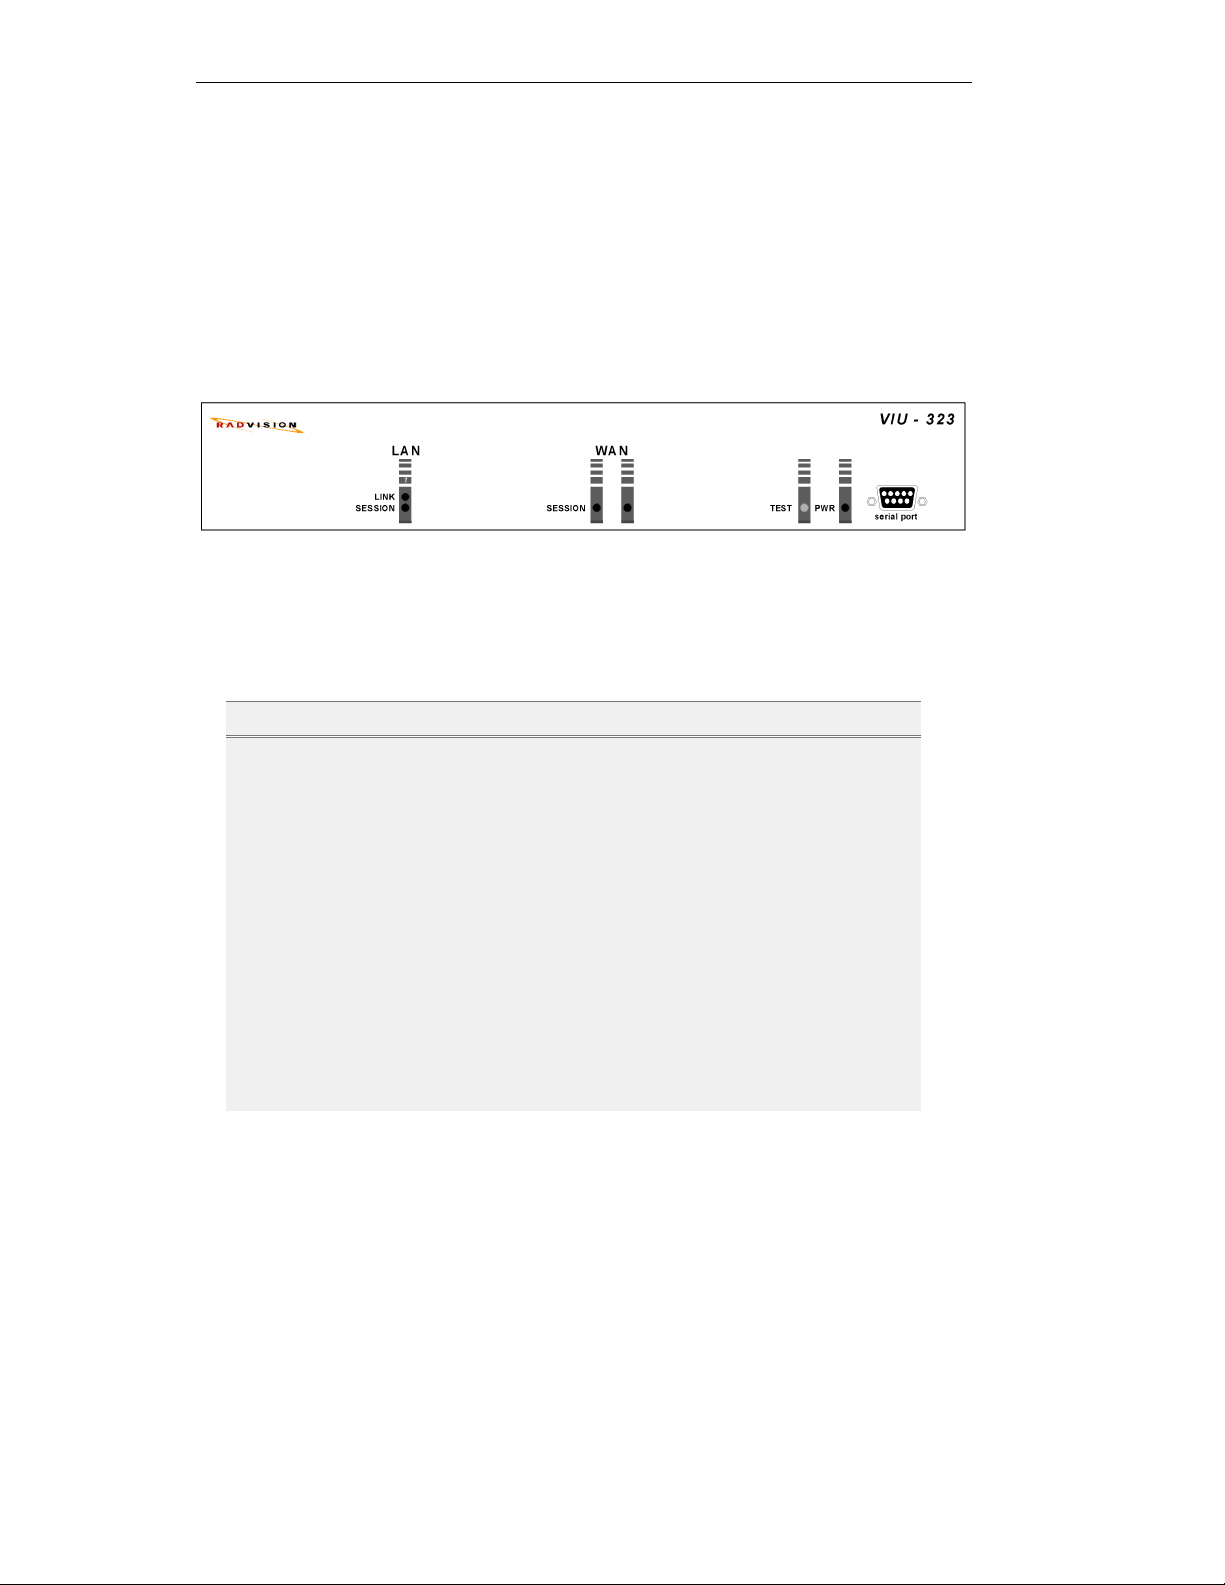
Front Panel
The VIU-323 front panel contains LEDs and an asynchronous RS-232 serial port that you
can connect to a PC or a modem. Use this port to run a terminal session for defining IP
addresses or running diagnostics.
Figure 1 - VIU-323 front panel
LEDs
Front panel LEDs indicate device status and LAN and WAN activity:
LED Color Indicates
Power and Self Test
PWR Green Power is switched on.
TEST Red VIU-323 is powering up or is being
WAN
SESSION (1) Green Indicates videoconferencing activity
SESSION (2) Green Indicates videoconferencing activity
LAN
LINK Green LAN link is present; port is
SESSION Green Indicates videoconferencing activity
configured. This turns off after the
VIU-323 successfully powers up.
for two-channel (2B) calls only.
connected to the network.
on the LAN.
1-2
Page 17

VIU-323 Physical Description
For information on using the LEDs for problem solving, see “LED Indications” in Chapter
9, “Troubleshooting.”
Console Port
You can connect the RS-232 console (serial) port directly to a terminal or to a remote
terminal via modem for diagnostics, monitoring and configuration. The console port has a
female DB9 connector. For information on connecting this port, see “Connecting to the
Console Port” in Chapter 3, “Installing the VIU-323.”
Rear Panel
The VIU-323 rear panel contains one LAN port, two serial ports (to connect the VIU-323 to
the room station), and a power plug with an ON/OF switch.
POWER
Port 1 LAN 1 100-240 VAC
Figure 2 - VIU-323 rear panel
Port 2
LAN Port Connection
This is a 10BASE-T IEEE 802.3 Ethernet connection (RJ-45 socket) which supports a
bandwidth of 10 Mbps.
Serial Ports
Each of the two high-speed 26-pin serial ports (female) connects to a V.35/RS-366 Y-cable,
which connects to a corresponding cable on the room system. Use Port 2 only when running
2B calls. See “Appendix A,” “Cable Connectors and Pin-outs” for details.
Power Socket and Switch
The VIU-323 automatically adjusts to the supply voltage ranging from 100 to 240V AC,
50/60 Hz.
1-3
Page 18

Introducing the VIU-323
1-4
Page 19

2
Overview
This chapter describes the OnLAN 323 product series and specifically
the VIU-323. It covers the following topics:
Overview
!
The OnLAN 323 Product Series
!
OnLAN 323 Product Collaboration
!
An Introduction to H.323
!
Page 20

Page 21

The OnLAN 323 Product Series
The RADVision OnLAN 323 product series provides connectivity for multimedia
applications between IP based networks such as LANs, Intranets and the Internet and circuit
switched networks such as ISDN and PSTN. The OnLAN 323 product series consists of the
L2W-323P Gateway (PRI), L2W-323 Gateway (BRI and V.35), the MCU-323 Multipoint
Conference Unit, the VIU-323 Video Interface Unit and the NGK-100 Gatekeeper. These
“building blocks” allow users to communicate over different networks, products and
protocols.
The L2W-323 Gateway
H.320 protocols, allowing the exchange of voice, video and data between H.323 based
conferencing endpoints on IP networks and H.320-compliant endpoints on circuit switched
ISDN networks as well as Voice over IP (VoIP). Connecting to an ISDN PRI, BRI or V.35
interface, the L2W-323 Gateway provides connections at rates of 384 Kbps, 128 Kbps or 64
Kbps. In conjunction with the internal Gatekeeper, the L2W-323 and L2W-323P Gateways
operate as multimedia PBXs allowing internetwork calls, direct inward dialing and call
transfer.
The MCU-323 Multipoint Conference Unit
only or full multimedia multipoint conferences at rates ranging from 64 Kbps to 1.5 Mbps.
The MCU-323 also provides audio mixing (G.711 A/µ Law), video switching (H.261
CIF/QCIF, voice activated) and simple monitoring of conferences using a web browser.
The VIU-323 Video Interface Unit
Room Systems to IP networks without disrupting the current H.320 capabilities of the
Room System. The VIU-323 translates between the H.323 and H.320 video and audio
streams and respective communication protocols.
The H.323 Gatekeeper
Gateway and the MCU-323 Multipoint Conference Unit. It manages the H.323 network by
enabling address resolution, full call control and supplementary call services such as call
forward and transfer. The H.323 Gatekeeper can be disabled in the L2W-323 Gateway and
in the MCU-323 Multipoint Conference Unit, allowing you to use an external gatekeeper.
NGK-100 Gatekeeper
for production IP telephony and multimedia networks. With the NGK-100 network,
managers can define, control, optimize and manage multimedia conferencing or Voice over
IP calls. The NGK-100 Gatekeeper is H.323 Version 2 compliant.
and the
is an internal component of the L2W-323 Gateway, the L2W-323P
is an external gatekeeper that runs on Windows NT and is designed
L2W-323P Gateway
allows users to spontaneously initiate voice-
is a self-contained terminal adapter that connects H.320
translate between the H.323 and the
2-1
Page 22
Overview
OnLAN 323 Product Collaboration
The VIU-323 together with other OnLAN 323 series products can provide comprehensive
inter-network multimedia conferencing solutions. The following are examples of how the
VIU-323 can collaborate with the L2W-323 Gateway and the MCU-323 Multipoint
Conference Unit.
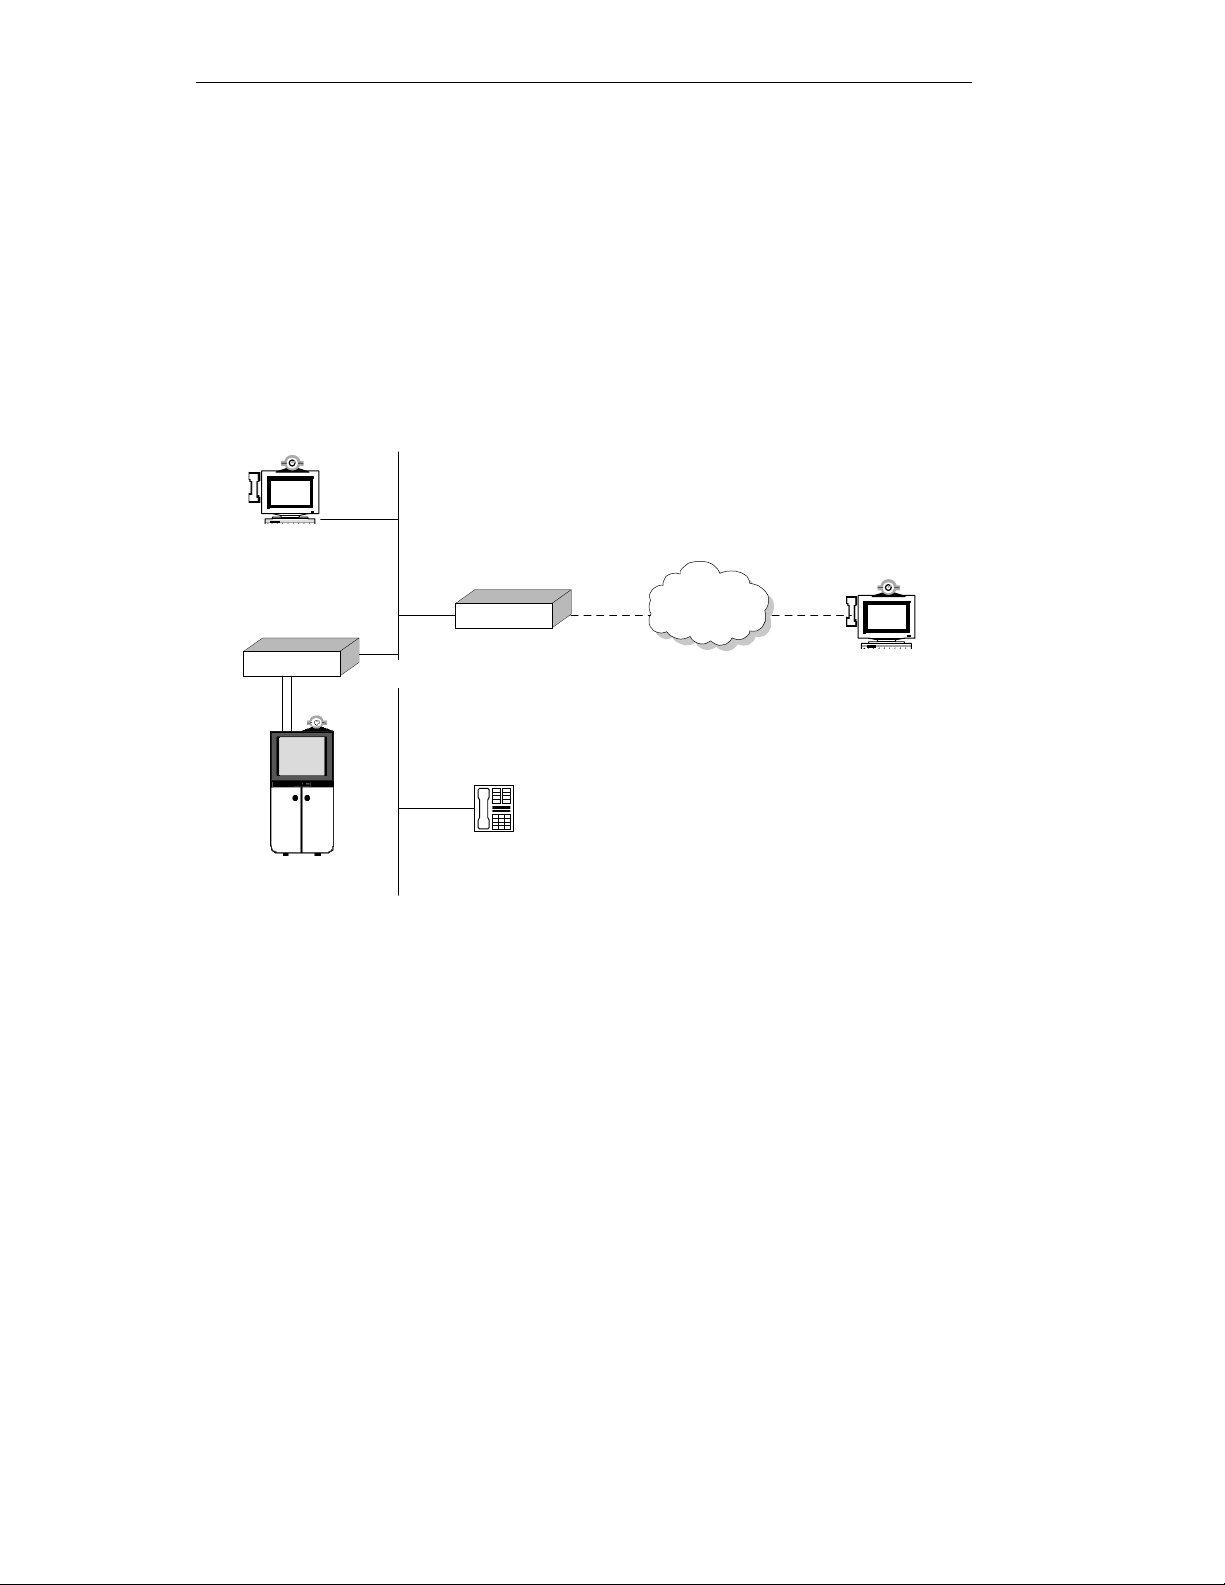
VIU-323 and L2W-323 Gateway
The L2W-323 Gateway enables H.320 room systems connected to the LAN (via a VIU-323)
to communicate with other room systems on a circuit switched network.
H.323
Terminal
L2W-323
Gateway
VIU-323
LAN
V.35 RS-366
IP phone
H.320 Room
System
ISDN
Figure 3 - H.320 room system connected to a VIU-323 communicating with
an H.320 terminal on the WAN, via a Gateway
H.320
Terminal
2-2
Page 23

OnLAN 323 Product Collaboration
VIU-323 and MCU-323
A VIU-323 on a LAN, together with an MCU-323 Multipoint Conference Unit and a
Gateway, can take part in a mixed WAN-LAN multipoint videoconference of three or more
participants.
H.323
Terminal
L2W-323
Gateway
MCU-323
VIU-323
V.35
H.320 Room
System
LAN
RS-366
IP phone
ISDN
Figure 4 - Mixed WAN-LAN multipoint multimedia conference
H.320
Terminal
2-3
Page 24

Overview
An Introduction to H.323
H.323 is the globally accepted standard for audio/video/data communications over IP-based
networks. It specifically describes how multimedia communications occur between user
terminals, network equipment, and assorted services on Local and Wide Area Internet
Protocol (IP) networks.
What is the H.323 Standard
H.323 is an umbrella recommendation from the International Telecommunications Union
(ITU) that specifies real-time multimedia communications over Internet Protocol-compliant
networks. It defines new models of interaction for both point-to-point and multipoint
conferences. For example, H.323 specifies how gatekeepers can provide address translation
and bandwidth management and how gateways can connect terminals on the LAN to those
on the WAN.
H.323 Network Components
The H.323 specification defines a number of new network components that interoperate
with other standards-compliant endpoints and networks by virtue of an H.323/H.32X
gateway.
Following are the network components defined by the H.323 standard:
Terminals
communications. Most H.323 terminals are desktop computers running H.323 compliant
software. All terminals must support voice communications while video and data are
optional. However, if these other media are supported, H.323 specifies what modes of
operation are required so that all terminals supporting video and/or data can work
seamlessly together.
Gateways
conferencing endpoints on the IP network and other ITU-compliant terminals (for example,
H.320 room systems) on other circuit switched networks.
Gatekeepers
providing network administrators the ability to incorporate management and security
policies into the network. Although the H.323 recommendation describes the gatekeeper as
an optional component of a functional H.323 system in practice the gatekeeper is essential.
The H.323 gatekeeper is responsible for providing address translation between LAN aliases
and IP addresses, call control and routing, basic telephony services such as directory
services and PBX functions, H.323 traffic bandwidth usage control and total network usage
control and the implementation of overall system management and security policies.
2-4
are the endpoints on the LAN which provide for real-time, two-way
are the devices that provide the needed translation services between H.323
perform crucial control and administration tasks for H.323 entities while
Page 25

An Introduction to H.323
Multipoint Controller Units (MCUs)
an optional multipoint processor or processors (MP). The MC is the conference controller.
The MC handles negotiation between all terminals to determine common capabilities and
controls conference resources such as multicasting. The MC does not deal directly with any
of the media streams. This is left to the MP, which does the mixing, switching, and other
processing of audio, video, and/or data bits.
Terminals, gateways and MCUs are also known as H.323 endpoints. The collection of all
terminals, gateways, and MCUs managed by a single gatekeeper comprise an H.323 Zone.
consists of a required multipoint controller (MC) and
Between H.323 and H.320
H.320 is the ITU standard for video conferencing over digital lines like ISDN. The standard
describes recommendations for both multipoint and point-to-point video conferencing over
circuit-switched networks (CSNs).
If you want your H.323 LAN endpoints to communicate with H.320 terminals within a LAN
segment, you need a VIU-323 to convert the H.320 to H.323 protocol.
If you want your H.323 LAN endpoints to communicate with H.320 terminals on circuit-
switched networks without actually connecting each LAN endpoint to an ISDN line, you
need a gateway that converts between these protocols.
2-5
Page 26

Overview
2-6
Page 27

3
Installing the VIU-323
This chapter describes how to mount the VIU-323 on a 19-inch rack,
how to connect all the cables and check for correct operation. It covers
the following topics:
Package Contents
!
Site Considerations
!
Physical Location
!
Connecting the Cables
!
Next Step: Configuration
!
Page 28

Page 29

Package Contents
When unpacking the VIU-323:
1. Make sure that the package contains all items listed on the enclosed packing list.
2. Remove the contents of the shipping box. The package contains:
!
VIU-323 unit.
!
CD ROM:
!
Unit Software.
!
System Configuration Software.
!
Software Upload Utility.
!
VIU-323 User Guide.
!
VIU–323 Quick Start Guide
!
Release Notes.
!
Power Cable.
!
Two V.35/RS-366 Y-cables, if ordered.
!
Null modem cable.
3. Inspect the VIU-323 unit for possible shipping damage. Report any damaged or
missing items to your local distributor.
Site Considerations
The VIU-323 is suited for an office environment where it can be rack mounted with your
other network equipment or free standing.
When deciding where to place the VIU-323, ensure that:
!
The VIU-323 is accessible and all cables can be easily connected to it; for proper
ventilation, leave a space of at least 10 cm (4 inches) behind the unit’s rear panel.
!
The room in which you install the unit has an operating temperature range of 0
C (32o to 104o F) and a non-condensing relative humidity range of 15% to 85%.
!
The air vents at the sides of the unit are not blocked.
o
to 40
o
3-1
Page 30

Installing the VIU-323
!
No objects are placed on top of the unit.
!
A Windows 95/98 or NT-based station running TCP/IP is available for running the
configuration software and other utilities (network software must be Winsock 1.1compatible).
!
Grounded AC power outlets are accessible for the VIU-323 and room system.
!
A LAN port is available on the hub for the VIU-323.
!
There is a gatekeeper to register the VIU-323’s IP address.
3-2
Page 31

Physical Location
Physical Location
You can place the VIU-323 in the H.320 room system cabinet; you can also mount it in a
19-inch rack. To mount it, you need:
!
Two 19-inch mounting brackets.
!
Two screws and two flat washers for each bracket.
!
Four screws to secure the unit in the rack.
"
To mount the VIU-323 in a rack
1. Place the VIU-323 right way up on a hard flat surface, with the front panel facing you.
On the two side panels, near the front panel, you will see two mounting holes.
2. Position a mounting bracket over the mounting holes on one side of the VIU-323.
3. Pass the two screws through the washers and bracket holes, inserting them into the
inside of the VIU-323 and tighten them securely.
4. Repeat steps 2 and 3 for the other side of the VIU-323.
5. Insert the unit into the 19-inch rack and secure with suitable screws. Two screws are
needed for each side.
6. Make sure the air vents at the sides of the VIU-323 are not blocked.
7. Connect cables, as described in the following section.
Cables
VIU-323 uses the following cables:
!
Power cable – connects the VIU-323 to the electrical source.
!
10Base-T IEEE, 802.3 Ethernet cable (straight) – connects the VIU-323 to the LAN
hub.
!
V.35/RS-366 (Y-cable) – connects the VIU-323 to the H.320 room system.
!
Null modem cable (Y-cable) – connects the VIU-323 to the configuration PC (for
special configuration) or modem (for remote configuration and diagnostics).
!
10Base-T IEEE, 802.3 Ethernet cable (crossed) – for testing.
3-3
Page 32

Installing the VIU-323
Power Connection
The VIU-323 receives AC power through a standard power cable with a grounded threeprong plug.
Before you connect the unit to the power, make sure the power source voltage is between
100-240 VAC.
Before you switch on the VIU-323, verify that
!
The protective earth terminals of the VIU-323 are connected to the (main) power cord
protective conductor.
!
The AC outlet is provided with a protective earth contact.
Warning : Don't use an extension cord (power cable) without a protective conductor
(grounding). The VIU-323 can become dangerous when you interrupt any of the
protective (grounding) conductors or disconnect any of the protective earth
terminals. Intentional interruption is prohibited.
A power cable with a plug suited to your country may be supplied with the VIU-323. If a
plug is not provided, attach a grounded plug that is appropriate to your area. The main
power cord has a molded IEC socket that connects to the VIU-323’s power connector. Wire
the national standard power plug as follows:
Brown lead: Live (phase)
Blue lead: Neutral
Green/yellow lead: Earth ground
"
To connect the power cable to the VIU-323
1. Make sure that the power switch on the rear panel is off.
2. Plug the power cord into the power socket on the rear panel of the VIU-323.
3. Connect the three-prong power plug to a grounded AC outlet.
3-4
Page 33

LAN Connection
The VIU-323 has one 10Base-T, IEEE 802.3 LAN port (RJ-45 socket). Use a straightthrough Ethernet cable (maximum length 15 m.) with RJ-45 connectors to connect the cable
to the 10Base-T LAN hub. For information on cables, see “Appendix A.”
"
To connect the VIU-323 to the LAN
1. Connect one of the RJ-45 8-pin connectors of the straight through Ethernet cable to the
VIU-323’s LAN Port 1.
2. Connect the other connector to a 10Base-T hub.
Connecting the Y-Cable
Note: V.35/RS-366 Y-cables are not always included in the VIU-323 package.
The V.35/RS-366 Y-cable connects the VIU-323 to the H.320 room system. It has one 26pin male connector that divides into a V.35 female (Winchester) connector and an RS-366
female connector; see Figure 5 on the next page.
Cables
Insert the 26-pin male connector into Port 1 on the rear panel of the VIU-323. Connect the
V.35 female connector to the male V.35 connector on the cable that attaches to the room
system; connect the RS-366 female connector to the corresponding RS-366 connector that
attaches to the room system.
If you are sending two-channel (2B) calls, connect the second Y-cable to VIU-323 Port 2
and connect the V.35 and RS-366 connectors to the appropriate connectors on the cable that
attaches to the corresponding room system port (or ports).
3-5
Page 34

Installing the VIU-323
POWER
26-Pin Male
V.35 Female
Connector
Connector
V.3 5
Cable
Port 1 LAN 1 100-240 VAC
RS-366
Female
Connect or
RS-366
Cable
RS-366 PortV.35 Port V.35 Port RS-366 Port
H.320 Room System
Port 2
V.35
Female
Connector
V.3 5
Cable
26-Pin M ale
Connector
RS-366 Female
Connector
RS-366
Cable
Figure 5 - Connecting the Y-Cable
Connecting to the Console Port
The console (serial) port on the front of the VIU-323 is used to connect the VIU-323 to a PC
or modem.
Use a null modem (crossover) cable to connect the console port’s female 9-pin D-type
connector to the configuration PC or modem. For information, see “Appendix A.”
From VIU-323 to PC
Connect the VIU-323 console port to a PC to:
3-6
Page 35

!
Configure the VIU-323 IP address and subnet mask; see “Appendix C.”
!
Use the Remote Diagnostics utility.
The terminal software used on the PC can be any standard terminal emulator such as
HyperTerminal.
"
To connect the VIU-323 console port to a PC
1. Verify the terminal software used on the PC has the following communications
parameters:
!
Baud rate: 9600
!
Data bits: 8
!
Stop bits: 1
!
Parity: none
!
Flow control: none
2. Connect the 9-pin male connector of the null modem cable to the VIU-323 console
port.
3. Connect the 9-pin female connector to the PC serial port.
4. Run HyperTerminal (or other terminal emulator) and press Ctrl+X to restart the
VIU-323.
Cables
From VIU-323 to Modem
Connect the VIU-323 console port to a modem for remote diagnostics.
The external modem connected to the VIU-323 should be a standard modem and should be
configured as follows
!
Baud rate: 9600
!
Data bits: 8
!
Stop bits: 1
!
Parity: none
!
Flow control: none
!
Auto answer: on
!
Carrier Detect (CD): on
!
Data Terminal Ready (DTR): on
!
Echo enabled: on
3-7
Page 36

Installing the VIU-323
"
To connect the VIU-323’s console port to a modem
1. Verify the modem configuration parameters are as specified above.
2. Connect the 9-pin male connector of the cable to the VIU-323’s console port.
3. Connect the 25-pin female connector on the other end of the cable to the modem.
4. For remote diagnostics, create a normal dial-up connection. For information, see
Chapter 8, “Creating a Dial-Up Connection to the VIU-323.”
Next Step: Configuration
Now that you have installed the VIU-323, you have to configure it. The configuration
process is detailed in the next two chapters, which are summarized in the following table:
Chapter Description
Preparing for Configuration Gives guidelines for planning the configuration process
Basic Configuration Guides you through the essential configuration
as well as instructions for setting up the configuration
terminal with the OnLAN Configure 323 configuration
software.
procedures for the VIU-323. Once these are complete,
you can make calls through your VIU-323.
If you are installing and configuring the VIU-323 for the first time, read Chapter 4,
“Preparing for Configuration” before configuring.
3-8
Page 37

Preparing for Configuration
This chapter describes several pre-configuration considerations and
procedures. It covers the following topics:
Planning the Configuration
!
Setting Up the Configuration PC
!
Installing the Configuration Software
!
4
Page 38

Page 39

Planning the Configuration
Before you start configuring the VIU-323, plan the procedure to ensure a smooth and
effortless configuration procedure. This section reviews the items to consider.
Prerequisites
IP Address
The VIU-323 operates on an IP-based LAN. Each VIU-323 must have a unique IP address.
The VIU-323 leaves the factory with a default IP address, which you must change to the
unique IP address according to your network IP addressing scheme (contact your network
administrator). For configuration via a terminal session see “Defining IP Addresses via a
Terminal Session” in Chapter 9. For configuration via the LAN, see "Selecting the VIU-323
for Configuration" in Chapter 5.
IP Subnet Mask
To ensure proper configuration, the VIU-323 and the configuration PC must be on the same
LAN and have the same subnet mask defined.
Default Password
The VIU-323 configuration is protected by a modifiable configuration password. The
default password for all VIU-323s is VIUrv.
Note: The password can be up to 16 characters and is case-sensitive: for example,“VIU”
must be typed in uppercase; “rv” must be typed in lowercase.
We recommend that you change this password and assign a unique password for each
VIU-323 during configuration. For information, see “Modifying the Password” in Chapter
5, “Basic Configuration.”
Default Gatekeeper IP Address
The VIU-323 must be registered with an H.323 gatekeeper (either a RADVision Gatekeeper
or another company’s). The configuration program will ask you to enter the default
Gatekeeper IP address.
4-1
Page 40

Preparing for Configuration
Default Router IP Address
Enter this field if the LAN to which the VIU-323 is connected connects through a router to
another LAN or the Internet.
VIU-323 Phone Number
Use this number to dial in to the VIU-323 from other H.323 or H.320 devices (16 digits
maximum).
Checklist of Prerequisites
Before you start configuration, obtain the following information (from your network
administrator, for example); enter the values below to make VIU-323 configuration more
convenient:
❒ VIU-323 IP address: __ __ __ . __ __ __ . __ __ __ . __ __ __
❒ VIU-323 IP subnet mask: __ __ __ . __ __ __ . __ __ __ . __ __ __
❒ Configuration PC IP subnet mask: __ __ __ . __ __ __ . __ __ __ . __ __ __
❒ Default gatekeeper IP address: __ __ __ . __ __ __ . __ __ __ . __ __ __
❒ Default router IP address: __ __ __ . __ __ __ . __ __ __ . __ __ __
❒ VIU-323 phone number: ___________________________
❒ Incoming default bandwidth: ______
❒ Outgoing default bandwidth: ______
❒ Default VIU-323 configuration password: VIUrv (case sensitive)
Note: We recommend that the VIU-323’s subnet mask be the same as the configuration
PC’s subnet mask so that the VIU-323 configuration program will display the
VIU-323’s IP address for your selection in the first configuration screen; otherwise,
you must manually enter the VIU-323’s IP address.
4-2
Page 41

Configuration PC Requirements
The configuration PC must:
!
Have Windows 95/98/NT installed.
!
Have network software that is Winsock 1.1 compatible installed (for example,
Microsoft TCP/IP Stack for Windows 95/98/NT).
!
Reside on the same LAN segment as the VIU-323 you want to configure.
!
Have an IP subnet mask that matches the IP subnet mask of the VIU-323 you want to
configure.
!
The OnLAN Configure 323 system configuration software, installed.
Installing the Configuration Software
The VIU-323 setup procedure installs the configuration program OnLAN Configure 323 on
your hard drive.
"
To install OnLAN Configure 323
1. Start Windows.
2. Insert the VIU–323 CD ROM in your CD drive
3. The RADVision OnLAN Tools Setup window displays. If it does not display
automatically, access the CD ROM using Windows Explorer and invoke the Setup.exe
file.
4. Follow the onscreen instructions for installation.
Upgrading the Configuration Software
Upgraded versions of VIU-323 software may also require that you upgrade the OnLAN
Configure 323 software configuration program (check the release notes that accompany the
software).
To upgrade OnLAN Configure 323, follow the steps in “Installing the Configuration
Software,” above. Note that if you install the new version of OnLAN Configure 323 to the
same directory of the previously installed version, you will overwrite the original; to keep
the previous version, install the new version in a different directory.
4-3
Page 42

Preparing for Configuration
Navigating the Configuration Software Screens
The configuration software comprises sequential screens that can be accessed through the
Next and Prev buttons. Some screens also have secondary screens that are accessed through
buttons. These are identified by the name of the screen they invoke, for example, the
Date/Time Settings screen is a secondary screen of the Unit Identification screen and can be
accessed from the Date/Time button on this screen. The following is a description of the
configuration software navigation buttons.
Button Shortcut Key Action
Exits the Configuration program without saving your
Abort Alt+A
Next Alt+N
Prev Alt+P
Finish Alt+F
Detect Alt+D
Save Alt+S
OK
Cancel
In a Confirmation box
Yes Alt+Y
No Alt+N
changes.
Moves to a subsequent screen, saving any changes you
made.
Moves to a previous screen. If you exit a dialog box
using Prev, changes you make to the information in the
dialog box are saved.
Allows you to save the configuration settings in a file to
be uploaded at a later time to the VIU-323.
Sends a
identification from any units that have not yet identified
themselves.
Saves parameter values of the dialog box to the local
disk as a text file in the directory where you installed the
Configuration Software.
Saves the information and exits the dialog box. The
saved tables contain only static data that is both
readable and writeable.
Returns to the previous dialog box without saving any
changes you made to the current dialog box.
Saves the parameters and proceeds to the next screen.
Returns to the previous screen.
broadcast
message to the network, requesting
The configuration software does not let you exit a screen before you have defined all of the
required parameters. A message appears informing you to fill in the required fields.
4-4
Page 43

5
Configuration
You have connected the VIU-323 to the LAN and installed the OnLAN
Configure 323 configuration software on the configuration PC. You are
now ready for configuration. This chapter describes the basic
configuration options of the VIU-323. It covers the following topics:
Configuration Checklist
!
Running the System Configuration Software
!
Selecting the VIU-323 for Configuration
!
Setting the VIU-323 Parameters
!
Saving VIU-323 Configuration Parameters
!
After Configuration
!
Page 44

Page 45

Configuration Checklist
The following checklist reviews the tasks required to configure the VIU-323:
❒ Unpack the VIU-323, check the package contents, and set up the unit (see Chapter 3,
“Installing the VIU-323”).
❒ Connect the VIU-323 to the LAN (see Chapter 3, “Installing the VIU-323”).
❒ Record all configuration parameters in the configuration prerequisite checklist (see
Chapter 4, “Preparing for Configuration”).
❒ Install the system configuration software, OnLAN Configure 323, on the configuration
PC (see Chapter 4, “Preparing for Configuration”).
❒ Make sure the configuration PC is connected to the LAN.
❒ Configure the VIU-323 from the configuration PC, as explained in this chapter.
Configuring the VIU-323
Setting IP Addresses via a Terminal Session
Normally, you set VIU-323 IP address parameters (IP address, default router IP address and
IP subnet mask), and all other VIU-323 parameters, using the system configuration
software, OnLAN Configure 323, as explained in "Selecting the VIU-323 for
Configuration".
Alternately, you can first connect the configuration PC to the VIU-323 console (serial) port
with a null modem cable and run a terminal session to set all IP address parameters; then run
OnLAN Configure 323 to configure the VIU-323. For information, see “Defining IP
Addresses via a Terminal Session” in Chapter 9, “Tips and Troubleshooting.”
Running OnLAN Configure 323
OnLAN Configure 323 is the name of the system configuration software used to configure
the VIU-323.
"
To start configuration
!
From Windows 95/98/NT, click the Start button and select Programs/RADVision
OnLAN Tools/OnLAN Configure 323.
5-1
Page 46

Configuration
Selecting the VIU-323 for Configuration
Select Unit is the first configuration screen. The Unit IP dropdown list displays all
VIU-323s, L2W-323s and MCUs that are on the same LAN segment as the configuration
PC and whose subnet mask matches that of the configuration PC.
Note For a new device being configured for the first time, you must change the Unit IP of
the VIU–323 as described below
Figure 6 - Select Unit screen
"
To select the VIU-323 for configuration
1. If the VIU-323 you want to configure is not displayed in the Unit IP dropdown list,
click Detect to refresh the list.
2. From the dropdown list, select the VIU-323 you want to configure; if the VIU-323 is
not displayed, manually type its IP address in the text box.
3. Click Next. The Enter Password screen is displayed. (There may be a brief delay.)
4. In the Enter Password screen, type VIUrv in the Password text box (if this is not a
first time configuration and you have changed the default password, type your new
password). The password is case sensitive.
5. Click Next. The Configuration Source screen is displayed.
5-2
Page 47

Selecting the VIU-323 for Configuration
"
To change the IP address of a new VIU–323
1. Type the IP address you want to assign in the Unit IP text box. The LAN
configuration station broadcasts the new IP address. The VIU-323 changes its IP
address to the broadcast IP, and restarts with its new IP address and the Enter
Password screen is displayed.
2. If you selected a unit from the Unit IP list, click Next to display the Enter Password
screen.
Figure 7 - Configuration Source screen
Configuration Source Screen Parameters
The upper area of Configuration Source screen contains the following read-only
parameters:
Unit Type – displays the type of RADVision unit you selected for configuration.
Hardware Version – displays the hardware version of the selected unit.
5-3
Page 48

Configuration
Software Version – displays the first two digits of the unit software version. Click the
ellipsis button (…) to display the full software version and other software related
information. For more information, see “Viewing Software Version Details” on this page.
The middle and lower area of the Configuration Source screen contain parameters that
allow you to:
!
Change the unit configuration password.
!
Select the configuration source file.
!
Access the VIU-323 configuration parameters.
Viewing Software Version Details
You can view version details about the various software modules used in the VIU-323 you
are configuring.
"
To view the software version details
•
From the Configuration Source screen, click the ellipsis (…) button next to Software
Version. The Software Version screen is displayed.
Figure 8 - Software Version screen
The Software Version screen displays the following read-only parameters:
Unit Version – displays the software version number of the selected unit.
Stack Version – displays the full version number of the H.323 protocol stack used by the
unit.
5-4
Page 49

Selecting the VIU-323 for Configuration
MIB Version – displays the SNMP proprietary RADVision MIB version used by the unit.
Modifying the Password
After using the default password to access the VIU-323, we recommend that you change the
password.
"
To change the configuration access password
1. In the Configuration Source screen, click Change Password. The Change Password
screen is displayed.
Figure 9 - Change Password screen
3. In the Old Password text box, type your current password (if this is the default
password, type VIUrv).
4. In the New Password text box, type the new password (16 characters maximum).
5. In the Confirm New Password text box, type the new password again for verification.
6. Click OK to confirm. You return to the Configuration Source screen.
The next time you access the configuration of this VIU-323, type your new password in the
Enter Password screen.
Note: If you do not remember the old password, please contact your RADVision
representative or technical support at support@radvision.com and
support@tlv.radvision.com.
5-5
Page 50

Configuration
Selecting the Configuration Source File
The Source list box displays all VIU-323 configuration source files. There are two default
source files:
Current – contains the current parameter settings from the VIU-323; these can be modified
Plug & Play – contains the VIU-323’s default parameter settings. Plug & Play file settings
are hard coded and cannot be modified. Select this to revert to default settings.
Note: All configuration files you save will also be displayed in this list.
"
To load a configuration source file for the VIU-323
1. From the Configuration Source screen, select the configuration file from the Source
list box. When configuring the VIU-323 for the first time, load the Current settings.
Figure 10 - Source list of configuration files for VIU-323 configuration parameters
2. Click Unit Setup to access the VIU-323 configuration parameters. The Unit
Identification screen is displayed.
5-6
Page 51

Selecting the VIU-323 for Configuration
Setting Unit Identification Parameters
The Unit Identification screen displays identification information for the VIU-323.
Figure 11 - Unit Identification screen
The Unit Identification screen displays the following read-only parameters:
Unit Name – displays the unit’s logical name.
Contact – displays the RADVision web site URL.
Description – displays the unit identification string.
The Location text box allows you to type a description of the physical location of the
VIU-323. This is a required field; use it to map RADVision units on the network.
The Date/Time button displays the Date/Time Settings screen. The Date/Time Settings
screen lets you set the time difference between the configuration PC location and a remote
VIU-323 location, which is relevant if you are configuring a VIU-323 from a remote site.
5-7
Page 52

Configuration
"
To set the Location parameter
•
Type a description of the physical location of the VIU-323 in the Location text box
and click Next to continue configuring VIU-323 parameters. The Network
Parameters screen is displayed.
Setting Network Parameters
Figure 12 - Network Parameters screen
The network parameters to set are:
Default Gatekeeper IP – the IP address of the gatekeeper where the VIU-323 is registered.
Port – the default port for gatekeeper communication is 1719, which is the H.323 standard;
do not change it unless the default gatekeeper specifies a different one.
Default Router IP– the IP address of the router for the VIU-323’s network segment.
Transcoding Priority – not applicable for the VIU-323.
Terminal ID – an alias for the VIU-323. This is an alphanumeric field.
Phone Number – the number other systems must dial to call the VIU-323 (maximum
length 12 digits).
"
To set the network parameters
1. In the Default Gatekeeper IP text box, the correct IP address may already be
displayed; if it is not, type the IP address of the gatekeeper the VIU-323 will be
registered with.
5-8
Page 53

Selecting the VIU-323 for Configuration
2. In the Gatekeeper Port text box, do not change the default port (1719) unless the
gatekeeper you are using indicates otherwise.
3. In the Default Router IP text box, if the correct IP address is not already displayed,
type the IP address of the default router, if one is being used. If you are not using a
router, leave the field blank.
4. In the Terminal ID text box, type the alias that identifies this VIU-323, for example,
“2nd Floor Conference Room.”
5. In the Phone Number text box, type the VIU-323’s phone number; this will be
recorded in the gatekeeper.
6. After setting parameters, click Next to continue configuring VIU-323 parameters. The
LAN Port Setting screen is displayed.
Setting LAN Port Parameters
The VIU-323 has only one LAN port. This must be connected to the LAN segment and its
IP address defined, along with the IP subnet mask. The Description parameter is an
optional alphanumeric field that you can use to describe the specific VIU-323.
Figure 13 - LAN Port Settings screen
5-9
Page 54

Configuration
The LAN Port Settings screen displays the following parameters:
Port Number – displays the number of the port you are configuring. This is a read-only
parameter whose value is always 1.
Enabled – This port must always be enabled.
Port Type – displays the type of LAN access method. This is a read-only parameter.
MAC Addr. – displays the hardware Media Access Control address for this LAN port. This
is a read-only parameter
IP Address – displays the IP address of this LAN port.
IP Mask – allows you to define what portion of the IP address is used for sub-network
definitions; see “Appendix C.”
Description – allows you to type a text description of this LAN port. This is a required
field; it is limited to a maximum of 31 characters (the default description is ‘attached to
shared segment’).
"
To define a LAN port
1. In the LAN Port Settings screen, make sure the Enabled check box is selected.
2. In the IP Address text box, the IP address is displayed automatically if you used a
terminal session to set this parameter (for information, see “Defining IP Addresses via
a Terminal Session” in Chapter 9, “Tips and Troubleshooting”); if the field is empty or
the address displayed is incorrect, type the correct address for this port.
3. In the IP Mask field, the subnet mask is displayed automatically if you used a terminal
session to set this parameter; if the field is empty or the address displayed is incorrect,
type the correct subnet mask (for information, see “Appendix C”).
4. In the Description field, type a description of this LAN port.
5. Click Next. The Dialing Properties screen is displayed.
5-10
Page 55

Selecting the VIU-323 for Configuration
Setting Dialing Parameters
In the Dialing Parameters screen, type the 2nd number delimiter and the default bandwidth.
Figure 14 - Dialing Parameters screen
The Dialing Parameters screen displays the following parameters:
Physical STD – displays the data interface standard, which is V.35.
Dialing STD – displays the dialing standard, which is RS366.
2nd Number Delimiter – for use with two-channel (2B) calls only. Options are asterisk (*),
pound (#) or None. This delimiter must match the 2nd Number delimiter defined for the
gateway. This delimiter differentiates between the two telephone numbers used to dial twochannel (2B) calls (note that if the phone number is the same for both channels, type the
phone number once followed by the delimiter). We recommend setting the 2nd Number
Delimiter as * because the VIU-323’s dialing prefix delimiter is preset as #.
Codec Type – displays the communications standard used by the room system the VIU-323
is connected to; this value is always H.320 and cannot be changed.
Outgoing Default Bandwidth – displays the default bandwidth of calls made from the
room system (via the VIU-323). You can change this setting when dialing by adding a
prefix to the dialing stream; see “Making Calls with the VIU-323.”
Incoming Default Bandwidth – displays the default bandwidth of calls received by the
room system (via the VIU-323). Remote VIU-323’s that call into the VIU-323 can force this
5-11
Page 56

Configuration
setting to change by adding a suffix to the dialing stream; see “Making Calls with the
VIU-323.”
Note: Set outgoing and incoming default bandwidths to the same value. We recommend
setting the default bandwidth to 384 Kbps (or 336 Kbps restricted) for maximum
quality. If you need to call to an endpoint with a different bandwidth, you can easily
change the bandwidth by using the dialing prefix; see “Making Calls with the
VIU-323.”
"
To define dialing settings
1. In the Dialing Settings screen, select * or # or None as the 2nd Number Delimiter.
2. Select the outgoing and incoming default bandwidths; these values must be the same.
3. Click Next. The Save Setup screen is displayed.
Saving VIU-323 Configuration Parameters
To a Configuration File
The Save Setup screen enables you to save the VIU-323 configuration parameters to a local
file. The parameters are saved as an *.ini file to the directory in which the
OnLAN Configure 323 configuration software is installed. The next time you run
OnLAN Configure 323, you can select this file from the Source drop down list in the
Configuration Source screen. Saving configuration parameters to a file may be useful if
you plan to configure more than one VIU-323 unit.
5-12
Page 57

Saving VIU-323 Configuration Parameters
Figure 15 - Save Setup screen
"
To save the VIU-323 configuration parameters to a file
1. In the Save as text box, type the name of the file to which you want to save the
configuration parameters.
2. Click Yes to confirm. The Confirm screen is displayed.
5-13
Page 58

Configuration
Saving Configuration Parameters to the VIU-323
The Confirm screen allows you to upload the configuration parameters to the VIU-323. For
the configuration changes to take place, you have to upload them to the unit.
Figure 16 - Confirm Configuration screen
"
To transfer the configuration parameters to the VIU-323
•
Click Yes in the Confirm screen. An ‘Updating node parameters’ message is
displayed while the system transfers the parameters to the VIU-323.
The VIU-323 restarts upon the uploading of the new configuration. Wait for the VIU-323 to
complete the restart process before you operate it. The unit may take longer to restart than
the time allotted in the transferring time bar displayed by the configuration software.
After Configuration
The VIU-323 is now configured. You can configure another VIU-323, or you can run calls
using the VIU-323, refer to the proceduresd and examples in the following chapter.
5-14
Page 59

6
Making Calls with the VIU-323
This chapter describes how to make calls using the VIU-323. It covers
the following topics:
Setting up a Call
!
Basic Dialing
!
Changing Outgoing Bandwidth
!
Changing Incoming Bandwidth
!
Changing Both Incoming and Outgoing Bandwidth
!
Page 60

Page 61

Setting up a Call
After the room system is connected to the VIU-323, the VIU-323 is connected to the LAN,
and both the room system and the VIU-323 are up and running. Use the room system dialer
to make your call.
Note: The VIU-323 does not support single-channel (1B) calls.
Bandwidth
In all cases, the bandwidth of the calling room system (via the VIU-323) must be the same
as the bandwidth of the receiving endpoint (gateway, VIU-323, H.323 terminal, or H.320
terminal). This means that before you call:
!
You must know your VIU-323’s bandwidth and that of the unit you are calling.
!
If you are calling through a gateway, you must know the gateway’s service number
and the type of connection (e.g., ISDN BRI) between the gateway and the unit you are
calling.
!
If you are calling through an IMUX, you must know the IMUX profile.
In a basic call, the default bandwidths of both the calling and the receiving units are the
same. However, there are cases when you must change the default bandwidths of the calling
VIU-323 or the receiving VIU-323, or both. You can do this by adding a dialing prefix (to
change the outgoing bandwidth) or a dialing suffix (to change the receiving VIU-323’s
incoming bandwidth).
Note: We recommend that you define all VIU-323s on the same LAN segment with the same
bandwidth. For optimal quality, if all the participating terminals support it, use
768 Kbps.
6-1
Page 62

Making Calls with the VIU-323
Basic Dialing
When the bandwidth of the calling VIU-323 is the same as that of the receiving unit, dial the
extension or phone number of the unit you’re calling.
Dialing Examples
Dialing Within a LAN
When the calling VIU-323s and the receiving endpoint are on the same LAN segment and
set to the same default bandwidths, simply dial the extension of the endpoint you’re calling.
Example
5555
Where 5555 is the extension of the endpoint you are calling.
Two-Channel (2B) Dialing Through a Gateway
When you are dialing through a gateway to an H.320 unit, you must take into account not
only the bandwidths of the calling VIU-323 and the receiving unit, but the bandwidth of the
circuit switched network that connects the two sides.
If:
!
You are making a BRI call, and
!
The default bandwidth of the calling VIU-323 is 2x64 Kbps, and
!
The default bandwidth of the receiving unit is also 2x64,
then you don’t have to change the bandwidth. You must, however, dial:
!
The gateway’s service prefix, followed by
!
The first channel phone number, followed by
!
The 2nd number delimiter.
!
If the second channel phone number is different from the first, you dial the digits of
that number that differ from the first number after the 2nd number delimiter (see
example below). If it’s the same as the first, don’t dial it.
6-2
Page 63

Basic Dialing
Example
80 7654321*
Where 80 is the gateway service prefix, 7654321 is the phone number for both the first and
second channels of the unit you are calling, and * is the 2nd number delimiter. (You don’t
have to dial the phone number twice because the phone numbers are the same for both
channels.)
Example
80 7654321*7654322
Where 80 is the gateway service prefix, 7654321 is the phone number of the first channel of
the unit you are calling, * is the 2nd number delimiter, and 7654322 is the phone number of
the second channel.
or dial:
80 7654321*2
Where the delimiter * is followed by the digits of the second number that differ from the
first number dialed, in this case the number 2.
Note: Since it is not common that the default outgoing bandwidth of a VIU-323 is 2x64
Kbps, you will probably have to change the outgoing bandwidth.
Dialing Through a Gateway and IMUX
When you are dialing through a gateway and an IMUX to a unit that has the same
bandwidth as the calling VIU-323, dial:
!
The gateway’s service prefix, followed by
!
The IMUX profile, followed by
!
The phone number of the receiving unit; if this is a 2x64 Kbps call, this will be
!
The first channel phone number, followed by
!
The 2nd number delimiter.
!
If the second channel phone number is different from the first, you dial the digits
of that number that differ from the first number after the 2nd number delimiter. If
it’s the same as the first, don’t dial it.
6-3
Page 64

Making Calls with the VIU-323
Example
80 #001 7654321*
Where 80 is the gateway service prefix, #001 is the IMUX profile, 7654321 is the phone
number for both the first and second channels of the unit you are calling and * is the 2nd
number delimiter. (You don’t have to dial the phone number twice because the phone
numbers are the same for both channels.)
Dialing Through Two Gateways to a Remote LAN Endpoint
When you are dialing through a second gateway to an H.323 endpoint on a remote LAN, if:
!
You are making a BRI call, and
!
The default bandwidth of the calling VIU-323 is 2x64 Kbps, and
!
The default bandwidth of the receiving unit is also 2x64,
then you don’t have to change the bandwidth. You must, however, dial:
!
The gateway’s service prefix, followed by
!
The remote gateway’s phone number; then
!
When you are prompted by an IVR message (for example), dial the extension of the
remote endpoint followed by a hash mark
Example
80 7654321 (IVR prompt) 6666 #
Where 80 is the gateway service prefix, 7654321 is the phone number of the second
gateway, and 6666 is the extension of the remote unit.
Note: Since it is not common that the default outgoing bandwidth of a VIU-323 is 2x64
Kbps, you will probably have to change the outgoing bandwidth. Similarly, it is also
uncommon that the bandwidth of an H.323 device is 2x64 Kbps, so you will probably
have to change the incoming bandwidth.
Changing Outgoing Bandwidth
When you make a call, it is transmitted from the calling VIU-323 at the default outgoing
bandwidth, which is set during VIU-323 configuration; however, if the endpoint you are
calling is set to a different bandwidth, or if you must go through a gateway which requires a
different bandwidth, you can change the default bandwidth of the calling VIU-323 by
adding a prefix to the dialing stream.
6-4
Page 65

Changing Outgoing Bandwidth
Why Change the Default Outgoing Bandwidth?
To make a call, the bandwidth of the calling VIU-323 must match that of the called
endpoint. When default settings do not match, you can force a change in the bandwidth of
the calling VIU-323.
There are three instances when this is necessary:
!
When the bandwidth of the receiving unit differs from the bandwidth of the calling
VIU-323.
!
When the bandwidths of the two units are the same, but to get through the gateway, the
bandwidth must be changed.
!
When you are calling another VIU-323 and high bandwidth is not available—during
peak calling hours, for example.
Note: When dialing from one VIU-323 to another, you can change the incoming bandwidth
of the VIU-323 that is receiving your call by adding a dialing suffix
How to Change the Bandwidth
Add the prefix before the dialing stream to force a change in the bandwidth of the VIU-323
that is calling.
The following table displays the prefixes that you dial to force a change in the outgoing
bandwidth (note the difference between prefixes for non-restricted and restricted
bandwidths):
To Force Calling
Bandwidth to:
2 x 64 Kbps (2B) #00
128 Kbps #10
256 Kbps #20
384 Kbps #30
768 Kbps #70
2 x 56 Kbps (2B) (restricted) #01
112 Kbps (restricted) #11
224 Kbps (restricted) #21
336 Kbps (restricted) #31
672 Kbps (restricted) #71
Use Prefix:
6-5
Page 66

Making Calls with the VIU-323
Dialing Examples
Note: The default outgoing and incoming bandwidths are the same and are referred to
below as “default bandwidth.”
Dialing within a LAN
When the calling VIU-323 is set to 384 Kbps and the receiving unit is set to 128 Kbps, dial:
!
The dialing prefix, followed by
!
The endpoint’s phone number.
Example
#10 3333
Where #10 is the prefix that forces the calling VIU-323’s bandwidth to 128 Kbps and 3333
is the extension of the receiving endpoint.
Dialing from a VIU-323 on a LAN through a Gateway (BRI) to an H.320 terminal
When the calling VIU-323 is set to 384 Kbps but the call is sent at 2x64 Kbps through the
gateway to the remote H.320 terminal, dial:
!
The dialing prefix, followed by
!
The gateway service prefix, followed by
!
The first channel phone number, followed by
!
The 2nd number delimiter;
!
If the second channel phone number is different from the first, you dial the digits of
that number that differ from the first number after the 2nd number delimiter (see
example below). If it’s the same as the first, don’t dial it.
Example
#00 80 7654321*
Where #00 is the dialing prefix, 80 is the gateway service prefix, 7654321 is the phone
number for both the first and second channels of the unit you are calling, and * is the 2nd
number delimiter. (You don’t have to dial the phone number twice because the phone
numbers are the same for both channels.)
6-6
Page 67

Changing Incoming Bandwidth
Example
#00 80 7654321*7654322
Where #00 is the dialing prefix, 80 is the gateway service prefix, 7654321 is the phone
number of the first channel of the unit you are calling, * is the 2nd number delimiter, and
7654322 is the phone number of the second channel.
or dial:
#00 80 7654321*2
Where the delimiter * is followed by the digits of the second number that differ from the
first number dialed, in this case the number 2.
Dialing Through a Gateway and IMUX
When you are calling through a gateway and an IMUX to a unit that has a different
bandwidth, dial:
!
The dialing prefix, followed by
!
The gateway’s service prefix, followed by
!
The IMUX profile, followed by
!
The phone number of the receiving unit; if this is a 2x64 Kbps call, this will be
!
The first channel phone number, followed by
!
The 2nd number delimiter.
!
If the second channel phone number is different from the first, you dial the digits
of that number that differ from the first number after the 2nd number delimiter. If
it’s the same as the first, don’t dial it.
Example
The calling VIU-323 is set to 384 Kbps but the receiving unit is set at 128 Kbps; dial:
#10 80 #001 7654321
Where #10 is the prefix that sets the bandwidth to 128 Kbps, 80 is the gateway service
prefix, #001 is the IMUX profile, and 7654321 is the phone number of the remote unit.
Changing Incoming Bandwidth
When making calls between two VIU-323s, you can force the VIU-323 receiving the call to
change its default bandwidth to match the bandwidth of the VIU-323 making the call.
To do this, add a dialing suffix after the phone number of the remote VIU-323. Dialing
suffixes are for non-restricted bandwidths only and are described in the following table:
6-7
Page 68

Making Calls with the VIU-323
To Force Receiving
Bandwidth to:
2 x 64 Kbps (2B) 00
2 x 56 Kbps (2B) 01
128 Kbps 10
112 Kbps 11
224 Kbps 21
256 Kbps 20
336 Kbps 31
384 Kbps 30
672 Kbps 71
768 Kbps 70
Use Suffix:
Note: A dialing suffix can be used only when calling to a VIU-323 from another H.323
endpoint. This includes calling from an H.320 unit through a Gateway.
During VIU-323 configuration, you enter the VIU-323’s phone number in the Network
Parameters screen. This phone number is registered with the gatekeeper (whose IP address
is entered in the same screen). The VIU-323’s phone number is registered in the gatekeeper
with up to 11 aliases (configurable); 10 of these are the original number with a suffix added,
for example, if the phone number is 5555, the gatekeeper adds the suffixes 00, 01, 10, 11,
21, 20, 31, 30, 70 and 71 so that:
6-8
!
Dialing 5555 tells the receiving VIU-323 to operate at the default bandwidth.
!
Dialing 5555 00 forces the receiving VIU-323 to operate at 2x64 Kbps.
!
Dialing 5555 01 forces the receiving VIU-323 to operate at 2x56 Kbps.
!
Dialing 5555 10 forces the receiving VIU-323 to operate at 128 Kbps.
!
Dialing 5555 11 forces the receiving VIU-323 to operate at 112 Kbps.
!
Dialing 5555 20 forces the receiving VIU-323 to operate at 256 Kbps.
!
Dialing 5555 21 forces the receiving VIU-323 to operate at 224 Kbps.
!
Dialing 5555 30 forces the receiving VIU-323 to operate at 384 Kbps.
!
Dialing 5555 31 forces the receiving VIU-323 to operate at 336 Kbps.
!
Dialing 5555 70 forces the receiving VIU-323 to operate at 768 Kbps.
!
Dialing 5555 71 forces the receiving VIU-323 to operate at 672 Kbps.
Page 69

Changing Incoming Bandwidth
Why Change the Default Incoming Bandwidth of the
Remote VIU-323?
For a call to succeed, the bandwidth of the called VIU-323 must match that of the calling
unit, but this does not always happen. When the bandwidth settings do not match, you can
force a change in the bandwidth of the receiving VIU-323. There are three instances when
this is necessary:
!
When the bandwidth of the VIU-323 being called differs from the bandwidth of the
unit that is calling.
!
When you don’t know the bandwidth of the VIU-323 being called.
!
When you are calling another VIU-323 and high bandwidth is not available—during
peak calling hours, for example. (In this case you may want to add a prefix as well as a
suffix.)
How to Change the Default Bandwidth
Add the suffix after the dialing stream or when prompted, for example, by the Gateway’s
IVR (Interactive Voice Response).
Dialing Examples
Note: The default outgoing and incoming bandwidths are the same and are referred to
below as “default bandwidth.”
Dialing within a LAN
When an H.323 endpoint calls a VIU-323, within a LAN and the receiving VIU-323 is set to
a different bandwidth, dial:
!
The extension of the receiving VIU-323, followed by
!
The appropriate dialing suffix.
Example
The calling endpoint is set to 384 Kbps but the receiving VIU-323 is set at 128 Kbps; dial:
7777 30
where 7777 is the receiving VIU-323’s extension and 30 is the suffix that changes the
incoming bandwidth of the receiving VIU-323 to 384 Kbps.
6-9
Page 70

Making Calls with the VIU-323
Making a BRI call through Two Gateways to a Remote LAN
Endpoint
If the bandwidth of the calling VIU-323 is 2x64 Kbps and the receiving VIU-323’s
bandwidth is 384 Kbps, dial:
!
The first gateway’s service number, followed by
!
The phone number of the remote gateway;
When you are prompted by an IVR message (for example), dial:
!
The extension of the remote VIU-323, followed by
!
The dialing suffix.
Example
80 7654321 (IVR prompt) 4444 00
Where 80 is the service prefix of the first gateway, 7654321 is the phone number of the
remote gateway, 4444 is the extension of the remote VIU-323, and 00 changes the receiving
VIU-323’s bandwidth to 2x64 Kbps.
Changing Both Incoming and Outgoing Bandwidth
In some cases, you must dial both a prefix and a suffix. Because the network sets bandwidth
availability at any particular time, you may have to use lower bandwidths during peak
hours. You may therefore have to use a prefix to force the outgoing call to a lower
bandwidth and a suffix so that the VIU-323 you are calling can receive the call. Remember
that you can only use a suffix when calling from one VIU-323 to another.
Example
If both VIU-323’s are set to 384 Kbps, but the call doesn’t go through, send the call at 128
Kbps by dialing the following:
#10 80 7654321 (IVR prompt) 4444 10
Where #10 changes the calling VIU-323’s bandwidth to 128 Kbps, 80 is the service prefix
of the first gateway, 7654321 is the phone number of the remote gateway, 4444 is the
extension of the remote VIU-323 and 10 changes the receiving VIU-323’s bandwidth to
128 Kbps.
Note: The dialing suffix (when used) must match the dialing prefix (when used); for
example, when the prefix is #20, the suffix, if necessary, must be 20; when the prefix
is #00, the suffix, if necessary, must be 00.
6-10
Page 71

Upgrading the VIU-323
This chapter describes how to upload a new version of the VIU-323.
7
Page 72

Page 73

Upgrading the VIU-323 Software
Upgrades for VIU-323 are issued periodically. The Software Upload utility is required to
upload new versions of VIU-323 software. The procedure for upgrading software is:
! Install the Software Upload utility on the configuration PC.
! Use the utility to upload the new version of VIU-323 software (the “flash file”).
Installing the Software Upload Utility on the Configuration PC
You need to install the utility only when a new version of VIU-323 software is released
(newly-purchased VIU-323s contain the latest software version, so the Software Upload
utility is not required). With a single installation of the utility, you can upgrade all your
VIU-323s.
To install the Software Upload utility on the configuration PC
"
1. From the configuration PC, start Windows.
2. Insert the VIU–323 CD ROM in your CD drive.
3. The RADVision OnLAN Tools Setup window displays. If it does not display
automatically, access the CD ROM using Windows Explorer and invoke the Setup.exe
file.
4. Follow the on–screen instructions for installation.
Setup creates a directory on the configuration PC (C:\Rvcfg\Rvburn is the default path) and
copies the utility software to the directory. In addition, Setup adds:
! The menu item, Software Upload Utility in the Program menu item, RADVision
Tools (for Windows 95/98/NT).
7-1
Page 74

Upgrading the VIU-323
Uploading the New VIU-323 Software Version
Use the Software Upload utility to upload the flash file, which contains the latest VIU-323
software version.
To upload the flash file to the VIU-323
"
1. Turn off the VIU-323.
2. Make sure the VIU-323 is connected to the LAN hub.
3. Turn on the VIU-323. After the red Test LED goes out, check that the Link LED on
the VIU-323 front panel is on.
4. Test that the VIU-323 is connected to the hub by pinging it from the configuration PC.
5. Insert the diskette containing the flash file in the drive.
6. From the Start button, select Programs\RADVision OnLAN Tools\Software
Upload Utility.
The Software Upload Utility screen is displayed.
Figure 17 - Software Upload Utility screen
7. Type the VIU-323’s IP address.
8. From the list of files, select the flash file (*.fls) you want to upload. Note: If the flash
file does not appear in the list, select the appropriate path from the Look in: field.
7-2
Page 75

Upgrading the VIU-323 Software
9. Click Upload. When the process is complete, a confirmation message is displayed.
After the new VIU-323 software is uploaded, you can configure the VIU-323.
7-3
Page 76

Upgrading the VIU-323
7-4
Page 77

Monitoring the VIU-323
This chapter covers the following topics:
Monitoring the VIU-323
!
Using the Diagnostics Menus
!
8
Page 78

Page 79

Monitoring the VIU-323
You can monitor the VIU-323 using the Diagnostics utility. The Diagnostics utility is a
series of menus that allow you to view information about:
!
VIU-323 ports configuration.
!
Connected terminals.
!
Ongoing call status.
!
Software version.
Accessing the Diagnostic Menus
The Diagnostic Menus are accessed through terminal emulator software running on a PC
connected to the VIU-323’s console (serial) port. You can connect the PC directly to the
VIU-323’s console port, or indirectly via a modem. For information, see “Connecting to the
Console Port” in Chapter 3, “Installing the VIU-323.”
8-1
Page 80

Advanced Procedures
Prerequisites
Before you begin, decide whether you will be accessing the diagnostic utility locally or from
a remote location.
If you are accessing the diagnostic utility locally, verify that:
!
You have connected the VIU-323’s console port to a PC with the appropriate cable.
!
You have standard terminal emulator software, such as HyperTerminal, installed on
the PC.
If you are accessing the diagnostic menus from a remote location, verify that:
!
You have connected an external modem to the remote VIU-323’s console port.
!
You have configured the modem properly.
!
You have prepared a PC with a modem running standard terminal emulator software
with a dial-up connection to the VIU-323.
Creating a Dial-Up Connection to the VIU-323
Refer to your terminal emulator on-line help or documentation for instructions on creating a
new dial-up connection.
Create a new dial-up connection with the following parameters:
!
The phone number of the remote VIU-323.
!
The following modem settings:
Baud rate 9600
Data bits 8
Parity none
Flow control none
8-2
Page 81

Advanced Procedures
Modem Connection
When connecting to the VIU-323 via a modem, the connection is made using a crossed
RS-232 cable. The connection to the VIU-323 is a female, 9-pin connector. The modem
connector depends on the type of modem being used.
The modem configuration parameters should be:
!
Auto answer: on
!
Carrier detect (CD): on
!
Data terminal ready (DTR): on
!
Echo enabled: on
The host modem can be of any type or manufacture.
Using the Diagnostics Menus
To use the Diagnostics Menus, type the menu option; for all menus except the Main Menu
press Enter after choosing the option.
Note: The option, once typed cannot be corrected; however you can always return to the
previous menu and select a different option.
8-3
Page 82

Advanced Procedures
Running the Diagnostics Utility
Note: The Diagnostics utility is adapted for the VIU-323, even if your version of the utility
displays “Gateway” instead.
"
To run the on-line diagnostics utility
1. Run the terminal emulator. If the VIU-323 is at a remote site, connect to the VIU-323
with the dial-up connection you created. Wait for the prompt.
2. Type diag at the prompt.
3. Type admin when prompted for the User Name.
4. Type the same password as for the configuration utility.
Note: The Remote Diagnostics program allows you to enter the User Name and Password
five times before exiting the program.
The Remote Diagnostic Main Menu is displayed.
********************************************************
Remote Diagnostic Main Menu
********************************************************
1.Exit Remote Diagnostics Session
2.VIU Ports Status
3.VIU Ports Configuartion
4.VIU Call Status
6.Get Versions
********************************************************
Accessing the Diagnostics Menus
"
To access a Diagnostics menu from the Main Menu
•
Type the menu option number that you want and press Enter.
Note: The option, once typed, cannot be corrected. To return to the Main Menu, follow the
instructions in the particular menu.
8-4
Page 83

Advanced Procedures
Viewing the VIU-323 Ports Status
"
To view the VIU-323 Ports status
•
Type 2 in the Remote Diagnostic Main Menu. The Gateway Ports Status menu is
displayed.
********************************************************
Gateway Ports Status
********************************************************
Type number associated with one of the following topics
1. Back to Previous Menu
2. LAN Ports Status
3. WAN Ports Status
********************************************************
Viewing LAN Ports Status
"
To view the LAN Ports status
•
Type 2 in the Gateway Ports Status menu.
********************************************************
LAN Ports Status
********************************************************
port 0: enabled
port 1: disabled
port 2: disabled
port 3: disabled
port 4: disabled
port 5: disabled
port 6: disabled
port 7: disabled
********************************************************
The status of each of the LAN ports displays. The status of the port may be either Enabled
or Disabled.
8-5
Page 84

Advanced Procedures
Viewing WAN Ports Status
"
To view the WAN Ports status
•
Type 3 in the Gateway Ports Status menu.
********************************************************
WAN Ports Status
********************************************************
port 0: enabled
port 1: enabled
port 2: disabled
port 3: disabled
********************************************************
The status of each of the two WAN ports is displayed. Status can be Enabled or Disabled.
Viewing the VIU-323 Ports Configuration
"
To view the VIU-323 ports configuration
•
Type 3 in the Remote Diagnostic Main Menu. The Gateway Ports Configuration
menu is displayed.
8-6
********************************************************
Gateway Ports Configuration
********************************************************
Type number associated with one of the following topics
1. Back to Previous Menu
2. LAN Ports Configuration
3. WAN Ports Configuration
********************************************************
Page 85

Viewing LAN Ports Configuration
"
To view the LAN ports configuration information
•
Type 2 in the Gateway Ports Configuration menu.
********************************************************
LAN Ports Configuration
********************************************************
GATEWAY Default Router IP: 0.0.0.0
********************************************************
Port IP address IP Mask Status
********************************************************
0 192.114.36.71 255.255.0.0 enabled
1 0.0.0.0 255.255.255.0 disabled
2 0.0.0.0 255.255.255.0 disabled
3 0.0.0.0 255.255.255.0 disabled
4 0.0.0.0 255.255.255.0 disabled
5 0.0.0.0 255.255.255.0 disabled
6 0.0.0.0 255.255.255.0 disabled
7 0.0.0.0 255.255.255.0 disabled
********************************************************
The following information is displayed for the LAN port:
Advanced Procedures
Default Router IP – the IP address of the default router.
Port Number – the number of the LAN port.
IP Address – the IP address of this LAN port.
IP Mask – defines the portion of the IP address that is used for sub-network definitions.
Status – the status of the LAN port. The status may be “enabled” or “disabled”.
8-7
Page 86

Advanced Procedures
Viewing WAN Ports Configuration
"
To view the WAN ports configuration information
•
Type 3 in the Gateway Ports Configuration menu. The WAN Ports Configuration
menu is displayed.
********************************************************
WAN Ports Configuration
********************************************************
Type number associated with one of the following topics
1. Back to previous Menu
2. Configuration status of all WAN ports
3. Configuration status per single WAN port
4. Back to main Menu
********************************************************
Viewing the Configuration Status of All WAN Ports
"
To view the configuration status of all the WAN ports
•
Type 2 in the WAN Ports Configuration menu.
********************************************************
Configuration status of all WAN ports
********************************************************
Port NET/USER Phys STD Status
********************************************************
0 DCE V35 enabled
1 DCE V35 enabled
2 disabled
3 disabled
********************************************************
The following information is displayed for the WAN ports:
Port Number – the number of the LAN port.
DTE/DCE – displays whether the WAN line is configured for DCE or DTE mode.
Phys. STD – displays the line type connected to this WAN port.
Status – the status of the LAN port. The status may be either “enabled” or “disabled.”
8-8
Page 87

Advanced Procedures
Viewing the Configuration Status Per Single WAN Port
"
To view the configuration status of a single WAN port
•
Type 3 at the WAN Ports Configuration menu. Configuration information for WAN
ports may differ depending on the type of port. Following is one example of a single
WAN port configuration screen:
********************************************************
Configuration status per single WAN port
********************************************************
Port Num: 1
Port Status: enabled
Physical Interface: V35
DCE/DTE: DCE
Dialing Protocol: RS366
Terminal Adapter type: z200
********************************************************
The following information is displayed for the WAN port:
Port Number – the number of the LAN port.
Port Status – the status of the LAN port. It may be either “enabled” or “disabled.”
Physical Interface – type of physical interface used for the port.
DCE/DTE – displays whether the WAN line is configured for DCE or DTE mode.
Dialing Protocol – the protocol used for dialing.
Terminal Adapter Type – The type of terminal adapter.
To continue to the next item, type n.
To return to the previous item, type p.
To exit to the previous menu, type e.
Viewing the VIU-323 Calls Status
"
To view the VIU-323 Calls Status
•
Type 4 in the Remote Diagnostic Main Menu.
8-9
Page 88

Advanced Procedures
********************************************************
GATEWAY Calls Status
********************************************************
Call Num: 1
Call Type: VIDEO-CONFERENCE CALL
Source: q
Destination: 8013,
Duration: 0:5:12
********************************************************
The following information is displayed for the VIU-323 calls:
Call Number – the number of the call.
Call Type – the type of the call.
Source – where the call originated.
Destination – the call destination phone number.
Duration – the duration of the call (in seconds).
To view the next call, type n. After the information for all the call has been displayed, the
total number of calls is displayed.
To view the previous call, type p.
To return to the Remote Diagnostic Main Menu, type e.
Viewing the Current Software Version
"
To view the current version of the VIU-323 software
•
Type 6 in the Remote Diagnostics Main Menu.
********************************************************
Gateway s/w version: 2.1.0.2
********************************************************
8-10
Page 89

9
Tips and Troubleshooting
This chapter covers problems you may encounter when configuring the
VIU-323 and suggests actions you can take to solve these problems. It
covers the following topics:
LED Indications
!
Common Problems
!
Analyzing Problems
!
IP Address Problems
!
Page 90

Page 91

LED Indications
The Power LED does not light
This indicates that the VIU-323 is not properly connected to the power source. Make sure
the power cable is firmly connected to the VIU-323 and to the power outlet.
The Link LED of a connected LAN port does not light
This indicates that the LAN port is not connected to the network segment. Make sure that
the connections are secure, you are using the correct Ethernet cable and connector, and the
devices at both ends of the Link are powered-up. For the LAN connector pin-out, see
Appendix A, “Cable Connectors and Pin-outs.”
Common Problems
One end can call the other but not vice versa.
Indicates that there is a probable configuration problem at one end. Check each
configuration for the proper phone number, IP address, subnet mask and default router
address.
Gatekeeper configuration problem.
Check the registration list on the gatekeeper and make sure that each endpoint is registered
there.
Make sure that the additional phone numbers created by the VIU-323 do not conflict with
other numbers assigned.
Unable to establish a call. The VIU-323 reports the line is busy and the green
Session LED on the front panel of the VIU-323 is lit.
The VIU-323 did not drop the session properly after the previous call. Restart the VIU-323.
9-1
Page 92

Tips and Troubleshooting
The VIU-323 indicates it is unable to call.
Check the gatekeeper endpoints list and make sure that each endpoint is registered; then
check the VIU-323 registration at both ends.
Check the network connection by pinging the far end VIU-323; if the ping fails, there is a
network problem; if the ping succeeds, turn off the room systems at both ends and turn them
back on; if this still does not work turn off the VIU-323s at both ends and turn them back
on.
Poor audio quality or last syllable repeats continuously.
Video has “artifacts” (areas where the screen does not update properly).
Call drops during videoconferencing.
These problems usually indicate a poor network connection. Try making the call at a lower
speed, if possible, or try making the call during off-peak hours.
If the above suggestions solve this problem, there is a network problem that you should
check.
Cannot place a call through a gateway.
Check the dialing stream to make sure the gateway prefix is correct.
Check that both ends of the call are set at the same bandwidth; if required, adjust the
bandwidth using the correct prefix.
Note: Firewalls will generally prevent calls from going through. Make sure that you are
not trying to send a call through a firewall.
Analyzing Problems
If the problem persists after trying the above solutions, apply the following procedures:
Network Quick Check
Use the Ping command to assess the network connection.
1. Working from a PC or UNIX system that is on the same segment as one of the failing
VIU-323, ping the IP address of the far-end VIU-323. The ping command indicates if
there is network connectivity and provides the round-trip delay time. Run the ping
command a few times or let it run continuously for a minute to see if connectivity is
consistent. Also note the round-trip delay variation.
9-2
Page 93

Analyzing Problems
2. Run the Ping command, using the gatekeeper’s IP address as the destination.
!
If connectivity seems good and round trip delays are consistent, go to the next
topic.
!
If connectivity is absent (the ping fails) or if connectivity regularly fails during a
short run, the network is at fault. Similarly, if the round-trip delay jumps around
substantially (more than a factor of 3), a network problem is likely.
Sending a Ping Command from a PC to a VIU-323
You send a Ping command from a Windows PC to a VIU-323 to see if the VIU-323 is
properly connected to the LAN.
"
To send a Ping command
1. On the Windows PC, from the Start menu, select Run (alternatively, select
Programs/Command Prompt or Programs/MS-DOS prompt).
2. In the window that opens, type Ping followed by a space and the IP address of the
VIU-323 you want to check (for example, Ping 123.30.80.48).
!
If a series of “Reply from…” messages appears on the screen, the VIU-323 is
connected. In this case, type Exit and press Enter to close the window.
!
If timeout messages appear on the screen, the VIU-323 is not connected. In this
case:
a. Check the physical connection of the LAN cable between the VIU-323 and
the LAN hub (and the PC’s connection to the LAN hub).
b. Check the VIU-323’s IP address.
c. Send another ping. If the second ping is also unsuccessful, you must redefine
the VIU-323’s IP address .
d. Type Exit and press Enter to close the window.
9-3
Page 94

Tips and Troubleshooting
Verify Component Interactions
Try a direct VIU-323-to-VIU-323 call to see if the problem lies with the gatekeeper.
1. Set up two VIU-323s to connect directly to each other rather than through the
gatekeeper.
2. Configure the VIU-323s to point to each other:
a. Run OnLAN Config 323 on a PC and specify the IP address of one of the
VIU-323s.
b. Advance to the Network Parameters dialog box and change the Default Gatekeeper
ID to the address of the destination VIU-323.
c. Save and transfer this configuration.
3. Make the same change on the destination VIU-323, specifying the source VIU-323’s
IP address as the default gatekeeper.
4. Try the call again.
!
If the configuration works, the room system and VIU-323s are in order; the
problem is with the gatekeeper, which is either broken or configured incorrectly.
!
If the call still fails, check the default router IP address on both VIU-323s and
make sure they are correct. If this does not fix the problem, go to the next topic.
Eliminate the Network
Try a VIU-323-to-VIU-323 call with both VIU-323s on the same LAN segment to see if
the problem is within the equipment itself (if this is not possible—for example, if the
equipment is remotely located—skip to the next topic):
1. Set up the VIU-323s to connect directly to each other rather than through the
gatekeeper. This may involve moving one system onto the local segment. Modify the
IP address of the moved VIU-323 to a value appropriate for the local segment.
2. Configure the VIU-323s to point to each other:
a. Run OnLAN Config 323 on a PC and specify the IP address of one of the
VIU-323s.
b. Advance to the Network Parameters dialog box and change the Default Gatekeeper
ID to the address of the destination VIU-323.
c. Save and transfer this configuration.
3. Try the call again.
!
If this configuration works, the network is at fault.
!
If the problem still exists, it is likely that one piece of equipment has failed.
Selectively replace pieces of equipment and run test calls until you locate the
broken component.
9-4
Page 95

Analyzing Problems
Network Problems
If problems disappear on the local segment but return as soon as you involve the larger
network, the problem may lie in the network itself. There are several tests you can run to
troubleshoot problems between remote sites, even if you are unable to test local
videoconferences.
Verify the Problem is with the Network
1. Reduce the speed of the videoconference to the lowest level possible (64K or 128K). If
the videoconference runs well at this lower speed but has problems at higher speed, the
network is suspect.
2. Try the videoconference at different times of day. Because network use varies over a
24-hour period, videoconferences may work better at some times of day than others. If
you find a videoconference works well during “off” hours, such as early morning, but
fails at busy times (typically late morning or mid-afternoon), the network is suspect.
3. Try a network route that has fewer router hops, such as across a leased line or an
alternate ISP. To determine the number of router hopes, run a traceroute (“tracer
Ipaddr” on a PC, “tr Ipaddr” on a UNIX system). If the videoconference behaves better
on a connection with fewer routers, the network is at fault.
Debug the Network
Network debugging is the domain of the network administrator and is not addressed in this
document. Contact your system administrator for assistance.
9-5
Page 96

Tips and Troubleshooting
IP Address Problems
If you experience difficulty setting the VIU-323 IP address parameters (IP address, default
router IP address and IP subnet mask) using the OnLAN Config 323 system configuration
software, an alternate method is to connect the configuration PC to the VIU-323 console
(serial) port and run a terminal session. After the terminal session, run OnLAN Config 323
to define the other VIU-323 parameters.
Defining IP Addresses via a Terminal Session
"
To establish a terminal session between a PC and the VIU-323
Note: The VIU-323 and configuration PC do not have to be disconnected from the LAN.
1. Make sure the VIU-323 is turned off.
2. Connect the 9-pin male connector of the null modem cable to the console (serial) port
on the front panel of the VIU-323 and connect the cable’s nine-pin female connector to
the configuration PC’s COM 1 port (alternately, you can connect the cable’s 25-pin
male connector to the PC’s COM 2 port, but this may require a female/female adapter).
3. Use Windows HyperTerminal™ or a similar application to open a console session. Set
the following parameters for Windows HyperTerminal:
!
Port Settings:
Rate=9600
Data bits=8
Parity=none
Stop bits=1
Flow control=none
!
Properties:
Function, arrow, and Ctrl keys act as=Terminal keys
Emulation=ANSI
Backscroll buffer lines=500
!
Terminal Setup:
Underline=enabled
Blink=enabled
!
ASCII Setup:
Wrap lines that exceed terminal width=enabled
9-6
Page 97

IP Address Problems
Note: All other values are default values.
4. Turn on the VIU-323 to start a terminal session. The message: “Press any key to start
configuration…” appears (if no message appears, press CTRL+X and wait for the
message). Press any key within six seconds of receiving the message to display a menu
of configuration options.
5. Type 1 and press Enter; type 1 again and press Enter.
6. Enter the IP address for Interface No. 1 and press Enter (the address must be entered
in dotted decimal format without leading zeroes, for example: 170.4.10.20).
7. Enter the default router IP address and press Enter (the address must be entered in
dotted decimal format without leading zeroes, for example: 170.4.10.20).
8. Enter the IP subnet mask in hexadecimal notation and press Enter. The PC displays
configuration information and the VIU-323 automatically reboots.
9. When Ready appears on the PC, disconnect the cable that connects it to the VIU-323
and close the terminal session.
After you set the IP addresses, run OnLAN Config 323. Note that the Select Unit screen
will display the IP address of the VIU-323 that you defined above in the list of RADVision
units. Select it from the list and continue to configure the VIU-323. Notice that the IP
addresses defined above appear in their appropriate screens during the configuration
procedure.
9-7
Page 98

Tips and Troubleshooting
9-8
Page 99

Appendix A
Cable Connectors and Pin-outs
Page 100

 Loading...