

Page 1
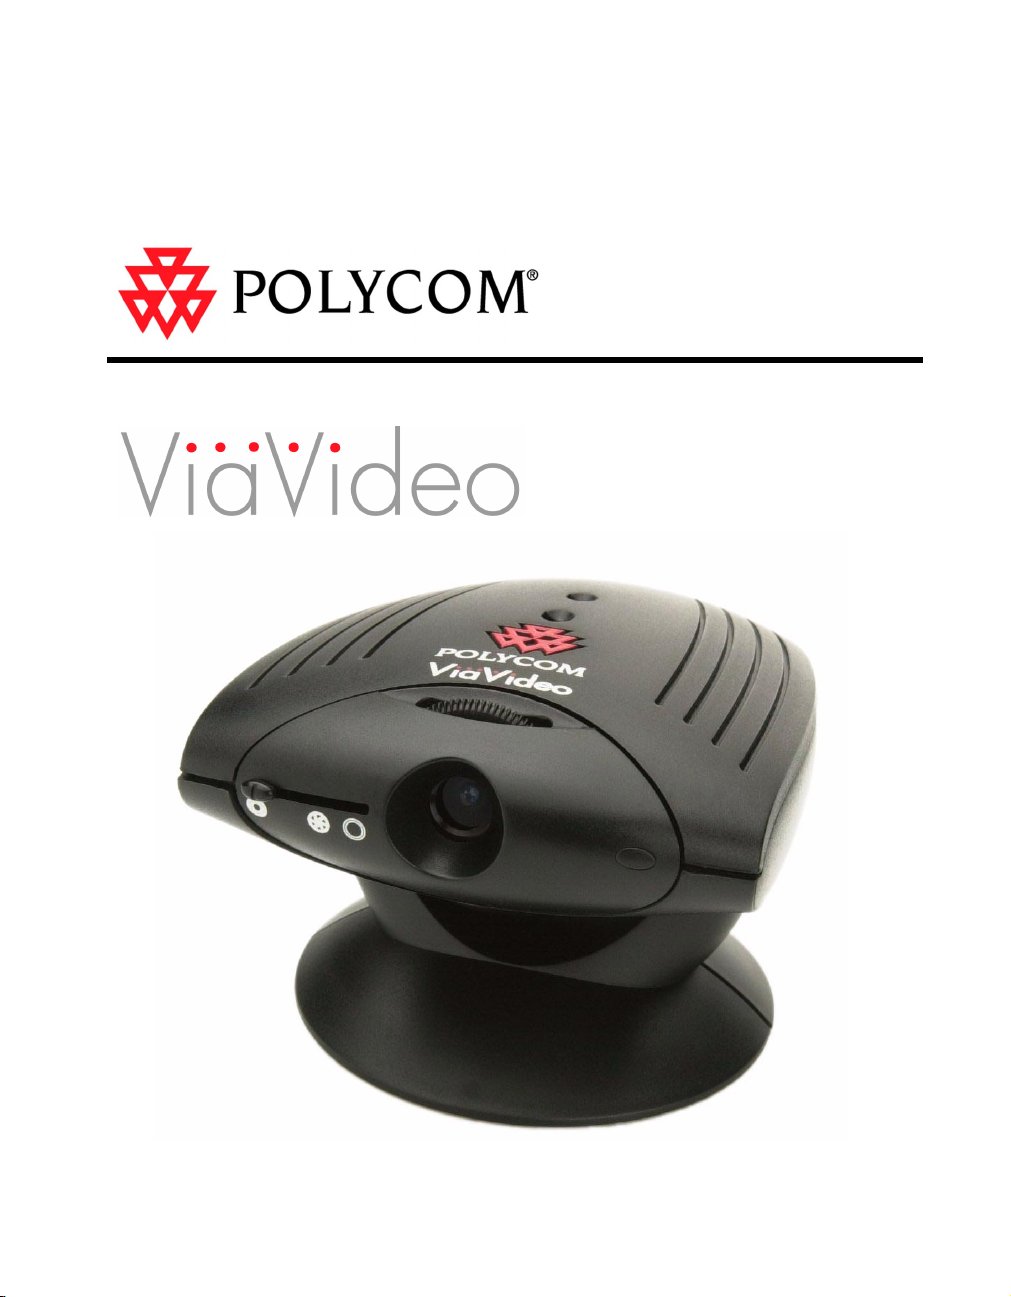
ViaVideo User’s Guide
November 2000 Edition
3151-10065-005A
Page 2

Page 3

Important Information
© 2000 Polycom, Inc. All rights reserved.
No part of this document may be reproduced or transmitted in any form or by any means, electronic or
mechanical, for any purpose, without the express written permission of Polycom, Inc.
Polycom, Inc. retains title to, and ownership of, all proprietary rights with respect to the software
contained within its products. The software is protected by United States copyright laws and international
treaty provision.
Every effort has been made to ensure that the information in this manual is accurate. Polycom, Inc. is not
responsible for printing or clerical errors. Information in this document is subject to change without notice.
Other Restrictions
You shall not allow any third party to decompile, disassemble, or otherwise reverse-engineer or attempt
to reconstruct or discover any source code or underlying ideas or algorithms of the software by any means
whatsoever.
Trademark Information
Polycom®, the Polycom logo design, ViewStationTM, and ViaVideoTM are either registered trademarks or
trademarks of Polycom, Inc.
Microsoft
Microsoft Corporation. Adobe Acrobat Reader
Pentium
All other brand and product names are trademarks or registered trademarks of their respective companies.
®
, Windows®, NetMeeting®, and DirectX® are either registered trademarks or trademarks of
®
is a registered trademark of Intel Corporation.
ViaVideo contains Macromedia Flash Player Software by Macromedia, Inc.,
Copyright © 1995-2000 Macromedia, Inc. All rights reserved. Macromedia and
Flash are trademarks of Macromedia, Inc.
TM
is a trademark of Adobe Systems Incorporated.
Patent Information
The accompanying product is protected by one or more U.S. and foreign patents and patents pending held
by Polycom, Inc.
Warranty
Polycom, Inc. warrants its products to be free of defects in materials and factory workmanship for a period
of twelve (12) months from the date of purchase. This warranty does not apply to damage to products
resulting from accident, misuse, service or modification by anyone other than a Polycom, Inc. authorized
service facility/dealer. The warranty is limited to the original purchaser and is not transferable. Any
liability of Polycom, Inc. or its suppliers with respect to the product or the performance thereof under any
warranty, negligence, strict liability or other theory will be limited exclusively to product repair or
replacement as provided above. Except for the foregoing, the product is provided “as is” without warranty
of any kind including without limitation, any warranty of merchantability or fitness for a particular
purpose. The entire risk of the quality and performance of the software programs contained in the system
is with you.
Limitation of Remedies and Damages
Polycom, Inc., its agents, employees, suppliers, dealers and other authorized representatives shall not be
responsible or liable with respect to the product or any other subject matter related thereto under any
contract, negligence, strict liability or other theory for any indirect, incidental, or consequential damages,
including, but not limited to loss of information, business, or profits.
The law of certain states or nations does not permit limitation or exclusion of implied warranties and
consequential damages, so the above limitations, disclaimers, or exclusion may not apply to you. This
warranty gives you special legal rights. You may also have other rights that vary by state and nation.
Page 4

Important Safeguards
Read and understand the following instructions before using the system:
• Close supervision is necessary when the system is used by or near children. Do not leave unattended
• Only use electrical extension cords with a current rating at least equal to that of the system.
• Always disconnect the system from power before cleaning and servicing and when not in use.
• Do not spray liquids directly onto the system when cleaning. Always apply the liquid first to a static
• Do not immerse the system in any liquid or place any liquids on it.
• Do not disassemble this system (except as instructed in the manufacturer's instructions). To reduce the
• Keep ventilation openings free of any obstructions.
• Save these instructions.
Regulatory Notices
FCC Notice
This equipment has been tested and found to comply with the limits for a Class B digital device, pursuant
to Part 15 of the FCC Rules. These limits are designed to provide reasonable protection against harmful
interference when the equipment is operated in a residential installation. This equipment generates, uses,
and can radiate radio frequency energy and, if not installed and used in accordance with the instruction
manual, may cause harmful interference to radio communications. However, there is no guarantee that
interference will not occur in a particular installation. If this equipment does cause harmful interference
to radio or television reception, which can be determined by turning the equipment off and on, the user is
encouraged to try to correct the interference by one or more of the following measures:
• Reorientate or relocate the receiving antenna.
• Increase the separation between the equipment and receiver.
• Connect the equipment into an outlet on a circuit different from that to which the receiver is connected.
• Consult the dealer for help.
Changes or modifications not expressly approved by Polycom could void the user's authority to operate
this equipment. If you experience trouble with this equipment, please contact your equipment provider for
repair/warranty information. If your equipment is causing harm to the telephone network, the telephone
company may request that you disconnect the equipment until the problem is resolved.
There are no user serviceable parts inside the ViaVideo or power supply.
while in use.
free cloth.
risk of shock and to maintain the warranty on the system, a qualified technician must perform service
or repair work.
Underwriters’ Laboratories’ Statement
The system is intended to be powered only by the supplied power supply unit.
RADVision Statement
Portions of this software are © 2000 RadVision Ltd.
Page 5

Contents
ViaVideo Quick Start
System Requirements and Installation............................................................. 1
Hardware Requirements ..................................................................... 1
Software Requirements....................................................................... 2
Installing Software ............................................................................... 2
Installing Hardware ............................................................................. 2
Starting ViaVideo ............................................................................................. 3
Turn on the Camera ............................................................................ 3
Initial Setup ......................................................................................... 4
Camera Calibration ............................................................................. 6
Placing a Call ................................................................................................... 6
Using Manual Dialing .......................................................................... 6
Using the Address Book or Speed Dialing .......................................... 9
On-Screen Remote Control................................................................. 11
Ending a Call.................................................................................................... 12
Answering Calls ............................................................................................... 12
Closing ViaVideo.............................................................................................. 13
Using ViaVideo
Calling Features ............................................................................................... 15
Using the Remote Control ................................................................... 16
Window Controls ................................................................................. 18
Sending Snapshots ............................................................................. 19
Address Book and Speed Dial ........................................................................ 21
Using the Address Book...................................................................... 21
Using Speed Dial ............................................................................................ 26
Controlling Audio and Video............................................................................. 27
Controlling Audio ................................................................................. 27
Muting Video ....................................................................................... 29
Collaboration and Application Sharing ............................................................ 31
Multiple IP Addresses ...................................................................................... 31
Picture in Picture (PIP) ........................................................... 18
Minimize Window ................................................................... 18
Information Screen Access .................................................... 18
Re-Size the ViaVideo Display ................................................ 19
Leaving a Callback Message ................................................. 20
Local and Global Address Book Entries................................. 23
Via the On-Screen Remote .................................................... 27
Via the Audio Screen ............................................................. 28
© Polycom, Inc. v ViaVideo User’s Guide
Page 6

Contents
System Information and Diagnostics
Using the System Information Screens ............................................................ 33
Diagnostics....................................................................................................... 35
Network Statistics ................................................................................ 36
Advanced Statistics ............................................................................. 37
Call Status ........................................................................................... 38
Reset System ...................................................................................... 39
Camera Calibration ............................................................................. 40
Generate Tone .................................................................................... 41
Setup ................................................................................................................ 42
General................................................................................................ 43
Directory Services ............................................................................... 45
LAN and Internet ................................................................................. 46
Audio ................................................................................................... 48
Software .............................................................................................. 50
PC Software ........................................................................... 50
ViaVideo Software .................................................................. 50
H.323 Setup ........................................................................................ 51
H.323...................................................................................... 52
Gatekeeper............................................................................. 54
Dialing Speeds ....................................................................... 55
Quality of Service and Firewalls ............................................. 56
Audio Connection
PC with Speakers............................................................................................. 59
PC with Headphones ....................................................................................... 60
Headphones Only ............................................................................................ 61
Headset with Attached Microphone ................................................................. 62
Network Connection
Pick Your Connection Type .............................................................................. 63
Simple Connection - Just a Modem, Thanks....................................... 63
Router With NAT, No Firewall ............................................................. 64
Router With Firewall ........................................................................... 64
Router With Firewall, Using a DMZ ..................................................... 64
Through a Virtual Private Network ...................................................... 65
Configure Your Connection .............................................................................. 65
Simple Connection - Just a Modem, Thanks....................................... 65
Router With NAT, No Firewall ............................................................. 65
Router With Firewall ........................................................................... 66
Configure your ViaVideo for NAT ........................................... 66
Open and Assign Ports in the Firewall ................................... 67
ViaVideo User’s Guide vi www.polycom.com
Page 7

What’s a Firewall?............................................................................................ 72
What’s a DMZ? ................................................................................................ 74
What’s a Network Address Translator?............................................................ 75
Troubleshooting
General Troubleshooting.................................................................................. 77
Audio Troubleshooting ..................................................................................... 78
Video Troubleshooting ..................................................................................... 80
Error Messages ............................................................................................... 82
Contents
Router With Firewall, Using a DMZ..................................................... 68
Configure Your ViaVideo for NAT .......................................... 69
Assign your ViaVideo to the DMZ .......................................... 69
Through a Virtual Private Network ...................................................... 70
Opening Ports ..................................................................................... 73
Port Number Assignation ....................................................... 73
Is it Safe? ............................................................................... 73
Installation Errors ................................................................................ 82
H.323 Errors........................................................................................ 82
© Polycom, Inc. vii ViaVideo User’s Guide
Page 8

Contents
ViaVideo User’s Guide viii www.polycom.com
Page 9

ViaVideo Quick Start
1
This chapter explains how to get started with the Polycom®
ViaVideo
describes:
• System Requirements and Installation (page 1)
• Starting ViaVideo (page 3)
• Placing a Call (page 6)
• Ending a Call (page 12)
• Answering Calls (page 12)
• Closing ViaVideo (page 13).
TM
desktop video communications system. The chapter
System Requirements and Installation
Hardware Requirements
These are the minimum system hardware requirements:
•USB port
• 350 MHz processor, Pentium
• 64 MB RAM
• 4 MB video memory
• 150 MB available hard disk space (might be considerably less
depending on whether you have the required software already
installed)
• SVGA monitor (800 x 600)
• 16-bit color or higher
• Desktop PC with headphones, headset, or external speakers
required
Laptop PC with headphones, headset, or internal speakers
required
• Broadband IP network access (32 KB and above).
®
II compatible with MMX
© Polycom, Inc. 1 ViaVideo User’s Guide
Page 10

Chapter 1 ViaVideo Quick Start
• If you are using a headset with microphone, it must have a single
audio connection, like those used with cellular phones.
Software Requirements
Installing Software
To use ViaVideo, you must have one of the following versions of
Microsoft
®
Windows® installed:
• Windows 98 version 1 or version 2
• Windows Millennium Edition
• Windows 2000.
As part of the installation process, ViaVideo also checks for the
following required software. If the software is not present, ViaVideo
installs it.
®
•DirectX
• Adobe Acrobat Reader
7
TM
version 4
• Microsoft database support (ODBC)
®
• NetMeeting
3.01.
To install the ViaVideo software, insert the ViaVideo CD into your
CD drive and click Install Software. Follow the instructions in the
installation screens to complete the installation.
Note If your PC is not set up to autorun the CD, double-click
vvsetup.exe
to run the installation program.
Installing Hardware
Caution Be sure to install the ViaVideo software before you install the ViaVideo
camera unit.
To install the ViaVideo camera unit, inser t the ViaVideo CD into your
CD drive and click the Install Hardware link. You are guided through
the installation procedures step by step.
Note For more information about audio port connections, see
“Audio Connection,” on page 59.
ViaVideo User’s Guide 2 www.polycom.com
Page 11
Chapter 1 ViaVideo Quick Start
Starting ViaVideo
The ViaVideo application and camera unit work together to provide
an unparalleled experience in conference room quality video
communications on your desktop. The ViaVideo camera unit
combines a camera and high-performance multi-media processor,
which performs all audio encoding and decoding, and video
encoding. This leaves the PC free to perform normal tasks while
ViaVideo is running, even if you are in a call.
Turn on the Camera
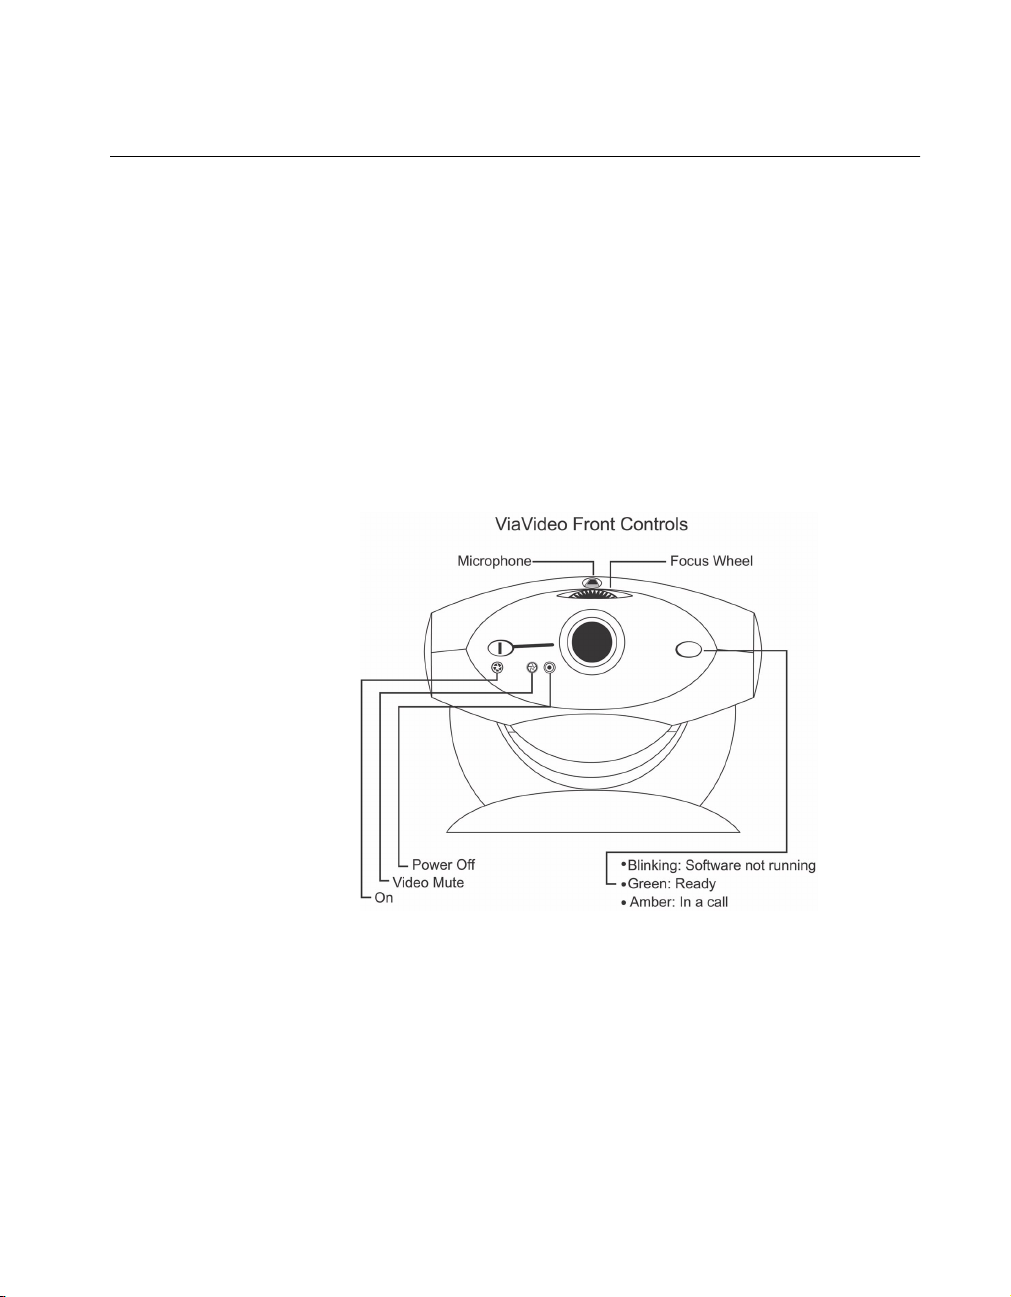
To start ViaVideo:
1. Turn the camera unit on using the slider switch in the front of the
unit.
If your camera is installed correctly, the status indicator light
blinks green, indicating that the camera unit is ready to receive
the software upload.
The switch on the front of the ViaVideo camera unit has three
positions:
On: Turns the camera unit on.
Video Mute: Blocks the camera unit lens. This does not
mute the camera unit’s audio. For more
© Polycom, Inc. 3 ViaVideo User’s Guide
Page 12

Chapter 1 ViaVideo Quick Start
information, see “Muting Video,” on page
29.
Off: Turns the camera unit off.
Because a substantial portion of the ViaVideo software is
uploaded to the camera unit when you start the application, the
camera unit should be turned on before you start the
application.
2. Start the ViaVideo application by double-clicking the ViaVideo
icon on your desktop.
Initial Setup
The first time the ViaVideo application star ts, it presents a series
of user setup dialogs:
a. User Information Provide the following essential
information:
Name: The name you enter in this field is
displayed in your caller identification, as
well as your listing in the address books of
users registered with your Internet
Locator Service (ILS) or Global Address
Book (GAB) server.
E-Mail Address: This E-Mail address is displayed in your
caller identification information.
Country: Select your country. ViaVideo uses this
setting to display the correct product
version.
b. Microphone Setup - Specify which type of microphone
setup you are using:
ViaVideo built-in microphone:
Select this setting if you are using
headphones or your PC’s speakers (not a
headset with attached microphone). This
setting is the default, and activates the
ViaVideo camera unit’s microphone
(located on top of the camera unit). This
microphone is directional (oriented
towards the face of the camera unit), and
sensitive enough to use where other
manufacturers’ cameras might require a
headset microphone.
ViaVideo User’s Guide 4 www.polycom.com
Page 13

Chapter 1 ViaVideo Quick Start
Headset with microphone:
Select this setting only if you are using a
headset with an attached microphone
plugged into the audio out port in the back
of the ViaVideo camera unit.
This setting turns off the internal ViaVideo
microphone.
Note: If you have an external microphone attached to the
microphone port in the back of your PC, ViaVideo
ignores it and uses the ViaVideo camera unit’s
internal microphone.
For more information about the different audio connections,
see “Audio Connection,” on page 59.
c. Global Address Book Registration - Specify if you want to
register with the Polycom Global Address Book (GAB)
server, another ILS server, or neither.
If you are registering with a GAB server or ILS server, enter
the server’s IP address in the field provided.
When you register with a GAB or ILS server, other
registered users can see your user information displayed as
a global listing in their address books, and can use that
listing to place calls. Likewise, if you are registered with the
same ILS server as other users, their listings are displayed
in your address book as global listings.
For more information about the Global Address Book and
ILS servers, see “Using the Address Book,” on page 21 and
“Directory Services,” on page 45.
If you choose not to register with either Polycom’s GAB or
another ILS server, you can still place calls manually, and
save those addresses, both in the Speed Dial screen, and
as local addresses in your address book. For more
information, see “Placing a Call,” on page 6.
When you complete the ViaVideo setup procedures, the
indicator light on the ViaVideo unit blinks green as the ViaVideo
application loads instructions to the camera unit. Once this
process is finished, ViaVideo presents the main screen, from
which you can place and receive calls.
© Polycom, Inc. 5 ViaVideo User’s Guide
Page 14

Chapter 1 ViaVideo Quick Start
3. As a final step, use the focus knob on top of the ViaVideo
camera unit to get a clear image in the main screen’s near video
window (displayed whenever you are not in a call). Turn the knob
to the right to focus on objects further away from the lens, and
to the left for closer objects.
Note If the ViaVideo application presents the main screen, but an
animation is displayed in the near video window, check to
make sure that your camera unit is turned on, and that the
power and USB cables are connected correctly. For more
information, see “Troubleshooting,” on page 77.
Camera Calibration
After your ViaVideo camera unit has been turned on for 1/2 hour or
more, ViaVideo presents the Camera Calibration screen in the
application window so that you can calibrate the camera for low light
settings. Once your camera has been calibrated, you will not need
to calibrate again unless you move the camera unit to a new
computer.
To calibrate your camera:
1. Slide the camera switch to the Video Mute position.
ViaVideo performs the calibration immediately once the switch
is in the Video Mute position.
2. ViaVideo notifies you when calibration is complete. This should
take just a few moments.
3. Slide the camera switch back to the On position.
You can also calibrate your camera manually in the Camera
Calibration screen (System Info>Diagnostics>Camera Calibration).
Placing a Call
This section describes how to dial a call:
• Using Manual Dialing
• Using the Address Book or Speed Dialing.
Using Manual Dialing
This section explains how to make a call by dialing the far site IP
number manually.
ViaVideo User’s Guide 6 www.polycom.com
Page 15
Chapter 1 ViaVideo Quick Start
Note Before you start the ViaVideo application, be sure your
camera unit is turned on.
1. Double-click the ViaVideo icon to launch the ViaVideo
application.
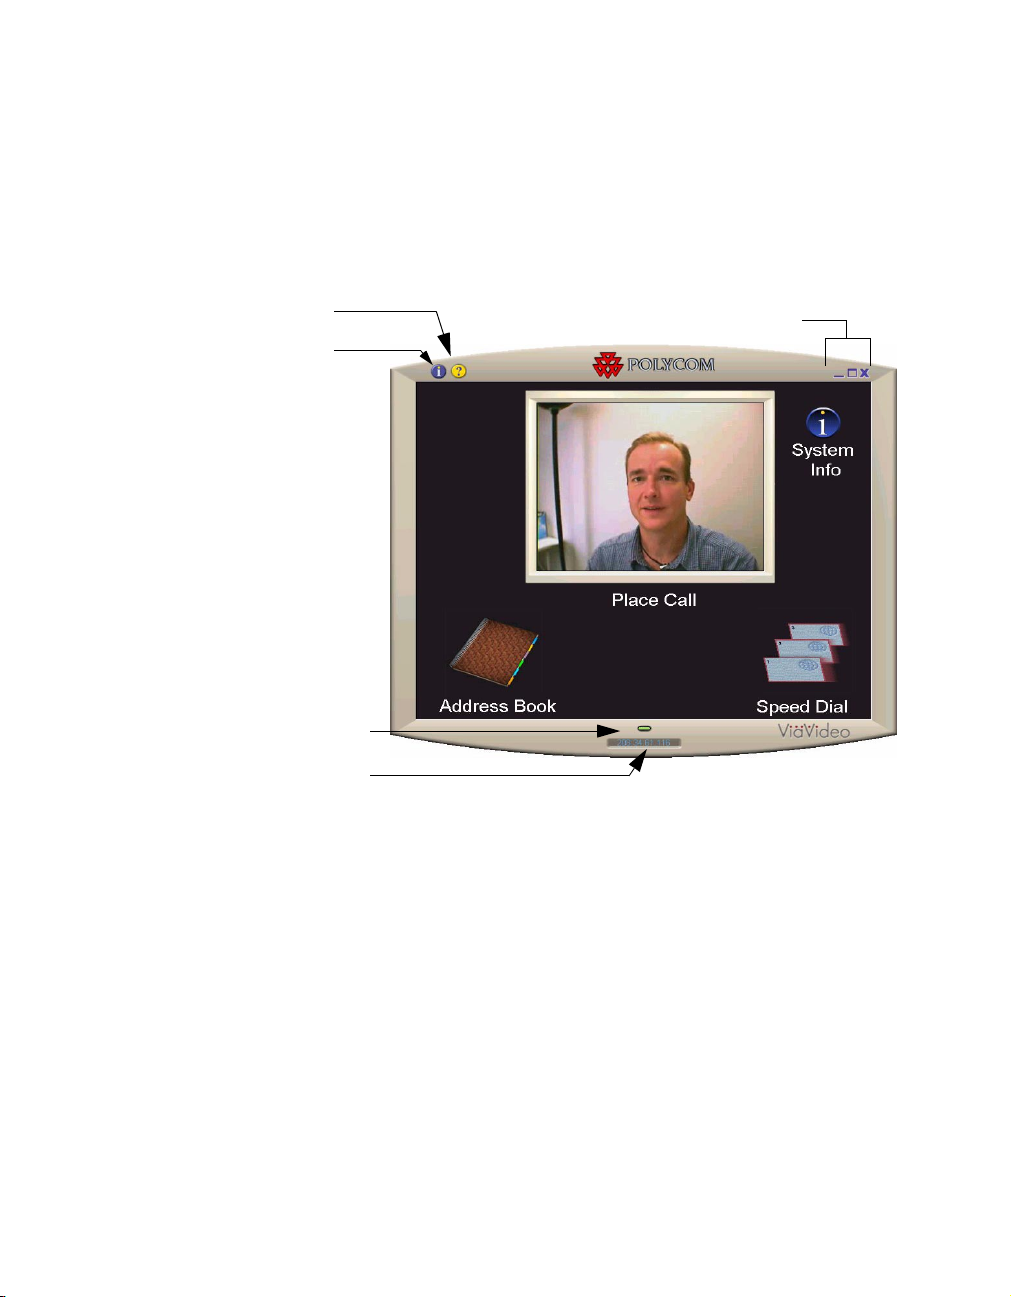
The ViaVideo application’s main screen is displayed, with near
video showing in the Place Call window.
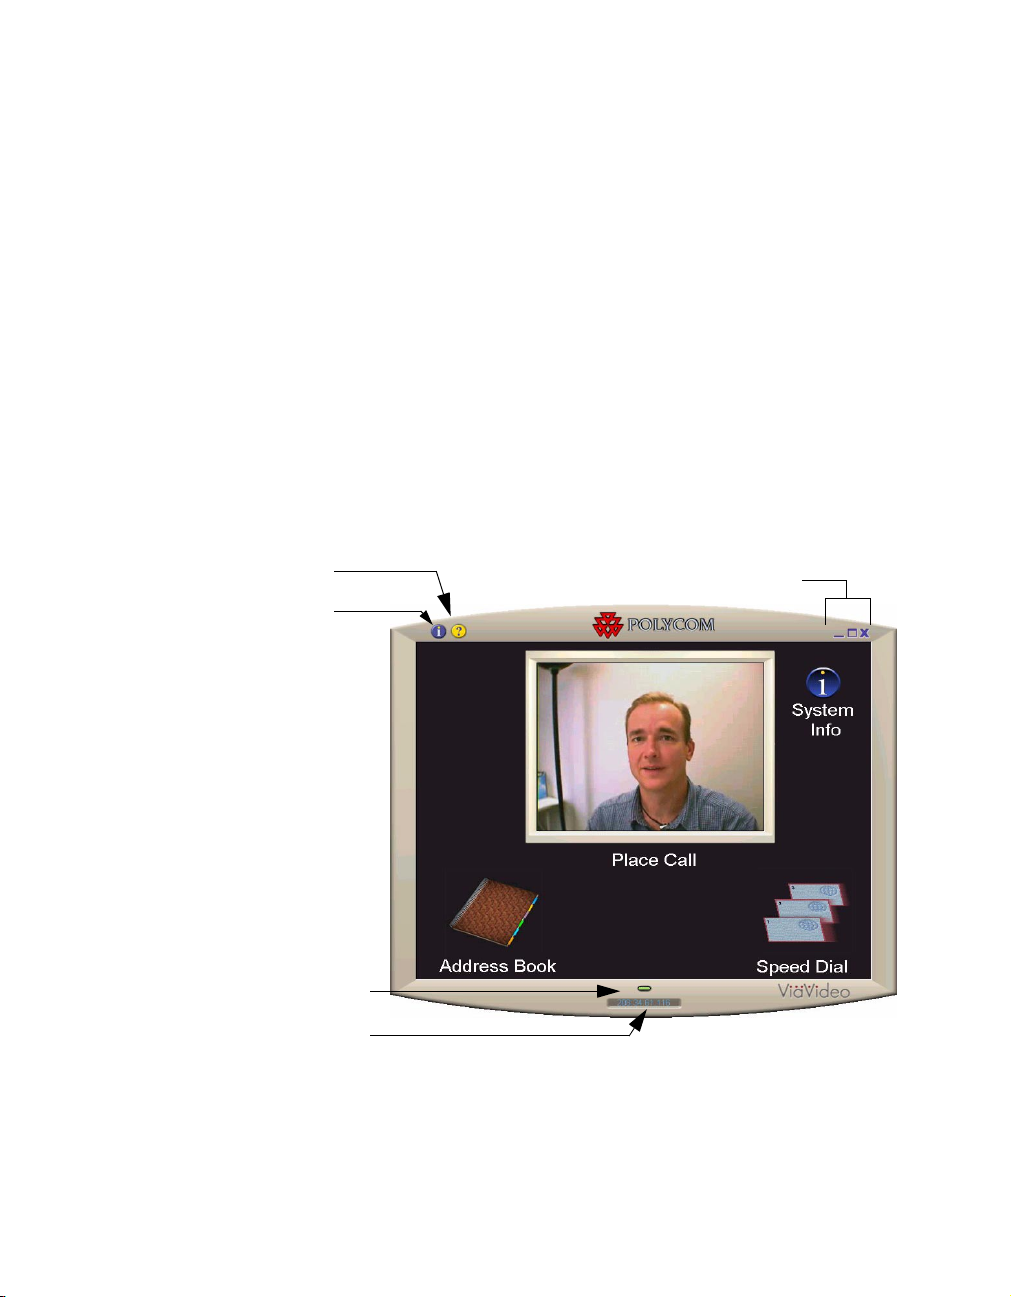
On-screen help icon
Info icon
Window controls
Call status light
IP address
If the ViaVideo application presents the main screen, but an
animation is displayed in the near video window, make sure that
your camera unit is turned on and that the power and USB
cables are connected correctly. For more troubleshooting
information, see “Troubleshooting,” on page 77.
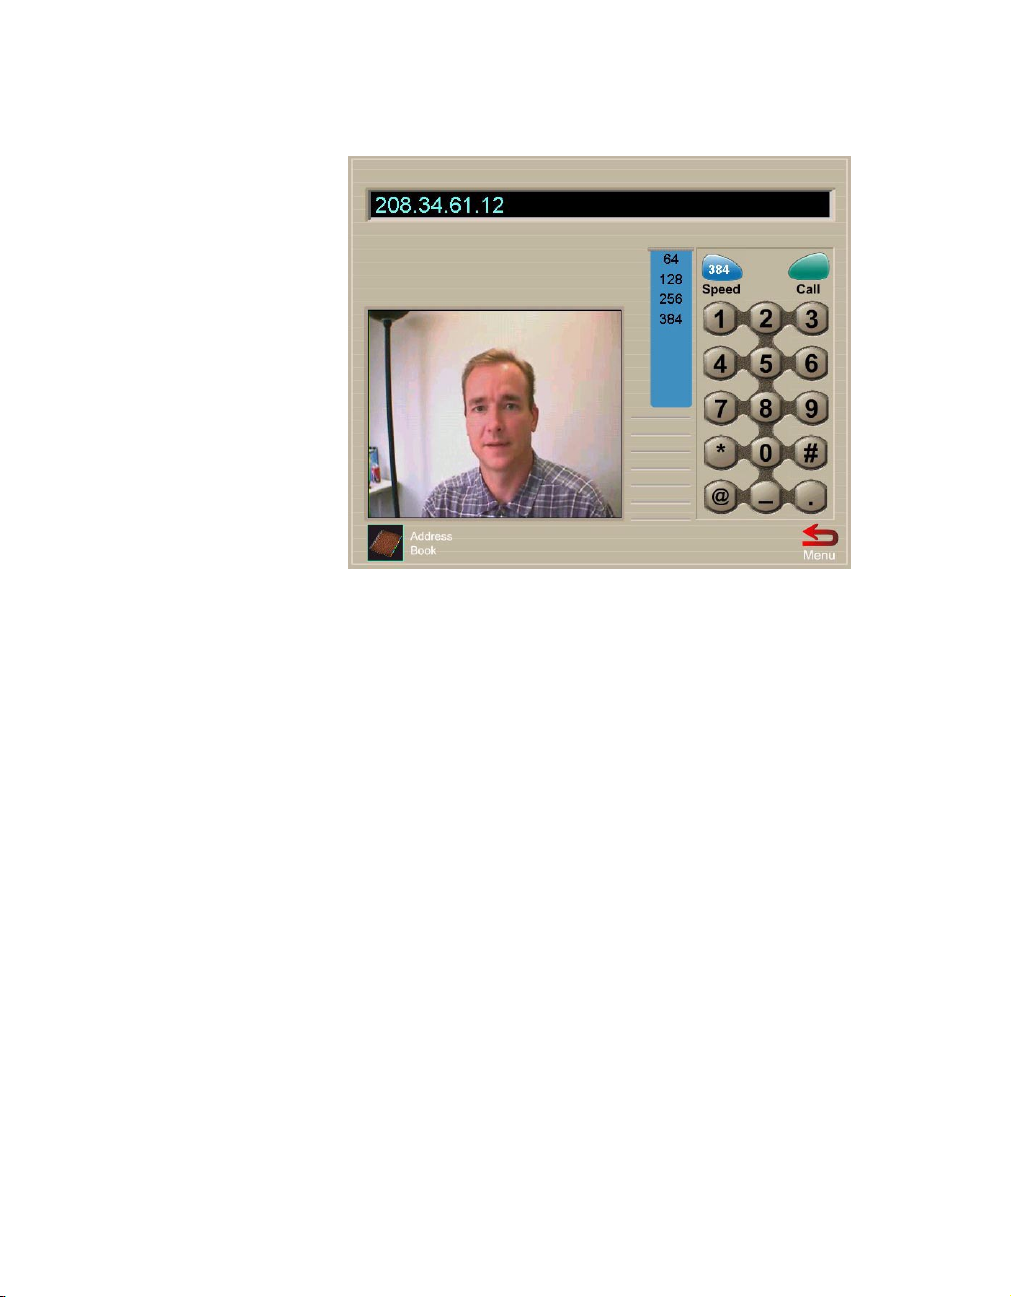
2. Click Place Call in the main screen.
The manual calling screen is displayed, with local video in the
video window.
3. The Speed icon shows the selected line speed.
To select a line speed, click Speed and select the speed you
want to use from the choice bar that is displayed on the left.
For better video quality, select a higher speed if you have the
network bandwidth available to support the higher transfer rate.
© Polycom, Inc. 7 ViaVideo User’s Guide
Page 16
Chapter 1 ViaVideo Quick Start
To conserve network bandwidth, select a lower speed.
For more information about choosing line speeds, see “Dialing
Speeds,” on page 55.
4. Use your keyboard or the number buttons on the number pad to
enter the IP number, and click Call.
5. While the call is connecting, ViaVideo shows the name and IP
address of the party you are calling, and the calling speed. A call
progress indicator is displayed on the lower left of the screen to
indicate that the call is connecting. The progress indicator
changes progressively to blue, yellow, orange, and green as
your call completes.
Blue Ringing, attempting connection to far site
Yellow Far site reached, waiting for answer
Orange Negotiating data transfer
Green Connected
6. Once your call is connected, ViaVideo shows the far site video,
and the on-screen remote is displayed to the right of your
screen. For more information about how to use the on-screen
remote, see “Using the Remote Control,” on page 16.
Note If the call does not go through, one of the following
messages is displayed:
ViaVideo User’s Guide 8 www.polycom.com
Page 17
Chapter 1 ViaVideo Quick Start
Network Error The far site does not answer. There is
either a network error, or more likely, the
far site is not activated.
Far Site Busy The far site is currently in a call.
Using the Address Book or Speed Dialing
This section explains how to make a call using the address book and
speed dial features of ViaVideo.
Note Before you start the ViaVideo application, be sure your
camera unit is turned on.
1. Double-click the ViaVideo icon to launch the ViaVideo
application.
The ViaVideo application’s main screen is displayed, with near
video showing in the Place Call window.
On-screen help icon
Info icon
Window controls
Call status light
IP address
If the ViaVideo application presents the main screen, but an
animation is displayed in the near video window, make sure that
your camera unit is turned on, and that the power and USB cables
© Polycom, Inc. 9 ViaVideo User’s Guide
Page 18
Chapter 1 ViaVideo Quick Start
are connected correctly. For more information, see
“Troubleshooting,” on page 77.
2. Click Address Book or Speed Dial. This presents the Address
Book screen.
Speed dial
New
entry
Edit
entry
Delete
entry
entries
Search
Call button
Directory
services
IP Address
Line speed
Connection type
The speed dial screen is actually part of the address book. To
access speed dial entries, click the top tab on the right of the
Address Book screen.
To place a call from the address book:
a. Highlight an entry in the Address Book screen.
b. Click Call or double-click on the entry.
ViaVideo presents the calling screen.
For more information about the Address Book screen, see
“Using the Address Book,” on page 21.
The Speed Dial screen shows the last twelve numbers you have
dialed. To place a call using speed dial, you must first have made
a call, either manually or using the address book, for the entr y
to appear in the Speed Dial screen.
To place a call using speed dial:
ViaVideo User’s Guide 10 www.polycom.com
Page 19

Chapter 1 ViaVideo Quick Start
a. To display the Speed Dial screen, click the tab for speed
dial entries on the right of the address book, or click Speed
Dial from the ViaVideo main screen.
b. Double-click on the speed dial entry you want to call.
For more information about the Speed Dial screen, see “Using
Speed Dial,” on page 26.
3. While the call is connecting, ViaVideo presents the name and IP
address of the party you are calling and the calling speed. A call
progress indicator is displayed on the lower left of the screen to
indicate that the call is connecting. The progress indicator
changes progressively to blue, yellow, orange, and green as
your call completes.
Blue Ringing, attempting connection to far site
Yellow Far site reached, waiting for answer
Orange Negotiating data transfer
Green Connected
4. Once your call is connected, ViaVideo shows the far site video,
and the on-screen remote is displayed to the right of your
screen. For more information about how to use the on-screen
remote, see “Using the Remote Control,” on page 16.
Note If the call does not go through, one of the following
messages is displayed:
Network Error The far site does not answer. There is
either a network error, or more likely, the
far site is not activated.
Far Site Busy The far site is currently in a call.
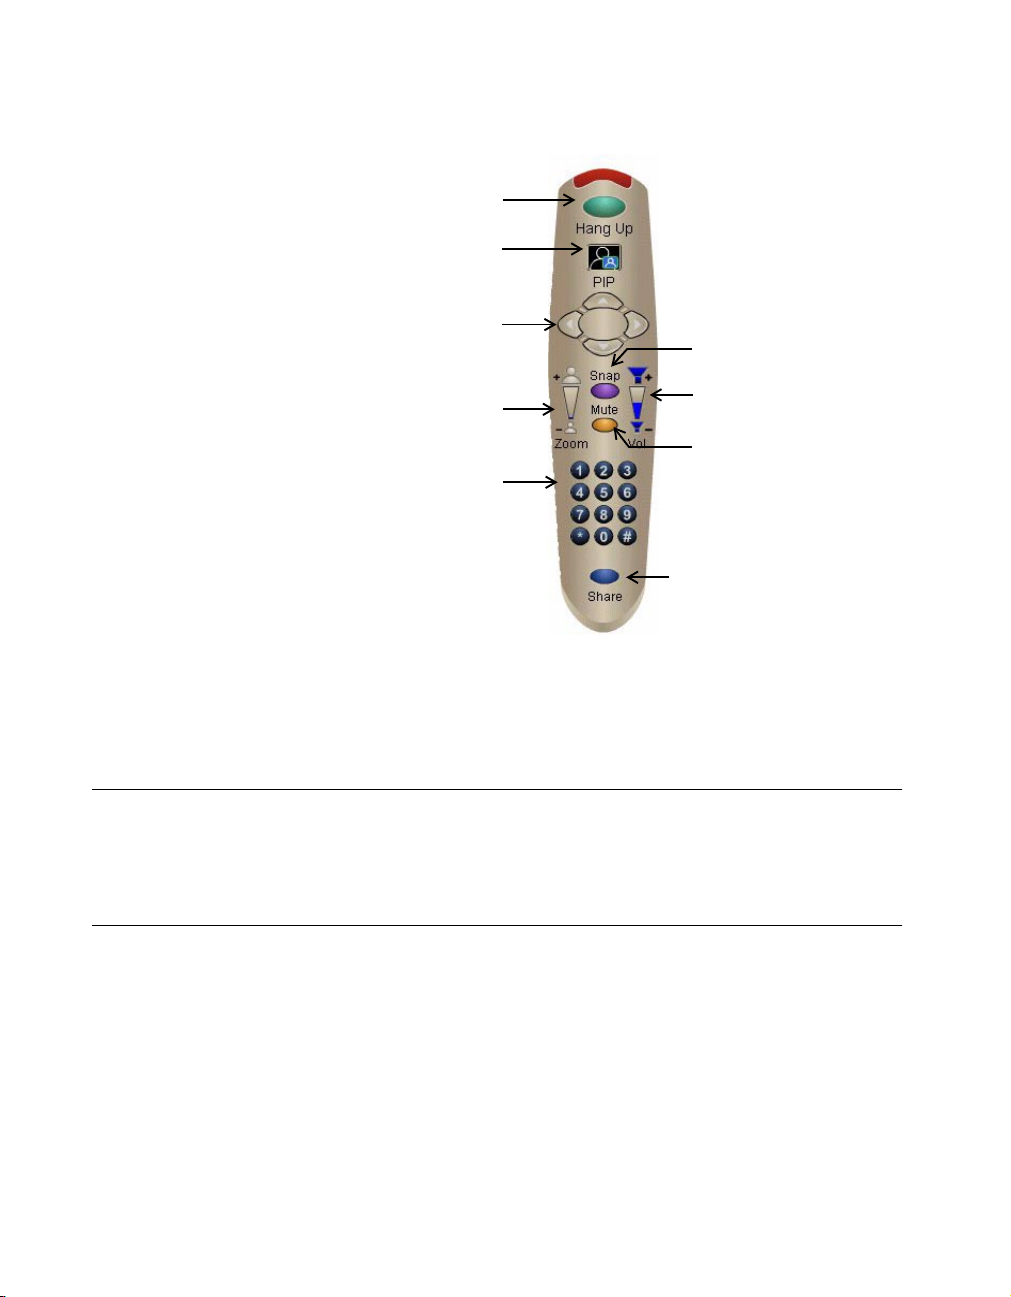
On-Screen Remote Control
When you place a call, a virtual remote control is displayed to the
right of the ViaVideo screen. The remote control performs a variety
of calling functions.
© Polycom, Inc. 11 ViaVideo User’s Guide
Page 20
Chapter 1 ViaVideo Quick Start
For more information, see “Using the Remote Control,” on page 16.
Hangs up call
To g g l e s l oc a l
Picture-in-Picture
Far camera movement
(ViaVideo-ViewStation
calls only)
Snapshot
Note: The far camera controls (far
camera movement and far camera
zoom) are not implemented in this
release. They will be implemented in a
future release.
Ending a Call
To end a call, click Hang Up on the virtual remote control. ViaVideo
disconnects immediately.
Answering Calls
ViaVideo is configured to ask if you want to receive an incoming call.
When you receive an incoming call, ViaVideo activates a ring tone,
and pops up a dialog box. This dialog shows the name of the far site
and its IP address. You can then choose to receive the call or not.
Far camera
zoom
Virtual keypad
(allows for DTMF
touchtone numbers)
Volume
Audio mute
Application sharing
To have ViaVideo answer incoming calls automatically, go to the
General Setup screen (System Info>Setup>General) and select
Auto Answer. When auto answer is on, ViaVideo activates a ring
tone, and automatically connects with the far site.
ViaVideo User’s Guide 12 www.polycom.com
Page 21

Chapter 1 ViaVideo Quick Start
Note To answer a call, the ViaVideo application must be running.
If the ViaVideo application window is minimized, you are still
able to receive incoming calls as described above.
Closing ViaVideo
To close the ViaVideo application, click the X in the top right corner
of the ViaVideo screen, or right-click on the top of the application
window frame.
Note To turn off the ViaVideo camera unit, move the slider switch
on the face of the camera unit all the way to the right.
© Polycom, Inc. 13 ViaVideo User’s Guide
Page 22

Chapter 1 ViaVideo Quick Start
ViaVideo User’s Guide 14 www.polycom.com
Page 23

Using ViaVideo
This chapter explains how to use the following ViaVideo features:
• Calling Features (page 15)
• Address Book and Speed Dial (page 21)
• Controlling Audio and Video (page 27)
• Collaboration and Application Sharing (page 31)
• Multiple IP Addresses (page 31).
Calling Features
This section describes the following ViaVideo features that you can
use during a call:
• Using the Remote Control (page 16)
• Window Controls (page 18)
• Sending Snapshots (page 19).
2
© Polycom, Inc. 15 ViaVideo User’s Guide
Page 24
Chapter 2 Using ViaVideo
Using the Remote Control
When you place a call, a virtual remote control is displayed to the
right of the ViaVideo screen. The remote control lets you perform a
variety of calling functions.
Hangs up call
Toggles local
Picture-in-Picture
Far camera movement
(ViaVideo-ViewStation
calls only)
Snapshot
Note: The far camera controls (far
camera movement and far camera
zoom) are not implemented in this
release. They will be implemented in a
future release.
Hang Up Terminates the current call. When you press this
PIP Activates the Picture-in-Picture (PIP) window.
Far Camera/Zoom The far camera controls are not supported in
Virtual Keypad Lets you use Dual Tone Multi Frequency (DTMF)
Far camera
zoom
Virtual keypad
(allows for DTMF
touchtone numbers)
button, the call is terminated.
ViaVideo maintains the PIP setting between
calls.
this version of ViaVideo. They will be supported
in the next version of ViaVideo.
touchtones. DTMF touchtones can be used
when you are making a call through an H.323
gatekeeper and you need to manually enter an
extension number.
See “H.323 Setup,” on page 51 for more
information.
Vol ume
Audio mute
Application sharing
ViaVideo User’s Guide 16 www.polycom.com
Page 25

Chapter 2 Using ViaVideo
Snapshot Sends a high-resolution still image, or snapshot,
to the far site during a call.
This feature is designed for far sites that use the
Annex D high-resolution (704 x 576) graphics
standard. These are typically conference room
video communications systems, such as
Polycom ViewStations.
Systems using lower resolution graphics
transfer standards (for example, QCIF,
NetMeeting) are not able to receive high
resolution snapshots.
Volume Controls audio volume received from the far site.
For more information about controlling audio,
see “Controlling Audio,” on page 27.
Audio Mute Mutes outgoing audio to the far site. When this
option is selected, the audio mute icon is
displayed on the screen (the far site does not
see the icon). ViaVideo maintains the audio
mute setting between calls.
© Polycom, Inc. 17 ViaVideo User’s Guide
Page 26

Chapter 2 Using ViaVideo
Window Controls
You can perform several window controls:
• Picture-in-Picture (PIP)
• Minimize Window
• Information Screen Access
• Re-Size the ViaVideo Display
Picture in Picture (PIP)
You can activate ViaVideo’s Picture in Picture (PIP) feature while in
a call by clicking PIP on the on-screen remote control.
Minimize Window
You can minimize the ViaVideo application window by clicking the
minimize icon in the top right corner of the ViaVideo application
window. If you are not in a call, the window is minimized and you can
answer incoming calls normally.
If you are in a call, you can still minimize the application window
without losing full audio and video functionality. To do so, simply click
the minimize icon in the top right of the ViaVideo application window
while you are in a call.
The ViaVideo window is minimized, and the far site is displayed in a
small window that is always on the top layer of your desktop. You can
drag this window to a convenient location on your desktop.
Note If you click Mute on the on-screen remote before minimizing
the application, you can go ahead and play Quake while
you’re in a conference call. As long as you keep a straight
face, no one will know!
Information Screen Access
You can access ViaVideo information screens while in a call by
clicking Info in the top left of the ViaVideo window. Far site video is
displayed in a small window, which you can drag to a convenient
location.
Information screen access during a call is useful if you want to
access your address book, check audio transfer to the far site
(System Info>Audio>Generate Tone), or see the call connection
ViaVideo User’s Guide 18 www.polycom.com
Page 27

Chapter 2 Using ViaVideo
statistics (System Info>Diagnostics>Network Stats or System
Info>Diagnostics>Advanced Stats).
To return to full-display mode, click Home in the bottom right of the
information screen. Then click Place Call.
Re-Size the ViaVideo Display
You can make ViaVideo display in a smaller screen to give you more
space on the desktop. Go to System Info>Setup>General and select
Show small size at startup. The next time you start ViaVideo, the
application is displayed in a half-size screen without any loss of
image quality.
Sending Snapshots
You can send a snapshot to the far site while you are in a call.
Snapshots are a way to transfer high-resolution still images to the far
site.
To send a snapshot:
1. Position and focus the ViaVideo camera to ensure a good
image. Use the PIP feature to see the near camera view.
2. Click Snap on the on-screen remote control.
The far site participant can see the snapshot image you sent.
3. ViaVideo invokes your default browser, and shows the snapshot
on your desktop.
When the far site sends you a snapshot, ViaVideo invokes your
default browser, and shows the snapshot in the browser window. You
can easily review the snapshots sent during a meeting by clicking
Back and Forward on your browser.
To save a snapshot, right-click on the image and select Save As...
to save the image. In this way, you can save all snapshots sent and
received during a meeting.
Note The snapshot feature is designed for far sites that use the
Annex-D high-resolution (704 x 576) graphics standard.
These are typically conference room video communications
systems, such as Polycom ViewStations.
Systems using lower resolution graphics transfer standards
© Polycom, Inc. 19 ViaVideo User’s Guide
Page 28

Chapter 2 Using ViaVideo
(for example, QCIF, NetMeeting) are not able to receive
high-resolution snapshots.
Leaving a Callback Message
You can also leave a message with other users if they have their unit
on, but are not at their desk. Simply send a snapshot and end the
call. The snapshot is displayed in a browser window at the far site,
and is sure to grab their attention.
It helps if you leave your number so the far site can call you back.
ViaVideo User’s Guide 20 www.polycom.com
Page 29

Chapter 2 Using ViaVideo
Address Book and Speed Dial
This section explains how to use the address book and speed dial
features. This section describes:
• Using the Address Book (page 21)
• Using Speed Dial (page 26).
Using the Address Book
The address book saves you time, letting you place calls by
selecting the user’s name. You can add up to 10,000 entries in the
address book. Address book entries can be:
• Global if you are registered with a Global Address Book or ILS
server. Global entries display a Global icon in the Address
Book screen.
• Local if you enter the addresses manually in the address book.
Local entries display a Delete icon in the Address Book screen.
To access the address book, click Address Book, either from the
main screen or the manual calling screen.
Speed dial
New
entry
Edit
entry
Delete
entry
IP address
Line speed
© Polycom, Inc. 21 ViaVideo User’s Guide
Connection type
entries
Search
Call button
Directory
services
Page 30

Chapter 2 Using ViaVideo
The address book information panel at the bottom of the Address
Book screen provides information about the selected entry. In the
example above, Jane Doe’s ViaVideo is set to a line speed of 128
Kbps. Her IP address is displayed (208.10.179.286), and the
Connection type icon indicates that she is on a local area network.
If you select an global entry, the Delete icon changes to a Global
icon, indicating that you cannot delete or edit the entr y from the
address book. For more information about local and global address
book entries, see “Local and Global Address Book Entries,” on page
23.
The following table shows actions you can perform on entries in the
address book.
To Do This
Create a new
entry
Edit an entry
1. Click New.
2. Enter the entry information, including the
preferred line speed.
3. Click Save.
1. Highlight the entry you want to change.
2. Click Edit.
3. Change any information you wish.
4. Click Save.
Only local entries can be edited in the
address book. Global addresses are
registered in a Global Address Book or ILS
server.
ViaVideo User’s Guide 22 www.polycom.com
Page 31

Chapter 2 Using ViaVideo
To Do This
Delete an entry
Search for an
entry
To place a call from the address book:
1. Highlight an entry in the Address Book screen.
2. Click Call or double-click on the entry.
ViaVideo shows the calling screen.
1. Highlight the listing you want to delete.
2. Click Delete.
Only local addresses can be deleted from the
address book. Global addresses are
registered in a Global Address Book or ILS
server.
1. Click Search.
2. Begin typing letters that occur anywhere in
the name, IP address, or E-mail address of
the entry you are looking for. This brings up
any entry containing the letters or numbers
anywhere in the entry’s name, IP address
or E-mail address, not only those entries
starting with the letters you’ve entered.
Local and Global Address Book Entries
There are two kinds of address book entries you can call with
ViaVideo:
• Local entries
• Global (ILS server) entries.
Local Entries
Local entries are entries that you create, modify, and maintain in the
ViaVideo address book. These addresses are stored locally, and do
not appear in other users’ address books. When you select a local
entry in the address book, the Delete icon is displayed in place of
the Global icon.
To create a local entry, open your address book and click New. You
can then enter the name, number, H.323 extension (if applicable)
and select your preferred line speed when calling this entry. Click
Save to save the entry to your address book.
© Polycom, Inc. 23 ViaVideo User’s Guide
Page 32

Chapter 2 Using ViaVideo
To modify a local entry, select the entry in your Address Book and
click Edit. You can then modify the entry information. Click Save to
save the changes to the address book.
To delete a local entry, select the entry in the address book and click
Delete. ViaVideo deletes the entry.
To delete all local entries, select Delete address book entries in the
Reset System screen (System Info>Diagnostics>Reset System)
and click Reset System. For more information about the Reset
System function, see “Reset System,” on page 39.
Global (ILS Server) Entries
ViaVideo supports registration with up to 5 Internet Locator Service
(ILS) servers. An ILS server is a global directory that stores names,
aliases, E-Mail addresses, and IP addresses of registered users.
ViaVideo provides the Global Address Book, which uses ILS server
technology, to provide ILS registration services to video
communications systems that can not communicate using IP
protocol.
When you register with an ILS server, other registered users can see
your entry in their address books, as you can see theirs. You cannot
delete or edit a global entry from the address book, as this record is
maintained by the ILS server.
Other registered users can also call you using the E-Mail address
you entered during the ViaVideo application setup. You can modify
this E-Mail address, as well as other identifying information, in the
General Setup screen (System Info>Setup>General).
ViaVideo User’s Guide 24 www.polycom.com
Page 33

Chapter 2 Using ViaVideo
To register with the Polycom Global Address Book or an ILS server:
1. Go to the Directory Services screen
(System Info>Setup>Directory Services).
2. Enter the IP address of the ILS server in the entry field and click
the selection button to the right of the address.
To register with the ViaVideo’s GAB server, enter
gab.austin.polycom.com in the entry field.
ViaVideo registers you with the servers you have selected as
soon as you leave the Directory Services screen.
You can also set the following two fields in the Directory Services
screen. Both are selected by default:
• Display Global Address
If you de-select Display Global Address, only local entries are
available from the Address Book and Speed Dial screens.
• Register This System When Powered On
If you de-select this field, your address is not registered with any
ILS servers when you start ViaVideo, and only local entries are
available from the Address Book and Speed Dial screens.
Note To refresh your connection with the ILS server, press F5 on
your keyboard while the Address Book screen is displayed.
© Polycom, Inc. 25 ViaVideo User’s Guide
Page 34

Chapter 2 Using ViaVideo
Using Speed Dial
To access the Speed Dial screen, click Speed Dial in the main
screen. You can also access the Speed Dial screen by clicking 1-6
or 7-12 on the top address book tab.
The speed dial feature stores the last twelve numbers you have
dialed. You can place a speed dial call by double-clicking a speed
dial entry.
When you right-click a speed dial entry, four actions are available to
you:
Delete All Deletes all unlocked entries from your Speed
Dial screen.
Lock Locks a speed dial entry so that it is always
present in the Speed Dial screen. When you
lock an entry, a lock icon is displayed in that
entry and the entry moves to the first unlocked
position in the Speed Dial screen. For example,
if you have no locked entries and you lock entry
twelve, it moves to entry one and remains in that
position regardless of subsequent calls.
To unlock an entry, right-click the locked entry
and select Unlock.
ViaVideo User’s Guide 26 www.polycom.com
Page 35

Chapter 2 Using ViaVideo
Dial Places a call to the selected entry. You can also
call a speed dial entry by double-clicking the
entry.
Delete Current Deletes the currently selected entry.
Controlling Audio and Video
This section describes how to control audio and video while using
ViaVideo:
• Controlling Audio (page 27)
• Muting Video (page 29).
Controlling Audio
You can adjust the volume and mute the audio during a call.
Via the On-Screen Remote
During a call, ViaVideo lets you adjust incoming audio using the
on-screen remote.
To adjust incoming (far site) audio during a call, use the volume
control on the on-screen remote. To mute outgoing (near site) audio
during a call, click Mute on the on-screen remote. A Mute icon is
displayed on-screen. To restore outgoing audio, click Mute again.
ViaVideo shows a Mute icon in the near video. This icon is not
© Polycom, Inc. 27 ViaVideo User’s Guide
Page 36

Chapter 2 Using ViaVideo
displayed in the far site view. ViaVideo maintains your audio mute
setting between calls.
Volume control
Mute
Via the Audio Screen
The Audio screen (System Info>Setup>Audio) lets you set Master,
Wave, and Line In audio levels. To set these levels, click the
Volume Control button in the Audio setup screen.
ViaVideo User’s Guide 28 www.polycom.com
Page 37

Chapter 2 Using ViaVideo
The Audio Mixer dialog is displayed.
Master Volume Controls the audio level for all your PC’s sounds.
Wave Volume Controls your PC’s sound effects volume.
Line In Controls the volume for all audio coming from
your ViaVideo camera unit (far site audio, audio
test tone, keypad touch tones).
To mute outgoing audio when using the auto answer feature, select
Mute Auto Answer Calls in the Audio screen (System
Info>Setup>Audio).
Muting Video
To mute the near video for privacy both during and in-between calls
without shutting off your ViaVideo unit, slide the ViaVideo camera
shutter to the Video Mute (middle) position.
Note This does not mute the outgoing audio in your call. To mute
the audio during a call, click Mute on your on-screen
remote.
© Polycom, Inc. 29 ViaVideo User’s Guide
Page 38

Chapter 2 Using ViaVideo
When you want the far site to see you again, slide the shutter back
to the on position.
ViaVideo User’s Guide 30 www.polycom.com
Page 39

Chapter 2 Using ViaVideo
Collaboration and Application Sharing
To activate application sharing software while in a call, click Share
on your on-screen remote. This activates Whiteboard, Chat,
Application Sharing, and File Transfer capabilities.
Collaboration and application sharing capabilities are not part of the
ViaVideo application. To perform collaborative functions, ViaVideo is
designed to link any T.120-compliant data sharing software.
Note Application sharing is not available on the Windows 2000
operating system.
ViaVideo is not designed as a camera for application sharing
software. If your collaboration software provides camera control
functionality, it will not drive the ViaVideo camera. You must initiate
calls through the ViaVideo application.
Multiple IP Addresses
If you are set up to use multiple IP addresses, ViaVideo detects the
presence of these addresses. The first time you start up the
ViaVideo application, ViaVideo presents the Multiple IP Addresses
screen.
You can select the IP address you want to use and click OK.
© Polycom, Inc. 31 ViaVideo User’s Guide
Page 40

Chapter 2 Using ViaVideo
ViaVideo detects more than one IP address when:
• There is more than one LAN card in your PC.
• You are using a docking station and a PCMCIA network card.
• You are connected to your network using a Virtual Private
Network (VPN).
If you want to change IP addresses once ViaVideo is already
running, go to the H.323 screen (System Info>Setup>H.323
Setup>H.323) and click Choose Other IP Address.
Note Choose Other IP Address is displayed in the H.323 screen
only when ViaVideo detects the presence of more than one
IP address at startup. If you add another IP address while
ViaVideo is running, you must restart the application so that
ViaVideo can detect the new IP address.
ViaVideo presents the Multiple IP Addresses screen, and you can
choose which IP address you want to use.
Once you restart the ViaVideo application, ViaVideo uses the IP
address you specified. This address is displayed in the System
Information screen, at the bottom of the application window, and in
your address book listing.
ViaVideo User’s Guide 32 www.polycom.com
Page 41

System Information and Diagnostics
This chapter provides a description of ViaVideo’s system
information and diagnostic screens, and explains how to view
settings, run diagnostic tests, and make changes to your system.
This chapter contains the following sections:
• Using the System Information Screens (page 33)
• Diagnostics (page 35)
• Setup (page 42).
Using the System Information Screens
To access the system information screens at any time, click the Info
icon in the top left corner of the ViaVideo application window. The
System Information screen is displayed.
3
Home icon
Menu icon
© Polycom, Inc. 33 ViaVideo User’s Guide
Page 42

Chapter 3 System Information and Diagnostics
Each of the system information screens has a Menu icon in the
lower right corner that returns you to the previous screen. To return
to the System Information screen from anywhere in the menu
hierarchy, click the Info icon at the top of each screen. To return to
the main calling screen, click the Home icon.
Note If you are in a call while using the system information
screens, click the Info icon to display the system
information screens. The far site video is displayed in a
small screen that is always on top of your desktop. You can
move this mini-screen by dragging it with your mouse.
The following diagram shows the ViaVideo screen hierarchy.
ViaVideo User’s Guide 34 www.polycom.com
Page 43

Chapter 3 System Information and Diagnostics
Diagnostics
You can view network statistics and perform various diagnostic tests
from the Diagnostics screen. Select the icon for the statistics you
want to view or tests you want to perform.
See the following sections for descriptions of the screens accessible
through the Diagnostics screen. You must be in a call for ViaVideo
to register information in the Network Stats and Advanced Stats
screens, and for current call statistics in the Call Status screens.
Network Stats Statistics on your network connections (see
page 36).
Advanced Stats Detailed information about call packet
statistics (see page 37).
Call Status Information about the current call, and on calls
placed (see page 38).
Reset System Lets you reset the ViaVideo system (see page
39).
Calibrate Camera Lets you calibrate the ViaVideo camera for low
light settings (see page 40).
© Polycom, Inc. 35 ViaVideo User’s Guide
Page 44

Chapter 3 System Information and Diagnostics
Generate Tone Lets you generate a tone to test audio
functions (see page 41).
Network Statistics
The Network Statistics screen presents the network protocols and
data speeds for a video call.
Tx Clock Rate Transfer clock rate; the clock rate for outgoing
packet transfer.
Rx Clock Rate Receiving clock rate; the clock rate for
incoming packet transfer.
Total Packet Loss Total number of packets lost in the call.
% Packet Loss Percentage of packets lost to all packets
transferred during the call.
Video Protocol The video transfer protocol used for the call.
Video Format The video format used for encoding and
decoding.
Audio Protocol The audio protocol used for the call.
Comm Protocol The communications protocol used for the call.
ViaVideo User’s Guide 36 www.polycom.com
Page 45

Chapter 3 System Information and Diagnostics
Advanced Statistics
The Advanced Statistics screen shows detailed information about
the status of your call. Transmit and receive speeds are displayed
for both audio and video during a call.
Audio Rate The rate of audio packet transfer.
Video Rate The rate possible for video packet transfer.
Video Rate Used The actual rate of video packet transfer.
Video Frame Rate The video transfer rate in frames per second.
Audio Packet Loss The number of audio packets lost in the call.
Audio Jitter The variance from average audio transmission
rate.
Video Packet Loss The number of video packets lost in the call.
Video Jitter The variance from average video transmission
rate.
Remote System ID The ID of the remote system. This is the
manufacturer’s ID of the remote system.
© Polycom, Inc. 37 ViaVideo User’s Guide
Page 46

Chapter 3 System Information and Diagnostics
Call Status
The Call Status screen presents information about the calls you
have placed.
The information in the Call Status screen is not cleared when you
reset your system. If you do a complete un-install and re-install of the
ViaVideo software, call status information is cleared.
Status Code Status of the call (connected or
disconnected).
Last Number Dialed Last number or IP address dialed.
Calls Placed Number of calls placed (whether the
calls actually connect or not).
Calls Received Number of calls received.
Calls Connected Number of calls connected.
Time In Last Call Length in minutes of the last call.
Total Time in Calls Total time in calls for calls already
completed.
ViaVideo User’s Guide 38 www.polycom.com
Page 47

Chapter 3 System Information and Diagnostics
Reset System
The Reset System screen is used to clear user settings and local
address book entries.
When resetting the system, you can choose to clear your personal
information (user settings) and your local address book entries. By
default, these options are not selected. If you click Reset System
without selecting either option, nothing happens.
Resetting the system with Delete user settings selected clears all
system information, including Global Address Book and ILS server
addresses, your IP server address, and user information, and resets
the information to the ViaVideo default settings.
Note Be sure to copy down any important system information
(such as Global Address Book name and IP addresses)
before resetting your system with the User Settings option
selected.
If you have cleared your user settings, the next time you start the
application, ViaVideo prompts you through the system configuration
screens as it did when you powered on ViaVideo the first time.
© Polycom, Inc. 39 ViaVideo User’s Guide
Page 48

Chapter 3 System Information and Diagnostics
Resetting the system with Delete address book entries selected
deletes all locally stored addresses, without affecting global
addresses. You will have to re-specify your ILS server when you
restart to regain access to global addresses.
Camera Calibration
The Camera Calibration screen lets you calibrate the camera for
low light settings. The first time you install the ViaVideo camera unit
on your PC, ViaVideo allows the camera to warm up to operating
temperature and automatically presents the Camera Calibration
screen so that you can calibrate the camera for low light settings.
If you want to calibrate the ViaVideo camera independent of
ViaVideo’s automatic calibration feature, you can do so using this
screen. Once your camera has been calibrated, you will not need to
calibrate it again unless you move the camera unit to a new
computer.
To calibrate your camera:
1. Slide the camera switch to the Video Mute position.
ViaVideo performs the calibration immediately once the switch
is in the Video Mute position.
2. ViaVideo notifies you when calibration is complete. This should
take just a few moments.
ViaVideo User’s Guide 40 www.polycom.com
Page 49

Chapter 3 System Information and Diagnostics
3. Slide the camera switch back to the On position.
Generate Tone
The Generate Tone screen lets you generate a tone so you can test
the near and far site audio functions. Generating a tone helps
determine whether a problem exists with the network connection, or
with a setting on your computer, such as the line in volume setting.
Click Generate Tone to generate a tone. Click Generate Tone
again to stop generating the tone.
© Polycom, Inc. 41 ViaVideo User’s Guide
Page 50

Chapter 3 System Information and Diagnostics
Setup
You can view and change various configuration settings from the
Setup screen. Select the icon for the configuration settings you want
to view or change.
See the following sections for descriptions of the screens accessible
through the Setup screen.
General Lets you see and change general setup
information (see page 43).
Directory Services Lets you see and change GAB and ILS server
settings (see page 45).
LAN and Internet Lets you see and change LAN and Internet
server settings (see page 46).
Audio Lets you see and change audio control settings
(see page 48).
Software Lets you see your current software version,
and update via the Web if necessary (see page
50).
ViaVideo User’s Guide 42 www.polycom.com
Page 51

Chapter 3 System Information and Diagnostics
H.323 Lets you see and change H.323, gatekeeper,
dialing speed, and QOS settings (see page
51).
General
The General Setup screen presents basic information about your
ViaVideo setup.
You can set the following options:
Auto Answer When Auto Answer is selected and an
incoming call is received, ViaVideo
activates a ring tone, and automatically
connects with the far site.
When Auto Answer is not selected and
an incoming call is received, ViaVideo
presents a dialog asking if you want to
answer the incoming call.
By default, Auto Answer is not selected.
Auto Start ViaVideo When Auto Start ViaVideo is selected,
the ViaVideo application starts as par t of
your PC’s boot process. When in auto
start mode, ViaVideo starts with the
application window minimized.
© Polycom, Inc. 43 ViaVideo User’s Guide
Page 52

Chapter 3 System Information and Diagnostics
Show Animations When Show Animations is selected,
the screen transition animations within
ViaVideo’s information screens are
active.
If Show Animations is not selected, the
screen transition animations do not
appear, and the screens load slightly
faster.
Show Half-Size Display When Show Half-Size Display is
selected, ViaVideo is displayed on a
half-size screen after you restart the
application.
User Name This is the name that is displayed in your
Global Address Book and ILS server
listings. This name is also displayed at
the far site whenever you make a call.
E-Mail This is the E-mail address that is
displayed as part of your user
information in the Global Address Book
and ILS server listings.
Country Shows the country you selected when
you first installed the ViaVideo camera
unit.
Language Shows the language you selected during
installation.
Maximum Time in Call Enter the maximum number of minutes
you want to allow for the length of a call.
When your call lasts longer than the
specified time, ViaVideo prompts you to
hang up or remain in the call. If you do
not respond within one minute, ViaVideo
automatically disconnects the call.
The default for maximum time in call is
480 minutes (8 hours).
Note: To set your time in call to an
infinite period, enter 0 in the text entry
field.
ViaVideo User’s Guide 44 www.polycom.com
Page 53

Chapter 3 System Information and Diagnostics
Directory Services
The Directory Services screen lets you specify up to five ILS
servers.
As part of the standard installation configuration, ViaVideo’s Global
Address Book (GAB) server is selected for you. ViaVideo provides
the Global Address Book, which uses ILS server technology, to
provide ILS registration ser vices to video communications systems
that can not communicate using IP protocol.
To register with an ILS server:
1. Specify the line speed for connection to all ILS servers in the
Dialing Speed field.
2. Enter the server’s address in the ILS Server field.
To register with ViaVideo’s GAB server, enter
gab.austin.polycom.com in the entry field.
3. Select the server by clicking in the check box to the right of the
ILS Server field.
ViaVideo registers you with a server as soon as you exit the
Directory Services screen.
You also have the following options when registering with ILS
servers:
© Polycom, Inc. 45 ViaVideo User’s Guide
Page 54

Chapter 3 System Information and Diagnostics
Display Global Addresses
Shows the addresses of users registered with the ILS
servers that you have selected in your address book.
If you do not select this option, only local addresses
(addresses you have entered manually) are displayed in
your address book.
Register this system when starting ViaVideo
Registers your contact information with selected ILS
servers when you start the application.
If you do not select this option, you will not be registered
with any servers when the ViaVideo application star ts.
You can register with an ILS server once ViaVideo is
running by selecting the servers in this screen, then
exiting the screen.
Note You must be operating an ILS server for the GAB
registration to work. Contact your system administrator if
your network is not already running an ILS server. ILS server
software is freely downloadable from the Microsoft web site.
LAN and Internet
The LAN and Internet screen shows information about your LAN,
Internet and H.323 settings. ViaVideo reads this information from
your network configuration settings.
ViaVideo User’s Guide 46 www.polycom.com
Page 55

Chapter 3 System Information and Diagnostics
Host Name This is the computer name entered in your
Windows network configuration settings.
WINS Resolution Specifies if Windows Internet Naming Service
(WINS) resolution is turned on or not. WINS
resolution allows you to run applications that
require the NetBIOS protocol.
IP Address This is the IP address of your computer. If
ViaVideo detects more than one IP address at
startup, ViaVideo displays them here.
For more information about multiple IP
addresses, see “Multiple IP Addresses,” on
page 31.
DNS Servers This is the IP address of your network’s
Domain Name Server (DNS).
DNS is a hierarchical naming system that uses
a combination of text names separated by
periods to create a unique name, such as
austin.polycom.com.
Default Gateway This is the IP address of your default gateway.
Subnet Mask This is the subnet mask number. The subnet
mask helps identify your computer within your
local network.
WINS Server This is the IP address of your Windows
Internet Naming Service (WINS) server.
To change your network configurations, click Configure in the LAN
and Internet screen. ViaVideo presents the Windows Network
© Polycom, Inc. 47 ViaVideo User’s Guide
Page 56

Chapter 3 System Information and Diagnostics
Properties dialog, where you can change your network
configuration settings.
Audio
The Audio screen lets you set audio configuration options.
ViaVideo User’s Guide 48 www.polycom.com
Page 57

Chapter 3 System Information and Diagnostics
Mute Auto Answer Calls Mutes outgoing audio for calls when
Auto Answer Incoming Calls is
selected.
Headphones or SpeakersActivates the ViaVideo camera unit’s
internal microphone. Select this option
when using speakers or headphones
without an attached microphone.
Headset with MicrophoneDisables the microphone in your
ViaVideo unit. Select this option if you
are using a headset (headphones with
attached microphone).
Volume Control Opens the Audio Mixer dialog, which
lets you set Master, Wave and Line In
audio levels.
Master Volume Controls the audio level for all your PC’s
sounds.
Wave Volume Controls your PC’s sound effects
volume, and the sound effects from the
ViaVideo application. For example, the
“click” sound when mousing over an
active area in the ViaVideo application
window.
Line In Controls the volume for all audio coming
from your ViaVideo camera. This
includes far site audio, audio test tone,
and keypad touch tones.
Sound Card Shows the sound card installed on your
PC.
© Polycom, Inc. 49 ViaVideo User’s Guide
Page 58

Chapter 3 System Information and Diagnostics
Software
The PC and ViaVideo software selections in the Software screen
allow you to view software information. This is useful when you are
troubleshooting PC problems, or if you are having trouble with the
ViaVideo unit.
PC Software
The PC Software screen lets you view the following system
properties without having to leave the ViaVideo application:
VGA Resolution VGA resolution setting.
Color Depth The color depth (or density) setting.
Display Mode The graphics display mode.
Operating System The operating system software version.
USB Universal Host Controller
The universal serial bus (USB) host controller
software version.
Video Card The type of video card installed.
ViaVideo Software
The ViaVideo Software screen lets you view and set the following
information:
USB Driver Version The version of the universal serial bus
driver.
Camera Version The version of software uploaded to the
camera unit.
Boot Version The version of software resident on the
camera unit (firmware).
Software Update URL The URL that ViaVideo uses to check for
software updates. The default address is
ViaVideo’s software update site:
viavideo.austin.polycom.com.
ViaVideo User’s Guide 50 www.polycom.com
Page 59

Chapter 3 System Information and Diagnostics
You can check ViaVideo’s software update site for the latest version
by clicking Check for New Software. If a new version of the
software exists, you can download it from this site.
The software update URL can be set to a site on your corporate
Intranet to make new software updates accessible from your internal
Web site.
H.323 Setup
The H.323 Setup screen gives you access to advanced network
configuration screens.
See the following sections for descriptions of the screens accessible
through the H.323 Setup screen.
H.323 Lets you see and change H.323 settings (see
page 52).
Gatekeeper Lets you see and change H.323 gatekeeper
settings (see page 54).
Dialing Speeds Lets you see and change dialing speed settings
(see page 55).
© Polycom, Inc. 51 ViaVideo User’s Guide
Page 60

Chapter 3 System Information and Diagnostics
QOS Lets you see and change QOS, Network
Address Translator, and Firewall settings (see
page 56).
H.323
The H.323 screen lets you configure the H.323 name and extension
used to dial your ViaVideo when you are using a gatekeeper.
H.323 Name The system name you set in the General Setup
screen is displayed here as your H.323 Name.
H.323 Extension The H.323 extension, or gatekeeper extension,
is an easy way for callers to reach you through
the gatekeeper. Extensions are usually assigned
by your system administrator.
Display IP Dialing Extension
When this option is selected, ViaVideo displays
the H.323 extension after your IP address in
your user information.
ViaVideo User’s Guide 52 www.polycom.com
Page 61

Chapter 3 System Information and Diagnostics
Multiple IP Addresses
If you are using multiple IP addresses, the Choose Other IP
Address option appears in the H.323 screen.
You can specify which IP address you want ViaVideo to use by
clicking Choose Other IP Address and selecting the IP address
you want ViaVideo to use. ViaVideo uses the new IP address when
you restart the application.
ViaVideo detects more than one IP address when:
• There is more than one LAN card in your PC
• You are using a docking station and a PCMCIA network card
• You are connected to your network using a Virtual Private
Network (VPN).
Note The option to choose more than one IP address is displayed
in the H.323 screen only when ViaVideo detects the
presence of more than one IP address at startup.
For more information about working with multiple IP addresses, see
“Multiple IP Addresses,” on page 31.
© Polycom, Inc. 53 ViaVideo User’s Guide
Page 62

Chapter 3 System Information and Diagnostics
Gatekeeper
Use the Gatekeeper screen to establish connections with your
network’s H.323 gatekeeper.
Registering with a gatekeeper lets you make calls using gateways
and some Multi-point Conferencing Units (MCUs).
The Gatekeeper screen provides the following options:
Off Makes no gatekeeper connection. Use this option when
no gatekeeper is present on the network.
Specify Lets you manually enter the Gatekeeper address in the
Gatekeeper IP Address field. Use this option when you
have more than one gatekeeper on your network.
Auto ViaVideo searches for a gatekeeper on your network, and
connects to the first gatekeeper it finds. Use this option if
you have only one gatekeeper on your network.
If you select Auto and ViaVideo is not able to find a
gatekeeper, be sure that you have a gatekeeper, and that
it is correctly configured.
ViaVideo User’s Guide 54 www.polycom.com
Page 63

Chapter 3 System Information and Diagnostics
Dialing Speeds
The Dialing Speeds screen lets you specify which line speeds are
available in the manual calling screen, and when creating local
address book entries.
Specifying a range of speeds in this screen makes it much easier to
select the correct speed when you are placing a call. You can select
up to eight line speeds here.These speeds then appear to the left of
the Speed button when you are making a manual call.
© Polycom, Inc. 55 ViaVideo User’s Guide
Page 64

Chapter 3 System Information and Diagnostics
We recommend that you select line speeds that you know your
network can handle. If you are not sure which line speeds are best,
contact your network administrator.
ViaVideo provides ultra-low speeds, 80 and below, to provide for
connection over very low bandwidth networks, such as dial-up
modems. Although the low transfer rate results in blocky image
transmission, audio quality is not affected.
Quality of Service and Firewalls
In this screen, you can configure your quality of service, Network
Address Translator (NAT), and firewall options.
Use Fixed Ports Specifies the fixed ports assigned to
ViaVideo when working with a firewall.
System is behind a NAT Alerts ViaVideo to use the IP address
that appears in the NAT outside (WAN)
address field as its external IP address.
When using a Virtual Private Network
(VPN) for your network connection,
make sure that System is behind a
NAT is not selected.
ViaVideo User’s Guide 56 www.polycom.com
Page 65

Chapter 3 System Information and Diagnostics
Auto discover NAT IP address
Selecting this option activates
ViaVideo’s automatic external IP
address feature, which discovers your
NAT’s external IP address and
automatically enters it in the NAT
outside (WAN) address field.
NAT outside (WAN) address
Specifies the external IP address used
by your NAT. If ViaVideo is unable to
discover your external IP address
automatically, you can enter it here.
IP Precedence Specifies the priority given IP packages
sent by ViaVideo. The default value for
IP precedence is 5.
Dynamic Bandwidth Specifies use of dynamic bandwidth
allocation. ViaVideo’s dynamic
bandwidth function automatically finds
the optimum line speed for a call.
If you experience excessive packet loss
while in a call, the dynamic bandwidth
function incrementally lowers the line
speed until there is no more packet loss.
After some time with no packet loss, the
dynamic bandwidth function
incrementally increases line speed until
packet loss occurs. At this point, the
dynamic bandwidth function lowers the
line speed one increment to ensure
minimal packet loss with maximum
throughput.
For more information about configuring your ViaVideo for operation
behind a firewall or NAT, see “Network Connection,” on page 63.
© Polycom, Inc. 57 ViaVideo User’s Guide
Page 66

Chapter 3 System Information and Diagnostics
ViaVideo User’s Guide 58 www.polycom.com
Page 67

Audio Connection
Because of the multiple possibilities for audio connection with the
ViaVideo camera unit, the following information is provided to help
you correctly install your audio connection.
PC with Speakers
This diagram shows the correct connection from the ViaVideo audio
line out to the PC line in when using speakers. Select Headphones
or Speakers in the Audio screen (System Information>Setup>
Audio) when using this type of audio connection.
A
© Polycom, Inc. 59 ViaVideo User’s Guide
Page 68

Appendix A Audio Connection
PC with Headphones
This diagram shows the correct connection from the ViaVideo audio
line out to the PC line in when using headphones. Select
Headphones or Speakers in the Audio screen (System
Information>Setup>Audio) when using this type of audio
connection.
ViaVideo User’s Guide 60 www.polycom.com
Page 69

Appendix A Audio Connection
Headphones Only
This diagram shows the correct connection from the ViaVideo audio
line out to the PC line in when using headphones. Select the
Headphones or Speakers option in the Audio screen (System
Information>Setup>Audio) when using this type of audio
connection.
To connect headphones directly to the ViaVideo line out port, your
headphones must have a single 3.5 mm stereo connector or adapter.
With this type of connection, you will be able to hear all sounds
generated by the ViaVideo camera unit processor:
• In-call audio
• Keypad tones
• Audio test tone.
You will not be able to hear sounds generated by the ViaVideo
application on your PC:
• Far and near site ring tones
• Splash screen sound effects
• Busy signals
• ViaVideo sound effects.
© Polycom, Inc. 61 ViaVideo User’s Guide
Page 70

Appendix A Audio Connection
Headset with Attached Microphone
This diagram shows the correct connection from the ViaVideo audio
line out to a headset with attached microphone. Select the Headset
with Microphone option in the Audio screen (System
Information>Setup>Audio) when using this type of audio
connection.
Headsets with attached microphones have a 2.5 mm phono
connection. Note that this type of connection requires the use of a
2.5 mm female to 3.5 mm male stereo phono adapter to fit the 3.5
mm Line Out port.
With this type of connection, you will be able to hear all sounds
generated by the ViaVideo camera unit processor:
• In-call audio
• Keypad tones
• Audio test tone.
You will not be able to hear sounds generated by the ViaVideo
application on your PC:
• Far and near site ring tones
• Splash screen sound effects
• Busy signals
• ViaVideo sound effects.
ViaVideo User’s Guide 62 www.polycom.com
Page 71

Network Connection
Although connecting any network device can be a confusing task,
we at ViaVideo are all for simplifying things a bit. If you don’t have a
network administrator to take care of all your connectivity issues,
read the information in this appendix and you will be ready to go in
no time.
If you are a network administrator, go ahead and read the appendix
anyway. Your secret’s safe with us!
This appendix contains the following sections:
• Find Your Connection Type (page 63)
• Configure Your Connection (page 65)
• What’s a Firewall? (page 72)
• What’s a DMZ? (page 74)
• What’s a NAT? (page 75).
B
Pick Your Connection Type
As simple as we can make it - just pick out your connection type from
those shown below, perform the tasks in the appropriate section,
and you’re ready to communicate ViaVideo!
Simple Connection - Just a Modem, Thanks
If your network connection is through a cable modem or DSL
modem, use the configuration instructions on page 65.
© Polycom, Inc. 63 ViaVideo User’s Guide
Page 72

Appendix Network Connection
Router With NAT, No Firewall
If your network connection is through a router with a Network
Address Translator (NAT), but no firewall, use the configuration
instructions on page 65. For more information about NATs, refer to
“What’s a Network Address Translator?,” on page 75.
Router With Firewall
If your network connection is through a router with a firewall, use the
configuration instructions on page 66. For more information about
firewalls, refer to “What’s a Firewall?,” on page 72.
Router With Firewall, Using a DMZ
If your network connection is through a router with a firewall, and you
want to set up your PC with ViaVideo in a “Demilitarized Zone”
(DMZ) use the configuration instructions on page 68. For more
information about DMZs, refer to “What’s a DMZ?,” on page 74.
ViaVideo User’s Guide 64 www.polycom.com
Page 73

Appendix Network Connection
Through a Virtual Private Network
If your network connection is through a Virtual Private Network
(VPN), use the configuration instructions on page 70.
Configure Your Connection
And you’re ready to communicate ViaVideo!
Simple Connection - Just a Modem, Thanks
If you are using a cable modem or DSL modem, you don’t need to
make any configuration adjustments. Because of the limited
bandwidth available, it is recommended that you select a lower line
speed, such as 128, for most calls. Select line speeds in the Dialing
Speeds screen (System Info>Setup>H.323>Dialing Speeds).
Router With NAT, No Firewall
To configure your ViaVideo to use your router’s Network Address
Translator (NAT):
1. Go to the Quality of Service and Firewall screen (System
Info>Setup>H.323>QOS).
© Polycom, Inc. 65 ViaVideo User’s Guide
Page 74

Appendix Network Connection
2. Select the System is Behind a NAT option.
3. Enter your NAT’s external IP address in the NAT Outside
(WAN) Address field.
You can enter the address manually, or let ViaVideo enter it
automatically by selecting the Auto discover NAT IP Address
option.
When you select Auto discover NAT IP Address, ViaVideo
automatically discovers your external IP address and enters it in
the NAT Outside (WAN) Address field.
If you are using a proxy server, the Auto discover NAT IP
Address option may not work correctly. You should enter your
NAT’s external IP address manually in this case.
Router With Firewall
If you are using a firewall, you need to perform the following tasks:
• Configure ViaVideo to work with your firewall’s Network Address
Translator (NAT)
• Open and assign por ts in the firewall to the PC running
ViaVideo.
Configure your ViaVideo for NAT
To configure your ViaVideo to use your router’s Network Address
Translator (NAT):
1. Go to the Quality of Service and Firewall screen (System
Info>Setup>H.323>QOS).
2. Select the System is Behind a NAT option.
3. Enter your NAT’s external IP address in the NAT Outside
(WAN) Address field.
You can enter the address manually, or let ViaVideo enter it
automatically by selecting the Auto discover NAT IP Address
option.
When you select Auto discover NAT IP Address, ViaVideo
ViaVideo User’s Guide 66 www.polycom.com
Page 75

Appendix Network Connection
automatically discovers your external IP address and enters it in
the NAT Outside (WAN) Address field.
If you are using a proxy server, the Auto discover NAT IP
Address option may not work correctly. You should enter your
NAT’s external IP address manually in this case.
Open and Assign Ports in the Firewall
To configure your ViaVideo to operate with a firewall, perform the
following tasks.
Before you Begin
Before you start, determine the internal IP address of the PC running
ViaVideo. To do so, start the ViaVideo application and look in the
System Information screen.
In Your Firewall
You will need to open and assign ports to the PC running ViaVideo
in your router’s firewall interface software. The exact steps and
terms involved are probably different in your firewall interface.
For example, opening and assigning ports to the PC running
ViaVideo is referred to in the Linksys firewall interface software as
“Forwarding,” while the Cisco firewall software refers to assigning
ports as “Port to Application Mapping.” However your firewall
interface describes it, the concepts and tasks remain the same.
1. Open a range of ports in your firewall. We recommend that you
open the default por ts: 3230-3235 for TCP and UDP.
2. Open port 1720 in your firewall. You must open this port for your
ViaVideo to receive incoming calls.
3. Assign the port range to the PC running ViaVideo.
In some firewall interfaces, opening and assigning port numbers
is performed in one step.
In some firewall interfaces, you assign the ports to an IP
address, while in others you assign the ports to an application,
in this case ViaVideo. Either way works fine.
In ViaVideo
Now you need to point ViaVideo at the right port numbers.
© Polycom, Inc. 67 ViaVideo User’s Guide
Page 76

Appendix Network Connection
1. Go to the Quality of Service and Firewall screen (System
Info>Setup>H.323>QOS).
2. Select the Use Fixed Ports option.
3. If you used the default port range when assigning the ports in
your firewall interface, you don’t need to change anything.
ViaVideo automatically enters this range. If you are using a
different range, enter the port numbers for that range here.
4. You should have already performed your NAT configuration. if
not, see “Configure Your ViaVideo for NAT,” on page 69, and
follow the instructions listed there.
Router With Firewall, Using a DMZ
If you are using a router with a firewall, and want to place the PC
running ViaVideo outside the firewall, you need to perform the
following tasks:
• Configure ViaVideo to work with your firewall’s Network Address
Translator
• Assign your ViaVideo to the DMZ.
ViaVideo User’s Guide 68 www.polycom.com
Page 77

Appendix Network Connection
In addition to placing the PC running ViaVideo in the DMZ, you also
need to configure your ViaVideo to run behind a Network Address
Translator (NAT)
Configure Your ViaVideo for NAT
In addition to assigning your PC running ViaVideo to the DMZ, you
also need to configure your ViaVideo to use your router’s NAT.
1. To configure your VIaVideo to use your router’s NAT:
2. Go to the Quality of Service and Firewall screen (System
Info>Setup>H.323>QOS).
3. Select the System is Behind a NAT option.
4. Enter your NAT’s external IP address in the NAT Outside
(WAN) Address field.
You can enter the address manually, or let ViaVideo enter it
automatically by selecting the Auto discover NAT IP Address
option.
When you select Auto discover NAT IP Address, ViaVideo
automatically discovers your external IP address and enters it in
the NAT Outside (WAN) Address field.
If you are using a proxy server, the Auto discover NAT IP
Address option may not work correctly. You should enter your
NAT’s external IP address manually in this case.
Assign your ViaVideo to the DMZ
If your router’s firewall software provides a “Demilitarized Zone” or
DMZ, simply follow your firewall’s instructions to assign the internal
IP address of the PC running VIaVideo to the DMZ. This allows full
external access for the PC running ViaVideo, while the other devices
in your internal network are protected by the firewall.
Note This solution does not provide protection for the PC running
ViaVideo. For more information about DMZs, see “What’s a
DMZ?,” on page 74.
© Polycom, Inc. 69 ViaVideo User’s Guide
Page 78

Appendix Network Connection
Through a Virtual Private Network
To configure your ViaVideo to operate through a Virtual Private
Network (VPN) you first need to configure your VPN (in Windows’
Settings>Control Panel>Network>Configuration). Select the VPN
connection as your network connection before launching the
ViaVideo application.
Note Before activating your VPN, make sure that ViaVideo’s
System is Behind a NAT option in the Quality of Service
and Firewall screen (System Info>Setup>H.323>QOS) is
not selected.
When you start ViaVideo, it detects the presence of multiple IP
addresses assigned to your machine, and asks you which one you
want to choose.
Select the IP address of your VPN connection. ViaVideo displays
this address in the System Information screen, in the bottom of the
application window, and in your address book user information.
ViaVideo User’s Guide 70 www.polycom.com
Page 79

Appendix Network Connection
If you want to change IP addresses once ViaVideo is already
running, go to the H.323 screen (System Info>Setup>H.323
Setup>H.323) and click Choose Other IP Address.
Note Before activating your VPN, make sure that ViaVideo’s
System is Behind a NAT option in the Quality of Service
and Firewall screen (System Info>Setup>H.323>QOS) is
not selected.
© Polycom, Inc. 71 ViaVideo User’s Guide
Page 80

Appendix Network Connection
ViaVideo presents the Multiple IP Addresses screen.,
Chose the IP address of your VPN connection and restart the
application.
Once the ViaVideo application re-star ts, ViaVideo uses the IP
address you specified. This address is displayed in the System
Information screen, at the bottom of the application window, and in
your address book user information.
What’s a Firewall?
A firewall acts as a security barrier between one network and
another. Usually the barrier is erected between an interior network,
such as a Small Office Home Office (SOHO) network, and an
exterior network, such as the internet.
Firewall services are provided as part of the configuration software
with most SOHO - quality routers, such as Linksys
can also run a firewall independent of your router by using one of the
popular software-only firewall packages, such as Black Ice, Norton
Firewall, and McAfee
With either type of firewall, the task of setting up a video
communications connection with the outside world encounters the
same problem: firewalls provide security for your network by putting
®
Firewall.
®
and Cisco®. You
®
ViaVideo User’s Guide 72 www.polycom.com
Page 81

Appendix Network Connection
up a barrier to packet traffic, limiting outside access to your internal
network. This is a good thing, but you wouldn’t be reading this if you
didn’t want to communicate with the outside world, so there are two
solutions: opening ports in the firewall, and setting up a DMZ.
Opening Ports
This solution consists of opening ports in the firewall and assigning
these ports to the PC running ViaVideo. This allows ViaVideo to
freely accept and receive calls with the outside world, while
maintaining protection for your PC and network.
For both router-based and software-only types of firewalls, the
procedure is the same, although most router-based firewalls allow
you to specifically assign ports to the internal IP address of the PC
running VIaVideo, software-only firewalls ask you to assign the ports
to an application. Either way, the result is the same - your internal
network is protected, and you have video communications access to
the outside world.
For information on opening and assigning ports in the firewall, see
“Router With Firewall,” on page 66.
Port Number Assignation
ViaVideo has applied with the Internet Assigned Numbers Authority
(IANA) for the default range of 6 ports: 3230 - 3235. You must also
assign port 1720 to ViaVideo so you can receive incoming calls.
We recommend that you use the default range of ports for both TCP
and UDP packet transfer. If you wish to assign a different range of
ports, you can specify any registered, non-assigned ports in a 6-port
range to ViaVideo. For a list of registered, non-assigned ports, go to:
http://www.isi.edu/in-notes/iana/assignments/port-numbers.
When you assign the por ts to the ViaVideo application, the router
reserves the assigned ports for use by ViaVideo.
Is it Safe?
The short answer is: “Safe enough.” Like any other defense, there’s
no such thing as a perfect firewall. Whenever you are connected to
the outside world, there is always some risk that someone could gain
© Polycom, Inc. 73 ViaVideo User’s Guide
Page 82

Appendix Network Connection
unauthorized access. The need for protection must be balanced
against the need to communicate with the outside world. This is why
most security solutions focus on minimizing the risk until it reaches
an acceptable level.
Opening ports in the firewall might seem at first like an unnecessary
security risk. However, there are in reality so many ports (65535
that simply discovering which port might be open is difficult enough.
In addition to the sheer number of ports, protections written into the
operating system make it very difficult to gain unauthorized access
to your network, even if those ports are open. Finally, only port 1720
is open to receive incoming requests. The range of six ports is only
open in your PC during a call.
If “safe enough” isn’t secure enough for you, then setting your
VIaVideo up in a DMZ is safer option. For more information about
DMZs, see the next section.
)
What’s a DMZ?
Most firewalls provide DMZ configuration as a way to allow high
availability access for web servers and video communications
servers (that’s your PC running ViaVideo) while providing firewall
access for the other devices in the network. A DMZ is not a physical
location, but is instead a way to configure your network so that the
devices that are “in” the DMZ are served by the router, but are
outside the protection of the firewall. Devices in the DMZ then
communicate with the other devices in the internal network through
the firewall.
This solution creates a “safe zone” within your internal network by
effectively placing the video communications server outside of the
firewall’s protection. In this way, no unauthorized connections are
allowed within the firewall-protected zone, and the video
communications server is allowed free access to the internet. Note
that this configuration leaves the video communications server
without protection from external sources.
Setting up your ViaVideo’s computer in a DMZ is the quickest way to
configure your ViaVideo to run while using a firewall. For more
information about configuring your video communications server in
a DMZ, see “Router With Firewall, Using a DMZ,” on page 68.
ViaVideo User’s Guide 74 www.polycom.com
Page 83

Appendix Network Connection
What’s a Network Address Translator?
A NAT is a set of services on the router that allow you to operate a
local network of devices, each with its own locally unique IP address,
while communicating to the Internet through a router which presents
a single, globally unique IP address to the outside world. Most small
business and home office (SOHO) routers provide NAT services.
The NAT ensures that outgoing packets have a globally valid IP
address, and that incoming packets go to the right device by
translating between the internal IP address and the external IP
address, owned by the router. This also adds an extra level of
security by effectively masking the internal network behind a single
external IP address.
A simplified explanation of how this translation takes place is that
when an internal device sends an outgoing packet to the router, the
NAT service either notes the internal IP address or the port number
of the device, and attaches an identifier to the external IP address of
the outgoing packet, substituting the router’s globally unique IP
address for the device’s internal IP address. When the answering
packet comes back, the NAT notes the indentifier, re-assigns the
packet to the device’s internal IP address, and sends it on its merry
way.
© Polycom, Inc. 75 ViaVideo User’s Guide
Page 84

Appendix Network Connection
ViaVideo User’s Guide 76 www.polycom.com
Page 85

Troubleshooting
This appendix explains the most common problems and error
messages you might encounter when using ViaVideo, and explains
how to correct them.
General Troubleshooting
The following table presents problems you might encounter while
using ViaVideo, their explanations, and possible solutions.
Problem Explanation Solution
C
ViaVideo generates the
following error message
during install:
“Unable to open temporary
file”
Address Book operation is
very slow
The ViaVideo application
window displays an
animation where the near
video image should be.
The installer program can
not create the temporary
file needed to run the install.
There is a faulty ILS server
connection.
ViaVideo is not able to
connect to the ViaVideo
camera unit.
Remove any directories that
begin with
Windows temp director y
and restart the install.
Make sure that the IP
address you entered for the
address book server is
correct.
1. Make sure the ViaVideo
camera unit is turned on.
2. Check the cable
connections (power,
USB)
3. Re-start the camera.
You must use ViaVideo
software to drive the
ViaVideo camera unit.
Likewise, the ViaVideo
application only works with
the ViaVideo camera unit.
_is
from their
© Polycom, Inc. 77 ViaVideo User’s Guide
Page 86

Appendix C Troubleshooting
Audio Troubleshooting
The following table lists audio-related problems, their explanations,
and possible solutions.
Problem Explanation Solution
No Audio You may not have your
audio hooked up correctly.
Select Generate Tone
(System
Info>Diagnostics>Generate
Tone). If you cannot hear a
tone, perform the following
checks:
1. Check your audio
connection (See “Audio
Connection,” on page 59)
2. Look in System
Info>Setup>Audio and
verify that you have
selected the correct
microphone setting.
3. Check the volume
controls in System
Info>Setup>Audio to make
sure they are set correctly.
4. Check the speaker
connection and volume
setting.
If you can hear a tone, but
cannot hear the other side,
make sure that the other
end is not muted.
No sound effects. Your Wave audio setting
may be low.
ViaVideo User’s Guide 78 www.polycom.com
Check the Wave audio level
in System
Info>Setup>Audio.
Page 87

Appendix C Troubleshooting
Problem Explanation Solution
Low Audio Audio levels are not set
correctly.
Cannot hear the far side. The far site is muted, or
volume controls need to be
adjusted.
Can hear the far site, but
they can not hear me.
The audio is muted,
microphone settings are
incorrect, or the audio
connection is not correct.
1. Check your sound levels
in the Volume Controls
(right-click the speaker
icon in the Windows
toolbar). Check Line In,
Wave, and Master
Volume controls.
2. Check the volume control
for your PC speakers.
See “No Audio” above.
1. Make sure your audio is
not muted.
2. Make sure the far site has
the volume set correctly.
3. Check your microphone
settings in System
Info>Setup>Audio.
© Polycom, Inc. 79 ViaVideo User’s Guide
Page 88

Appendix C Troubleshooting
Video Troubleshooting
The following table lists video-related problems, their explanations,
and solutions.
Problem Explanation Solution
Launching ViaVideo
generates the following
error message:
“Your video card does not
support hardware
acceleration using the
current display settings. For
optimal performance, set
your display to 16-bit color
using the Display
properties settings in the
Windows Control Panel.
1. My video appears
fractured when I move.
2. I get scrambled video.
3. My mouse blinks.
4. Windows is running very
slow.
5. ViaVideo is taking up
most of my CPU cycles.
1. My video is very blocky.
2. The ViaVideo window is
displayed with an animation
where the near camera
video should be.
3. Although my hardware is
correctly set up, I keep
getting the message that
ViaVideo could not connect
to the hardware.
Either your drivers/hardware
do not support DirectX, or
they do not support the
needed DirectX functionality
at your current color depth
or resolution.
In this case ViaVideo
reverts to GDI mode, and
remains fully functional, with
some loss in performance.
The video rendering is
taking up too much of the
CPU resources because it is
either running in GDI mode
or the video card does not
properly suppor t
DirectDraw hardware
acceleration.
ViaVideo is having
problems communicating
over your USB port.
1. Try changing the color
depth and/or screen
resolution.
2. Upgrade the video drivers
to the latest version.
3. Update to a new video
card.
1. Change to a different
video resolution or color
depth.
2. Update the video drivers.
3. Update to a new video
card.
1. Make sure that you have
the ViaVideo camera unit
connected correctly
(power, USB, power is
on).
2. Remove any unknown
devices in the Device
Manager under the
Universal Serial Bus
controllers folder and
power cycle the ViaVideo.
ViaVideo User’s Guide 80 www.polycom.com
Page 89

Appendix C Troubleshooting
Problem Explanation Solution
Video is out of focus. Either the camera is out of
focus, or there is not enough
light in the area and the
camera cannot generate a
clear image.
Video has lots of
noise/colored dots appear in
my picture.
There is not enough light for
the ViaVideo camera to
operate properly.
Frame refresh rate is low. The lighting in your office is
insufficient and ViaVideo is
automatically c ompensating
for this by increasing the
exposure time so that it can
gather more light.
The near video display is
dark.
Near video appears darker
in the ViaVideo application
than it does on the far site.
Use the focus wheel above
the camera lens to adjust
focus.
If this does not resolve the
problem, add more light to
the area.
Add more light to the area.
Add more light to the area.
Although there is usually no
problem with the transmitted
image, using a dark
background, or wearing
dark clothing always
provides for better image
quality.
A lightning bolt is displayed
on-screen during calls.
There has been an error in
data transmission outside of
normal parameters.
Although this is not a
serious error, you may have
selected a calling speed that
is too high for your network
bandwidth.
1. Activate the Dynamic
Bandwidth option
(System
Info>Setup>H.323>QOS)
2. Try making calls at a
lower speed, or check
with your system
administrator for the
optimum speed.
© Polycom, Inc. 81 ViaVideo User’s Guide
Page 90

Appendix C Troubleshooting
Error Messages
The following tables give common error messages, their
explanations, and solutions.
Installation Errors
The following table lists installation-related error messages, their
explanations, and solutions.
Error Message Explanation Solution
ViaVideo generates the
following error message
while attempting to install:
Unable to open
temporary file
The installer program can
not create the temporary file
needed to run the install.
H.323 Errors
The following errors are specific to H.323 gatekeepers.
Error Message Explanation Solution
Gatekeeper Unregistered ViaVideo has been
unregistered from your
gatekeeper.
Gatekeeper Not Found The gatekeeper registration
information is incorrect.
Remove any directories that
begin with
Windows temp directory
and restart the install.
1. Check the Gatekeeper IP
address.
2. Check that the
gatekeeper is still
operational and
configured correctly.
1. Check the Gatekeeper IP
address.
2. Check that the
gatekeeper is still
operational and
configured correctly.
_is
from their
Gatekeeper Duplicate Alias The gatekeeper registration
was not successful because
another system is using the
same user name.
ViaVideo User’s Guide 82 www.polycom.com
Check with your system
administrator for a valid user
name.
Page 91

Appendix C Troubleshooting
Error Message Explanation Solution
Gatekeeper Discovery
Required
You must allow ViaVideo to
discover the gatekeeper.
Gatekeeper Invalid Revision Your gatekeeper may not
support the correct version
of H.323.
Gatekeeper Invalid Call
Signal Address
Gatekeeper Invalid RAS
Address
Gatekeeper Invalid Terminal
Type
The gatekeeper has an
invalid call signal address.
The gatekeeper has an
invalid RAS Address.
The gatekeeper has an
invalid terminal type.
Select Auto on the H.323
Gatekeeper setting
(System Info>Setup>H.323
Setup>H.323).
Check that your gatekeeper
supports H.323, version 3.
1. Check the Gatekeeper IP
address.
2. Check that the
gatekeeper is still
operational and
configured correctly.
1. Check the Gatekeeper IP
address.
2. Check that the
gatekeeper is still
operational and
configured correctly.
Make sure your gatekeeper
has the correct terminal
type.
Gatekeeper Undefined
Reason
An unknown error has
occurred with the
gatekeeper.
1. Check the Gatekeeper IP
address.
2. Check that the
gatekeeper is still
operational and
configured correctly.
Gatekeeper Transport Not
Supported
Gatekeeper Full
Registration Required
© Polycom, Inc. 83 ViaVideo User’s Guide
Gatekeeper transport is not
supported.
The gatekeeper did not
receive full registration
information.
Verify that your gatekeeper
supports IP.
Make sure that your User
Name and other registration
information is not blank.
Page 92

Appendix C Troubleshooting
ViaVideo User’s Guide 84 www.polycom.com
 Loading...