

Page 1

Polycom SoundPoint
320/321
Quick Guide
ISC Networking & Telecommunications
University of Pennsylvania
October 2009, v2
Page 2

PennNet Phone: Polycom SoundPoint IP 320/321 Quick Guide
Contents
Features ............................................................. 3
Phone Basics ...................................................... 4
Making Calls ................................................... 4
Answering Calls .............................................. 4
Ending Calls .................................................... 4
Rejecting/Silencing a Ringing Call .................. 4
Redialing Last Outgoing Number ................... 4
Muting a Call .................................................. 4
Activating Do Not Disturb .............................. 4
Navigation Arrows ............................................. 4
Voice Mail Message Retrieval ............................ 5
Call Lists.............................................................. 5
Accessing the Call Lists ................................... 5
Making a Call from the Received Call List ...... 5
Making a Call from the Placed Calls List ........ 5
Clearing Call Lists............................................ 5
Contacts ............................................................. 5
Adding Contacts ............................................. 5
Adding Contacts from a Call List .................... 6
Editing Contacts ............................................. 6
Deleting Contacts ........................................... 6
Placing a Call to a Contact in the Local
Contact Directory ........................................... 6
Searching the Contact Directory .................... 7
Volume ............................................................... 7
Adjusting the Volume .................................... 7
Call Hold, Transfer, & Conference ..................... 7
Placing a Call on Hold ..................................... 7
Placing a Call on Hold to Dial another Number
....................................................................... 7
Transferring a Call without consultation
(Blind Transfer) .............................................. 7
Initiating a Three-Way Conference Call ......... 7
Creating a Conference call using the Join
Softkey ........................................................... 8
Splitting a Three-way Conference Call ........... 8
Speed Dial Numbers .......................................... 8
Assigning a New Speed Dial Key .................... 8
Adding or Editing a Speed Dial Index for an
Existing Contact ............................................. 8
Using Speed Dial ............................................ 8
Phone Settings ................................................... 8
Distinguishing Calls via Ring Type Settings .... 9
Adjusting the Contrast on the Display ........... 9
Changing the Date and Time Format ............. 9
Line Icons & Symbols ......................................... 9
PPS ..................................................................... 9
Advance One .................................................. 9
Anonymous Call Block ................................... 9
Block Caller ID ................................................ 9
Call Forward All .............................................. 9
Call Forward on Busy ................................... 10
Call Forward on Ring No Answer ................. 10
Call Waiting .................................................. 10
Passwords .................................................... 10
Proxy ............................................................ 10
Voice Mail Delivery Method ........................ 10
Voice Mail Envelope .................................... 10
Voice Mail Caller ID ...................................... 10
Logging into PPS........................................... 10
Soft Reboot ...................................................... 10
Getting Help ..................................................... 10
Transferring a Call with Consultation............. 7
ISC Networking & Telecommunications 2
Page 3
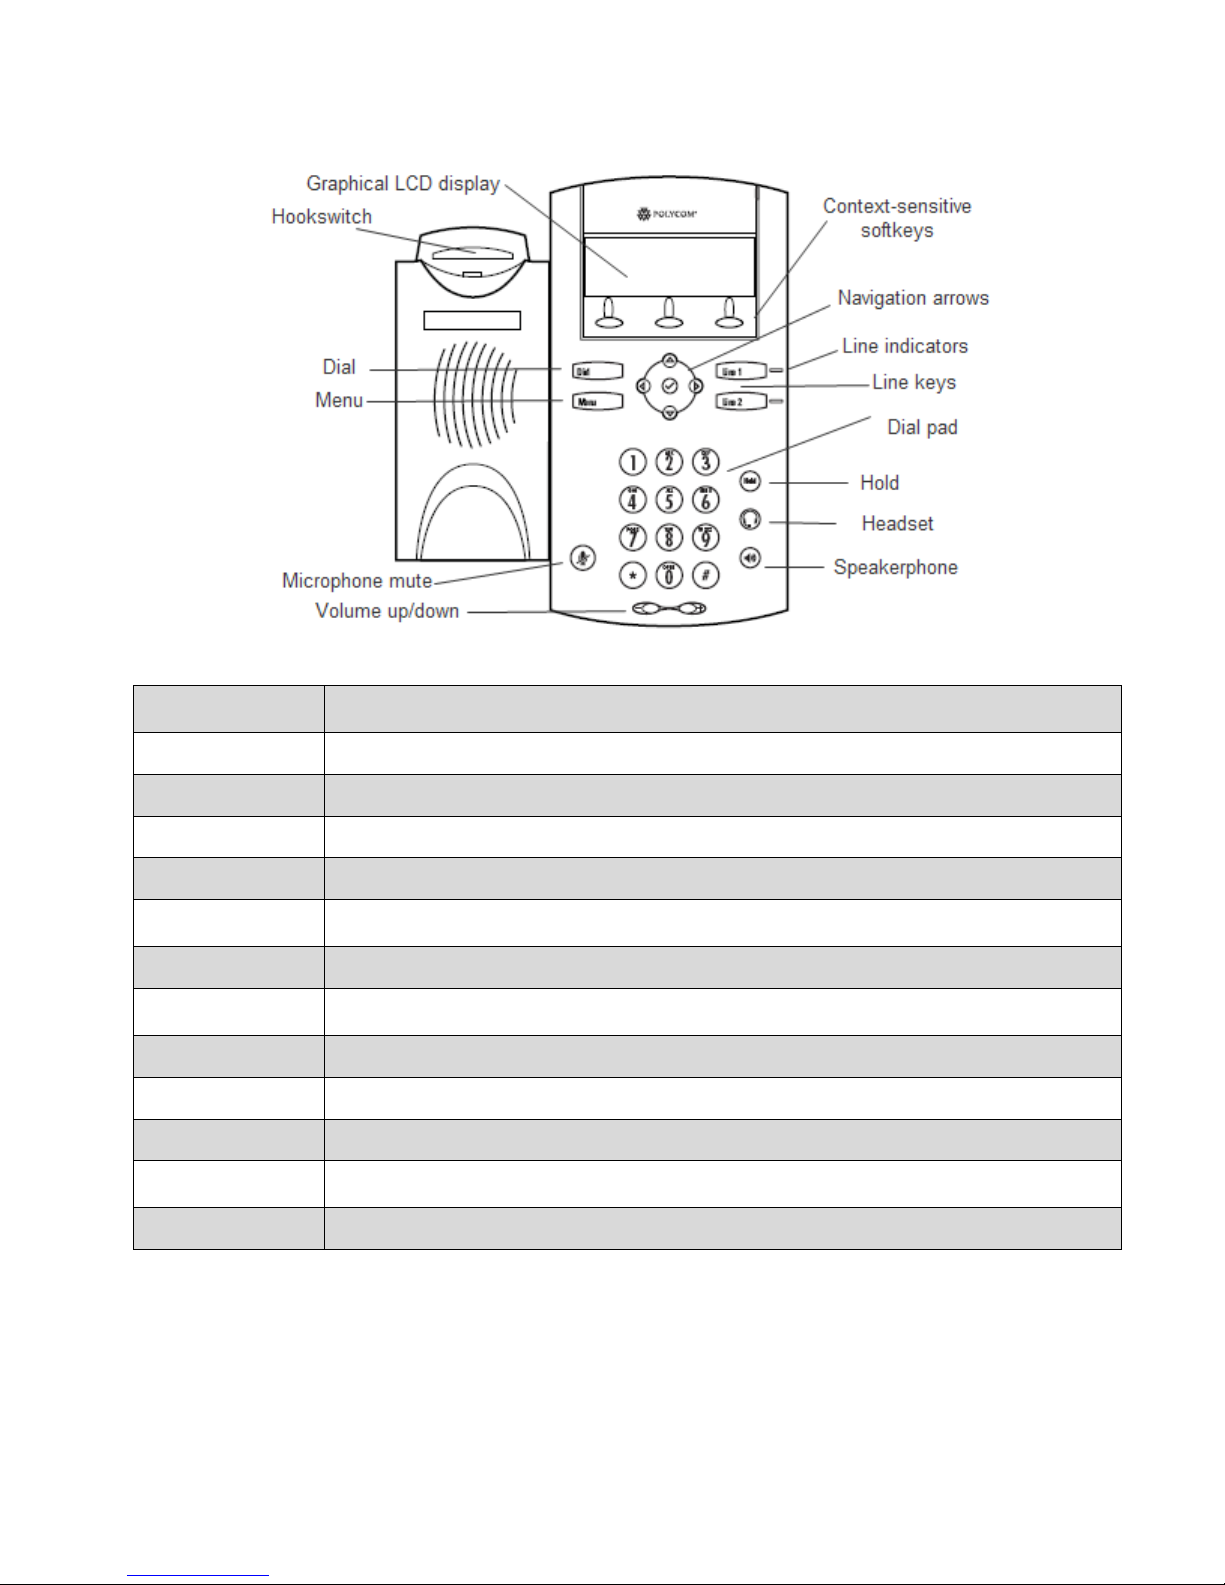
Features
Graphical LCD Display
View standard phone information such as time, date, total number of missed calls, and select various
softkeys.
Dial
Press to dial a phone number or view the placed call lists
Menu
Activate features for basic phone settings, such as ringtone and backlit display.
Microphone Mute
Toggle the microphone on and off during a conversation. When on, callers can’t hear you.
Volume
Adjust the volume of the handset, speaker, or ringer.
Softkeys
Activate various features and functions. Softkeys change depending on the calling feature or option
selected.
Navigation arrows
Scroll through menu options. Use the checkmark button to select an item,
Line indicator
Solid green – An active call is in progress; Fast flashing green – There is an incoming, ringing call;
Flashing red – The call is on hold; Solid red – The line is busy remotely (shared lines).
Lines/Speed Dial keys
Use these keys to get dial tone or activate one speed dial.
Dial pad
Use the 12 keys for dialing and entering contact information such as names and telephone numbers.
Hold
Place a caller on hold or resume a held call.
Headset
Listen hands-free by inserting the plug of the headset into the headset jack and toggling the Headset
button on or off.
Speakerphone
Toggle the speakerphone off and on.
PennNet Phone: Polycom SoundPoint IP 320/321 Quick Guide
ISC Networking & Telecommunications 3
Page 4

PennNet Phone: Polycom SoundPoint IP 320/321 Quick Guide
Phone Basics
Making Calls
Using the handset
Pick up the handset, dial the number, then press
the Dial button
or
Dial the number, and then press the Dial button.
Using the hands-free speakerphone
With the handset on-hook:
1. Press the Speaker Phone button or press the
NewCall softkey
2. Dial the number, and then press the Dial button.
Using speed dial
Use the dial pad to enter the speed dial index
followed by the # key
Press the Dial button or pick up the handset to
place a call.
Tip: During a call, you can alternate between handset
and hands-free speakerphone modes by pressing the
speaker phone button or picking up the handset.
Answering Calls
When you are not in another call, you can answer the
phone by:
Picking up the handset
or
Pressing the Speakerphone button
or
Pressing the Line key
or
Pressing the Answer softkey.
Ending Calls
To end a call, do one of the following:
Hang up the handset
or
Press the EndCall softkey
or
If using the speakerphone, press the
Speakerphone key.
Rejecting/Silencing a Ringing Call
You can ignore an incoming call and stop it from
ringing. Silencing the current call does not affect
future calls (future calls will ring as usual).
Press the Ignore softkey to silence the ring of an
incoming call. If voice mail is configured for the line,
the unanswered call will default to voice mail and
will show up in your Received Calls List.
Note: This feature does not work on lines that appear
on multiple sets.
Redialing Last Outgoing Number
To call the last number dialed from your phone, use
the Placed Call list.
1. Press the Menu button
2. Select Features (1 on the dial pad)
3. Select Call Lists (4 on the dial pad)
4. Select Placed (2 on the dial pad)
5. Highlight the call, and then press the Dial
button.
Muting a Call
During a call, press the Mute key (Red button with
microphone icon). The Message Waiting Indicator
turns red and a microphone on the graphic display
indicates that the other party (or parties) cannot hear
you.
Activating Do Not Disturb
If voice mail is configured for the line, all calls will
default to voice mail when Do Not Disturb (DND) is
enabled.
To turn on Do Not Disturb:
1. Press the Menu button
2. Select Features using the checkmark button,
and then select Do Not Disturb. A flashing icon
―(x)‖ and the text ―Do Not Disturb‖ is displayed
on the screen indicating the feature has been
turned on.
To disable Do Not Disturb:
1. Press the Menu button
2. Select Features, and then select Do Not Disturb
again.
Navigation Arrows
When the phone is in use, press the appropriate
navigation arrows to scroll through menu options or
to select an item from the menu.
Checkmark button – Use the checkmark button
to select a field, a menu option, or to enter into
edit mode for some options
Up, down, left, right keys – Use these navigation
arrow keys to scroll through lists
ISC Networking & Telecommunications 4
Page 5

PennNet Phone: Polycom SoundPoint IP 320/321 Quick Guide
Accessing the Call Lists
You can view and track calls you missed, received, or
placed. If the call was from another PennNet Phone
subscriber, the person’s name and the last 5 digits of
phone number are displayed. For calls from nonPennNet Phone callers, only the phone number is
displayed.
Voice Mail Message Retrieval
Reminder: If you have elected to receive voice mail
as email only, you cannot listen to messages using a
telephone. You must log into email to listen to your
messages.
When messages are waiting, the Msgs softkey, the
envelope icon, and the number of messages will
appear on the display. You will also hear a stutter dial
tone in place of the normal dial tone when picking up
the handset.
From your Polycom 320 phone:
1. Press the Msgs softkey
2. Wait for the prompt
3. Enter your password.
From someone else’s Polycom 320 phone:
1. Press the Msgs softkey
2. At the prompt, press the # key on the dial
pad
3. Enter your mailbox number
4. Enter your password.
To access voice mail when there are no new
messages:
1. Press the Menu button
2. Select Features > Messages > Message Center
3. Follow the prompts to enter your password.
Making a Call from the Received Call
List
1. Press the Callers softkey
2. Use the navigation arrows to scroll through the
list and find the contact you want to call
3. Highlight the entry, and then press the Dial
button to place the call.
Making a Call from the Placed Calls
List
See ―Redialing Last Outgoing Number.‖
Clearing Call Lists
You can clear all entries from a call list or a single
entry. When erasing any entry from a call list, the
system does not ask for confirmation: the list is
immediately cleared when the Clear softkey is
pressed.
To clear a single entry from a call list:
1. Press the Menu button
2. Select Features > Call Lists > Clear
3. Select either Received or Placed Call List
4. Press the Yes softkey to confirm deleting the
contact.
To save a contact to the local contact directory:
1. While viewing the call list entry, press the
checkmark button
2. Press the Save softkey to add the call list entry
into the phone’s contact directory.
Call Lists
When the phone is idle, the display will show the
number of missed calls below the date and time
display, e.g., ―3 new missed calls.‖
Local lists of incoming—both missed and received
calls—and outgoing (also known as placed) calls is
maintained by the phone (up to 99 for each list).
A symbol to indicate whether the call was answered
(handset) or missed (telephone set) is shown for each
entry in the incoming list.
ISC Networking & Telecommunications 5
Contacts
Adding Contacts
You can manually add a new entry to your Contact
Directory. For the directory to register the contact,
you must enter the phone number. You can correct
an entry by pressing the << softkey.
1. Press the Dir softkey. The Directory screen
displays, and Press up navigation
arrow―<New Entry>‖ displays at the top of the
list
Page 6

PennNet Phone: Polycom SoundPoint IP 320/321 Quick Guide
2. Press the checkmark button to display the Add
To Directory screen.
3. Press the checkmark button to display the First
Name screen, as shown below:
4. Enter the first name of the contact using the dial
pad. If you need to correct an entry, press the <<
softkey.
5. When finished entering the first name, press the
Ok or Cancel softkeys to accept or cancel
changes
6. Press the down navigation arrow to access the
Add to Directory screen
7. Press the checkmark button to display the Last
Name screen
8. Enter the last name of the contact using the dial
pad
9. When finished entering the last name, press the
Ok or Cancel softkeys to accept or cancel
changes
10. Press the down navigation arrow to display the
next field
11. Press the checkmark button to display the
Contact screen. The Contact screen is used to
enter the telephone number
12. Enter the telephone number for the contact, then
press Ok or Cancel to accept or cancel changes
13. Press the down arrow to access and complete all
the remaining options, pressing Ok to confirm
your entries
14. After completing all options, press the left
navigation arrow to end the data entry for the
contact. The Confirmation/Save to Directory?
Screen displays
15. Press the Yes or Cancel softkeys to save the
contact to your directory, or to cancel
16. Press the left arrow repeatedly to return to the
idle display.
Adding Contacts from a Call List
To add a new entry:
1. Do one of the following steps:
Press the Callers softkey to view the
Received Calls list.
Press the Dial button to view the Placed
Calls list.
2. Use the up and down navigation arrows to
scroll through the list to find the contact
3. Press the checkmark button to select the entry
4. Press the Save softkey to save the contact to the
local contact directory
5. Press the left navigation arrow repeatedly to
return to the idle display.
Editing Contacts
1. Press the Dir softkey
2. Use the navigation arrows to scroll through the
list to find the contact
3. Press the checkmark button to select the
contact
4. Press the Edit softkey
5. Use the navigation arrows to scroll through the
fields, and then press the checkmark button to
select the field.
6. Do the following
Use the left or right navigation arrows to
place the cursor either at the beginning or
end of the item respectively
Use the <<< softkey to erase a letter or
number to the left of the cursor
Use the down navigation arrow to move to
the next field. Or, press the left navigation
arrow to exit edit mode and save your
changes.
7. Press the Ok or Cancel softkeys to accept or
cancel changes
Note: The Ok softkey is not displayed until a
change has been made. The Cancel softkey will
cancel the edit session for the entry and return
you to the screen before the Edit softkey was
selected.
8. Press the left navigation arrow repeatedly to
return to the idle display.
Deleting Contacts
To delete a contact from the directory:
1. Press the Dir softkey
2. Use the navigation arrows to scroll through the
list to find the contact
3. Press the checkmark button to select the entry
4. Press the Delete softkey, and then press the Yes
softkey to confirm the deletion and the next
entry in the directory appears
5. Press the left navigation arrow repeatedly to
return to the idle display.
Placing a Call to a Contact in the Local
Contact Directory
1. Press the Dir softkey
2. Use the navigation arrows to scroll through the
list to find the contact
3. Press Dial button or lift the handset.
ISC Networking & Telecommunications 6
Page 7

PennNet Phone: Polycom SoundPoint IP 320/321 Quick Guide
Searching the Contact Directory
1. Press the Dir softkey
2. Search for a contact using the dial pad by
entering the contact’s last name.
The first time a dial pad key is pressed, the first
entry whose last name starts with the character
that matches the first letter on the key label will
be shown. The second key press repeats the
process and so on until you find the entry you
desire.
Volume
Adjusting the Volume
To adjust the receiver volume during a call, p ress the
volume control buttons (- or +):
Pressing the volume control buttons while the
phone is idle adjusts the ringer volume for the
set.
Pressing the volume control buttons while using
the speaker phone adjusts the speaker phone
volume.
Call Hold, Transfer, &
Conference
Placing a Call on Hold
1. Ask the caller to stay on the line
2. Press the Hold button
3. To return to the caller, press the Hold button
again or the Resume softkey.
Placing a Call on Hold to Dial another
Number
You can speak to another person and then return to
the original caller.
1. Ask the caller to stay on the line
2. Press the Hold button. The top of the display
screen will show ―Hold‖ and list the phone
number
3. Press the New Call softkey
4. Dial another phone number, press the Dial
button, consult privately, then press the End
Call softkey to end the call
5. Press the Resume softkey to return to the
original caller.
Transferring a Call with Consultation
You can speak with the party to whom you want to
transfer the call before transferring the call.
1. Ask the caller to stay on the line while you
transfer the call
2. Press the Trans softkey. The caller is placed on
hold
3. Enter the number to which you want to transfer
the call, then press the Dial button
4. When the third party answers, the caller remains
on hold so you can talk privately with the third
party
5. To transfer the call, press the Trans softkey, and
then hang up the phone.
Note: To cancel the transfer before the call connects,
and return to the caller, press the Cancel softkey.
Transferring a Call without
consultation (Blind Transfer)
You can transfer a call without speaking to the person
who is to receive the transferred call.
1. Ask the caller to stay on the line while you
transfer the call
2. Press the Trans softkey
3. Press the Blind softkey
4. Dial the number to which you want to transfer
the call, and hang up. The call is automatically
transferred after you dial the number of the party
to whom you want to transfer the call.
Initiating a Three-Way Conference Call
You can set up a conference call between you and
two other persons.
1. Place a call or answer an incoming call
2. Ask the first caller to stay on the line
3. Press Conf softkey to create a new call. The
active call is placed on hold, and the message
―Conference with‖ will appear at the top of the
display.
4. Dial the second party, then press the Dial button
5. When the second party answers, press the Conf
softkey again to create the conference call
6. When finished talking, hang up or press the End
Call softkey to disconnect from the call.
If the second party does not answer (e.g., you
reach their voice mail, misdial the number, or get
a busy signal), press the Cancel softkey to
reconnect to the first caller.
Tip: To put both parties on hold: Placing a call
on hold on the phone that originated the
ISC Networking & Telecommunications 7
Page 8

PennNet Phone: Polycom SoundPoint IP 320/321 Quick Guide
conference call will place all other parties on
hold.
Creating a Conference call using the
Join Softkey
You can create a conference call at anytime between
an active call and a call that is on hold.
When you are in an active call:
If you have one call on hold (on the same line or
other line), use the down navigation arrow to
go to the call on hold, and then press the Join
softkey.
If you have more than one call on hold, use the
up and down arrows to switch to the desired
call on hold, press the Join softkey.
Splitting a Three-way Conference Call
You can split or drop one leg of a conference call
when you need to drop a bad connection (cell phone),
or after reaching a wrong number or voice mail
instead of the intended person. If call waiting is
turned off, you cannot split a conference call.
Press the Split softkey to split the conference, both
parties will be on hold.
Press the Resume softkey to return to both parties.
Speed Dial Numbers
For frequently used numbers, you can associate them
with a speed dial index. This feature is local to the
phone, and may be lost during a software upgrade. It
will be lost if the phone needs to be replaced.
Note: When a new entry is added to the Contact
Directory, it is automatically assigned the next
available speed dial index and the new entry
appears at the bottom of the Speed Dial list.
Assigning a New Speed Dial Key
1. Press and hold Line 2, if unassigned. A new
empty entry in the Contact Directory is
automatically opened allowing contact
information to be added.
2. Press the checkmark button to enter a first
name
3. Enter the first name of the contact from the dial
pad
4. Press the Ok or Cancel softkeys to accept or
cancel changes
5. Press the down navigation arrow to display the
next field in the contact’s entry
6. Repeat steps 2 to 5 to enter the last name of the
contact.
7. Repeat steps 2 to 5 to enter a contact number.
8. Repeat steps 2 to 5 to change the Speed Dial
Index if desired
The index can be any value between the next
available index value and the maximum (99).
9. Press the Yes or Cancel softkeys to accept or
cancel changes
10. Press the left navigation arrow repeatedly to
return to the idle display.
Adding or Editing a Speed Dial Index
for an Existing Contact
1. Press the Dir softkey
2. Use the up and down navigation arrows to
scroll through the list to find the contact
3. Press the checkmark button to select the entry
4. Press the Edit softkey
5. Press the down navigation arrow repeatedly
until the speed dial index field appears
6. Press the checkmark button to select the speed
dial index for edit
7. Do one of the following steps:
Enter the next available speed dial index.
Delete the existing speed dial index by using
the left navigation arrow, and then enter a
new speed dial index.
8. Press the Ok or Cancel softkeys to accept or
cancel changes, and then press the Yes softkey
to confirm your changes
9. Press the left navigation arrow repeatedly to
return to the idle display.
Using Speed Dial
To dial a contact via the Speed dial index:
1. Using the dial pad, enter the speed dial index
followed by the # key
2. Press the Dial button or pick up the handset
To access the Speed Dial Index directory:
1. Press the Menu button
2. Select Features > Speed Dial.
ISC Networking & Telecommunications 8
Page 9

Phone Settings
Distinguishing Calls via Ring Type
Settings
You can set distinctive incoming ringing tones for
contacts in your local directory
1. Press the Menu button
2. Select Settings > Basic > Ring Type
3. (Optional) If multiple lines are configured on
your phone, first select the line to change
4. Using the navigation arrow buttons, navigate
through the list of available rings
5. Press the Play softkey to hear the selected ring
type
6. Press the Select softkey to change to the selected
ring type
7. Press the back arrow repeatedly to return to the
idle display.
PennNet Phone: Polycom SoundPoint IP 320/321 Quick Guide
Line Icons & Symbols
Adjusting the Contrast on the Display
To adjust the contrast on the display screen:
1. Press the Menu button
2. Select Settings >Basic> Contrast
3. Use the Up and Down softkeys to decrease or
increase the display contrast
4. Press the Save softkey to save your changes
5. Press the left navigation arrow repeatedly to
return to the idle display.
Changing the Date and Time Format
You can choose how the date and time are formatted
on the display:
1. Press the Menu button
2. Select Settings > Basic > Preferences > Time
& Date
3. Use the navigation arrows to scroll through the
various options and choose a format for the time,
the date, or the order in which they are to appear
on the display. Press the checkmark button to
change and save the new settings
4. To return to the idle display, press the left
navigation arrow repeatedly.
PPS
PPS is a web tool that allows subscribers and proxies
to manage certain telephone and voice mail features.
Use PPS to turn on or select the following features.
Advance One
When an incoming call is not answered, the
destination number is rung next. If the destination
number is not answered, the call is then sent to the
voice mail of the original PennNet phone number.
Advance One is only available between PennNet
phone extensions.
Anonymous Call Block
Reject incoming calls from anonymous callers. Note
that the call will not appear in the handset's Missed
Call Lists.
Block Caller ID
Prevent your caller ID information from displaying
on outgoing calls. When calling other PennNet
Phone subscribers, your name is blocked but your 5digit phone number will display. When calling a
traditional telephone on campus, both your name and
your 5-digit phone number are blocked.
ISC Networking & Telecommunications 9
Call Forward All
Forward all incoming calls to another PennNet
phone, a traditional phone at Penn, or any off-campus
or cellular phone. Call Forward All overrides all call
forwarding options (Advance One, Call Forward
Busy, and Call Froward on Ring No Answer).
Page 10

PennNet Phone: Polycom SoundPoint IP 320/321 Quick Guide
Call Forward on Busy
Eliminate busy signals when you’re on the phone by
redirecting calls to another number. The forward-to
number can be a PennNet phone, a traditional phone
at Penn, or any off-campus or cellular phone.
In order for Call Forward on Busy to work, Call
Waiting must be turned off.
Call Forward on Ring No Answer
When you are unable to answer the phone, redirect
calls to another number instead of voice mail. The
forward-to number can be a PennNet Phone, a
traditional phone at Penn, or any off-campus
telephone or cell phone.
Call Waiting
Call Waiting is turned on by default. When you are
on an active call, a short beep sound announces the
new call and the display shows the telephone number
of the inbound call.
In order for Call Forward on Busy to work, Call
Waiting must be turned off.
Disabling Call Waiting removes the ability to split
conference calls and to receive and place more than
one call when you’re already on the line.
Note: Anytime you turn on or off Call Waiting, you
will need to restart your phone for the update to take
effect. To restart your phone via PPS, click the
―Remotely restart handset‖ button in the pop-up
window. To restart via your handset, select Menu >
Settings > Basic > Restart Phone. The handset will
not restart if there is an active call. One the active call
is disconnected, the handset will restart.
Voice Mail Caller ID
Unless the caller ID information is blocked, hear the
caller ID before each voice mail message is played.
Logging into PPS
To access PPS, log in at
http://pps.voice.isc.upenn.edu/. (PennKey
authentication required.) PPS is also available from
the Penn Voice Services home page at
www.upenn.edu/computing/voice/.
Soft Reboot
To restart the phone:
1. Press Menu button
2. Press Settings (or 3 on the dial pad)
3. Press Basic (or 1 on the dial pad)
4. Press Restart Phone (or 4 on the dial pad)
5. Press the Yes softkey to confirm restarting your
phone.
Important: If your phone loses local power, the
information in the Call Lists is lost. Numbers saved
in the contact directory are not affected by the loss of
power.
Getting Help
Requesting repairs
To report problems with telephone equipment, lines
or voice mail visit
www.upenn.edu/computing/voice/help/repair.ht
ml
Passwords
Manage your voice mail passwords in real time.
Proxy
Designate a proxy to make adjustments or changes to
your PennNet Phone account. A proxy can be any
member of the Penn community who has a valid
PennKey and password.
Voice Mail Delivery Method
Change your voice mail delivery method in real time.
You can choose to manage voice mail messages by
phone, by computer, or both.
Voice Mail Envelope
Hear the date and time before each voice mail
message is played.
ISC Networking & Telecommunications 10
 Loading...